
3 minute read
MAKE YOUR OWN KOMBUCHA


People around the world are devoted to kombucha, claiming a series of health benefits. That may or may not be true. What’s more certain though, is that it’s delicious!
BY GLENN TOWNEND
In the last few months I’ve been making my own kombucha. It’s certainly much more affordable than buying commercially bottled product—not to mention that it’s often hard to find in shops where cheap imitations abound. Real kombucha is a natural fermented tea that is full of probiotics just like yoghurt (fermented milk), sauerkraut or kimchi (fermented cabbage), or fermented coconut as traditionally consumed in some parts of the South Pacific. Like these foods, kombucha is full of probiotics produced by a natural culture and is considered by many to be good for gut health— some say it reduces weight because it eats sugars in the gut. Just check out the debate raging on the internet; you’ll have to make your own decision about the health benefits. All I can say, as someone who has had long-term gut issues, is that, since I began regularly having yoghurt in the morning and kombucha in the afternoon, I have far less digestive discomfort.
Here’s how to make your own kombucha . . .
WHAT YOU’LL NEED INGREDIENTS
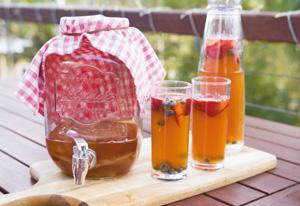
• Large pot • Stove • Large mason jar • Piece of cloth • Rubber band or string • Glass bottles • 3 litres of water • ¾ cup sugar • 8 organic green tea bags • Kombucha “scoby” • 2 cups cut fruit (strawberries, raspberries, apples etc.)
STEP 1 STEP 2 STEP 3
STEP 6 STEP 7 STEP 8
STEP 10 BONUS STEP
METHOD FOR HOMEMADE
kombucha
1. Boil 3 litres of water. 2. Add ¾ of a cup of sugar and dissolve it. 3. Steep 8 organic green tea bags in the hot sugary water (black tea is traditional or why not try a caffeine-free alternative such as
Rooibos tea?). 4. Let the mixture cool for a few hours (or overnight) to room temperature. 5. Remove the tea bags from the liquid. 6. Transfer mixture to a large mason jar or similar glass container. 7. Add about 100 ml “starter kombucha” left over from a previous batch along with the active kombucha “scoby”—a live bacterial
blob that looks a lot like an undercooked pancake. (Having a kombucha-brewing friend helps here! Otherwise search online for kombucha starter kits.) 8. Cover the top of the jar with a piece of cloth, securing it with a rubber band or string—the mixture needs to breathe, but you don’t want dust in it. 9. Leave in a dark place at room temperature for a week. During the week the scoby eats the sugar and tea and leaves its probiotics. 10. At the end of the week, chill the drink in glass bottles and drink as desired. It self-carbonates so is very refreshing.

As it is a live culture, care must be taken to ensure sterile conditions for preparation.
Bonus Step
Here’s an optional step that I think takes the result from good to great. Before I chill the kombucha I add pieces of different fruits or herbs (up to 2 cups to the 3 litres) so the kombucha has an infused flavour. My favourite flavours include ginger and lemon; blueberries and mint; and pear, mint and ginger. You can use strawberries, raspberries, apple, rosemary—experiment to suit your taste buds! If you add flavouring, let the glass bottles sit for another 24 hours before you chill them.
Glenn Townend is a keen cyclist who loves the outdoors and leads the Seventh-day Adventist Church in the South Pacific region. Please note: kombucha has caused negative side-effects in some people and is not recommended for those who are pregnant or have weakened immune systems. If in doubt, consult your doctor.


