
3 minute read
Good Golly! Great Gallery Wall


Lori Bryne holds your hand but gives you the hammer to hang your own treasures on a Gallery Wall
BY LORI BYRNE
PHOTOS BY STEVE SMITH, VISIONFIRE STUDIOS
good golly!
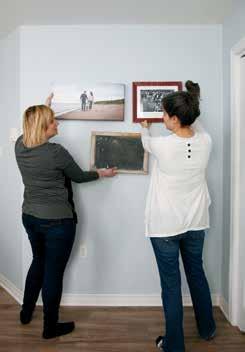
If you’re flipping through the latest decorating magazine or scrolling through Pinterest or Houzz, you’re sure to come across a gallery wall. Why are they so popular right now? Well, you can showcase a lot of photos or items within a gallery wall, without having to purchase a large piece of art. But, installing a gallery wall can certainly be a struggle.
Sam Madore, of Bliss Productions in Truro was kind enough to allow us to install her gallery wall in her master bedroom. Since it is in the master, the theme is around her wedding to Joey Schurman and their adorable dog,
GREAT GALLERY WALL!


Full Service Investment Office: -Stocks, Bonds, ETF's - Mutual Funds -Registered Products - TFSA's - RESP’s -Insurance Products David C. Whittemore, BA, CIM, Investment Advisor Let’s Talk: 902-752-5750 156 MacLean Street, New Glasgow, NS, B2H 5V5 www.davidwhittemore.ca
Stocks, bonds and mutual funds are offered through Manulife Securities Incorporated. Insurance products and services are offered by David Whittemore, an independent Insurance Representative. Banking products and services are offered through referral. Manulife Securities Incorporated is a Member of the Canadian Investor Protection Fund. Manulife Securities and the block design are registered service marks and trademarks of The Manufacturers Life Insurance Company and are used by it and its affiliates including Manulife Securities Incorporated. Manulife Securities Incorporated ah! Spring 2017 - 14
Hank (who you should be following on Instagram as @hankoftruro) with a few pieces thrown in for interest sake. I’ll take you through, step-by-step, of how I installed this wall and then you can translate to your own gallery wall! But be sure to show a picture of the finished wall on our Facebook page! STEP 1. Gather your photos and items and lay them out on the floor in the configuration that will work with the space you have to work with. STEP 2. Measure your wall and find the centre from side to side and mark with a light pencil mark. Also mark the middle of the gallery wall in height, which should be around 57" off the floor. Then find the centre of your display. STEP 3. Mark the top and centre of where your centre piece goes and then measure where the hangers are.
Translate that onto the wall with pencil marks and use either nails, screws or picture hangers to hang the piece, depending on the style of hanger on the back. STEP 4. Once the first piece is hung, measure from where your next piece needs to be and mark that with pencil.
Again, measure where the hangers are on the back and translate that onto the wall and install the required hardware. STEP 5. Continue measuring where each piece needs to hang in relation to its neighbour and install the hardware, hanging each piece as you go, until they are all hung.

Here’s a list of my go-to supplies and tools:
Hammer Level Pencil with a white eraser 1" common nails, they have a good head to catch on the hangers Picture hangers Screws and wall anchors Measuring tape and a ruler 3M Velcro strips Screwdrivers
Tips:
A gap of 1" to 2" between pieces give them the space they need. It isn’t necessary to have matching frames for a gallery wall, although it can be a very sharp look. Using a variety of items makes for a very interesting gallery wall.

Pictou County’s Weekly Newspaper Since 1893

The news and how it affects you every Wednesday in the Advocate newspaper.
Fresh daily at pictouadvocate.com
21 George Street, Pictou, Nova Scotia (902) 485-8014


