
Craft-A-Flower: Daisy & Mini Delight: Cactus


 BY LYDIA EVANS
Craft-A-Flower:

Daisy
Layering Die Set
• Label Love Stamp Set
• Classic Crest Solar White
Cardstock
• Summer Afternoon Gradient
Cardstock Set
• Green Meadow Gradient
Cardstock Set
• Essential Black & White 6x6
Paper Pack
• Glue Tape
• Foam Tape
• Obsidian Ink
1. Create a 4 ¼” x 5 ½” top folding card base from Classic Crest Solar White Cardstock.
2. Adhere strip of patterned paper from Essential Black & White 6x6 Paper Pack into place on card base using glue tape.
3. Cut flower and leaf layers from Craft-AFlower: Daisy from colored cardstock. Use Buttercream and Warm Sunshine Cardstock for the flowers, Caramel Toffee and Paper Bag Cardstock for the flower centers, and Sweet Leaf, Just Green, and Hunter Green Cardstock for the leaves.


4. Adhere die-cut layers together using glue tape.
5. Adhere layered die-cut images into place on card base using foam tape.

6. Stamp sentiment from Label Love Stamp Set onto a strip of Classic Crest Solar White Cardstock using Obsidian Ink. Adhere sentiment into place using foam
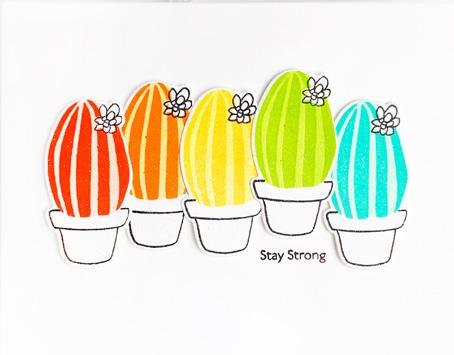
BY LAURA JANEMini Delight: Cactus Stamp and Die Set

• Classic Crest Solar White Cardstock

• Glue Tape
• Foam Tape
• Apothecary Labels Stamp & Die Set
• Ink- Permanent Black, Obsidian, Grass Field, Shadow Creek
• Artist Markers Set D
1. Create a 4 ¼” x 5 ½” top folding card base from Classic Crest Solar White Cardstock.
2. Stamp images from Mini Delight: Cactus Stamp Set repeatedly over a 4 ¼” x 5 ½” panel of Classic Crest Solar White Cardstock. Use Shadow Creek and Grass Field Inks for the cactus layers and Permanent Black Ink for the flower and pot images.


3. Color flower and pot images using Artist Markers. Use Puffy Heart and Purple Wine Markers for the flowers and Mountain Mist, Volcano Lake, and Lagoon Markers for the pots.

4. Adhere stamped panel onto card base using glue tape.
5. Cut second smallest label from Apothecary Labels Die Set from Classic Crest Solar White Cardstock.
6. Stamp sentiment from Apothecary Labels Stamp Set onto die-cut label using Obsidian Ink.
7. Adhere sentiment label into place on card base using foam tape.
Build-A-Flower: Balloon Flower Layering Stamp & Die Set


 BY JAYCEE GASPAR

Paint-A-Flower:

 BY LAURIE WILLISON
 BY NORINE BORYS