
Build-A-Flower: Queen of the Lilies & Paint-A-Flower: Himalayan Poppy
subscription inspiration guide
Bring gorgeousness to your projects with some beautiful florals. This guide will give you some great crafty inspiration to get started on your own handmade cards. These stunning creations will show you how our Build-A-Flower: Queen of the Lilies Layering Stamp & Die Set and Paint-A-Flower: Himalayan Poppy Outline Stamp Set can come to life onto the page.

Build-A-Flower:
Queen Of The Lilies
Layering Stamp & Die Set
• Build-A-Flower: Queen Of The Lilies Layering Stamp & Die Set


• Cardstock- Classic Crest Solar White
• Ink- Obsidian, Desert Night, Blush, Pink Pearl, Rouge, Coral Bliss, Frayed Leaf, Forest Glades, Evergreen, Chamomile
• Pure White Crisp Embossing Powder
• Instant Dimension Foam Tape
1. Create a 4 ¼” x 5 ½” top folding card base from Classic Crest Solar White Cardstock.
2. Ink blend Desert Night Crisp Dye Ink to the top of the card base.
3. Stamp images from Build-A-Flower: Queen Of The Lilies Layering Stamp Set onto a piece of Classic Crest Solar White Cardstock. Use Obsidian Pigment Ink for the outlines, Blush, Pink Pearl, Rouge, and Coral Bliss Crisp Dye Inks for the flower, Forest Glades and Chamomile Ink for the flower centers, and Frayed Leaf, Forest Glades, and Evergreen Crisp Dye Inks for the leaves.

4. Die cut images using coordinating dies.
5. Adhere die-cut images into place on card base using foam tape.
6. Stamp sentiment from Build-A-Flower: Queen Of The Lilies Layering Stamp Set into place on card base using Obsidian Pigment Ink.

 Created by Lydia Evans
Created by Teri Wilson
Created by Teri Wilson
Created by Jenny Colacicco
Created by Lydia Evans
Created by Teri Wilson
Created by Teri Wilson
Created by Jenny Colacicco
Paint-A-Flower:
Himalayan Poppy
Outline Stamp Set
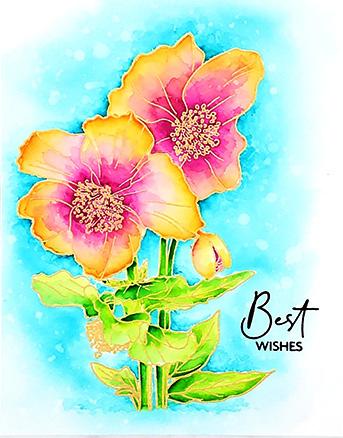
• Paint-A-Flower: Himalayan Poppy Outline Stamp Set


• Cardstock- Classic Crest Solar White, Blush
• Ink- Obsidian, Peach Perfect, Pink Pearl, Cotton Candy, Deep Iris, Desert Night
• Pure Graphite Artist Marker
• Instant Dimension Foam Tape
1. Create a 4 ¼” x 5 ½” top folding card base from Blush Cardstock.
2. Stamp image from Paint-A-Flower: Himalayan Poppy Outline Stamp Set onto a piece of Classic Crest Solar White Cardstock using Obsidian Pigment Ink.
3. Ink blend over stamped image using Peach Perfect, Pink Pearl, Cotton Candy, Deep Iris, and Desert Night Crisp Dye Inks.
4. Color around image using Pure Graphite Artis Marker,
5. Fussy cut around image.
6. Adhere fussy-cut image into place on card base.
7. Stamp sentiment from Paint-A-Flower: Himalayan Poppy Outline Stamp Set into place on card base using Obsidian Pigment Ink.


 Created by Lydia Evans


