
CREATE & INSPIRE EDITION 77 Step up your cardmaking game with these fun ideas! Creative hacks & techniques to inspire your creativity. Reinvent Your Cards! 7 Must-Try Card Making Ideas
CONTENTS 03 05 07 09 04 06 08 Adding Texture to a CAS Card Rainbow Shaker Card with Recycled Packaging Step Up Your Alphabet Dies Floral-Shaped Card “Just Fur You” Space-Themed Florals Bold Floral Silhouette
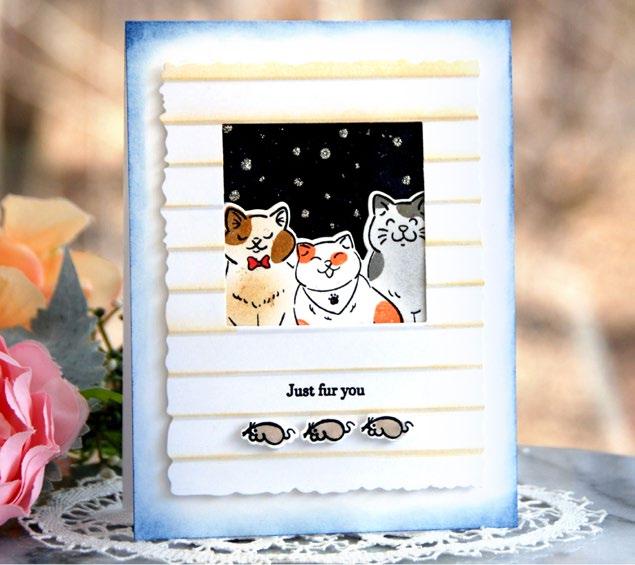
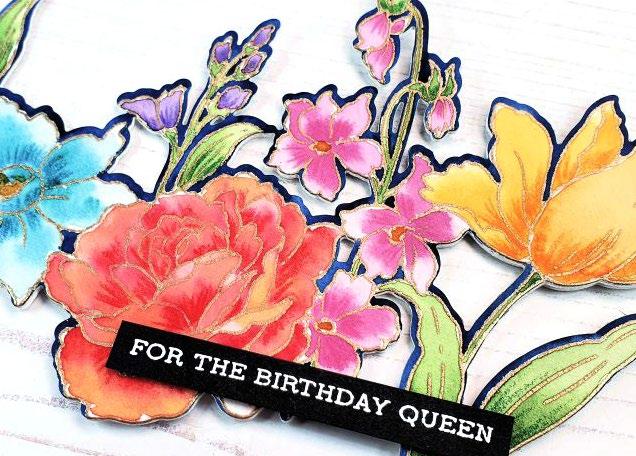
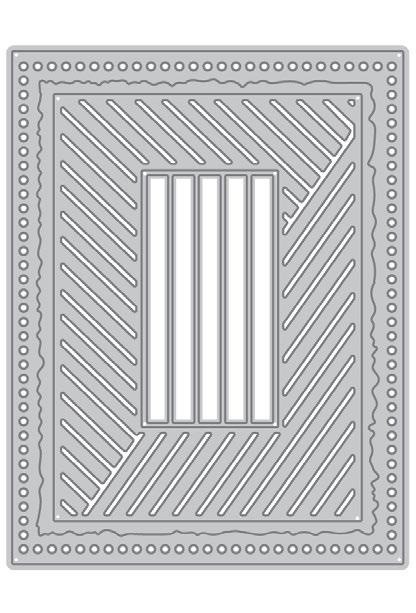
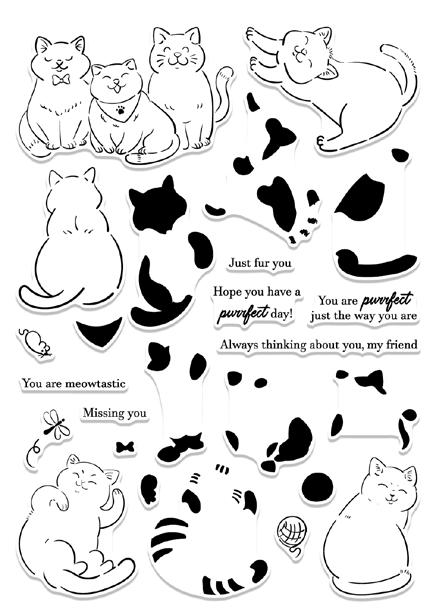
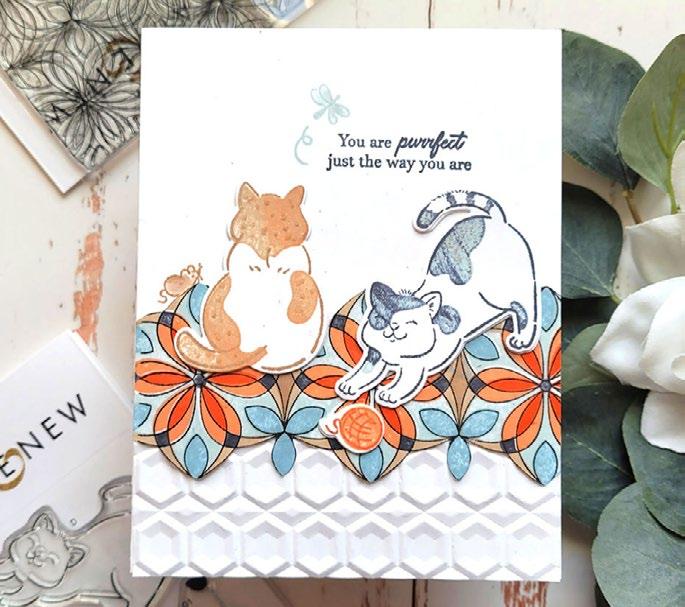
“JUST FUR YOU”
BY VIRGINIA LU
INSTRUCTIONS
1. Create a 4 ¼” x 5 ½” card base from Classic Crest Solar White Cardstock. Set aside.
2. Die cut a white cardstock panel with the torn paper die from Mix and Match Frames Die Set.

3. Dry emboss the panel with Window Slats 3D Embossing Folder.
4. Lightly ink the edges of the window slats with Vanilla Cream Ink and Detailed Blending Brushes.
5. Cut out the middle of the embossed panel with one of the dies from the Fine Frames Square Die Set.
6. On another panel, stamp the three cats from Cat Life Stamp Set using Obsidian Pigment Ink, Hazelnut, Autumn Blaze, and Evening Gray Dye Inks.
SUPPLIES
Stamp, Dies & 3D Embossing Folder

Cat Life Stamp and Die Bundle
Window Slats 3D Embossing Folder
Mix and Match Frames Die Set
Fine Frames Square Die Set
Inks
Obsidian Pigment Ink
Crisp Dye Inks - Vanilla Cream, Hazelnut, Autumn Blaze, and Evening Gray
Cardstock and Paper
Classic Crest Solar White Cardstock
Other Instant Dimension Foam Tape
Watercolor Nebula Wide Washi Tape
Detailed Blending Brushes
Glitter drops
7. Stamp three mice from the same stamp set onto a piece of cardstock using Obsidian Ink. Add color to the mice using Vanilla Cream Ink and Detailed Blending Brushes.
8. Die cut all images with coordinating dies.
9. Stamp sentiment from Cat Life Stamp Set into place onto the embossed panel using Obsidian Ink.
10. Create a “night sky” by applying a piece of Watercolor Nebula Washi Tape onto a piece of cardstock and adding droplets of glitter.
11. Adhere the washi tape panel, three cats die-cut, and embossed panel onto the card base with foam tape.
12. Adhere the three mice below the stamped sentiment using foam tape.
SEE MORE ON OUR BLOG
03
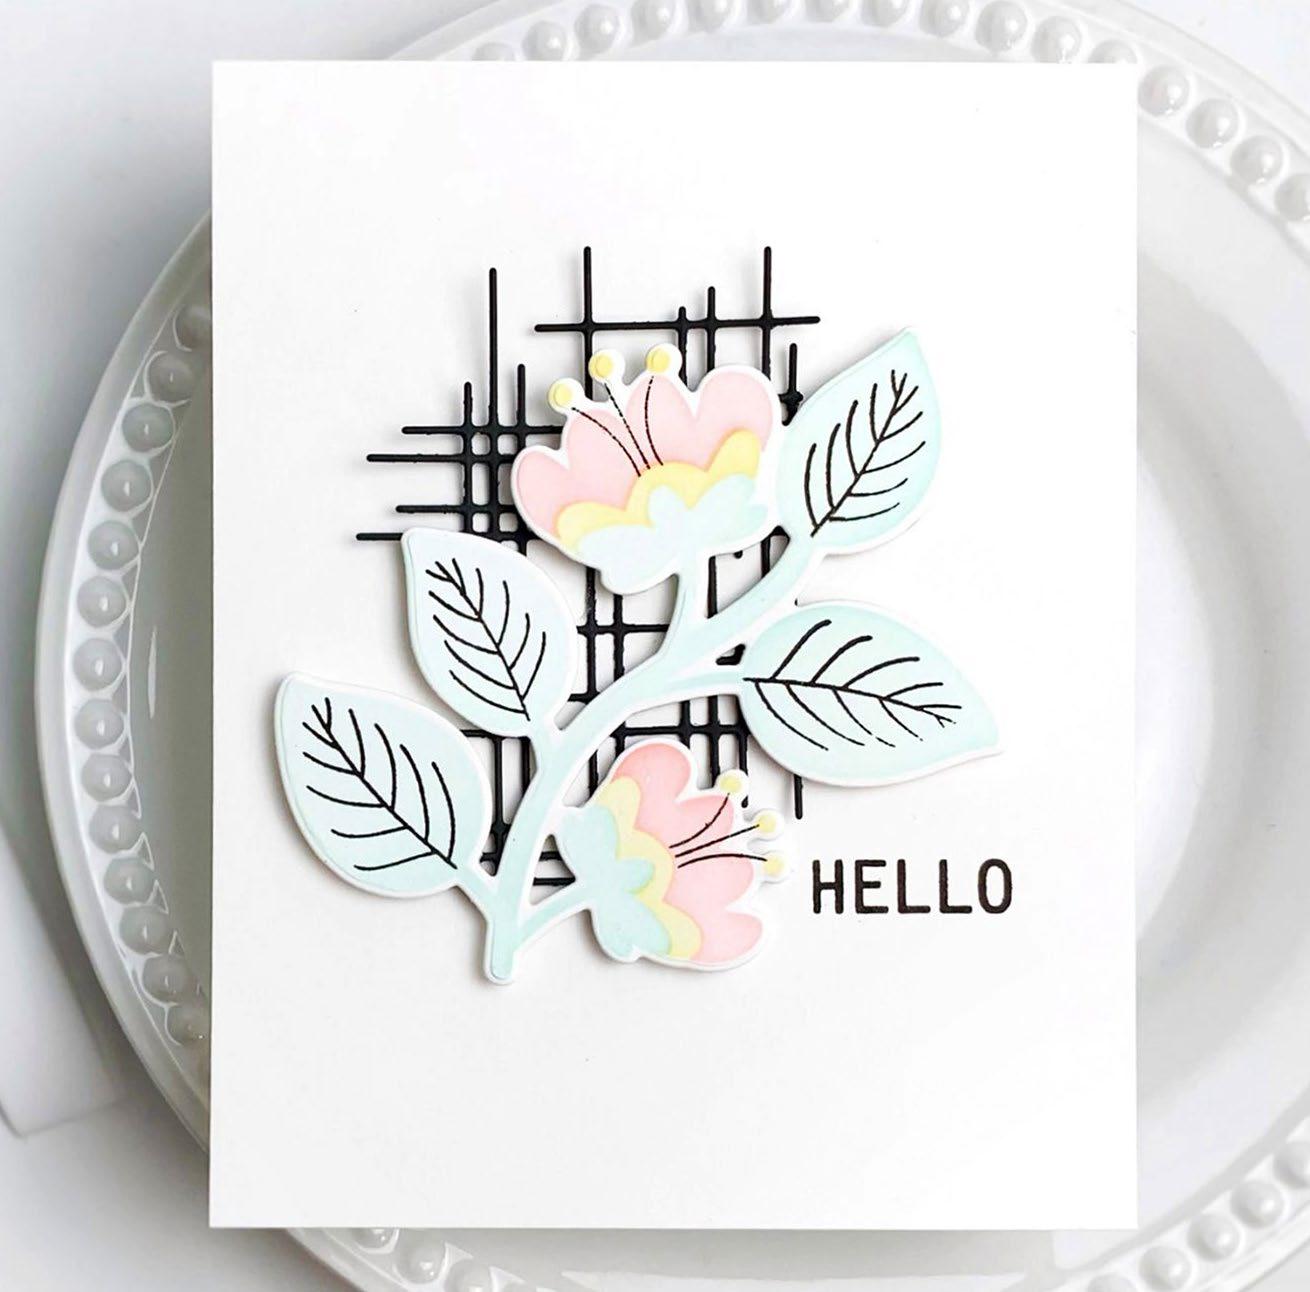
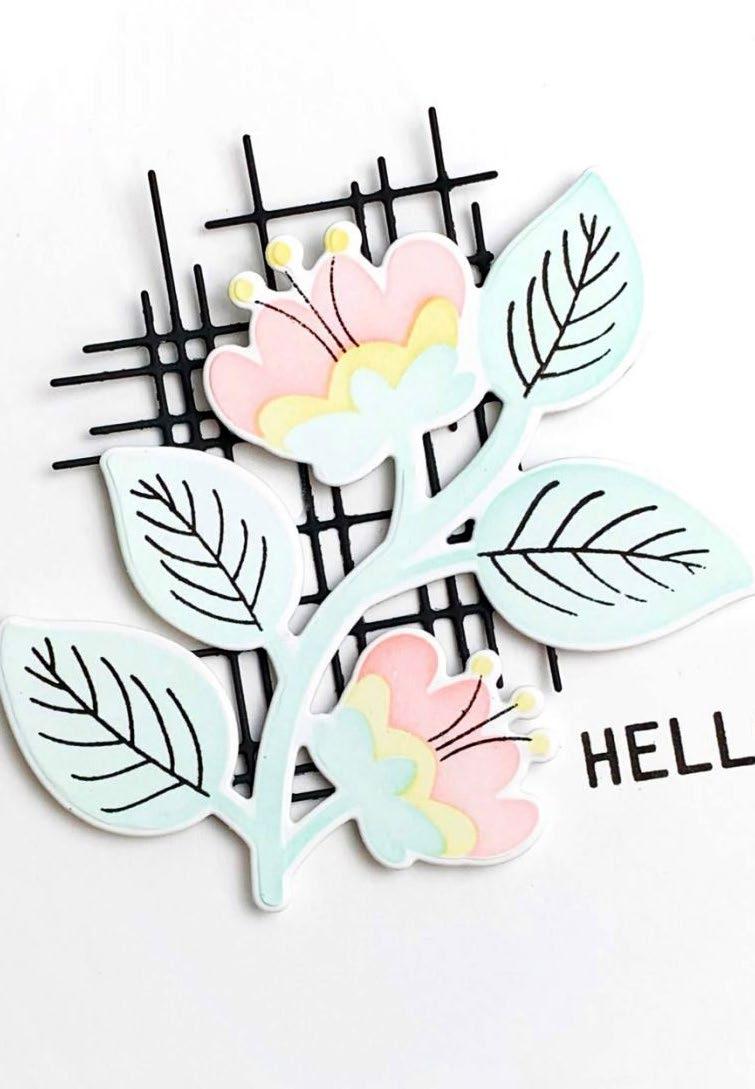
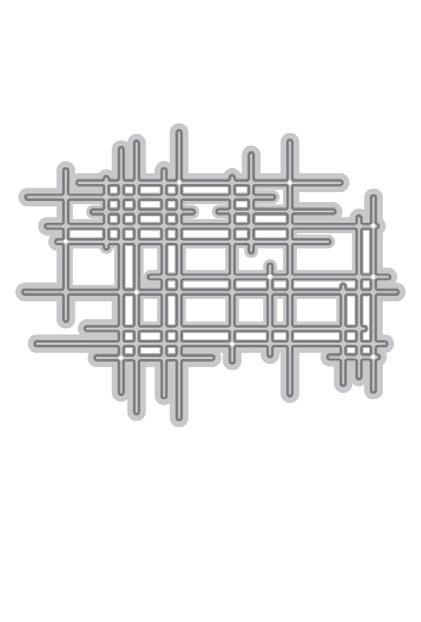
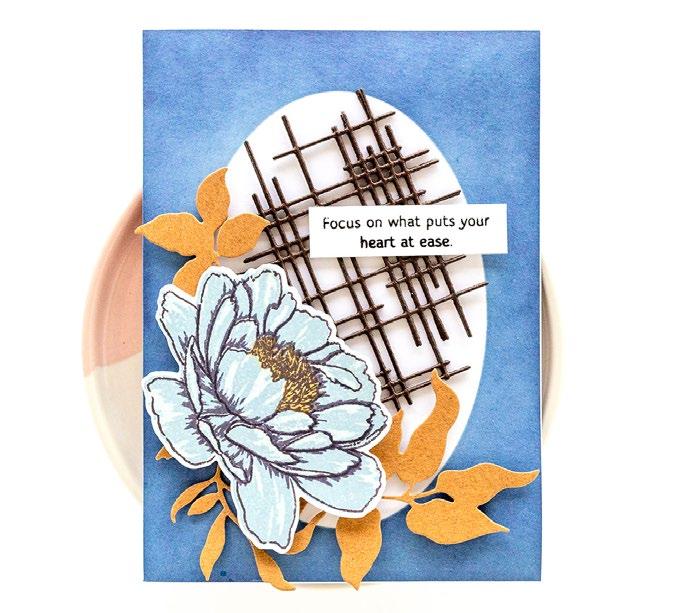
ADDING TEXTURE TO A CAS CARD
BY LAURIE WILLISON
INSTRUCTIONS
1. Create a 4 ¼” x 5 ½” card base from Classic Crest Solar White Cardstock.
2. Cut the Linear Crossroads Die out of black cardstock.
3. Adhere the die-cut to the center of the card using liquid glue.
4. On another panel of white cardstock, ink blend the bloom and leaves from Folk Flowers Details Stamp Set and Stencil Set using Obsidian Pigment Ink, Coral Bliss, Sunray, and Mountain Mist Dye Inks.
5. Die cut the image with the coordinating die.
6. Pop up the die-cut into place onto the card base using foam tape.
7. Stamp sentiment into place onto the card base using Obsidian Ink.
SUPPLIES
Stamp, Dies & Stencil
Folk Flowers Stamp & Die & Stencil Bundle
Linear Crossroads Die
Inks
Obsidian Pigment Ink
Crisp Dye Inks - Coral Bliss, Sunray, and Mountain Mist
Cardstock
Classic Crest Solar White Cardstock
Jet Black Cardstock (25 sheets/set)
Other
Instant Dimension Foam Tape
2-in-1 Precision Glue Pen
SEE MORE ON OUR BLOG
04
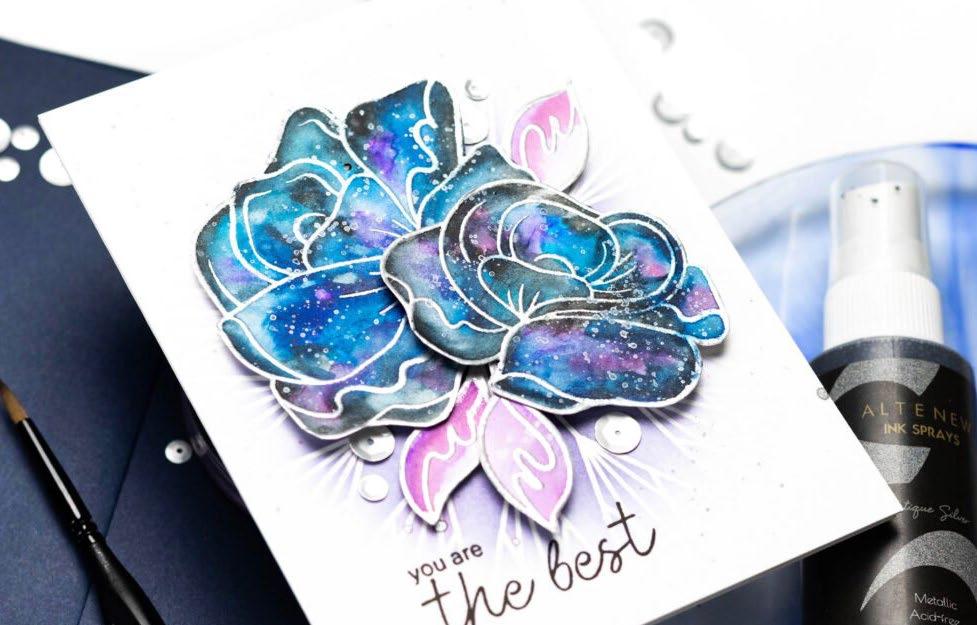
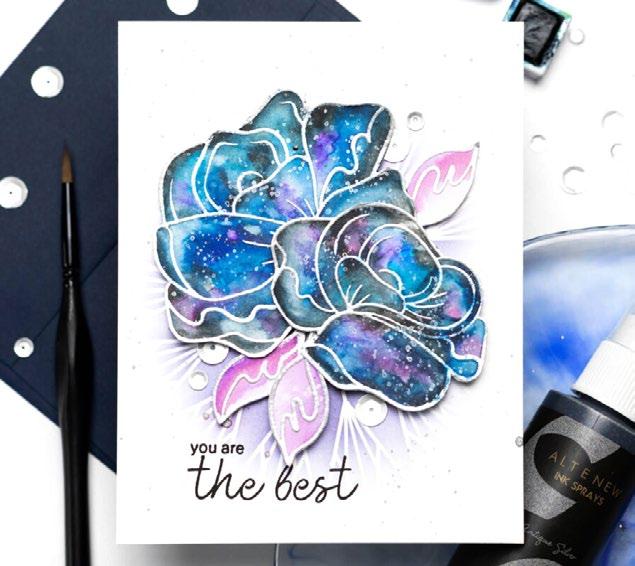
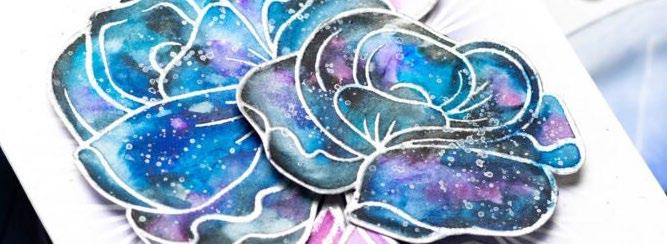
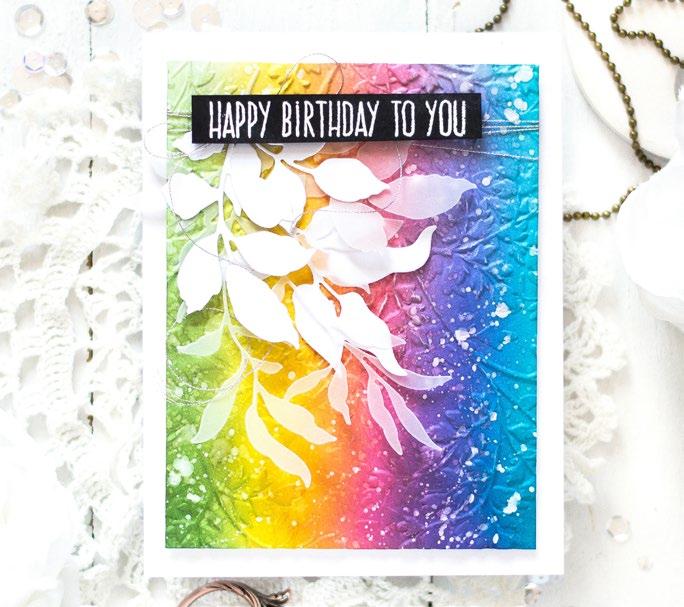
SPACE-THEMED FLORALS
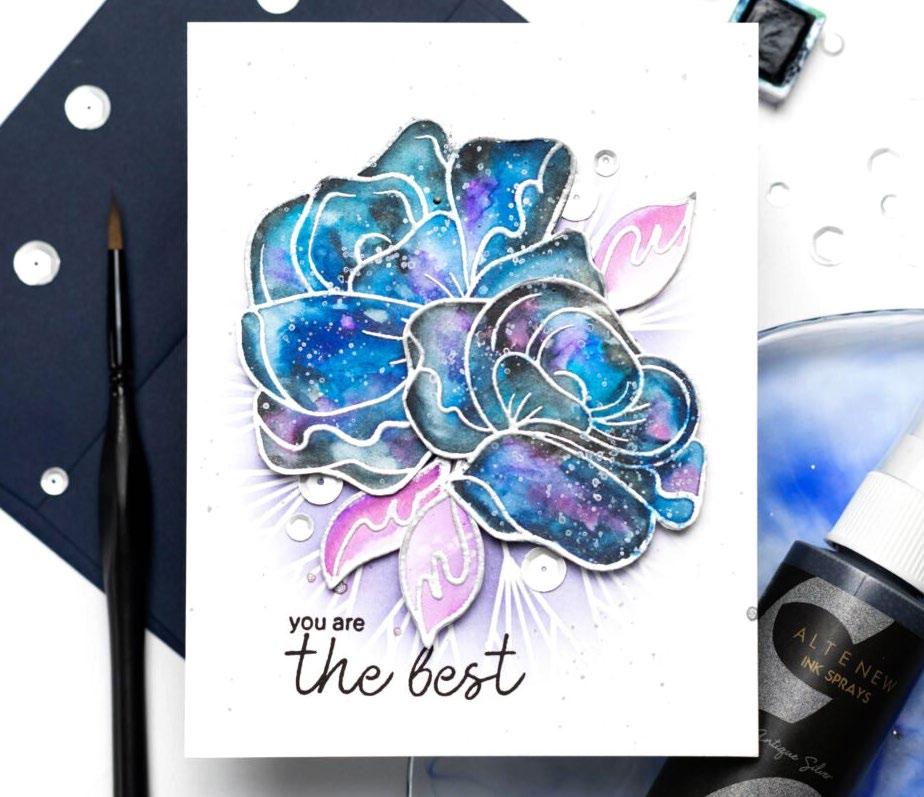
 BY JENNY COLACICCO
INSTRUCTIONS
1. Create a 4 ¼” x 5 ½” card base from Classic Crest Solar White Cardstock.
2. Stamp images from Simple Roses
Stamp Set onto Watercolor Paper using Embossing Ink and heat emboss with Antique Silver Embossing Powder.
3. Start adding splodges of pink, purple, blue, and dark blue pigments on the images using Artists’ Watercolor 24 Pan Set and #3 Artists’ Watercolor Brush.
4. Add a slightly watered-down black paint and blend it in towards the other colors, filling in the white areas.
5. TIP! Use a wet brush (without paint) to blend a little and remove harsh lines. You can also use a ‘thirsty’ brush (wet but dried on a paper towel) to pick up any excess paint.
SUPPLIES
Stamp, Die & Stencil
Simple Roses Stamp and Die Bundle
Linear Stencil
Inks
Obsidian Pigment Ink
Embossing Ink
Dark Night Crisp Dye Ink
Coloring Medium
Artists’ Watercolor 24 Pan Set
Cardstock and Paper
Classic Crest Solar White Cardstock
Watercolor Paper Set (A2 loose sheets)
Other
Instant Dimension Foam Tape
Artists’ Watercolor Brushes - Detailed
Ink Blending Tool - Large
Antique Silver Crisp Embossing Powder
Antique Silver Metallic Ink Spray
Matte Silver Sequins
Paper towel
6. Let it dry and then add lots of splatters of white paint.
7. Fussy cut or die cut with the coordinating die.
8. Use Linear Stencil and a Large Ink Blending Tool to blend Dark Night Ink from the center of the card base fading out to the edges.
9. Stamp sentiment from Simple Roses
Stamp Set into place on the card base using Obsidian Ink.
10. Adhere the watercolored die-cuts onto the card base with Instant Dimension Foam Tape.
11. Add some splatters with Antique Silver Metallic Ink Spray.
12. Add a few matte silver sequins.
SEE MORE ON OUR BLOG
05
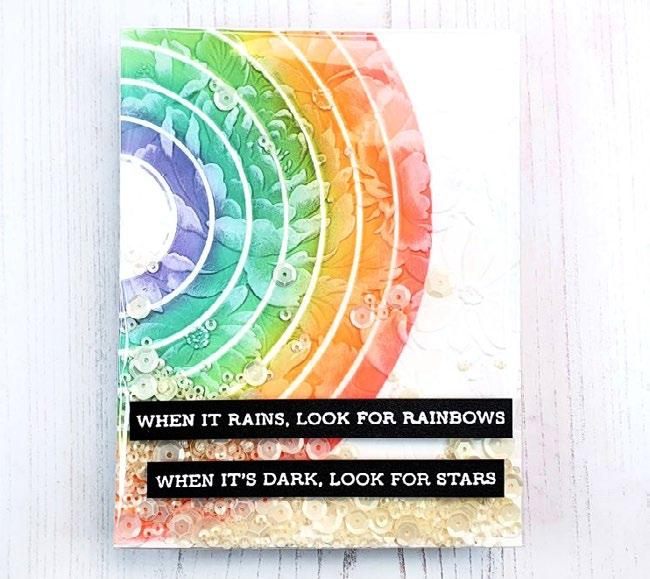
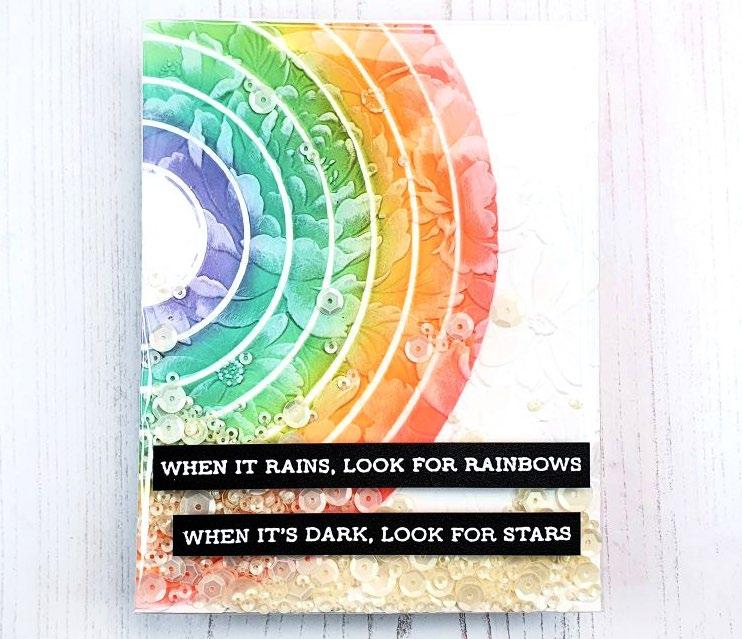
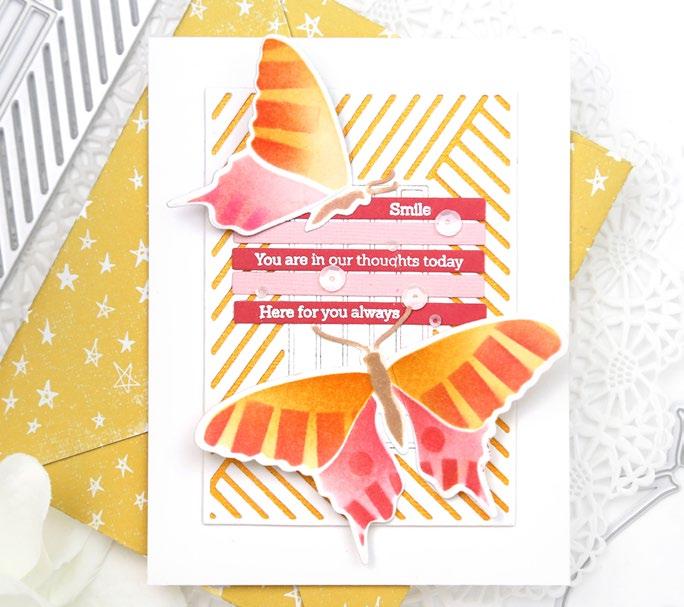
RAINBOW SHAKER CARD WITH RECYCLED PACKAGING
 BY LYDIA EVANS
INSTRUCTIONS
1. Create a 4 ¼” x 5 ½” card base from Classic Crest Solar White Cardstock.
2. Place the Double Rainbow Stencil over another 4 ¼” x 5 ½” white cardstock panel and ink through using Pink Pearl, Chamomile, Minty Mint, Volcano Lake, and Wisteria Inks.
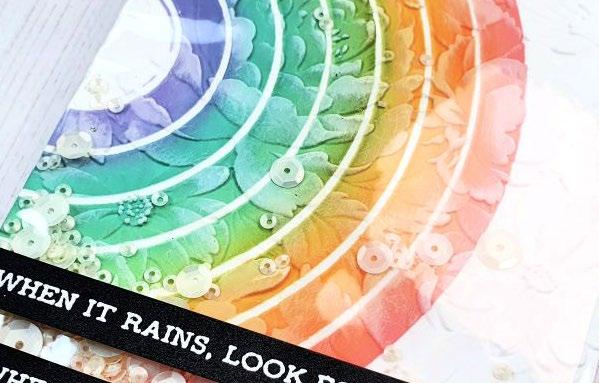
3. Dry emboss the panel using Flower Bed 3D Embossing Folder.
4. Once embossed, place the stencil back into place and ink it again with Coral Bliss, Snapdragon, Sweet Leaf, Lagoon, and Hydrangea Inks.
5. To add a little more interest to the embossed design, swipe over a white pigment ink pad.
SUPPLIES
Stamp, Stencil & 3D Embossing Folder
Double Rainbow Stencil
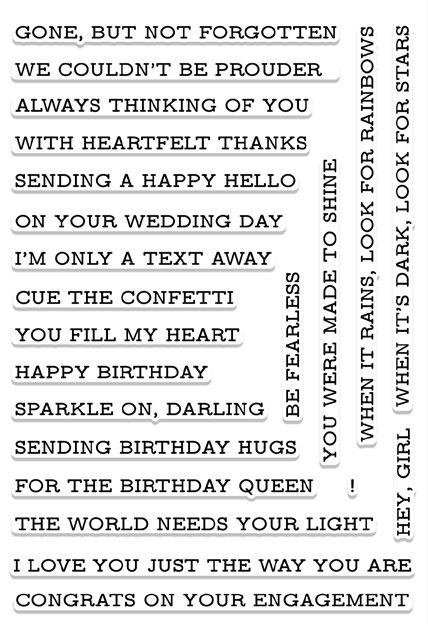
Sentiment Strips 3 Stamp Set
Flower Bed 3D Embossing Folder
Inks
Embossing Ink
Crisp Dye Inks - Pink Pearl, Chamomile, Minty Mint, Volcano Lake, Wisteria, Coral Bliss, Snapdragon, Sweet Leaf, Lagoon, and Hydrangea
White Pigment Ink
Cardstock and Paper
Classic Crest Solar White Cardstock
Jet Black Cardstock (25 sheets/set)
Other
Instant Dimension Foam Tape
Ultra Sticky Double Sided Tape (1/4 inch × 50m)
Glue Tape
Pure White Crisp Embossing Powder
Sequins - Satin White
Old plastic packaging
6. Adhere the panel onto the card base using glue tape.
7. Adhere a piece of old packaging to the back of the card panel using Ultra Sticky Double-Sided Tape.
8. Adhere the three sides first before adding in some Satin White Sequins. Then, adhere the last side.
9. White heat-emboss sentiments from Sentiment Strips 3 Stamp Set onto black cardstock strips.
10. Adhere sentiment strips into place using foam tape.
SEE MORE ON OUR BLOG
06
AGA MALYSZEK
INSTRUCTIONS
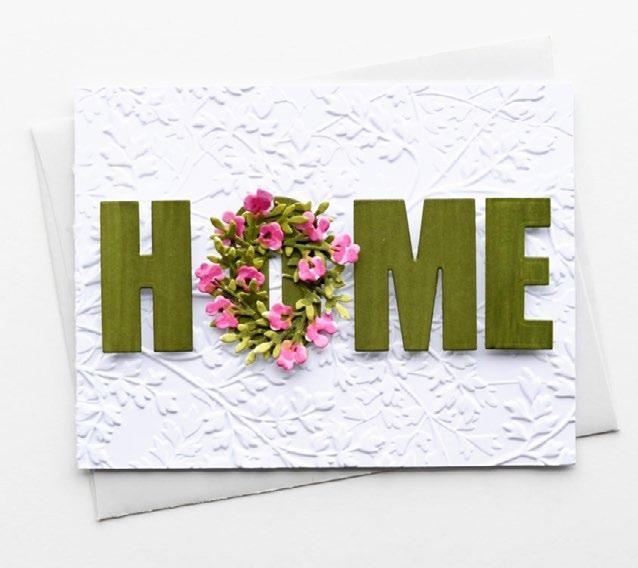
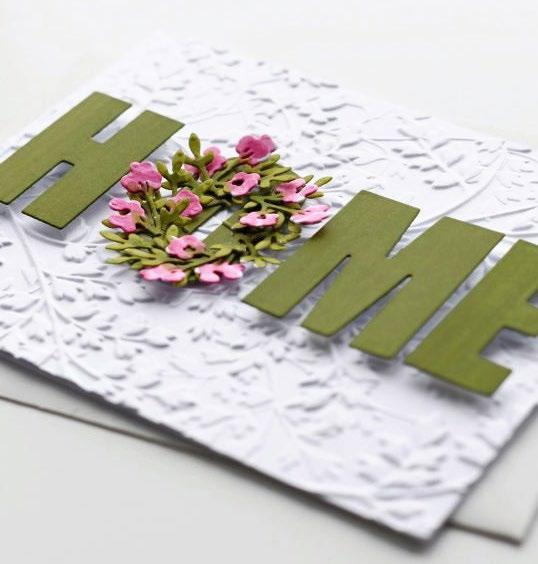
1. Create a 4 ¼” x 5 ½” card base from Classic Crest Solar White Cardstock.
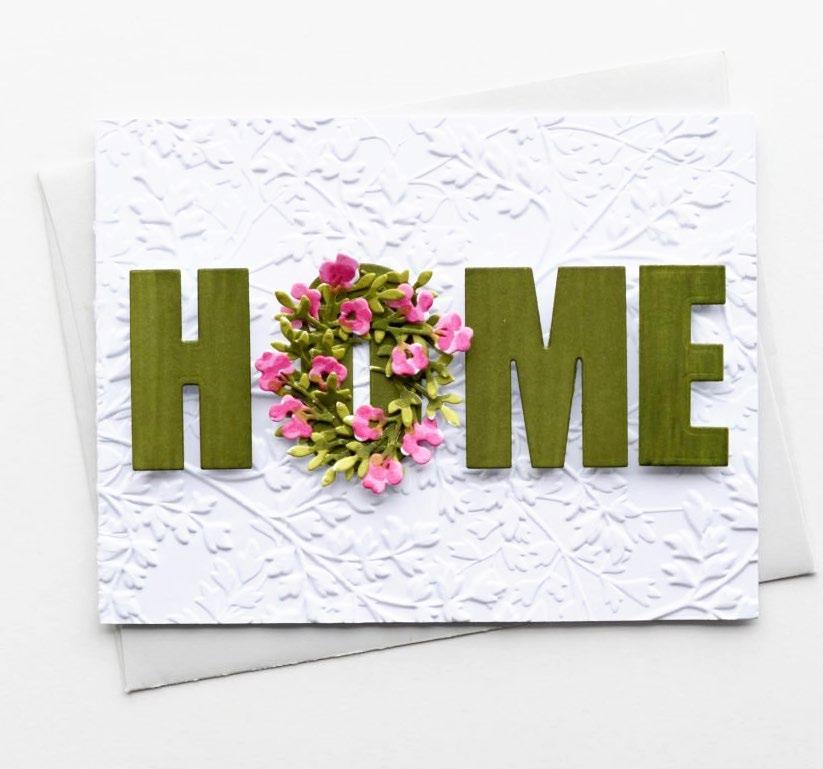
2. Dry emboss the card base using the Garden Harmony 3D Embossing Folder.
3. Next, cut the “HOME” word out of white cardstock with Caps Bold Alphabet Die Set.
4. Use green markers from Tropical Garden Artist Alcohol Markers Set E to color the letters.
5. Pop the die-cuts up with foam tape onto the card panel.
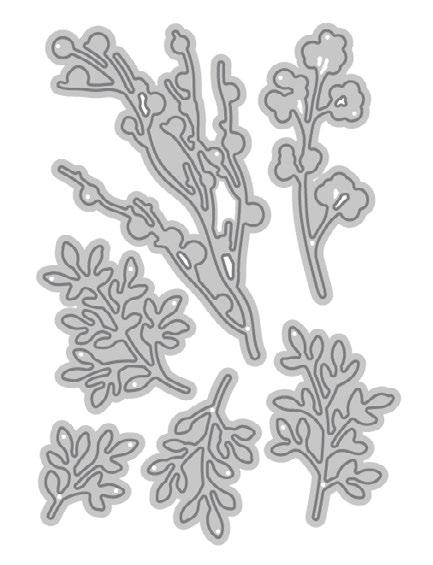
6. Die cut little twigs from the Branches and Berries Die Set.
SUPPLIES
Dies & 3D Embossing Folder
Garden Harmony 3D Embossing Folder
Caps Bold Alphabet Die Set
Branches and Berries Die Set
Coloring Medium
Tropical Garden Artist Alcohol Markers Set E
Sunshine Valley Garden Artist Alcohol Markers Set F
Cardstock and Paper
Classic Crest Solar White Cardstock
Other
Instant Dimension Foam Tape
2 in 1 Precision Glue Pen
7. Use green markers from Tropical Garden Artist Alcohol Markers Set E to color the leaves and pink markers from Sunshine Valley Garden Artist Alcohol Markers Set F to color the blooms.
8. Arrange the die-cuts in the shape of a wreath and adhere them to the letter O using liquid glue.
SEE MORE ON OUR BLOG
BY
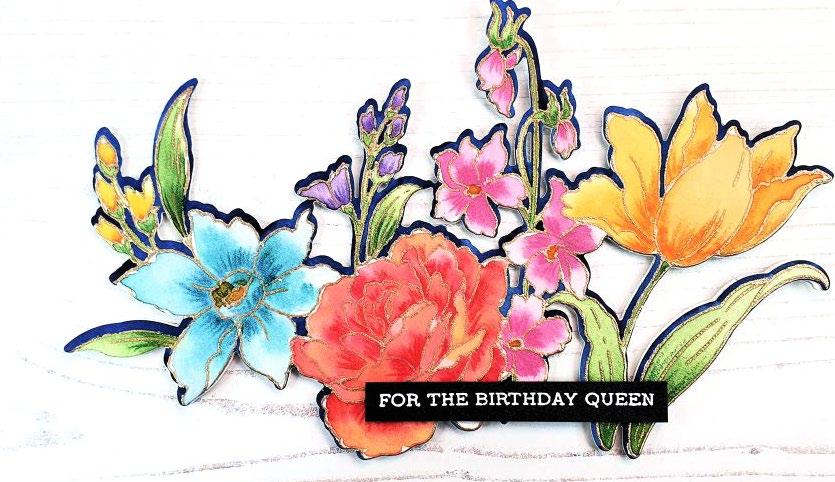
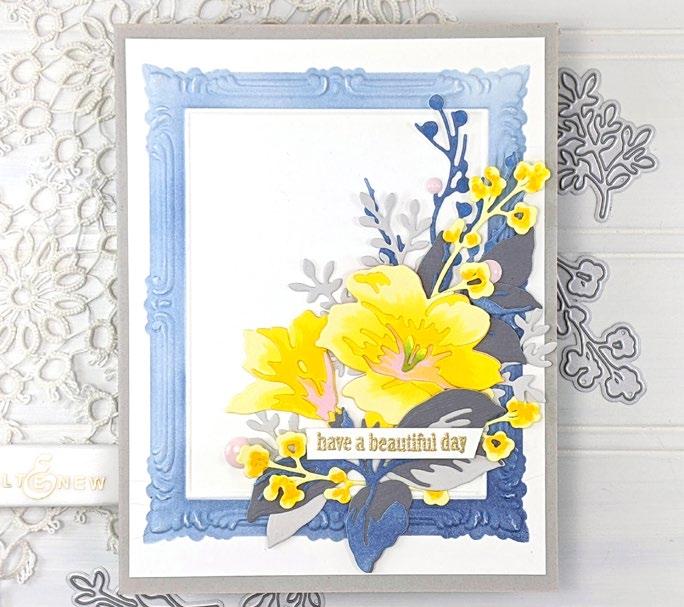
07 STEP
ALPHABET DIES
UP YOUR
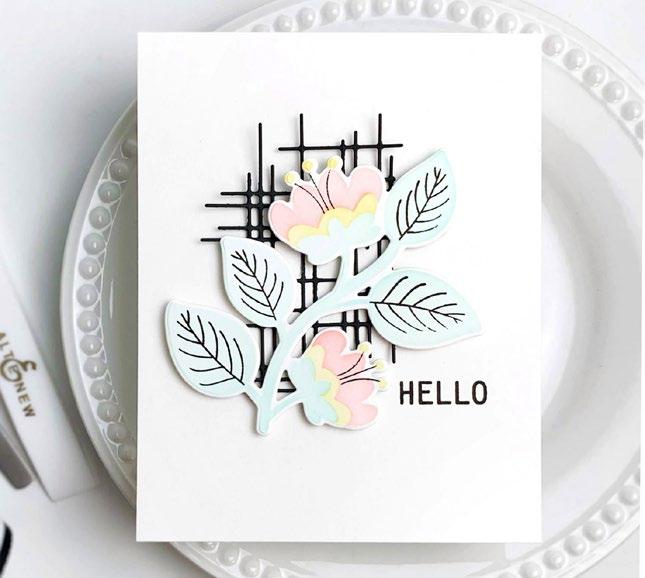
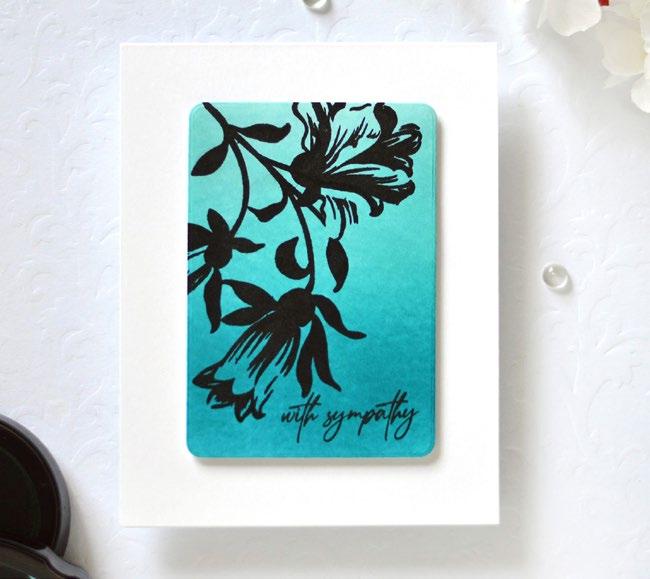
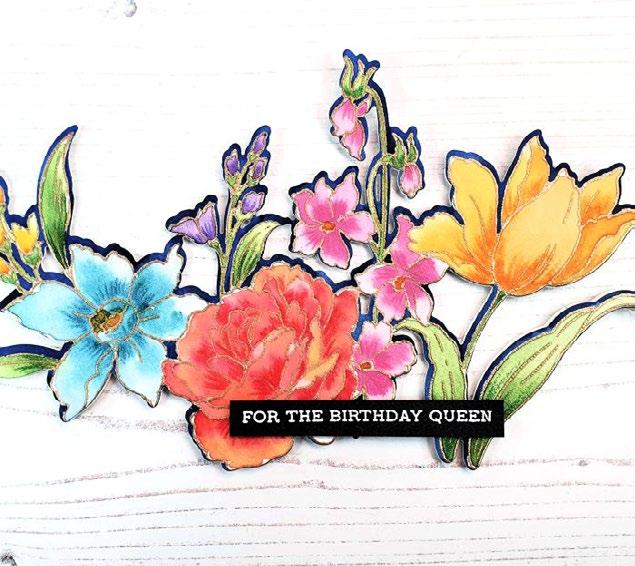
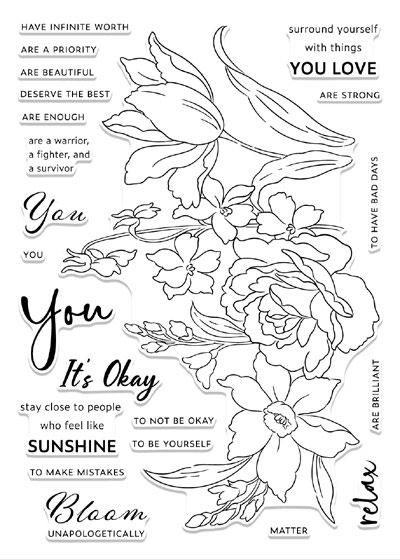
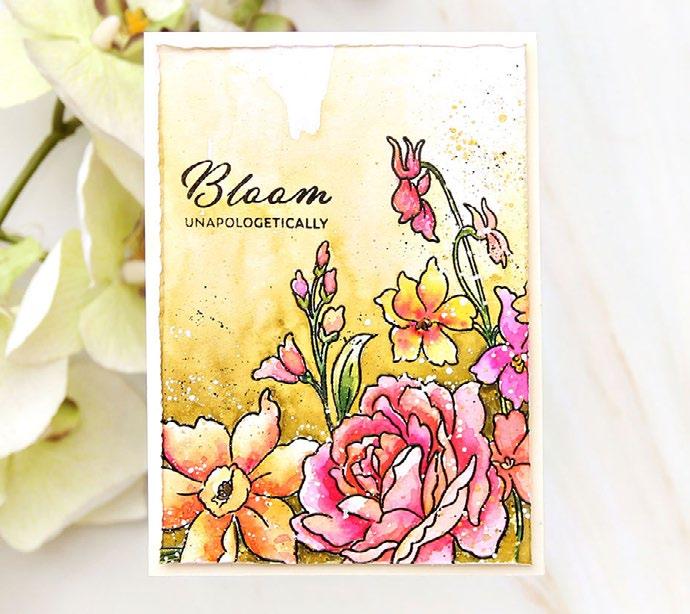
BOLD FLORAL SILHOUETTE
BY THERESE CALVIRD
INSTRUCTIONS
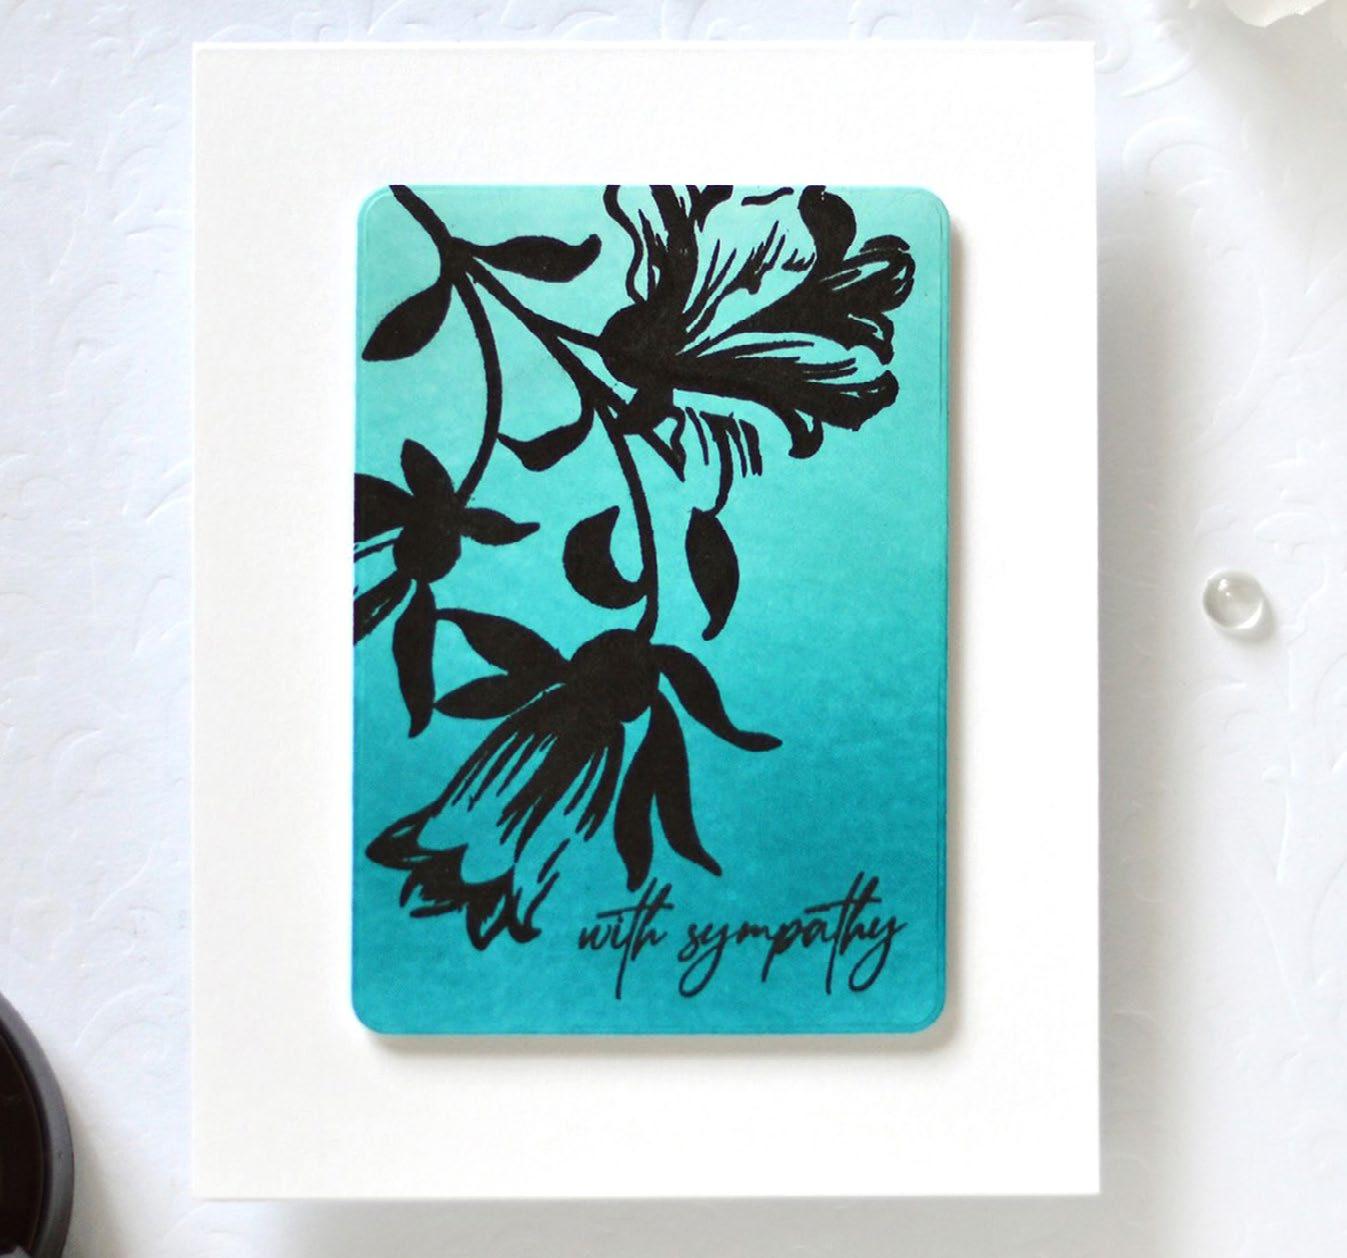
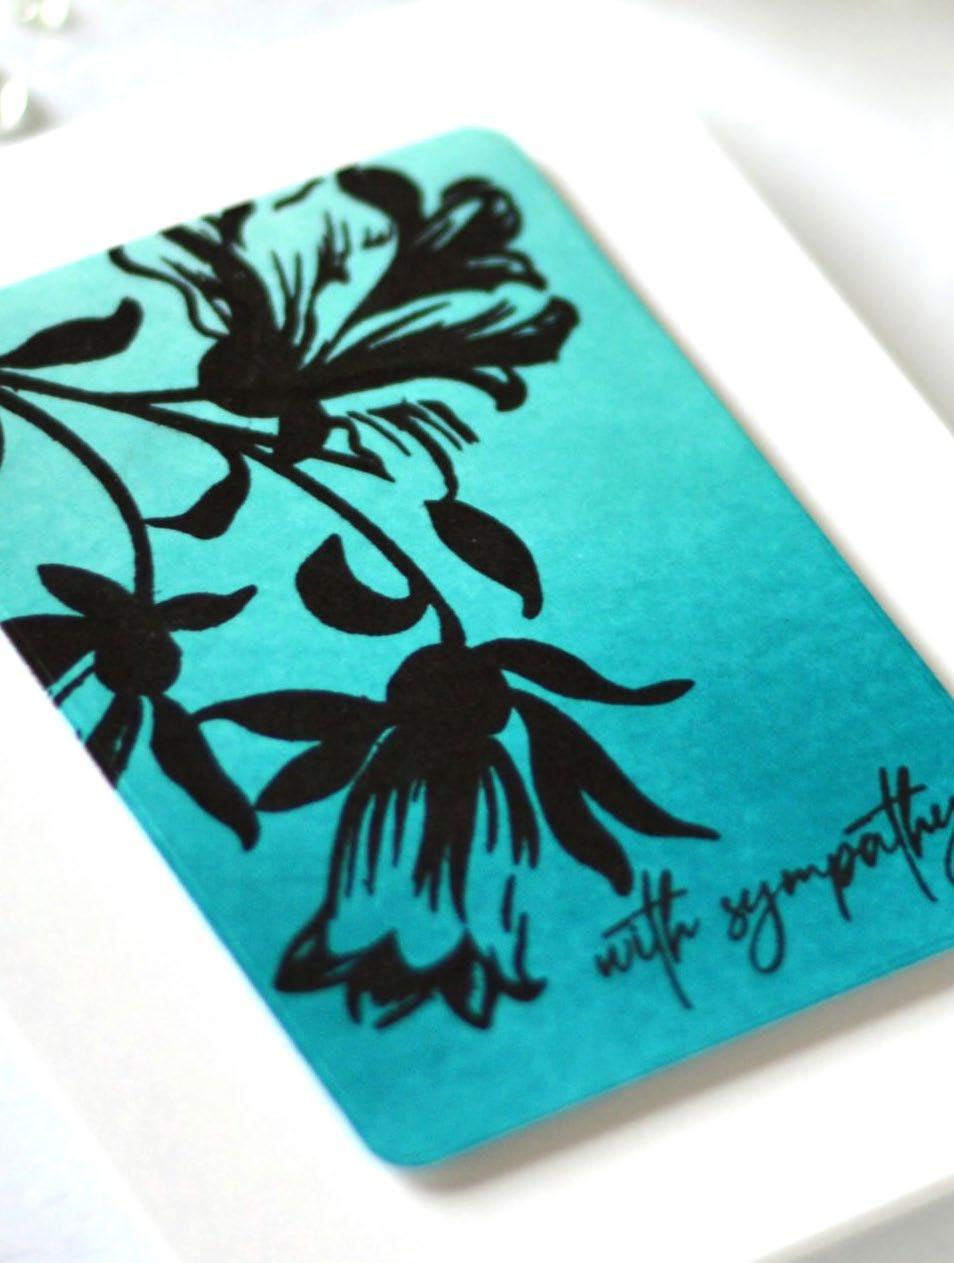
1. Create a 4 ¼” x 5 ½” card base from Classic Crest Solar White Cardstock.
2. Create an ombré blended background (in any color that you like) onto another panel using Large Ink Blending Tools. Therese used the Sweet Dreams Crisp Dye Ink Oval Bundle.
3. Die cut the ink-blended panel with one of the dies from the Rounded Rectangles Die Set.
4. Stamp the image from Build-AFlower: Giant Bellflower Layering Stamp Set onto the panel using Obsidian Ink.
5. Stamp sentiment from Fragile Foliage Stamp Set into place onto the panel using Obsidian Ink.
SUPPLIES
Stamps & Die
Build-A-Flower: Giant Bellflower Layering
Stamp Set
Fragile Foliage Stamp Set
Rounded Rectangles Die Set
Inks
Obsidian Pigment Ink
Sweet Dreams Crisp Dye Ink Oval Bundle
Cardstock and Paper
Classic Crest Solar White Cardstock
Other
Instant Dimension Foam Tape
Ink Blending Tool - Large
6. Adhere the panel onto the card base using foam tape.
SEE MORE ON OUR BLOG
08
FLORAL-SHAPED CARD
 BY LYDIA EVANS
INSTRUCTIONS
1. Stamp the large image from Endless Florescence Stamp Set onto a piece of Watercolor Cardstock using Embossing Ink and heat emboss with Rose Gold Embossing Powder.
2. Color the image using Artists’ Watercolor 24 Pan Set. TIP! Paint around the outside of the image using dark blue pigment so that when you cut the image it would have a dark edge.
3. Die cut the image with the coordinating die.
4. Cut a piece of white cardstock using the same die twice.
5. On one of these die-cuts, score a line around about 1″ down from the top of the tulip, all across the die-cut.
SUPPLIES
Stamps & Die
Endless Florescence Stamp and Die Bundle
Sentiment Strips 3 Stamp Set
6. Add liquid glue to the top of the score line and adhere the other white die-cut to it.
7. Then, adhere the colored die-cut image on top of it.
Ink
Embossing Ink
Coloring Medium
Artists’ Watercolor 24 Pan Set
Cardstock and Paper
Classic Crest Solar White Cardstock
Watercolor Paper Pad (9”x 12”)
Jet Black Cardstock (25 sheets/set)
Other
2 in 1 Precision Glue Pen
Instant Dimension Foam Tape
Pure White Crisp Embossing Powder
Rose Gold Crisp Embossing Powder
8. White heat emboss a sentiment from Sentiment Strips 3 Stamp Set onto a strip of black cardstock.
9. Pop up the sentiment strip into place using foam tape.
SEE MORE ON OUR BLOG
09
FEATURED PRODUCTS


Note: Gray SKU represents coordinating die set.
CAT LIFE ALT6955 RETAIL $23.99 ALT6956 RETAIL $16.99 ENDLESS FLORESCENCE ALT6957 RETAIL $23.99 ALT6958 RETAIL $22.99 SENTIMENT STRIPS 3 ALT6618 RETAIL $15.99 BRANCHES AND BERRIES ALT4881 RETAIL $10.99 CAPS BOLD ALPHABET ALT2024 RETAIL $45.00 FINE FRAMES SQUARE ALT3911 RETAIL $6.99 LINEAR CROSSROADS ALT4705 RETAIL $8.99 MIX AND MATCH FRAMES ALT6376 RETAIL $17.99 DOUBLE RAINBOW ALT6673 RETAIL $6.99 FOLK FLOWERS ALT6756 RETAIL $17.99 ALT6755 RETAIL $11.99 FLOWER BED ALT6781 RETAIL $8.99 GARDEN HARMONY ALT4950 RETAIL $8.99
MORE DESIGN INSPIRATION


STAY CONNECTED Download our FREE mobile app! altenew.com blog.altenew.com facebook.com/altenew instagram.com/altenewllc pinterest.com/altenew youtube.com/altenew tiktok.com/@altenew support@altenew.com (800) 593-1089
