


& INSPIRE 78 Dive into the world of die-cutting, hot foiling, embossing, & more! Get your creative juices flowing with these tips & tricks!
Techniques!
Must-Try
CREATE
Terrific
7
Card Making Ideas


CONTENTS 03 05 07 09 04 06 08 2 Quick and Easy Ways to Use Cardstock Strips Easy Embossed Overlay Technique Add Sparkles to Layered Daisies One-Layer Card with 5-Step Masking Easy 10-Minute Spring Card Hot Foiling with Dies Simple Thank You Card with Mini Stamps
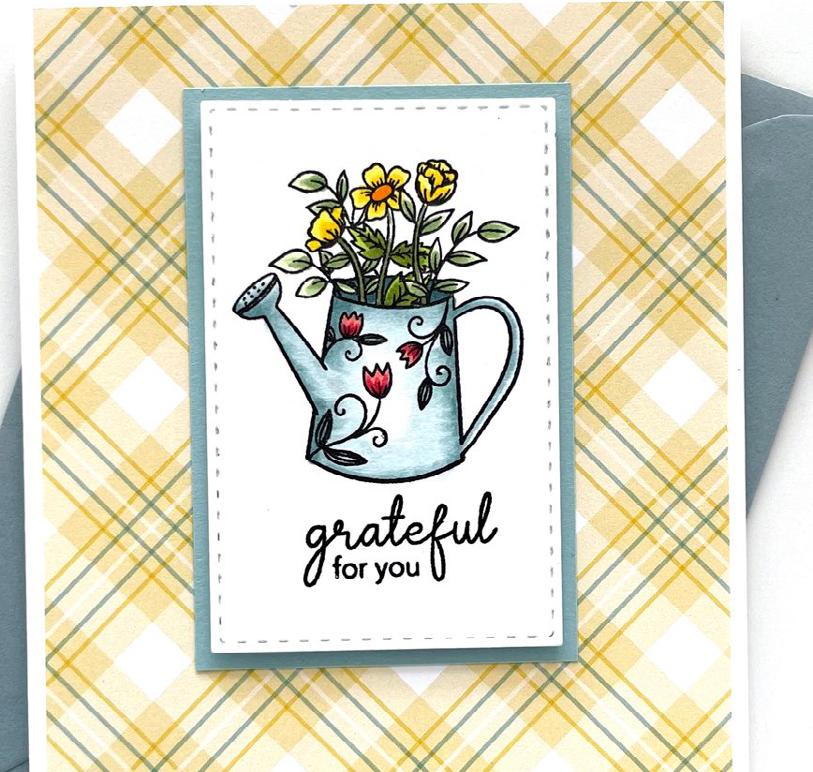
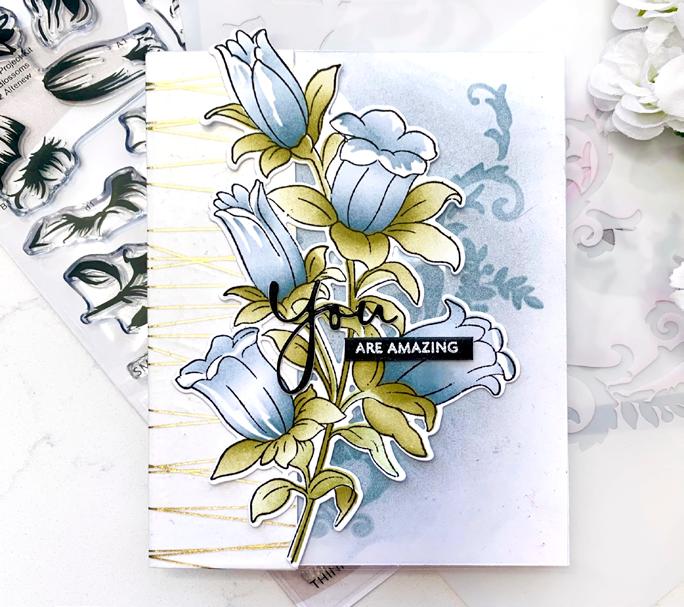
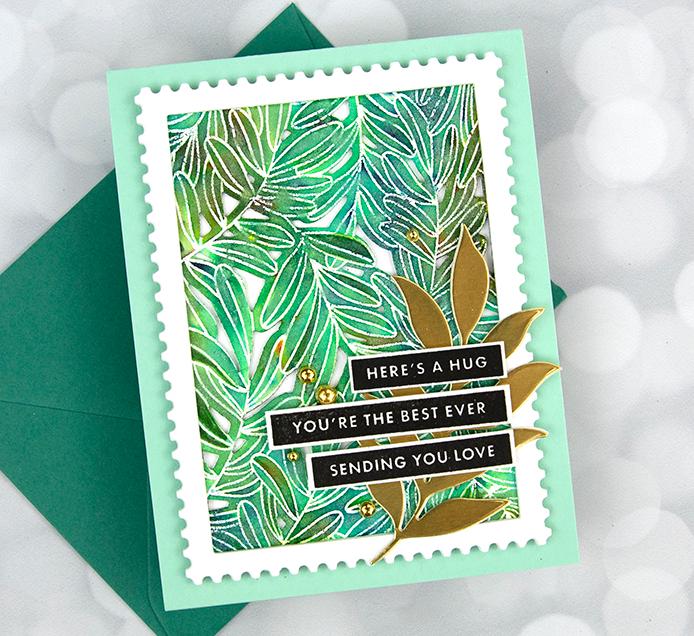
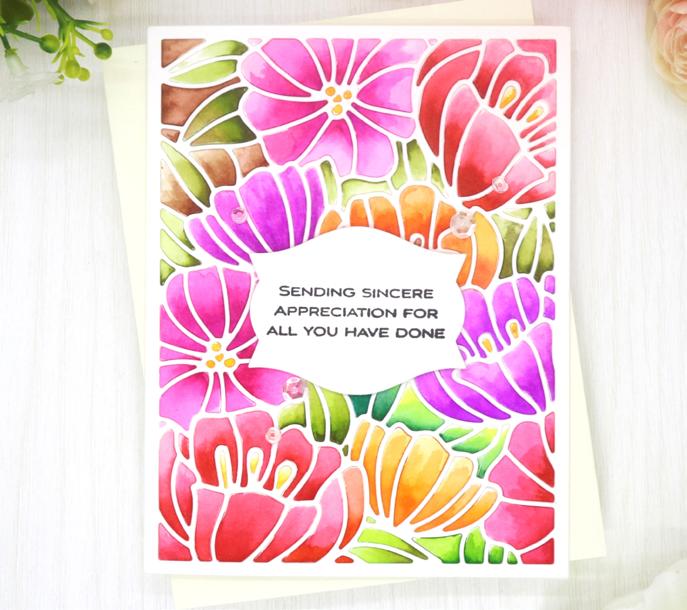
EASY 10-MINUTE SPRING CARD
BY AGA MALYSZEK
INSTRUCTIONS
1. Create a 4 ¼” x 5 ½” card base from Classic Crest Solar White Cardstock.
2. Cut four leafy branches out of white cardstock with Dainty Leaves Die Set.
3. Color the die-cuts using Frosty Pink, Frayed Leaf, Forest Glades, and Evergreen markers from Cosmic Garden Artist Alcohol Markers Set A.
4. Adhere the die-cut branches on the card base using glue tape.
5. Stamp the “you are” from the You Are Everything Stamp Set on a piece of white cardstock using Obsidian Ink.
6. Cut sentiment with the coordinating die.
SUPPLIES
Stamp & Dies
Dainty Leaves Die Set
You Are Everything Stamp and Die Set

7. Stamp a sub-sentiment onto a strip of white cardstock using Obsidian Ink.

8. Adhere the sentiment and subsentiment into place on the card base using foam tape.
Ink
Obsidian Pigment Ink
Coloring Medium
Cosmic Garden Artist Alcohol Markers Set A
Cardstock
Classic Crest Solar White Cardstock

Other
Instant Dimension Foam Tape
Glue Tape
SEE MORE ON OUR BLOG
03
CARDSTOCK STRIPS
BY MICHELLE SHORT
INSTRUCTIONS
1. Cut cardstock strips to different widths from a few Gradient Cardstock Sets; Pinkalicious, Purple Wine, Warm Sunshine, Caramel Toffee, Mountain Mist, and Volcano Lake.
2. Apply Double-Sided Adhesive Sheet to a piece of Classic Crest Solar White Cardstock.
3. Remove the backing paper from the adhesive sheet and adhere the strips on top diagonally.
4. Cut off the excess before die cutting the panel with Terrific Tags Die Set.
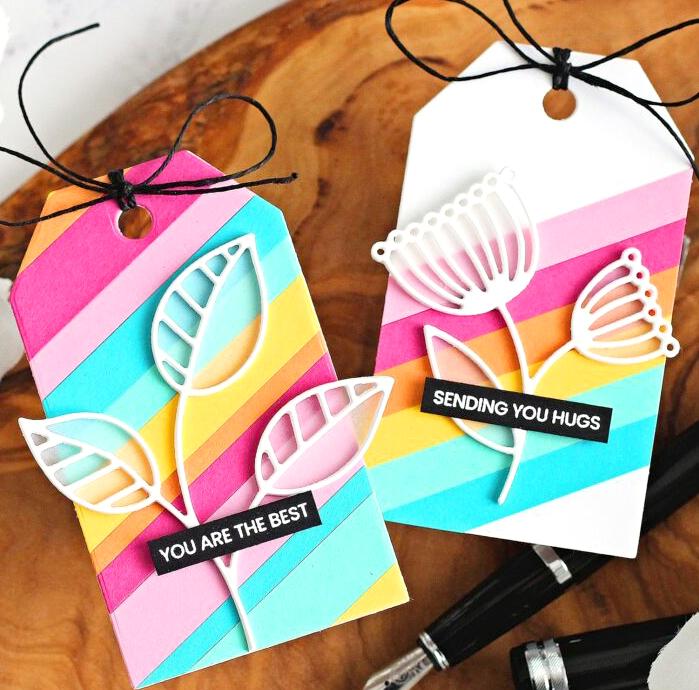
5. Die cut the Flowing Foliage Dies three times from white cardstock (with more adhesive sheets on the back).
6. Stack them on top of one another for added dimension.
SUPPLIES
Stamp & Dies
Tiny Sentiments: Hello Stamp Set

Terrific Tags Die Set
Flowing Foliage Die Set
Ink
Embossing Ink
Cardstock and Paper
Classic Crest Solar White Cardstock
Jet Black Cardstock (25 sheets/set)
Gradient Cardstock Sets - Cherry Blossom, Rose Petal, Summer Afternoon, Sea Shore
Other
Instant Dimension Foam Tape
Pure White Crisp Embossing Powder
Double-sided Adhesive Sheets (10 sheets/set)
Scissors
Twine
7. Adhere the die-cut to a piece of Vellum Translucent Paper and fussy cut around it with scissors.
8. Adhere the vellum die-cut to the tag and cut off the excess of the stem.
9. Stamp a sentiment from the Tiny Sentiments: Hello Stamp Set onto black cardstock using Embossing Ink and heat set with Pure White Embossing Powder.
10. Cut this into a strip and adhere it to the tag with Instant Dimension Foam Tape.
11. Add twine through the top of the tag and tie it in a bow at the front.
SEE MORE ON OUR BLOG
04
EASY
TO USE
2 QUICK AND
WAYS
HOT FOILING WITH DIES
BY LYDIA EVANS
INSTRUCTIONS
1. Create a 4 ¼” x 5 ½” card base from Classic Crest Solar White Cardstock.
2. Heat up Dainty Blooms Cover Die in your hot foiling machine, add some gold foil (shiny side down) and a piece of white cardstock.
3. Run this through your die-cutting machine. This will give you a beautiful gold foiled outline of the cutting lines of the die transferred onto the cardstock.
4. Color the panel using Woodless Coloring Pencils. Use Peach Perfect, Coral Bliss, and Heart Beat for the flowers, Fresh Lemon, Maple Yellow, and Orange Cream for the flower centers, Limeade, Grass Field, and Shadow Creek for the leaves, and Desert Night for the background.
SUPPLIES
Dies
Dainty Blooms Cover Die
Always Be Kind Die Set

Coloring Medium
Woodless Coloring Pencils
Cardstock
Classic Crest Solar White Cardstock
Navy Cardstock (25 sheets/set)
Hot Foil Roll - Enchanted Gold
Other
Instant Dimension Foam Tape
Hot Foil Machine
Die Cutting Machine
5. Trim the piece to size and adhere it to the card base using foam tape.
6. Foil the smaller die from Always Be Kind Die Set onto a piece of Navy Cardstock.

7. Cut around this using the shadow die in the set.
8. Adhere the die-cut into place onto the card base using foam tape.
SEE MORE ON OUR BLOG
05
EASY EMBOSSED OVERLAY TECHNIQUE
BY JAYCEE GASPAR
INSTRUCTIONS
1. Create a 4 ¼” x 5 ½” card base from Classic Crest Solar White Cardstock.
2. Dry emboss another panel of white cardstock with Peony Sunshine 3D Embossing Folder.
3. Swipe Butter Cream Pigment Ink around the edges of the peony, place the embossed panel inside, and run it through the die-cutting machine again. Repeat the process with Warm Sunshine Pigment Ink (near the peony center) and Caramel Toffee Pigment Ink (in the peony center).
4. Die cut “you” from Caps Bold Alphabet Die Set out of a piece of Summer Afternoon Gradient Cardstock.
SUPPLIES
Stamp, Stencil & 3D Embossing Folder
Peony Sunshine 3D Embossing Folder
Caps Bold Alphabet Die Set
Craft Your Life Project Kit: Dynamic Blossoms
Inks
Pigment Inks - Butter Cream, Warm Sunshine, and Caramel Toffee
Caramel Toffee Crisp Dye Ink
Cardstock
Classic Crest Solar White Cardstock
Gradient Cardstock Set - Summer Afternoon
Other
Instant Dimension Foam Tape
Satin Masking Tape
5. Place die-cuts into place in the embossed panel, add a strip of Satin Masking Tape, and then remove the embossed panel from underneath, leaving the die-cuts inside the Peony Sunshine 3D Embossing Folder.
6. Run this through the die-cutting machine. This will emboss the peony image on the sentiment die-cuts.
7. Repeat the same process in step 2 with the sentiment die-cuts, using Warm Sunshine and Caramel Toffee Pigment Inks.
8. Stamp sub-sentiment from Craft Your Life Project Kit: Dynamic Blossoms onto a piece of white cardstock using Caramel Toffee Dye Ink.
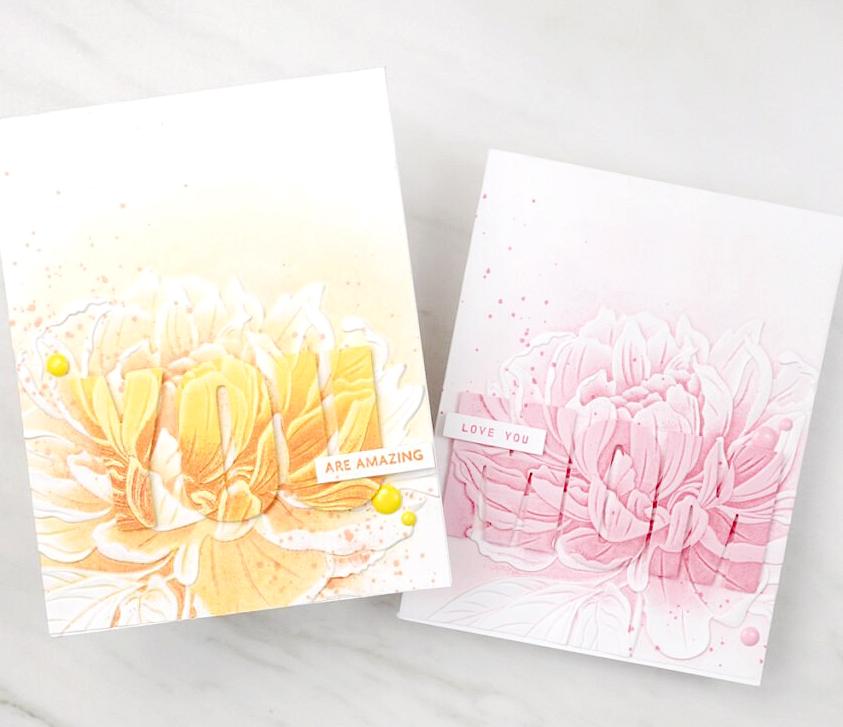
9. Adhere the sentiment and subsentiment die-cuts onto the panel using foam tape.
10. Adhere the panel onto the card base using foam tape.
SEE MORE ON OUR BLOG
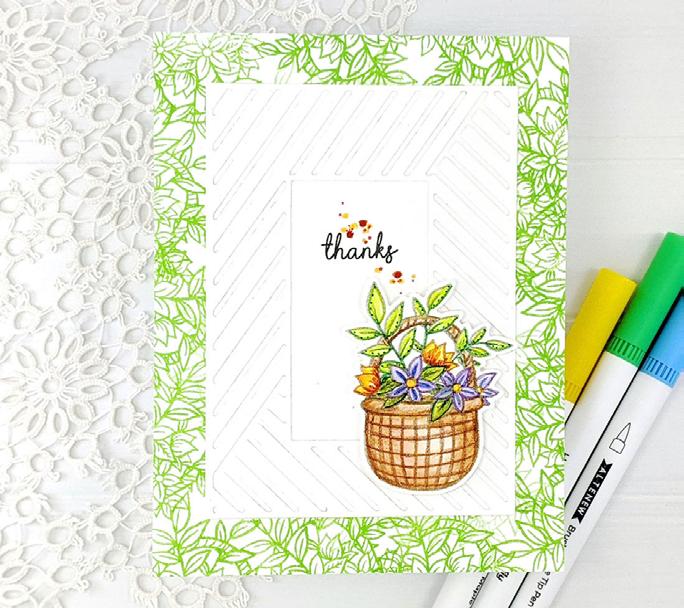
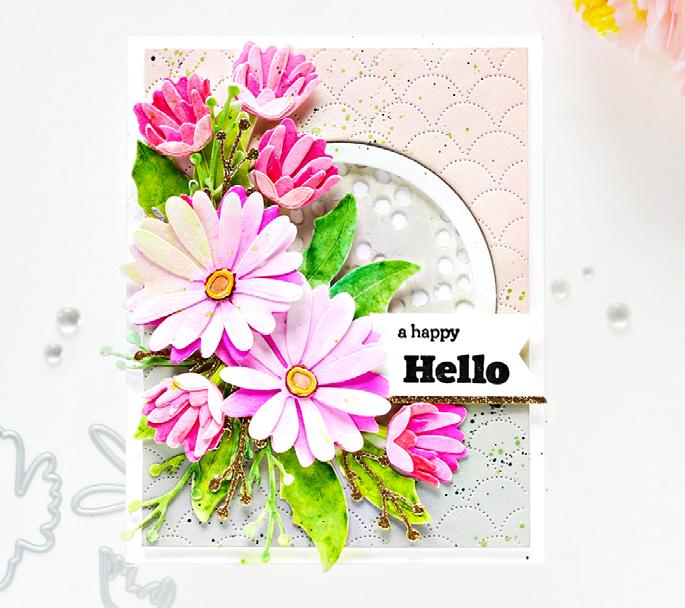
06
BY TERRI KOSZLER
INSTRUCTIONS
1. Create a 4 ¼” x 5 ½” card base from Classic Crest Solar White Cardstock.
2. Die cut Craft-A-Flower: African Daisy Die Set from Rose Petal, Summer Afternoon, and Green Meadows Gradient Cardstocks.
3. Die cut one layer for each flower from Pink Brilliance Glitter Gradient Cardstock.
4. Adhere the layers of the flower using liquid glue for the small centers and glue tape for the main layers.
5. Emboss a 4” x 5 ¼” panel using the Checkered Diamonds 3D Embossing Folder.
6. Adhere this panel to the card base using glue tape.
SUPPLIES
Dies & 3D Embossing Folder
Craft-A-Flower: African Daisy Layering Die Set
Craft Your Life Project Kit: Seasonal Blooms
Checkered Diamonds 3D Embossing Folder
Mega Stamp Frames Die Set
Cardstock
Classic Crest Solar White Cardstock
Glitter Gradient Cardstock Set - Pink Brilliance
Gradient Cardstock Sets - Rose Petal, Summer Afternoon, and Green Meadows
Other
Instant Dimension Foam Tape
2 in 1 Precision Glue Pen
Glue Tape
7. Adhere the daisy die-cuts into place on the embossed panel using foam tape and glue tape.
8. Cut the large frame from the Mega Stamp Frames Die Set and adhere this to the panel using foam squares.
9. Die cut “hello” detailed sentiment from the Craft Your Life Project Kit: Seasonal Blooms out of Pink Brilliance Glitter Gradient Cardstock and the base layer out of white cardstock.
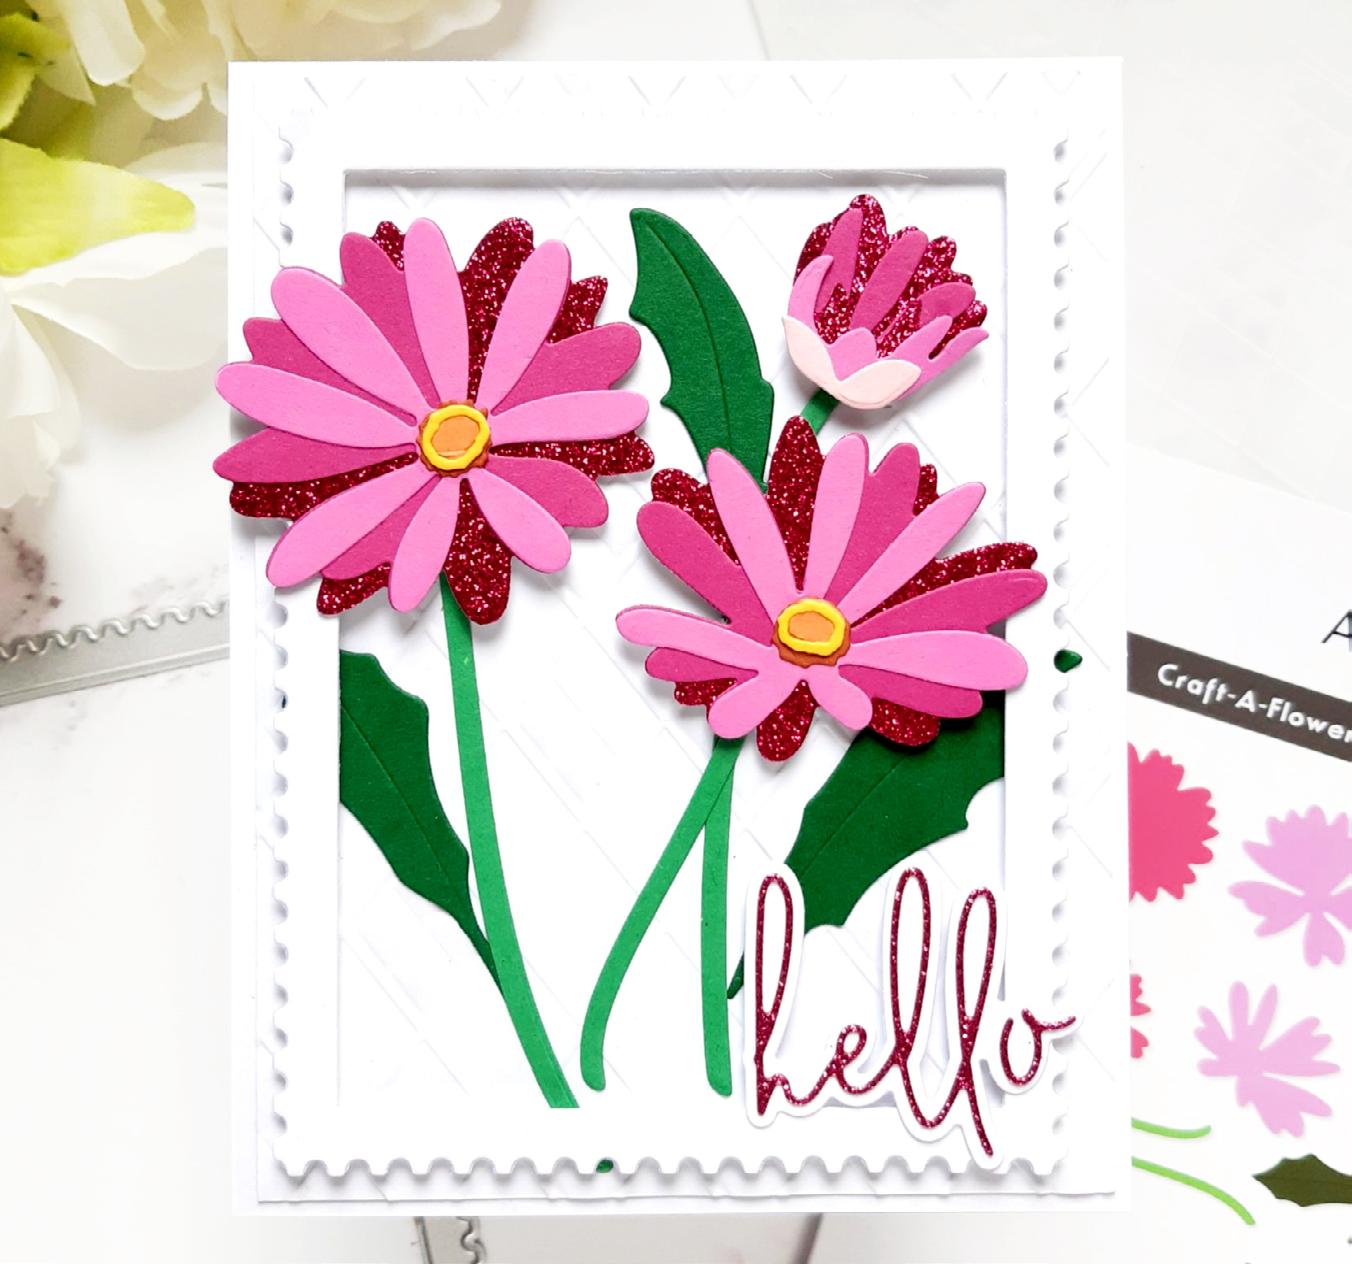
10. Adhere the die-cuts together with liquid glue.
11. Adhere the sentiment die-cut onto the panel using foam tape.
SEE MORE ON OUR BLOG
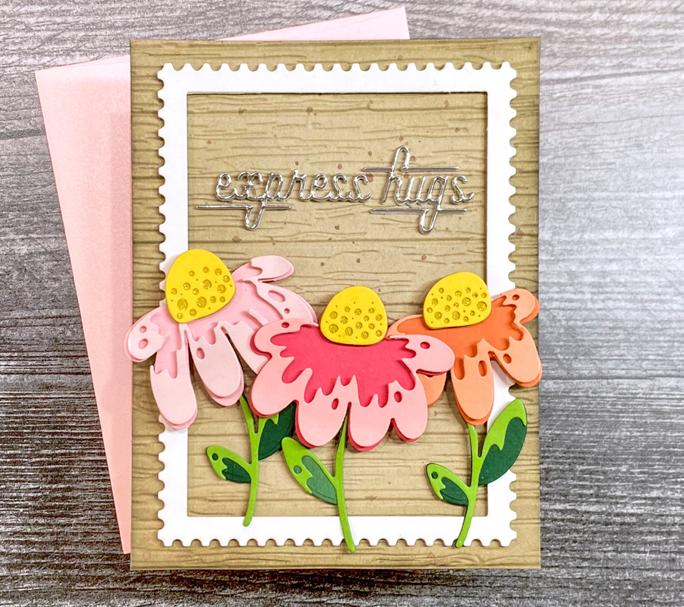
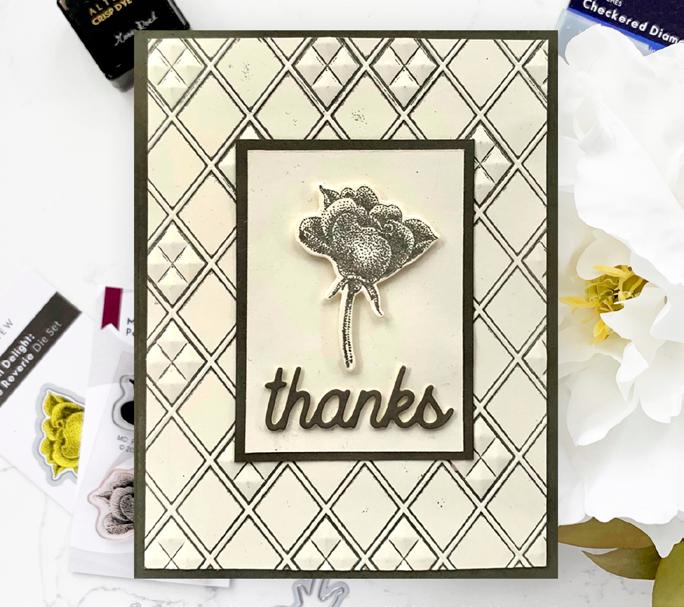
07 ADD
TO LAYERED DAISIES
SPARKLES
MINI STAMPS
BY NORINE BORYS
INSTRUCTIONS
1. Create a 4 ¼” x 5 ½” card base from Classic Crest Solar White Cardstock.
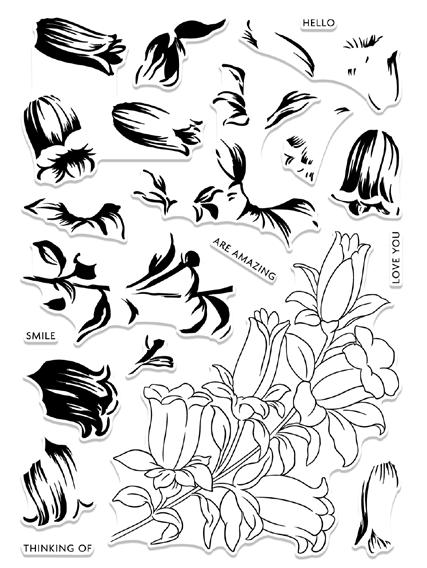
2. Stamp the image from Bouquet Basket Stamp Set on white cardstock with Permanent Black Ink.
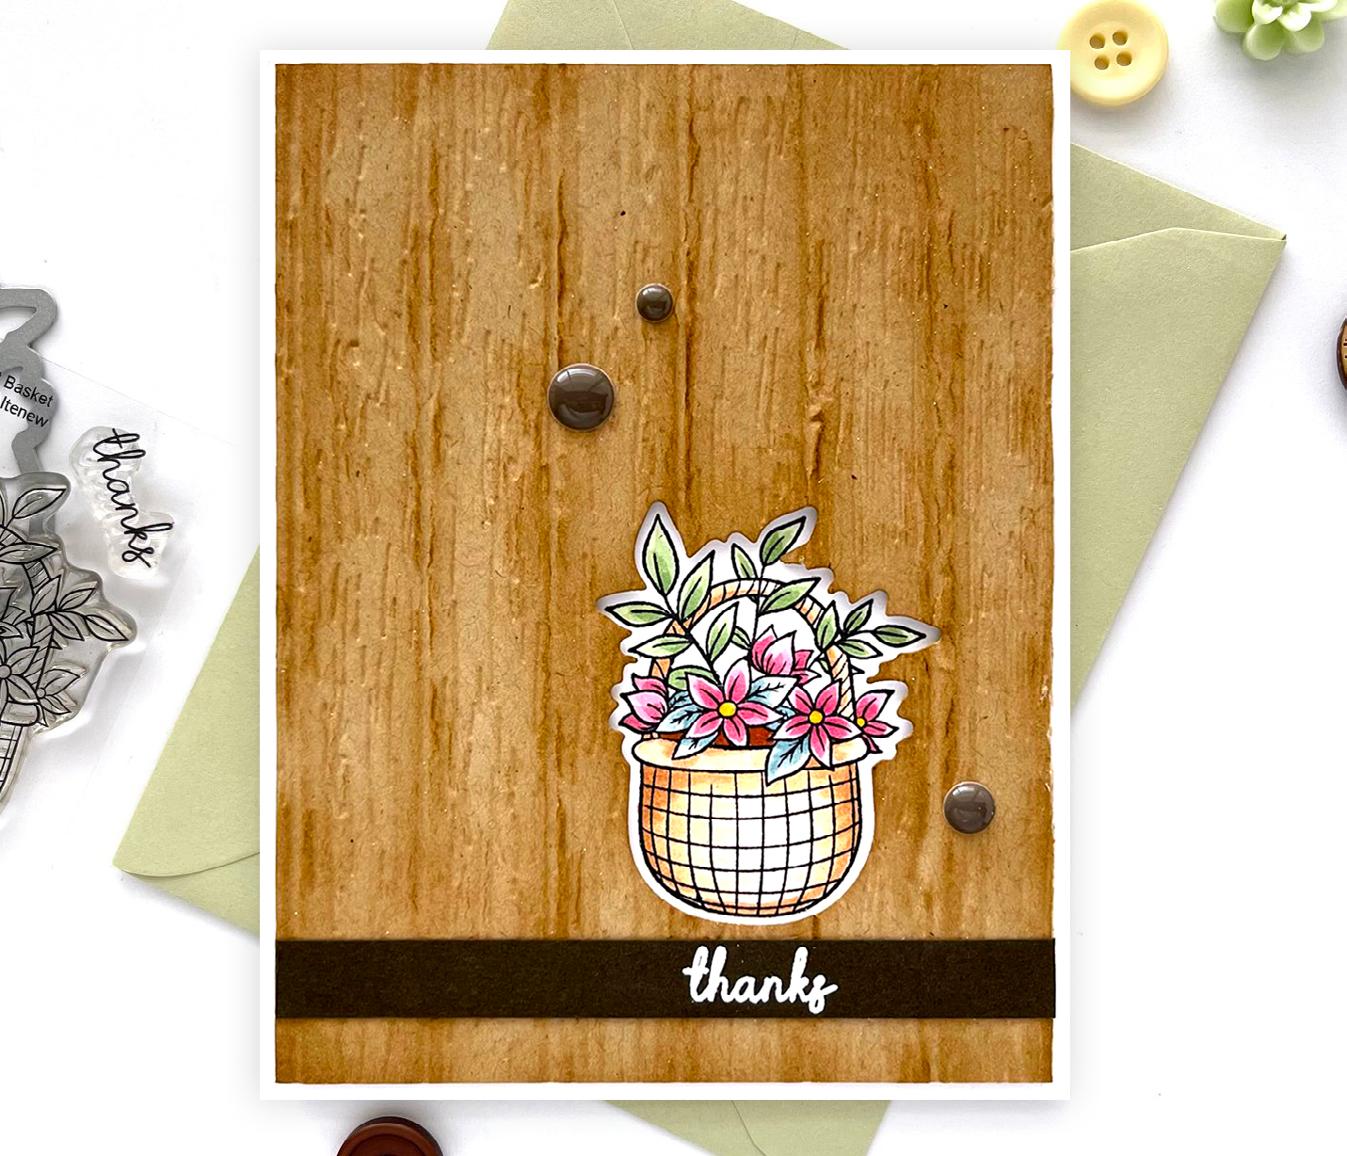

3. Color the image with your favorite Artist Alcohol Markers.
4. Die cut with coordinating die.
5. Place the Bouquet Basket Die in the bottom right corner of an A2-sized panel of Kraft cardstock and run it through the die-cutting machine to create a “bouquet basket” opening.
6. Sandwich the Kraft cardstock in the Deck Planks 3D Embossing Folder and run it through the die-cutting machine.
SUPPLIES
Stamp, Die & 3D Embossing Folder
Bouquet Basket Stamp and Die Set
Deck Planks 3D Embossing Folder
Inks
Embossing Ink
Milk Chocolate Crisp Dye Ink
Permanent Black Ink
Coloring Medium
Artist Alcohol Markers Bundle (84 Colors)
Cardstock
Classic Crest Solar White Cardstock
Kraft Cardstock
Brown Cardstock
Other
Instant Dimension Foam Tape
Glue Tape
Ink Blending Tool - Large
Pure White Crisp Embossing Powder
Summer Afternoon Enamel Dots
7. To emphasize the texture of the embossed panel, lightly ink blend with Milk Chocolate Crisp Dye Ink and a large ink blending tool.
8. Adhere the panel onto the card base using glue tape, placing and adhering the die-cut basket into the die-cut opening.
9. Stamp the “thanks” sentiment from the Bouquet Basket Stamp Set on coordinating brown cardstock using Embossing Ink and heat set with Pure White Embossing Powder.
10. Add a few brown enamel dots all over the embossed panel.
SEE MORE ON OUR BLOG SIMPLE THANK YOU CARD WITH
08
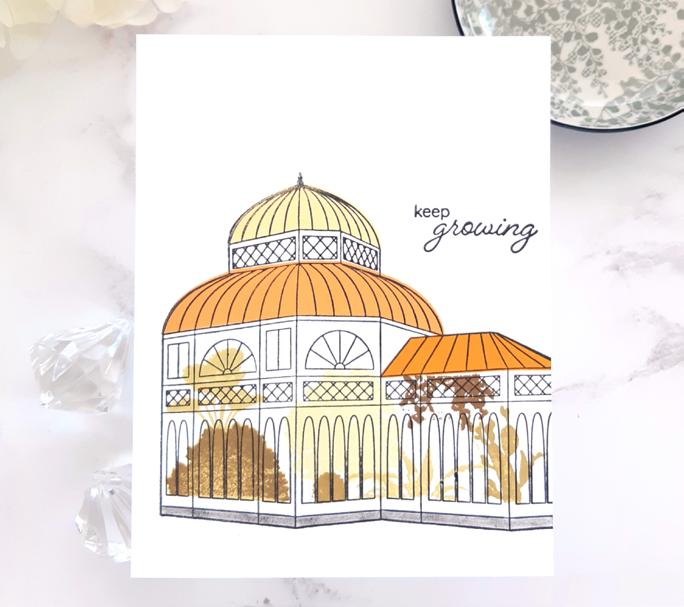
ONE-LAYER CARD WITH
5-STEP MASKING
BY VIRGINIA LU
INSTRUCTIONS
1. Create a 4 ¼” x 5 ½” card base from Classic Crest Solar White Cardstock.

2. Create masks for the greenhouse and the plants by stamping on a piece of masking paper using Obsidian Ink and die cutting them.
3. Stamp the plants from Victorian Greenhouse Stamp Set onto the panel using Green Valley Set, Fall Harvest Set, Autumn Blaze, and Moss Dye Ink.
4. Place masks over the stamped plants.
5. Stamp the greenhouse image using Vanilla Cream Dye Ink.
6. Place masks over the greenhouse image and stamp the foreground and background.
SUPPLIES
Stamp & Die
Victorian Greenhouse Stamp and Die Set
Ink
Crisp Dye Inks - Green Valley Set, Fall Harvest Set, Autumn Blaze, Moss, Vanilla Cream, Ocean Waves, Butternut
Obsidian Pigment Ink
Cardstock and Paper
Classic Crest Solar White Cardstock
Masking Paper (10 sheets/set)
Other Mini Blending Brush Set
Golden Trim Washi Tape
Sea Shore Enamel Dots
7. Stamp the “trees” behind the greenhouse using the plants in the same stamp set and the Green Valley Ink Set.
8. Re-stamp the plants inside the greenhouse in Obsidian Ink.
9. Apply Ocean Waves Dye Ink lightly above the greenhouse using a Mini Blending Brush.
10. Apply Butternut Dye Ink on the “ground” using a Mini Blending Brush.
11. Stamp sentiment into place onto the panel using Obsidian Ink.
12. Add a strip of Golden Trim Washi Tape at the bottom.
13. Finish with a few Sea Shore Enamel Dots.
SEE MORE ON OUR BLOG
09
FEATURED PRODUCTS


Note: Gray SKU represents coordinating die set.

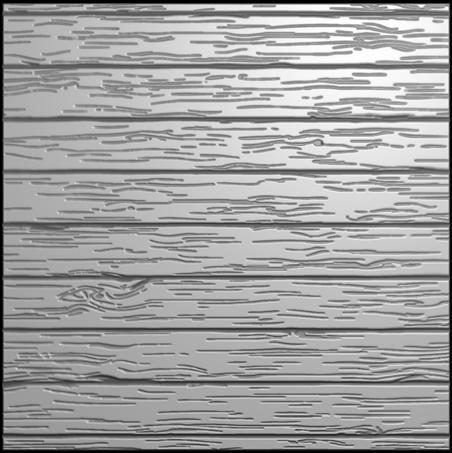
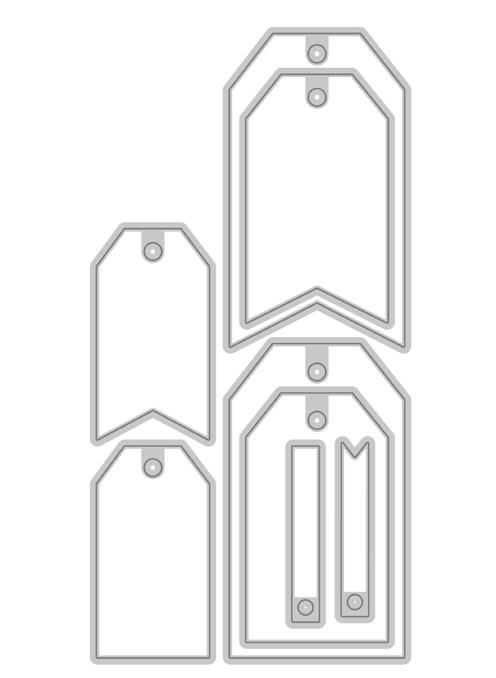
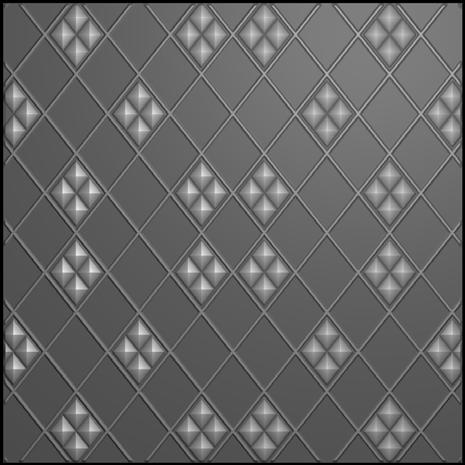
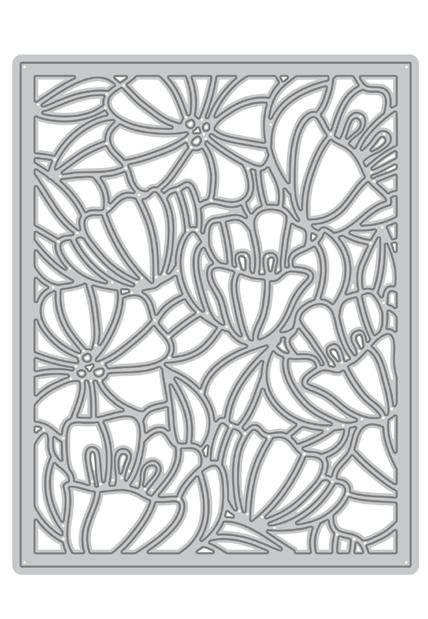

DAINTY LEAVES ALT6881 RETAIL $23.99 FLOWING FOLIAGE ALT6536 RETAIL $19.99 DAINTY BLOOMS ALT3359 RETAIL $21.00 PEONY SUNSHINE ALT6654 RETAIL $8.99 CRAFT-A-FLOWER: AFRICAN DAISY ALT6692 RETAIL $35.99 BOUQUET BASKET ALT6936 RETAIL $6.99 ALT6937 RETAIL $6.99 VICTORIAN GREENHOUSE ALT6936 RETAIL $6.99 ALT6937 RETAIL $6.99 CHECKERED DIAMONDS ALT6656 RETAIL $8.99 TERRIFIC TAGS ALT4221 RETAIL $29.99 CRAFT YOUR LIFE PROJECT KIT: DYNAMIC BLOSSOMS ALT6949BN RETAIL $59.99 DECK PLANKS ALT6128 RETAIL $8.99 MEGA STAMP FRAMES ALT6656 RETAIL $8.99
MORE DESIGN INSPIRATION


STAY CONNECTED Download our FREE mobile app! altenew.com blog.altenew.com facebook.com/altenew instagram.com/altenewllc pinterest.com/altenew youtube.com/altenew tiktok.com/@altenew support@altenew.com (800) 593-1089
