2 minute read
2.7.4 Compression Test


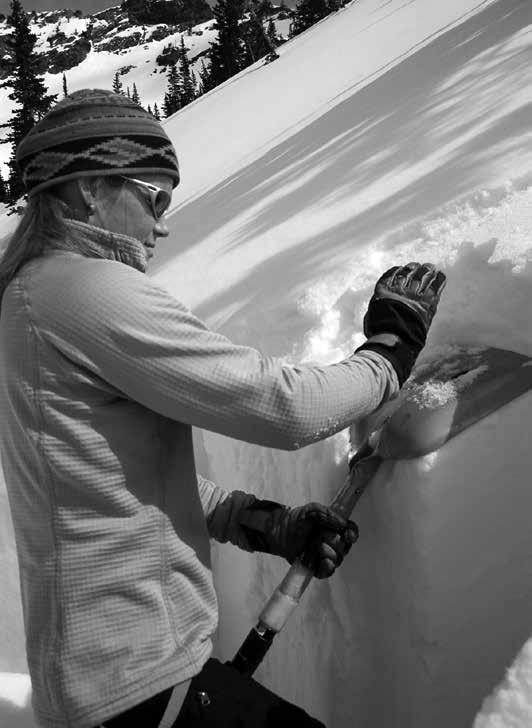
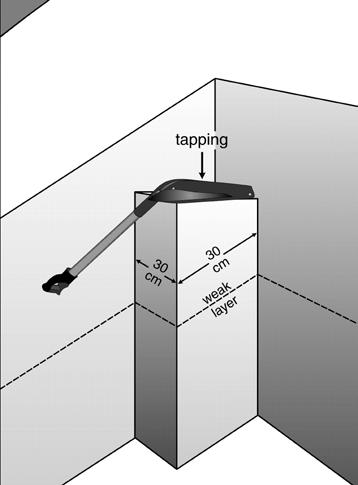
FIGURE 2.14 Schematic and photograph of the Compression Test. ! Bruce Tremper
Advertisement
2.7.4 COMPRESSION TEST
The Compression Test was first used by Parks Canada wardens working in the Canadian Rockies in the 1970s. The following procedure was developed by the University of Calgary avalanche research project in the late 1990s. Similar tests have been developed elsewhere.
Objective The Compression Test attempts to locate weak layers in the upper snowpack (~ 1m) and provide an indication of the triggering likelihood on nearby slopes with similar snowpack conditions. The tester places a shovel blade on top of an isolated snow column and taps the blade, causing weak layers within the column to fracture. These fractures can be seen on the smooth walls of the column. Compression tests are typically performed on sloping terrain. Tests of distinct, collapsible weak layers can be performed on level study plots.
Procedure A shovel is the only piece of equipment required for the Compression Test. However, a snow saw will make cutting the column of snow easier and more precise. 1. Select a safe site that has undisturbed snow and is geographically representative of the slopes of interest. 2. Isolate a column of snow 30 cm wide with a 30 cm upslope dimension that is deep enough to expose potential weak layers on the smooth walls of the column. Field tests have indicated that the size of the shovel blade used has minimal impact on test outcome (Jamieson, 1996).
A depth of 100–120 cm is usually sufficient since the
Compression Test rarely produces fractures in deeper weak layers. Taller columns tend to wobble during tapping, potentially producing misleading results for deep weak layers (Jamieson, 1996). 3. Rate any fractures that occur while isolating the column as Very Easy (CTV). 4. If the snow surface slopes, you can remove a wedge of snow to level the top of the column. 5. Place a shovel blade on top of the column. Tap 10 times with fingertips, moving hand from wrist and note the number of taps required to fracture the column (1 to 10). 6. If during tapping the column fails, leave the failed portion on top of the column, provided it does not compromise other observations. If the upper part of the column slides off or no longer “evenly” supports further tapping on the column, remove the damaged part of the column and continue tapping. 7. Tap 10 times with the fingertips or knuckles moving forearm from the elbow, and note the total number of taps required to fracture the column (11 to 20). While moderate taps should be harder than easy taps, they should not be as hard as one can reasonably tap with the knuckles. 8. Finally, hit the shovel blade moving the arm from the shoulder 10 times with open hand or fist and note the total number of taps required to fracture the column (21 to 30). If the moderate taps were too hard, the operator


