15 minute read
AutoCAD
from AUGIWORLD
by AUGI, Inc.
An AREA That Needed Improvement
IN THE BEGINNING WAS THE AREA COMMAND
In 1982, Autodesk introduced their flagship product AutoCAD. Even at its infancy, AutoCAD had the AREA command. The AREA command provided a method to retrieve the area value formed by objects such as a Polyline or Hatch. Unfortunately, for many releases since then, this area value can only be read as a static number. When the geometry of the Polyline or Hatch object changes you would have to manually run the AREA command again to retrieve the new calculated area value.
THEN CAME THE FIELD COMMAND
Twenty-two years later, AutoCAD 2005 was released with the new FIELD command. The FIELD command provided a method to retrieve an object’s area value and place this in the drawing as an Attribute, MText or Text object that would automatically update as the object changed. This added feature is truly a godsend to the end user. Now the AutoCAD drawing behaves dynamically. When Polylines that form rooms or Hatch patterns that show the extent of various landscape sections change the calculated area value shown in the Attribute, MText or Text will automatically update. But this is only true when the FIELD command is applied and applied properly.
A FIELD OF COMPLEXITY
Though powerful, the new FIELD command when executed, brings up a very complex graphic user interface (GUI). The Field GUI is neither friendly nor easily understandable. You would have to go through the following complicated and tedious steps every time before an object’s area value can be retrieved; let alone placed into the drawing (see Figure 1):
1. You’ll need to know to start from the top left column under the Field category drop down list - select Objects 2. Directly below this in the Field names list box - select Object 3. Then you’ll need to move over to the top middle column under Object type and click on a button that is not labeled showing a mouse arrow -

Figure 1
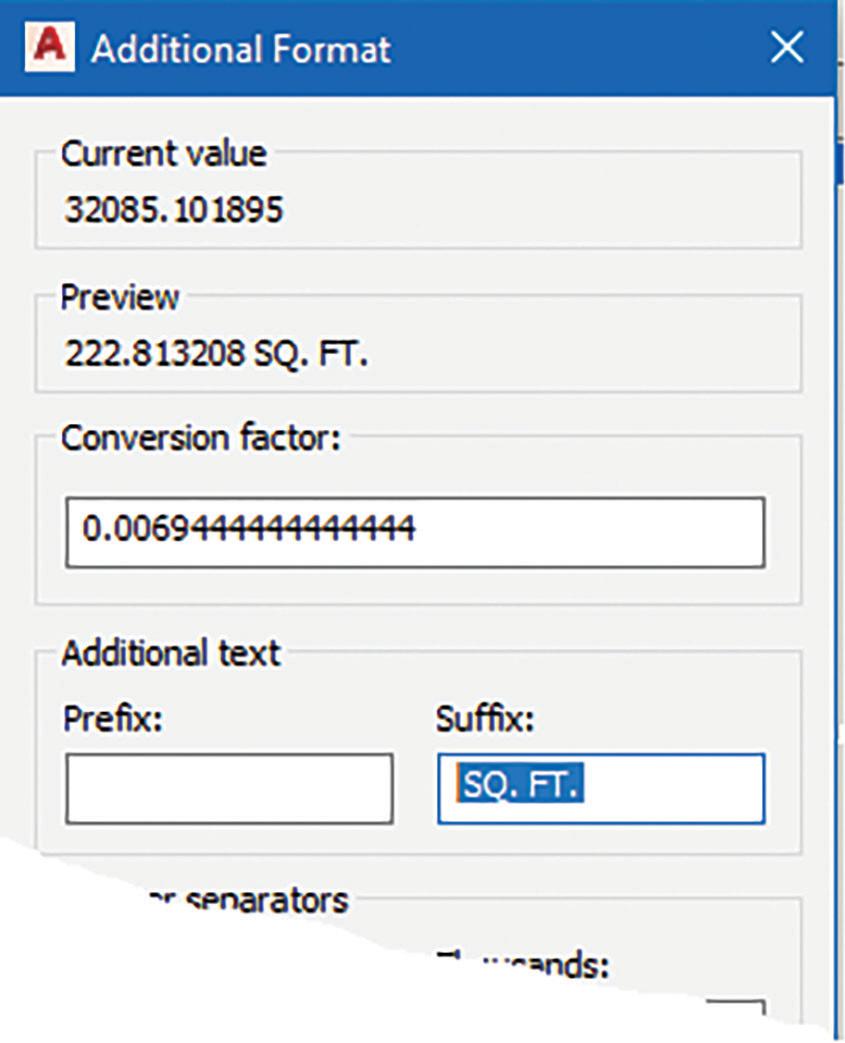
you’ll have to hover over this before the Select object label appears 4. After selecting an object like a Polyline or Hatch that contains an area value, Area is one of many entries that appears listed under the Property window 5. Finally, after selecting the Area entry you can view the area value listed under the Preview box on top of the right column 6. The process is still not over because to add a suffix like Sq. Ft. after the area value, you would have to click the Additional
Format button located on the bottom of the right column.
This will bring up another GUI on top of the first GUI giving you options to manually enter a
Suffix like SQ. FT. (see Figure 2).
Now what if you want to round up or round down the area value? Then you would have to begin all over again because this is supposed to be done under the Formula section (see Figure 3):
1. Starting from the left column under Field names – this time select Formula 2. The same Field GUI then transforms into another very hard to understand window - showing a list of four buttons in the middle column: Average, Sum, Count and Cell – so what are these and where is Rounding? (Answer:
After doing some research on-line, I learned that these 4 buttons apply to cells within the Table object.) 3. Finally, under Formula there’s a large empty box - you’re now left clueless as to how to proceed

So instead of getting the area value rounded so that it can update automatically in the drawing, you are left with many of the following questions:
1. How do you select an object like a Polyline or
Hatch at this point to retrieve the area value? (Answer: After more research online, I found out that inside the Formula window you need to right mouse click, select Insert Field from the context menu which will bring you back to the initial Field GUI to start the object selection process – again see Figure 1.) 2. Where is the formula to input and round the area value? (Answer: Again, after doing more
“Googling,” I found this blog that contains supported functions inside the Formula window: https://blog.jtbworld.com/2005/04/ autocad-2006-and-formulas-in-fields.html?m=1) As I work on Architectural floor plans, I would have to repeat these many steps using the FIELD GUI to obtain an automatically updated formatted area value for just one room. This would be multiplied several fold since a typical floor plan may contain many rooms. Now, imagine when I must deal with more than one floor plan which also need rooms to be labeled with areas. I would end up spending more time with many more mouse clicks on the Field GUI. There must be a better and faster way of getting this done.
Figure 2

Figure 3
AREA OBJECT LINK TO THE RESCUE
So back in 2014, I decided to write an app that would simplify the process, save me time, and solve this problem. The app would make it easy to implement the FIELD command in retrieving an object’s area value and use a much easier to understand GUI to complete the process. The AutoCAD add-in app I built is called: AREA OBJECT LINK (AOL). The AOL app is built entirely using the AutoLISP/Visual Lisp programming language. Autodesk first introduced AutoLISP as the programming interface for AutoCAD
version 2.18 in 1986. Then Visual Lisp was added in 1997 with AutoCAD Release 14 which provided a programming environment and additional functions to access the object model. (As a side note, I personally like to use Visual Studio for the programming environment because I can open an AutoLISP file for editing in multiple windows. This way I can jump to various locations of the program to make adjustments simultaneously without having to jump back and forth in a single window.) Since all flavors of the AutoCAD product are always shipped with the AutoLISP code interpreter built-in, AutoLISP/Visual Lisp is the most flexible language to use to customize AutoCAD. The AOL app then is 100% compatible with past, present, and future releases of the AutoCAD product. In 2014, the AOL app worked with AutoCAD 2015. Today the same program still works with AutoCAD 2022. As long as AutoCAD continues to support AutoLISP, the AOL app will continue to run on future AutoCAD releases. There’s no need to recompile the app which would be needed when using other programming languages i.e.: .NET. Also, the programming process gave me a chance to implement the Dialog Control Language (DCL) code to create the GUI.
DCL was first introduced in AutoCAD Release 12 in 1992. It gave the AutoCAD developer a way to customize dialog boxes that would run inside AutoCAD using AutoLISP. But all of the initial AutoLISP programs that implement DCL and accompanied AutoCAD had the DCL file stored as a separate file. This made it a requirement for the DCL file to be located in an AutoCAD support folder in order for the AutoLISP program to locate the file at run time. So, to do away with this limitation, I included within the AutoLISP code a function to write the DCL file at run time to the AutoCAD temp folder. The AutoLISP code could then point to this temp folder location to load the DCL file at run time. When the app completes its execution the DCL file is removed for a clean ending. Another advantage for using this method is that the AutoLISP code can change how the DCL file is written at run time so that the GUI may change dynamically depending on how the app executes the code.
INTRODUCING AOL
Since I wanted others to also take advantage of the time saved using my AOL app, I decided to share the app for free on the Autodesk Exchange Store: (https://apps.autodesk.com/ACD/en/Home/Index). After downloading and successfully installing AOL, launch AutoCAD and under the Add-ins ribbon tab you’ll find the newly added Area Object Link panel (see Figure 4).
The Area Object Link app can be executed within AutoCAD by selecting: AOL or AOLSET. You can also execute these at the Command prompt using the keyboard.
The AOL app actually incorporates the power of Fields but done invisibly in the background to achieve a linked object area value. In addition, the AOL GUI provides various pre-populated and or predefined parameters typically used for you to select from to format the area value. All this simplifies the process to have an area value that would update automatically. Then you don’t have to go around hunting for formulas or waste time figuring out how to use the FIELD GUI to include functions to get the area value formatted.
When AOL is launched for the first time you are presented with all the options to choose from in a single GUI (see Figure 5). The AOL GUI is divided into two major sections. The top section shows four new commands. The middle section contains several settings for area value calculations and formatting.
Let’s start with the top section: Area Object Commands which contains four radio buttons: 1. Link an object’s area value to MText, Text or
Attribute
Figure 4
Figure 5

2. Insert an AOL pre-defined Block that contains an attribute as a label and a second attribute for linking to an object’s area value 3. Show object(s) shaded that has an area value already linked to a selected MText, Text or
Attribute 4. Update selected MText, Text and Attributes with
Fields and or ALL AOL Blocks to match with the current set formatting parameters
AOL LINK COMMAND
Now to see how simple it is to use the AOL app to Link an object’s area value to Text, select AOL from the Area Object Link panel on the ribbon: 1. (1) The 1st time you start AOL the GUI appears 2. (2) Select Link 3. (3) Click OK
With just three simple clicks you’re ready to select MText, Text or Attribute to Link as a Field to an object’s area value. To repeat the Link command, run AOL again. This time there is no GUI to interrupt the process. You can continue to select the next MText, Text or Attribute to Link to another object’s area value. I wanted to include in the code the ability to bypass the GUI when the same AOL command is executed again. I find that this is another way to speed up the process without being delayed by a GUI.
AOL INSERT COMMAND
Now lets explore the second new AOL command. This time select AOLSET from the Area Object Link panel on the ribbon to bring up the AOL GUI again. Under the Area Object Commands section this time select Insert. The new AOL Insert command simplifies the process of placing a Block that contains Attributes to link to an object’s area value as a Field: 1. On the AOL GUI select Insert 2. Select from the dropdown list a Scale option to use 3. Specify a Rotation angle other than 0 if desired 4. Click OK
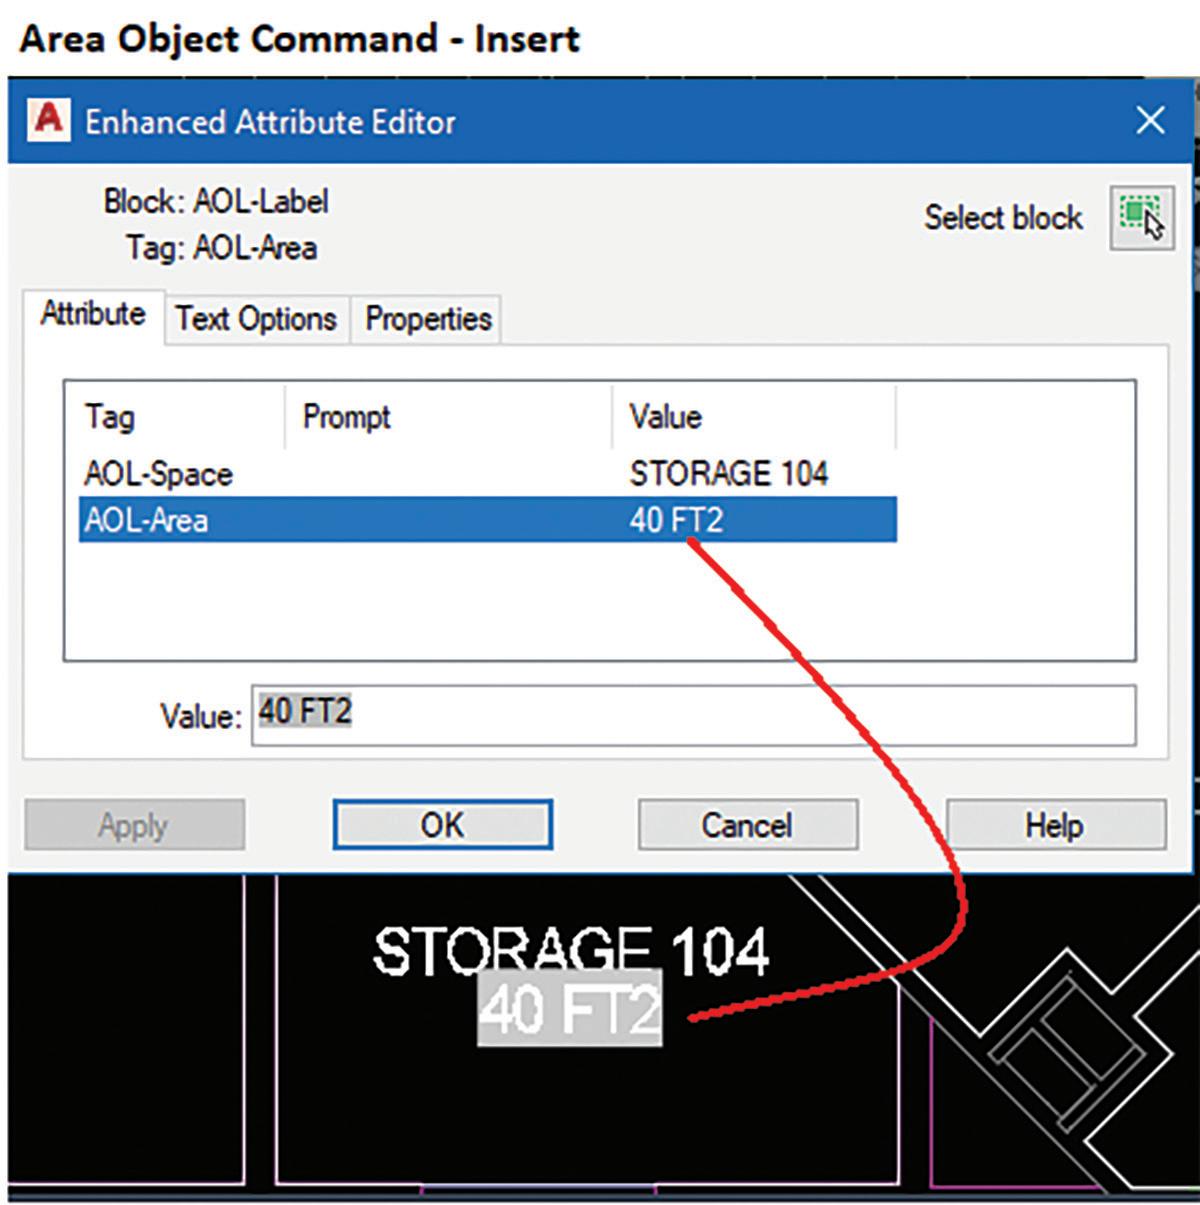
With these 4 simple steps you are ready to insert a pre-defined AOL Block with Attributes into the drawing for linking. When completed you’ll see a room label with the area value shown as a Field (see Figure 6). panel. AOL’s Insert command will start again using all the settings you chose previously to Insert another AOL Block with Attributes.
With both AOL’s Link and Insert commands, the required FIELD code is actually embedded into the Attribute, MText or Text object behind the scenes. This eliminates the need to start the cumbersome FIELD GUI and do all those mouse clicks. We can all benefit from how much time is saved using the AOL app to place on a floor plan in all the rooms linked area Field labels.

Figure 6
AOL SHOW COMMAND
Since AutoCAD currently does not offer a command to identify which object with an area value is linked as a Field to a Text object, I wanted to include this as the third new command in the AOL app. Select AOLSET from the Area Object Link panel on the ribbon to bring up the GUI. This time in the Area Object Commands section select Show and click OK. You’ll be prompted to select an Attribute, MText or Text that has a linked Field area value. The linked object(s) would then be highlighted in a shaded color for you to review (see Figure 7).
AOL UPDATE COMMAND
There are times after you’ve Inserted and Linked the area values in the current drawing you or your client want to change the format to something completely different. This is when you use AOL’s Update command. Select AOLSET from the Area


Figure 7
Object Link panel on the ribbon to bring up the GUI. This time in the Area Object Commands section select the last command shown: Update. The Update command offers two Selection options. You can choose to Update only selected text objects with Field area value links, or ALL AOL Blocks inserted in the current drawing (see Figure 8). Figure 8

AOL PARAMETERS
Before continuing with the Update command, it’s time to introduce the second major section of the AOL GUI. The middle section of the AOL GUI contains parameters that change the calculations and formatting of the area value.
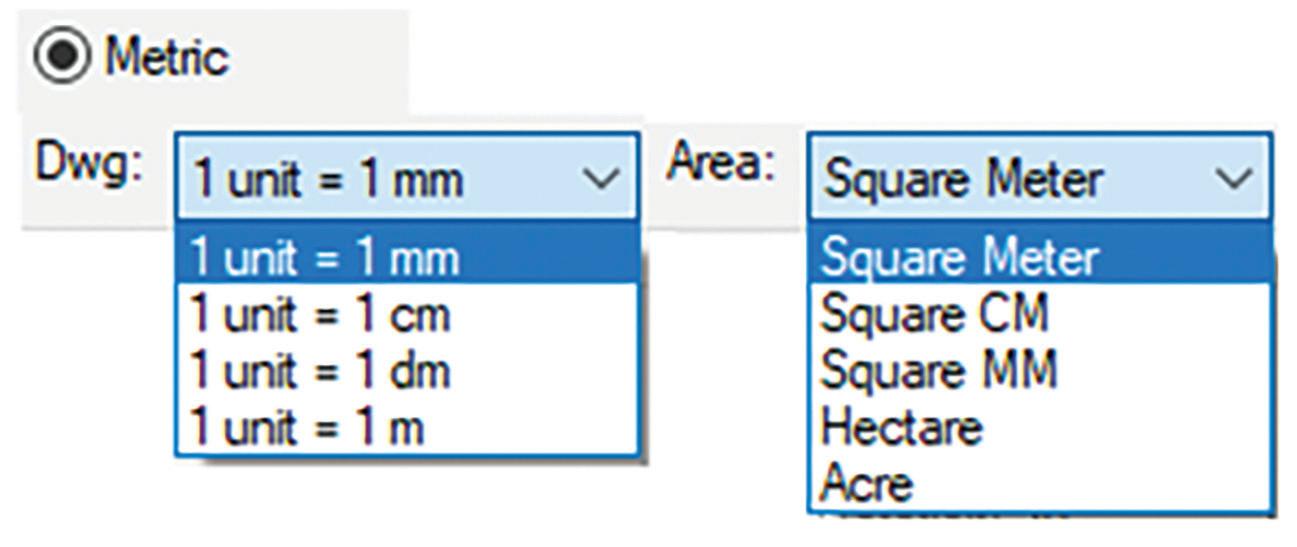
Under the Measuring Units section choosing to draw in Imperial or Metric impacts the area value calculations. Since Architects deal with construction parts down to fractions of an inch, they typically draw 1 unit = 1 in (Imperial) or 1 unit = 1 mm (Metric). (Note: There are options to select drawing in centimeters or decimeters.) Civil engineers and surveyors on the other hand, since they deal with large lot sizes, would typically draw 1 unit = 1 ft (Imperial) or 1 unit = 1 meter (Metric). The Drawing (Dwg) unit needs to be properly selected in order to acquire the correct area calculation. Furthermore, I made it a point to include a number of conversion factors in the AOL app to support five different area values. Now there’s no need to look up the conversion factor to get an area in Acres vs Square Feet vs Hectare. The AOL GUI conveniently provides them all to choose from in the Area drop down list (see Figures 9 & 10).
Under Insert Options is where you can specify the Scale and Rotation for AOL Block inserts. This eliminates the need to look up the scale factor by including a pre-populated standard list of scales both in Imperial & Metric systems along with an edit box to enter a custom scale. The Rotation angle can be set from 0 to 360 degrees using the horizontal slider or you can enter the angle in the edit box (see Figure 11).
Next, you can choose to Add a Suffix to the area value by selecting from a pre-built drop-down list with an option to enter a Custom suffix (see Figure 12).

Figure 9
Figure 10

Figure 11

Lastly, at the bottom of the GUI, the area value’s decimal Precision can be set as none to up to 3 places. Or you can choose to Round Up or Round Down the area value from none up to the nearest thousand (see Figure 13).

Figure 13
AOL LIVE DEMO
Now, we’re ready to go back to the Update command. Let’s say that several AOL Blocks have already been Inserted and Linked to room areas on a floor plan. The area value is shown calculated in square feet (abbreviated FT2) and formatted with no rounding (see Figure 14).
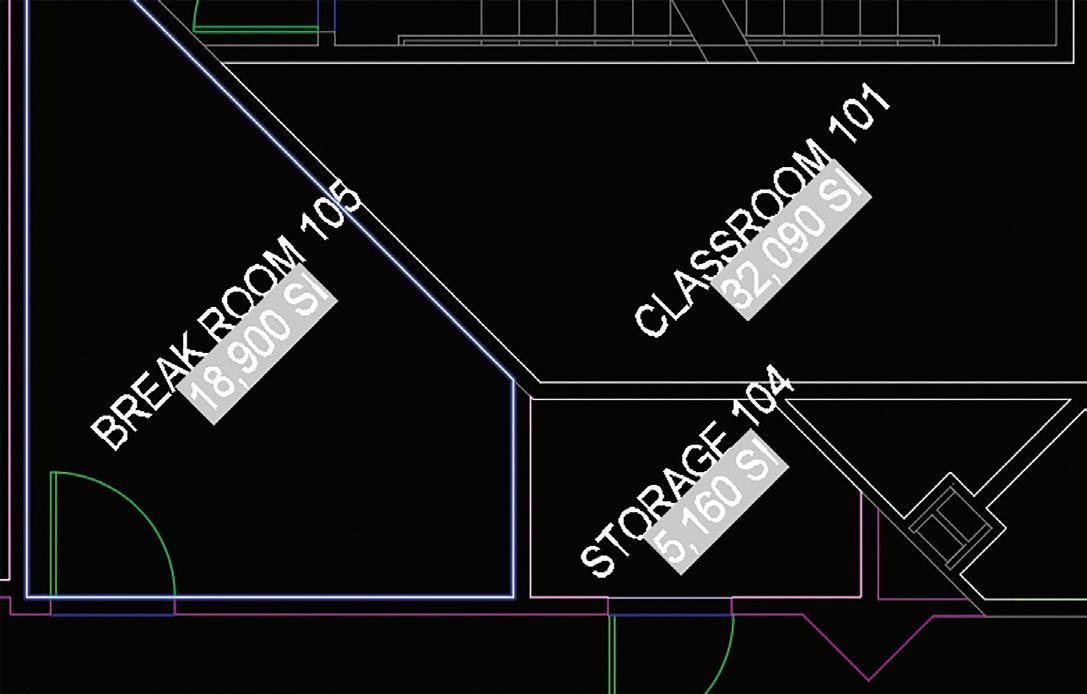
The client for some reason changes his mind and now wants to see all the room areas: larger in size (scale), rotated 45 degrees, in square inches (abbreviated IN2) and rounded up to the nearest ten. This actually can be done easily using Area Object Command - Update|All AOL. Use the middle section of the GUI to adjust the area value calculation and format. Under Measuring Units|Area, change the selection on the drop-down list from Square Feet to Square Inch. Under Insert Options|Scale, change the selection from 1/4”=1’-0” (48) to a larger number like 3/16”=1’-0” (64). In the Rotate edit box enter 45. Under Add Suffix | Type, select from the drop-down list IN2. Finally, under Round, select Up and change the drop-down selection from 0 to 10. After you click OK, all the AOL Blocks inserted in the entire drawing change automatically with the area value still linked as Fields. Notice how all these changes are quickly set in a single GUI meeting the client’s requirements (see Figure 15).

Figure 14 Figure 15

IN THE END AOL WILL DO
The Area Object Link app provides many improvements to AutoCAD’s original Area command. In addition, the AOL app brings to the forefront many of the hidden power of AutoCAD’s Field command without the need to figure out how to use the FIELD GUI. I also recently updated the AOL app to v4 which includes many of the powerful features mentioned in this article. I hope you’ll enjoy using Area Object Link as you continue your adventures in AutoCAD.
Mr. Paul Li graduated in 1988 from the University of Southern California with a bachelor’s degree in Architecture. He worked in the Architectural field for small to mid-size global firms for over 33 years. Throughout his tenure in Architecture, he has mastered the use of AutoCAD. Though he recently retired from the Architectural field, he continues to customize AutoCAD as a hobby on the side and write articles for magazines like AUGIWorld. Paul can be reached for comments or questions at PaulLi_apa@hotmail.com.


