
6 minute read
A Pressing Matter…Not


A Pr AA Pressing Matter…Not! A Pressing Matter…Not! essing Matter…Not!
By John Lindley
When I bought my 35, it came with turf tyres which, apart from them standing flat for the best part of twelve years, I didn’t particularly want and so, early on in the restoration process, I decided to replace them with standard rear tyres.
Now I’d had trouble with front tyres previously on my 20, trouble breaking the seal that is. I tried all kinds of things like running my car onto the tyre while it was flat on the ground, smacking it with a sledge hammer, various crow bars and the like and finally I thought of my vice. Luckily, I have an old blacksmiths vice with plenty of room between the jaws and the screw, enough in fact to allow room for the tyre when the wheel rim is resting on the jaws. I used a foot square of ¾” scrap ply between the back jaw and the rim, to spread the weight, and with the front jaw as close to the rim as possible, a good squeeze from the vice broke the seal, it was then turned round and the process repeated, the tyre was then removed with the aid of my lump hammer and a couple of crowbars (some of you may have proper tyre levers!) That was relatively simple on the front tyres, but the rear ones were a different kettle of fish!
Some years ago, I’d had to replace one of the rear tyres on my old 20 (it never had much tread when I bought the tractor some 38 years ago) so I set to, without success I might add, trying to get the thing off. I eventually gave up and resorted to the “professionals” at the local tyre company; well, they did get it off and they supplied a new one but, in the process, they totally mullered the rim; both sides. I wasn’t best pleased, but they did give me a 10% discount!
Then, of course, I had a beat-up rim, albeit complete with tyre, but as it was only a few hours old and covered in tyre-fitter’s gunk, it came off easily; some hours later, with the aid of both sledge and lump hammers, I got them back to something like normal and ground off the sharp edges that would almost certainly have cut the side walls. With that experience behind me, I decided not to go that way again.
A while ago, I joined the Ferguson Club from whence I’d received some sound advice on other matters, so I gave John (Selley) a call. It transpired that he’d come across the same problem but he, not wanting to save the old tyres, resorted to various knives and an angle grinder in the removal of same! As my turf-tyres had life left in them, I wanted to get them off relatively undamaged if possible, hence the call to John.
He knew a man who knew a man who had a hydraulic press that would easily break the seal if we could get the wheel in it; we couldn’t, but he directed us to a farmer a way down the road who “might be able to help.” Now, said farm sported a newly opened farm shop & café staffed by an extremely attractive young lady who plied us with coffee and sticky buns whilst waiting for the farmer to appear. He’d “never had that problem” but thought the local agricultural dealers might be able to help. By this time though, I was lost as John was driving, so I have no recollection of where or who they were (John doesn’t even remember the trip) which is a great shame as I can’t directly credit the chap who gave me the solution to the problem. (If you are that man and happen to read this, please let me know and I’ll give credit where credit’s due.)
Anyhow, John met an old mate outside and whilst he was chatting I went in search of a press. In the workshop I met a chap to whom I explained the problem and “did they have a press?”
“You don’t need all that junk mate” he explained “you just need three old bits of old angle iron, a lump hammer and room to swing it! Look here” he said gesticulating to a huge Fendt tractor “it’s so simple; if I wanted to change those tyres, I wouldn’t even bother taking the wheels off.” I can best illustrate his method with the photographs I took as I tried it out back at home.
I firstly cut three lumps of 2” angle iron about 4” long and de-burred all the edges then, as my wheels were


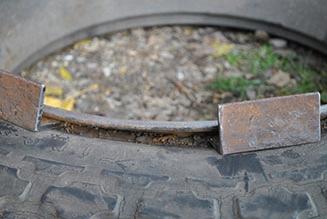
Step One: drive angle in direction shown Step Two: drive in from side Step Three: repeat at intervals round the tyre
already off, I worked on the floor. Method as explained to me:
“Firstly, thump a cold chisel in between the tyre and the rim to give the angle a start, then knock in the angle, one corner first. When that has a start, smack the angle home as far as it will go. Move round the tyre a few inches and repeat the process with the remaining two angles. By the time they’ve all been beaten home the tyre will be free of the rim on that section and the rest can be freed off using just the hammer.”
I have to say I was sceptical when he first explained it to me and though I didn’t say anything, I thought he was having me on, but all I can say is “try it!” It’s always good when the simple solution works and it’s worked for me!
It’s always good when the simple solution works and it’s not just a fluke; I’ve now used it on four rear wheels, the ones illustrated and both on my 20 (I managed to puncture both those on the same day) but as it is quite literally a ten minute job to get the tyres off with this method, I wasn’t too long off the road. required space to swing the hammer, however, it’s much easier to fit the new tyres (or replace the old ones) with the wheels on the tractor as that enables gravity to lend a hand, an extremely reliable helper and free to boot!
By the way, I got £80 for the old tyres on eBay, much better than carving them up to make flip-flops or starting a bonfire!!
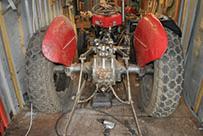
You can quite clearly see the years of rust Above photo: Despite standing flat for twelve years, both innertubes held air when they were pumped up.

Left photo: Tyre and rim virtually undamaged.


