
5 minute read
Snack


SNACK Cauliflower “Popcorn”
Crisp on the outside, creamy on the inside, and tasty all over—this cauliflower can be served as either a side dish or a substantial snack. It’s best eaten when hot, so if you are cooking for just one or two people, use only half the ingredients.
Advertisement
HANDS-ON TIME: 10 MINUTES TOTAL TIME: 40 MINUTES MAKES: 4 SERVINGS
INGREDIENTS 1 head cauliflower 1 tablespoon olive or vegetable oil ½ teaspoon kosher salt INSTRUCTIONS 1. Turn on the oven and set the heat to 425 degrees. 2. Cut the core out of the cauliflower, then pull apart the florets into pieces about the size of popped corn or slightly larger. 3. Put the cauliflower on a large rimmed baking sheet, add the oil and salt, and toss to mix well. Spread out the cauliflower in a single layer. 4. Put the baking sheet in the oven and roast until the cauliflower is golden brown, about 30 minutes, tossing every 10 minutes to ensure even cooking. Serve right away.
Or You Could Make it spicy: When the cauliflower comes out of the oven, sprinkle it with 1–2 teaspoons ground cumin, smoked paprika, curry powder, or nutritional yeast.
Spiced Chicken Breasts, Pan-Roasted Asparagus, and Fresh Fruit Gelée DINNER PLUS


This easy recipe, which was inspired by a recipe from Gourmet magazine, results in highly flavorful, evenly cooked chicken. Using bone-in chicken deepens the flavor, as does browning it well before roasting. This is a great dish to serve for company as it is easily doubled or tripled.
HANDS-ON TIME: 15 MINUTES TOTAL TIME: 35 MINUTESS MAKES: 2 SERVINGS
INGREDIENTS 2 bone-in, skin-on chicken breast halves 1 teaspoon chili powder ½ teaspoon kosher salt ¼ teaspoon black pepper ¼ teaspoon ground cumin ¼ teaspoon ground coriander 1/8 teaspoon ground cinnamon 3 teaspoons olive or vegetable oil, divided
INSTRUCTIONS 1. Turn on the oven and set the heat to 450 degrees. 2. Pat the chicken dry. Stir together the seasonings and 1 teaspoon of the oil and rub evenly all over the chicken. 3. Put a heavy ovenproof skillet on the stove, turn the heat to medium-high, and add the remaining 2 teaspoons oil. 4. When the oil is hot, add the chicken, skin side down, and brown well, then flip and brown the other side, about 5 minutes total. 5. Put the skillet in the oven and roast the chicken until just cooked through, 16 to 18 minutes. (Be certain to use pot holders when removing the skillet from the oven.) Transfer the chicken to plates and serve right away.
Sprinkle with spices


Or You Could Make it easier: • Use 2 teaspoons curry powder or other premade spice mixture and eliminate the chili, cumin, coriander, and cinnamon. • Instead of browning on the stovetop, cook the chicken in the oven from the beginning—it will take an additional 4 minutes to cook.

Pan-Roasted Asparagus DINNER PLUS
You can find asparagus at the supermarket year-round these days, but spring asparagus is much more likely to be super-fresh and locally grown. In addition to its great flavor and the fact that it’s good for you, it is incredibly quick and easy to cook. This pan-roasted version is a perfect spring side dish.
HANDS-ON TIME: 5 MINUTES TOTAL TIME: 15 MINUTES MAKES: 2–3 SERVINGS
INGREDIENTS 1 bunch asparagus, trimmed 2 tablespoons cold water 1 teaspoon olive or vegetable oil ¼ lemon INSTRUCTIONS 1. Put the asparagus, water, and oil in a large skillet. Turn the heat to high and bring to a boil. 2. Cook, shaking the pan occasionally to roll the asparagus, until the water has been absorbed and the asparagus begins to sizzle, about 5 minutes. 3. Transfer the asparagus to a serving dish, squeeze the lemon over the top, and serve right away.
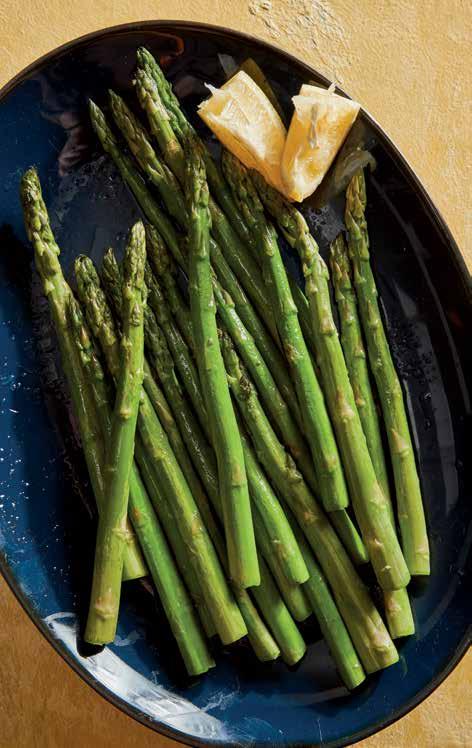
Tip: Trimming Asparagus The bottom inch or so of asparagus tends to be tough and woody, so it’s best to trim it off before cooking. The easiest way is to line up the spears in a row on a cutting board and slice off all the ends at once. You should cut right where the stalks turn from white to green.

Fresh Fruit Gelée
Don’t let the French name scare you off—this is like the just-add-water gelatin dessert that comes in a box, except it tastes better and is much healthier because you make it yourself with real fruit juice. For an extrapretty dessert, use white grape juice so the colorful fruit can shine through.
HANDS-ON TIME: 10 MINUTES TOTAL TIME: 4 HOURS MAKES: 4 SERVINGS
INGREDIENTS 2 cups 100% fruit juice (not mango, papaya, kiwi, or pineapple), divided 1 (¼-ounce) envelope unflavored gelatin 1 cup berries or cut-up fruit (not mango, papaya, kiwi, or pineapple) INSTRUCTIONS 1. Put ½ cup of the fruit juice in a small heatproof bowl or large heatproof measuring cup and sprinkle the gelatin over it. (This is called “blooming” the gelatin, and it makes it easier to dissolve later.) 2. Put the remaining 1½ cups juice in a small pot and put the pot on the stove. Turn the heat to medium and bring the juice just to a boil. 3. Carefully pour the boiling juice over the gelatin mixture and stir until the gelatin dissolves, about 2 minutes. 4. Divide the fruit into 4 short glasses or small bowls, then add ½ cup of the gelatin mixture to each. 5. Refrigerate until firm, about 4 hours.

Did You Know? You can find packets of unflavored gelatin at the supermarket near the other gelatin desserts. Gelatin is made of a protein called collagen, and it works by creating tangles of protein strands that turn a liquid, like juice, into a wiggly solid. But some fruits, such as mango, papaya, kiwi, and pineapple, contain an enzyme called protease that breaks up the protein strands so they can’t form a solid. If you use those fruits, your gelatin won’t set properly.


