


I’m the medical assistant for a busy primary care provider. I log in to Connie every day to check for information on patients who are coming in for their appointments. Using Connie, I can see if our patients have had a hospital visit or a visit with another provider, and even see lab or radiology results that I might not have in our EMR
I’m a physician who needs to check my patients’ Narx reports through the Connecticut PMP. I can log in to Connie, check on any clinical data for my patient and view their Narx report before prescribing controlled substances.
I wear multiple hats as a medical assistant and office manager for the doctor’s office where I work. I can log in to the Connie portal, manage my office’s authorized portal users, and check clinical information for our patients.
Before I meet with my patient during a visit, I can use the Snapshot feature to identify potential issues that I need to be aware of and discuss with my patient. I can quickly see their care team, and any healthcare encounters they had in the past year. This provides me with a quick orientation before digging into my patient’s details in preparation for our appointment.
As an orthopedic surgeon, I have the ability to view patient images on my local archive, which are imperative to complete a consultation with my patient.


Connie receives data from participating healthcare organizations per Connecticut state statute.
Data types include:
• Admit, discharge, or transfer information, which can include patient demographic, diagnostic, and insurance information
• Patient-specific clinical summary documents, called Continuity of Care Documents (CCDs)
• Radiology images and reports
• Laboratory results
• List of an organization’s patients
• Other clinical that include discharge summaries, care notes, and care alerts
For a current list of the organizations sharing data, and the type of data they are sharing, visit https://conniect.org/connected-organizations/. Data also available, but not listed on the website, includes Continuity of Care Documents through National Networks.
1. Navigate to portal.conniect.org
2. Login with email and password


Don’t Have a Login? Contact Connie Customer Support at help@conniect.org or 866.987.5514 to request access. Resetting a Password - Click on the “Reset your password?” link and follow the onscreen instructions.


To keep patient data confidential and secure, Connie requires that you set up Two-Factor Authentication (2FA) for your portal account. For more information about setting up 2FA, see Connie Portal Two-Factor Authentication Guide.
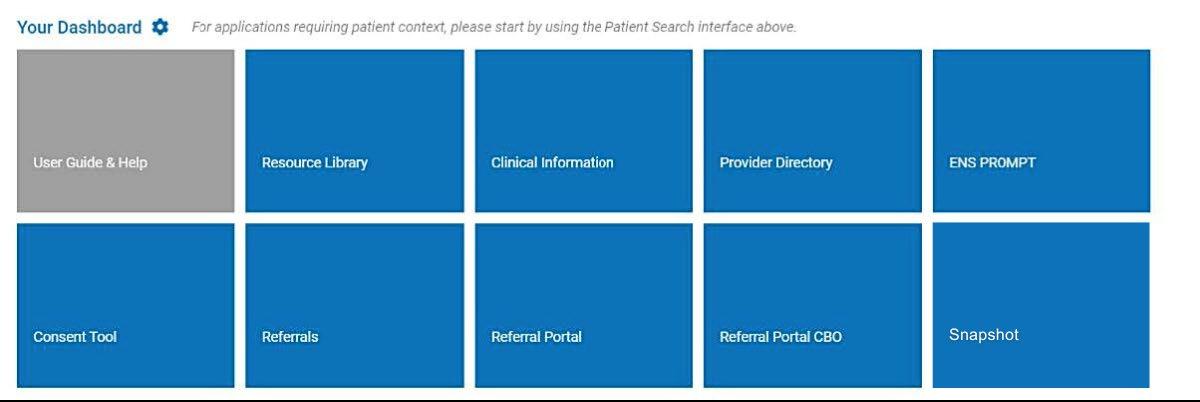
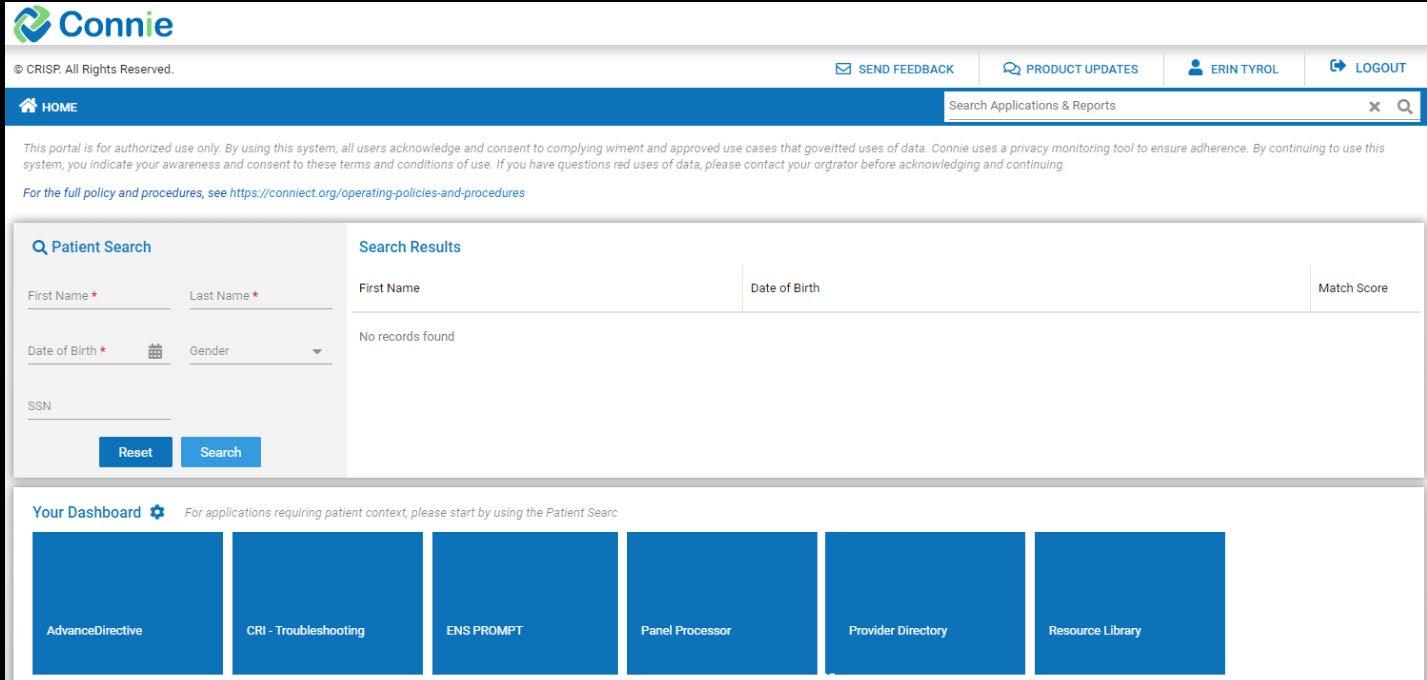
The Connie landing page consists of a Patient Search section and a Dashboard.

On launch, general applications will For patient-specific applications, you will need to first search for a patient.

To conduct a patient search, users must provide at the minimum:


*GenderandSSNcanbeaddedtoPatientSearchtorefineresults.Dataenteredisnotcase donotneedforwardslashesseparatingthemonthdataandyear.Entering050281willresultin05/02/1981.


The results of Patient Search will appear in order of most likely to least likely matches.


• The ‘Patient List’ displays all possible matches based on the patient information your EMR has sent to Connie.
• Each patient will have a ‘Match Score’ which will tell you how closely the patient matches the information sent to Connie. A patient can receive a match score that indicates ‘Certain’, ‘Probable’ or ‘Possible’ matches. The more data provided in the search, the better the match score.
• Only patients matched using the required fields plus gender and social security number (SSN) will display as ‘Certain’.
Once a patient has been selected, you may select the app you would like to launch

Alternatively, on patient



If you try to access Connie for patients for whom we don’t have a record of your relationship, you will get a pop-up warning:

Selecting ‘cancel’ will return you to ‘Patient Search

To proceed, you will be asked to enter a reason for accessing that patient’s record in Connie.


Please note, certain users do not have this functionality available to them. If you think this is in error, please contact your HIE Admin.
Also, please be aware that all instances of breaking glass are recorded and audited.


All applications are displayed within the Portal ‘Home’ takes you back to the dashboard view with applications displayed as tiles, allowing you to conduct a new patient search.
The upper right area allows you to:
• Send feedback to Connie if you are having difficulty or want to suggest improvements.
• Review product updates on any changes to features within Connie.
• Select your name to log out or change your password.
• Quickly log out


Once you have selected your initial application, your Connie Apps will appear on the left side under ‘Reports & Applications’. Use this left menu to navigate to the other Connie tools. This menu collapses once you minimize your screen size.


To collapse the Application menu to view the app in a larger screen, click the < sign next to ‘Reports and Applications’.
Tables can be searched and filtered using the table navigation buttons.

Clicking on the field name in a table in any app will sort the field alphabetically. Use the tools on the right side to (a) search any terms on the page, (b) customize the columns available to view, and (c) filter results.

Search: Search allows you to search through the data in any of the columns displayed on the screen to find specific information. The field is a dynamic search. As you type, Connie will narrow down the documents available to you to match your search criteria. To clear your search criteria, click on the ‘X’ next to your search box.


Columns: View Columns allows you to add or remove columns from your view. Editing the columns viewable on the data table only affects the currently viewed table.
Filters: Filters allows you to set filter criteria to filter the data displayed. Filters vary by area of the Clinical Data section but always include date and source filters.
Camera: The camera icon means that a radiology report has a corresponding image for you to view. Click on the icon to open an image viewer.
Orange Flags: Orange flags next to an individual record indicate a value that is abnormal (per the sending organization).
Down Arrow: An arrow at the column header indicates the direction the column is sorted. All columns in the four areas of the ‘Clinical Information’ section can be sorted. Simply click on the column header to toggle between ascending and descending order.
Imaging: Imaging worklist allows you to view and compare multiple images for your patient.
Download PDF: ‘Download PDF’ enables you to download the PDF version of the patient health record you are viewing so that you can print it or upload it to your own medical record.
Download Attachment: ‘Download Attachment’ enables you to download the PDF attachment the organization has included in the health record they sent over.
Blue Information Icon: The blue information icon tells you that there is more information about this row of data (typically you’ll see the blue information icon in the ‘Care Team’ section). Hover over the icon to see contact information.
Orange Information Icon: The orange information icon means that there is an alert or more information. Hovering over the icon will give you additional information about the item in question.


Navigation Bars: At the bottom of most of the screens in the ‘Clinical Information’ section, you’ll be able to easily navigate through pages and rows of data. You can set the default number of rows of data you want returned (10, 25, 50, 100) and you can use the right and left arrows to navigate through pages when your patient has multiple pages of data to be displayed. Changing the number of rows of data on one table will not persist across other tables.
Note:Anychangesyoumaketoyourpreferenceswillnotpersistthenexttimeyoulogintothesystem.
The following tools are currently available in the Connie Portal for all clinical users:
• User Guide
• Resource Library
• ENS PROMPT
• Provider Directory
• Clinical Information
o Patient Information
o Clinical Data
o Care Coordination
o Medication Management
o Social Needs Data
• Snapshot
Additional tools are also available for select users
• Prescription Drug Program (PMP): Available only to licensed providers register with the Connecticut Prescription Monitoring and Reporting System
• HIE Admin Tool: Available only to participating organizations’ designated HIE Admin(s).
• Panel Processor: Available only to participating organizations’ designated HIE Admin(s).
• Consent Tool: Available only to licensed providers.


ENS PROMPT is Connie’s Alert service providing encounter notifications. It enables participating organizations to receive vital alerts regarding admissions to and discharges from emergency departments, and in-patient and outpatient settings through the Connie Portal.
ENS PROMPT includes these features:
• Alerts remain active for 6 months or 150,000 messages ENS alerts are a combination of patient panel attributes and sender ADT message attributes
• Custom filters
• Patient workflow status indicators
• Download results for up to 500 rows
Connie Alerts are available within the Connie Portal. To access:
• Log into the Connie Portal
• Click the ‘ENS PROMPT’ service card from your dashboard to launch the application. Your dashboard will consist of all the services you have available to access. Each service will be displayed within a card. If you don’t see the service, ask your HIE Admin to assign the service to your user account.


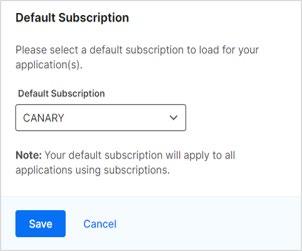
When first logging in, you will have multiple subscriptions. However, notifications can be viewed as one subscription at a time. PROMPT will request for your default subscription, which will be the panel of patients that your display will default to. These selections can be changed during your session. If there are multiple subscriptions associated with the account, you can toggle to a different subscription by selecting the dropdown arrow beside the selected subscription name that displays above the notification table.


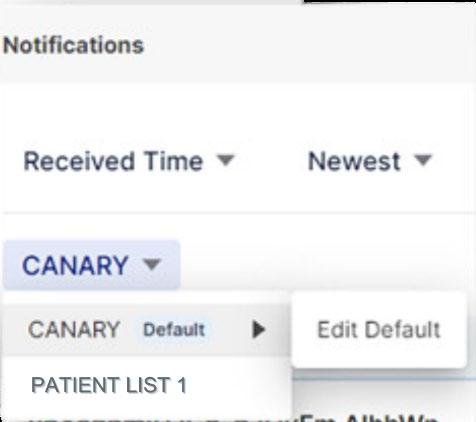
On the left-hand side of the screen, above the table of notifications, you will find a blue text indicating the total number of notifications for all your subscriptions. When you hover over this number, a small box will appear, displaying a date within it This date represents the event date of the most recent notification in your list. This allows you to easily track the total number of notifications and quickly identify the latest event date associated with them.
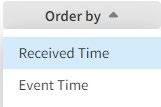
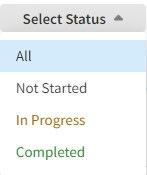
Notifications can be sorted and specified by a specific date range based on a message’s date and time as well as the status of the notification’s task. A user can quickly modify the number or sort of the notifications being displayed based on the Received Time or Event Time, sorted by Newest or Oldest first, a date range, and the task status
Select the drop-down arrow next to “Received Time” to change the sort to “Event Time”, the one next to “Newest” to change the order to “Oldest First”, the one next to “Last 30 Days” to change the date range selected, or the one next to “Status: All” to change the task status selected.



Within the notifications on the Notification Home Page, the most recently received notification will be displayed at the top of the list. The columns that display for the notification list are as follows:
Name: provide the patient’s name, gender, and age. Select the patient’s name to view the patient’s care team (see next page of this user guide)
Event Details icon: links to more details about the event. This feature is further described on page 11-12 of this user guide
MRN: provides your MRN for the patient
Event Time: the date and time of the message’s event
Facility: where the patient event occurred
Patient Class: specifies if the patient was classified an Inpatient, Outpatient or Emergency
Event type: the type of event (i.e. registration, transfer, discharge) of the message
Alert type: the default is ENS PROMPT (this is the name for the general ENS notifications If smart alerts have been developed, they will be listed by their configured/defined names)
Status: dropdown value that can be updated to reflect the basic status for each notification Status Icon


To access the patient's care team, simply click on the patient's name from the notifications list on the Notifications Home Page. This action will take you to the Patient Summary page, where you'll find a list of care teams or subscribers. The care teams and subscribers are arranged in order of their most recent update, with the latest ones appearing first. Initially, only the top five are displayed on the table.


When you click on a notification, a pop-up window will appear, presenting the notification details. By default, the window will open to the "Event Details" tab. This tab can be identified by its appearance as either a spiral notebook paper with lines or a spiral notebook paper with a pencil, indicating that there are care notes associated with the patient. The notification details pop-up window consists of four tabs:
• "Event Details"
• "Patient Information"
• "Care Note"
• "Event History"
These tabs allow users to navigate and access specific information related to the notification and the patient's care.
The notification details pop-up window will open to the “Event Details” tab. This tab provides additional information regarding the event that generated the notification. It also includes specific subscriber information submitted with the patient panel that is not found in the "Patient Info" tab. The top section of fields in the "Event Tab" will always remain the same, providing consistent information. However, the fields in the "Details" section will vary depending on the alert type of the notification. For example, a Readmission notification may present different fields or display them in a different order compared to a disease-specific notification. By tailoring the fields to match the appropriate alert type, the "Event Details" tab ensures that relevant information is displayed accurately, enhancing the understanding of the notification and its context.
To view patient information, click on the “Patient Info” tab to display any information that was documented in the hospital’s message, such as patient date of birth, address, ethnicity and race, phone and work numbers, and the hospital’s medical record number (Facility MRN).
If submitted with the patient panel, the subscriber patient information will display on this tab and include the Emergency Contact, Primary Care Provider, Care Manager, and Insurance.
For each item, the event [date and] time, [patient class and] event type, complaint, and facility display on each row. To view additional information about an event, such as the diagnosis code, diagnosis description, and discharge disposition, click on the expand icon, a down arrow, for each event history row.


To view a list of event history for the patient within the network, click on the “Event History” tab. Event History displays a highlevel event history list of all events for a patient for the past three months and will include the following event types:
• Admission (A01)
• Transfer (A02)
• Discharge (A03)
• Registration (A04)
• Status Change Outpatient to Inpatient (A06)
• Status Change Inpatient to Outpatient (A07)


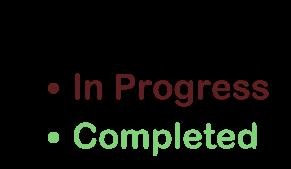
Notification status can be viewed and updated under the “Status” column on the Notification Home Page list view. Status values and their colors are:


When a new notification is generated, a “New Alerts” indicator will display at the top of the screen, along with the number of new notifications on the ‘refresh’ icon. The system will not automatically reresh the list of notifications until you are ready to view them. This allows you to continue to work without interruption and not lose your place in your workflow. When ready, click on the ‘refresh’ icon with the number of new notifications. When the new notifications appear in the list, a “New” indicator will appear briefly to the right of the patient’s name.


To initiate an export of the current list of notifications from the Notification Home Page, click on the export icon:


1. You will see a window requesting to acknowledge that PHI will be downloaded as a file to their device. Only after accepting terms of downloading protected patient information will you be allowed to proceed with exporting notifications.
2. An ‘Export’ window will appear, and you will be asked to name the file, define the export timeframe, and select the fields to be included in the export file. Timeframes can be selected on the “Received Time/Event Time” row to adjust the dates. To define fields within the export file, select the “Event Details” row and select/de-select data fields. When finished, click “Done”.
3. When the export information is defined, select the “Export” button. You will then see a status update icon display in the bottom right corner of the Export icon and a brief message indicating that the export is in progress.
4. Once the export is completed, the status icon will change to a red circle with a white exclamation mark You will see an “Export Completed” message appear.
5. To download the file, select the “Export” icon, then “Download”. Only one export file can be accessed at a time. To initiate a new report the original file will need to be deleted or downloaded first.


Filters can be applied through Name/MRN or Filter by additional fields. These can be applied individually or combined.
To filter by patient name or MRN, users can type the patient’s information into the “Search MRN or Name” text box on the right-hand side of the screen, then select enter to execute the refinement on the list of notifications.
To remove the Name/MRN filtering, select the text within the same text box and click on the ‘x’. This will remove the Name/MRN filtering from the notification list.
A new filter can be added by selecting “Filters” then the “New Filter” button. To build your filter, select the dropdown options You can add multiple fields to refine the list of notifications or add multiple notifications for some fields. Select “Add another” to display a new filter by set of fields. Each filter by set of fields must be filled out before applying or saving the filter.
When building a new filter, Connie doesn’t recommend using “Event Time” and “Received Time” together in one filter. You will see “Event Time vs. Received Time” appear as a message with an information icon (an ‘I’ in a circle) beside it. If you select the information icon a pop-up will display to inform you that using these fields separately allows for best filter results and provides a definition of the fields. Once you have added/selected all conditions and values, click “Apply” at the bottom of the pop-up window to apply the selected criteria.
The notifications will be refined based on the applied criteria and display above the list of notifications.


After you have built and applied your filter, you can continue to edit if needed. To begin, click the “Edit” link next to the applied criteria. You should see the criteria you have already applied and selected appear in the New Filter window. You can then add additional filters by field conditions, remove field values, and/or edit the currently built fields, operators, and values. Click “Apply” to apply the newly selected conditions to the list of notifications. To remove a specific applied condition, click the red ‘x’ that displays within the appropriate condition to remove it.


After building, you can save a filter for future use through two different steps in the building process. Please note that all filters are saved at the user level and not associated with a specific subscription.
1. You can save the filter after initially building a new one
2. You can save after building and applying the filter conditions
To use the first method and save a filter while building, select the “Save” button instead of “Apply ” A new window will appear prompting you to name your filter. After naming the filter, click “Save” which will save the filter for later use and apply the condition(s) to the list of notifications.
The second way to save a filter is after at least one condition has been applied that is not associated with a saved filter. A “Save” link will display next to the newly applied conditions, which you can then select. After naming the new filter click “Save” again. This will save the filter for later use and apply the new condition(s) to the list of notifications.


To remove an applied filter, click on the “Clear” link
To remove individual criteria, select the ‘x’ next to the criteria you want to remove
In order to duplicate a saved filter, click “Filters” then “Edit Saved Filters” then on the three dots next to the filter you’d like to duplicate. Select “Duplicate” and you will see a new filter in your list with a “- copy” added to the original filter name. You can edit the new filter under the ellipsis icon menu and change the name or modify as desired.
To delete a saved filter, click “Filters” then “Edit Saved Filters”. From the list of saved filters, click the three dots next to the filter you’d like to delete and select “Delete”. A ‘Delete Filter’ confirmation window will appear. By clicking “Delete” and confirming deletion of the saved filter, you will remove the filter from the list of saved filters.


ENS PROMPT can make reports for different, specific scenarios, making it easier to manage daily, weekly, and monthly workflows. These reports are made by combining/adding multiple filters. The examples below yield reports detailing “Emergency Room Discharge” and “Inpatient Admission”.
Commonly used Combined Filter Reports
I. Emergency Room Discharge
First Filter
• Filter by: Patient Class
• Condition: Is
• Value: E – Emergency
Second Filter (additional filter being added)
• Filter by: Event Type
• Condition: Is
• Value: Discharge
II. Inpatient Admission
First Filter
• Filter by: Patient Class
• Condition: Is
• Value: IP – Inpatient
Second Filter (additional filter being added)
• Filter by: Event Type
• Condition: Is
• Value: Admission




The Provider Directory is a quick and easy-to-use search tool used by providers to search and find other providers. The directory listings are a composite of hundreds of national and regional provider datasets to ensure a robust database of provider information using the Convergent platform.
You can search providers using the following fields:
• Name
• NPI
• Organization
• Specialty
• Provider Type
• Location: Street Address, City, State, Zip

When you conduct a search with more than two fields, it will behave as an “AND” search. For example, searching on name “John” with state “CT” will return all the providers with name “John” AND from the state “CT.”


Once you include any of the search parameters in the search fields, you will notice the ‘Search’ button becomes accessible. Connie Provider Directory allows for a misspelled name, partial names and either first name or last name to be added to the search field
To use the distance search option, you will need to include either a full address or a zip code
Activate the distance search by clicking the "Use Distance Search" checkbox. You must include the radius distance in miles in the search field.


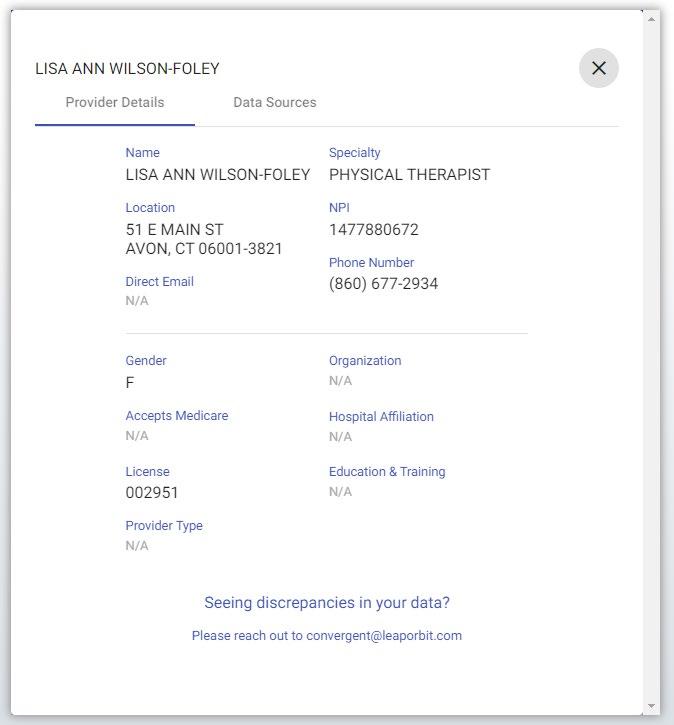
To see more detailed information about a particular provider, select "Show" under the "Detail" column in the results.
The Provider Details screen will show more information about the selected provider


If you conduct a search which yields many results, you can use the page navigation tools to:
• Show more items per page
• Navigate forwards or backwards
• Or jump to the first or last page in the search results
If at any point, you want to clear your search results and begin a new search, simply select the ‘Clear’ button to begin a new search, which will bring you back to a new search page.


When a user’s session becomes inactive, a banner with text will appear at the top of the screen indicating that the session has expired. To remove the banner, click anywhere in the app.
The ‘Clinical Information’ app defaults to your patient’s Encounters in the ‘Clinical Data’ view, but provides access to patient demographic information, the care team under ‘Care Coordination’, ‘Medication Management’ and the Prescription Monitoring Program (PMP).

Click on the 3 dots to the right of your patient’s name to access the glossary for this app, including descriptions of the sections and explanations of the icons. The icon descriptions are also described in the ‘Icon’ section of this user guide. The descriptions of each ‘Clinical Information’ section are also listed in the subsequent pages of this guide.


Clinical Alerts are designed to notify healthcare providers about past instances of overdose. These alerts are triggered when a patient arrives at the emergency room and their diagnosis indicates an overdose event, as determined by ICD 10 codes.
Clinical Alerts can be seen on the top toolbar. By clicking the “Priority Alerts” icon (depicted as a bell) a text pop-up screen will appear. The Priority Alert icon will indicate the total number of alerts associated with the patient.
Within the pop-up screen, the priority alerts are presented in a table format, organized chronologically based on the date of the most recent alert, source of the alert, a description of the event, and the type of alert. In cases where there are no alerts for a specific patient, clicking on the priority alerts icon will not trigger any pop-up screen.

Disclaimer Icon

The Disclaimer icon can be seen at the top right of the Priority Alerts table. Its purpose is to flag that although the alert may affect decisions to prescribe or dispense controlled substances, abruptly discontinuing medications could also carry risks.


Navigate to the User Settings section using the button at the bottom of the Clinical Information left hand navigation.
Here, you can re-arrange the order of the sections within Clinical Information clicking the up and down arrows next to sections listed.


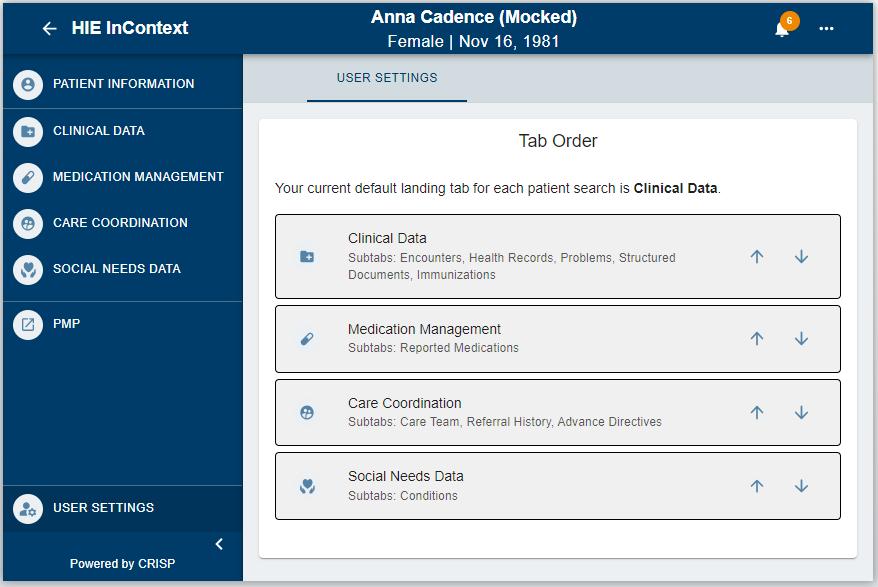
Once you have changed the order of sections, you will see a ‘save’ button. Selecting ‘save’ updates the new order immediately, with the first listed section becoming the default landing page. In the given example below, Medication Management was moved to the top of the list, changing the default landing page from Clinical Data to Medication Management. These updates are specific to your view of the application and will not change how other users see the sections. The order you set will remain consistent every time you launch the application until you make a new change in the arrangement


The ‘Patient Information’ tab aggregates the demographic information we have in the ‘Master Patient Index (MPI)’ for your patient. Data in the MPI is pulled from multiple sources and organizations for your patient. Additionally, in the ‘Aliases’ table, you can see all the sources of data for this patient (in other words, other organizations and providers who are also in an active care relationship with your patient and have provided us data) and the medical record number (MRN) for your patient in their system. You can sort or filter the ‘Aliases’ table by either column.
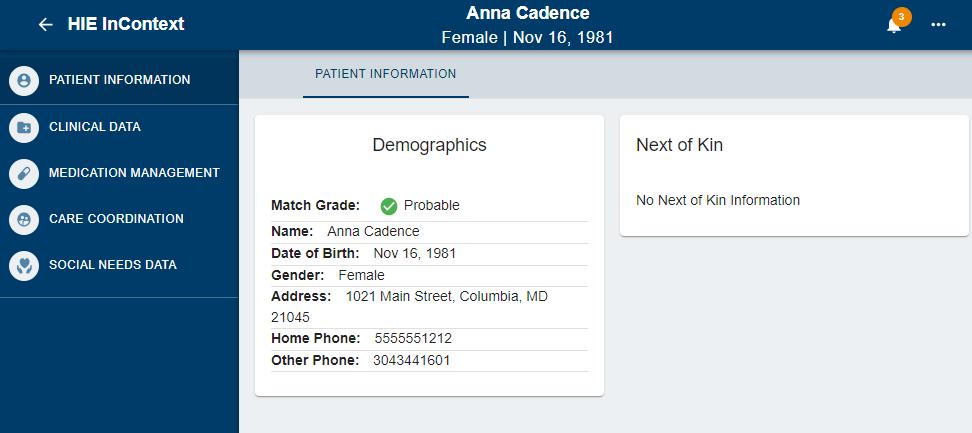

The ‘Next of Kin’ area of the ‘Patient Information’ section aggregates any next of kin information received from participating organizations on your patient.


There are five areas of the ‘Clinical Data’ section, and each area may have one or more sub-tabs of data for you to see on your patient.
The five areas are:
• Encounters
• Health Records
• Problems
• Structured Documents
• Immunizations


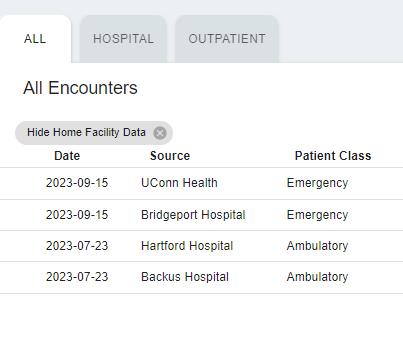
You have the ability to hide data sent to Connie from your own organization so you can view only data that comes from outside your organization when accessing the Clinical Data section. This feature applies to the Encounter, Health Records, and Structured Documents tabs. This feature specifically applies to the Encounters and Health Records tabs, which can be found in the Clinical Data section. To activate this feature, click on the Filter icon located on the right side of the window. Then, check the box labeled “Hide Home Facility Data”.
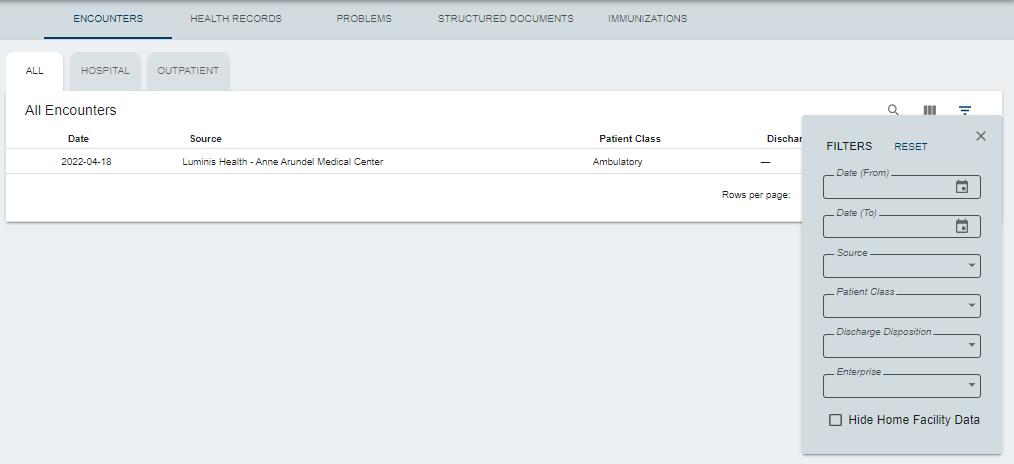

Once selected, only data from outside of the facility from where you’re accessing patient records will display in the Connie portal. To undo this filter, simply select the “x” next to “Hide Home Facility Data” as it displays.



When you click on the ‘Hospital Encounters’ sub-tab, Connie filters out encounters to only show you encounters associated with a hospital visit. The table columns include diagnosis, admit reason, and length of stay. ‘Status’ is currently hidden on launch but can now be added via the filter options if desired. Using the ‘View Columns’ icon, you can also add ‘Location’ to the table.


When you click on the ‘Outpatient’ sub-tab, Connie filters encounters to only show you encounters associated with outpatient visits. This table includes the diagnosis code associated with the visit. Using the ‘View Columns’ icon, you can also add ‘Location’ to the table.


‘Encounters’ displays information regarding your patient’s previous inpatient or outpatient encounters, identified through ADT data. This includes date, source, patient class, and discharge disposition on the ‘All Encounters’ sub-tab. Using the ‘View Columns’ icon, you can also add ‘location’ to the table.
‘Health Records’ displays your patient’s radiology reports, laboratory reports, and clinical notes received from Connie participants.


The table view includes date, source, description, and provider. Clicking on any row in this table will open a pop-up window that will provide you the detailed text of the report. Depending on the type of document you open, you will find additional options to download an attachment, open the image viewer (for radiology reports with an image), preview and/or download a PDF of the document, or close the popped-up dialog box. You can view the PDF report in a Health Record before choosing whether or not to download. Please keep in mind that this feature is not available in an Internet Explorer 10 browser. However, you can still download the file in PDF form using the download icon.


The default display is to show you all health records for your patient sorted in descending order by date. Toggling on any of the document types at the top of the screen functions as a preset filter. For example, by clicking on the laboratory document type, the table will filter results to only show you lab results. Using ‘View Columns’ you can also add ‘Category’ (e.g., ‘Laboratory’, ‘Radiology’, ‘Clinical Notes’) to the table view which would enable you to sort the table by category in ascending or descending alphabetical order.
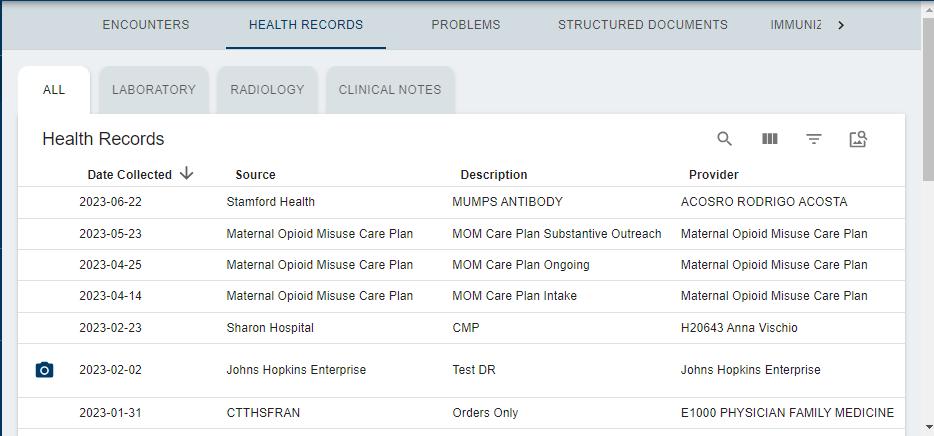

Image Share: ‘Radiology Reports’ with a camera icon indicate an image is available to view. Clicking on the camera icon will enable you to view the image. Images viewed in the last 90 days will display within seconds. Select the ‘Image Worklist’ icon for a list of all the images available for your patient, compare up to four images, and, if you have been approved by your PACS Administrator, transfer images to your organization’s PACS. Please note that when you exit out of eHealth Viewer, your changes are not saved.
For more information about the full list of features available through Connie’s Image Share service, see Image Share in the Appendix.


The Problems Tab provides a consolidated list of active or unresolved issues obtained from Continuity of Care Documents (CCD), excluding routine patient visits. The purpose of this tab is to enable users to quickly gather relevant medical status information and inform immediate care decisions.
The 'Problems' tab contains a data table with the following fields:
• Description: Displays the description of the problem using the ICD 10 code description.
• Code: This field contains the numeric ICD 10 or SNOWMED code associated with the problem.
• First Reported Date: Shows the initial instance when the problem was recorded in a CCD.
• Last Reported Date: Indicates the most recent occurrence of the problem in the CCD, retrieved from the organization listed as the "Last Reported By" entity.
• Last Reported By: Specifies the organization that sent the CCD containing the problem.
Any duplicate problems with identical ICD 10 or SNOWMED codes are eliminated, and only the last submitted CCD entry is displayed. Once a problem is resolved, all records pertaining to that problem are removed from the Problem List. However, historic records will remain in relevant source CCDs under the "Structured Documents" section.


Use the filter icon (circled in green) to narrow the list by a date range, organization that last reported a problem, or ICD-10 code. The magnifying glass icon (circled in blue) can search for a specific problem by using a description or a code. Users can also search using a partial code or description to identify related problems. For example, searching for “E1” or “diabetes” will return all results that include E10 and E11 codes for Type 1 and 2 diabetes.


The ‘Structured Documents’ area displays any ‘Continuity of Care Documents’ (CCDs) for your patient from Connie participants including participants from outside the state through Connie’s participation on eHealth Exchange Hub and Carequality. A CCD is a generic name for an electronically generated document that summarizes either an episode of care for a patient or contains a longitudinal summary of care for that patient.


The ‘Structured Documents’ table displays the document date, source, title, type, and size (a proxy to assist you in estimating the amount of content in the document and the time it might take to display).


Clicking on any row will open a dialog box with the selected document. Larger documents may take longer to display on screen. Please note that most of the documents will be long and you may have to scroll to see all the data. You can download the PDF to be able to use the document in your own system or to give to your patient. Patients who have consented to sharing clinical information related to substance use disorder (SUD) treatment with their care team will have this icon:


Selecting will reveal disclaimer language, specifying that the information contained in the structured document subject to 42 CFR Part 2 rules and prohibits disclosure of this structured document.


Continuity of Care Documents (CCDs) displayed in the Structured Documents subtab include a Table of Contents to support navigation to important sections of the CCD. Click on a section header in the table of contents to jump to that section of the document.

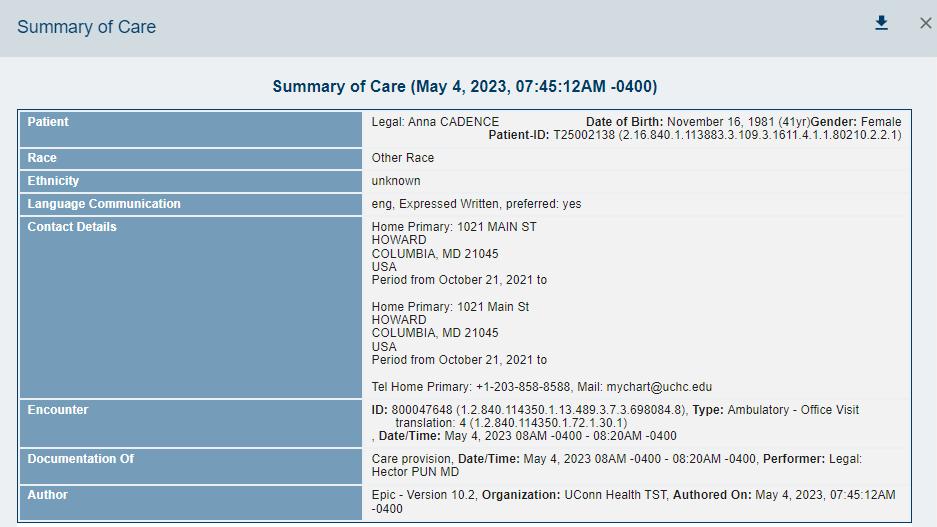
When immunization data becomes available, the ‘Immunizations’ tab displays any immunization records Connie has on your patient. The table displays the immunization administered date, vaccine name, location where patient received the immunization, and data source. Immunization information is also available in the CCDs located under the ‘Structured Documents’ tab (see previous section).


The Medication Management section is a compilation of medication data from various sources including Continuity of Care Documents (CCDs) contributed to Connie to facilitate medication reconciliation and deprescribing, support collaborative care, reduce medication costs and errors, and improve clinical outcomes. The medication management section may not reflect a patient’s complete medication history.
Medication management can augment the data within a provider’s electronic health record (EMR) to facilitate a medication reconciliation processes that typically takes place within their EMR and utilizing EMR tools for drugdrug / drug-allergy interactions.
This section uses a deduplication algorithm to streamline viewing for an easily digestible overview of a patient's most recent medications, while enabling the provider access to the underlying data if needed.
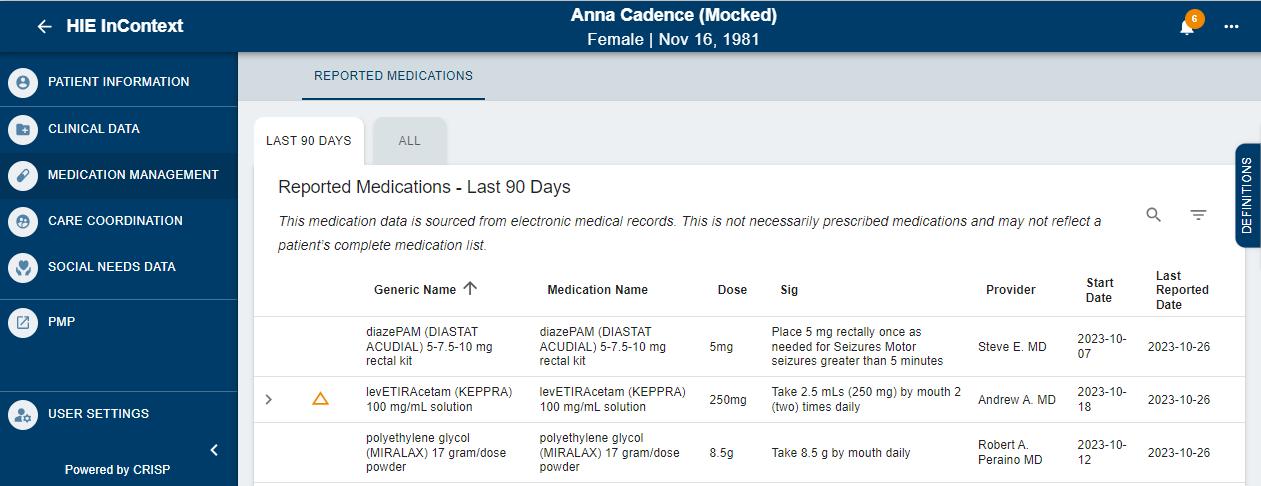


When displayed in full view, ‘Medication Management’ will provide only one tab Medications and two sub-tabs 'Last 90 Days’ and ‘All’ with ‘Last 90 Days’ as the default view.
Both sub-tab views display the medications table with the following columns: generic name, medication name, dose, sig, prescriber, start date, and last reported date.
Data on the table is arranged alphabetically by generic name. ‘Start date’ represents the prescription start date as of the latest CCD received by Connie. The ‘reported’ date refers to the date of the latest CCD that the medication was shown on

Data displayed on the table is listed so that:
1. A single data row represents that the generic name was found only on one CCD.
2. A data row with an expand/collapse button represents that the generic name was found on more than one CCD but there were no changes in the dose or prescriber data.
3. A data row with an expand/collapse button and the ‘Change in Meds History’ flag represents that the generic name was on more than one CCD with either a change in dose or prescriber information.


In mobile view, the table collapses such that both table tabs will always display generic name, dose, and sig. You can find the other columns - medication name, prescriber, start date, and report date - by expanding each data row on the table. In mobile view, the expand/collapse button and the ‘Change in Meds History’ flag will only display the most recent data; and the ‘Change in Meds History’ flag will still be displayed if applicable to that data row.


A “Conditions” subtab under Social Needs Data section displays Social Determinants of Health information using ICD-10 z-Codes from ADTs. When used, these codes will highlight whether the patient has experienced problems related to education, literacy, employment, housing, psychosocial circumstances, and other social issues that have a known impact on health.


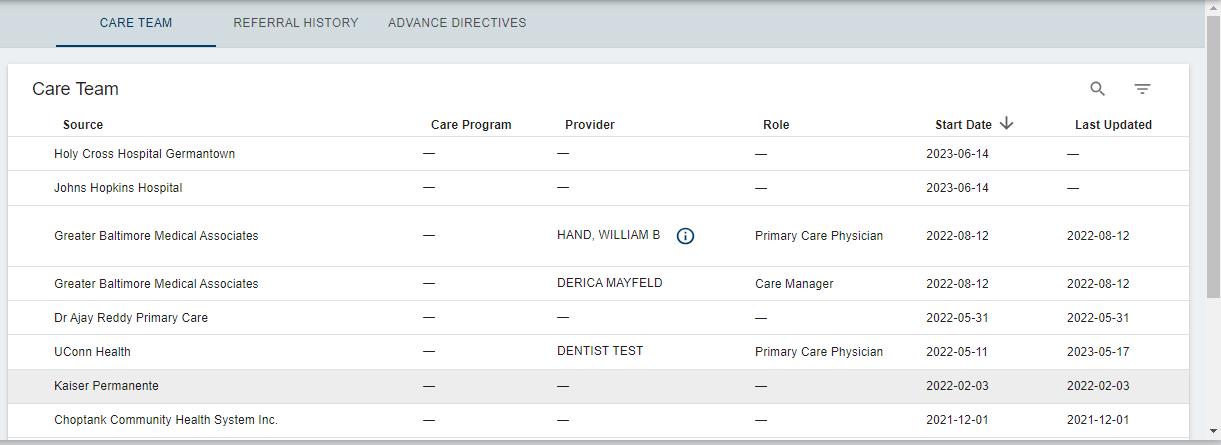
The ‘Care Coordination’ section displays three tabs: Care Team, Referral History, and Advance Directives. Care Team lists the organizations and providers that have a relationship with your patient. This can include your patient’s care program and care manager and identifies the ‘start date’ and ‘last updated’ dates for a Care Team relationship. Care Team data is populated from ADTs and patient panels submitted to Connie.

Hover over the blue information icon to get contact information for providers and care managers. When the Care Team is identified as a 42 CFR Part 2 (substance use disorder treatment) facility, a will appear at the beginning of the Care Team row. Clicking on the icon will show a disclaimer specifying that the information contained is subject to 42 CFR Part 2 rules.

Referral History includes a list of referrals providers have made for the patient through Connie. Each entry includes the referral date, source of the referral, what service (program) the patient was referred to, and whether the referral status is pending or complete. Select a referral entry for details. The Referral History tab displays the most recent referral first.


Users can access Advance Directives under the Care Coordination section within the Clinical Information app in the portal, or the InContext app.

To access the Advance Directives tab, do the following:
1. Select “Clinical Information”
2. Select the “Care Coordination” menu option
3. Select “Advance Directives”
By clicking the page icon, you can view the full document as a PDF (circled).


Note: The documents provided may not reflect the patient’s most recent or complete decisions regarding medical planning, including any modifications or revocations made after the documents have been shared through Connie
This tab displays advance healthcare documents (AHCDs) created in or uploaded to MyDirectives.com by either Connecticut residents or providers using ADVault. When an AHCDs are available, the listed information will include the date the form was submitted, the form’s source, and a document description. This description contains the document type and effective due date.


If an AHCD is available, you’ll see two documents, including the HIPAA Authorization form for the allowance of sharing the document and the AHCD itself.
To print or save the AHCD, users can select the print/save icons after viewing the document as a PDF.


The Prescription Monitoring Program (PMP) can be accessed under the Clinical Information menu, or the Applications & Reports menu in the far-left navigation.
The PMP collects prescription data for Schedule II through Schedule V drugs into a centralized database, the Connecticut Prescription Monitoring and Reporting System (CPMRS), which can then be used by healthcare providers and pharmacists in the active treatment of their patients.
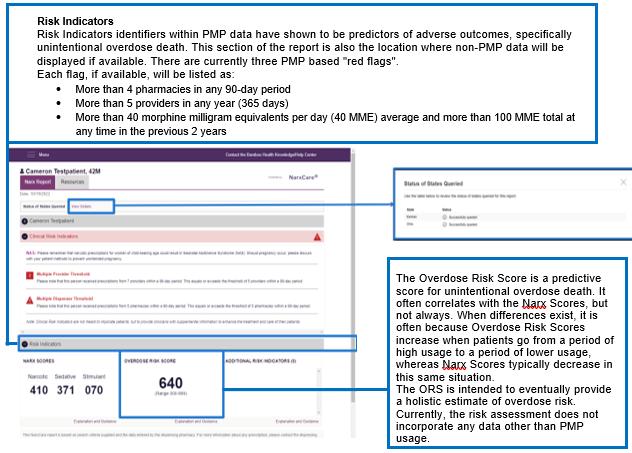
The purpose of the CPMRS is to present a complete picture of a patient’s controlled substance use, including prescriptions by other providers. The CPMRS is used to improve quality of patient care and to reduce prescription misuse, addiction, and overdose. Integrating the PMP into the Connie portal allows authorized users to access the CPMRS NARX Report directly within the Connie portal.
Registration with CPMRS is required prior to accessing PMP through Connie. Per state statute, all prescribers in possession of a Connecticut Controlled Substance Registration issued by the State of Connecticut, Department of Consumer Protection, are required to register as a user with the Connecticut Prescription Monitoring and Reporting System (CPMRS) at https://connecticut.pmpaware.net.
Contact your organization's HIE Admin if you would like to have access to PMP through the Connie Portal.
Features




Snapshot includes four quick-view features:
• Patient Demographics: Patient name, gender, DOB, phone number, address, and (if applicable) Medicaid ID.
• Encounters from ADT: The patient’s emergency, inpatient, outpatient, and/or ambulance encounters displayed as a histogram by encounter type across a flexible date range.
• Next of Kin: Provides a list of closest living relatives to the patient on file from different sources.
• Care Team: List of practices providing care, associated primary care provider, and (if available) a care manager or a care program within which they are enrolled.


Hover over an encounter for more information or change the encounter timeframe display using the quick pick range or a custom range.


The consent tool includes forms that enable Connie users to provide written notices about their patients to Connie. In 2023, there will be two forms available:
• Prevention of Harm – Block Patient Access Form. The Prevention of Harm Form enables providers to submit written notice to Connie that the patient’s electronic health information (EHI) should not be shared with that patient or his/her/their authorized representative because access or disclosure of EHI is reasonably likely to cause substantial harm to or endanger the life or physical safety of (a) the patient; and/or (b) another person.
• SUD Part II Provider – Patient Consent Form The SUD Consent Form enables substance use disorder (SUD) providers who have executed a qualified service agreement (QSOA) to share data protected by 42 CFR Part 2 through Connie upon patient consent. This tool aims to improve care coordination between SUD providers and other health care providers, strengthen continuity of care for patients throughout SUD treatment levels, and ease workflow burden when obtaining consent and disclosing information.
When there are multiple forms available, the Consent Tool App defaults to the Consent Types section of the tool. This section lists the forms available. Currently, only the Prevention of Harm - Block Patient Access form is available for Connie Users and launching the Consent Tool App will open the Prevention of Harm form directly.
The Prevention of Harm Form was developed in anticipation of Connie enabling patient access to their EHI available in Connie. Enabling patient access (a) aligns with federal and state information blocking and interoperability rules, and (b) supports Connie’s efforts to attain the Patient Access goals of the State-wide Health Information Exchange as described in Connecticut State Statute Sec. 17b-59d.
Prevention of Harm is one of the few exemptions to the federal information blocking rule. If you have questions about when to apply the Prevention of Harm exemption for your patients, please contact your legal representative.


The patient demographic data will pre-populate the fields at the beginning of the form.


Step 1: Certify the nature of the harm being prevented
The form requires you to certify that you are a licensed health care professional with a treatment relationship with the patient. Further, in exercising your professional judgement, that you feel that disclosing EHI with that patient — or their authorized representative — is reasonably likely to cause substantial harm to or endanger the life or physical safety of (a) the patient; or (b) another person. You will be required to select either harm to the patient or harm to another person using the radio button next to appropriate option.


Step 2: Sign the form
You can sign the form using your mouse, mouse pad, or touch screen to drawn in your signature. or


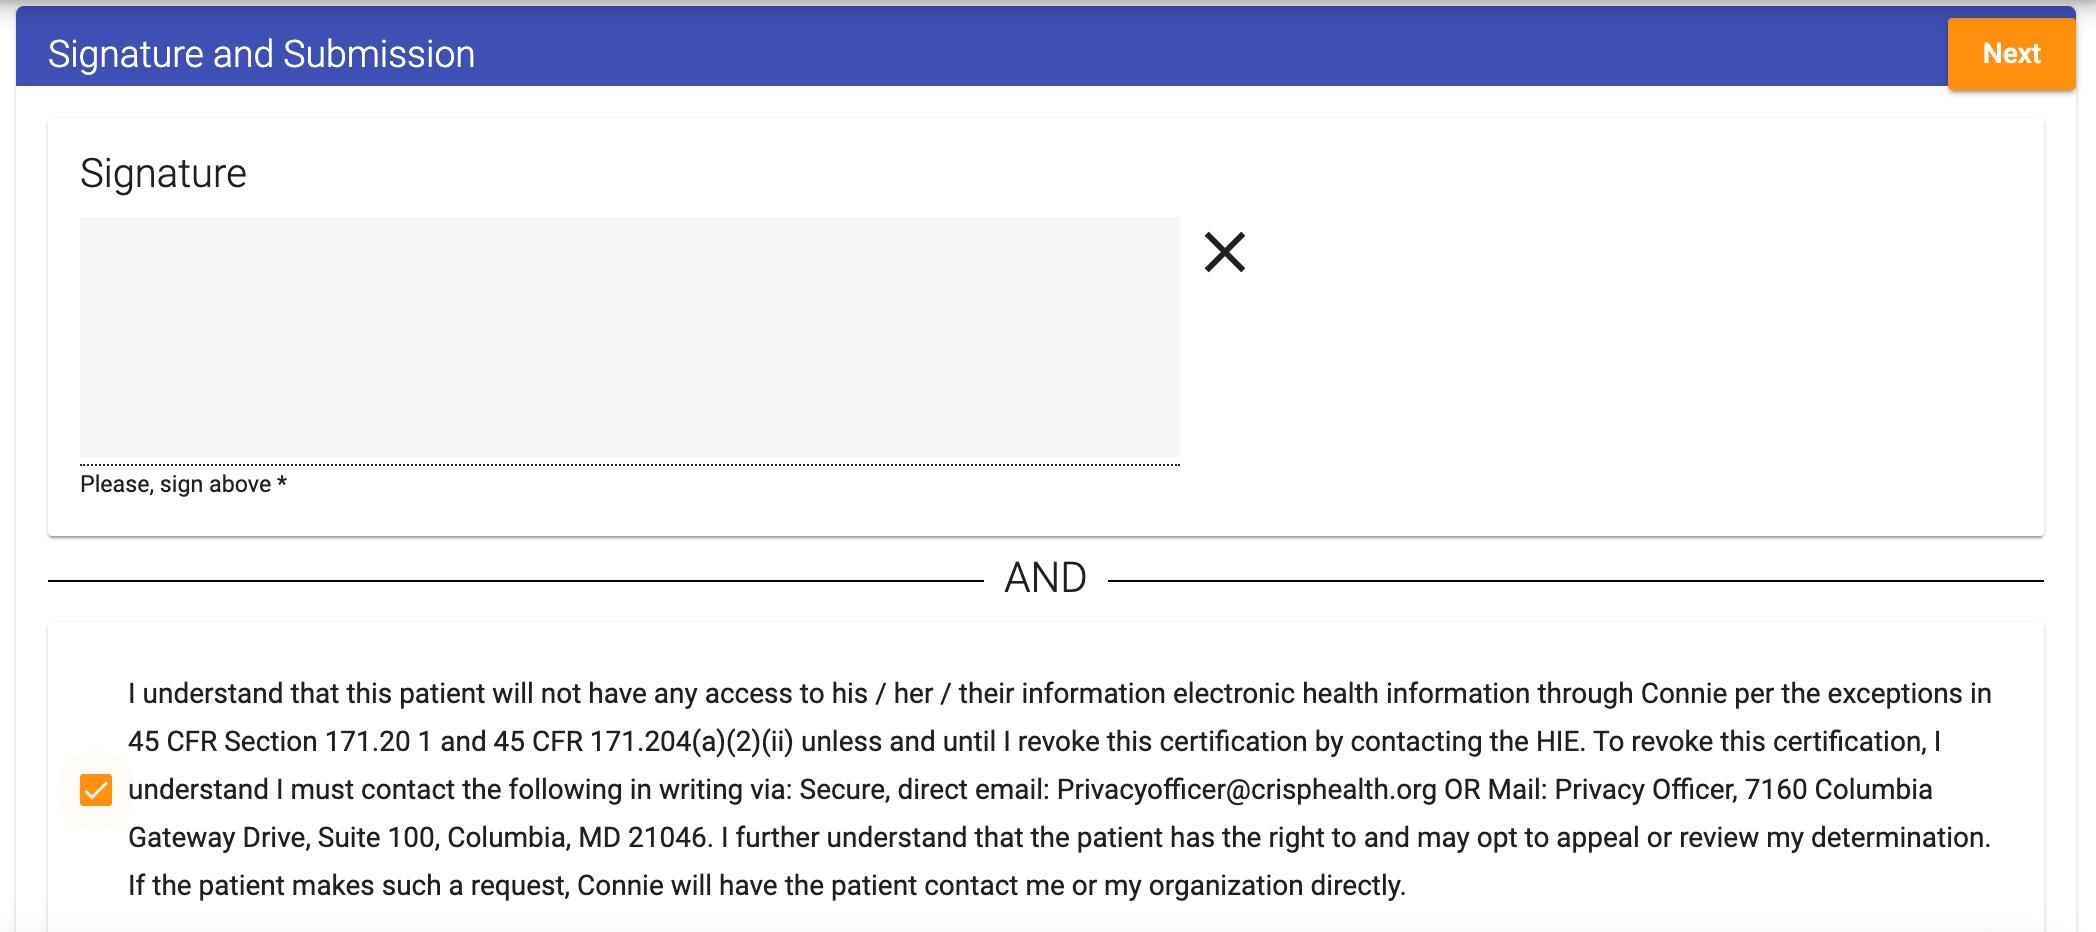

Step 3: Attest to blocking the patient’s access to their EHI.
To submit the form, you must check the box next to the text under the signature box that confirms your understanding that submitting this form means that the patient named on the form will not have access to their EHI through Connie unless you revoke the certification.
Step 4: Add your name and license number


Type your name and provider license number on the one line provided, separated by a space, and select “submit” to complete the process. This information is required for the Privacy and Security Officer to reverse the flag when provided written notification subsequently.


Once the form is submitted, the patient’s record will be flagged. The Prevention of Harm flag blocks the patient from seeing any of their EHI directly from Connie while continuing to allow their providers to view the data within Connie’s portal. If a patient with a Prevention of Harm flag on their record tries to access the Connie data through the 3rd party apps connected to Connie’s Patient Access APIs, the patient will be notified that they are unable to access their data at this time. The patient will then be directed to contact their providers directly if they would like copies of their EHI. The patient will also have the option to contact Connie’s Customer Support to provide support and answer questions about why they are unable to see their data and, if it is because of a prevention of harm block, how they can appeal the prevention of harm block with their provider.
Revoking Prevention of Harm
To reverse this decision, contact the following in writing via:
Email: Privacyofficer@crisphealth.org (please remember to use encryption or Direct email to protect PII) OR
Mail: Privacy Officer, 7160 Columbia Gateway Drive, Suite 100, Columbia, MD 21046
Patients who agree to the consent form are agreeing that their Substance Use Disorder (SUD) treatment provider may share information about their SUD through Connie to the patient’s Care Team who also participate with CRISP Shared Services and affiliate HIEs including Maryland, DC, West Virginia, Alaska and any future HIE affiliates.
Patients who consent to sharing SUD treatment via Connie are not able to specify which of their providers can/cannot access or view their SUD treatment information. These patients should be made aware that they aren’t able to limit access to only specific providers.
These patients must select the amount and kind of information to disclose, which requires providers/staff to select one of two options shown below:


After selecting the desired option, please review instructions for each section carefully. If this is done via a telehealth visit, please be sure to have the Consent Form signed and completed by the patient before attesting in this tool.


expiration date, which a patient can select up to five years from the date the consent is registered.
Additionally, providers/staff obtaining patient consent must attest that they have verified that patient’s identity and the patient has been informed of all terms of the consent.
To sign the Consent Form, the patient will provide an electronic signature using a touchscreen or signature pad. The provider must then attest to the patient’s identity signing the form, and that the patient has consented. The provider must also attest that the patient has provided consent knowing all the terms of consent.


Legal guardians, parents, or legally authorized representatives may also provide a signature if applicable. This is done by selecting the “Click here if you are the patient’s Legal Guardian, Parent, or Legally/Authorized Representative” – the person signing on behalf of a patient must enter their name into the form and sign electronically.

Follow these steps to provide submission and confirmation:

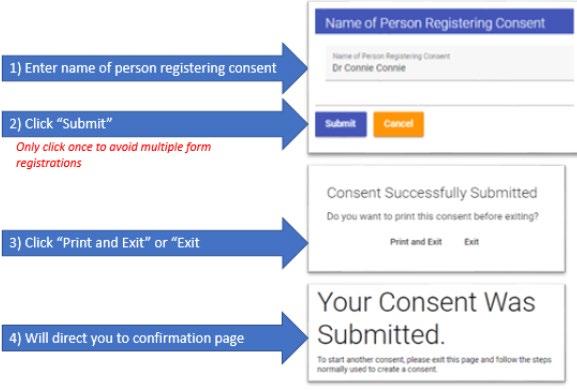


Once a patient has registered their consent, the SUD Part II data will be available to authorized providers in the Clinical Information app under “Clinical Data” tab and “Structured Documents” subtab. CCDs in this list will indicate with an information icon if the CCD provided is subject to 42 CFR Part 2 rules and can’t be disclosed.


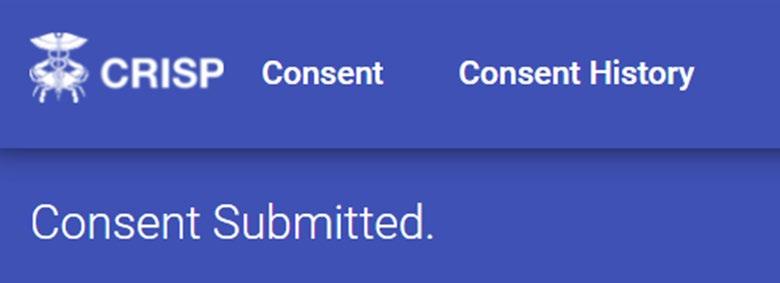


Upon patient request to revoke consent, providers can “deactivate” patient consents prior to any expiration date through the Consent History page. Deactivating a consent will change the status of the consent to inactive”.
Note:UsingthedeactivationfeatureforthePreventionofHarmToolwillnotlifttheflagandenableapatienttoaccess theirrecords.OnlycontactingtheCRISPSharedServicesPrivacyOfficerinwritingeitherbysecure,directemail: Privacyofficer@crisphealth.orgORmailingPrivacyOfficer,7160ColumbiaGatewayDrive,Suite100,Columbia,MD 21046willliftthePreventionofHarmflag.


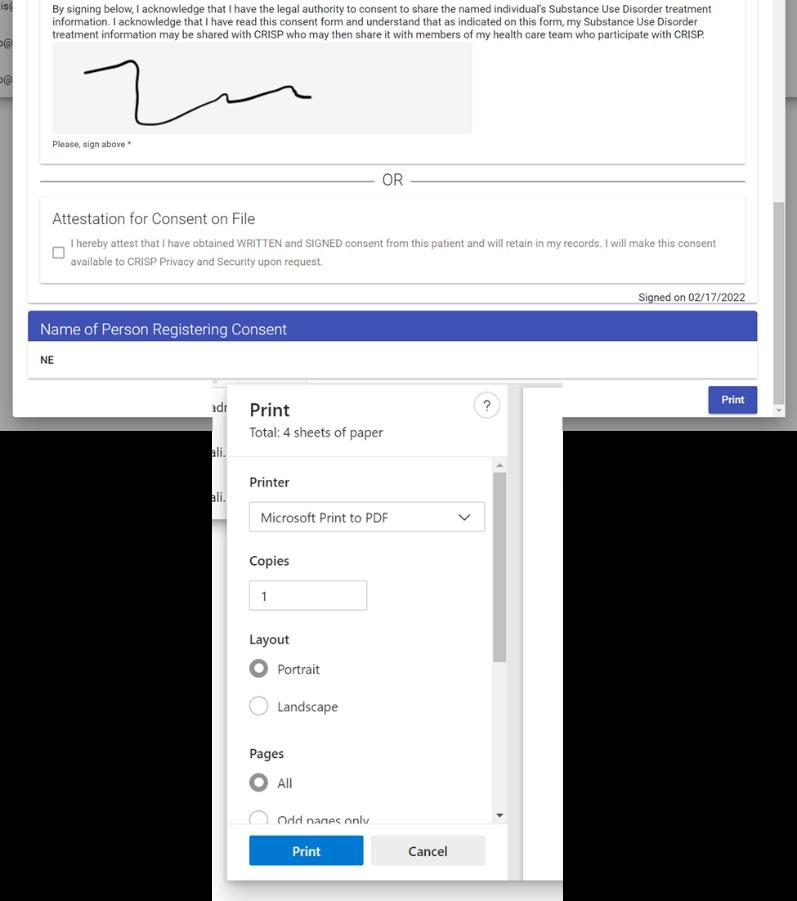
Providers can review, print to PDF, or save the form as a file. From the Consent History tab, select the form on file you wish to print. Scroll to the bottom of the form and select the “Print” button. Use the dialogue box to specify how you would like to print and save the document.


Imaging provides access to patient images in full diagnostic quality at point of care. Images and reports are available directly in the Connie portal and InContext app within minutes of the exam being performed, thus enhancing both speed and quality of care.
Image Functionality
• Report-Level: View an image and the corresponding Radiology or Cardiology report.
• Imaging Worklist: Compare images from all organizations that contribute images to Connie. Images taken within the last 90 days are made available to all authorized Connie users within seconds of collection.
• Transfer to PACS: Download external images from the Imaging Worklist to your local PACS. Note: not all users will have access to this functionality. Access is determined by facility PACS administrator.
Report-Level View
Accessing Images
Once on the Clinical Information tab, navigate to the Radiology sub tab within Health Records. Open an image by: Clicking on the camera icon to the left of the listed report


Opening a report - click on the row that has the report and click on the image icon.

To open an image, click on the camera icon here too.

This user guide will be updated as new tools are added to Connie’s Portal.
If you are having difficulties accessing the Portal or tools are not displaying as described above, please contact help@conniect.org and a member of our Customer Support will respond.
Connie is powered by CRISP technology through our partnership with CRISP Shared Services
