

Table of ConTenTs

1.0 InTroduCTIon
Welcome to version 2.0 of the Company Scale System set of games. These rules are to be considered valid for all previous games in the series and any rules here should take precedence over those previous games. There are some changes that have been made after several years of experience in the play of these games. The changes have been made in blue text so that veterans of the games can easily adapt to any new or corrected rules of version 2.0. Make sure to check the Compass website for any changes needed in those prior games that have been published before this version of the rules has been published.
The Company Scale System (hereafter CSS) is a series of games covering company scale operations in the modern era. The hex scale for all of these games is set at 500 meters a hex, with two-hour daylight turns (and two night-time turns) and the majority of units in the game are at company level. Here you’ll find all basic rules that apply to all games in the system. Company level allows for the best blend of tactical operations and operational scale to allow battles that normally wouldn’t be possible at the tactical level if one was using platoons or squads.
To gain the most information on this series, please check the following places on the web.
For interacting with the designer or developer(s): talk/consimworld.com - and look for the CSS folder
For insight and for advance news of future games in the series: https://www.facebook.com/groups/1548006105303235
For rules addenda and/or errata: https://www.compassgames.com
For general information on the game and the system: https://boardgamegeek.com/boardgamefamily/46595/series-company- scale-system
2.0 Game defInITIons
The following are series specific terms that are used in CSS. The exclusive rule book will cover all unique game terms that apply to that game. We have capitalized these terms throughout the rules.
“The Cup”: An opaque container used to store all Chits that will be drawn this turn.
Action: Generally, a type of operation that an Active Unit can perform. Depending on the type of Unit being Activated, the available operations are moving, firing, assaulting,
rallying, or engineering. See also ‘Second Action’. Inactive Units can perform Opportunity Fire.
Action Phase: A step in the Sequence of Play during which all Activations occur.
Activation: 1). The period from when a Chit is drawn from The Cup to when all Actions have occurred, and another Chit is to be drawn from The Cup; or 2). The process of making a Unit Active.
Active Unit: When a Division or Formation Chit is in play, all Units of that Division or Formation are considered to become Active and may perform Actions. See also Direct Commands.
Assault Action: The game mechanism that represents an attacking force advancing on a defending force to dislodge the defenders from their position. Assault is a type of Action. It may have specific names attached to it in different modules, e.g., Prepared Assault for US Marines but generally, the mechanics for all assaults are the same.
Blocking Terrain: A terrain type that completely obstructs Line of Sight.
Chits: The Markers that go into The Cup and are drawn to determine the order of play for that turn. Chits have the game logo on their fronts and their identity on their backs.
Column: A status that allows a Unit to optimize the amount of movement points it receives when doing a Move Action. Some Units cannot move unless they are in Column. Generally, a Unit is shown to be in Column when the back of the counter is face up (the front showing Deployed status).
Color-Stripe (other than white): A notation on a Unit or Marker that shows it belongs to a particular Formation. All Units and Markers that belong to the same Formation will have the same colored stripe.
Command Rating: A rating representing the overall Command Ability of a Division. This measures personalities as well as technology. Its value contributes towards determining how many Direct Commands a Division will receive for a Game Turn.
Defensive Value: A quantitative rating of a Unit’s or a Support Weapon’s Defense ability. It always modifies an opponent’s Firepower. That means the lower the value the better for the Defender (i.e., -1 is better than +1).
Deployed: A status that allows a Unit to optimize the amount of Firepower it receives when doing a Fire Action. Some
Units cannot do a Fire Action unless they are Deployed. Generally, a Unit is shown to be Deployed when the front of the counter is face up (the back showing Column status).
Direct Command (DC): An abstraction to show direct supervision of combat Units by their higher level leadership. This is tracked using the Direct Commands Marker on each Division’s General Records Track. No Division may have more than 19 Direct Commands on its track during a turn. Direct Commands allow for additional Activations by Units. They may also be used for other game mechanics.
Disorganization (DG): The level of Disorganization in a hex is marked by the use of DG Markers. Those levels apply to all Soft Targets Units in the hex (Hard Targets can ignore them). They have values ranging from 1 to 4. The higher the value the greater the level of Disorganization (4 being the worst). They reduce the Firepower, Movement and (if 3DG or 4DG) the Troop Quality of Units. All these modifiers are clearly stated on the DG Markers.
Dispatch Points (DP): An abstraction that represents the “planning” and “preparation” by a Formation or Division to accomplish a military task. This is tracked using a Dispatch Points Marker on each Division’s General Records Track. No Division may have more than 9 Dispatch Points on its track. Dispatch Points allow players to add Division and Formation Chits to The Cup, both at the start of the game turn and during the Chit draw phase of the Game Turn. They may also be used for other game mechanics.
Dispatch Rating: A rating representing the ability of personnel in a Division to plan attacks, and their general intelligence appreciation of the situation. Helps determine how many Dispatch Points a Division will receive each Game Turn.
Division: A grouping of several Formations. All Divisions have the same background color on their Units and Markers. A Division in game terms is not necessarily a Division in actual military terms. See also No-Stripe and WhiteStripe Units.
Divisional Display: A separate chart that is used to track various administrative functions in the game. Players may look at their opponent’s Divisional Displays at any time during play.
Engineering Action: Engineering Actions allow Units to perform certain types of activities. These will be described in the Exclusive Rules.
Fire Action: Firing at an enemy Unit or being in a Stack with a Firing Unit and adding an additional +1 strength to the Firepower, counts as the Unit having done a Fire Action.
Fire Zone: A hex considered to be in the Fire Zone of a Unit if that Unit could legally Fire into that hex. The exception is Units who have a black Firepower box face up on their counter (Indirect Firing Units). These never have a Fire Zone. A Barrage in a Unit’s hex or an enemy Unit adjacent to a Unit reduces that Unit’s Fire Zone to only adjacent hexes regardless of any other factors.
First Action: The action taken when a Divisional Activation or a Formation Activation Chit is pulled from the Cup. These Actions cost no additional Direct Commands to perform and the Unit (or other types of markers) do not need to be In-Command to perform this Action.
Formation: A group of Units in the same organizational structure. Usually this is a Brigade or Regiment in military terms. A group of Formations make up a Division.
Fortification: A Foxhole, Trench, Pillbox, Bunker, Cave, Ridge, Booby Trap, or Mines.
Game Day: From the beginning of the first day turn to the end of the second night turn. The time of the first daylight turn varies by what time of year and the location of the battle.
Game Turn: Each daytime turn represents approximately 2 hours of real time. There are two night turns, each representing somewhere from 4-6 hours.
General Records Track: The 0-19 track on each Divisional Display where various Divisional markers are kept (Current Troop Quality, Direct Commands, Dispatch Points and Fatigue).
Hard Target: An armored target. All Hard Targets have either a black or yellow box surrounding the defense value on their counter. Hard Targets with black boxes around their defense strengths are “Tanks” in game terms.
Hero: A person of special significance in the battle. Heroes have special attributes to represent their effect in the actual battle. These are marked on the Hero’s counter.
Hindering Terrain: Hindering Terrain will only block LOS after until the LOS path has been traced through a certain number of hexes on the same elevation. That will be covered in the Exclusive Rules. The effects of Hindering Terrain can be ignored if the Spotting Hex and Targeted Hex are on different elevations.
Inactive Unit: A Unit that has not been activated or a Unit that has been activated but has completed its Action for that Activation Chit.
In-Command: A Unit is In-Command if it is within command range of its Formation HQ, or its Division HQ, or if it is stacked with or adjacent to any Leader.
Indirect Fire: If a black Firepower box is face up and visible on a Unit counter it means that when it does a Fire Action, it will use Indirect Fire. Indirect Fire may be performed with the use of a spotter.
Initiative Player: The Initiative Player will be defined in the Exclusive Rulebook. Being the Initiative Player gives certain advantages during the Sequence of Play.
Interrupt: An option for the Initiative Player to spend 2 Dispatch Points to immediately play a Formation Activation Chit that has not already been bought/played in that Game Turn. If Initiative Player declines, the Reaction Player has the option to do so. If both decline a Chit is randomly pulled from the Cup.
Leader: A commander of a Division or a Formation. Leaders offer combat advantages and can command Units in or adjacent to the hex in which they are currently placed. Any modifiers they offer are stated on counter.
Leg Unit: A Unit whose movement allowance is denoted in a color other than black or red. Usually colored in white but not always.
Line of Sight (LOS): A straight line traced from the center of a Spotting Hex to the center of a Targeted Hex. Line of Sight can be clear, hindered or blocked.
Markers: All game pieces that are not Units. These can be Support Weapons, Leaders, Heroes, Fortifications, Barrages, Division Trucks, or Unit Status Markers (like DGs, Pinned or Suppression).
Move Action: An Action where a Unit expends their movement points. Many Units must be in Column to perform a Move Action. Move Actions can trigger Opportunity Fire.
No-Stripe Units: These Units are considered part of every Formation in their Division for all game purposes.
Opportunity Fire: A type of Action performed by Units that are not Active. This may be performed when an enemy Move Action is used in a friendly, inactive Unit’s Fire Zone or when a Unit is being Assaulted. There are some restrictions to when Opportunity Fire can be used
Pinned: A combat result from a Fire Action when the Target Unit is Deployed and fails a Rout Check. Units
remaining after a Targeted Unit in their hex has routed are also Pinned. A Pinned Unit loses some abilities, as noted on the Pinned marker.
Reaction Player: The player that is not the Initiative Player.
Second Action: An action performed by an In-Command Unit after it has performed its first (free) action. This cannot be the same type of action as the first action. A second action costs a Direct Command per activated Unit. A Unit cannot do a Second Action if it did an Assault Action as a first Action, nor if it was Activated for its First Action by a Direct Command.
Spotter: A Unit that has a clear LOS to the Targeted Hex that the Indirect Firing Unit wishes to fire upon. The Spotter and Indirect Firing Unit must both belong to the same Division.
Soft Target: A Unit that does not have any armored protection from enemy fire. These Units or Markers have no box around their Defense Value. Soft Targets are affected by Disorganization.
Status Markers: These are all Fortifications, DGs, Suppressed, Pinned, different types of Assault Markers and Barrage Markers. Players are free to make more of these if needed during a game.
Support Weapon (SW): A marker that can adjust the Firepower/Range/Fire Type of a Unit. Support Weapons have the notation “SW” on their marker.
Suppressed: An involuntary state caused by combat. A Suppressed Unit cannot move or fire and has a modifier to its TQ, as noted on the Suppressed Marker.
Sustained Fire: A Support Weapon that allows more than one Opportunity Fire in an Assault or Activation. Sustained Fire can lead to a Support Weapon becoming broken (see Exclusive Rules).
Tanks: Tanks are a specific type of Hard Target and have a black box around their Defense Value.
Tracked Unit: A Unit with a red movement value on its counter.
Troop Quality (TQ): A quantification of the current morale and quality state of a group of Units (usually a Division). The higher the value, the better.
Troop Quality Check (TQC): is a die roll that is compared with a Unit’s current Troop Quality. A roll equal to or less than the Troop Quality passes the TQC.
Unit: A formed combat force that is usually company size. Units in the game do not have a + or – in their Fire Power box.
Wheeled Unit: A Unit with a black movement value.
White-Stripe Unit: These Units are not part of a formation. They only activate when the Division Activation for their Division is pulled from The Cup and may Activate when the Direct Command Chit is pulled. Some markers have a white stripe; these have similar limitations on their use and limits on their placement.
3.0 Game ComponenTs
The game components for each game will be in the exclusive rulebook for that game. Generally, all games will have one or more maps, one or more countersheets, several Division Displays, a Combat Results table, a Terrain Effects Chart, and a Game Turn/General display chart.
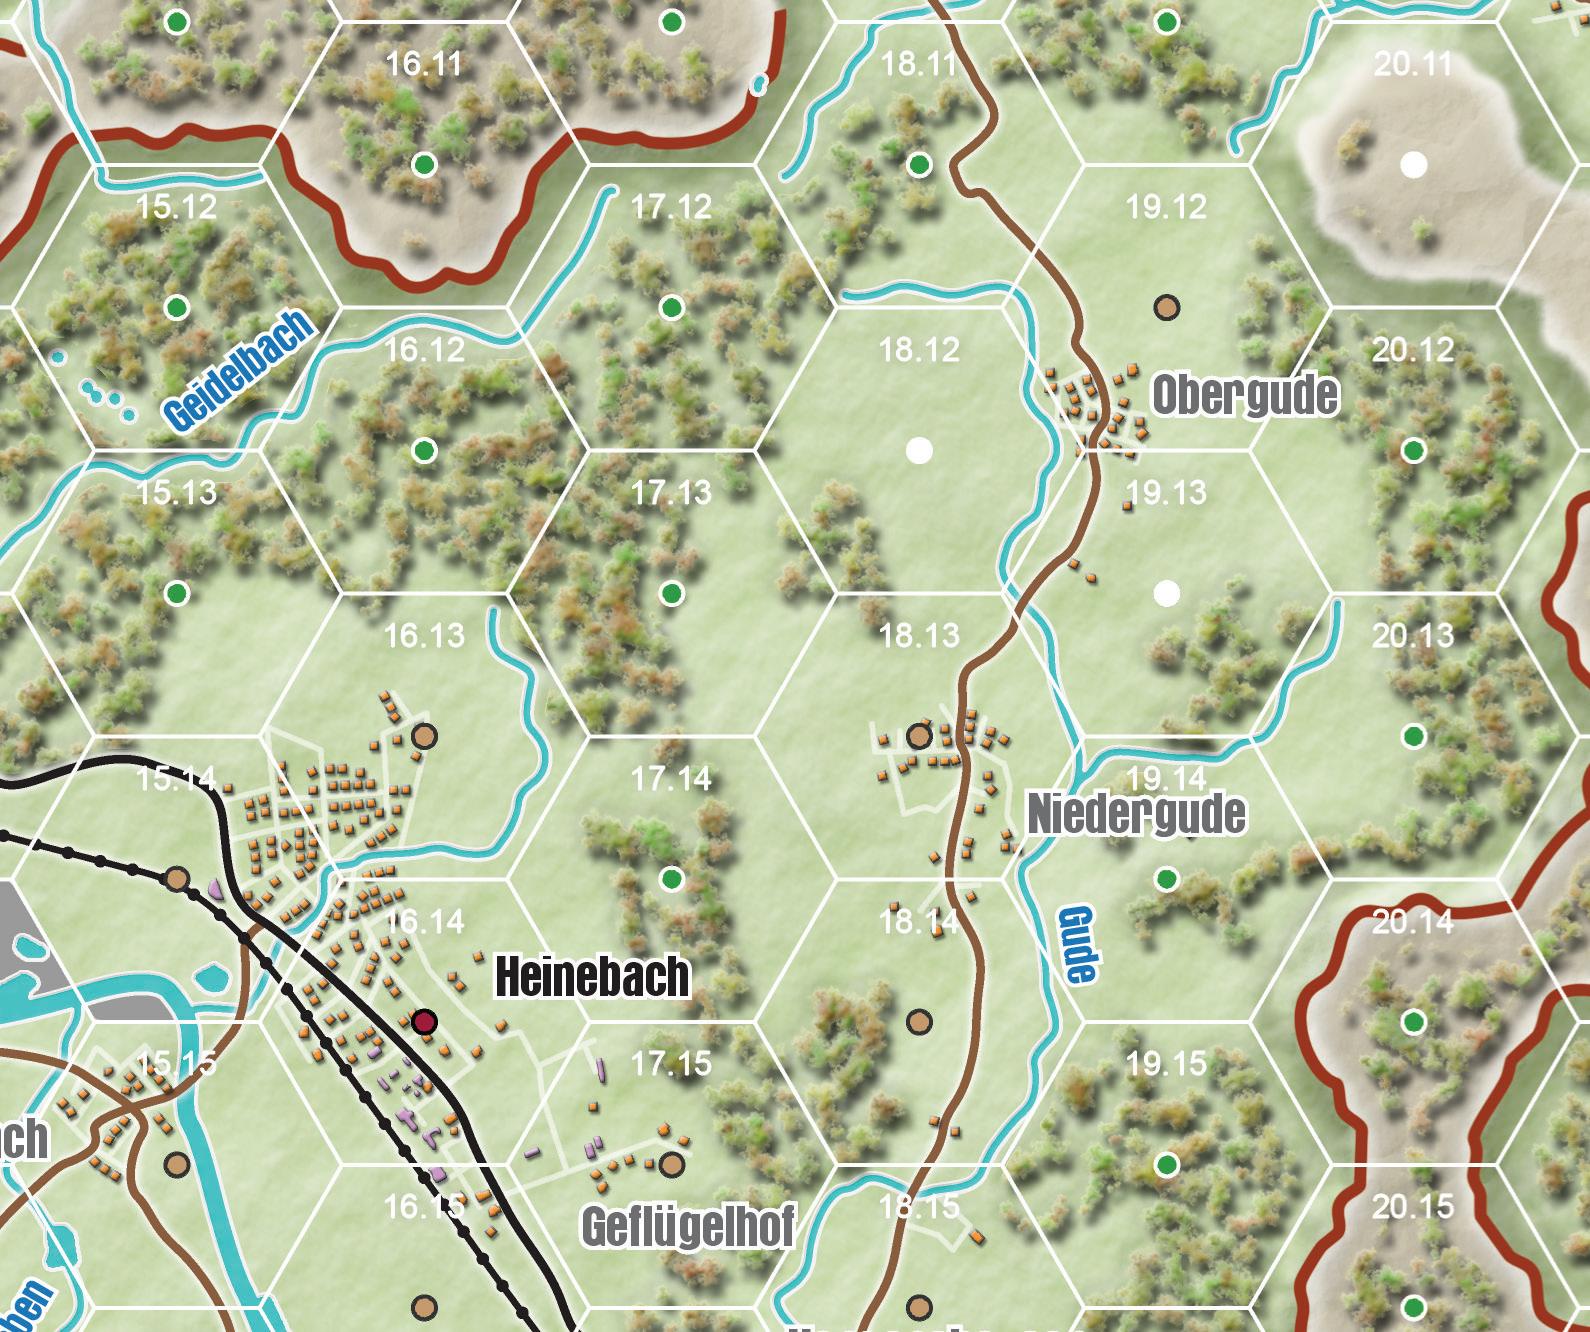
3.1 The Game map
The Game Maps are scaled at 500 meters a hex (exactly at 1:25,000 scale). Each playable hex has a dot in to indicate the terrain type for that hex – and to trace a Line of Sight. Hexes without a dot are not playable hexes.
Determines Terrain Type

3.2 The Game pieces


CHITS
Fronts of all Chits have the game logo on them
Division Activation Chit (note - no stripes)
Formation Activation Chit (an identifying stripe)


Each side always has one of these in The Cup
Removes all Barrage Markers
Roll on Random Events Table
(Front)

(Back)

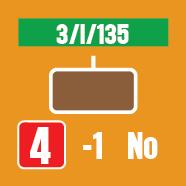
1 - Stripe (yellow in this case): Identifies Formation


Formation Stripe
Division Stripe
No-Stripe Unit (belongs to any Formation in Division)
2 - Fire Power Box (Color Identifies Types of Weapon)


Red: Small Arms
Yellow: High Explosive
Black: Indirect Fire
White: Either Armor Piercing or High Explosive (Firing Player’s Choice)
Blue: Armor Piercing
3 - Fire Power Value
A value ranging from 0-8 and the unmodified value you use to start determining your strength in a Fire Action. A Superscript number is the range; no superscript = Range of 1.
4 - Movement Value


Deployed: May not move
Deployed: May move
Column: White: Leg movement
Column: Red: Tracked movement
Column: Black: Wheeled movement
5 - Unit ID
Generally Company/Battalion/Regiment or Brigade. The Unit above is A Company of the 4th Battalion, 77th Armor Regiment.
6 - Defense Value
If no value is shown, the Defense Value is 0 (Soft Target) Lower numbers are better


Defense Values in a black box are Tanks. These are all Hard Targets.
Yellow Boxes Targets are hard targets but are not considered Tanks in the game.
7 - Unit Symbol
Used mostly for historical interest but it is important to know which Units are Engineers. Engineers may have this symbol - - but also all Units with “Eng” in their name are also Engineers.

8 - The Division Color
9 - Special Offensive Attribute - See Exclusive Rules
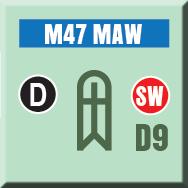
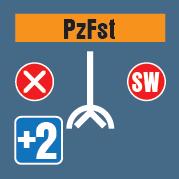
SUPPORT WEAPONS

1 - All Support Weapons have this symbol:

2 - Support Weapons also have an identifying stripe. Colored stripes belong to a Formation, white stripes belong to a Division and no-stripes belong to all Formations of that Division
3 - Symbol of the weapon type. For historical interest only
4 - If there is a Defensive addition or subtraction from the value of the hex, it is listed here. If no value is present, there is no modification.
5 - The Firepower addition, range, and Firepower type change
6 - The Division to which the Support Weapon belongs is shown by the overall color of the counter
7 - The type of Support Weapon
8 - Any special attributes the Support Weapon offers. See Exclusive Rules
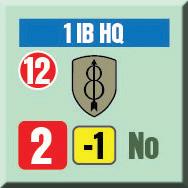
LEADERS, HQs, HEROES & COMMISSARS


Leaders have a Command Range of 5 hexes and may add their TQ bonus (1) to any Units in range and in their Command.
HQ Command Range
Eliminated HQs are placed in the Routed Units box


FORTIFICATIONS
Troop Quality Modifier for all Units in the hex

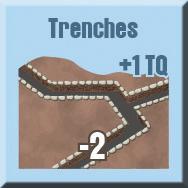


Terrain Defense Modifier


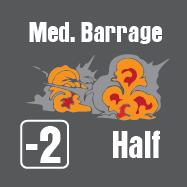
BARRAGE MARKERS
Troop Quality Modifier for all Units in the hex


Firepower Modifier for all Units in the hex
Movement Modifier for all Units in the hex
3.3 Game charTs and Tables
There are various charts containing Division Displays, Game Turn / Weather / Vcitory Point Tracks, Combat Results Tables, Randome Events and Terrain Effects Charts.

1. PREPARATION PHASE
A) Weather Determination (first day Turn only) Roll on the Weather Table to determine the weather for this entire Game Day The effects of weather and what types of weather occur in the game will be listed in the exclusive rulebook.
B) Check for Division Fatigue: (first day turn only). This will depend on the Nationalities involved. See the exclusive rulebook for the impact of fatigue in the game.
C) Distribute Alcohol (Every Turn): This will depend on the Nationalities involved. These allow for one re-roll of any type during the turn. See the exclusive rules for each specific game.
D) Place any Reinforcements due to arrive this turn.
E) Spend Dispatch Points: Each player may spend Dispatch Points to add Chits to The Cup for this turn. Players must pay 2 Dispatch Points to add a Division Activation Chit to The Cup and 1 Dispatch Point to add a Formation Chit to The Cup. The Dispatch Points must come from the relevant Division. If buying a Formation Chit that must come from the Division the Formation belongs to. If a Division does not have enough Dispatch Points to buy a Chit, that Chit may not be bought this turn. Troop Quality of the Division may restrict the ability to buy Division or Formation Chits (see Exclusive Rules).
F) Fatigue:
• If a player adds a Division Activation to the cup during a day turn, add 2 to the Division’s current Fatigue.
• If a player adds a Division Activation to The Cup during a night turn, add 4 to the Division’s current Fatigue.
• If a player does not add a Division Activation to The Cup during a night turn, subtract 1 from the Division’s current Fatigue.
Make these adjustments immediately after all Activation Chits have been purchased.
G) Getting More Dispatch Points: Each player may roll a die to add more Dispatch Points to each Division. They must roll a die for each Division; if they roll the Division’s Dispatch Rating or less, they should add 3 Dispatch Points to that Division’s total. If they roll higher than the Division’s Dispatch Rating, they should add 1 Dispatch Point to each Division’s total. Each Division may have no more than 9 Dispatch Points on its track.
2. ACTION PHASE
A) All Chits purchased in step 1E are put into “ The Cup”. To these Chits are added each Player’s Direct Command Chit, the Wind Chit and the Random Event Chit. Additional automatically added chits or other types of chits may be added as well. See the exclusive rulebook for additional rules about chit types and special rules. All games will have Two Direct Command Chits (one for each side), a Wind Chit, and a Random Events Chit (what random event occurs and how to determine the event will be explained in the exclusive rulebook.
B) If this is the first day turn and there are any Illumination Rounds on the map, remove them.
C) If a Formation Activation Chit was the last Chit in The Cup from the previous Game Turn this is played now (no option for an Interrupt before it is played).
D) Interrupt: Should the Initiative Player wish to immediately play an available Formation Activation Chit before the draw of any Chit throughout the Action Phase, they can spend 2 Dispatch Points and play a Formation Chit (only if that Formation Chit was not purchased for this turn in Step 1E and has not been played already in this Action Phase, i.e., a player cannot buy the same chit more than once per turn). If the Initiative Player does not wish to do this, the Reaction Player has the option to do so. If neither player wishes to do this, draw a Chit from The Cup. Once a Chit has been drawn, this option is no longer available until the next Activation (i.e., you cannot wait to see the Chit draw before deciding whether to preempt it).
E) If an Interrupt does not take place, a Chit should be pulled and the following carried out:
i) If the Wind Chit is drawn, remove all Barrages and Illumination Rounds from the map.
ii) If the Random Event Chit is drawn, roll on the Random Events Table and resolve the Event.
iii) If a Division or Formation Activation Chit is drawn, do the following:
a) Remove all Concentrated Fire, Sustained Fire, and No Opportunity Fire Markers from any Active Units
b) Move Active Support Weapons from the Reallocating SW box to the Available SW box of the Active Division.
c) Active Units adjacent to Assault Markers must
change from Deployed to Column if they are able to Assault into that hex and if they are unable to move while Deployed (see 9.3)
d) Perform any Assaults. All Units that assaulted, or fired indirectly in support of an Assault are no longer Active for this Activation.
e) Place any new Assault Markers adjacent to Active Units.
f) Other Active Units may now perform Actions other than Assault (move, fire, engineer, rally). They may switch from Column to Deployed and vice versa before doing these Actions.
g) Before an Active Unit does an Action, Support Weapons may be attached or detached from the hex it is in (see 12.1-2)
h) Pay a Direct Command to Perform a Second Action with any In-Command Units.
i) Move all Active Leaders to any hex of their command (see 13.1).
j) Check for any Over-stacking and different formation penalties and apply DGs as needed.
F) If the Direct Command Chit is drawn, do the following:
a) Roll a die for each Friendly Division, halve the result (rounding down) and add that number to the Division’s Command Rating. Add this value to the Division’s current Direct Command total. Each Division may have no more than 19 Direct Commands on its track.
b) Activate Units as desired at a cost of one Direct Command per Unit.
1. For each Unit (or stack) activated, remove any Concentrated Fire, No Opportunity Fire, or Sustained Fire Markers from the hex occupied by the Active Unit.
2. The Active Unit (only) may change from Deployed to Column or vice versa at the beginning of their activation (but may not change again until the Unit is Active again with a future Chit draw).
3. The Active Unit may perform one action (only) of any type except Assault.
G) If there is only one Chit left in The Cup and neither player wishes to purchase a Formation Chit, proceed to the End Phase. This is put to one side. It will be the first Chit to be played in the next Game
Turn. If there are still Chits remaining in the Cup, return to the start of Step 2D.
3. END PHASE
A) Check to see if a Victory Condition has been met.
B) Check to see if the game has ended.
C) If not, advance the Turn Record to the next turn and return to the beginning of Step 1A.
5.0 aCTIvaTIons and aCTIons
CSS is a chit pull game, which means that when particular chits are pulled from a cup (or purchased with Dispatch Points during an Interrupt), a certain level of command on the battlefield is activated.
There are three levels of command simulated in CSS, each of which receives a different chit. The highest level of command to be activated is the Division. The next is Formation, which is usually a Brigade or Regiment that is part of a Division. Lastly there is Direct Command, which represents Divisional Commanders taking control over particular Units to deal with incidents that would normally be handled by more junior commanders. Each Activation Chit can only ever be used once per Action Phase, regardless of how it is brought into play. The last chit in the cup is not played. Instead, if it is a Division or Formation Chit, it is put to one side and will be the first to be played in the next game turn. Otherwise ignore the final Chit in the cup.
Units become activated during the Action Phase of a Game Turn when their relevant Division or Formation Activation chit is drawn from a cup. They may also be activated individually when the Direct Command Chit is drawn for their side. A Unit that has been activated is described as an Active Unit.
With a Division or Formation Activation Chit, each Active Unit can potentially perform up to two Actions. These are referred to as a First and Second Action. They include Actions such as moving, firing, assaulting, rallying, and building things (engineering actions). With a Direct Command Activation, the Units may only perform a First Action. The Second Action must be different to the First Action. Inactive Units may only ever perform Opportunity Fire.
Interrupts: Before each chit is drawn randomly, the players can do Interrupts. This will normally start with the second chit of an Action Phase. This is because the first chit to be played in a turn won’t be drawn randomly. It will be the one that wasn’t played in the turn before (the exception being on the first turn, where there won’t be an unplayed chit from the previous turn). The final opportunity to do an Interrupt is at the end of the Action Phase when the Cup only has one chit left in it.
The first option to do an Interrupt before a chit is drawn randomly, always goes to the Initiative Player. The Initiative Player will be stated in the Exclusive Rulebook. If they pass, the option to do an Interrupt goes to the Reaction Player. If both players do not wish to do an Interrupt, then a chit must be drawn randomly from the Cup (unless this is the last chit, in which case the Action Phase is completed).
Example: At the start of the Action Phase before any Chits are drawn, the Soviet Player (who is the Initiative Player in this game example, and therefore always has the first option), says they wish to take the first opportunity to do an Interrupt. They pay 2 Dispatch Points to choose a Formation Activation Chit that was not purchased during Step 1E in the Sequence of Play. They immediately activate that formation and complete all the actions they want to do.
There is now a second opportunity to do an Interrupt. Since the Initiative Player always has the first option, they could take the second opportunity too. However, they decide they don’t want to and pass. This means the NATO player (the side without the initiative in this game example) can take the second opportunity to do an Interrupt. They do want to take it, so they follow the same procedure as the Soviet Player did.
There is now a third opportunity to do an Interrupt. Again, the Initiative Player (the Soviet Player in this game example) has first option to take the third opportunity. However, they pass and give the NATO player the option to take it. They also pass and because both of the players have passed on the same opportunity to do an Interrupt, a chit must now be randomly drawn from the Cup (unless it is the last chit).
This example describes three opportunities to do an Interrupt. This was for the benefit of the example. The number of opportunities to do an Interrupt before each chit pull is only limited by each player’s available Dispatch Points and their desire to do so.

5.1 division acTivaTion
This is the highest level of command simulated in CSS. It reflects the Division operating in a co-ordinated way across the battlefield. This means that when their Division Activation Chit is drawn from the Cup, all Units of that Division (Color-Stripe, White-Stripe and No-Stripe Units) are now Active and may perform an Action. Those that do not Assault or use Indirect Fire in support of an Assault, may also perform a Second Action. There are two requirements for this. The Unit must be In-Command (see 5.4) at the moment it wishes to take that Second Action and the Owning Player must pay a Direct Command Point from that Division.
Who goes when the Division Activation Chit is pulled?
This Chit can only come out of The Cup if it was purchased earlier in the turn and added to The Cup.

All Units of that same background color are now active. This should include all Units and Support Weapons of the following Formations:


1st Brigade (blue stripe) - 20 Units and 10 Support Weapons.
2nd Brigade (red stripe) - 20 Units and 10 Support Weapons.
3rd Brigade (yellow stripe) - 20 Units and 10 Support Weapons.
Divisional Units (white stripe) - 9 Units.

No-Stripe Units (in this case there are just the two).
5.2 FormaTion acTivaTion
This is the next level of command in CSS. Formations are mostly Brigades or Regiments and usually part of a Division. When their Formation Activation Chit is drawn from the Cup, (or during an interrupt), all the Color-Stripe Units of that Formation are now Active and may perform an Action.
Those that do not Assault, or fire Indirect Fire in support of an Assault, may also perform a Second Action. There are two requirements for this. The Unit must be In-Command at the moment it wishes to take that Second Action and the Owning Player must pay a Direct Command Point from the Division to which the current Formation Activation Chit belongs.
White-Stripe Units: Players should note that White-Stripe Units do not belong to a particular Formation and are therefore never activated by a Formation Activation Chit.
No-Stripe Units: Unlike Color-Stripe Units, who are activated when their particular Formation Activation Chit is drawn, No-Stripe Units activate every time a Formation Chit is drawn. No-Stripe Units are usually those capable of covering large distances in a very short space of time such as Helicopters or Aircraft. They follow the same procedure for a Second Action as a Color-Stripe Unit.
Who goes when a Formation Chit is pulled?

During the Action Phase, this Chit becomes the Chit in play. This could have happened either by the NATO purchasing the Chit for 2 Dispatch Points, it was purchased earlier and is randomly pulled out of The Cup, or NATO had an EW advantage and decided it would be the next Chit in play. Regardless of how it becomes the current Chit in play, when it is, the following Units are now Active and able to perform Activations.
This includes all Units and all Support Weapons that have a Red Stripe and the same Division color – and any No-Stripe Units of that Division (here being the Division Leader, Whiddon, and the Attack helicopters attached to the Division).


5.3 direcT command
Direct Command represents a Divisional Commander exercising control over Units in a way that would normally be left to a more junior officer. The cost of this micro-managing is deliberately expensive. It also means that when a Direct Command Chit is drawn it does not activate a group of Units. Instead, the Owning Player must pay a Direct Command Point for each Unit they wish to activate (Color-Stripe, White-Stripe and No-Stripe Units). These Units do not need to be In-Command. Each Unit activated by a Direct Command Point may perform a single Action. No Unit may perform a Second Action. If the player is doing an Action that uses more than one Unit, each Unit that participates must be paid for individually.
Example: A player wishes to activate three Units in the same hex to perform a single Fire Action together. This will cost them 3 Direct Command Points.
Direct Command Chit:
Unlike all other Activation Chits, the Direct Command Chit may activate any unit that the player controls to do one (only) Action.
But before any Units are chosen to become Active, roll to see how many additional Direct Commands are added to each Division by rolling a die for each Division in play (has any Units of that Division on the map) and add the correct number of Direct Commands to that Division’s Display.
After that, the points acquired this turn as well as any that remained from previous turns may now be used to Activate one Unit at the cost of one Direct Command.
5.4 beinG in-command
To be In-Command a Unit must meet at least one of the following criteria. There are no benefits to meeting more than one criterion.
• Within its Formation HQ range (If Color-Stripe/ No-Stripe)
• Within its Division HQ range (If ColorStripe/White-Stripe/No-Stripe)
• Stacked with/adjacent to a hex with any Leader of its Division (All Units).
5.5 perForminG acTions
When Units are activated by a Chit, they are considered to be Active Units. Active Units can perform Actions individ-
ually or as a Stack. The use of ‘Stack’ (as opposed to ‘stack’) denotes more than one Unit in the same hex doing a single Action, rather than Units who just happen to be physically stacked together. Units may also be able to do a Second Action. However, this Second Action, (whether Units are doing it individually or as part of a Stack), must always be different from their First Action.
As soon as a player moves on to perform an Action with a different Unit/Stack, the previous Unit/Stack becomes Inactive. As stated in the introduction to the chapter, Inactive Units can only perform Opportunity Fire (8.5).
Individually: Units performing an Action individually may be eligible to do any of the following: Move (6.0), Direct Fire (8.2), Indirect Fire (8.6), (Collectively called ‘Fire Actions), Assault (9.0), Rally (10.0), or build things (an Engineering Action, see 11.0). Any Second Action they wish to do/are eligible for, must be completed before the player does an Action with another Unit/Stack.
Stack: Providing they started the Activation in the same hex, Units may also combine to do an Action as a Stack. This includes any of the following: Move, Direct Fire, and Indirect Fire, Assault and Engineering. How a Stack performs them is discussed in more detail in the sections dedicated to each Action.
If a player does a First Action with a Stack, each Unit that made up that Stack must complete any Second Actions they wish to do/are eligible for, before the player moves onto doing Actions with another Unit/Stack.
An ‘Active Hex’ marker is provided to remind players where a Stack is currently performing an Action. If there are units that are physically in the same hex but who are not performing that Action, players may find it useful to temporarily move them to one side and then replaced when the Action has been completed.
There is an important exception to this “one Unit/Stack at a time” guideline when players are doing an Assault Action with their Units.
During an Assault Action, eligible Units may be in more than one hex. However, they still perform the Assault at the same time (9.4). After the Assault is completed, all the participating Units become Inactive Units and may not perform any more actions that Activation.
5.6 leaders durinG acTivaTions
Division/Formation Activations: As a guiding principle, Leaders are activated by the same Activation Chits as the Units they Command.
• No-Stripe Leaders of that Division are activated during the Division Activation and every Formation Activation.
• White-Stripe Leaders of that Division are activated during their Division Activation
• Color-Stripe (Formation) Leaders of that Division are activated during their Division Activation and their own Formation Activation. 5.
However, Leaders must remain in the hex they started the Activation in, until all activated Units have finished their Actions. Then, as a final step of that Activation, all Activated Leaders must be placed with a Unit they Command. A player will simply pick them up and place them in a hex with the correct type of Unit. For this placement, they can ignore any enemy Fire Zones or normal movement restrictions.
No-Stripe Leaders must be placed with any Unit in their Division
• White-Stripe Leaders must be placed with any White-Stripe Unit in their Division
• Formation Leaders must be placed with any Unit in their Formation.
Direct Command Activation: If any Leaders start the Activation in the same hex as a Unit that has been made Active, they may Move with that Unit. If it is the only Unit in the hex, they must Move/Assault with it as Leaders cannot be left in a hex at the end of an Activation. Players should note that there is no placement of Leaders as there is at the end of a Division or Formation Activation.
Leaders are always in command but are not Units.
5.7 chiT acTivaTion summary
Chit Drawn The first thing you do is: Activates... 2nd Action Possible?
Division Activation
Chit
Formation Activation
Chit
Direct Command
Chit
Perform Assault Actions
Perform Assault Actions
Roll for more Direct Commands
All Units in that Division
Yes – 1DC per Unit, if In-Command
All Units in that Formation Yes – 1DC per Unit, if In-Command
Any Friendly Unit (Doesn’t have to be In-Command), Pay 1
DC from the Unit’s Owning Division No
6.0 move aCTIons
A Move Action is one in which a Unit spends Movement Points to move to a different hex. Units may move individually, or as a Stack if they all started the Activation in the same hex and move to the same hex. Some Units will have no Movement Points unless they are in Column. In order for these types of Units to move they must be flipped to their Column side.
Move Actions require Units to spend movement points to enter an adjacent hex and then, after spending those points, to move into the adjacent hex. This timing is important for some game mechanisms, notably Opportunity Fire.
A friendly Unit performing a Move Action in an enemy Fire Zone may create an Opportunity Fire trigger for an enemy Unit (see 8.51).
Stacking Example
Immediately before an Active Unit (or Stack of Active Units providing they all occupy the same hex at the start of an Activation) does an Action they may first change from Column to Deployed status, or vice versa. This is the only times a Unit can change from one mode to the other.
6.1 sTackinG
Generally, Players may stack up to 3 Units in a single hex without penalty. The exception being if a stack contains Units from different Formations and/or Divisions.
Mixed Formations/Divisions Penalty: If an Activation ends with Units sharing the same hex from different Divisions, or from different Formations within the same Division, 1 DG is added to the hex. White-Stripe and No-Stripe Units may stack with any Units from the same Division without incurring any DG penalty.
The NATO player has three stacks but wishes to combine them into one stack in hex 27.35

1) General Whidden, commander of the 8th Infantry Division, as well as Company B/3/8 are in hex 27.35. Also, in the hex are two M47 MAW Support Weapons.
2) A Company of the 32 Regiment from the 3rd Armor is in 24.34
3) Colonel Driskill, commander of the 11th Cavalry Brigade, as well as the 3 Troops of the 1st Squadron are in hex 24.36


The NATO player moves A Company into hex 27.35. Leader Units do not count towards stacking but the hex now contains 2 Non-Leader Units (A/2/32 and B/3/8). Support Weapons don’t count towards stacking. So, the stacking does not exceed 3 for a penalty but the NATO player does have Units of different formations in the same hex. 1 DG is added to the stack.
Next, the 11th Cavalry enters the hex. We now have 5 non-Leader Units in the hex. This is 2 over the allowed 3 Non-Leader Unit limit. 2 DG are added to the hex. Note that the different Formation penalty is only applied once so even with three Formations in the hex, no additional DG is added. A total of 3 DG are now in the hex.
The next time any of these formations are active, the NATO player may perform a Rally Action and remove one of those DGs from the hex.
Unless more Units enter the hex, there is no added penalty for overstacking or for different formations if the hex remains unchanged as the game continues.


This 1 DG penalty is regardless of the number of different Divisions/Formations that are in the hex. Also, once a hex has paid the penalty for the mixed Formations/Divisions at the end of an Activation, it does not need to do so again.
If there are more than 3 Units in a single hex, another penalty is applied.
Over-stack Penalty: One level of Disorganization is added to each hex containing more than 3 Units at the end of any Activation (whether friendly or enemy). However, once this penalty has been applied to a hex, it isn’t applied again.
Example: A hex ends an Activation with a total of 4 Units in it meaning that it is over-stacked by 1 Unit. Therefore 1 DG is added to the hex. At the end of the next Activation the hex has a total of 5 Units in it. Although there are now 5 Units in the hex (2 over the 3 Unit threshold) only 1DG is added because the penalty for the 4th Unit has already been paid in a previous Activation. If the hex continues to have 5 Units in it at the end of future Activations, no more DG would be added. For clarity, it doesn’t matter if it’s the same 4 or 5 Units. The 1 DG from over-stacking is applied cumulatively with the penalty for having Mixed Formations/Divisions.
Players should note that if a hex ever goes over the limit of 4 DG after incurring the penalty for either the having Mixed Formations/Divisions in a hex, or from being overstacked, any Soft Targets in the hex are routed as if they had failed a Rout Check in Column (see 8.4.1). This is an exception to the Combat Rules where 1 Soft Target is eliminated for each Disorganization level over 4DG.
6.2 disorGanized markers in a move acTion
Disorganization Markers (DG Markers) mark the level of Disorganization that exists in a particular hex. The DG marker applies to all Soft Targets in that hex. If any Soft Target Units move out of a hex with a DG Marker, they are given a DG Marker of the same level to take with them.
If any Units with a DG Marker move into a hex that is currently at a lower level of Disorganization, the level of Disorganization in that hex will immediately be changed to match the DG Marker of the Unit that has just entered. This still applies even if the Unit is just moving through that hex.
Example: An Infantry Unit in a hex marked with a 3 DG Marker is moved out of the hex. It is given a 3DG Marker to take with it. Subsequently it moves into another hex contain-
ing two friendly Infantry Units. That hex is only marked with 1 DG Marker. Immediately after the Infantry Unit with the 3 DG Marker moves into the hex, the 1 DG Marker for the hex is discarded and replaced with a 3 DG Marker. All the Units in the hex are now at 3 DG.
If any Unit moves into a hex that is currently at a higher level of Disorganization, it will immediately acquire the same level of DG as well. This still applies even if the Unit is just moving through that hex.
Routed: A Unit that routs is placed in the Routed Units box of its Division. All DG, Pinned, and/or Suppressed Markers it may have at the time of the rout are removed. If the hex that was occupied by the routed Unit is now empty of all friendly Units, remove any DGs from play that might remain in it.
Disorganized Example
• Troop B (with 1 DG) starts in hex 12.36
• Troop A (with 3 DG) starts in hex 13.36
• Troop C (with 1 DG) starts in hex 15.35
Troop B moves into hex 13.36. He takes his 1 DG with him but enters a hex with 3 DG. Since the hex he’s entering has a higher DG than the marker he is carrying with him, remove the lower valued (1 DG) marker. He keeps moving and enters 14.35. Both hex 13.36 and 14.35 now have 3 DG markers. He moves into the 15.35 – taking his 3 DG marker with him. The hex he enters has only 1 DG but since he has 3, the lower marker is removed and now hex 15.35 has 3 DGs.


7.0 lIne of sIGhT (los)
For a Unit to use Direct Fire on an enemy Unit or spot for an Indirect Fire, the targeted Unit or hex must be visible to that Unit. This will require it to be able to trace a LOS. Direct fire always targets a specific unit in a hex, whereas Indirect Fire targets a particular hex. However, the rules on tracing a LOS are identical for both direct fire and spotting for Indirect Fire. The only difference is that Indirect Fire can be spotted for by a unit other than the one that will be firing (see 8.6).
For simplicity, the rules will refer to the hex containing the Unit attempting to use Direct Fire or spot for Indirect Fire as the ‘Spotting Hex’. The hex that is going to be targeted for Indirect Fire or contains the Unit that will be fired on with Direct Fire will be referred to as the ’Targeted Hex’.
To check if a LOS exists, the player should trace a straight line from the center of the Spotting Hex to the center of Targeted Hex.
The following rules regarding tracing a LOS are always applied
• LOS is always reciprocal unless specifically stated otherwise in the rules
• The maximum range of a LOS path is 8 hexes during clear weather, 3 hexes during Rain.
• The maximum range of a LOS path is 1 hex during night turns (exception Illumination Rounds).
• Units – whether friendly or enemy, never block LOS.
• Units in the Spotting Hex can always see into six hexes adjacent to them.
• Units in the same hex as a Barrage/Smoke/Fire marker can only see into the six hexes adjacent to them.
Clarification: Hexside and hex spine mean the same thing. They have been used interchangeably to avoid clunky sentences that talk about two sides of a hexside etc…
7.1 TracinG a los
All the different rules about LOS discussed in 7.1 assume that the ability/inability to trace a LOS is reciprocal, even if that is not explicitly stated. The exceptions are the OPs (7.2) and when a Barrage/Smoke/Fire is on the Spotting Hex (7.3).
7.1.1. eFFecT oF blockinG Terrain on The same elevaTion
a) If the Spotting Hex and the Targeted Hex are at the same elevation and the LOS is traced through any Blocking Terrain, the LOS is blocked.
Example (a1): The Japanese Armored Unit (17.76) cannot see the USMC Infantry Company (16.80) because the LOS is traced through Blocking Terrain (Tinian Town) and both the Spotting Hex, and the Targeted Hex are at the same elevation.


Example (a2): A LOS is being traced from hex 29.21 to 29.23, passing through hex 29.22. They are all at the same elevation – level 1. However, because there is Woods in 29.22, which is Blocking Terrain, the LOS is blocked.


b) If the Spotting Hex and the Targeted Hex are at the same elevation, and the LOS is traced along a hex spine where one side of that hex spine has Blocking Terrain and the other does not, the LOS is not blocked. This applies even if further along the LOS path, the other side contains Blocking Terrain (for example there was blocking terrain in 25.30).
Example (b): The Japanese Armored Unit in 17.77 can see the USMC Infantry Company in 16.79. This is because, while Tinian Town is Blocking Terrain on one side of the hex spine, the other side of that hex spine (17.78) is Rice Paddy which is Non-Blocking Terrain. This means a LOS can be traced from the Spotting Hex to the Targeted Hex.

c) If the Spotting Hex and the Targeted Hex are at the same elevation, and the LOS is traced along a hex spine where both sides of that hex spine have Blocking Terrain, the LOS is blocked.
Example (c): The German Infantry Unit in 36.39 and the Free French Unit in 35.40 cannot see one another. This is because the LOS path is traced along a hex spine both sides of which contain Woods, which is Blocking Terrain. Therefore, the LOS is blocked.


d) The terrain in the Spotting or Targeted hex, never blocks LOS
Example (d): The German Infantry Unit in 41.36 and the Free French Unit in 45.36 both occupy Village hexes. Villages are listed on the TEC as Blocking Terrain. However, the hexes between them are clear, which is Non-Blocking Terrain, so a LOS can be traced.

7.1.2
eFFecT oF elevaTion chanGes
Different Elevation levels are shown by the use of different colors, usually from green to an increasingly darker brown. However, some games might have the lowest level (Level 1) as a light brown such as the example below.

Level 3
Level 2
If there is more than one elevation in the same hex, a Unit is always considered to be at the highest level. Each group of contiguous hexes of the same elevation is described as a plateau. For example, in the illustration above, hexes 20.10, 21.11, 22.11 etc.… all belong to the same plateau. This will become important for tracing LOS later in this chapter.
Level 1
Level 4
a) Higher Elevation: If the LOS is traced through any hex that is higher than both the Spotting Hex and the Targeted Hex, the LOS is blocked.
Example 1 (a): The Soviet Unit and American Unit cannot see each other. This is because the LOS is traced through Hex 51.64 (level 3) which is at a higher elevation than both the Spotting and Targeted hex (both at level 2).

b) Plateau Effect: A LOS cannot be traced through an elevation change unless the Spotting or Targeted hex (whichever is on the higher elevation) is on the edge of that plateau. A Unit on the edge of that plateau can potentially see (and be seen) across multiple elevation changes. Units at a lower elevation cannot see beyond the hex on the edge of the plateau of a higher elevation.
Example 1 (b): The Soviet Unit in 33.63 is at the higher elevation but is not on the edge of the plateau. Thus, the LOS is blocked because of the elevation change. If it moved to 34.62, it would be on the edge of the plateau and a LOS could be traced between it and the American Unit.


Example (b)1 continued: The American Unit has now moved directly adjacent to its plateau edge. However, it cannot see beyond the edge of the plateau of the higher elevation, so still cannot see the Soviet Unit in its current position.
Example 2 (a):The Soviet Unit is at the higher elevation and on the edge of its plateau. Therefore, it can see across multiple elevation changes to see the American armored unit below it. Multiple adjacent elevation changes on a LOS path can create blind spots, however.


Blind Spot: If the hex immediately adjacent to the lower of either the Spotting Hex or Targeted Hex is on the edge of a plateau of a higher elevation, the LOS is blocked.
Example 2 (b): The American Unit has now moved to 27.60. The two units can no longer see each other, despite the Soviet Unit still being on the edge of its plateau. This is because the lower of the Spotted/Targeted Hex is immediately adjacent to the edge of a plateau of a higher elevation (28.60). This has created a blind spot in 27.60 for the Soviet Unit.

7.1.3: eFFecT oF blockinG Terrain over diFFerenT elevaTions
a) Generally, Blocking Terrain such as Woods and Villages does not block LOS between different elevations (Exceptions see 7.1.3 b and 7.3).
Example 1: A Soviet Unit is attempting to spot an American Unit. Although the intervening Woods in 27.60 are considered Blocking Terrain, this is ignored when tracing a LOS between different elevations. As 27.60 is elevation 2 and the Soviet Unit is on the edge of a level 3 plateau, this means there is a valid LOS between the Soviet and American Units.
However, there are circumstances when Blocking Terrain will block LOS over different elevations.
b) Blocking Terrain will block LOS over different elevations if both of the following are true. If they aren’t, rule 7.1.3a is applied instead.
i) The distance between the Spotting Hex and the Targeted Hex is at least six hexes
ii) The LOS is traced through Blocking Terrain which is immediately adjacent to the lower of the Spotting/Targeted hex (Example 1) Or
The LOS is traced through a hex spine, where both sides are Blocking Terrain and immediately adjacent to the lower of the Spotting/ Targeted Hex (Example 2)
Example 2: The American unit is attempting to trace a LOS to the Soviet Unit. However, the Town hex in 16.14 is adjacent to the lower of the Spotting Hex and the Targeted Hex, which are at least six hexes apart. This means the effect of Blocking Terrain of the Town hex is applied, despite the difference in elevation, and the LOS is blocked.
Example 3: The American Unit is attempting to spot the Soviet Unit six hexes away on a higher elevation. The Town hex 8.06 does not block LOS blocked because it is not adjacent to the Spotting hex. However, the LOS path is traced along the hex spine of 07.06/0.7.07, both sides of which are Towns hexes and therefore Blocking Terrain. As the American Unit is adjacent to these two hexes the LOS is blocked. If either of them was Non-Blocking terrain, the LOS would be clear.


Example 4: By contrast, in the example below, 7.1.3 b) (ii) does not apply. The Soviet Unit and the American Unit are six hexes apart; but the hex immediately adjacent to the lower of the Spotting hex/Targeted hex (15.16) is not Blocking Terrain. It is Clear. This means a LOS path can be traced.

7.1.4: eFFecT oF blockinG hexside Terrain:
If the LOS is ever traced over at least one elevation change and along the hex spine of Hexside Blocking Terrain (for examples Slopes/Steep Slopes) that LOS is always blocked. Players should be careful not to confuse Blocking Terrain with Blocking Hexside Terrain as their effects are different. Both types of Terrain will be clearly identified on the TEC.
Example 1: The American Unit, is attempting to spot the Soviet Unit. As this is at a different elevation and the LOS is traced along the hex spine of a slope, which is Hexside Blocking Terrain, the LOS is blocked.

However, 7.1.4 only applies when the LOS is traced along the Hexside Blocking Terrain. Elevation changes are not Hexside Blocking Terrain.
Example 2: A German Armored Car Unit is attempting to spot the French Battery. Although the LOS is traced along the hex spine of an elevation change (64.43/64.44) this is not Hexside Blocking Terrain and the LOS is clear (the Wood hexes at Elevation 1 are ignored because of 7.1.3).


7.2 eFFecT oF observaTion posTs (ops):
Many games have Observation Posts marked on the map. These are special places that offer superior vantage points that can’t be fully shown on a hex and counter map. From these hexes, units can see past normally blocked hexsides.

Units at the same or higher elevation as a unit that might be spotted can see through 2 normally blocking hexes and into the third hex. This is not reciprocal. The units being spotted cannot spot the units in the Observation Posts unless they can see them without the special benefit of the Observation Posts.


Example: The German Unit is able to spot the nearer Soviet Unit despite the two intervening LOS obstacles. It is unable to spot the farther Soviet Unit because of the third obstacle. The non-reciprocal nature of LOS to and from an Observation Post means neither Soviet Unit can spot the German Unit.
7.3 eFFecT oF barraGes/smoke/Fires
Barrages, Smoke and Fires all count as Blocking Terrain. They are of infinite height so will always block a LOS path that is traced through them regardless of the elevation of the Spotting and Targeted Hexes. Their infinite height means they also nullify the effect of OPs (7.2) which cannot include them as one of the two hexes of Blocking Terrain they can ignore. This blocked LOS through Barrage/Smoke/Fire is always reciprocal between the Spotting Hex and the Targeted Hex.
However, if a Unit occupies a hex that contains a Barrage/ Smoke or a Fire, their LOS only extends into the six hexes adjacent to them. This is not reciprocal. Other Units may still be able to trace a LOS path into that hex from up to the maximum range of eight hexes away.
Example 1: The German Unit is attempting to trace LOS through a Medium Barrage (Blocking Terrain infinitely high). The Units are unable to see each other despite Blocking Terrain usually being ignored when the Spotting Hex and the Targeted Hex are at different elevations and less than six hexes apart.

LOS Obstacle
Example 2: The German Unit is still attempting to spot the Russian Unit. This time the Barrage is now on the same hex as the Russian Unit. This means the German Unit would be able to trace a LOS to the Russian Unit. However, the Russian Unit cannot see the German Unit because Barrage limits its LOS to its adjacent hexes.
Example 2: The American Unit in 14.68 can see the Japanese Unit in 16.65 as the Japanese Unit is on a different elevation and therefore the Hindering Terrain has no effect. This example also demonstrates one of the differences between Blocking and Hindering Terrain. If it was all Blocking Terrain, the LOS would be blocked because of the two criteria set out in 7.1.3 (concerning range and adjacency of blocking terrain).

7.4 eFFecT oF hinderinG Terrain
Hindering Terrain (for example Sugarcane) will only block LOS after the LOS path has been traced through the third hex on the same elevation. Hindering Terrain can be ignored if the Spotting Hex and Targeted Hex are on different elevations.

7.5 eFFecT oF niGhT

The LOS at Night is into adjacent hexes only. The exception is when Illumination Rounds are used. This is all discussed in 16.0 Night Turns.
Example 1: The American Unit in 14.72 can see the Japanese Unit in 11.70 because the LOS path is only traced through two hexes of Sugarcane (Hindering Terrain). However, it cannot see the Japanese Unit in 18.70 because the LOS path is traced through three hexes of Hindering Terrain.


8.0 fIre aCTIons
During an Activation, the Attacker may select a Unit to perform a Fire Action against a suitable target in its Fire Zone (if Direct Fire) or within its printed Range (if Indirect Fire). To resolve either type of Fire Action, the Active Unit’s Firepower (after applying any relevant modifiers to it) is compared to a single die roll.
If that die roll is equal to or less than the Unit’s modified Firepower, the Fire Action has been successful. The Attacker should now cross-reference their die roll with the correct row on the Combat Results Table (for example, red row when using Small Arms).
Depending on the type of fire and whether it is targeting a hex or a Hard Target, the successful Fire Action can result in Elimination, Rout Checks, Suppression, and increasing levels of Disorganization. Pinning is not a result on the CRT, but it can happen as a result of a Fire Action leading to a failed Morale Check (see 8.4.1).
If the die roll is greater than the Unit’s modified Firepower, it is a miss, and the Fire Action has no effect.
Should the Attacker roll a natural 0 or 9, this will have a special effect, whether using Direct or Indirect Fire. In summary, a 0 is always a successful Fire Action and a 9 is always a miss. This is described fully in 8.4 for Direct Fire and 8.6.1 for Indirect Fire.
Most Units will either need to be Deployed to do a Fire Action or have better Firepower when Deployed. Players should note that Immediately before an Active Unit (or Stack of Active Units providing they all occupy the same hex at the start of an Activation) does an Action they may first change from Column to Deployed status, or vice versa.
One Fire Action Limit: a maximum of one Fire Action may be performed from each hex during an Activation. This is regardless of the number of units in a hex. This single Fire Action can either be Direct or Indirect Fire. The One Fire Action Limit does not mean one of each.
8.1 Fire Types
There are 3 types of Direct Fire and 1 type of Indirect Fire.
Fire Types:
• Small Arms (shown by a red box around a Unit’s Firepower)

• High Explosive (shown by a yellow box around a Unit’s Firepower)
• Armor Piercing (shown by a blue box around a Unit’s Firepower)

• Indirect Fire (shown by a black box around a Unit’s Firepower)

Note that a white box around a Unit’s Firepower value means that the Attacker can fire both High Explosive and Armor Piercing. High Explosive if the target is a hex and Armor Piercing if firing at a Hard Target.

8.2 perForminG a direcT Fire acTion
To perform a Direct Fire Action with a Unit, the Attacker must select an eligible hex in its Fire Zone. A Unit’s Fire Zone normally means any hex that is within its printed range and Line of Sight. However, Players should note that other factors on the battlefield can reduce the size of a Fire Zone. They are discussed later in this section. If there is no eligible hex within a Unit’s Fire Zone, a Fire Action cannot take place.
Example: A Unit wants to conduct a Direct Fire Action against an enemy Unit which it has a clear LOS to and is three hexes away. However, the Unit’s printed range is only two hexes. This means that enemy Unit is not in its Fire Zone (it does not meet the requirement to be within its printed range).
Example: A Unit wants to conduct a Direct Fire Action against a Unit that is three hexes away. However, its LOS is blocked by Terrain. This means the enemy Unit is not in its Fire Zone (it does not meet the requirement to be within its LOS).
The following restrict a Unit’s Fire Zone to its adjacent hexes only
• If an enemy Unit is adjacent to the Firing Unit
• If the Firing Unit is under a Barrage or Bombardment Marker
• If the Firing Unit is in Column (some Units have a Firepower box on their Column side)
The following have no Fire Zone (no Direct Fire possible)
• Units in a hex with a Concentrated Fire Marker on it
• A Unit that cannot fire (for any reason) has no Fire Zone.
Once the Firing Unit has determined that the hex that they wish to fire on is in their Fire Zone, this is declared as the Targeted Hex. There are three different types of Targeted Hex.

Fire example
This is a simple combat to show how firing at a hex versus firing at a Hard Target works. As well as what happens when Units are deployed or column and facing fire.
• A/2/32 is deployed and in hex 40.26
• 3/3/120G is deployed and 3/1Tk/120G is in column and both are in hex 39.28
• 2/1Tk/120G and 3/1/120G are both in column and in hex 40.28
It is clear weather and a day turn.
The American M-60A3 is performing a Fire Action as its first action and firing at hex 40.28. As there are both hard and not-hard targets in the hex, the American player must choose if he is firing at the “hex” or at a single hard target in the hex. For the first case, he chooses to fire at the hex and not at a specific Unit. Both hexes that are being considered for attack are within the 5-hex range of A/2/32 and both can be seen.
Looking at rule 8.3, the following cases will apply to the unmodified fire strength of A/2/32 of 6(white). White, when firing at a hex, must use the Red table for determining results.
Case a – the defense value of the selected target Unit. Since all Units in the hex are in Column, the firing player may choose which Unit is used for the selected target Unit. In this case, the US player chooses the Infantry Unit with a “0” defense value.
Case e – the defender is in a village hex but is in column, the defending Unit does not receive any terrain benefit.
Case f – the attacking player chooses to not use concentrated fire. If he did, he would have to place a “Concentrated Fire” marker on the US tank. While this would increase his fire by 1 for this attack, this would also remove the tank’s Fire Zone after the fire has been resolved and he would not be able to fire again until the marker was removed. You must have a Fire Zone on a hex to be able to fire at it.
Case g – the US Unit is firing at a hex and the range is 2 or more. This reduces the fire value by another 2. 6 goes to 4.
Case h – there are hard targets in the target hex, a final 2 is subtracted from the fire strength. 4 goes to 2.
The Defender also may have modifiers. Looking at 8.3.1, there are no applicable modifiers.
If the US player rolls a 0, the target hex gains 1 DG and is Suppressed.
If the US player rolls a 1, the target hex must take a Rout Check but gets to subtract two to his roll when checking against the current troop quality of the defending selected Unit. If the roll fails and a rout occurs, the selected Unit is routed (since it is in column) and placed in the Routed Units box of the Division Display. Additionally, if you fail a rout roll, the hex is Pinned.
If the US player rolls a 2, one DG is added to the hex and the defending player also must perform a rout check – but this time, only 1 is subtracted from the die roll. If the roll fails, the selected Unit is routed (and placed in the Units Routed box of the Division Display) – and the hex is pinned.
A roll of 3, 4, 5, 6, 7, 8 or 9 is a miss.
It is now the second Action of the A/2/32’s Activation. He chooses to fire at hex 39.28 but in this case, he will fire at only the hard target in the hex, the 3/1Tk/120G Unit. Again, the US tank Unit has a fire value of 6 but this time, as he is firing at a hard target, he must use the Blue table to determine the result of the fire. Notice that no results on the “If Firing at a Hard Target” side of the Combat Results Table are “hex” results. The only results on this table are Rout or Elimination. Looking at rule 8.3.1 to determine the firing Unit’s modifiers, the following cases apply: Case a – the Tank has a defense value of -3. So 6 comes down to 3.
That is all. The US player rolls a die.
If he rolls a 0, the defender performs a rout check
If he rolls a 1, the defender performs a rout check but subtracts one from his roll
If he rolls a 2, the defender performs a rout check
If he rolls a 3, again, the defender performs a rout check.
If he rolls a 4, 5, 6, 7, 8, or 9, he misses and there is no impact from this fire.


• Hex only contains Hard Targets
• Hex only contains Soft Targets
• Hex is Mixed and contains Hard and Soft Targets
A Direct Fire Action can either target a hex, or a single Hard Target within a hex. Should there just be Hard Targets in the hex, the Attacker must select one of them (only) and fire at that. The result of that Fire Action will only be applied to that Hard Target. An exception to this is if that Hard Target receives and fails a Rout Check. This will pin all the Units that shared its hex when it was fired upon.
If the Targeted Hex only contains Soft Targets, the hex itself must be fired upon. Any results from a Fire Action against a hex are applied to all the Units in it.
Should there be both Hard and Soft Targets in the hex (Mixed) the Attacker may choose to fire at either the hex or a single Hard Target in the hex. If firing at a Hard Target, the Fire Action is treated in the same way as if only Hard Targets occupied the hex. If firing at the hex, results from a Fire Action are applied to all the Units in it. The only exception is Disorganization, which Hard Targets can ignore.
As previously stated, a Targeted Hex may not be fired at twice from the same hex during the same Activation, due to the One Fire Action Limit. However, it may be fired at by multiple different hexes during the same Activation.
8.3 direcT Fire modiFiers
After the Attacker has determined whether they are firing on the hex or a Hard Target in the hex, they should then adjust the Unit’s Firepower, using any relevant modifiers. These modifiers are always applied to the Firepower of the Unit taking the Fire Action. Not the die roll. All negative modifiers are subtracted from the Firepower and therefore are always good for the defense. All positive modifiers add to the Firepower and are always bad for the defense.
a) Apply the Defense Value of the Target Unit (8.3.1)
b) Apply the modifiers of a Support Weapon/Leader/Hero (one of each) from the same formation as the Firing Unit (8.3.2)
c) Apply any relevant Status Markers on both the Firing Unit and the Target Unit (8.3.3)
d) Add the fire of up to two Deployed Units in the hex with the Firing Unit for a modifier of +1 each (8.3.4)
e) Apply the Terrain Defense Value modifier of the Targeted Hex (8.3.5) if the target is Deployed. Terrain does not apply if the Unit is in Column.
f) Add (+1) to the Firing Unit if it is performing Concentrated Fire (8.3.6)
g) If using Direct Fire (only) at a range of 2 or more hexes, subtract 3 from the unit’s Fire value.
h) Subtract the Rain Modifier (-1) and the Night Modifier (-1). These are cumulative (8.3.7).
8.3.1 deFense value oF one uniT (TarGeT uniT)
The Defense Value of one Unit will always be used as a modifier to the Fire Action. This is based on the printed Defense Value on its counter. However, the presence of Support Weapons, Leaders and Heroes in its hex may modify that Defense Value. If the hex is targeted and any Hard Targets occupy that hex, that will act as a second modifier.
Target Unit: The Unit selected to provide its Defense Value depends on whether a Hard Target or a hex is being fired at. Regardless, this Unit is referred to as the Target Unit.
• If the Fire Action is against a Hard Target, use the Defense Value of that Hard Target to defend against it.
• If the Fire Action is against the hex and it contains at least one Deployed Unit, the Defender chooses which Unit’s Defense Value is used to defend against the Fire Action. This does not have to be a Deployed Unit; it could be a Unit in Column. The presence of a Deployed Unit just allows the Defender to make the choice.
• If the Fire Action is against the hex and all the Units are in Column, the Attacker chooses which Unit’s Defense Value is used to defend against the Fire Action.
Defender’s Support Weapons, Leaders and Heroes: Generally, during a Fire Action against a hex, there is an opportunity for either the Attacker or the Defender (never both) to add the modifiers of the Target Unit’s Support Weapon, Leader and Hero.
Who decides depends on whether the Target unit is Deployed or in Column. It seems counter intuitive for the Attacker to ever choose to do this, but some friendly Support Weapons, Leaders and Heroes will give a positive modifier to the Firepower of an enemy Unit (for example if the Friendly Unit is carrying a flamethrower).
If the Fire Action is against the hex, and the Target Unit is Deployed, the Defender may choose to apply the modifiers of up to one of each. To qualify they must belong to the same formation as the Target Unit and be stacked in same hex. Any exceptions to this will be in the Exclusive Rules.
If the Fire Action is against the hex, and the Target Unit is in Column (even if the Defender chose that as the Target Unit) the Attacker may choose to apply the modifiers of up to one of each. To qualify they must belong to the same formation as the Target Unit and be stacked in same hex. Any exceptions to this will be in the Exclusive Rules.
Hard Targets present: If the Fire Action is against a hex but there are any Hard Targets in it, a further -2 modifier is added to the Defense Value of the Target Unit. Thematically, they are providing some cover to the Soft Targets and acting as a distraction to the firer.
8.3.2 aTTacker’s supporT Weapons, leaders, or heroes
The Firepower modifiers of a Support Weapon/Leader/Hero (one of each) stacked with a deployed Firing Unit and from the same formation, may be applied to a Fire Action. Any further restrictions will be mentioned in the Exclusive Rules.
Support Weapons: To use a Support Weapon, two criteria must apply. Firstly, the Firing Unit must be Deployed (exception: see Tank Support Weapons, 12.4). Secondly, the Support Weapon itself must have a Fire Zone into the Targeted Hex; the Fire Zone of Firing Unit is disregarded. If both these criteria are met, the Support Weapon can be used. There are no restrictions on which type of Unit (Infantry, Armor etc...) may use a Support Weapon.
The Firepower modifier of the Support Weapon is then added to the printed Firepower of the Firing Unit. The combined total gives the actual Firepower of that Support Weapon. This will then be adjusted by any relevant modifiers listed in 8.3. The Fire Type of the Support Weapon is also used to resolve the Fire Action (not that of the Firing Unit).
Example: A Deployed NATO Infantry Unit with a dual High Explosive/Armor Piercing Firepower of 4 (shown by its Firepower being in a white box) wishes to attack a Soviet Infantry Unit two hexes away. There is no intervening terrain to interfere with its LOS. Unfortunately, it has no range printed on its counter which means its Fire Zone only extends into adjacent hexes. It could not normally do a Fire Action in these circumstances.

It can do this because it meets the two criteria necessary to use a Support Weapon. The Unit firing it is Deployed and the Targeted Hex is in the Fire Zone of the Support Weapon.
The Controlling Player now needs to calculate the Support Weapon’s actual Firepower, which is its +3 added to the NATO Infantry Unit’s printed Firepower of 4 to give a total of 7. As the Support Weapon is being used, the Fire Type will change from High Explosive/Armor Piercing to Small Arms. The Controlling Player doesn’t mind as they are just targeting Infantry.
Leader/Hero: In addition to one Support Weapon, a Leader and/or one Hero stacked in the same hex (whether in Column or Deployed) may also be used to modify the Firing Unit’s Firepower. To be eligible to do this, they must belong to the same Formation. Leaders never change the Fire Type used to resolve the Fire Action; they have a transparent Firepower box to show this.
8.3.3 sTaTus markers


Status Markers can affect the Firepower of the Firing Unit and Defense Value of the Targeted Hex. These include Disorganized, Pinned, Barrage, and Fortification Markers. Status Markers in the Firing Unit’s hex are applied to its Firepower. Status Markers in the Targeted Hex are applied to the Target Unit’s Defense Value.

8.3.4 addinG addiTional uniTs To The aTTacker’s FirepoWer (sTack).
If a Firing Unit is Deployed, other Deployed Units that are in the same hex may join it to create a Stack. To be included in the Stack, these Units must also exert a Fire Zone into the Targeted Hex.
Each additional Deployed Unit adds a +1 to the Firing Unit’s Firepower. A maximum of two additional Deployed Units may be added. All the Units in the Stack have now used a Fire Action for that Activation.

However, the NATO Unit is stacked with a M249 Support Weapon. This has a Small Arms Firepower Modifier of +3 (shown by its Firepower being in a red box) and a range of two hexes. The player controlling the NATO Unit decides to use this to attack the Soviet Infantry.
Example: A Deployed Firing Unit shares a hex with two other Deployed Units. The Targeted Hex is in all their Fire Zones. They create a Stack and fire at the Targeted Hex, adding 1 to the Firing Unit’s Firepower for each additional Deployed Unit. This gives the Firing Unit a +2 to its Firepower. All three Units are considered to have performed a Fire Action in that Activation.
If a Stack has been activated by a Direct Command Activation, the Attacker must pay Direct Command Point for each Unit that participates in the Fire Action.
8.3.5 Terrain deFense value modiFier
Players should check the Terrain Effects Chart and apply the Defense Value of the terrain in the Targeted Hex. If the fire crosses a hex side of the Targeted Hex that provides an additional modifier, that should also be applied to the Terrain Defense Value modifier. If the target unit is In Column this modifier does not apply.
8.3.6 concenTraTed Fire
If the Firing Unit is Deployed, the Attacker may choose to use a Concentrated Fire Marker to add an additional +1 to its Firepower. Place a Concentrated Fire Marker on the Firing Unit’s hex. This Marker stays in the hex for the remainder of this Activation. Any Units in a hex with a Concentrated Fire Marker do not have Fire Zones and as a result cannot do Opportunity Fire. This applies even if they moved to that hex after the Concentrated Fire Marker was placed.

If the die roll is greater than the modified Fire Value, the fire “misses” and there is no effect on the Target Unit or hex.
Result is a 0 or 9: Should the Attacker roll a natural 0, this is always treated as a successful Fire Action, and any modifiers to the Firepower are ignored. The 0-column result of the Combat Results Table is applied instead. Should the Attacker roll a natural 9, this is always treated as a miss and any modifiers to the Firepower are ignored. A miss means there is no effect from the Fire Action.
If the Attacker used a Support Weapon during a Direct Fire Action (including just to modify the Fire Type) the die roll should be compared to its Breakdown Number. If it exceeds the Breakdown Number, then the Support Weapon is broken and placed in the owning Division’s Reallocating Box. Any exceptions to this will be noted in the Exclusive Rules.
8.4.1 combaT resulTs (direcT and indirecT Fire)
The Marker is removed when a subsequent Division or Formation Activation Chit activates any Unit in the hex, or when a Direct Command Activation is used to make a Unit in that hex Active. Only one Unit need be Active to remove the Concentrated Fire Marker from a hex. The Concentrated Fire Marker is also removed when there are no Units in the hex at the end of an Activation.
8.3.7 rain and/or niGhT
• Subtract 1 from all Firepower during a Turn with Rain.
• Subtract 1 from all Firepower at Night (however, see 16.1)
These modifiers are cumulative, so if it rains during a Night Turn, the total modifier for the battlefield environment will be –2.
8.4 resolvinG Fire combaT (direcT and indirecT)
After applying all relevant modifiers to the Firepower of the Firing Unit, the Attacker should roll a die. If that die roll is equal to or less than the Unit’s modified Firepower, the Fire Action has been successful. The Attacker should now cross-reference their die roll with the Combat Results Table, using the correct row, (for example, yellow row when using High Explosive).
If the Fire Action was Direct Fire against a Hard Target, the result of that Fire Action will only be applied to that Hard Target (exception Rout Check). If it was against the hex, it is applied to all Units in the hex. This is except Disorganization, which Hard Targets are unaffected by. Indirect Fire always targets a hex.
Generally, markers should be stacked on top of all units in hex. The effects of Status Markers are more completely explained in rule 10.2
S – Suppressed: Place a Suppressed Marker on the hex. It affects all Units in the hex, including Hard Targets.


DG 1 - 4: Increase the Disorganization level in the hex by the DG value on the Combat Results Table. The maximum level of Disorganization for a hex is 4. If the hex already had a DG marker and the combined DG result is greater than 4 DG, then place a 4 DG marker and eliminate a Soft Target Unit from the hex for each DG level over 4. It’s the Defender’s choice which Unit is eliminated; it does not have to be the Target Unit.
Example: A Fire Action results in a 3DG result on a hex that already has a 3DG marker making a DG level of 6. The Defending Player needs to eliminate two Soft Targets of their choice as the DG level is two above its maximum of 4. A 4DG marker is then placed on the hex.
R – Rout Check: Target Unit (only) takes a Rout Check, using its Troop Quality Check.
R* – Rout Check: roll for Rout but subtract one from the Troop Quality Check die roll.
R** – Rout Check: roll for Rout but subtract two from the Troop Quality Check die roll.
E – Eliminated: remove the Target Unit from play. Eliminated HQ’s are placed in the Routed Units box.
Apply the effects of the combat results in the order they appear on the CRT. For example, DG results are applied to the hex before any Rout check is performed. If an HQ is eliminated, they are placed in the Routed Units Box of the owning Division.
Rout Check: To perform a Rout Check, the TQ of the Target Unit for the fire is compared to a die roll. The TQ of the Unit should be calculated before the die roll. It is modified by the following.
a) TQ modifier from a Leader and/or a Hero in the Targeted Hex.
b) TQ modifiers of any Status Markers in the Targeted Hex.
The die roll itself uses the following modifiers.
a) -1 to the die roll, if * was next to the result rolled on the CRT
b) -2 to the die roll, if ** was next to the result rolled on the CRT
c) Apply the Defensive Value of the Target Unit (8.3.1)
d) Apply the Terrain Defense Value of the Targeted Hex (see 8.3.5)
If the modified die roll is equal to or less than the Unit’s Troop Quality, the Rout Check is passed and nothing further happens. Should the modified die roll exceed the Troop Quality of the Target Unit, it has failed the check.
Failed rouT check:
If the Target Unit is Deployed, the hex is Pinned. This will affect all Units in the hex, including Hard Targets. Units in a hex cannot be both Pinned and Suppressed. A Pinned hex that receives another Pinned result becomes Suppressed instead.

If the Target Unit is in Column, it is Routed. If it can trace an unlimited path of passable hexes (by the movement type of the Routed Unit) belonging to any HQ of the Unit’s Division, it is placed in the Routed Units box of the owning Division. However, no hex in the path may be in an ene-
my Fire Zone (except for the hex the Target Unit has just routed from). It does not take any Status Markers with it. If the Unit cannot do this, it is eliminated instead.
If any friendly Units remain in the hex that the Unit Routed from, place a Pinned marker on the hex. This will affect all Units in the hex.
If the target hex is left vacant after a Unit Routs, all Status Markers in that hex are removed from play.
Routed Units are placed in the Routed Units box of their Divisional Display. When the Unit is Active again (and can be with a Direct Command chit), it may return to play and is placed on/adjacent to the Division HQ. Routed HQs are placed with the Divisional Leader. Placement cannot be in an Enemy Fire Zone. Placement is considered one action.
Routing Example
The NATO player has three units from the 1st Battalion of the 11th Cavalry in hex 24.36. A and B Comapnies are in Column while C Company is Deployed. The Soviet Player fires at the A/1/11 unit (you must choose one hard target to fire upon) and gets an R* result. This causes a Rout Check on the A/1/11 unit. The Troop Quality of the unit 7.
The Soviet Player rolls a D10 to check for rout and rolls a 9. The R* subtracts one from the roll for a final modified roll of 8. This exceeds the TQ of the unit. The unit routs. The unit first traces a rout back to any HQ of the 11th Cavalry. It can be of unlimited length but no hex of the trace can bee in an enemy Fire Zone. Trace is done from the unit to the HQ (so the first hex traces is one hex from the unit). If this trace is possible, the unit is removed from the map and placed in the Routed Units box of the 11th Cavalry Division Display. If the trace is not possible, the unit is removed from the game.
As the unit’s Rout Check failed, the other two unit in the hex are now Pinned. Place a Pinned marker on the hex.


8.4.2 hex on Fire (direcT and indirecT Fire)
Some Fire Actions may result in a hex catching fire (for example Flamethrowers). If so, they Attacker should place an On-Fire marker in the hex.
An On-Fire marker has the following effects:
• It counts as Blocking Terrain for LOS.

• No Unit may enter a hex containing an On-Fire marker.
• Any Active Units still in an On-Fire hex at the end of their Activation automatically routs straight away. There is no Rout Check.
Should the weather become Rain or Tropical Storm then remove all On-Fire markers.
Whenever the Wind Chit is drawn, roll for each existing On-Fire marker in Sugarcane, Town, Building or Brush terrain.
• If the die roll is a 0, 1, or 2, flip the On-Fire marker to its Fire Cleared side. A hex with a Fire Cleared marker counts as Clear Terrain for the rest of the game (the “CT” on the Fire Cleared Marker is to remind you of this).
• If the die roll is 8 or 9 the fire has possibly spread. If either of the hexes immediately to the north-west or south-west of the currently on fire hex are hexes that can also catch fire (Sugarcane, Town, Building, or Brush), place a Fire marker on this hex. If both hexes are flammable, roll a die to see which one catches fire: 0-4 northwest or 5-9 for southwest.
8.5 opporTuniTy Fire (direcT Fire only)
Opportunity Fire is triggered when enemy Units (singular or plural) attempt to leave a hex as part of a Movement or an Assault Action. It is not triggered when enemy Units enter a hex or because of an advance after a successful Assault. Any exceptions to this will be covered in the Exclusive Rules. Opportunity Fire uses the same method as a normal Fire Action, except Concentrated Fire may not be used.
8.5.1 - hoW To do opporTuniTy Fire
Opportunity Fire may be performed by any eligible Inactive Units. These are generally Units that are not under a Concentrated Fire Marker or using Indirect Fire. They must also exert a Fire Zone into the hex the Enemy Units are leaving. Opportunity Fire is always voluntary; Inactive Units may wish to wait for a better target. As with a normal
Fire Action, there is a maximum of one Opportunity Fire per hex during an Activation. However, multiple hexes that meet the criteria may do Opportunity Fire against a single trigger. If multiple hexes are eligible, the Inactive Player chooses which order to resolve them in. Once a Unit/Stack in a hex has conducted an Opportunity Fire, place a “No Opportunity Fire” marker on that Unit/Stacks hex which means no Unit in that hex may use Opportunity Fire (however, see 8.5.2).
This No Opportunity Fire Marker is removed from a hex in two different circumstances. Firstly, if there are no Units in the hex at the end of any Activation (including the one in which the marker was added). Secondly, if any of the Units in the hex become Active again in a subsequent Activation. Only one Unit needs to be made Active to remove the No Opportunity Fire Marker from a hex.

Deployed Units in the hex: If any friendly Deployed Units remain in the hex during a Move/Assault Action, no Opportunity Fire is allowed from enemy Inactive Units. The one exception is if those doing a Move/Assault Action move from one hex in the Fire Zone of an Inactive Unit, to another hex in the Fire Zone of the same Inactive Unit. That Inactive Unit may do an Opportunity Fire.
8.5.2 susTained Fire
Some Support Weapons allow Units to fire using Sustained Fire. Sustained Fire does not modify the Firepower of the Firing Unit. It does, however, allow Units to fire an unlimited number of Opportunity Fires during an Opponent’s Activation Phase, including during an Assault Action.

After the first Opportunity Fire from a hex by a Unit/Stack using a Sustained Fire Support Weapon, the Inactive player may place a Sustained Fire marker on the hex. This means the Unit/Stack may continue to Opportunity Fire at active enemy Units unless they roll a 7 or greater on their fire roll. Then the Unit/Stack may no longer use sustained Fire. The marker stays on the hex.
The Sustained Fire Marker is removed when a subsequent Division or Formation Activation Chit activates any Unit in the hex. It is also removed when a Direct Command Activation is used to make a Unit in that hex Active Only one Unit need be Active to remove the Sustained Fire Marker from a hex.
8.6 indirecT Fire

If a black Firepower box is face up and visible on a Unit counter it means that when it does a Fire Action,
Opportunity Fire Example One:
• D/1/11 (Deployed) is in hex 26.40
• 1/1Tk/120G, 3/1Tk/120G (both in Column) and 3/1/120G (Deployed) are in hex 26.39
The Soviet Player wishes to move out from hex 26.39 with his two tank Units. Since there is a Deployed Unit in the hex, he might be able to do this without receiving Opportunity Fire from the Trooper in 26.40. The 1/1Tk/120G moves out first and goes to hex 27.39, then to 28.38, and finally to hex 29.39. The American cannot Opportunity Fire this movement for two reasons. The first is there is a Deployed Unit in the hex from which the Unit is moving and secondly, even with a 6 hex range, when an enemy Unit is adjacent to the American, his Fire Zone is reduced to one hex – and the hexes moved into by the Soviet Tank Unit are not in the Fire Zone of the same enemy.
However, 3/1Tk/120G wishes to move to hex 25.40. In this hex, the American can fire Opportunity Fire. Even though the hex being left has a deployed Unit in it, the Soviet is moving from Fire Zone to Fire Zone of the same enemy.


Opportunity Fire Example Two:
D/1/11 (Deployed) is in hex 26.40

1, 3/1Tk/120G (in Column) and 3/1/120G (Deployed) are now in hex 27.39
In this case, there is no Soviet Unit adjacent to the American and the US Trooper will be able to Opportunity Fire on any hex moved into by the Soviet player until a hex is moved into that is out of the Line of Sight and range of the US Unit.
In this case, 1/1Tk moves into hex 28.39 and the Trooper can fire at the Soviet Unit as it leaves the hex (and if the Soviet ends up not being able to move out of the hex from the fire, it does not move out of the hex). Assuming the US Unit fires here and there is not a result that prevents movement (like a Pin or a Suppression), place a “No Opportunity” fire marker on the US Unit. If the 3/1Tk Unit now moves to hex 26.38, the US player will not be able to fire on this movement.

it will use Indirect Fire. Normally, this black Firepower box will be on the front of a Unit’s counter, i.e., when it is Deployed. However, some will also have it on their Column side, e.g. Self-Propelled Artillery.
For ease of reference, a Unit whose black Firepower box is face up and visible will be described as being in Indirect Fire mode.
If a Unit in Indirect Fire mode, wishes to do a Fire Action it must be Active; it cannot be Pinned or Suppressed. The Targeted Hex must be within its printed range and LOS. If it can’t see the Targeted Hex for itself, it can have an eligible Unit spot for it.
There are two types of eligible Units for spotting. The first is a friendly ground Unit. This must be from the same Division as the Firing Unit and have a LOS to the Targeted Hex. There is no limit on the distance between the Firing Unit and the ground Unit spotting for it. Nor does the ground Unit need to be Active or In-Command. The second type of eligible Unit will be friendly aircraft. If available for a particular module, the rules for aircraft spotting will be covered in the Exclusive Rules.
Indirect Fire has many similarities to Direct Fire but also some important differences.
• It can fire into a hex, even if it doesn’t contain a Hard or Soft Target.
• A Unit in Indirect Fire mode does not create a Fire Zone and therefore may never use Opportunity Fire. It only has a range.
• Indirect Fire always targets a hex not a specific target within the hex.
• It will usually leave a barrage marker in the hex it fires into (8.6.2).
• Fewer modifiers are applied to Indirect Fire
The Column side of a Unit capable of Indirect Fire will normally show its movement allowance. If the Unit has “No” where their movement allowance would be, they require Transport to do a Move Action (see 15.0). If an Indirect Fire Unit does have a movement allowance on its Column side, then it may not be transported but must move using its printed movement allowance.
8.6.1 hoW To perForm indirecT Fire
Indirect Fire is always against a hex, not a specific target within the hex. It is resolved by applying any applicable modifiers to the Unit’s Firepower (see 8.6.3) and then rolling a die. Players should note that modifiers always adjust the Firepower, not the die roll itself.
If that die roll is equal to or less than the Unit’s modified Indirect Firepower, the Fire Action has been successful. The Attacker should now cross-reference their die roll with the black row of the Combat Results Table and apply the results. The successful Indirect Fire Action can result in Rout Checks and increasing levels of Disorganization. Pinning and Suppression are not results on the black row of the CRT, but both can happen because of an Indirect Fire Action causing a failed Morale Check (see 8.4.1).
When Indirect Fire is used, a Barrage Marker will normally be placed in the Targeted Hex. Which type of Barrage Marker is discussed in 8.6.2.
Result is a 0 or 9: Should the Attacker roll a natural 0, this is always treated as a successful Fire Action, and any modifiers to the Firepower are ignored. The 0-column result of the Combat Results Table is applied instead. Should the Attacker roll a natural 9, this is always treated as a miss and any modifiers to the Firepower are ignored. A miss means there is no effect from the Fire Action and no Barrage Marker is placed in the hex.
If there isn’t a legal target in the hex: Unlike Direct Fire, the Targeted Hex may still be fired at even if there isn’t a legal target in the hex. This would be when the hex…
• Is vacant (contains no Units of either side).
• Only contains Hard Targets (this includes any Soft Targets occupying hexes with fortifications or terrain that makes them Hard Targets).
If the Firing Unit has no legal targets in the hex, there is still a roll of a d10. This isn’t cross-referenced with the CRT. It is just to see if a 9 is rolled. If a 9 is rolled, it is a miss and no Barrage Marker is placed in the hex. If it is not rolled, the Attacker must place a Barrage Marker on the hex as per 8.6.2. There is no other effect from the Fire Action.
Opportunity Fire and Fire Zones: Units in Indirect Fire mode do not create a Fire Zone. This means they are not able to do Opportunity Fire. This exclusion would not apply when the same Unit is not in Indirect Fire mode. For example, some Units capable of Indirect Fire have a red Firepower box (Small Arms) on the other side of their counter. If this was face up and visible, the Unit would be able to do Opportunity Fire.
8.6.2 barraGes
When a Unit uses Indirect Fire, it will leave a Barrage Marker in the Targeted Hex (unless the Fire Action resulted in a miss). Friendly Units of all types can also place a Smoke Barrage in their own hex and adjacent hexes as a Fire Action. This is handy to restrict enemy LOS into hexes beyond the frontline (see 7.3).

To determine the strength of the Barrage Marker (only) the Attacker always uses the printed Firepower of the Firing Unit. Any modifiers that would normally apply to a Unit’s Firepower are ignored.
• Printed Indirect Firepower of 2 or less, place a Smoke Marker on the hex
• Printed Indirect Firepower of 3, place a Light Barrage Marker on the hex
• Printed Indirect Firepower of 4, place a Medium Barrage Marker on the hex
• Printed Indirect Firepower or 5 or more, place a Heavy Barrage Marker on the hex
There can only ever be one Barrage Marker in a single hex. The Targeted Hex can only be attacked again with Indirect Fire if it would result in a stronger Barrage Marker being placed in the hex. This does not apply if the Indirect Fire is being used to support an Assault (see 9.4).
Example: A hex has been hit by Indirect Fire that leaves a Medium Barrage Marker on it. It can now only be targeted by Indirect Fire if that would place a Heavy Barrage Marker in the hex. This would require a Fire Action from a Unit with a printed Indirect Firepower of 5 or more.
Effect of Barrages on Movement: Reductions to a Unit’s movement allowance are immediately applied to all Units (enemy or friendly) that are in a hex with a Barrage Marker. It also is immediately applied to any Units (enemy or friendly) that enter a hex with a Barrage Marker.
When Units in/or entering a hex with a Barrage Marker calculate their movement allowance, they must apply any relevant Status Marker effects first. Then the effects of the Barrage Marker are also applied.
Example: A hex contains a single Unit with a movement allowance of 5. The hex has a 3DG marker on it, so the Unit’s movement allowance is halved (rounded down) from 5 to 2. An Indirect Fire Action is then used against the hex which leaves a Medium Barrage Marker on it as well. This means the Unit’s movement allowance is immediately halved again, from 2 to 1. If it wishes to leave the hex during a friendly Activation, it now only has a movement allowance of 1. As there is no minimum one-hex move in CSS, entering certain types of terrain in adjacent hexes might be a problem for the Unit in a subsequent friendly Activation.
Example: A Unit with a printed movement allowance of 5 and a 3DG marker moves into an adjacent hex that has a Light Barrage Marker in it. Its terrain type would normally cost 1 movement point to enter. The printed movement allowance of 5 would have been halved by the DG Marker (rounded down) at the start of the Move Action, leaving it with 2 movement points. It cost 1 movement point to enter the hex, so it now has 1 movement point left. However, the -1 on the Light Barrage Marker is applied instantly, reducing the Unit’s movement allowance to 0. It could not continue moving.
Effect of Barrage Markers on Fire Zones and LOS: Units under a Barrage Marker have their Fire Zone and LOS limited to adjacent hexes only (see 7.3). Units may not trace LOS through a Barraged hex. Although Units in Indirect Fire mode would have their LOS reduced to adjacent hexes because of a Barrage Marker, they can still fire at a hex further away with the help of a spotter.
Removing Barrage Markers: All Barrage Markers are removed when the Wind Chit is drawn from The Cup.
8.6.3 indirecT
Fire sTrenGTh modiFiers
Only the following modifiers (and no others) are used with Indirect Fire. Players should especially note that the Defense Value of a Unit in the Targeted Hex is not included (as it is with Direct Fire). These modifiers are always applied to the Firepower of the Unit taking the Fire Action. Not the die roll. All negative modifiers are subtracted from the Firepower and therefore are always good for the defense. All positive modifiers add to the Firepower and are always bad for the defense.
• Add the fire of up to two additional friendly Units in Indirect Fire mode that occupy the same hex as the Firing Unit (+1 each). Any that contribute a +1 are considered to have done a Fire action that Activation.
• Apply the modifiers of a DG Marker in the hex of the Firing Unit
• Apply the modifiers of a Barrage Marker in the hex of the Firing Unit
• Subtract –2 If there are any Hard Targets in the Targeted Hex (once only)
• Apply the Terrain Defense Value of the Target Hex
• Apply the Defense Value of a Fortification Marker on the Target Hex
8.6.4 indirecT Fire uniTs and column
A Unit in Indirect Fire mode that becomes Active, must immediately be flipped to its Column side if it has started its Activation adjacent to an enemy Unit. These Units (if Active) may flip back to their Deployed side during a future Activation. However, they cannot flip to Deployed if are still next to an enemy unit. Any exceptions to this will be noted in the Exclusive Rules.
8.6.5
resolvinG indirecT Fire
Although there are some important differences between Indirect Fire and Direct Fire, they are resolved the same way. Players should use 8.4 and, when applicable, 8.4.1 to resolve their Indirect Fire.
9.0 assaulT aCTIons
Assault Actions are sometimes given different names depending on the nationality that undertakes them. However, the procedure for them is generally the same. Any exceptions to the method described in this chapter will be covered in the Exclusive Rules.
Assault Actions cannot happen in a single Activation. This is deliberate and reflects the time they take to organize. To initiate an Assault, an Assault Marker must first be placed in a hex adjacent to a friendly Active Unit during an eligible Activation. To initiate an Assault, an Assault Marker must first be placed in a hex adjacent to a friendly Active Unit during an eligible Activation. This does not count as an Action for that Unit.
In the next eligible Activation, all friendly Active Units who are adjacent to one of their Assault Markers, must Assault that hex (see 9.3 for exceptions). If they are not in a mode that allows them to move, they must switch to a
Indirect Fire Example
• B/4/8 Cav (2nd Brigade of the 3rd Armored Division) is Deployed in hex 21.40
• D/3/12 (2nd Brigade of the 8th Infantry Division) is Deployed in hex 22.40
• The enemy Soviet Unit 3/1/120G is Deployed in hex 22.39
Within range but outside of the map area presented (all Deployed):
• A,F/40 of the 3rd Armored Division
• MTR/2/67 of the 2nd Brigade of the 3rd Armored Division
• MTR/1/68 of the 2nd Brigade of the 8th Infantry Division


The American player wants to fire artillery at the Soviet Unit in hex 22.39, this is what can fire when the following Chits are in play.


Direct Command: The spotting Unit need not be Active to spot thus firing at a hex when the Direct Command is in play but does require a possibly eligible spotter. In this case, B/4/8 can spot for any indirect fire Unit that is no-striped, white-striped, or red striped of the 3rd Armored Division. The Indirect firing Unit must pay a Direct Command to fire but that is all.
The 2nd Brigade of the 3rd Armored Division Formation Chit is in play: Again, a spotting Unit is required but in this case, it must be from this Formation. B/4/8 Cav is and can spot for any Artillery of the same Brigade. Looking over the three Indirect Fire Units within range, none belong to this Formation – thus no Artillery may be fired when this Formation Chit is in play.
The 2nd Brigade of the 8th Infantry Division Formation Chit is in play: In this case, we have a spotter of this Formation that can see the target (D/3/12) and MTR/1/68 is from the same Formation and may fire Indirect Fire during this Activation. Note however no other Artillery Units may fire from the 8th Division as they are not Active.
The 3rd Armored Division Activation Chit is in play: Here, we have a spotter from that Division and both a Division asset (the A,F/40) and an Indirect Firing Unit from the 3rd Brigade within Range (MTR/2/67). As a division activation chit is in play the A,F/40 can fire with the B/4/8 Unit as a spotter but the MTR cannot. It does not have a spotter from the same Formation that can spot.
mode which will allow them to move. Players should note that some Units are able to move when Deployed. These do not have to be switched to be in Column. All other Units must be switched to their Column side, if they aren’t in Column already.
Eligible Activations are those where a Division Chit or a Formation Chit has been played. The placement of Assault Markers and Assault Actions cannot happen after the play of a Direct Command Chit.
Where any Active Units are adjacent to Assault Markers, all these Assaults must always be resolved at the very start of an Activation. Once the Attacker has resolved all their Assaults, they then have the option to do any other types of Actions. They may also start placing new Assault Markers. Players should note that, unlike most Status Markers in the game, the modifiers on Assault Markers are always applied to Assaulting Units, never to any Defending Units in the hex.
Any Units that participate in an Assault Action (including those who use their Indirect Fire in support) are finished for that Activation. They cannot do a Second Action.
The procedure for resolving an Assault is described in sections 9.1-9.5.
9.1 summary oF an assaulT
The following is a brief summary of how to resolve each Assault. They are discussed in more detail in the following sections of the chapter.
A-C are listed separately because they don’t require players to look at anything else listed on the summary. In other words, once any of A, B or C have been fully applied, the Attacker can proceed to another Action.
A) The Attacker may “call off” the Assault. Remove the Assault Marker.
B) If the Attacker does not call off the Assault, and the hex with the Assault Marker is currently empty of any enemy Units, at least one Assaulting Unit must do a Move Action into that hex. Then the Assault Marker should be removed.
C) Defending Unit/s in Column may retreat to a single adjacent hex, which cannot be in an enemy Fire Zone. All Units defending in the hex must be able to retreat into that hex, or none may retreat. After the retreat, a Suppressed Marker is placed on the hex into which the Unit/s retreated. Once the retreat is completed, at least one Assaulting Unit
must do a Move Action into the hex that contains the Assault Marker. Then the Assault Marker should be removed.
However, D-M should be followed sequentially, in the order they are listed.
D) If there are enemy Units in the hex and the Assault is not being called off, all friendly Active units adjacent to the Assault Marker must do an Assault into that hex (with three exceptions, see 9.3).
E) The Attacker may use Active Units in Indirect Fire mode to support the Assault. All Units that participate in using Indirect Fire have completed their available Actions for this Activation and are considered Inactive.
F) All Assaulting Units that do not have any movement points when Deployed are flipped to their Column side (for clarity this does not include those that used Indirect Fire to support the Assault).
G) Defender may use eligible Units to do Opportunity Fire at a single Assaulting hex (more than a single hex if using Sustained Fire).
H) Compute the odds for the Assault.
I) Each Player rolls one die and applies appropriate modifiers.
J) Remove or Replace any Leaders lost from the Assault.
K) Compare the difference in the modified die rolls and apply any Combat Loss Points.
L) All Units that participated in the Assault have completed their available Actions for this Activation and are considered Inactive.
M) Remove the Assault Marker.
9.2 placinG an assaulT marker

Assault Markers may be placed whenever a Formation or a Division Chit is pulled from The Cup. However, this placement is only done after all Assault Markers placed in a previous Activation have been resolved.
To place an Assault Marker, the Attacker should spend 1 Dispatch Point from the Active Division (or the Division that the Active Formation belongs to) and place an Assault Marker in any hex adjacent to an Active Unit of that Division or Formation. This does not count as an Action for the Unit placing the Assault Marker. It could even happen during the Move Action of an Active Unit. Once a Unit becomes Inactive it cannot be placed. For example, a
Unit could not do a Fire Action and then place an Assault Marker because as soon as it completes the Fire Action it becomes Inactive.
This hex can be unoccupied, friendly occupied or enemy occupied. It must be a hex that the adjacent Active Friendly Unit could legally move into with a Movement Action (although no actual movement need take place).
Should there not be a friendly Unit adjacent to an Assault marker at any time during a turn, remove the Assault Marker from play.
Note that the Assault marker has no effect on play during Enemy Activations. Enemy Units may freely leave, reinforce, or move through the hex as they wish.
9.3 When assaulTs occur
Assaults occur whenever a Formation or Division Chit is pulled from The Cup and there are Active Units adjacent to a previously placed Assault Marker. Assault is voluntary and the Attacker may choose to call off the Assault. If they do, the Assault Marker is simply removed from play. It has no further effect on the game.
If the Attacker doesn’t call off the Assault, all Active Units adjacent to an Assault Marker must Assault. There are three exceptions to this.
• Adjacent Units in a hex with Status Markers that prevent them leaving it, like Suppression, Pinned, or Heavy Barrage, cannot participate in the Assault.
• Adjacent Units that would be prohibited from entering the hex containing the Assault Marker because of movement restrictions, cannot participate in the Assault.
• Units are adjacent to more than one Assault Marker. The Attacker must state now which of those will participate in the current Assault. However, the general rule that players should follow is that all must Assault somewhere, if at all possible (unless they are unable to enter any of the Assault hexes).
If any Support Weapons cannot make a legal move into the Assaulted hex, they must be left behind and, if left in a hex without any friendly Units after the Assault, must be placed in the Reallocating Support Weapons box of the owning division.
9.4 conducTinG an assaulT
The first action taken during an Assault, is for the Attacker (only) to use Active Units to do an Indirect Fire Action in support of the Assault. Players should note any Units that
do so will not be allowed the option of a Second Action for the rest of this Activation. Once they have completed their Indirect Fire, they will become Inactive. These Indirect Fire Actions are resolved as normal (see 8.6.1) with a couple of exceptions.
Firstly, each Unit in Indirect Fire mode that fires in support of the Assault will, in addition to its normal Indirect Fire Attack, add a +1 modifier to the Attacker’s die roll during step I of the Assault Sequence (unless they rolled a 9 and therefore a miss). This is in addition to the +1 - you may fire, apply the results and then add the +1 later. Secondly the restriction on only being able to add the fire of Units that would leave a stronger Barrage Marker in the hex, does not apply (see 8.6.2). The number of Units in Indirect Fire mode that can support an Assault will be set out in the Exclusive Rules
After the Indirect Fire has been resolved, all Assaulting Units that don’t have any movement points when Deployed are turned to their Column side. To clarify, the term Assaulting Units does not include those that supported the Assault with Indirect Fire.
Then the Defending Unit/Stack in the hex being Assaulted (only) may perform Opportunity Fire against a single Assaulting hex (8.5.1). However, if the Defending Unit/ Stack has a Sustained Fire Support Weapon, it can be used to conduct Opportunity Fire at more than one Assaulting hex (see 8.5.2). Players should note though that the breakdown of Support Weapons applies. If a breakdown occurs (see Exclusive Rules for rules governing breakdowns) the Support Weapon is removed from the map immediately. No more Opportunity Fire may be conducted; a No Opportunity Fire Marker is placed on the Defending hex.
Example: The Defending hex is being attacked from three different Assaulting hexes. It conducts an Opportunity Fire against the first Assaulting hex. As it has a Support Weapon that can do Sustained Fire it can now use it to conduct an Opportunity Fire against a second Assaulting hex. The roll for that causes the Support weapon to breakdown. The Defending hex receives a No Opportunity Fire Marker. The third Assaulting hex can attack without any Opportunity Fire being used against it.
The Assault Marker has additional Defense/Troop Quality modifiers on it. These modifiers on Assault Markers are always applied to Assaulting Units, never to any Defending Units in the hex.
After the Attacker has fired any Indirect Fire in support and the Defender has completed their Opportunity Fire, the actual Assault is conducted.
Assault Examples
The Setup:
The Soviets are defending with:
1/1/120G (Deployed), 3/1/120G (Deployed), 2/1Tk/120G (Deployed), AGS-17 SW, Hero!, Trenches in hex 29.20
NATO are Assaulting with:
A/6/77 (Column), C/6/77 (Column), M72 LAW, M249 SAW in hex 30.19
A/5/77 (Deployed), A/4/8 (Deployed), B/4/8 (Deployed) in hex 30.20
C/4/8 (Deployed), D/4/8 (Deployed) in hex 29.21
Off the displayed area but within range MTR/6/77, 4/29, 6,29 (Deployed) and stacked together. First off, who may assault and when?
If the 8th Infantry Division is the Chit in play, all 8th Infantry Division Units may place an assault marker. If only a Formation Chit of a Division is in play, only Units of that Formation may place the Assault Marker.
If a Dispatch Point is paid and an immediate Assault is occurring, only Units of that Formation are Active may assault – even if other Units are adjacent. The other Units just sit and watch.
Let’s assume the 8th Infantry Division Chit is in play and the NATO player pays one Dispatch Point to immediately Assault. As all Units are part of the 8th Infantry Division, all are now Assaulting.
Following along with rule 9.1, the following occurs:
A) The Assaulting Player may “call-off” the Assault (this would be a poor choice for an immediately placed assault but might have value if the Assault is delaying and things have changed that aren’t to the assaulting player’s liking).
B) NATO may fire his Indirect Fire Units that are Active. In this case, he may only use one Indirect Firing Unit (as it is an immediate Assault). He chooses the 4/29 Unit to fire and resolves its attack. If a 9 wasn’t rolled, a Heavy Barrage is placed on the hex. The other two Units that are stacked with the 4/29 Unit may perform Actions normally, but the 4/29 Unit is done for this Activation.
C) All Assaulting Units that cannot move on their Deployed side change to Column.
D) The Soviet player could choose to Rout any or all of the Units in the Assaulted hex. He sticks it out.
E) The Soviet player now fires his Opportunity Fire. He fires at 30.20 and Suppresses the hex. A Suppressed marker is placed on the hex. The Units in the Suppressed hex will not be able to continue the Assault. As the Soviet player has no Sustained Fire weapons, he may not Opportunity Fire at any other attacking hex. A No Opp Fire marker is placed on the hex.
F) Odds for the Assault are now computed. 4 NATO Companies are assaulting (the 3 in 30.20 may not be counted as they cannot continue the Assault) and 3 Soviet Companies are defending. The Odds are 1-1.
G) The Assault is resolved with each player rolling a die and adding their modifiers (see 9.5).
NATO rolls a 5 and adds the following to his roll:
• Odds of 1-1 (-1)
• Tanks are Assaulting (but not only tanks (+4)
• Appropriate Assault Marker modifier (+3)
• Leader (+1)
• The Lowest TQ of any of the Assaulting Units (+6)
His modified roll is 18
The Soviet player rolls a 9 and adds the following to his roll:
• As he has Deployed Units in the hex, the Village modifier is applied (subtracting -1 gives a +1) and the Trenches marker is applied (+2), for a combined (+3)
• As there are Deployed Units, the Soviet player may decide which Unit’s defense value is used, he’ll choose the Tank (+3)
• Tanks are defending (but not only tanks) (+3)
• The Heavy Barrage marker is in the hex (-1)
• The Hero in the hex (+2)
• The Lowest TQ Unit in the hex (+4)
His modified roll is 23
The Soviet player wins the roll by 5 and the NATO player must place 5 DGs in the assaulting hex. He can place them how he wishes but chooses 2 DG in 30.19 and 3 DG in 29.21. He cannot put any in hex 30.20 as it did not actually assault.
Lastly, the Soviet Hero is removed from play.


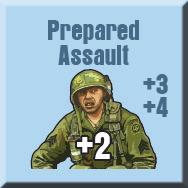


1. The Set Up
2. They Go In
3. The Result
To do this, both players roll a die, each applying all the relevant Assault modifiers listed in 9.5. Players should note they are different for the Attacker and Defender. If both players roll the same final modified number, one point of Combat Loss is applied to each Assaulting hex (note the “each” here) and to the Defending hex; the assault is over –proceed to Step L in the Assault Sequence.
If there is a difference in the two rolls, the player with the lowest modified roll (and therefore the loser) receives that difference in Combat Loss Points. The Defender applies them to the defending hex; the Attacker may distribute them amongst their Assaulting hexes as they see fit. However, the most the loser can receive is 6 Combat Loss Points. Winner always receives half the number of Combat Loss Points (rounded down) of the loser.
Combat Loss Points can be satisfied in two ways. The first is as Disorganization levels. The second is by eliminating Hard Targets. Normally players can decide which method they choose. There is one exception. If an Assaulting hex only contains Hard Targets and has reached the maximum of 4 DG, any remaining Combat Loss Points must be used to eliminate Hard Targets. This prevents players adding DG levels to a hex only containing Hard Targets, knowing that they can ignore it.
Example: A single Assaulting hex containing two Hard Targets and a Soft Target receives 6 Combat Loss Points. The Attacker takes 5 Combat Loss Points as Disorganization levels and 1 as an eliminated Hard Target. Taking the Disorganization to 5 DG, is one DG level over its maximum of 4 DG and that means the Soft Target is eliminated as it would be if this had happened because of a Fire Action (see 8.4.1). As there are only Hard Targets now remaining in the hex, the final Combat Loss point must be taken by a Hard Target being eliminated. It cannot be satisfied by adding a DG level in the hex as the Hard Targets can ignore that. The Attacker could have added 4 DG to the hex and eliminated two Hard Targets to satisfy the 2 remaining Combat Loss Points but decided that keeping the Hard Target alive was more important than keeping the Soft Target alive.
If either player rolls a natural 9 and used a Leader to aid their Assault Action, that Leader is replaced or removed from play (if already a replacement Leader).
If the defending hex is vacant after all results have been applied (either through losses or a retreat) the Attacker must advance at least one Unit that assaulted into it. Remove the Assault Marker and continue with the Activation.
9.5 assaulT modiFiers
The Attacker applies the following die roll modifiers to their Assault:
a) The Odds of the Assault: divide the number of Assaulting Units by the number of Defending Units to form a ratio and round that ratio in favor of the defender. Find the ratio on the table below and apply the corresponding modifier to the Attackers die roll (only – not the defender):
1-3 or less: -3
1-2: -2
1-1: -1
3-2: 0
2-1: +1
3-1: +2
4-1: + 3
5-1 or more: +4
b) If Tanks and at least one type of Leg Unit are Assaulting: add 2
c) If only Tanks are Assaulting: subtract 2;
d) Add the Troop Quality Bonus on the Assault Marker;
e) Apply any Status Markers on the Assaulting Units Troop Quality as applicable.
f) Add a Leader and/or Hero Troop Quality modifier.
g) Add 1 for each Friendly Indirect Fire Unit that fired earlier in the sequence.
h) Add the lowest Troop Quality value of any of the Assaulting Units.
The Defending Player applies the following die roll modifiers:
a) Subtract the Terrain Defensive Value (including any Fortification Markers). Remember, subtracting a negative number will add to the total while subtracting a positive number will reduce the total.
b) Subtract the Defense Value of one Unit (if all defending Units are in Column, the Assaulting Player may choose any one of those). If any are Deployed, the Defender may choose one Unit. Remember, subtracting a negative number will add to the total while subtracting a positive number will reduce the total.
c) If Tanks and at least one type of Leg Unit are defending in the hex add 2
d) If only Tanks are Defending in the hex: subtract 2
e) Subtract any Status Markers on the Defending Units Troop Quality as applicable. Remember, subtracting a negative number will add to the total while subtracting a positive number will reduce the total.
f) Add a Leader and/or Hero Troop Quality modifier.
g) Add the lowest Troop Quality value of any of the Defending Units.
10.0 rally aCTIons
Units can have various Status Markers placed on them that temporarily modify their various values (e.g., movement points, Firepower etc...). These are applied equally to all Units in a hex that are affected by that type of Status Marker. This means only one marker for each type of status is ever placed in a hex. There are various ways these Status Markers can be removed.
Three types of Status Markers - Suppressed, Pinned, and Disorganized can only removed by the use of a Rally Action. Disorganized Status Markers can be of any level between 1-4 and are usually referred to in the rules as DG Markers. So, for example, a hex with level 3 Disorganization would be described as having a 3DG Marker (or sometimes just as having 3DG).
10.1 hoW To rally
A Rally Action may be performed by any single Active Unit in a hex with a Suppressed, Pinned or DG Marker. This includes a hex in an enemy Fire Zone. However, only one Rally Action is allowed per hex per Activation. The owning player selects which Active Unit they are going to do the Rally Action with and then they can remove or reduce the level of applicable Status Marker.
A Rally Action removes a Suppressed or Pinned Marker or reduces a DG Marker by one level.
Example: A hex with three Active Units in it has a 3DG marker. One of the Units does a Rally Action, and the 3DG Marker is replaced with a 2DG Marker. Another Rally Action cannot be done in the same hex during this Activation (even with two other Active Units in the hex).
If a hex is Suppressed or Pinned, that must be the first Status Marker removed by Rally Action. If a hex is Suppressed or Pinned and also has a DG Marker, you can’t rally any levels of Disorganization before you remove the Suppressed or Pinned Marker.
A hex cannot be both Pinned and Suppressed. If a Suppressed hex receives a Pinned result, it can ignore the Pinned result. If a Pinned hex receives a Suppressed result, remove the Pinned Marker and replace it with a Suppressed Marker. If a Suppressed hex receives another Suppressed result, it will ignore the second Suppressed result or be eliminated depending on the game. See Exclusive rules.
10.2 suppressed, pinned, and disorGanized (dG) markers
10.2.1 suppressed markers
Suppressed Markers apply to all the Units in a hex. The only Action Units under a Suppressed Marker can do is a Rally Action to remove the Suppressed Marker. They cannot do any other action, including Opportunity Fire.
Suppressed Markers must be removed via a Rally Action before any Disorganization in the hex can be reduced. Only one Active Unit need perform a Rally Action to remove the Suppressed Marker from a hex but only one Rally Action is permitted per hex, per Activation.
10.2.2 pinned markers
Pinned Markers apply to all the Units in a hex. They subtract 3 from a Unit’s Fire Value and Pinned Units may not do a Move or Assault Action. Pinned Markers must be removed via a Rally Action before any Disorganization in the hex can be reduced. Only one Active Unit need perform a Rally Action to remove the Pinned Marker from a hex but only one Rally Action is permitted per hex, per Activation.
10.2.3 disorGanized (dG) markers
DG Markers apply to all Soft Targets Units in the hex (Hard Targets can ignore them). They have values ranging from 1 to 4, representing the levels of Disorganization in a hex. The higher the value the greater the level of Disorganization (4 being the worst). They reduce the Firepower, Movement and (if 3DG or 4DG), the Troop Quality of Units. All these modifiers are clearly stated on the DG Markers. Units at 4DG may not Assault. This is not marked on the DG Marker.
If any Units move out of a hex with a DG Marker, they are given a DG Marker of the same level to take with them.
If any Units with a DG Marker move into a hex that is currently at a lower level of Disorganization, the level of Disorganization in that hex will be changed to match the
DG Marker of the Unit that has just entered. This still applies even if the Unit is just moving through that hex.
If any Unit moves into a hex that is currently at a higher level of Disorganization, it will immediately acquire the same level of DG as well. This still applies even if the Unit is just moving through that hex.
A Rally Action removes one level of Disorganization (4 goes to 3, 3 goes to 2, etc.). Only one Active Unit need perform a Rally Action to remove one level of Disorganization from a hex, but only one Rally Action is allowed per hex, per Activation.
4DG is the maximum level of Disorganization a hex may be at. After DG level 4, each newly acquired level of DG will eliminate a Soft Target Unit in the hex.
11.0 en GIneerIn G aCTIons
Engineering Actions can only be performed as a First action. It will always be a TQ check to see if successful. Modifiers to the TQ check may apply depending on the Engineering Action undertaken. Exclusive Rules will list Engineering actions that are available to the players for each module and explain the requirements for performing them.
12.0 supporT Weapons
Support Weapons are Division, Regiment or Battalion assets that can be attached to hexes. They can be used by any Units in that hex that belong to the same Formation/Division. They will add to these Unit’s Firepower and sometimes to change their type of Firepower (see 8.1). They may also provide an additional benefit as shown on the middle left of the Marker. Support Weapons all have “SW” on their counter to show that they are Support Weapons.
Once attached to a hex they can only be attached to another hex via the Division Reallocating Box. Support Weapons can break when used in a Fire Action. The process for how Support Weapons become broken will be discussed in the Exclusive Rules.
12.1 aTTachinG a supporT Weapon
Only Support Weapons in the Available Support Weapons box on the Division Display can be attached to a hex. This attachment must take place before the Unit performs a Fire or Assault action.

Once a Support Weapon has been selected, the owning player must then trace a path of unlimited hexes, from the owning Formation HQ or Division HQ to an eligible Unit that the Support Weapon is to be attached to. The path can
only consist of hexes that are passable to Leg Units. This criterion still applies where a hex would normally be impassable to Support Weapons. For the purposes of tracing the path that restriction is ignored. The final destination can be in an enemy Fire Zone, but no other hexes along the path can be. The HQ may not be in a Sea Zone.
If a path cannot be traced, the Support Weapon cannot be attached.
To be eligible to use the Support Weapon attached to a hex, both the Unit and the Formation it is part of must be Active. No-Stripe Support Weapons are active when any Formation of their Division is Active and may be attached to any Unit of their Division.
The number of Support Weapons that can be attached to a hex is limited to the number of eligible Units there are in the hex. If a hex is over-stacked, it is possible for more than 3 Support Weapons to be attached to it.
12.2 deTachinG supporT Weapons
Voluntary Removal of Support Weapons: To voluntarily remove a Support Weapon from a hex, the players more or less reverse the process of attaching a Support Weapon.
Before an Active Unit has performed any non-Assault Actions, the owning player must trace a path of unlimited hexes, from the owning Formation HQ or Division HQ to an eligible Unit that the Support Weapon is to be detached from. The path can only consist of hexes that are passable to Leg Units. This criterion still applies where a hex would normally be impassable to Support Weapons. For the purposes of tracing the path that restriction is ignored. The final destination can be in an enemy Fire Zone, but no other hexes along the path can be. The HQ may not be in a Sea Zone.
If a path does exist, the Support Weapon is removed from the Unit and placed in the Reallocating box of the owning Division’s Display. If it does not exist, the Support Weapon cannot be removed.
Involuntary Removal of Support Weapons: If there are fewer eligible Units than Support Weapons in a hex at any point during the game, the owning player should immediately remove any excess Support Weapons (their choice) and place them in the Reallocating Support Weapons box of the relevant Division’s Display. They must follow exactly the same procedure for an involuntary removal as for a voluntary removal. If they are unable to do this for any reason, any excess Support Weapons are eliminated from the game.
12.3 usinG supporT Weapons
Support Weapons may be moved with any eligible Units that are in the hex to which they are attached. Eligible Units are those Units that would be to use them as described in 12.0. Players should note that there can’t ever be more Support Weapons in a single hex than friendly Units.
The rules covering the use of Support Weapons in Fire Actions is discussed in 8.3.2.
13.0 leaders
Leaders may provide Command, Change TQ values for Units, and modify Fire Attacks for Units of the same Formation that are using the benefit.
13.1 movinG leaders
Leaders must remain in the hex they started the Activation in, until all activated Units have finished their Actions. Then, as a final step of that Activation, all Activated Leaders must be placed with a Unit they Command. A player will simply pick them up and place them in a hex with the correct type of Unit. For this placement, they can ignore any enemy Fire Zones or normal movement restrictions.
• No-Stripe Leaders must be placed with any Unit in their Division
• White-Stripe Leaders must be placed with any White-Stripe Unit in their Division
• Formation Leaders must be placed with any Unit in their Formation.
Direct Command Activation: If any Leaders start the Activation in the same hex as a Unit that has been made Active, they may Move with that Unit. If it is the only Unit in the hex, they must Move/Assault with it as Leaders cannot be left in a hex at the end of an Activation. Players should note that there is no placement of Leaders as there is at the end of a Division or Formation Activation.
13.2 usinG leaders
Leaders perform a number of useful functions on the battlefield.
• Units in a hex with a Leader or adjacent to a Leader are In-Command, so Direct Commands may be spent on them to allow Second Actions.
• Leaders add their Troop Quality bonus to any eligible Units in the hex in which they are stacked.
• Leaders add their Fire Bonus to any eligible Fire Action from the hex they are currently in. However, they never change the type of fire (as Support Weapons do).
13.3 losinG leaders
Leaders are eliminated in an Assault when the owning Player rolls a “9” for their Assault Roll and has a Leader present either in one of the Assaulting hexes or the Assaulted hex. When this happens, the leader is flipped to his Replacement side. That Replacement is immediately available to supply all the benefits of the original Leader. If the Leader is already on his Replacement side, remove the Leader from play. He is not replaced.
14.0 heroes
Heroes potentially add to a Unit’s Firepower, Defense Value and Troop Quality. They are covered in the Exclusive Rules.
15.0 TransporT
Transport Assets can transport one Unit and one attached Support Weapon and Hero. All Units being transported must be on their In-Column Side.
Transport Assets are also the only way larger Artillery Units can move (the ones that have “No” as their movement allowance on their In-Column side). Division Transport Assets arrive as reinforcements and on arrival they are immediately placed in the Transport Asset Pool box of the owning Division’s Display.
Loading on to a Transport Asset: When an In-Command Unit, that isn’t in an enemy Fire Zone (see 8.2), is made Active by a Division, Formation or Direct Command Activation chit, the owning player may place a Transport Asset currently in the Active Division’s Transport Pool on that Unit. There are some prerequisites.
• White-Stripe Transport Assets can only be placed with an In-Command Active Unit when the Division or Direct Command Activation Chit is pulled.
• Color-Stripe Transport Assets can only be placed with an In-Command Active Unit when the correct Formation Activation Chit is pulled.
If the relevant prerequisites are met, the Unit is now loaded into the Transport Asset. This uses all the Actions for both the Transport Asset and the Unit being loaded for this Activation.
In subsequent activations, the Transport Asset may move normally, like any other White-Stripe/Color-Stripe Unit and the Unit being transported (and anything else) moves with the Transport Asset. A Transport Asset effectively subsumes the Unit in all respects. Only the Transport Asset’s values and modifiers are considered when it does a Move Action, or comes under attack from a Fire or Assault Action.
If the Transport Asset is eliminated, it is removed from play, and any Unit being transported when this happens is also eliminated. Any Support Weapon is returned to the Reallocating Box on the Divisional Display following all the rules set out in 12.2. Any Hero with the Unit is eliminated.
Unloading from a Transport Asset: To unload a Unit from a Transport Asset, the Transport Asset is taken off the Unit. If it is in a Fire Zone, this gives the enemy player a chance to perform Opportunity Fire against the Transport Asset. This takes place the Transport Asset is removed and before it has unloaded the Unit has been transporting. After unloading, if the Transport Asset hasn’t been eliminated, place it back on the Divisional Display. Any markers it has acquired from combat remain with the unloaded Unit. The Transport Asset may be used again in a following Activation on another Unit. Unloading/Removing a Transport Asset uses up all Actions by the Unit being transported for this Activation.
16.0 nIGhT Turns
There are generally two Night Turns during a Game Day. During Night Turns maximum visibility is reduced to 1 hex (exception see 16.1). Any additional effects of Night Turns are covered in the Exclusive Rules.
16.1 illuminaTion rounds
During Night Turns, players may only spot for Indirect Fire into hexes that are adjacent to friendly Units. To spot any other hexes, players must use Illumination Rounds.

Illumination Rounds can only be fired at night. Firing an Illumination Round is a Fire Action.
To fire an Illumination Round, the owning player should select the Active Indirect Fire Unit you wish to use and choose a target hex within 8 hexes of any Unit of the same division. The target hex may be unoccupied, friendly occupied or enemy occupied. Roll one die. If a 9 is rolled, the Illumination counter is not placed; otherwise, place an Illuminated marker in the target hex. This Hex is now Illuminated and is treated for LOS and fire purposes as if the current turn was a Day Turn.
Fire into an Illuminated hex does not suffer the -2 or -1 for firing at night and the hex can be seen, subject to normal Line of Sight restrictions, at the normal 8 hex range in clear weather or 3 hexes if it is raining. There is no effect on any enemy Units that might be in the Illuminated hex (other than that they may now be seen).
Remove all Illumination markers whenever the Wind Chit is drawn or at the start of the first day turn; whichever comes first.
17.0 reInforCemenTs
Reinforcements are placed in Step D of the Preparation Phase. Division and Formation Activation Chits are available for purchase on the same turn any reinforcements of the Division and/or Formation enter play. Players may also roll for Dispatch Points and Direct Commands at the applicable times after any Unit of a Division enters play.
18.0 dIvIsIonal dIsplays
Each Division in the game has a display which generally performs three main functions.
The first is to state the overall Command Rating, Dispatch Rating and Max. Troop Quality of a Division. However, see 18.1 for potential variance in these ratings.
The second is to provide specific places for the player to store their unused Support Weapons, Routed Units, and Engineers being busy etc...
Lastly, they enable a player to keep track of the available Dispatch Points and Direct Commands by providing a General Records Track at the bottom of each Display.
18.1 dispaTch poinTs and direcT commands
The Command Values for each Division can be found on the Display. The Command Rating is used when the Direct Command Chit is drawn. Roll a D10, halve the roll (rounding down), and add the Command Rating. This will give the owning player the number of Direct Commands to add to the Direct Commands on the General Records Track. No more than 19 may ever be on this track. Any excess is lost.
Dispatch Rating is used in Step G of the Preparation Phase of the Sequence of Play. When this time comes, the owning player rolls a die for each Division and if they roll equal to or less than the Dispatch Rating, they will add 3 more Dispatch Points to the General Records Track. If they roll
more than the rating, they add 1 to the Track instead. No more than 9 Dispatch Points may ever be on this track. Any excess is lost.
Value because of other game effects, such as a Hero being placed with it.
20.0 random evenTs

Players should note that different scenarios may specify different values for Command and Dispatch ratings for the same Division. They should therefore check their Division Displays carefully for each scenario and note any differences between the printed values on the Division Display and the values given for a particular scenario. The values given for specific scenarios always have precedence over those printed on the Division Display.
19.0 dIvIsIon Troop qualIT y
Each Division has a Base Troop Quality (TQ) Value. However, the actual Troop Quality of the Division can change during a game for a number of reasons and this is tracked with the Current Troop Quality Marker.
The Current TQ Value is always used when a Division’s TQ Value is needed during the game. This Current TQ Value can be lower than the Base TQ Value on the Division’s Display but it can never exceed it. Equally the Current TQ Value can never go lower than 0. Therefore, any increases over the Division’s Base TQ Value or reductions below 0 are simply ignored.
However, an individual Unit’s Troop Quality can be higher than both the Division’s Base TQ Value and its Current TQ
The Event Chit is added to The Cup each turn. When it is drawn from The Cup, generally a D10 will be rolled to decide what Random Events occurs. The Random Events specific to a module will be covered in the Exclusive Rules.
21.0 CredITs
Series Designer: Adam Starkweather
Graphic Artist: Antonio Pinar
Rules Writing: Jim Falkus, Mark Popofsky
Rules Layout: Nadir Elfarra
Playtesting: Ross Mortell, Allan Rothberg, Bill Ramsey, Thom Sobziak, Ben Starkweather, James Stier
VASSAL Module Creator: Nigel Rabbitts
Special Thanks: Julian Thomas, Billy Thomas, and Bill Thomas
Produced by: Bill Thomas for Compass Games, LLC

22.0 Index
A
Actions
Assault 3, 5, 9, 12, 27, 31, 32
Engineering 4, 12, 38 Fire Actions 4, 21
Direct Fire 12, 15, 21
Indirect Fire 5, 6, 10, 11, 12, 15, 21, 25, 27, 29, 30, 31, 32, 33, 34, 36, 40
Opportunity Fire 3, 5, 8, 9, 12, 13, 25, 27, 28, 29, 32, 33, 34, 37, 40
First Action 4, 5
Movement 13, 29, 30, 32, 39, 40 Rally 13, 37, 38
Second Action 3, 5, 9, 10, 11, 12, 32, 33
Activation
Direct Command 4, 5, 6, 8, 9, 10, 11, 25, 26, 27, 31, 32, 39, 40
Division 4, 6, 8, 10, 12, 31
Formation 5, 6, 8, 9, 10, 11, 12, 25, 27, 39, 40
B
Barrage 5, 8, 19, 20, 29
Blind Spot. See Line of Sight
Blocking Terrain. See Line of Sight
C
Chit 2, 3, 4, 5, 6, 8, 9, 10, 11, 12, 25, 31, 32, 33, 34, 39, 40, 41
Column 3, 4, 5, 6, 9, 13, 14, 21, 22, 23, 24, 25, 26, 28, 29, 31, 32, 33, 34, 36, 39
Combat Loss Points 32, 36
Combat Results
Disorganized 4, 5, 13, 21, 23, 25, 29, 36, 37
Eliminated 7, 26
Pinned 5, 14, 22, 24, 26, 29, 33, 37
Rout Check 5, 22, 23, 25, 26
Suppressed 5, 14, 22, 25, 26, 29, 32, 34, 37
Command Rating 3, 9, 40
D
Defense Value 5, 6, 23, 25, 26, 30, 36, 39
Deployed 3, 4, 5, 6, 9, 13, 21, 23, 24, 25, 26, 27, 28, 29, 31, 32, 33, 34, 36
Direct Command. See Activation
Disorganized. See Combat Results
Dispatch Points 4, 5, 8, 9, 10, 11, 40
Dispatch Rating 4, 8, 40
Distribute Alcohol 8, See also Exclusive Rules
Division Activation. See Activation Divisional Display 4, 26, 40
Engineering Action. See Actions
Fatigue 4, 8. See also Exclusive Rules Fire Types
Armor Piercing 6, 21, 24
Dual HE/AP 6, 21
High Explosive 6, 21, 24, 25
Indirect Fire 5, 6, 10, 11, 12, 15, 21, 25, 27, 29, 32, 33, 34, 36, 40
Small Arms 6, 21, 24, 29
Fire Zone 4, 5, 13, 21, 22, 24, 26, 27, 28, 29, 30, 32, 37, 38, 39, 40
Formation 3, 4, 5, 6, 7, 8, 9, 10, 11, 12, 13, 24, 25, 27, 31, 32, 33, 34, 38, 39, 40
Formation Activation. See Activation
Fortifications. See Markers
Hero 4, 5, 7, 23, 24, 26, 34, 36, 37, 39, 40, 41
Hindering Terrrain. See Line of Sight
Illumination 8, 15, 20, 40
In-Command 5, 9, 11, 12, 29, 39
Interrupt 5, 8, 9, 10 L
Leader 5, 7, 9, 11, 12, 13, 23, 24, 26, 32, 34, 36, 37, 39
Line of Sight 3, 5, 6, 15, 21, 28, 40
Blind Spot 17
Blocking Terrain 3, 15, 18, 19, 20, 27
Hindering Terrain 4, 20
Plateau Effect 17
M
Markers
Concentrated Fire 8, 9, 21, 22, 23, 25, 27
Disorganized. See Combat Results
Fortifications 4, 24, 30, 36
No Opportunity Fire 8, 9, 27, 33
Move Action. See Actions
Movement Method
Column 3, 4, 5, 6, 9, 13, 14, 21, 22, 23, 24, 25, 26, 28, 29, 31, 32, 33, 34, 36, 39
While Deployed 9
Movement Type
Leg 5, 6, 36
Tracked 5, 6
Wheeled 5, 6
N
Night 20, 23, 25, 40
No Opportunity Fire. See Markers
O
Observation Post 2, 15, 19
On-Fire 27
Opportunity Fire. See Fire Actions
P
Phases
Action Phase 8 End 9
Preparation 8
Pinned. See Combat Results
Player
Initiative 5, 8, 10
Reaction 5, 8, 10
R
Rally Actions. See Actions Random Event 8, 41
Reinforcements 8, 40
Rout Check. See Combat Results
Routed Units 7, 14, 22, 26, 40
Notes:
SSmoke 15, 19, 29, 30
Spotter 5, 29, 31
Stacking 13
Stripes
Formation Stripe / Color Stripe 3, 6, 10, 11, 12, 39, 40 No-Stripe 4, 5, 6, 10, 11, 12, 13, 38, 39
White Stripe / Division 4, 6, 10, 11, 12, 13, 39, 40
Support Weapons 3, 5, 7, 23, 24, 25, 27, 33, 38, 39, 40 Breakdown 25. See also Exclusive Rules
Suppression. See Combat Results
Sustained Fire 5, 8, 9, 27, 32, 33, 34
T
Target
Hard 4, 5, 6, 21, 22, 23, 24, 25, 29, 36
Soft 5, 6, 14, 25, 29, 36, 38
Terrain
Blocking Terrain. See Line of Sight
Hindering Terrain. See Line of Sight
Terrain Effects. See Exclusive Rules
The Cup 3, 4, 6, 8, 9, 10, 11, 30, 32, 33, 41
Transport 29, 39, 40
Troop Quality 4, 5, 7, 8, 25, 26, 33, 36, 37, 39, 40, 41
W
Weather 7, 8
Rain 15
Wind 8, 27, 30, 40
Abbreviated Sequence of Play
1. PREPARATION PHASE
A) Weather Determination (first day Turn only)
B) Check for Division Fatigue: (first day turn only)
C) Distribute Alcohol (Every Turn)
D) Place any Reinforcements due to arrive this turn.
E) Spend Dispatch Points to add chits to The Cup:
• 2 Dispatch Points to add a Division Activation Chit
• 1 Dispatch Point to add a Formation Chit
F) Fatigue:
• If a player adds a Division Activation to the cup during a day turn, add 2 to the Division’s current Fatigue.
• If a player adds a Division Activation to The Cup during a night turn, add 4 to the Division’s current Fatigue.
• If a player does not add a Division Activation to The Cup during a night turn, subtract 1 from the Division’s current Fatigue.
Make these adjustments immediately after all Chits have been purchased.
G) Getting More Dispatch Points: Each player may roll a die to add more Dispatch Points to each Division. They must roll a die for each Division:
• Roll ≤ Division’s Dispatch Rating add 3 Dispatch Points
• Roll > the Division’s Dispatch Rating add 1 Dispatch Point Each Division may have no more than 9 Dispatch Points on its track.
2. ACTION PHASE
A) Fill “ The Cup”
• Purchased Chits are added
• Each Player’s Direct Command Chit, the Wind Chit and the Random Event Chit are added.
• Additional automatically added chits or other types of chits may be added as well.
See the exclusive rulebook for additional rules about chit types and special rules.
B) Remove Illumination Markers if this is the first day turn.
C) Play Formation Chit from Previous Turn: If a Formation Activation Chit was the last Chit in The Cup from the previous Game Turn this is played now (no option for an Interrupt before it is played).
D) Interrupt: Should the Initiative Player wish to immediately play an available Formation Activation Chit before the draw of any Chit throughout the Action Phase, they can spend 2 Dispatch Points and play a Formation Chit (only if that Chit was not purchased this turn in Step 1 and has not been played already in this Action Phase, (cannot buy the same chit more than once per turn). If the Initiative Player does not wish to do this, the Reaction Player has the option to do so. If neither player wishes to Interrupt, draw a Chit from The Cup. Once a Chit has been drawn, Interrupt is no longer available until the next Activation (i.e. you cannot wait to see the Chit draw before deciding whether to preempt it).If an Interrupt does not take place, a Chit should be pulled and the following carried out:
i) If the Wind Chit is drawn, remove all Barrages and Illumination Rounds from the map.
ii) If the Random Event Chit is drawn, roll on the Random Events Table and resolve the Event.
iii) If a Division or Formation Activation Chit is drawn, do the following:
a) Remove all Concentrated Fire, Sustained Fire, and No Opportunity Fire Markers from any Active Units
b) Move Active Support Weapons from the Reallocating SW box to the Available SW box of the Active Division.
c) Active Units adjacent to Assault Markers must change from Deployed to Column if they are able to Assault into that hex and if they are unable to move while Deployed (see 9.3)
d) Perform any Assaults. All Units that assaulted, or fired indirectly in support of an Assault are no longer Active for this Activation.
e) Place any new Assault Markers adjacent to Active Units.
f) Other Active Units may now perform Actions other than Assault (move, fire, engineer, rally). They may switch from Column to Deployed and vice versa before doing these Actions.
g) Before an Active Unit does an Action, Support Weapons may be attached or detached from the hex it is in (see 12.1-2)
h) Pay a Direct Command to Perform a Second Action with any In-Command Units.
i) Move all Active Leaders to any hex of their command (13.1)
j) Check for any Over-stacking and different formation penalties and apply DGs as needed.
E) If the Direct Command Chit is drawn, do the following:
a) Roll a die for each Friendly Division, halve the result (rounding down) and add that number to the Division’s Command Rating. Add this value to the Division’s current Direct Command total. Each Division may have no more than 19 Direct Commands on its track.
b) Activate Units as desired at a cost of one Direct Command per Unit.
1. For each Unit (or stack) activated, remove any Concentrated Fire, No Opportunity Fire, or Sustained Fire Markers from the hex occupied by the Active Unit.
2. The Active Unit (only) may change from Deployed to Column or vice versa at the beginning of their activation (but may not change again until the Unit is Active again with a future Chit draw).
3. The Active Unit may perform one action (only) of any type except Assault.
F) If there is only one Chit left in The Cup and neither player wishes to purchase a Formation Chit, proceed to the End Phase. This is put to one side. It will be the first Chit to be played in the next Game Turn. If there are still Chits remaining in the Cup, return to the start of Step 2D.
3. END PHASE
A) Check to see if a Victory Condition has been met.
B) Check to see if the game has ended.
C) If not, advance the Turn Record to the next turn and return to the beginning of Step 1A.