This game is a simulation of the failed Soviet offensive to recapture Kharkov and the subsequent German attack which produced the last great pocket of Soviet prisoners during the spring of 1942.
Players will conduct operations as either Soviet Direction Commander Timoshenko or the German commander of Army Group South, von Bock. They are termed the Soviet player and the Axis player, respectively.
Several possibilities existed given the situation and some of these will be possible in this game. Also offered in this game, are a couple hypothetical scenarios.
[2.0] Game Equipment & Definitions
[2.1] Game
Maps
Each of the two game maps is represented under a hexagon grid that regulates the area and placement of the participating game pieces (units). Each game turn represents one day. Both maps cover the area of the battle at approximately 3 miles to a hex, from side to side.
[2.2] Charts
and Tables
There are several player aids included to streamline setting up the game, movement, combat, and special conditions that will affect turn-by-turn flow:
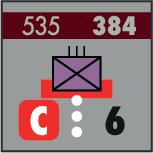
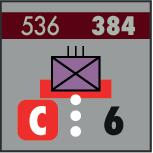
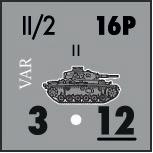
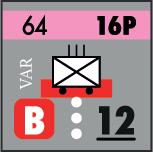
The die–cut cardboard game pieces (counters) represent the participating units that actually fought in the battles. The unit designations printed on the counter identify the particular branch and association that they belong to within that nationality.
[2.4] Unit
Types & Symbols
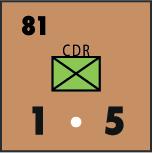
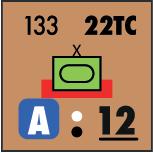
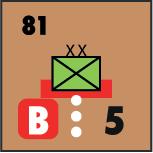
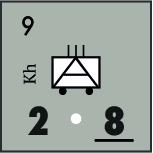
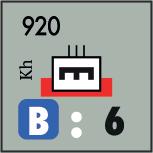
For detailed counter anatomy charts, see Map W. Armor units are a subset of mechanized type comprised of all units with a tank silhouette and Soviet tank brigades. Foot units are a subset of non-mechanized comprised of any Infantry, Mountain, Bicycle, Airborne, Engineer, Police or Ordnance units.
Mechanized Icon
Recon (Aufk)
Tank
Motorized Infantry (Schützen)
Anti-Aircraft (FLAK)
Motorized Artillery
Armored Car
Non-Mechanized
Headquarters (HQ)
Ordnance
Police
Engineer (Sapper)
Infantry
Mountain Infantry
Airborne Infantry
Bicycle Infantry (Radf)
Cavalry
Artillery
Anti-Tank
[2.5] Unit
Size
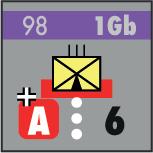
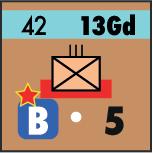
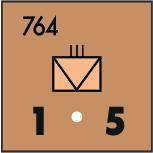
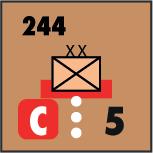
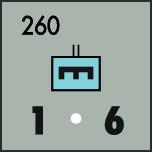
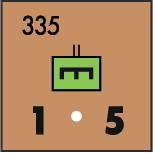
Units represented in this particular game cover a range from divisional to battalion size, with artillery further grouped to portray a proper ratio of tubes between each side. If the unit size is in brackets, the counter represents more than one unit of that size, but is considered that size for any game purposes. A unit will have a number of stacking dots (0-3) as further indication of overall size (these can be black or white). Unit sizes from smallest to largest:
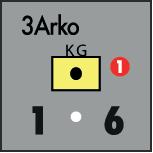
II = battalion, KG = kampfgruppe, III = regiment, Gp = group, X = brigade, XX = division.
A Kampfgruppe was usually a group of smaller units working together under a common commander that didn’t conform to the standard unit size.
Aircraft: German Fighter, Stuka, or Bomber Wings representing approximately 50 planes per Air Point or Soviet Air Force groupings representing approximately 70 planes per Air Point.
[2.6] Nationalities
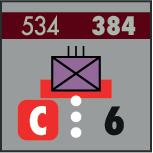
German units are light gray-green (Sixth Armee) and dark gray (Seventeenth Armee). Units with a purple bar under their stacking dots are Hungarian, green bar is for Rumanians, teal bar for the Slovak artillery, and an orange bar for the Italian unit. All of these are considered Axis units. Soviet units are brown (South-Western Front) or tan (Southern Front).
[2.7] Markers
A supply of markers you will need for functions found in this game are provided. The number of markers is not a hard limit and additional markers may be made as needed.
[2.8] Game Abbreviations
The following abbreviations are used in this game:
AG: Assault Gun (German: Sturmgeschütz). AP: Air Point.
Arty: Artillery. AT or Pj: Anti-Tank (German: Panzerjägd or Panzerjäger). Aufk: Recon (German: Aufklarung).
Bde: Brigade. Bn: Battalion (German: Abteillung). CC: Cavalry Corps. CDR: Cadre units (13.4). Div: Division. DRM: Die Roll Modifier. Eng or Sap: Engineers (Soviet: Sappers). EZOC: Enemy Zone of Control. FJ: Airborne (German: Fallschirmjäger).
SF: Southern Front (Soviet HLC). SP: Support Point.
SWF: Southwestern Front (Soviet HLC). TC: Tank Corps.
TEC: Terrain Effects Chart. TRT: Turn Record Track. VP: Victory Point. ZOC: Zone of Control.
[3.0] Setting up the Game
Players should select a scenario (21.0) and decide which optional rules to use. Markers for Air & Ground Condition, Game Turn indication, Support Points, and Victory Point totals, should be placed on the tracks of each side’s Player Aid Card at the start of the game according to the scenario rules. Blown
Bridge markers are placed on corresponding bridges as shown on the maps. Place the Rain Days marker on the box marked with your chosen scenario.
Units with ‘VAR’ on their counter are placed aside and must wait for a specific turn to be brought into play. This usually happens when the player makes the die roll for entry.
Units with an asterisk next to their unit symbol are used if utilizing Soviet High Risk Option (20.1) or the Soviet player captures a city hex (as outlined on the Axis Player Aid for scenarios #2 & #3).
Units have a specific color assigned to their symbol. For the Axis, this corresponds to their parent corps formation. For the Soviets, it corresponds to their parent army formation. White belongs to a higher level affiliation and red are special optional commands. These colors only come into play during set-up and under 18.0 restrictions. Place units on the appropriate charts for the scenario to be played. Units from the respective setup charts are then placed on the map as indicated. Play can commence.
[4.0] Sequence of Play
Spring Prelude is played in game turns. Each game turn is divided into phases. Players take actions as directed during the phases according to the following sequence of play. During a player’s turn, they are called the phasing player.
[4.1] Game Turn Outline
1. Preparation Stage
a. Weather Phase: (Skip phase on certain turns as instructed by scenario special rules) Roll dice for possible Rain and apply ground conditions according to the weather rules.
2. Accounting Phase
a. Adjust Support Point (SP) and Victory Point (VP) tracks to current totals by adding SP from Turn Record Track (TRT) and counting controlled VP on the maps.
b. Mutual Variable Reinforcement Segment: Each player rolls one die to release any reinforcements that are available as per the Variable Reinforcement Chart.
a. Mutual Air Segment: Number of Air Points available is determined. Axis/Soviet Interdiction or para drop (Optional) missions may be conducted.
3. Soviet Player Turn
a. Replacement Phase: (Skip phase when playing scenario #1) Spend available replacement points on eligible depleted or eliminated units.
b. Movement Phase: Soviet player may start building entrenchments or repairing bridges. All friendly units may now move within the limits of the Terrain Effects Chart. Reinforcements may arrive and move onto the map.
c. Combat Phase: Combat may take place between adjacent units at the phasing player’s discretion.
d. Supply Phase: (Skip phase on first turn of any scenario) Soviet player adjusts the current status of all his units.
e. Engineering Phase: Soviet player may build and destroy bridges, build entrenchments, remove rubble, and assist units in river crossing.
4. Axis Player Turn
a. Replacement Phase: (Skip phase when playing scenario #1) Spend available replacement points on eligible depleted or eliminated units.
b. Movement Phase: Axis player may start building entrenchments or repairing bridges. All friendly units may now move within the limits of the Terrain Effects Chart (TEC). Reinforcements may arrive and move onto the map. Mechanized units can now be designated as Reserves.
c. Combat Phase: Combat may take place between adjacent units at the phasing player’s discretion.
d. Supply Phase: (Skip phase on first turn of any scenario) Axis player adjusts the current status of all his units. Axis supply drop may be attempted.
e. Exploitation Phase: (Skip phase on any Rain turn) Designated reserve units may now be moved. Combat may take place between reserve units and adjacent enemy units at the phasing player’s discretion.
f. Engineering Phase: Axis player may build and destroy bridges, build entrenchments, remove rubble, and assist units in river crossing.
One full game turn has passed and the marker on the Turn Record Track is moved forward one space. Remove any Air Points from the map, if placed. Play proceeds until the end of the scenario and a victor is declared.
[5.0] Weather
During the Weather Phase players check for Rain and assess Ground Condition. If there is a ‘Continued Rain’ marker, a roll is not needed for this turn (the Air Condition is automatically ‘Clear’), remove the ‘Continued Rain’ marker, flip the Air Condition marker to indicate ‘Clear’, and Ground Condition remains Mud; proceed to the Accounting Phase.
When checking for Rain each player rolls one die and values are added together. Refer to the values along the bottom of the Weather Track. This dice roll has two possible outcomes.
B If the result of the two dice is within the printed range above the box where the ‘Rain Days’ marker resides, there is Rain this turn. Flip the Air Condition indicator to Rain (or add the ‘Continued Rain’ marker if already showing Rain) and advance the ‘Rain Days’ marker one box to the right (increasing the total); Ground Condition becomes Mud, flip marker to indicate this status.
B If the result of the two dice is not within the printed range above the box where the ‘Rain Days’ marker resides, there is no Rain this turn and the Air Condition for this turn is ‘Clear’. If the Air Condition marker was already showing Rain, it would be flipped to show ‘Clear’ and Ground Condition remains Mud. Otherwise the Air Condition marker is left on ‘Clear’ and Ground Condition is ‘Dry’, flip if needed to indicate this status.
Note the end of the track has no value as only a maximum of 6 days of Rain are possible, once the ‘Rain Days’ marker reaches this box no roll needs to be made for the remainder of the game.
If both players agree, the historical weather shown on the TRT may be used instead of rolling.
[5.1] Effects of Weather
When the Air Condition is ‘Clear’ and Ground Condition is ‘Dry’, there is no effect of weather on play.
Rain stops all Air Supply Drops (7.6), Assisted River Crossing (15.4), and Air Operations (9.0); they are not available during a Rain turn.
Combat during a Rain turn is automatically shifted one column to the left after all other shifts.
Axis player may not designate Mobile Reserves (11.0) during a Rain turn.
Mud has the following effects:
B Each side’s available Air Point total is halved (round down).
B Non-Mech units may not use Strategic Movement.
B All cavalry and bicycle units have a maximum Movement Allowance of 6 .
B There is a Mud column for mechanized units on the Terrain Effects Chart.
B Marked stream hexsides become swollen streams and use that line on the TEC.
B Any advance after combat is limited to two hexes no matter the actual length of retreat.
Spotter Rain Effects (Optional Rule)
The detrimental effects of rain on visibility and artillery operations were ignored in the interest of gameplay. However, if players don’t mind the extra rolls and how it may slow even further the Soviet offensive, they can employ this rule.
During a Rain turn every artillery unit attempting to provide fire support must roll a 1-4 on 1d6 for it to be successful. A higher roll means the fire was ineffectual, off target, or maybe even friendly fire due to the visibility conditions.
[6.0] Zone of Control (ZOC)
Combat units that have a red bar behind the bottom of their unit symbol will exert a Zone of Control into the six (6) hexes that surround them. All other units do not exert Zones of Control and only control the hex they sit in.
A friendly unit will negate an enemy Zone of Control (EZOC) in its hex for tracing supply only. A Zone of Control never extends over an unbridged Dnepr hexside.
A stack of units with a total non-artillery combat strength of 4 or more will exert a ZOC (even if they would individually not have a ZOC).
Foot or cavalry units with a total combat strength of 2 or more stacked in an Entrenchment or Improved Position will exert a ZOC normally.
[6.1] ZOC Effects on Movement
All units entering an EZOC must stop and end movement for the current phase.
All units that begin the movement or exploitation phase in an EZOC and wish to move must pay a disengagement cost which is listed on the TEC. This cost is in addition to normal terrain costs. Units may not move from one EZOC to another but must exit to a non–enemy controlled hex. They may not enter another EZOC for the remainder of the current phase.
German Combat Flexibility (Optional Rule)
Early in the batt le the two panzer divisions were able to rapidly shift their axis of att ack from day to day. This rule adds the ability to accomplish this without the prior planning required with the base rules.
German mechanized units may move one or two hexes out of an EZOC directly into another EZOC if there is a friendly unit in both start and end hexes for the entire phase. This is the only exception to the disengagement rule prohibiting EZOC re-entry, is limited to moving only one or two hexes, and cannot be done across prohibited terrain. The disengagement cost is still paid as normal.
[6.2] ZOC Effects on Combat
Stacks that must retreat through an EZOC lose one step for each controlled hex entered. Remember this loss is per stack and not per unit. That step must come from an artillery unit (if one is present).
When executing advances and retreats, friendly units have no effect on EZOC (they can only negate when tracing supply).
[7.0] Supply
Units must be within reach of supplies to functi on without penalty.
Units can have one of three possible supply statuses: in supply, out of supply and isolated.
Supply status is determined by each player for their owned units during the supply phase on their player turn, and once a unit’s supply status has been determined, it remains fixed until their next supply phase.
To be in supply, a unit must trace a supply line to a supply source of its nationality or to a supply road hex. A supply road hex is a road hex connected to a supply source by an uninterrupted string of road hexes that are free of EZOC and none of which has suffered from bridge destruction. Neither the supply line nor the supply road may be traced through a hex in an EZOC unless that hex is occupied by a friendly unit.
A supply line may only cross an unbridged river hexside if it crosses a hexside of the tracing unit’s hex.
A unit may trace a supply line four hexes to a supply road hex or three hexes direct to a supply source.
When a supply line is traced to a HQ unit instead of a supply road, it is called a Line of Communications.
All units are considered to be in supply on their turn of arrival or placement on the map.
Supply status is never checked on the first turn of any scenario, all units are considered in supply.
[7.1] Out of Supply
A unit is out of supply if:
1. It can trace a supply line to a supply road hex or supply source, but the supply line is longer than permitted; or
2. The supply road hex to which its supply line is traced is not connected to a friendly supply source; or
3. It is unable to trace a supply line (as above), but is within 3 hexes of a friendly unit in supply.
Out of Supply Effects
A unit marked as out of supply has its combat strength and movement allowance modified as follows:
1. Сombat strength is halved (round fractions down).
2. Defense strength is normal
3. Mechanized units’ movement allowance is halved (round fractions down).
4. Non–mechanized units’ movement allowance is normal.
Note: All units have a minimum Combat Strength of one.
[7.2] Isolation
A unit is isolated if:
1. It is completely unable to trace through to a friendly supply source and there is no friendly, supplied combat unit within three hexes.
2. It is a Soviet HQ unit and completely unable to trace through to its supply source due to enemy controlled hexes. Isolation Effects
All units marked as isolated have their combat strengths and movement allowances further reduced as follows:
1. Maximum attacking combat strength is one Exception: Units making an attrition attack have their combat strength halved (round fractions down).
2. Defending units are individually halved in combat strength, (round fractions down).
3. Mechanized units have their movement allowance reduced to four
4. Non–mechanized unit’s movement allowance is halved (round fractions down).
Note: All units have a minimum Combat Strength of one.
[7.3] Isolation and Surrender
Starting with turn 11 a Soviet unit or stack with an isolated marker which is unable to trace a LOC to its parent HQ during a Soviet supply phase and is still in an isolated status must place a second marker. Units with two isolated markers must make a 1d6 surrender roll at the end of their supply phase. A result of 1-2 yields - No Effect; on a result of 3-4, a step is lost; and on a result of 5-6, two steps are lost. Axis units will never surrender during the game.
[7.4] Soviet Attrition Attacks
Soviet units which can only trace a LOC to an Isolated Soviet HQ unit must move toward a friendly supply source in their movement phase and attack if possible. These attacks do not cost Support Points and may ignore command restrictions. Artillery units may still provide fire support
[7.5] Supply Sources
The Axis player may use any road hex on the edge of Map W, the southern edge of Map E, and the northern edge of Map E west of E3201 (inclusive), as a supply source. Any German controlled city hex is also a supply source. The Soviet player may only use a road hex on the eastern and northern edges of Map E between hexes E4845 and E4001 (inclusive) as a supply source.
[7.6] Air Supply Drop (Axis Only)
During the Axis supply phase, the Axis player may attempt to supply units in one hex by air. This does not require the use of Air Points.
A successful supply drop automatically improves a unit’s supply status by one level (from Isolated to Out of Supply to Supplied).
If a hex to be supplied by air is in an EZOC, it is successful on a 1d6 roll of 1-4. If not in an EZOC it is supplied on a roll of 1-5 .
A supply drop may not be attempted during Rain.
Each attempt will cost one Support Point from the HLC of the largest unit in the hex.
[8.0] Support Points (SP)
Both players have two High Level Commands (German armies and Soviet Fronts) which are used to track Support Points. Before the start of the game, Support Points are given to each HLC as per the Turn Record Track or scenario rules. Players may receive additional points during the game, also given on the TRT. Once allotted to a specific HLC, a point may never be transferred to another. Support Points are expended when attacks are made, special actions taken, and replacements taken. A listing of the cost per action is on the Support Point Summary.
Place SP markers for each command on the Support Point track in the correct amounts at the start of the game. Keep track of gains and losses there.
Designer’s Note: While the Germans were gearing up for the Fall Blau offensive; the Soviets committed to this battle with little preparation. Approval for the attack was not acquired until late April and their supply system was woefully inadequate for a sustained offensive. To keep a fun and more balanced game, Soviet SP levels have been elevated from their actual numbers. For those (solo) players that want to see what the historical Soviets faced logistically, start with SWF-12/SF-2 and only add 8 SP on turns 2-6 with the TRT being accurate to use for the remaining turns.
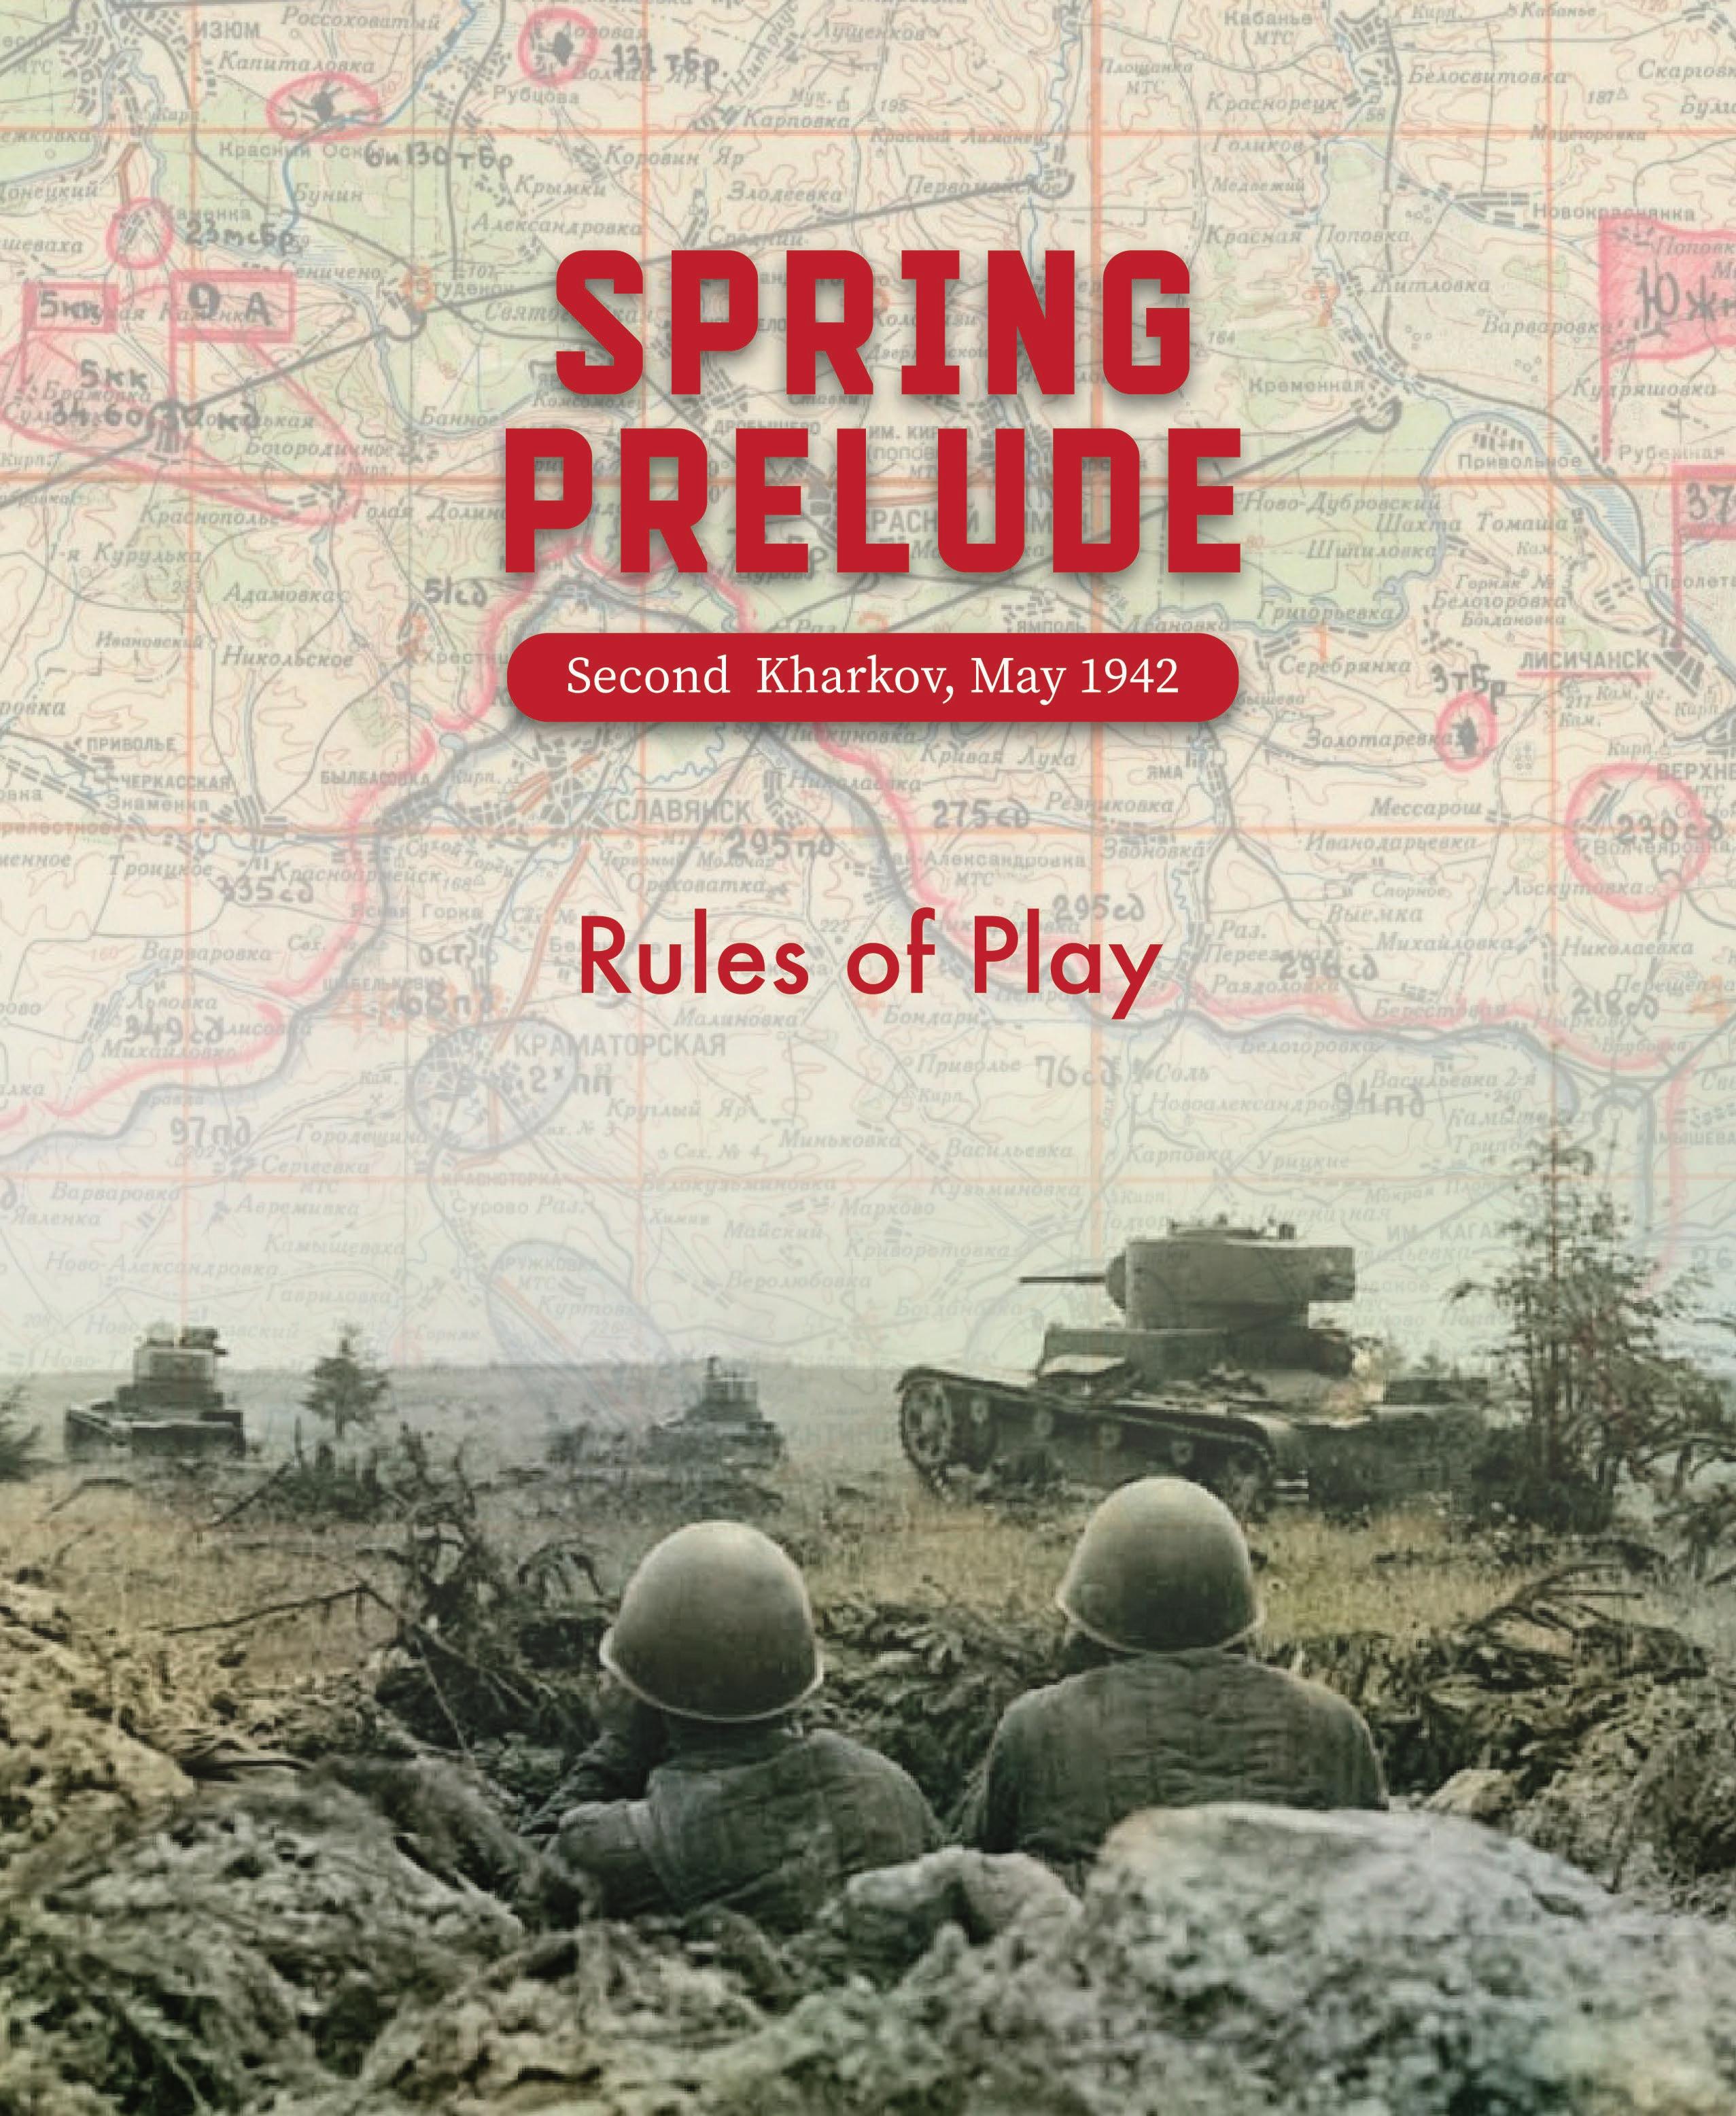
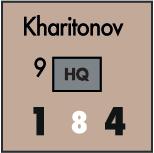
[8.1] Soviet Headquarters (HQ) Units
The Soviet player has HQ counters for each of his armies and one for Group ‘Bobkin’. They represent a combinati on of the auxiliary HQ and stockpiles of supplies for off ensive operati ons.
A HQ unit functions to allow Soviet combat units to expend Support Points. Any HQ unit which is supplied may act as a conduit for the expenditure of any number of Support Points to units of its formation (symbol color) or Front units (those with white symbols) of its same High Level Command (HLC). These units must be able to trace a Line of Communication (LOC) to the HQ unit.
A Line of Communication is traced like a supply line, but to a HQ unit instead of a supply road hex, and its length must be equal or less in hexes than the Command Range of the HQ unit it is being traced to.
HQ units trace supply normally and have supply states as with other units.
A HQ unit which is out of supply may only allow use of one Support Point per turn to units of its formation (symbol color) with a direct LOC to it.
HQ units may never use Strategic movement and must stay at least 3 hexes from an enemy unit. If an enemy unit is closer than 3 hexes at the beginning of the friendly movement phase, the HQ must move away from the enemy unit until at least 2 hexes separate them. If the HQ cannot end its move greater than 3 hexes from an enemy unit, it must move in the direction of a friendly supply source. HQ units never pay the disengagement cost for leaving an enemy ZOC (6.1).
A HQ unit is not a combat unit. It has no ZOC or combat strength. If attacked while alone in a hex, the HQ defends with a combat strength of 1; all available column shifts and terrain modifiers apply. A HQ unit adds its defense strength to any friendly units it is stacked with. A HQ can never retreat and is eliminated by any loss or retreat result. A HQ unit is eliminated if left alone in a hex as a result of the elimination and/or retreat of other friendly units in the hex.
One previously eliminated HQ unit may be returned per game turn. A returning HQ is placed within 3 hexes of a unit of its army (same color symbol) and at least 3 hexes from enemy units after a proper Support Point expenditure from its HLC.
[8.2] Expending Support Points
Various game actions require the expenditure of SP in order to complete them. See the Support Point Summary for the cost per use. Support Points may only be used by units of that specific HLC. Attacks which may include units of more than one HLC, expend the SP from the HLC with the most units or if equal, the most combat strength involved. If still equal, owning player can decide.
Additionally, Soviet units must trace a Line of Communication to their parent (same color symbol) HQ unit before expending a SP for an attack or rebuilding a bridge. All units with white symbols trace to any HQ unit of their HLC.
Axis units are restricted from expending SP with other units not of the same nationality unless they are German units.
[8.3] Gaining Support Points
During the Accounting Phase, a player may receive additional Support Points and assign them to a HLC by moving its marker on the track. (See 18.3) Note that this does not happen on the first game turn, each player starts with a pre-determined total from the TRT.
[8.4] Negative Support
Players may elect to overspend support. If a HLC has its SP total reduced to less than zero, the supply rating for all units subordinate to that HLC is immediately reduced by one level (Supplied units are now Out of Supply, Out of Supply becomes Isolated), artillery may not provide fire support, and units may not receive an integrity bonus shift for combat.
[9.0] Air Operations
During the Air Segment of the Accounting Phase, players consult the Turn Record Track. This will show how many Air Points can be used in the current turn.
Axis Air Points may support all Axis nationalities.
Range of effect is unlimited for Air Points (i.e., they may be used anywhere on the map).
Air Points may not be saved from turn to turn.
Each Air Point can be used for only one mission if they are available for that turn.
[9.1] Air Combat Support Mission
Players may allocate an Air Point during either the combat phase or exploitation phase to individual combats. However, using a point to support ground combat is not an automatic function. Refer to the appropriate side’s line under the “Die Roll Needed” section of the Air Support Table. Roll 1d6. If the result is within the span indicated on the chart, the Air Point is placed on the defender and provides a column shift on the Combat Results Table. Otherwise, the point is lost for this turn. No more than one point may be allocated to a combat per side, regardless of whether or not it was successful.
If the opposing stack includes an AA (Flak) unit, the “Die Roll Needed” is a 1, all other results are unsuccessful.
Any successful air support in a town or city hex results in the immediate placement of a rubble marker (9.4).
[9.2] Air Interdiction Mission
Each side may use one Air Point to conduct an interdiction mission. If a side has half the Air Points of the other side (or less) for the turn they are not allowed to interdict. An interdicting Air Point is placed on the map in any hex occupied by an enemy combat unit (remember that Soviet bridge or HQ units are not combat units) during the Air Segment. A roll is made on the Air Support Table as with a support mission, but subtracting one from the die result. Unsuccessful Air Points are immediately removed from the map. The same hex may never be targeted two turns in a row. If the targeted stack has or is adjacent to an AA (Flak) unit, add one to the roll made on the Air Support Table instead of subtracting.
Town and city hexes may not be targeted for interdiction.
Units which start their movement or exploitation phase in an enemy interdicted hex may only use half their MA (round fractions down) and may not use Strategic Movement.
Units which enter any of the six hexes adjacent to the enemy interdicted hex during Tactical Movement must pay an additional Movement Point (1 MP) over and above the normal cost of the hex and through the enemy interdicted hex itself, costs 2 MP over the normal cost of the hex.
Units may not enter the interdicted hex or its adjacent hexes while using Strategic Movement.
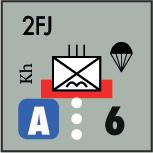
[9.3] German Para Drop (Optional Rule)
There is some debate about whether the Soviet reports of German paratroopers dropping to reinforce the besieged garrison of Ternovaya were accurate. For this rule we assume the reports are true and the German can plan and execute reinforcing drops during the batt le.
the 2FJ unit may be returned to full strength and loses the ability to drop steps. If an attempt has been made and the Kharkov garrison is released, the 2FJ unit remains a cadre and loses the remaining attempt.
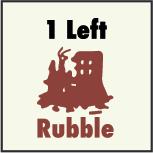
[9.4] Rubble
If an Air Point results in a column shift against an enemy unit in a city or town, a rubble marker is placed in the hex. The marker is placed in the hex immediately upon resolution of the combat and has no effect on that particular combat; it will affect subsequent combat unless removed. The marker does affect any advances resulting from the combat which caused the marker to be placed in the hex.
There may not be more than one rubble marker in any given hex. There is no limit as to how many times a rubble marker may be placed in a single hex during the game. The marker has no effect on stacking.
A unit using tactical movement pays an additional cost of one Movement Point to enter a hex containing a rubble marker. Any unit defending in a hex containing a rubble marker receives a column shift to the left on the Combat Results Table. Only one such shift may be awarded per combat.
A unit advancing after combat into a rubble hex must end its advance in that hex. Rubble has no effect on retreats.
[10.0] Movement
When following this rule, the German 2FJ regiment starts play as a cadre and may never receive replacements. During any two Air Segments per game, the Axis player may attempt a (night) drop of one step of fallschirmjäger from Kharkov into a hex occupied by a reduced German infantry unit of the Sixth Armee HLC. There is a marker that represents these two steps which can be left on the Axis PAC until an attempt is made.
If the unit is adjacent to an enemy unit, the drop is successful on a 1d6 roll of 1-4. If not adjacent to an enemy unit, it is successful on a roll of 1-5. When successful, increase the unit’s number of steps by one. If unsuccessful, the step is lost. Either way, flip or remove the marker after this action depending on which attempt it was.
Drops may not be attempted if any Soviet unit is within three hexes of the airfield in hex E2118. In the event a para drop has not been attempted and the Kharkov garrison is released,
During the movement phase (or exploitation phase for eligible mechanized units) the phasing player may move his units in any order he wishes. Eligible units are moved individually, tracing a path of contiguous hexes through the hexgrid. Once a player begins moving a particular unit, he must complete its movement before any other unit can be moved. Units may move as stacks provided each unit in the stack respects the movement rules applying to it. Movement is regulated by the printed movement allowance which shows the number of Movement Points for the phase to be used on the Terrain Effects Chart. Units pay Movement Points (MP) for each hex entered during movement, according to the terrain in the hex (or a crossed hexside) up to this allowance which can be altered by supply status and the presence of enemy units.
[10.1] Tactical Movement
For this movement a unit is considered to be in combat ready mode and uses the normal costs on the Terrain Effects Chart. This is the only type of movement allowed during the exploitation phase.
SPRING PRELUDE: Second
Units crossing a hexside along a road ignore terrain costs and instead use the Tactical road movement rate.
Motorized infantry, armored car, and recon units may cross unbridged rivers or swollen streams during Tactical Movement only. In addition to the normal cost to enter that hex, this move has additional costs shown on the TEC. They may not cross unbridged rivers during a Mud turn.
All mechanized units and artillery conducting Tactical Movement must pay an extra 1 MP when moving uphill from a Level 1 to Level 2 hex. This cost is ignored when using Tactical road movement rate. All other units may freely move between levels using normal movement costs.
[10.2] Strategic Movement
This is a faster type of movement that is only used far from enemy lines.
Units using Strategic Movement may not start within or come closer than 3 hexes from any enemy unit at any time during the phase (count the enemy hex not your own).
Reinforcements may enter the game using Strategic Movement if they meet the criteria above.
Units crossing a hexside along a road ignore terrain costs and instead may use the Strategic road movement rate.
[10.3] Rail Movement
Units of both sides arrived at the batt lefi eld via train during the ti me covered by this game. All available rolling stock was either being used for supplies or transporti ng these reinforcements to the area. Therefore, units were never shift ed from sector to sector during the batt le.
Rail hexes have no effect on movement (use the other terrain), but railroad bridges are treated as normal bridges.
[10.4] Terrain Effects on Movement
Mechanized units may not enter wooded marsh terrain unless entering through a road hexside.
Units retain fractional costs until movement is complete. A unit must possess the required MP in order to enter a hex. However, a unit can always enter a single hex during the movement or exploitation phase provided the terrain is not prohibited for its unit type or restricted by EZOC.
River or ‘swollen stream’ hexsides may not be crossed by artillery (FLAK units are considered artillery for this rule) and armor units, unless there is an active bridge across or by using Assisted River Crossing (15.4).
Dnepr River hexsides may not be crossed except at active bridges.
[10.5] Universal Movement Restrictions
Units may only use one type of movement (e.g., Tactical or Strategic) per movement or exploitation phase.
[10.6] Southern Map Edge
Axis units may use Strategic Movement from any hex marked E to one marked W or vice versa. This is the only way a unit may leave the map and return. Each unit that exits via one of these hexes will spend one complete turn off-map. The following turn it will enter the map as a normal reinforcement via one of the opposite labelled hexes. Axis player aid card has holding boxes to help with accomplishing this transition.
[11.0] Mobile Reserves
During Clear turns, Axis mechanized units may move in either the movement phase or exploitation phase, but not both. The choice of which is up to the owning player. Those units selected to use the exploitation phase are marked with a Reserve marker during the movement phase and may be in an EZOC when marked.
Reserves are limited to Tactical Movement during the exploitation phase. These units may never overstack during this movement or pass through a hex that is in an overstack condition. Only these units may participate in combat at the end of the exploitation phase, subject to normal stacking restrictions (12.2). Defending units may have already been attacked during the previous combat phase. All exploitation movement must be conducted before any combat is resolved.
Remove any Reserve marker from all units after completion of the exploitation phase.
[12.0] Stacking
Combat units have a limit of up to six stacking dots (black or white) which may be in a single hex.
This stacking rule is enforced once during a player’s turn at the end of the movement phase. If any stacks are found to be in violation, the owning player must eliminate excess units.
Markers and units without stacking dots do not count toward this limit.
Enemy and friendly units may never be stacked together. Maximum one HQ unit may be stacked in a hex.
Axis units may only stack with or pass through a hex with units of their nationality and with German units. They are prohibited from participating in combat with other nationalities (other than Germans) per 8.2.
[12.1] Overstacking
During combat resolution, units may be forced to retreat onto friendly stacks in violation of the stacking limit. This is a temporary, but allowed situation. If this stack is attacked in the same phase, the overstacked units do not take part in the new combat. If this attack results in any adverse result (i.e., the hex is left vacant through loss or retreat), the overstacked units are immediately eliminated. Stacks must conform to the stacking rule by the end of the next friendly movement phase.
[12.2] Stacking and Combat
The area covered by a hex allows for units to fi t physically, but when engaging with another hex not all the men and equipment can meet the enemy. Therefore, there are further restricti ons as to which units may actually parti cipate in combat
Units with combinations up to a total of four stacking dots may participate in combat from a given hex. This applies whether attacking or defending. Units with a black stacking dot have the choice to participate in combat using only its cadre strength in order to fall under the limit of four or count its dots normally. Units without stacking dots may freely participate in combat from a hex.
Non–participating units within a stack may only contribute to integrity bonuses (i.e., combined-arms must come from participating units), but are also subject to the effects from combat results, including advance after combat, retreats, and any leftover losses. This is important to remember even during the exploitation phase.
Units participating in different combats while stacked in the same hex may not contribute integrity or combined-arms bonuses to both combats and are only subject to the effects from their participating combat results.
[13.0] Combat Strength Chits
[13.1] Size Class
Unlike the smaller units in the game, prime units do not have their combat strength printed on the counter. When engaging in combat for the first time, these units use a randomly picked strength chit from either a Red Class or a Blue Class, corresponding to the class color box printed on the unit.
Place the Red Class chits and Blue Class chits into two opaque cups. Both sides share these chits and return spent chits to their respective cup for re–use.
Once picked, place the chit under the unit to keep the exact strengths unknown to your opponent.
The Red Class represents the strongest and largest units while the Blue Class an average value in size and available support.
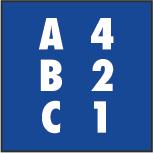
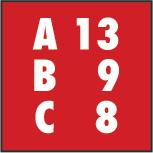
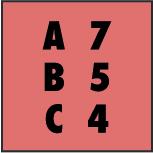
[13.2] Effectiveness Rating
Each unit’s Effectiveness Rating (A, B or C) equals the strength number used in calculating combat odds. A = Highest, B = Average, C = Mediocre. These correspond to the quality of training and experience of the unit in combat.
Strength chits are printed with a full strength (darker color / white values) and a reduced strength (lighter color/black values) side.
Strength chits are only revealed immediately before combat resolution of a declared attack or defense, after artillery or Air Points have been committed.
[13.3] Fixed Strength Units
Only prime units within the simulation require strength chits. All other units use the printed number on the bottom left of the counter when calculating combat odds. These units usually have only one step.
Most German battalions and Soviet regiments have two steps of strength. When such a unit loses one step, flip it to its reduced or cadre side. Losses of two steps or an additional one step loss eliminates it. They cannot be replaced once eliminated.
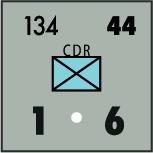
[13.4] Cadre Units
Cadre units are the last step in an organizati on. They represent the last trained remnants to survive combat losses.
Formations that have one or more of their members at cadre status are not eligible for integrity bonus in combat. Cadre units do not exert a ZOC and have only one step with a fixed strength of one.
[13.5] Veteran Units
No combat is allowed across a Dnepr hexside unless it is crossed by a bridge. If all units are attacking across a Dnepr hexside via a bridge, the defender is tripled.
If all units are attacking across stream hexsides the defender receives a bonus shift to the left.
Units defending in a village, town, or city hex may ignore one hex of any normal retreat result (overrun results may not be ignored). Any defending units NOT in one of those types of hexes would still follow the combat results as normal (i.e., only units actually in the hex will gain the benefit). Also remember that this is optional and the units may retreat anyway, if so desired.
Certain units on each side either previously contributed or during the batt le showed exemplary combat performance. To refl ect their excepti onal status, they are given an extra chance to draw a strong chit.
Qualifying units have either a cross or a star next to their Size Class / Effectiveness Rating. When one of these units first enters battle, the owning player draws two chits and uses the higher strength value; the other is returned to its cup.
More Random Chit Use (Optional Rule)
To add to the uncertainty and random nature of the combat system in Spring Prelude, units should surrender all full strength chits once every fourth turn in the Accounting Phase. Return these chits to the cups.
[14.0] Combat
Combat may occur between opposing units that are adjacent. Combat is optional and each attack costs one Support Point. The phasing player sets the order of any attacks. There is no need to declare all attacks prior to any resolution.
Each combat is separate and may involve only units that are both adjacent and have not already been in combat this phase. Each attack is resolved before moving on to another attack.
[14.1] Terrain Effects on Combat
At the top of the Combat Results Table are lines that apply to the defender’s terrain. Use the terrain in multi–hex attacks that is most favorable to the defender.
Units defending solely behind river and/or swollen stream hexsides are doubled in combat strength.
Units defending in a friendly Entrenchment (not Improved Positi on) or in town hexes are doubled in combat strength. Units in a friendly Entrenchment (not Improved Position) or town hexes (normally doubled), that defend solely behind river hexsides have their combat strength tripled when defending.
If any units are defending in a friendly Improved Position hex, increase the Combat Strength of the hex by two. This may not increase more than double (i.e., a strength of one would not increase to three, but would become only two).
Mechanized units have their combat strength halved (round down, never below one) when defending in or attacking into a wooded marsh hex. Attacks out of a wooded marsh hex are conducted as normal.
Entrenchments and Improved Positions printed on the map only benefit the side which built them.
Fort Assault Attrition (Optional Rule)
Attacks against defenders in an Entrenchment (not Improved Positi ons) are subject to a mandatory step loss if the defending stack elects to convert any retreat hexes into losses in order to remain in the hex.
[14.2] Multi–hex Combat
Units may combine forces from two or more hexes to attack adjacent enemy units.
Defenders (up to the normal four dot per hex limitati on) must be totaled into one sum and may not be singled out of a hex.
As long as the limit of four stacking dots per hex is not exceeded, more than one hex may be attacked from a single, adjacent hex. If friendly units in one hex are attacking into more than one combat, all die rolls must be completed before any advance or retreat. The attacker decides the order in which results for each combat are applied.
Screening Forces (Optional Rule)
For ease of play I removed the “soak-off ” requirement so units can pick and choose who to att ack. However, it does abstract out what actually happens when an enemy is in close proximity. Follow this rule for a more realisti c batt le.
Units participating in an attack and which have enemy units of three or more stacking dots in their ZOC and those enemy units are not defending against other attacks; will only be able to attack at half strength (round fractions up).
[14.3] Parent Integrity
Combined–Arms in the Attack
When all units (possibly 2, 3, or 4 units depending on formation) with the same color stripe are adjacent to the defender in an attack, one integrity column shift to the right is awarded. A maximum of two such column shifts may be awarded for a single attack. Note: These do not need to be participating in the attack, merely adjacent to defender.
When two units belonging to the same color stripe are defending, either stacked together or adjacent to each other (i.e., they both do not have to be adjacent to the attacking enemy); then one integrity column shift to the left is awarded. A maximum of one such column shift may be awarded for a single defense.
The requirements for integrity bonuses are checked at the moment of combat.
Any members of the parent formation reduced to cadre, or eliminated, will negate integrity combat bonuses for that entire formation until those units are restored by later replacements (17.0).
Attached units and parent formation units without a color stripe cannot establish unit integrity requirements even if designated with parent identification (e.g., some German regiments fought in the battle separated or without their full division and may not gain an integrity shift because they have no color stripe.).
Integrity shifts are cumulative with other shifts awarded.
NOTE: German 71 Infantry Division can only meet integrity requirements on defense during scenarios #1-3 . German 113 Infantry Division can only meet integrity requirements on defense during scenarios #2-3 However, in scenario #4 both have all three regiments and will act normally.
[14.4] Combined–Arms
Players organizing their units as cooperati ve combat teams are awarded shift s
Units attacking solely across river (or swollen stream) hexsides are never allowed a combined-arms bonus.
Entrenchments (not Improved Positi ons) negate all combinedarms shifts by the attacker in that combat.
Cadre units can fulfill conditions as normal, based on the role of their symbol.
If the phasing player has armor units that are stacked with motorized infantry or foot units, the attack is eligible for a combined–arms shift.
Each attacking combined–arms stack provides a shift to the right on the Combat Results Table.
Combined–Arms in the Defense
Combined–arms defense consists of a motorized infantry or foot unit stacked with armor or anti-tank units. German FLAK units are considered anti-tank for combat purposes.
A stack with combined–arms defense negates all combinedarms shifts by the attacker in that combat.
Combined–arms defense that includes armor receives a shift to the left if defending against units that have no armor or antitank units.
Soviet Tank Brigade Composition (Optional Rule)
Each tank brigade is actually composed of two tank batt alions and a motorized infantry batt alion. It is easier to classify them as strictly Armor. However, if players don’t mind the small bit of overhead required, implement the following.
Soviet tank brigades with a combat strength of 4 or more automatically qualify for combined-arms.
Tank brigade cadres are considered motorized infantry for purposes of the combined-arms rule.
[14.5] Artillery Support
Artillery units may support combat in non–adjacent hexes within a range of two hexes (one intervening hex) of any defending hexes. In these rules this is called, “providing fire support” or “fire”.
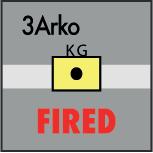
Artillery may only fire twice per game turn, once during each player turn. After providing fire support, flip the artillery unit over to its FIRED side. Flip any FIRED artillery unit back over at the end of each player turn.
When providing fire support, artillery units provide column shifts equal to their fire combat strength (number in red circle). This is true even if they are supporting any defending units.
Maximum of two artillery units may provide fire support for attacking units; only one artillery unit may support the defending units.
Artillery that is adjacent to enemy combat units at the moment of combat may not provide fire support, but may use its combat strength in attack or defense as normal.
[14.6] Combat Resolution
The procedure in combat is for the attacker to declare combat, the units involved, artillery and Air Points. Then the defender declares any artillery or Air Points to support his units. Next, total the combat strength points by revealing chits or drawing new chits.
After any adjustments, all individual units have a minimum Combat Strength of one.
Players compare the total combat strengths of each side stating the attackers, then the defenders total.
As an example: Attacker–20, Defender–6 or 20–6… Divide the lower total into the higher one and round off in favor of the defender. Simplify this into a ratio: 20 divided by 6 or 3–1 odds.
Use the odds column appropriate to the defender’s terrain on the Combat Results Table.
Any attacks made at ratios lower or higher than those printed on the CRT will start with the lowest or highest ratio columns provided.
From this odds column, players apply any column shifts that will affect the final outcome of the combat including parent integrity, combined–arms, artillery, or Air Points.
Identical column shifts negate one another. Excess column shifts are applied to arrive at the final odds column. No ratio may ever be reduced voluntarily.
Final odds that are above the maximum or below the minimum column printed on the Combat Results Table are resolved at the maximum or minimum column.
The attacking player now rolls 2d6 dice and determines the outcome of the combat by cross–indexing the roll with the final column. Apply the results.
Results after an “A” affect the attacking player’s forces. Results after a “D” affect the defending player’s forces. The parenthesized numbers are mandatory loss requirements in number of steps. Numbers following the letter ‘r’ are all retreat results in number of hexes.
A side that receives a result with an ‘r’ is considered the loser; the other side is the victorious side. The losing side will always resolve their result first, then the victorious side.
If any of the attacking units are armor units and an attacker loss is required, the first loss must come from the armor unit. If losses are required of a prime unit, its strength chit is flipped over to the reduced side for one step. The reduced strength chit
is removed and the prime unit flipped over revealing the cadre side for a second step. The cadre unit is removed from the map for any third step.
Some lesser strength chits have a “0” combat strength on the reduced side. In this case the prime unit is deemed to have only two steps of strength and is immediately flipped to its cadre side after one loss. Return the chit to its cup.
One step units (blank on the back) are removed after a step loss.
NOTE: On a split A(1*)/D(1) result, if the defender’s hex is left vacant and the attacker’s force elects to take 2 step losses instead of just one, an advance into the defenders hex is allowed even though there is no ‘r’ result.
Losses must first be taken from those units that actually participated in the combat. If there are not enough steps available among these units, only then may losses be taken from other units that are in the same hex and not participating in a different combat.
[14.7] Retreat
Retreats as called for in combat results may be substituted with losses on a one step for one hex basis. (EXCEPTION: 14.9 Overrun).
When a stack of units retreats, move the entire stack. The retreat must be moved in hexes without entering the same hex twice and the final hex of the retreat should be that number of hexes away from the original hex.
Retreating units have the following order of priorities they must satisfy for each retreat hex:
1. Enter an empty hex free of enemy ZOC or to a friendly occupied hex that is free of enemy ZOC. If not possible;
2. Into an enemy controlled hex at a cost of one step loss per stack for each hex entered.
While the top two priorities are listed in order of importance above, whenever possible during retreats, a unit must choose a retreat path that leads back toward the nearest friendly supply source. Soviet units may also use their (same color symbol) HQ unit to retreat towards in order to follow the first priority.
Armor and artillery units may not retreat across unbridged river hexsides. All other units may retreat across unbridged river hexsides.
No unit may retreat off of the map.
Retreating units may end up overstacked (12.1) with friendly units.
If the enemy stack is eliminated due to combat, the victorious units (yes, the defender may advance) may choose the path of retreat to use as if the eliminated stack had survived and retreated.
[14.8] Advance after Combat
Victorious units may advance the number of hexes retreated by the enemy units. They will always move individually. The first hex in the advance must be one that the retreating units initially occupied.
When enemy units are all eliminated the number of hexes in any advance will be the remaining retreat result. This number could be reduced to “0” and would represent a “stand fast” order by voluntary step losses.
Mechanized and cavalry units ignore any EZOC coming from a single hex into the first hex of an advance after combat (i.e., if the defender’s vacant hex is in the ZOC of two or more enemy hexes, they must stop and may not ignore the ZOC).
Non–mechanized units must follow the path of retreat exactly and may only continue until entering an EZOC.
Mechanized and cavalry units may choose to deviate from this path of retreat after the first hex, up to the number of any remaining retreat result, or until entering an EZOC.
Armor units may never advance across unbridged river or swollen stream hexsides.
Advancing cavalry, foot, and motorized infantry units may only advance across unbridged river or swollen stream hexsides if it is the very first hex in the advance and then must stop.
No unit may ever advance into terrain impassible to it by the rules of movement. (See Terrain Eff ects Chart).
Artillery units may never advance after combat.
Any city hex, or a town with a rubble marker, stops all advances (i.e., an advancing unit must stop when entering such a hex no matt er how many hexes are available in its advance).
All advances are limited to two hexes during Mud turns.
[14.9] Overrun Results
Red results on the Combat Results table are ‘overrun’ results.
When such a result occurs:
1. The attacker chooses the defender’s path of retreat.
2. The defender must retreat and cannot choose losses instead of retreating.
3. Any retreated units lose their ZOC during the attacker’s advance for that combat.
4. Mechanized units can advance one hex further than under normal advance after combat rules (except during a Mud turn).
During the Engineering phase, players may build and destroy bridges, build entrenchments, remove rubble, and assist units in river crossing. Many of these actions require an engineer unit present.
Soviet Bridge Units
Soviet player has four independent bridge units which were in place to maintain their bridgeheads over the Donets. Because of their sensiti ve nature, there were always ample troops available to repair them .
Soviet bridge units may be removed at any time by the Soviet player. However, once removed, they cannot be returned to the map. Soviet bridge units may only be disabled by Soviet player removal.
Soviet bridge units do not count against stacking (there can be six stacking dots of units plus a bridge unit in a hex).
[15.1] Bridge Destruction
Bridges across rivers may be destroyed to prevent enemy armor and arti llery from freely crossing. It is assumed that all units in the game have access to means of demoliti on.
To destroy a bridge, any supplied combat unit may be used. The unit earmarked to destroy a bridge must trace a legal supply path to the bridge not longer than 4 hexes. Bridges must be within 3 hexes of an enemy unit to be eligible for demolition. Use the Demolition Table to resolve any attempts.
A single bridge may never have more than one attempt against it per game turn.
A single combat unit may attempt to destroy two different bridges per game turn.
Bridges across streams and over the Dnepr may never be destroyed.
[15.2] Bridge Building
If an engineer unit begins its movement phase adjacent to a demolished bridge hex and there is no enemy unit also adjacent to either the engineer or the bridge hex, the engineer may rebuild the bridge. It remains in the hex for two friendly engineering phases and does not engage in any other activity.
SPRING PRELUDE:
An engineer unit must be in supply to rebuild a bridge.
Bridge building costs 1 SP (and Soviet engineer units must trace LOC) to place the bridge marker with the building side up and another building marker as a reminder. One support point is expended on the turn the building markers are placed, regardless of whether it is completed or not. On the immediately following friendly engineering phase remove the reminder building marker. During the second friendly engineering phase the bridge is complete, flip the bridge marker over.
Remove the bridge marker if an enemy unit moves adjacent before the bridge is rebuilt.
Each side may rebuild a maximum of two blown bridges during the game.
[15.3] Entrenchments
Units in a friendly Entrenchment (not Improved Position) that defend solely behind river hexsides have their combat strength tripled when defending.
Improved Positions increase the Combat Strength of the hex by two. This may not increase more than double (i.e., a strength of one would not increase to three, but would become only two) and is after any doubling for terrain.
Entrenchments and Improved Positions printed on the map may never be removed.
[15.4] Assisted River Crossing
Entrenchments represent foxholes with cleared fi elds of fi re, trenches, sighted arti llery coordinates, light barbed wire entanglements, a scatt ering of mined approaches, etc. Some of these hexes are clearly marked on the map and may never be destroyed; additi onally, others can be made during the course of play (or placed as designated in the scenario rules) and may be destroyed by enemy occupati on.
If an engineer unit plus one foot (yes, two engineer units will sati sfy this requirement) or motorized infantry unit start and finish 2 full consecutive turns in a hex and no enemy unit is within 3 hexes at any time during the process, a fully functional Entrenchment may be created. These units must be in supply to build an Entrenchment. Use two Entrenchment markers with the building side up. Remove one on the first completed friendly engineering phase. Flip the marker to its completed side after the second friendly engineering phase. The hex is now a fully functional Entrenchment.
Entrenchment markers are removed if they are unmanned at the end of any movement phase. They are also removed if the units occupying them are eliminated or forced to retreat.
One support point is expended on the turn the building markers are placed, regardless of whether it is completed or not.
Entrenchments may not be built in marsh, wooded marsh, city, or town hexes. If built on a friendly Improved Position hex, consider the hex upgraded to an Entrenchment hex for as long as the marker is present.
Entrenchments and friendly Improved Positions allow foot or cavalry units with a combat strength of 2 or more to exert a ZOC even if they would individually not have a ZOC.
Entrenchments (not Improved Positi ons) negate all combinedarms shifts by the attacker in that combat.
Units defending in a friendly Entrenchment (not Improved Positi on) are doubled.
Armor and artillery “(FLAK units are considered artillery for this rule) may be assisted in crossing an unbridged river hexside (not Dnepr) by the accompaniment of an engineer unit during a friendly engineering phase. All units must not have moved or engaged in combat earlier that turn. Involved units must begin the phase stacked and adjacent to the river (or swollen stream) to accomplish this. This movement may not be into or across prohibited terrain, into or through an EZOC, or performed during Rain turns.
[15.5] Removing Rubble
A rubble marker may only be removed during the Engineering Phase by the player whose unit(s) occupies the hex. A player is not obligated to remove a rubble marker and any combat unit may be used. The unit removing the rubble marker may not move or attack during this turn. It may help to leave the rubble marker fl ipped on top of the unit as a reminder
[15.6] Heavy Weapons Assault
If an engineer is present in a stack and is attacking an Entrenchment (not Improved Positi ons), town, or city hex, shift the column one to the right on the Combat Results Table. Only one such shift may be awarded per combat.
[16.0] Reinforcements
Units scheduled to arrive after the start of play are listed on the appropriate reinforcement chart that shows their point of entry.
Reinforcements may only enter during the friendly movement phase (they may not be placed in Reserve on the turn of entry). They may arrive using either Tactical or Strategic Movement. When entering the map at a common road, stage units at maximum stacking and move on the board in column, one stack behind the other as if a road stretched off the map edge. Remember to pay movement costs for that first hex and for
the column of units any extra hexes in the line. Reinforcements may delay entry after the scheduled turn of arrival at the owner’s discretion.
Some reinforcements have an entry date listed as “VAR”. These units only enter if the conditions for their entry are met. (16.2)
Soviet entrance areas consist of many possible entry hexes and are marked on the map: SWF – Any road hex along the east edge between E4805 and E4822 (inclusive). SF – Any road hex along the east edge between E4824 and E4845 (inclusive).
[16.1] Scheduled Reinforcements
Both players have reinforcements which may enter as scheduled during the course of the game.
Units arriving in a specific hex are placed first and can then move normally from that hex.
If all of the entry points are enemy occupied or in EZOC, entry is delayed by one game turn. Delayed units may then enter at any hex within five hexes of their original entry point on the same map edge or at the closest eligible supply source hex.
[16.2] Variable Reinforcements
Starting on the Release Turn given on the Variable Reinforcement Chart, the owning player makes a die roll to see if the VAR group is available. If the roll is within the range, they are immediately placed at the location indicated and are treated as normal reinforcements arriving this turn. If they fail to arrive, continue rolling each turn until they do. If the group has an Auto Release, they will arrive automatically on that turn.
[17.0] Replacements
Both players receive Replacement Points (RP) at the beginning of the game turns noted on the TRT. Axis RP may only be used for German units. Replacement Points may be saved for use on later turns.
The following German units may never qualify to receive replacements: 912 & 920 Eng (Pioneer) Rgt, 2 FJ Rgt, 375/454S Inf Rgt, 610/213 Inf Rgt
Units adjacent to enemy units, out of supply, or isolated may not receive replacements.
Units that have received air supply may not receive replacements on the same turn.
[17.1] Replacement Point (RP) Use
No more than one mechanized RP and one infantry RP may be spent by each side per game turn.
By expending one mechanized RP, the player may do one of the following:
• Flip a reduced tank battalion to its full strength side.
• Restore to full strength a motorized infantry regiment or tank brigade that is reduced (place the strength chit back in the pool).
• Restore a cadre unit to a reduced strength motorized infantry regiment or tank brigade (draw a chit and place under unit on reduced side).
• Return an eliminated motorized infantry regiment or tank brigade to the map as a cadre unit in a supplied town closest to divisional or army members and at least three hexes away from enemy units.
By expending one infantry RP, a player may do one of the following:
• Restore to full strength an infantry regiment or division that is reduced (place the strength chit back in the pool).
• Restore an infantry cadre unit to a reduced strength regiment or division (draw a chit and place under unit on reduced side).
• Return an eliminated infantry regiment or division to the map as a cadre unit in a supplied town closest to divisional or army members and at least three hexes away from enemy units.
When a player spends a Replacement Point, see the Support Point Summary for appropriate cost from the respective HLC. Axis expenditure of mechanized Replacement Points also costs VP as per the Victory Point Schedule.
If a side has no engineer units on the map, one can be returned from the eliminated units at the cost of one infantry Replacement Point, placed according to the Infantry RP rules above.
The following rule section is important and reflects the way the historical Soviet commanders fought the battle. Obviously, if the Soviet player is given full control, events will unfold according to hindsight and a rather different match will result. Feel free to experiment with removing or altering any of these restrictions, but just remember this can skew balance, usually in the favor of the Soviet player.
[18.1] Lack of Tactical Flexibility
Each attack the Soviet player makes must have all units with the same color symbols or combined with white symbol units. This includes any artillery units providing fire support.
Designer’s Note: While this recreates the typical Soviet command structure, other minor issues were left out. Namely the fact that on the first days of the offensive, the Soviets of Sixth Army and Group Bobkin lacked any air support because of command issues with Southern Front which was supplying the planes. Also, I have included on the maps the army boundaries assigned for the advance. Soviet commanders would follow these, but you don’t have to unless you want the pure historical feel.
[18.2] Hesitation & Indecision
[18.3] Southern Front Unpreparedness
Soviet units of the 9th & 57th Armies (Southern Front HLC, Gray & Light Blue symbols) are considered ‘Inactive’ and may not move or attack until one of them is attacked. Flip these two HQ units to their Inactive side as a reminder. From the instant a SF unit is attacked, all SF units may then operate normally for the rest of the game.
Additional SP received each turn may be given only to the SWF HLC until the SF armies are released. From then until the end of the game, the Soviet player may freely distribute SP between his two HLC.
NOTE: To keep the Axis player honest and not taking undue advantage of the situation, no more than two units of the 17 Armee HLC may be north of hexrow xx38 (inclusive) prior to SF activation. Historically, only the German 526/298 and Rumanian 5/4 infantry regiments moved from their initi al positi ons to help extend the front in this directi on
Soviet units which have a highlighted setup hex on the setup chart were delayed in deploying to the actual battle by their commanders. Place ‘Do Not Move’ markers on each of these units corresponding to the turn indicated on the setup chart. They will not perform any function until one of the following happens:
a. Start of their designated turn;
b. Unit itself is attacked by an Axis unit;
c. A unit of the Southern Front HLC is attacked; or
d. Any attack on a Soviet unit in a Soviet Entrenchment hex east of the Donets.
When triggered by a) they are individually released or when triggered by b) through d), all are released; Remove the marker and they begin functioning normally.
Designer’s Note: Release dates were set in the game so that the units will arrive at the front at the same time as their historical counterparts. However, some Soviet plans called for units to be released after certain objectives had been taken. Players may optionally create their own time table upon agreement. Historically, the two Soviet tank corps (21 & 23) assigned to 6th Army were planned to move forward when the Soviets took Yefremovka (E1529) and Velikaya Bereka (E1830). As an example, you would release the units of these tank corps on the turn after both of the two hexes are in Soviet control or on their normal release turn, whichever comes first.
[18.4] Tank Doctrine Infancy
At this stage of the war, Soviet tank units were sti ll mostly used alone or thinly mixed with infantry defense. Rarely did they employ proper combined-arms technics as the Germans had mastered
Soviets are limited to only one combined-arms bonus per attack, no matter how many Soviet stacks qualify.
Soviet player may not designate any reserve units.
[19.0] Special Conditions
Given the limitation of scale, only the portion of the USSR covered by the battle is shown on the maps. Therefore, it must be noted that each side’s front line continues north and south of the maps. To simulate this connection in scenarios #2 and #3, players must maintain a friendly ZOC on at least one hex along the north map edge and east map edge (south of and including E4848 for Axis, north of and including E4847 for Soviet).
If a player cannot maintain control of an edge hex for two consecutive turns the final level of victory should be shifted one level in favor of the opposing player.
This requirement is waived during scenarios #1 and #4
[20.0] Default Victory Conditions
Each player keeps track of the Victory Points awarded for hex ownership (values printed on map) turn by turn on the track and brings this total to the end of the game where unit and hex supply conditions are checked and values are added or subtracted according to the Victory Point Schedule.
Initial ownership tally, is as follows —
Axis Player: 300 Soviet Player: 75
At the end of the game, each player totals his Victory Points and finds the differential between the two.
After Victory points are computed, players refer to the Victory Level Schedule to determine the victor and level of victory.
Victory Point Schedule and Victory Level Schedule along with the following Soviet High Risk Option are printed on Map W for easy reference.
[20.1] Soviet High Risk Option
Before the start of scenario #2 or #3, the Soviet player may “go for broke” and declare a Bryansk-Kursk Offensive. He has convinced Stalin to order a supporting attack, but will be shot if he fails…
If this offensive is declared, the following effects apply to the game:
• All Soviet Variable Reinforcement entries do not need to roll and automatically arrive on their release turn. Plus, Gordov releases his army reserves – Soviet 1 Motor Brigade enters on hex E3705 the turn after Soviets occupy Murom (E3010).
• Any scheduled Axis reinforcements entering from the north edge (other than 172/75 Inf Rgt and 175/75 Arty Rgt which were supporting their division) are not available as they would be engaged off the map (these unit entries are marked with an asterisk).
• Available Axis reserves would be sent to the area immediately. This constitutes units with an asterisk on their counter, for scenario #2 the IV Hungarian Korps enters via E1001 on turn 5; while for scenario #3 the IV Hungarian Korps enters via E1001 on turn 7 and the 22 Panzer Division arrives on turn 16 via E4152. Also, both 3 & 23 Panzer Divisions are automatically released on their turn (no need to roll).
• The Soviet player must capture FIVE city hexes anywhere on the map and control all five at the same . If this condition is fulfilled, victory is given immediately to the Soviet player. If this fails to happen by the end of the scenario, the Axis player is automatically declared the victor.
It is highly recommended for balance purposes that Soviet Hesitation & Indecision (18.2) be ignored when using this option.
[21.0] Scenarios
#1 Northern Pincer
This historical scenario uses a portion of a single map as an introduction to the full campaign. The scenario provides the players a look at one thrust of the plan that was designed to capture Kharkov between two forces. The goal of this scenario is to study the true threat to German plans posed by the Soviet forces east of the city .
Initial deployment: Map E
Use the portion of the map north of hex row Exx22 (inclusive).
Set-up: Follow Setting up the Game (3.0). Note that German 211/71 Inf Rgt starts at reduced strength, draw and flip strength chit for the unit before play . Units may overstack during set-up.
Scenario Duration: Turns 1–6 (12–17 May)
No variable reinforcements or any replacements are available for this scenario.
There are no Soviet scheduled reinforcements in this scenario.
Supply Sources:
Axis: Any road hex off west edge, road hexes off the south edge of play west of E3222 (inclusive), road hexes off the north map edge west of E3201 (inclusive), and any Axis controlled Kharkov city hex.
Soviet: Any road hex off east edge and road hex E4422.
Special Rules:
• Soviet player gets a favorable column shift for all combats during their first turn due to surprise.
• Axis artillery may not provide fire support during the first Soviet Combat Phase.
• Axis units which have been attacked during the first Soviet Combat Phase may move normally during the first Axis Movement Phase (there is a marker provided to help identify these units). Axis units within 3 hexes of a Soviet combat unit may use half their Movement Allowance (round down). All other Axis units may not move at all on the first turn.
• Soviet player starts with 9 Support Points and the Axis player has three. Soviet has three Air Points available on turn 1 and the Axis player has one. Available Air & Support Points for each turn after the first are half (round down) what is shown on the TRT.
• Weather conditions for the entire scenario are Clear and Dry, no die roll is made.
Victory Conditions:
SPRING PRELUDE: Second
Players use the following (instead of Default Victory Conditions) for victory determination –
If at any time during the scenario the Axis player loses control of Chuguyev (E2822) or Malinovka (E2922) the Soviet player wins automatically.
If a Soviet unit occupies or was last to pass through any of the following hexes (E2308, E2511, E2617) at the end of the game, he wins a level of victory equal to the number of hexes as follows:
One = Tactical Victory .
Two or any Kharkov city hex = Marginal Victory .
Three = Substantial Victory .
One or more and any Kharkov city hex = Decisive Victory .
If an Axis unit occupies or was last to pass through any of the following hexes (E3010, E3013, E3116) at the end of the game, he wins a level of victory equal to the number of hexes as follows:
One = Tactical Victory .
Two = Marginal Victory .
Three = Substantial Victory .
If both players reach a level of victory, only Soviet conditions are used. If neither player reaches a level of victory, the result is a Draw.
#2 Izyum Salient
This is the full historical campaign covering both offensives as the battle flows back and forth across the steppe. You can use all the bells and whistles for this one
Initial deployment: Map E & W
Set-up: Follow Setting up the Game (3.0). Note that German 211/71 Inf Rgt starts at reduced strength, draw and flip strength chit for the unit before play . Units may overstack during set-up.
Scenario Duration: Battle Version – Turns 1–10 (12–21 May); Campaign Version – Turns 1–16 (12–27 May).
Special Rules:
• Soviet player gets a favorable column shift for all combats during their first turn due to surprise.
• Axis artillery may not provide fire support during the first Soviet Combat Phase.
• Axis units which have been attacked during the first Soviet Combat Phase may move normally during the first
May 1942
Axis Movement Phase (there is a marker provided to help identify these units). Axis units within 3 hexes of a Soviet combat unit and units in hexes E2427 & E2926, may use half their Movement Allowance (round down). All other Axis units may not move at all on the first turn.
• On the first turn in which Axis units attack Soviet units of the Southern Front HLC apply a favorable shift for all Axis initiated combats against Southern Front units only, due to surprise.
• Weather conditions for the first two turns are always Clear and Dry, no die roll is made until Turn 3 (14 May).
• Axis Restriction: Additional SP from each turn may be given only to the Sixth Armee HLC until turn 4. On this turn and until the end of the game, the Axis player may freely distribute SP between his two HLC.
Victory Conditions:
Follow Default Victory Conditions (20.0) to determine victory after either 10 or 16 turns.
#3 Aggressive Timoshenko
This is a fictional situation that assumes the Soviets are ready to attack on the original planned kick-off date. The scenario plays the same as the historical campaign, but things are shifted 8 days earlier. The initial setup will be slightly modified and some German reinforcements will take longer to arrive. Rain and mud play a much larger role in the outcome.
Initial deployment: Map E & W
Set-up: Follow Setting up the Game (3.0). Units may overstack during set-up.
Scenario Duration: Battle Version – Turns 1–12 (4–15 May); Campaign Version – Turns 1-20 (4–23 May).
Special Rules:
• Soviet player gets a favorable column shift for all combats during their first turn due to surprise.
• Axis artillery may not provide fire support during the first Soviet Combat Phase.
• Axis units which have been attacked during the first Soviet Combat Phase may move normally during the first Axis Movement Phase (there is a marker provided to help identify these units). Axis units within 3 hexes of a Soviet combat unit and units in hexes E2017 & E2217, may use half their Movement Allowance (round down). All other Axis units may not move at all on the first turn.
Rules of
SPRING PRELUDE: Second
• On the first turn in which Axis units attack Soviet units of the Southern Front HLC apply a favorable shift for all Axis initiated combats against those units only, due to surprise.
• Weather conditions for the first turn is Clear and Dry, no die roll is made until Turn 2 (5 May).
• Axis Restriction: Additional SP from each turn may be given only to the Sixth Armee HLC until turn 4. On this turn and until the end of the game, the Axis player may freely distribute SP between his two HLC.
Victory Conditions:
Follow Default Victory Conditions (20.0) to determine victory after either 12 or 20 turns.
#4 Passive Timoshenko
This is a fictional situation that places the Soviets on a stronger footing. The scenario postulates that Timoshenko did not propose his attack plans to Stalin and the head man himself was more occupied with other parts of the front. In this case, Fridericus is launched as planned by the Germans against a dug-in and defensive minded Soviet force. Will there still be a pocket?
Initial deployment: Map E
Use the portion of the map south of hex row Exx25 (inclusive).
Setup:
Use the Scenario #4 Set-up Charts.
• Alternate German 113 Inf Div and 194/71 Inf Rgt counters (four units) are used for this scenario.
Scenario Duration: Turns 1–10 (18–27 May)
Initiative:
There is no Soviet Player Turn during the first Game Turn of this scenario.
Supply Sources:
Axis: Any road hex off the southern and western edges of Map E and off the northern edge of the play area west of E3425 (inclusive).
Soviet: Any road hex off east edge of Map E and off the northern map edge of the play area east of E4425 (inclusive).
Special Rules:
• In this alternate reality, most of Soviet Command & Doctrine Restrictions (18.0) should not apply, ever. Only Soviet Tank Doctrine Infancy (18.4) is in effect. In fact, Soviet colors have no effect on Support Point use either.
Kharkov, May 1942
Soviet units on or south of a line from E4837 to E4237 to E3242 to E1042 (inclusive) will be considered part of SF HLC (9 & 57 Army) and any units north of the line are part of SWF HLC (6, 28, & 38 Army). (Orange line on map.)
• Weather conditions for the first two turns are always Clear and Dry, no die roll is made until Turn 3 (20 May).
• Axis player gets a favorable column shift for all combats during their entire first turn due to surprise.
• Soviet artillery may not provide fire support during the first Axis Combat Phase.
• Soviet units which have been attacked during the first turn or are part of the 23 Tank Corps (four units), may move normally during the Soviet Movement Phase of turn 2 (19 May). All other Soviet units may only use half their Movement Allowance (round down).
• Bridge in E2228/E2229 has been rebuilt by the Germans. However, it does not count as one of their two bridge limit. Feel free to use a Soviet marker for it (as they most likely won’t be rebuilding any bridges during this scenario anyway!).
Victory Conditions:
Players use the following (instead of Default Victory Conditions) for victory determination –
B If there are no supplied Soviet units west of the Donets and Axis player controls Izyum (E3838) at the end of the game, the Axis wins a Marginal Victory.
B In addition to the previous two conditions, if the Axis player also controls the town of Kupyansk (E4526) at the end of the game, the Axis can claim a Decisive Victory.
B Any other result is a Soviet Morale Victory.
[22.0] Game Notes
[22.1] Soviet Player’s Notes
A brief look at the map will make the objectives of both sides very clear. Soviets are poised with two large forces aimed at the key city of Kharkov while the Germans have these same Soviets in a large bulbous bridgehead which is scheduled to be pinched off. Both plans work in this game as potential history. Sadly for the Soviets, the German plan had more strength, better tactics & leadership, and was launched before the poorly supplied troops of the Southwestern Front could complete their objective. Had Timoshenko known there were two panzer divisions sitting around Kharkov refitting for Case Blue, would he still have attacked? You can explore a negative response via Scenario #4. For these notes, however, let’s just cover basic strategy for the main scenario (#2).
SPRING PRELUDE:
Soviets are given an uphill fight from the beginning. True, they are strong at the point of attack and have surprise on their side. But logistics for an extended offensive are not in play and to make matters worse, the commanders are holding back assault troops for long after the initial breakthrough should be exploited. Players can experiment with ignoring certain Soviet command rules in order to see just how effective they could have been.
To make the best of a bad situation, one must focus on single objectives and coordinate your attacks to be most effective with the least amount of SP used. There are basically three axes of advance which each of the pincers can use. Each has its advantages and disadvantages. I will list all six here, but I will focus on the two which should have the best chance of leading to Soviet victory. However, skillful players can make them all work, and that is why you play the game.
The northern pincer consists of units of three armies: 21, 28, and 38. This in itself causes problems, as strict doctrine forces units of different armies to be unable to work together. A Soviet player must always keep this in mind as attacks are setup and advances planned. Three possible directions are: (1) North between Belgorod and Liptsy. (2) Direct at Kharkov. (3) South toward the Udy crossings to link with 6th Army.
Direction (1) will usually open up the easiest as the German troops are light in this area. But be warned, many reinforcements arrive through Belgorod so the flank of a breakthrough in this area will constantly be threatened.
Direction (2) makes the most sense and will be what the Axis player most likely defends against. Plus, there is already a garrison there. It is not much, but every step will keep you out of the city that much longer. Remember, time is not a friend to the Soviet in this game!
Direction (3) will lead to the best chance for a Soviet victory at end game. Of course, telegraphing your intentions is a sure recipe for failure. If the Axis player knows this is your objective, don’t be surprised to see two strong panzer divisions barring your way. Using the 3rd Guards Cavalry Corps as a coordinated attack force is your best bet. In this sector you are pretty evenly matched, so skill and deception are your allies.
The southern pincer is more straightforward and consists of one army (6) and its support group, Group ‘Bobkin’. It also has three possible directions of attack: (1) Poltava through Krasnograd. (2) Kharkov. (3) Zmiyev and the Mzha crossings to link with the north.
Direction (1) is the easiest and of course, the longest in distance. Supply lines can be hard to maintain and don’t think of ever having but a small token force surviving to the end of the game.
Direction (2) is the obvious choice and what the Axis player will do everything to stop. I mean, Kharkov is worth 60 VP, right?
Direction (3) is actually your best bet. If you can pocket the Germans in the Balakleya salient, you will have
accomplished two goals. One, you will have established a secondary supply line for 6th Army. This is real important when the inevitable attack of Kleist from the south cuts your bridges at Izyum and possibly Savintsy. But also, two, it forces the Axis player to send Kleist straight north to help LI Korps. This gives you the upper hand of knowing where to setup your defense. Plus, if you can somehow manage to keep them surrounded, those VP the Axis will lose will definitely help your cause.
Remember, even VP hexes with no supply line count half points at the end tallies. This forces the Axis to attack your far-flung, isolated units if they are in places of value. The Germans are the stronger side, but if you can take more VPs and keep them from the Axis to the end of the game, you will be victorious!
[22.2] Axis Player’s Notes
Anybody who knows about the Soviet Operation Uranus which sealed the fate of the German Sixth Armee at Stalingrad should be able to see marked similarities in this battle. The main difference here at Kharkov is the Germans were gearing up for an offensive, instead of being exhausted at the tail end of one. Both caught the Germans by surprise, but by the time of Uranus the Soviets had begun to learn from their mistakes.
As the Axis player, you command a diverse group of two forces split by a Soviet bulge. The southern half of the maps will be quiet for a few turns until you get lucky or your reinforcements arrive on their own. Since you are preparing for an offensive, there are plenty of supplies available. Until that southern panzerkorps gets into action, you won’t have to worry at all about SP expenditure. There’s more than enough to go around.
You only start with three Luftwaffe wings, but soon those from Sevastopol arrive and give you the advantage for good. Don’t forget to utilize your interdiction capability. It is extremely handy in places where a Soviet breakout is imminent or needs to be slowed.
The first half dozen or so turns, you will be a punching bag. Be careful in your placements and watch that gaps do not appear. If they do, be sure to have units close by to prevent Soviet strategic movement. That can be disastrous early on. If large groups of Soviets move into your rear areas they will be hard to root out, especially if they can somehow maintain a supply line. Be mindful of your reinforcements and use them for counterattacks as necessary, especially your two panzer divisions arriving in Kharkov.
Remember, time is on your side and you should be able to take back almost all territory gained by the Soviets during the game. The key to this is getting Kleist’s forces into play and attacking as soon as feasible. You get a surprise shift, so use it wisely only when the bulk of your forces are ready. Be happy if the Soviet player has left some forces behind to help defend in the south. That means less VP you will have to reclaim in the last few turns.
SPRING PRELUDE: Second
Your objective is the Donets crossings and linking up with Germans in the north. If you can cut all Soviet supply roads to the west, you will have won. Another option will be getting across the Donets in force. This is a much harder proposition and should only be attempted if the opportunity presents itself. Take your lumps early and then lay into the enemy to finish the game. Keep your forces from being cut-off. Your better command, Luftwaffe, and logistics should be the deciding factors in your victory!
[22.3] Designer’s Notes
The ease of play inherent in the design of Operation Typhoon has captured my interest ever since the first time I played it. Subsequent games using the Victory in the West system all covered fighting in Western Europe or Mediterranean. I endeavored to bring these back to the Eastern Front. Second Battle of Kharkov seemed to be the perfect situation to entice players into the world of strength chits; not heavily covered by titles and sporting the fact that during the fighting both sides were attacker and defender.
After reading the Glantz book on the battle, the facets of the fighting took shape in my head. I found ways I could keep the extra rules to a minimum while showing the options I wanted to show. Any additional overhead was relatively painless to implement and helped the flow of the battle resemble its historical counterpart.
I had decided to include weather from the start. Rain, mud, and swollen rivers played their part in the beginning stages. Heat became an issue later in the month, but not enough to slow operations on the scale of the game. Main question is: How to make weather variable, realistic, and not overwhelming, all at the same time? Looking over the Almanac for May 1942 in the Kharkov area, I found there were 6 days of rain during the period of the game. Obviously, most of those days took place early in the month before the Soviet offensive. I didn’t want too much rain to dominate play, but needed it to be a problem for the early start hypothetical scenario I had envisioned. The weather roll was my answer to that dilemma. There’s a much greater chance of rain during the early part of the month, but when all is said and done, you will have the same amount of rain that historically fell. Nice, huh?
Kharkov, May 1942
This was initially to be part of VCS family of games, but interest was low and the game returned to me. The core of the game is still true to Nathan’s improvements of VCS and would not be possible without that base. With the new freedom of shifting the game to Compass, I’ve gone through and changed a few key structure issues which may have prevented the massive German gains of 17-18 May during normal play. Long advances with your mechanized forces should be possible now by properly utilizing the exploitation phase.
I added from Operation Typhoon headquarters units to portray the Soviet command structure in a more accurate way. Air interdictions were added to help cover a wider expanse of frontage and provide a better feel. Of course, what would the game be without the Soviet Command & Doctrine Restrictions? So much of those first years of war were spent with the Soviets learning how to use their army against the mobile Germans.
Hopefully players will enjoy exploring the historical battle as well as the two hypothetical situations I have included. Hindsight should always allow for results different than history. The quest of a good game is to balance those to keep players happy, without losing the historical outcome as a possibility. Time will show whether I succeeded or not… enjoy!
[23.0] Credits
Rules and editing by Greg Blanchett
Game Development by Greg Blanchett
Original Maps by Edmund Hudson
Final Artwork by Ilya Kudriashov
Vassal module by Greg Blanchett
Testers: Nick Wade, Mitchell Land, Nathan Kilgore, Michał Bankiet, Scott Krutsch, Martin W Spetz, Walter Moore, James Vella.
Special thanks to Nathan Kilgore for the base VCS system from which this was derived.
GAME TURN OUTLINE
1. Preparation Stage
a. Weather Phase: (Skip phase as instructed by scenario special rules) Roll dice for possible Rain and apply ground conditions according to the weather rules (5.0).
2. Accounting Phase
a. Adjust Support Point (8.0) and Victory Point (20.0) tracks to current totals by adding SP from TRT and counting controlled VP on the maps.
b. Mutual Variable Reinforcement Segment: Each player rolls one die to release variable reinforcements that are available as per the Variable Reinforcement Chart. (16.2)
c. Mutual Air Segment: Number of Air Points available is determined (9.0). Axis/Soviet Interdiction (9.2) or para drop (Optional 9.3) missions may be conducted.
3. Soviet Player Turn
a. Replacement Phase: (Skip phase when playing scenario #1) Spend available replacement points on eligible depleted or eliminated units.
b. Movement Phase: Soviet player may start building entrenchments or repairing bridges. All friendly units may now move within the limits of the Terrain Effects Chart (10.0). Reinforcements may arrive and move onto the map (10.0/16.0).
c. Combat Phase: Combat may take place between adjacent units at the phasing player’s discretion (14.0).
d. Supply Phase: (Skip phase on first turn of the scenario) Soviet player adjusts the current status of all his units (7.0).
e. Engineering Phase: Soviet player may build and destroy bridges, build entrenchments, remove rubble, and assist units in river crossing. (15.0).
4. Axis Player Turn
a. Replacement Phase: (Skip phase when playing scenario #1) Spend available replacement points on eligible depleted or eliminated units.
b. Movement Phase: Axis player may start building entrenchments or repairing bridges. All friendly units may now move within the limits of the Terrain Effects Chart (10.0). Reinforcements may arrive and move onto the map (10.0/16.0). Mechanized units can now be designated as Reserves (11.0).
c. Combat Phase: Combat may take place between adjacent units at the phasing player’s discretion (14.0).
d. Supply Phase: (Skip phase on first turn of the scenario) Axis player adjusts the current status of all his units (7.0). Axis supply drop (7.6) may be attempted.
e. Exploitation Phase: (Skip phase on any Rain turn) Designated reserve units may now be moved (10.0/11.0). Combat may take place between reserve units and adjacent enemy units at the phasing player’s discretion (14.0).
f. Engineering Phase: Axis player may build and destroy bridges, build entrenchments, remove rubble, and assist units in river crossing. (15.0).
One full game turn has passed and the marker on the Turn Record Track is moved forward one space. Remove any Air Points from the map and pick up the supply drop marker, if placed. Play proceeds until