4 minute read
Over The Campfire
BY LEXIE ANGELO I PHOTOGRAPHY BY BRANDIE J. WRIGHT
Cooking a meal over a fire is one of the highlights of camping. While campgrounds and provincial parks may have restrictions in effect, or limited sites available in the months to come, you can always enjoy a backyard affair – and one classic tool you will want to bring with you is a cast iron pie maker.
Advertisement
“It’s such a versatile item, and it’s simple to use,” says Kimberly Worbeck, senior merchant, at Mountain Equipment Co-op. She explains the cast iron pie maker is popular with Albertans, and it’s easy to see why. It comes in both single and double sizes and it’s readily available online and in stores throughout the province. If you’re able to head to one of Alberta’s 500 campgrounds, the pie maker is a lightweight tool, perfect for a long weekend or a short day trip.
Perfect for desserts While many campers go for the classic s’more, the cast iron pie maker offers up endless dessert possibilities. A toasted fruit pie is easy to make, and a key ingredient, such as cherry pie filling is inexpensive and often on-hand in the pantry.
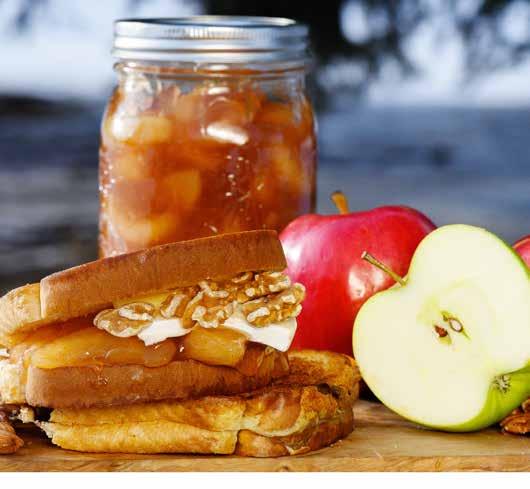
However, don’t overlook decadent combinations of marshmallow, peanut butter and Nutella, or more sophisticated choices, such as stuffing puff pastry with apples, brie, and walnuts, all of which are made better by toasting over the fire. Cinnamon Apple, Brie, and Walnut Pies Makes 4 pies
Prep Time: 5 minutes Cook Time: 4-6 minutes per pie 8 slices cinnamon swirl bread ¼ cup (60 mL) soft margarine 1 can apple pie filling Brie cheese 4 Tbs walnuts, whole or pieces
1. Lightly spread margarine on each slice of bread. Place a slice in one half of the pie iron, margarine side down. 2. Scoop 2-3 tablespoons of pie filling on to the bread. Top with two slices of Brie and one tablespoon of walnuts.
3. Place the second slice of bread over the filling (margarine side up) and close the pie iron. Trim any excess bread crust off with your fingers otherwise it may burn while cooking. 4. Cook pies over the campfire for 2-3 minutes per side. Carefully open pie iron and tip pie onto plate. 5. Repeat for the other remaining pies. Let cool.
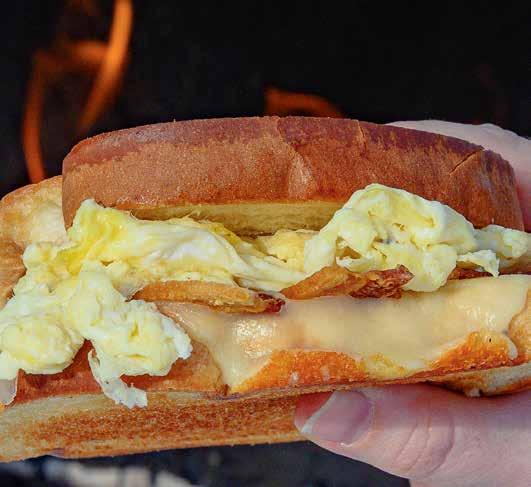
Try going savoury But the pie maker isn’t just for desserts. You can start your day with a delicious and savoury bacon breakfast sandwich filled with scrambled egg, bacon and cheese. Cooking the bacon in advance keeps assembly fast and clean up even quicker. Worbeck says that being prepared before you get to the campsite really helps.
For lunch, grilled ham and cheese sandwiches are a fun alternative, and it’s easy to get the kids involved in making pizza pockets with shredded cheese and mini pepperoni - all of which can be

Offering genuine hospitality, excellent food and a place guaranteed to always have the game on - whatever your sport may be.


quickly clamped into a cast iron cooker and set over the fire.
The pie maker adds a fun twist on outdoor cooking and can also be paired with accessories like hotdog forks, and even a waffle iron. The best advice is to remember to grease the iron, get creative, and don’t be afraid of a few burnt edges.
Bacon, Egg, and Cheese Breakfast Sandwiches Makes 4
Prep Time: 5 minutes, Cook Time: 4-6 minutes per sandwich 8 slices bacon 8 slices white bread ¼ cup (60 mL) soft margarine 4 eggs, scrambled or a small carton of liquid eggs 4 slices sharp cheddar cheese Ketchup (optional)
1. Cut each bacon slice in half and cook in advance. Wrap in foil. I prefer to pack my cooked bacon in the cooler the day before departing for the campsite. 2. Lightly spread margarine on each slice of bread. 3. Place a slice in one half of the pie iron (margarine side down) and arrange two pieces of bacon on top. 4. Using a pan over the fire, scramble one egg or use 1/3 cup liquid eggs. When cooked, add the egg mixture on top of the bacon. Top with a slice of cheddar cheese. 5. Place the second slice of bread over the filling (margarine side up) and close the pie iron. Trim any excess bread crust off with your fingers to avoid burnt edges. 6. Cook the sandwich over the campfire for 2-3 minutes per side. Carefully open and tip sandwich onto plate. 7. Repeat for remaining sandwiches. Dip in ketchup or hot sauce if you like, and enjoy!.
Lexie Angelo is a food and lifestyle writer in Calgary. She is a traveler and adventurer always in search of the hottest trends in food and drink from around the world. Follow her on twitter @angelolexie


