

Effective Weed Management in Nurseries
Dr Samuel Stacey, PhD Technical Manager, ICL.
Effective Weed Management in Nurseries
Foreword
Weed management is vitally important in nursery production. Weeds affect the growth rates and quality of ornamental plants, increase production costs and reduce profitability. This book is a short guide to the most effective practices that prevent and control weeds in nurseries. It can be used when training staff and as a reference when developing or improving your own weed management plans.
1. The What, Where and Why of Weed Management
1.1 What is Weed Management?
There are many reasons why weeds need to be controlled in production nurseries. While this list is not exhaustive, weeds:
• Compete with crops for nutrients, water and light.
• Reduce plant quality and growth rates.
• Can harbour pests and diseases (Figure 1).
• Increase production costs, and
• Negatively affect the reputation of the nursery.
The goal of weed management is to suppress or eliminate the growth and spread of weeds. This needs to be done to reduce their impact on plant production, reduce ongoing management costs and prevent the spread of weeds to landscapes that receive the finished plants.
Weed management is most effective when multiple control practices are combined rather than relying too heavily on one strategy. For example, herbicides are a useful tool to manage weeds in nurseries, but they are far more effective when combined with other practices, such as strategic fertiliser use and efficient hand weeding. In fact, herbicide use alone will not adequately control weeds in nurseries.


Figure 1. Weeds harbour pests such as these aphids on fleabane.

1.2 Where do weeds come from?
Each batch of new plants should be potted into fresh media in clean pots. If the media has been composted it should not contain viable weed seeds as they are unable to withstand composting temperatures of 600C to 700C. Therefore, weeds that affect potted plants primarily come from the seeds of those that are already present in the nursery.
Initially they may have been introduced from plants or other items brought into the nursery. But they only establish and affect new stock when they are allowed to grow and set seed.
Weeds in newly potted stock may come from:
• Propagation material and young plants (Figure 2).
• Seeds remaining on the weed mat or gravel in the growing area.
• Seeds attached to reused pots.
• Weeds adjacent to the growing area, such as in the surrounds or on paths, and
• Weeds growing in established stock nearby.
Weeds may come from a variety of places within a nursery and the weed management strategy needs to be equally broad in its scope. It is not efficient to treat affected areas in isolation.
Figure 2. Weed seeds in propagation material can quickly germinate in newly potted stock.
1.3 Why are weeds successful?
Some of the most successful weed species have short generation times – they grow and reproduce quickly. Important nursery weeds such as flickweed and spurge can produce viable seed within several weeks of germinating under ideal conditions. Therefore, knockdown herbicide or hand weeding schedules that have greater than a 2 to 3-week rotation will not be able to adequately control these weeds. It may be more effective to use a longer-acting pre-emergent herbicide, such as Sierraron 4G, which is registered for use in Australia, to control weeds in paths and gravel beds.
Successful weeds also produce huge numbers of viable seeds, often with no dormancy period. A study by Bachman and Whitwell (1995) showed that single flickweed plants can produce up to 5000 seeds under ideal conditions (the study showed that the number of seeds per plant ranged between 675-4980). Another important nursery weed, Fleabane, can produce up to 110,000 seeds per plant with 80% viability
(Peltzer and Douglas, 2021). Therefore, even a small number of uncontrolled weeds can generate a very large number of new seeds.
The seeds of successful weeds are also easily spread. Flickweed seeds can be spontaneously projected by the seed pods up to a distance of one metre (Bachman and Whitwell, 1995). The seeds stick to plastic containers, clothing and footwear, which can aid their spread around the nursery. The seeds of other weeds, such as spurge, can be either ejected from the pods or transported by ants (Ohnishi et al., 2008), and other seeds such as those from fleabane can be transported by wind.
Because weeds are fast growing and produce large numbers of seeds it is necessary to control them before they flower to reduce their spread around the nursery.

2. Preventing weeds
2.1 Sanitation practices
In weed management we talk about both “sanitation” and “control”. While control usually means practices that kill existing weeds, sanitation refers to practices that reduce the number of weeds seeds and prevent their spread throughout the nursery. Sanitation is important because weed control is much easier and less expensive when fewer weeds are present.
In your weed management strategy, you may need to include sanitation practices such as:
• Sweeping weed mat to remove potting mix and weed seeds between crops.
• Bagging and removing weeds that have been removed by hand - If left on the ground their seed pods may still mature and start the next generation.
• Always potting into clean pots (see below).
• Ensuring that plugs and propagation material are weed free.
• Keeping paths, surrounds and gravel beds free of weeds.
• Storing growing media in a protected, weed free environment.
• The use of mulches or discs on pots to reduce weed establishment (Figure 3).
• Applying fertiliser below the surface and using the right longevity and rate of controlled release fertiliser to reduce the need to top-dress (this is explained below).
• Avoid applying water soluble or liquid fertiliser through sprinklers unless the nursery has the right infrastructure to apply it efficiently. Fertiliser that lands on the gravel between pots can increase weed growth.
As mentioned above, plants should always be potted into clean pots. Bachman and Whitwell (1995) showed that flickweed seeds readily stick to unwashed, reused containers. Washing reused pots significantly reduced the number of weeds in the crop – there were six times more weeds when unwashed pots were reused. The importance of using clean pots is not limited to flickweed management. Numerous weeds, not to mention plant diseases, can be spread by reusing pots that have not been washed and sanitised.

Figure 3. Placing mulches or coir discs on the top of pots can reduce weed growth. They are most effective when combined with weed control in the surrounds.

Sweeping weedmat between production batches is an important part of good sanitation practice.
2.2 Strategic use of fertiliser
The application of fertilisers to the surface of pots can encourage weed growth. Weeds are plants and they need nutrients to establish and grow. By applying nutrients close to the surface, which is where weed seeds germinate, we are effectively feeding their growth.
Studies have shown that weed growth can be dramatically reduced by applying fertilisers by dibble application or at least 3 cm below the surface of the media. Altland et al (2004) measured a 55% and 82% reduction in the growth (shoot weight) of creeping oxalis and groundsel, repectively, when controlled release fertiliser was applied below the surface of the media. In a similar trial, Fain et al (2003) measured a 74% reduction in the growth of prostrate spurge
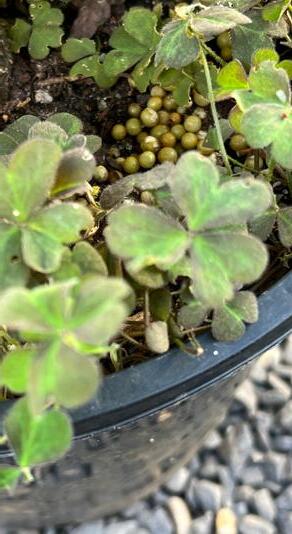
across different pot sizes and crops. Our own trials have shown substantial reductions in the growth of liverwort and oxalis, in a nursery with significant weed pressure, by applying fertiliser below the potted plant (Figure 4).
The most practical way to apply controlled release fertiliser below the surface is by using an automated dibbler on a potting machine. For advanced tree stock, a measured amount of controlled release fertiliser should be applied in the top third of the pot, but at least 3-4 cm below the surface of the media.

4. Subsurface fertiliser placement can reduce weed growth. This photo shows a reduction in liverwort and oxalis growth (left side) when controlled release fertiliser (CRF) was applied 3-4cm below the surface of the media compared to (right side) incorporated throughout.
Figure
In all cases applying the right longevity of controlled release fertiliser, at the right application rate, at potting is essential so that additional fertiliser does not need to be applied before sale or repotting. Topdressing with fertiliser midseason will give weeds the nutrition that they need to grow (Figure 5).
Osmocote is available in five different longevities, supplying nutrients each day up to a maximum of 16-18 months. Each longevity of Osmocote has a different recommended application rate (Table 1). Applying the recommended rate at potting improves plant growth and reduces the likelihood that the plant will need to be top-dressed.
Table 1. Recommended rates (g/l) of Osmocote 5 and Osmocote Pro at potting.
Figure 5. Topdressing fertiliser can encourage weed growth.
3. Controlling weeds
3.1 Weed control in the surrounds
If most weeds come from plants already in the nursery then controlling weeds in the surrounds, before they flower, should be central to a weed management strategy.
Surrounds include paths, empty growing areas, beds with (gravel or weed mat), around structures like sheds, polytunnels and glass houses, along fence lines, neighbouring plants and garden beds (Figure 6).
Control strategies can include the use of knockdown herbicides, steam wands, pre-emergent herbicides or hand weeding.
Pre-emergent herbicides, like Sierraron 4G, can be applied to gravel, fence lines and around the outside of structures to inhibit weed germination for months following application. They may be more effective than knockdown herbicides during periods of frequent rain (when knockdown herbicides cannot be applied) or when the availability of labour is a limitation.
Controlling weeds in the surrounds will significantly reduce the spread of weed seeds to growing areas.

Figure 6. Important nursery weeds like spotted spurge camouflage well in gravel paths and surrounds.
3.2 Using pre-emergent herbicides
Pre-emergent herbicides are used preventatively as they control weeds at the seed germination stage. They will not control established weeds. Pre-emergent herbicides also provide residual control, which can significantly reduce labour costs compared to hand weeding or other weed control methods.
To be effective, pre-emergent herbicides need to be applied 1) at the right rate according to the product label, 2) in the right place with an even distribution, and 3) at the right time. Staff who apply herbicides need to be trained to apply them accordingly:
1) Right rate: The product label will specify the correct application rate for the target weeds. Some pre-emergent herbicides have a single application rate for all weeds and others have varying label rates for different species. A simple method that can be used to calibrate granular herbicide applications is provided in Section 3.3.
2) Right placement: Not all pre-emergent herbicides can be safely applied to potted plants. Some are designed for application to paths and surrounds and will inhibit growth if applied to pots. Additionally, some plant species may be sensitive to certain active ingredients. If unsure about the risk of phytotoxicity it is always good practice to test on a small number of plants first. Most pre-emergent herbicides should not be applied in enclosed structures with poor ventilation as plant damage can result. When applying to potted plants, preemergent herbicides should be applied to the pot surface, where weed seeds germinate, and not mixed throughout the media.
Pre-emergent herbicides need to be applied evenly over the target area to provide effective control. Uneven application will create gaps where weeds can germinate and establish (Figure 7).
3) Right timing: Pre-emergent herbicides need to be applied before weed germination as most will not control established weeds. Ideally, they should be applied within 24 hours of potting and many growers apply the product just outside of the potting shed. When doing so, it is best practice to apply pre-emergent herbicide after the initial heavy watering. Application should be followed
by a second light watering to wash granules off leaf surfaces and to help incorporate the herbicide into the surface of the media. Water application should be gentle so that the distribution of the herbicide is not affected.
Pre-emergent herbicides should be reapplied at the correct interval. The product label will specify the minimum or recommended time between applications.
When using any plant protection product within the nursery, read the label before use. The “Directions For Use” table will specify the correct application rate, the frequency of application and any precautions that you should be aware of. The label safety directions, including requirements for protective clothing, should be read and understood before the product is opened or used.

Figure 7. Uneven application of pre-emergent herbicides leaves gaps where weeds can grow.
3.3 Calibrating herbicide applications
Granular pre-emergent herbicides can be applied using granule spreaders such as the Handy Pro spreader by ICL or alternative ‘belly grinder’ spreaders from other manufacturers.
The most accurate way to calibrate herbicide application rates is to:
1) Measure a test area that the herbicide will be applied to in square metres (Figure 8).
2) Add herbicide to the spreader or application equipment.
3) Weigh the spreader (g or kg) with herbicide inside and note the weight down.
4) Apply what you believe to be the correct rate as evenly as possible over the test area. Calibration cards for OH2 and Sierraron are provided at the back of this book to provide a visual reference. The herbicide should be applied by walking along both sides of the bed of plants to achieve overlap.
5) Re-weigh the spreader and calculate how much herbicide was applied (the change in weight from the first measurement).
6) Divide the weight of herbicide applied by the test area in square metres to give the g/m2 or kg/ m2 of herbicide that was applied (Figure 8).
7) Adjust your walking speed or the spreader settings depending on whether you need to apply a higher or lower rate in other areas of the nursery.
This calibration method should be repeated at regular intervals when first learning to apply a new product. The frequency can be reduced once a staff member has more experience with the herbicide being applied but calibration should still be done periodically to maintain a high level of accuracy.
A video explaining how to calibrate and apply OH2 can be accessed via this QR code below:
Figure 8. Calibrating the herbicide application rate when using granule spreaders.
3.4 Achieving an even distribution of herbicide
Herbicides need to be applied evenly over the target area to provide effective control. Uneven application will create gaps where weeds can germinate and establish (Figure 7). Additionally, when applied to pots, uneven application can increase the risk of plant setback by supplying higher than the label rate to some of the crop (see Section 3.8).
Granular Herbicides:
When applying granular herbicides, the application rate is determined by walking speed and the spreader flow rate settings. The distribution of the herbicide is affected by the rate at which the spreader handle is turned. Turning the handle faster will throw the herbicide granules further. Therefore, the optimum handle rotation speed will depend on the width of the bed of plants that the herbicide is applied to (Table 2).
A useful way to achieve the correct handle rotation speed is to use a metronome app on your phone with the beats per minute (BPM) set to the desired handle rotation speed. The rate at which the Handy Pro handle should be turned in revolutions per minute (RPM) when applying OH2 is shown in Table 2.
As shown in Table 2, the distribution of OH2 herbicide will be even (low variation) when the handle rotation speed is 100 RPM for bed widths of 1.5 metres and 160 RPM for bed widths of 2 metres. It is more difficult to achieve an even distribution of granular herbicides at wider bed widths, but a faster rotation speed will help.
Liquid herbicides:
The key to applying an even application of liquid preemergent herbicides is to ensure that both the pressure inside the spray-unit and your walking speed remains constant. Modern backpack sprayers have built-in batteryoperated pumps that regulate the pressure and flow rate for you. That way, the person applying can focus on maintaining a constant walking speed. Additionally, some backpack applicators are compatible with small booms, which can improve distribution when spraying paths and surrounds.
Liquid pre-emergent herbicides are difficult to apply evenly to potted plants when using a hand-held wand. Most handheld wands spray through a single nozzle, which makes it difficult to achieve the same application rate over every pot. The person applying herbicide is unable to see where the herbicide has been applied so there is no visual feedback to help them apply the correct rate and distribution or to alert them if pots have been missed. Finally, unless a boom sprayer is used, application may be slow compared to applying a granular herbicide through a spreader.
Table 2. Recommended rotation speed (RPM) when applying OH2 through a Handy Pro Spreader
3.5 Mode of Action groups and herbicide rotation
If growers apply the same herbicide too often populations of weeds can eventually adapt and become resistant. When resistance occurs, the herbicide will be less effective.
Herbicides control weeds by targeting various plant physiological processes. Some active ingredients affect cell division and limit root growth while others inhibit other processes, such as photosynthesis or cellulose production. The way in which a herbicide controls weeds is called the “Mode of Action”.
For example, OH2 Ornamental Herbicide contains two active ingredients, Oxyfluorfen and Pendimethalin. It is a Group 3 and 14 pre-emergent herbicide that jointly inhibits photosynthesis and cell division and affects the integrity of cell membranes in germinating weeds.
The probability of weeds becoming resistant to herbicides can be reduced by not relying too heavily on one mode of action. This can be achieved by alternating (rotating) the use of herbicides from different mode of action groups. It is not sufficient to simply use different brands or different active ingredients. To prevent resistance, the herbicides should be rotated from different mode of action groups, which are shown in Table 3.
In Australia and New Zealand, all herbicides are labelled with the mode of action group that the active ingredient belongs to. The mode of action group is a number that is displayed
using white text in a black box and is usually placed on the front of the product label. For example, OH2 contains herbicides from two different mode of action groups, 3 and 14. This is displayed on the label as:

Mode of action groups for pre-emergent herbicides, along with published values of their leaching potential, are presented in Table 3. The leaching potential of herbicides is discussed in the following section 3.6.
Table 3. Mode of action and leaching potential of pre-emergent herbicides that are present in either Australia or New Zealand. Note that not all are safe to apply to pots.
3.6 Environmental fate of herbicides
Most herbicides in use are readily adsorbed onto the surfaces of organic matter, such as composted pine bark, coconut coir and peat, as well as the organic carbon in soil. This prevents leaching through pots and soil and greatly reduces the chance of off-site losses. When applied to paths and surrounds, there is normally enough organic matter present to retain most active ingredients as soils typically contain between 1-5% organic carbon, concentrated near the soil surface.
The level of herbicide adsorption to organic matter is estimated by measuring the Koc in a laboratory. The Koc is the level of adsorption (K) to organic carbon (OC). The Kfoc is essentially the same thing. A high Koc or Kfoc indicates strong adsorption to organic matter and a low likelihood
of leaching, whereas low values show that the herbicide is mobile in soil and potting media and is more prone to leaching. Published Koc and Kfoc values for a range of preemergent herbicides are presented in Table 3 (Lewis et al., 2016). Their classifications range from “non-mobile” through to “moderately mobile”.
The active ingredients in OH2, Oxyfluorfen and Pendimethalin, have high Koc values (Table 3), are non-mobile and are retained on the top surface layers of the media where weed seeds germinate. Therefore, OH2 should be safe to apply even in sensitive environments where the leaching and loss of chemicals would be of particular concern.

3.7 How long do pre-emergent herbicides last?
After application, herbicides are exposed to UV light and soil microbes, which breakdown the active ingredients through photodegradation and biodegradation. Active ingredients may also be lost by volatilisation, which is why most preemergent herbicides cannot be used in poorly ventilated areas, such as polytunnels and enclosed glass houses. These processes cause a slow and continuous reduction in the control of weeds in the weeks or months following application (Figure 9).
the media, soil moisture (the amount and frequency of rainfall or irrigation), the type of media and the species and population size of microorganisms present. Because temperature and moisture are so influential, pre-emergent herbicides usually provide better residual control of weeds in cooler and drier seasons compared to warmer and wetter seasons.
Herbicide labels usually provide guidance about the recommended reapplication time. For example, the OH2 label states:
“One application will last for 2-3 months depending upon rainfall, irrigation, soil type, temperature and weed seed burden. Re-treat when the first signs of weed growth are seen but no sooner than 2 months and no later than 3 months after the first application.”
The rate at which degradation occurs is neither constant nor easy to predict. Environmental conditions that affect the rate of biodegradation include the temperature of
The best residual control can be achieved by applying the correct rate of herbicide with an even distribution. Applying too little herbicide will give poor residual control in the weeks and months following application. Applying too much herbicide risks causing setback (phytotoxicity) in the crop. For guidance about how to accurately calibrate herbicide application rates, see Section 3.3 in this guide.

Figure 9. Conceptual relationship between active ingredient concentration and weed survival over time.
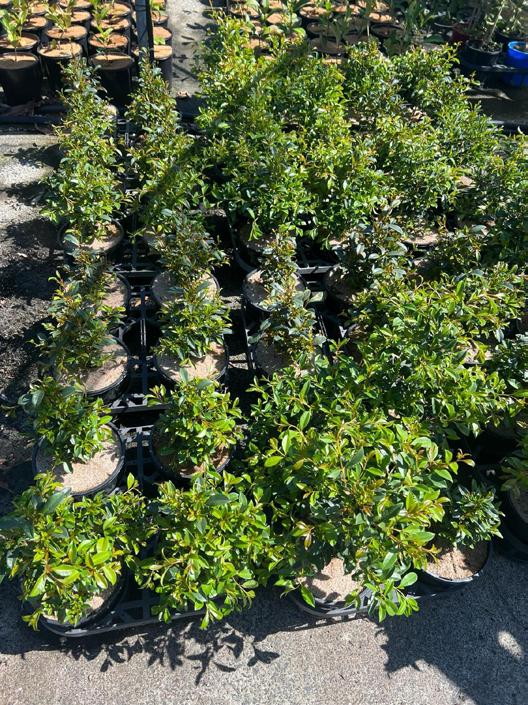
Figure 10. Setback in Syzygium caused by application of a pre-emergent herbicide that inhibits root growth.
3.8 Plant setback from herbicide use
Setback is when plant growth is adversely affected by the herbicide applied. When applied to pots some herbicides may reduce root and/or shoot growth, even if they do not cause the death of the plant. Setback is undesirable because it weakens the plant, reduces plant quality, increases variability between plants in a batch and can significantly increase the time it takes to produce the crop (Figures 10 and 11).
Nursery stock is at a higher risk of setback when:
• Pre-emergent herbicides designed for controlling weeds on paths and surrounds are inappropriately applied to pots.
• The incorrect rate of herbicide is applied.
• The herbicide is applied unevenly.
• The species grown is particularly susceptible to the active ingredients applied.
Some plant species are quite sensitive to certain active ingredients and are therefore more susceptible to setback than others. APVMA registered product labels normally include a comprehensive list of plants that have undergone phytotoxicity testing with the herbicide. For example, the OH2 Ornamental Herbicide label contains advice about safety on more than a hundred species of ornamental plants.
Be aware that in Australia herbicides are sometimes granted permission to be used under an APVMA minor use permit. Herbicides that are used under the permit scheme have not achieved full registration and may not have undergone phytotoxicity testing on nursery crops, or on a limited number. To reduce the risk of setback these products should be used with caution.
In New Zealand, herbicides do not need to be registered for use on ornamental crops (plants that are not used for human or animal consumption). When using products that do not provide comprehensive plant safety information on the label, growers should check for adverse reactions on a small number of plants, compared to the growth of untreated plants, before applying the herbicide to larger batches.

Figure 11. Setback in Buxus caused by application of a pre-emergent herbicide that inhibits root growth.
3.9 Efficient hand weeding
Regular hand weeding is an essential weed management practice that should be used alongside other methods of control. Hand weeding can have a dramatic effect on the level of weed pressure in a nursery.
Research by Barker and Neal (2016) showed that hand weeding every two weeks required less labour and was more effective at reducing weed numbers compared to weeding every eight weeks. This practice has been successfully adopted at a number of nurseries and is colloquially known as the “Pull ‘em or Leave ‘em” method.
When hand weeding every two weeks:
• Larger, established weeds should be removed as they could potentially flower and produce seeds prior to the next hand weeding cycle.
• Small weeds less than 1-week old can remain. Juvenile weeds will be removed during the next hand weeding cycle and prior to flowering.
Barker and Neal (2016) showed that labour costs could be almost halved using a two-week hand weeding schedule because small weeds are often the most time consuming to remove (Table 4). They also found that the two-week schedule reduced overall weed growth by 74%, averaged across six sites.
Table 4. Average labour costs when hand weeding on two and eight-week schedules. Calculated from Barker and Neal (2016).
Consistently hand weeding every two weeks will help to control some of the most prevalent and costly nursery weeds such as flickweed and prostrate spurge, which can start to produce viable seed within several weeks of germination under ideal conditions. Removing these weeds before they flower will help reduce the spread of their seeds and ultimately reduce their total number within the nursery.

Figure 12. Dispose of pulled weeds into a lidded bin to avoid seed dispersal.
4. Identification of Common Nursery Weeds
Cardamine spp.
Common names: Flickweed, Bittercress, Popweed


bonariensis, C. albida, C. canadensis
Common name: Fleabane

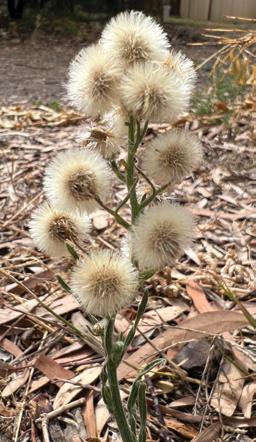


Conyza
Epilobium ciliatum, Epilobium billardierianum
Common name: Willowherb


Euphorbia maculata, E. prostrata, E. thymifolia, E. drumondii
Common names: Spurge, Prostrate Spurge, Caustic Weed


Euphorbia peplus
Common name: Petty Spurge


Marchantia spp.
Common names: Liverworts


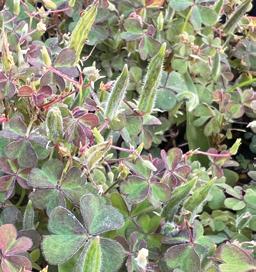

Oxalis corniculata
Common names: Creeping Oxalis, Creeping Woodsorrel
Stellaria media
Common name: Common Chickweed

Common names: Sow-thistle, Milk-thistle


Sonchus oleraceus
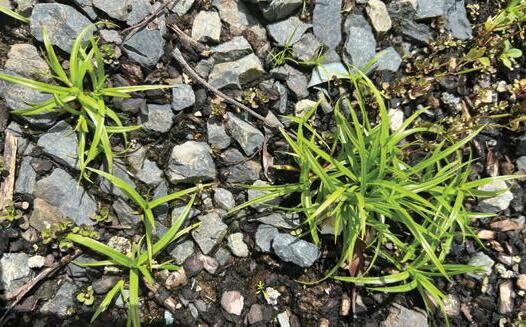
Common name: Nutgrass
5. Calibration Cards
The following calibration cards provide a visual reference of the correct application rates for OH2 and Sierraron 4G. The cards are not as accurate as the weight-based calibration method described in Section 3.3 of this guide. However, they can be a helpful reference when applying herbicides to check that the product is applied evenly and that rates do not change over time.
Cyperus rotundus


6. References
Altland JE, Fain GB, Von Arx K (2004) Fertiliser placement and herbicide rate affect weed control and crop growth in containers. Journal of Environmental Horticulture 22(2):93-99.
Bachman G and Whitwell T (1995) Hairy bittercress seed production, dispersal and control. Southern Nursery Association Research Conference 40: 288–290.
Barker A and Neal JC (2016) Frequent hand weeding saves money, North Carolina State University. https://content.ces.ncsu.edu/frequent-hand-weeding-saves-money
Lewis, K.A., Tzilivakis, J., Warner, D. and Green, A. (2016). An international database for pesticide risk assessments and management. Human and Ecological Risk Assessment: An International Journal, 22(4): 1050-1064.
Fain GB, Knight PR, Gillman CH and Olive JW (2003) Effect of fertilizer placement on prostrate spurge growth in container production. Journal of Environmental Horticulture 21(4):177-180.
Ohnishi Y, Suzuki N, Katayama N and Teranishi S (2008) Seasonally different modes of seed dispersal in the prostrate annual, Chamaesyce maculata (L.) Small (Euphorbiaceae), with multiple overlapping generations. Ecological Research 23:299-305.
Peltzer S and Douglas A (2021) Fleabane. Department of Primary Industries and Regional Development. https://agric.wa.gov.au/n/261
