EPSON INK PAD REPLACEMENT KIT INSTALLATION INSTRUCTIONS

Available to specific Epson printers:


Before you start:
• Instructions shown are for PhotoCake IV 8.XX version
• Must be on Update 42 or newer
DIRECTIONS
1 From the printer menu, navigate to “Setup”; select “Maintenance”.
2 Select “Ink Cartridge Replacement” and remove ink cartridges.


3 Power off the printer. Disconnect Power and USB cables from printer.
4 Remove extended output tray. Push in Paper Feed and connected Output trays.
5 Set Printer display side down so rear of printer is facing up.
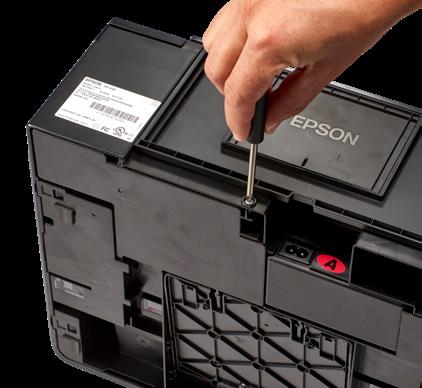
6 Using the #2 screwdriver (included in kit), remove screw and set aside.
7 Slide the cover up to access the Ink Pad.
8 Slide the Ink Pad left to remove.
9 Install the new Ink Pad.
10 Reinsert the cover and screw.
11 Set printer right side up, reconnect trays and cables.
12 Power printer on and install ink cartridges.
XP-4100
WF-2850
XP-4105 WF-2830
VISIT DECOPAC.COM FOR PHOTOCAKE PRINTER MAINTENANCE VIDEOS
PHOTOCAKE EPSON INK PAD REPLACEMENT KIT #28142 – Each 5 Set printer display side down 6 Remove screw and set aside
8 Slide the Ink Pad left to remove
9 Install the new Ink Pad
INSTRUCCIONES DE INSTALACIÓN DEL KIT DE REEMPLAZO DE ALMOHADILLA DE TINTA EPSON
Disponible para impresoras Epson específicas:


Antes de comenzar:
• Las instrucciones mostradas son para la versión 8.XX de PhotoCake IV
• Debe tener la actualización 42 o más reciente.
INSTRUCCIONES
1 En el menú de la impresora, vaya a “Configuración”; seleccione “Mantenimiento”.
2 Seleccione “Reemplazo del cartucho de tinta” y retire los cartuchos de tinta.
3 Apague la impresora. Desconecte el cable de energía y los cables USB de la impresora.
4 Retire la bandeja de salida extendida. Empuje las bandejas de alimentación de papel y de salida conectadas.
5 Coloque la impresora con la pantalla hacia abajo, de modo que la parte posterior de la impresora quede hacia arriba.
6 Con el destornillador # 2 (que se incluye en el kit), retire en el tornillo y déjelo a un lado.
7 Deslice la tapa hacia arriba para acceder a la almohadilla de tinta.
8 Deslice la almohadilla de tinta hacia la izquierda para retirarla.
9 Instale la nueva almohadilla de tinta.
10 Vuelva a colocar la tapa y el tornillo.
11 Coloque la impresora en posición correcta y vuelva a conectar las bandejas y los cables.
12 Encienda la impresora e instale los cartuchos de tinta.
5 Coloque la pantalla de la impresora hacia abajo
6 Retire el tornillo y déjelo a un lado
7 Deslice la tapa hacia arriba para acceder a la almohadilla de tinta
8 Deslice la almohadilla de tinta hacia la izquierda para retirarla
KIT DE REEMPLAZO DE ALMOHADILLA DE TINTA EPSON PHOTOCAKE #28142 – Cada uno
2 #29180 ©2023 DecoPac. Printed in USA
XP-4100 XP-4105 WF-2830 WF-2850
VISITE DECOPAC.COM PARA VER VIDEOS DE MANTENIMIENTO DE LA IMPRESORA PHOTOCAKE


