Table of Contents
1. React and React Native, Fifth Edition: Build cross-platform JavaScript and TypeScript apps for the web, desktop, and mobile
2. 1 Why React?
I. Before you begin: Join our book community on Discord
II. What is React?
III. React is just the view layer
IV. Simplicity is good
V. Declarative UI structures
VI. Data changes over time
VII. Performance matters
VIII. The right level of abstraction
IX. What's new in React?
X. Setup a new React project
i. Using Web Bundlers
ii. Using Frameworks
iii. Online Code Editors
XI. Summary
3. 2 Rendering with JSX
I. Before you begin: Join our book community on Discord
II. Technical requirements
III. Your first JSX content
i. Hello JSX
ii. Declarative UI structures
IV. Rendering HTML
i. Built-in HTML tags
ii. HTML tag conventions
iii. Describing UI structures
V. Creating your own JSX elements
i. Encapsulating HTML
ii. Nested elements
iii. Namespaced components
VI. Using JavaScript expressions
i. Dynamic property values and text
ii. Handling events
iii. Mapping collections to elements
VII. Building fragments of JSX
i. Using wrapper elements
ii. Using fragments
VIII. Summary
4. 3 Understanding React Components and Hooks
I. Before you begin: Join our book community on Discord
II. Technical requirements
III. Introduction to React Components
IV. What are component properties?
i. Passing property values
ii. Default property values
V. What is component state?
VI. React Hooks
VII. Maintaining state using Hooks
i. Initial state values
ii. Updating state values
VIII. Performing initialization and cleanup actions
i. Fetching component data
ii. Canceling actions and resetting state
iii. Optimizing side-effect actions
IX. Sharing data using context Hooks
X. Memoization with Hooks
i. useMemo Hook
ii. useCallback Hook
iii. useRef Hook
XI. Summary
5. 4 Event Handling, the React Way
I. Before you begin: Join our book community on Discord
II. Technical requirements
III. Declaring event handlers
i. Declaring handler functions
ii. Multiple event handlers
IV. Declaring inline event handlers
V. Binding handlers to elements
VI. Using synthetic event objects
VII. Understanding event pooling
VIII. Summary
6. 5 Crafting Reusable Components
I. Before you begin: Join our book community on Discord
II. Technical requirements
III. Reusable HTML elements
IV. The difficulty with monolithic components
i. The JSX markup
ii. Initial state
iii. Event handler implementation
V. Refactoring component structures
i. Starting with the JSX
ii. Implementing an article list component
iii. Implementing an article item component
iv. Implementing an add article component
VI. Render props
VII. Rendering component trees
VIII. Feature components and utility components
IX. Summary
7. 6 Type Checking and Validation with TypeScript
I. Before you begin: Join our book community on Discord
II. Technical requirements
III. Knowing What to Expect
i. The Importance of Props Validation
ii. Potential Issues Without Proper Validation
iii. Options for Props Validation
IV. Introduction to TypeScript
i. Why Use TypeScript?
ii. Setting Up TypeScript in a Project
iii. Basic Types in TypeScript
iv. Interfaces and Type Aliases
V. Comparing PropTypes and TypeScript
VI. Using TypeScript in React
i. Type Checking Props in React Components
ii. Typing State
iii. Typing Event Handlers
iv. Typing Context
v. Typing Refs
VII. Summary
8. 7 Handling Navigation with Routes
I. Before you begin: Join our book community on Discord
II. Technical requirements
III. Declaring routes
i. Hello route
ii. Decoupling route declarations
IV. Handling route parameters
i. Resource IDs in routes
ii. Query parameters
V. Using link components
i. Basic linking
ii. URL and query parameters
VI. Summary
9. 8 Code Splitting Using Lazy Components and Suspense
I. Before you begin: Join our book community on Discord
II. Technical requirements
III. Using the lazy API
i. Dynamic imports and bundles
ii. Making components lazy
IV. Using the Suspense component
i. Top-level Suspense components
ii. Working with spinner fallbacks
V. Avoiding lazy components
VI. Exploring lazy pages and routes
VII. Summary
10. 9 User Interface Framework Components
I. Before you begin: Join our book community on Discord
II. Technical requirements
III. Layout and organization
i. Using containers
ii. Building responsive grid layouts
IV. Using navigation components
i. Navigating with drawers
ii. Navigating with tabs
V. Collecting user input
i. Checkboxes and radio buttons
ii. Text inputs and select inputs
iii. Working with buttons
VI. Working with styles and themes
i. Making styles
ii. Customizing themes
VII. Summary
11. 10 High-Performance State Updates
I. Before you begin: Join our book community on Discord
II. Technical requirements
III. Batching state updates
IV. Prioritizing state updates
V. Handling asynchronous state updates
VI. Summary
12. 15 Why React Native?
I. Before you begin: Join our book community on Discord
II. Technical requirements
III. What is React Native?
IV. React and JSX are familiar
V. The mobile browser experiences
VI. Android and iOS – different yet the same
VII. The case for mobile web apps
VIII. Summary
13. 16 React Native under the Hood
I. Before you begin: Join our book community on Discord
II. Technical requirements
III. Exploring React Native architecture
i. The state of web and mobile apps in the past
ii. React Native current architecture
iii. React Native future architecture
IV. Explaining JS and Native modules
i. React Navigation
ii. UI component libraries
iii. Splash screen
iv. Icons
v. Handling errors
vi. Push notifications
vii. Over the air updates
viii. JS libraries
V. Exploring React Native components and APIs
VI. Summary
14. 17 Kick-Starting React Native Projects
I. Before you begin: Join our book community on Discord
II. Technical requirements
III. Exploring React Native CLI tools
IV. Installing and using the Expo command-line tool
V. Viewing your app on your phone
VI. Viewing your app on Expo Snack
VII. Summary
15. 18 Building Responsive Layouts with Flexbox
I. Before you begin: Join our book community on Discord
II. Technical requirements
III. Introducing Flexbox
IV. Introducing React Native styles
V. Using the Styled Components library
VI. Building Flexbox layouts
i. Simple three-column layout
ii. Improved three-column layout
iii. Flexible rows
iv. Flexible grids
v. Flexible rows and columns
VII. Summary
16. 19 Navigating Between Screens
I. Before you begin: Join our book community on Discord
II. Technical requirements
III. Navigation basics
IV. Route parameters
V. The navigation header
VI. Tab and drawer navigation
VII. File-based navigation
VIII. Summary
17. 20 Rendering Item Lists
I. Before you begin: Join our book community on Discord
II. Technical requirements
III. Rendering data collections
IV. Sorting and filtering lists
V. Fetching list data
VI. Lazy list loading
VII. Implementing pull to refresh
VIII. Summary
18. 21 Showing Progress
I. Before you begin: Join our book community on Discord
II. Technical requirements
III. Understanding progress and usability
IV. Indicating progress
V. Measuring progress
VI. Exploring navigation indicators
VII. Step progress
VIII. Summary
19. 22 Geolocation and Maps
I. Before you begin: Join our book community on Discord
II. Technical requirements
III. Using Location API
IV. Rendering the Map
V. Annotating points of interest
i. Plotting points
ii. Plotting overlays
VI. Summary
20. 23 Collecting User Input
I. Before you begin: Join our book community on Discord
II. Technical requirements
III. Collecting text input
IV. Selecting from a list of options
V. Toggling between on and off
VI. Collecting date/time input
VII. Summary
21. 24 Displaying Modal Screens
I. Before you begin: Join our book community on Discord
II. Technical requirements
III. Important information
IV. Getting user confirmation
i. Displaying a success confirmation
V. Error confirmation
VI. Passive notifications
VII. Activity modals
VIII. Summary
22. 25 Responding to User Gestures
I. Before you begin: Join our book community on Discord
II. Technical requirements
III. Scrolling with your fingers
IV. Giving touch feedback
V. Using Swipeable and cancellable components
VI. Summary
23. 26 Using Animations
I. Before you begin: Join our book community on Discord
II. Technical requirements
III. Using React Native Reanimated
i. Animated API
ii. React Native Reanimated
IV. Installing the React Native Reanimated library
V. Animating layout components
VI. Animating styling components
VII. Summary
24. 27 Controlling Image Display
I. Before you begin: Join our book community on Discord
II. Technical requirements
III. Loading images
IV. Resizing images
V. Lazy image loading
VI. Rendering icons
VII. Summary
25. 29 Selecting Native UI Components Using Tamagui
I. Before you begin: Join our book community on Discord
II. Technical requirements
III. Application containers
IV. Headers and footers
V. Using layout components
VI. Collecting input using form components
VII. Summary
VIII. Further reading
React and React Native, Fifth Edition: Build cross-platform JavaScript and TypeScript apps for the web, desktop, and mobile
Welcome to Packt Early Access. We’re giving you an exclusive preview of this book before it goes on sale. It can take many months to write a book, but our authors have cutting-edge information to share with you today. Early Access gives you an insight into the latest developments by making chapter drafts available. The chapters may be a little rough around the edges right now, but our authors will update them over time.You can dip in and out of this bookor follow alongfrom start to finish; Early Access is designed to be flexible. We hope you enjoy getting to know more about the process of writing a Packt book.
1. Chapter 1: Why React?
2. Chapter 2: Rendering with JSX
3. Chapter 3: Understanding React Components and Hooks
4. Chapter 4: Event Handling, the React Way
5. Chapter 5: Crafting Reusable Components
6. Chapter 6: Type Checking and Validation with TypeScript
7. Chapter 7: Handling Navigation with Routes
8. Chapter 8: Code Splitting Using Lazy Components and Suspense
9. Chapter 9: User Interface Framework Components
10. Chapter 10: High-Performance State Updates
11. Chapter 11: User Interface Framework Components
12. Chapter 12: High-Performance State Updates
13. Chapter 13: Unit Testing in React
14. Chapter 14: Server Rendering and Static Site Generation with React Frameworks
15. Chapter 15: Why React Native?
16. Chapter 16: React Native under the Hood
17. Chapter 17: Kick-Starting React Native Projects
18. Chapter 18: Building Responsive Layouts with Flexbox
19. Chapter19: Navigating Between Screens
20. Chapter20: Rendering Item Lists
21. Chapter 21: Showing Progress
22. Chapter 22: Geolocation and Maps
23. Chapter 23: Collecting User Input
24. Chapter 24: Displaying Modal Screens
25. Chapter 25: Responding to User Gestures
26. Chapter 26: Using Animations
27. Chapter 27: Controlling Image Display
28. Chapter 28: Going Offline
29. Chapter 29: Selecting Native UI Components Using Tamagui
1 Why React?
Before you begin: Join our book community on Discord
Give your feedback straight to the author himself and chat to other early readers on our Discord server (find the "react-and-react-native-5e" channel under EARLY ACCESS SUBSCRIPTION).
https://packt.link/EarlyAccess

If you're reading this book, you probably know what React is. If not, don't worry. I'll do my best to keep philosophical definitions to a minimum. However, this is a long book with a lot of content, so I feel that setting the tone is an appropriate first step. Yes, the goal is to learn React and React Native. But it's also to put together a lasting architecture that can handle everything we want to build with React today and in the future.This chapter starts with a brief explanation of why React exists. Then, we'll think about the simplicity of React and how it is able to handle many of the typical performance issues faced by web developers. Next, we'll go over the declarative philosophy of React and the level of abstraction that React programmers can expect to work with. Finally, we'll touch on some of the major features of React.Once you have a conceptual understanding of React and how it solves problems with UI development, you'll be better equipped to tackle the remainder of the book. This chapter will cover the following topics:
What is React?
React features
What's new in React?
Setting up a new React project
What is React?
I think the one-line description of React on its home page (https://react.dev/) is concise and accurate:
"A JavaScript library for building user interfaces."
It's a library for building User Interfaces (UIs). This is perfect because, as it turns out, this is all we want most of the time. I think the best part about this description is everything that it leaves out. It's not a mega framework. It's not a full-stack solution that's going to handle everything from the database to real-time updates over WebSocket connections. We might not actually want most of these prepackaged solutions. If React isn't a framework, then what is it exactly?
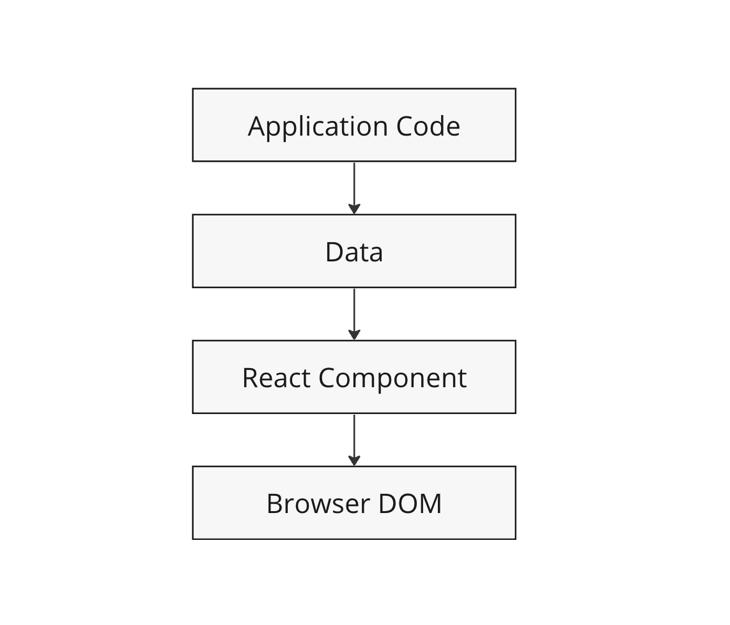
React is just the view layer
React is generally thought of as the view layer in an application. You might have used a library such as Handlebars or jQuery in the past. Just as jQuery manipulates UI elements and Handlebars templates are inserted into a page, React components change what the user sees. The following diagram illustrates where React fits in our frontend code:
1.1 - The layers of a React application
This is all there is to React – the core concept. Of course, there will be subtle variations to this theme as we make our way through the book, but the flow is more or less the same. We have some application logic that generates some data. We want to render this data to the UI, so we pass it to a React Component, which handles the job of getting the HTML into the page.You may wonder what the big deal is; React appears to be yet another rendering technology. We'll touch on some of the key areas where React can simplify application development in the remaining sections of the chapter.
Simplicity is good
Figure
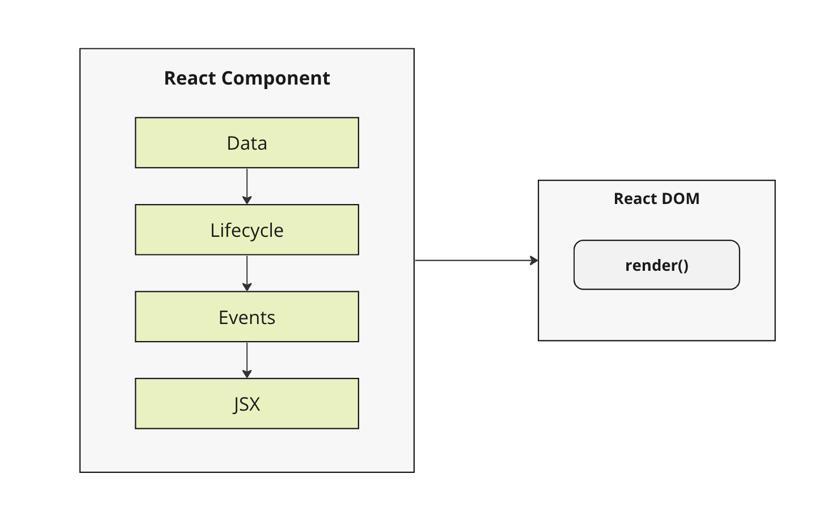
React doesn't have many moving parts to learn about and understand. Internally, there's a lot going on, and we'll touch on these things throughout the book. The advantage of having a small API to work with is that you can spend more time familiarizing yourself with it, experimenting with it, and so on. The opposite is true of large frameworks, where all of your time is devoted to figuring out how everything works. The following diagram gives you a rough idea of the APIs that we have to think about when programming with React:
Figure 1.2 - The simplicity of the React API
React is divided into two major APIs:
The React Component API: These are the parts of the page that are rendered by the React DOM.
React DOM: This is the API that's used to perform the rendering on a web page.
Within a React component, we have the following areas to think about:
Data: This is data that comes from somewhere (the component doesn't care where) and is rendered by the component.
Lifecycle: This consists of methods or Hooks that we implement to respond to the component's entering and exiting phases of the React rendering process as they happen over time – for example, one phase of the life cycle is when the component is about to be rendered.
Events: These are the code that we write for responding to user interactions.
JSX: This is the syntax of React components used to describe UI structures.
Don't fixate on what these different areas of the React API represent just yet. The takeaway here is that React, by nature, is simple. Just look at how little there is to figure out! This means that we don't have to spend a ton of time going through API details here. Instead, once you pick up on the basics, we can spend more time on nuanced React usage patterns that fit in nicely with declarative UI structures.
Declarative UI structures
React newcomers have a hard time getting to grips with the idea that components mix in markup with their JavaScript in order to declare UI structures. If you've looked at React examples and had the same adverse reaction, don't worry. Initially, we're all skeptical of this approach, and I think the reason is that we've been conditioned for decades by the separation of concerns principle. This principle states that different concerns, such as logic and presentation, should be separate from one another. Now, whenever we see things mixed together, we automatically assume that this is bad and shouldn't happen.The syntax used by React components is called JSX (JavaScript XML). A component renders content by returning some JSX. The JSX itself is usually HTML markup, mixed with custom tags for React components. The specifics don't matter at this point; we'll go into detail in the coming chapters. What's groundbreaking about the declarative JSX approach is that we don't have to perform little micro-operations to change the content of a component.
IMPORTANT NOTE
Although I won't be following the convention in this book, some React developers prefer the .jsx extension instead of .js for their components.
For example, think about using something such as jQuery to build your application. You have a page with some content on it, and you want to add a class to a paragraph when a button is clicked. Performing these steps is easy enough. This is called imperative programming, and it's problematic for UI development. While this example of changing the class of an element is simple, real applications tend to involve more than three or four steps to make something happen.React components don't require you to execute steps in an imperative way. This is why JSX is central to React components. The XML-style syntax makes it easy to describe what the UI should look like –that is, what are the HTML elements that this component is going to render? This is called declarative programming and is very well suited for UI development. Once you've declared your UI structure, you need to specify how it changes over time.
Data changes over time
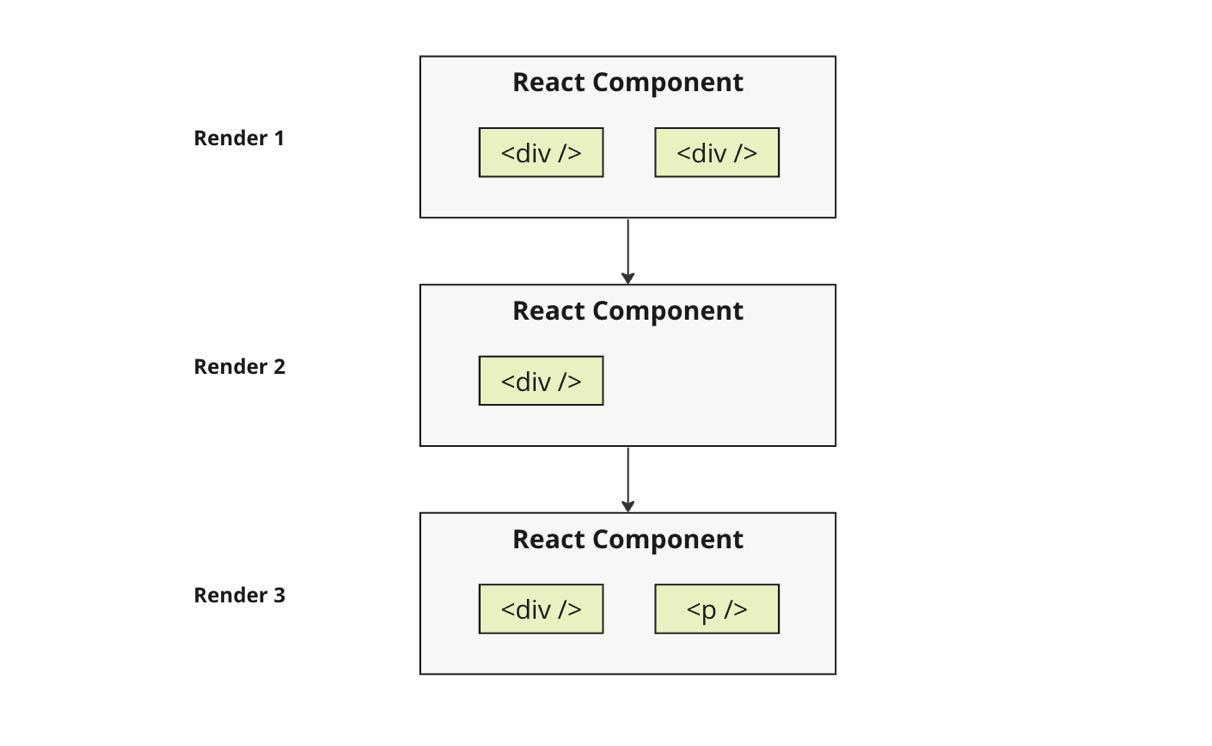
Another area that's difficult for React newcomers to grasp is the idea that JSX is like a static string, representing a chunk of rendered output. This is where time and data come into play. React components rely on data being passed into them. This data represents the dynamic parts of the UI – for example, a UI element that's rendered based on a Boolean value could change the next time the component is rendered. Here's a diagram illustrating the idea:
1.3 - React components changing over time
Each time the React component is rendered, it's like taking a snapshot of the JSX at that exact moment in time. As your application moves forward through time, you have an ordered collection of rendered UI components. In addition to declaratively describing what a UI should be, re-rendering the same JSX content makes things much easier for developers. The challenge is making sure that React can handle the performance demands of this approach.
Performance matters
Using React to build UIs means that we can declare the structure of the UI with JSX. This is less error-prone than the imperative approach of assembling the UI piece by piece. However, the declarative approach does present a challenge –performance.For example, having a declarative UI structure is fine for the initial rendering because there's nothing on the page yet. So, the React renderer can look at the structure declared in JSX and render it in the DOM browser.
Figure
IMPORTANT NOTE
The Document Object Model (DOM) represents HTML in the browser after it has been rendered. The DOM API is how JavaScript is able to change content on a page.
This concept is illustrated in the following diagram:
Figure 1.4 - How JSX syntax translates to HTML in the browser DOM
On the initial render, React components and their JSX are no different from other template libraries. For instance, Handlebars will render a template to HTML markup as a string, which is then inserted into the browser DOM. Where React is different from libraries such as Handlebars is when data changes and we need to re-render the component. Handlebars will just rebuild the entire HTML string, the same way it did on the initial render. Since this is problematic for performance, we often end up implementing imperative workarounds that manually update tiny bits of the DOM. We end up with a tangled mess of declarative templates and imperative code to handle the dynamic aspects of the UI.We don't do this in React. This is what sets React apart from other view libraries. Components are declarative for the initial render, and they stay this way even as they're re-rendered. It's what React does under the hood that makes re-rendering declarative UI structures
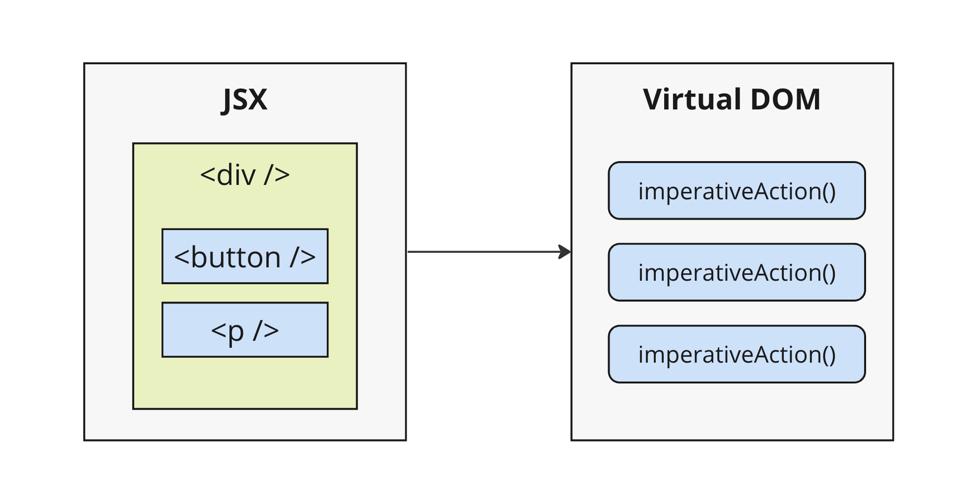
possible.React has something called the virtual DOM, which is used to keep a representation of the real DOM elements in memory. It does this so that each time we re-render a component, it can compare the new content to the content that's already displayed on the page. Based on the difference, the virtual DOM can execute the imperative steps necessary to make the changes. So, not only do we get to keep our declarative code when we need to update the UI but React will also make sure that it's done in a performant way. Here's what this process looks like:
Figure 1.5 – React transpiles JSX syntax into imperative DOM API calls
IMPORTANT NOTE
When you read about React, you'll often see words such as diffing and patching. Diffing means comparing old content (the previous state of the UI) with new content (the updated state) to identify the differences, much like comparing to versions of a document to see what’s changed. Patching means executing the necessary DOM operations to render the new content, ensuring that only the specific changes are made, which is crucial for performance.
As with any other JavaScript library, React is constrained by the run-tocompletion nature of the main thread. For example, if the React internals are
busy diffing content and patching the DOM, the browser can't respond to user input. As you'll see in the last section of this chapter, changes were made to the internal rendering algorithms in React to mitigate these performance pitfalls. With performance concerns addressed, we need to make sure that we're confident that React is flexible enough to adapt to different platforms that we might want to deploy our apps to in the future.
The right level of abstraction
Another topic I want to cover at a high level before we dive into React code is abstraction.In the preceding section, you saw how JSX syntax translates to low-level operations that update our UI. A better way to look at how React translates our declarative UI components is via the fact that we don't necessarily care what the render target is. The render target happens to be the browser DOM with React, but it isn't restricted to the browser DOM.React has the potential to be used for any UI we want to create, on any conceivable device. We're only just starting to see this with React Native, but the possibilities are endless. I personally will not be surprised if React Toast becomes a thing, targeting toasters that can singe the rendered output of JSX onto bread. The abstraction level with React is at the right level, and it's in the right place.The following diagram gives you an idea of how React can target more than just the browser:
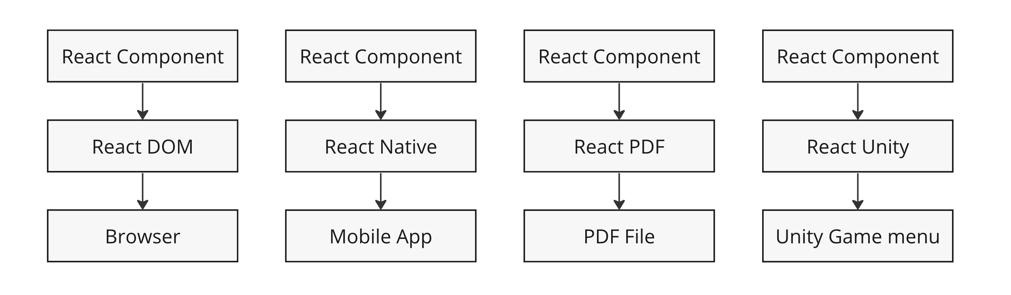
Figure 1.6 – React abstracts the target rendering environment from the components that we implement
From left to right, we have React DOM, React Native, React PDF, and React Unity. All of these React Renderer libraries, the accepts React
Component and return platform specific result. As you can see, to target something new, the same pattern applies:
Implement components specific to the target. Implement a React renderer that can perform the platform-specific operations under the hood.
This is, obviously, an oversimplification of what's actually implemented for any given React environment. But the details aren't so important to us. What's important is that we can use our React knowledge to focus on describing the structure of our UI on any platform.Now that you understand the role of abstractions in React, let's see what's new in React.
What's new in React?
React is a continuously evolving library in the ever-changing web development landscape. As you embark on your journey to learn and master React, it's important to understand the evolution of the library and its updates over time. One of the advantages of React, its core API has remained relatively stable in recent years. This provides a sense of continuity and allows developers to leverage their knowledge from previous versions. The conceptual foundation of React has remained intact, meaning that the skills acquired three or five years ago can still be applied today. Let's take a step back and trace the history of React from its early versions to the recent. From React 0.x to React 18, numerous pivotal changes and enhancements have been made as follows:
React 0.14: In this version, the introduction of functional components allowed developers to utilize functions as components, simplifying the creation of basic UI elements. At that time, no one knew that now we would write only functional components and almost completely abandon class-based components.
React 15: With a new versioning scheme, the next update of React 15 brought a complete overhaul of the internal architecture, resulting in improved performance and stability.
React 16: This version, however, stands as one of the most notable releases in React's history. It introduced hooks, a revolutionary concept
that enables developers to use state and other React features without the need for class components. Hooks make code simpler and more readable, transforming the way developers write components. We will explore a lot of hooks in this book. Additionally, React 16 introduced Fiber, a new reconciliation mechanism that significantly improved performance, especially when dealing with animations and complex UI structures.
React 17: This version focused on updating and maintaining compatibility with previous versions. It introduced a new JSX transform system.
React 18: This is the latest, stable release, which continues the trajectory of improvement, and emphasizes performance enhancements and additional features such as automatic batching of renders, state transitions, server components, and streaming server-side rendering. Most of the important updates related to performance will be explored in Chapter 12, High-Performance State Updates. More details about server rendering will be covered in Chapter 14, Server Rendering and Static Site Generation with React Frameworks.
React's stability and compatibility make it a reliable library for long-term use, while the continuous updates ensure that it remains at the forefront of web and mobile development. Throughout this book, all examples will utilize the latest React API, ensuring that they remain functional and relevant in future versions. Now that we have explored the evolution and updates in React, we can delve deeper into React, and examine how to get set up with the new React project.
Setup a new React project
There are several ways to create a React project when you are getting started or learning. In this section, we will explore three common approaches:
To start developing and previewing your React applications, you will first need to have Node.js installed on your computer. Node.js is a runtime environment for executing JavaScript code.
Let's dive into each approach in the following subsections.
Using Web Bundlers
Using a web bundler is an efficient way to create React projects, especially if you are building a Single Page Application (SPA). For all of the examples in this book, we will use Vite as our web bundler. Vite is known for its remarkable speed and ease of setup and use.To set up your project using Vite, you will need to take the following steps:
1. Ensure that you have Node.js installed on your computer by visiting the official Node.js website and downloading the appropriate version for your operating system.
2. Open your terminal or command prompt and navigate to the directory where you want to create your project.
3. Run the following command to create a new React project with Vite:
npm create vite@latest my-vue-app -- --template vue
This command creates a new directory called my-react-app and sets up a React project using the Vite template.
1. Once the project is created, navigate into the project directory:
cd my-react-app
1. Install dependencies:
npm install
1. Finally, start the development server by running the following command:
npm run dev
This command launches the development server, and you can view your React application by opening your browser and visiting http://localhost:3000.By now, you would have successfully set up your React project using Vite as the web bundler. For more information about Vite and possible configurations, visit the official website at https://vitejs.dev/.
Using Frameworks
For real-world and commercial projects, it is recommended to use frameworks built on top of React. These frameworks provide additional features out of the box, such as routing and asset management (images, SVG files, fonts, etc.). They also guide you in organizing your project structure effectively, as frameworks often enforce specific file organization rules. Some popular React frameworks include Next.js, Gatsby, and Remix.In Chapter 14, Server Rendering and Static Site Generation with React Frameworks, we will explore NextJS setup and some differences between using web bundlers.
Online Code Editors
Online code editors combine the advantages of web bundlers and frameworks but allow you to set up your React development environment in the cloud or right inside of the browser. This eliminates the need to install anything on your machine and lets you write and explore React code directly in your browser.While there are various online code editors available, some popular options include CodeSandbox, StackBlitz, and Replit. These platforms provide a user-friendly interface and allow you to create, share, and collaborate on React projects without any local setup.To get started with an online code editor, you even don’t need an account. Try to open the link on your browser at https://react.new. In a few seconds you will see that CodeSandbox is ready to work project with live preview. To save your work, you need to create an account. Using online code editors is a convenient way to learn and experiment with React, especially if you prefer a browser-based development environment.In this section, we explored different methods for setting up your React project. Whether you choose web bundlers, frameworks, or online code editors, each approach offers its
unique advantages. Select the method that you prefer and suits your project requirements, and let's dive into the world of React development!
Summary
In this chapter, you were introduced to React at a high level. React is a library with a small API used to build UIs. Next, you were introduced to some of the key concepts of React. We discussed the fact that React is simple because it doesn't have a lot of moving parts. Afterward, we explored the declarative nature of React components and JSX. Following that, you learned that React takes performance seriously, enabling us to write declarative code that can be re-rendered repeatedly. You also gained insight into the idea of render targets and how React can easily become the UI tool of choice for all of them. I then provided you with a brief overview of React’s history and introduced latest developments. Finally, we delved into how to set up a new React project and initiate the learning process.That's sufficient introductory and conceptual content for now. As we progress through the book’s journey, we'll revisit these concepts. Next, let's take a step back and nail down the basics, starting with JSX in the next chapter.