PDF Etextbook 978-0078024306 laboratory manual for human anatomy & physiology cat version 3rd editio
Human Anatomy & Physiology Cat Version 3rd Edition
Visit to download the full and correct content document: https://ebookmass.com/product/etextbook-978-0078024306-laboratory-manual-for-hu man-anatomy-physiology-cat-version-3rd-edition/
More products digital (pdf, epub, mobi) instant download maybe you interests ...
Human Anatomy & Physiology Laboratory Manual, Cat Version (13th Edition )
The procedures are clear, concise, and easy to follow. Relevant lists and summary tables present the contents efficiently. Histology micrographs and cadaver photos are incorporated in the appropriate locations within the associated labs.
The pre-lab section includes quiz questions. It also directs the student to carefully read the introductory material and the entire lab to become familiar with its contents. If necessary, a textbook or lecture notes might be needed to supplement the concepts.
Terminologia Anatomica is used as the source for universal terminology in this laboratory manual. Alternative names are included when a term is introduced for the first time.
Laboratory assessments immediately follow each laboratory exercise.
Histology photos are placed within the appropriate laboratory exercise.
A section called “Study Skills for Anatomy and Physiology” is located in the front of this laboratory manual. This section was written by students enrolled in a Human Anatomy and Physiology course.
Critical Thinking Activities are incorporated within most of the laboratory exercises to enhance valuable critical thinking skills that students need throughout their lives.
Cadaver images are incorporated with dissection labs.
In Touch with Instructor Needs
The instructor will find digital assets for use in creating customized lectures, visually enhanced tests and quizzes, and other printed support material.
A correlation guide for Anatomy & Physiology RE vEAlEd® (APR) and the entire lab manual is available. Contact your McGraw-Hill Learning Technology Representative. Cadaver images from APR are included within many of the laboratory exercises.
Some unique labs included are “Scientific Method and Measurements,” “Chemistry of Life,” “Fetal Skeleton,” “Surface Anatomy,” “Diabetic Physiology,” and “Genetics.”
The annotated instructor’s guide for Laboratory Manual for Human Anatomy and Physiology describes the purpose of the laboratory manual and its special features, provides suggestions for presenting the laboratory exercises to students, instructional approaches, a suggested time schedule, and annotated figures and assessments. It contains a “Student Safety Contract” and a “Student Informed Consent Form.”
Each laboratory exercise can be completed during a single laboratory session.
In Touch with Educational Needs
Learning outcomes with icons o have matching assessments with icons A so students can be sure they have accomplished the laboratory exercise content. Outcomes and assessments include all levels of learning skills: remember, understand, apply, analyze, evaluate, and create.
Assessment rubrics for entire laboratory assessments are included in Appendix 2.
In Touch with Technology
Detailed cadaver photographs blended together with a state-of-the-art layering technique provide a uniquely interactive dissection experience.
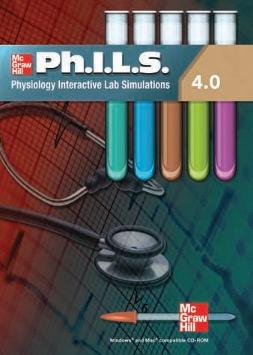
Physiology Interactive Lab Simulations (Ph.I.L.S. 4.0) is included with the lab manual. Eleven lab simulations are interspersed throughout the lab manual. The correlation guide for all of the simulations is included in Appendix 3.
Engaging Presentation Materials for lecture and lab
McGraw-Hill Connect® Anatomy & Physiology is a digital teaching and learning environment that saves students and instructors time while improving performance over a variety of critical outcomes.
From in-site tutorials, to tips and best practices, to live help from colleagues and specialists–you’re never left alone to maximize Connect’s potential.
Instructors have access to a variety of resources including assignable and gradable interactive questions based on textbook images, case study activities, tutorial videos, and more.
Digital images, PowerPoint slides, and instructor resources are also available through Connect.
Digital Lecture Capture: Get Connected. Get Tegrity. Capture your lectures for students. Easy access outside of class anytime, anywhere, on just about any device.
Visit www.mcgrawhillconnect.com.
‘‘…(We) have reduced the time we spend on grading by 90 percent and student test scores have risen, on average, 10 points since we began using Connect!”
—William Hoover, Bunker Hill Community College
Save time with auto-graded assessments and tutorials
Fully editable, customizable, auto-graded interactive assignments using high-quality art from the lab manual, and animations and videos from a variety of sources take you way beyond multiple choice. Assignable content is available for every Learning Outcome in the lab manual. Extremely high quality content, includes case study modules, animated learning modules, and more!
Generate powerful data related to student performance based on question tagging for Learning Outcomes, HAPS topics and outcomes, specific topics, Bloom’s level, and more.
Integrated and adaptive Learning SyStemS
LearnSmart Labs is a superadaptive simulated lab experience that brings meaningful scientific exploration to students. Through a series of adaptive questions, LearnSmart Labs identifies a student’s knowledge gaps and provides resources to quickly and efficiently close those gaps. Once students have mastered the necessary basic skills and concepts, they engage in a highly realistic simulated lab experience that allows for mistakes and the execution of the scientific method.
The primary goal of LearnSmart Prep is to help students who are unprepared to take college-level courses. Using superadaptive technology, the program identifies what a student doesn’t know and then provides “teachable moments” designed to mimic the office hour experience. When combined with a personalized learning plan, an unprepared or struggling student has all the tools needed to quickly and effectively learn the foundational knowledge and skills necessary to be successful in a college-level course.
What You’ve Only Imagined
The Future of Custom Publishing is Here.
Introducing McGraw-Hill Create™—a new, self-service website that allows you to quickly and easily create custom course materials by drawing upon McGraw-Hill Education’s comprehensive, cross disciplinary content and other third party resources.
Select, then arrange the content in a way that makes the most sense for your course
Combine material from different sources and even upload your own content
Choose the best format for your students-print or eBook
Edit and update your course materials as often as you’d like
GuIdE d tour tHrouGH an ExErCISE
The laboratory exercises include a variety of special features that are designed to stimulate interest in the subject matter, to involve students in the learning process, and to guide them through the planned activities. these features include the following:
Purpose of the Exercise the purpose provides a statement about the intent of the exercise—that is, what will be accomplished.
Learning outcomes the learning outcomes list what a student should be able to do after completing the exercise. Each learning outcome will have matching assessments indicated by the corresponding icon A in the laboratory exercise or the laboratory assessment.
Materials needed this section lists the laboratory materials that are required to complete the exercise and to perform the demonstrations and learning extensions.
s afety a list of safety guidelines is included inside the front cover. Each lab session that requires special safety guidelines has a safety section. your instructor might require some modifications of these guidelines.
introduction the introduction describes the subject of the exercise or the ideas that will be investigated. It includes all of the information needed to perform the laboratory exercise.
Procedure t he procedure provides a set of detailed instructions for accomplishing the planned laboratory activities. usually these instructions are presented in outline form so that a student can proceed efficiently through the exercise in stepwise fashion.
the procedures include a wide variety of laboratory activities and, from time to time, direct the student to complete various tasks in the laboratory assessments.
there are also separate procedures in 11 labs that utilize Ph.I.L.S. 4.0.
Pre-Lab the pre-lab includes quiz questions and directs the student to carefully read introductory material and examine the entire laboratory contents after becoming familiar with the topics from a textbook or lecture. after successfully answering the pre-lab questions, the student is prepared to become involved in the laboratory exercise.
Demonstration Activities
Demonstration activities appear in separate boxes. they describe specimens, specialized laboratory equipment, or other materials of interest that an instructor may want to display to enrich the student’s laboratory experience.
Learning Extension Activities Learning extension activities also appear in separate boxes. they encourage students to extend their laboratory experiences. Some of these activities are open-ended in that they suggest the student plan an investigation or experiment and carry it out after receiving approval from the laboratory instructor. Some of the figures are illustrated as line art or in grayscale. this will allow colored pencils to be used as a visual lear ning activity to distinguish various structures.
illustrations Diagrams similar to those in a textbook often are used as aids for reviewing subject matter. o ther illustrations provide visual instructions for performing steps in procedures or are used to identify parts of instruments or specimens. Micrographs are included to help students identify microscopic structures or to evaluate student understanding of tissues.
Laboratory Assessments a laboratory assessment form to be completed by the student immediately follows each exercise. these assessments include various types of review activities, spaces for sketches of microscopic objects, tables for recording observations and experimental results, and questions dealing with the analysis of such data. as a result of these activities, students will develop a better understanding of the structural and functional characteristics of their bodies and will increase their skills in gathering information by observation and experimentation. by completing all of the assessments, students will be able to determine if they were able to accomplish all of the learning outcomes.
Histology Histology photos placed within the appropriate exercise.
Changes To This EdiTion
Global Changes
new design incorporated in the laboratory exercises and assessments.
revised icons for Learning outcomes and matching assessments.
bIoPaC exercises rewritten and an additional exercise added.
LAborAtorY ExErCisE toPiC
1 Introductory material table 1.1
2 fig. 2.1b (anterior body cavity) Procedure b (organ systems) fig. 2.5 (anatomical position) figs. 2.6 and 2.10 (anatomical planes) figs. 2.8a and 2.8b (surface regions) assessments: Part E
Ph.I.L.S. 4.0 laboratory exercises revised and placed within a new design section at the end of the Laboratory assessments. added aPr icons.
Increased italicized terminology in laboratory introductory materials.
CHAnGE
added independent and dependent variables Improved depth
added figure
Expanded components
Improved labels revised and improved labels revised and full color
Expanded components
4 fig. 4.7 (wet mount steps) redrawn figure
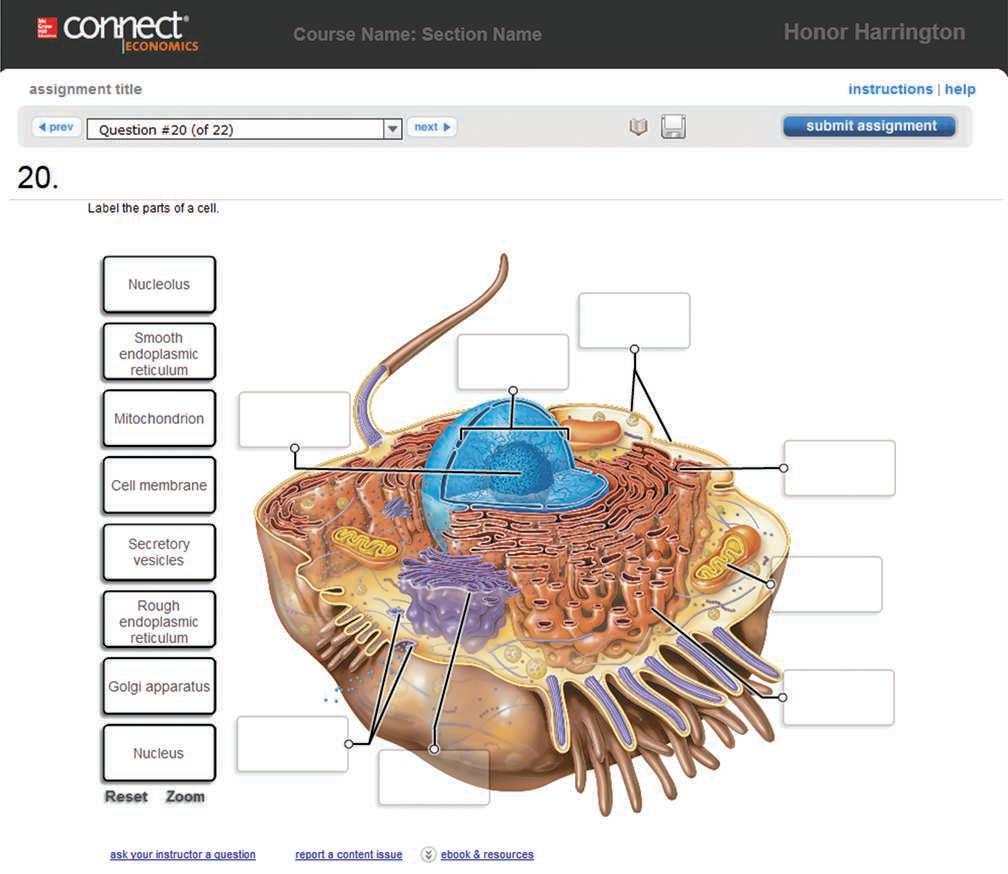
5 Introductory material figs. 5.1 and 5.4 (composite cell) table 5.1 (cellular structures and functions) fig. 5.5
6 Procedure b (osmosis) figs. 6.2 (osmosis), 6.3 (filtration), and 6.4 (water bath) assessments: Parts a, b, C, and D
7 fig. 7.3 (prophase cell) figs. 7.4 and 7.5 (mitosis phases) fig. 7.6a (chromosomes) fig. 7.7a and d (mitosis phases)
8 fig. 8.1c,d, and j (epithelial tissues) fig. 8.1g and k (epithelial tissues) table 8.1 (epithelial tissues)
Improved depth
Expanded content and labels added table new micrograph
Improved directions redrawn figures
Expanded and improved directions
revised labels redrawn figures new figure Improved leader lines
new micrographs added micrographs Expanded components
9 fig. 9.1a,b, and h (connective tissues) new micrographs
10 fig. 10.2 (nervous tissue) tables 10.1 and 10.2 (muscle and nervous tissues)
11 table 11.2 (skin glands) fig. 11.4 (fingernail) fig. 11.5d (light skin) assessments: Parts a, b, and C
13 fig. 13.1a and b (bones) assessments: Part a (bones) new figures Improved figures in color
14 fig. 14.7 (bones of orbit) fig. 14.8 (paranasal sinuses) assessments: Part D added figure redrawn figure Expanded components
15 figs. 15.1 (vertebrae) and 15.5 (rib) assessments: Part b (fig. 15.8) redrawn figures new radiograph of neck
16 fig. 16.1 (shoulder and upper limb) fig. 16.2 (clavicle) assessments: Part C (figs. 16.8 and 16.10)
redrawn figure added figure new radiographs of elbow and hand
LAborAtorY ExErCisE toPiC
CHAnGE
17 assessments: Part C (figs. 17.6, 17.7, and 17.8) new radiographs of pelvis, knee, and foot
19
20
Procedure a and table 19.1 (joints) figs. 19.2 (synovial joint) fig. 19.5a (supination/pronation) assessments: Part b (fig. 19.6) assessments: Part E (fig. 19.7)
Procedure (skeletal muscle structure and function)
fig. 20.2b (neuromuscular junction) table 20.1 (various roles of muscles) assessments: Parts b and C
Expanded and improved depth new figure new photograph redrawn joints in full color redrawn in full color and clarified movements
Expanded and improved depth added figure updated terminology and descriptions revised and expanded components
22 fig. 22.5 (scalene muscles) added figure
23 new organization
fig. 23.1 and table 23.1 (respiratory muscles) assessments: Parts a, b, C, D, and E (figs. 23.7 and 23.8)
24 table 24.1 (vertebral muscles) fig. 24.1 (vertebral column muscles) assessments: Part a (fig. 24.6) assessments: Part b
25 fig. 25.5 (deep quadriceps muscles) fig. 25.8 (lateral leg) assessments: Part D (fig. 25.11)
Content divided into Procedures a and b added figure and table new organization of components and added respiratory muscle figures
revised and expanded components Expanded and relabeled figure new figure of abdominal wall Expanded components
added figure redrawn figure added figure of leg muscles of cadaver
26 assessments: Part C (fig. 26.10) redrawn figure of surface features
27 fig. 27.4 (nervous tissue) new micrograph
28 Meninges, Spinal Cord, and Spinal nerves figs. 28.1(meninges), 28.3 (spinal cord), and 28.5 (spinal nerves) figs. 28.2 (spinal nerves), 28.4 (spinal cord), 28.6 (spinal nerves), and 28.13 (dermatomes) figs. 28.7, 28.8, 28.9, 28.10, 28.11, and 28.12 (nerve plexuses)
table 28.1 (nerve plexuses)
assessments: Parts a, b, C, and D
29 reflex arc and Somatic reflexes
Introductory material
figs. 29.1 (stretch reflex) and 29.2 (withdrawal reflex)
assessments: Part a table
30 Procedure a (cranial meninges) and fig. 30.1 (cranial meninges)
66 figs. 66.2 and 66.5 added aPr cat urinary figures
67 figs. 67.2b and 67.4b added aPr cat reproductive figures
Acknowledgments
i value all the support and encouragement by the staff at McGraw-Hill Education, including M ichael Hackett, Amy Reed, Jessica Cannavo, Fran Simon, Vicki Krug, and Sherry Kane. Special recognition is granted to Colin Wheatley for his insight, confidence, wisdom, warmth, and friendship.
I am grateful for the professional talent of contributors Brian Kipp, Cindy Prentice-Craver, and Phillip Snider Jr. for valuable updated contents to all of the laboratory exercises, including the Ph.I.L.S. Physiology Interactive Lab Simulations and the digital content. The BIOPAC® labs by Janet Brodsky have been updated, and an additional lab has been added.
I am particularly thankful to Dr. Norman Jenkins and Dr. David Louis, retired presidents of Kishwaukee College, and Dr. Thomas Choice, president of Kishwaukee College, for their support, suggestions, and confidence in my endeavors. I am appreciative for the expertise of Womack Photography for numerous contributions. The professional reviews of the nursing procedures were provided by Kathy Schnier. I am also grateful to Laura Anderson, Rebecca Doty,
reviewers
Michele Dukes, Troy Hanke, Jenifer Holtzclaw, Stephen House, Shannon Johnson, Brian Jones, Marissa Kannheiser, Morgan Keen, Marcie Martin, Angele Myska, Sparkle Neal, Bonnie Overton, Susan Rieger, Eric Serna, Robert Stockley, Shatina Thompson, Nancy Valdivia, Marla Van Vickle, Jana Voorhis, Joyce Woo, and DeKalb Clinic for their contributions. There have been valuable contributions from my students, who have supplied thoughtful suggestions and assisted in clarification of details.
To my son Ross, an art instructor, I owe gratitude for his keen eye, creative suggestions, and creative cover illustration. Foremost, I am appreciative to Sherrie Martin, my spouse and best friend, for advice, understanding, and devotion throughout the writing and revising.
Terry R. Martin
Kishwaukee College
21193 Malta Road Malta, IL 60150
I would like to express my sincere gratitude to all reviewers of the laboratory manual who provided suggestions for its improvement. Their thoughtful comments and valuable suggestions are greatly appreciated. They include the following:
Andrew E. Accardi
Central Carolina Technical College
Sharon Allen
Reading Area Community College
Bert Atsma
Union County College
Patricia Bernard
Erie Community College
Carolyn J.W. Bunde
Idaho State University
Claire M Carpenter
Yakima Valley Community College
Alan Crandall
Idaho State University
Iveta D. Dinbergs
Middlesex Community College
Anna East Gilletly
Central New Mexico Community College (CNM)
Danny J. Ebert
Boise State University
Martha Eshleman
Pulaski Technical College
David Evans
Pennsylvania College of Technology, an affiliate of the Pennsylvania State University
Mitchell A. Freymiller
University of Wisconsin–Eau Claire
Louis Giacinti
Milwaukee Area Technical College
Gary Glaser
Genesee Community College
Mark Haefele
Community College of Denver
Clare Hays
Metropolitan State College of Denver
D. J. Hennager
Kirkwood Community College
Michael A. Hill
Pennsylvania College of Technology
Anthony Holt
University of Arkansas Community College at Morrilton
Michele Iannuzzi Sucich
SUNY Orange
Alexander Ibe
Weatherford College
Mary Katherine Lockwood
University of New Hampshire
Allan L. Markezich
Black Hawk College
Herbert L. Matthews
Pulaski Technical College
Tiffany B. McFalls
Elizabethtown Community & Technical College
Igor V. Oksov
Union County College
Karen Payne
Chattanooga State Community College
Michael W. Ruhl
Vernon College
Jennifer Shaw
Polk State College
Marina G. Smitherman
Dalton State College
Paula S. Steiert
Southwest Baptist University
Avani Thaci
Malcolm X Jr. College
Eileen Walsh
Westchester Community College
Sheila M. Wicks
City Colleges of Chicago/RUSH
University Department of Clinical Anatomy and Cell Biology/ University of Illinois Department of Anatomy & Kinesiology
Ronika R. Williams
Coastal Bend College
DEDICATION
McGraw-Hill Education along with Brian Kipp, Cynthia Prentice-Craver, and Phillip Snider wish to dedicate this lab manual to Terry and Sherrie Martin.
On Tuesday, May 6, 2014, the ribbon cutting took place for the Terry & Sherrie Martin Health Careers Wing at Kishwaukee College. A highlight of the Terry & Sherrie Martin Health Careers wing is the Nursing Simulation Lab. According to Kishwaukee College:
High fidelity human patient simulators allow our students to have controlled, customized exposure to clinical events.
I consider it a true honor to have been able to work with Terry Martin for so many years. He is the epitome of an instructor, author, and friend. He and Sherrie have dedicated their lives to education. It’s a true privilege to call them friends.
Fran Simon Sr. Product Developer
Terry and Sherrie, Your dedication in teaching and support of your community is inspirational. Your hard work and generosity will be admired and genuinely appreciated by many for years to come. Congratulations!
Cindy Prentice-Craver
I am so proud to know Terry and Sherrie, who have done so much to help students become the health care professionals of tomorrow.
Two of the most genuine people I have ever met. “I am truly blessed to have met and gotten to know Terry and Sherrie. The integrity that they both show is truly inspirational.”
Phillip Snider Jr.
Terry and Sherrie Martin are two of those rare individuals who can take a sophisticated approach to solving a problem, yet keep things down to earth at the same time. I feel privileged to have them as colleagues and friends.
David Shier
Terry and Sherry Martin have always helped people achieve their dreams, as educators and now with this legacy of the Health Careers Wing at Kishwaukee. I am proud and inspired to have them as friends.
Jackie Butler
Terry’s passion for teaching is infectious and evident in his writing. His clear and approachable writing style is a perfect reflection of his personality. It is an honor to work with him.
Brian Kipp
Ricki Lewis
about tHE autHor
This laboratory manual series is by Terry R. Martin of Kishwaukee College. Terry’s teaching experience of over forty years, his interest in students and love for college instruction, and his innovative attitude and use of technology-based learning enhance the solid tradition of his other well-established laboratory manuals. Among Terry’s awards are the Kishwaukee College Outstanding Educator, Phi Theta Kappa Outstanding Instructor Award, Kishwaukee College ICCTA Outstanding Educator Award, Who’s Who Among America’s Teachers, Kishwaukee College Faculty Board of Trustees Award of Excellence, Continued Excellence Award for Phi Theta Kappa Advisors, and John C. Roberts Community Service Award. Terry’s professional memberships include the National Association of Biology Teachers, Illinois Association of Community College Biologists, Human Anatomy and Physiology Society, former
Contributors
b ri A n H. Ki PP is an associate professor in the Biomedical Sciences Department at Grand Valley State University, in west Michigan. He earned a B.S. in Biological Science from Saginaw Valley State University in 1995 and a Ph.D. in Biology from Wayne State University in 2001. At WSU Brian’s research focused on organic oxidation-reduction reactions and the generation of reactive oxygen species. Since coming to GVSU in 2002 he has been very active in the development of one- and twosemester anatomy and physiology courses and is responsible for creating the undergraduate pre-clinical A&P course sequence.
Brian has also been at the forefront of new and developing pedagogical methods of instruction. Since he began working with McGraw-Hill in 2007 he has worked with APR, authored digital content for other physiology books and LearnSmart, and served as a digital faculty consultant.
Brian has been married to his best friend Nicole since 2000, and they have three beautiful children who keep them very busy. Currently, Brian and two of his children are practitioners of the martial art of Tang Soo Do and will be testing for their black belts in 2016. Brian’s other passion is the sport of powerlifting, where he has won state, national, and world championships.
Chicago Area Anatomy and Physiology Society (founding member), Phi Theta Kappa (honorary member), and Nature Conservancy. Terry revised the Laboratory Manual to Accompany Hole’s Human Anatomy and Physiology, Fourteenth Edition, and revised the Laboratory Manual to Accompany Hole’s Essentials of Human Anatomy and Physiology, Twelfth Edition. Terry teaches portions of EMT and paramedic classes and serves as a Faculty Consultant for Advanced Placement Biology examination readings. Terry has also been a faculty exchange member in Ireland. The author locally supports historical preservation, natural areas, scouting, and scholarship. We are pleased to have Terry continue the tradition of authoring laboratory manuals for McGraw-Hill Education.
The Editor
C Y nt H i A
Pr E nti CE -Cr AVE r
is a contributing author to this third edition of Terry Martin’s laboratory manual series. At Chemeketa Community College in Oregon since 1994, Cynthia’s professional passion has been teaching Human Anatomy and Physiology. Thirteen years ago, Cynthia pioneered the development of hybrid and all-online Human Anatomy and Physiology courses. Her M.S. in Curriculum and Instruction, along with undergraduate and graduate coursework in biological sciences, were instrumental in the effective results of these nontraditional courses. She is thrilled to be using the human cadaver lab at Chemeketa Community College in her teaching of Human Anatomy and Physiology. Cynthia’s experience includes Life Sciences program chair for eight years, serving on faculty hiring and Nursing application committees, and serving as reviewer and advisor of textbooks and digital products. She is a member of the Human Anatomy and Physiology Society (HAPS). Beyond her professional pursuits, Cynthia’s passions include being active outdoors, volunteering in local schools and in youth athletics, competing in numerous half-marathons, and raising her five boys who are now young men.
P H i LL i P D. s ni DE r Jr. has been teaching Human Anatomy and Physiology at Gadsden State Community College for the last ten years. He also began teaching Human Gross Anatomy and Pathophysiology in 2008. He was instrumental in implementing the gross anatomy course and lab at his college, which distinguished it as the only community college in the state of Alabama to have two fully functional gross anatomy labs. Among Phillip’s awards are Who’s Who Among America’s Teachers, Alabama Community College Systems Chancellor’s Award inductee, Leadership Development Institute graduate at Gadsden State, and National Institute for Staff and Organizational Development Excellence Award. Phillip’s professional memberships include Human Anatomy and Physiology Society (HAPS) and the National Institute for Staff and Organizational Development. Phillip also serves as a Deputy Coroner for Calhoun County, Alabama.
tE rr Y r . M A rtin
To The STudenT
The exercises in this laboratory manual will provide you with opportunities to observe various anatomical structures and to investigate certain physiological phenomena. Such experiences should help you relate specimens, models, microscope slides, and your body to what you have learned in the lecture and read about in the textbook.
Frequent variations exist in anatomical structures among humans. The illustrations in the laboratory manual represent normal (normal means the most common variation) anatomy. Variations from normal anatomy do not represent abnormal anatomy unless some function is impaired. The following list of suggestions and study skills may make your laboratory activities more effective and profitable.
1. Prepa re yourself before attending the laboratory session by reading the assigned exercise and reviewing the related sections of the textbook and lecture notes as indicated in the pre-lab section of the laboratory exercise. Answer the pre-lab questions. It is important to have some understanding of what will be done in the lab before you come to class.
2. Be on ti me. During the first few minutes of the laboratory meeting, the instructor often will provide verbal instructions. Make special note of any changes in materials to be used or procedures to be followed. Also listen carefully for information about special techniques to be used and precautions to be taken.
3. Keep your work area clean and your materials neatly arranged so that you can locate needed items. This will enable you to proceed efficiently and will reduce the chances of making mistakes.
4. Pay pa rticular attention to the purpose of the exercise, which states what you are to accomplish in general terms, and to the learning outcomes, which list what you should be able to do as a result of the laboratory experience. Then, before you leave the class, review the outcomes and make sure that you can perform all of the assessments.
5. Precisely follow the directions in the procedure and proceed only when you understand them clearly. Do not improvise procedures unless you have the approval of the laboratory instructor. Ask questions if you do not understand exactly what you are supposed to do and why you are doing it.
6. Handle all laboratory materials with care. Some of the materials are fragile and expensive to replace. Whenever you have questions about the proper treatment of equipment, ask the instructor.
7. Treat a ll living specimens humanely and try to minimize any discomfort they might experience.
8. Although at times you might work with a laboratory par tner or a small group, try to remain independent when you are making observations, drawing conclusions, and completing the activities in the laboratory reports.
9. Record your observations immediately after making them. In most cases, such data can be entered in spaces provided in the laboratory assessments.
10. Read t he instructions for each section of the laboratory assessment before you begin to complete it. Think about the questions before you answer them. Your responses should be based on logical reasoning and phrased in clear and concise language.
11. At the end of each laboratory period, clean your work area and the instruments you have used. Return all materials to their proper places and dispose of wastes, including glassware or microscope slides that have become contaminated with human blood or body fluids, as directed by the laboratory instructor. Wash your hands thoroughly before leaving the laboratory.
Study Skills for a natomy and Physiology
Students have found that certain study skills worked well for them while enrolled in Human Anatomy and Physiology. Although everyone has his or her learning style, there are techniques that work well for most students. Using some of the skills listed here can make your course more enjoyable and rewarding.
1. Time management: Prepare monthly, weekly, and daily schedules. Include dates of quizzes, exams, and projects on the calendar. On your daily schedule, budget several short study periods. Daily repetition alleviates cramming for exams. Prioritize your tasks so that you still have time for work and leisure activities. Find an appropriate study atmosphere with minimum distractions.
2. Note taking: Look for the main ideas and briefly express them in your own words. Organize, edit, and review your notes soon after the lecture. Add textbook information to your notes as you reorganize them. Underline or highlight with different colors the important points, major headings, and key terms. Study your notes daily, as they provide sequential building blocks of the course content.
3. Chunking: Organize information into logical groups or categories. Study and master one chunk of information at
a time. For example, study the bones of the upper limb, lower limb, trunk, and head as separate study tasks.
4. Mnemonic devices: An acrostic is a combination of association and imagery to aid your memory. It is often in the form of a poem, rhyme, or jingle in which the first letter of each word corresponds to the first letters of the words you need to remember. S o L ong Top Part, Here Comes T he T humb is an example of such a mnemonic device for remembering the eight carpals in a correct sequence. Acronyms are words formed by the first letters of the items to remember. IPMAT is an example of this type of mnemonic device to help you remember the phases of the cell cycle in the correct sequence. Try to create some of your own.
5. Note cards/flash cards: Make your own. Add labels and colors to enhance the material. Keep them with you; study them often and for short periods. Concentrate on a small number of cards at one time. Shuffle your cards and have someone quiz you on their content. As you become familiar with the material, you can set aside cards that don’t require additional mastery.
6. Recording and recitation: An auditory learner can benefit by recording lectures and review sessions with a cassette recorder. Many students listen to the taped sessions as they drive or just before going to bed. Reading your notes aloud can help also. Explain the material to anyone (even if there are no listeners). Talk about anatomy and physiology in everyday conversations.
7. Study groups: Small study groups that meet periodically to review course material and compare notes have helped and encouraged many students. However, keep the group on the task at hand. Work as a team and alternate leaders. This group often becomes a support group.
Practice sound study skills during your anatomy and physiology endeavor.
the use of a nimals in biology Education*
The National Association of Biology Teachers (NABT) believes that the study of organisms, including nonhuman animals, is essential to the understanding of life on Earth. NABT recommends the prudent and responsible use of animals in the life science classroom. NABT believes that biology teachers should foster a respect for life. Biology teachers also should teach about the interrelationship and interdependency of all things.
Classroom experiences that involve nonhuman animals range from observation to dissection. NABT supports these experiences so long as they are conducted within the longestablished guidelines of proper care and use of animals, as developed by the scientific and educational community.
As with any instructional activity, the use of nonhuman animals in the biology classroom must have sound educational objectives. Any use of animals, whether for observation or dissection, must convey substantive knowledge of biology. NABT believes that biology teachers are in the best position to make this determination for their students.
NABT acknowledges that no alternative can substitute for the actual experience of dissection or other use of animals and urges teachers to be aware of the limitations of alternatives. When the teacher determines that the most effective means to meet the objectives of the class do not require dissection, NABT accepts the use of alternatives to dissection, including models and the various forms of multimedia. The Association encourages teachers to be sensitive to substantive student objections to dissection and to consider providing appropriate lessons for those students where necessary.
To implement this policy, NABT endorses and adopts the “Principles and Guidelines for the Use of Animals in Precollege Education” of the Institute of Laboratory Animals Resources (National Research Council). Copies of the “Principles and Guidelines” may be obtained from the ILAR (2101 Constitution Avenue, NW, Washington, DC 20418; 202-334-2590).
*Adopted by the Board of Directors in October 1995. This policy supersedes and replaces all previous NABT statements regarding animals in biology education.
LABORATORY
EXERCISE 1
Scientific Method and Measurements
Purpose of the Exercise
To become familiar with the scientific method of investigation, learn how to formulate sound conclusions, and provide opportunities to use the metric system of measurements.
MATERIALS NEEDED
Meterstick
Calculator
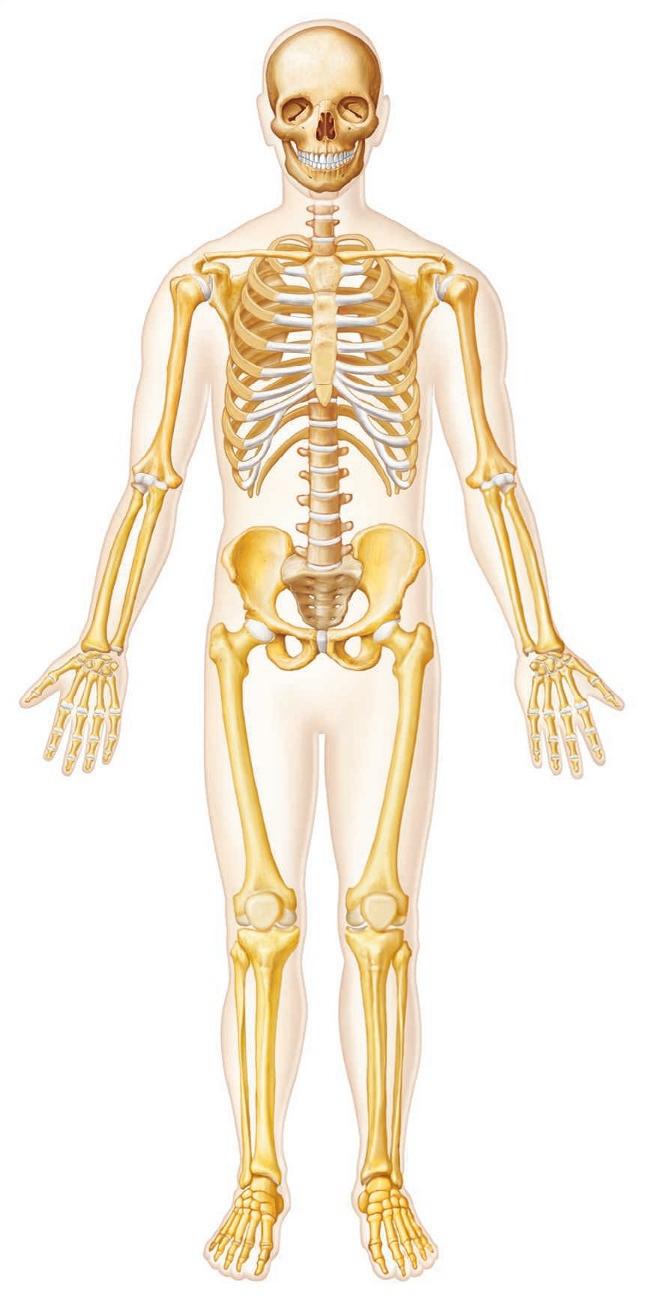
Human skeleton
Learning Outcomes
After completing this exercise, you should be able to:
O1 Convert English measurements to the metric system, and vice versa.
O2 Calculate expected upper limb length and actual percentage of height from recorded upper limb lengths and heights.
O3 Apply the scientific method to test the validity of a hypothesis concerning the direct, linear relationship between human upper limb length and height.
O4 Design an experiment, formulate a hypothesis, and test it using the scientific method.
The O corresponds to the assessments A indicated in the Laboratory Assessment for this Exercise.
Pre-Lab
Carefully read the introductory material and examine the entire lab. Be familiar with the scientific method from lecture or the textbook. Answer the pre-lab questions.
Pre-Lab Questions Select the correct answer for each of the following questions:
1. To explain biological phenomena, scientists use a technique called a. the scientific method. b. the scientific law. c. conclusions. d. measurements.
2. Which of the following represents the correct sequence of the scientific method?
a. analysis of data, conclusions, observations, experiment, hypothesis b. conclusions, experiment, hypothesis, analysis of data, observations c. observations, hypothesis, experiment, analysis of data, conclusions d. hypothesis, observations, experiment, analysis of data, conclusions
3. A hypothesis, verified continuously from experiments by many investigators, can become known as a a. control. b. variable.
c. valid result.
d. theory.
4. The most likely scientific unit for measuring the height of a person would be
a. feet.
c. inches.
b. centimeters.
d. kilometers.
5. Which of the following is not a unit of the metric system of measurements?
a. centimeters
c. inches
b. liters
d. millimeters
6. The hypothesis is formulated from the results of the experiment.
a. True _____
b. False _____
7. A centimeter represents an example of a metric unit of length.
a. True _____ b. False _____
Scientific investigation involves a series of logical steps to arrive at explanations for various biological phenomena. It reflects a long history of asking questions and searching for knowledge. This technique, called the scientific method, is used in all disciplines of science. It allows scientists to draw logical and reliable conclusions.
The scientific method begins with making observations related to the topic under investigation. This step commonly involves the accumulation of previously acquired information and/or your observations of the phenomenon. These observations are used to formulate a tentative explanation known as the hypothesis. An important attribute of a hypothesis is that it must be testable. The testing of the proposed hypothesis involves designing and performing a carefully controlled experiment to obtain data that can be used to support, reject, or modify the hypothesis. During the experiment to test the proposed hypothesis, it is important to be able to examine only a single changeable factor, known as a variable. An independent variable is one that can be changed, but is determined before the experiment occurs; a dependent variable is determined from the results of the experiment.
An analysis of data is conducted using sufficient information collected during the experiment. Data analysis may include organization and presentation of data as tables, graphs, and drawings. From the interpretation of the data analysis, conclusions are drawn. (If the data do not support the hypothesis, you must reexamine the experimental design and the data, and if needed develop a new hypothesis.) The final presentation of the information is made from the conclusions. Results and conclusions are presented to the scientific community for evaluation through peer reviews, presentations at professional meetings, and published articles. If many investigators working independently can validate the hypothesis by arriving at the same conclusions, the explanation can become
a theory. A theory serves as the explanation from a summary of known experiments and supporting evidence unless it is disproved by new information. The five components of the scientific method are summarized as
Observations
↓
Hypothesis ↓
Experiment ↓
Analysis of data ↓
Conclusions
Metric measurements are characteristic tools of scientific investigations. The English system of measurements is often used in the United States, so the investigator must make conversions from the English system to the metric system. Table 1.1 provides the conversion factors necessary to change from English to metric units.
PrOcEdurE A: using the Steps of the Scientific Method
This procedure represents a specific example of the order of the steps utilized in the scientific method. Each of the steps for this procedure will guide you through the proper sequence in an efficient pathway.
1. A correlation exists between the length of the upper and lower limbs and the height (stature) of an individual. For example, a person who has long upper limbs (the arm, forearm, and hand combined) tends to be tall. Make some visual observations of other people in your class to observe a possible correlation.
2. From such observations, the following hypothesis can be formulated: The length of a person’s upper limb is equal to 0.4 (40%) of the height of the person. To test this hypothesis, perform the following experiment.
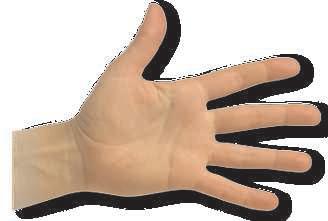
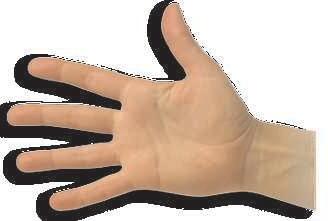
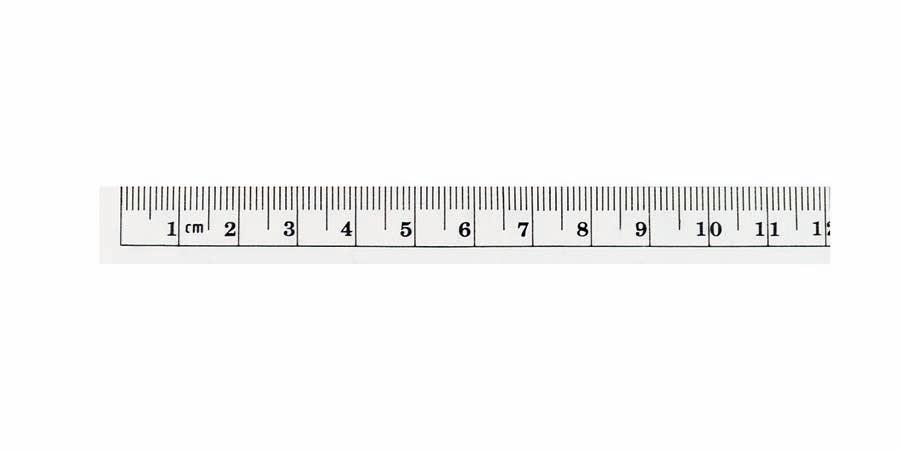
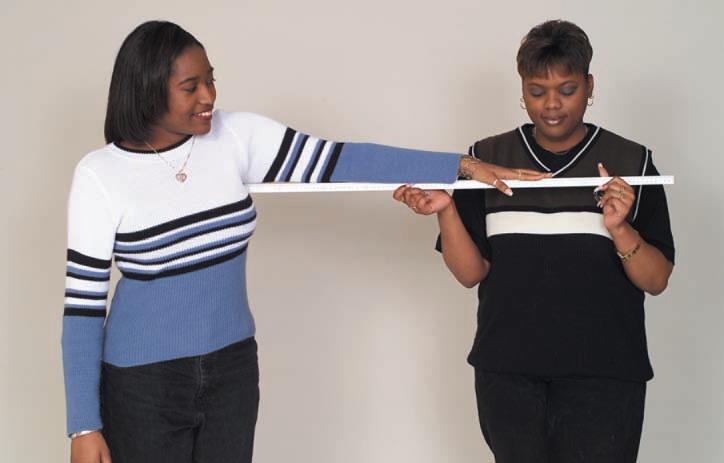
3. Use a meterstick (fig. 1.1) to measure an upper limb length of ten subjects. Place the meterstick in the axilla (armpit) and record the length in centimeters to the end of the longest finger (fig. 1.2). Obtain the height of
Figur E 1.1 Metric ruler with metric lengths indicated. a meterstick length would be 100 centimeters (10 decimeters). ( t he image size is approximately to scale.)
(liquids and gases)
(s)
millisecond (ms)0.001 (10–3) s same
Figur E 1.2 Measurement of upper limb length.
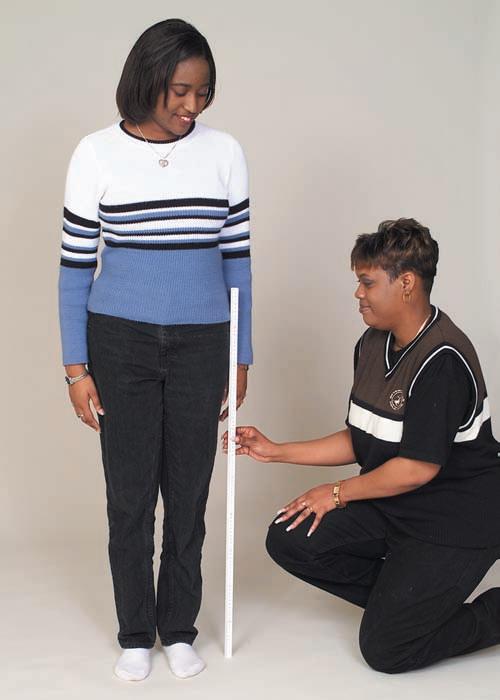
each person in centimeters by measuring them without shoes against a wall (fig. 1.3). The height of each person can also be calculated by multiplying each individual’s height in inches by 2.54 to obtain his/her height in centimeters. Record all your measurements in Part A of Laboratory Assessment 1.
4. The data collected from all of the measurements can now be analyzed. The expected (predicted) correlation between upper limb length and height is determined using the following equation:
Height × 0.4 = expected upper limb length
The observed (actual) correlation to be used to test the hypothesis is determined by
Length of upper limb/height = actual % of height
5. A graph is an excellent way to display a visual representation of the data. Plot the subjects’ data in Part A of the laboratory assessment. Plot the upper limb length of each subject on the x-axis (independent variable) and
Figur E 1.3 Measurement of height.
the height of each person on the y-axis (dependent variable). A line is already located on the graph that represents a hypothetical relationship of 0.4 (40%) upper limb length compared to height. This is a graphic representation of the original hypothesis.
6. Compare the distribution of all of the points (actual height and upper limb length) that you placed on the graph with the distribution of the expected correlation represented by the hypothesis.
7. Complete Part A of the laboratory assessment.
PrOcEdurE B: design an Experiment
You have completed the steps of the scientific method with guidance directions in Procedure A. This procedure will allow for less guidance and more flexibility using the scientific method.
critical
thiNkiNg aC ti V it Y
You have probably concluded that there is some correlation of the length of body parts to height. Often, when a skeleton is found, it is not complete. It is occasionally feasible to use the length of a single bone to estimate the height of an individual. Observe human skeletons and locate the humerus bone in an upper limb or the femur bone in a lower limb. Use your observations to identify a mathematical relationship between the length of the humerus or femur and height. Formulate a hypothesis that can be tested. Make measurements, analyze data, and develop a conclusion from your experiment. Complete Part B of the laboratory assessment.
the a corresponds to the indicated Learning outcome(s) o found at the beginning of the Laboratory Exercise. Name
Scientific Method and Measurements
PArt A: Assessments
1. Record measurements for the upper limb length and height of ten subjects. Use a calculator to determine the expected upper limb length and the actual percentage (as a decimal or a percentage) of the height for the ten subjects. Record your results in the following table. a2
* t he height of each person can be calculated by multiplying each individual’s height in inches by 2.54 to obtain his/her height in centimeters. a1
2. Plot the distribution of data (upper limb length and height) collected for the ten subjects on the following graph. The line located on the graph represents the expected 0.4 (40%) ratio of upper limb length to measured height (the original hypothesis). (The x-axis represents upper limb length, and the y-axis represents height.) Draw a line of best fit through the distribution of points of the plotted data of the ten subjects. Compare the two distributions (expected line and the distribution line drawn for the ten subjects). a3
Represents 0.4 (40%) ratio (the hypothesis)
3. Does the distribution of the ten subjects’ measured upper limb lengths support or reject the original hypothesis? ___________ Explain your answer. a3
PArt B: Assessments
1. Describe your observations of a possible correlation between the humerus or femur length and height. a4
2. Write a hypothesis based on your observations. a4
3. Describe the design of the experiment that you devised to test your hypothesis. a4
4. Place your analysis of the data in this space in the form of a table and a graph. a4
a. Table:
Humerus or femur length (centimeters) Height (centimeters)
5. Based on an analysis of your data, what can you conclude? Did these conclusions confirm or refute your original hypothesis? a4
6. Discuss your results and conclusions with classmates. What common conclusion can the class formulate about the correlation between the humerus or femur length and height? a4
LaboratorY e xercis e 2 Body Organization, Membranes, and Terminology
Purpose of the Exercise
To review the organizational pattern of the human body, to review its organ systems and the organs included in each system, and to become acquainted with the terms used to describe the relative position of body parts, body sections, and body regions.
Materials Needed
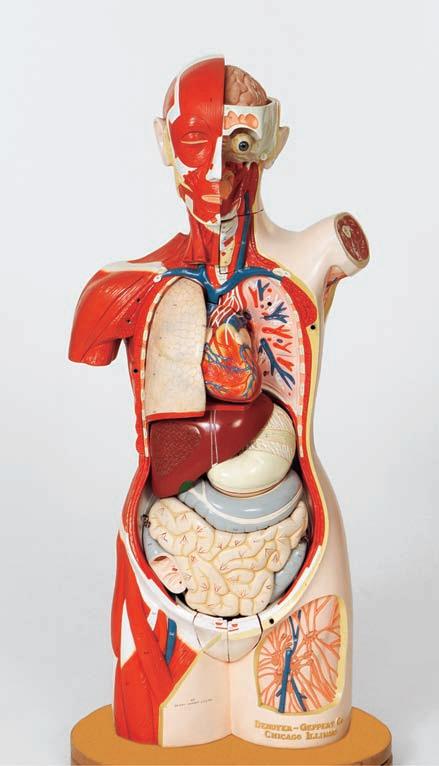
Dissectible human torso model (manikin)
Variety of specimens or models sectioned along various planes
Learning Outcomes
After completing this exercise, you should be able to:
O1 Locate and name the major body cavities and identify the membranes associated with each cavity.
O2 associate the organs and functions included within each organ system and locate the organs in a dissectible human torso model.
O3 Select the terms used to describe the relative positions of body parts.
O4 Differentiate the terms used to identify body sections and identify the plane along which a particular specimen is cut.
O5 Label body regions and associate the terms used to identify body regions.
the O corresponds to the assessments a indicated in the Laboratory assessment for this Exercise.
Pre-Lab
Carefully read the introductory material and examine the entire lab. Be familiar with body cavities, membranes, organ systems, and body regions from lecture or the textbook. Answer the pre-lab questions.
Pre-Lab Questions Select the correct answer for each of the following questions:
1. The basis for communication in anatomy and physiology assumes a. the person is lying down. b. relative positions.
c. anatomical position. d. the person is sleeping.
2. Which of the following is not a body cavity?
a. diaphragm b. thoracic
c. cranial d. abdominopelvic
3. The pericardium is associated with the a. lung. b. intestine.
c. liver. d. heart.
4. The ____________ plane divides the body into left and right sides. a. frontal b. cranial
c. sagittal d. transverse
5. The abdominopelvic cavity can be subdivided into a. pleural cavities. b. pericardial cavities.
c. quadrants. d. vertebral canals.
6. The larynx is part of the ________________ system.
a. urinary b. respiratory
c. lymphatic d. nervous
7. The epigastric region is a portion of the ________ cavity.
a. pelvic
c. vertebral
b. pleural
d. abdominal
8. The brachial surface region pertains to the wrist.
a. True _____
b. False _____
9. A frontal plane divides the body into anterior and posterior parts.
a. True _____
b. False _____
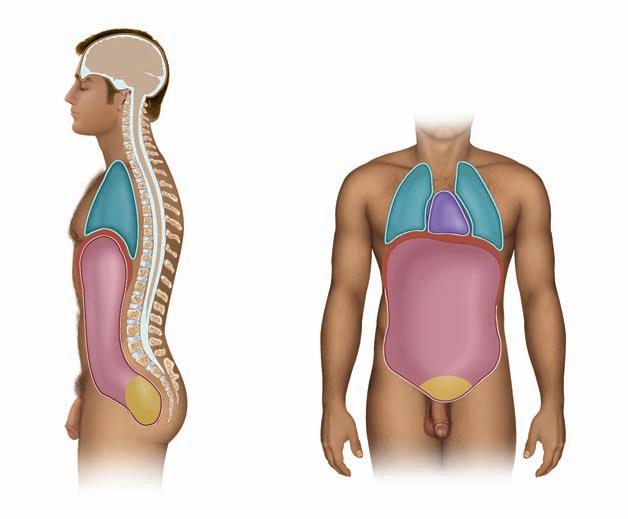
The major features of the organization of the human body include certain body cavities. The dorsal body cavity includes a cranial cavity containing the brain and a vertebral canal (spinal cavity) containing the spinal cord. The ventral body cavity includes the thoracic cavity, which is subdivided into a mediastinum containing primarily the heart, esophagus, and trachea. The thoracic cavity also includes two pleural cavities, each surrounding a lung. Also included in the ventral body cavity is the abdominopelvic cavity, composed of an abdominal cavity and pelvic cavity. The entire abdominopelvic cavity is further subdivided into either nine regions or four quadrants. The large size of the abdominopelvic cavity, with its many visceral organs, warrants these further subdivisions into regions or quadrants for convenience and for accuracy in describing organ locations, injury sites, and pain locations.
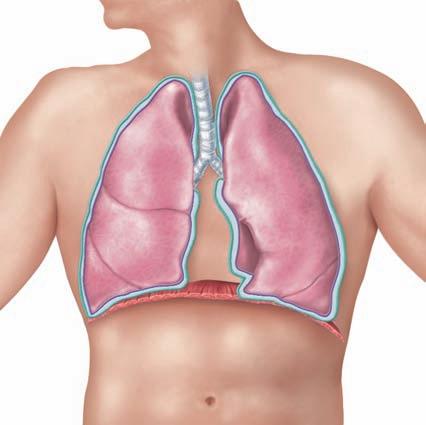
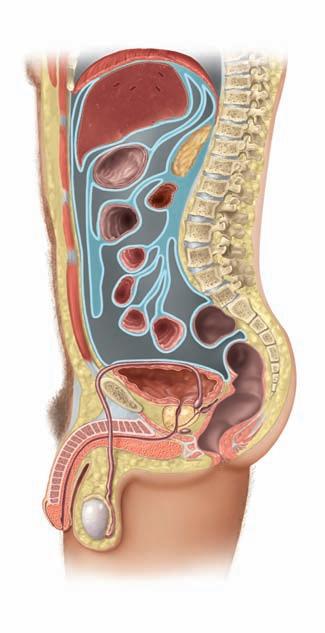
Located within the ventral body cavities are thin serous membranes containing small amounts of a lubricating serous fluid. The double-layered membranes that secrete this fluid include the pericardium, pleura, and peritoneum. The pericardium is associated with the heart; the pleura is associated with a lung; the peritoneum is associated with the viscera
Dorsal body cavity:
Cranial cavity
Vertebral canal
Ventral body cavity:
Thoracic cavity
Diaphragm
Abdominopelvic cavity:
Abdominal cavity
Pelvic cavity
located in the abdominopelvic cavity. The inner portion of each membrane attached to the organ is the visceral component, whereas the outer parietal portion forms an outer cavity wall. Several abdominopelvic organs, such as the kidneys, are located just behind (are retroperitoneal to) the parietal peritoneum, thus lacking a mesentery.
Although the human body functions as one entire unit, it is customary to divide the body into eleven body organ systems. In order to communicate effectively with each other about the body, scientists have devised anatomical terminology. Foremost in this task we use anatomical position as our basis for communication, including directional terms, body regions, and planes of the body. A person in anatomical position is standing erect, facing forward, with upper limbs at the sides and palms forward. This standard position allows us to describe relative positions of various body parts using such directional terms as left-right, anterior (ventral)-posterior (dorsal), proximal-distal, and superiorinferior. Body regions include certain surface areas, portions of limbs, and portions of body cavities. In order to study internal structures, often the body is depicted as sectioned into a sagittal plane, frontal plane, or transverse plane.
PrOcEdurE A: Body cavities and Membranes
This procedure outlines the body cavities by location. Certain cavities contain thin layers of cells, called membranes, that line the cavity and cover the organs within the cavity. The figures included in Procedure A will allow you to locate and identify the associated membrane location and name appropriate for the cavity and the organs involved.
1. Study figures 2.1, 2.2, and 2.3 to become familiar with body cavities and associated membranes.
Thoracic cavity:
Pleural cavity
Mediastinum
Pericardial cavity
Diaphragm
Abdominopelvic cavity:
Abdominal cavity
Pelvic cavity
Figur E 2.1 Major body cavities: (a) left lateral view; (b) anterior view.
Figur E 2.2 t horacic membranes and cavities associated with (a) the lungs and (b) the heart.
Parietal pleura— lines cavity wall
Visceral pleura—covers lung
Pleural cavity
Lung
Diaphragm (a)
2. Locate the following features on the dissectible human torso model (fig. 2.4):
• mediastinum—region between the lungs; includes pericardial cavity
• pleural cavities (2)
abdominopelvic cavity
• abdominal cavity
• pelvic cavity
diaphragm—separates thoracic and abdominopelvic cavities; functions in respiration smaller cavities within the head
oral cavity
Parietal pericardium— outer
Visceral pericardium—inner
Pericardial cavity
Heart
Diaphragm
nasal cavity with connected sinuses
orbital cavity
middle ear cavity
membranes and cavities
pleural cavity—associated with lungs
• parietal pleura—lines cavity wall
• visceral pleura—covers lungs
pericardial cavity—associated with heart
• parietal pericardium—covered by fibrous pericardium
• visceral pericardium (epicardium)—covers heart
peritoneal cavity—associated with abdominal organs
• parietal peritoneum—lines cavity wall
• visceral peritoneum—covers organs
3. Complete Part A of Laboratory Assessment 2.
(b)
Visceral peritoneum—covers organ
Peritoneal cavity
Greater omentum
Parietal peritoneum—lines cavity wall
Figur E 2.3 Serous membranes of the abdominal cavity are shown in this left lateral view.
Diaphragm
Liver
Pancreas
Stomach
Duodenum of small intestine
Large intestine
Small intestine
Mesentery
Urinary bladder
Rectum
plane
Figur E 2.4 Dissectible human torso model with body cavities, abdominopelvic quadrants, body planes, and major organs indicated. t he abdominopelvic quadrants include right upper quadrant (rUQ), left upper quadrant (LUQ), right lower quadrant (rLQ), and left lower quadrant (LLQ).
Cranial cavity— houses brain
Thoracic cavity
Arm—transverse plane
Diaphragm
Abdominopelvic cavity
Ar tery Vein
Head—sagittal plane
Brain
Larynx
Thyroid gland
Lung— frontal plane
Heart
Liver Stomach
Gallbladder
Large intestine (transverse colon)
Small intestine
Lymph node
Left Right
Sagittal
LLQ RLQ
LUQ RUQ
PrOcEdurE B: Organ Systems
The eleven body systems are listed in this procedure, and a major function of each system is included. Representative major organs are listed within each of the systems. By using models and charts to locate each major organ included within the system, you will have an early overview of each system of the human body. More detailed organs and functions are covered within each system during later laboratory exercises.
1. Use the dissectible human torso model (fig. 2.4) to locate the following systems and their major organs:
integumentary system—protection skin—composed of epidermis and dermis accessory organs—such as hair and nails
skeletal system—support and protection
bones—in head, torso, and limbs
ligaments—connect bones to bones muscular system—movement
skeletal muscles—allow voluntary movements tendons—connect muscles to bones nervous system—detects changes; interprets sensory information; stimulates muscles and glands
brain—within cranial cavity
spinal cord—extends through vertebral canal nerves—conduct impulses into and from brain and spinal cord
endocrine system—secretes hormones
pituitary gland—attached to base of brain
thyroid gland—anterior neck; inferior to larynx
parathyroid glands—four glands; embedded on posterior thyroid gland
adrenal glands—located superior to kidneys pancreas—most in LUQ; influence blood sugar ovaries—in females; produce reproductive hormones
testes—in males; produce testosterone
pineal gland—small gland within brain thymus—within mediastinum
cardiovascular system—transports gases, nutrients, and wastes
heart—muscular pump for blood arteries—transport blood away from heart veins—transport blood back to heart
lymphatic system—immune cell production and return tissue fluid to blood lymphatic vessels—carry lymph fluid
lymph nodes—along lymphatic vessels; help fight infections
thymus—within mediastinum
spleen—large organ in LUQ
respiratory system—gas exchange between air and blood
nasal cavity—superior to mouth cavity
pharynx—passage for air superior to larynx
larynx—anterior neck; houses vocal cords
trachea—tube between larynx and bronchi
bronchi—airway tubes within lungs
lungs—large organs within thoracic cavity
digestive system—food breakdown and absorption
mouth—contains tongue and teeth
tongue—for food manipulation
teeth—for biting and chewing food
salivary glands—secrete saliva into mouth
pharynx—passageway for food superior to esophagus
esophagus—tube from pharynx to stomach
stomach—between esophagus and small intestine; in LUQ
liver—produces bile; in RUQ
gallbladder—stores bile; in RUQ
pancreas—produces digestive enzymes; most in LUQ
small intestine—tube from stomach to large intestine
large intestine—tube from small intestine to anus
urinary system—removes liquids and wastes from blood
kidneys—two large organs in upper adominopelvic cavity
ureters—tubes from kidneys to urinary bladder
urinary bladder—pelvic organ; stores urine
urethra—tube from urinary bladder to external opening
male reproductive system—sperm production scrotum—encloses testes
testes—produces sperm and hormones
penis—external reproductive organ
urethra—transports semen and urine
female reproductive system—egg production and fetal development
ovaries—produce eggs and hormones
uterine tubes (oviducts; fallopian tubes)— transport eggs
uterus—muscular organ in pelvis; structure for fetal development
vagina—tube from uterus to external opening
2. Complete Part B of the laboratory assessment.
PrOcEdurE c: relative Positions, Planes,
and regions
This procedure illustrates and incorporates planes (sections), abdominopelvic subdivisions, and surface regions using the anatomical position of the human body. Communications and directions for anatomical study assume the person is in an anatomical position.
Anatomical planes (sections; cuts) of the entire body and individual organs allow a better understanding of the internal structure and function. Sectional anatomy is accomplished by cutting the body in standard ways to maximize the view of the particular organ. The anatomical planes include the sagittal, frontal, and transverse sections or cuts. Radiologic images by such techniques as a CT (computed tomography) scan or an MRI (magnetic resonance imaging) are examples of the advances and the importance of sectional anatomy for the diagnosis and treatment of medical situations.
The abdominopelvic area of the body is rather large and contains numerous viscera representing structural and functional parts of several body systems. People with abdominopelvic discomfort will often complain about it using terms like a “stomach ache.” This is too general a term to be used for medical tests and procedures. Therefore, this abdominopelvic portion of the body is further subdivided into four quadrants and/or nine regions. Some medical disciplines prefer the use of quadrants, while others prefer the more specific use of the regions.
The general surface of the entire body is subdivided into regions using anatomical terms appropriate for that particular portion of the body. This becomes helpful for descriptions of injuries or pain locations that are more specific than using broader general terms such as head, neck, and upper limb, for example.
1. Observe the person standing in anatomical position (fig. 2.5). Anatomical terminology assumes the body is in anatomical position even though a person is often observed differently.
2. Study figures 2.6, 2.7, and 2.8 to become familiar with anatomical planes, abdominopelvic quadrants and regions, and body surface regions.
3. Examine the sectioned specimens on the demonstration table and identify the plane along which each is cut.
4. Complete Parts C, D, and E of the laboratory assessment.
Figur E 2.5 a natomical position with dire ctional terms indicated. t he body is standing erect, face forward, with upper limbs at the sides and palms forward. When the palms are forward (supinated) the radius and ulna in the forearm are nearly parallel. t his results in an anterior view of the body. t he relative positional terms are used to describe a body part’s location in relation to other body parts.