Visit to download the full and correct content document: https://ebookmass.com/product/ebook-pdf-new-perspectives-microsoft-office-365-acc ess-2019-comprehensive/
More products digital (pdf, epub, mobi) instant download maybe you interests ...
New Perspectives Microsoft Office 365 & Access 2019
Comprehensive 1st Edition Mark Shellman
https://ebookmass.com/product/new-perspectives-microsoftoffice-365-access-2019-comprehensive-1st-edition-mark-shellman/
eTextbook 978-1305880139 New Perspectives Microsoft Office 365 & Access 2016: Comprehensive
https://ebookmass.com/product/etextbook-978-1305880139-newperspectives-microsoft-office-365-access-2016-comprehensive/
New Perspectives Microsoft Office 365 & Office 2019
Introductory 2019th Edition Patrick Carey
https://ebookmass.com/product/new-perspectives-microsoftoffice-365-office-2019-introductory-2019th-edition-patrick-carey/ Microsoft Office 365 & Outlook 2019 : comprehensive Corinne Hoisington
https://ebookmass.com/product/microsoftoffice-365-outlook-2019-comprehensive-corinne-hoisington/
New Perspectives Microsoft Office 365 & Excel 2016: Intermediate 1st Edition
https://ebookmass.com/product/new-perspectives-microsoftoffice-365-excel-2016-intermediate-1st-edition/
eTextbook 978-1305880412 New Perspectives Microsoft Office 365 & Excel 2016: Intermediate
https://ebookmass.com/product/etextbook-978-1305880412-newperspectives-microsoft-office-365-excel-2016-intermediate/
Microsoft Office 365 : Office 2016, intermediate Freund
https://ebookmass.com/product/microsoftoffice-365-office-2016-intermediate-freund/
Microsoft Office 365 : Office 2016 : introductory Freund
https://ebookmass.com/product/microsoftoffice-365-office-2016-introductory-freund/
Shelly Cashman Series Microsoft Office 365 & Excel 2019
Comprehensive (MindTap Course List) 1st Edition Steven M. Freund
https://ebookmass.com/product/shelly-cashman-series-microsoftoffice-365-excel-2019-comprehensive-mindtap-course-list-1stedition-steven-m-freund/
Working with the Navigation Pane ...........
Session 3.2 Quick Check
AC 3-53
AC 3-55
Review Assignments ... . ........... . ...... AC 3-56
Case Problems AC 3-57
Module 4 Creating Forms and Reports
Usi n g Fo rms a nd Re p o rts to Dis play
Patient an d Vis it Dat a AC 4-1
Session 4.1 Visua l Overview:
Form Displayed in Form View
AC 4-2
Creating a Form Using the Form Wizard ........ AC 4-4
Modifying a Form's Design in Layout View AC 4-7
Applying a Theme to a Database Object ...... AC 4-7
Module 5 Creating Advanced Queries and Enhancing Table Design M aki ng the C lin ic Da t abase Easier t o Use
AC 5-1
Session 5.1 Visual Overview: Calcu lated Field AC 5-2
Reviewing the Clinic Database AC 5-4
Using a Pattern Match in a Query AC 5-5
Using a List-of-Va l ues Match in a Query AC 5-8
Using the Not Logical Operator in a Query AC 5-9
Using an AutoFilter to Filter Data AC 5-10
Assigning a Conditional Value to a Calculated Field AC 5-13
Creating a Parameter Query ... . ........... . AC 5-17
Add in g a Picture to a Form.··············AC 4-1 1 Creating a More Flexib le Parameter Query ... AC 5-19
Changing the Co lor of Text on a Form AC 4-13 Session 5.1 Qu ick Check AC 5-21
Navigating a Form ........................ AC 4-15
Finding Data Using a Form ·
Session 5.2 Visual Overview:
AC 4-16 Advanced Query Wizards AC 5-22
Maintaining Table Data Using a Form AC 4-19 Creati ng a Crosstab Query AC 5-24
Previewing and Printing Selected c · F. d D 1· Q AC 5 30 reat1ng a m up 1cates uery -
Form Records ............................ AC 4-20 C . F' d U h d Q AC 5 32 reat1ng a m nmatc e uery
Creating a Form with a Main Form
Creating a Top Values Query ... .
. AC 5-34 and a Subform AC 4-22
Session 4.1 Quick Check AC 4-27
Session 5.2 Quick Check ....... . ........... AC 5-35
Sess ion 5.3 Visua l Overview:
Session 4.2 Visual Overview: Lookup Fields and Input Masks . . . . ......... . AC 5-36
Report Displayed in Print Preview AC 4-28 Creati ng a Lookup Field ....................
Creating a Report Using the Report Wizard
Modifying a Report's Design in Layout View AC 4-34
Applying a Theme to a Report ............ AC 4-34
Changing the Alignment of Field Va lues AC 4-35
Moving and Resizing Fields on a Report AC 4-36
Changing the Font Color and Inserting P
5-38
5-42
Identifyi ng Object Dependencies AC 5-47
Defining Data Validation Rules AC 5-48
Defining Field Val idation Ru les
Using Conditional Formatting in a Report. AC 4-39 Designating a Trusted Folder ..
Session 4.2 Quick Check
Review Assignments ......................
Session 5.3 Quick Check ...................
Assignments AC 5-58
Module 6 Using Form Tools and Creating Custom Forms
Creating Forms for Lakewood Community Health Services ..................... AC 6-1
Session 6.1 Visual Overview:
Anchoring Contro ls ....... . ................
AC 6-2
Designing Forms ......... . ................ AC 6-4
Changing a Lookup Field to a Short Text field ......................... AC 6-4
Creating a Relationship Report and Using the Documenter
AC 6-7
Creating Forms Using Form Tools ........ . ... AC 6-1 1
Creating a Form Using the Data sheet Tool
Creating a Form Using the Multiple Items Tool
Creating a Form Using the Split Form Too l
AC 6-11
AC 6-13
AC 6-14
Modifying a Split Form in Layout View AC 6-15
Anchoring Contro ls in a Form
Session 6.1 Quick Check . ..
Session 6.2 Visua l Overview:
Custom Form in Design View
AC 6-19
6-21
6-22
Planning and Designing a Custom Form ....... AC 6-24
Creating a Custom Form in Design View AC 6-24
Working in the Form Window in Design View .
AC 6-25
Adding Fields to a Form AC 6-27
Selecting, Moving, and Aligning Form Con t ro ls AC 6-28
Resizing and Deleting Controls AC 6-32
Adding a Combo Box Control to a Form ...
6-34
Using Form Headers and Form Footers AC 6-40
Adding a Tit le to a Form AC 6-41
Session 6.2 Quick Check AC 6-43
Session 6.3 Visual Overview:
Custom Form in Form View AC 6-44
Adding a Combo Box to Find Records
Adding a Subform to a Form ................ AC 6-50
Displaying a Subform's Calcu lated
Controls in the Main Form AC 6-53
Adding Calcu lated Contro ls to a Subform's Form Footer Section
Adding Calculated Controls to a Main Form
Resizing, Moving, and Formatting Calculated Controls
Changing the Tab Order in a Form
6-56
6-58
6-61 Improving a Form's Appearance
Adding a Rectangle to a Form
Modifying the Visual Effects of the Controls in a Form
Session 6.3 Quick Check
Assignments
Module 7 Creating Custom Reports Creating Custom Reports for Lakewood Community Health Services . ...
Session 7. 1 Visua l Overview: Report Sections
Customizing Existing Reports ................
Viewing
7-2
Creating a Custom Report . . . ...............
Sorting and Grouping Data in a Report
Working with Controls in Design View
H.d. D 1· t v 1 · R t
AC 7-25 Session 8.2 Visual Overview:
AC 7-27
Tabbed Control with a Chart
AC 7-32 Using a Tab Control in a Form
1 mg up 1ca e a ues m a epor -
Session 7.2 Quick Check ... . ...............
Session 7.3 Visual Overview:
Custom Form in Design View
AC 7 38
Creating a Chart Using the Chart Wizard ......
AC 7-39 Using Temp lates and Application Parts ........
Exporting a Report to a PD F File .............
AC 8-24
AC 8-26
AC 8-30
AC 8-36
AC 8-40
AC 7-40
Integrating Access with Other Applications
Understanding Page Header and Linking Data from an Excel Worksheet.
Page Footer Sections
Adding the Date to a Report
Adding Page Numbers to a Report
Adding a Report Title to a Page Header Section
Creating Mailing Labels
Session 7.3 Quick Check
Review Assignments
Case Problems
AC 7-42 Sess ion 8.2 Quick Check
AC 7-42 Review Assignments
AC 7-46 Case Problems
AC 7-48
AC 7-50
AC 7-54
AC 7-55
AC 7-56
Module 8 Sharing, Integrating, and Analyzing Data
Importing , Exporting, Linking, and Analyzing Data in the Clinic Database .....................
Session 8.1 Visual Overview:
Exporting Data to XM L and HTML
Exporting an Access Query to an HTML Document
Viewing an HTML Document in a Web Browser
Importing a CSV Fi le as an Access Table . .......
Analyzing a Table with the Table Ana lyzer
Working with XML Files
Importing Data from an XM L File
Saving and Running Import Specifications ...
Exporting an Access Table as an XML File
AC 8-1
AC 8-2
AC 8-4
AC 8-6
AC 8-7
AC 8-1 1
AC 8-12
AC 8-13
AC 8-14
AC 8-17
Saving and Running Export Specifications . . . AC 8-20
Session 8.1 Quick Check
AC 8-42
AC 8-43
AC 8-47
AC 8-48
AC 8-49
Module 9 Using Action Queries and Advanced Table Relationships
Enhancing User Interaction with the Health Database ...
..........
AC 9-1
Session 9.1 Visual Overview:
Action Queries ............................
AC 9-2
Action Queries ............................
Crea ti ng a Make-Table Query
Creati ng an Append Query ...............
AC 9-4
AC 9-5
AC 9-9
Creati ng a De lete Query .... . .. . ........ . AC 9-12
Creating an Update Query ... . ........... AC 9-15
Sess ion 9.1 Quick Check
Session 9.2 Visual Overview:
Many-to-Many Re lationship .................
Understanding Types of Table Relationships
Many-to-Many Relationships
One-to-One Relationships
Defining M:N and 1:1 Relationships Between Tables
Understanding Join Types
Inner and Outer Joins
Self-Joins
Using Indexes for Table Fields
AC 8-23
Creating an Index
AC 9-17
AC 9-18
AC 9-20
AC 9-21
AC 9-22
AC 9-24
AC 9-27
AC 9-27
AC 9-31
AC 9-36
AC 9-39
Session 9.2 Quick Check ... . ............... AC 9-4 1
Review Assignments AC 9-42
Case Problems . ...................... . ... AC 9-43
Module 10 Automating Tasks with Macros
Creating a User Interface for the Health D at abase ............... ....... ...
Session 10.1 Visua l Overview:
Module 11 Using and Writing Visual Basic for Applications Code
VBA Code for the He alth D atab ase
10-1
Session 11.1 Visua l Overview: The Mac ro Designer Window
Int roduction to Macros
Running a Macro
Viewing a Macro in the Macro Designer
Using a Command Button with an
Adding a Submacro ......................
Adding a Command Button to a Form
Attach ing a Submacro to a
Session 10.1 Quick Check
Session 10.2 Visual Overview: A Navigation Form
Designing a User Interface.. .
Creating an Unbound Form
Adding a List Box Control to a Form
Viewing a SOL Statement for a Query
Using a SO L Statement for a List Box Control.
Creating Multiple Macros for a Form
Creating a Navigation Form
Session 10.2 Quick Check
10-2
10-4
10-4
10-6
10-7
10-7
10-12
to Visual Basic for Applications
11.1 Quick Check
10-18
10-21 Session 11.2 Visual Overview:
10-22 Understanding How an Event
10-26
10-30
10-32 Designing the Field Validation Procedure
Adding a Field Value Event Procedure
10 35 Adding an Event Procedure to Change the Case of a Field Value
10-40
10-45
10-49
Hiding a Control and Changing a
Session 11.2 Quick Check
Review Assignments
Module 12 Managing and Securing a Database Administering the Health Database
Session 12.1 Visual Overview:
Multivalued Fields and Subqueries
Additional Filtering Options
Saving a Filter as a Query
Creating a Subquery
Using Multivalued Fields
Session 12.1 Quick Check .................
11-37 Session 12.2 Quick Check .................
11-38 Review Assignments
Session 12.2 Visual Overview: Appendix A Relational Databases and Database
12-1
12-2
12-4
12-5
12-8
12-11
12-14
12-21
Saving an Access Database as a First Norma l Form
12-29
Introduction to Database Concepts
Be for e you beg in using Access to c rea te th e database f o r Donn a, you need t o understand a few key terms and concepts associated with databases.
Organizing Data
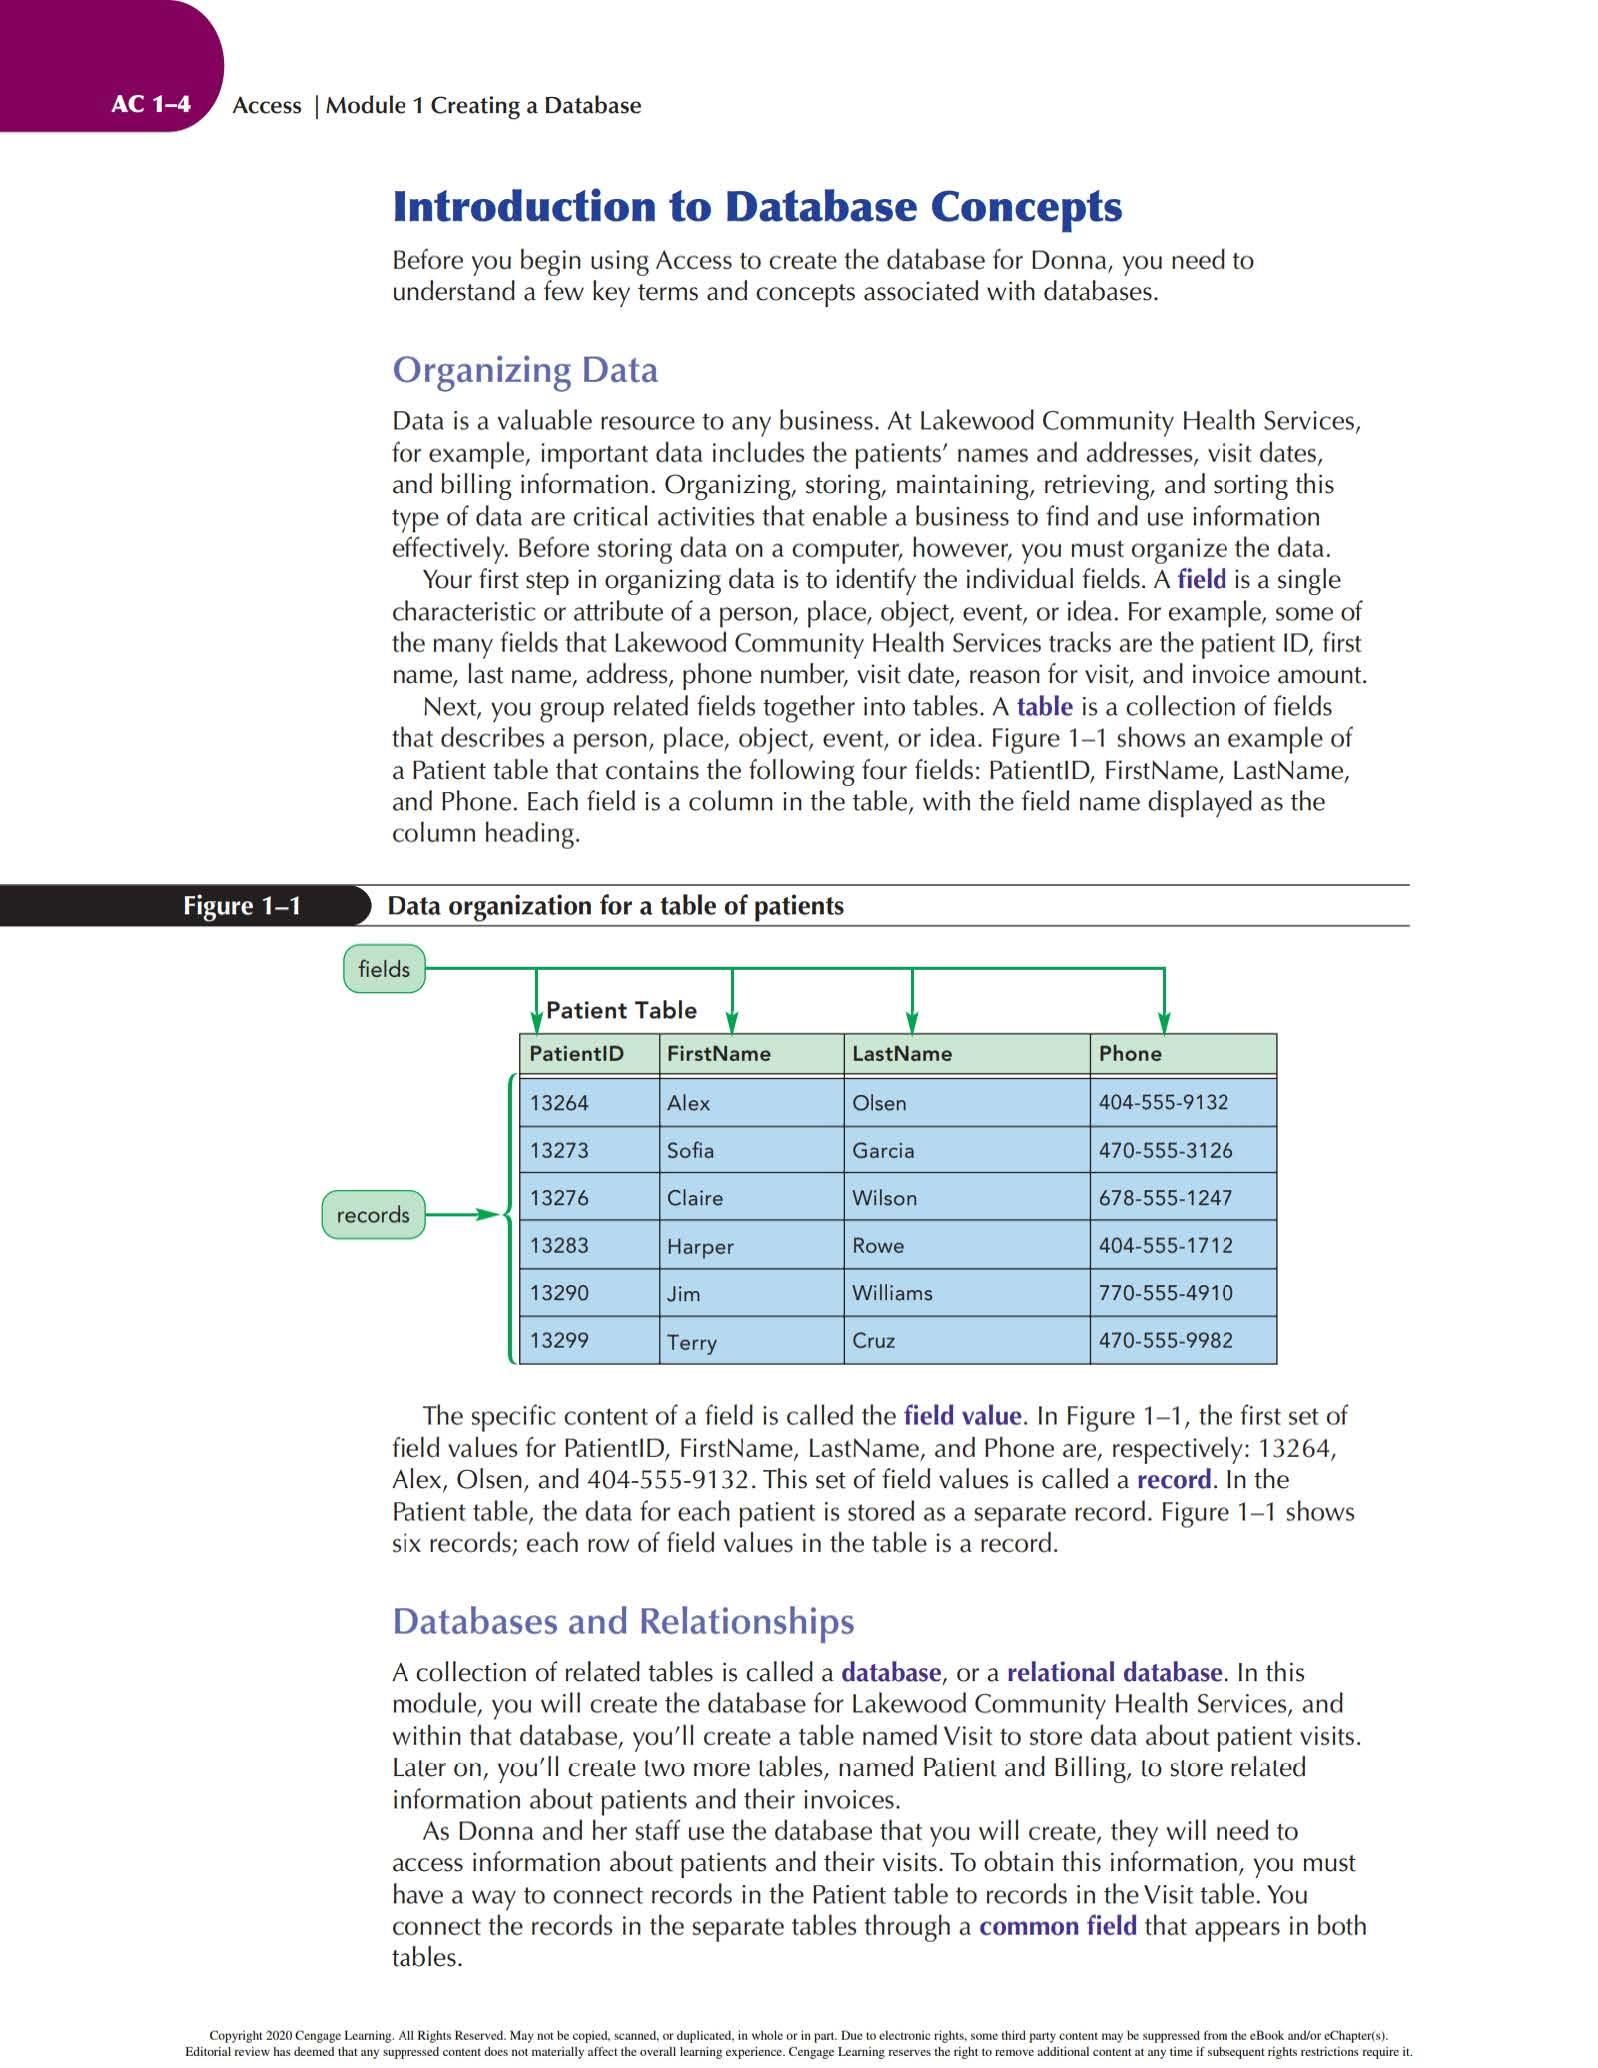
D ata i s a v a lu abl e resource to a ny bu sin ess At Lakew oo d C o mmunity H ea lth Servi c es, for e xa mpl e, impo rt ant data includes th e p ati ents' nam es and addresses, v isit d ates, and billing information. Organizing, st or in g, maintaining, retrieving, and sorting this typ e of data are c riti ca l ac tiviti es th at en ab le a bu siness to find and use inform ation effectiv el y. Be fo re sto rin g d ata o n a co mpute r, ho w eve r, you mu st orga ni ze th e d at a You r first step in organizing data i s to identify th e individual field s A field i s a single charac teri sti c or attribute of a person , place, object , event, or i dea For example, some of th e m any fi elds th at Lakew ood Community H ea lth Se rvi ces trac ks are th e p ati ent ID, first name, last name, address, phone number, visit date, reason for visi t, and invoice amount. N ext, you group rel ated field s to geth er in to tabl es A table i s a c ol lection of fi e l d s th at desc rib es a pe rson, pl ace, o bj ect , ev ent, or idea Fi gure 1- 1 sho w s an e xa mpl e of a Patient t abl e that conta in s the follow in g four field s: PatientiD, FirstName, Las tNam e, and Phone. Eac h field is a c o lu mn in the tab l e, w ith the fie l d nam e di splayed as the co l umn h eadin g.
Data organization for a table of patients l' fields )
Te rry Cruz
Th e sp ec ifi c content o f a fi eld i s call ed th e field value In Fi gure 1- 1, th e first set o f fi el d valu es for Pati entiD, FirstN ame, La stNam e, and Phon e are, resp ectively : 132 64, Alex, Ol sen, and 404- 55 5-91 3 2. Thi s set of field value s i s c alled a record In the Pati ent tabl e, th e d at a for eac h p a ti e nt i s st o red as a separate record. Fi gu re 1- 1 sho w s si x reco rd s; eac h row of fi e ld v alues in th e t abl e i s a record .
Databases and Relationships
A co l lection of related table s is c al led a database, or a relational database In thi s mo dul e, you wil l c rea te th e datab ase fo r Lakewo o d Co mmunity Health Servi ces, and w ithin th a t da tab ase, yo u' ll c rea te a tabl e nam ed Vi sit to store dat a about pati ent v i sits Laler on , you'll c reale Lwo more Lable s, named Palienl and Billing, Lo slore relaled info rm ati o n abo ut p ati ents and th eir invoices
A s D o nn a and he r staff u se th e d atab ase that y ou will c reat e, th ey will need to access i nformation about patients and their vis i ts. To obtain thi s i nformation, you mu st hav e a w ay to c onnec t records in the Pati e nt t able to record s in th e Vi sit t abl e You conn ec t th e record s in th e sep arate tab les throu gh a common field th at appea r s in b o th table s
( p rimary keys )-
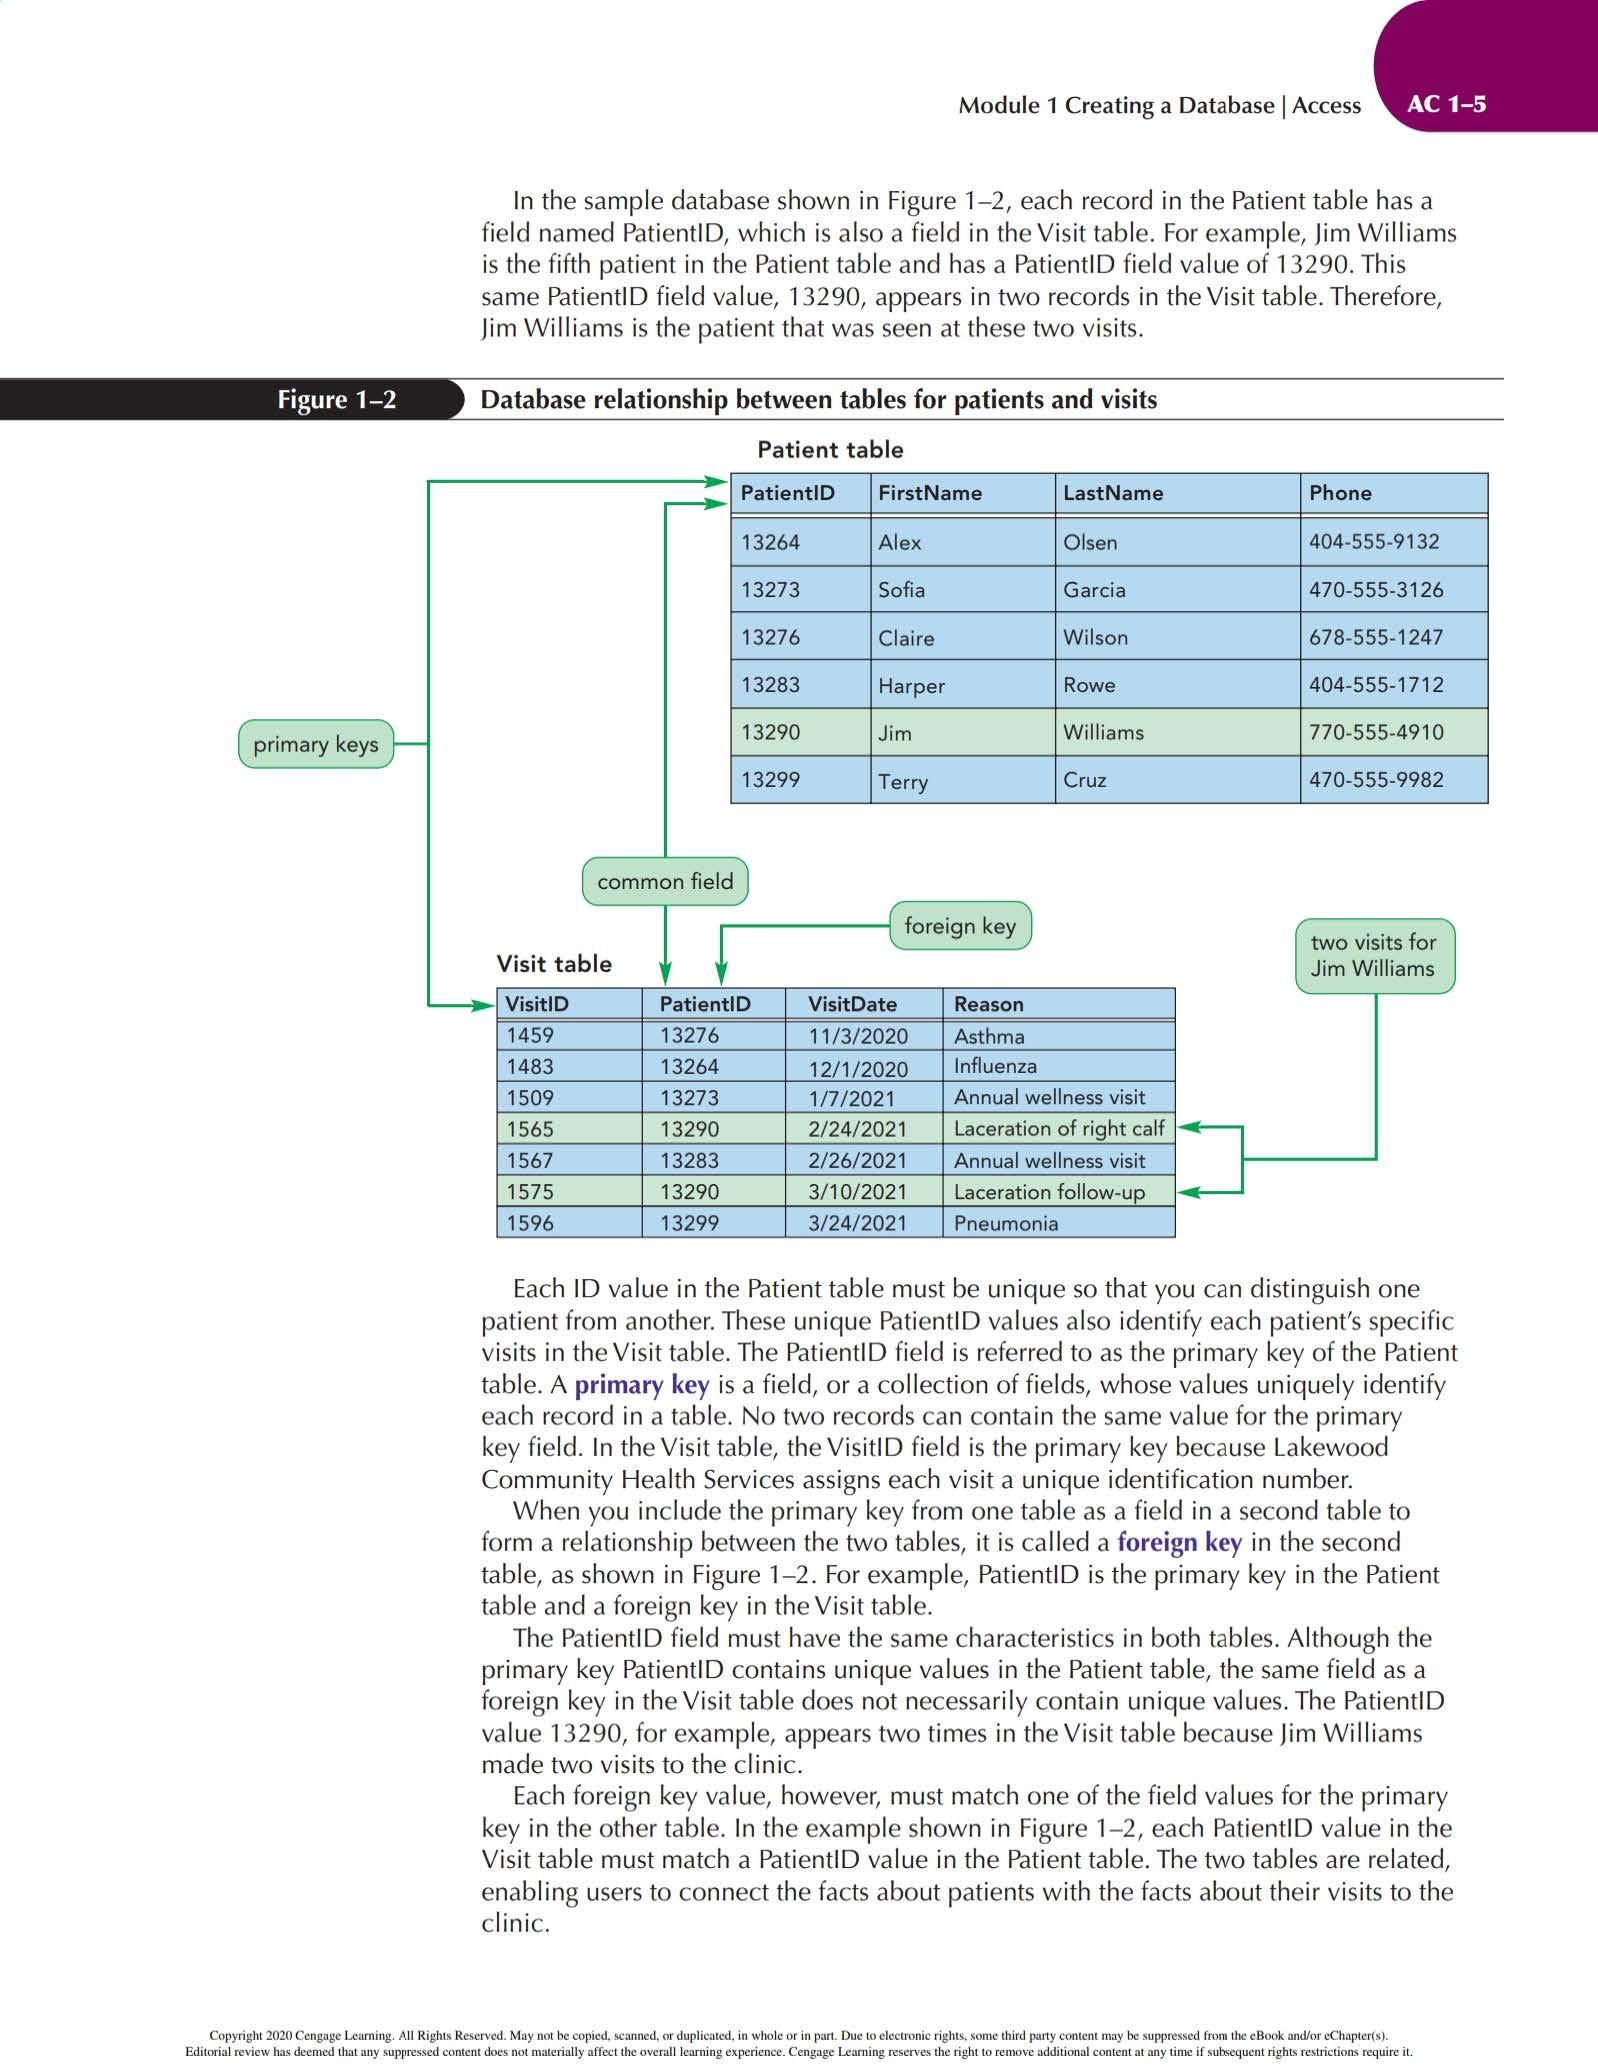
In t h e samp l e d atabase sh own in Fi gure 1-2, eac h re cord i n t h e Pati ent tab l e has a field named Pati ent i D, which i s also a fi eld i n the Vis it tab l e. For exa mp le, Ji m Wi ll i am s i s th e fifth patient in the Patient t ab l e and has a Pati ent i D f ie ld va l ue of 13290. This same Patien tiD field va l ue, 13290, appears i n two records i n the Vi sit table. Therefore, Jim W il l i am s i s the patie nt th at was seen at th ese two visits.
Database r elationship b etween tabl es for pati ents and vi sits
( co mmon fie ld ( fo rei gn key )
Vi s it table Jim Wi lliams
V isitiD Pati entiD VisitDat e Rea son 1459 13 276 11 /3/ 2020 A sthm a 1483 13264 12/ 1/ 2020 Influenza 1509 13273 1/ 7/ 2021
wellness visi t 1565 13290 2/24/2021 Laceration of right ca lf II 1567 13283 2/ 26/ 2021 Annual w ellness visi t 1575 13290 3/10/2021 Laceration follow- up 1596 13299 3/24/ 2021 Pneum oni a
Each 10 va l ue in the Pat i ent tab le mu st be u n iq u e so that y o u ca n di st i ng ui sh one p at ient fr o m an o th er Th ese unique Patie nt i D va l ues a l so iden tify each pati ent's spec i fi c v i si ts in the Vis it t abl e Th e PatientiD fie l d i s referred to as th e primary key of th e Pati en t table A primary key i s a f ield, or a c ollect ion of f i elds, w hose va l ues u n ique l y identify eac h record in a tab le. No two reco r ds ca n contain t h e sa m e va l ue for the p r imary key f ie l d. In the Vi si t tabl e, th e Vi si t i D fie l d is th e primar y k ey b eca u se Lakewood Co mmun i ty H ea lth Serv i ces ass i gns each v i sit a un i que i denti f ication number.
When you i nclude the p rim ary key from o ne tab l e as a fi e ld in a second t abl e to fo rm a relationship b etween t h e two tables, it i s ca l led a foreign key in th e seco nd table, as shown i n Figure 1-2 . Fo r examp le, Patienti D i s t h e pr i mary ke y in the Pati e nt t abl e and a foreign k ey in the Vis it t ab le.
Th e Patient i D field mu st h ave th e sa m e c harac te ri st i cs in both tabl es. A l though the pr i mary key Pat ie ntiD contains unique va l ues in t h e Pati ent table, the same f ie ld as a fo re ign key i n th e V i si t tab l e does n ot necessa ril y co nt ai n u n iq u e valu es Th e Patient iD va l u e 13290 , for exa mp l e, appea rs two times i n the Vi sit tabl e because Jim Williams made two vi sit s to the cli n ic.
Each fore i gn k ey va l ue, however, m ust m at c h o ne o f t h e f i el d values f o r th e pr i m ary key in the other tab le. In the exa mp l e show n in Fi gure 1-2, each Pati entiD va l ue in th e Visi t table must match a Pat ienti D va l ue i n the Patien t tab l e. The two tables are related, en ab l ing u se rs t o co nnect t h e fa c ts about p at ients w it h the f ac ts abo ut th eir v i sits to t he clini c
Storing Dat a in Sep arate Tables
When you create a database, you must create separate tables that contain only fields that are directly related to each other. For example, in the Lakewood database, the patient and visit data should not be stored in the same table because doing so would make the data diffi cult to update and prone to errors Consider Jim W i lliams a n d his visits to the clin i c, and assume that he has many more than just two visits. If all the patient and v i sit data was stored in the same table, so that each record (row) contained all t he info r mation ab out e ach visit and the p atient, the patient data would appear multiple t imes in the table. This causes problems when the data changes. For example, if the phone number for Jim Williams changed, you would have to upd at e the m ultip l e occurrences of the ph o ne numbe r through o ut the tab l e Not only wou l d th i s be time-consuming, it would i ncrease the likelihood of errors or i nconsistent data.
Relational Database Management Systems
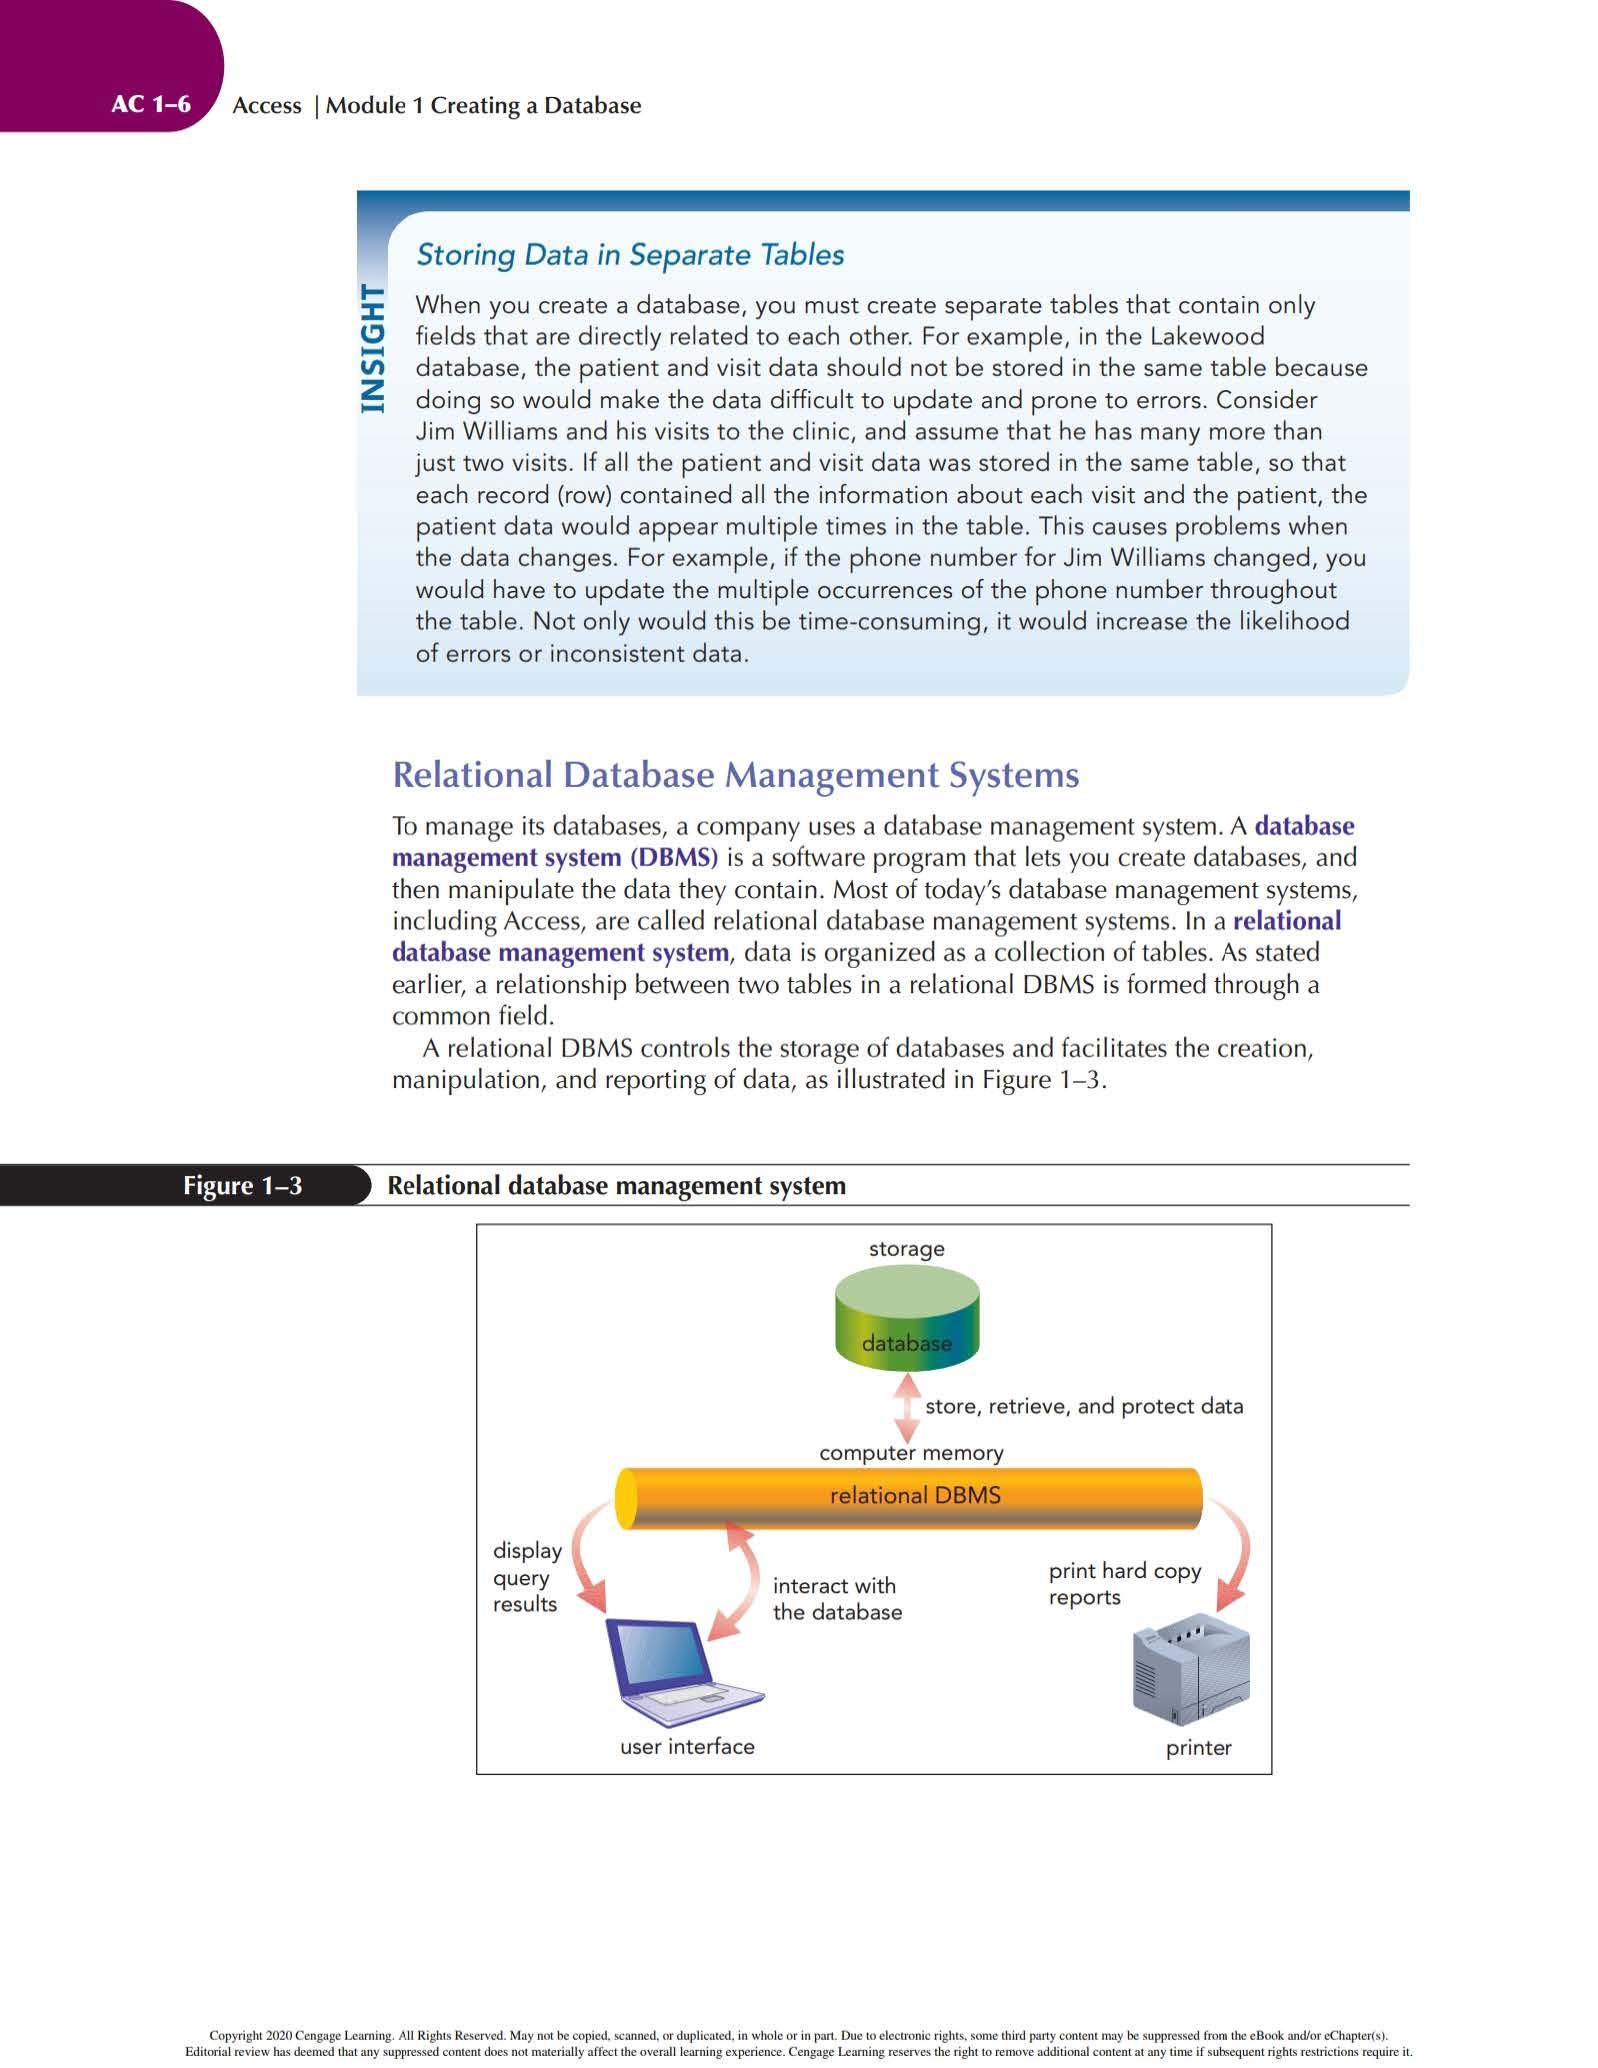
To ma nage its databases, a com p a ny use s a databas e manage me nt syste m . A database management system (DBMS) is a software p rogram that lets yo u crea te d atabases, and t he n ma nipul ate th e dat a th ey co nta in. Most of today's d at a base ma nage me nt sys tems, incl ud in g Access, are ca ll ed re lationa l database manageme nt systems. In a relational database management system, data is organ ized as a co llectio n of tab les. As stated ea rli e r, a re la ti ons h ip be tween two ta b les in a re la ti o na l DBMS is form ed thro ugh a co mm on fie ld.
A re lat io na l DBMS co ntrols the storage of d ata bases a nd faci litates the creation, ma nipu lati o n, a nd re po rtin g of d ata, as illu strated in Figur e 1-3
Spec i f i cally, a re l ationa l DBMS provides th e fol low i ng funct i ons:
• I t a l lows you to create d at aba se st r uctu res conta i nin g fields, tab les, and t able relationsh i ps.
• It l ets you easi ly add new reco rds, c hange fie l d va lues in existing r ecords, and delete records.
• It contains a b u il t-in query language, which lets you obta i n immediate answe rs to t he quest i ons (o r queries) you ask about you r data.
• I t contains a built-in report ge nerator, which l ets yo u produ ce professiona l- l ooking, formatted reports from yo ur data.
• It protects databases through sec ur i ty, control, and r ecovery facil iti es
An organ i zation su c h as Lakewood Co mmunity H ea l th Se rvices benefits from a re l ational DBMS because it a l l ows users working in d i ffere nt groups to share the same data. More th an one user can enter data into a database, an d more than one user ca n retri eve and analyze data that other users h ave entered. For exa mpl e, the database for Lakewood Comm un it y Health Services will contai n o nl y one copy of t he Vis it tab le, and al l e mp loyees wil l use it to access v isi t information.
Fina l ly, unlike othe r so ftwar e prog rams, su c h as sp read sheet program s, a DBMS ca n hand le mass ive amo unts of data and al l ows re l at i onsh i ps among mu ltiple tab les. Each Access database, for example, can be up to two g i gabytes i n size, ca n conta i n up to 32,768 objects (tab l es, reports, and so on), and can h ave up to 255 peop l e u sing the database at the same tim e. For instructio n a l purposes, the databases you w i l l create and work w ith throughout thi s tex t co nta i n a relat ively sma ll number of records compared to databases you wou l d encounter outside the classroo m, which would likely contain tables with ver y l arge numbers of records.
Starting Access and Creating a Database
Now that you've l earned some d atabase terms and con cepts, you're ready to sta rt Access and create the Lakewood database for Donna.
To start Access:
t 1. On the Windows taskbar, click the Start button EEJ . The Start menu opens.
t 2. On the Start menu, scroll down the l ist of apps, and then click Access Access starts and d i sp lays the Recent screen in Backstage view. See Figure 1-4.
Recent scr ee n in view
option for creating a new, blank database
a list of recently opened databases might appear here
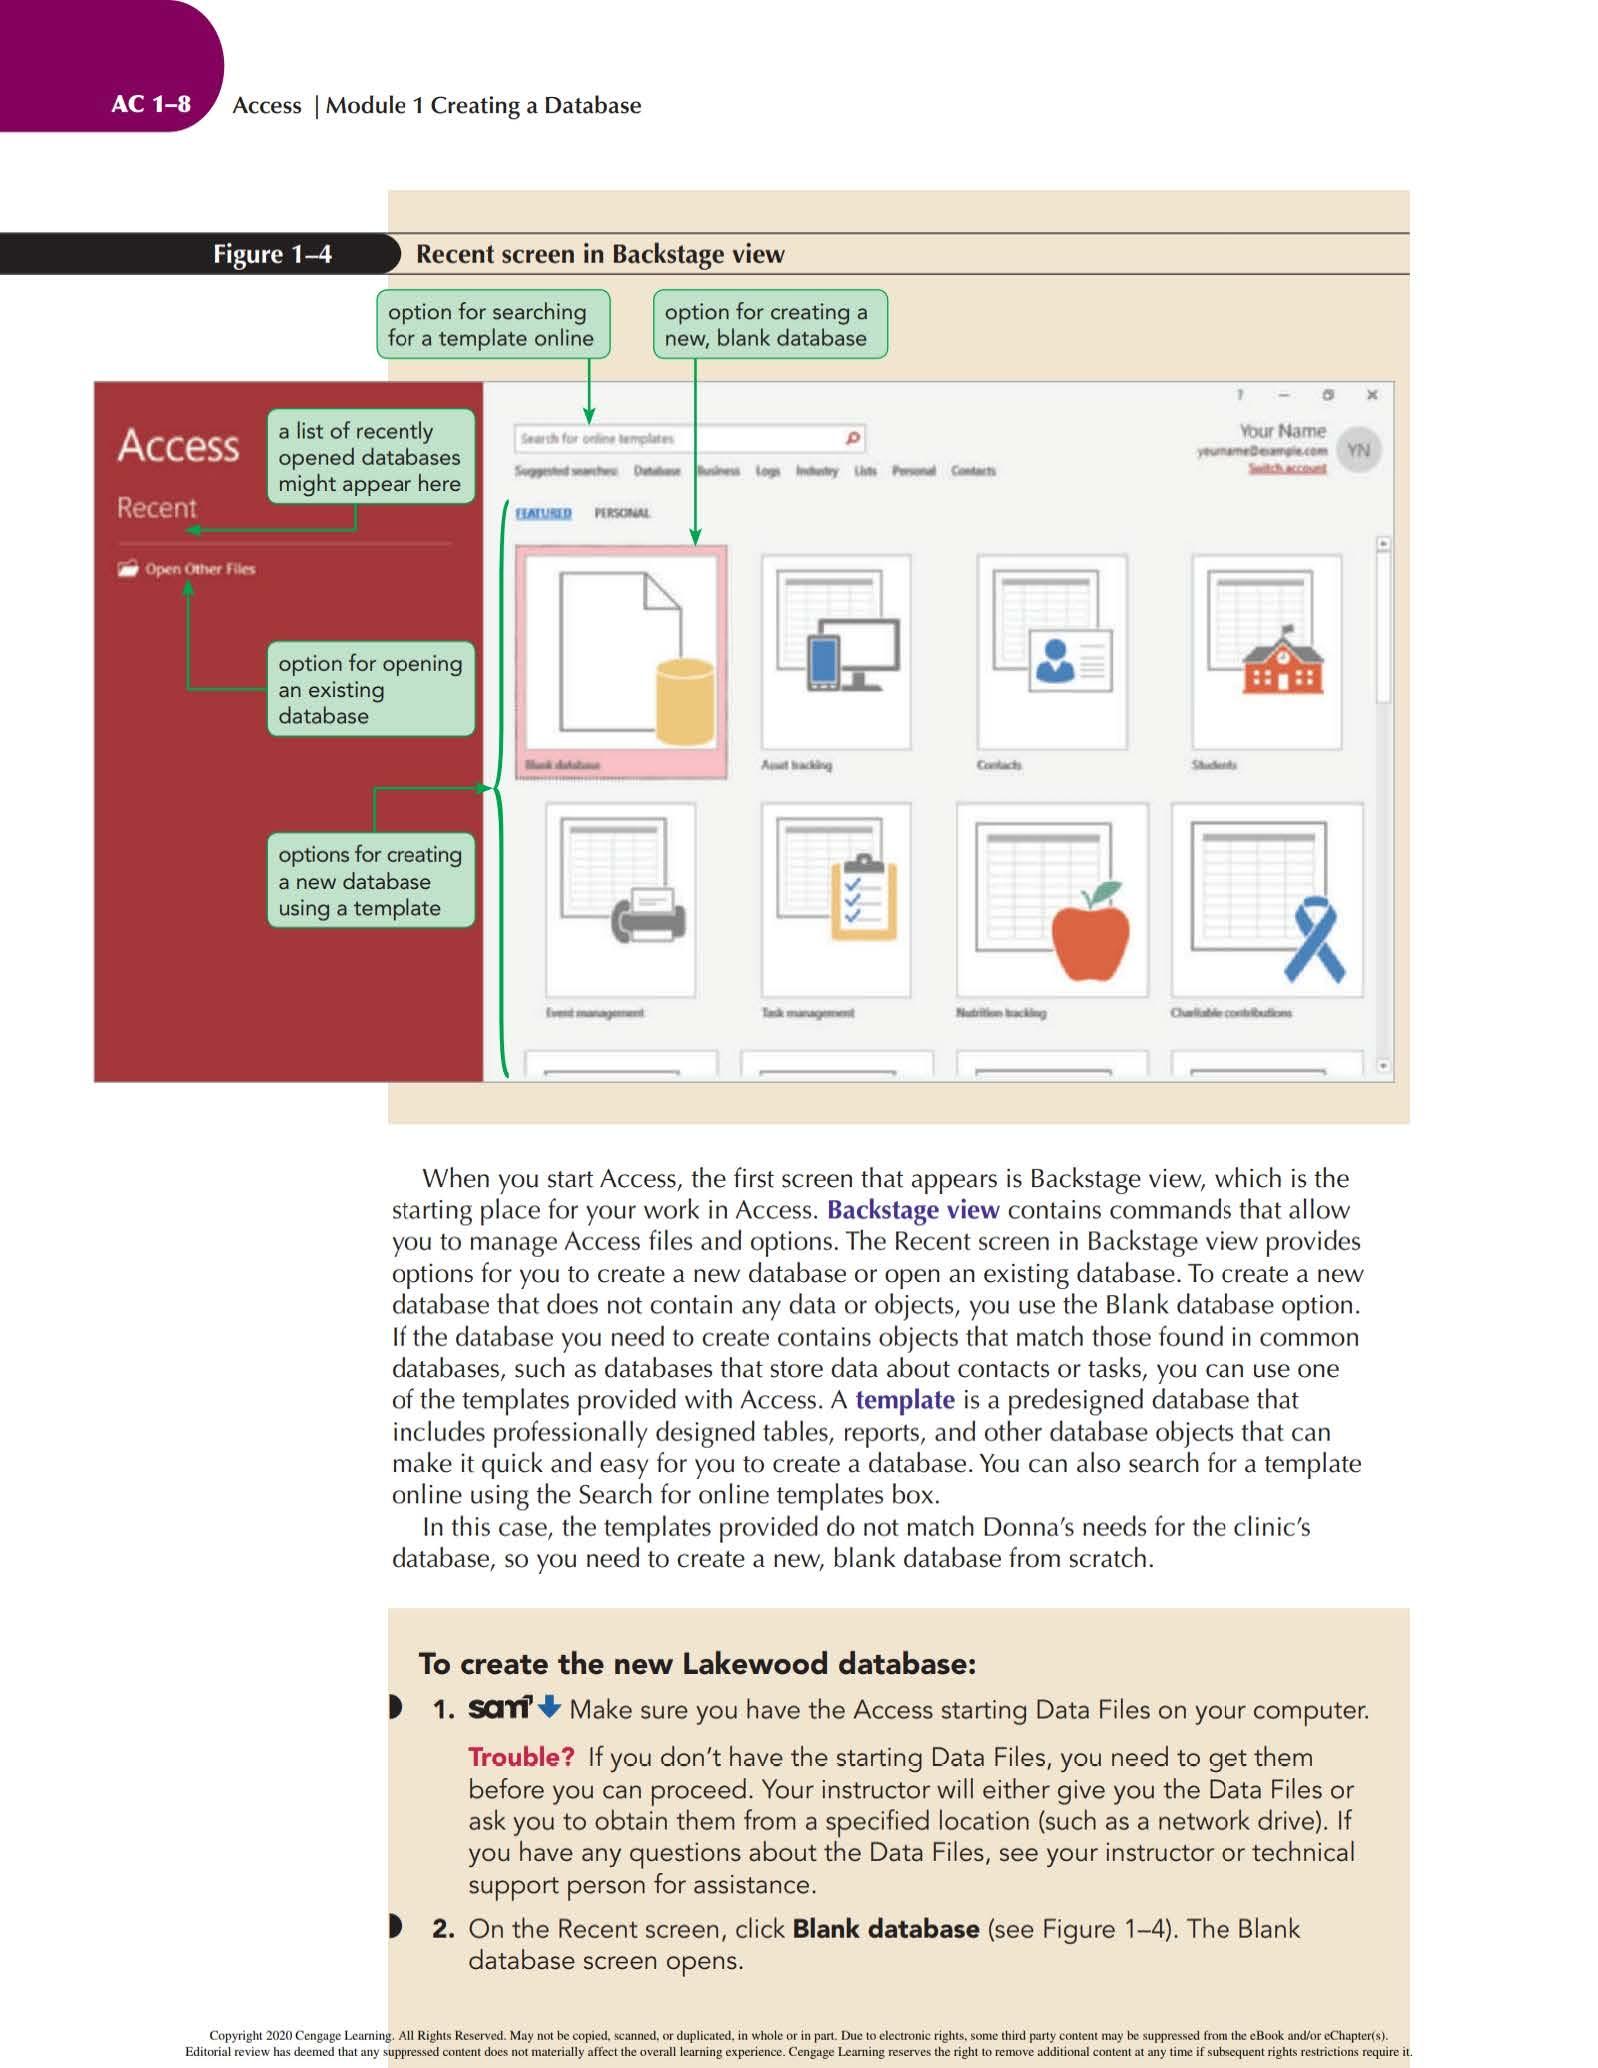
When yo u sta rt Access, the f irst screen that appears is Backst age v i ew, wh ich is the sta rtin g place for your work in Access. Backstage view co ntain s com m ands that all ow you to manage Access f il es and options. Th e Recent screen in Back stage view provides options for yo u to create a new database or open an ex ist ing database. To create a new databa se that does not contain any data o r objects, you u se the Bla nk database optio n If the d atabase you need to create contains obj ects t hat match those found in co mmon databases, such as databases that store data about contacts or tasks, you can use one of t h e templates prov ided w ith Access. A template is a predesi gned database t h at inc lud es p r ofessiona ll y designed tab les, reports, a nd other database objects that ca n make it quick a nd easy for you to create a database. You ca n also search for a template onl ine us in g the Search for on lin e temp l ates box. In this case, the temp lates provid ed do not match Donna's needs fo r the c lini c's database, so you need to c reate a new, blank database from scratch
To create the new Lakewood database:
t 1 . sa'ri' + Make sure you have the Access starti ng Data Files on your computer.
Trouble? If you don't have the starting Data Files, you need to get them before you can proceed. Your instructor will either give you the Data Fi les or ask you to obtain them from a specified location (such as a network drive). If you have any questions about the Data Files, see your instructor or technical support person for assistance.
t 2. On the Recent screen, click Blank database (see Figure 1-4). The Blank database screen opens.
Be sure to type Lakewood or you'l l create a database named Database1.
If you don ' t type the
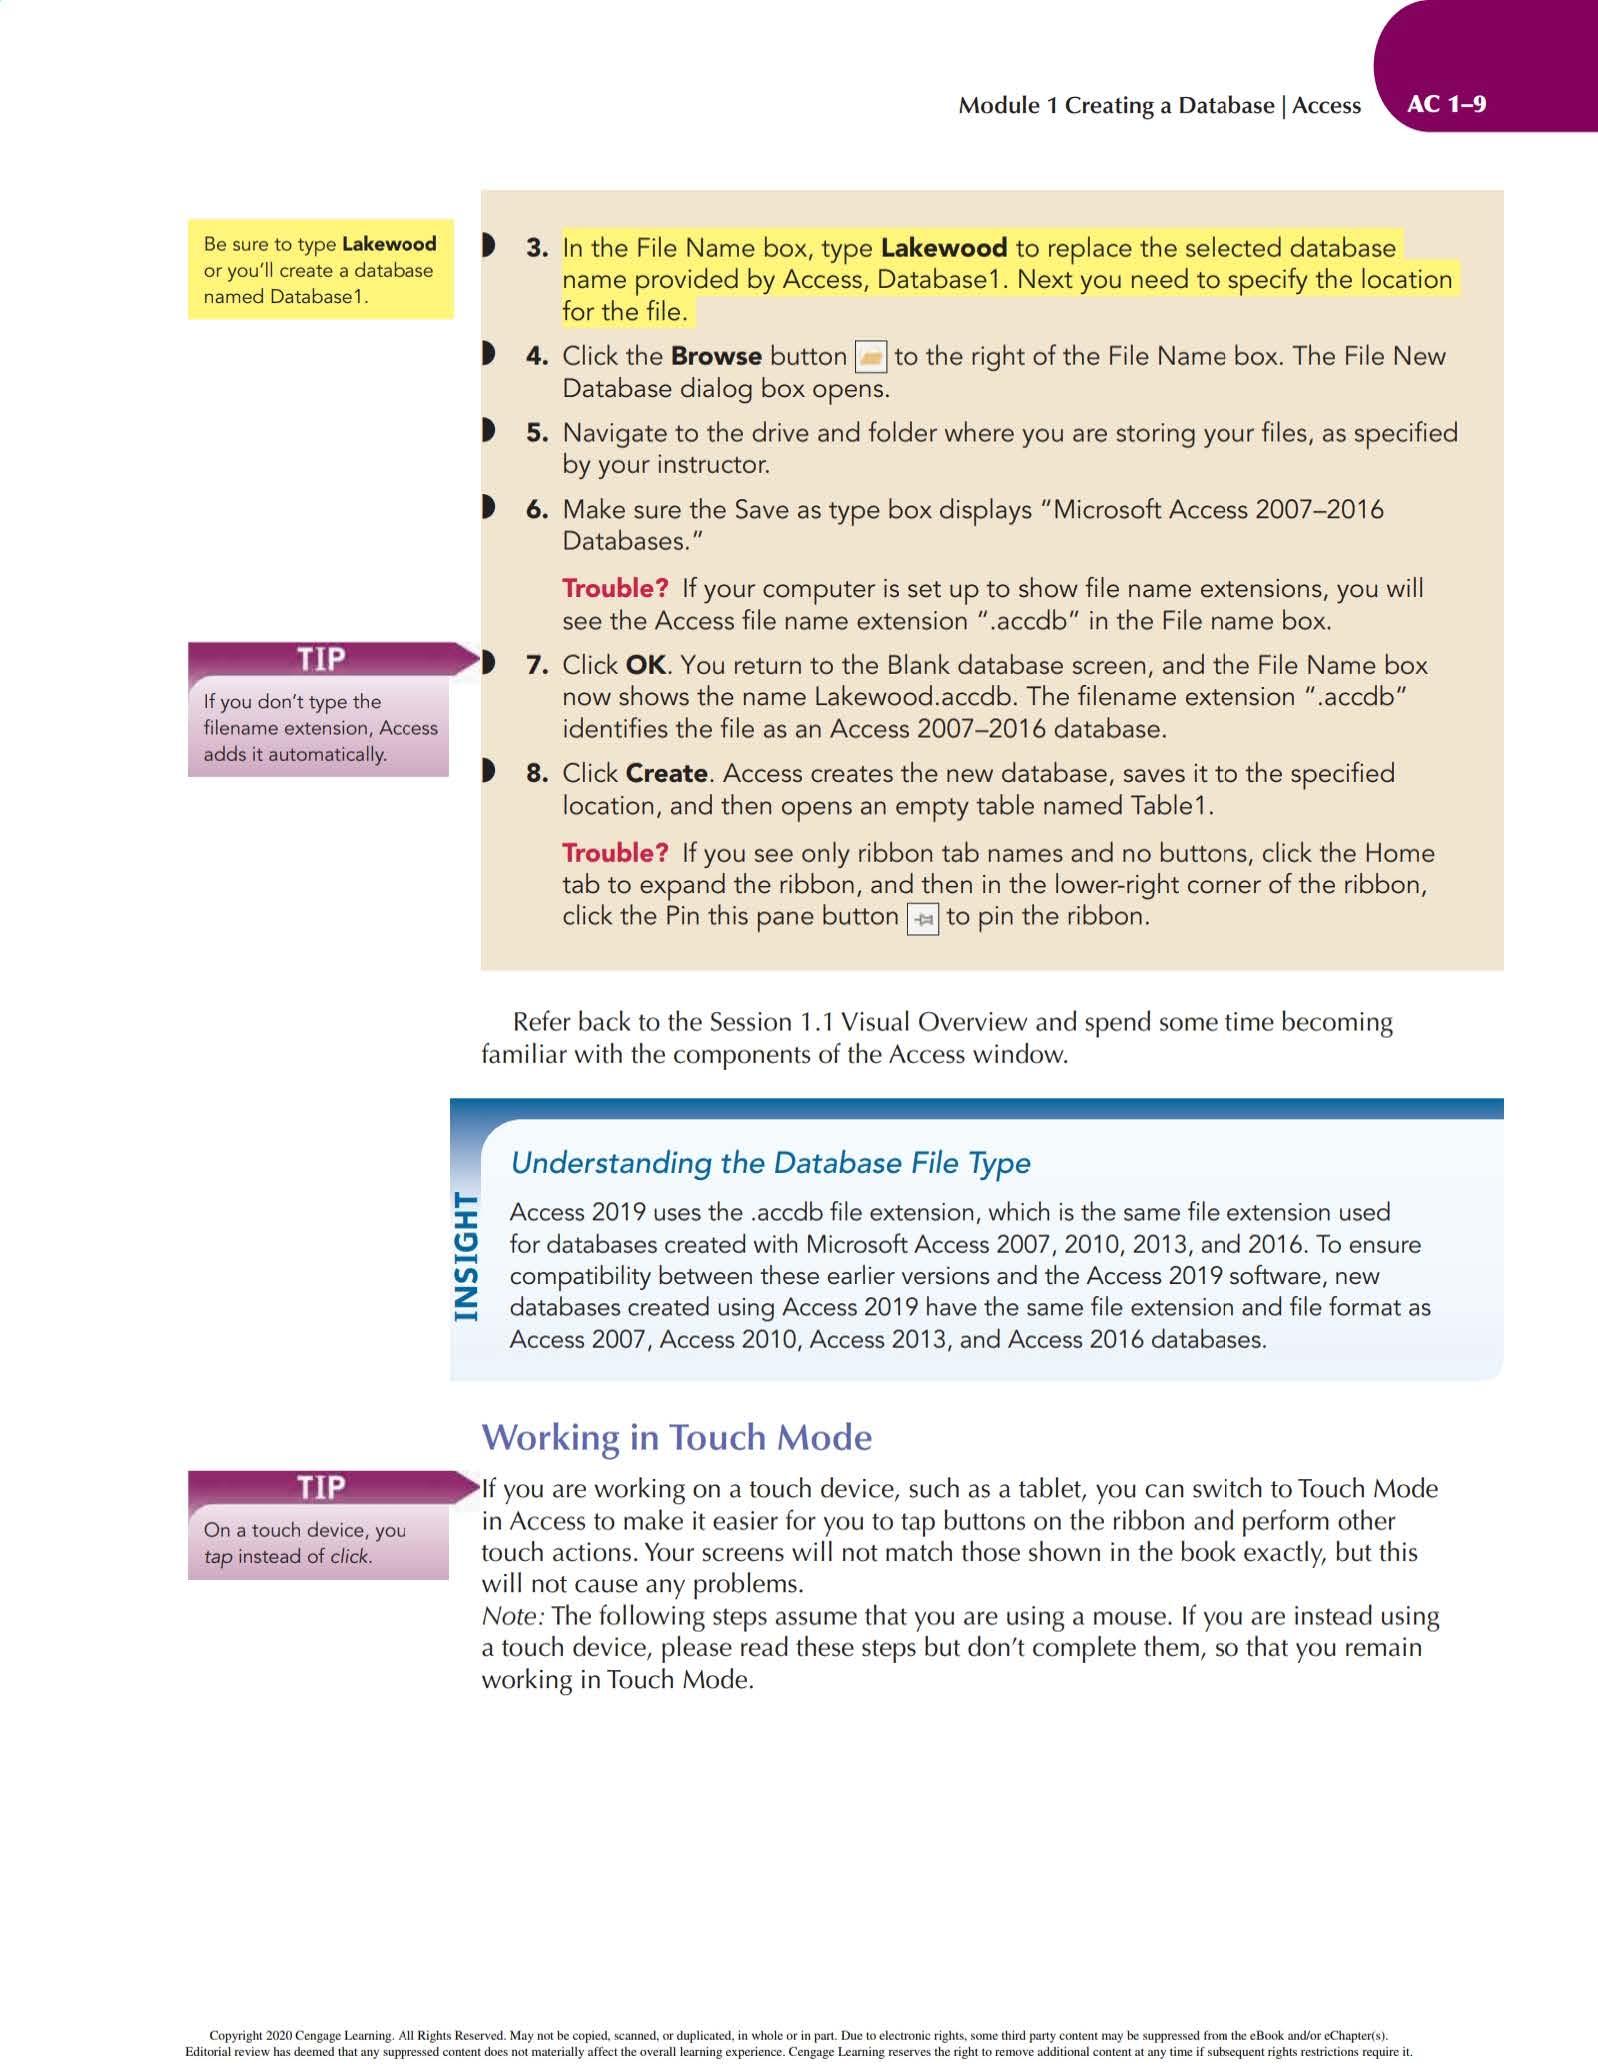
t 3. In the File Name box, type Lakewood to replace the selected database name provided by Access, Database1. Next you need to specify the location for the fi le
t 4 . Click the Browse button D to the right of the File Name box. The Fi le New Database dialog box opens.
t 5 Navigate to the drive and folder where you a re storing your files, as specified by your instructor.
t 6 Make sure the Save as type box disp lays "Microsoft Access 2007-2016 Databases."
Trouble? If your com p uter is set up to show file name extensions, you will see the Access file name extensi on " .accdb" i n the File name box.
7 Click OK You return to the Blank database screen, and the File Name box now shows the name Lakewood.accdb. The f i lename extension ".accdb" ident ifies the file as an Access 2007-20 16 database. file na me e xte ns ion , Access add s it automat ically.
8. Click Create . Access creates the new database, saves it to the specified location, and then opens an empty table named Tab l e 1
Trouble? If you see only ribbon tab names and no buttons, cl ick the Home tab to expand the ribbon, and then in the lower-right corner of the r ibbon, click the Pin th is pane button B to pin the r i bbon.
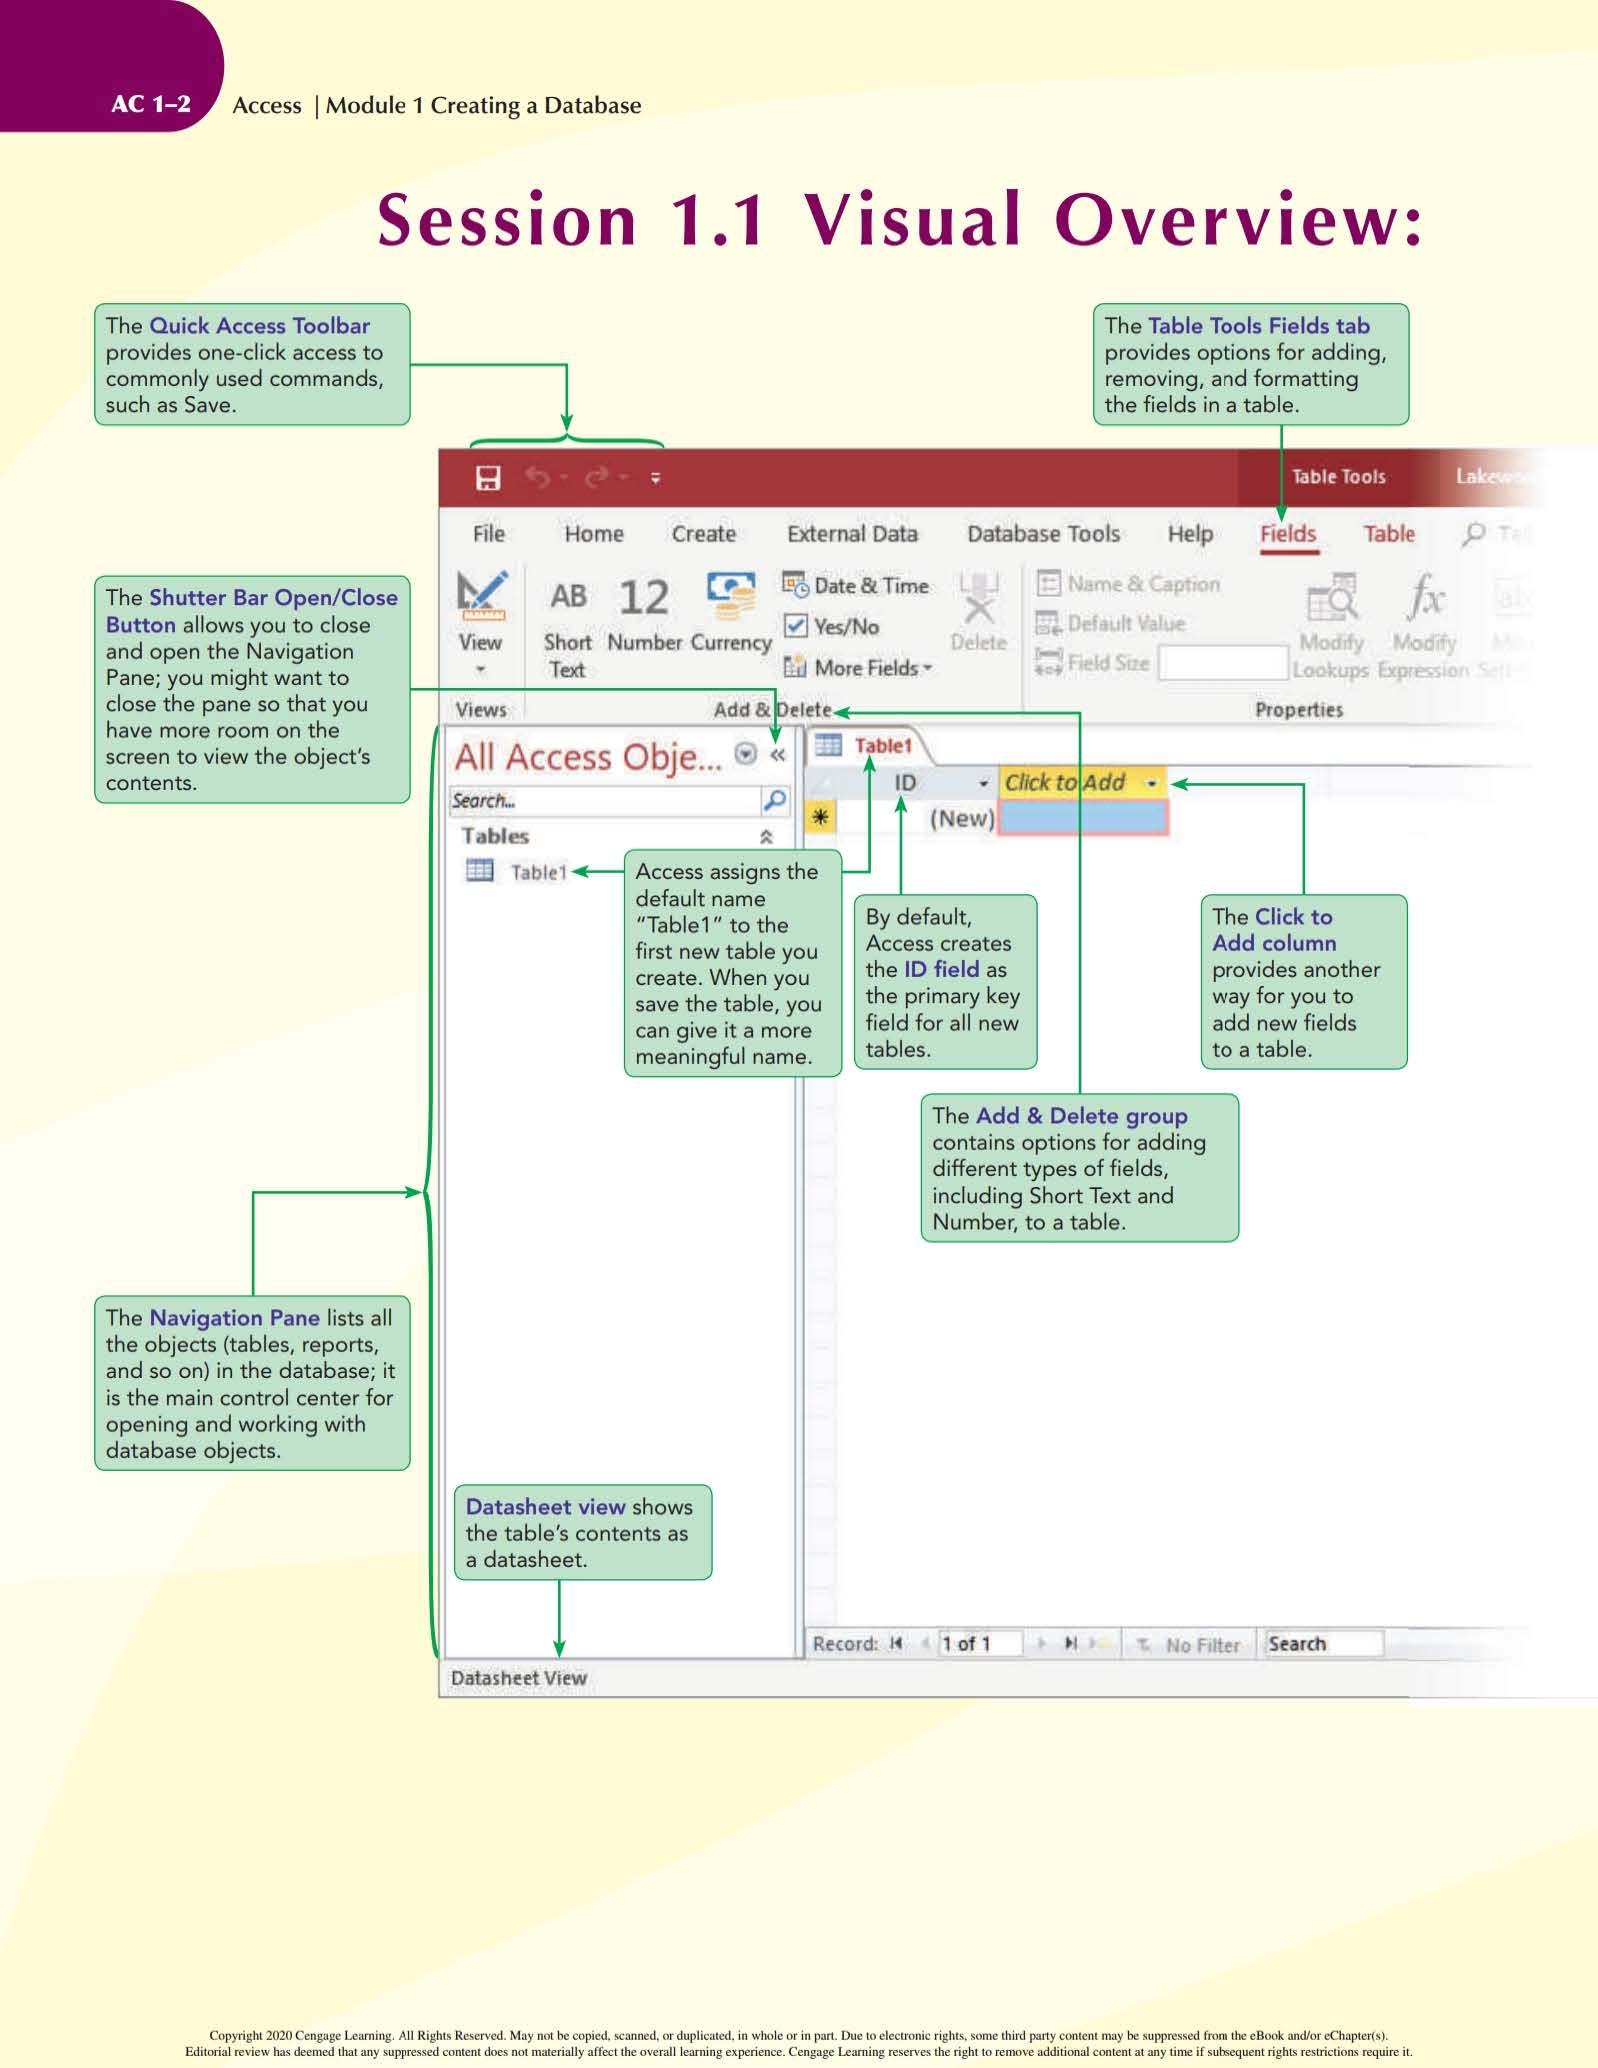
Refer b ack t o th e Sess ion 1.1 Vi su al Overvi ew a nd spe nd so me ti m e b ecoming fam i l iar w ith t h e c o m pon ents of th e Acce ss w i ndow.
Understanding the Database File Type
A cce ss 2019 u ses th e .a ccdb fil e exten sion , which is th e sam e fi le extensi on used for d ataba ses c reated with Mi cro soft A ccess 2007, 2010 , 2013, and 2016. To ensure compatibil ity between these earlier versions and the Access 20 19 softwa re, new dat aba ses created using Access 2019 have the same fil e exten sio n and fil e form at as Acce ss 2007, Acce ss 2010, Acc ess 2013, and Acc ess 2016 databases
Working in Touch Mode
yo u are wor ki ng o n a to u ch dev i c e, su ch as a tab l et, you c an swit ch to To uc h Mode in Access to m ak e it easi er for you to t ap butto n s on th e r i bbon and p er fo rm oth er t ap instead of click. touch actions. Your sc ree n s wi ll not matc h those shown i n t he book e xactly, b ut th is w i l l not cau se an y prob lem s
N o te: Th e foll o win g step s assu me th at yo u are usin g a mo u se If yo u are in stea d u si ng a tou c h devi ce, p l ease read t hese st ep s but don 't c omplete th em, so t hat you rema i n workin g i n Tou ch Mode.
Touch/Mouse Mode
0 button on Quick Access Toolbar
To switch to Touch Mode:
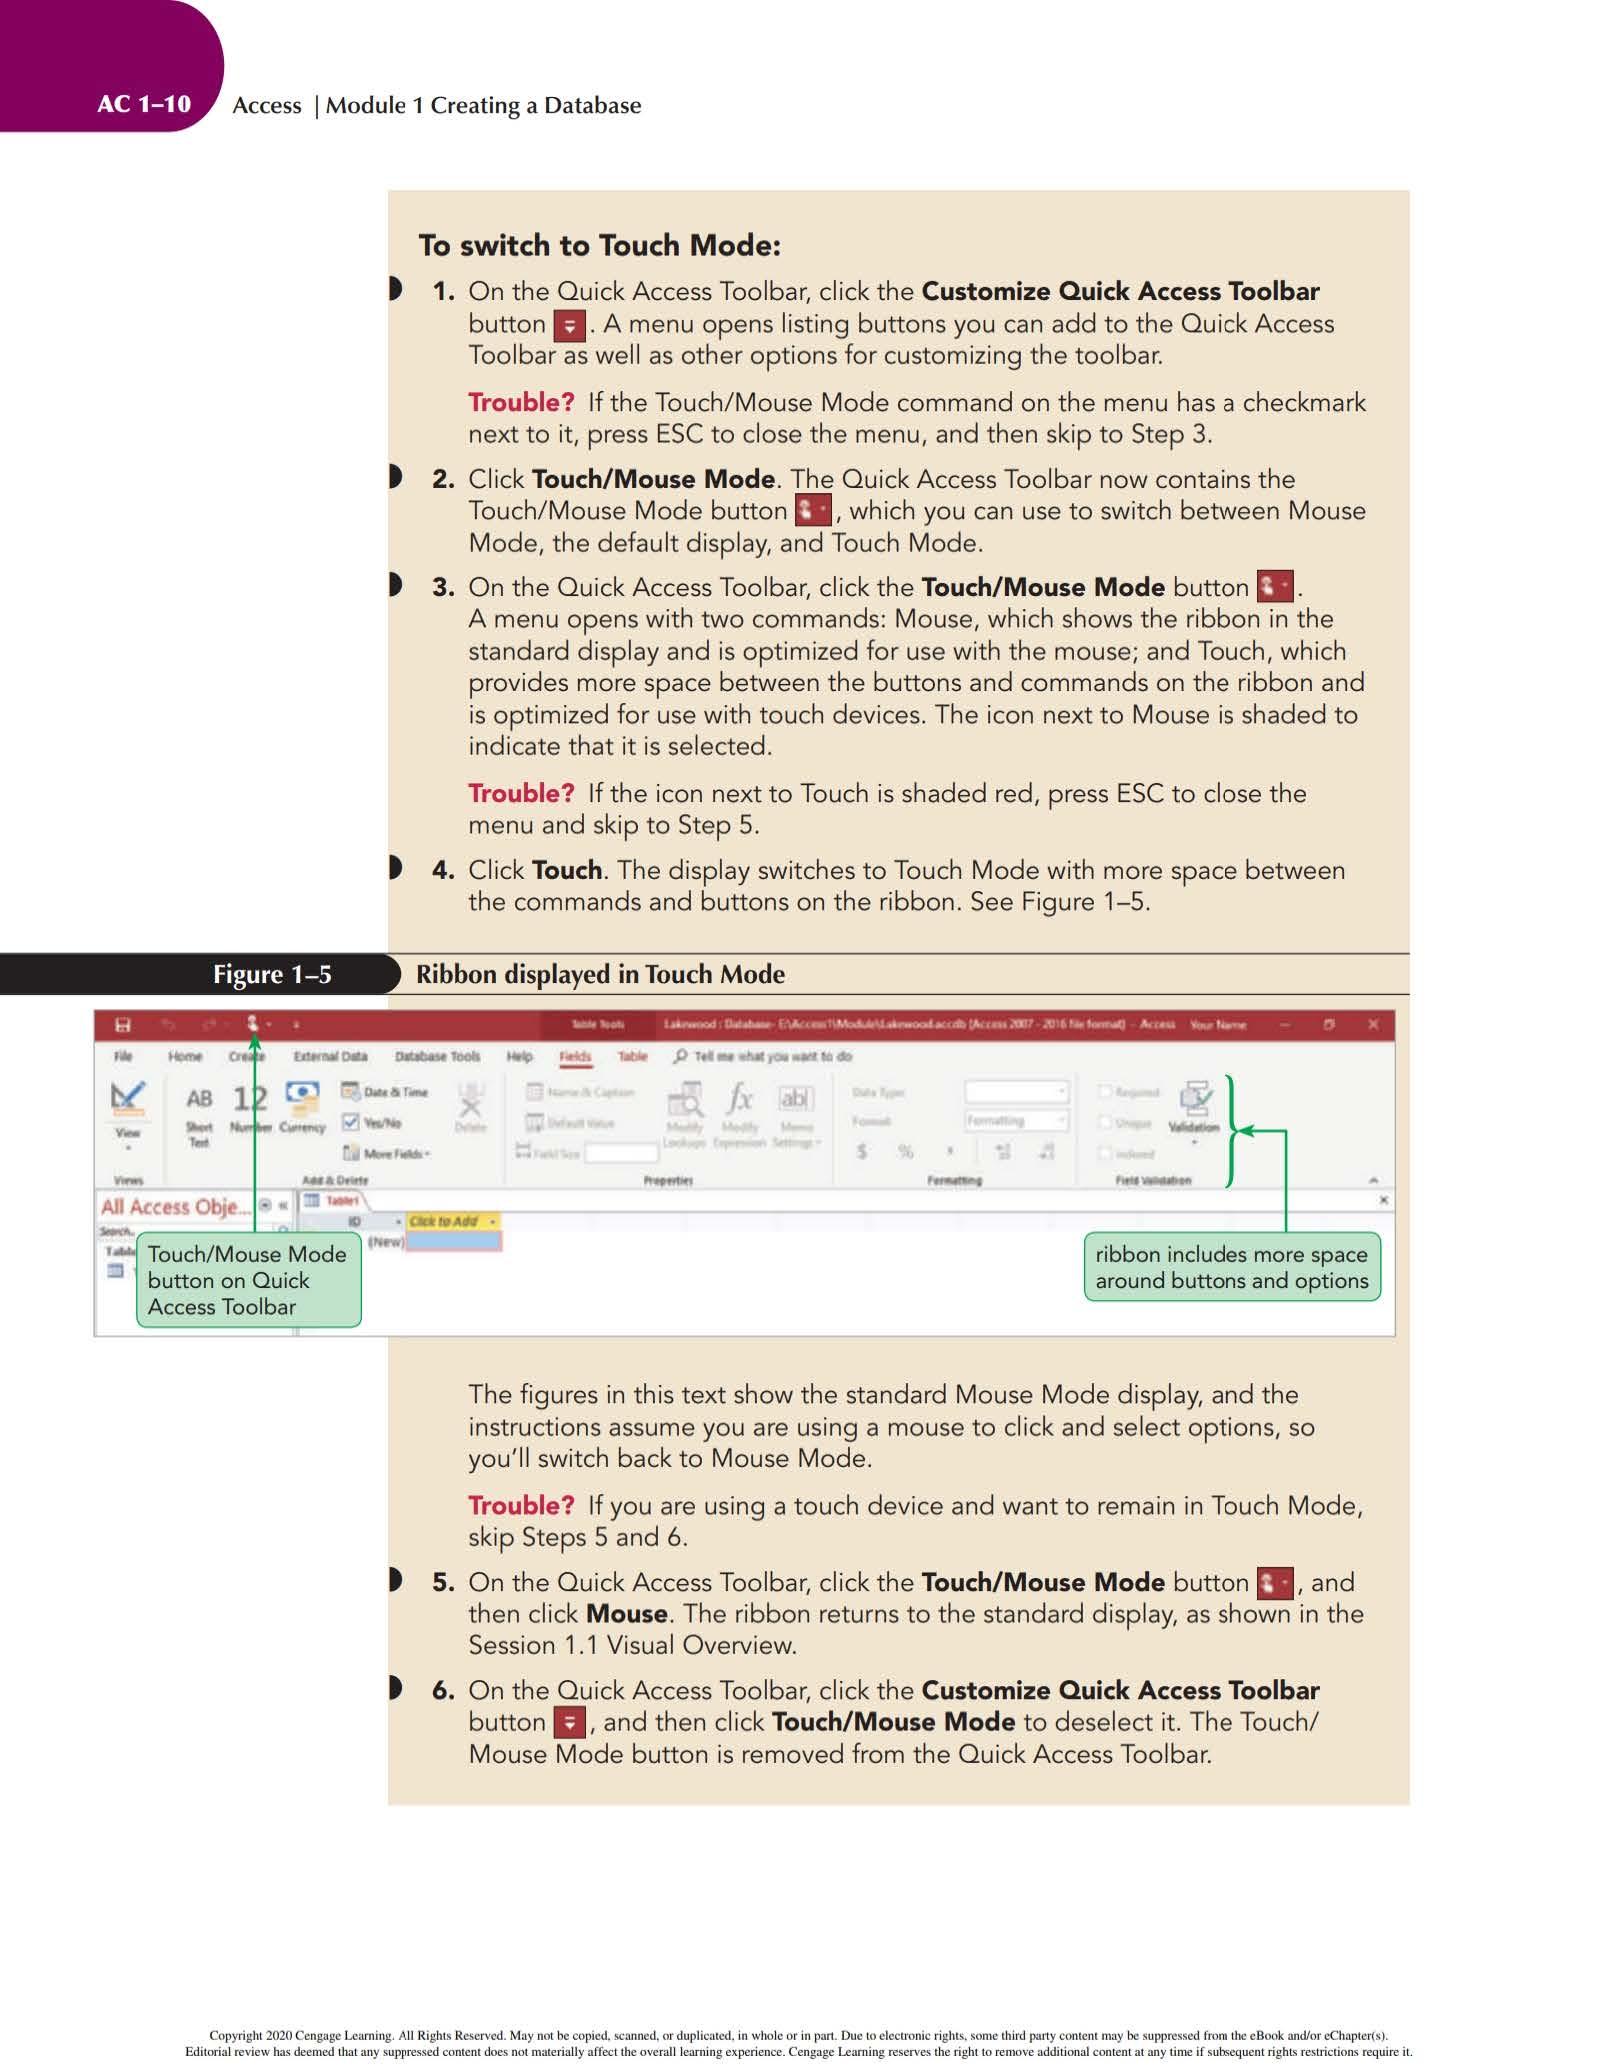
t 1. On the Quick Access Toolbar, click the Customize Quick Access Toolbar button II ·A menu opens listi ng buttons you can add to the Quick Access Toolbar as well as other options for customizing the toolbar.
Trouble? If the Touch/Mouse Mode command on the menu has a checkmark next to it, press ESC to close the menu, and then skip to Step 3.
t 2. Click Touch/Mouse Mode The Quick Access Toolbar now contains the Touch/Mouse Mode button EJI , which you can use to switch between Mouse Mode, the default display, and Touch Mode.
t 3. On the Quick Access Toolbar, click the Touch/Mouse Mode button EJI . A menu opens with two commands: Mouse, which shows the ribbon in the standard display and is optimized for use with the mouse; and Touch, which provides more space between the buttons and commands on the ribbon and is opt i mized for use with touch devices. The icon next to Mouse is shaded to indicate that it is selected.
Trouble? If the icon next to Touch is shaded red, press ESC to close the menu and skip to Step 5.
t 4. Click Touch The display switches to Touch Mode with more space between the commands and buttons on the r i bbon. See Figure 1-5.
ribbon includes more space around buttons and options
The figures in this text show the standard Mouse Mode display, and the instructions assume you are using a mouse to click and select options, so you'l l switch back to Mouse Mode.
Trouble? If you are using a touch device and want to remain in Touch Mode, skip Steps 5 and 6.
t 5 On the Quick Access Toolbar, click the Touch/Mouse Mode button EJI , and then click Mouse The ribbon returns to the standard display, as shown in the Session 1 1 Visual Overview.
t 6. On the Quick Access Toolbar, click the Customize Quick Access Toolbar button 11 . and then click Touch/Mouse Mode to deselect it. The Touch/ Mouse Mode button is removed from the Quick Access Toolbar.
Creating a Table in Datasheet View
Tables contain all the data in a d at abase and are th e fundamental objects for you r work in Access. You ca n create a table i n Access in d ifferent ways, including entering the fields and record s for th e t abl e direct ly in Datasheet view.
Creating a Table in Datasheet View
• On the ribbon, click the Create tab.
• In the Tables group, click the Table button.
• Rename the default ID primary key fie ld and change its data type, if necessary; or accept the default ID field with the Auto Number data type.
• On the Fields tab in the Add & Delete group, click the button for the type of field you want to add to the table (for exampl e, click th e Short Text button}, and then type the field name; or, in the table datasheet, click the Click to Add column heading, click the type of field you want to add from the list that opens, and then press TAB or ENTER to move to the next column in the datasheet. Repeat this step to add all the necessary fields to the table.
• In the first row below the field names, enter the value for each field in the first record, pressing TAB or ENTER to move from one field to the next.
• After entering the value for the last field in the first record, press TAB or ENTER to move to the next row, and then enter the values for the next record. Continue this process until you have entered all the records for the table.
• On the Quick Access Tool bar, click the Save button, enter a name for the table, and then click OK.
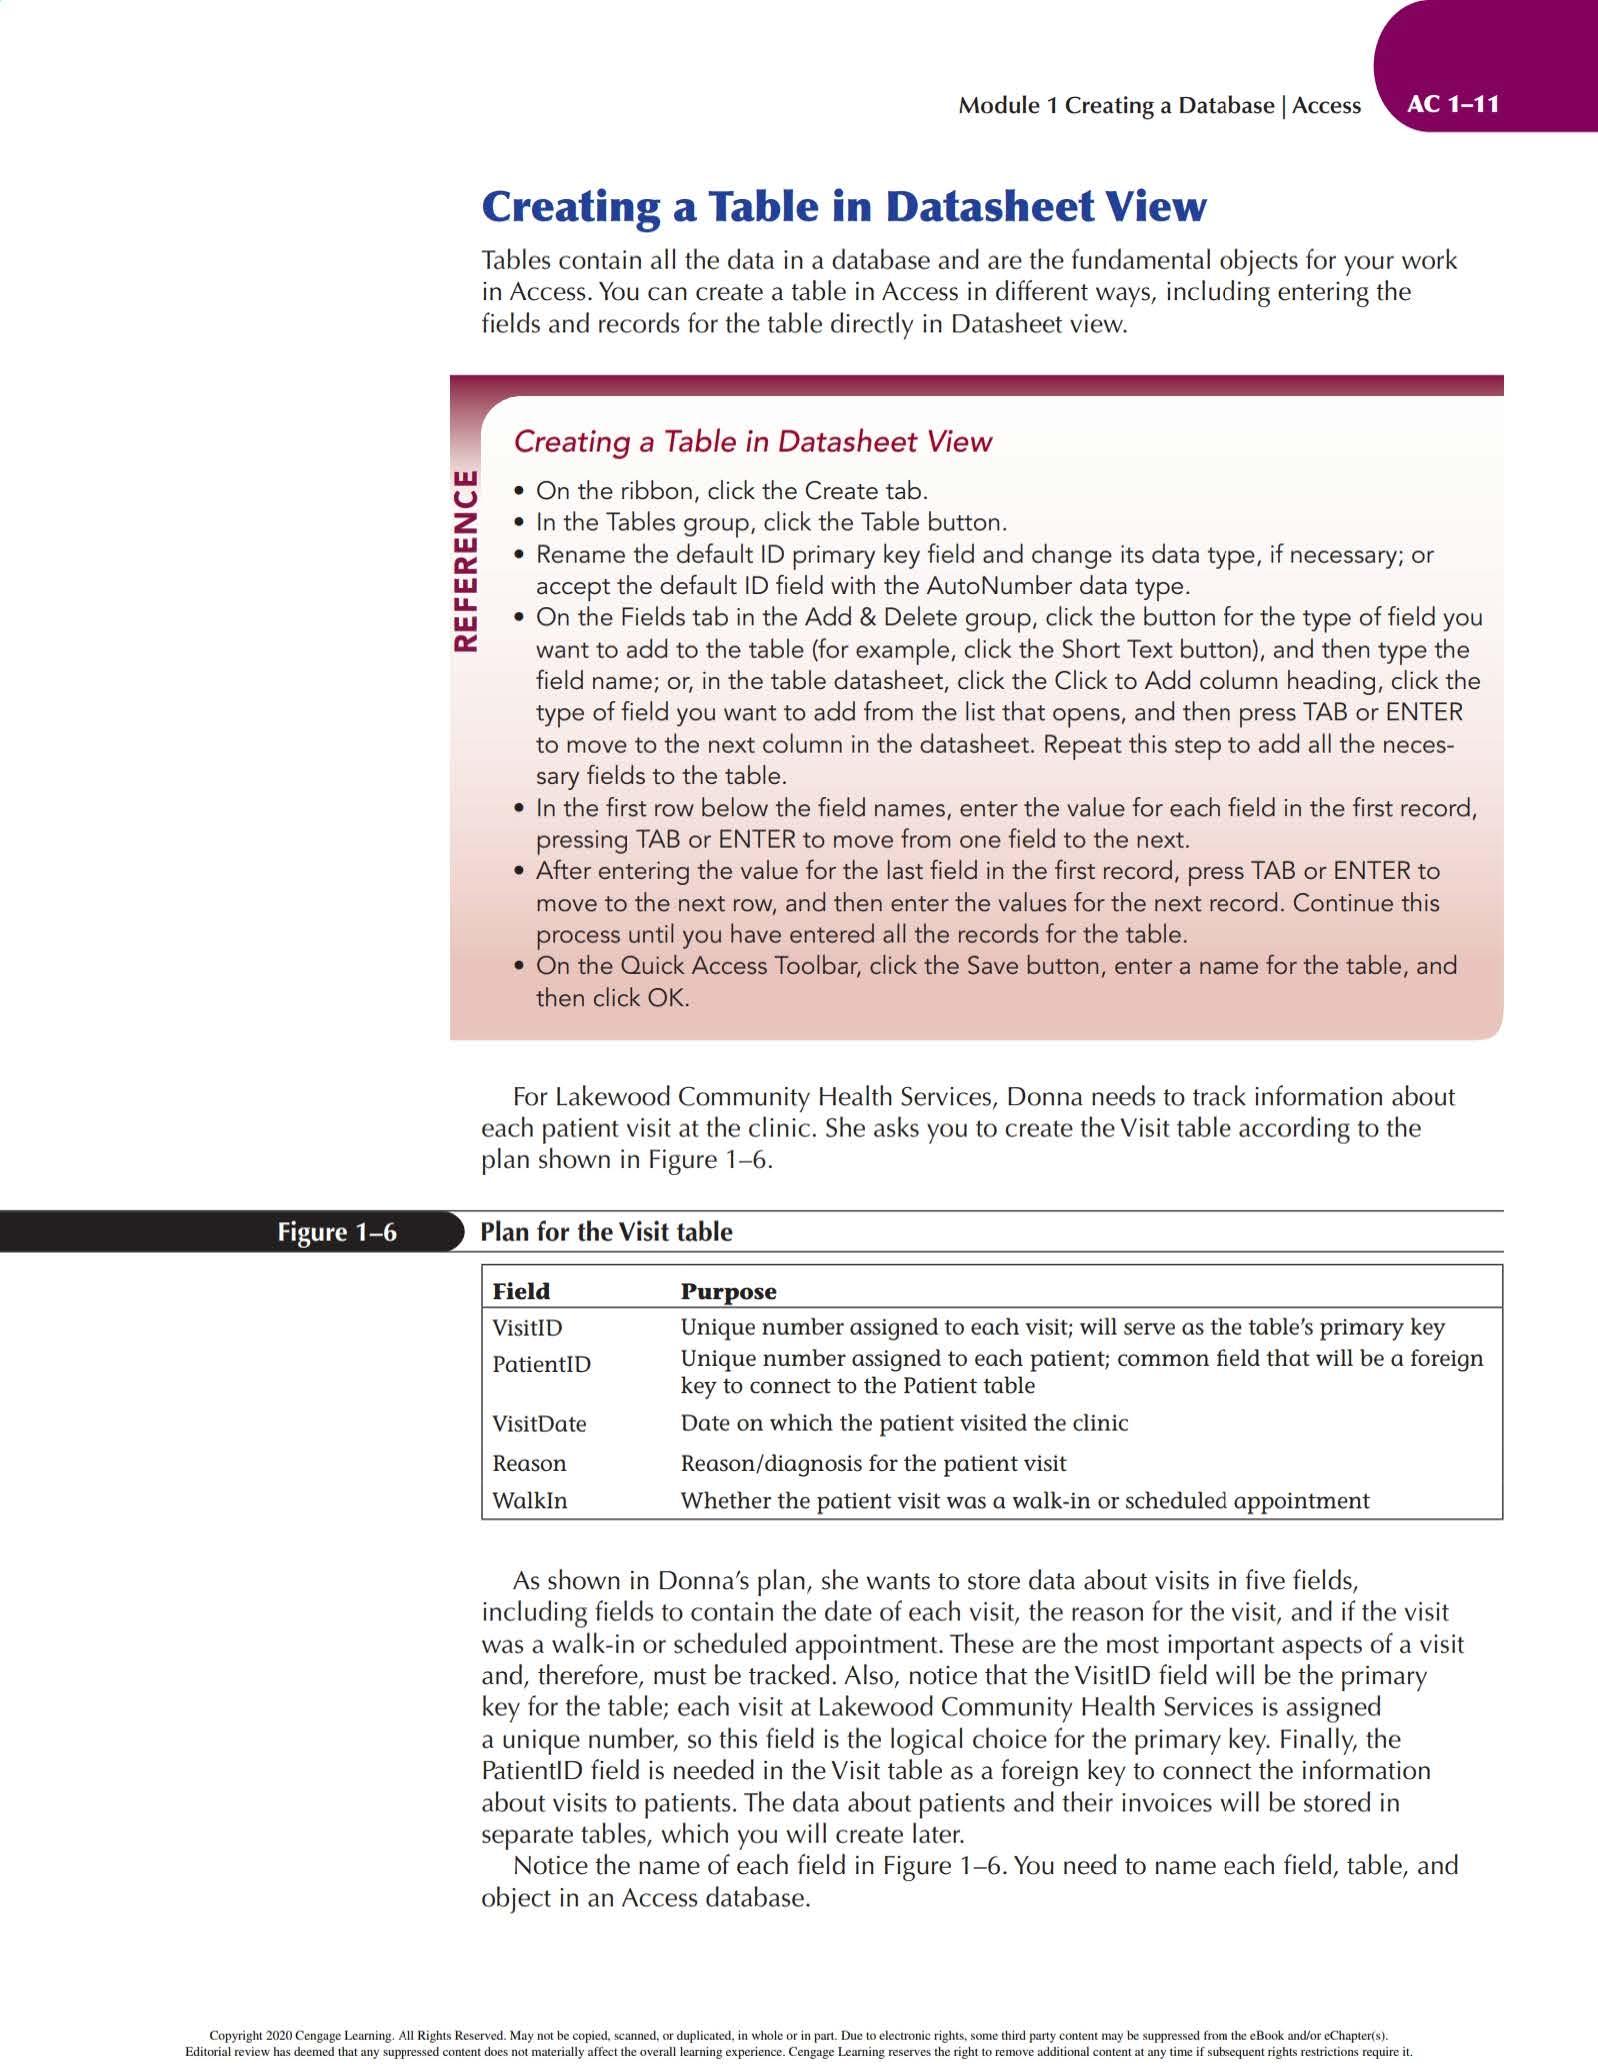
For Lakewood Community Health Services, Donna needs t o track information about eac h patient visit at the clini c She as ks yo u to create th e Visit tab l e accord ing to the plan show n in Figure 1-6
Pu rpose
Unique number assigned to eac h visit; will serve as the table's primary key
Unique number assigned to each patient; common field that will be a foreign key to connect to the Patient table
Date on which the patient visited the clinic
Reason / diagnosis for th e patient visit
Whether the patient visit was a walk-in or sch eduled appointment
As shown in Donna's plan, she wants to store data about visits in five fields, including f ie l ds t o co ntain the date of each visit, the reason for the visit, and if the visit was a walk-in or sc h edul ed appointm en t. Th ese ar e the most importa nt aspects of a v i sit and, therefore, mu st be tracked. Also, notice that the Visiti D fie l d w i ll be the primary key for th e table; each visit at Lakewood Community H ea lth Services is ass igned a unique number, so this field i s the log i ca l choi ce for the primary key. Finally, the PatientiD field is needed in the Visit table as a foreign key to connect the i nformation abo ut visits to patients. The data abo ut patients and th e ir invoi ces will be stored in separate tables, which you w i l l create later.
Notice the name of each field i n Figure 1-6. You need to name each fie l d, table, and o bject in a n Access database.
\n
A shortcut m enu o p e ns when you r ight- dick an obj e ct and pro vides option s for w o rk ing w ith that object.
Decision Making: Naming Fields in Access Tables
One of the most important tasks in creati ng a table is deciding what names to specify for th e tabl e 's fi elds. Kee p th e follow i ng guidelines in mind wh en y o u assign fi eld nam e s:
• A field name can consist of up to 64 characters, including letters, numbers, spaces, and special characters, except for the period (.). exclamati on mark (!), grave accent('), 0.. and square brackets ([ ])
• A field name cannot begin with a space.
• Capitalize the first letter of each word in a field name that combines multiple words, for example VisitDate.
• Use concise field names that are easy to remember and reference and that won't take up a lot of space in the table datasheet.
• Use standard abbreviations, such as Num for Number, Amt for Amount, and Oty for Quantity, and use them consistently throughout the database. For example, if you use Num for Number in one field name, do not use the number sign (#)for Numbe r in another.
• Give fields descriptive names so that you can easily identify them when you view or edit records.
• A lthough Access supports the use of spaces in field names (and in other object names), experienced database developers avoid using spaces because they can cause errors when the objects are i nvolved in programming tasks. By spending time obtaining and analyzing information about the fields in a table, and understanding the rules for naming f i elds, you can create a well-designed table that wi ll be easy for others to use.
Renaming the Default Primary Key Field
A s noted earlier, A ccess provides th e 10 fi eld as t he d e fault primary key fo r a ne w tabl e you create i n Oatasheet view. Reca ll t h at a p r imary key is a f ie l d, or a col l ec tion of fie lds, whose va lu es un i q u e ly i de nt ify each record i n a table. H oweve r, according to Donna's plan , the Vi sit i O f ie ld shou l d be the prima r y key for th e V isit tab l e You ' ll b egin by renam i ng the defau l t 10 fie ld to c reate the Vis it iO fie l d.
To rename the 10 field to the VisitiD
field:
t 1. Right-click the ID column heading to open the shortcut menu, and then click Rename Field T he column heading ID is selected, so that whatever text you type next will replace it.
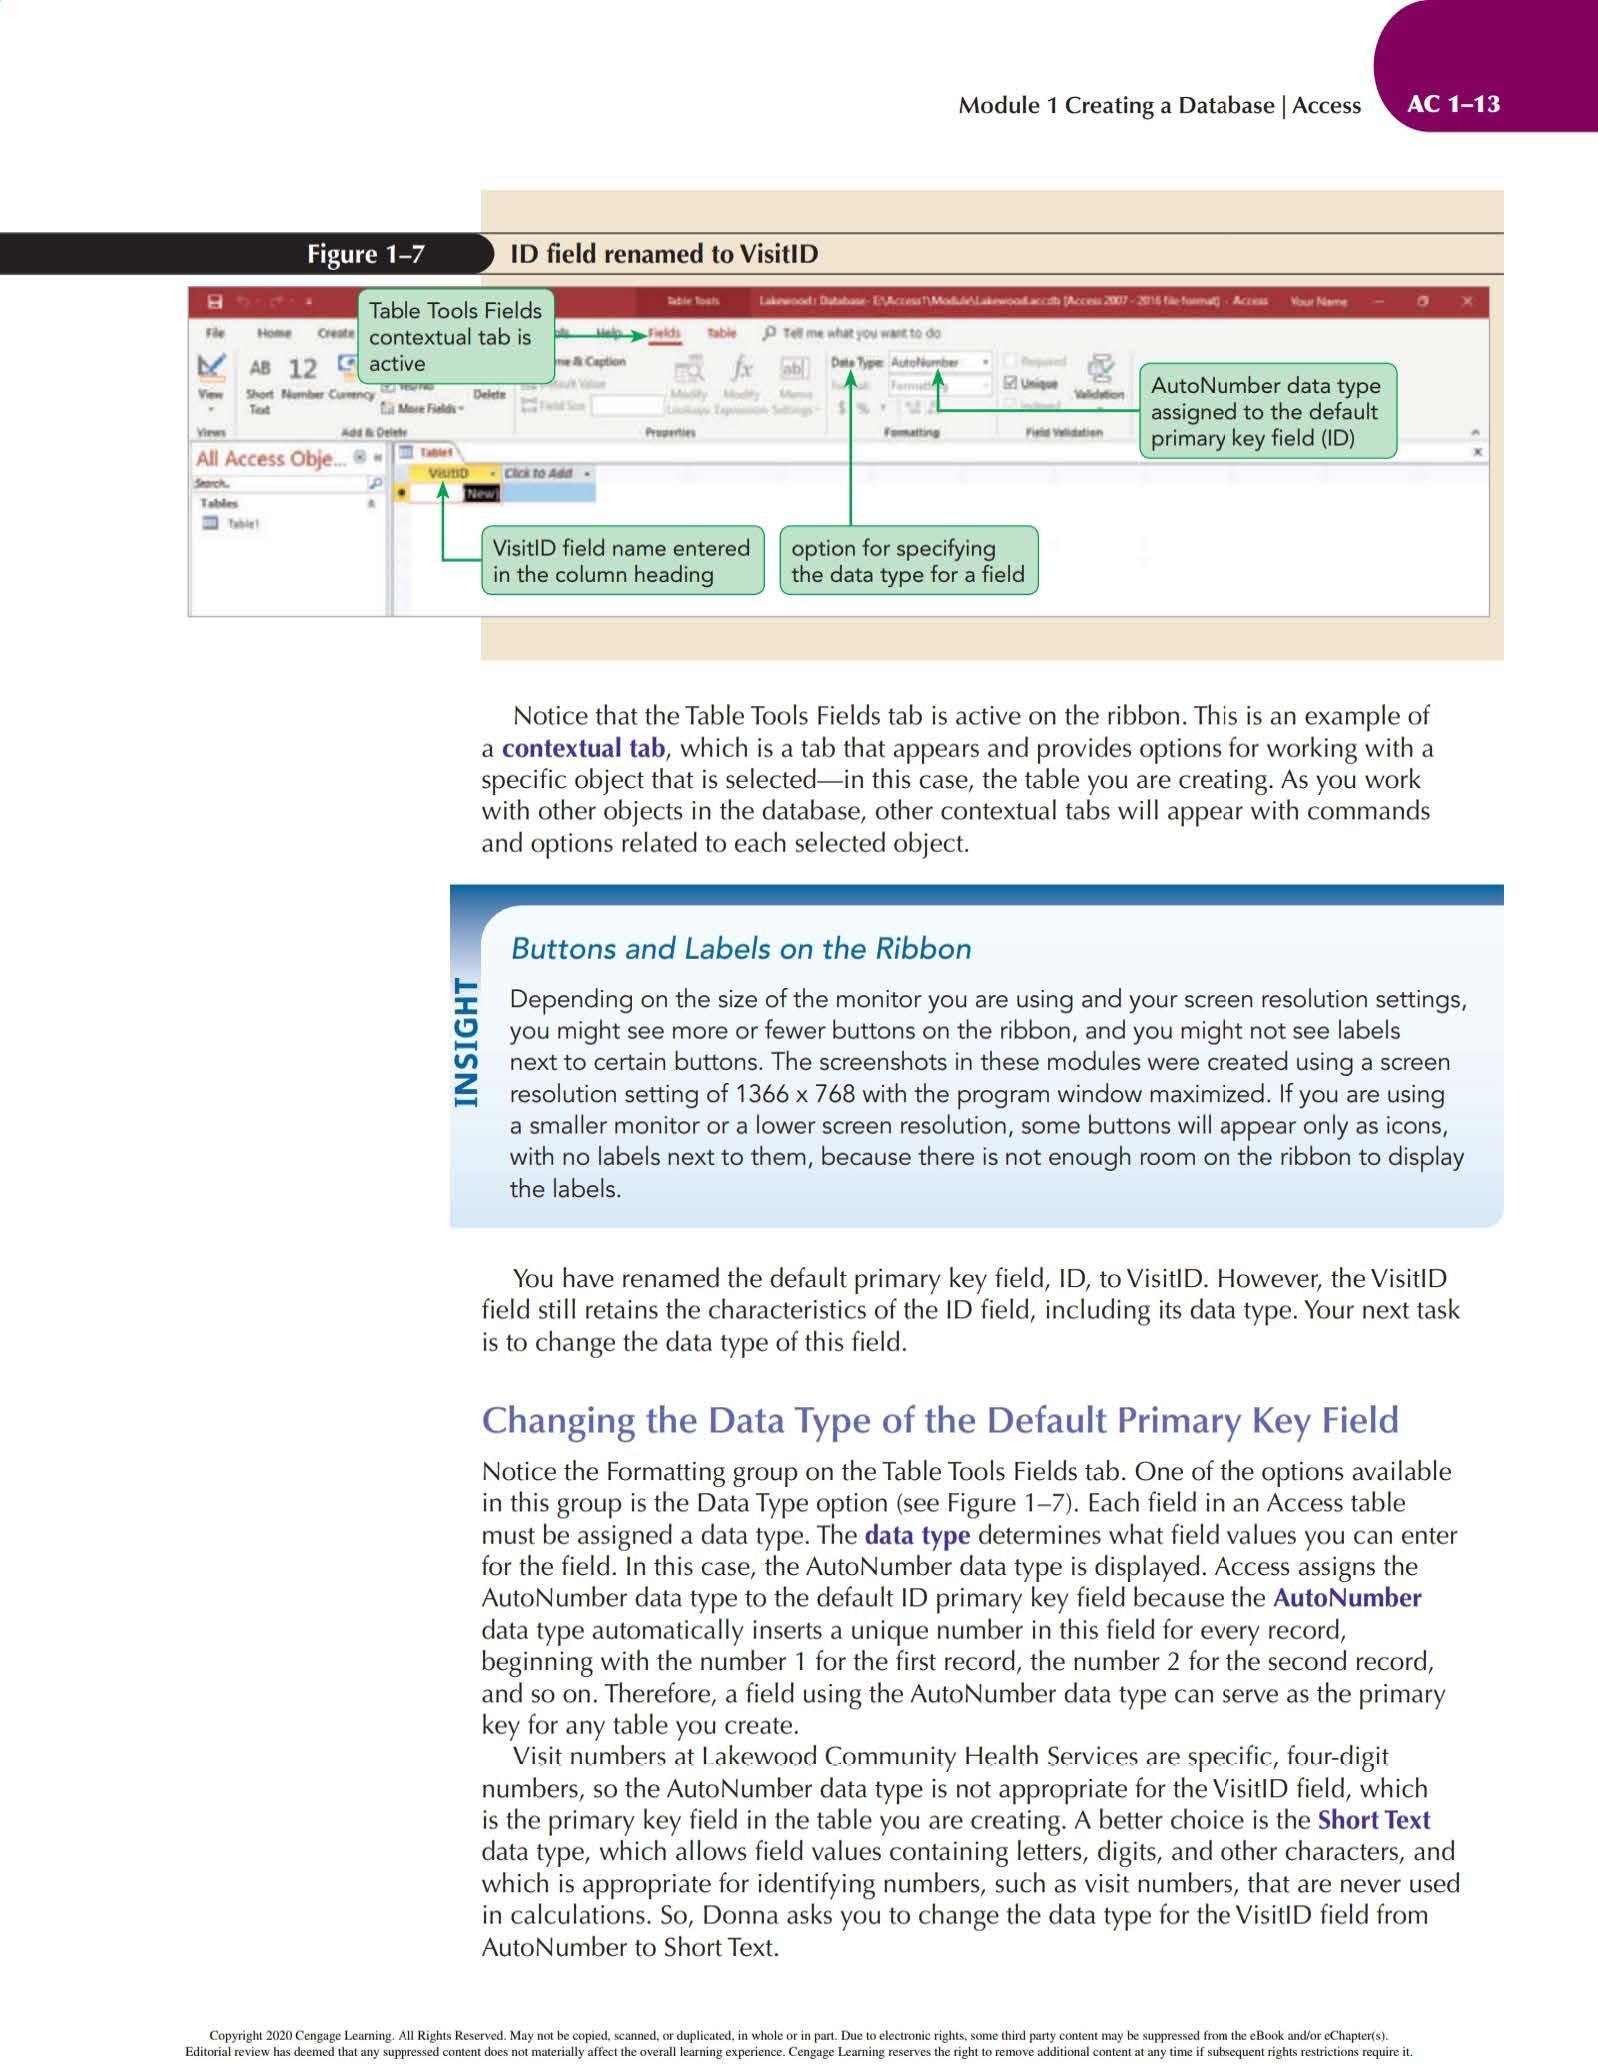
t 2. Type VisitiD and then click the row below the heading. The column heading changes to VisitiD, and the insertion point moves to the row below the heading. T he insertion point is a flashing cursor that shows where text you type w i ll be inserted. In this case, it is hidden within the selected field va l ue (New). See Figure 1-7.
Trouble? If you make a m istake while typi n g the field name, use BACKSPACE to delete characters to the left of the insertion point or use D ELETE t o delete characters to the right of the insertion point. Then type the correct text. To correct a field name by rep lacing it entirely, press ESC, and then type the correct text.
ID field renamed to VisitiD
AutoN umber data type '------'=-----1 assigned to the default primary key field (I D)
VisitiD field name entered option for specifying in the column heading the data type for a field
Not ice th at the Table Too l s Fi e lds tab i s active on the ribbon . Thi s i s an example of a contextual tab, which i s a tab th at appea rs and prov i des o ptions for work ing with a specifi c object th at is selected-i n this case, th e table yo u are c reating. As you work w ith o th e r objects in the databa se, othe r contextua l t abs wi ll appea r wit h commands an d options re l ated to each se lec ted object.
Buttons and Labels on the Ribbon
Depending on the size of the monitor you are using and your screen resolution settings, you might see more or fewer buttons on the ribbon, and you might not see labels next to certain buttons. The screenshots in these modules were created using a screen resolution setting of 1366 x 7 68 with the program window maximized If you are using a smaller monitor or a lower screen resolution, some buttons will appear only as icons, with no labels next to them, because there is not enough room on the ribbon to display the labels.
You have r ena m ed th e defau lt primary key field , ID, to VisitiD. H owever, the VisitiD field st ill r etain s t h e c h aracter ist i cs of th e ID f ie ld , i ncl u d in g its data type. Your next task is to c hange the data typ e of th is f ie ld
Changing the Data Type of the Default Primary Key Field
Noti ce the Formatting group on the Table Too l s Field s tab. One of the options available in this group i s t he D ata Type opt i on (see Fi gure 1-7). Each field in an Access tab le mu st be ass ig n ed a data type. Th e data type det ermin es what fie ld values you ca n enter for the fie ld. I n this case, the AutoN umber data type is displayed. Access assigns th e AutoN umber data type to the def ault ID primary key f ield beca u se the AutoNumber data type automatica ll y in sert s a uniqu e number in thi s field for eve ry reco rd , beginning w ith the number 1 f o r the first record, the number 2 for the second record, and so o n. Therefore, a fie l d using t h e AutoN umber data type can serve as the primary key fo r any tab l e you c rea t e.
Visit numbers at Lakewood Comm unity Health Services are specific , four-digit numbers, so t he AutoN umber data type i s n ot appropr i at e for the VisitiD f ie ld , wh ic h i s t h e primary key fie l d i n the tab l e you are c rea tin g. A b etter c hoice i s the Short Text data type, wh i c h al l ows field va l ues conta ining letters, digits, and other c haracters, and whic h i s appropr iate fo r ident ify i ng numbers, such as v i sit numbers, that are never used in ca l c ul atio n s. So, Do nn a as ks you to c h ange the data type for the VisitiD fie ld from AutoN um ber to Short Tex t.
To change the data type for the VisitiD field :
t 1 . Make sure that the V isitiD co lumn is selected. A column is se lected when you cl ick a field value, in whi ch c ase the background color of the column heading changes to orange (the default color) and the insertion point appears in the f ield value. You can also click the column heading to select a column, in which case the background color of both the column heading and the field value changes (the default colors are gray and blue, respectively)
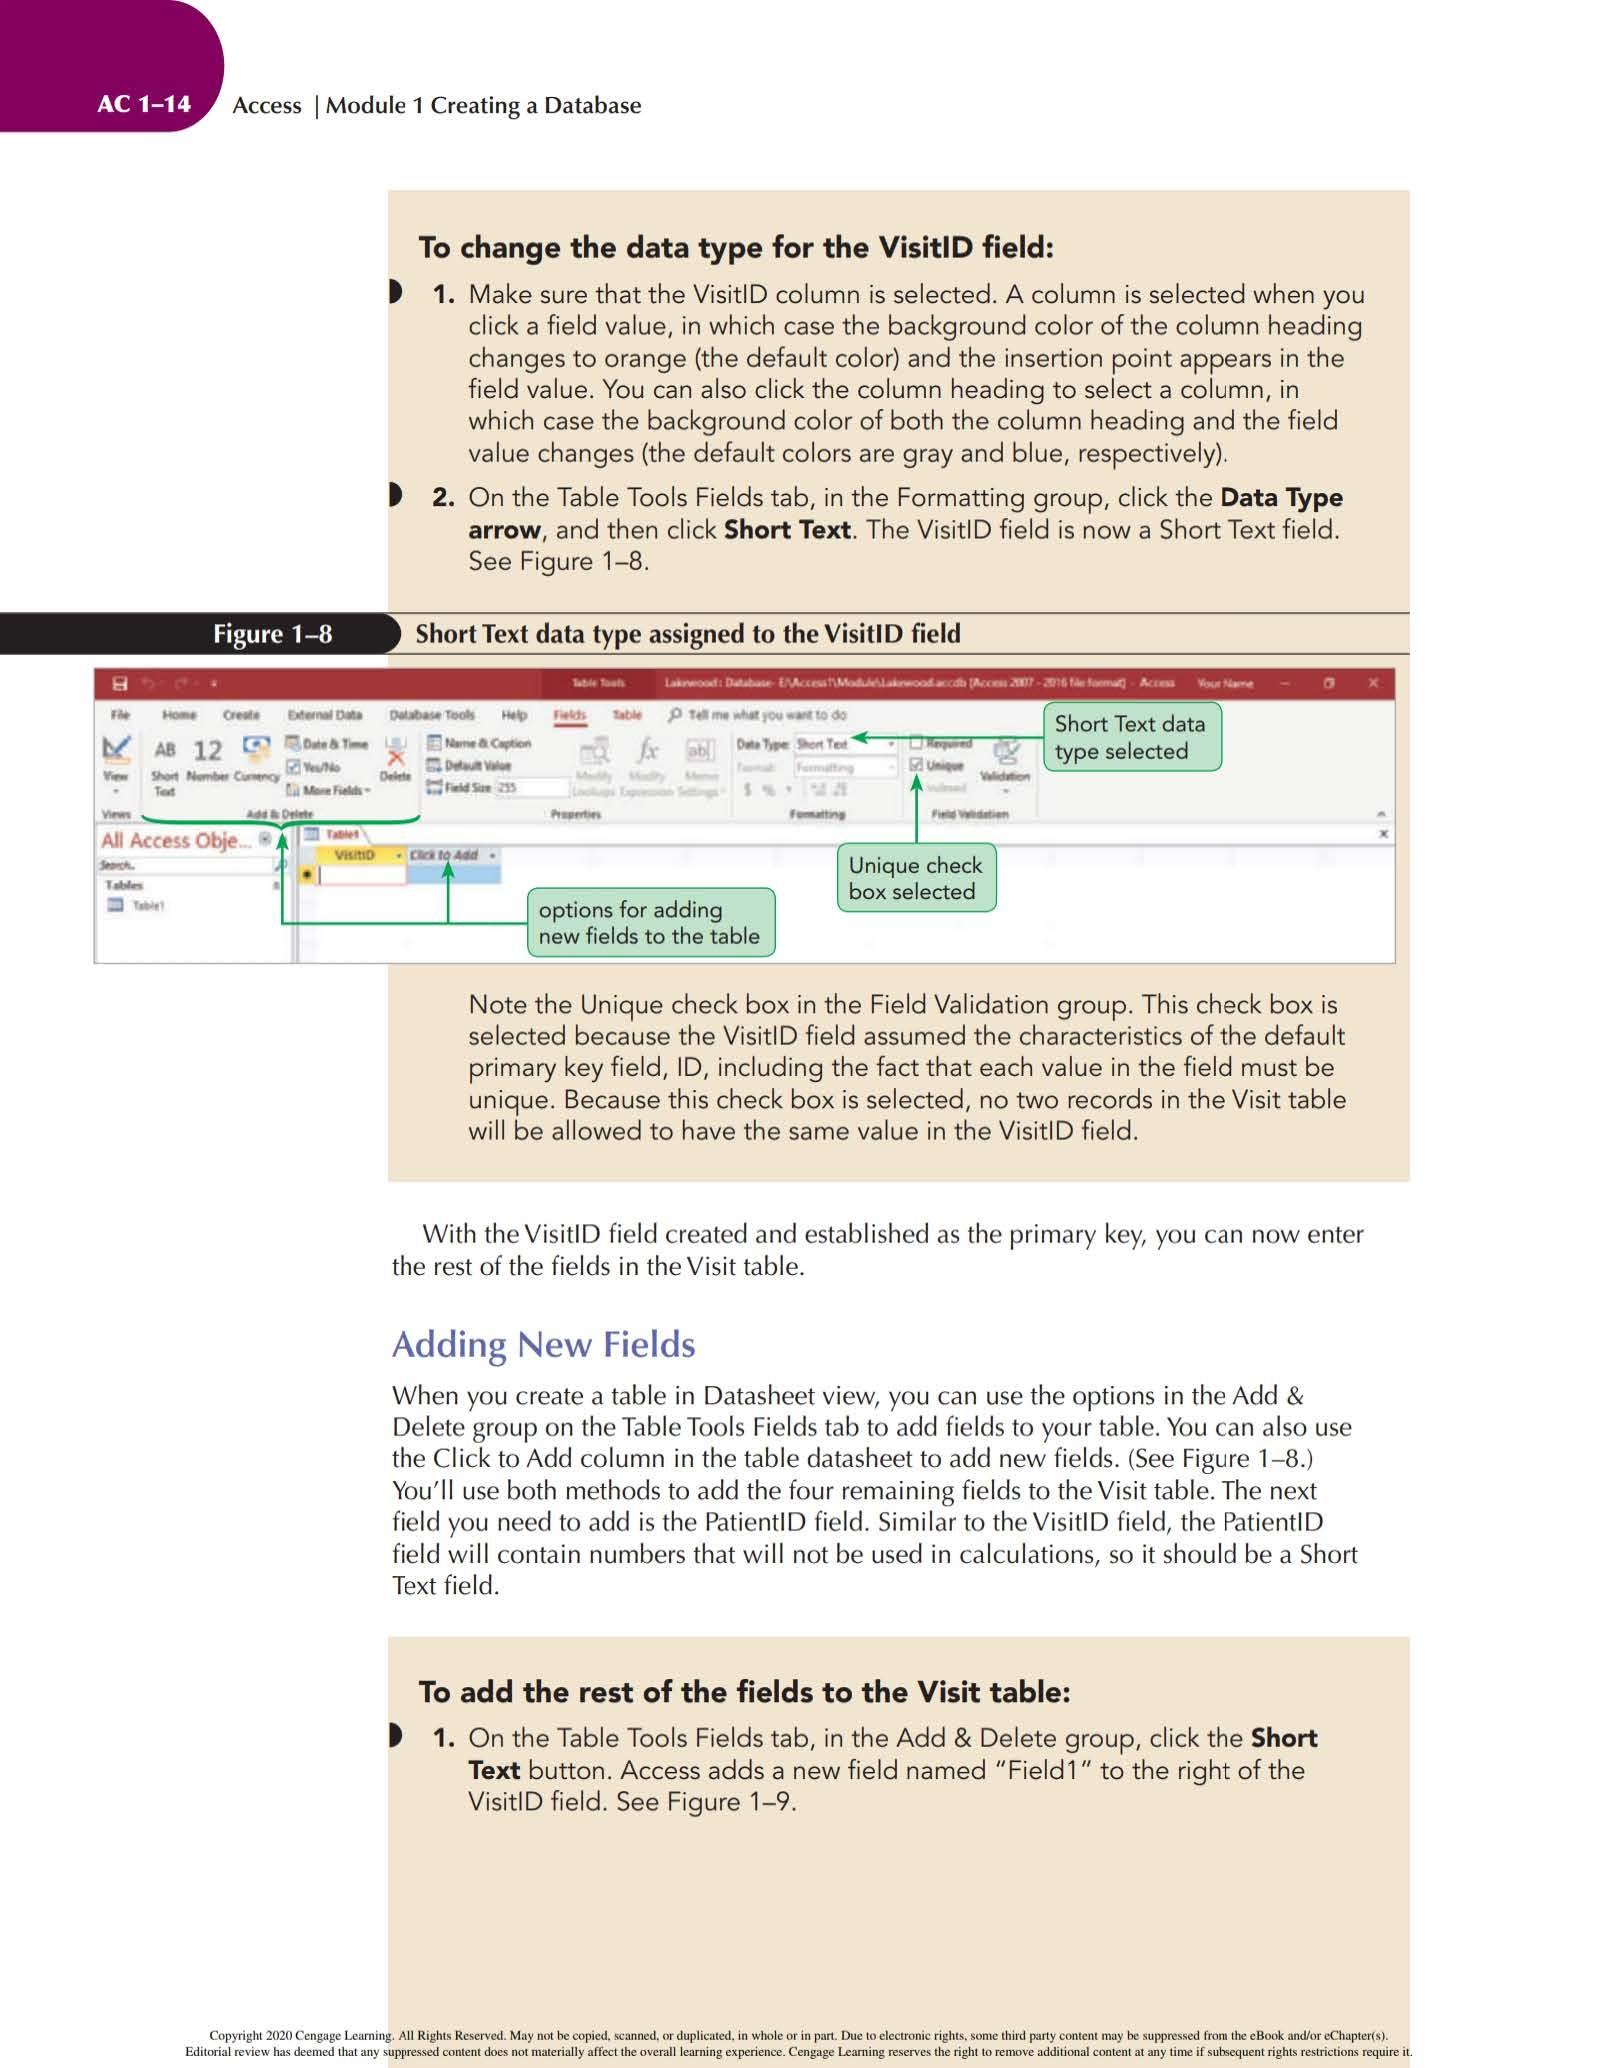
t 2. On the Table Tools Fi elds tab, in the Formatting group, click the Data Type arrow, and then cli ck Short Text. The Vi sitiD field is now a Short Text f ie ld. See Figure 1-8.
Note the Unique check box in the Field Validat ion group This ch eck box i s se lected because the VisitiD f i eld assumed the chara cteristics of the default primary key field, ID, including the fact that each value in the field must be unique. Because this check box is selected, no two records in the V isit table will be allowed to have the same value in the VisitiD f ield.
With th e V i siti D fi el d c r eated a nd est ab l i shed as th e prim ary key, you ca n now e nter t he rest of the fields in the V i sit tab le.
Adding New Fields
When you c reate a t able i n Datasheet view, you ca n use the o ptions in th e Add & De l et e group on th e Tabl e Too ls Fi e ld s t ab to add fi e ld s to your tabl e . Yo u ca n a l so use t he C li c k to Add column in the table datasheet to add new field s (See Figure 1- 8.)
Yo u' ll use both methods to add the four rema i ning f ield s to th e Vi sit t able. The next fi el d you need to add i s th e Pati entiD fi el d. Simil ar t o th e Vi siti D fi e ld, th e Pati entiD fi e ld wil l conta i n numbers that will not be used in ca l c ulations, so it should be a Short Text field.
To add the rest of the fields to the Visit table:
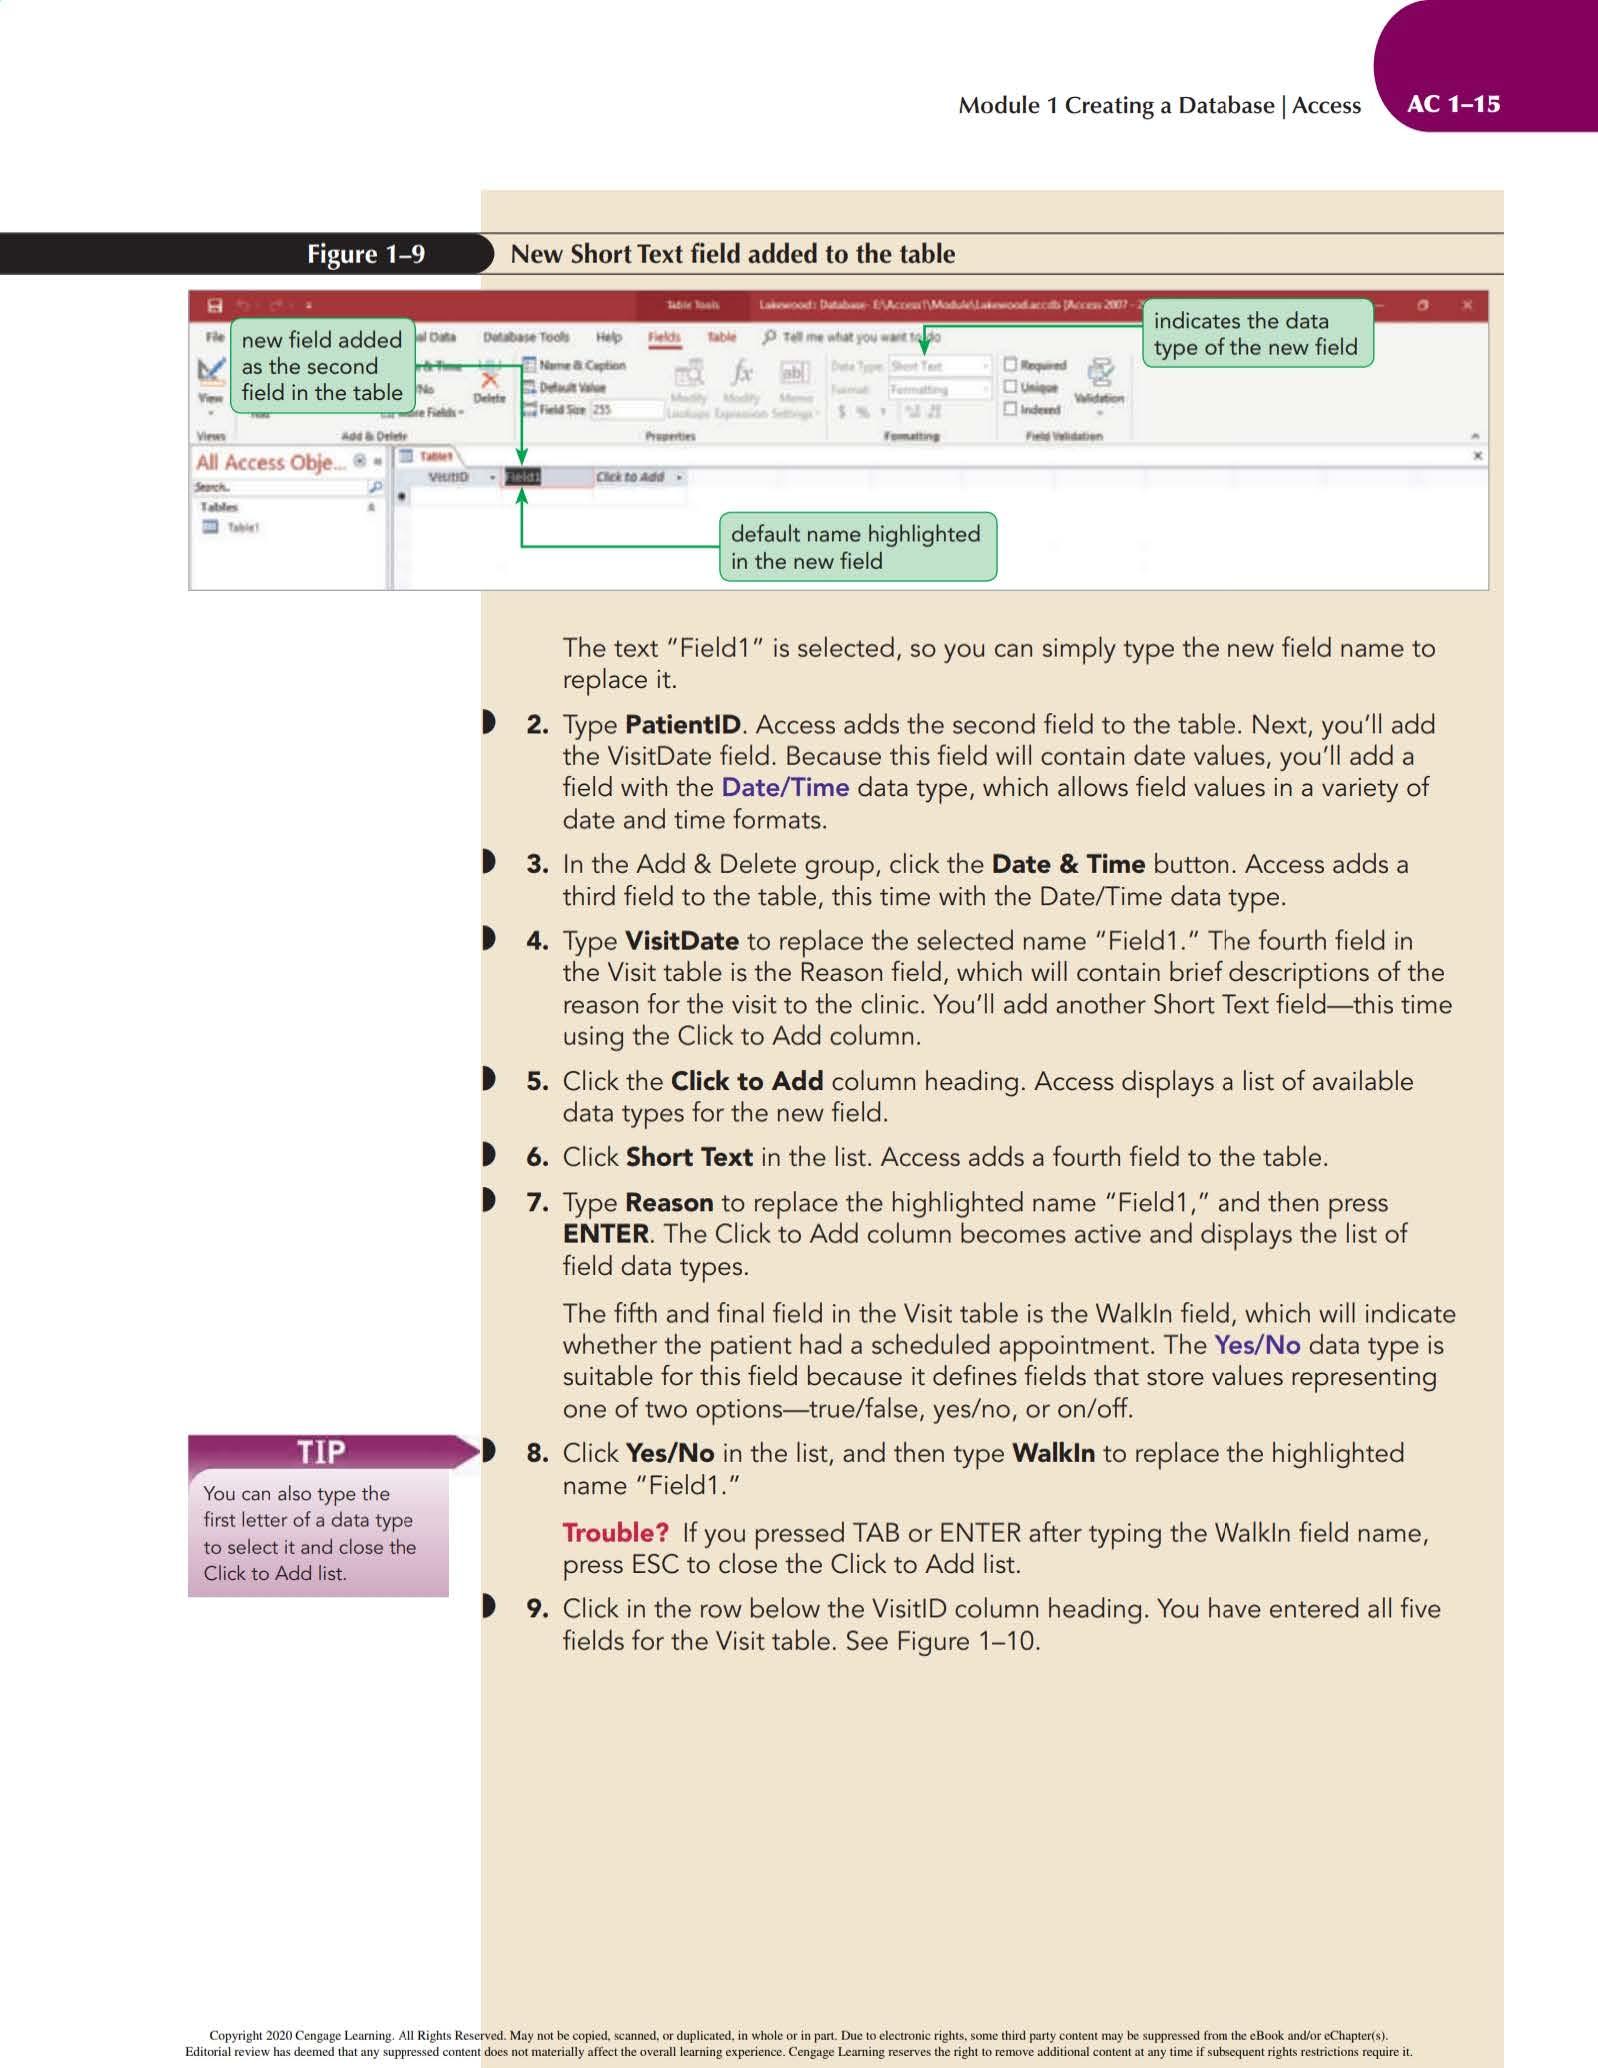
t 1. On the Table Tools Fields tab, in the Add & De lete group, click the Short Text button. Access adds a new f i eld named "Field1" to the right of the VisitiD field. See Figure 1-9.
indicates the data type of the new field
You can also type the first letter of a data type to select it and close the Click to Add list.
'---------i default name highlighted in the new field
The text "Field1" is selected, so you can simp ly type the new fie ld name to replace it.
2. Type PatientiD . Access adds the second field to the table. Next, you'll add the VisitDate field. Because this field will contain date values, you'l l add a f ield with the Date/Time data type, which allows field values in a variety of date and time formats.
3 . In the Add & Delete group, click the Date & Time button. Access adds a third field to the tab l e, this t ime with the Date!Time data type.
4. Type VisitDate to replace the selected name "Field1." The fourth field in the Visit table is the Reason field, which will contain brief descriptions of the reason for the v i sit to the clinic. You'll add another Short Text field-this time using the Click to Add co lumn.
5. Click the Click to Add column heading. Access d isplays a list of available data types for the new field.
6. Click Short Text in the list. Access adds a fourth f ield to the table.
7 . Typ e Reason to replace the high lighted name "Field1," and then press ENTER . The Click to Add column becomes active and displays the list of field data types.
The fifth and fina l fie ld in the Visit table is the Walkln fie ld, wh i ch wil l indicate whether the patient had a schedu led appointment The Yes/No data type is suitable for this field because it defines fields that store values representing one of two options-true/false, yes/no, or on/off.
8. Click Yes/No in the list, and then type Walkln to replace the highlighted name "Field1."
Trouble? If you pressed TAB or ENTER after typing the Wa lkln field name, press ESC to close the Click t o Add list.
9 . Click in the row below the Visit iD column heading. You have entered all five fields for the Visit table. See Figure 1-10.
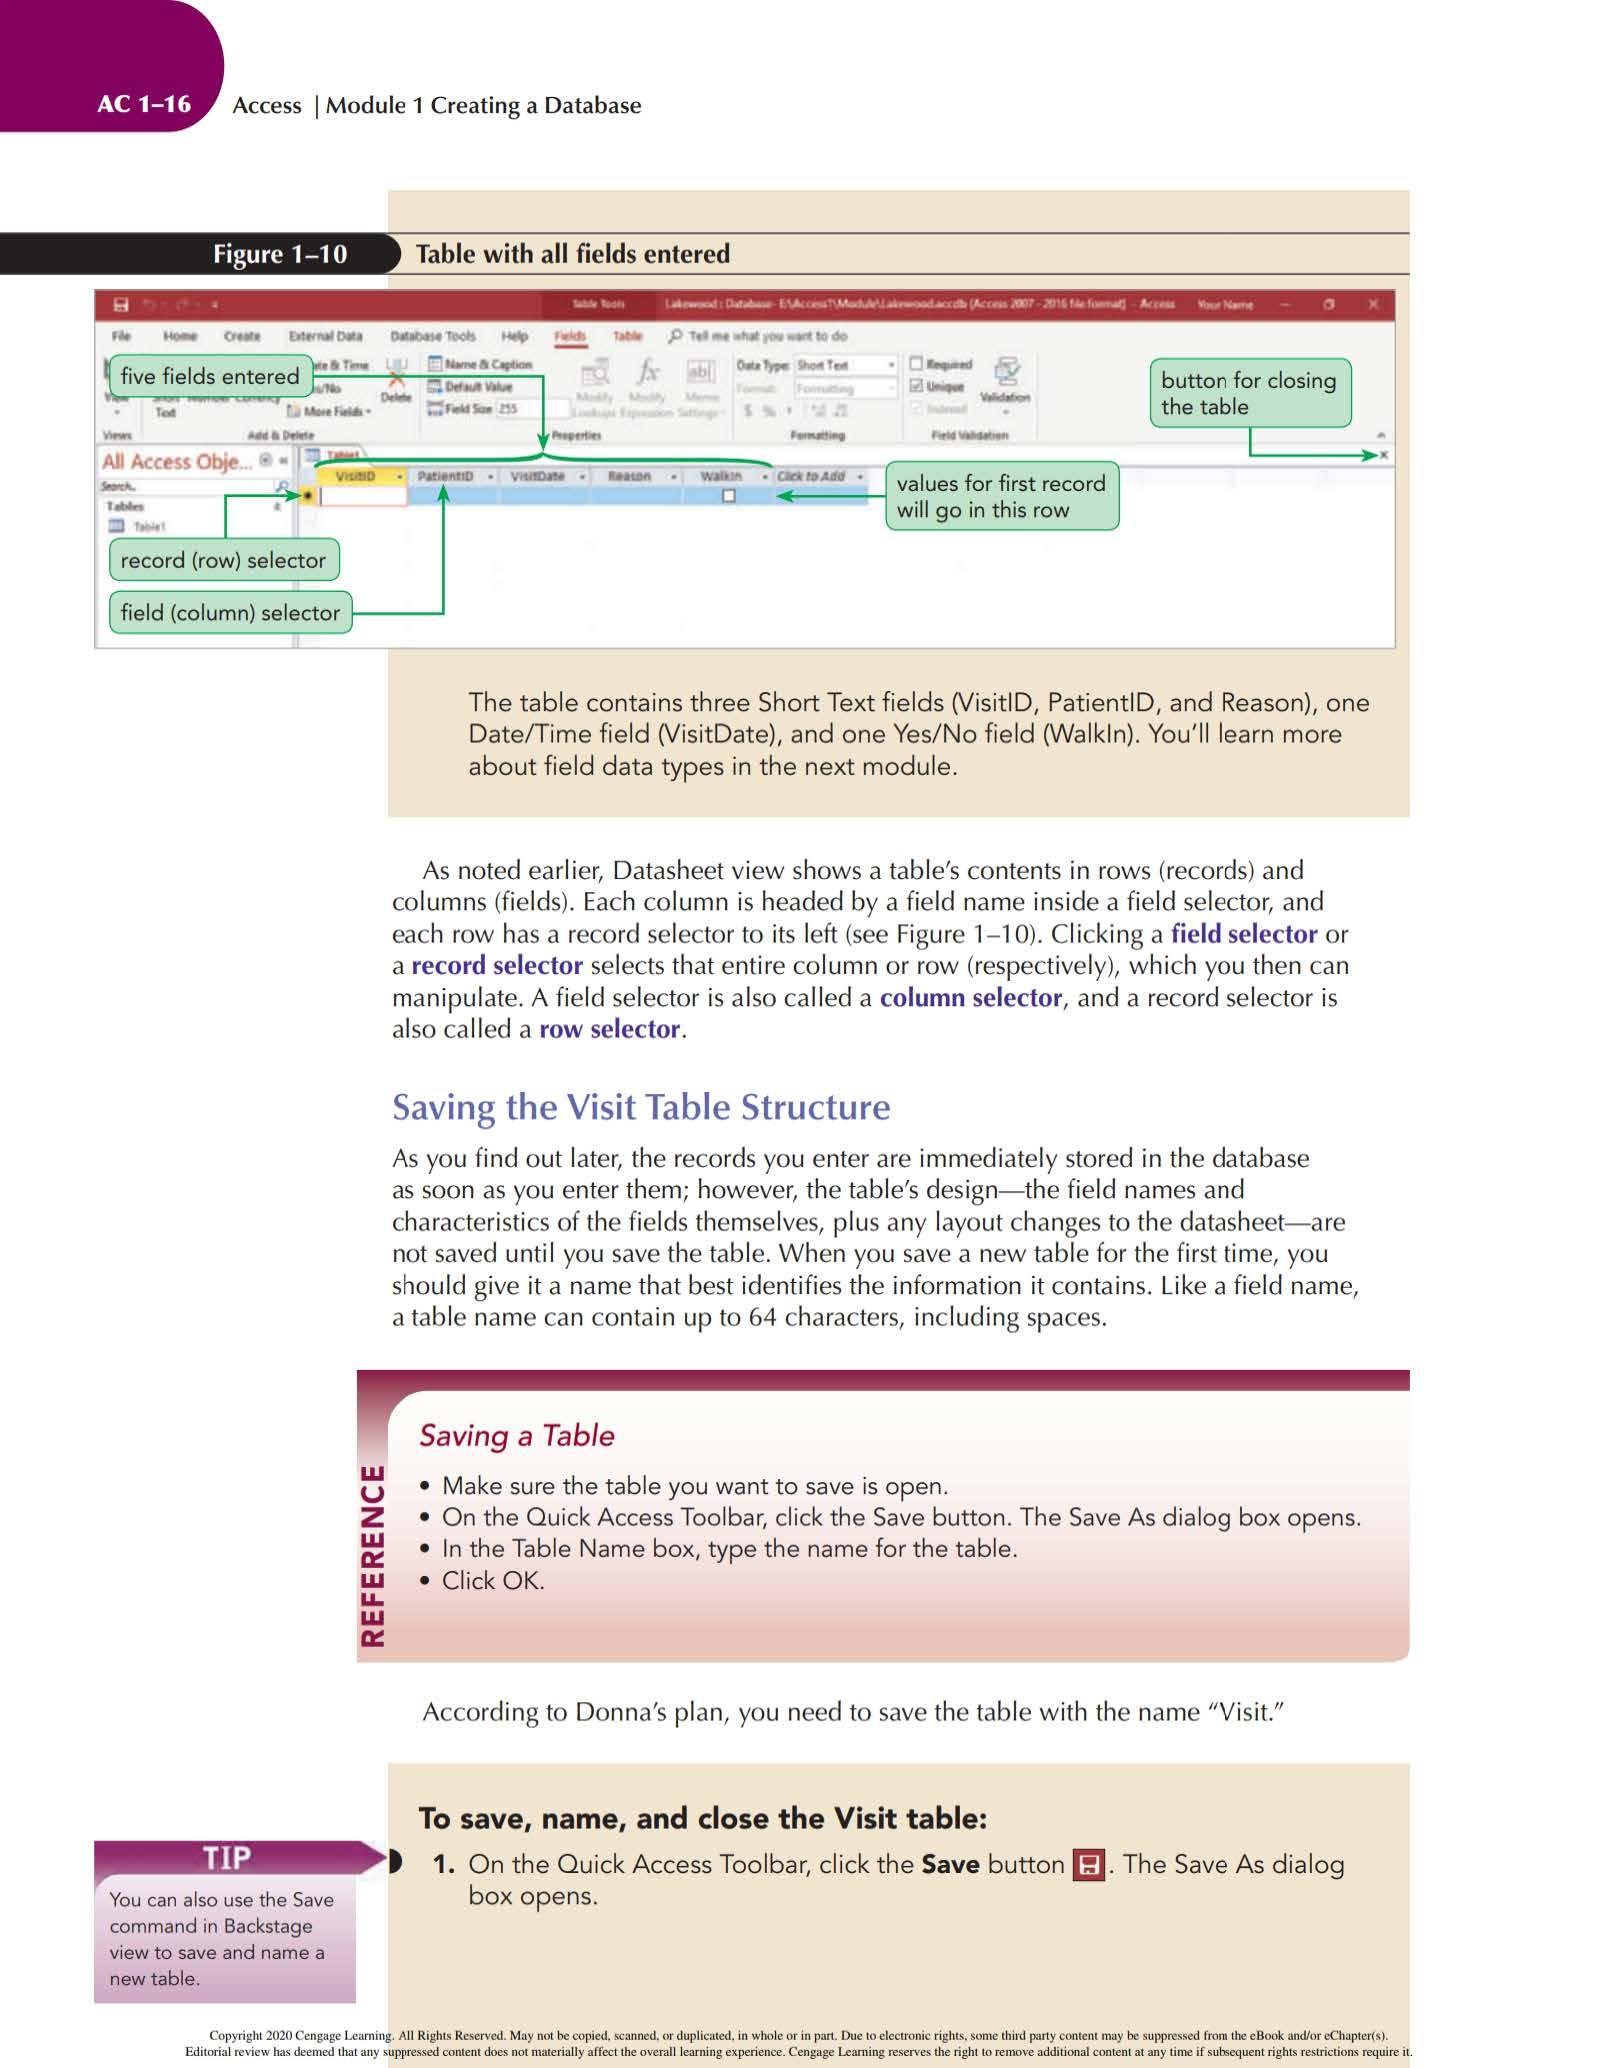
The table contains three Short Text fields (VisitiD, PatientiD, and Reason), one Date/Time field (VisitDate), and one Yes/No field (Walkln). You'll learn more about field data types in the next module.
As noted ear li er, Datasheet v i ew shows a table 's contents in row s (records ) and co lumns (field s) Eac h column i s headed by a field name inside a f ie ld se l ector, and eac h row h as a re cord se lector to its le ft (see Fi gure 1- 10). Cl i ck in g a field selector or a record selector selects that ent ire co lumn or row (respectively), which you then can manipulate. A f ie ld se l ector is a l so ca lled a column selector, and a reco rd se l ector i s also ca ll ed a row selector
Saving the Visit Table Structure
As you find o ut l ater, th e records you enter are imm ediately stored in the database as soon as yo u enter them; however, the table's design- the field names and c haracter i sti cs of th e fields th em se lves, plus any l ayout c h anges t o th e datas h eet-a re not saved until you save th e tabl e. When yo u save a new table for the f irst time, you shou l d give it a n ame that best identifi es the information it co ntai n s. Like a field name, a t able n am e ca n co ntain up to 64 c haracte rs, inc lu d in g spaces
S a ving a Table
• Make sure the table you want to save is open
• On the Quick Access Toolbar, click the Save button. The Save As dialog box opens.
• In the Table Na me box, type the name for the table.
• Click OK.
According to Donn a's plan , you n eed to save th e tab l e with the n am e "V i sit."
To save, name, and close the Visit table :
1 On the Quick Access Toolbar, click the Save button I!J . The Save As dialog box opens.
t 2. With the default name Table1 selected in the Table Name box, type V isit and then click OK The tab for the tab le now displays the name "Visit," and the Visit table design is saved in the Lakewood database.
t 3 . Click the Close ' Visit ' on the object tab (see Figure 1-10 for the location of this button). The Visit table closes, and the main portion of the Access window is now blank because no database object is current ly open. The Lakewood database file is stil l open, as indicated by the filename in the Access window title bar.
Creating a Table in Design View
Th e Lakewood d at abase al so needs a tab le that w il l ho l d all of th e invoic es generated by each office v i sit. Donna has decided to ca l l this new table the Billing table. You created the stru ct ure for the Vi sit table i n Datasheet vi ew. An alte rnate method of crea tin g the stru cture of a table i s by usi ng Des i gn vi ew. You wi l l c reate th e new Bill ing table using D es ig n v i ew.
Creatin g a tab l e in Des ig n v iew involves e nter ing th e f i e ld names and defining the properti es for the f i e lds, spec ifyi ng a primary key for th e table, and th en sav ing the table structure. Donn a began documenting the design for the new Billing table by li sting eac h fie ld 's name, data type, and purpose, and w ill continu e to r efin e the desi gn. See Fi gure 1- 11.
field Name In voiceNum
Visit!O In voiceAmount InvoiceDate In voice Paid
Data Type Short Text Short Text
Curre n cy Date/Time Yes/No
P u rpose
Unique numb er assign ed to ea ch invoice; wi ll serve as the table 's primary key
Unique numb er assigned to ea ch visit; common field that will be a foreig n key t o connect to the Visit table
Dollar amount of each invoice
Date the invoice was g en erated Wheth er the in vo ice has been paid or n o t
You ' ll use D onna's d es i gn as a gu ide for creati ng the Billing table in the Lakewood database.
To beg in creating the Billing table:
t 1 If the Navigation Pane is open, click the Shutter Ba r Open / Close to close it.
t 2 . On the ribbon, click the Create tab.
t 3 . In the Tables group, click the Table Design button. A new table named Table1 opens in Design v iew.
Defining Fields
When yo u fi rst create a table in Design view, the inserti o n point i s l ocated in the f irst row's Fi eld Name box, ready for yo u to begin defining the first field in the table. You enter val ues for t he Fi eld N am e, Data Type, and Desc ripti on fi eld properti es (optional), and then se l ect va l ues for all other f ie ld properties in the Field Properti es pan e. These other properties wi ll appea r w hen you move to the first row's Data Typ e box.
Yo u can also p ress ENTER t o move from one property to t he n ext in the Table Desi gn grid.
Defining a Field in Design View
• In the Field Name box, type the name for the field, and then press TAB.
• A cce pt the d ef ault Short Text data typ e, or cli ck the arrow and sel ect a different data type for the f ie ld. Press TAB.
• Enter an optional description for the field, if necessary.
• Use the Field Properties pane to type or select other field properties, as appropriate.
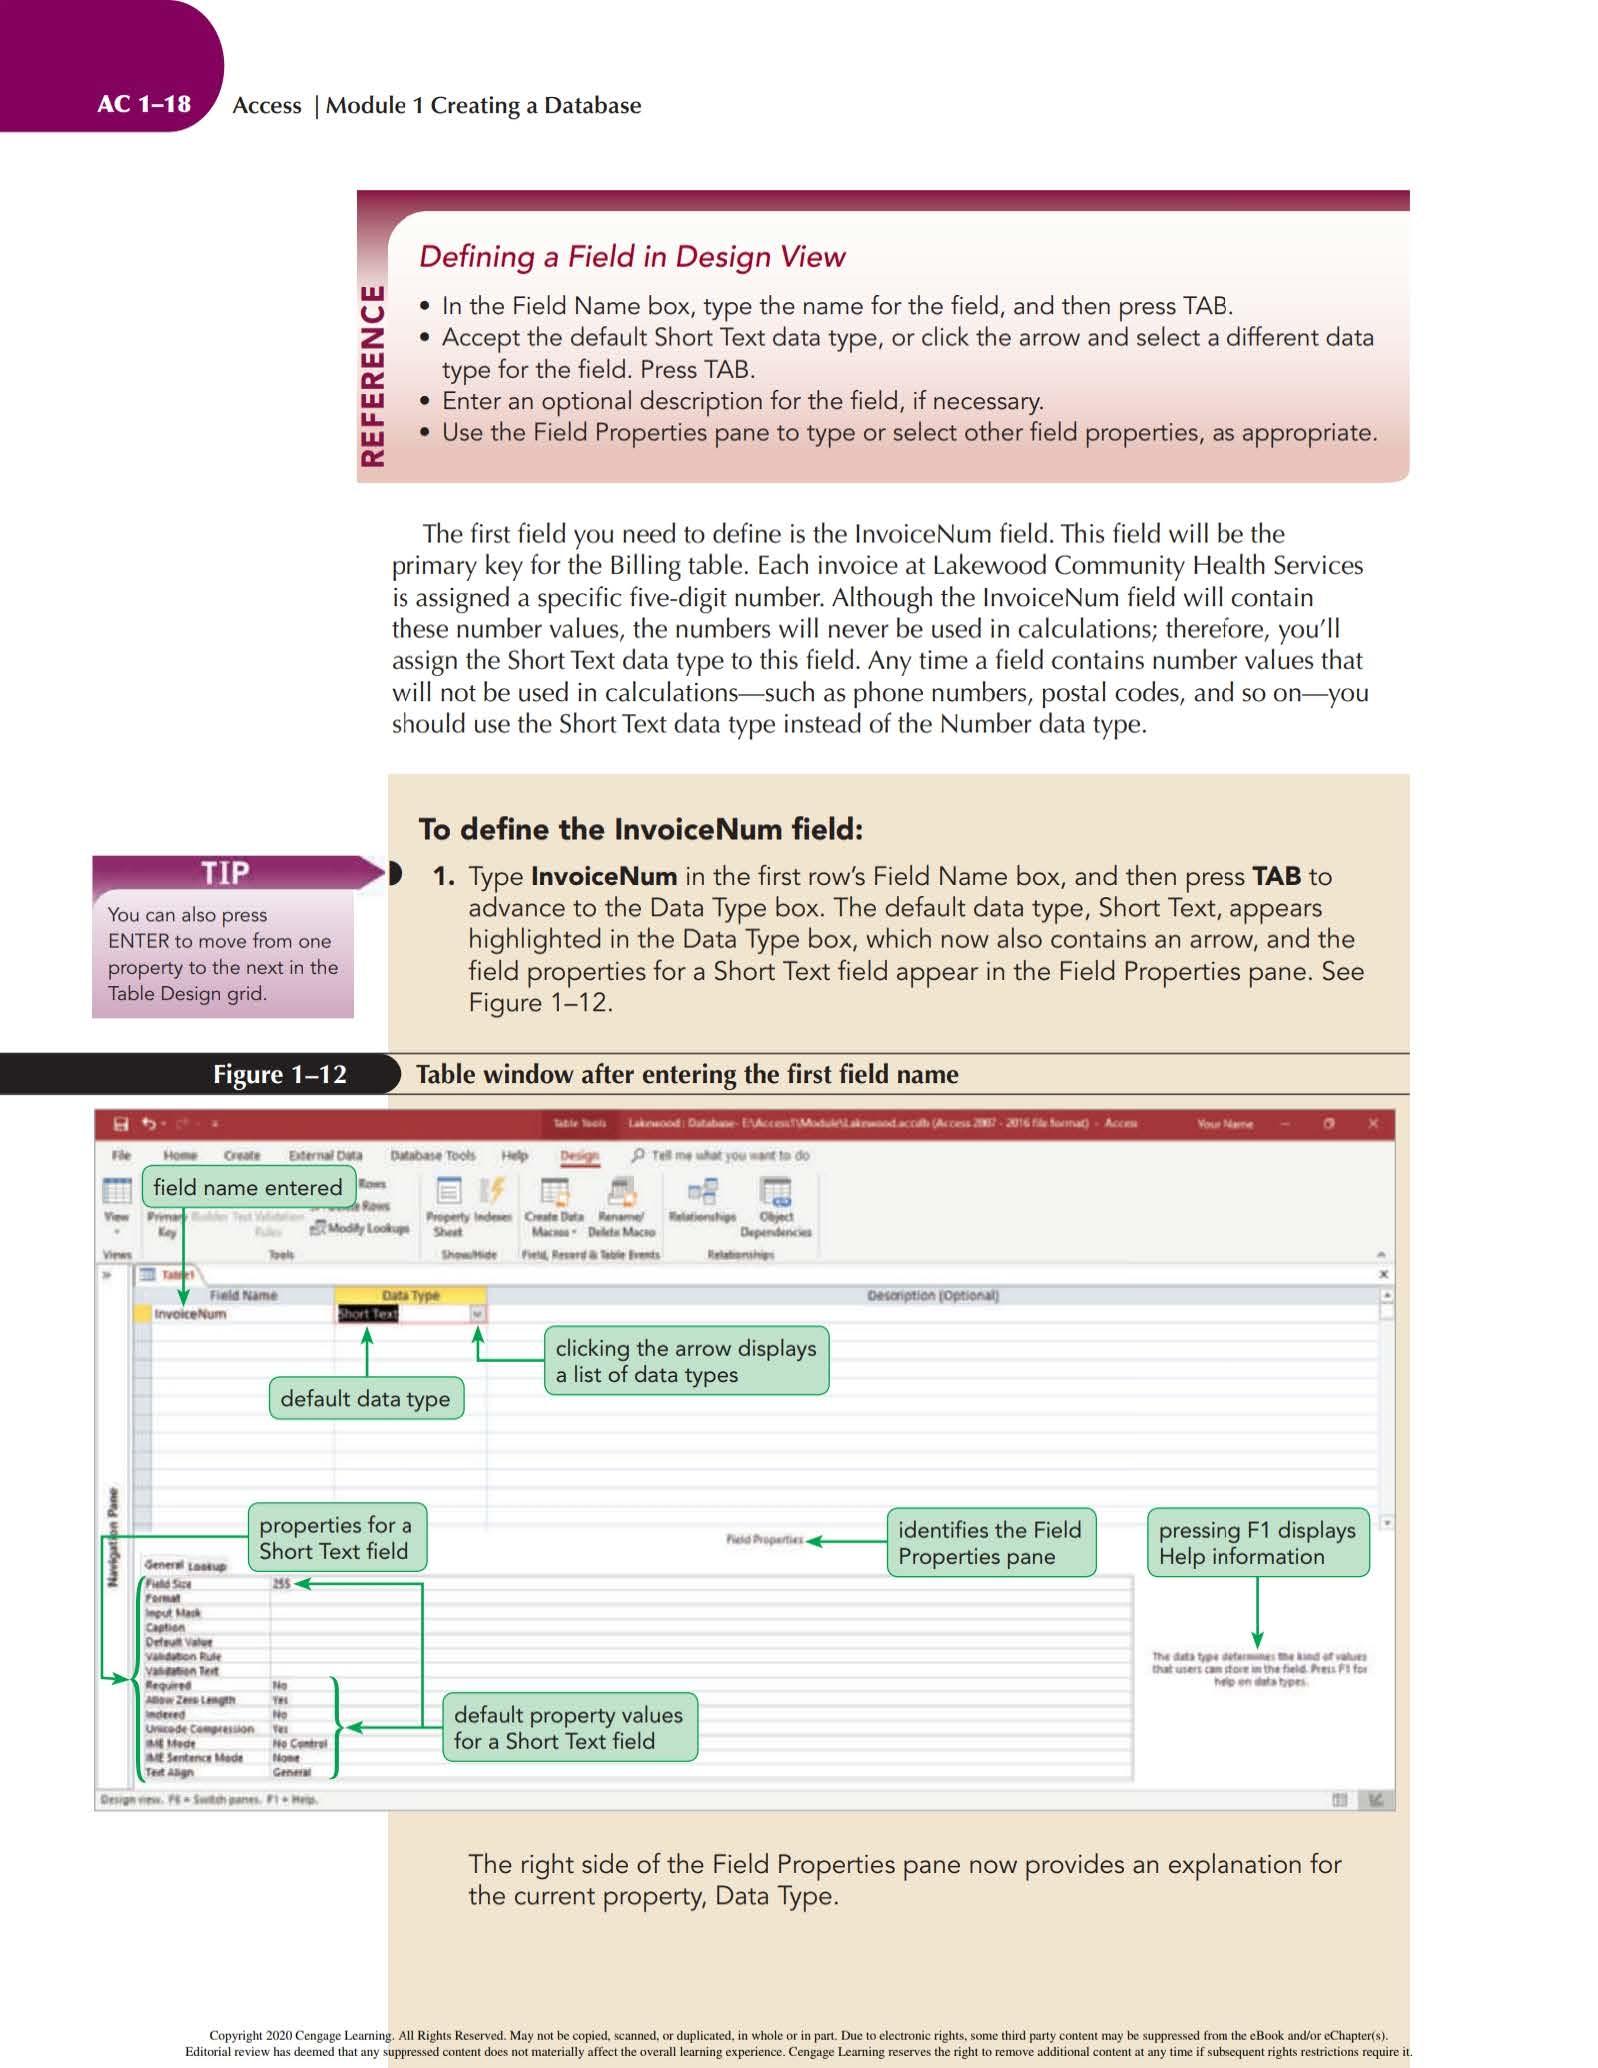
The f irst f ie ld yo u need t o defin e i s th e l nvoi ce Num f ie ld. Thi s fi el d wil l be th e pr im ary key for th e Bi ll ing t ab le Eac h invoice at Lakewood Community H ea lth Serv i c es is ass ig ned a spec ifi c five-d ig i t nu mber. A lt houg h the l nvoi c eNum fie l d w ill c ontain th ese numbe r va lues, th e numbers will never be used in ca l c ul ati o ns; th erefore, you' ll assign th e ShortText d at a t y pe to thi s fi e ld. Any tim e a fi el d c ontains number va l ues that w ill not be used in ca l c ul ations- such as p ho ne nu mbers, posta l code s, and so on- yo u shou l d use th e Short Text data t ype in st ea d of th e Number d ata type
To define the lnvoiceNum field :
t 1. Type lnvoiceNum in the first row's Field Name box, and then press TAB to advance to the Data Type box. The default data type, Short Text, appears highlighted in the Data Type box, wh ich now also contains an arrow, and the field properties for a Short Text f i eld appear in the Field Properties pane. See Figure 1-12.
Table window after e ntering the first fi e ld name
clicking the arrow disp lays a list of data types
identifies the Field Properties pane
The right side of the Field Properties pane now provides an explanati on for the current property,
You can also use TAB to
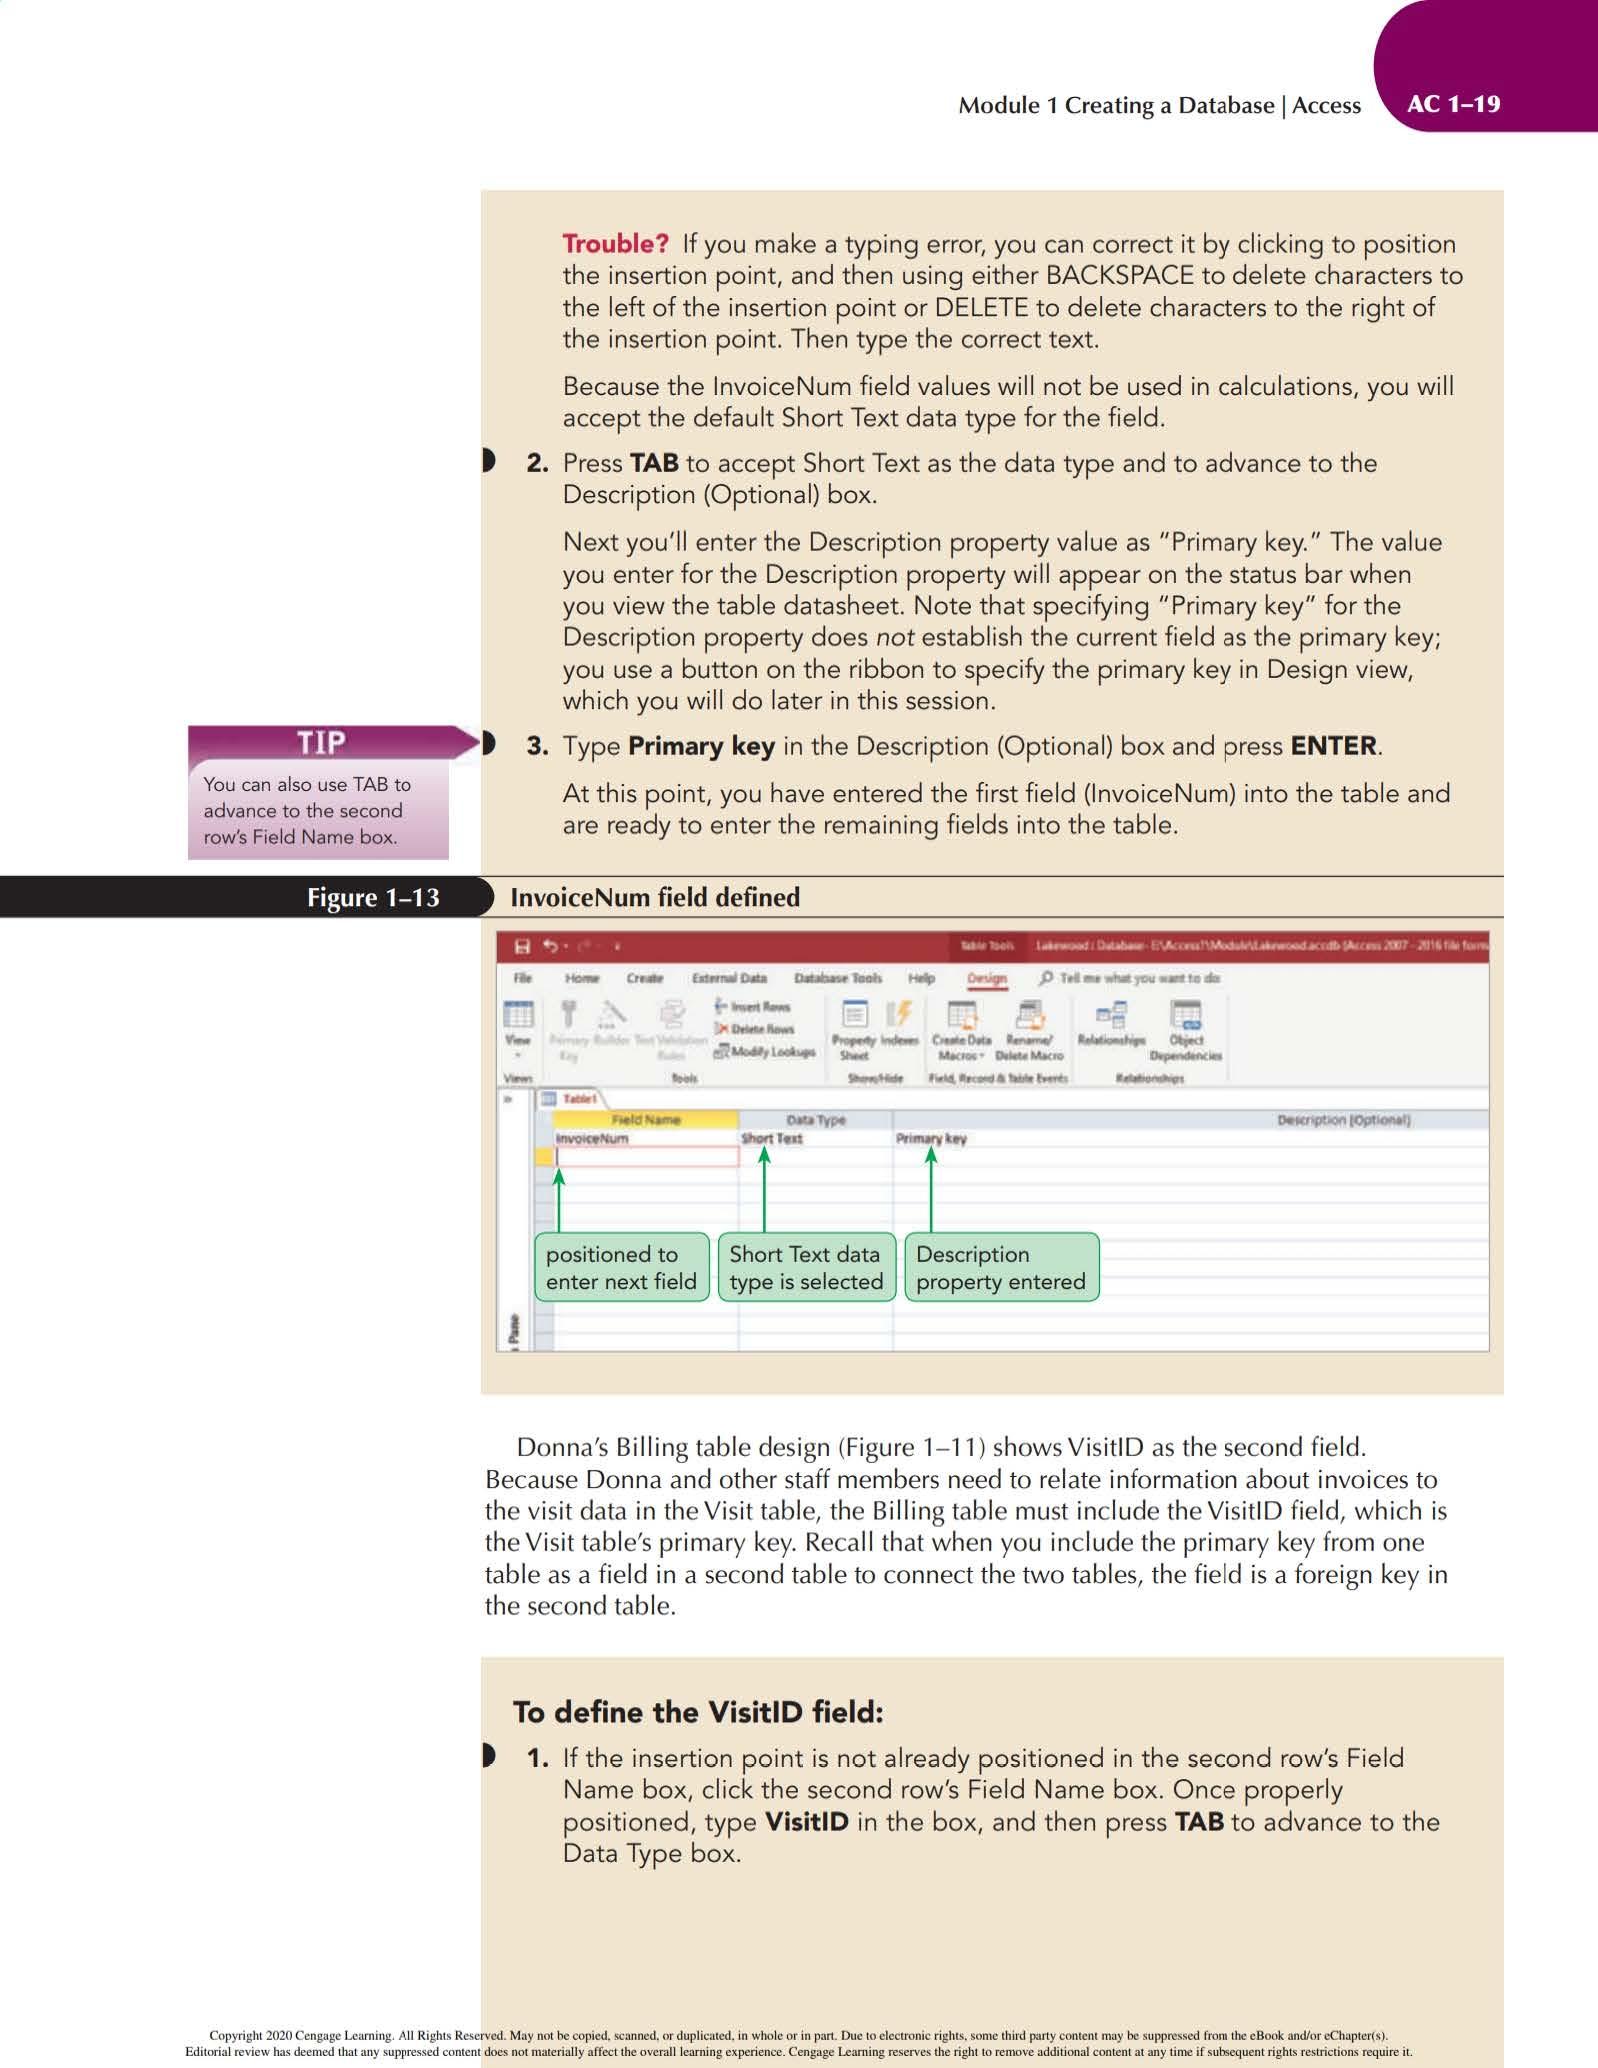
Trouble? If you make a typing error, you can correct it by clicking to position the insertion point, and the n using either BACKSPAC E to delete characters to the left of the inserti on point or DELETE to delete characters to the r ig ht of the insertion point. Then type the correct text.
Because the lnvoice N um field values will not be used in calculations, you will accept the defau lt Short Text data type for the fie ld.
t 2 Press TAB to accept Short Text as the data type and to advance to the Descriptio n (Optiona l) box.
Next you'll enter the Description property value as " Primary key." T he va l ue you enter for the Description property will appear on the status bar when you view the table datasheet. N ote that specifying "Pri mary key" for the Description property does not establ ish the current field as the primary key; you use a button on the ribbon to specify the primary key in Design view, which you will do later in this session.
3. Type Primary key in the Description (Optional) box and press ENTER
At this poin t , you have entered the first field (l nvoice N um) into the table and are ready to enter the remaining fields into the table.
Don na's Bi ll ing table des i gn (Fi gu re 1- 1 1) shows Vis it i D as the second f i el d. Beca use D o nna an d othe r staff m em b ers n eed to re l ate i nfor m at io n abo ut i nvo i ces to t h e v i sit data in t h e V i sit t ab le, t he Bi ll i ng table m u st i nclude t h e V i sit i D fi eld , whic h i s t h e V i sit tab l e's pr i mary key. Reca ll that whe n you i nclude t h e pr i ma r y key from o n e t ab le as a f i el d i n a seco nd tab le to co nnect th e t wo tables, the f ie ld is a fo r ei gn key i n t h e second tab l e.
To define the VisitiD field:
t 1 . If the insertion po int is not already pos itioned in the second row's Fie ld Name box, cl ick the second row's Field Name box. Once properly positioned, type VisitiD in the box, and then press TAB to advance to the Data Type box.