No part of this publication may be reproduced, stored in a retrieval system or transmitted in any form or by any means, electronic, mechanical, photocopying, recording, scanning or otherwise, except as permitted under Sections 107 or 108 of the 1976 United States Copyright Act, without the prior written permission of the Publisher. Requests to the Publisher for permission should be addressed to the Permissions Department, John Wiley & Sons, Inc., 111 River Street, Hoboken, NJ 07030, (201) 748-6011, fax (201) 748-6008, or online at http://www.wiley.com/go/permissions
Trademarks: Wiley, For Dummies, the Dummies Man logo, Dummies.com, Making Everything Easier, and related trade dress are trademarks or registered trademarks of John Wiley & Sons, Inc., and may not be used without written permission. All other trademarks are the property of their respective owners. John Wiley & Sons, Inc., is not associated with any product or vendor mentioned in this book.
LIMIT OF LIABILITY/DISCLAIMER OF WARRANTY: WHILE THE PUBLISHER AND AUTHORS HAVE USED THEIR BEST EFFORTS IN PREPARING THIS WORK, THEY MAKE NO REPRESENTATIONS OR WARRANTIES WITH RESPECT TO THE ACCURACY OR COMPLETENESS OF THE CONTENTS OF THIS WORK AND SPECIFICALLY DISCLAIM ALL WARRANTIES, INCLUDING WITHOUT LIMITATION ANY IMPLIED WARRANTIES OF MERCHANTABILITY OR FITNESS FOR A PARTICULAR PURPOSE. NO WARRANTY MAY BE CREATED OR EXTENDED BY SALES REPRESENTATIVES, WRITTEN SALES MATERIALS OR PROMOTIONAL STATEMENTS FOR THIS WORK. THE FACT THAT AN ORGANIZATION, WEBSITE, OR PRODUCT IS REFERRED TO IN THIS WORK AS A CITATION AND/ OR POTENTIAL SOURCE OF FURTHER INFORMATION DOES NOT MEAN THAT THE PUBLISHER AND AUTHORS ENDORSE THE INFORMATION OR SERVICES THE ORGANIZATION, WEBSITE, OR PRODUCT MAY PROVIDE OR RECOMMENDATIONS IT MAY MAKE. THIS WORK IS SOLD WITH THE UNDERSTANDING THAT THE PUBLISHER IS NOT ENGAGED IN RENDERING PROFESSIONAL SERVICES. THE ADVICE AND STRATEGIES CONTAINED HEREIN MAY NOT BE SUITABLE FOR YOUR SITUATION. YOU SHOULD CONSULT WITH A SPECIALIST WHERE APPROPRIATE. FURTHER, READERS SHOULD BE AWARE THAT WEBSITES LISTED IN THIS WORK MAY HAVE CHANGED OR DISAPPEARED BETWEEN WHEN THIS WORK WAS WRITTEN AND WHEN IT IS READ. NEITHER THE PUBLISHER NOR AUTHORS SHALL BE LIABLE FOR ANY LOSS OF PROFIT OR ANY OTHER COMMERCIAL DAMAGES, INCLUDING BUT NOT LIMITED TO SPECIAL, INCIDENTAL, CONSEQUENTIAL, OR OTHER DAMAGES.
For general information on our other products and services, please contact our Customer Care Department within the U.S. at 877-762-2974, outside the U.S. at 317-572-3993, or fax 317-572-4002. For technical support, please visit https://hub.wiley.com/community/support/dummies.
Wiley publishes in a variety of print and electronic formats and by print-on-demand. Some material included with standard print versions of this book may not be included in e-books or in print-on-demand. If this book refers to media such as a CD or DVD that is not included in the version you purchased, you may download this material at http://booksupport.wiley.com. For more information about Wiley products, visit www.wiley.com
Nonlinear editing programs like Adobe Premiere Pro CC have changed the game when it comes to making movies so much that it’s easy to take it for granted. Anyone with an Adobe Creative Cloud subscription and a dream can make a movie and show it to an audience that spans the globe. But it wasn’t always like that. Not that long ago, making a movie depended on a tabletop full of editing equipment with a severe lack of forgiveness. There was no undo in this world. Actually, there was its own version — it was called the do-it-over.
As for editing costs, the passion of putting a movie together in the last millennium could make you broke faster than an online gambling site. Unless you were fortunate to be working in the industry, and had access to state-of-the-art equipment, chances are you were making quality sacrifices. So, without a suitcase filled with cash, putting the finishing touches on your movie project was as far off as a walkin membership to a snooty country club. Even if you could afford the most basic equipment, the disparity between the consumer and professional level was far beyond a professional-quality movie. Instead of providing the look of a Hollywood movie, the end-result would be of significantly lesser quality.
Nowadays, that glass ceiling has been broken and all that should matter is how well you shot and edited your movie. Nonlinear applications like Premiere Pro CC are leading the way by allowing average Joes access to professional-style editing tools. Video content creators have access to the tools to create a real movie — be it long, short, really short (looking at you TikTok) or anything in between.
Premiere Pro CC puts the creative power at anyone’s fingertips. Not even Nostradamus could have imagined the power in the hands of the average user, who was long on passion and short on accessibility, to now make a movie with limited resources and deliver to a potentially wide global audience.
About this Book
I’m making no allusions that this book is the oracle to understanding everything about Premiere Pro. To adequately cover every feature, function, and technique, in addition to tips, workarounds, and other tricks, I would need far more than a few hundred pages. Rather, this singular Adobe Premiere Pro CC For Dummies serves as a reliable resource to familiarize you with the software and get you editing quickly.
So, what exactly does that mean? It means you get the dollar tour of the workspace with the basics of setting up your project, importing various types of content, and
making magic in the Timeline — otherwise known as the place to arrange your movie assets. This is what’s important when dipping your toe into Premiere Pro.
If you’re not sure how important editing is to the filmmaker, just check out some classic films like the shower scene from Alfred Hitchcock’s Psycho, or the Odessa Steps scene from Sergei Eisenstein’s seminal 1925 film, Battleship Potemkin. Brian DePalma paid homage to that classic scene in the 1987 film, The Untouchables
Versatility is the name of the game with Premiere Pro. Much like the special way you take your latte at a particular coffee chain, Premiere Pro is quite versatile. Plus, making a movie with it won’t get your name spelled wrong on the cup. So, whether you’re capturing a documentary with your new Sony F7 professional camcorder system, using your Canon 5D (of any mark you choose), a consumerlevel camcorder, or more than likely, your smart phone, you can easily ingest that footage and begin making a movie after a quick perusal this handy guide.
How this book is organized
Reading this book should make you feel like living in the no commitment zone. That means you will not have to read it cover to cover; instead, you’ll consume the information that you need and apply it with hands-on ease.
Premiere Pro CC For Dummies is divided into five parts, each detailing an aspect of preparing, editing, and delivering your movie. Depending on your level of understanding and your needs, you may prefer a particular area over another. Feel free to read it start to finish if that’s your thing. But chances are you want to spend more time editing. So also feel free to jump around.
PART I: Getting Familiar with the Adobe Premiere Pro Universe
Think of this set of chapters as the appetizer to the big meal — you know, if the big meal were a pro-quality movie. Complex in what it can do, yet easy to learn, Premiere Pro CC essentially consists of a collection of individual windows called panels that together create its powerful interface. This section prepares you with a swift overview of setting up your workspace and customizing it for your needs.
PART II: Gathering Content
With features and functions that transform old school linear video editing from the suite to a nonlinear powerhouse on your laptop or desktop computer, the following chapters explain fundamental techniques for bringing content from a
variety of sources into the workspace. These include the previously mentioned collecting, managing, and organizing movie assets.
PART III: Editing Your Masterpiece
If the past sections were the appetizer, then think of the following chapters as the main course. Whether you’re a beginner looking to make a short video, a working professional looking to understand the program’s newest and most powerful features, or anyone in between, this group of chapters takes you through the ins and outs of editing your movie with sublime simplicity.
PART IV: Finishing Off Your Project
Now that your movie is edited, it’s time to give a quality control once-over and export it as a movie file. After that, you can upload it to a social media site with your sights set on viral video victory. Maybe festivals or public showings are in the cards — then you could have a full house. Sharing your movie through a file transferring service is another option, or you could go old school by transferring to a DVD (or an even older school, like transferring to videotape) if that’s your thing. Whatever you choose, your movie is ready to live outside the program.
PART V: The Part of Tens
The For Dummies version of the top ten list provides insight into tools and techniques that take your Premiere Pro moviemaking skills to the next level. And by including a trio of lists, think of your progress increasing three times as much.
Icons Used in the Book
What’s a For Dummies book without icons pointing out pertinent information that quickly gives you what you need and lets you get on your way? Here’s a brief description of the icons used in book.
This icon marks a generally interesting and useful fact — something you may want to remember for later use.
This light bulb points out helpful suggestions and useful nuggets of information.
When you see this icon, you know that techie stuff is nearby if you’re not feeling very techie feel free to skip it.
The warning icon alerts you of lurking danger. With this icon I’m telling you to pay attention and proceed with caution.
Beyond the book
In addition to what you’re reading right now, this book comes with a free accessanywhere Cheat Sheet that includes tips to help you use Adobe Premiere Pro CC. To get this Cheat Sheet, simply go to www.dummies.com and type Adobe Premiere Pro For Dummies Cheat Sheet in the Search box.
1 Getting Familiar with the Adobe Premiere Pro Universe
Learn how you can use Premiere Pro for video editing projects.
Become familiar with the Premiere Pro workspace.
Learn about hardware requirements. Identify what accessories you’ll need to capture video.
Learn how to tweak settings for you needs and customize windows.
IN THIS CHAPTER
» Getting to know the workspace
» Introducing the panels
» Describing each tool
» Briefing on the libraries
Chapter 1
Perusing the Premiere Pro Landscape
Way back in the early 20th century, the only way to edit a videotape package was to put it together in linear order. You know, the first scene first, then the second, blah, blah, blah. Nowadays, Adobe Premiere Pro lets you randomly drag clips (parts of a movie file) around and put them in any order you like. This is known as nonlinear editing. The really cool thing is that you can shuffle clips around as many times as you like until you’re happy with the results.
As with any software, learning how to navigate the Premiere Pro features is extremely important. This chapter introduces you to the Premiere Pro workspace, including the panels, tools, and libraries.
In the workspace, various configurations of panels allow you to control various aspects of making a movie: audio mixing, controlling effects, and managing project assets. One of the key panels here is the timeline, which is the place you arrange, and often rearrange your clips to make your movie.
Understanding What Premiere Pro Can Do
Premiere Pro brings the creative power of post-production moviemaking from the editing suite to the convenience of your computer screen. Tape-to-tape editing, film splicing, and workprint are a few of the antiquated terms now in the rear-view mirror thanks to nonlinear editing.
That’s quite a contrast from the way things used to be. For years, putting a movie together involved a series of steps that had to occur in sequential order. Imagine splicing pieces of film from different reels and putting them together and then realizing that you missed an entire scene. That’s not a good feeling, and you get little forgiveness for skipping parts of the order.
Premiere simplifies the process of telling stories visually by making it more affordable, more flexible, and allowing you to change your mind and experiment with placing clips in the timeline without penalty. Change your mind and see how it plays out without any worry. You also don’t get your fingers sticky with film cement, and you won’t get cut with a razor blade. While the software is intuitive, it’s important to have a lay of the land to fully understand its potential.
Premiere Pro lets you to place elements in a timeline, a long panel that appears at the bottom of the screen where you add video clips. The order in which you add the clips doesn’t matter; you can drop in the last scene first, and the first scene later on, or in any other combination. It still plays out in linear fashion, regardless of when you add the clips. Yet, while Premiere Pro is intuitive, it’s important to have a lay of the land to fully understand what the software can do.
Dissecting the Workspace
Premiere Pro makes you feel like a video-editing superhero whose special powers transform your movie project from appalling to appealing. Not quite as cool as x-ray vision or web-slinging, but producing effective, clean edits is a power in its own way.
Before you can create an award-winning masterpiece, you need to get familiar with the workspace. C’mon, even Batman had to know his way around Gotham City, right? So think of yourself as Batman (your choice on which actor. . .okay, Christian Bale, no wait, Robert Pattison, or go old school with Michael Keaton or Adam West). No matter. You should learn your way around Premiere Pro so when you see the Bat-Signal — or most likely a text message on your iPhone — to edit an important package, you intimately know the Premiere Pro tools and functions
that are at your disposal. The following sections give you an overview of what you see when you open Premiere Pro.
Breaking down the interface
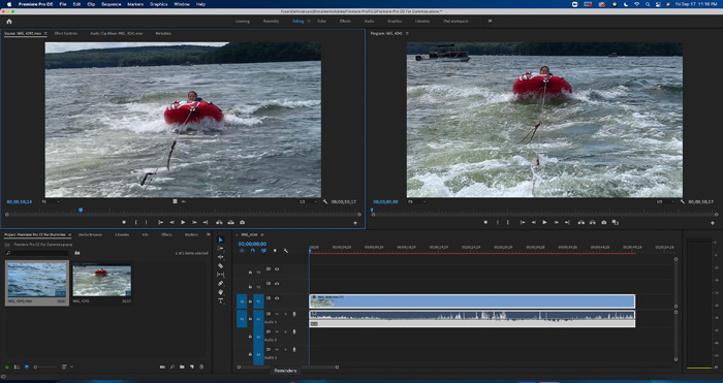
The Premiere Pro interface looks overwhelming at first glance because so many choices make it hard to focus on anything specific. Yeah, there’s a ton of great stuff; it’s just a matter of focusing on what’s necessary. I’ll address the points of contention, taking it from the top — of the screen, that is, where you’ll find nine menu headers whose deep nesting make it feel like “bursting” nest syndrome. Consider the overwhelming screen real estate, shown in Figure 1-1.
While complex, the workspace actually makes sense. You just need to look at it as a series of individual components that work together as a single entity. The Project panel (lower left in Figure 1-1) shows the ingested movie files, and the timeline (lower right in Figure 1-1) has an edited clip. On top, the Source Monitor panel shows clip content while the Program Monitor panel plays out clips on the timeline.
Ingesting and Editing
Ingesting refers to transferring your video content from the camera of card into Premiere Pro. Editing is the means of putting that ingested content into some cohesive order.
FIGURE 1-1: Premiere Pro showing the editing workspace.
The screen is far less scary when viewing the workspace as individual sections, or panels, each with its own special function. Although the panels have specific functions, they all work together. For example, the Projects panel stores your assets and sequences that you could drag into the timeline and then view on the Program Monitor panel before deciding to color-correct the video by making a selection in the Effects panel and fine-tuning it in the Effect Controls panel.
Understanding the panels
The panels in Premiere Pro are stylish, functional, and easy to navigate once you get the hang of working with them. You can click on one panel and interact that action with another panel. So, you can be in the Projects panel, select a clip, set its In and Out points, and drag the clip into the timeline. Once there, you can click on the clip, activate the Audio Meters, and make adjustments to the sound. Need to be more focused? Then for precise work, fill the screen with a single panel by highlighting it and pressing the accent key.
While each panel is a stand-alone, they all work together to create your video. It isn’t necessary to understand every panel to do great work. The more you know, the more you can do, but you can easily get started by simply learning how a few panels work.
When you click in a particular panel, the area becomes activated, as indicated by a blue borderline. This allows you to perform whatever task that panel offers. For example, when selecting the Timeline panel, you can move clips around, change their length, or delete them altogether.
Getting around the workspace
Unlike a lot of software that folks use (I’m looking at you, Office 365), you can customize where different elements of the Premiere Pro interface live. Think of the interface of what you see on the screen, and the workspace, the particular way they are arranged.
Timeline on the bottom, monitors on top enjoys popularity; but so does the reverse. And even then, some users tuck the timeline to get a better view of the Project panel. Other users like a deep timeline to see multiple audio and video channels. Still others keep it compact so they have more monitor real estate. It’s all about freedom of choice, and Premiere Pro makes it like a buffet where you get to choose what fills your plate and how much.
Some users may opt for one of the preset workspaces found at Windows ➪ Workspaces. Again, it’s all about personal choice, and Premiere Pro makes the available choices unlimited. Any time you choose, you can toggle between various layouts (see Chapter 3 for more information) to perform specific actions to get the job done.
The panels operate independently depending on the one you highlight. Navigating to a particular panel is just a matter of clicking on it (a blue borderline lets you know it’s active). The pull-down menus supplement the workflow by providing you with another way to access an action or effect, or to provide more choices.
Having a Panel Discussion
With Premiere Pro, most of your work will be done in three panels:
» The Project panel where your video resides
» The Timeline panel where the clips are placed
» The Program and Source Monitor panels that shows the playback
When you’re getting familiar with Premiere Pro, you need to know what each panel allows you to do when you’re editing video. When you move into a new house, you need to understand the layout. Otherwise, it may take opening a closet door or two before you find the bathroom. In the following sections, I walk you through these primary panels in Premiere Pro.
Knowing the Project panel
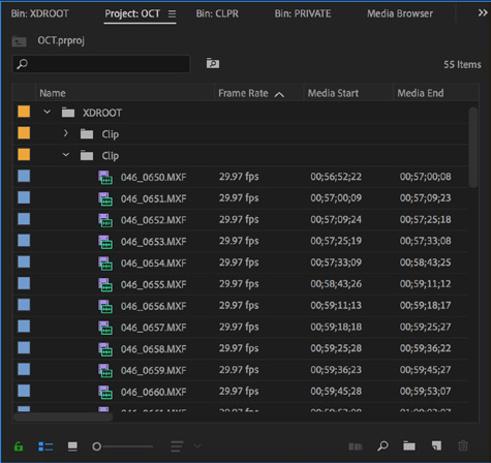
Think of Premiere Pro as an office building, and the Project panel as a large office space with several rooms leading off of it. This panel, shown in Figure 1-2, holds media assets like your movie clips, still photos, and audio files, as well as all the sequences you’ve created. The panel is much like a self-contained room where the pieces are organized, and is completely customizable regarding size and display.
You can also control how panel information displays on the bottom of the palette. The palette allows you to view the contents as icons of various sizes, or view each element and its vital stats in list view Freeform view allows you to also make minor changes. The functions are found in the bottom-left corner of the panel.
Here’s how the views compare:
» In List view, the Video and Audio Info shows vital stats, when you scroll horizontally, like frame rate, clip duration, and In and Out points. Audio Info shows duration, compression, and format. Navigate this information by using the slider on the bottom of the panel. Switching from these views at your leisure is fairly simple.
» Icon view shows mini thumbnails of clip content, and comes in handy when you need to quickly find the right clip in a busy folder.
» Freeform view lets you to organize footage, like the Icon view, but with a little more oomph. It’s perfect if you’re a visual thinker, and the thumbnails help you find the right asset. You can preview thumbnails, set In and Out points, and reorder your clips directly in the Project panel. This view allows you to drag clips and group them in different order than either Icon or List view. It’s the most flexible, but takes up the most space.
The Project panel has a few other nifty features that will come in handy as you create a video.
» The Search field atop the panel lets you find specific clips. This comes in handy when you are working with lots of clips.