
Fo ow us here to s m e
projects and ideas!

Fo ow us here to s m e
projects and ideas!
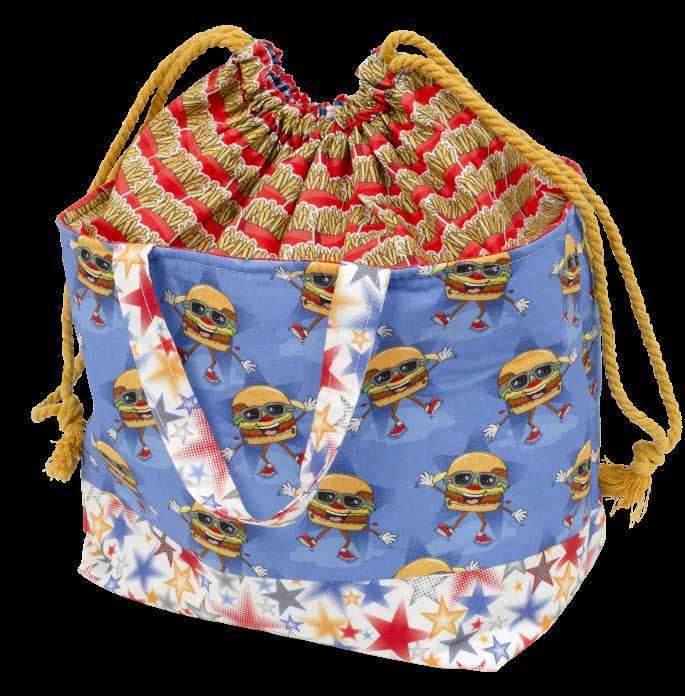
3 Wishes® Burger Bar Collection
• 1/2 yd – Quick Bites (22194-BLU-CTN-D)
• 1/2 yd – Food Outlines (22195-ROY-CTN-D)
• 1/2 yd – Bunch O’ Stars (22196-WHT-CTN-D)
• 1/2 yd – Just Fries (22197-MLT-CTN-D)
• 1/2 yd – Burger Boogie (22198-BLU-CTN-D)
Additional Supplies Needed:
• 1/2 yard Fusible fleece OR Insul-Fleece™
• 2 yards – 5 mm Cotton Cord
• Piecing and sewing thread
• Basic sewing supplies
Read all instructions before beginning project. Do not pre-wash fabrics. Press fabrics with a dry iron on cotton setting before cutting. Use a 3/8 in (9.5 mm) seam allowance and sew fabrics with right sides together (RST) unless otherwise noted. Press seams in the direction of the arrows. wof = width of fabric
Use a rotary cutter and ruler to cut the size and number of squares and rectangles from each fabric listed below.
1∕8 in x 6 3⁄8 in
15 1∕8 in x 12 1⁄8 in
Bites (22194-BLU-CTN-D) – ½ yd (45.72 cm x 106.68 cm)
2 – 15 1∕8 in x 12 1⁄8 in (38.4 cm x 30.8 cm)
15 1∕8 in x 6 3⁄8 in
Outlines (22195-ROY-CTN-D) – ½ yd (45.72 cm x 106.68 cm)
2 – 15 1∕8 in x 6 3⁄8 in (38.4 cm x 16.2 cm)
15 1∕8 in x 11 1⁄2 in
O’ Stars (22196-WHT-CTN-D) – ½ yd (45.72 cm x 106.68 cm)
Cut 1 – 15 1∕8 in x 11 1⁄2 in (38.4 cm x 29.2 cm)
Cut 2 – 3 1∕4 in x 12 in (8.3 cm x 30.5 cm)
Just Fries (22197-MLT-CTN-D) – ½ yd (45.72 cm x 106.68 cm)
Cut 2 – 15 1∕8 in x 6 3⁄8 in (38.4 cm x 16.2 cm)
1∕8 in x 6 3⁄4 in
Boogie (22198-BLU-CTN-D) – ½ yd (45.72 cm x 106.68 cm)
Cut 2 – 15 1∕8 in x 6 3⁄4 in (38.4 cm x 17.1 cm)

Fusible Fleece – ½ yd (45.72 cm x 106.68 cm)
Cut 1 – 14 3∕8 in x 22 3⁄4 in (36.5 cm x 57.8 cm)
1. Place one Burger Boogie 15 1/8 in x 6 ¾ in (38.4 cm x 17.1 cm) rectangle on either short side of the Bunch O’ Stars 15 1/8 in x 11 1/2 in (38.4 cm x 29.2 cm) rectangle as shown in Diagram A. Note the direction of fabric designs (as shown by large arrows). Pin RST and sew together to make the Outer rectangle measuring 15 1/8 in x 23 1/2 in (38.4 cm x 59.7 cm). Press seams in the direction of small arrows.
2. Center the Fusible Fleece 14 3/8 in x 22 side of the Outer rectangle. Adhere according to the manufacturer’s directions.

3. Fold one 3 1/4 in x 12 in (8.3 cm x 30.5 cm) strip in half lengthwise with sides together and press. Open and re-fold each long side to the center and press. Fold along the center crease again and topstitch along both long edges (Diagram C). Repeat to make two Straps. Pin each strap to the short side of the Outer rectangle, centered and with about 3 1/4 in (8.3 cm) between. Sew edges down with a 1/4 in (6.35 mm) seam.
4. Place one Just Fries 15 1/8 in x 6 3/8 in (38.4 cm x 16.2 cm) rectangle on either short side of the Outer rectangle as shown in Diagram D. Note the direction of fabric designs. Pin RST, sew and press to complete the Outer rectangle measuring 15
5. Place the two Quick Bites 15 1/8 in x 12 1/8 in (38.4 cm x 30.8 cm) rectangles RST, pin along one long side and sew together. Note the direction of fabric designs. Place one Food Outlines 15 1/8 in x 6 3/8 in (38.4 cm x 16.2 cm) on either short end of the new Quick Bites rectangle as shown in Diagram E. Pin RST and sew each together to make the Lining measuring 15
6. Place Outer rectangle and Lining RST, pin along the short sides and sew together making a long band. Rotate the band so that the designs match up on either side. The middle of the Outer rectangle is now on one end and the middle of the Lining rectangle is on the other end as shown in Diagram F. Press edges.
Middle of Outer to the end
Middle of Lining to the other end
7. Sew the layers together along the long edges. Leave a ¾ in (1.9 cm) opening on both sides at the edge of the Just Fries design where it meets the Food Outlines design as shown in Diagram G. Leave about a 5 in (12.7 cm) opening along one side of the Lining for turning the project right side out later. Press seams open.
Leave ¾ in (1.9 cm) open on both sides
Leave ¾ in (1.9 cm) open on both sides
Leave about 5 in (12.7 cm) open
8. Box the corners as follows (Diagram H). At one Quick Bites corner, align the side and end edges, matching seams. Measure along the seam 2 5/8 in (6.7 cm) from the corner and mark a line across perpendicular to the seam. Stitch along the line. Trim the edge 1/2 in (1.27 cm) away from the seam. Optional: Zig zag the edge to finish. Repeat for the other Quick Bites corner. Repeat for the Bunch O’ Stars corners, but match the side seams with the end crease.
9. Turn the bag right side out through the 5 in (12.7 cm) opening. Sew the opening closed. Machine stitch close to the edges or hand stitch for a more discreet closure.
10. Push the Lining inside the Outer half of the bag as shown in Diagram J. Press the edges. Sew ¾ in (1.9 cm) from the edge to create a casing for the drawstring. Then push the Just Fries/Food Outlines section into the bag and press the edges as shown. Topstitch close to the edge, being careful not to catch the handles in the seam.
11. Cut the 2 yard length of cotton cording in half. Attach a safety pin to one end of 1 yd cotton cording and feed it through a side hole into the casing. Feed it through the casing so that the cord goes all the way around and back out of the hole it started in. Tie the very ends of the cord with a knot. Repeat with the other 1 yd of cording through the opposite side. Pull the cords to tighten the drawstring.
Machine wash in cold water, with mild detergent on gentle cycle. Lay flat to dry or tumble dry low; press.