
Fo ow us here to s m e exciting projects and ideas!

Fo ow us here to s m e exciting projects and ideas!
Size 4: 22 in width x 23 in length (55.88 cm x 58.42 cm)
Size 6: 24 ½ in width x 25 ½ in length (62.23 cm x 64.77 cm)
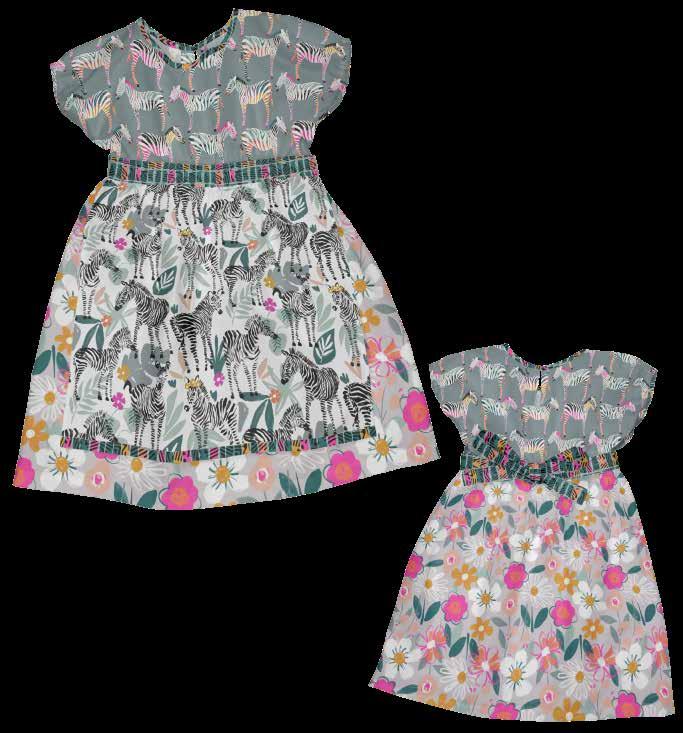
3 Wishes Fabric® Zebra Dazzle Collection
• 1 1/8 yds – 22228-GRY-CTN-D (Floral Scatter)
• 5/8 yd – 22226-GRY-CTN-D (Zebra Row)
• ½ yd – 22224-WHT-CTN-D (Dazzle of Zebras)
• 3/8 yd – 22227-TRQ-CTN-D (Funky Geo)
Additional Supplies Needed:
• 1 pkg. ¼ in Elastic
• 1 Hook & eye closure (small)
• Coordinating thread
• Small safety pin
• Basic sewing supplies
• Sewing machine
• Iron and pressing surface
Read all instructions before beginning project. Do not prewash fabrics. Press fabrics on cotton setting. Do not remove selvages. Backstitch at the beginning and end of stitching. Side seams can be finished with zigzag or serge stitching. Cut out Bodice Pattern pieces and tape together as indicated. Note: There are size 4 and size 6 cutting lines printed on the Bodice pattern
Size 4
1. Pin Bodice pattern to fabric along folded edge as shown. Cut along the outside printed line. Note: Do not cut along fold and do not remove pattern from Bodice. Cut additional pieces as shown below.
Zebra Row (22226-GRY-CTN-D)
5 8 yd (57.15 cm x 106.68 cm)
Cut 1 on fold – Size 4: Bodice Pattern
Cut 1 – Size 4: 3 in x 4 in (7.62 cm x 10.16 cm) Bodice Back Facing
1 – Size 4: 1 in x 14 in (2.54
x 35.56 cm) Elastic Casing
2. Cut rectangle pieces as shown below. Note: Check orientation of the designs.
1. Pin Bodice pattern to fabric along folded edge as shown. Cut along the outside printed line. Note: Do not cut along fold and do not remove pattern from Bodice. Cut additional pieces as shown below.
3 in x 4 in 1 in x 14 in 10 in
Zebra Row (22226-GRY-CTN-D)
5 8 yd (57.15 cm x 106.68 cm)
Cut 1 on fold – Size 6: Bodice Pattern
Cut 1 – Size 6: 3 in x 4 in (7.62 cm x 10.16 cm) Bodice Back Facing
Cut 1 – Size 6: 1 in x 15 in (2.54 cm x 38.1 cm) Elastic Casing
2. Cut rectangle pieces as shown below. Note: Check orientation of the designs.
Elastic Cut 2 – Size 6: 11 ¼ in (28.58 cm) Sleeves
Cut 1 – Size 6: 13 in (33.02 cm) Bodice Back 19 ½ in x 25 in 15 in x 18 in 2 ¾ in x 25 in 1 in x 18 in
2 ¾ in x 16 in
Funky Geo (19450-RED-CTN-D) 3⁄8 yd
Cut 2 – Size 6: 2 ¾ in x 25 in (6.99 cm x 63.5 cm) Waist Ties
Cut 1 – Size 6: 2 ¾ in x 16 in (6.99 cm x 40.64 cm) Apron Waistband
Cut 1 – Size 6: 1 in x 18 in (2.54 cm x 45.72 cm) Apron Bottom Band
Cut 1 (on diagonal) – Size 6: 1 in x 19 in (2.54 cm x 48.26 cm) Neck Binding
Scatter (19455-MLT-CTN-D) – 1 1⁄8 yds (102.87 cm x 106.68 cm)
Cut 2 – Size 6: 19 ½ in x 25 in (49.53 cm x 63.5 cm) Skirt Front and Back
Dazzle of Zebras (19453-BLU-CTN-D) ½ yd
Cut 1 – Size 6: 15 in x 18 in (38.1 cm x 45.72 cm) Apron
1. Before removing the pattern from the Zebra Row Bodice, use the removable marker to label the Front and Back on the wrong side. Fold it right sides together so side edges meet and press a light crease to indicate the center of the Bodice. Refer to Diagram A to make a mark at the Center Front and Center Back edges, also mark the center front of the neck opening. Draw a three inch line at the center back of the neck opening as shown. Serge or zigzag the bottom edges of the Front and Back.
2 Press the sides and bottom edge of the Zebra Row Bodice Back Facing ¼ in (6.35 mm) to the wrong side, then again ¼ in (6.35 mm). Sew close to the inside edge as shown (Dia. B). Fold in half so long edges meet and press fold to crease.
3. Pin the Back Facing to the edge of the Back neck opening on the right side as shown in Diagram C, so the crease is aligned with the 3 in (7.62 cm) drawn line (on the back). Mark the bottom of the 3 in (7.62 cm) on the Facing. Pin and sew ¼ in (6.35 mm) away from the crease around the sides and bottom as shown, turning at the 3 in (7.62 cm) mark sew across the bottom and up the other side.
4. Refer to Diagram D to carefully cut a slit along the center crease of the Back Facing and into the corners up to, but not through the stitches. Press the Facing sides and bottom to the wrong side of the Bodice. Sew close to the pressed edges.
5. Fold the Funky Geo Neck Binding so long edges meet; press. Open and press both ends and one long edge ¼ in (6.35 mm) to the wrong side (Dia. E). Pin the cut edge along the neck opening on the wrong side of the Bodice; sew ¼ in (6.35 mm) from the edge. Carefully clip seam every ½ in (1.27 cm) close to, but not through stitching. Fold over to the right side, press and sew close to the inner edge as shown.
6. Sew ¾ in (1.91 cm) from the side edges of the Bodice as shown in Diagram F. Press the edges under ¼ in (6.35 mm). Then again ½ in (1.27 cm) so the fold is on the stitching. Sew close to the inner fold to create a Casing for Elastic.
7. Attach the safety pin to one end of a piece of elastic and insert it into the Casing so the ends are even. Stitch across the ends to secure the Elastic. Repeat for the other Elastic and Casing.
8. Press the Funky Geo Apron Waistband with wrong sides together so long edges are even. On the right side of the Bodice, pin the Waistband along the bottom Front with edges even; sew 1/8 in (3.18 mm) from the edge to attach (Dia. G).
9. Press the ends of the Zebra Row Elastic Casing ¼ in (6.35 mm) to the wrong side; sew close to the cut edge. Press the long edges ¼ in (6.35 mm) to the wrong side (Dia. H)
10. On the wrong side of the Bodice Back, measure ½ in (1.27 cm) from each edge and pin the Casing. Note: Casing needs to measure ½ in (1.27 cm) from both side edges. Sew close to the long edges to attach (Dia.I). Attach a safety pin to one end of the Elastic and insert it through the Casing so both ends are even. Stitch several times over each end to secure.
11. Press side edges of the Apron ¼ in (6.35 mm) to the wrong side, then again ¼ in (6.35 mm) to the wrong side to hem the Apron sides.
12. Press the ends and one long edge of the Funky Geo Apron Bottom Band ¼ in (6.35 mm) to the wrong side (Dia. J).
13. Refer to Diagram K to pin the cut edge of the Band to the Apron Bottom on the wrong side; sew using a ¼ in (6.35 mm) seam. Fold the Band over to the Apron front and press. Topstitch along the folded edge as shown.
14. Using a long gathering stitch, sew 1/8 in (3.18 mm) from the top edge of the Apron starting and ending ½ in (1.27 cm) from the side edges. Note: Do not backstitch at the beginning and end of stitching. Leave long tails on the thread ends as they will be pulled to gather the Apron. Use the tails to pull gathers until the top edge measures 9 in (22.86 cm), then tie the tails (Dia. L).
15. Fold the Floral Scatter Skirt piece in half so side edges meet. At the top edge, use the fold to mark the center of both pieces. Using a long gathering stitch, sew 1/8 in (3.18 mm) from the top edge, starting and ending ½ in (1.27 cm) from the side edges. Sew another row of long gathering stitches 3/8 in (9.52 mm) from the top edge (Dia. M). Note: Do not backstitch at the beginning and end of stitching. Leave long tails on the thread ends as they will be pulled to gather the Skirt.
16. Match the center marks on the Bodice Back and a Skirt piece and pin them right sides together. Pull the tails on the sides of Skirt to gather the top edge so that it fits the bottom edge of the Bodice; pin and baste. Tie the tails. Sew over the gathering stitches using a 3/8 in (9.52 mm) seam allowance (Dia. N).
17. Gather the Skirt Front to be the same length as the Skirt Back and tie the tails. Pin the Apron to the top edge of the Skirt with right sides together matching the center marks; baste. Note: It will be pinned on top of the Apron Waistband. Use a 3/8 in (9.52 mm) seam allowance and sew over the gathering stitches on the Skirt to attach (Dia. O).
18. Press one short end of a Funky Geo Waist Tie ¼ in (6.35 mm) to the wrong side. Fold long edges wrong sides together so they meet: press to create a crease. Open and fold each long edge ¼ in (6.35 mm) to the wrong side; press. Fold again so edges meet and press; pin. Topstitch close to the three folded edges (Dia. P). Repeat to make the other Waist Tie.
19. On each side edge of the Bodice Front, pin the cut end of a Waist Tie over the Apron Waistband; sew using a 1/8 in (3.18 mm) seam allowance (Dia. Q). Tip: Pin the Waist Tie ends to the center of the Dress to avoid sewing them into the side seams.
20. Pin the side seams of the Dress Front and Back right sides together with edges and seams even; sew using a ½ in (1.27 cm) seam allowance (Dia. R).
21. Press the bottom edge of the Dress ¼ in (6.35 mm) to the wrong side. Then press 1 in (2.54 cm) to the wrong side and sew close to the inside fold to hem or hem to desired length.
22. Hand sew the hook & eye closure to the Neck Binding at the back opening.
Machine wash in cold water; gentle cycle. Do not bleach. Tumble dry low or hang to dry.
Note: Use non-directional fabrics only.