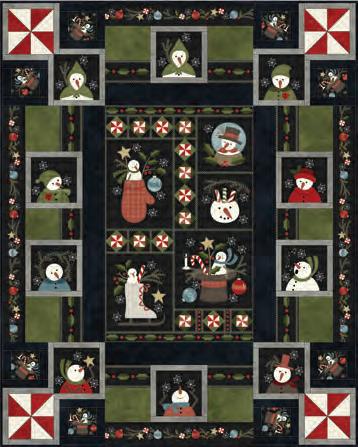


Fabric 1 9913-SW
1/3 yard
Fabric 2 9918-SW 3/4 yard
Fabric 3 9919-R2 3/4 yard
Fabric 4 9919-G2 3/4 yard
Fabric 5 9915-G 1/2 yard
Fabric 6 9917-G 1/2 yard
Fabric 7 9918-G 1/2 yard
Fabric 8 9918-R includes binding 1 yard
Fabric 9 9914-G 2 yards
Backing your choice 4 yards
WOF - Width of Fabric
LOF - Length of Fabric
RST - Right Sides Together
HST - Half Square Triangle
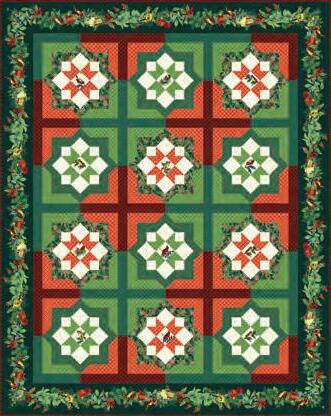
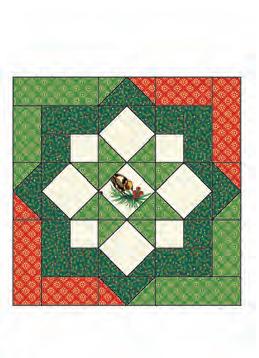
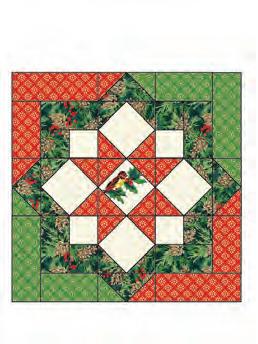
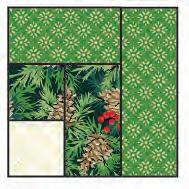
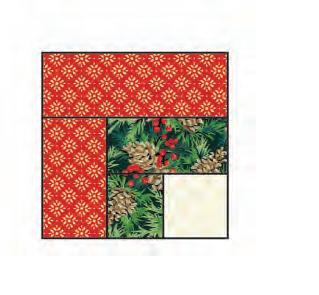
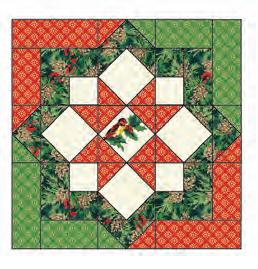
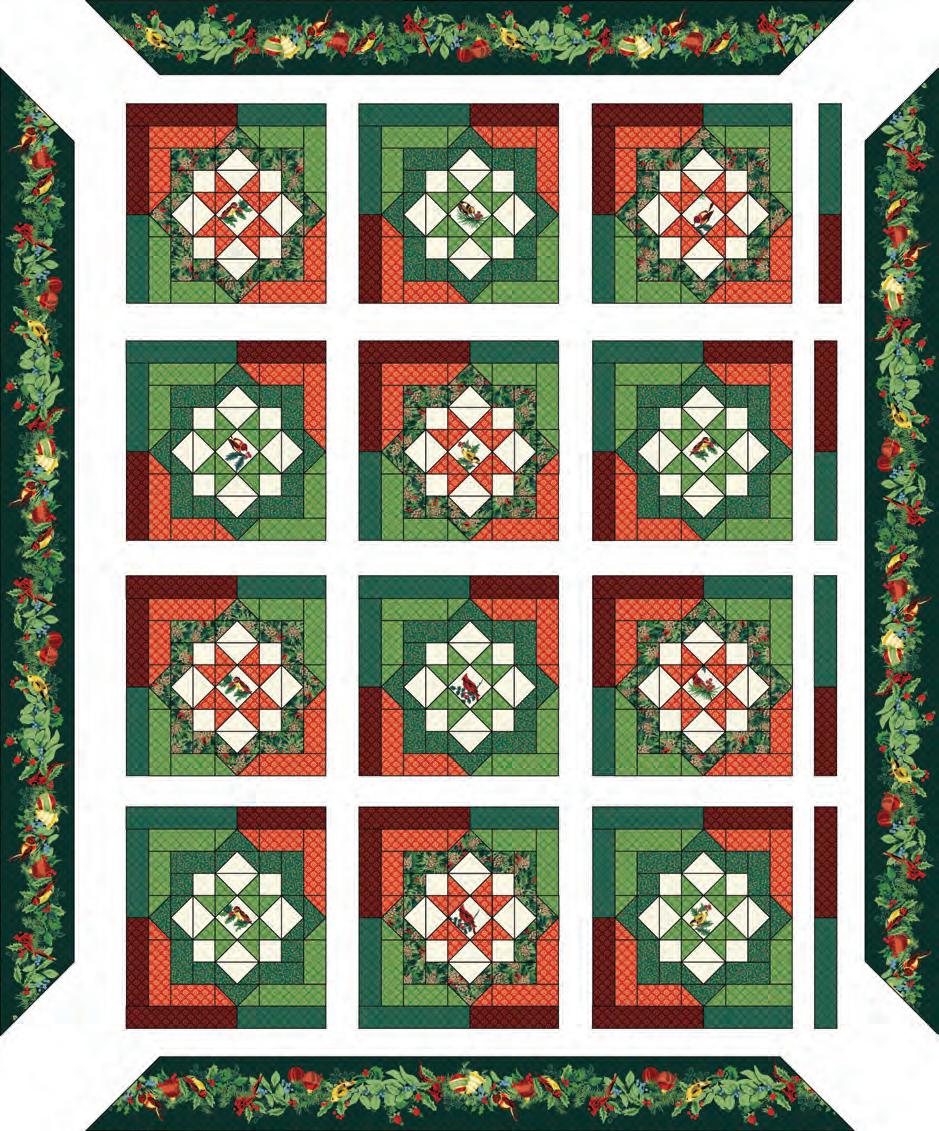
Block is 13-1/2" x 13-1/2" finished (14" x 14" unfinished)
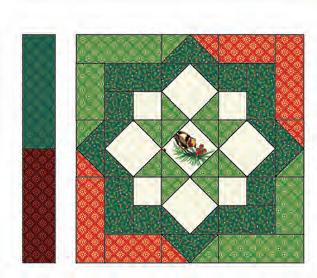
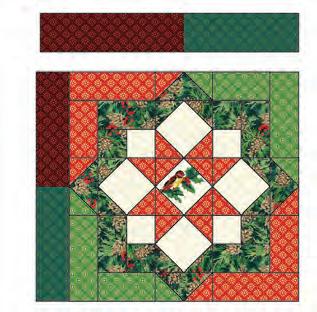
Block 1 Block 2
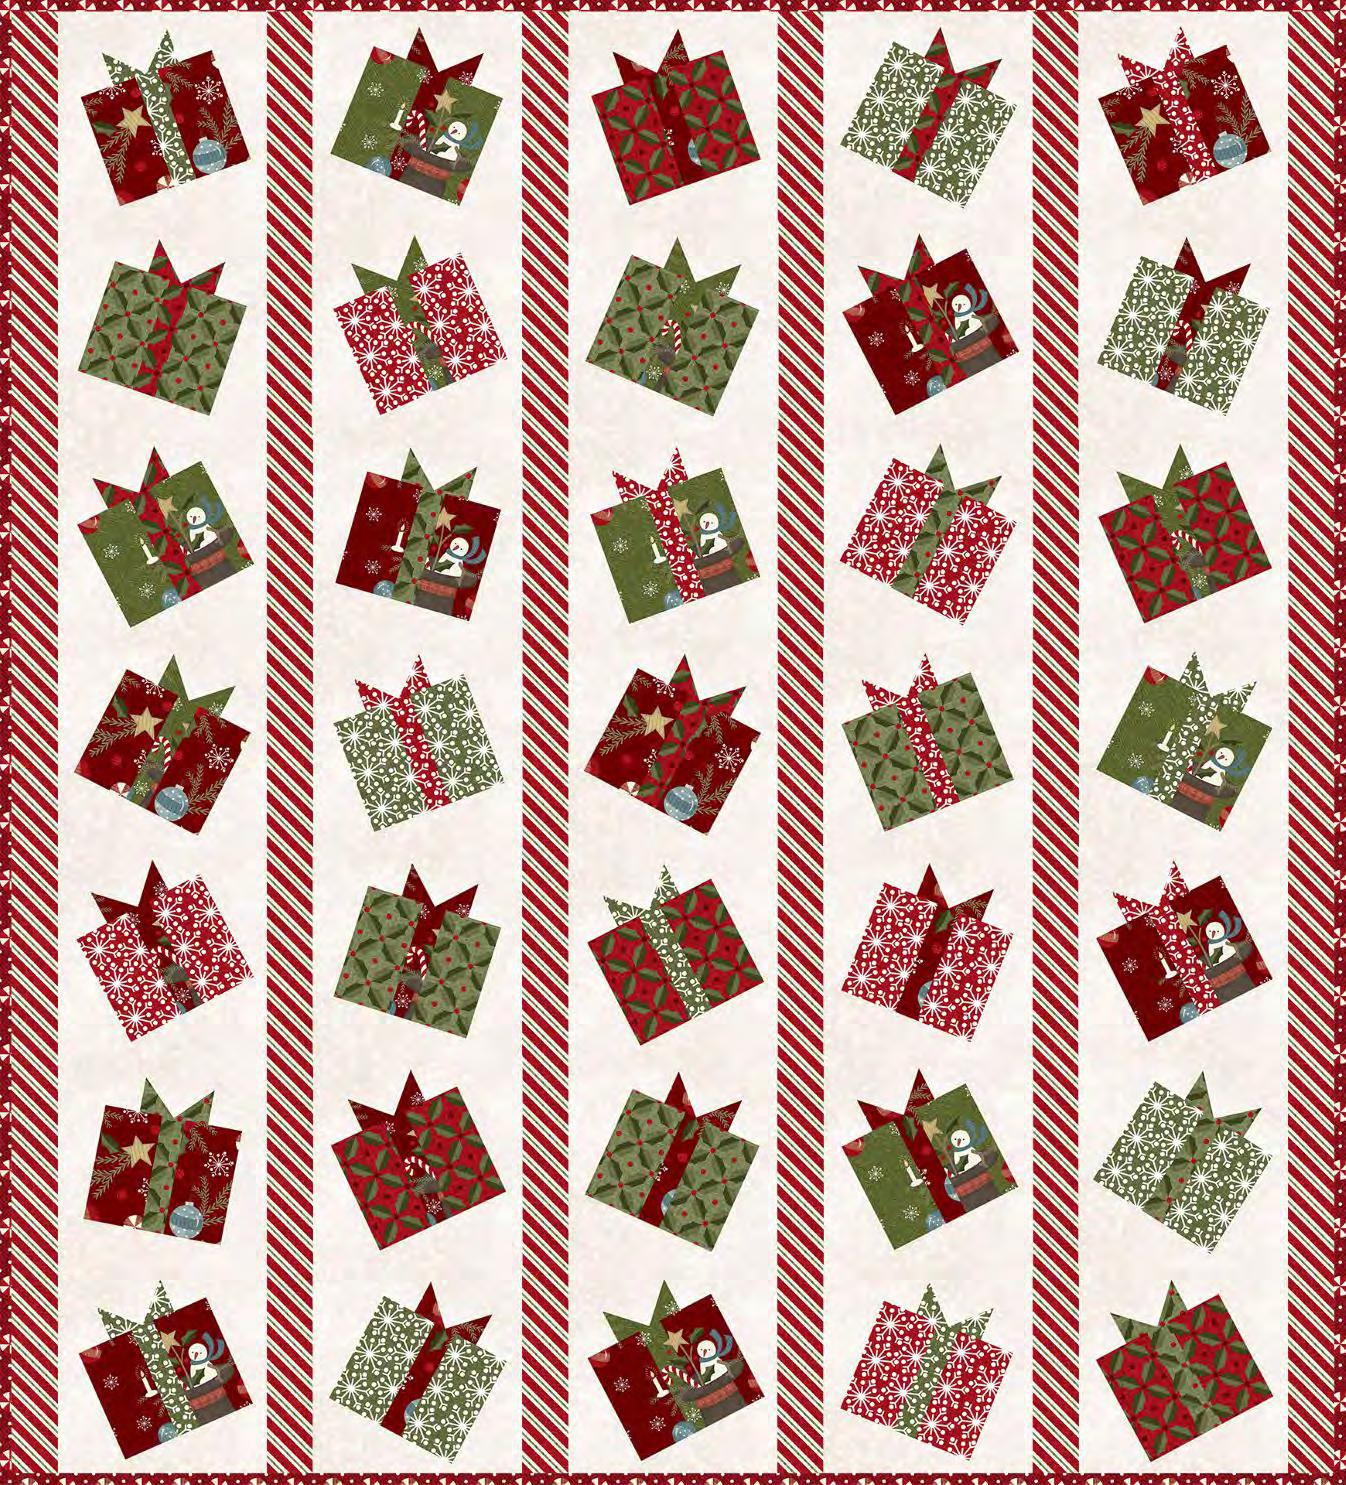
Finished Size 51" x 64"
Fabric 1 Birds
A: (12) Fussy Cut 3.5 x 3.5" squares
Fabric 2 Light Geo Cut (5) 3.5" x WOF strips. Subcut into A: (48) 3.5 x 3.5" squares Cut (3) 2" x WOF strips. Subcut into B: (48) 2 x 2" squares.
Fabric 3 Red Geo Metallic Cut (12) 2" x WOF strips. Subcut into B: (120) 2 x 2" squares C: (24) 2 x 3.5" rectangles D: (24) 2 x 5" rectangles
Fabric 4: Green Geo Metallic Cut (12) 2" x WOF strips. Subcut into B: (120) 2 x 2" squares C: (24) 2 x 3.5" rectangles D: (24) 2 x 5" rectangles
Fabric 5: Green Pinecones Cut (8) 2" x WOF strips. Subcut into: B: (72) 2 x 2" squares C: (48) 2 x 3.5" rectangles
*Use leftover from B strip to cut for C
Fabric 6: Green Holly Cut (8) 2" x WOF strips. Subcut into: B: (72) 2 x 2" squares C: (48) 2 x 3.5" rectangles *Use leftover from B strip to cut for C
Fabric 7: Dark Green Geo Cut (6) 2" x WOF strips. Subcut into: F: (21) 2 x 6.5" rectangles G: (10) 2 x 8" rectangles
Fabric 8: Dark Red Geo Cut (6) 2" x WOF strips. Subcut into: F: (21) 2 x 6.5" rectangles G: (10) 2 x 8" rectangles Cut (6) 2.5" x WOF strips for binding.
Fabric 9: Border Stripe *Cut Length of Fabric Cut (2) 5.5 x 70" Cut (2) 5.5 x 56"

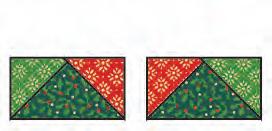
Please read all instructions before you begin. Seam allowance is 1/4" unless otherwise stated. Do not prewash fabric. Use a light sizing or starch to stabilize pieces before sewing. Fabric will be abbreviated to 'F'. For example, F2 refers to Fabric 2.
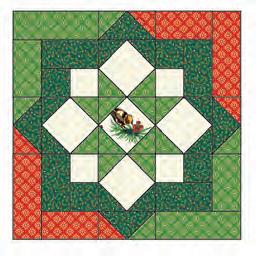
Make the block center units.
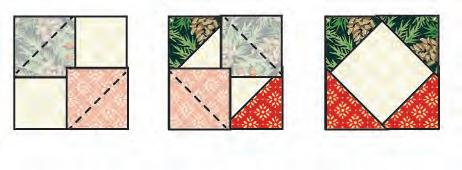
Gather the (12) F1-A fussy cut bird squares,(24) F3-B and (24) F4-B-squares.
1. Mark a diagonal line from corner to corner on the F3-B squares. Place the F3-B squares on opposite sides of the F1-A square. Sew on the marked line. Trim 1/4" away from the stitching. Press away from center. Make 6.
2. Place a F3-B square to opposite sides of the step 1 unit. Sew on the marked lines. Trim 1/4" away from the stitching. Press away from center. Make 6.
3. Repeat steps 1-2 using the remaining F1-A bird blocks and the F4-B squares.

Gather the (48) F2-A squares, (48) F3-B squares, (48) F4-B squares, (48) F5-B squares, and (48) F6-Bsquares.
4. Mark a diagonal line from corner to corner on the B squares.
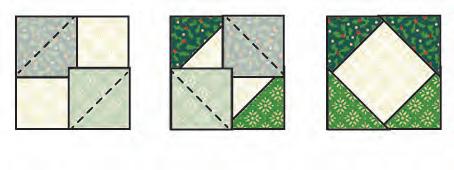
5. Follow the diagrams for Block 1 to sew the F3 and F5-B squares on the corners of (24) F2-A squares.
6. Follow the diagrams for Block 2 to sew the F4 and F6-B squares on the corners of (24) F2-A squares.
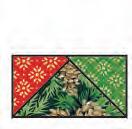
Make the flying geese units. *Note - you will be making mirror image units. Follow the illustrations for fabric placement.
Gather (24) each F5 and F6-C rectangles, and (48) each F3 and F4-B square.
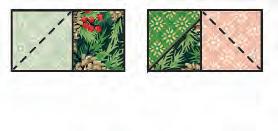
7. Mark a diagonal line from corner to corner on each B square. Place a F4-B square on the left corner of a F5-rectangle. Sew on the marked line. Trim 1/4" away from the stitching. Press away from center. Make 12.
8. Place a F3-B square to opposite sides of the step 7 unit. Sew on the marked lines. Trim 1/4" away from the stitching. Press away from center. Make 12.
9. Repeat steps 7 and 8 to make the remaining flying geese units. See illustration to the right.
Make the corner units.
Block 1: Gather (24) each: F2-B, F5-B, F5-C and (12) each: F3-C, F3-D, F4-C, F4-D.
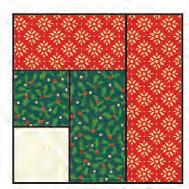
Block 2: Gather (24) each: F2-B, F6-B, F6-C and (12) each: F3-C, F3-D, F4-C, F4-D.
1. Sew (24) F5-B and F2-B squares together. Press toward F5. Make 24.
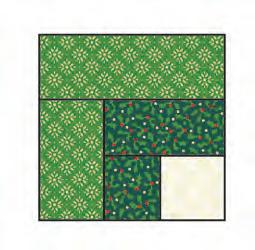
2. Sew a F5-C rectangle to each step 1 unit. Press toward C. Make 24.
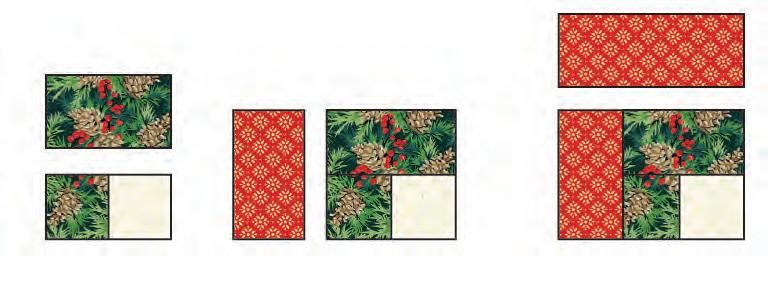
On 12 Step 2 units: 3. Sew a F3-C rectangle to the step 2 unit. Press toward F3.
4. Sew a F3-D rectangle to the step 3 unit. Press toward F3.
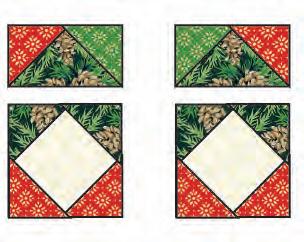
On the remaining 12 Step 2 units: 5. Sew a F4-C rectangle to the step 2 unit. Press toward C.
6. Sew a F4-D rectangle to the step 5 unit. Press toward D.
Repeat steps 1-6 to make the Block 2 units. Follow the illustrations to the right.

Add the sashing strips.
Gather the F7-F & G and F8-F and G rectangles.
*Note: the reds match up to the reds and the greens match up to the greens.
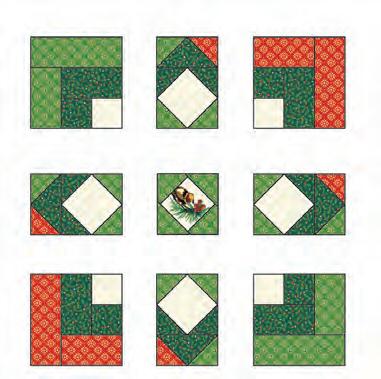
1. Sew (12) F8-F (red) rectangles to (12) F7-F (green) retangles. Sew to the left side of each Block 1 and Block 2. Make sure to orient the red next to the red and the green next to the green as illustrated.
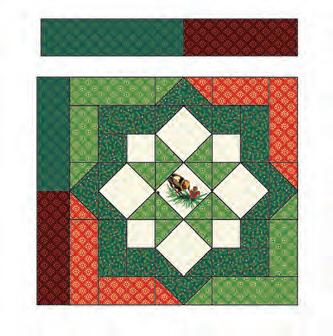
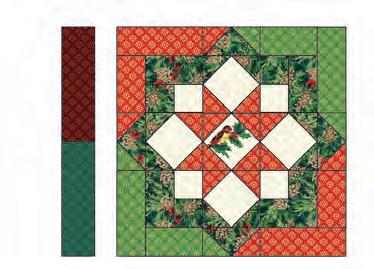
2. Block 1: Sew (9) F8-G rectangles to (9) F7-F rectangles together. Sew (6) of them to the top of Block 1. Reserve 3.
3. Block 2: Sew (9) F7-G rectangles to (9) F8-F rectangles. Sew (6) of them to the tops of Block 2. Reserve 3.
4. Sew (2) reserved Step 2 sashing strips to the bottom of (2) Block 2s. Make sure to match the red to the red and the green to the green.
5. Sew (1) reserved Step 3 sashing strip to the bottom of (1) Block 1. Make sure to match the green to the green and the red to the red.
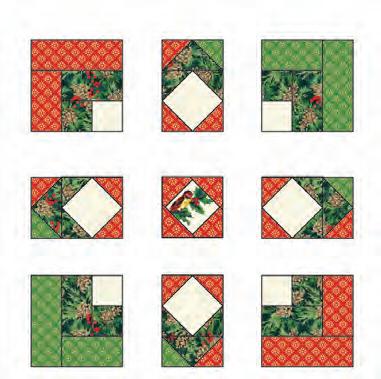
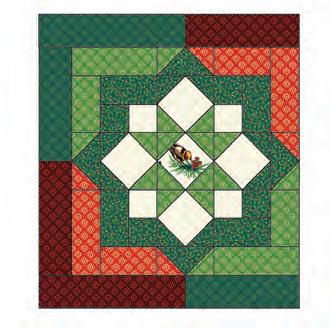
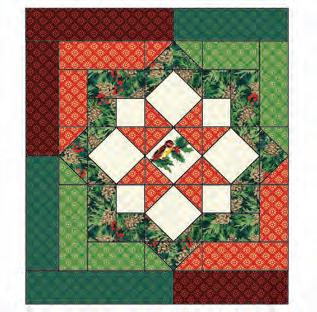
6. Sew the blocks into (4) rows as illustrated on p.7. Press rows in opposite directions.
7. Sew the remaining reserved sashing strips to the ends of each row as illustrated on p.7.
Row 1: Block 1 - Block 2 - Block 1 - F7-G/F8-F
Row 2: Block 2 - Block 1 - Block 2 - F8-G/F7-F
Row 3: Block 1 - Block 2 - Block 1 - F7-G/F8-F
Row 4: Block 1-Block 2 - Block 1 - Sew (1) F7-G to (1) F8-G, then sew to the end of Row 4.
8. Sew row to row. Press in one direction.
Joyful Quilt © Maywood Studio all rights reserved
1. Sew a F9 border strip to the top and bottom of the quilt top, making sure to stop and start 1/4" away from each end of the quilt top. To miter each corner, fold the quilt top on a diagonal, wrong sides together. This should line up the strips from adjacent sides.
2. Starting at the sewn seam, draw a 45° line to the edge of the fabric. Sew on that line. Trim the excess fabric leaving a 1/4" seam. Repeat on remaining corners.
3. Layer the backing (wrong side up), batting and quilt top (right side up). Baste layers to secure. Quilt as desired. Trim the excess backing and batting.
4. Sew the binding strips together into one continuous strip. Press in half length-wise. Sew the binding to the quilt top with a 3/8” seam allowance, mitering the corners. Turn the binding to the back side of the quilt and stitch down by hand with matching thread.







Fabric 1 F9931-JK 1 Panel
Fabric 2 F9930-JK 3/4 (1 Panel)
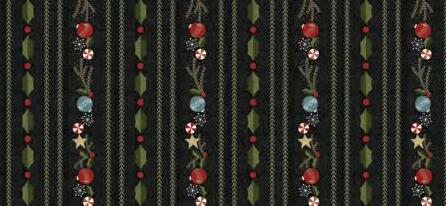
Fabric 3 F9932-JK 1-1/4 yard
Fabric 4 F9933-JK 2/3 yard
Fabric 5 F9200-J *includes binding 1-1/2 yards
Fabric 6 F9200-G3 1/2 yard
Fabric 7 F9200-K2 7/8 yard
Fabric 8 F9200-R Fat Quarter
Fabric 9 F18510-E Fat Quarter
Backing your choice 4-1/2 yards
WOF - Width of Fabric
LOF - Length of Fabric
RST - Right Sides Together HST - Half Square Triangle
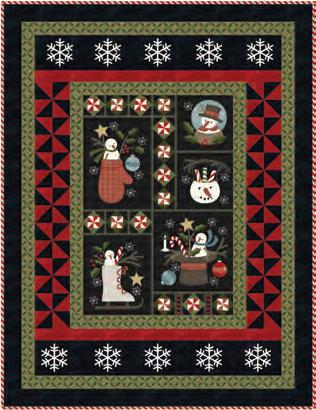
Finished Size 62½“ x 77½“
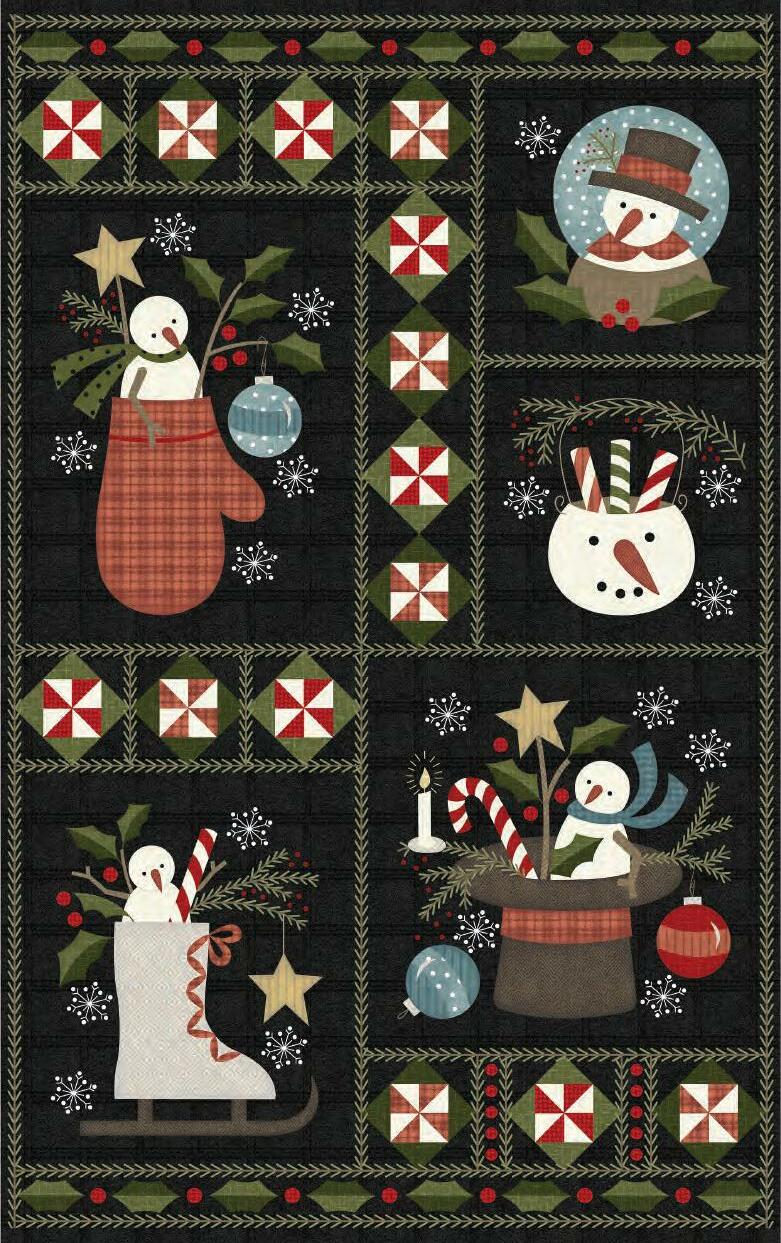
Fabric 1 (Panel)
Trim to 26-1/2" x 42"
Fabric 2 (Snowfolk blocks)
A: Fussy cut (10) 8-1/2“ x 8-1/2“ squares
Fabric 3 (Stripe)
Cut the stripes into 4-1/2" strips along the LOF From the holly leaf Stripe section subcut: B: (8) 4-1/2" x 8-1/2" stripe sections
C: (2) 4-1/2" x 6" stripe sections From the ornament sections subcut: D: (2) 4-1/2" x 26-1/2" stripe sections E: (2) 4-1/2" x 42" stripe sections
Fabric 4 (Tossed Snowfolk)
F: Fussy cut (8) 5-1/2" x 5-1/2" squares
Fabric 5 (Black) Cut (4) 4-1/2" x WOF strips G: (2) 4-1/2" x 42" strips H: (2) 4-1/2" x 26-1/2" strips Cut (7) 2" x WOF strips. Subcut into: I: (16) 2" x 5-1/2" rectangles J: (16) 2" x 8-1/2" rectangles Binding Cut (8) 2-1/2" x WOF strips
Fabric 6 (Green) Cut (2) 6-1/2" x WOF strips. Subcut into: K: (8) 6-1/2" x 8-1/2" rectangles L: (2) 6-1/2" x 6" rectangles
Fabric 7 (Grey) Cut (1) 8-1/2" x WOF Strip. Subcut into: M: (28) 1-1/2" x 8-1/2" rectangles Cut (1) 9-1/2" x WOF Strip. Subcut into: N: (16) 1-1/2" x 9-1/2" rectangles Cut (1) 10-1/2" x WOF Strip. Subcut into: O: (12) 1-1/2" x 10-1/2" rectangles
Fabric 8 (red) P: (8) 5-1/4" squares
Fabric 9 (cream) Q: (8) 5-1/4" squares

Please read all instructions before you begin. Seam allowance is 1/4" unless otherwise stated. Do not prewash fabric. Use a light sizing or starch to stabilize pieces before sewing. Fabric will be abbreviated to 'F'. For example, F2 refers to Fabric 2.
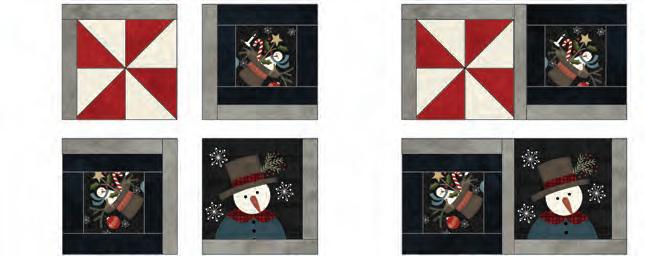
Pinwheel Units: Gather (8) F8-P squares, (8) F9-Q squares, and (4) F7-M & N rectangles.


1. Mark a diagonal line from corner to corner on the F9-Q squares. Sew the F9-Q squares to the F8-P squares 1/4" away from the marked line. Cut on the marked line. Press toward F8. Square up to 4-1/2" x 4-1/2". Make 8 for 16 total HST units.
2. Lay the HST units out as illustrated in the pinwheel configuration. Sew into pairs. Press to nest in opposite directions. Sew the pairs together to create the pinwheel. Press open.
3. Sew a F7-M rectangle to the left side of the pinwheel unit. Press toward M. Sew a F7-N rectangle to the top of the pinwheel unit. Press toward N. Make 4.
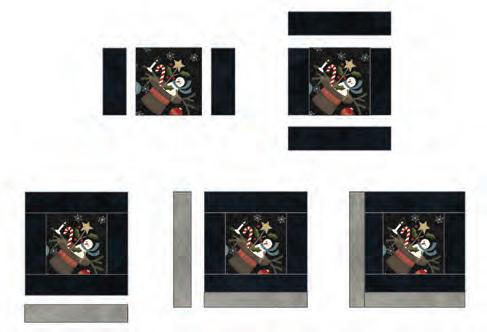
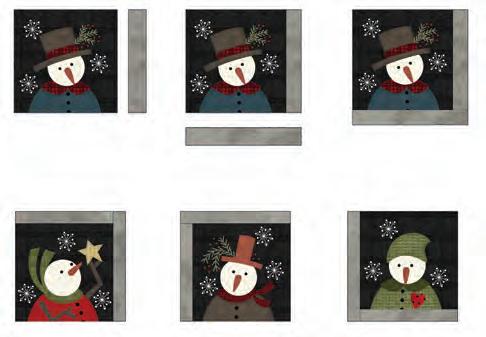
*Each block has the grey rectangles sewn to a different side. Make sure to follow the illustrations on this page for the layouts.
4. Sew a F7-M rectangle to the sides of the F2-A blocks as illustrated. Press toward M. Sew a F7-N rectangle to F2-A unit as illustrated. Press toward N. Make 1 of each for a total of 4.
Top Hat Blocks: Gather (8) F4-F squares, (16) F5-I and J rectangles, and (8) F7-M & N rectangles.
*Note: The top hats are oriented in different directions. Refer to the block illustrations on p.5 for inspiration on how to set these in the blocks.
5. Sew a F5-I rectangle to opposite sides of the F4-F square. Make sure to orient the square as illustrated. Press toward I.
6. Sew a F5-J rectangle to the top and bottom of the step 5 unit. Press toward J.
7. Sew a F7-M rectangle to the bottom of the Step 6 unit. Press toward M.
8. Sew a F7-N rectangle to the left side of the Step 7 unit. Press toward N. Make 8.
Make 8 for 16 4-1/2" x 4-1/2"
Make 4 9-1/2" x 9-1/2" Make 1 9-1/2" x 9-1/2" Make
9-1/2" x 9-1/2"
Make the Corner Blocks, con't.
9. Lay the units out as illustrated. Sew into pairs. Press in the direction of arrows.
10. Sew the pairs together. Press open. Make one of each corner block as illustrated below.
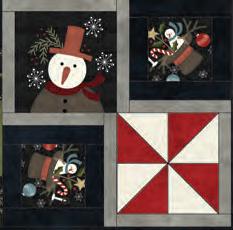
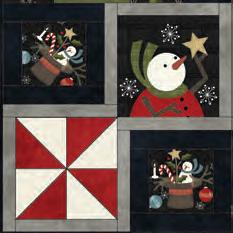
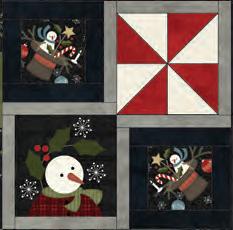
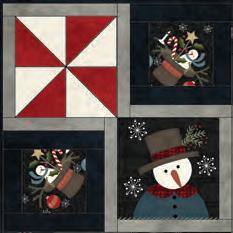
Make 1 18-1/2" x 18-1/2"
Make the Top and Bottom Rows
Make 1 18-1/2" x 18-1/2"
Make 1 18-1/2" x 18-1/2"
Make 1 18-1/2" x 18-1/2"
Snowfolk Blocks 2: Gather (6) F2-A blocks and (12) F7-M & O rectangles.
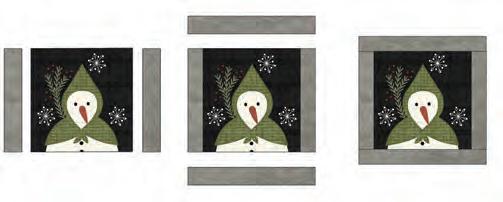
11. Sew a F7-M rectangle to opposite sides of the F2-A square. Make sure to orient the square as illustrated. Press toward M.
12. Sew a F7-O rectangle to the top and bottom of the step 11 unit. Press toward O. Make 6.
Top & Bottom Sections: Gather (8) F3-B and (2) D stripe sections, (8) F6-K rectangles, and (2) F5-H rectangles.
13. Sew the F6-K rectangles to the F3-B stripe sections. Make 4. Press toward B. Reserve 4 for the side sections.
14. Sew the Step 13 units to the Step 12 Blocks. Make 2. Press toward center.
15. Sew the F3-D stripe section to the top of the step 13 row. Press toward D.
16. Sew the F5-H rectangle to the bottom of the Step 15 section. Press toward H. Make 1.
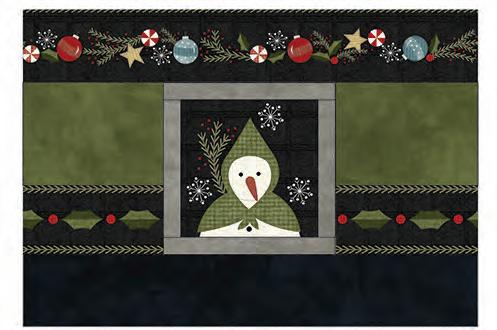
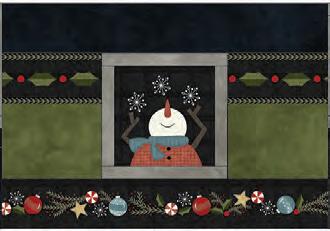
17. Repeat steps 13-16 to make the bottom section. Arrange the fabric as illustrated.
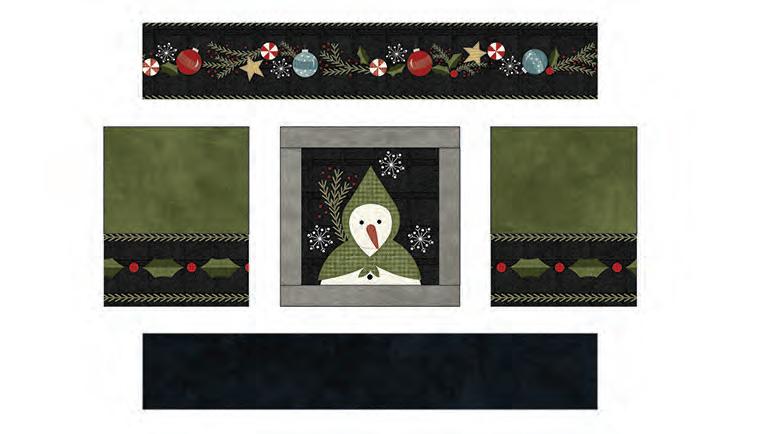
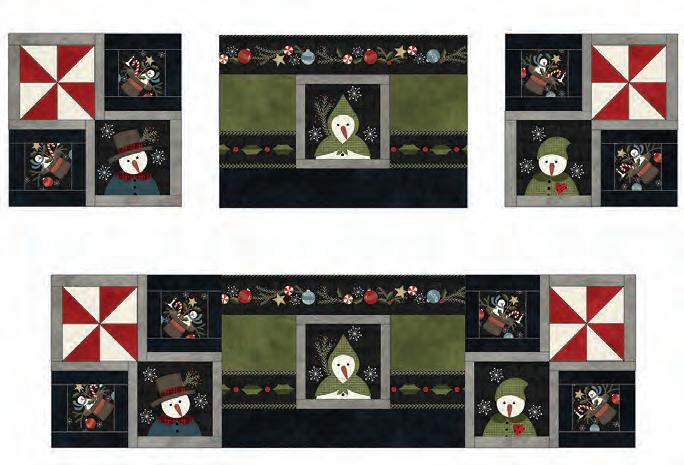
Top: Make 1 18-1/2" x 26-1/2"
Make 6 9-1/2" x 9-1/2"
Bottom: Make 1 18-1/2" x 26-1/2"
Make the Top & Bottom Rows Con't.
18. Sew the corner blocks to the top and bottom sections. Make sure to lay the blocks out as illustrated, with the pinwheel units in the corners.
Refer to the illustration below for the bottom row layout. Press in the direction of the arrows.
Side Sections: Gather (4) KB units, (2) F3-C and F3-E stripe sections, (2) F6-L rectangles, and (2) F5-G rectangles.
19. Sew the F6-L rectangles to the F3-C stripe sections. Make 2. Press toward C.
20. Left side: Lay the fabric out as illustrated. Sew the center section into a column. Press in the direction of arrows.


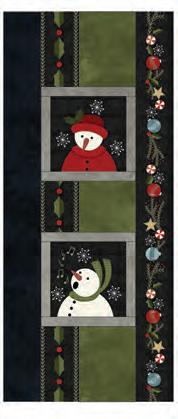
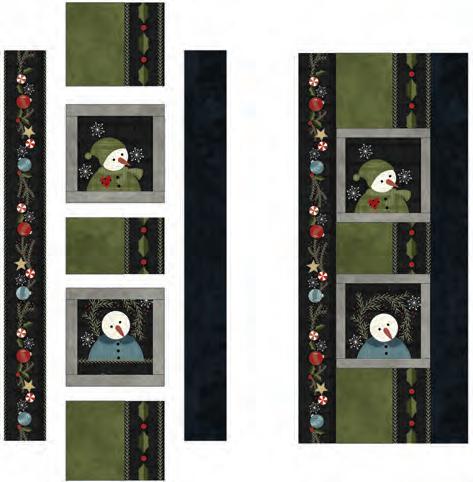
21. Sew the E and G strips to the sides of the step 20 row as illustrated. Press away from center. Make 1.
22. Follow steps 20-21 to make the right side column. Refer to the illustration for the layout.
K K
Top Row
Bottom Row
B
Left Column Right Column
23. Sew side sections to the center panel section. Press toward the sides.
24. Sew the top and bottom rows to the center section. Press toward center section.
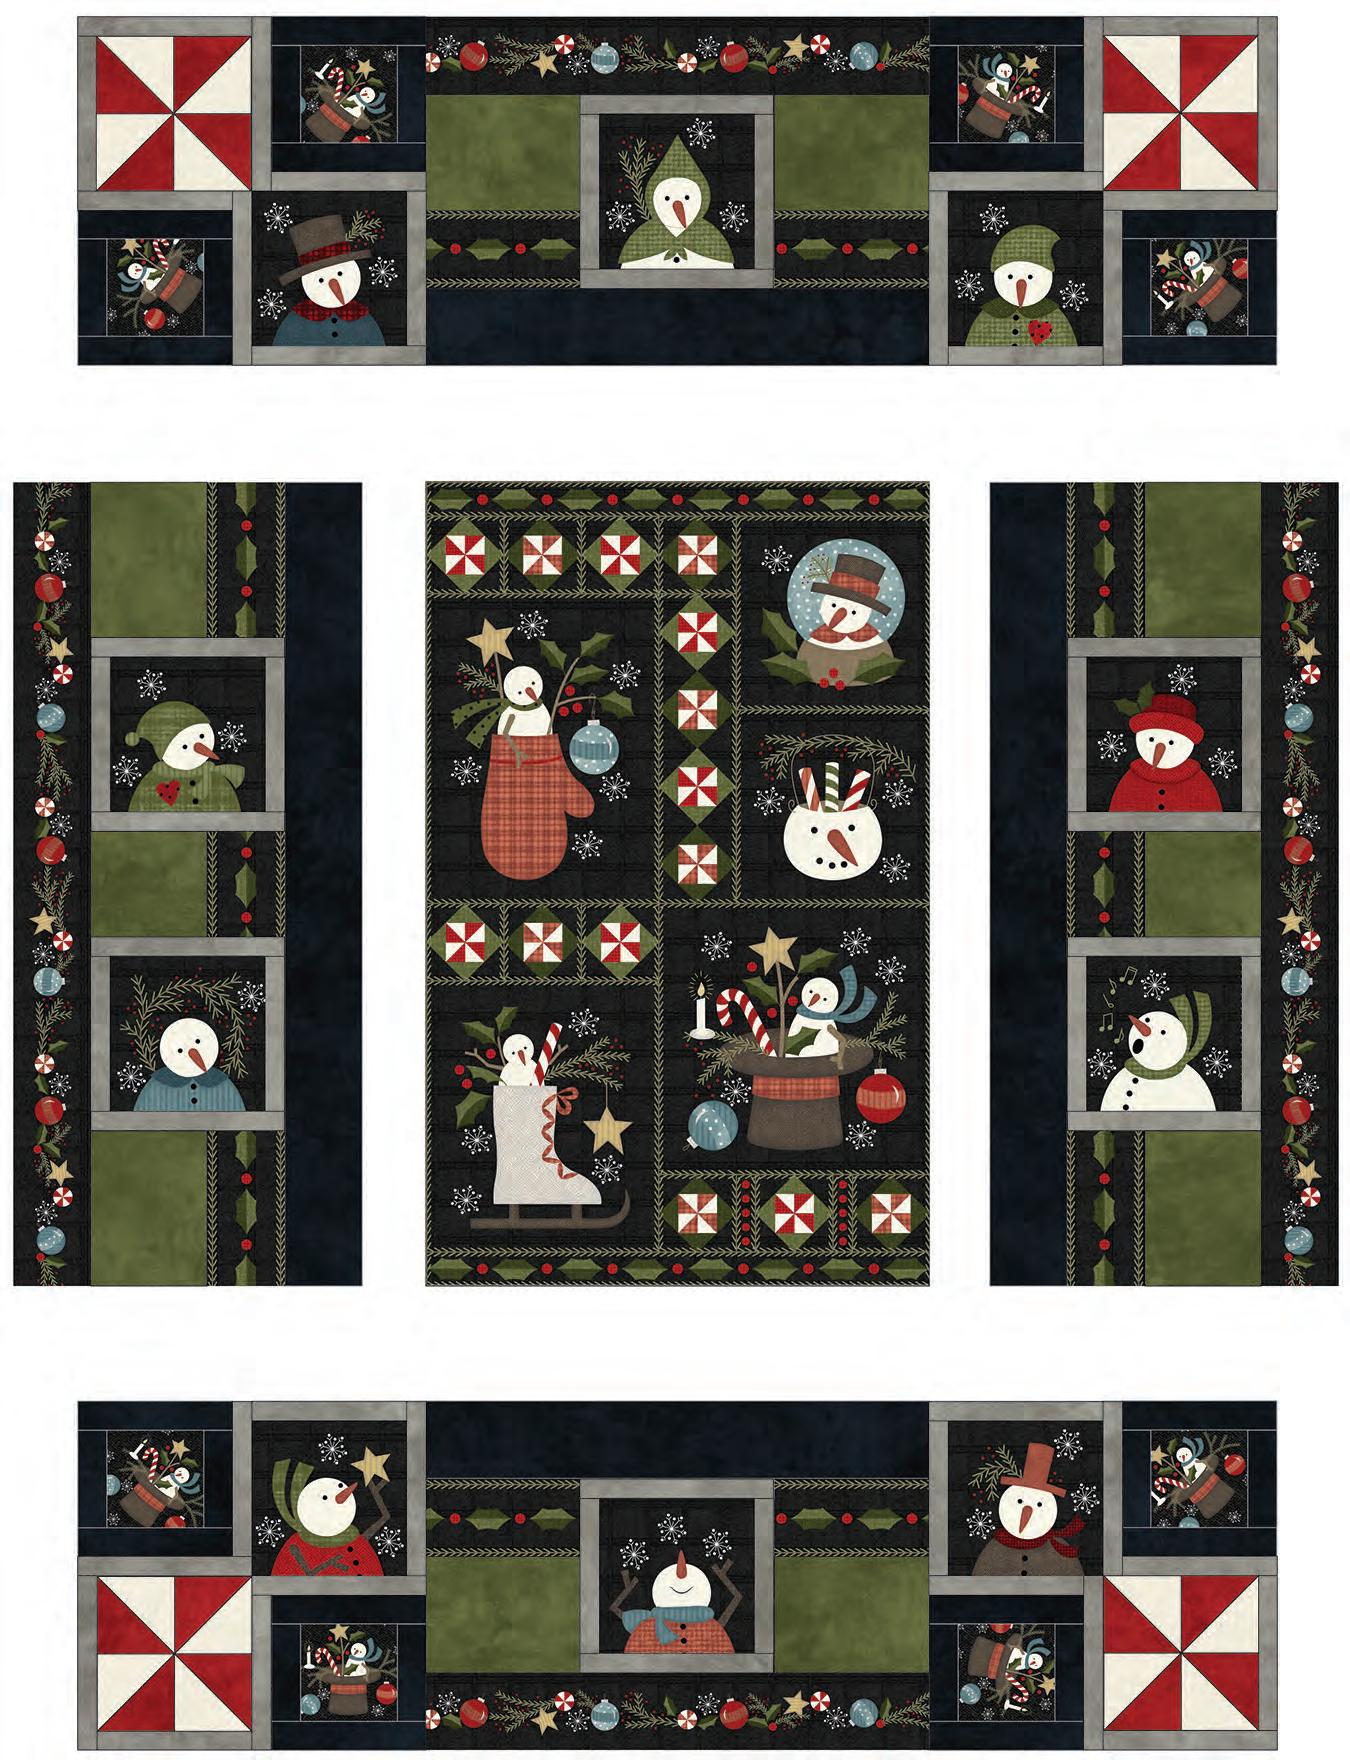
25. Layer the backing (wrong side up), batting and quilt top (right side up). Baste layers to secure. Quilt as desired. Trim the excess backing and batting.
26. Sew the binding strips together into one continuous strip. Press in half length-wise. Sew the binding to the quilt top with a 3/8” seam allowance. Turn the binding to the back side of the quilt and stitch down by hand with matching thread.
