
17 minute read
Aquatic Facilities - Causes of Tiling Failures


Causes of tiling failures in concrete swimming pools
THE REAL FACTS FROM THE AQUATIC ENGINEERS PERSPECTIVE
Advertisement
by Geoff J Ninnes CP Eng MIE Aust NER and Brad Fong CP Eng MIE Aust NER
There are countless examples of beautiful tiled pools many decades old, and new, throughout Australia and all over the world.
Over the past few years there has been instances of delamination of pool tiling in several aquatic centres. These have, in the main, been reasonably new aquatic centres in which the tiling delamination has commenced within the first 4-7 years of the pool’s life.
This type of tile failure is a recent phenomenon and it has been blamed by the tiling trade on many issues including concrete shrinkage, as well as tiling too soon after the concrete has been placed, being forced to apply tiles in wet/dusty/hot situations, filling pools too soon after the tiles have been laid, and thermal shock to the tiles caused by significant temperature differences between the tile surface and the water used to fill the pool.
It should be appreciated that there are a great number of tiled pools in Australia, built over many decades that have stood the test of time without tile failures as has been recently occurring. These pools were tiled using good adhesives and a correct application system which is why they have given such an excellent service life.
This paper has been written to address the numerous, and in our opinion, incorrect reasons, being offered as the cause of these tile delamination failures in concrete pools. The reasons for failure suggested by the tiling trade are obscuring other, more valid potential causes for tile delamination, such as poor tile application technique and the use of lower strength tile adhesives.
We believe there are significant trade related issues leading to this problem that are being ignored and these include; lack of skilled supervision of tile fixing workers, failure to apply the adhesive to the tiles to a pretested method to achieve the required adhesive coverage and failure to “backbutter” tiles even where the tile supplier has required it.
In addition, from tests that have been undertaken on some of the adhesives used in projects where tiles have delaminated, it has been found in many cases that the adhesives have only just been able to satisfy the Australian Standards for submerged tensile strength under ideal laboratory conditions. If these adhesives are applied with less than 100% coverage, they would most probably achieve an average tensile strength less than the Code requires.
Other potential causes of tile delamination listed in this paper cannot be allowed to be ignored, as to do so, would discredit pool tiling when it is, in fact, an excellent, well proven and durable pool interior finish for concrete pools.
The paper will also discuss methods of onsite checking of tile systems to achieve a 10-year warranty from tile supplier and installer.
The following section is a discussion of the issues offered by some members of the tiling trade as the cause of their delamination failures:
A. Concrete Shrinkage This has been identified by some members of the tiling trade as the most significant factor leading to tiling delamination, however there has been much misinformation about how shrinkage in concrete affects tiling. It has often been recommended by the trade that a membrane should be used between the concrete and the tiles to prevent delamination due to concrete shrinkage by absorbing the effects of lateral movement of the concrete on the tiles.
The authors of this paper do not consider concrete shrinkage to be of sufficient magnitude after the application of tiles and filling of the pool to cause movement resulting in the tile delaminating. Nor do we consider the membrane to be necessary. We make the following points: - (I) Concrete shrinkage occurs due to two components being chemical shrinkage and drying shrinkage when the concrete loses
moisture or dries out over time. Chemical shrinkage is usually complete after about 60 days and is approximately 10% of the total shrinkage. Any remaining shrinkage is solely due to drying shrinkage. Drying shrinkage can only occur if the concrete is able to lose moisture and dry. If it cannot, then drying shrinkage will not occur. (ii) Pool structures should not be tiled until at least 42 days (as required by AS 3978), or sometimes 90 days, have elapsed from the last concrete pour of the structure being tiled depending on the Aquatic Engineer’s specifications. This allows most chemical and some drying shrinkage to occur before tiles are applied. (iii) A calculation of ongoing concrete shrinkage using a final drying shrinkage strain of 700 microstrain as is usually associated with the 40 MPa concrete mix used for swimming pools designed to water retaining structures code, and based on a typical concrete section with an effective thickness of 300mm and the typical reinforcement content of 0.73%, shows the actual shrinkage, or reduction in length, of 10 metre long concrete wall or slab during the period of 56 to 1000 days in the life of the structure would be 1.4mm. The shrinkage is pro-rata for other lengths.
As the standard distance between tiling expansion joints is between 4 and 5 metres, the actual total concrete shrinkage that could be experienced within any one panel of tiling is approximately 0.7mm dispersed over the length/width of the tile panel.
A good quality C2TES2 tile adhesive would easily tolerate that amount of substrate movement without allowing tile delamination.
Claims of significant changes in dimension of the pool walls and floors through delayed concrete shrinkage causing shear induced delamination are simply not correct, even if the concrete is able to undergo drying shrinkage. Note: shrinkage reducing admixtures should not be used in pool structures. (iv) Once the tiles are installed and the pool is filled, for an in-ground pool, ongoing drying shrinkage of the concrete is very limited and is very unlikely to occur because the concrete is unable to lose moisture due to the pool water preventing loss of moisture and also the ground or backfill largely preventing moisture loss. (v) When drying of the concrete is severely limited and most likely wetted to almost saturation because it is underwater for a significant length of time, it is difficult to accept that the concrete would, under these conditions, lose moisture and shrink. In fact, the concrete may expand slightly. It has been known for decades in the field of concrete technology that concrete expands when saturated and will not undergo drying shrinkage when the ambient relative humidity of the surrounding air is 100%. Hence pool tiling would not experience the effects of significant concrete shrinkage because the concrete cannot lose moisture to any significant degree.
B. Tiling Too Soon After Placing Concrete (i) This should not be a factor, as all tiling specifications for commercial swimming pools require a minimum of 42 days delay between the time of the last concrete pour of the pool being tiled and the application of tiles. This is based on Appendix E2 of AS3958.1 Guide to Installation of Ceramic Tiles. The majority of the concrete shrinkage may or may not have substantially taken-up by this stage.
The responses by the tiling trade and other parties to this matter is based on their assertion that there is significant ongoing shrinkage beyond 42 days therefore they believe the tiling should be delayed for a significantly longer period than is contemplated by most specifications, to the point where it becomes unworkable within the project construction program. Their answer appears to be to recommend the use of a membrane between the tiles and the concrete. (ii) What occurs to the concrete in terms of drying shrinkage prior to tiling is largely irrelevant to the performance of the tiles. The majority of the concrete drying shrinkage may not have occurred prior to tiling due to site curing conditions such as wet weather, high humidity, and water testing which will limit moisture loss from the concrete and therefore stop or limit drying shrinkage. (iii) Some tilers and other parties make reference to site shrinkage testing of concrete in an attempt to explain that because the shrinkage has not occurred before tiling it is assumed to shrink after tiling (delayed shrinkage) even when the pool is full of water. This is difficult to comprehend as once the concrete is underwater and against ground it therefore cannot lose moisture and shrink. Claims of delayed shrinkage are contradictory, because they contend that the concrete may not shrink due to these site conditions prior to tiling as demonstrated by shrinkage testing, but somehow will shrink later when the concrete is immersed in water after tiling.
C. Membranes (i) As noted above, some firms are recommending a membrane to prevent the effects of concrete shrinkage movement on the tile system but as this shrinkage is unlikely to occur when the pool is filled, we see little reason for its use. In fact, the membrane has a negative effect on the tile adhesive bond to the structure as will now be discussed. (ii) A membrane will lessen the bond of the tile system to the concrete substrate. A membrane by its design is needed to take up movement and remain waterproof and has typical adhesion to concrete of about 0.5MPa. The adhesion of adhesives like Metz 27 or Laticrete Platinum have been tested for adhesion 4 times as great as membrane bond and at 2MPa to a concrete shell.
Hence tiles have much more ability to bond to a concrete shell without a membrane.
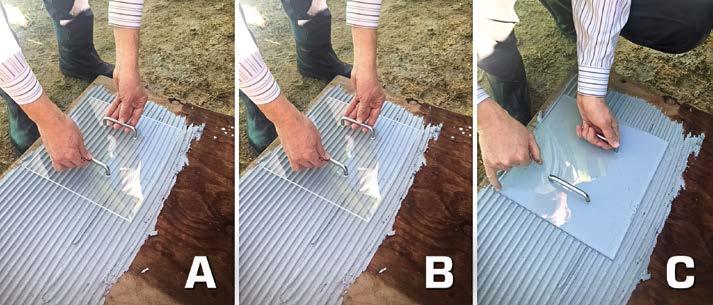
(A) The Tarver System with transparent tile showing how to achieve maximum adhesive coverage. About to laterally move the tile. (B) Tile moved laterally up and partial collapse of notches. (C) Tile moved down to completely collapse notches giving 100% coverage to tile.
(iii) A membrane is just another layer that can fail between the tiles and the substrate as the tiles are relying on the membrane to grip the concrete surface and then the tile adhesive to bond to the membrane.
It is considered a minimisation of risk if the tiles bond directly to the pool shell.
It is also important that the tile to shell bond is optimised by ensuring a good rough sandpaper-like concrete surface. This will provide a mechanical key by introducing a profiled surface roughness which increases the surface area for the adhesive to bond to.
It is also preferable not to have a render layer between tile and concrete as the render is also just another layer that can fail. If render is required because the pool shell is not dimensionally correct it is required to have a high bond strength, dense, strong, and with flexibility. (iv) A membrane is often used where complete waterproofness is required and the consequence of even a small leak cannot be accepted. (e.g. pools above habitable spaces or carparks). For an in-ground pool the consequences of a very small leak are insignificant as it will generally allow self-sealing by autogenous healing.
A membrane may also be used to minimise efflorescence emanating from above water level hobs or raised pool concrete walls and mortar beds next to pools.
D. Other Claimed Causes of Tiling Delamination Other causes mentioned such as tiling in adverse weather conditions need to be manageable by the tiling contractor. Tiles should not be applied in extreme weather conditions of cold temperature (usually less than 5 degrees) or hot weather (usually more than 30 degrees). Likewise, filling the pool too soon or too fast after completion and heating the pool too quickly can induce thermal shock and delamination and require site management.
E. Inspection of Failed Tiling Systems Inspection by the authors of several failed pool tile systems has shown that none of them have been due to concrete shrinkage.
The failures are generally due to poor workmanship in the tile installation process, lack of adequate tile movement jointing, lack of substrate preparation to ensure maximum adhesion of tile adhesive, contamination of the substrate by airborne dust or dirt or other deleterious materials and not removed before tiling, and tiling in rain or onto wet surfaces, and not allowing full curing of glue or joint systems.
A major problem noted with all failed pools is lack of coverage of the tile with adhesive as this will have a dramatic effect both on the average adhesion strength and allow the ability for moisture movement under the tile layer and degradation of the adhesive itself. It is even more relevant when the adhesive used has minimal acceptable adhesion strength.
There is some evidence that excessive tile growth may also be a contributing factor.
F. Steps Towards Achieving a High Quality Tiled Surface. (i) Aiming for 100% tile adhesive coverage and the Tarver system of tile placement:
Current Australian Codes require a minimum coverage of adhesive on tiles of 90% while aiming for 100%. This requires the notches in the adhesive caused by the notch trowel process of tiling to be collapsed by lateral tile movement, twisting, or impact. The current adhesive used in pool tiling is a thin set adhesive and the tiles must be moved across the adhesive notches by at least one notch to ensure collapse of the adhesive ridges into the notch resulting in more than adequate coverage and then moved back. This system was promoted in Australia many years ago by a well known tiling consultant to the tiling industry and about the same time in the USA in the “TCA Handbook for ceramic tile installation” where it is called the Tarver system. There was also a push for the concept of 100% coverage of tile with adhesive. This was in the 1990’s.
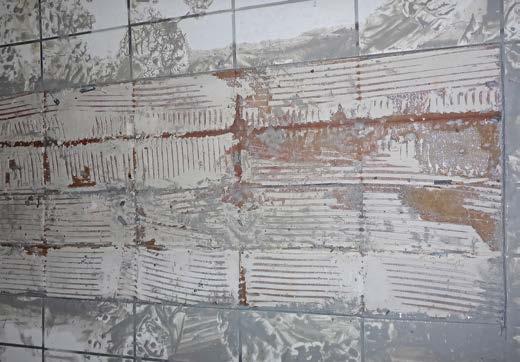
Unfortunately, in every tile failure we have inspected the general tile adhesive coverage is poor and the notches still evident with gaps between adhesive strips visible.
This lack of adhesive coverage coupled with adhesive strengths that only just meet the Australian Code requirement of submerged tensile adhesion strength of 1MPa, gives a substantial reduction in bond strength to the tile system and is coupled with a low shear strength, which is often the way tiles fail. As noted by the tile consultant in his paper “therefore poor installation practices of the installers, which leave voids behind tiles, are contributing significantly to the level of delamination and impact damage occurring to tiling worldwide.”
It should also be noted in the British Code of Practice BS5385-4 it is recommended that tiles should be solidly bedded so no voids exist behind them.
IS YOUR AQUATIC ENGINEER TRULY INDEPENDENT?
There’s no such thing as a ‘one size fits all’ solution for commercial pools and aquatic centres. From pool design, construction, heating, filtration, HVAC and any other number of factors, EVERY pool and aquatic centre design needs to take into account not only the clients specific needs, but also the very specific engineering requirements of the site.
Making sure you get the right planning, design and engineering advice from a fully independent, professional aquatic engineer – free from any conflict of interest - is paramount. It’s the ONLY way to be sure that you’re getting ALL THE FACTS and ALL THE AVAILABLE OPTIONS to meet your needs.

When it comes to choosing and Aquatic Engineer – choose wisely… it may end up being one of the most important choices you make.
GEOFF NINNES FONG & PARTNERS

2018 WINNER for STEEL EXCELLENCE in BUILDINGS - Small Projects
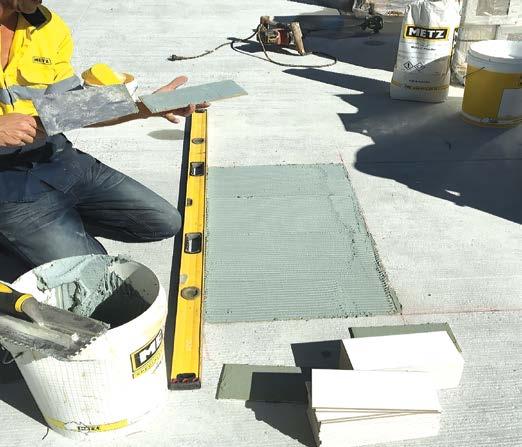
Back buttering a tile on-site prior to laying tiles, using the Tarver method. Note: notches are unidirectional on tile glue surface.
The German DIN Standard also recommends the combined butteringfloating method of tile installation (where the back of the tile is back buttered and the tile moved across the notches to collapse and fill the entire bed).
Australian Standard AS3958.1-2007 Part 1, Guide to installation of ceramic tiles, Section 5.6.2, also specifies the floating method and the buttering method of tile installation.
In Section 5.6.4 Adhesive Coverage, there is a section dealing with good tiling practice and it notes in 5.6.4.5: - (a) Use correct notch (b) Spread adhesive to leave horizontal ribs on walls and unidirectional ribs on floors (c) Occasionally remove a tile to check coverage (d) Butter the adhesive on the back of the tile where difficult access. In our opinion, tiles should always be backbuttered and installed following the Tarver system to obtain maximum coverage with no or minimal voids. (ii) Adhesives and Grouts: There has been substantial work done in the formulation of adhesives to enable them to have high adhesion (immersed) and high shear strength and increased flexibility.
Formulations of adhesives without the addition of sufficient polymer have shown very low shear strength test results which is often a mode of failure for tiles. C2S2 adhesives with higher polymer content showed almost no loss of performance in shear. Thus the most important ability of adhesives is to have a high bond strength but also be highly flexible and able to absorb shear stresses, this requires adequate polymer inclusion into the adhesive.
Also important is polymer/cement ratio. It is suggested that a polymer/cement ratio of 0.4 and dispersible polymer powder of 12% will provide both an acceptable immersed tensile adhesion strength at 28 days of 2MPa and a shear adhesion test of 1.4 MPa and be in accordance with AS ISO 13007.2 (2013).
To achieve these results requires a high quality adhesive and there are adhesives in Australia that easily meet these requirements. There are also some that don’t.
Adhesives may require a minimum 21 days to attain full strength.
G. Quality Assurance (QA) There is a need to show the client that there has been QA applied to the tile process to show an excellent long lasting job has been undertaken. Some Codes have suggested that tiles be selectively removed to prove that coverage close to 100% is being obtained and the writers agree and suggest that one tile/4sq.m be removed up to 30 minutes after placing and photographed and located on a plan of the project. If it fails 100% coverage, then tiles are progressively removed until 100% coverage is achieved. The composite of test photos and location are forwarded to the client and tile supplier as proof of coverage.
Both the tile supplier and tiler should warrant the project for 10 years.
In addition tiling cannot commence until the tile supplier has approved the roughness of the concrete substrate in writing to the client. Also, the tile supplier must approve the tiler’s method of tile installation and checking their ability to obtain maximum adhesive coverage by way of trial laying perspex tiles and observing the coverage will quickly make all aware of this.
Summary The following points summarise the author’s experiences in producing a high quality pool tiling outcome: 1. Ensure the correct curing times for the concrete shell are adhered to, and concrete mix is to specification. 2. Ensure tiles conform to BSEN 1441-2012
Extruded Ceramic Tiles with low water absorption are used 3. Ensure the concrete pool surface is adequately prepared and roughened to tile supplier approval in writing (equal to ICRI-CSP4/5 which is similar in profile to coarse sandpaper). Undertake onsite pull off tests to prove tile adhesion to the substrate.
Any render required must have high compressive strength, flexible and compatible with the tile adhesives. 4. Use a C2TES2 adhesive with polymer/ cement ratio min 0.4 and dispersible polymer powder 12% with minimum immersed tensile strength at 28 days of 2MPa and shear adhesion strength of 1.4 MPa and to ASISO 13007.2. Use a CG2WA cementitious grout to AS3958-1-2007. 5. Wet deck and raised hobs should have epoxy grout joints over a compatible membrane to minimise efflorescence. 6. Only tile in approved temperatures and weather conditions. 7. Lay tiles by Tarver system plus back buttering with QA system by tiler, approved in writing by tile supplier. Allow system to sit for 3 weeks after completion of joints, grout, tiling, and CJ’s and use tile joints at close centres. 8. Send QA to client with warranties. 9. Obtain advice on rate of filling pool and rate of heating pools that are tiled. For further information, please visit:
www.gnfp.com.au


