7 minute read
HomeLink Universal Transceiver


About HomeLink
If your vehicle is equipped with the HomeLink® Universal Transceiver, you can operate up to three Radio Frequency (RF) devices, including garage doors, gates, lights, and security systems.
Advertisement
NOTE: Depending on date of manufacture, market region, and options selected at time of purchase, some vehicles are not equipped with a HomeLink Universal Transceiver. WARNING: Do not use the HomeLink Universal Transceiver with a device that does not have safety stop and reverse features. Using a device without these safety features increases the risk of injury or death.
Supported Modes
HomeLink supports three different transmit modes, which is how your vehicle and the RF device communicate. Selecting a transmit mode is determined by your RF device's compatibility:
• Standard Mode: Use Standard Mode if your RF device is equipped with a remote control that must be used to operate the device (for example, a remotecontrolled garage door). This mode is the most commonly used transmit mode for HomeLink devices. • D-Mode or UR-Mode: Use D-Mode or UR-Mode if the
RF device does not have a remote control, and the receiver has a "Learn" button (may also be called "Program" or "Smart"). D-Mode and UR-Mode function similarly in that Model 3 communicates directly with the device's receiver as opposed to the remote control.
NOTE: D-Mode is used primarily in North America whereas UR-Mode is popular in Europe, the Middle
East, and Asia. To determine the mode your device is compatible with, contact HomeLink (www.homelink.com or call 1-800-355-3515).
Each of your devices can be set to a different mode. For example, your garage door can be set to Standard Mode, your front gate can be set to D-Mode, etc. To change a transmit mode, touch the HomeLink icon at the top of the touchscreen and select the device you want to change. Then, select Program and choose the desired mode for your device. Confirm by touching Set Mode and follow the onscreen instructions.
For older vehicles, changing the mode for one device changes the mode for all devices, so be careful when changing transmit modes. Devices not compatible with your selected mode may not work. Touch the HomeLink icon at the top of the touchscreen, then touch Change Transmit Mode. NOTE: Check the product information for your HomeLink device to determine which mode is compatible with your device.
Programming HomeLink
To program HomeLink®:
1. Park Model 3 so that the front bumper is in front of the device you want to program. CAUTION: Your device might open or close during programming. Therefore, before programming, make sure that the device is clear of any people or objects.
2. Check that the device's remote control has a healthy battery. Tesla recommends replacing the battery in the device's remote control before Programming
HomeLink. 3. Touch the HomeLink icon at the top of the touchscreen. 4. Touch Create HomeLink. 5. Select the mode you wish to use: Standard, D-Mode, or UR-Mode (see Supported Modes on page 153). 6. On the touchscreen, enter a name for your device, then and touch Enter or Create HomeLink. 7. Touch Start and follow the onscreen instructions.
NOTE: If you see a screen called “Train the receiver” while programming the device, remember that this is a time-sensitive step. After pressing the Learn/
Program/Smart button on the device's remote control, you have only approximately 30 seconds to return to your vehicle and press Continue, and then press the trained HomeLink device name twice.
Consider having an assistant to ensure you can complete this step within 30 seconds.
8. Once your device is programmed, touch Save to complete the programming. 9. Ensure HomeLink works as expected. In some cases, you may need to repeat the programming process multiple times before succeeding.
Once programmed, you can operate the device by touching its corresponding HomeLink icon on the touchscreen. HomeLink remembers the location of your programmed devices. When you approach a known location, the HomeLink control on the touchscreen automatically drops down. When you drive away, it disappears.
NOTE: For additional assistance or compatibility questions, contact HomeLink (www.homelink.com or call 1-800-355-3515).
Auto Opening and Closing Troubleshooting HomeLink
To operate a HomeLink device without using the touchscreen, you can automate the device to open as you approach, and close as you drive away:
1. Touch the HomeLink icon at the top of the touchscreen , then choose the device you want to automate. 2. Select the Auto-open when arriving checkbox if you want the device to open as you approach. 3. Touch the arrows to specify the distance you want
Model 3 to be from the device before it opens. 4. Select the Auto-close when leaving checkbox if you want the device to close as you drive away.
As you approach (or drive away from) a device that is set to operate automatically, the HomeLink status icon displays a count-down message to let you know when the device automatically opens or closes. In situations where you don't want the device to automatically open or close, touch Skip Auto-Open or Skip Auto-Close at any time during the count-down message.
NOTE: Do not rely on HomeLink to ensure the device fully closes.
Resetting the Location of the HomeLink Device
If you experience situations in which you sometimes drive up to your HomeLink device and it doesn't open, or the touchscreen does not display a notification as you approach a programmed device, you may need to reset the device's location. To do so, park as close as possible to the HomeLink device (garage door, gate, etc.) and display the HomeLink settings page by touching the HomeLink icon at the top of the touchscreen. Touch the name of the device you want to reset, then touch Reset Location.
Deleting a Device
To delete a HomeLink device, touch the HomeLink icon at the top of the touchscreen. Touch the name of the device you want to delete, then touch Delete.
NOTE: You can also perform a factory reset to erase your HomeLink settings, along with all other personal data (saved addresses, music favorites, imported contacts, etc.). See Erasing Personal Data on page 131. NOTE: For security reasons, delete your HomeLink devices if you sell your Model 3.
Standard Mode
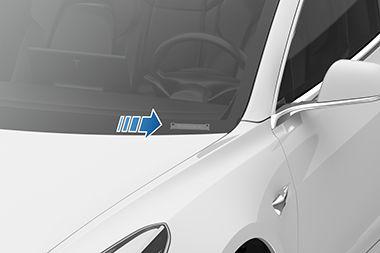
In Standard Mode, Model 3 records the RF signal from your HomeLink device's remote control. The touchscreen instructs you to stand in front of the vehicle, point the device's remote control at the front bumper, and press and hold the button until the headlights flash. When the headlights flash, Model 3 has learned the remote control and you can touch Continue on the touchscreen. If the headlights do not flash:
• Check the batteries in the remote control. It is a good idea to replace the batteries before you start programming. • Ensure you are standing in front of Model 3 with the device's remote control positioned within five cm of the Tesla emblem. • Press and hold the button on your device's remote control until the headlights flash. In some cases you must hold the button on the remote control for up to three minutes.
NOTE: Some HomeLink remote controls require multiple short presses (approximately one second each press) instead of one long duration press. If you are unsuccessful after multiple attempts of using long presses, try repeated presses of one second each.
D-Mode and UR-Mode
In D Mode and UR-Mode, the device’s receiver learns Model 3. The touchscreen instructs you to press the "Learn" button (may also be called "Program" or "Smart") on the device's receiver. If this does not work, refer to the following guidelines:
• Park Model 3 with its bumper as close as possible to the garage door, gate, etc. that you are trying to program. • Make sure you are pressing the receiver's Learn/
Program/Smart button. For instructions on how to put the receiver into learning mode, refer to the product details provided with your RF device that you are trying to program. • If you see a screen called "Train the receiver" while programming the device, remember that this is a time-sensitive step. After pressing the Learn/
Program/Smart button on the device's remote control or receiver, you only have approximately 30 seconds to return to your vehicle, press Continue, then press the trained HomeLink device name twice.
Consider having someone assist you with this step. • Most devices stay in learning mode for only three to five minutes. Immediately after pressing the device's
Learn/Program/Smart button, follow the instructions displayed on the vehicle's touchscreen.
For additional assistance or compatibility questions, contact HomeLink (www.homelink.com or call 1-800-355-3515).