

In the Emmy-nominated opening credits of HBO’s “White Lotus,” wallpaperlike images told a story: The tropical prints started off innocuously enough, but then turned ominous. Fruit started rotting, fish got tangled in seaweed, and a sense of foreboding set the whole premise of an exotic paradise on its edge.
The artist, Lezio Lopes, has said he was trying to evoke the design and themes of the show’s resort suites.
It’s a surreal example of a current trend in decor — wallpapers that combine art and narrative qualities to set the mood of a room. Some take us to wild places in nature, others to wild worlds born in artists’ imaginations. They go way beyond your nice stripe or simple floral.

They tell a story.
Wallpaper in general is back in a big way, decor experts say, and often makes a statement through images or texture (many papers incorporate fabric or fibers). Chicago-based design writer Elaine Markoutsas, who attended two of the year’s biggest design expositions, Maison et Objet and Deco Off, in Paris, said new wallcoverings were among the most exciting things she saw.
She cited intriguing patterns, and digital and 3D printing techniques. One theme stuck out.
“We heard the term ‘revenge travel,’ referring to a post-pandemic urge to get away for real, or virtually,” she says. “Travel often triggers designers, who mine details from architecture, landscape and destination culture.”
Some of the new papers feature contemplative renditions of forests
and seascapes. Others reference places, people or creatures as fun, imaginative, maximalist marvels.
For a mashup of both, there’s the baroque “Novafrica Sunset” created by Christian Lacroix’s creative director, Sacha Walchoff.
He’s envisioned a kind of fever dream jungle with a tangerine sky, foliage clouds, glimpses of fauna, hyper-colored blooms and silkribbon-wrapped tree trunks. Put this on your walls and let the conversation begin.
At Pierre Frey, artist Veronique Villaret cut out simple paper sprigs of Pacific Island vegetation to
create a joyful, colorful pattern she calls “Rangiroa.” It’s available as a wallpaper or fabric.
Dutch studio Moooi’s “Memento Moooi Medley “ wallcovering collection was inspired by the accounts of early explorers and the creatures they encountered. The “Golden Tiger” roams among cubs and other jungle animals on a wood veneer background. “Mimic Moths,” now extinct, take on the coloring of their favorite plants. Other moths, moon orchids and lilies-of-dusk tumble across an embossed, suedelike wallcovering.
Partnering with textile giant
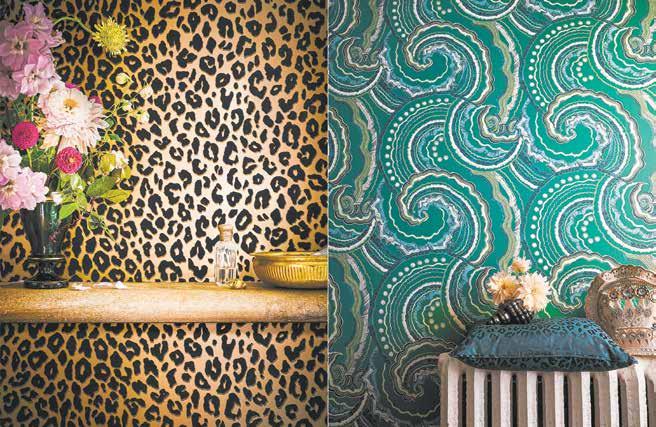
Romo, Alice Temperley’s eponymous London-based fashion and design house drew inspiration from their archive of richly detailed gowns. They came up with a wallcovering collection full of leopard prints, swirling sea agate patterns, and golden Victorian keys and dressmaking scissors.
Stories for Walls has a cheeky one called “Safari Gangsta,” featuring fierce and funny wild animals dressed in hip-hop gear; there’ll be some cool kids who’ll want it in their bedrooms, and probably some adults too.
Katie Deedy has found a way to artfully mix her intellectual
Nature, history and imagination infuse new wallpapers that help a room tell a storyThis photo provided by New Zealand designer Emma Hayes shows the designer’s Willow wallpaper in chocolate pattern. Hayes draws much of her inspiration from the landscape around her. Emma Hayes via AP
curiosity and love of history. Her Brooklyn-based Grow House Grow studio produces some of the most imaginative wallpapers and tile. One pattern, “Ode to the Unhasty,” includes pictures of sloths, snails, manatees and slow-growing bristlecone pines.
“The pattern’s narrative inspiration is more of a gentle lesson,” she laughs.
Between running her business and parenting, Deedy says she began to feel like life was going too fast.
“So I created this wallpaper as a visual ode to taking it easy. When I look at this collection of our Earth’s slowest moving flora and fauna, it’s a reminder to mosey more and sprint less.”
Another of her patterns, “Mary Ward,” honors a forgotten female entomologist. In the mid-1800s, Ward spent her days with a magnifying glass, collecting and drawing insects.
“As a woman, she couldn’t be formally trained at university,” says Deedy. “Yet over the course of her young life, she became a renowned expert in microscopy, writing the goto texts used in the same schools that wouldn’t admit her.”
The wallpaper playfully intermingles late-Georgian-style silhouettes of Ward and her beloved oversize insects.

At this year’s International Contemporary Furniture Fair in New York, Emma Hayes showed a couple of ethereal and dreamy wallcoverings based on her New Zealand home. “Willow” depicts willow wisps caught by a breeze, against a midnight background. “Sediment” shows a gently rolling shoreline of tonal watery hues.

Alexis Audette of New York-based studio Mazy Path showed natureinspired papers in the styles of Arts & Crafts textiles, Delft tiles and 16th century French wallpapers. Audette sees a commonality between plants and people.
“Just as family heirlooms remind us of our history and identity, heirloom plants do too,” she says.
She developed wallpapers that tell stories about plants. One collection,
“Heirloom,” features patterns depicting wild ramps, Virginia strawberries and winter wheat –all part of America’s food history.
Her “Treasure Tree” collection pays homage to trees that provide food, medicine or protection; the paper is printed with imagery of
guava, elderberry, nickel trees and mangroves.
Studio Heimat recently worked with clients in Mission Dolores, California, to incorporate their interests in geology and zoology into their home’s interior design.
“The clients LOVE bugs,” says the studio’s Eva Bradley. So local artist Rafael Arana was commissioned to hand-paint some crawling up a stairwell’s wall.
“The homeowners asked that the bugs be black and white and oversize, so visitors wouldn’t be scared,” says the studio’s Alicia Cheung.
Another way designers tell artful stories is by mixing materials, Markoutsas says. She cites a new wallpaper from French design house deGournay “made of embroidered silk, embellished with shells. Elitis has a vinyl wallcovering that simulates beautiful embroidery.”
And Arte introduced “Le Foret,”
Metro
Renovations are a great way for homeowners to reshape their homes. Some may aspire to renovate so their home is more reflective of their personal taste, while others may do so in an effort to make their homes better align with modern styles and sensibilities. Regardless of why a homeowner chooses to renovate, the need to do so is often evident to the naked eye, especially when the time comes to update home exteriors.
Curb appeal is often discussed in regard to the effects it can have when selling a home. But curb appeal is equally important for homeowners who aren’t putting their homes on the market. A wellmaintained, aesthetically appealing home is a source of pride, while
a home with fading curb appeal can make homeowners feel a little sheepish. Homeowners who want their homes to maintain their curb appeal can look for signs that it’s time to update their home exteriors.
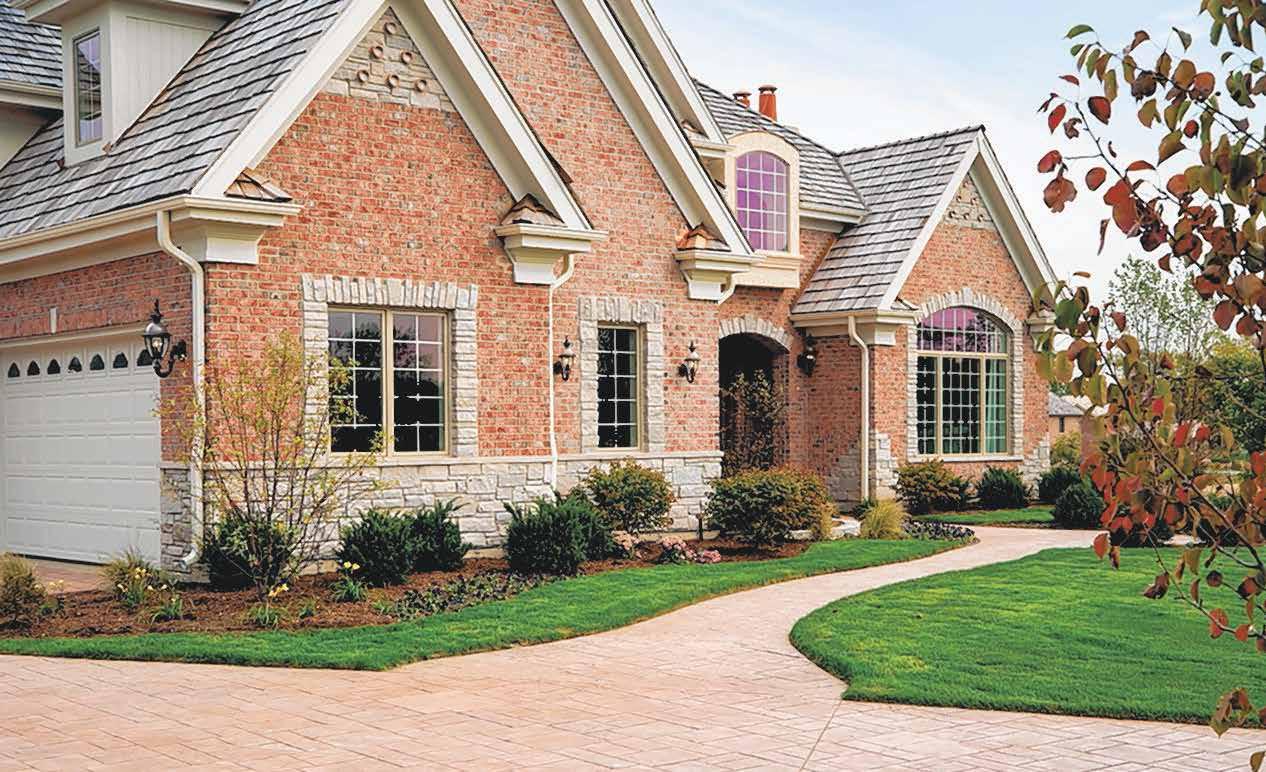
• Curling shingles: The roof may not be the first thing people think of when pondering curb appeal, but a damaged roof can contribute to problems that ultimately affect the exterior and interior of the home. Multiple curling shingles indicate it’s time to replace the roof. The sight of curling shingles is not pretty, but the larger issue in such instances is the potential for costly water damage when water gets in through the affected shingles.
• Dated entry door: Many home improvement experts insist they can determine when a home was
built or most recently renovated simply by looking at the front door. Steel and glass doors are popular in modern homes, so homeowners with front doors with ornate designs and oval glass inserts can likely benefit from an upgrade to their entryway. A modern front door can make a statement and real estate experts note how popular updated front doors are among buyers.
• Unsightly landscaping: It’s not only the physical components of the home that may suggest an update is necessary. Homeowners without a green thumb may have exterior landscaping that has seen better days. If a spring or summer day spent tending to your landscaping is not your ideal weekend pastime, then consider
replacing unsightly landscaping with low-maintenance plants or hardscaping. These alternatives to more needy plants can create curb appeal without requiring any extra work for homeowners.
• Cracked driveways/ walkways: If the driveway looks like a busy road at the end of snow plowing season, chances are that’s adversely affecting the impression people have of your home. In addition, cracked walkways indicate a need for renovations, as these areas are front and center when welcoming guests.
Updating a home’s exterior can restore curb appeal and help homeowners feel better about their properties.
— Metro





Cold weather contributes to many different conditions that can affect homes. When winds are blowing fiercely, homeowners may soon discover deficits in insulation or in caulking around windows and doors. Icy conditions can cause walkways and stairs to become slick.
One winter condition can cause extensive headaches and damage and could be a mystery to many homeowners. Ice dams occur when warm air in the attic heats up the roof and melts accumulated snow. Water from this melt runs down the roof and refreezes when it reaches the colder roof edge. A mound of ice forms at the lower edge of the roofline as a result.

Ice dams may help create a picturesque winter vista, with icicles hanging and glinting in the sunlight, but they can cause significant damage. According to experts, ice dams can weigh hundreds of pounds if they get large enough, potentially affecting the structural integrity of roof eaves. In addition, ice dams can cause melted runoff to back up under roof shingles. This water can eventually make its way inside, ruining ceilings and walls. The roof, gutters, insulation, interior drywall, and other home surfaces can be damaged if ice dams are left unchecked.
The following are some conditions that make a home vulnerable to ice dam formation:
1. The presence of snow on the roof.
2. An average outdoor temperature that is 32 F or lower.
3. A roof surface temperature above 32 F at its higher points and below 32 F at the lower end.
4. Indoor heat making its way to the underside of the roof. Homeowners should take a few steps to address ice dams. The first is preventing future ice dams from forming. According to First American Roofing and Siding, LLC, improving insulation in the ceiling below the attic and addressing any inefficiencies in the home is necessary. A professional can do a blower door test, which works by depressurizing the home and
Metro
using a thermal camera to find areas where insulation is poor. In addition, adequate ventilation under the roof deck is necessary so cold air can circulate and prevent the attic from getting so warm that it will melt the snow on the roof.
The next step is to remove excess snow from the roof with a roof rake and keeping gutters clear. If ice dams have already formed, hire a professional to remove them, as it can be dangerous to do it oneself.
Snow-covered roofs and landscapes can be beautiful, but also dangerous if conditions that cause ice dams to form are not addressed.
— Metro
A homeowners’ guide to

As fall inches closer to winter, it’s not uncommon for people to look to the coming cold with a degree of lament. Spring, summer and fall provide ample opportunities to enjoy the great outdoors, but such chances are few and far between once the winter freeze settles in. Though winter might compel the masses to huddle up inside, there’s still a way to take in the great outdoors on cold winter days and nights.
It might not prove an exact substitute for summer nights around the firepit, but a sunroom affords homeowners a chance to marvel at snowy winter landscapes without venturing out into the cold. Sometimes referred to as “all-season rooms,” sunrooms can make for a great retreat on quiet summer mornings or crisp autumn afternoons. Sunrooms can be treated as blank canvasses, which makes decorating them more fun. But a few tricks of the trade can help homeowners turn their blank canvasses into welcoming spaces to take in all that nature has to offer throughout the year.
Metro
• Define the purpose. The experts at Better Homes & Gardens recommend homeowners decide how they want to use the sunroom before they begin decorating it. When the weather gets too chilly to dine outside, will the sunroom serve as an alternative dining space in the same way patios and decks do during the warm weather? Or do homeowners want to turn their sunrooms into reading rooms? Though it’s possible to make sunrooms multipurpose spaces, it may be hard to create a relaxing vibe in rooms that are too crowded with furnishings or too busy. Defining how the space will be used also makes it easier when shopping for furnishings.
• Define when the room will be used. In addition to defining how the room will be used, homeowners should give ample consideration to when the room will be used. A year-round sunroom will need to be heated, while a three-season sunroom likely won’t require heating. Cooling might be a concern on hot summer afternoons, but many homeowners will likely spend such days outside anyway, so cooling the room may be as simple as installing a ceiling fan and ensuring windows can be opened to let fresh air in. Homeowners who want a year-round sunroom should install insulated glass to keep the room even warmer when the mercury dips.



• Opt for bright colors. Bright colors can make sunrooms feel all the more inviting and make for a perfect match with all the natural light already in the room. The renovation experts at HGTV note that white walls and ceilings can maximize the warm illumination of the natural light that will be pouring in from the floor-to-ceiling windows. Better Homes & Gardens adds that brightly colored cushions, pillows and area rugs with similarly hued colors and patterns can add visual interest and texture to a sunroom.
— Metro




Areader asks how to remove paint from a brick wall. Removing paint from bricks — especially the types made for walls rather than pavement — is tricky because of their texture and pores. Paint seeps into all the little crevices, essentially making it impossible to scrape or sand away. And if you use a paint stripper, you risk smearing the residue onto nearby bricks, which would look even worse.
You can try removing the paint in a way that minimizes smearing, but you need to accept that, if it doesn’t work well, you might need to cover the remnants with paint that matches the bricks. Or you could skip trying to strip it and fast-forward to the painting step.
If you want to try removing the paint, a stripper such as Peel Away, made by Dumond, might seem appealing. In theory, you would apply the stripper, cover it with the special paper that Dumond sells, wait for the stripper to work, then peel away the paper and the paint residue clinging to it, with no risk of smears. But a call to Dumond’s customer service line (609-655-7700) made it clear that the paper is there mostly to keep the stripper from drying out too fast; the bulk of the softened paint probably won’t peel away with the paper when you go to remove it.
Nevertheless, the customer service agent recommended getting Dumond’s paint removal test kit ($26.99 at Ace Hardware), because it contains small samples of three stripping formulas, as well as the paper and basic tools
such as gloves, brushes and a scraper, so you can determine what would work best on your brick. Paint formulas vary, so chemical strippers need to vary as well. Or, if you have stripper from a different project, you could test that, provided that the label says it can be rinsed with water and isn’t highly alkaline, which might damage the bricks.
The agent looked at the picture you sent and made a couple of observations that might influence the process on your house. The paint color on the brick matches the window trim, and it appears
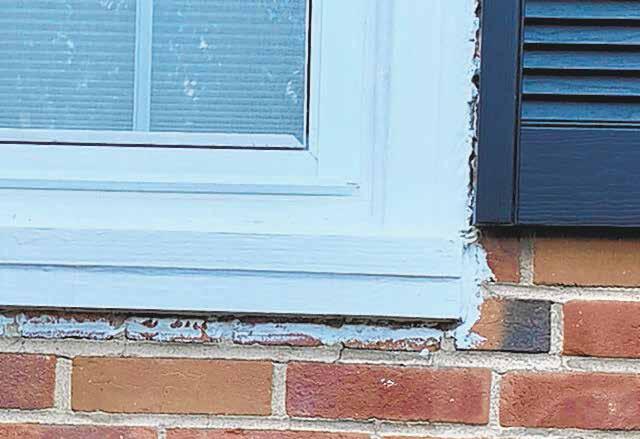
to be fairly new paint, so there’s a good chance it’s only one or two layers of water-based paint, rather than multiple layers that include old oil-based paint. He recommended testing the Smart Strip and Smart Strip Pro formulas in the kit but setting aside the container of Peel Away, which was designed to work on thick layers of oil-based paint, including products that contain lead. (If you think the paint on the brick is from the 1970s or earlier, test for lead before proceeding.)
Although the areas of paint on the brick are wide enough to look
unsightly, from a paint-stripping perspective, they are quite small. The agent suggested not worrying about covering the stripper with paper; you could just brush on a little more stripper if it dries too fast. After about three hours, the paint probably would be soft enough to remove, assuming you tackle this when it’s at least about 40 degrees. Wait for warmer weather if needed.
To scrape away the softened paint from small areas, use a little brush with stiff nylon bristles, such
SPLATTER, continued from 12
as the plastic handle stripping brush ($4.99 at Ace Hardware), and wash it after each pass. (If you were stripping a bigger area, you’d also need a tool such as the 3M heavy-duty stripping pad, which is $4.99 per two-pack at Ace.)

Be careful not to smear the paint over a wider area. Work from the outermost part of the paint toward the window. Then, while the paint is still soft from the stripper, try to wash away any remnants. Use the jet setting on the nozzle of a hose, not a power washer. To avoid damaging the paint around the window, shield the wood with a tool such as the 12-inch Allway blue steel taping knife ($12.75 at Walmart) in one hand while you use your other hand to squirt away the paint remnants. Alternate between brushing and rinsing as needed.


If you still can’t get off all the paint, or if you don’t want to try to strip it, covering it with paint
might be the best remedy. Bring home paint-sample cards and compare them with the brick color to get the best match. Buy paint that’s that color and that’s a little darker, or ask the paint store if it can tint a small amount of the main color, so it’s slightly darker. Brush the main color over the paint you want to cover. Feather the edges, so there isn’t a distinct line where the paint meets the unpainted brick. Let that dry, then apply the darker color with a stencil brush ($6.99 at Ace) with short, stubby bristles, to mimic the shadows formed by the texture of unpainted brick. Load a tiny amount of paint onto the tips of the brush and dab it onto the brick at a right angle with a clean inand-out motion. Or hire a painter who specializes in faux painting. Someone who makes sets for theatrical productions, which are all about faux effects, might also be able to create the magic you need.
— The Washington Post
Metro
Afully finished and functional basement is a dream for many homeowners. Such a space, when completed, can serve as an entertainment space, a man cave, an artist’s studio, or any number of additional functions.
Despite their usefulness, finished basements are something of a rarity. In an analysis of data from the U.S. Census Bureau’s Survey of Construction, the National Association of Home Builders found that only around 24 percent of single-family homes built in 2018 have basements. Homeowners who do not currently have a finished basement but are considering such a project can approach the remodel with a few key factors in mind. Careful consideration of these factors can ensure the project is budget-friendly and worthy of
homeowners’ investments.
• Investment value: Conventional wisdom among home renovation and real estate experts suggests that a basement remodel is best if done to satisfy current inhabitants and not necessarily to appeal to prospective buyers once the home is put up for sale. Remodeling magazine reports that a midrange basement remodel costing around $70,000 will provide a return of around $49,000 (or 70 percent) at resale. Though that’s not a poor return on investment, homeowners who are remodeling a basement solely for the potential ROI at resale can find other projects that provide a greater return.
• Foundation: The foundation of the home must garner ample consideration before beginning a basement remodel. Certain foundation issues, such as soft concrete, cracked or curved outside walls and cracks in the flooring, are
indicative of significant issues with the foundation. These issues can be costly to address, and they must be remedied before the basement remodel can begin.
• Existing space: Some homeowners may have bought their homes with partially finished basements or even finished areas that they simply want to remodel. In such instances, a pre-remodel inspection from a licensed home inspector can save homeowners lots of money and heartache over the long haul. Partially finished or even aging finished basements might not have been renovated in adherence to codes, which could lead to costly violations down the road. An inspection in advance of a remodel can give homeowners an idea of what they will need to do to bring the basement up to code. Local officials also can provide a list of necessary permits and a detailed description of
requirements to ensure the remodeled basement adheres to code.
• Soil: Soil surrounding the home should be tested prior to beginning the project. Radon is an odorless gas found in soil that the U.S. Environmental Protection Agency notes can increase individuals’ risk for lung cancer. Radon can seep into basements and increase that risk even further if it is present at elevated levels in the soil surrounding a home. Radon tests are simple and inexpensive, and no basement remodel project should begin without first conducting such a test.
Finished basements are valuable spaces. Homeowners who want to finish or remodel their basements should consider a host of factors before beginning the renovation.
 — Metro




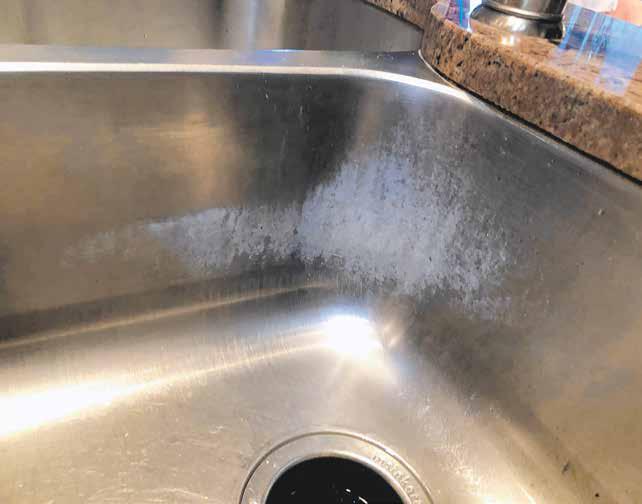
My former cleaning lady put something in my stainless-steel sink to clean the floors. I don’t know what she used, but now there are whitish stains on the sides and corners. It looks as if some of the finish has been removed. How can I refurbish it?
Because you mentioned floor cleaner, a customer service representative for a company that makes floor cleaners seemed like a good person to ask. Joni Thompson, who has that role at Holloway House, which makes the Quick Shine floor-care products, heard a description of your problem and said the deposits might be residue from a floor-maintenance product designed to leave a shiny finish or to strip a shiny finish. But those would leave a shiny coating, not white deposits. Once she saw the pictures you sent and consulted with a technical expert at the company, she emailed to say that she was sure it was not caused by a floor finish. “Paint possibly or just some buildup,” she said. She suggested trying a Magic Eraser, a type of sponge made of melamine foam that works like very fine sandpaper to scrub away deposits and that needs only plain water. Be sure to scrub in the direction of the grain lines in the stainless steel, so any scratches from the
pads blend in. (A two-pack of Magic Erasers is $3.29 at Target.)
If a Magic Eraser — or several, given they wear down quickly — doesn’t get your sink looking clean again, Thompson suggested trying nail polish remover, which should strip off paint residue, if that is what you’re seeing. “Stainless steel is very durable,” she noted, so if that doesn’t work, you could try other household cleaners
or stain removers, including staples such as vinegar or baking soda.
You might even try what Thompson recommended when she initially thought a floor-shine product or floor cleaner was to blame. Quick Shine multi-surface floor finish and similar products from other manufacturers contain waterborne polymers, which are basically plastics formulated to remain as a whisper-thin coating
on the floor once the water evaporates. If someone repeatedly sprayed one of these products on a cleaning cloth or mop in the sink and didn’t rinse and wipe off the sink thoroughly, the spatters could leave a stubborn residue.
A cleaning product that was designed to remove polymer coatings, such as the Quick Shine deep cleaner, could also do that if
See SINK 17
someone dumped a bucketful of mop water in a sink and didn’t clean up the splashes. The cleaner would re-liquefy polymer on the floor, but the polymer could reharden on the sink once the water evaporated.
To remove hardened polymer, whether from a product intended to leave a shine or to remove it, Thompson recommended using a cleaner that includes ammonia or something that is chemically close to it. The Quick Shine deep cleaner is ammonia-free, but it’s what Thompson called “an aminebased product — in the ammonia family but without the ammonia smell.” Or she suggested using Windex Original ($4.99 for a 23-ounce bottle at Ace Hardware) or Formula 409’s multi-surface cleaner ($4.99 for 32 ounces at
Ace Hardware). You could also mix your own cleaner using 3 or 4 tablespoons of ammonia with 1/2 cup hot water. “Let the cleaner sit for a good two minutes,” Thompson said, then scrub and rinse.
If you want to try other cleaners, read their labels first. The big caveats are to avoid using any products that contain chlorine bleach or are strongly alkaline, such as oven cleaners or drain openers. Stainless steel is stainless — not stain-proof — because the metal includes chromium. Chromium at the surface combines with oxygen in the air or water and forms a protective layer of chromium oxide. But chlorine bleach, which is found in numerous cleaning products, breaks the bonds in the chromium oxide layer, allowing oxygen to reach the steel and form iron oxide, or rust.
Luckily, as Thompson
said, stainless steel is fairly indestructible, so if you don’t already have a cleaner or solvent that gets rid of the white deposits, you might forgo buying a bunch of other cleaners to test and instead work on scouring the crud to reveal fresh stainless steel underneath.
Asked a couple of years ago about how to remove pitting caused by leaving oven cleaner in a stainlesssteel sink, a representative of Elkay, a sink manufacturer, recommended using a maroon Scotch-Brite pad ($2.79 at Ace Hardware) and a powdered cleanser, such as Bon Ami ($2.59) or Bar Keepers Friend ($2.99). Always rub in the same direction as the grain lines that the manufacturer left when buffing the sink.
Scrubbing down to fresh stainless steel is also the remedy when a sink becomes dull and dark because

someone used chlorinebleach-based cleaners or fine steel wool instead of a synthetic scrub pad to clean. Shards of steel wool can break off and become lodged in the grain lines. Steel wool generally isn’t made of stainless steel, so the shards can rust and turn the surface dark and dull.
However you clean or whatever you use to scrub, keep the sink looking its best by rinsing the metal well, then wiping it dry with a soft cloth or a microfiber cloth, so water doesn’t linger and begin to form a mineral crust. Once the sink is clean and dry, you can add a few drops of olive oil or mineral oil to a lint-free cloth and buff the sink until it shines. But drying the sink and adding that shine are just cosmetic. The stainless steel itself will do fine without the coddling.


