

Home Improvement Fall


From sketchbook to
wallpaper
Behind the scenes at Rifle Paper Co.
By RACHEL KURZIUS The Washington Post
Rifle Paper Co. products are everywhere: party supplies at Target, bedding at Pottery Barn Kids, wallpaper at Anthropologie and its eponymous stationery collections, well, all over. And they all bear the bright, playful patterns that have become the company’s calling card, each of which began with hand-painted art from Anna Bond, co-founder, CEO and chief creative officer.
While Bond loves painting, her favorite part is what comes next — turning art into a suite of products. “It’s a fun challenge to create things that I think are beautiful but also people actually want to buy,” she says. Bond walked us through how, exactly, that process works, using the Roses pattern, which was released this year, as an example.
•••
Step 1: Sketching and painting Why roses? “I usually try to do a new floral pattern each season,” Bond says. After the success of the company’s Hydrangeas pattern, she wanted to create another that had a single flower type as a focal point. She drew inspiration from old books filled with specimen paintings and antique prints featuring roses.
Bond sees muses everywhere — a rug in a museum or the pattern mixing in some element of British interior design — and lets the ideas stew in her mind. “My process is usually taking a lot of things in for a

while and then cramming a bunch of creativity into a few days — get it all out,” she says. “And then I need to recover and get more inspiration. I’m not like a slow and steady creative person.”
While color is by no means finalized at this stage, Bond gravitated
toward a palette of darker reds, yellows and pinks when she started to paint the roses. That color scheme led her toward the inclusion of raspberries.
She uses gouache paint on flat watercolor paper each time. Using the same materials and process for her
first step brings “a consistency to our brand aesthetic, because everything is really starting with something hand-painted,” she says. But she isn’t concerned about how the elements of the pattern — in this case, the various roses, leaves and raspberries — are interacting at this stage.
“I always say that if someone were to go through all my original paintings, they’re not always that good-looking because they’re just made to scan,” Bond says. That means that she spaces out the components of the painting so she can easily manipulate different pieces. Sometimes, even the paint colors she chooses will differ from what she wants in the final product, because she’s using ones that are easier to work with in Photoshop.
•••
Step 2: Scanning and pattern building
Bond scans all of the paintings into Photoshop at the highest resolution with the help of a large flatbed scanner beneath her desk. The components don’t have to be perfect to be ready for this step. “When we’re piecing things together, I can move a little leaf to hang this way or move the flower head that way,” Bond says. “It’s sometimes funny when I’m painting because I’m like, ‘Oh, I’ll fix that later.’”
Once the building blocks for the pattern are loaded into Photoshop, it’s time for Bond and her team to figure out their layout. Should the flowers all be facing in the same direction? How big should they be? How much negative space? Bond usually has a preexisting pattern to
Photos by Rifle Paper Co.

compare with the work in progress — often it’s Garden Party, a colorful explosion of blossoms that remains Rifle’s bestseller. “Some of it is putting those next to each other and making sure [the new pattern] does something different,” she says.
It also helps in terms of figuring out the scale. Roses “is pretty true to the scale I painted it,” she says.
The Rifle team also has a “library of flowers” — a collection of every blossom Bond has painted that “we can kind of play with and go back to,” she says. The pattern Estee, a checkerboard of plant life, came about through futzing with these archival images.
•••
Step 3: Getting the pattern on paper products
Once there’s a mock-up, Bond will start talking with her team about what kind of items might work best with it. Whenever Bond is introducing a pattern, she likes to do so on products that are already bestsellers. “It’s always risky to put a new pattern on a new product because both are unknowns, right? You could have a real dud on your hands,” she says.
The Rifle team plays around with
how to apply the pattern: “Okay, let’s put this on stationery. Maybe it has a mint background. Let’s try these other colors. What’s the font that’s going to go with that on the label?” Bond says. “And we kind of go through that process and start creating actual products with it and then sample those.”
Products employ the pattern differently. Roses on a rug, for instance, will be much larger and more textured than on a spiral notebook. An embroidered journal might have only one of the roses rather than a repeating pattern. A lot of the color choices play to the product itself, and how it will be used, as well as the materials used to make it. Gold might be more of an accent for a notecard, but then a metallic version becomes the background for wrapping paper. “The more we can get out of one pattern, the better,” she says.
•••
Step 4: Turning Roses into wallpaper
Bond has found that colors that work on home products may vary from what works on stationery or accessories. The team is careful with yellows, for instance, which “can be really strong and difficult inhome.” But Rifle definitely doesn’t eschew color for home products like wallpaper. “People want color from us,” Bond says. “So usually when I do something that’s more minimal or quieter, it doesn’t sell for us as well as the things that are brightly colored.”
That’s why, when it came to picking color schemes for the Roses wallpaper, the team wanted to make sure to have one with a bold navy background. Bond has also been drawn to plums and aubergines for home products recently.
Rifle partners with York Wallcoverings on its wallpaper offerings. Figuring out how to use patterns and colors is collaborative. The final decision generally happens at York’s headquarters in Pennsylvania, where all of the options are displayed on boards to examine together.
Consumers get to choose from a handful of colorways for each pattern. “The editing process is really important,” Bond says. “Do we have too many blues overall? Do we have too many kind-of-quirky ones, or which ones do you think are going to sell out?”
Deciding is a bit like drafting a sports team — you want to make that sure all the options work well together and that each brings something unique to the table. She likes to think about it holistically: “Even though the two-color patterns are never typically going to be the bestsellers, they need to be there to tell the story.”
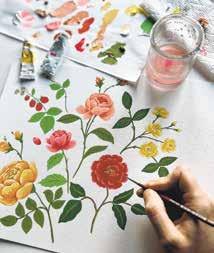
Anna Bond paints roses as part of the wallpaper creating process.
Above and below: Anna Bond paints flowers as part of the wallpaper creating process.
Don’t work in bed, and other tips for creating a peaceful sleep zone in a studio apartment
Keep it cozy
There’s a lot to be said for the work/play energy of a nice studio or other small apartment during the day. But how do you bring that energy down to get a good night’s sleep?
With electronics, cookery, clothes and books all in one space, it can be a challenge to create a restful refuge.
Design and sleep experts have some tips.
Prioritize a sleep space, starting with the bed
Everyone needs good sleep to stay healthy.
“The primary rule, maybe the only rule of small space design, is people have to be honest about how they really live,” says Olivia Hosken, House Beautiful’s deputy managing editor. “When there’s limited square footage, there’s less allowance for things that don’t function optimally.”
So spend your money on a proper bed or a quality sleep sofa. Skip big tables or chairs you won’t use, she added.
Andrea Morris of Lancaster Place Interiors in Wilmington, North Carolina, is a fan of wall beds, which rest flush with the wall when closed, then flip down for sleeping. They’re better known as Murphy beds, named after William Murphy, who came up with his version in 1900 while living in his own San Francisco studio apartment.
Some Murphy beds combine a sofa with a wall bed.

A horizontal tilt wall bed with built-in cabinets for TV and more helps organize a studio apartment and keeps the sleeping area in its own space.
Create a buffer zone
To separate your sleep area from the rest of the apartment, you could get a freestanding screen, room divider or “floating” (hanging) wall. And as much as you can, keep that area strictly for sleeping.
“Avoid doing work or anything stressful from your bed,” says Jeff Kahn, co-founder of the Chicagobased sleep-research company Rise
Science, which developed a sleeptracking app, Rise.
“This helps to maintain what sleep medicine practitioners call ‘stimulus control,’ which helps your brain associate the bed with sleep, rather than wakefulness and stress,” he says.
If the bed is the only place of refuge, still do what you can to keep wakefulness and sleep in separate
zones. Lisa Strauss, a psychologist specializing in cognitive behavioral treatment of sleep disorders, has suggested designating different sides or ends of the bed for reading and sleeping.
Keep things tidy
“One of my don’ts when it comes to studio living is leaving beds unmade,” says Morris. “It’s amazing how much better you feel after a hard day entering a space with a made bed. And in a studio, it’s often the sofa, too. So make it inviting for yourself and others.”
Stow away electronics overnight and out of sight; side tables with plugs and ports are handy and an efficient way to reduce clutter.
Choose flexible, storable bedding
Ingui recommends choosing breathable materials for bedding if it’s difficult to regulate your studio’s heating and cooling.
“It’s also great to invest in a duvet cover/insert rather than a bulky comforter — this way, you can easily keep multiple foldable, storable covers on hand and swap them out, rather than hoarding a bunch of large comforters you don’t have space for,” she says.
With some thoughtful choices, your small space can have the vibes we all want from home life: cohesive, calming and sleep-friendly.
— The Associated Press
California Closets via AP


redesign
FAQ about garage remodels
Homeowners tend to want to maximize all of the space they have in their homes. For some, this may involve turning a garage from a utilitarian space into one that serves multiple purposes.
According to The Mortgage Reports, a home-buying and improvement resource, garage renovations can increase the value of a home and add living space. Garage remodels can create additional storage space, provide an area for a home gym or even create room for a home office. Prior to beginning a garage remodel, homeowners may have some common questions about the process.
How much does the renovation cost?
Several factors will ultimately determine the final price of a garage remodel, but HomeAdvisor says the national average for a garage remodel falls between $6,000 and $26,000. Most homeowners come in at around $15,000 for a total garage conversion.
Will I recoup my investment?
A garage conversion adds value to a home if it creates new and usable living space. The firm Cottage, which pulled together a team of builders, architects and technologists, advises the average garage conversion provides an 80 percent return on investment. That ROI varies depending on location.
How can I upgrade flooring?
Garages traditionally feature concrete floors. Although durable, concrete floors can feel damp, hard and cold underfoot. Both vinyl plank and epoxy flooring options can elevate the design and

functionality of the garage.
Can I have the best of both worlds?
Sometimes a garage needs to serve many purposes. Lofting the garage means a homeowner can still park cars or utilize the lower space as a living area, all the while items are stored overhead. Some flip this design scenario and have the loft area as a bedroom or finished living space, while the lower portion remains a traditional garage area. Another thought is to finish only a portion of the garage. This works well for two- or three-car garages where there will be room to park a car and the remainder will serve another purpose.
What are other ways
to improve the garage?
Installing more windows or improving on the lighting in the garage can be important. The garage improvement experts at Danley’s say window installation enables people to circulate air in the garage without having to open the garage door. Improving the lighting means the garage can still be enjoyed or utilized after dark. Spread out lighting in the garage, and use a combination of overhead and task lighting just as one would in the home itself.
How do I deter bugs or other pests from entering?
Insects often want to hunker down in garages, and they may find it easy to get inside a garage.
Keeping the garage clean and organized is the best way to deter pests and to spot infestations before they become problematic, indicates Mosquito Joe pest control company. Reducing water and humidity in the space, weatherproofing at the base of the garage door and other entry spots and utilizing insect repellents to make the garage less hospitable also can decrease the risk of insect infestation.
Remodeling a garage can add value and plenty of usable space to a home. Whether a garage houses cars or hosts neighborhood game night, a garage renovation can be well worth the investment.
— Metro


When it comes to hiring a contractor, there are some things you need to know.
Tips when hiring a contractor
Contractors perform important work for millions of homeowners every day.
Home improvement projects are complicated undertakings, and the experience of skilled contractors can ensure jobs are completed on time and within homeowners’ budgets.
Homeowners have undoubtedly heard horror stories from neighbors about projects that have gone awry. Projects can go sideways for a number of reasons, but a skilled contractor can help homeowners navigate such situations successfully. That underscores how important it can be to find the right professional for the job.
The following are some tips homeowners can consider as they look to hire a contractor.
• Identify which professional you need. Some contractors are
of the jack-of-all-trades variety, but many specialize in a particular line of work. It’s important that homeowners identify which type of contractor they should work with prior to starting a project. This requires homeowners to define the goal of the project (i.e., new wood floor installation), which can serve as a springboard into finding the right type of contractor.
• Prioritize building safety. Safety should be the utmost priority for homeowners and contractors alike. Prior to hiring a contractor, homeowners should identify any safety restrictions that might be enforced by local governments and take note of all the permits necessary to get a job done. Homeowners can then discuss those restrictions and permits as they interview contractors. Projects that do not adhere to code are illegal and can compromise homeowners’ ability to sell their
homes in the future. So it’s vital to work with contractors who are familiar with local codes and aware of which permits are necessary to ensure a project can go forward.
• Insist on written estimates. Handshake agreements offer no protection to homeowners or contractors, so estimates indicating what will be done and how much the project will cost should be provided. Homeowners should insist on receiving written estimates and interpret an unwillingness to provide one as a significant red flag.
• Know your rights. Laws vary by region, but in general homeowners have a right to a written contract and contractors are obligated to provide a copy of that contract signed by both parties. That contract must be provided prior to the start of the project. The contract should provide a detailed
account of the work that will be done, as well as a timeline indicating important dates that components of the project will begin and be completed. The contract also should detail materials and who is providing them. Details regarding payments, guarantees and warranties also should be cited.
• Do not pay in cash . Some contractors may suggest that the project will cost less if they’re paid in cash. However, home improvements should never be cash transactions. Cash does not indicate proof of payment, which can be problematic if a dispute arises.
Contractors help homeowners turn dream projects into reality. Homeowners can employ various strategies to ensure they find the right professional for their home improvement project.


DIY can be bad for your bottom line
Homeowners know it can be tempting to go the DIY route when starting a home improvement project. Home repairs and renovations can be costly, and the notion of saving money on such projects compels many homeowners to try their hand at home improvements. However, the DIY approach can be costly as well, and if things go awry, homeowners may end up with empty pockets and unfinished projects.
Online tutorials and advertisements for home improvement retailers can make DIY seem like a snap. However, there are potential pitfalls to consider that could make the ostensibly less expensive DIY route far more detrimental to the bottom line than homeowners may recognize.
• Permits: Permits ensure work is done in accordance with local codes, which are designed to ensure the safety of residents and their neighbors. Licensed contractors know which permits are necessary for projects they’re hired to work on, and many even procure permits for their clients (homeowners are urged to read estimates and contracts to determine who will be responsible for acquiring the appropriate permits).
DIYers may not know about local permits, and therefore go ahead with projects without procuring any. That can be harmful in the short- and longterm. In the short-term, a failure to procure the appropriate permits can make a home less safe and potentially lead to costly fines and necessitate a complete do-over of the project. In the longterm, homeowners who did not

Sometimes DIY does not mean less expensive.
secure the appropriate permits may not be given a certificate of occupancy when putting their homes on the market, which can make it very difficult to sell the home.
• Ancillary costs: The ancillary costs of DIY are not often noted in online tutorials. However, such costs can dramatically increase the amount of money DIYers shell out in order to complete projects on their own. Ancillary costs include but are not limited to the price of tools and equipment; disposal fees for materials that will need to be discarded; and the cost of
permits. These costs are often included in estimates provided by contractors, but they’re easily overlooked by novice DIYers.
• Repairs: Even experienced contractors make mistakes, so DIYers, particularly novices, can anticipate making a few errors along the way. Minor mistakes may not prove too costly, but more significant mishaps can quickly negate any cost savings associated with DIY renovations. The cost to fix DIY mistakes varies depending on the project, but a 2019 survey from Porch. com found that the average DIY mistake cost homeowners $310 and added five and a half
hours to the overall time spent to complete a project. It’s worth noting the Porch.com survey was conducted prior to the dramatic increase in materials costs related to inflation in recent years. So it’s reasonable to assume that fixing DIY mistakes in 2024 could end up costing considerably more than a few hundred dollars.
Before diving in to DIY, homeowners may want to consider the real costs associated with forgoing professional experience in the potentially misplaced hopes of saving a few dollars.
— Metro


