
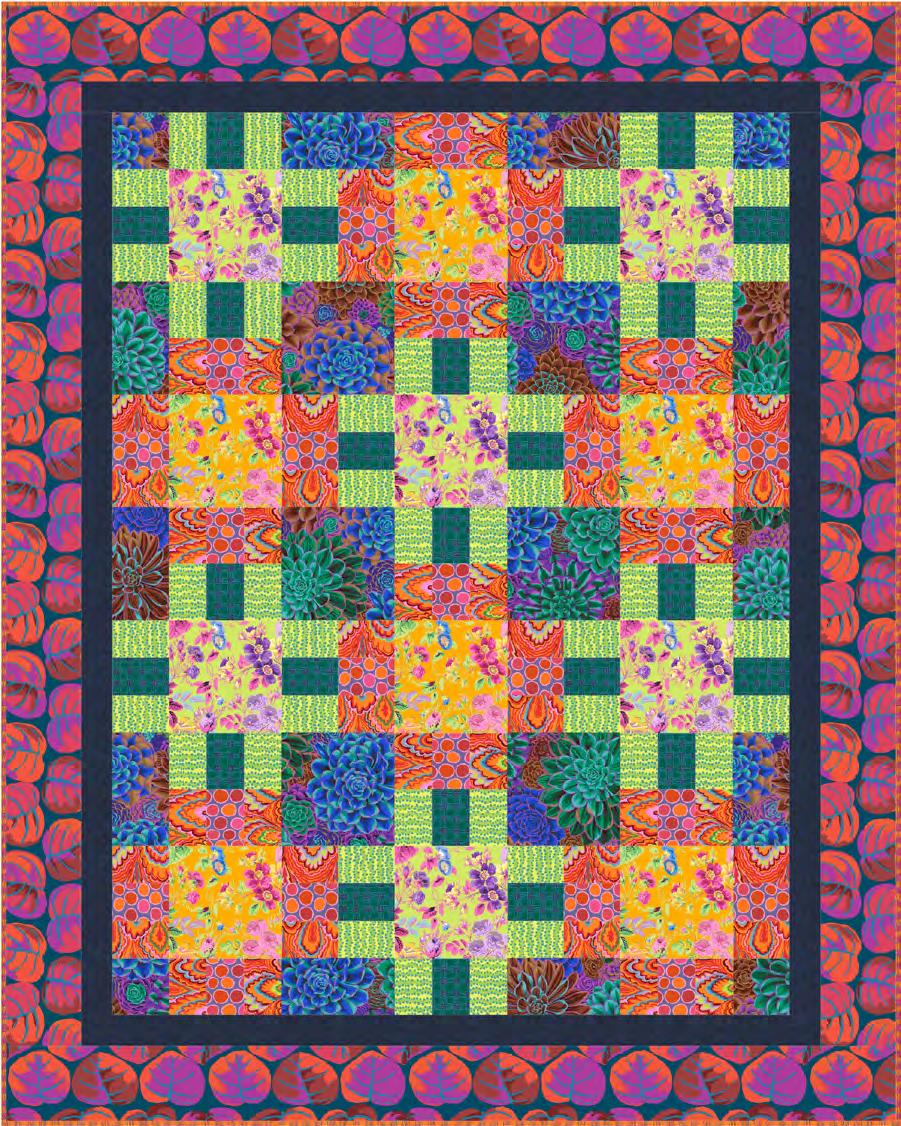
Gridlock Quilt
Featuring Kaffe Fassett Collective February 2025
Collection: Kaffe Fassett Collective February 2025
Technique: Pieced
Skill Level: Advanced Beginner
Finished Sizes:
Finished Size: 71" x 89" (1.80m x 2.26m) Main Blocks: 9" x 9" (22.86cm x 22.86cm)
All possible care has been taken to ensure the accuracy of this pattern. We are not responsible for printing errors or the manner in which individual work varies. Please read the instructions carefully before starting this project. If kitting, it is recommended a sample is made to confirm accuracy.
Gridlock Quilt
Project designed by Stacey Day | Tech edited by Julie
Kentner
Fabric Requirements
DESIGN COLOR ITEM ID
(A) Penny-wise Red
(B) Marble Scallops Red
(C) Palm Leaves Red
(D) Aboriginal Dot Midnight
(E) SM Bubble Stripe Yellow
(F) Gingham Aqua
(G) Gingham Coral
(H) Gradi Floral Lime
PWGP206.RED 1⁄2 yard (0.46m)
PWGP207.RED 3⁄4 yard (0.69m)
PWGP208.RED 13⁄4 yards (1.60m)
PWGP071.MIDNIGHT 5⁄8 yard (0.57m)
PWBM097.YELLOW 3⁄4 yard (0.69m)
PWBM089.AQUA 1⁄2 yard (0.46m)
PWBM089.CORAL* 2⁄3 yard (0.61m)
PWPJ053.LIME 5⁄8 yard (0.57m) (I) Gradi Floral Gold
PWPJ053.GOLD 5⁄8 yard (0.57m) (J) House Leeks Drama
PWPJ113.DRAMA 11⁄8 1.03 * includes binding
Backing (Purchased Separately)
44" (1.12m) wide Flower Studies Lilac


PWGP205.LILAC 51⁄2 yards (5.03m) OR 108" (2.74m) wide Palm Leaves Pink
Additional Recommendations
QBGP010.PINK 21⁄2 yards (2.29m)
• 100% cotton thread in coordinating or neutral color
• 81" x 99" (2.06m x 2.52m) batting
Cutting
WOF = Width of Fabric
From Fabric A and F:
(3) 3½" x WOF; sub-cut
(24) 3½" x 5" rectangles
From Fabric B and E:
(6) 3½" x WOF; sub-cut
(48) 3½" x 5" rectangles
From Fabric C:
(8) 7" x WOF; sew together end to end and cut
(2) 7" x 71½"
(2) 7" x 76½"
From Fabric D:
(7) 2½" x WOF; sew together end to end and cut
(2) 2½" x 58½"
(2) 2½" x 72½"
From Fabric G:
(9) 2½" x WOF for binding
From Fabric H and I:
(2) 9½" x WOF; sub-cut
(6) 9½" squares
From Fabric J:
(3) 9½" x WOF; sub-cut
(6) 9½" squares
(10) 5" x 9½" rectangles
(1) 5" x WOF; cut
(4) 5" squares
Block Assembly
1. Unit A: Sew (2) Fabric B 3½" x 5" rectangles and (1) Fabric A 3½" x 5" rectangle together as shown in Fig. 1. Press towards Fabric B. Make (24).
2. Unit B: Sew (2) Fabric E 3½" x 5" rectangles and (1) Fabric F 3½’ x 5" rectangle together as shown in Fig. 1. Press towards Fabric F. Make (24).
1
Quilt Layout
3. Sew (1) Unit A and (1) Unit B together as shown in Fig. 2 to make Block A. Press open. Make (17). Trim and square to 9½" x 9½".
Fig. 2
2
Gridlock Quilt
Row Assembly
4. Using the Quilt Layout diagram (page 5) as a guide, assemble rows using the Unit A, Unit B, and Block A components made in steps 1-3 along with the 9½" Fabrics H, I and J squares, the Fabric J 5" x 9½" rectangles and the Fabric J 5" squares. The Fabric J 5" squares will be used in the top and bottom rows of the quilt top. Press seams in opposite directions for each row.
5. Sew rows together to make the quilt top. Press seams down. Once assembled it should measure 541⁄2" x 721⁄2".
2
Borders
6. Sew the Fabric D 2½" x 72½" strips to the left and right sides of the quilt, matching ends and centers. Press towards Fabric D. Sew the Fabric D 2½" x 58½" to the top and bottom, matching ends and centers. Press towards Fabric D
A
7. Sew the Fabric C 7" x 76½" to the left and right sides of the quilt top, matching ends and centers. Press towards Fabric C. Sew the Fabric C 7" x 71½" to the top and bottom, matching ends and centers. Press towards Fabric C.
Fig. 1
Fig.
Fig.
Fig.
Gridlock Quilt
Finishing
8. Binding: Sew together the (9) 2½" Fabric G binding strips end-to-end using diagonal seams. Press seams open, then press the binding strip in half wrong sides together. Set aside until the quilt is ready for binding.
9. Once the top is complete it is ready for quilting! Quilts can be sent out for longarm quilting or you can quilt it yourself. If you are sending the quilt out, it is important to discuss backing and batting requirements with the quilter to ensure they have everything needed to properly finish the quilt.
10. If quilting yourself and using 44" fabric for backing, choose your favorite method for piecing (taking time to remove selvedges), then layer, baste and quilt. Once finished, trim excess batting and backing and bind according to your favorite method.
11. To complete binding by hand, it must first be machine sewn to the quilt top. Leaving an 8" tail of binding, sew binding to top of quilt through all layers, matching raw edges. Miter corners. Stop approximately 12" from where you started. Lay both loose ends of binding flat along quilt edge. Where the two loose ends meet, fold each side back on themselves and press to form a crease. Using this crease as your stitching line, sew the two open ends of the binding together right sides together. Trim seam to 1⁄4" and press seam open. The binding will naturally fold, wrong sides together, and lay along the quit edge. Finish sewing binding to quilt. Turn and press the binding to the back of the quilt and hand stitch in place.
12. If machine binding, complete the steps above only attach the binding to the BACK of the quilt, turn and press binding to the front of the quilt and machine stitch in place.
Gridlock Quilt
Quilt Layout
Quilt Layout

Bento Quilt - Cool
Featuring Kaffe Fassett Collective February 2025
Collection: Kaffe FassettCollective February 2025
Technique: Pieced
Skill Level: Advanced Beginner
Finished Sizes:
Finished Size: 84" x 98" (2.13m x 2.49m)
Finished Block: 13 1⁄2" x 13 1⁄2" (34.29cm x 34.29cm)
All possible care has been taken to ensure the accuracy of this pattern. We are not responsible for printing errors or the manner in which individual work varies. Please read the instructions carefully before starting this project. If kitting, it is recommended a sample is made to confirm accuracy.
Bento Quilt - Cool
Project designed
by
Stacey Day | Tech edited by Julie Kentner
Fabric Requirements
10" Charm Pack Cool FB610GP.COOLFEB25 1 PACK
(A) Broad Stripe Azure WSGP003.AZURE*
(B) Aboriginal Dot Midnight PWGP071.MIDNIGHT
*includes binding
Backing (Purchased Separately) 44" (1.12m) wide Palm Leaves Blue PWGP208.BLUE
(2.40m)


(7.54m) OR 108" (2.74m) wide
Gradi Floral Purple QBPJ005.PURPLE
Additional Recommendations
• 100% cotton thread in colors to match
• 94" x 108" Batting
yards (2.51m)


Cutting
WOF = Width of Fabric
From 10" Charm Pack:
From each 10" charm cut (4) 5" x 5" squares; Keep matching fabric designs together. Grouping matching fabrics together will help with block placement during the assembly process. Keep like fabrics together and labeled Charm Block Fabrics A-O.
From Fabric A Broad Stripe Shot Cotton cut:
(49)2" x WOF; sub-cut
(168)2" x 5" rectangles
(168)2" x 61⁄2" rectangles
(10) 21⁄2" x WOF for binding * Binding can be cut WOF or on the bias, makers choice
From Fabric B Aboriginal Dot cut:
(35)2" x WOF; sub-cut
(42)2" x 14" rectangles
(84)2" x 61⁄2" rectangles
(10)2" x WOF; for borders
Block Inventory:
The Bento Quilt is composed of 42 blocks, cleverly placed to create a balanced grid. As blocks are completed, they will be set aside and then assembled according to the Quilt Layout (page 6).
There is some variation in the number of blocks made from each fabric – please refer to the Block Quantity table below when piecing individual Charm Block.
Charm Block Placement
Bento Quilt - Cool
Instructions
All seam allowances are 1⁄4" and fabrics are sewn right sides together (RST). Press seams as directed by arrows in Figure illustrations.
1. Unit A: Gather (4) 5 " Charm A fabrics, (4) 2" x 5" Fabric A rectangles, and (4) 2" x 61⁄2" Fabric A rectangles. Sew a Fabric A 2" x 5" rectangle to the right of the 5" Charm A fabric. Repeat for the remaining (3) Charm A fabrics. Press according to Figure 1.
Take a 2" x 61⁄2" Fabric A rectangle and sew to the bottom of the unit, making sure the 5" square is on the left. Repeat for the remaining three (3) units. Press according to Figure 1. There will be four (4) Unit A measuring 61⁄2" square.
Fig. 1


2. Unit B: Join (2) completed Unit A by sewing (1)2" x 61⁄2" Fabric B rectangle between them. Note that the 5" Charm A fabrics will be in the top-left and top-right corners as shown in Figure 2. Repeat for the remaining (2) Unit A and Fabric B pieces. Press according to Figure 2. Unit B will measure 61⁄2" x 14".


3. Block Assembly: The block is constructed using (2) Unit B completed in the previous step and (1) 2" x 14" Fabric B rectangle as shown in Figure 3 . Press according to Figure 3. The block should measure 14" x 14" (unfinished).


Bento Quilt - Cool
4. Repeat steps 1 – 3 for the remaining Charm A fabrics, then for the remaining 5" Charm B – O fabrics. NOTE: There will be either 2 or 3 of each identical block for a total of 42 blocks. As blocks are assembled, take care to keep like blocks together and labeled Charm Blocks A-O as this will help determine their placement in the quilt layout.
Quilt Top Assembly
5. Using the cover photo, the Quilt Layout diagram (page 6), and the Block Placement table (page 3) referenced earlier in these instructions, arrange the completed quilt blocks together into seven (7) rows of six (6) blocks each.
Note: This layout is only one example of how the blocks can be arranged – play around with the placement until you find a layout that appeals to you!
6. Once the layout is finalized, sew blocks together using a 1⁄4" seam allowance, turning blocks 90-degrees as needed to nest center seams. Alternate pressing seams left and right – odd rows one direction, even rows the opposite.
Sew rows together and press seams in one direction.
Fig. 2
Fig. 3
Bento Quilt - Cool
Borders
7. Sew (10) Fabric B 2" x WOF border strips together end to end with diagonal seams. Press. Cut (2) top/bottom borders 2" x 84" and (2) left/right side borders 2" x 941⁄2".
NOTE: It is always a good idea to measure the center of both the length and width of the quilt top to verify border measurements before cutting.
8. Attach side borders and press toward borders. Attach top and bottom borders, again pressing towards borders.
Finishing
9. Binding: Sew together (10) 2 1⁄ 2" x WOF Fabric A binding strips end-to-end using diagonal seams. Press seams open, then press binding strip in half, wrong sides together. Set aside until the quilt is ready for binding.
10. Once the top is complete it is ready for quilting! Quilts can be sent out for longarm quilting or you can finish it yourself! If you are sending the quilt out it is important to discuss backing and batting requirements with the quilter to ensure they have everything needed to finish the quilt.
11. If quilting yourself and using 44" fabric for backing, choose your favorite method for piecing (taking time to remove selvedges), then layer, baste and quilt. Once finished, trim excess batting and backing and bind according to your favorite method.
12. To complete binding by hand, it must first be machine sewn to the quilt top. Leaving an 8" tail of binding, sew binding to top of quilt through all layers, matching raw edges. Miter corners. Stop approximately 12" from where you started. Lay both loose ends of binding flat along quilt edge. Where the two loose ends meet, fold each side back on themselves and press to form a crease. Using this crease as your stitching line, sew the two open ends of the binding together right sides together. Trim seam to 1⁄4" and press seam open. The binding will naturally fold, wrong sides together, and lay along the quit edge. Finish sewing binding to quilt. Turn and press the binding to the back of the quilt and hand stitch in place.
13. If machine binding, complete the steps above only attach the binding to the BACK of the quilt, turn and press binding to the front of the quilt and machine stitch in place.
Bento Quilt - Cool


Quilt Layout

Espania Quilt
Featuring Kaffe Fassett Collective February2025
Collection: KaffeFassettCollective February 2025
Technique: Pieced
Skill Level: Beginner
Finished Sizes:
Finished Size: 80½" x 98½" (2.04m x 2.50m)
Finished Block Size: 22" x 31" (55.88cm x 78.74cm)
All possible care has been taken to ensure the accuracy of this pattern. We are not responsible for printing errors or the manner in which individual work varies. Please read the instructions carefully before starting this project. If kitting, it is recommended a sample is made to confirm accuracy.
Espania Quilt
Project designed by Kaffe
Fassett | Tech edited
by
Julie Kentner
Fabric Requirements
DESIGN COLOR ITEM ID
(A) Flower Studies Black
(B) Penny-wise Contrast
(C) Marble Scallops Black
(D) Palm Leaves Contrast
(E) Gingham Purple
(F) Gradi Floral Contrast
PWGP205.BLACK 13⁄4 yards (1.60m)
PWGP206.CONTRAST 11⁄2 yards (1.37m)
PWGP207.BLACK 3 yards (2.74m)
PWGP208.CONTRAST 12⁄3 yards (1.52m)
PWBM089.PURPLE 1 yard (0.91m)
PWPJ053.CONTRAST 17⁄8 yards (1.71m)
(G) House Leeks Drama PWPJ113.DRAMA 17⁄8 yards (1.71m)
(H) Spot Noir
* includes binding
Backing (Purchased Separately)
44" (1.12m) wide Flower Studies Blue
PWGP070.NOIRX* 1 yard (0.91m)


PWGP205.BLUE 71⁄2 yards (6.86m) OR 108" (2.74m) wide
Gradi Floral Purple
Additional Recommendations
QBPJ005.PURPLE 25⁄8 yards (2.40m)
• 100% cotton thread in coordinating or neutral color
• 88" x 106" (2.24m x 2.69m) quilt batting
Backing 44"
Backing 108"
(A) (B) (C) (D)
(E) (F) (G) (H)
Cutting
WOF = Width of Fabric
Espania - Fabric Cutting Page 1
LOF = Length of Fabric
From Fabric A fussy cut:
(2) 15" x 24" rectangles
Fabric A Cutting Diagram
From Fabric B cut:
(1) 10" x WOF; sub-cut
(4) 10" squares
(7) 5" x WOF; remove selvedges and sew together end-to-end. Sub-cut
(2) 5" x 71"
(2) 5" x 62" for inner borders
From Fabric C cut:
(1) 80" x WOF; sub-cut
(2) 10" x 80" LOF for left and right side borders
(4) 10" x 20" pieces (Note direction of print when sub-cutting as these will be used for top and bottom borders)
(2) 10" x WOF; trim off selvedge
From Fabric D cut:
(1) 31" x WOF; sub-cut
(2) 10" x 31" LOF pieces
(2) 10" x WOF; sub-cut
(2) 10" x 22" pieces
From Fabric E cut:
(8) 4" x WOF; sub-cut
(1) 4" x 24"
- Fabric Cutting Page 2
(1) 4" x 15" piece from each strip
From Fabric F fussy cut:
(2) 15" x 24" rectangles
F Cutting Diagram
Espania Quilt
From Fabric G fussy cut:
(1) 10" square and (16) 4" squares (fussy cutting for the 4" squares is optional, but adds a nice effect)
Fabric G Cutting Diagram Espania - Fabric Cutting Page 3
From Fabric H cut:
(10) 21⁄2" x WOF for binding
Fabric
Espania
Espania Quilt
Instructions
Notes:
• Use a 1⁄4" seam allowance throughout.
• Sew all pieces with right sides together and raw edges even using matching thread.
Quilt Center Assembly
1. As shown in Fig. 1, arrange (4) Fabric G 4" squares, (2) Fabric E 4" x 15" rectangles, (2) Fabric E 4" x 24" rectangles, and (1) Fabric F 15" x 24" rectangle. Stitch into rows, pressing the top and bottom rows toward Fabric G. Press the center row towards Fabric F. Sew rows together. Press seams down. Make a total of (2) Block 1. Repeat for Block 2, using (2) Fabric A 15" x 24" rectangles for the centers. Make (2) Block 2.

2. Using Blocks 1 & 2 made in Step 1, (1) Fabric G 10" square, (2) Fabric D 10" x 22" pieces, and (2) Fabric D 10" x 31" pieces, arrange the Quilt Center following the layout in Fig. 2. Stitch into rows, pressing towards Fabric D. Sew rows together to complete quilt center, pressing seams down. The Quilt Center will measure 53" x 71" at this point.


Borders
3. Using the Quilt Layout diagram (page 6) as a guide, stitch Fabric B 5" x 71" borders to the left and right sides of quilt center. Press towards Fabric B . Add Fabric B 5" x 62" borders to top and bottom of quilt center. Press towards Fabric B.
4. Sew the Fabric C 10" x 80" borders to the left and right sides of the quilt. Press towards the border.
5. The outer top and bottom borders will be pieced, each using (1) Fabric C 10" x WOF piece and (2) Fabric C 10" x 20" rectangles. Sew a WOF strip between (2) Fabric C 10" x 20" pieces. Press seams open. Trim to 10" x 62". Next, stitch (1) Fabric B 10" square to each end of the Fabric C 10" x 62" border. Press seams open. Repeat for the second border. Attach borders to the top and bottom of the quilt center. Press towards borders.
Fig. 1
Fig. 2
Fig. 2
Quilt Center - Make 1
Espania Quilt
Finishing
1. Binding: Sew together the (10) 21⁄2" Fabric H binding strips end-to-end using diagonal seams. Press seams open, then press the binding strip in half wrong sides together. Set aside until the quilt is ready for binding.
2. Once the top is complete it is ready for quilting! Quilts can be sent out for longarm quilting or you can quilt it yourself. If you are sending the quilt out, it is important to discuss backing and batting requirements with the quilter to ensure they have everything needed to properly finish the quilt.
3. If quilting yourself and using 44" fabric for backing, choose your favorite method for piecing (taking time to remove selvedges), then layer, baste and quilt. Once finished, trim excess batting and backing and bind according to your favorite method.
4. To complete binding by hand, it must first be machine sewn to the quilt top. Leaving an 8" tail of binding, sew binding to top of quilt through all layers, matching raw edges. Miter corners. Stop approximately 12" from where you started. Lay both loose ends of binding flat along quilt edge. Where the two loose ends meet, fold each side back on themselves and press to form a crease. Using this crease as your stitching line, sew the two open ends of the binding together right sides together. Trim seam to 1⁄4" and press seam open. The binding will naturally fold, wrong sides together, and lay along the quit edge. Finish sewing binding to quilt. Turn and press the binding to the back of the quilt and hand stitch in place.
5. If machine binding, complete the steps above only attach the binding to the BACK of the quilt, turn and press binding to the front of the quilt and machine stitch in place.


Quilt Layout
Quilt Center
Quilt Layout

Pods Quilt Cool
Featuring Kaffe Fassett Collective February 2025
Collection: Kaffe Fassett Collective February 2025
Technique: Pieced
Skill Level: Advanced Beginner
Finished Size:
Finished Sizes:
691/2" x 901/2" (1.77m x 2.30m)
Finished Block Size: 51/2" x 91/2" (13.97cm x 24.13cm)
All possible care has been taken to ensure the accuracy of this pattern. We are not responsible for printing errors or the manner in which individual work varies. Please read the instructions carefully before starting this project. If kitting, it is recommended a sample is made to confirm accuracy.
Pods Quilt Cool
Project designed by Stacey Day | Tech edited by Julie
Kentner
Fabric Requirements
DESIGN
6" Design Strip Cool
(A) Gradi Floral Contrast
(B) Aborigional Dot Midnight
* includes binding
Backing (Purchased Separately)
44" (1.12m) wide
Marble Scallop Blue
FB4DSGP.COOLFEB25 1 DS
PWPJ053.CONTRAST 11⁄2 yards (1.37m)
PWGP071.MIDNIGHT* 25⁄8 yards (2.40m)

PWGP207.BLUE 61⁄2 yards (5.94m) OR 108" (2.74m) wide
Gradi Floral Purple
Additional Recommendations
• 100% cotton thread in colors to match
QBPJ005.PURPLE 21⁄4 yards (2.06m)
• 80" x 100" batting Backing 108"
6” Design Strip
(A) (B)
Cutting
WOF = Width of Fabric
To begin, open the design roll and label each Fabrics A – O in the order they are stacked, keeping duplicates together.
From Fabric A, C, K, N and O, 6" x WOF, cut:
(8) 6" x 10" rectangles, keeping like fabrics together and labeled
From Fabric B , D , E , F , G , H , I , J , L , and M , 6" X WOF, cut:
(4) 6" x 10" rectangles, keeping like fabrics together and labeled
From Fabric P:
(20) 21⁄2" x WOF; sub-cut (320) 21⁄2" squares
(7) 2" x WOF; sew together end to end and cut (2) 2" x 581⁄2" (2) 2" x 761⁄2" (9) 21⁄4" x WOF for binding
From Fabric Q:
(8) 6" x WOF; sew together end to end and cut
(2) 6" x 691⁄2"
(2) 6" x 791⁄2"
Pods Quilt Cool
Instructions
All seam allowances are 1⁄4". Press all seams open.
1. Draw a diagonal line from corner to corner across the wrong side of each Fabric Q 21⁄2" square.
2. Pin a Fabric Q 21⁄2" square in each corner of a 6" x 10" rectangle as shown in Figure 1. Sew on the line, trim the seam allowance to 1⁄4", and press seams open. Make (8) Fabrics
A C, K, N and O. Make (4) Fabrics B, D, E, F, G, H, I, J, L and M. There will be a total of (80) 6" x 10" blocks.
1
Quilt Top Assembly
3. Referring to the quilt layout diagram for fabric placement, sew the blocks together into (8) rows of (10) blocks each, matching all seams. Press seams in rows 1, 3, 5, 7, and 9 to the right. Press seams in rows 2, 4, 6, 8, and 10 to the left. Sew rows together, nesting seams, to complete the quilt top.
4. Sew Fabric P inner border strips, 2" x 761⁄2" strips to the left and right sides of the quilt top, matching ends and centers. Press seam allowances towards the borders, then sew the 2" x 581⁄2" to the top and bottom, pressing seam allowances towards the borders.
5. Sew Fabric Q outer border strips, 6" x 791⁄2" to the left and right sides of the quilt top, matching ends and centers. Press seam allowances towards the borders, then sew the 6" x 691⁄2" to the top and bottom. Press the seam allowance toward the borders.
Finishing
6. Sew together the 21⁄4" Fabric P binding strips end-to-end using diagonal seams. Press seams open. Press the binding strip in half, wrong sides together. Set aside until the quilt is ready for binding.
7. Once the quilt top is complete it is ready for quilting! Quilts can be sent out for longarm quilting or you can quilt it yourself. If sending the quilt out, it is important to discuss backing and batting requirements with the quilter to ensure they have everything needed to properly finish the quilt.
Fig.
8. If quilting yourself and using 44" fabric for backing, choose your favorite method for piecing (taking time to remove selvedges), then layer, baste and quilt. Once finished, trim excess batting and backing and bind according to your favorite method.
9. To complete binding by hand, it must first be machine sewn to the quilt top using the following steps:
10. Leaving an 8" tail of binding, sew binding to top of quilt through all layers, matching raw edges. Miter corners. Stop approximately 12" from where you started. Lay both loose ends of binding flat along quilt edge. Where the two loose ends meet, fold each side back on themselves and press to form a crease. Using this crease as your stitching line, sew the two open ends of the binding together right sides together. Trim seam to 1⁄4" and press seam open. The binding will naturally fold, wrong sides together, and lay along the quit edge. Finish sewing binding to quilt. Turn and press the binding to the back of the quilt and hand stitch in place.
11. If machine binding, complete the steps above only attach the binding to the BACK of the quilt, turn and press binding to the front of the quilt and machine stitch in place.
Pods Quilt Cool
Quilt Layout

Pods Quilt Warm
Featuring February 2025 by Kaffe Fassett Collective
Collection: February 2025 by Kaffe Fassett Collective
Technique: Pieced
Skill Level: Advanced Beginner
Finished Sizes:
Finished Size: 691/2" x 901/2" (1.77m x 2.30m)
Finished Block Size: 51/2" x 91/2" (13.97cm x 24.13cm)
All possible care has been taken to ensure the accuracy of this pattern. We are not responsible for printing errors or the manner in which individual work varies. Please read the instructions carefully before starting this project. If kitting, it is recommended a sample is made to confirm accuracy.
Pods Quilt Warm
Project designed by Stacey Day | Tech edited by Julie Kentner
Fabric Requirements
DESIGN COLOR ITEM
(A) Gradi Floral Gold
(B) Gradi Floral Tomato
(C) Gingham Coral
(D) Coral Red
(E) Small Fronds Melon
(F) Small Bubble Stripe Red
(G) Marble Scallops Red
(H) Palm Leaves Pink
(I) Gradi Floral Lavender
PWPJ053.GOLD 6" Strip
PWPJ053.TOMAT 6" Strip
PWBM089.CORAL 6" Strip
PWPJ004.RED 6" Strip
PWBM098.MELON 6" Strip
PWBM097.RED 6" Strip
PWGP207.RED 6" Strip
PWGP208.PINK 6" Strip
PWPJ053.LAVENDER 6" Strip
(J) House Leeks Pink PWPJ113.PINK 6" Strip
(K) Penny-wise Red
(L) Palm Leaves Red
(M) House Leeks Drama
(N) House Leeks Purple
(O) Marble Scallops Purple
(P) Aboriginal Dot Midnight
(Q) Gradi Floral Contrast
* includes binding
Backing (Purchased Separately)
44" (1.12m) wide
Palm Leaves Pastel
PWGP206.RED 6" Strip
PWGP208.RED 6" Strip
PWPJ113.DRAMA 6" Strip
PWPJ113.PURPLE 6" Strip
PWGP207.PURPLE 6" Strip
PWGP071.MIDNIGHT* 25⁄8 yards (2.40m)
PWPJ053.CONTRAST 11⁄2 yards (1.37m)


PWGP208.PASTEL 61⁄2 yards (5.94m) OR
108" (2.74m) wide
Palm Leaves Pink
Additional Recommendations
• 100% cotton thread in colors to match
• 80" x 100" batting
QBGP010.PINK 21⁄4 yards (2.06m)
Cutting
WOF = Width of Fabric
From Fabric A, B, I, J, and M, 6" x WOF, cut: (8) 6" x 10" rectangles, keeping like fabrics together and labeled
From Fabric C, D, E, F, G, H, K, L, N, and O, 6" X WOF, cut:
(4) 6" x 10" rectangles, keeping like fabrics together and labeled
From Fabric P:
(20) 21⁄2" x WOF; sub-cut (320) 21⁄2" squares
(7) 2" x WOF; sew together end to end and cut (2) 2" x 581⁄2" (2) 2" x 761⁄2" (9) 21⁄2" x WOF for binding
From Fabric Q:
(8) 6" x WOF; sew together end to end and cut
(2) 6" x 691⁄2" (2) 6" x 791⁄2"
Instructions
All seam allowances are 1⁄4". Press all seams open.
1. Draw a diagonal line from corner to corner across the wrong side of each Fabric Q 21⁄2" square.
2. Pin a Fabric Q 21⁄2" square in each corner of a 6" x 10" rectangle as shown in Figure 1. Sew on the line, trim the seam allowance to 1⁄4", and press seams open. Make (8) Fabric A B, I, J, and M. Make (4) Fabric C, D, E, F, G, H, K, L, N, and O. There will be a total of (80) 6" x 10" blocks.
1

Pods Quilt Warm
Quilt Top Assembly
3. Referring to the Quilt Layout diagram (page 5) for fabric placement, sew the blocks together into (8) rows of (10) blocks each, matching all seams. Press seams in rows 1, 3, 5, 7, and 9 to the right. Press seams in rows 2, 4, 6, 8, and 10 to the left. Sew rows together, nesting seams, to complete the quilt top.
4. Sew Fabric P inner border strips, 2" x 761⁄2" strips to the left and right sides of the quilt top, matching ends and centers. Press seam allowances towards the borders, then sew the 2" x 581⁄2" to the top and bottom, pressing seam allowances towards the borders.
5. Sew Fabric Q outer border strips, 6" x 791⁄2" to the left and right sides of the quilt top, matching ends and centers. Press seam allowances towards the borders, then sew the 6" x 691⁄2" to the top and bottom. Press the seam allowance toward the borders.
Fig.
Finishing
6. Sew together the 21⁄2" Fabric P binding strips end-to-end using diagonal seams. Press seams open. Press the binding strip in half, wrong sides together. Set aside until the quilt is ready for binding.
7. Once the quilt top is complete it is ready for quilting! Quilts can be sent out for longarm quilting or you can quilt it yourself. If sending the quilt out, it is important to discuss backing and batting requirements with the quilter to ensure they have everything needed to properly finish the quilt.
If quilting yourself and using 44" fabric for backing, choose your favorite method for piecing (taking time to remove selvedges), then layer, baste and quilt. Once finished, trim excess batting and backing and bind according to your favorite method.
• To complete binding by hand, it must first be machine sewn to the quilt top using the following steps:
• Leaving an 8" tail of binding, sew binding to top of quilt through all layers, matching raw edges. Miter corners. Stop approximately 12" from where you started. Lay both loose ends of binding flat along quilt edge. Where the two loose ends meet, fold each side back on themselves and press to form a crease. Using this crease as your stitching line, sew the two open ends of the binding together right sides together. Trim seam to 1⁄4" and press seam open. The binding will naturally fold, wrong sides together, and lay along the quit edge. Finish sewing binding to quilt. Turn and press the binding to the back of the quilt and hand stitch in place.
• If machine binding, complete the steps above only attach the binding to the BACK of the quilt, turn and press binding to the front of the quilt and machine stitch in place.
Pods Quilt Warm
Pods Quilt Warm

Quilt Layout

Zippers Quilt Cool
Featuring Kaffe Fassett Collective February 2025
Collection: Kaffe Fassett Collective February 2025
Technique: Pieced
Skill Level: Advanced Beginner
Finished Sizes:
Finished Size: 60" x 80½" (1.52m x 2.05m)
Finished Block Size: 11½" x 30" (29.21cm x 76.2cm)
All possible care has been taken to ensure the accuracy of this pattern. We are not responsible for printing errors or the manner in which individual work varies. Please read the instructions carefully before starting this project. If kitting, it is recommended a sample is made to confirm accuracy.
Project designed by Stacey Day | Tech edited by Julie
Kentner
Fabric Requirements
DESIGN COLOR ITEM ID
Fat Quarter Bundle Cool
(P) Aboriginal Dot Midnight
* includes binding
Backing (Purchased Separately)
44" (1.12m) wide Marble Scallop Green
FB4FQGP.COOLFEB25 1 BUNDLE
PWGP071.MIDNIGHT* 2 yards (1.83m)
Zippers Quilt Cool
PWGP207.GREEN 61⁄2 yards (5.94m) OR 108" (2.74m) wide
Gradi Floral Purple
Additional Recommendations
QBPJ005.PURPLE 21⁄4 yards (2.06m)
• 100% cotton thread in coordinating or neutral color
• 70" x 90" (1.78m x 2.29m) batting
Cutting WOF = Width of Fabric
From Fabric P:
(15) 2½" x WOF; sub-cut (30) 2½" x 18" (8) 2½" x WOF for binding

Backing 44"
Backing 108"
(P)
Zippers Quilt Cool
Instructions
Notes:
• All seam allowances are 1/4" and fabrics are sewn Right Sides Together (RST).
• Press seams as directed by pattern arrows in Figure Illustrations.
1. Trim and square each FQ to 18" x 20". For reference purposes, label each fat quarter A – O in the order they are stacked in the bundle.
2 Unit A
2. Sew a 2½" x 18" Fabric P strip to the top and bottom of each 18" x 20" Fat Quarter. Press towards Fabric P.
3. Sub-cut as shown in Fig. 1 into (14) 2½" x 12" Unit A. Organizational Tip: Keep like fabrics together and labeled.
4. Sew (15) Unit A together as shown in the order listed in Fig. 2 (A-O) to make Block A. Press following the arrow. Block A will measure 12" x 30½". Make (8) Block A.
5. Sew (15) Unit A together as shown in the order listed in Fig. 2 (O-A) to make Block B. Press following the arrow. Block B will measure 12" x 30½". Make (6) Block B.
Fig.
Zippers Quilt Cool
6. Sew the Block A units together in pairs and Block B units together in pairs as shown in Fig. 3 to make (4) Row A and (3) Row B.
Fig.
Fig. 3
Quilt Top Assembly
7. Beginning with Row A, and alternating with Row B, sew the rows together to make the quilt top as shown, on the front cover. Press seams down.
Finishing
8. Binding: Sew the (8) 2½" x WOF Fabric P binding strips end-toend using diagonal seams. Press seams open, then press binding strip in half, wrong sides together. Set aside until the quilt is ready for binding.
9. Once the top is complete it is ready for quilting! Quilts can be sent out for longarm quilting or you can quilt it yourself. If you are sending the quilt out, it is important to discuss backing and batting requirements with the quilter to ensure they have everything needed to properly finish the quilt.
10. If quilting yourself and using 44" fabric for backing, choose your favorite method for piecing (taking time to remove selvedges), then layer, baste and quilt. Once finished, trim excess batting and backing and bind according to your favorite method.
11. To complete binding by hand, it must first be machine sewn to the quilt top. Leaving an 8" tail of binding, sew binding to top of quilt through all layers, matching raw edges. Miter corners. Stop approximately 12" from where you started. Lay both loose ends of binding flat along quilt edge. Where the two loose ends meet, fold each side back on themselves and press to form a crease. Using this crease as your stitching line, sew the two open ends of the binding together right sides together. Trim seam to 1/4" and press seam open. The binding will naturally fold, wrong sides together, and lay along the quit edge. Finish sewing binding to quilt. Turn and press the binding to the back of the quilt and hand stitch in place.
12. If machine binding, complete the steps above only attach the binding to the BACK of the quilt, turn and press binding to the front of the quilt and machine stitch in place.
Zippers Quilt Cool

Zippers Quilt Warm
Featuring Kaffe Fassett Collective February 2025
Collection: Kaffe Fassett Collective February 2025
Technique: Pieced
Skill Level: Advanced Beginner
Finished Sizes:
Finished Size: 60" x 80½" (1.52m x 2.05m)
Finished Block Size: 11½" x 30" (29.21cm x 76.2cm)
All possible care has been taken to ensure the accuracy of this pattern. We are not responsible for printing errors or the manner in which individual work varies. Please read the instructions carefully before starting this project. If kitting, it is recommended a sample is made to confirm accuracy.
Project designed by Stacey Day | Tech edited by Julie
Kentner
Zippers Quilt Warm
Fabric Requirements
DESIGN COLOR ITEM ID YARDAGE
Fat Quarter Bundle Warm
(P) Aboriginal Dot Midnight
* includes binding
Backing (Purchased Separately)
44" (1.12m) wide Gradi Floral Gold
FB4FQGP.WARMFEB25 1 BUNDLE
PWGP071.MIDNIGHT* 2 yards (1.83m)
PWPJ053.GOLD 61⁄2 yards (5.94m) OR 108" (2.74m) wide Palm Leaves Pink
Additional Recommendations
QBGP010.PINK 21⁄4 yards (2.06m)
• 100% cotton thread in coordinating or neutral color
• 70" x 90" (1.78m x 2.29m) batting
Cutting WOF = Width of Fabric
From Fabric P:
(15) 2½" x WOF; sub-cut (30) 2½" x 18" (8) 2½" x WOF for binding
Backing 44"
Backing 108"
(P)
Zippers Quilt Warm
Instructions
Notes:
• All seam allowances are 1/4" and fabrics are sewn Right Sides Together (RST).
• Press seams as directed by pattern arrows in Figure Illustrations.
1. Trim and square each FQ to 18" x 20". For reference purposes, label each fat quarter A – O in the order they are stacked in the bundle.
2. Sew a 2½" x 18" Fabric P strip to the top and bottom of each 18" x 20" Fat Quarter. Press towards Fabric P.
3. Sub-cut as shown in Fig. 1 into (14) 2½" x 12" Unit A. Organizational Tip: Keep like fabrics together and labeled.
4. Sew (15) Unit A together as shown in the order listed in Fig. 2 (A-O) to make Block A. Press following the arrow. Block A will measure 12" x 30½". Make (8) Block A.
5. Sew (15) Unit A together as shown in the order listed in Fig. 2 (O-A) to make Block B. Press following the arrow. Block B will measure 12" x 30½". Make (6) Block B.
Fig. 1
Fig. 1
Illios
Fig. 2
Fig. 2
Fig. 3 Fig. 1
Fig. 2
Fig. 3
Zippers Quilt Warm
6. Sew the Block A units together in pairs and Block B units together in pairs as shown in Fig. 3 to make (4) Row A and (3) Row B.
Fig.
Fig. 3
Quilt Top Assembly
7. Beginning with Row A, and alternating with Row B, sew the rows together to make the quilt top as shown, referencing the quilt on the cover page. Press seams down.
Finishing
8. Binding: Sew the (8) 2½" x WOF Fabric P binding strips end-toend using diagonal seams. Press seams open, then press binding strip in half, wrong sides together. Set aside until the quilt is ready for binding.
9. Once the top is complete it is ready for quilting! Quilts can be sent out for longarm quilting or you can quilt it yourself. If you are sending the quilt out, it is important to discuss backing and batting requirements with the quilter to ensure they have everything needed to properly finish the quilt.
10. If quilting yourself and using 44" fabric for backing, choose your favorite method for piecing (taking time to remove selvedges), then layer, baste and quilt. Once finished, trim excess batting and backing and bind according to your favorite method.
11. To complete binding by hand, it must first be machine sewn to the quilt top. Leaving an 8" tail of binding, sew binding to top of quilt through all layers, matching raw edges. Miter corners. Stop approximately 12" from where you started. Lay both loose ends of binding flat along quilt edge. Where the two loose ends meet, fold each side back on themselves and press to form a crease. Using this crease as your stitching line, sew the two open ends of the binding together right sides together. Trim seam to 1/4" and press seam open. The binding will naturally fold, wrong sides together, and lay along the quit edge. Finish sewing binding to quilt. Turn and press the binding to the back of the quilt and hand stitch in place.
12. If machine binding, complete the steps above only attach the binding to the BACK of the quilt, turn and press binding to the front of the quilt and machine stitch in place.