

How to - Stocktake Guide Cloud
Stocktake Guide Index
1. Recommended Preparation
1.1
2. Set up a Stocktake
2.1 Creating a stocktake
2.2 Stocktake Structure
3. Accessing Stocktake via PDE
3.1 Create an Input
3.2 Check last scanned
4. Manual Inputs
4.1
6. Closing Stocktake
7. Recommended Stocktake Methods
7.1 Naming inputs effectively
7.2 Naming sections effectively
7.3 High – Low Investigations
How to - Stocktake Guide Cloud
Preperations
It is important to start preparation for stocktake at least a month before hand. This should give you ample time to create / manage sections and start double checking how accurate your system is.
It is highly recommended that a few checks are conducted prior to stocktake taking place to help ensure stocktake goes as smooth as possible. These checks include, correct department, SOH valuation, out of stocks and negative counts.
The more you prepare the smoother your stocktake should go, so take it seriously! It is usually possible to get rid of most stocktake issues by completing the checks above.
1.1 Creating Sections
Sections are used to identify the area of the store being counted for an input. This makes them very useful when conducting an investigation for an incorrect count after stocktake. If a section is named correctly it should be very easy to re-count or check a count later on.
To create a section in EM Cloud™:
Select > Stocktakes > Sections

How to - Stocktake Guide Cloud
>Select > Create Section

> Name the New Section

Notice that this name gives enough information for almost any user to know where to go to find the products? It is important to ensure you name the sections correctly or they are not very useful.
> Select > Create
You will see new section has gone into the list below.

You can now highlight a section in the list and hit the delete button to permanently remove it.
Mapping your store
It is up to each store to map out their back end according to their preferences. The recommendation is to ensure it is mapped well enough for anyone to be able to check a count post stocktake without being confused around where the stock actually is.
How to - Stocktake Guide Cloud
1.2 Checking Stock on Hand
Before stocktake takes place it is important to look at a stock on hand valuation to identify departments that clearly have incorrect on hand counts.
It is usually quite easy to clean up your valuation using global updates, however the best method is to run a valuation periodically (say once a month) and fix it in smaller batches. Doing this will also help to spot any database errors as you go.
Completing this check and the others below will help give you a reasonably accurate total for your current warehouse valuation. This can then be compared to your valuation after stocktake to give you a good idea if anything has gone seriously wrong.
To run a stock on hand valuation:
> Reports > Stock > Stock On Hand

> Select > Stores

How to - Stocktake Guide Cloud
> Choose your store

> Click > Run Report

Note:
• If the report shows high negative values for departments it is likely that you have inventory on for them but you don’t receive the stock on e-invoices.
• This is common for fresh departments and direct lines depending on how you manage your inventory/invoices.
• At this stage, if you’re confident, you’re welcome to use global updates to zero stock on hand for specific departments.
How to - Stocktake Guide Cloud
1.3 Checking Out of Stocks
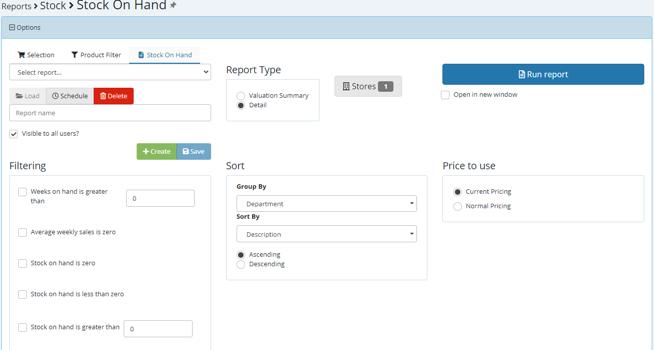
After taking a look at your stock on hand it is a good idea to look closely at any products that are currently 0 on hand in the system. It is important that the system only has a 0 count on products that you’re actually out of stock on, otherwise, the product will inevitably have auto ordering issues.
To check out of stock Reports > Stock > Stock On Hand


How to - Stocktake Guide Cloud
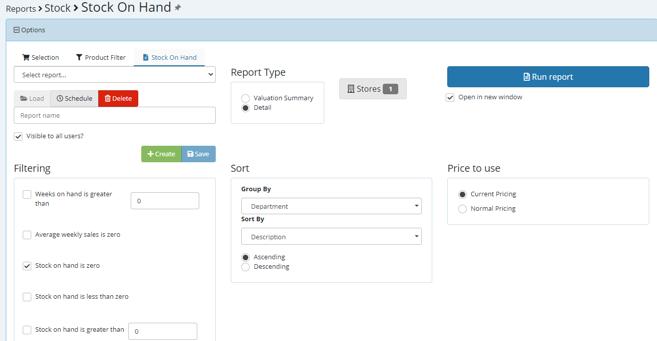
Select > Detail Select > Stock on hand is zero

How to - Stocktake Guide Cloud
Select > Run Report
NOTES:
• This report should show all active lines that currently have 0 stock on hand.
• It can be used to eliminate false 0’s, de-activate lines no longer carried and obviously find true out of stocks.
• It is recommended that departments generate this report periodically to minimize its size and stay on top of their stocks week to week.
How to - Stocktake Guide Cloud
1.4 Checking Negative Stock on Hand
Any products marked with a negative stock count in your system should be looked into. It is likely that they are not supposed to be tracking inventory and it is possible that an e-invoice has been missed, causing the negative count.
It is important to stay on top of these products as they will cause auto order issues, especially if they are not actually out of stock, the system will continue to order them.
To check negative stock on hand
Reports > Stock > Stock On Hand


How to - Stocktake Guide Cloud
Select > Detail

Select > Stock on hand is less than zero
Select > Run Report

This report will show you any line that currently has less than 0 on hand. When going through this report pay attention for direct lines that shouldn’t be tracking SOH and make sure to turn it off.
Also pay close attention to lines that may be ‘stuck’ on order. As in, EM Cloud™ states that the product is on order but the order was sent weeks ago and the stock never arrived. The on order figure can be reset via a global update or for specific products by accessing the product’s inventory tab.
How to - Stocktake Guide Cloud
2.1 Creating a Stocktake
Creating a stocktake is a simple process however it is important to ensure some settings are correct in EM Cloud™ before starting.
Select > Stocktakes
Select > Create


Fill out the details for your stocktake

Note:
• The date at this point is important. When creating your stocktake in advance make sure that this date reflects the actual date of stocktake. If you do not get this correct then setting the stock will not work correctly.
Select > Save

How to - Stocktake Guide Cloud
You should now see the below screen

The stocktake has been created and it is now time to ensure that it is structured correctly.
2.2 Stocktake Structure
A stocktake should always have all elements in one place to ensure that you can easily report on it later.
What this means is that once the stocktake is created, all RF PDE’s and manual inputs should go into that stocktake.
A common issue across the stores occurs here, where multiple stocktakes are created for different departments.
Below shows an example of how your stocktake should look using Example stocktake 2020:

How to - Stocktake Guide Cloud
There are a few main things to take away from the above picture:
• All inputs exist inside the ‘Example Stocktake 2020’ stocktake.
• All comments state clearly what department was being counted and who counted for this input. Listing who counted is useful because you can ask them exactly where to go when investigating.
• All inputs are linked to a section and make sense. (E.G. it would be bad to see comment = Fruit & veg (Sean) but section = Deli Retail).
• It does not matter if you have several of the same section listed in your inputs as long as people aren’t physically doubling up on counting.
• Each of these inputs was created and can be accessed via the RF (see ‘Accessing stocktake via PDE).
• Everyone’s stocktake should be a large list of inputs like the one above where all counts are in the one place. This makes reporting far easier.
• Be very careful of the delete button, it does not delete inputs. If hit, this button it will delete the entire stocktake.
How to - Stocktake Guide Cloud
3. Accessing Stocktake via PDE
3.1 Create an Input
In order to add counts to the stocktake you must first create a list. This list will be named and attached to a section that maps it to the store. When you scan a product and add a count it is put into this list. The stocktake as a whole is a collection of all these lists. Follow the steps below to create an input on an RF PDE.
Login > Inventory> Stocktake
Note: In the case that you are performing a LIVE stocktake, meaning while the store is trading, then please ensure the stock being sold is counted first.

Highlight > Stocktake > Select Edit
Note: You will see a list of current open or in progress stocktakes. Highlight a current stocktake in progress and Select > Edit if you wish to add to it.

How to - Stocktake Guide Cloud
The next screen appearing will allow you to select the input name and select the section you want to perform a stocktake on.
Select Section > Create

Note:
Selecting sections allows you to keep track on what areas of the store has been counted and which sections still need to be counted. It also allows the stock taker to take ownership of their count, as section/s can be allocated against a specific person/s or team name.
Highlight Input > Select Edit

How to - Stocktake Guide Cloud
If the input is empty you’ll be moved to the below screen

Start scanning products to add counts.
If there is data in the input you will see this screen
Review input > Select Edit to add counts.


• Location can be set up on the products at the same time the stock is being counted.
>If required, scan the location label first and then the product in the location, repeat as your move and count the various bays.
• You MUST hit the ‘add’ button on the last item you’re counting to make sure that the count goes into the system (otherwise you’ll lose the last item)
• Be careful to avoid the clear location and request label buttons. These functions do work although shouldn’t be used often during a full stocktake.
How to - Stocktake Guide Cloud
3.3 Check last scanned
Assuming you are in the middle of editing an input for your stocktake. The following steps will show you how to check the count for the items you have scanned.
Select > Back Button

You should now see a list of the counts you have added. You are now capable of scrolling and editing at this section as required.

How to - Stocktake Guide Cloud
4. Manual Inputs
4.1 Adding Manual Inputs
Manual inputs are used to fix errors on a stocktake, usually after it has finished, and discrepancies have been noticed. They involve manually accessing the stocktake via a computer and keying in values. This process takes a long time and should only be used to minimise errors.
Be careful when using manual inputs to alter counts. Ensure that the final count reflects what you want.
Follow the steps below to add a manual input.
> Navigate to your stocktake
> Select > Add Input

> Fill out the comment and section details
> Select > Add

How to - Stocktake Guide Cloud
Notice that the input is now listed in your stocktake with Manual as the type.

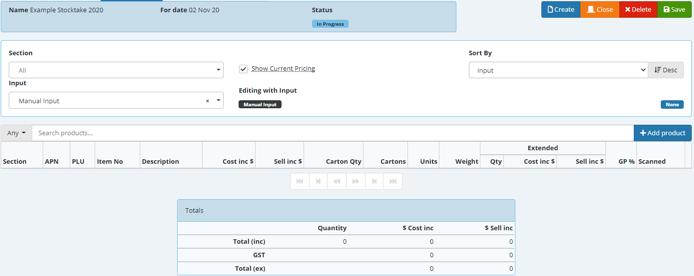
> Navigate to the products section and change the input to your manual input.

Select > Add Product
How to - Stocktake Guide Cloud
Type the APN, item number or description you’re trying to add in the field below. (It is highly advisable to use APN or item number here to ensure you’re loading the correct products)

Click on the product in the lower list and fill out the details in the popup
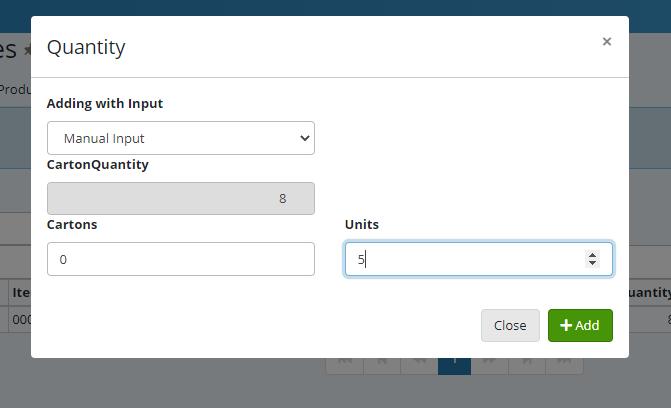
You should now see that the new item has been added correctly to your stocktake.

How to - Stocktake Guide Cloud
4.2 Checking a Products Total Quantity
It is most likely that a report will highlight that a product has been keyed in incorrectly and you’ll have to use a manual input to fix it. A good way to do this is to start by checking the total quantity of the product in your stocktake and then performing the change.
To do this, navigate to your products tab and change the input to All

Note:
• You should see a large list of all inputs from your stocktake here.
• Now search for the product you wish to check, we’ll use the 2L Coke in this example:

How to - Stocktake Guide Cloud
• Notice that the list above will show every input that this product appears on and the ‘Totals’ section will give you the total quantity within this stocktake.
• For example this total was supposed to be 20; you could repeat the steps under ‘adding a manual input’ to add another 9 but because we already have a manual input, we can use the next method instead.
• Despite the above example, it is actually far more likely that you will have to reduce the total quantity count for products
>This was seen most commonly in previous stocktakes due to the RF units getting stuck’ and keying in 9999999 etc., as the quantity for a product. The next section describes how to alter a product total.
4.3 Altering Products total Quantity
Navigate to your stocktake product tab and search for the product you wish to alter. (If you don’t know how see ‘checking a products total quantity’.)

At this screen, click the purple icon (circled above) on any of the inputs, and you’ll get this popup

Notice that the popup is already filled out to be correct to the total of 20 units? (2*8 = 16 for the
How to - Stocktake Guide Cloud
Let’s say we wanted the total to be 14 instead. Type zero in the cartons, 14 in the Units and hit enter. EM Cloud™ will automatically fill this out.

Select > Update and you’ll see that the total quantity has changed.

How to - Stocktake Guide Cloud
5. Reporting
5.1 Input Report
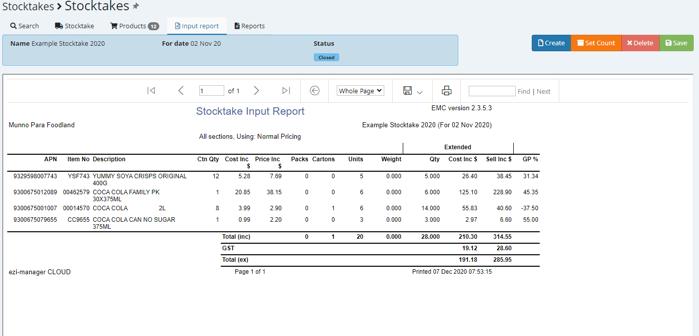
An input report compiles all of the inputs from your stocktake and displays them by product. Meaning if you have 3-4 entries for coca cola 2L, it will show up once on the input and the quantity will be the sum of all the entries for it.
An input report can be used to print out a list of what someone has keyed in with their relative counts. This means that if someone wants to double check their counts you can easily print an input report for their input.
To see an input report, navigate to your stocktake Example, stocktake > stocktake > Example stocktake 2020:
Select > Input Report

How to - Stocktake Guide Cloud
At this screen you can now use the save button to save the report in excel or pdf and you can use the print button to print it.

The previous report will show all inputs for the stocktake. If you want to filter down to see specific

Above, an input filter has been applied so that only the lines in that input show up. If the input report tab is now accessed you should see this:

How to - Stocktake Guide Cloud
5.2 Stock Valuation Summary
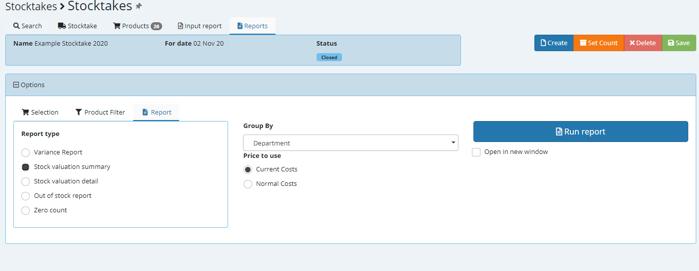
A stock valuation summary gives a list of totals depending on how you group it. The default is by department so you’ll see a list of the departments and the dollar values associated with them.
This is usually the first report to run once the physical counts are completed to see if the dollar amount on hand is accurate. From here if any of the totals seem incorrect per department they can easily be investigated further.
To run a stocktake valuation summary report, start by accessing your stocktake.
Select > Reports

At this screen, select Stock valuation summary and adjust group by if required
How to - Stocktake Guide Cloud
Now click run report (it is up to you if you’d rather run in a new window)

You should now see your valuation summary report:
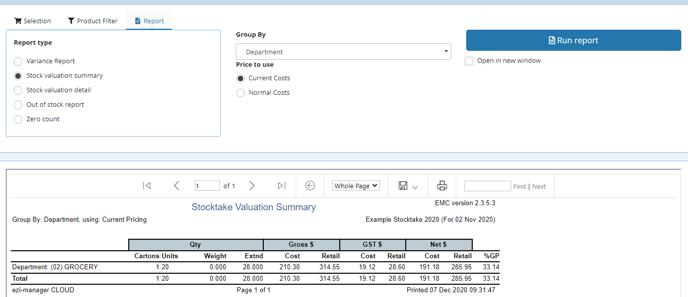
If any of these values seem incorrect (too high or too low) then they should be flagged for further investigation. Using the next method, a detailed valuation for the department that has been flagged can be created to see exactly what counts need to be altered.
How to - Stocktake Guide Cloud
5.3 Stock Valuation Detail
A stock valuation detail report gives a detailed report of all products with their quantities and dollar values attached.
This is the main report that is used for investigations as it allows the user to see if there are issues with counts, pricing and carton quantities. The report has a variety of sort by and group by options which, coupled with the product filter, should allow users to narrow down their reporting with ease.
To run a valuation detail report, navigate to your stocktake reports tab
At this screen, select stock valuation detail and then choose your sort by and group by options

Select > Run Report (it is up to you if you’d rather run in a new window)

How to - Stocktake Guide Cloud
You should now see your stocktake valuation:

As before, you can now save or print the report at your leisure.
If you want to specifically look at a department, start at this screen and select product filter:

Now fill out the filter as required:

How to - Stocktake Guide Cloud
Select > Report

When running the report you should only see lines according to your filter.
5.4 Variance Reporting
A variance report shows the difference between current stock on hand and the counted stock on hand at a glance. It can also be used to determine if counts are inaccurate during a stocktake, as well as seeing whether your counts were accurate pre-stocktake.
To run a stocktake variance report, start by accessing your stocktake.
Select > Reports

The report defaults to a variance report, you can change how the report is sorted here
How to - Stocktake Guide Cloud
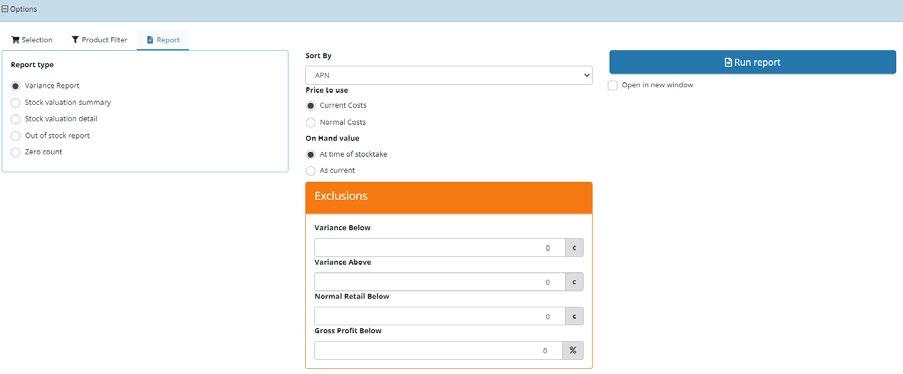
Users can dictate which price and which ‘on hand’ figure is used here

Users can configure exclusions here

How to - Stocktake Guide Cloud
Note, exclusions could be handy to clean up a report and see only the specific data you need.
Select > Run Report

You should now see your variance report

How to - Stocktake Guide Cloud
6. Closing a Stocktake
6.1 Closing Stocktake
Closing your stocktake in EM Cloud™ stops any further input from taking place. Make sure that you only close a stocktake once it is finished.
Make sure you have checked your input report for discrepancies. All manual inputs must take place before closing.
To close a stocktake, navigate to the one you’re working with.
Example, Stocktakes > Stocktakes > Example stocktake 2020
You should be able to view the below screen:

Select > Close

How to - Stocktake Guide Cloud
Select > Yes

Once a stocktake is closed, the orange button will turn into ‘Set Stock’.

Select > Set Count

How to - Stocktake Guide Cloud
The three options explained below will apply changes to product settings.
Leave inventory = Does not alter inventory (on/off) or auto order (on/off) settings for all products in the stocktake.
Turn inventory on = Turns inventory on for all products in the stocktake.
Turn inventory and auto order flags on = Turns inventory and auto order on for all products in the stocktake.
All three options will set the stock on hand counts for all products in the stocktake.
How to - Stocktake Guide Cloud
6.2 Setting Stock Count
Setting the stock count finilises the stocktake and sets the stock on hand count for all products according to the stocktake. It is highly advised that you thoroughly check a stocktake before setting the stock count to avoid setting counts incorrectly.
To Set the Count for a stocktake it must be closed using the steps above. Once this is done, navigate to your stocktake.
Example, stocktakes > stocktakes > Example stocktake 2020
At the below screen you will notice that the ‘Close’ button has become ‘Set Count’:

Click on set count and you’ll see this screen:

It is up to you which option you choose, for a full stocktake if you are setting the stock count it is recommended that you use the setting above. Click ‘Set Count’ and EM Cloud™ will begin working through setting the counts for you.
How to - Stocktake Guide Cloud
7. Recommended Methods
7.1 Name Inputs effectively
As mentioned throughout the guide, it is important to name your inputs effectively to cut down in investigation time. While the goal is obviously to not have to investigate, simply adding the person’s name and what department they’re counting to an input can help incredibly. It means that you can easily check the area or ask them if need be.
7.2 Name sections effectively
Similar to above, making sure that your sections have clear names can easily speed up any post count investigations. If sections are named poorly it is difficult to discern exactly what happened on the original count. If they are named well, even in the worst case scenario it becomes easy to re-count a section without fear of double ups.
7.3 High – Low Investigations
High – low investigations involve running valuation detail reports for each department after counting has finished. They can be tedious but are a considerable help to cutting out mistakes that could have a large effect on the dollar value of your stocktake.
Follow the steps on the next page to generate a high-low report
To run a high-low report navigate to your stocktake > Reports tab and select Stock valuation detail.
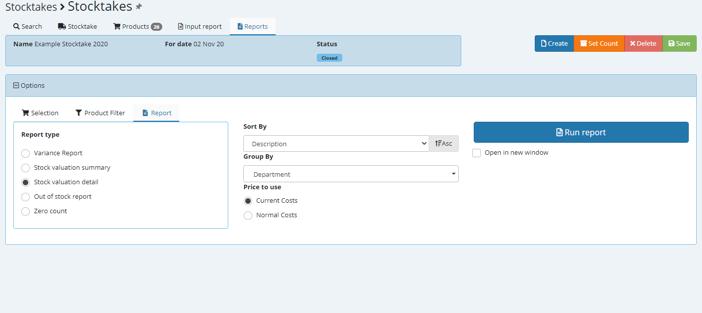
Now select the product filter tab and set it to a particular department (in this case,
How to - Stocktake Guide Cloud
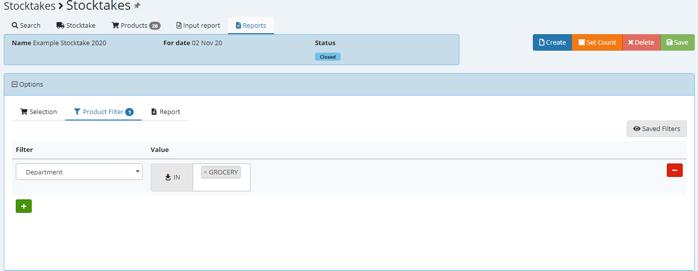
Go back to Report and alter Sort By to be Quantity. Change the list order to Desc

Now run your report and it should be similar to below:

Notice that the report is listed with the highest quantity at the top? This is a very easy way to see any keying errors such as 99999. It is recommended that you save the report in excel, then print off the first 10 pages.
How to - Stocktake Guide Cloud
This should include all of the highest counts for that department. Now that you have it, hand it to the department manager and get them to validate the counts. If any alterations need to be made, do them via manual inputs to ensure the stocktake is as accurate as possible.
Note:
If you would like even further accuracy, re-run the report but change it from desc to asc:

This report will show all of the lowest counts at the top. While these will not have a large negative impact on your dollar values, it can help to spot keying errors such as, 1 when it should be 11 etc.
