7 minute read
8.3. Writing the Main Code of the App

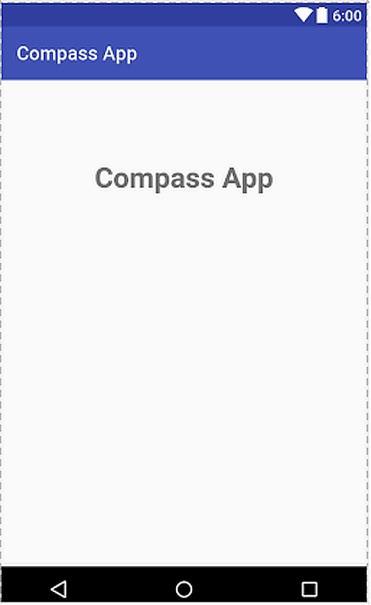
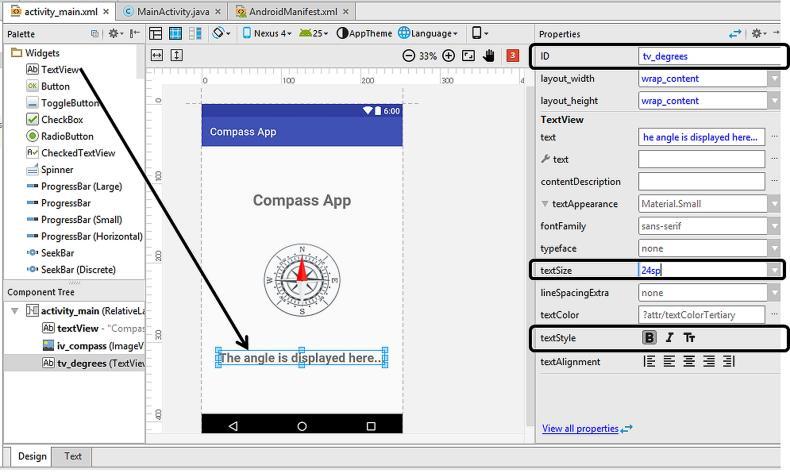
Finally, let‟s place a TextView below the ImageView in which we‟ll display the orientation angle in real time. I set its ID as tv_degrees (short for TextView_degrees), and made it 24sp with a bold text as shown below:
Figure 8.7. Adding the TextView to display the orientation angle
Advertisement
8.3. Writing the Main Code of the App
We completed the design of the user interface and now ready to continue with the coding. Please open the MainActivity.java file in Android Studio. This file will have the default contents as follows:
package com.example.atomic.compassapp;
import android.support.v7.app.AppCompatActivity; import android.os.Bundle;
public class MainActivity extends AppCompatActivity {
@Override protected void onCreate(Bundle savedInstanceState) { super.onCreate(savedInstanceState); setContentView(R.layout.activity_main);
}
Code 8.3
The horizontal direction of a compass bearing is called as azimuth. We‟ll calculate this angle from the magnetometer and accelerometer outputs. Let‟s define a float type variable to hold this data:
Float azimuth_angle;
Code 8.4
We also need to define objects related to the sensors as follows:
private SensorManager compassSensorManager; Sensor accelerometer; Sensor magnetometer;
Code 8.5
In this code, the first object is a SensorManager object that is used to access the sensors. The other two declarations define Sensor objects for reading the outputs of the accelerometer and the magnetometer.
Finally, let‟s declare ImageView and TextView objects which will be used to access the corresponding components in the GUI:
TextView tv_degrees; ImageView iv_compass;
Code 8.6
We can place these declarations inside the MainActivity class just before the onCreate() method. Then, we can assign the default accelerometer and magnetometer sensors to their objects inside the onCreate() method as follows:
compassSensorManager = (SensorManager)getSystemService(SENSOR_SERVICE);
accelerometer = compassSensorManager.getDefaultSensor(Sensor.TYPE_ACC ELEROMETER);
magnetometer = compassSensorManager.getDefaultSensor(Sensor.TYPE_MAG NETIC_FIELD);
Code 8.7
After these declarations and assignments, the MainActivity.java file currently looks like Code 8.8.
package com.example.atomic.compassapp;
import android.hardware.Sensor; import android.hardware.SensorManager; import android.support.v7.app.AppCompatActivity; import android.os.Bundle; import android.widget.ImageView; import android.widget.TextView;
public class MainActivity extends AppCompatActivity {
Float azimuth_angle; private SensorManager compassSensorManager; Sensor accelerometer; Sensor magnetometer; TextView tv_degrees; ImageView iv_compass;
@Override protected void onCreate(Bundle savedInstanceState) { super.onCreate(savedInstanceState); setContentView(R.layout.activity_main); compassSensorManager = (SensorManager)getSystemService(SENSOR_SERVICE); accelerometer = compassSensorManager.getDefaultSensor(Sensor.TYPE_ACC ELEROMETER); magnetometer = compassSensorManager.getDefaultSensor(Sensor.TYPE_MAG NETIC_FIELD); }
}
Code 8.8
In order to continue with reading sensors, we have to implement SensorEventListener class. We do this by using the implements keyword in the main class definition as follows:
public class MainActivity extends AppCompatActivity implements SensorEventListener
Code 8.9
Note that this is a single line code.
When we implement SensorEventListener class, Android Studio warns us by a red bulb saying that we need to implement the required methods in our code:
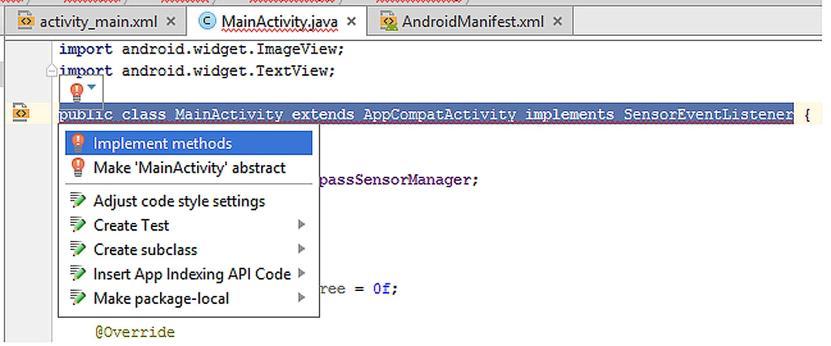
Figure 8.8. Warning for implementing the required methods
Please click the Implement methods and then Android Studio will automatically place the onSensorChanged() and onSensorActivityChanged() methods when we click the OK button in the dialog box:
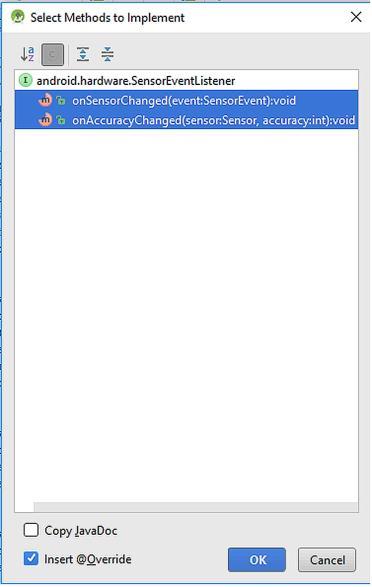
Figure 8.9. Dialog showing the methods which will be implemented
Android Studio automatically places the following code to MainActivity.java:
@Override public void onSensorChanged(SensorEvent event) {
@Override public void onAccuracyChanged(Sensor sensor, int accuracy) {
}
Code 8.10
We‟ll write our main code inside the onSensorChanged() method. However, before moving on to the main code, let‟s write the onResume() and onPause() methods for the main activity because sensors are power hungry components therefore it is important to pause and resume the sensor listeners when the activity pauses and resumes. For this, we simply add the following code just below the end of the
onCreate() method:
protected void onResume() { super.onResume(); mSensorManager.registerListener(this, accelerometer, SensorManager.SENSOR_DELAY_UI); mSensorManager.registerListener(this, magnetometer, SensorManager.SENSOR_DELAY_UI); }
protected void onPause() { super.onPause(); mSensorManager.unregisterListener(this);
}
Code 8.11
In the onResume() method, the sensor listeners are registered meaning that the sensors are powered on again when the activity resumes. Similarly, the sensors are unregistered (disconnected) in the onPause() method when the activity pauses.
We‟re now ready to write the main code. Firstly, let‟s define two float type arrays to hold the accelerometer and magnetometer output data. These will be array variables because the outputs of these sensors are vectoral quantities i.e. they have different values for different directions. We can define the arrays named accel_read and magnetic_read for these sensors as follows:
float[] accel_read; float[] magnetic_read;
Code 8.12
Please write these declarations just before the onSensorChanged() method so that we can access these variables from anywhere in the
onSensorChanged() method.
Inside the onSensorChanged() method: This method is called automatically when there‟s a new sensor event therefore we‟ll write our main code inside this method. The following code creates objects to access the ImageView and TextView of the GUI which will be updated when a sensor event happens:
tv_degrees =(TextView) findViewById(R.id.tv_degrees); iv_compass = (ImageView) findViewById(R.id.iv_compass);
Code 8.13
Then, the following code reads accelerometer and magnetometer sensors and stores the output data to accel_read and magnetic_read arrays:
if (event.sensor.getType() == Sensor.TYPE_ACCELEROMETER) accel_read = event.values; if (event.sensor.getType() == Sensor.TYPE_MAGNETIC_FIELD) magnetic_read = event.values;
Code 8.14
If the sensor outputs are available (i.e. they are not null), we‟ll use the accel_read and magnetic_read variables in the method called getRotationMatrix() to get the rotation matrix R of the device as follows:
if (accel_read != null && magnetic_read != null) { float R[] = new float[9]; float I[] = new float[9];
boolean successful_read = SensorManager.getRotationMatrix(R, I, accel_read, magnetic_read);
Code 8.15 (cont‟d from the previous page)
If this operation is successful, the successful_read variable will be true and the rotation matrix will be stored in the variable R. In this case, we‟re ready to get the azimuth angle (the angle between the device direction and the absolute north) as follows:
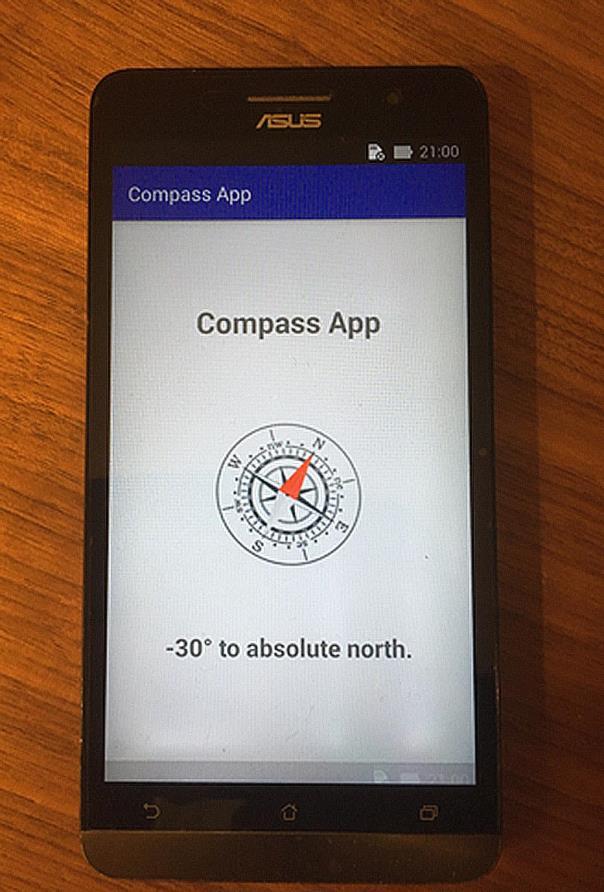
if (successsful_read) { float orientation[] = new float[3]; SensorManager.getOrientation(R, orientation); azimuth_angle = orientation[0]; float degrees = ((azimuth_angle * 180f) / 3.14f); int degreesInt = Math.round(degrees); tv_degrees.setText(Integer.toString(degreesInt) + (char) 0x00B0 + " to absolute north."); }
Code 8.16
In this code:
A new array called orientation is declared. The orientation of the device is extracted using the getOrientation() method and 3-dimensional orientation data is stored in the orientation array. The first component of this array is the azimuth angle in radians, which is assigned to the azimuth_angle variable in the fourth line. In the fifth line, the azimuth angle in radians is converted to degrees and assigned to the newly created variable degrees. The degrees variable is of float type therefore it is better to round it to an integer. The sixth code line does this job using the method
Math.round(). Finally, the azimuth angle in integer degrees is shown in the
TextView in the user interface. The char 0x00B0 is used to display the degree symbol (°).
It is also good to rotate the compass image according to the azimuth angle. For this animation, we need to declare a float type variable which will hold the current value of the ImageView‟s rotation degree:
private float current_degree = 0f;
Code 8.17
Then, we can use the following animation code which will rotate the ImageView according to the azimuth angle:
RotateAnimation rotate = new RotateAnimation(current_degree, -degreesInt, Animation.RELATIVE_TO_SELF, 0.5f, Animation.RELATIVE_TO_SELF, 0.5f); rotate.setDuration(100); rotate.setFillAfter(true);
iv_compass.startAnimation(rotate); current_degree = -degreesInt;
Code 8.18
In this code, we declared a RotateAnimate object and then set the animation duration. The startAnimation starts the rotation of the ImageView. This code rotates the compass image in real time according to the degreesInt variable which holds the azimuth angle data.
Combining all these code lines, we reach the following MainActivity.java shown below:
package com.example.atomic.compassapp; import android.hardware.Sensor; import android.hardware.SensorEvent; import android.hardware.SensorEventListener; import android.hardware.SensorManager; import android.support.v7.app.AppCompatActivity; import android.os.Bundle; import android.view.animation.Animation; import android.view.animation.RotateAnimation; import android.widget.ImageView; import android.widget.TextView;
public class MainActivity extends AppCompatActivity implements SensorEventListener {
Float azimuth_angle; private SensorManager compassSensorManager; Sensor accelerometer; Sensor magnetometer; TextView tv_degrees; ImageView iv_compass; private float current_degree = 0f;
@Override protected void onCreate(Bundle savedInstanceState) { super.onCreate(savedInstanceState); setContentView(R.layout.activity_main);
compassSensorManager = (SensorManager)getSystemService(SENSOR_SERVICE);
accelerometer = compassSensorManager.getDefaultSensor(Sensor.TYPE_ACC ELEROMETER);
magnetometer = compassSensorManager.getDefaultSensor(Sensor.TYPE_MAG NETIC_FIELD); }
protected void onResume() { super.onResume(); compassSensorManager.registerListener(this, accelerometer, SensorManager.SENSOR_DELAY_UI);
compassSensorManager.registerListener(this, magnetometer, SensorManager.SENSOR_DELAY_UI); }
protected void onPause() { super.onPause();
compassSensorManager.unregisterListener(this); }
float[] accel_read; float[] magnetic_read; @Override public void onSensorChanged(SensorEvent event) { tv_degrees =(TextView) findViewById(R.id.tv_degrees);
iv_compass = (ImageView) findViewById(R.id.iv_compass);
if (event.sensor.getType() == Sensor.TYPE_ACCELEROMETER) accel_read = event.values; if (event.sensor.getType() == Sensor.TYPE_MAGNETIC_FIELD) magnetic_read = event.values; if (accel_read != null && magnetic_read !=
null) {
float R[] = new float[9]; float I[] = new float[9]; boolean successsful_read = SensorManager.getRotationMatrix(R, I, accel_read, magnetic_read); if (successsful_read) { float orientation[] = new float[3]; SensorManager.getOrientation(R, orientation);
azimuth_angle = orientation[0]; float degrees = ((azimuth_angle * 180f) / 3.14f); int degreesInt = Math.round(degrees);
tv_degrees.setText(Integer.toString(degreesInt) + (char) 0x00B0 + " to absolute north.");
RotateAnimation rotate = new RotateAnimation(current_degree, -degreesInt, Animation.RELATIVE_TO_SELF, 0.5f, Animation.RELATIVE_TO_SELF, 0.5f); rotate.setDuration(100); rotate.setFillAfter(true);
iv_compass.startAnimation(rotate); current_degree = -degreesInt; }
} @Override public void onAccuracyChanged(Sensor sensor, int accuracy) { }
}
Code 8.19 (cont‟d from the previous page)