


DUAL FOCUS SECONDARY EDUCATION 1 VisUAl And AUDIOvISuaL ArtS ANDALu SIA muestra


1. Communicating through images 7 1 Visual communication • 2 Images • 3 Images in art • 4 Degrees of realism • Vocabulary • Art workshop • The final challenge 2. Getting creative 15 3. Bursting with colour 23 4. Telling stories through images ...... 31 1 Comics • 2 Photography • 3 Film • 4 Animation and digital formats • Vocabulary • Art workshop • The final challenge 5. Exploring form ....................................... 39 6. Using geometry 47
CONTENTS
1 COMMUNICATING THROUGH IMAGES
Take action!
Can you create a collage to introduce yourself?

SCAN THE CODE TO FIND OUT THE CHALLENGE
COMMUNICATING THROUGH IMAGES. VISUAL COMMUNICATION
Sender
Context
Receiver Message Code
Basic elements
Denotation

Connotation
Images
Analysis
Genres
Informative

Functions of images
Communicative Expressive Aesthetic / entertaining


Degrees of realism
Signifier Landscape Realism


Signified Still life Figurative art

Symbol

Icon Portrait


Abstract art

FOCUS O N ENGLISH
Listening
Listen and repeat.
Speaking
Do you know the difference between to look and to see? Read the statement. Discuss its meaning with a classmate. ‘I shut my eyes in order to see.’ Paul Gauguin
7
Visual communication 1
We communicate in many ways. Visual communication is when we use images to transmit a message.
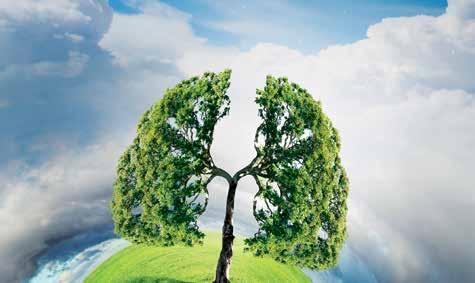
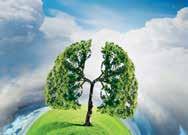
An image can have a denotation, which is a direct reference to an object (a tree is a tree), or a connotation, which is a double meaning. The picture below depicts a tree, but it is in the shape of lungs, showing the oxygen we breathe comes from plants.
Images
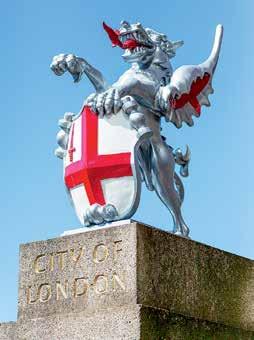
1 Speaking. Work with a classmate. Look at this picture and discuss the questions.
Art can be visual (painting, sculpture, drawing, architecture, engraving, photography and crafts) or audiovisual with added sound (film).
Basic elements of visual communication
Receiver. The person who sees and interprets the visual message.
Context. The circumstances of the communication.
a) What message is the statue trying to convey?
b) Who is the sender of the message?
c) Who is the intended receiver?
d) In what context was the statue created?
e) What visual code does it use?
2 Reading. Do some research into coats of arms and their symbols. Design a coat of arms for you and your family or group of friends.
Message. The idea the sender transmits through an image.
Code. The visual language the sender uses.
Sender. The person who chooses or creates an image to transmit an idea.
8
Images 2
The functions of images
We can classify images by their function:
Informative
Images that transmit information in an objective way (maps, diagrams, designs).
Analysing images
Expressive Communicative
Images that evoke or express emotions (paintings, sculptures, films).
Images that are designed to make the viewer respond (a traffic signal, an advertisement).
Images are all around us. Many are in the form of symbols that we can interpret with the knowledge we have from our culture or society.
IMAGE
Signifier
The visual form of the image.
Icon

Looks like the object it refers to. For example, the bin icon on a computer.
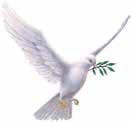
Symbol
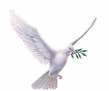
Does not look like the object it refers to. It represents an idea. For example, the dove of peace.
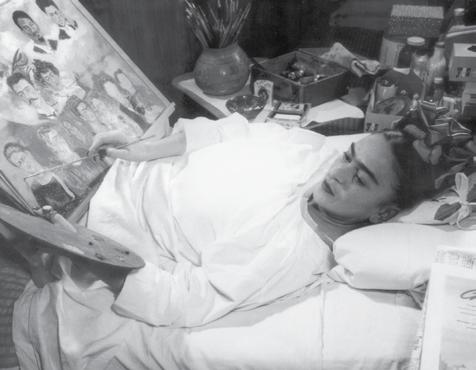
3 Writing. Look at this picture and answer the questions in your notebook.
a) What do you think it was created for?
b) What is the signifier?
c) What is the signified?
4 Speaking. Discuss with a classmate. Is it easier to understand a message through a picture or a text?
5 Speaking. Invent a symbol to represent you, such as a hand gesture. Show your classmates and explain its meaning.
Aesthetic or entertaining
Images that are made to decorate or entertain.
Signified
The message the image transmits.
Denotation
The image is clear and easy to understand.

Connotation
The image is a metaphor and needs interpretation.
9 Unit 1
Images in art 3
Genres
There are three main artistic genres:
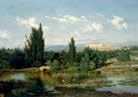
• Landscape. Paintings with nature themes, including forests, valleys, mountains, rivers, sea and beaches. Also urban landscapes and dream (imaginary) landscapes.
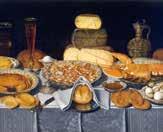
• Still life. Paintings of flowers, fruit, food, inanimate objects and dead animals.
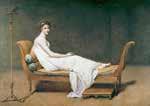
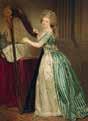
• Portrait. Paintings of individuals or groups. When an artist paints their own picture, it’s called a self-portrait.
6 Writing. Look online for an example of each genre of painting. For each painting, write the title, the date, the genre and where it is currently located (museum, private collection, etc.).
7 Speaking. Choose your favourite piece from the works you selected in activity 1 and present it to the rest of the class. Tell them the information you discovered and explain why you like it.
8 Speaking. Work in groups of five. Select five objects related to one of the following: school, home, happiness, childhood.
Agree on who will work on which object, then choose an art technique to represent your object. Put the finished pieces together to create a collaborative still life.
9 Work with a classmate. Take it in turns to draw each other’s portrait.
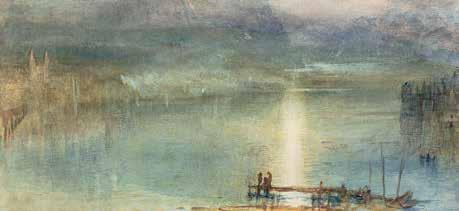
Lake Lucerne (1841), William Turner.
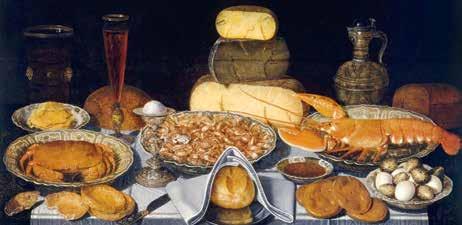
Still life with crab, shrimps and lobster (1937-1640), Clara Peeters.
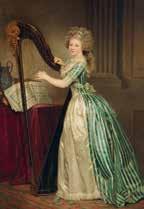
Left: Self-portrait with a harp (1791), Rose Adélaïde Ducreux.
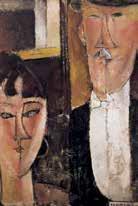
Right: Bride and groom (The Couple) (1915-1916), Amedeo Modigliani.
10
Degrees of realism 4
Realism
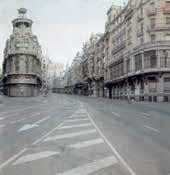
Realism shows objects how they look in reality (proportion, colours, texture, etc.). With hyperrealism, the paintings are so detailed they look like photos.

Figurative art
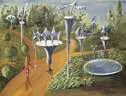
In figurative art, objects are recognisable, but not as we see them in real life. Figurative art includes diagrams, deformed images, etc. It allows artists more freedom of expression.
Abstract art
In abstract art, objects are barely recognisable or unrecognisable. The movement appeared in the 19th century after the invention of photography, which artists thought would kill art.
Organic abstraction. Round shapes and wavy lines.
Geometric abstraction. Combinations of geometric shapes.
10 Speaking. Collect pictures of objects, animals and people. On a piece of paper, draw or trace only the main contour lines. Ask a classmate to guess what each outline shows.
11 Look around you and choose a simple object. Identify the shapes that form it, check its measurements and pay attention to its main lines. In your notebook, sketch it using just one realistic feature, for example, its colour. Use geometric shapes for all other elements to create a work of abstract art.
12 Writing. Look online for artists who work or worked in hyperrealist, realist, figurative and abstract styles. Choose one and write a short biography of that artist on A4 or poster paper. Print and attach a picture of one of their works of art, or draw it yourself. Display your fact sheet in the classroom.
Vocabulary
Denotation – Connotation
Sender – Receiver – Context
Message – Code – Signifier
Signified – Icon – Symbol
Landscape – Still life – Portrait
Gran Vía (1974-1981), Antonio López.
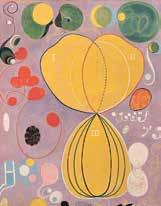
The ten largest, No. 7, Adulthood (1907), Hilma af Klint.
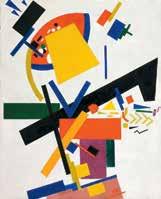
Suprematist composition (1916), Kazimir Malevich.
11 Unit 1
Posters are designed to grab your attention. They need to provide information in a clear and concise way so you can understand the message very quickly.
Posters have four main parts:
• A clear, main theme presented with simple graphics that make it easy to understand.
• A body with the main information in the area our eyes are first drawn to.
• An interesting or striking image that is simple but very expressive.
• A title consisting of one word or a short phrase (slogan) that summarises the message. There may also be a subtitle with extra information.
The text needs to look good and be easy to read. It is important to choose a good font for the message and use a clever design. Calligrams are sometimes used, turning the text itself into a picture.
This poster was designed by Eva María Gómez López. She said she wanted to create ‘a simple design that said a lot with just a few elements.’
The classic font and dark colours of the text ensure the graphic elements (the red carpet and the silhouette) are the main focus. They also provide an elegant touch.

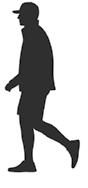
The silhouette is a metaphor for a festival in constant movement that opens doors and creates opportunity.
The red carpet looks like a roll of film that is the universal symbol of cinema.
12
Art workshop. Posters
Design process
1. Choose a theme
Find information about your chosen topic. Don’t forget you want to transmit a specific message, so you need to make sure people will understand it at a glance.
2. Select the images
Look at some similar posters for inspiration. You can use a collage technique or illustrate it yourself.
3. Write the text
Create a simple, striking title. Add a subtitle with extra information if needed.
4. Final composition
Distribute the artwork and text appropriately.
Create a poster for World Children’s Day
1 Read this text from the Action Plan of the World Summit for Children held on 30 September 1990: ‘There is no cause which merits a higher priority than the protection and development of children. The survival, stability and advancement of all nations and human civilisation depends on them.’
2 Use the text as inspiration to create a poster with a short, simple slogan for World Children’s Day, held every year on 20 November. Add other important information as a subtitle.
3 Choose the images you want to use. You can use photos, cut-outs from magazines or your own illustrations.
4 Personalise it with colours, a special background, drawings, etc.
5 Display your poster in the classroom and celebrate World Children’s Day.

13 Unit 1
The final challenge
INTRODUCE YOURSELF TO THE CLASS WITH A COLLAGE
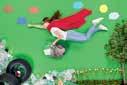
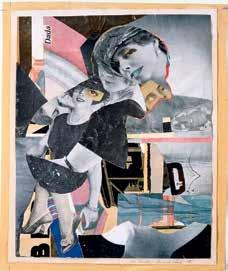
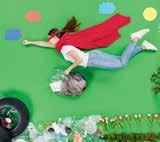
Collage is a technique that consists of pasting different elements onto a support to create a piece of art. When a collage is made with photographs, it is called a photomontage.
Make a photomontage that represents your group so that your class can get to know you better. Share your interests and hobbies (sports, music, cinema, ecology, etc.) and find pictures of these activities.
STEP 1
Materials and sketches
• Gather pictures (personal pictures, pictures from magazines, etc.), and get thick paper or cardboard to use as a support, as well as a glue stick or white glue. Then make sketches of possible ideas and choose the most suitable one.
STEP3
Organising the composition
• Organise the elements on the background until you have a good composition, and then stick them on with glue. You can complete your composition by painting or writing on it and by applying a layer of white glue.

STEP 2
Preparing the support and the elements
• Prepare the support and the background by painting or decorating it. Prepare the elements you will include: cut them out and, if necessary, fold them, tear them or crumple them.
STEP 4
The presentation
• Prepare a presentation of the photomontage for the class. Each member of the group should explain the elements of the collage that represent them.
Collage in art
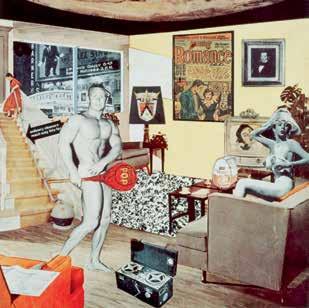
• Pop art was an important artistic movement of the 20th century that used images of popular culture as a way to reach out to people. As such, the main theme of pop art is daily life and one of the most commonly used techniques is the collage.
• Richard Hamilton (1922-2011) was a British artist and a pioneer in pop art who created paintings, sculptures, photographs, collages and installations.
Just what is it that makes today’s homes so different, so appealing? (1956), by Richard Hamilton and John McHale.
14
SCAN THIS CODE TO CONSULT THE GLOSSARY FOR THIS UNIT.
4 TELLING STORIES THROUGH IMAGES


• Panel
• Speech bubble
• Thought bubble
• Onomatopoeia
• Caption
• Motion lines
• Visual metaphor


Listen and repeat.
Speaking
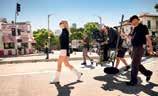
Do you have a camera, or do you just take photos with your phone? With a partner, discuss how new technologies have changed photography.
How do you think it will change in the future?
31
Listening
FOCUS O N ENGLISH
Parts of comics
2D Origins Genres Shots
SCAN THE CODE TO FIND OUT THE CHALLENGE
Film Photography Animation 3D TELLING STORIES THROUGH IMAGES Stop motion
Genres
Angles
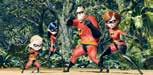
Take action! Can you create a stop-motion animation? Comics
Before comics
People have used pictures to tell stories since Prehistoric times. We usually read these stories as a sequence from left to right and top to bottom.
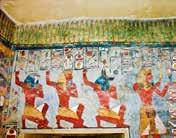
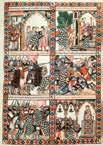
Egyptian hieroglyphs, ancient Greek reliefs and medieval codices are the ancestors of the modern comic.
Parts of a comic
Comics tell a story through a sequence of images and text.
1 Reading. Look online for information about thaumatropes. Find out:
a) How they work;
b) How they are related to persistence of vision.
Draw two pictures on the front and back of a disc of card. Tie a piece of string to each side of the disc. Twist the string to wind your thaumatrope up, then release it to observe your optical illusion.
2 Writing. Look at the texts below. What kind of bubble would you use for each one? Draw them in your notebook and write the text inside.
a) BAAANG!!!
b) I wonder who’s at the door?
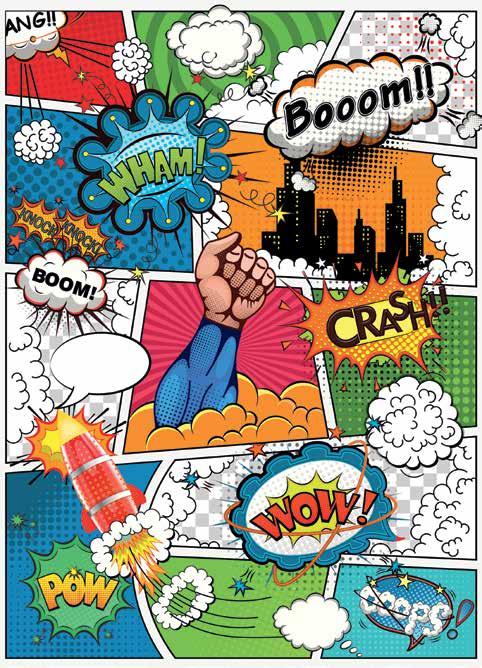
Onomatopoeia. The sound effects presented in bubbles. Extra letters mean a longer sound.
Bubble. Speech bubbles contain dialogue and thought bubbles contain thoughts.
Visual metaphors. Symbols used to express ideas. For example, stars to show a knock on the head.
Motion lines. Lines used to show movement.
c) Look at the Moon! It’s so beautiful. Create three more bubbles with texts of your own.
3 Speaking. Search online for some examples of comics. Work with a classmate and identify the different parts. Analyse how the sequence of images tells the story.
32
Comics 1
Caption. A text box with the voice of the narrator to give context.
Panel. A single frame in the story sequence.
Look
out!
Photography 2
The origins of photography
Photography uses a camera to capture images. In traditional photography, the light reflected from a scene is projected onto a photosensitive support and fixed.
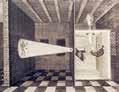
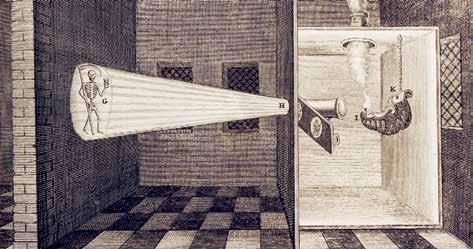
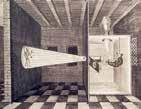
The history of photography dates back to the Renaissance and the camera obscura. This was closed box with a small hole in it. Light entered through the hole and an inverted image was reflected onto the opposite wall.
Colour photography
The first images were in black and white. They were often coloured by hand until Kodachrome colour film appeared in 1935.
Digital photography
In digital photography, the image is stored in electronic memory.
Genres of photography
Advertising photography
Uses creativity to encourage consumers to buy a product. Sub-genres include fashion, product and food photography.
4 Reading. Find out who took the world’s first photograph. What was the photo of?
5 Speaking. Work with a classmate.
a) Discuss places and things you have only seen in photos. What impressed you the most?
b) Discuss these questions:
What do you take photos of?
Do you take a lot of photos?
Why do you take photos?
6 Speaking. Discuss the job of a photojournalist with a classmate. Are there different types of photojournalism? Would you like to be a photojournalist?
Genres of photography
Art photography
Used as a means of personal expression. Sub-genres include fine art photography and photojournalism.
Scientific photography
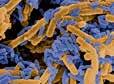
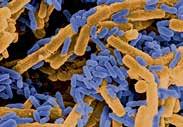
A powerful tool for scientific research and dissemination. Particularly useful for capturing images the eye can’t see.
33
Illustration of a camera obscura, or ‘magic lantern’ by A. Kircher in the 17th century.
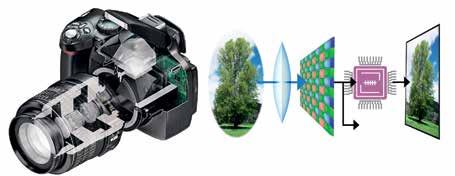
Digital process: a mirror reflects the light that enters through the lens. When the shutter is pressed, the lever protecting the sensor lifts and lets the light in. The pulses of light turn into a digital signal, allowing us to see the image on the camera screen.
Unit 4
Film 3
The origins of film
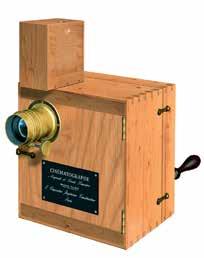
Film uses moving pictures to tell stories and evoke emotions. Before digital technology, the illusion of movement was created with a series of still images projected in quick succession. In 1895, the Lumière brothers patented the first motion picture system called the cinématographe. It recorded black and white images on 35 mm film and then projected them onto a screen.
Film genres
Films genres can be categorised using different criteria.
• Style: drama, comedy, science fiction, etc.
• Format: live action, animation, etc.
• Setting: war, horror, etc.
• Audience: children, family, adults, etc.
Angles and shots
Different camera angles and shots transmit different feelings.
7 Writing. Think of a different film for a genre in each of the four categories. Write them in your notebook. Then, compare them with a classmate. Tell each other about your chosen films.
8 Imagine you are making a film about a giant. You really want to emphasise how big the giant is. What camera angle/POV will you use? Which type of shot will you use?
9 There are many tutorial videos on the Internet, and they are very simple to make.
Think about something you can do very well and make a step-by-step video to show how to do it.
10 Reading. Do some research online. Who was Eadweard Muybridge? What was he famous for? Write a short summary in your notebook.

34
angle Neutral / eye level High angle Back view
Low
low angle
Close-up 3/4 shot Medium shot Medium long shot Long shot
of angle or point of view (POV) Types of shots
Overhead / bird’s-eye view Extreme
/ worm’s-eye view
Types
4
Animation and digital file formats
Types of animation
• Traditional 2D animation consists of hand drawing each frame with tiny variations. The animator then photographs them in sequence.
• Stop motion consists of photographing objects with tiny variations in their position. When the sequence is reproduced at high speed, it gives the illusion of movement.
– Cut-out animation is stop motion using flat shapes cut from paper, card, photos, etc.
– Pixelation is stop motion using real human figures.
11 Speaking. Work with a classmate. Make a list of animated films you have seen. Discuss how they were made and categorise them (2D, stop motion, cut-out animation, pixelation, 3D).
12 Traditional 2D animation, required each frame to be drawn by hand. A flip book creates a similar effect. Cut squares of paper, or use sticky notes to create your own flip book. Draw a simple character on the first page, then on each consecutive page draw the same character with slight variations to show movement. Flip the pages to see the animation.
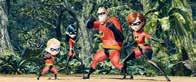
• 3D animation uses digital images and animation software to produce more realistic results. Pixar was the first studio to produce 3D animated films.
Digital file formats
Digital images and animations can be stored in different ways.
Digital file formats

JPG or JPEG
Can be compressed x100 and maintain good quality. Recognised by browsers. Ideal for the web.

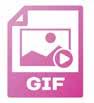
GIF
Ideal for the web. Supports animation, but with low quality images and colour.
Vocabulary
Panel – Bubble – Frame
Metaphor – Onomatopoeia
Caption – Photojournalism
Setting – Angle Shot – Animation
Stop motion – Pixelation

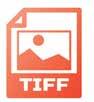
TIFF
Compatible with imageediting and design software. Maintains quality. Files are very large and format does not support animation.

PNG
Created to solve the issues with GIF. Stores images with better contrast, and colour and image quality. Does not support animation.
35
Unit 4
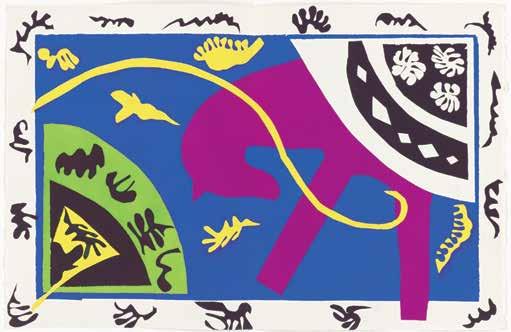
Art workshop. Collage
Collage is an artistic technique that consists of sticking different materials (cut-outs or pieces of paper, card, fabric, etc.) onto a support to create a work of art.
The textures, colours and type of cut (scissors, torn, etc.) evoke different sensations, making the work more expressive. French artist Henri Matisse used colourful paper cut-outs to create a relationship between figures, shapes and the background. In this composition, four colours are presented on a neutral background.


Photomontage


When a collage is made with photos it’s called a photomontage. German Dada artist Hannah Höch was one of the first artists to use photomontage. She used cut-outs from the newspapers and magazines to make art that denounced discrimination against women. She depicted the new free and independent woman of the period after the World War I.
36
Horse, rider and clown (1947), Henri Matisse.
Da Dandy (1919), Hannah Höch.
Design process
1. Plan
• Theme: message
• Degree of realism: abstract or figurative art
• Genre: landscape, portrait or still life
• Style: realist, surrealist
2. Select the materials
Collect materials that you find interesting and work with your theme and plan. You can use recycled materials, photos, cut-outs from magazines, etc.
3. Experiment with composition
Experiment with different positions. Move the materials around to create different images and balance the colours and visual weight. Put some materials on top of others to create volume and rhythm.
4. Final composition
Stick the materials into their final position.
Create a collage
1 Think about what you have learnt and study the different collages for inspiration.
2 Choose your theme and message. What do you want to communicate?
3 Choose between collage and photomontage. You can use digital or manual techniques, or a combination of both.
4 Decide on the style: realist, abstract, figurative, symbolic, surrealist, etc.
5 Select the cut-outs, print-outs and materials you want to use. Remember to use them in different contexts and use them with different meanings.
6 Experiment with the composition. Move things around until you are happy.
7 Stick the cut-outs carefully on your chose support. Don’t forget to overlap them to create volume.
37
Unit 4
The final challenge
Shoot a stop motion production
Stop motion is a variant of animation in which the frames, which are generally photographs, pass by slowly, allowing us to see how the images jump from one to the next. There are programs that slow video images down. But artists create stop motion animation by moving and photographing stationary objects. The whole class is going to organise a stop motion production that narrates a story, such as a trip you took together.
STEP 1
The materials
• Gather the following materials: photographic camera, video editing programs, materials and resources for props, the sets, decoration, the characters, etc.
STEP3
Photographic session
• Organise a photo session; prepare the camera by using the focus and making the necessary adjustments, and place it on a tripod or stand. Slowly move the objects, photographing the scenes, taking 8 to 12 photos for each second of video.
Narration in art
The storyboard

STEP 2
• First you need to write the story, and define the characters, the setting and the script. Each group should prepare a storyboard (a graphic script that uses illustrations to show the sequence) and then you can choose the one you like best as a class.
STEP 4
The presentation
• Put the photographs in order with the amount of frames per seconds you have chosen. Place them on the timeline in an animation tool and convert them to video.
• Add sound: dialogue, music, sound effects; you can even include text with the title and credits.
• Curro González (Seville, 1960) created paintings in which real or imaginary characters and objects were mixed into the stories, some of which were autobiographical. His artwork has been used in stop motion productions and animated films.
38
THIS CODE TO CONSULT THE GLOSSARY FOR THIS UNIT.
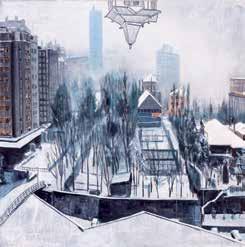
Small palace in the snow, by Curro González.
SCAN
1. Communicating through images .....................2 2. Getting creative ........................................................ 6 3. Bursting with colour . ............................................10 4. Telling stories through images ........................ 14 5. Exploring form ........................................................ 18 6. Using geometry ...................................................... 22 Index SECONDARY EDUCATION 1 VisuA l A nd AUDIOv
Arts DuAl FOCUs
IS ual
COMMUNICATING THROUGH IMAGES
Types of art
Visual art
Art
Audiovisual art
Painting, sculpture, drawing, architecture, engraving, photography, crafts, etc. film
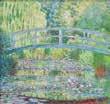
Waterlily pond, green harmony, Claude Monet.
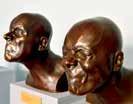
Busts, Franz Xaver Messerschmidt.
Visual communication
Basic elements of visual communication
Sender Receiver Code Context
Denotation
Message
Connotation
22
1
The functions of images
Images that transmit information.
Analysing images
Images that evoke or express emotions.
Images that call for a response.
Images that decorate or entertain.


23
Functions Image Informative Signifier Icon Denotation Connotation Expressive Communicative Aesthetic or entertaining Visual form Message Signified
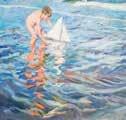
The little sailing boat, Joaquín Sorolla.
Genres: landscape
Genres: still life
Genres: portrait

24 1
Nature Urban Dream Individual Group Self-portrait Flowers, fruit, food, inanimate objects, dead animals.
Still life
Landscape
Portrait
Landscape of the Manzanares riverbank, Carlos de Haes.
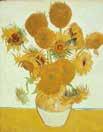
Sunflowers, Vincent van Gogh.
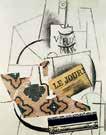
Bottle of Vieux Marc, Pablo Picasso.
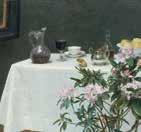
Corner of a table, Henri Fantin-Latour.
Still life with crab, shrimps and lobster, Clara Peeters.
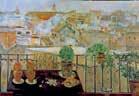
Seville From My Terrace, Carmen Laffon.
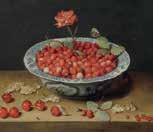
Wild Strawberries and a Carnation in a Wan-Li Bowl, Jacob van Hulsdonck.
Degrees of realism: realism
Degrees of realism: figurative art
Objects look real. Hyperrealist paintings look like photos.

Degrees of realism: abstract art
Organic abstraction
Objects are recognisable. Diagrams and deformed images are figurative. Realism Figurative art
Objects are barely recognisable or unrecognisable. Abstract art
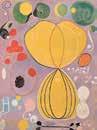
The ten largest, No. 7, Adulthood Hilma af Klint.

Geometric abstraction
Suprematist composition, Kazimir Malevich.
25
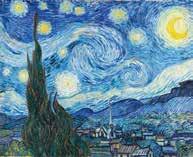
The Starry Night, Vincent van Gogh.
Gran Vía, Antonio López. Gran Canal, Canaletto.
TELLING STORIES THROUGH IMAGES
Before comics
Prehistoric cave paintings
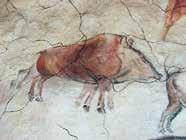
Wild boar with eight legs, Altamira Cave, Santillana del Mar (Cantabria).
Stories told through images
Egyptian hieroglyphs
Medieval codices Origins
Parts of comics
Parts of comics
26
bubble Thought bubble
4 Panel Caption Bubbles Onomatopoeia Motion lines Visual metaphors Speech
Tomb of Ramses I, Valley of the Kings. Western Thebes, Luxor (Egypt).
Miniature 36 of the Cantigas de santa María, unknown artist (13th century).
The evolution of photography
Photography
Origins
Camera obscura
Black and white photography
Image recorded on photosensitive support.
Workers
Colour photography
Kodachrome colour film appeared in 1935.
Digital photography
Light is turned into a digital signal and stored in electronic memory.

Genres of photography
Advertising photography
Uses creativity to encourage consumers to buy a product. Sub-genres include fashion, product and food photography.
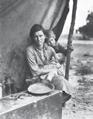
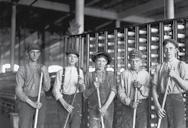
Group of sweepers. Cotton Mill (North Carolina, 1908), by Lewis Hine.
Genres of photography
Art photography
Used as a means of personal expression. Sub-genres include fine art photography and photojournalism.
Scientific photography
A powerful tool for scientific research and dissemination. Particularly useful for capturing images the eye can’t see.
27
Illustration of a camera obscura, or ‘magic lantern’ by A. Kircher in the 17th century.
New York Construction
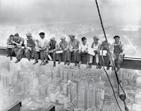
Lunching on a Crossbeam (1932), by Lewis Hine.
Film genres
Film
Camera angles or points of view
Angles or POV
Types of shots
28 4
Close up Medium shot 3/4 shot Medium long shot Long shot
of shots Drama, comedy, science fiction, etc. Live action, animation, etc. War, horror, etc. Children, family, adults, etc.
Types
Style Format Setting Audience Overhead / bird’s-eye view High angle Neutral / eye level Back view Low angle Extreme low angle / worm’s-eye view
genres
Types of animation
2D animation
Frames hand drawn with tiny variations.
Types of animation
Stop motion
Objects photographed with tiny variations.

Cut-out animation
Pixelation
Digital file formats
Shapes cut from paper, card photos, etc.
Digital file formats
Real human figures.
3D animation
Digital images made with animation software.
JPG or JPEG
Can be compressed x100 and maintain good quality. Recognised by browsers. Ideal for the web.

GIF
Ideal for the web. Supports animation, but with low quality images and colour.
TIFF
Compatible with imageediting and design software. Maintains quality. Files are very large. Format does not support animation.
PNG
Stores images with better contrast, and colour and image quality than GIF. Does not support animation.

29
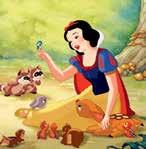
Snow White and the Seven Dwarfs (1937). Walt Disney.
The Incredibles (2004). Pixar Animation Studios.
© This edition: GRUPO ANAYA, S.A., 2024 - Valentín Beato, 21 - 28037 Madrid - Printed in Spain. All rights reserved. No part of this publication may be reproduced, stored in a retrieval system, or transmitted, in any form or by any means, electronic, mechanical, photocopying, recording, or otherwise, without the prior permission of the publishers.
