JumpstartSTEM4Girls.Online Facilitation Plan
Course Title Short Description Long Description
Jumpstart STEM 4 Girls.Online
Target Audience: Troop Leaders who want to give the STEM badges a try, without feeling like they’ve jumped in over their heads.
Workshop Length: 80 minutes
Not enough guidance in the badge booklets? (Too soft!) Too much information in VTK? (Too hard!)
We’d like to think the Jumpstart for STEM platform developed in partnership with Ericsson is JUST RIGHT!
Using Jumpstart as our guide on the side, we’ll execute on a couple of badge activities to demonstrate how easy leading STEM badges can actually be.
PRE-WORK:
Create a Jumpstart account at https://stem4girls.online
Become familiar with the platform and the badges demoed in this workshop. Print and gather all needed supplies.

1
Printed Materials / Items / People Needed:
A laptop or PC with screen projection capabilities to show Jumpstart
3 or 6 iPads or tablets, depending upon the number of your small work groups, logged into Jumpstart for breakout sessions. Make sure these do not lock up with screen savers.
1 main facilitator – will lead and direct the run of show
3 co-facilitators to act as small group coaches for the Daisy, Brownie, and Junior Activity breakout groups. Coaches will learn all the assigned badge activity instructions in Jumpstart and be prepared to coach and assist small groups. The coach may have one or two people as “troop leaders” in their assigned PGL, depending upon the capacity size of the room.
A private quiet room nearby where the 3 coaches can work with their breakout group leader(s) for 10 minutes to prepare them to lead an activity in the main room.
D / B / J tabletop cards to designate the small work groups and randomly select the audience member who will play the part of the “troop leader” in the breakout group.
3 or 6 participation prizes of your choosing, depending upon the number of breakout groups you have, for the “troop leaders” for their extra level of participation in the class.
A timer for your breakout coaches, or else have them use their phones to keep track of their 10 minutes for prep time during the breakout.
For Daisy Group 1 – Space Science Explorer – Observe the Moon (Badge Step 2)
The coach should pre-make the moon sand at home and bring with them to the workshop. Print a paper copy of the instructions from Jumpstart to keep with you during the role play.
Half size chaffing dish disposable aluminum pan
Large bowl
Whisk
8 cups of flour
1 cup of baby oil
Variety of spheres: golf balls, marbles, etc.
Moon phase chart – print on 11 x 17 paper
The Moon resource
For Daisy Group 2 – Space Science Explorer – Meet the Stars (Badge Step 3)
Print a paper copy of the instructions from Jumpstart to keep with you during the role play.
Constellations Handout - one handout per small group
Constellation Cards - one set per girl
Black foam board cut into 5x7 inch pieces - one per girl (purchase from Amazon)
Glow in the dark loom bands OR a large bag of thin rubber bands (purchase from Amazon)
Lots of push pins, at least 8 per girl (purchase from Amazon)
For Brownie Group 1 - Cybersecurity Badge 1 –Discover what your technology can do (Badge Step 2)
2
Print a paper copy of the instructions from Jumpstart to keep with you during the role play.
Tech Scavenger Hunt Scenarios (cut into strips)
Bowl
A larger- size calendar
A flashight
A diary or journal
A school notebook
An address book
A music CD
A movie DVD
For Brownie Group 2 - Cybersecurity Badge 1 – Find out how to create layers of security (Badge Step 3)
Print a paper copy of the instructions from Jumpstart to keep with you during the role play.
Password Checklist– 10 copies
Computer or device to watch a video
Pencil
Paper
For Junior Group 1 - Robotics Badge 1 / Programming Robots – Learn about programming (Badge Step 3)
Print a paper copy of the instructions from Jumpstart to keep with you during the role play.
Computer or device to view a video
Tangram Sets (one per girl; each girl should have 7 small shape pieces)
Copies of Algorithm Card Images (one copy of cards per small group)
For Junior Group 2 – Automotive Engineering Badge 2 (Badge Step 1)
Print a paper copy of the instructions from Jumpstart to keep with you during the role play.
Do Activity #1:
“Vehicle Diagram” from the Simple Machines Matching Game
Cut out “Everyday Objects” and “Vehicle Parts” from the Simple Machines Matching Game
Do Activity #2: Rather than hand make a marble run with assorted craft materials, to save time in the workshop purchase this National Geographic marble run kit from target. It’s got some simple machine pieces in it that the group can recognize and use. Break it open and practice with it before the workshop so that you can assist if the group needs help.
Target: https://www.target.com/p/national-geographic-glow-in-the-dark-marble-run-50pc/-/A-80170802? ref=tgt_adv_XS000000&AFID=google_pla_df&fndsrc=tgtao&DFA=71700000012732838&CPNG=PLA_Toys
%2BShopping_Local
%7CToys_Ecomm_Hardlines&adgroup=SC_Toys&LID=700000001170770pgs&LNM=PRODUCT_GROUP&network=g& device=c&location=9026835&targetid=aud-1453399007976:pla-
517349206223&ds_rl=1246978&ds_rl=1248099&gclid=CjwKCAjwp7eUBhBeEiwAZbHwkWd_o55kuKNlUTCP8YgVQM rdRvDhpyD-lFbzzwUpC-zEReOBJUbpABoCt6UQAvD_BwE&gclsrc=aw.ds
3

4
Print one sheet per Daisy work group. Cut into cards and place at seats. Card with star is the “troop leader”.

5
Print one sheet per Brownie work group. Cut into cards and place at seats. Card with star is the “troop leader”.

6
Print one sheet per Daisy work group. Cut into cards and place at seats. Card with star is the “troop leader”.
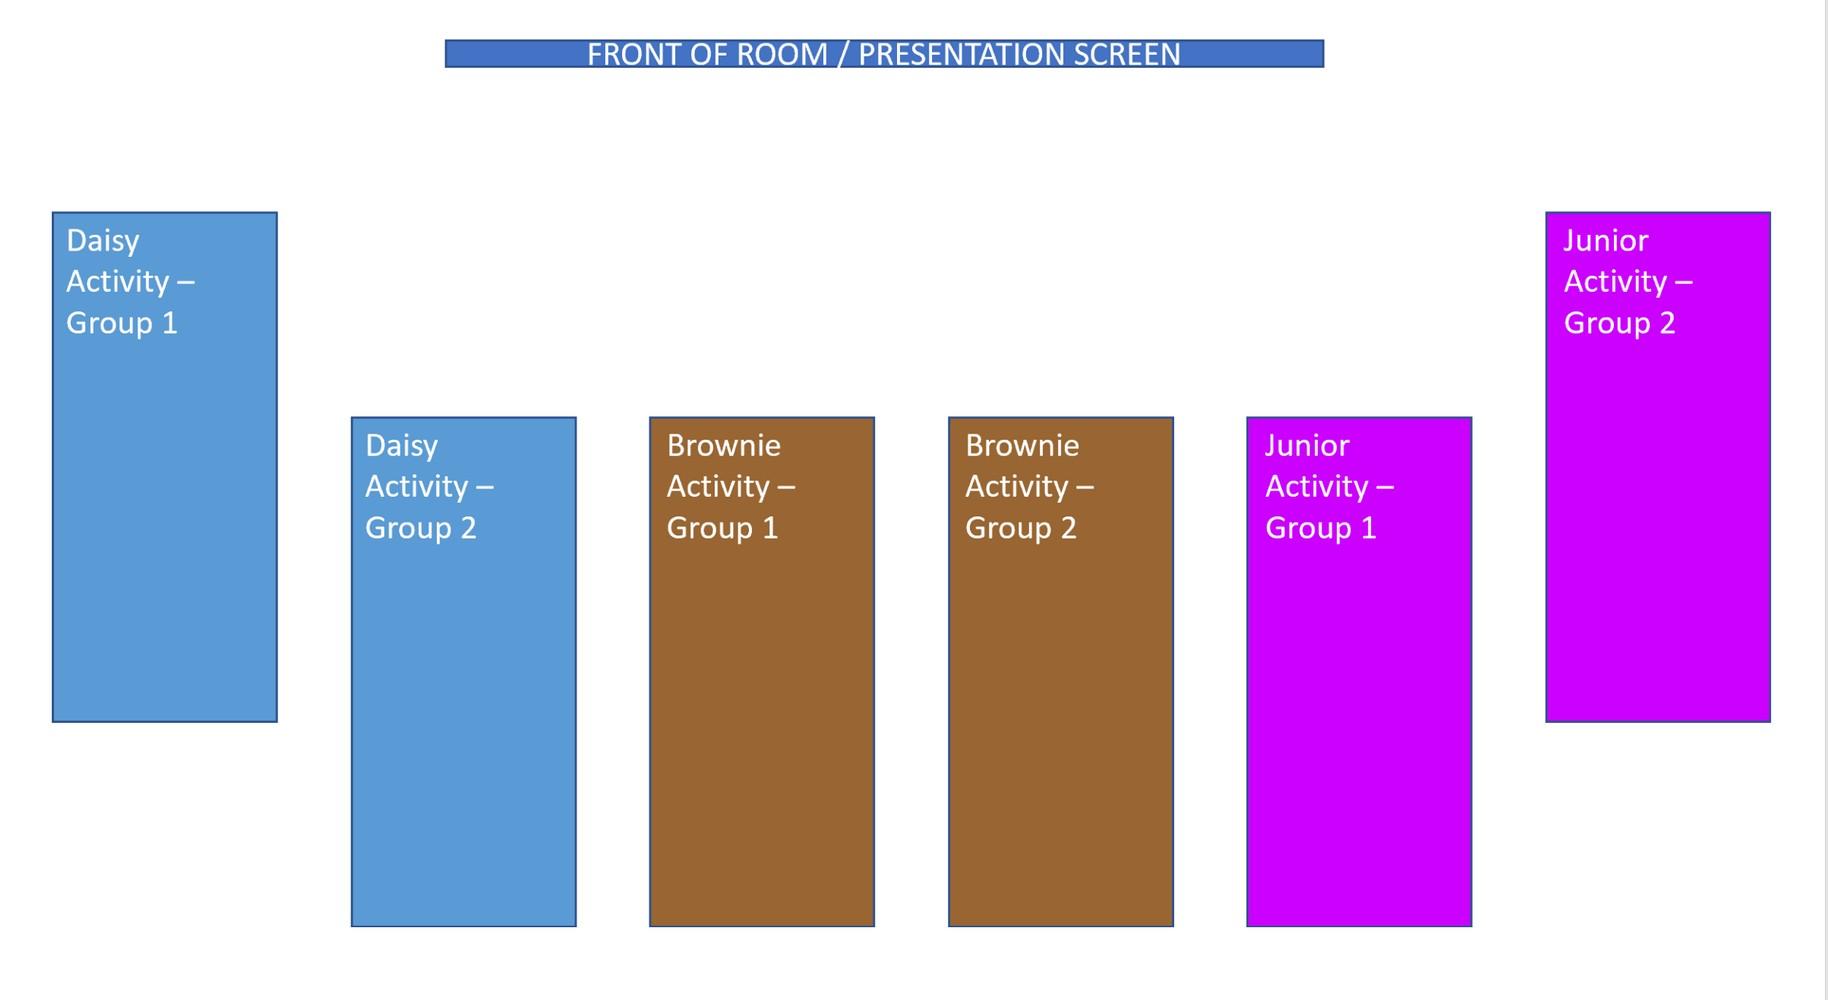
Room Set Up:
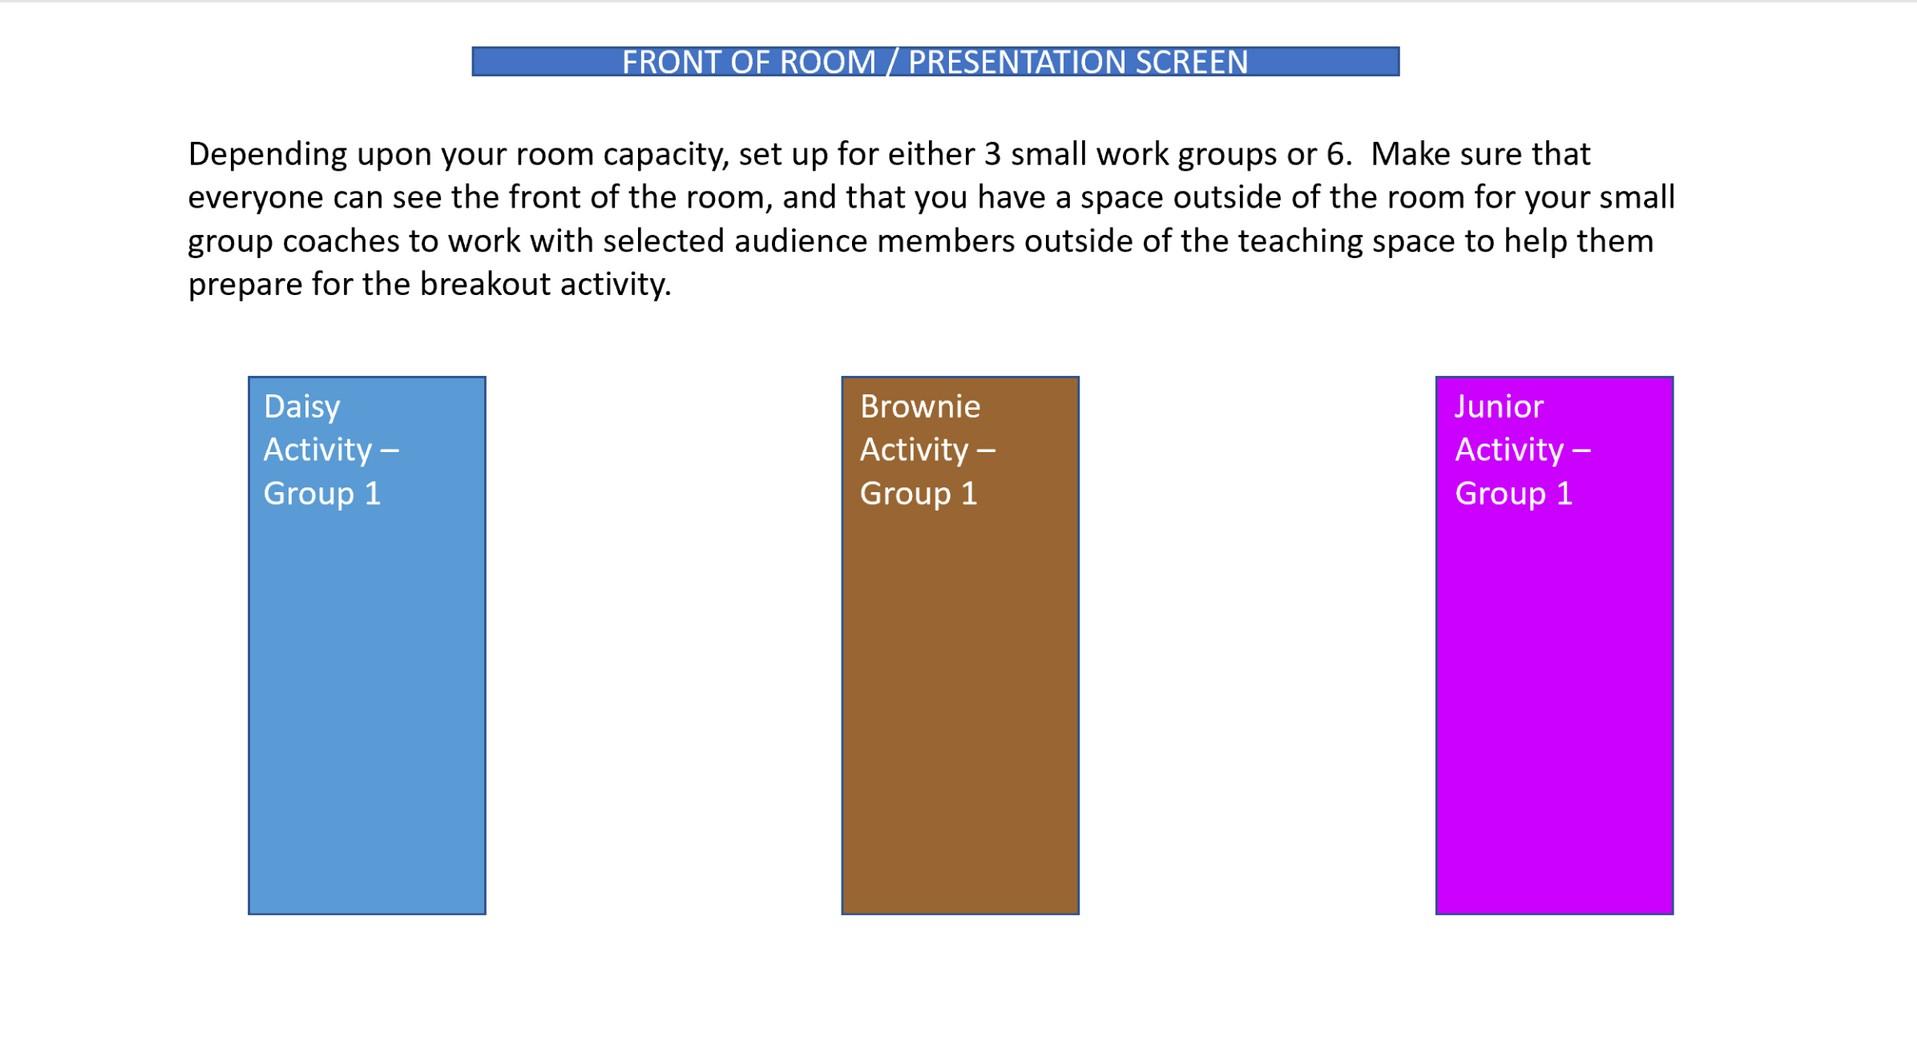
This Jumpstart experiential workshop is designed to allow audience members to get hands on experience using the Jumpstart platform to deliver one step of a badge in a small group setting. You should visit your teaching space in advance to ensure that you have Wi-Fi and screen presentation capability and are able to modify the classroom set up to accommodate your needs. Depending upon the size of the room, you will either set up table / workspace capacity for 3 or 6 small breakout work groups. You will also need another quiet, private space nearby for coaches to work with the breakout group leaders outside of the main room.
OR 7
Jumpstart Session – Run of Show
Preset the Room:
30 students = 3 groups of 10. 60 students = groups of 10.
Place the D / B / J small cards at the seats of the table groups. One of the cards per table should have a yellow star in the lower right corner. This audience will become a small group leader.
The main facilitator should log into Jumpstart on the projection PC, and also pull up your email associated with Jumpstart and Facebook or Linked In to demonstrate receiving and posting a digital badge.
The small group coaches should log into Jumpstart on the iPads or tablets and have their small group supplies for the breakouts boxed up and ready to go.
Open & Connect with Students / 3 min –
Welcome & greet students / introduce the teaching team.
Ask students by show of hands who in the room has used Jumpstart to plan and deliver a badge before so that you can get a read of the room.
Focus / 10 min –
Start with our WHYs –
o We know that the high paying jobs of the future are heavily slanted toward Science, Technology, Engineering, and Math fields, and we know that there is a gender gap in those fields that we would like to fill with grown up Girl Scouts.
o We know that girls lose confidence by the time they reach 4th and 5th grade and are less likely to raise their hands in class or take on tasks or subjects when they feel uncertain of themselves.
o We know that exposure and practice in a safe environment, a place to try, a place to learn from mistakes and try again is the best way to build self confidence in how a girl views herself and her abilities.
o We also know that troop volunteers are busy and feel those same confidence steps themselves.
What is Jumpstart? Why are we creating it?
o Jumpstart is designed to be your guide on the side, a tool that is portable on your tablet or your phone so that you can follow instructions from your device in the meeting if you need to.
o It was created to help troop leaders who feel intimidated by STEM Badges to feel more confident in their abilities by providing a balance between not enough instructions and information and too much.
8
o Jumpstart is a work in progress. It will continue to grow and evolve as we continuously add new content and opportunities to it.
How is it different from badge booklets and VTK meeting plans? A Goldilocks and the 3 Bears comparison:
o Like the bed or the chair that was too soft… the badge booklets are written in 5 steps with 3 options to complete the step. However, detailed instructions for HOW to complete the step are not given. The step may say to create a retractable claw using popsicle sticks and rubber bands, but then you are on your own to search YouTube or Google for instructions for exactly how to do that if you don’t already know how.
o Like the bed or the chair that was too hard… the Volunteer Toolkit meeting plans will give you instructions, but a whole lot more. Every minute of your meeting plan from the opening to the closing is scripted out for you.
o Like the bed or chair that is just right… Jumpstart contains ONLY THE BADGE STEPS, scripted out with instructions for how to facilitate. In the case of the retractable claw made from popsicle sticks and rubber bands… printable instructions are there for you, but also a YouTube video that you can view and show the girls so that they can see and hear what the process and finished product should look like.
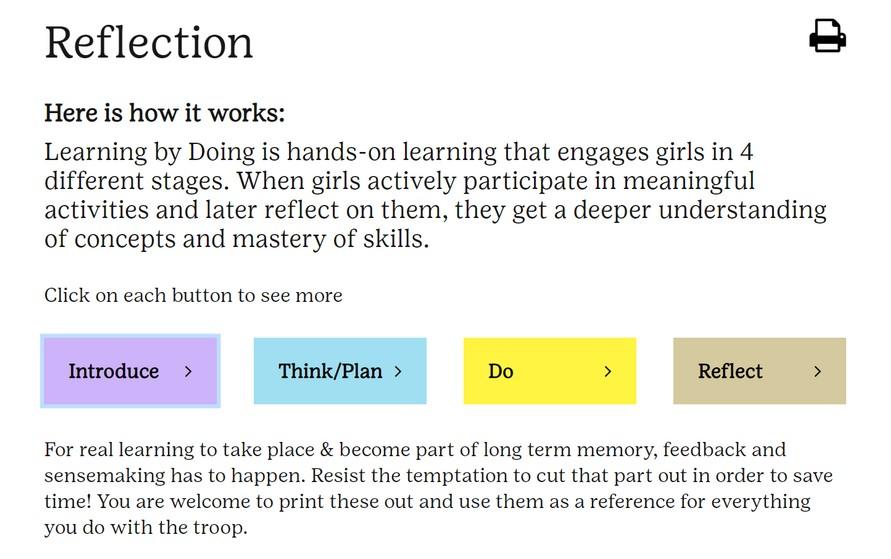
The badge steps are also aligned with the Learning by Doing cycle.
o Our 3 Processes are Girl Led, Learning by Doing, and Collaborative Learning.
o If we want girls to engage in learning by doing, then it makes natural sense to write the instructions in the 4 stages of the learning by doing cycle.
1. Introduce the topic
2. Allow girls to think and plan and make it their own
3. DO the thing
4. Reflect for feedback and sensemaking
Let’s look next at how Jumpstart is set up.
9
DO Activity – 3 Parts
DO Activity Part 1 – Jumpstart Drive Thru on the Big Screen & Ordering a Digital Award / 20 min
Main facilitator should be logged into Jumpstart on the HOME page:
o Scroll the page and point out the pathway to the badges by PGL, the badge completion tracker beneath it (show the scroll on the left and right), and the free patch links at the bottom of the page.
o The free patches shown at the bottom of the page – including the Jumpstart patch - are free to GSNETX members, however, can be done and ordered by members outside of GSNETX for the cost of $1 per patch and postage.
Click on the Brownies PGL Scroll the page to demonstrate the variety of badges available.
Click on the Mechanical Engineering Badge 1- Leap Bot Design Challenge icon and a pop up will appear.
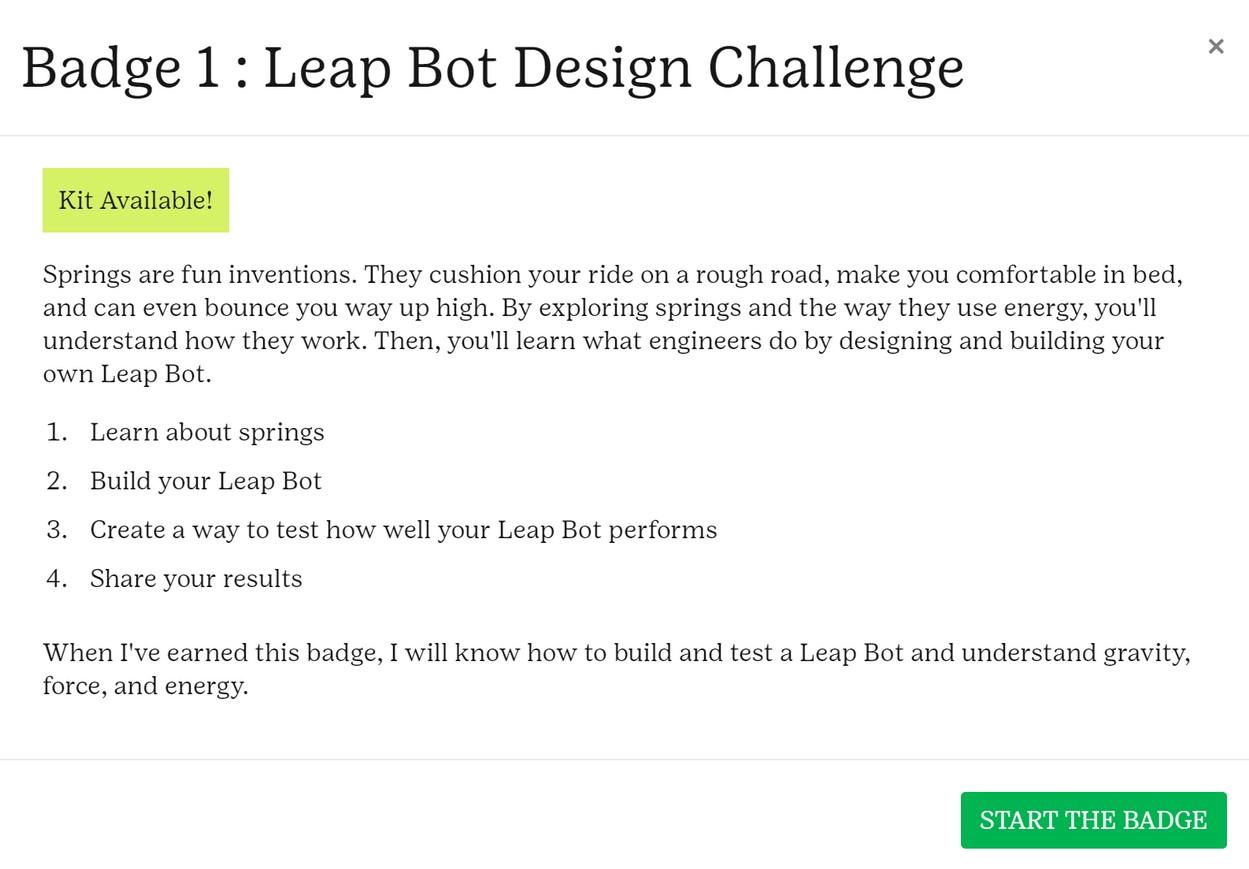
Point out the green “Kit Available!” ICON in the upper left corner and let audience members know that the ability to “Do it Yourself” or to purchase a kit that contains materials or supplies is an option.
Click the “Start the Badge” button.
Scroll the page and show audience members that DIY 3 Mechanical Engineering badges are on the left, and 3 options to purchase badge kits are on the right side of the page. You will demonstrate both.
We are going to start with BADGES WITH KITS TO PURCHASE – click READ MORE
This pathway comes with a higher tech, yet still hands-on experience. The kits are produced by a company called UpBrainery, a digital learning company focused on STEM education. UpBrainery worked with Ericsson and Girl
10
Scouts of Northeast Texas to create kits for these Girl Scout STEM badges. Prices on kits vary, but hover around the $20 mark. It is generally recommended to order one kit for every 4 girls.
Demonstrate putting a kit in your cart and checking out so that you can show that they will be taken to the UpBrainery site and asked to create an account over there to complete the purchase. The kit will come in the mail. The supplies included may be a little higher tech than you would find at home and the activities slightly more in-depth. Actual badges are not included, only materials and instructions.
Go back to the badge landing page and click on the Do-it-Yourself option. Some troops may have the budget to buy prefabricated kits and want the convenience. Others may not or may prefer to Do it Themselves.
Click on the READ MORE button for Mechanical Engineering Badge 1 – Leap Bot The page will change, and the 5-step navigation menu will pop up.
Scroll the page. Demonstrate the materials list and the vocabulary link.
Click on step 1. Scroll the page, stopping to point out the Introduce / Think & Plan / DO / Reflect sections. We have integrated the Learning by Doing cycle into the instructions.
o Introduce prepares the girls brains to begin shift and gain a basic understanding about what they are going to do.
o Think and Plan allows girls to engage their minds more deeply and focus.
o DO is exactly what it sounds like. The instructions for how to facilitate the step are there. The DO step in this example has a “Collaborative Learning” ICON next to it. When girls share their drawings with each other and discuss they are learning from each other. Calling out when a volunteer is using a girl led or collaborative learning process helps that volunteer recognize when they are actually using a GSLE process more easily.
o Reflect closes the learning by doing cycle allowing girls to make connections and sense of what they have done by making meaning from it.
Demonstrate the difference between the “Read Ahead” button and the “Completed Step with Group” button.
o Read Ahead allows you to indulge your curiosity and look at all of the steps of the badge without marking them as done.
o Clicking the “Completed Step with Group” button signifies that you have actually done the step with the group, puts a record of the badge on your completion dashboard on the home page, and enables you to order a digital badge.
o You can facilitate the steps during the meeting from your tablet or phone, however, if you prefer to go with printed copies of the instructions – no problem. Demonstrate the PRINTER icon in the upper right corner. Show that when clicked a .PDF version of the instructions without graphics will appear.
Demonstrate using the “Completed Step with Group” for all 5 steps so that you can get to the REFLECTION step.
o Explain that reflection is the 4th step of the learning by doing cycle. The model has 4 steps, not 3. Allowing girls the space and opportunity to dig into their thoughts and form language to express those
11
thoughts actually is glue that helps make learning sticky. It helps them make sense of what they did and find meaning from it.
o Some leaders are not aware of how the learning by doing cycle is set up, so it never occurs to them to stop and talk about what went well, what didn’t go well, and what they would do differently if they had to do the badge all over. Others may stop and reflect with girls, however, could have a group of chatter boxes, or even yet, a group of girls who rarely say anything, so they keep moving and avoid doing it.
o Whichever way the wind blows, we’ve got you covered. Click through the LBD cycle buttons to show the pop up messages:
o Next, look at the yellow RESOURCES box in the 2nd half of the page. Every potential scenario for what could happen and how to handle it, plus examples of creative ways to do reflection by age and grade level are provided. If you practice and use these resources, you will become a master of the Learning by Doing process.
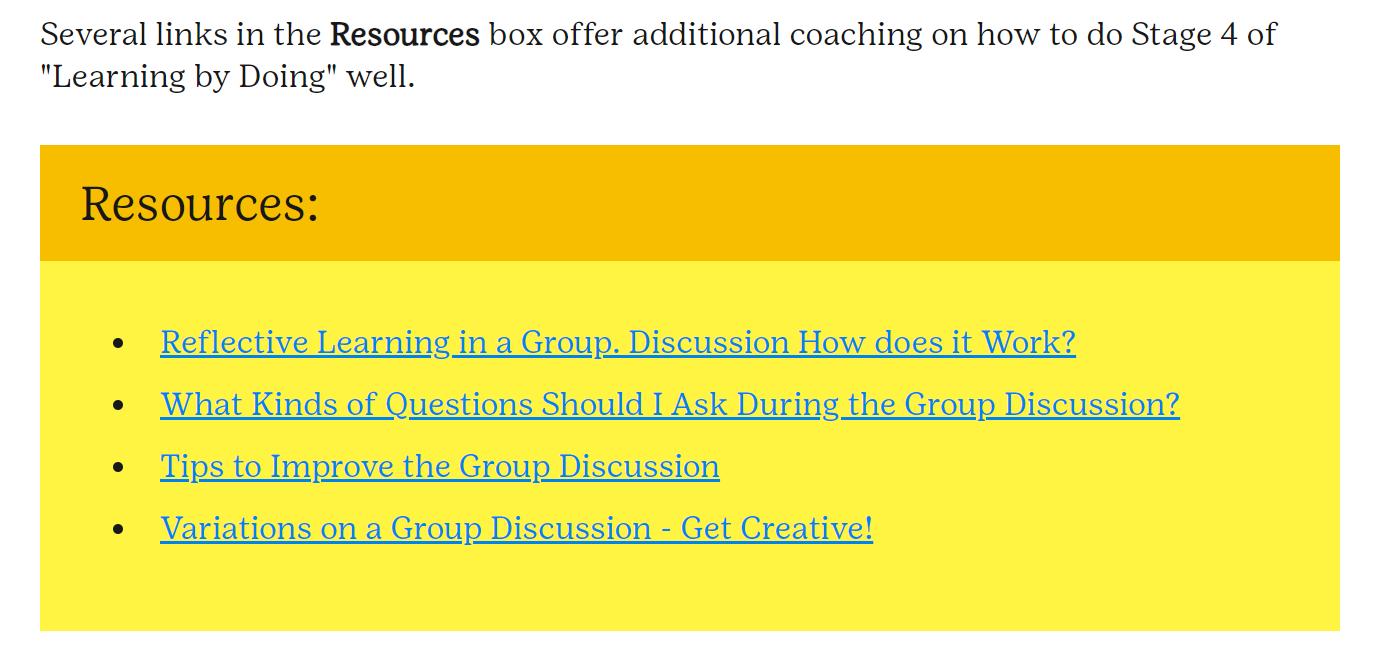
o Open and show all 4 of the Reflection Resoures. What’s in here? Scroll the documents so that audience members can see the value of the job aids, especially “Variations on a Group Discussion – Get Creative!”.
o Click FINISHED at the bottom of the page to get to DIGITAL AWARD next.
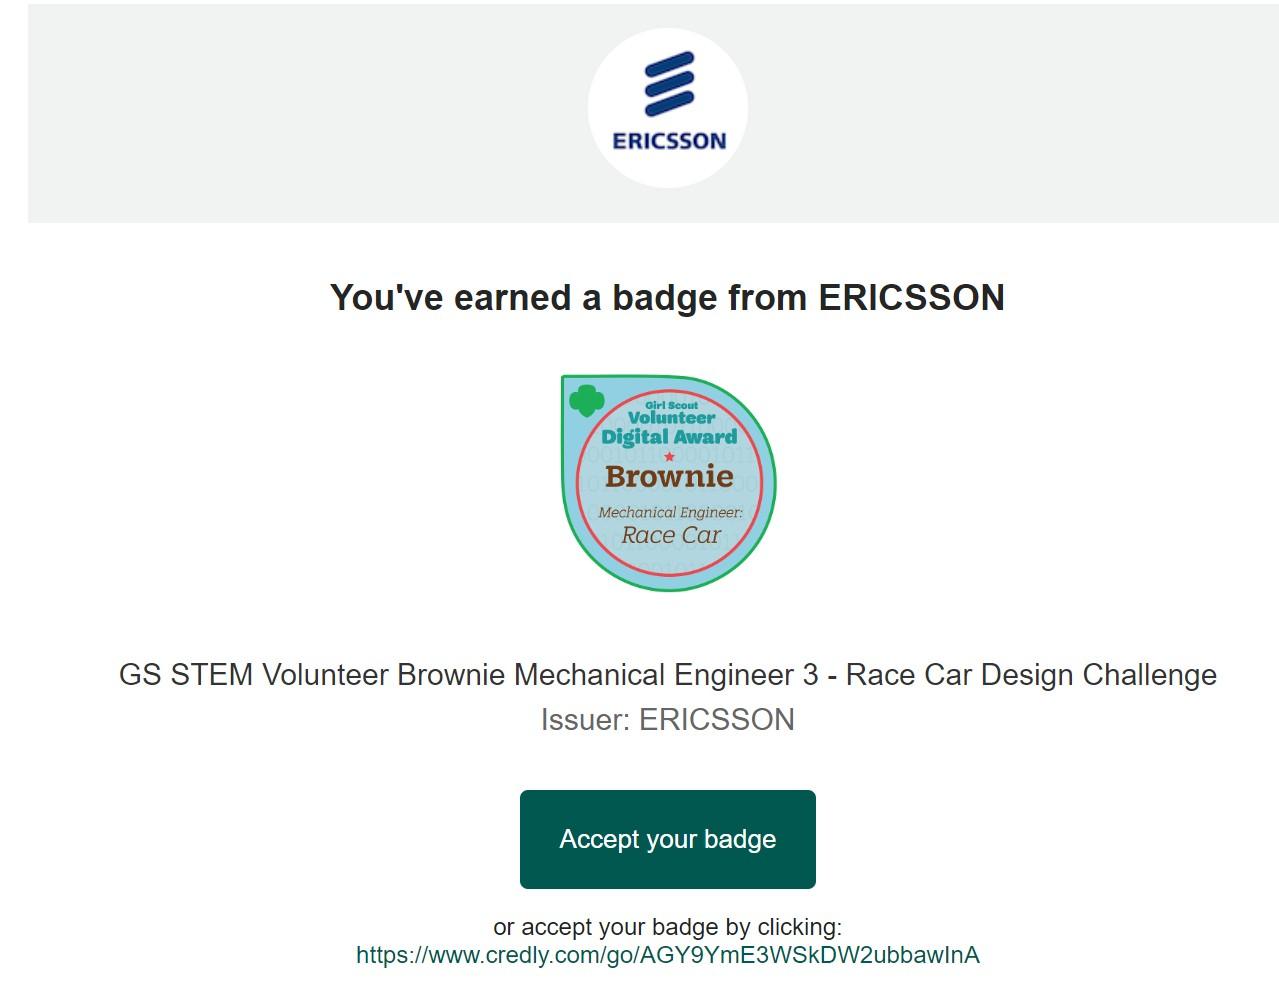
Demonstrate the process of ordering a Digital Award by clicking on the GET AWARDED button.
o Order the badge.
12
o Have your email account associated with the email you used to log into Jumpstart open. Demonstrate receiving the email. It will arrive in approx. 30 seconds and look like this:
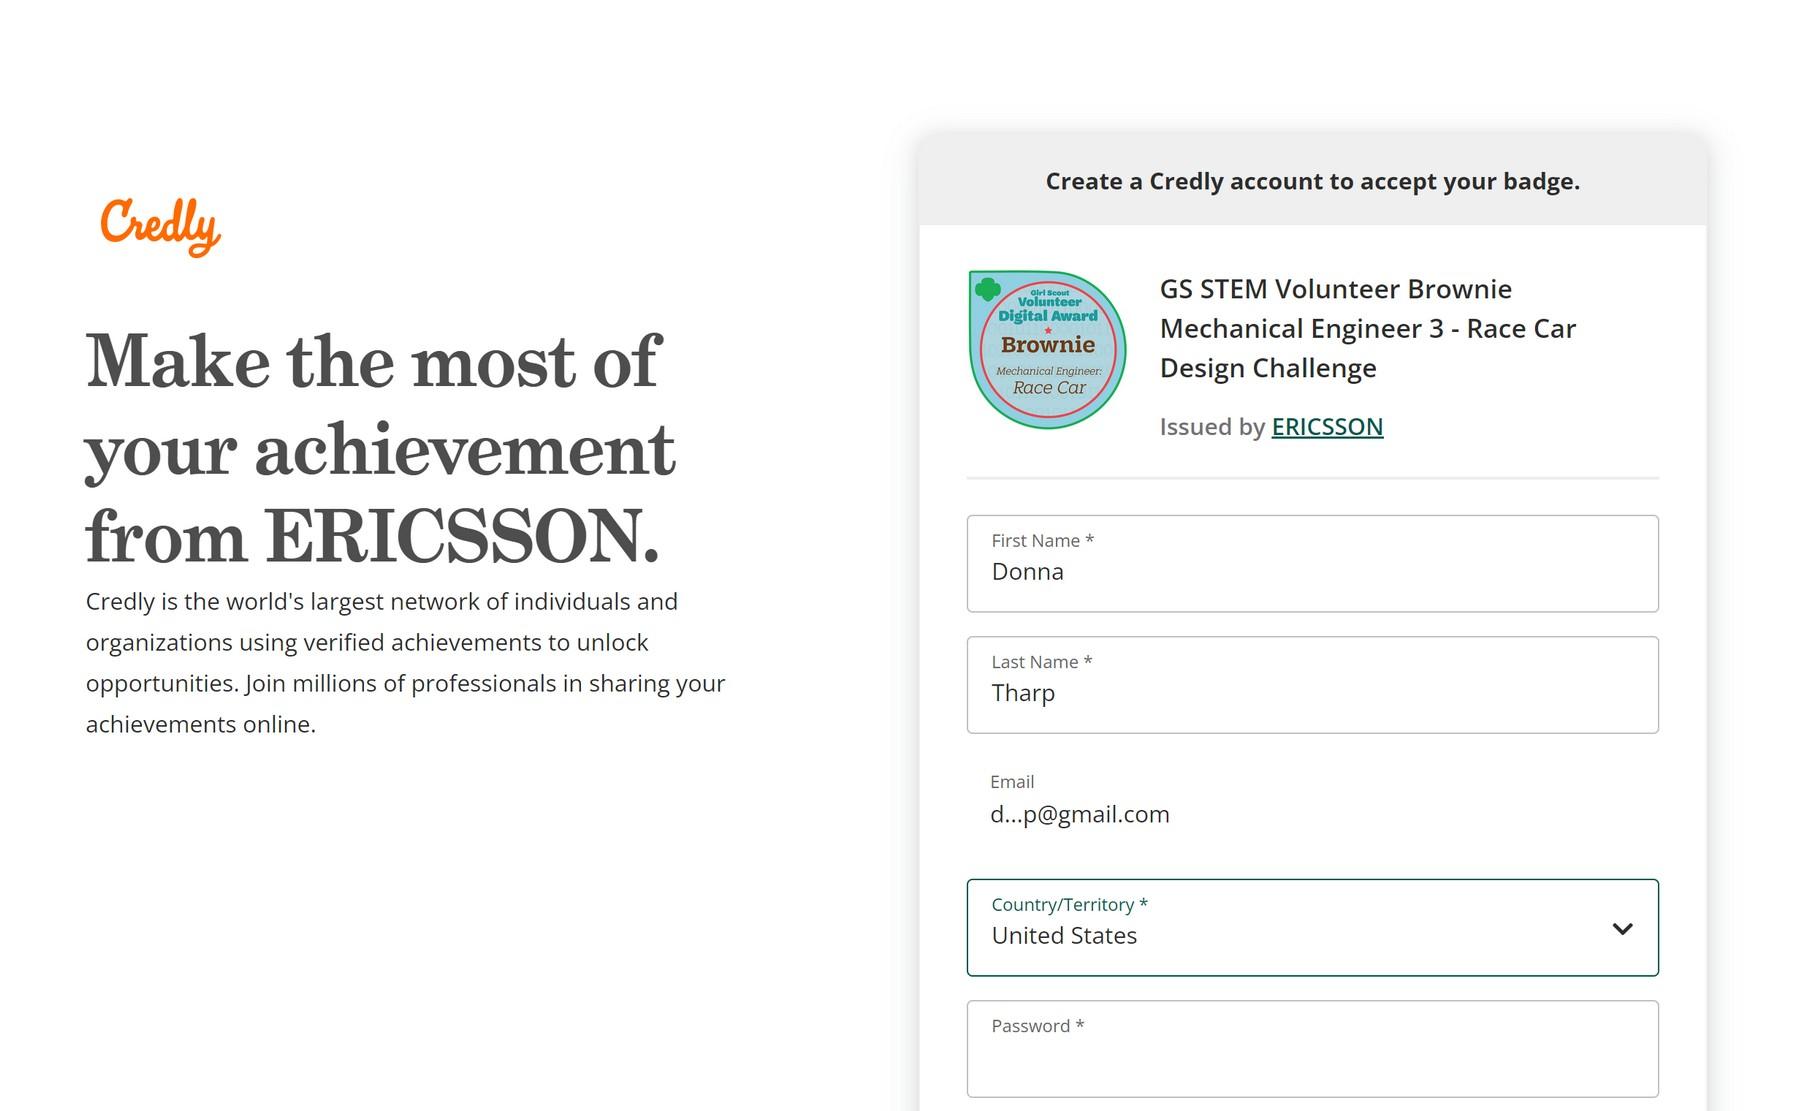
A new window will open that will ask you to create a Credly Account. Go ahead and make one. This will trigger an email to your inbox that asks you to verify your email address. If you already have a Credly account, just sign in.
o
13
Once that is done you will see this:
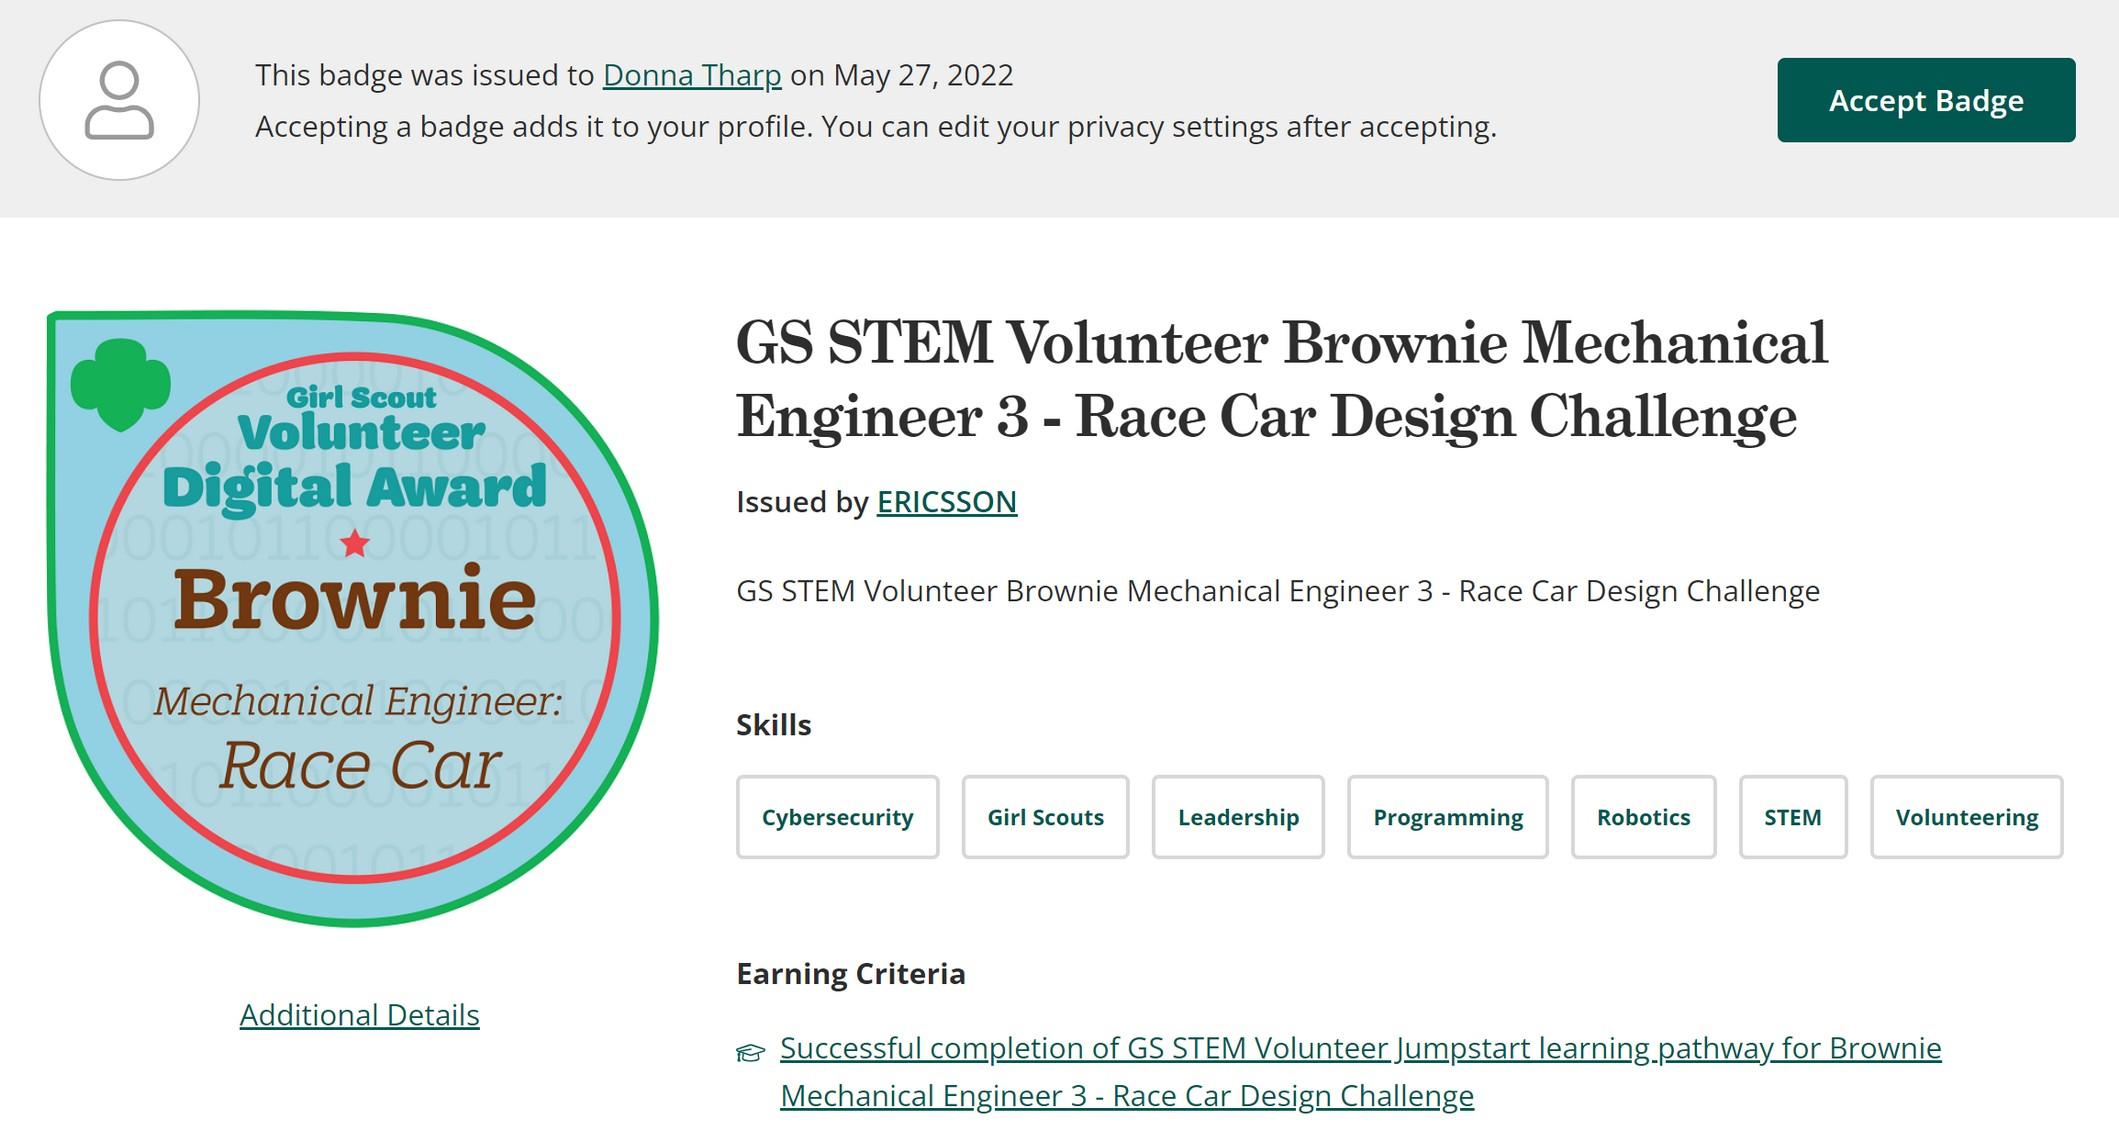
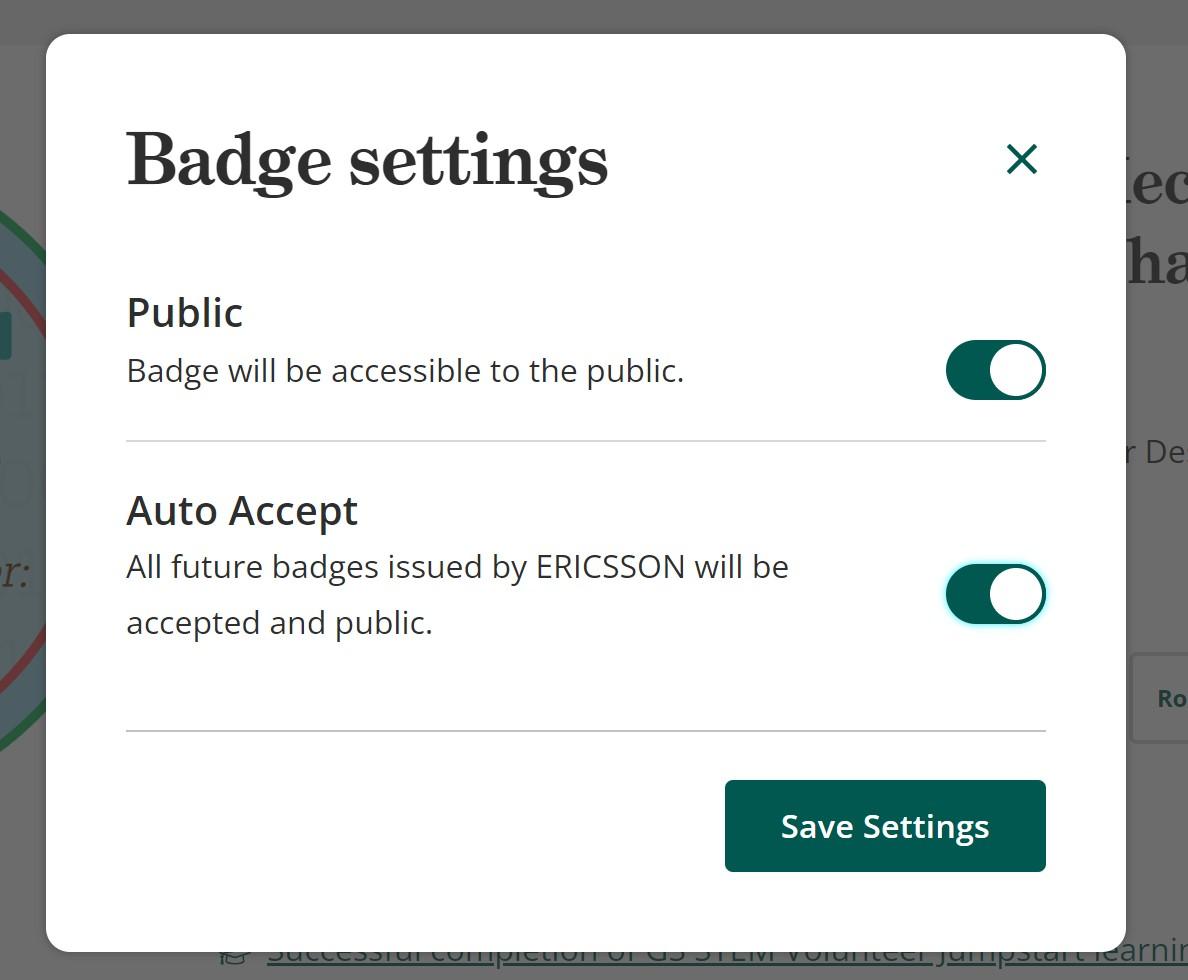
Click the Accept Badge button. You will get a pop up that looks like this. Accepting the settings will allow you to share your digital badge on social platforms.
14
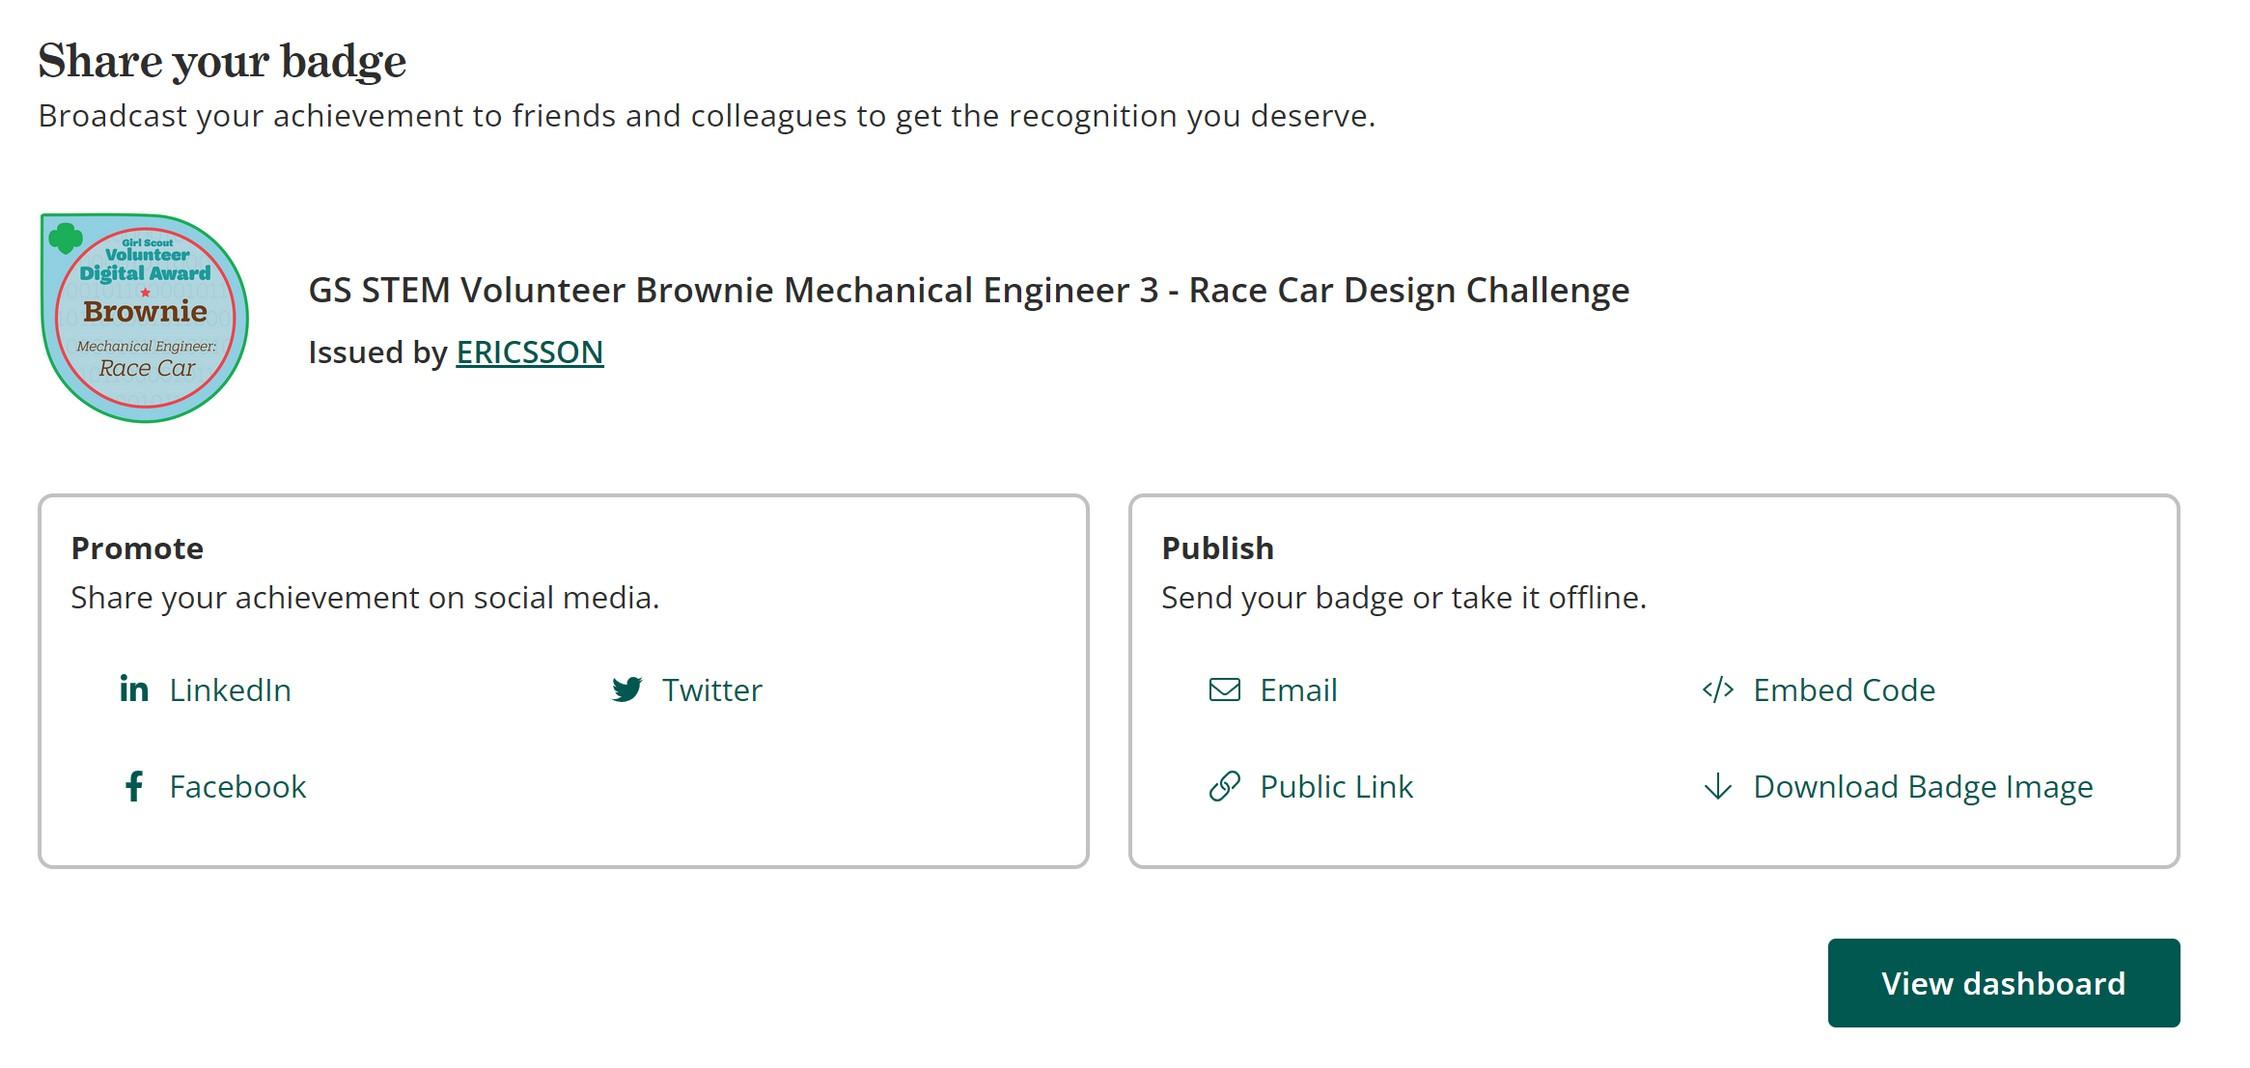
The next step will ask you where you want to share your achievement. Open your LinkedIn, Twitter, or Facebook profile and demonstrate sharing your newly earned badge. It can be emailed or downloaded, too.
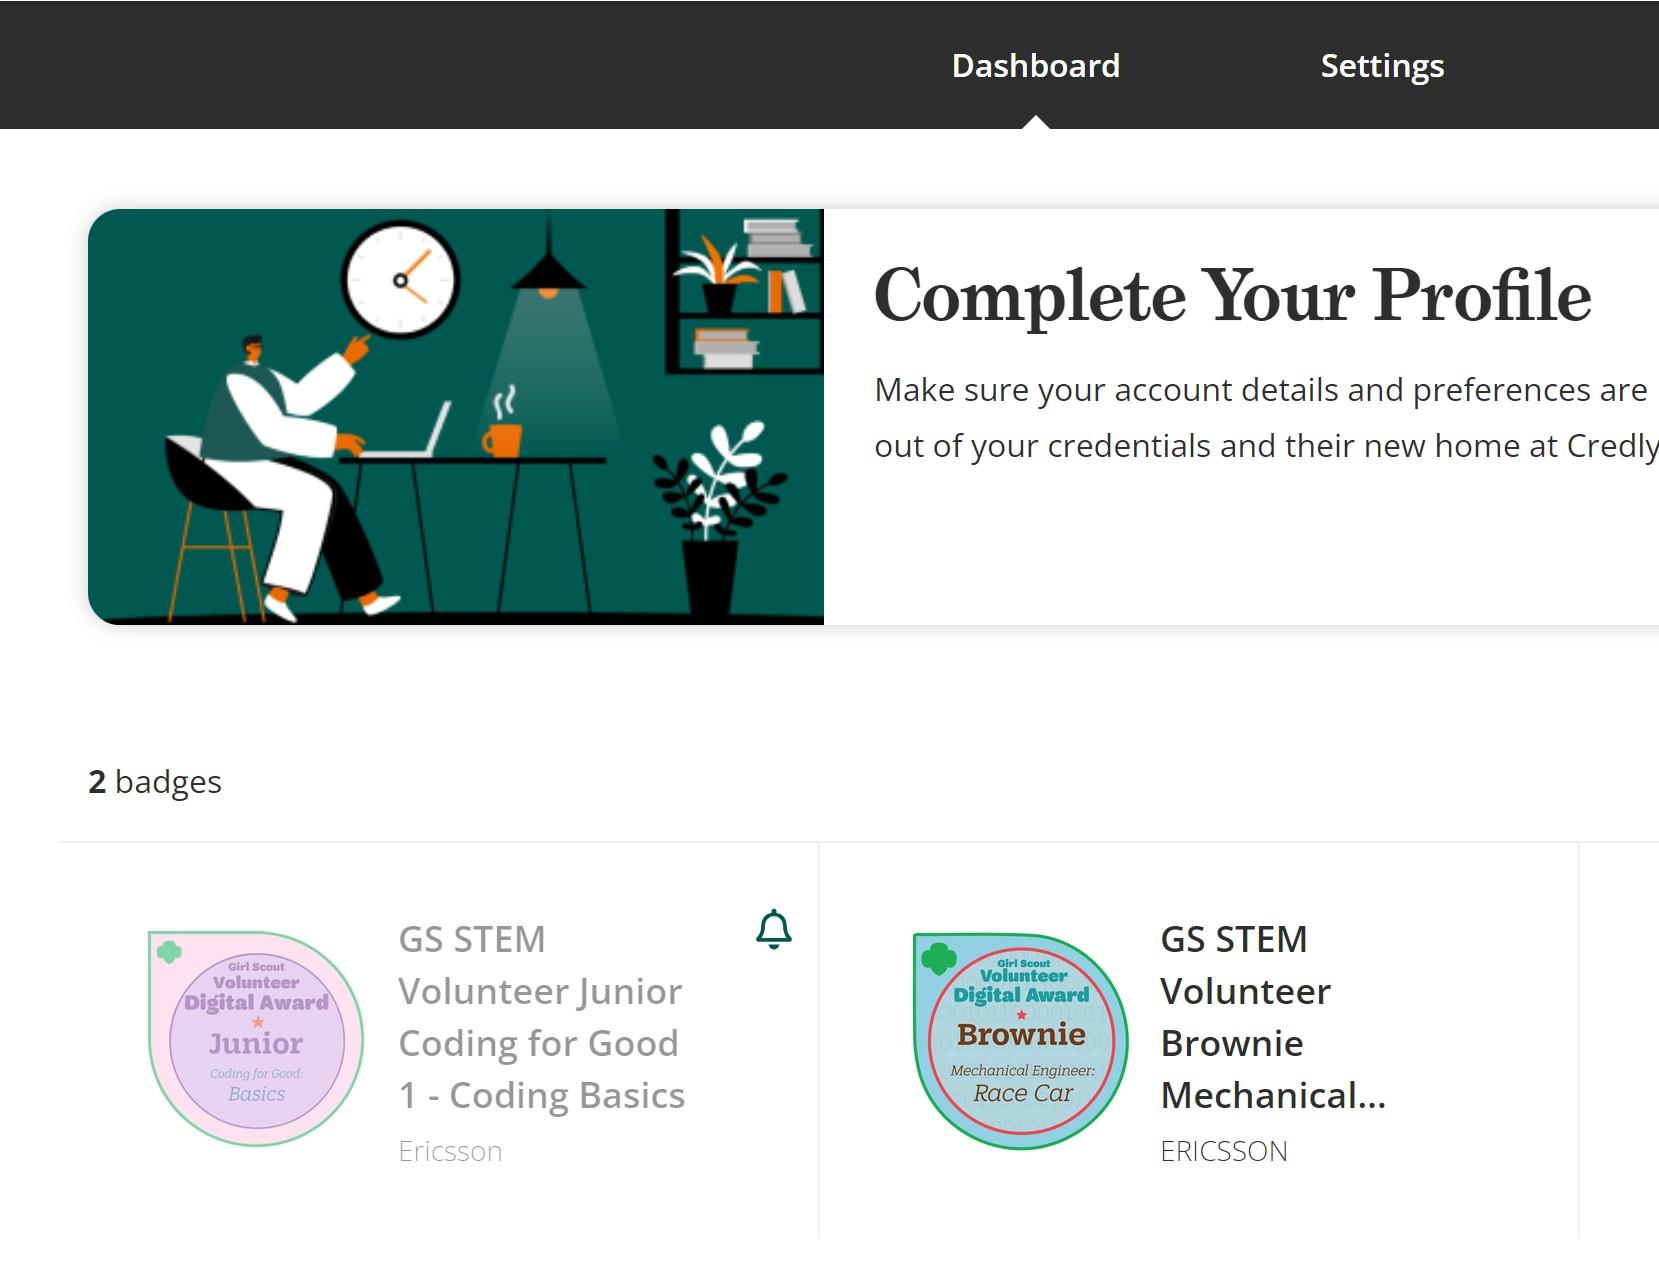
Click the VIEW DASHBOARD button to demonstrate that a collection of badges has begun that they can access any time. 15
Transition Time for Breakout Groups / 4 min
SAY:
So that’s it for the Jumpstart drive through. It’s time to test it out for yourselves. And the best way to do that is with a real-life role play.
On your table you have slips of paper that designated your troop PGL for an upcoming role play. One of those slips of papers has a gold star on it. The person with a star on their paper is going to play the role of troop leader, and the rest of you at the table will fulfill the role of troop. Your troop leader is going to facilitate you through one step of a badge using Jumpstart on a tablet to guide you.
If your slip of paper has a gold star on it, please come to the front of the room. You are going to demonstrate how easy this can be, with a short amount of preparation time. You will have a Coach who will take you out of the room and help you prepare.
NOTE: If someone absolutely does not want the challenge of being in front of the room or leading the group, allow them to switch roles with another at the table. Someone will come up.
Introduce your new troop leaders to their assigned PGL coach and send them out from the room.
DO Activity Part 2 - Debrief the audience while the new Troop Leaders go with the PGL Coaches to receive their technology devices and instructions / 12 min
ASK: While they are out preparing to lead a badge step for the next 10 minutes…. I’m curious…
What do you like about what you have seen?
What uses can you think of for Jumpstart? How could you use it?
Could you have troop parents use it to prepare to lead a badge? What about older Girl Scouts? Parents of Individually Registered Girls?
Walk Audience Members through setting up an account on their own smart phones
Ask audience members to pull out their phone and type stem4girls.online into a browser and create an account. Write this on a whiteboard or chart paper so that it is large and visible.
Let them know that Jumpstart will send an email to their inbox that they must open and click a link to verify their email address.
If the verification email does not come to their inbox within 30 seconds, ask them to check their spam folder.
Once they have created their account, the next step is to log in and fill out their profile.
16
Give them the remainder of the time until the PGL Troop Leaders come back into the room to explore what Jumpstart looks like on a phone device and practice navigating and looking at badges they are interested in.
DO Activity Part 3 – Badge Step Activities in Small Groups / 20 min
Welcome the Troop Leader role play leaders and their coaches back to the room and send them off to facilitate their badge with their table group.
Daisy Group 1 – Space Science Explorer Step 2
Daisy Group 2 - Space Science Explorer Step 3
Brownie Group 1 – Brownie Cybersecurity Basics Badge 1 – Step 2
Brownie Group 2 – Brownie Cybersecurity Basics Badge 1 – Step 3
Junior Group 1 – Robotics Badge 1 – Programming - Step 3
Junior Group 2 – Junior Automotive Engineering Badge 2 - Step 1
Coaches should stay near and observe and support their PGL groups. Allow the groups to work for 20 minutes giving them ten-, five-, and one-minute warnings.
Closing - Reflection & Wrap Up / 8 min
Once 20 minutes have passed and you have wound down the activity at the tables, ask the group “How was that? Were you able to understand and follow along with the instructions from your troop leader?” Did you have any challenges doing the step of the badge?
Remind the group that the troop leader was not expecting to be a troop leader and only had 10 minutes to prepare. Imagine what they could do if they had 20 minutes!
Let the group know that you want to hear from the audience members who played the role of troop leader. Thank them for going into the pressure cooker up front, and bringing their Girl Scout spirit and leadership to the class. It is appreciated.
To the “troop leaders”:
Ask them to describe their experiences – preparing and facilitating. How do they feel about how it went? How did they experience Jumpstart as a tool?
Gift them with their participation prizes.
To the group audience:
17
SAY: Thinking back on all that you have seen and heard…. How likely are you to use Jumpstart as a tool to help deliver STEM experiences to the girls in your troop? We are going to vote with hand signals. They are:
18
(Demonstrate voting signals)
o A fully closed fist means: It’s not for me; I would not use it.
ASK: Is it because you do not have a troop, or because you would not choose to lead a STEM badge, or something else that leads you to vote this way? We’d love to learn about any barriers.
o A hand, palm down, held in front of you means: Maybe; I’m in the middle somewhere. I’d look at Jumpstart if badge booklet and the VTK plans didn’t work out.
ASK: what would make the Jumpstart platform better or more appealing to you?
o A thumbs up gesture means: I like this a lot and am very likely to use Jumpstart to deliver STEM badge experiences for my troop.
ASK: what do you like most about the Jumpstart platform?
Thank everyone for coming and participating in the experience.
19
Additional Instructions for Breakout Group Coaches:
Daisy Group 1 – Space Science Explorer Step 2
Daisy Group 2 - Space Science Explorer Step 3
Brownie Group 1 – Brownie Cybersecurity Basics Badge 1 – Step 2
Brownie Group 2 – Brownie Cybersecurity Basics Badge 1 – Step 3
Junior Group 1 – Robotics Badge 1 – Programming - Step 3
Junior Group 2 – Junior Automotive Engineering Badge 2 - Step 1
Your responsibilities include:
Creating an account in Jumpstart so that you are familiar with the platform and how to navigate through badge steps on the platform.
Studying the assigned badge steps so that you are confident when explaining what to do and answering questions from your assigned role-playing troop leader(s). Print a paper copy of the badge step and keep it with you.
Gather the supplies, making sure that you have everything you need for your badges. Be ready to explain the supplies and answer questions. Practice with them in advance.
Pull up the badges assigned to you on the tablet used in the workshop in advance. Become familiar with how to return to the badge step in case your charge accidentally loses their place and panics. Make sure that the tablet does not have a screen lock.
During the preparation period sit with your charge(s) away from the other coaches so that your conversations don’t bleed over to others and become distracting.
Let your charge know what steps you are going to take to prepare them, and how you will approach it. Some people panic under pressure so reassure them that they can do it and you will be there to coach.
When you get to the preparation room and sit down – each coach should start their timer at 10 minutes and count down. Keep track of the time and attempt to allocate as follows:
o Give badge assignment and tablet to your PGL leader(s). Tell them that the badge step is already pulled up in Jumpstart on the tablet and all the supplies they need are right here for them.
o Give them the first five minutes to read and study the badge step for understanding They can touch and explore the supplies, too, if they want to.
o During the second 5-minutes you will invite them to ask you questions for where they need clarity so that you can talk through what to do when they get in the room.
o Tell them that if they have trouble with the tablet that you have a printed copy of the step which they can use and that you will assist and coach them in the moment if they get stuck and invite you.
o When time is up, gather your supplies and return to the main room.
Circulate between your groups, listening, and observing. Give kudos and praise where it is due. Offer to step in and coach the group back on track, if asked.
Keep track of timing. Allow the groups to work for 20 minutes giving them ten-, five-, and one-minute warnings.
20
