1970 Dodge Charger & Coronet Service Repair Manual – DOWNLOAD

Page 1

2

INTRODUCTION AND GENERAL INFORMATION

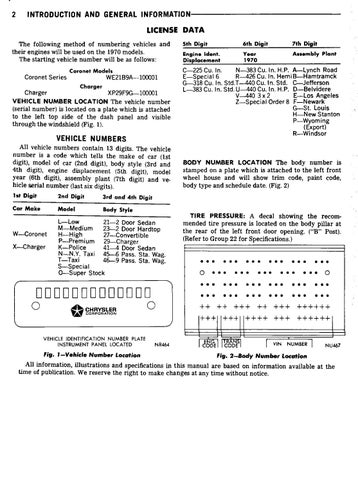
LICENSE DATA The following method of numbering vehicles and their engines will be used on the 1970 models. The starting vehicle number will be as follows: Coronet Models

Coronet Series

WE21B9A-100001 Charger

Charger

XP29F9G-100001 The vehicle number (serial number) is located on a plate which is attached to the left top side of the dash panel and visible through the windshield (Fig. 1). VEHICLE NUMBER LOCATION

VEHICLE NUMBERS All vehicle numbers contain 13 digits. The vehicle number is a code which tells the make of car (1st digit), model of car (2nd digit), body style (3rd and 4th digit), engine displacement (5th digit), model year (6th digit), assembly plant (7th digit) and vehicle serial number (last six digits). 1st Digit 2nd Digit 3rd and 4th Digit Car Make

Model

5th Digit

6th Digit

7th Digit

Engine !dent. Displacement

Year 1970

Assembly Plant

N-383 Cu. In. H.P. A—Lynch Road C-225 Cu. In. R-426 Cu. In. Hem i B—Hamtramck E—Special 6 G-318 Cu. In. Std.T-440 Cu. In. Std. 0—Jefferson L-383 Cu. In. Std. U-440 Cu. In. H.P. D—Belvidere E—Los Angeles V-440 3 x 2 Z—Special Order 8 F—Newark G—St. Louis H—New Stanton P—Wyoming (Export) R—Windsor

BODY NUMBER LOCATION The body number is stamped on a plate which is attached to the left front wheel house and will show trim code, paint code, body type and schedule date. (Fig. 2)

Body Style

L—Low 21-2 Door Sedan M—Medium 23-2 Door Hardtop W—Coronet H—High 27—Convertible P—Premium 29—Charger X—Charger K—Police 41-4 Door Sedan N—N.Y. Taxi 45-6 Pass. Sta. Wag. 1—Taxi 46-9 Pass. Sta. Wag. S—Special 0—Super Stock

DODOE0000000111 a CHRYSLER

VEHICLE IDENTIFICATION NUMBER PLATE INSTRUMENT PANEL LOCATED Fig. 1 —Vehicle Number Location

0

NR464

TIRE PRESSURE: A decal showing the recommended tire pressure is located on the body pillar at the rear of the left front door opening. ("B" Post). (Refer to Group 22 for Specifications.)

• • •• 0 ••• ••• ••• ••• ••• 0 ••• ••• • • • • •• ••• • •• • • • • •• • • • ••• ••• • •• •

• •

• • •

• • •

• • •

• •

++ ++ +++ ++ +++ ++++++ +++ +++ ++++ +++ ++++++ ENG I ITRANSI CODE CODE

VIN NUMBER

NU467

Fig. 2—Body Number Location

All information, illustrations and specifications in this manual are based on information available at the time of publication. We reserve the right to make changes at any time without notice.

INTRODUCTION AND GENERAL INFORMATION CAPACITY CONVERSION TABLE Imperial

U.S.

U.S.

Imperial

U.S.

Imperial

7 71/4 7 1/2 73/4

53/4 6 6 1/4 61/2

15 151/2 16 161/2 16 3/4

121/2 13 13 1/4 133/4 14

63/4 63/4 7 71/4 71/2 73/4 8 8

17 171/2 18 181/2 19 191/2 20 201/2

141/4 141/2 15 151/2 153/4 161/4 163/4 17

21 21 1(2 22 22 1/2 23 23 1/2 24 241/2 25 25 1/2 26 26 1/2 27 271/2 28 29 30

171/2 18 181/4 18 3/4 191/4 19 1/2 20 201/2 203/4 211/4 213/4 22 221/2 23 231/4 241/4 25

1/4 1/2 3/4

1/4 3/8 5/8

1 11/4 11/2 13/4

3/4 1 11/4 11/2

2 21/4 21/2 23/4

13/4 13/4 2 21/4

8 81/4 81/2 83/4 9 91/4 91/2 93/4

3 31/4 3-1/2 33/4

21/2 23/4 3 3

10 101/4 10 1/2 103/4

81/4 81/2 8 314 9

4 4 1/4 41/2 43/4 5 5 1/4 51/2 5 3/4

31/4 3 1/2 33(4 4 41/4 4 1/4 41/2 4 3/4

11 111/4 111(2 113/4 12 12 1/4 121/2 12 3/4

91/4 9 1/4 91(2 93/4 10 10 1/4 101/2 10 1/2

6 61/4 61/2 63/4

5 51/4 51/2 51/2

13 131/2 14 141/2

103/4 111/4 113/4 12

CAPACITY CONVERSION-U.S. GALLONS TO LITERS Gallons 0

10 20 30

40

4

0

1

2

Liters

Liters

Liters

Liters

Liters

Liters

00.0000 37.8533 75.7066 113.5600 151.4133

3.7853 41.6387 79.4920 117.3453 155.1986

7.5707 45.4240 83.2773 121.1306 158.9840

11.3560 49.2093 87.0626 124.9160 162.7693

15.1413 52.9947 90.8480 128.7013 166.5546

18.9267 56.7800 94.6333 132.4866 170.3400

3

5

3


GROUP 0

LUBRICATION AND MAINTENANCE CONTENTS Page

Page

ALTERNATOR BATTERY BODY MAINTENANCE BRAKES CAPACITIES CARBURETOR AIR CLEANERS CARBURETOR CHOKE SHAFT CERTIFIED CAR CARE CHASSIS LUBRICATION CLASSIFICATION OF LUBRICANTS CLUTCH LINKAGE COOLING SYSTEM CRANKCASE VENTILATION SYSTEM DISTRIBUTORS ENGINE OIL FILTERS ENGINE OIL—SELECTION OF ENGINE PERFORMANCE DIAGNOSIS FREQUENCY OF OIL CHANGES FRONT WHEEL BEARINGS FUEL FILTERS HEADLIGHTS HOISTING HOOD LOCK, RELEASE MECHANISM AND SAFETY CATCH

9 9 23 7 4 15 17 1 2 1 8 9 12 9 11 10 15 10 21 17 9 2

HYDRAULIC BRAKE SYSTEM 7 LUBRICATION AND MAINTENANCE 3 SCHEDULE 3 Normal Service Trailer Towing and Severe Service 4 LUBRICATION AND MAINTENANCE GUIDE (Coronet and Charger) 2 MANIFOLD HEAT CONTROL VALVES .. 15 MATERIALS ADDED TO ENGINE OILS 10 PARKING BRAKE MECHANISM 8 PARTS REQUIRING NO LUBRICATION 25 PROPELLER SHAFT AND UNIVERSAL JOINTS 18 REAR AXLE 6 SPEEDOMETER CABLE 22 STEERING GEAR 18 SUMMARY OF LUBRICATION AND MAINTENANCE SERVICES 1 THROTTLE LINKAGES 25 TIRES 22 TRANSMISSION (Automatic) 20 TRANSMISSION (Manual) 19 WINDSHIELD WIPER BLADES 10

22

CERTIFIED CAR CARE Certified Car Care is a thorough servicing program that helps make sure the cars you sell receive the regular attention you know they need. Certified Car Care helps build business for you in the best way known—through customer satisfaction. Inform your customers that the best approach to trouble-free driving is Certified Car Care. This is a practical plan to help you build up sales and service volume, by providing regular service customer visits.

SUMMARY OF LUBRICATION AND MAINTENANCE SERVICES Maintenance and lubrication service recommendations for Chrysler Corporation-built Dodge cars have been compiled to provide maximum protection for the car owner's investment against all reasonable types of driving conditions. Since these conditions vary with the individual car owner's driving habits, the area in which the car is operated and the type of service to which the car is subjected, it is necessary to prescribe lubrication and

maintanance service on a time frequency as well as mileage interval basis. Information pertaining to Lubrication and Maintenance requirements is shown on the guide (Fig. 1) and on the Schedule. Vehicles operated under conditions not classified as normal service for passenger cars, such as in trailer towing service, operation at higher than normal loading, or police or taxicab operation, require servicing at more frequent intervals. This information is included in each group under the heading "Trailer Towing, Package and Severe Service".

CLASSIFICATION OF LUBRICANTS Oils, lubricants and greases are classified and graded according to standards recommended by the Society of Automotive Engineers (SAE), the American Petroleum Institute (API) and the National Lubricating Grease Institute (NLGI). Engine Oil The SAE grade number indicates the viscosity of engine oils, for example, SAE 30, which is a single grade oil. Engine oils are also identified by a dual


0-2 LUBRICATION AND MAINTENANCE LUBRICATION AND MAINTENANCE GUIDE CORONET AND CHARGER

A

STEERING LINKAGE PIVOTS AND SUSPENSION BALL JOINTS

MI LIFT POINTS •

COOLING SYSTEM DRAINS

(1) CRANKCASE DIPSTICK (OTHER VS. OPPOSITE SIDE) (2) FUEL FILTER (3) OIL FILL CAP (4) CARBURETOR CHOKE SHAFT

(5) (6) (7) (8)

MANIFOLD HEAT VALVE CRANKCASE INLET AIR CLEANER PCV VALVE OIL FILTER (OTHER VB, LEFT FRONT)

PY608

Fig. 1 —Lubrication and Maintenance Guide

number, for example, SAE 10W-30, which indicates a multigrade oil. The API classification system defines oil performance in terms of engine usage. Only engine oils designated "For Service MS" should be used. These oils contain sufficient chemical additives to provide maximum engine protection. Both the SAE grade and the API designation must be found on the container.

Conventional hydraulic hoists may be used after determining that the adapter plates will make firm contact with the lower control arms and the rear axle housing. Floor Jack A regular floor jack may be used under the rear axle housing, or under the front suspension lower control arms, however, a floor jack must never be

Gear Lubricants The SAE grade number also indicates the viscosity of Multi-Purpose Gear Lubricants, defined by MIL-L2105B. An example is SAE 75, which is a light viscosity lubricant.

used on any parts of the underbody. CAUTION: Do not attempt to raise one entire side of the vehicle by placing a jack midway between the front and rear wheels. This practice may result in permanent damage to the body.

Lubricants —Greases Semi-solid lubricants, such as specified for suspension ball joints, bear the NLGI designation. They are further classified as grade "0" or "2."

Bumper Jack The bumpers are designed to accept a bumper jack in an emergency, if it becomes necessary to change a tire on the road. Notches are provided in the bumpers for the purpose of raising the vehicle with the bumper jack.

HOISTING Post Type Special care should be taken when raising the vehicle on a frame contact type hoist. The hoist must be equipped with the proper adapters in order that the vehicle will be supported in the correct locations (Fig. 2).

CHASSIS LUBRICATION Front Suspension Ball Joints The front suspension ball joints (Fig. 3) are semipermanently lubricated with a special lubricant at the factory.


,

LUBRICATION AND MAINTENANCE

0-3

LUBRICATION AND MAINTENANCE SCHEDULE SERVICE INTERVAL

ITEM

PAGE Replace Check Inspect Lubricate Service Fluid and/or Level Clean

Every Two Months

Battery Cooling System

3 Months or 4,000 Miles, whichever occurs first Every Engine Oil Change

Engine Crankcase Oil

10

Manifold Heat Control Valve

15

Power Steering Fluid Carburetor Air Filter—Paper Every Second Oil Change Engine Oil Filter Tire Rotation Carburetor Air Filter—Oil Bath Carburetor Air Filter—Paper Crankcase Ventilation System Carburetor Choke Shaft Crankcase Inlet Air Cleaner Transmission Every 6 Months Rear Axle Gear (Manual) Steering Linkage Suspension Ball Joints Universal Joints Brake Master Cylinder Brake Hoses Headlight Aiming Hood Latch and Safety Catch Every 12 Months Cooling System Crankcase Ventilator Valve Carburetor Air Filter—Oil Bath Carburetor Air Filter—Paper** Throttle Linkage Every 12 Months or Engine Performance Evaluation 12,000 Miles, whichBrakes* ever occurs first Front Wheel Bearing Lubricant Every 24 Months or Carburetor Air Filter 24,000 Miles, whichFuel Filter ever occurs first Brake Pedal Linkage Bushings Every 36 Months or Front Suspension Ball Joints 36,000 Miles, whichSteering Tie Rod Ends ever occurs first Clutch Torque Shaft Bearings Distributor Body Mechanisms When Necessary Clutch Drive Lugs, Release Bearing Sleeve, Fork Fingers and Pivot Column-Mounted Gearshift Linkage Floor-Mounted Gearshift Controls Parking Brake Mechanism Speedometer Cable Points That Should Not Be Lubricated *Replace linings if necessary **Vehicles equipped with Fresh Air Induction System

9 9

18 15 11 I 22 16 15 12 17 14 20 6 18 5 2 18 7 8 9 22 9 14 16 15 26 15 7 21 15 17 F 8 2 5 8 9 23

X X

X

x

x X

X X

x X X '

X X

X X X X X X X X X

I X

X X X X X X

9

X

20

X

20 8 22 25

X X X


0-4 LUBRICATION AND MAINTENANCE LUBRICATION AND MAINTENANCE SCHEDULE TRAILER TOWING PACKAGE AND SEVERE SERVICE SERVICE INTERNAL

PAGE

ITEM

Transmission Rear Axle Universal Joints *Transmission Fluid *Automatic Transmission Filter *Automatic Transmission Bands Rear Axle Lubricant **Universal Joints *And every 12 months or 12,000 miles thereafter **Police and Taxi

Every 3 months or 4,000 Miles, whichever occurs first After first 36 months or 36,000 Miles, whichever occurs first

Replace

Check Fluid Level

Inspect and/or Lubricate Service Clean

X X

20 6 18 20 20 20 6 18

X X X X X X

CAPACITIES U.S. Measure

Imperial Measure

Crankcase

Models equipped with 426 Hemi, 440 HP and 440 Three 2 BBL engines only All other engines Add 1 quart (3/4 Imperial quart) when filter is replaced

6 qts. 4 qts.

5 qts.

12 qts.*** 13 qts.* 16 qts.** 18-1/2 qts. 14-1/2 qts.** 16 qts. 15-1/2 qts.** 17 qts.

10 qts.*** 10-3/4 qts.* 13-1/4 qts.** 15-1/2 qts. 12 qts.** 13-1/4 qts. 13 qts.** 14-1/4 qts.

17 pts. 16.3 pts.

14-1/4 pts. 13-1/2 pts.

19 pts. 16.8 pts.

15-3/4 pts. 14 pts.

6-1/2 pts. 4-3/4 pts.

5-1/2 pts. 4 pts.

7-1/2 pts.

6-1/4 pts.

2 pts. 4.4 pts. 5-1/2 pts.

1-3/4 pts. 3-1/2 pts. 4-1/2 pts.

19 Gals.

15-3/4 Gals.

3-1/4 qts.

Cooling System

225 Cu. In. Engine 225 Cu. In. Engine (Police, Taxi) 318 Cu. In. Engine 318 Cu. In. Engine (Police, Taxi) 383 Cu. In. Engine 383 Cu. In. Engine (Police) 440 Cu. In. Engine (4 or 6 BBL) 426 Hemi For Maximum Cooling or Air Conditioning. *Add 1 Qt. **Add 1-1/2 Qts. ***Add 2 Qts. Transmission (TorqueFlite)

198, 225 and 318 Cu. In. Engines 383 (4 BBL) Cu. In. Engines 383(2 BBL) and 440 Cu. In. Engines and/or Police, Taxi 426 Hemi Transmission 3-Speed (Manual)

Model A-903 (6 cyl. Models) Model A-230 (8 Cyl. Models and 6 Cyl. Police and Taxi) Transmission 4-Speed (Manual)

Model A-833 Rear Axle

7-1/4 Axle 8-1/4 and 8-3/4 Axle 9-3/4 Axle Fuel Tank

All Models


LUBRICATION AND MAINTENANCE 0-5

/APPROXIMATE CENTER OF GRAVITY

STATION WAGON 60"

5r-55r

CAR

18.5" 26.5"

9"

PAD POSITION WITHIN THESE LIMITS SATISFACTORY

II.\

20 SQ." MINIMUM FOUR PADS

ALL MODELS 116.5" t FRONT WHEELS

t REAR WHEELS

NN1928

Fig. 2—Support Locations—Frame Contact Hoist (Coronet & Charger)

The ball joints should be inspected every six months, or whenever vehicle is serviced for other reasons, for damage to the seals which can result in loss or contamination of lubricant. Clean accumulated dirt and lubricant from outside surface of seals to permit thorough inspection. Replace damaged seals or joints immediately to prevent contamination of lubricant or damage to parts. Lubricate ball joints, if necessary. BALL JOINTS ARE DESIGNATED TO OPERATE WITH SOME FREE PLAY. REPLACEMENT SHOULD BE MADE ONLY WHEN FREE PLAY EXCEEDS THE SPECIFICATIONS SHOWN IN "FRONT SUSPENSION" Group 2.

Relubrication is required every 36 months or 36,000 miles, whichever occurs first.

When lubricating control arm ball joints, use only the special long-life chassis greases such as MultiMileage Lubricant, Part Number 2525035 or equivalent. Remove threaded plug from each ball joint and temporarily install lubrication fittings. Inject lubricant until it flows freely from seal bleed areas at base of seal. Stop when seal begins to balloon. Remove fittings and reinstall threaded plugs. CAUTION: If high pressure lubrication equipment is used, stop filling when lubricant begins to flow freely from bleed area at base or at top of seal, or if seal begins to balloon.

Steering Linkage Ball Joints

Fig. 3—Upper and Lower Bali Joints (Coronet & Charger)

The four tie rod end ball joints and the steering gear arm ball joint (Fig. 4) are semi-permantly lubricated with a special lubricant at the factory. The ball joints should be inspected every six months, or whenever vehicle is serviced for other reasons, for damage to seals which can result in loss of lubricant. Clean accumulated dirt and lubricant from outside surfaces of seals to permit thorough inspection. Replace damaged seals or joints immediately to prevent contamination of the lubricant or failure of parts. Lubricate ball joints, if necessary. Relubrication of tie rod ball joints is required every


0-6 LUBRICATION AND MAINTENANCE • FIE ROD END FITTINGS

STEERING GEAR ARM BALL FITTING

FILLER HOLE

c.g. 6

-t,tes ; 6

-;

r.r ND 7F3 TIE ROD END FITTINGS

NNI868

Fig. 5—Removing Rear Axle Lubricant (7-1 / 4 Inch Axle)

Fig. 4—Steering Linkage (Coronet & Charger)

36 months or 36,000 miles, whichever occurs first. When lubricating steering linkage ball joints, use only the special long-life chassis greases such as Multi-Mileage Lubricant Part Number 2525035, or equivalent. Remove threaded plug from each ball joint and temporarily install lubrication fittings. Inject lubricant until it flows freely from seal bleed area •at top or base of seal. Stop when seal begins to balloon. Remove fittings and reinstall threaded plugs. CAUTION: High pressure lubrication equipment may be used if time is allowed for grease to bleed from seal base.

The factory 1111 lubricant is satisfactory to —30°F. ambients. Anticipated Temperature Range

Viscosity Grade

SAE 90 SAE 80 SAE 75 If necessary to change lubricant in 7-1/4, 8-1/4 or 8-3/4 inch axle remove old lubricant with suction pump through filler plug hole (Figs. 5, 6, and 7). For 9-3/4 inch axle remove the drain plug from the bottom of the axle housing (Fig. 8). Every six months check the fluid level in the axle through the filler plug hole. When checking the level, be sure the vehicle is in a level position, on an axle or drive-on type hoist, and the fluid level is as indicated in the accompanying chart. Above As low as Below

REAR AXLE Standard and Sure-Grip

The lubricant installed in the rear axle at time of assembly is a high quality product and regularly scheduled changes of the lubricant are not recommended in vehicles where operation is classified as normal passenger car service. The only exceptions, however, would be where the lubricant has become contaminated with water, or to provide the correct viscosity grade for the anticipated temperature range, as indicated by the accompanying table.

—10°F. —30°F. —30°F.

Type of Lubricant

Chrysler Corporation recommends that Multi-Purpose Gear Lubricant as defined by MIL-L-2105B (API GL-5) should be used in all rear axles with conventional differentials; Chrysler Hypoid Lubricant (Part Number 2933565) or equivalent, is an oil of this type and is recommended. In Sure-Grip axles use only the special Multi-Put-

AXLE IDENTIFICATION CHART Axle Size

Filler Location

7-1/4

Cover

8-1/4

Carrier* Right Side Carrier Right side Cover

8-3/4 9-3/4

Cover Fastening

Capacity Pints

9 Bolts 10 Bolts

2.0 4.4

Welded

4.4

**From 1/8 Inch Below Filler Hole to 1/4 Inch Below Maintain at Bottom of Filler Hole

10 Bolts

5.5

Bottom of Filler Hole to 1/2 Inch Below

Lubricant Level

Bottom of Filler Hole to 5/8 Inch Below

*Axles with filler hole located in cover, maintain lubricant at bottom of filler hole. **Do not raise oil level to bottom of filler hole, this will result in "Overfill" condition.


LUBRICATION AND MAINTENANCE 0-7

Performance engines. These axles have rectangular shaped identification tags on the axle carrier stating "Use Limited Slip Lube Only." Chrysler Hypoid Lubricant Part Number 2933565 or equivalent, for use in all limited slip axles that do not have a special identifying "Limited Slip" identification tag on the axle carrier housing.

FILLER HOLE

PY771 Fig. 6—filler Plug Location (8-1/4 In. Axle)

pose Lubricants intended for use in Limited Slip Differentials. Use lubricants listed below, or their equivalent, for axles indicated. Special Sure-Grip Lubricant Part Number 2585318 or its equivalent, for use in heavy duty axles used with 426 cubic inch Hemi and 440 cubic inch High

Fig. 7—Removing Rear Axle Lubricant (8-3/4 Inch Axle) 144.

FILLER HOLE

Trailer Towing Service For vehicles equipped for trailer towing service, the axle fluid level should be checked every 3 months or 4,000 miles, whichever occurs first. The lubricant should be drained and axle refilled with the specified lubricant, every 36,000 miles. If the axle is submerged in water, such as on a boat launching ramp where water can enter the axle vent, and contamination is suspected or evident, replace the lubricant immediately to avoid early axle failure. BRAKES

The brakes on all models equipped with drum brakes, except heavy duty, are equipped with a selfadjusting mechanism which makes it unnecessary to perform major brake adjustments. Inspect brake linings for wear every 12 months or 12,000 miles, whichever occurs first Replace linings, if necessary. At this time, lubricate contact areas of' brake shoe supports, on models with drum brakes, with a thin film of high-temperature lubricant such as Chrysler Support Plate Lubricant available under Part Number 2932524 or equivalent. To perform this service, first remove the brake shoes. Next, clean the contact surfaces on the shoes and supports by sanding lightly with fine sandpaper. Then, carefully apply lubricant. On models equipped with disc brakes, inspect the discs, calipers and linings every 12 months or 12,000 miles, whichever occurs first, as outlined under "Brakes". Group 5. HYDRAULIC BRAKE SYSTEM

Every 6 months the fluid level in the master cylinder should be checked (Fig. 9). Before removing the master cylinder cover wipe it clean to prevent dirt and other foreign matter from dropping into the master cylinder.

If necessary, add fluid to bring level to within 1/4 inch of the top of the reservoir. With disc brakes the fluid level can be expected to fall as the brake pads wear. No noticeable drop in level should occur in a PLUG DRAIN re AXLE ONLY

31‘ Fig. 8—Drain and Filler Plug Locations (9-3/4 Inch Axle)

NP15/A

car equipped entirely with drum brakes. Low fluid level may have been caused by a leak and a checkup may be needed. Only brake fluid conforming to SAE .11703 MRS type) should be used. Chrysler Parts Brake Fluid or


0-8 LUBRICATION AND MAINTENANCE

9—Brake Master Cylinder equivalent is recommended to provide best brake performance. Use of a brake fluid that may have a lower initial boiling point, such as fluid identified as

NNS63

Fig.

70R1 or unidentified as to specification, may result in sudden brake failure during hard prolonged braking. Brake Hoses Inspect brake hoses for cracking abrasion, cuts or tears in the outer covering. Examine all connections for fluid leakage. Correct leakage and replace hose where cover damage exposes the fabric braid. Pedal Pivot Bushings

The plastic bushings at the upper end of the brake pedal should be serviced every 24 months or 24,000 miles, whichever occurs first, or at time of major brake service. The bushings, located on the brake pedal pivot on all models and on the lower linkage pivots on Coronet and Charger models equipped with power brakes, should be removed, thoroughly cleaned and relubrieated with Multi-Mileage Lubricant. Part Number 2525035 or equivalent. PARKING BRAKE MECHANISM

Pivot points indicated (Fig. 10) should be lubricated, as required, to maintain ease of operation. Apply a film of smooth, white body hardware lubricant conforming to NLGI grade 1. Chrysler Parts Lubriplate, Part Number 1064768 or equivalent, is recommended for this purpose. When the foot pedal can be depressed more than four and one half inches, the brake cable should be adjusted. For adjusting procedure, refer to "Parking Brakes," Group 5. CLUTCH LINKAGE Clutch Torque Shaft Bearings

Inspect clutch torque shaft bearings (Fig. 11) for

Fig. 10—Foot-Operated Parking Brake (Coronet and Charger Models)

wear and relubricate every 36 months or 36,000 miles, whichever occurs first. To perform this sesrvice, refer to "Clutch." Group 6. After removing torque shaft assembly. disassomble and thoroughly clean all parts in a suitable solvent and inspect for wear. Damaged bearings and/or ball studs should be replaced. When reassembling shaft, coat inside surfaces at ends of shaft, inside and outside surfaces of bearings and ball studs with Multi-Mileage Lubricant. Part Number 2525035. or equivalent. Clutch Drive Lugs, Release Bearing Sleeve, Release Fork and Fork Pivot Whenever effort required to depress clutch pedal

becomes excessive, or when servicing clutch torque shaft bearings. lubricate drive lugs, sleeve, fork and pivot (Fig. 11). To gain access to this area, first remove inspection plate at bottom of clutch housing. CAUTION: Care must be taken to avoid getting lubricant on clutch disc and/or pressure plate. Fill cavity in sleeve with Multi-Mileage

Lubricant.

ITE-AitaNG INSIDE SURFACE

tNSIDE SURFACE /N

14

BALL STUD BEARINGS

•aiti STUD

'

er:3 FORK

PADS

Will 72C Fig. 11—Clutch Torque Shaft Bearings and Linkage


LUBRICATION AND MAINTENANCE 0-9 Part Number 2525035 or equivalent. Apply a film of same lubricant to clutch drive lugs, clutch release fork pads on sleeve, contact areas of fork fingers, pivot contact area of fork and fork pivot (Fig. 11).

COOLING SYSTEM The cooling system of all cars is protected against corrosion and freezing as they leave the factory. A permanent type anti-freeze is added to provide protection to —20°F. Higher percentages of anti-freeze must be added where temperatures below —20°F. are anticipated. Vehicles equipped with 383 cubic inch engines with 2 barrel carburetors and 440 cubic inch standard engines are equipped with 195 degree thermostats. All other engines are equipped with 190 degree thermostats and only permanent type anti-freeze should be used. Alcohol base anti-freeze products should not be used because of their low boiling point. Inspect coolant level every two months and refill as necessary. Once a year, preferably in the fall, the cooling system should be drained and refilled. This draining and refilling procedure, however, need not be performed until the fall following the vehicle's first full year of operation. Drain V-8 engine cooling system by removing drain plugs in sides of cylinder block and opening drain cock in lower radiator tank. On 6-cylinder engines, remove the single drain plug in right side of engine and open drain cock in lower radiator tank. Discard old solutions. Flush the system thoroughly with water. If there is an indication that the system contains a considerable amount of sediment, use a reliable cooling system cleaner to loosen the sediment. Rinse thoroughly to remove deposits. At this time, check water pump belt tension and check hose connections for tightness. In areas where protection from freezing is required, refill cooling system with clean, soft water and a suitable high quality, permanent type anti-freeze, in sufficient quantity to provide full protection for the lowest anticipated temperature, but never less than 40 percent of the cooling system capacity to ensure adequate protection against corrosion. If it becomes necessary to add coolant during the cold weather season, be sure the system contains sufficient antifreeze to provide protection at least to —20 degrees F. A suitable high quality permanent type anti-freeze available under Part Number 2932531 or equivalent, should be used. When vehicle is operated in areas where protection from freezing is not required, and vehicle is not equipped with air conditioning, refill cooling system with clean, soft water and add a high quality corrosion inhibitor, such as Chrysler Rust Resistor, Part Num-

ber 2421778 or equivalent. This need not be done until the first yearly service. If the vehicle is equipped with air conditioning, the cooling system must contain anti-freeze all year round. This is necessary because in the reheat-cycle system used on all vehicles, cold, refrigerated air passes through the heater core. Anti-freeze is necessary to prevent coolant in the heater core from freezing in hot weather when the air conditioner is being used. For complete information refer to "Air Conditioning", Group 24.

ALTERNATOR The alternator is provided with prelubricated bearings, which require no periodic lubrication.

BATTERY Every two months, or more often in hot weather and on long trips, check fluid level of cells. Restore level to 3/8 inch above plates, using only water of a known low mineral content. Do not overfill. Check specific gravity, using a reliable hydrometer, every 12 months or 12,000 miles, whichever occurs first, or more often if there is excessive use of water. Clean battery posts and cable terminals and tighten terminals. Coat connections with light mineral grease or petrolatum. Refer to "Electrical," Group 8, for complete servicing.

DISTRIBUTORS Two types of distributors are used. One type (with double breaker points) is provided with an oil cup. When servicing breaker points apply 3 to 5 drops of light engine oil in the cup. Distributors without the oil cup have permanent lubrication and no periodic lubrication is required. Whenever breaker points are serviced, lubricate cam surfaces. Wipe old lubricant from cam and rubbing block (Fig. 12) and apply a thin film of Cam Lubricant, Part Number 1473595, or equivalent. At this time, apply 1 drop of light engine oil to felt wick under rotor. CAUTION: Avoid over-oiling and applying an excessive amount of cam lubricant to prevent lubricants from spreading to breaker contacts.

HEADLIGHTS To assure correct adjustment of headlight aiming, it is recommended that the headlights be checked and, if necessary, re-aimed properly every six months. Changes in front and rear suspension, such as front suspension height and/or deflection of rear springs


0-10 LUBRICATION AND MAINTENANCE

Oil Viscosity Recommendations Multigrades SAE 20W-40 Where temperatures are consistently

SAE 10W-40 above -I-32=E. or SAE 10W-30 SAE 10W-30 Suitable for year long operation in many parts of the U.S.; may be used Of SAE 1fM-40 where temperatures occasionally drop as low as —10=E. SAE SW-3D Recommended where minimum temOf peratures are consistently below SAE SW-20 +10W.

Single Grades Fig. 12—Distributor Lubrication due to heavy loading, will change the headlight beam pattern and may cause unsafe nighttime driving conditions. If a vehicle is to be loaded abnormally, such as for a vacation trip, or with a salesman's products. the headlight aiming should be checked and adjusted to serve the new conditions. Refer to "Electrical System,- Group 8. for adjusting procedures.

WINDSHIELD WIPER BLADES Long exposure to heat and road splash tend to harden rubber wiper blades, thus destroying their efficiency. When blades smear or in general do not satisfactorily clean the windshield, they should be replaced. To replace. depress release on top of blade bridge and slide out rubber blade. Slide new rubber blade refill into bridge and lock it in place. Refer to Parts List for correct rubber blade refill.

ENGINE OIL—SELECTION OF For best performance, and to provide for maximum protection of all engines for all types of operation. only those lubricants should be selected which: (a) Conform to the requirements of the API classification "FOR SERVICE MS." Ili) Have the proper SAE grade number for the expected ambient temperature range iFig. 13). Lubricants which do not have both an SAE grade number and an MS Service cals.sification on the container should not be used. Oils used in our engines, labeled "For Service MS", should equal or exceed the Engine Oil Performance Rating Sequence Tests for varnish, sludge and rusting, when tested according to the methods established by the car manufacturer. All Season Supreme and Supreme Motor Oils or their equivalent, available through the Parts Division, meet these requirements.

SAE 30 SAE lOW

Where temperatures are consistently above--32t F. Where temperatures range between ▪ 32=T. and —102 E.

IMPORTANT: If the vehicle is to be used for maximum performance service I very high speeds or very rapid acceleration), the engine requires heavier than normal lubricating oil. This is due to the high speeds. Loads, and temperature of moving parts developed in these engines during this type of operation. FOR BEST PROTECTION OF THE ENGINE UNDER THESE CONDITIONS, THE HEAVIEST ENGINE OIL OF MS QUALITY SHOULD BE USED THAT WILL PERMIT SATISFACTORY COLD STARTING. SAE 30 AND 40 ARE RECOMMENDED. MULTIVISCOSITY OILS SAE 20W40 AND 20W-50 MAY ALSO BE USED. When outside temperatures are consistently below 32:F. SAE 10W-30 or SAE 10W-40 are recommended for ease in cold starting. However, even in cold weather, these grades should not be used if the vehicle is driven in competition or other forms of maximum operation.

MATERIALS ADDED TO ENGINE OILS It is not necessary to add any other products to engine oils for most types of driving when MS quality oils are used. In some instances, such as infrequent operation or short trips only, and during break-in after a major overhaul, addition of special materials containing anti-rust and anti-scuff additives is beneficial. A product suitable for this purpose is Engine Oil Supplement. Part Number 1879406 or equivalent

FREQUENCY OF ENGINE OIL CHANGES The by-products of combustion, such as unburned fuel, condensation and carbon deposits, in addition to dust and other abrasive materials, tend to contaminate


LUBRICATION AND MAINTENANCE 0-11 oil during this initial period, an oil with the "For Service MS" classification and of the proper viscosity grade should be used. biondetergent or straight mineral oils must never be used. Oil level should be checked during each stop for gasoline. Oil should be added only when level on oil level indicator is at or below "ADD OIL" mark. Frequently, a new engine will consume some oil during its first few thousand miles of operation. This should be considered as a normal part of the break-in and not interpreted as an indication of difficulty. Severe Operating Conditions NK575 Fig. 13—Shaded Area Covers Region Where Minimum Temperatures May Be Consistently Below +10°F. During Some Winter Months

engine oil. If permitted to remain in the crankcase for too great a period of time, the contaminates reduce the lubricating qualities of the oil causing excessive wear which can materially affect the operating efficiency of the engine. To provide maximum protection to engine parts, it is recommended under normal operating conditions, that engine oil be drained and replenished with new oil of the proper viscosity and API classification, every three (3) months or 4,000 miles, whichever occurs first. When draining the old oil, it is recommended that the engine be at normal operating temperature. as the warmed oil will drain more readily and carry with it such foreign matter which might otherwise cling to the sides of the crankcase and the various moving parts. A greater degree of contamination of the engine oil takes place when the vehicle is operated under adverse conditions, such as frequent driving in dusty areas, short trips, stop-and-go driving and where long periods of idling are experienced. For oil change frequencies under these operating conditions, refer to the recommendations in the paragraphs under Severe Operating Conditions and Taxi and Police Operation.

Severe operating conditions, such as frequent driving on dusty roads, or in sandy geographic areas, or unusually short trip driving in cold weather may reasonably require oil changes more frequently than every three months. Under these conditions, consult and follow the advice of any Chrysler Motors Corporation Authorized Dealer's Service Manager. Taxi and Police Operation

Severe service such as taxi and city police driving, which is principally short trip operation, including frequent and prolonged idling, requires oil changes more frequently on a regular schedule. For this type of service, it is recommended that engine oil be changed and the crankcase ventilation system serviced every two months, not to exceed 2,0000 miles. Replace filter every second oil change.

ENGINE OIL FILTERS All engines are equipped with full-flow, throwaway oil filters (Figs. 14, 15 or 16) to provide efficient filtering of engine oil for maximum engine protection. The filter should be replaced every second oil change. Since filters vary widely in quality, it is recommended that a Chrysler Corporation Engine Oil Filter, or equivalent, be used for replacement to assure most efficient service.

During Break-In

Cars should be driven moderately during the first 300 miles. Speeds up to 50 to 60 mph are desirable. While cruising, brief full-throttle accelerations contribute to a good break-in. Wide-open throttle accelerations in low gear can be detrimental and should be avoided for at least 500 miles. The oil installed in the engine at the factory is a high-quality lubricant, classified "For Service MS," and should be retained until the first regularly scheduled three-month or 4,000 mile oil change, whichever occurs first. If it becomes necessary to add

Fig. 14—Engine Oil Filter (6 Cylinder Engines)


0-12 LUBRICATION AND MAINTENANCE HOLLY CARBURETOR

DISTRIBUTOR VACUUM `. HOSE VENTILATOR VALVE HOSE

BOWL VENT TO FUEL PUMP - -HOSE ECS OF SO EQUIPPED)

AIR CLEANER REFERENCE VENTILATOR VALVE HOSE NR80

AIR CLEANER HOSE

CARTER CARBURETOR

Fig. 15—Engine Oil Filter (318 Cu. In. Engine) / 7 , ;CONNECTOR...1i

CRANKCASE INLETAIR CLEANER—.

VENTILATOR VALVE

1 FWD DISTRIBUTOR VACUUM HOSI ) C Pr/72

ECS VENT LINE (IF SO EQUIPPED)

Fig. 17 — Crankcase Ventilation System (6 cylinder models) NN359 Fig. 16—Removing Engine Oil Filter (383, 426, 440 Cu. in. Engines)

CRANKCASE VENTILATION SYSTEM All models are equipped with a closed crankcase

ventilating system (Figs. 17, 18, 19, 20, 21, or 22). This system consists of a crankcase ventilator valve mounted on the cylinder head cover, and a carburetor with a hose from its base connected to the ventilator valve. A closed crankcase inlet air cleaner with a hose connecting it to the carburetor air cleaner housing provides the air inlet for the system. The crankcase inlet air cleaner is also provided with inlet fittings for a bowl vent hose and vent line hose (eight cylinder engines), or vent line only (six cylinder engines), where evaporative control system

throttle body, into the combustion chamber, are burnt and expelled with the exhaust gases. Servicing Frequencies

Proper maintenance of the crankcase ventilation system is required to keep the system clean and maintain good engine performance and durability. Periodic servicing is required to remove combustion products MR CLEANER REFERENCE W„Al

VENTILATOR VALVE •-

VENTILATOR

VALVE HOSE

(ECS), is required. VENTILATION SYSTEM OPERATION

The ventilating system operates by manifold vacuum. Air is drawn from the carburetor air cleaner through the air cleaner hose and crankcase inlet air cleaner into the crankcase, (where ECS systems are used the fuel tank and float bowl vapors are also drawn into the crankcase through the crankcase inlet air cleaner), circulated through the engine and drawn out through the ventilator valve, pass through the ventilator valve hose and passage in the carburetor

DISTRIBUTOR VACUUM HOSE AIR CLEANER HOSE

BOWL VENT HOSE KS OF SO EQUIPPED)

ECS VENT LINE (IF SO EQUIPPED)

CRANKCASE INLET AIR CLEANER PY773 Fig. 18—Crankcase Ventilation System (318 Cu. In. Engine)


LUBRICATION AND MAINTENANCE 0-13 DISTRIBUTOR VACUUM HOSE II

VENTILATOR VALVE

VENTILATOR VALVE HOSE

VENTILATOR VALVE

F-1 DISTRIBUTOR VACUUM HOSE VENTILATOIV HOSE, AIR CLEANER REFERENCE

BOWL VENT HOSE ECS (IF SO EQUIPPED) HOLLY CARBURETOR

AIR CLEANER

AIR CLEANER HOSE

— REFERENCE

DISTRIBUTOR VACUUM BOWL VENT HOSE HOSE LINE ECS (IF SO EQUIPPED)

AIR CLEANER HOSE

PY774

ECS (IF SO EQUIPPED)

VENT LINE CRANKCASE INLET AIR CLEANER

PY776

Fig. 19—Crankcase Ventilation System (383 Cu. In. engine with 2-barrel carburetor)

Fig. 21— Crankcase Ventilation System (440 Cu. In. engine with three 2-barrel carburetion)

from the ventilator valve, hoses, carburetor passages and crankcase inlet air cleaner. Every six months the system must be tested for proper operation and cleaned if necessary. This includes inspecting the operation of the valve, checking the hoses and carburetor passages for deposits and cleaning the crankcase inlet air cleaner and carburetor air cleaner. The crankcase ventilator valve must be replaced with a new one every year. The carburetor air cleaner filter element must be replaced every year on High Performance Vehicles equipped with "Fresh Air Induction System", and every 2 years for vehicles

equipped with standard air cleaner. If the car is used extensively for short trips with frequent idling, the ventilation system may require servicing more frequently.

VENTILATOR VALVE VENTILATOR VALVE HOSE AIR CLEANER REFERENCE

inspection and Service Procedure

a. With engine idling1. Remove ventilator valve from rocker cover. If the valve is not plugged, a hissing noise will be heard as air passes through the valve, and a strong vacuum should be felt when a finger is placed over the valve inlet (Fig. 23). 2 Reinstall the ventilator valve, then remove the crankcase inlet air cleaner. Loosely hold a piece of stiff paper, such as parts tag, over the VENTILATOR VALVE HOSE POWER BRAKE HOSE

VENTILATOR VALVE

AIR CLEANER HOSE l_J DISTRIBUTOR VACUUM HOSE — —. -----75---Ncd.:--' BOWL VENT HOSE c. ! !„. _.., VENT LINE ECS VENTILATOR (IF SO EQUIPPED) \ VALVE HOSE CARTER _...-04 CARBURETOR

,A—

BOWL VENT HOSE VENT LINE ECS (IF SO EQUIPPED)

Fig. 20—Crankcase Ventilation System (383 and 440 Cu. In. Engine)

DISTRIBUTOR- — FUEL` LINES \ VACUUM HOSE

AIR CLEANER HOSE

BOWL VENT HOSE VENT LINE

. / ES (IF SO `EQUIPPED)

CRANKCASE INLET AIR CLEANER PY777

Fig. 22—Crankcase Ventilation System (426 Hemi)


0-14 LUBRICATION AND MAINTENANCE

Fig. 25—Shaking Ventilator Valve Fig. 23 —Checking Vacuum at Ventilator Valve Inlet

opening in the rocker cover (Fig. 24). After allowing about a minute for the crankcase pressure to reduce, the paper should be sucked against the opening in the rocker cover with a noticeable force. NOTE: For 6 cylinder 198 and 225 CID engines. it will he necessary to clamp off or plug the carburetor bowl vent to fuel pump hose (Pig. 171 in order to perform this check. b. With engine stopped1. Remove ventilator valve from rocker cover and shake (Fig. 25). A clicking noise should be heard to indicate that the valve is free. c. If the ventilation system meets the tests in and (b) above, no further service is required: if not. the

ventilation valve should be replaced and the system rechecked. DO NOT ATTEMPT TO CLEAN THE VENTILATOR VALVE! On the 6 cylinder 198 cu. in. engine, use the Chrysler Ventilator Valve identified by a white end washer (Part No. 2951244 or 2951892) or equivalent. On the 6 cylinder 225 cu. in. engine and all V-8 engines, use the valve identified by a black end washer Part No. 2951243 or 2951891) or equivalent. d.. With a new ventilator valve in.stalled, if the paper is not sucked against the crankcase inlet air cleaner opening in the rocker cover with noticeable force, it will be necessary to clean the ventilator hose. vent tube and passage in the lower part of the carburetor. Carburetor Vent Tube

Remove Carburetor. Dip lower end of carburetor in carburetor cleaner, part number 2933500 or equivalent. Hand turn a 1/4 inch drill through vent tube passage to dislodge solid particles, then blow clean. IMPORTANT: make sure drill size used will not remove any metal. Use smaller size if necessary. It is not necessary to disassemble carburetor for this service.

Crankcase Inlet Air Cleaner

Fig. 24—Checking Vacuum at Crankcase Mkt Air Cleaner Opening

Disconnect the hoses from the crankcase inlet air cleaner. Inspect the hose from the crankcase inlet air cleaner to the carburetor inlet air cleaner and clean if necessary. Remove the crankcase inlet air cleaner and wash it thoroughly in kerosene, or similar solvent. Lubricate or wet the filter, by inverting the crankcase inlet air cleaner and filling with SAE30 engine oil. Position the air cleaner to allow excess oil to drain thoroughly through the vent nipple located on the top of the air cleaner.


LUBRICATION AND MAINTENANCE 0-15 Hoses

Clean hoses by immersing in Carburetor Cleaner, Part Number 2933500, or equivalent, followed by drying with compressed air. Hoses should not remain in solvent more than one-half hour.

ENGINE PERFORMANCE DIAGNOSIS The following services should be performed every 12,000 miles or 12 months to provide best vehicle operation and lowest emissions of hydrocarbons and carbon monoxide. 1—SPARK PLUGS—Remove and inspect each spark plug. Most plugs can be cleaned, adjusted, and reinstalled. Rough idle, hard starting, frequent engine miss at high speeds, or apparent physical deterioration; are indications that the spark plugs should be replaced. 2—CABLES--Check all secondary distributor cables for cleanliness and proper connections. Replace all cracked, damaged, or faulty cables. See "Ignition System" Group 8—Electrical for tests. 3—DISTRIBUTOR—Inspect distributor cap and rotor, for carbon tracking and abnormal wear. Check condenser, and points for abnormal pitting. blueing, or misalignment, and adjust, if serviceable, or replace. Lubricate cam and wick. See "ignition System" Group 8—Electrical for tests and adjustments. 4—AIR CLEANER—Clean and/or replace if necessary. See "Carburetor Air Cleaners." 5—CRANKCASE VENT VALVE—Replace. Check function of the entire crankcase ventilating system. See page 14. 6—IGNITION TIMING—Check timing and set as required. See decal located in engine compartment or "Ignition System" Group 8—Electrical. 7—IDLE RPM—Check after carburetor or ignition timing service. See decal located in engine compartment or "Fuel System" Group 14.

Fig. 26—Manifold Heat Control Valve 16 cylinder models)

MANIFOLD HEAT CONTROL VALVE Freedom of movement of the heat control valve, by removing lead deposits from the valve shaft bearings, is assured by application of suitable solvent. Such a solvent is available under Part Number 2525054, Manifold Heat Control Valve Solvent, or equivalent. Every engine oil change apply solvent to both ends of valve shaft where it rotates in bushings (Figs. 26, 27, 28, 29 or 30). APPLY SOLVENT ONLY WHEN MANIFOLD IS COOL. Allow solvent to soak a few minutes, then work valve shaft back and forth until it moves freely.

CARBURETOR AIR CLEANER Paper Element Type

The paper filter element (Fig. 31) in the carburetor air cleaner should be cleaned every six months and replaced every two years. On high performance vehicles equipped with "Fresh Air Induction System" (Fig. 82) clean filter every oil change and replace every year.

8—MANIFOLD HEAT CONTROL VALVE—Clean pivot areas as necessary. 9—BATTERY—Check specific gravity, clean and tighten terminals; apply grease to pasts and terminals after lightening. 10—VALVE LASII—(198, 225, and 426 cu. in. engines): If engine continues to be noisy and/or the idle rough after the above services have been performed, adjust the valve lash to specifications. See "Engine" Group 9 for lash specifications. Idle adjustments of the carburetor should be rechecked after setting lash.

Fig. 27—Manifold Heat Control Valve (318 Cu. In. Engine)


0-16 LUBRICATION AND MAINTENANCE

COUNTERWEIGHT

Nka7

Fig. 28—Manifold Heat Control Valve

HOUSING

PY723

Fig. 31—Carburetor Air Cleaner (Dry Type)

move cover and filter element and clean cover and housing. Using compresed air, gently clean element by holding air hose nozzle at least two inches from inside screen (Fig. 33). CAUTION: Do not use compressed air on outside surface of element as this will embed foreign matter in the element paper.

Fig. 29—Manifold Heat Control Valve (383 and 440 Cu. In. Engine)

Use a Chrysler Corporation filter element or equivalent, for replacement. If the filter element is saturated with oil for more than one-half its circumference, replace the filter element and check the rest of the crankcase ventilating system for proper functioning. To clean, remove air cleaner from carburetor. Re-

Examine element for punctures. Discard an element that has small pin-point puncture& Examine soft plastic sealing rings on both sides of element for smoothness and uniformity. Replace element if not satisfactory. At this time, also service the Carburetor Choke Shaft, as outlined. Oil Beth Type (Extra Equipment)

The sediment level in the air cleaner should be examined every second oil change. or more frets"

COVER

FILTER ElEmENT

VENT HOSE

"P-3 THERMOSTAT

Nr$6.1

Fly. 30—Header Heat Control Value

(426 Cu. In. Engine)

FILTER RETAINER NU323

Fig. 32 —Carburetor Air Cleaner (Fresh Air System)


LUBRICATION AND MAINTENANCE 0-17

Fig. 33—Cleaning filter Element

quently under severe operating conditions, such as in dusty areas. If the sediment builds up to within 3/8 inch of the shelf, discard old oil and thoroughly clean the air cleaner. In any event, the cleaner should be serviced at least once a year. To clean, remove cover and filter element. Wash element thoroughly in kerosene and drain. Element should be washed in an upright position to prevent the accumulation of dirt on the top side of the element, and the underside of the cover during the washing operation, dirt accumulation due to improper element cleaning will result in increased engine wear rate. Clean reservoir thoroughly and fill to indicated level with SAE 10W-30 engine oil. This grade is suitable for all temperatures. Reassemble cleaner and install on carburetor. CARBURETOR CHOKE SHAFT

Fig. 34—Choke Valve Shaft and Fast Idle Cam

Fig. 35—Fuel Filter (6 Cylinder Engines)

filter should be replaced every 24 months or 24,000 miles, whichever occurs first Should an excessive amount of foreign matter accumulate in fuel tank, filter may require replacing more frequently. After installing new filter, run engine for several minutes and check for leaks at connections.

Every six months, apply Carburetor Cleaner, Part Nuiriber 2933500. or equivalent, to both ends of choke shaft where it passes through the air horn (Fig. 34). At same time, move choke shaft back and forth until deposits are flushed out. Run engine at idle to clean out excess cleaner from carburetor and intake manifold. Also, apply same type of cleaner to fast idle cam and pivot pin to remove dirt, oil and any other deposits that may have collected and cause sticking oxerratic motion. This service will assure freedom of movement of the choke mechanism. FUEL FILTERS The fuel filters (Figs. 35. 36 and 37) are of the disposable type. Under normal operating conditions.

Fig. 36—Fuel Filter (3 1 8 Cu. fn. Engine)


0-18 LUBRICATION AND MAINTENANCE

purpose Grease, NLGI Grade 2, E.P., such as MultiMileage Lubricant part number 2525035, or equivalent. STEERING GEAR Manual

Fig.37—Eu., Filter (383, 426, 440 Cu. In. Engines)

PROPELLER SHAFT AND UNIVERSAL JOINTS

Under normal operating conditions, relubrieation of the propeller shaft universal joints is not recommended. Every six months, however, the front and rear joints (Figs. 38 or 39) should be inspected for external leakage or damaged seals. If external leaks or damage is evident, the universal joint should be replaced. Severe Service Requirements

When the vehicle is operated under the severe conditions as in police and taxi service the universal joints should be disassembled, cleaned, and relubricated every 36,000 miles or 3 years. The units should be disassembled, cleaned, and relubricated with Multi-

The lubricant installed in the steering gear at time of assembly is a high quality product and regularly scheduled changes are not required. Every six months, remove plug in steering gear housing (Fig. 40) and check lubricant level. Lubricant should cover worm gear. If lubricant is below prescribed level, replenish with Multi-Purpose Gear Oil SAE 90, as defined by MILL-2105R. This is suitable for all temperatures. Special Sure-Grip Lubricant, Part Number 2585318, and Chrysler Hypoid Lubricant, part number 2933565, or their equivalent, are lubricants of this type and are recommended. CAUTION: When filling, do not use a pressure gun as high pressure may damage the seals.

Power Steering

At every engine crankcase oil change, the power steering fluid level should be checked at the power steering pump reservoir (Fig. 41 or 42). When the fluid is checked when hot, the fluid level will be approximately 1/2 to 1 inch below the top of the filler neck. At room temperature (approximately 70°F) the fluid level should be above the joint of the filler neck and reservoir (between 1-1/2 to 2 inches below the top of the filler neck).

Fig. 38—Front Universal Joint

Fig. 39—Rear Universal Joint

Fig. 40—Manual Steering Gear Filler Plug


LUBRICATION AND MAINTENANCE 0-19

Fig. 47—Power Steering Pump Reservoir (1.06 Pump)

If necessary, add fluid to restore these levels. Units equipped with a dipstick should be filled to the required indicated oil level. Only petroleum fluids specially formulated for minimum effect on the rubber hoses should be used. Power Steering Fluid part number 2084329, or its equivalent, is recommended. CAUTION: Before removing the reservoir cover, wipe outside of cover and case so that no dirt can fall into the reservoir.

TRANSMISSION (Manual) Three-Speed

The lubricant installed in the transmission at the time of assembly is a high quality product and regularly scheduled changes are not required for vehicles whose operation is classified as normal service for passenger cars. The fluid level should be checked every six months. The correct level is at the bottom of the filler plug hole (Fig. 43). Replenish if necessary with DEXRON Automatic Transmission Fluid or Chrysler Automatic Transmission Fluid AO-ATF-2848A, available under Part Number 1843314 or their equivalent. In warm climates, if desired, the Automatic TransFILER CAP

dee,

OVAL SHAPED FILLER TUBE

Fig. 43—Transmission Filler and Drain Plugs

mission may be drained (Model A903, use suction gun.) and the transmission refilled with Multi-Purpose Gear Lubricant SAE 90, as defined by MIL-L-2105B. When vehicle is used for other than normal service, or for towing trailers, refer to "Trailer Towing Service," for recommended servicing. Four -Speed

The transmission is filled at the factory with a special gear lubricant and regularly scheduled changes are not required for vehicles whose operation is classified as normal service for passenger cars. The fluid level, however, should be checked every six months. The correct level is at the bottom of the filler plug hole (Fig. 43). If lubricant is below the specified level, replenish with Multi-Purpose Gear Lubricant SAE 140, as defined by MILALc2105B. During cold weather, if shift effort becomes extremely high, transmission should be drained and refilled with Multi-Purpose Gear Lubricant SAE 80 or SAE 90, as defined by MIL.L-2105B or with automatic transmission fluid types labeled DEXRON Automatic Transmission Fluid or Chrysler Automatic Transmission Fluid AQ-ATF-2848A available under Part Number 1843313 or their equivalent. Automatic transmission Fluid should be replaced with MultiPurpose Gear Lubricant SAE 140 in warm weather. No other lubricants should be used.

Trailer Towing and Severe Service

NP168

Fig. 42—Power Steering Pump Reservoir (.94 Pump)

For vehicles equipped for trailer towing service, or if the regular operation of the vehicle is classified as severe, the transmission lubricant level should be checked every 3 months or 4,000 miles, whichever occurs first. The transmission should be drained and refilled


0-20 LUBRICATION AND MAINTENANCE TRANSMISSION (Automatic)

Automatic transmissions should be maintained and serviced by an authorized Chrysler Corporation dealer or service center to obtain best performance and long life. It is important that the transmission fluid be maintained at the level prescribed. Selection of Lubricant Use only fluids of the type labeled DEXRON Automatic Transmission Fluid or Chrysler Automatic Transmission Fluid AQ-ATF-2848A. or their equivalent.

Fig. 44—Column-Mounted Gearshift Control with the specified lubricant initially after 36 months or 36.000 miles. whichever occurs first, and every 12 months or 12,000 miles. thereafter, whichever occurs first. Column-Mounted Transmission Gearshift Controls If operation of gearshift controls becomes noisy or shift effort becomes objectionable. lubricate linkage at lower end of steering column (Fig. 44i. Apply a film of Multi-Mileage Lubricant Part Number 2525035 or equivalent or Multi-Purpose Grease. N'LGI grade 2 EP. to contact surfaces on levers (Fig. 44). Floor-Mounted Transmission Gearshift Controls if operation of the mechanism becomes difficult. remove rubber boot on floor panel and apply a few drops of light engine oil to the mechanism. In addition, from under the vehicle, apply light engine oil to rod ends in operating levers (Fig 451.

Special Additives Chrysler Corporation does not recommend the addition of any fluids to the transmission other than those from the automatic transmission fluids listed above. Exceptions to this policy are the uses of special dyes to aid in detecting fluid leaks, and the use of Chrysler Automatic Transmission Sealer which introduces a small amount of swelling of the seals to reduce fluid leakage resulting from hardening or shrinking of the seals in high mileage vehicles. Such a product is available under Part Number 2298923 Transmission Sealer, or its equivalent. Fluid Level Check The fluid level should be checked every six months This check should be made when engine temperature gauge indicates a normal warmed-up condition and transmission fluid is heated to its normal operating temperature. Click level with parking brake applied firmly and engine idling. CAUTION: Before removing level indicator, wipe off cap and top of filler tube to prevent accumulated diri from dropping into transmission filler tube.

After engine has idled for about two minutes, move gearshift lever slowly through all gear positions, pausing momentarily in each and ending with lever in "N" position. When fluid is "hot.- level should be at the "FULL" mark (Jr slightly below, but never above the "FULLmark 'Fig. 46i. Fluid should be added or extracted, depending upon the reading. to restore level as spedfled Frequency of Fluid Change (All Models except with 426 Hemi Engine) For vehicles operated under normal service conditions, the transmission fluid and filter will provide satisfactory lubrication and protection to the transmission. Therefore, periodic fluid changes are not required.

Fig. 45—Floor-Mounted Gearshift Control

IMPORTANT: If, for any reason, the factory fill fluid is replaced with another fluid, the fluid and filter must be changed every 36 months or 36,000 miles, which-


LUBRICATION AND MAINTENANCE 0-21 FRONT WHEEL BEARINGS

The condition and quantity of the lubricant in the front wheel bearings on cars equipped with either drum or disc type brakes should be inspected whenever the wheels are removed to inspect or service the brake system. Brake system inspection is recommended every 12 months or 12,000 miles, whichever occurs first. When inspection of the wheel bearing lubricant indicates it is low in quantity, contains dirt, or has been contaminated by water to produce a milky appearance, bearings and hub should be cleaned, inspected and relubricated. ND167A

Fig. 46—Transmission Level Indicator Markings

A band adjustment should be made at time of oil change

ever occurs first, in normal service.

Frequency of Fluid Change (Vehicles Equipped with 426 Hemi Engine) The factory fill fluid should be changed after the first 24 months or 24,000 miles, whichever occurs first, and periodically, thereafter, every 12 months or 12,000 miles, whichever occurs first. The filter should be changed and the band adjustment checked with each fluid change. If, for any reason, the factory fill fluid is replaced with another fluid, prior to the 24 months or 24,000 miles interval, the fluid and filter should be changed and bands adjusted every 12 months or 12,000 miles, thereafter, whichever occurs first, after the change to the field fluid.

Trailer Towing Service and Severe Usage (All models except 426 Hemi engine) If the regular operation of a car is classified as severe, the fluid level should be checked every 3 months or 4,000 miles, whichever occurs first, and the transmission should be adjusted and the fluid and oil filter changed after the first three years or 36,000 miles of operation, whichever comes first, and every 12,000 miles or 12 months of operation thereafter, whichever comes first. Typical examples of the type of service that comes within this category are: (a) Police and taxicab operation. (b) Frequent towing of trailers. (c) Continuous operation at higher than normal loading. For transmission draining and refilling service, filter replacement and band adjustment procedures, see "Torque Flite Transmission," Group 21.

CAUTION: To avoid possible contamination of lubricant by mixing lubricants that are not compatible, do not add lubricant to bearings.

Thoroughly clean old lubricant from bearings and hubs. After cleaning, carefully examine cups, rollers, and inner race of cone for brinnelling or spalling. Bearing should be replaced if any defects exist. Discard old seals. Repack bearings and hubs with new Multi-Purpose Grease, NLGI grade 2 EP, such as Multi-Mileage Lubricant, Part Number 2525035, or equivalent. When repacking hubs (Fig. 47), make sure all surfaces of hub and outer grease cup interiors are covered with lubricant to minimize condensation and lubricant travel out of bearing. DO NOT OVERFILL.

Adjust bearings as follows: (1) Install wheel and drum assemblies and tighten wheel nuts on Charger and Coronet models, to 65 foot-pounds. (2) Tighten wheel bearing adjusting nut (Fig. 48) to 90 inch-pounds on Coronet and Charger models, while rotating wheel, (3) Position nut lock on adjusting nut so one pair of cotter pin slots align with hole in spindle.

WHEEL HUB GREASE CAVITY ND418

Fig. 47—Front Wheel Bearing Lubrication


0-22 LUBRICATION AND MAINTENANCE LEFT FRONT

RIGHT FRONT

\ \ / /111

/

111 RIGHT REAR

LEFT REAP

Adjustment (4) Back off adjusting nut and nut lock to the next slot and install cotter pin. (5) Install wheel covers.

NP158

Fig. 48—Front Wheel Bearing

TIRES

All tires, especially wide tread, 70 Series and Fiberglass belted tires should be rotated no later than every second oil change (Fig. 49) and should be in correct balance to obtain the most uniform treadwear. If owner insists on a four tire switch only, rotate tires according to diagram (Fig. 50). Tires should be examined at every oil change for unusual wear patterns, foreign material and proper inflation pressures. If irregular tread wear has developed, rotation is suggested at this time. Unusual wear conditions may indicate a need for a change in driving habits or that mechanical corrections are necessary. A decal showing the recommended tire pressure is located on the body pillar at the rear of the left front door opening ("B" post). Refer to "Tires", Group 22, for additional information.

RIGHT FRONT

LEFT FRONT

Fig. SO-Tire Rotation Diagram-4 Tires

SPEEDOMETER CABLE To service a noisy speedometer cable, disconnect housing at speedometer head. Remove shaft and clean it thoroughly. Apply a very thin film of speedometer cable lubricant on the shaft. Such a lubricant is available under Part Number 1243632, Speedometer Cable Lubricant or equivalent. Wipe excess lubricant from the top one-foot of the shaft and from the ferrule. CAUTION: Excessive lubricant may cause malfunction of the speedometer.

HOOD LOCK, RELEASE MECHANISM AND SAFETY CATCH

Lubrication of the hood latch release mechanisms and safety catch is of vital importance and should be inspected, cleaned and lubricated every 6 months to assure ease of operation and freedom from binding.

All Models

Apply Multi-Purpose Lubricant NLGI grade 2 EP, such as Multi-Mileage Lubricant, Part Number 2525035 or equivalent, sparingly to all sliding contact areas of latch and release lever, and ends of hood lock release links, if so equipped. (Figs. 51 and 52). Work lubricant into the lock mechanism until all CONTACT AREAS

PIVOT AREA SAFETY CATCH LOCK

LEFT REAR

HIGH! KkAR I / \ SPARE alla

Fig, 49-Tire Rotation Diagram-5 Tires

KP23A

RELEASE HANDLE Fig. 5I--Hood Lock (Coronet Models)

NR'237


LUBRICATION AND MAINTENANCE 0-23 PIVOT AREAS

SAFETY LATCH

LATCH HANDLE

PIVOT POINTS

CONTACT AREAS

SPRING END

---

PIVOT AREA

RELEASE HANDLE

-NR253

SPRING END

Fig. 52—Hood Lock (Charger Models)

frictional surfaces are covered. Also apply a film of the same lubricant to the pivot contact areas of the safety catch. BODY MAINTENANCE

Body and other operating mechanisms should be inspected, and relubricated as needed. This is necessary to maintain ease of operation and to provide protection against rust and wear. Prior to applying any lubricants, wipe the parts clean to remove dust and grit. After lubricating parts, remove excess oil or lubricant. Relubricate mechanisms as outlined in the following paragraphs. Where Lubriplate is specified, use a smooth, white body hardware lubricant conforming to NLGI grade 1. Chrysler Parts Lubriplate, Part Number 1064768 or equivalent, is a suitable lubricant and is recommended. Where Door Ease Lubricant is specified, use a stainless wax type lubricant such as Chrysler Parts Door Ease, Part Number 774512 or equivalent.

Lock Cylinders When necessary, apply a thin film of Lubriplate or equivalent, directly to key. Insert key into lock and actuate several times. Wipe excess lubricant from key. Particular attention should be given to external lock cylinders during fall and winter months to insure protection from water and ice.

PIVOT POINTS

PIVOT POINT

GEAR TEETH NN404

Fig. 53—Hood Hinge (Coronet & Charger Models)

Door Latch Striker Plate (Coronet and Charger Models) Apply Door Ease Lubricant, or equivalent, to striker teeth lock rotor contact surfaces (Fig. 55). Door Latch Striker Rotor (Coronet and Charger Models) Apply light engine oil, sparingly, to outside and inside rotor bearing surfaces (Fig. 55). Wipe off excess oil. PIN ENDS

PIN ENDS

FRONT DOOR UPPER

PIVOT AND ROLLER CONTACT AREAS REAR DOOR UPPER

Hood Hinges (All Models) Apply engine oil to all link or hinge pivots and Lubriplate or equivalent, to gear teeth and sliding contact areas (Fig. 53). Door Hinges (Coronet and Charger Models) On all hinges, apply engine oil to hinge pin ends (Fig. 54). On lower hinges, in addition, apply engine oil to torsion spring contact points and all pivot contact points.

PIN ENDS TORSION SPRING CONTACT PO/NIS

TORSION SPRING CONTACT POINTS FRONT DOOR LOWER

REAR DOOR LOWER

DOOR HINGE LUBRICATION

Fig. 54 — Door Hinge (All Models)

PY813


0-24 LUBRICATION AND MAINTENANCE APPLY ENGINE OIL

STRIKER

SLIDING CONTACT SURFACE

ROTOR

APPLY DOOR EASE

PIVOT

NU460

Fig. 55—Door Striker Rotor and Striker Plate (Coronet & Charger Models)

Door Locks and Locking Control Linkage (All Models)

If necessary to inspect operation of and relubricate

NK630A

Fig. SO—Deck Lid Latch Lubrication (All Models)

contact areas with Multi-Purpose lubricant NLGI grade 2, EP such as Multi-Mileage Lubricant, Part

these paile, lenitive Qom Ulm panel. Apply a film of

Number 2626026 or equivalent.

Lubriplate or equivalent, to all pivot and sliding contact areas.

To lubricate the remote lock or glass regulator, remove tail gate trim panel and apply Lubriplate to all pivot sliding contact areas, remote control assembly and spring. Door Ease or equivalent, should be applied to contact surfaces of striker bolt.

Door Remote Control Link (All Models) If necessary to inspect operation of and relubricate these parts, remove door trim panel. Apply a film of Lubriplate or equivalent, to all link end pivots. Window Regulator, Glass Lower Frame (All Models)

If necessary to inspect operation of and relubricate these parts, remove door or quarter trim panel. Apply Lubriplate or equivalent, sparingly, to regulator sector gear teeth, assist spring and pivots. Apply same lubricant sparingly, to glass lower frame roller slide tracks and roller and bracket assembly pivot points.

Tail Gate Window Wiper Linkage

To lubricate this linkage, remove tail gate trim panel. Apply Lubriplate or equivalent, sparingly, to the sliding contact areas between the actuator arm and pin, and between the actuating arm and regulator sector gear. Do not contaminate wiper blades with lubricant.

HINGE TORSION BAR

Deck Lid Latch (All Models) Apply Lubriplate or equivalent, sparingly, to all pivot and sliding contact surfaces (Fig. 56).

SUPPORT SPRING NUT

Deck Lid Hinges (All Models)

Apply Lubriplate or equivalent, sparingly, to all torsion bar support bearing areas and interior surface of torsion bar slide (Fig. 57). Also, apply same lubricant sparingly, to contact surface of hinge cam slide.

BEARING AREA

I

INTERIOR SURFACE

CONTACT SURFACES

TAIL GATE—DOOR LUBRICATION (Coronet Models)

HINGE CAM

Apply engine oil sparingly to upper and lower hinge pivot pins and to the check strap and link pivot bolts (Fig. 58). Lubricate check strap, link and torsion bar

TORSION BAR

NP178

Fig. 57—Deck Lid Hinge (Coronet Models)


LUBRICATION AND MAINTENANCE 0-25 STRIKER BOLT

UPPER HINGE PIVOT PIN LOCK CONTACT AREAS PIVOT PIN

--rc brL'' LINK CONTACT AREAS ECK STRAP CONTACT AREAS LOWER HINGE PIVOT PINS

BELLCRANK PIN AUTOMATIC TRANSMISSION

TORSION BAR

WR190

Fig. 55—Tail Gate—Door

ACCELERATOR LINKAGE COMPONENTS Every 12 months the accelerator linkage components should be lubricated with Multi-Purpose Grease, NLGI grade 2 EP, such as Multi-Mileage Lubricant, Part Number 2525035 or equivalent, as described in the following paragraphs. Do not lubricate ball joints or throttle control cable.

Passenger Compartment On models with manual and Automatic transmissions, apply a thin film of the prescribed lubricant on both ends of the accelerator shaft where it turns in the bracket and where it is contacted by the antirattle spring, if so equipped (Fig. 59). Also; lubricate the pedal pivot pin, cable ball end and pocket in the accelerator shaft. Be sure plug is in place. On all models apply a light film of lubricant on the accelerator shaft under the nylon roller. INSULATOR-

WASHER at_

Fig. 60—Throttle Linkage Lubrication (6 cylinder models)

Engine Compartment On models with automatic transmissions apply a thin film or the prescribed lubricant to the bellcrank pivot areas (Figs. 60, 61 or 62).

PARTS REQUIRING NO LUBRICATION There are many points that should not be lubricated, some because they are permanently lubricated, some because lubricants will be detrimental to their operating characteristics, and some because lubricants will cause component failures. In any event, rubber bushings should not be lubricated, not only because lubricants will cause rubber to fail, but also will destroy their necessary fraction characteristics. The following parts should not be lubricated: All Rubber Bushings Alternator Bearings Automatic Transmission Controls and Linkage BELLCRANK PIN-UPPER (AUTOMATIC TRANSMISSION)

CABLE BALL END PLUG

BRACKET ASSEMBLY SEAL

LEVER ACCELERATOR SHAFT PEDAL BELLCRANK PIN-LOWER (AUTOMATIC TRANSMISSION) PY737 PY741

Fig. 59—Accelerator Components Lubrication

Fig. 6I—Throttle Linkage Lubrication (8 cylinder models)


0-26 LUBRICATION AND MAINTENANCE

BELLCRANK UPPER

426 HEMI

BELLCRANK LOWER PY739

Fig. 62—Throttle Linkage Lubrication (Models with 426 Hemi and 440 three 2 BBL.)

Carburetor Air Cleaner (Paper Element Type) Clutch Pedal Push Rod Ends Clutch Adjustment Rod Ends Clutch Release Bearing Drive Belts Fan Belt Idler Pulley

Rear Springs Rear Wheel Bearings Starting Motor Bushings Throttle Linkage Ball Joints Throttle Control Cable Upper and Lower Control Arm Bushings Water Pump Bearings


GROUP 1

ACCESSORIES CONTENTS

Page ELECTRIC CLOCK RADIO AND ANTENNA REAR WINDOW DEFOGGER

Page

1 SPEED CONTROL 5 1 TAIL GATE WIPER WASHER SYSTEM ... 11 14

ELECTRIC CLOCK GENERAL INFORMATION

The electric clocks have a self-regulating mechanism for automatically correcting time gain or lag when the hands are reset to the correct time. Clocks should be reset as follows: (1) If the clock runs fast, pull the time set shaft out and reset the hands in a "counterclockwise" di-

rection to the correct time. Push in the time set shaft. (2) If the clock runs slow, pull the time set shaft out and reset the hands in a "clockwise" direction to the correct time. Push in the time set shaft. (3) Repeat steps (1) and/or (2) frequently for several days until the correct rate of time is achieved.

SERVICE DIAGNOSIS Condition CLOCK DOES NOT OPERATE

Possible Cause

Correction

(a) Wire loose or off terminal.

(a) I nstall connector on terminal.

(b) Internal short.

(b) Repair or replace the clock as necessary. (c) Tighten clock retaining screws on cluster housing and/or cluster mounting screws.

(c) Faulty ground.

SERVICE PROCEDURES Removal—Coronet (1) Remove clock reset knob from front of instru-

ment panel. (2) From under the instrument panel, remove the wiring connector from clock terminal, the three screws mounting the clock to the cluster and remove the clock.

Cluster Removal", Group 8. (2) Remove clock or clock tachometer. On clock tachometer, remove grommet and wire from tachometer housing and remove the screws attaching clock to tachometer housing. Carefully remove clock without damaging tachometer indicator hand. Installation—Charger

Installation—Coronet

(1) From under the instrument panel position clock, install mounting screws and clock wiring connector. (2) Install clock reset at front of instrument panel and check operation of clock. Removal—Charger

(1) Remove instrument cluster. See "Instrument

(1) Carefully install clock and attaching screws on instrument cluster. On clock tachometer carefully enter clock into tachometer housing and install clock attaching screws. (2) Install clock and tachometer on instrument cluster and install attaching screws. (3) Install instrument cluster. See "Instrument Cluster Installation", Group 8.

RADIO AND ANTENNA INDEX Page Antennas Antenna Trimming General Information Fader Control Front Speakers

3 3 2 2 5

Interference Elimination Radios Rear Seat Speakers Service Diagnosis

Stereo Speakers

Page 3 4 5

2 5


1-2 ACCESSORIES GENERAL INFORMATION

Combination AM Radio and Stereo Tape Player (Optional)

OPERATION

The operating controls consist of four thumbwheels and a selector button. This four program eight-track stereo tape player provides full stereo reproduction. To operate, insert the tape cartridge, label side up, into opening provided. The door will swing inward and the tape player will begin to play when the cartridge is in position. At any given time the listener has a choice of four different selections by depressing the selector button located to the left of the radio dial.

RADIO—Push Button AM (Optional)

To operate the radio, the ignition must be in the "on" or accessory position. Left center knob turns on the radio and controls volume. Stations are selected by the push buttons or right center knob. Left outer ring allows you to adjust tone quality. Push Button FM/AM (Optional)

Operating controls consist of four thumbwheels. Left outside—On-Off and Volume Left inside—Station Selection Right inside—Tone Quality Right outside—FM and AM Selector Push buttons may be set for either FM or AM stations.

Do not store tape cartridges in high temperature

areas,

such as on top of the instrument panel or the rear package shelf.

Speaker Fader Control

The speaker fader control, located remotely from the stereo unit, serves to proportion the sound level between the front and rear speakers.

SERVICE DIAGNOSIS Condition

RADIO INOPERATIVE

Possible Cause

(c) Receiver or Speaker loose or faulty.

RADIO RECEPTION WEAK

RADIO NOISY

(a) Replace fuse, check for short or open

(a) Blown fuse.

(b) Antenna open or shorted.

Correction

in wiring harness (b) Test with an auxiliary antenna with lead-in plugged into the receiver set and test antenna held outside of car. If radio plays with test antenna, use original antenna and check antenna mostly for shorts to ground while rocking antenna slightly. Unplug antenna lead from radio and use ohmmeter to check from center contact of antenna to outside of case. if reading on ohmmeter is less than 500,000 ohms, replace antenna. connections (c) Test the voltage at the fuse and tight-

(a) Unbalanced antenna trimmer.

en all connections. With speaker control tuned to either stop, rotate control to other stop. If radio plays, replace faulty speaker. If radio does not play, remove radio receiver for servicing. (a) Carefully adjust the antenna trimmer. See "Service Procedures".

(b) Shorted antenna lead-in.

(b) Turn on radio and wiggle antenna. If speaker static is heard, check for antenna mounting tightness If speaker static is still heard after tightening, disassemble antenna and test for faulty insulators or presence of moisture. Make an ohmmeter check step (b) under "Radio Inoperative. If no static is heard, test for faulty or loose receiver or antenna connections at receiver. Also check antenna lead-in at antenna. If antenna checks OK, re. move radio receiver for servicing.

(a) Outside electrical interference.

(a) Move the car or eliminate interference.


ACCESSORIES 1-3 Condition

RADIO RECEPTION DISTORTED

INTERMITTENT RECEPTION

Possible Cause

Correction

(b) Insufficient or faulty interference sup- (b) Install effective capacitor in ignition pression. system or voltage limiter. (c) Faulty antenna. (c) Turn on radio and wiggie antenna lead and listen for speaker static. If static is heard, disassemble antenna and check for faulty insulators or presence of moisture. Make an ohmmeter test, Step (b) ''Radio Inoperative." If no static is heard, check for a loose or faulty capacitor. If capacitor is OK, remove antenna plug from radio receiver and bump receiver with heel of hand. If no static is heard, start engine, turn on headlights and slowly, accelerate engine speed. If a whining noise is heard, turn off headlights and if whining noise is still present check alternator for burned out diodes and voltage regulator setting. If OK, remove radio receiver for servicing. (a) Speaker voice coil leads rubbing on (a) Install an auxiliary speaker and comspeaker cone. pare. Replace if improved. (b) Torn speaker cone. (b) Replace the speaker. (c) Faulty radio. (c) Send radio to authorized radio service station for repair. (d) Clean or replace speaker. (d) Foreign material in speaker. (a) Broken or shorted antenna lead-in (a) Test with a substitute antenna and rewire. place if necessary. (b) Faulty radio. (b) Send radio to authorized radio service station for repair. SERVICE PROCEDURES

Antenna Trimming All radios are trimmed at the factory and should require no further trimmer adjustment. However, whenever a radio is being installed after repair, or if verification of trimmer adjustment is desired, proceed as follows: (1) Extend antenna to 40 inches. (2) Manually tune radio to a weak signal between 1400 and 1600 K.C. (3) Increase radio volume and set tone control to maximum treble. (4) The trimmer screw is located at the rear lower right hand corner of the radio and can be reached by inserting a screwdriver into the trimmer screw access hole. (5) Adjust antenna trimmer by carefully turning back and forth until position is found that gives peak response in volume. Maximum output indicates proper point of antenna trimmer adjustment. Radio Push Button Adjustment

(1) Extend radio antenna fully. (2) Turn radio ON and allow a warm-up period of 15 minutes. (3) Unlock push button by pulling out toward rear of vehicle.

(4) Using manual tuning control, tune in desired station. (5) Relock push button by pushing it all the way in toward front of vehicle. Interference Elimination Three capacitors are used to suppress engine electrical interference. The alternator is equipped with an internal capacitor integral with the output stud. A second capacitor is mounted on the back of the instrument cluster with a self tapping screw (Figs. 1 and 2). The lead wire of this capacitor is connected to the input terminal of the voltage limiter on all models. A third capacitor is installed on the ignition coil with the lead connected to the positive primary terminal of the coil (Fig. 3). Radio resistance type wires in the high tension circuit of the ignition system complete the interference suppression. If radio noises are evident, be sure the capacitor lead wires are making good contact on their respective terminals and are securely mounted. Faulty or deteriorated spark plug wires should be replaced. AN Removal—All Models (1) Unplug antenna lead from radio receiver.


1-4 ACCESSORIES CGS

PRIMARY BATTERY POST

. ,71‘

VOLTAGE LIMITER

0, 121 4 „i

SCREW

-

CAPACITOR NR551

MOUNTING- BRACKET

Fig. I—Radio Interference Capacitor to Cluster Installation—Charger

(2) Remove antenna mast by unscrewing from antenna body (Fig. 4). (3) Remove capnut (Figs. 5 and 6). (4) Remove antenna fender adapter and gasket. (5) From under fender remove the lower adapter mounting collar and antenna lead. Installation — All Models (1) Assemble mounting collar to antenna body (if removed). (2), Enter anenna body from underneath fender and insert through mounting hole in fender. (3) Install gasket, adapter and capnut. Tighten capnut to 155 inch pounds, plus or minus 25 inch pounds with Tool C-4085 (Fig. 8). (4) Install antenna mast into antenna body until sleeve bottoms on antenna body. (5) Reroute antenna lead through cowl side panel and over top of glove box to radio receiver (Fig. 7).

MOUNTING

801r—

-1EKP 439 B

CAPACITOR

Fig. 3—ignition Coil Capacitor

(7) Remove radio from under panel. Installation (1) Enter radio from under panel and position on instrument panel and install the mounting screws. (2) Connect antenna and speaker leads. (3) Install radio mounting bracket. (4) Install upper center, left air and lower center ducts on cars equipped with air conditioning. (5) Install radio finish plate (four screws).

1.:7"ss ANTENNA MAST

RADIOS

CAP NUT

CAUTION: Do not operate the radio with speaker leads detached since damage to the transistors may result.

UPPER ADAPTER GASKET

Removal —Charger Models (1) Disconnect battery ground cable. (2) Remove radio finish plate. (S) On air conditioning equipped models, remove lower center air duct, left air duct and upper center duct. See "Air Conditioning" Group 24. (4) Remove radio mounting nut. (5) Remove two screws mounting radio to front of instrument panel. (6) Disconnect antenna and speaker leads. CLUSTER

VOLTAGE LIMITER

NR4ROA

Fig. 4—Antenna Installation ANTENNA MAST CAPNUT

"•• GASKET

ADAPTER FENDER SECTION REFERENCE MOUNTING COLLAR COWL SIDE PANEL REFERENCE ANTENNA LEAD

ANTENNA BODY

CAPACITOR

SCREW

NR544

Fig. 2—Radio Interference Capacitor to Cluster Installation—Coronet

NR546

GROMMET

Fig. S—Antenna Disassembled


ACCESSORIES 1-5 PLACE EXCESS CA811 BEHIND TRIM PANEL

ea. .

— TOOL CAP NUT

COWL SIDE PANEL

ANTENNA ADAPTER

VIEW IN DIRECTION

Of ARROW Y

NU42

Fig. 6—Tightening Antenna Cap Nut

NP317

Fig. 7—Antenna Cable Routine

Removal—Coronet

Installation

(1) Disconnect battery ground cable. (2) Remove radio upper trim panel. (3) Remove radio finish plate. (4) Remove radio rear mounting nut from mounting bracket (5) Disconnect electrical wiring and antenna lead. (6) Remove two mounting screws from front of instrument paneL (7) Remove radio from under panel.

(1) Assemble speaker to speaker mounting plate. (2) Position speaker and mounting plate to panel and install the two speaker mounting nuts. (3) Install radio. See "Radio Installation."

Installation

(1) Enter radio from under panel into position on the instrument panel and install the two mounting screws. (2) Connect electrical wiring and antenna lead. (3) Install radio mounting bracket nut (4) Install radio Eviiqh plate. (5) Install radio upper trim panel. (6) Connect battery ground cable and test operation of the radio.

Rear Seat Speaker—All Models Removal

(1) Disconnect speaker leads. (2) Remove the four sheet metal screws holding speaker to shelf panel. Installation

(1) Position speaker under shelf panel and install four mounting screws. (2) Connect speaker leads. STEREO SPEAKERS (Righter Left Speaker) Removal

Ii) Remove the four speaker and grille mounting screws. (2) Disronnect speaker lead and remove speaker.

SPEAKERS—FRONT Removal—Charger Models

(1) Remove radio. See "Radio RemovaL" (2) Remove two speaker mounting nuts. (3) Remove speaker from under paneL (4) Remove speaker from mounting plate by removing four screws.

Installation

1) Attach speaker lead to speaker and position speaker and grille on instrument panel. (2) Install the four speaker and grille attaching screws.

SPEED CONTROL SYSTEM

General Information Installation Removal

INDEX Page 5 Service Diagnosis 10 Test and Adjustments 10

Page 6 7

GENERAL INFORMATION

The speed control system (Fig. 1) is electrically actuated and vacuum operated. The turn signal lever on the steering column incorporates a CONTROL

RING which when rotated, turns the system "OFF", "ON" or "RESUME SPEED" A SPEED SET button is located in the end of the lever. This device is de-


1-6 ACCESSORIES INTAKE MANIFOLD VACUUM FITTING CLIP HOSE h CLAMP (2) MANUAL BRAKE" LA " ENGINE ONLY CLIP BRACKET CABLE TO SPEEDOMETER

PIN

SERVO

CABLE TO TRANSMISSION

BRACKET CLIP

rt 1r—if)

CLAMP

NUT

HOSE (WITH POWER BRAKE)

SOLENOID

CLAMP (2)

BRACKET

Pk,

PY4S1

SCREW (2)

Fig. I—Speed Control Servo Adaptation—Coronet and Charger

signed to operate at speeds above approximately 30 M.P.H. WARNING: The use of "Speed Control" is net recommended when driving conditions do not permit maintaining a constant speed, such as heavy traffic or on roads that are winding, icy, snow-covered or slippery. TO ENGAGE: Rotate control ring to the "ON" posi-

tion, attain desired speed then momentarily depress and release "SPEED SET" button establishing speed memory and engaging system. Remove foot from accelerator. Speed will be maintained at this level. Turning the control ring from "OFF" to "ON" while the vehicle is in motion establishes memory without system engagement at that speed. TO DISENGAGE: Normal brake application or a soft tap on the brake pedal will disengage control unit without erasing speed memory. Fully rotating the control ring in the "OFF" position or turning the ignition "OFF" also disengages the system and in addi-

tion erases the speed memory. TO RESUME: Rotate control ring fully in the "RESUME" direction. Vehicle will resume to the previously memorized speed. TO VARY SPEED SETTING: To increase speed, depress accelerator to desired speed and momentarily depress and release SPEED SET button. When speed control unit is engaged, tapping SPEED SET button may increase speed setting incrementally. To decrease speed, tap brake pedal lightly disengaging system. When desired speed has been obtained depress and release SPEED SET button. Decrease in speed can also be attained by holding set button depressed until desired speed is attained. Releasing the button engages the system at that speed. TO ACCELERATE FOR PASSING: Depress accelerator as needed, when passing is completed, release accelerator and vehicle will return to previous speed setting.

SERVICE DIAGNOSIS Condition NO SPEED CONTROL WHEN BUTTON PRESSED.

Possible Cause

Correction

(a) Turn ring to "ON" position. (b) Replace fuse. (c) Check vacuum lines. (c) Vacuum leak. (d) Speed control throttle cable discon- (d) Connect and adjust control cable. See "Tests and Adjustments". nected.

(a) Control ring in "OFF" position. (b) Fuse blown.


ACCESSORIES 1-7 Condition

Possible Cause

Correction

(e) Improper stop lamp and speed con- (e) Adjust switch. See "Tests and Adjusttrol switch adjustment. ments". (f) Faulty electrical circuit. (f) See "Electrical Tests". NO RESUME WHEN CONTROL RING IS ROTATED.

(a) Insufficient rotation of control ring. (b) Faulty electrical circuit.

NO SYSTEM DISENGAGEMENT WHEN BRAKE PEDAL IS DEPRESSED.

(a) Improper adjustment of stop lamp (a) Adjust switch. See "Tests and Adjustments". and speed control switch. (b) See "Electrical Tests". (b) Faulty electrical circuit.

SPEED CONTROL ENGAGES WITHOUT ACTUATING THE SWITCH.

(a) Faulty electrical circuit.

CARBURETOR DOES NOT RETURN TO NORMAL IDLE.

(a) Speed control throttle cable malad- (a) Adjust speed control throttle cable. See "Tests and Adjustments". justed. (b) Speed control throttle cable kinked (b) Repair or replace cable. or damaged.

(a) See "Electrical Tests".

(u) 3lanulani tlii uttic linkage faulty.

SPEEDOMETER NOISE, EXCESSIVE NEEDLE WAIVER OR ERRATIC SERVO LOCK-IN PERFORMANCE.

(a) Rotate ring fully toward "Resume". (b) See "Electrical Tests".

(e) Repair or replace linkage.

(a) Speedometer cable kinked or dam- (a) aged. (b) Cable core bent or too long. (b) (c) Cable ferrule nut loose at speedom- (c) eter head, transmission or speed control servo. (d) No lubricant on speedometer cable (d) core. (e) Noisy speedometer head assembly. (e)

Align cables to avoid sharp bends or replace cable. Replace core. Tighten cable ferrule nuts. Lubricate cables. Repair or replace the speedometer as necessary.

SPEED SETTING AFTER LOCK-IN, TOO HIGH OR TOO LOW.

(a) Improper adjustment of speed control throttle cable. (b) Vacuum leak. (c) Improper speed control servo lock-in adjustment.

Adjust speed control throttle cable. Check all vacuum hose connections. See "Servo Lock-in Screw Adjustment".

UNIT DISENGAGES ON ROUGH ROAD.

(a) Improper adjustment of stop lamp and speed control.

Adjust as necessary. See "Tests and Adjustments".

RESUME SPEED IS POSSIBLE BELOW 20 M.P.H.

(a) Faulty low speed inhibit switch in Replace servo unit. servo unit. (b) Faulty electrical circuit. (b) See "Electrical Tests".

SPEED CONTROL ENGAGES WHEN ENGINE IS STARTED OR DOES NOT DISENGAGE WHEN BRAKE PEDAL IS DEPRESSED.

(a) Faulty electrical circuit

(a) See "Electrical Tests".

SERVICE PROCEDURES Test and Adjustments Servo Lock-in Screw Adjustment The Lock-in Screw Adjustment (Fig. 2) controls the accuracy of the speed control unit.. When the SPEED SET button is depressed and released at speeds above approximately 30 M.P.H.; the speed control system is activated, the system "locks-in" and should hold the vehicle at virtually the same speed at which it is

traveling. IMPORTANT: Lock-in accuracy will he affected by

(a) Poor engine performance (need for tune-up etc.) (b) Power to weight ratio (loaded gross weight of car; trailering). (c) Improper slack in throttle control cable. (See "Throttle Control Cable Adjustment"). This screw should never be adjusted indiscriminately. Need for adjustment can be determined only after accurate diagnosis of the Speed Control System

operation.


14 ACCESSORIES

Fig. 2—Lock-in Screw Adjustment

After the steps (a) (b) and (c) have been considered and speed "sags" (drops) more than 2 to 3 M.P.H. when speed control is activated, the lock-in adjusting screw should be turned counter-clockwise (approximately 1/4 turn per one M.P.H. correction required). If "Pull-up" (speed increase) of more than 2 to 3 M.P.H. occurs, the lock-in adjusting screw should be turned clockwise approximately 1/4 turn per one M.P.H. correction required. If the screw is loose. stake side of servo housing adjacent to screw to INSURE a snug fit. CAUTION: This adjustment must not exceed two turns in either direction or damage to unit may occur. Speed Control Throttle Cable Adjustment Optimum servo performance is obtained with a given amount of freo play in the throttle control cable. To obtain proper free play, insert a 1/16 inch diameter pin between forward end of slot in cable end and carburetor linkage pin. Use hair pin clip removed from carburetor linkage pin as a gauge (Fig. 3). With choke in full open position and carburetor at curb idle, pull back on cable (toward dash pane)) without moving carburetor linkage until all free play is removed . Tighten cable clamp bolt to 45 inch-pounds. remove 1/16 inch diameter pin and install hair pin clip if removed. Stop Lamp and Speed Control Switch Adjustment Refer to Figure 4, for proper switch adjustment as follows: 1. Loosen switch bracket. 2. Insert proper spacer gauge between brake push rod and switch with pedal in free position. 3. Push switch bracket assembly toward brake push rod until plunger is fully depressed and switch body contacts spacer. 4. Retighten switch bracket bolt to 100 inchpounds. 5. Remove spacer. Electrical Tests: Refer to "Speed Control Wiring Diagram", (Fig. 5).

Fig. 3 —Servo Throttle Cable Adjustment It is suggested that the electrical tests be made in the following sequence: (1) Check accessory fuse for continuity. (2) Speed control switch (turn signal lever) test. (a) Disconnect the four wire electrical connector at the steering column. (16 Connect a twelve volt positive source to the black wire terminal in the speed control harness connector (male). (c) With the speed control lever rotary switch in the ON position, attach one lead of a test lamp to the connector yellow wire, other lead to a good ground: lAgt lamp should light and snoula go Off mien the "Speed Set" button is depressed. kb Move the test lamp lead to the connector blue wire; test lamp should light and should go off when the speed control lever rotary switch is turned to the OFF position. (e) With the rotary switch in the ON position, move test lamp lead to the connector white wire; test lamp should light by either depressing the "Speed Set- button or by rotating the speed control lever rotary switch fully toward the "Resume" position. (f) Reconnect speed control lever harness connector to harness connector. (3) Stop lamp and speed control switch test: (a) Disconnect the double connector at the switch pigtail and connect a twelve volt source to either terminal and connect a test lamp from the other terminal to a good ground: test lamp should light when brake pedal is in the normal position and should go off when the brake pedal is depressed to a maximum of approximately one half inch after proper adjustment as outlined in -Stop Lamp and Speed Control Switch Adjustment". (b) Remove test lamp and reconnect pigtail connector to harness connector. (4) Servo unit tests:


SCREW AND WASHER (POWER AND MANUAL BRAKES) TORQUE 95 ROUTE WIRING TO ASSURE NO "CHAFING THROUGH" OF WIRE INSULATION

INSULATOR YELLOW

SCREW

WHITE BLACK SWITCH AND BRACKET ASSEMBLY

V AL

DARK BLUE VIEW IN DIRECTION OF ARROW A SWITCH AND BRACKET ASSEMBLY

it itildit II 0 I • il i

.140 INCH SPACER (SEE NOTE) .140 INCH SPACER (SEE NOTE)

FREE POSITION POWER BRAKES

.140 INCH PEDAL TRAVEL TOLERANCE ACCEPTABLE FOR SWITCH FUNCTION

NOTE: DO NOT PULL BRAKE PEDAL TO ADJUST SWITCH POSITION SWITCH AGAINST SPACER WITH PEDAL IN FREE POSITION AND SWITCH PLUNGER FULLY DEPRESSED

MANUAL BRAKE

Fig. 4 -Stop Lamp and Speed Control Switch Adaption -Coronet and Charger

PY413

S31210S9333V

FREE POSITION


1-10 ACCESSORIES PUSH BUTTON ACTUATOR

STOP LAMP AND SPEED BRAKE SWITCH 18D131

IV I

I— X308-20081 TURN SIGNAL AND SPEED CONTROL SWITCH LEVER

X30A.20DBL-

18DBL

TO ACCESSORY FEED (SEE ACCESSORY WIRING DIAGRAM)

GROMMET FDBL 22BK 22W' 22y

—X30B-20D8L X32-20BK — X33-20BK X31-18Y• '..\DASH LINE X33-20Br X31 18Y* X30A-20DBL

nn _TO SPEED CONTROL UNIT (ENGINE COMPARTMENT)

COLOR CODE BK 0111 Y •

BLACK DARK BLUE YELLOW WITH TRACER PY246

Fig. 5—Speed Control Wiring Diagram

(a) Locking coil test; turn ignition switch to the Accessory or ON position and rotate the speed control rotary switch to the ON position. (b) Momentarily disconnecting and connecting the double connector at the servo terminals should produce a clicking sound in the servo. Replace the servo if no clicking sound is heard. (c) Holding coil and Low Speed switch test; without removing either connector at servo, place a test lamp probe to the black (with tracer) wire terminal of servo, other probe to a good ground. Block front wheels; raise rear wheels and drive rear wheels to 35 miles per hour; with speed control lever rotary switch in the ON position and ignition switch in the ON position, depress and release "Speed Set" button. The speed should increase above 35 miles per hour and the test lamp should remain ON until the brake pedal is depressed to disengage the system and test light should go off. (d) Remove test lamp.

(2) Disconnect speedometer and transmission drive cables at the servo housing. (3) Disconnect vacuum hose at servo housing (Fig. 7) and electrical connectors. (4) Remove servo from mounting bracket (two selflocking nuts). Installation

(I) Position servo on mounting bracket studs and install attaching nuts. Tighten to 95 inch-pounds. (2) Install vacuum hose and clamp. Make sure the hose clamp is locked securely. (3) Connect speedometer and transmission drive cables at servo. (4) With choke in full open position, align throttle

Speed Control Servo (Fig. 6) Removal

(1) Remove two self-locking nuts attaching the servo cable cover to servo housing. Pull cover away from servo to expose cable retaining clip (Fig. 6) and remove clip attaching cable to servo diaphragm pin

Fig. 6—Removing or Installing Throttle Cable Cover


ACCESSORIES 1-11

Fig. 7—Removing or Installing Servo Hose

cable to servo pin and install retaining clip. (5) inct211 cable cover on servo studs and install attaching nuts. Tighten nuts securely. (6) Install electrical connectors at servo. Servo Throttle Cable Assembly (Servo to Carburetor) Removal

(1) Remove air cleaner. (2) Disconnect cable at retaining clamp and at carburetor lost motion link, removing hair pin clip. (3) Disconnect cable at servo (Fig. 6) and remove cable assembly. Installation

(1) Locate cable through routing brackets on dash panel and on brake booster studs, (so equipped). (2) Connect cable at servo housing (Fig- 6)(3) Route cable through retaining clamp and connect at carburetor lost motion link lever pin. (4) Adjust cable free play as described under "Speed Control Throttle Cable Adjusiment" Speed Control Switch (Turn Signal Lever) Removal

(1) Disconnect battery negative terminal at battery negative post and speed control connector at lower end of column. (2) Remove steering wheeL See Group 19 "Steering". (3) Remove turn signal switch and lever attaching strew.

(4) Remove steering column cover plate and sup-

Fig. 8—Removing Wire Terminals with Taal C-4135

port steering column while clamp is removed to prevent column from sagging. (5) Remove wire harness trough to facilitate reach. ing the lower end of speed control switch lead wires (Figs. 4 and 5) and remove wires and terminals from connector with Wire Harness Tool C-4135 (Fig. 8). CAUTION: Check color coding of wires to insure they are installed in the proper connector at reassembly. See Figures 4 and 5.

(6) Tape terminals, then turn direction indicator lever sideways and pull lever up and wires out through opening between column and tuba Installation

(1) Make a guide wire and thread the harness through the opening in column. Make guide wire long enough so that it can be reached at bottom of column before harness is attached to the upper book. When harness has been pulled through. install terminal clips into switch connector and connect to harness connector (be sure wires are connected to proper cavity (Fig. 4). (2) Install harness trough. Steering column cover plate and column support clamp. (3) Install turn signal lever (speed control lever switch) and turn signal switch attaching screw. (4) Install steering wheel, steering column cover plate. See Group 19 "Steering". (5) Connect battery negative terminal at battery negative pest.

TAIL GATE WIPER WASHER SYSTEM INDEX General Information Intermediate Blade Motor Pump

Page 12 14 14

Service Diagnosis Washer Reservoir Wiper Blade—Replacement

Page 12 14 14


1-12 ACCESSORIES WIPER BLADES TAIL GATE WINDOW

SPRAY NOZZLES FLUID RESERVOIR

-.0

NR4.98B

Fig. I—Tail Gate Window Washer and Wiper System

GENERAL INFORMATION The tail gate wiper washer system (Fig. 1) is a mechanically activated squeegee wiper with an electric motor driven washer pump for applying water to the tail gate glass. Operation The tail gate glass may be cleaned by: (1) Lowering the glass by activating the tail gate switch. (2) Activate the tall gate washer switch. (3) Raising the glass by activating the tail gate switch. The wiped area is accomplished by using two 18" flexible wiper blades, end to end.

When the glass is lowered to its bottom position an actuator arm is activated by the regulator sector gear which permits the spring loaded blades to move to an "on glass" position. When the glass is raised to its upper limit, the actuator arm is again activated causing the wiper blades to go to an "off glass" position. This permits the blades to remain in the "off glass" (free) position until the glass is again lowered. Washer fluid may be applied (as required) to the glass surface (with glass in lower position) by an electric driven pump, supplying nozzle assemblies located inside the upper part of the tail gate.

SERVICE DIAGNOSIS Condition

INTERMITTENT OPERATION OF WASHER.

Possible Cause

(a) Loose wiring connection.

(b) Faulty washer push button switch. (c) Faulty motor.

PUMP INOPERATIVE MOTOR RUNS.

(a) Nozzle jets plugged.

PUMP ASSEMBLY INOPERATIVE.

(a) Poor ground.

(b) Broken or loose hose. (c) Faulty pump.

(b) (c) (d) (e)

Loose wiring terminals. Broken wires. Faulty switch. Faulty motor.

Correction

(a) Tighten connections and repair as necessary. (b) Replace switch. (c) Replace motor and pump assembly. (a) Clean nozzle jets. (b) Replace hose. (c) Replace motor and pump assembly. (a) Clean ground wire terminal and tighten mounting screw. (b) Tighten terminals. (c) Repair or replace wires. (d) Replace switch. (e) Replace motor and pump assembly.


HOSE

VIEW C

RESERVOIR SEAL

BUSHING

BRACKET

SPRING

TAILGATE OUTSIDE PANEL

LEFT PILLAR REFERENCE

TAB BLADE ARM BUMPER NUT AND WASHER NUT AND WASHER

-

,

=

A

a

VIEW g

\,\ Fig, 2—Tail Gate Window Washer Installed

S31110SS333V

I

NR501B 7,4


1-14 ACCESSORIES WIPER BLADES WILL NOT GO ONTO GLASS.

Correction

Possible Cause

Condition

(a) Replace actuator arm. (b) Replace springs.

(a) Faulty actuator arm. (b) Torsion springs broken.

(a) Replace actuator arm. (b) Reinstall pin.

WIPER BLADES WILL NOT (a) Faulty actuator arm • (b) Actuator pin loose. COME OFF OF GLASS. SERVICE PROCEDURES Wiper Blade Replacement (18 Inch Blades) (1) Lower the tail gate glass to full bottom position. (2) Open tail gate to horizontal position. (3) Remove inner trim panel of tail gate. (4) Raise glass approximately half way, after tripping limit switch. (5) Position actuator arm for "off glass" condition of blades. (6) Disengage glass lower frame with window regulator arms, remove lower frame and remove glass. (7) Scribe location of window regulator or tail gate inner panel mounting brackets and remove the four screws attaching the window regulator to the mounting brackets. Do not lose any spacers and note location. Slide the regulator assembly to bottom of tail gate. (8) Depress locking tab on side of blade to release blades from mounting arm pins (Fig. 2). (9) Install new blades with locking tab down. Do

(2) Connect rubber filler hose at reservoir. (3) Reconnect the wire at washer motor. (4) Connect washer hose at washer pump, making sure hoses are routed to the correct outlets.

(5) Install tail gate inner panel. (6) Lower tail gate glass to bottom position and recheck motor and pump operation. Washer Nozzle Replacement (1) Perform steps 1 through 7 under "Wiper Blade Replacement"; then remove washer hose from nozzle. (2) Remove the screws mounting the two nozzle assemblies. (3) Inspect and clean nozzles. Replace if nozzles are damaged. (4) Position nozzles and install mounting screws. (5) Connect washer hose to nozzles. (6) Perform steps 10 through 13 under "Wiper Blade Replacement" and recheck nozzles operation.

not get lubricant on wiper blades.

(10) Position window regulator on mounting brackets and install mounting spacers (if used) and screws noting scribe mark locations. (11) Insert tail gate glass into tail gate, install glass lower frame and engage with regulator arms. (12) Install tail gate inner panel. (13) Lower glass to full bottom position and recheck operation of wiper blades. Washer Reservior and/or Motor Pump Assembly Removal (1) Lower tail gate glass to bottom position and open tail gate to horizontal position. (2) Remove tail gate inner trim panel. (3) Raise glass sufficient to allow access to reservoir assembly. CAUTION: Do not exceed normal height of glass travel.

(4) Remove washer hoses from both outlets at washer pump, being careful not to break outlets; identify hoses. (5) Disconnect one wire to washer motor. (6) Remove three mounting screws supporting reservoir and remove rubber filler hose at reservoir. Installation (1) Position reservoir and install mounting screws.

REAR WINDOW DEFOGGER To service the blower motor or fan, the assembly must be removed from the shelf panel from inside the luggage compartment. After disconnecting the outlet hose and wire connector, remove the mounting screws from the mounting clips and remove the assembly from the vehicle for service. Disassembly (1) Remove the blower motor adapter plate to housing mounting screws and withdraw motor and fan assembly from housing. (2) Loosen fan set screw on fan hub and slide fan from motor shaft. (3) Remove the motor adapter plate mounting nuts and separate motor from plate. Assembly (1) Position adapter plate on motor studs and install the mounting nuts. (2) Install fan on motor shaft and insert assembly in housing. Check fan to housing clearance and adjust if necessary. (3) Install the blower motor adapter plate to housing mounting screws.


GROUP 2

FRONT SUSPENS/ON AND STEERING LINKAGE CONTENTS LOWER BALL JOINTS LOWER CONTROL ARM AND SHAFT LOWER CONTROL ARM STRUT PRE-ALIGNMENT INSPECTION Height Adjustment SPECIFICATIONS STEERING KNUCKLES STEERING LINKAGE SWAY BAR TIGHTENING REFERENCE

Page 9 7 9 4 4 12 6 6 7 13

GENERAL INFORMATION The torsion bar rear anchors are integral with the engine rear support member and the front anchors, which are part of the lower control arms, provide the means of adjusting vehicle front height. The lower ball joints are integral with the steering arms. Compression type lower balljoints are used on all Models. All ball joints and the torsion bars at the front of the rear anchors are effectively sealed against road splash by tightly fitted balloon type flexible seals. The ball joints and tie rod ends are of the semi-permanent lubricated type. When re-lubrication of the ball joints and tie rod end assemblies is required remove the plugs and install a lubrication fitting. After the lubrication is completed reinstall the plugs. Lower ball joints, steering arm assemblies, should not be replaced for looseness if the axial end play (Up and Down movement) is under .070 inch. Looseness of this nature is not detrimental and will not affect front wheel alignment or vehicle stability.

TORSION BAR UPPER BALL JOINTS UPPER CONTROL ARM WHEEL ALIGNMENT Camber Caster Steering Axis Inclination Toe-in Toe-out On Turns (Turning Radius)

Page 5 11 10 3 3 3 3 3 3

Service replacement ball joints are equipped with a "Knock-Off" type lubrication fitting. After lubrication, knock off that portion of the fitting over which the lubrication gun was installed. A ball check is installed in the remaining portion of the fitting to prevent foreign materials from passing through.

The tie rod ends are serviced separately and should be inspected for damage at all oil change periods. Caster and camber adjustments are controlled by cams on the upper control arm pivot bolts. All front suspension points that contain rubber shouid be tightened while the suspension is at the specified height (see specifications), with full weight of vehicle on its wheels. Rubber bushings should not be lubricated at any time. ON MODELS EQUIPPED WITH DISC BRAKES, REFER TO GROUP 5 FOR BRAKE DISC REMOVAL AND INSTALLATION PROCEDURES.

SERVICE DIAGNOSIS Condition

FRONT END NOISE

Correction

Possible Cause

(a) Ball joint needs lubrication. (a) Lubricate ball joint. (b) Shock absorber inoperative or bush- (b) Replace bushings, shock absorber or ings worn, or loose shock absorber tighten shock absorber mounting nuts. mounting.

(c) Worn strut bushings. (d) Loose struts. Loose steering gear on frame. Worn upper control arm bushings. Worn lower control arm shaft bushings. Excessively worn upper ball joint. Excessively worn lower ball joint. Worn tie rod ends. Loose or worn front wheel bearings.

(c) Replace bushing. (d) Inspect bushings and tighten strut

ig h t Tnuts.

te) en steering gear mounting bolts. (f) Replace worn bushings. (g) Replace worn bushings.

Replace ball joint. Replace ball joint. Replace tie rod end. Adjust or replace bearings as necessary. (I) Steering arm contacting the control (I) Smooth off contacting areas and luarm wheel stops. bricate with a water resistant grease. (h) (i) (j) (k)


2-2 FRONT SUSPENSION AND STEERING LINKAGE Possible Cause

Condition

Correction

POOR DIRECTIONAL STABILITY

(a) Inflate tires to correct pressure. (a) Low or uneven tire pressure. (b) Adjust wheel bearing. (b) Loose wheel bearings. (c) Improper steering cross shaft adjust- (c) Adjust steering cross shaft. ment. (d) Adjust steering gear. (d) Steering gear not centered. (e) Replace bushing or idler arm as (e) Worn idler arm bushing. necessary. (f) Replace bushings. (f) Loose or failed front strut bushings. (g) Replace spring. (g) Weak or broken rear spring. (h) Incorrect front wheel alignment or (h) Measure and adjust front wheel alignment and suspension heights. suspension heights. Replace shock absorber. (i) inoperative. absorber Shock ) 1 (. (j) Align steering gear or replace cross(j) Un-horizontal center link (cocked) member.

HARD STEERING

(a) Ball joints need lubrication. (b) Low or uneven tire pressure. (c) (d) (e) (f)

(g) (h) EXCESSIVE PLAY IN STEERING

(d) (e) (f) (g) (h)

VEHICLE PULLS TO ONE SIDE

(a) Adjust or replace wheel bearings as necessary. (b) Adjust steering gear. Incorrect steering gear adjustment Loose steering gear to frame mount- (c) Tighten steering gear to frame bolts. ing bolts. (d) Replace tie rods as necessary. Worn tie rod ends. (e) Replace worn steering gear parts and Worn steering gear parts. adjust steering gear as necessary. (0 Replace ball joints. Worn upper control arm ball joints. (g) Replace ball joints. Worn lower control arm ball joints. (h) Replace bushing. Worn idler arm bushing.

(a) Worn or loose front wheel bearings. (b) (c)

FRONT WHEEL SHIMMY

(a) Lubricate ball joints. (b) Inflate tires to the recommended pressures. (c) Fill power steering pump reservoir to Low power steering fluid level. correct level. Lack of assist of power steering (d) Inspect and test power steering pump and gear. Service as required. system. (e) Adjust heights to specifications. Low front suspension height. Incorrect front wheel alignment (Par- (0 Replace bent parts and adjust front wheel alignment. ticularly caster) resulting from a bent control arm steering knuckle or steering knuckle arm. (g) Adjust steering gear. Steering gear not adjusted properly. (h) Replace idler arm. Idler arm binding.

(a) Tire and wheel out of balance. (b) Unever tire wear, or excessively worn tires. (c) Worn or loose wheel bearings. (d) Worn tie rod ends. (e) Strut mounting bushings loose or worn. (f) Incorrect front wheel alignment and car height (particularly caster). (g) Upper ball joints loose or excessively worn.

(d) (e) (f) (g)

(c) Replace or adjust wheel bearings. (d) Replace tie rod ends. (e) Replace strut mounting bushings. (f) Adjust front wheel alignment and car height. (g) Tighten to specifications or replace as necessary.

(a) Inflate tires to the recommended pressure. (b) Adjust brakes. Front brake dragging. Grease, lubricant or brake fluid leak- (c) Replace brake shoe and lining as necessary and eliminate all leaks. ing onto brake lining. (d) Inspect bushings and replace as Loose strut bushings. necessary. Power steering control valve out of (e) Adjust steering gear control valve. adjustment. Incorrect front wheel alignment (par- (f) Adjust front wheel alignment ticularly caster). Broken or sagging front or rear (g) Replace spring. spring.

(a) Low or uneven tire pressure. (b) (c)

(a) Balance wheel and tire assembly. (b) Rotate or replace tires as necessary.


FRONT SUSPENSION AND STEERING LINKAGE 2-3 Condition

Correction

Possible Cause

(h) Excessively worn suspension pivot (h) Replace bushings. bushings.

SERVICE PROCEDURES WHEEL ALIGNMENT Front wheel alignment is the proper adjustment of all the interrelated suspension angles affecting the running and steering of the front wheels of the vehicle. The importance of wheel alignment and wheel balancing is considered essential in order to maintain ease of steering, good directional stability and to prevent abnormal tire wear. Under every day driving conditions the front wheel alignment angles change and therefore it becomes necessary that every vehicle should have an alignment check at least once a year. Such an inspection of the front suspension and steering components is a preventative maintenance service and also has a definite bearing on the safe operation of the vehicle. The method of checking front wheel alignment will vary depending on the type of equipment being used. The instructions furnished by the manufacturer of the equipment should always be followed, with the exception that the specifications recommended by the Chrysler Motors Corporation be used. There are six basic factors which are the foundation to front wheel alignment; height, caster, camber, toe-in, steering axis inclination and toe-out on turns (Fig. 1). All are mechanically adjustable except steering axis inclination and toe-out on turns. The latter two are valuable in determining if parts are bent or damaged particularly when the camber and caster adjustments cannot be brought within the recommended specifications.

tire wear factor; negative camber causes wear on the inside of the tire, while positive camber causes wear to the outside. Toe-in is measured in inches and is the distance the leading edges of the tires are closer than the trailing edges. Toe-in is considered the most serious cause for excessive tire wear. Toe-in is the last of the alignment angles to be set in the front wheel alignment operation. Steering Axis inclination is measured in degrees and is the amount the spindle support center line is tilted from true vertical. It has a fixed relationship with camber settings and does not change except when a spindle or ball joint is damaged or bent. This angle is not adjustable and damaged parts must be replaced. Toe-out on Turns (Turning Radius') is measured in degrees and is the amount one front wheel turns sharper than the other on a turn. This angle is designed into the steering arms in relationship to the wheelbase of the vehicle and is not adjustable. When checking the turning radius and it is found not HEIGHT

TOE IN

Do not attempt to modify any suspension or steering components by heating or bending.

All adjustments should be made in the following sequence: (a) Front suspension height (b) Caster and Camber (c) Toe in (d) Steering Axis Inclination (e) Toe-out on Turns. Caster is the number of degrees of forward or backward tilt of the spindle support arm at the top. Forward tilt of the spindle support arm at the top is negative caster. Backward tilt of the spindle support arm at the top from true vertical is positive caster. Camber is the number of degrees the top of the wheel is tilted inward or outward from a true vertical. Inward tilt of the top of the wheel from true vertical is negative camber. Outward tilt of the wheel at the top is positive camber. Excessive camber is a

STEERING AXIS INCLINATION POSITIVE NEGATIVE CASTER CASTER FRONT OF CAR

PIVOT POINT POSITIVE CAMBER

00

NEGATIVE CAMBER

TOE-OW ON TURNS .0°

N

WHEELS TURN ABOUT COMMON CENTER NK372

Fig. I—Wheel Alignment Factors


2-4 FRONT SUSPENSION AND STEERING LINKAGE to be within the recommended specifications, look for possible bent or damaged components. PRE-ALIGNMENT INSPECTION Before any attempt is made to change or correct the wheel alignment factors the following inspection and necessary corrections must be made on those parts which influence the steering of the vehicle. (1) Check and inflate tires to recommended pressure. All tires should be same size and be in good condition and have approximately same wear. Note type of tire tread wear which will aid in diagnosing (Group 22). (2) Check and adjust front wheel bearings (Group 22). (3) Check front wheel and tire assembly for radial and lateral runout (follow the Equipment Manufacturers Instructions (Group 22). (4) Check wheel and tire for unbalance conditions both static and dynamic which could affect steering. (5) Inspect ball joints and all steering linkage pivot points for excessive looseness. (6) Check shock absorbers for leaks and jounce vehicle to determine if shock absorbers have proper control. (7) Check steering gear for roughness, binding or sticking condition and adjust as necessary. (8) Check rear springs for cracks or broken leaves and "U" bolts for proper tightness and measure height differential between left and right sides of vehicle. (Vehicle should be on level floor or on alignment rack) with a full tank of fuel and no luggage or passenger load. (9) Front suspension heights must only be checked after the vehicle has the recommended tire pressures, full tank of fuel, no passenger load and is on a level floor or alignment rack. To obtain accurate readings, vehicle should be jounced in following manner just prior to taking each measurement (Height Caster - Camber and Toe): Grasp bumpers at center (rear bumper first) and jounce up and down several times. Always release bumpers on the down cycle after jouncing both rear and front ends an equal number of times.

Height

Front suspension heights must be held to specifications for a satisfactory ride, correct appearance, proper front wheel alignment and reduced tire wear. The heights should only be measured after the vehicle has the recommended tire pressures, a full tank of fuel, no passenger or luggage compartment load and is on a level floor or alignment machine rack. (1) Clean all foreign material from bottom of steering knuckle arm assemblies and from lowest area of the height adjusting blades directly below center of lower eutittul aim inner pivots. (2) Jounce vehicle several times releasing it on downward motion. (3) Measure distance from lowest point of one adjusting blade to floor (Measurement A) and from lowest point of steering knuckle arm, at the centerline, on same side (Measurement B) to floor (Fig. 2). Measure only one side at a time. The difference between A and B (A always being greater than B) is the front suspension height.

(4) Refer to Specifications and adjust if necessary by turning torsion bar adjusting bolt clockwise to increase height and counterclockwise to decrease height. (5) After each adjustment, jounce vehicle before remeasuring. Both sides should be measured even though only one side has been adjusted. (6) Measure other side in same manner. The maximum allowable difference in suspension height from side to side is 1/8 inch on all Models.

Caner Access holes to loosen upper control arm cam bolt nuts have been provided for in the fender side shields (Fig. 3) of the Coronet model vehicles. The front access hole is made available by removing splash cover tapping screws and cover. (1) Prepare vehicle for measuring wheel alignment. (2) Remove all foreign material from exposed threads of cam adjusting bolts. (3) Record initial camber and caster readings before loosening cam bolt nuts.

Camber and

WHEEL ALIGNMENT ADJUSTMENTS Front wheel alignment settings must be held to specifications to hold tire wear to a minimum and to maintain steering ease and handling of vehicle. The equipment manufacturers recommended procedure should always be followed. Any parts of the front suspension system should be replaced if they are found to be bent. Do not attempt to straighten any bent part.

ND3O

Ng. 2 — Measuring Front Suspension Height


FRONT SUSPENSION AND STEERING LINKAGE

fig. 3—Access Opt

g in Fender Shield (4) Camber settings should be held as close as possible to the "preferred" setting. Caster should be held as nearly equal as possible on both wheels. See specifications at rear of group. The toe setting should be the final operation of the front wheel alignment adjustments. The front wheels must be in a straight ahead position. Follow the equipment manufacturers procedure. The steering wheel should also be centered during this operation. Turning the tie rod sleeve will "center" the steering wheel spokes. If the steering wheel was centered, make the toe-in adjustment by turning both sleeves an equal amount. Tighten adjusting sleeve clamp bolt nuts 115 inchpounds. Make sure clamp bolt nuts are on the bottom. TORSION BAR

My. 4—Torsion Bar

toward rear of torsion bar to allow sufficient room for striking the striking pad of tool. Do not apply heat to torsion bar, front anchor or rear anchor. (6) Remove tool and slide rear anchor balloon seal from anchor to facilitate removal of torsion bar. (7) Remove torsion bar by sliding bar out through rear of anchor. Use care not to damage balloon seal when it is removed from torsion bar. Inspection (1) Inspect balloon seal for damage and replace if necessary. (2) Inspect torsion bar for scores and nicks. Dress down all scratches and nicks to remove sharp edges, then paint repaired area with a good rust preventative. (3) Remove all foreign material from hex openings in anchors and from hex ends of torsion bars. (4) Inspect adjusting bolt and swivel and replace

The torsion bars are not interchangeable side for side. The bars are marked either right or left by an "R" or an "L" stamped on one end of the bar. Removal (1) Remove upper control arm rebound bumper. (2) If vehicle is to be raised on a hoist, make sure it is lifted on body only so that front suspension is in full rebound (under no load). If vehicle is to be raised on jacks, placed under center of crossmember it will be necessary that, a support first be placed between the crossmember and the jack. (3) Release all load from torsion bar (Fig. 4) by turning anchor adjusting bolt (Fig. 5) counterclockwise. (4) Remove lock ring from torsion bar rear anchor (Fig. 4). (5) Using Tool 03728, remove torsion bar (Fig. 5) from its anchors. It is advisable to place Tool C-3728

2-5

Fig. 5—Removing Torsion Bar


2-6 FRONT SUSPENSION AND STEERING LINKAGE if any corrosion or other damage is noted. Lubricate for easy operation.

prevent damage to brake hose when lower bolts are removed.

Installation

Installation (1) Position steering knuckle on brake support and install upper mounting bolts and nuts. Tighten nut finger tight only. (2) Position steering knuckle arm on steering knuckle and install mounting bolts and nuts finger tight only. (3) Install upper ball joint stud in steering knuckle and tighten ball joint stud nut 100 foot-pounds (Coronet Charger). Install Cotter Pin. (4) Tighten steering knuckle upper bolt nuts 55 foot-pounds. Tighten lower bolt nuts 120 foot-pounds (Coronet Charger Models). (5) Place a load on the torsion bar by turning adjusting bolt clockwise. (6) Install tie rod end in steering knuckle arm and install nut, tighten 40 foot-pounds and install cotter pin. (7) Install wheel, tire and drum assembly and adjust front wheel bearings (Group 22). (8) Lower vehicle to floor and install upper control arm rebound bumper. Tighten nut 200 inch-pounds. (9) Measure and adjust front suspension heights and wheel alignment as necessary.

(1) Insert torsion bar through rear anchor. (2) Slide balloon seal over torsion bar (cupped end toward rear of bar). (3) Coat both hex ends of torsion bar with MultiMileage Lubricant or equivalent. (4) Slide torsion bar into hex opening of lower control arm. (5) Install lock ring in rear anchor. (6) Pack the annular opening in rear anchor completely full of Multi-Mileage Lubricant or equivalent. (7) Position balloon seal on rear anchor so lip of seal engages with groove in anchor. (8) Turn adjusting bolt clockwise to place a load on torsion bar. (9) Lower vehicle to floor and adjust front suspension height. (10) Install upper control arm rebound bumper and tighten nut 200 inch-pounds.

STEERING KNUCKLES ON MODELS EQUIPPED WITH DISC BRAKES, REFER TO GROUP 5 FOR BRAKE DISC REMOVAL AND INSTALLATION PROCEDURES.

STEERING LINKAGE (Fig. 6) Removal (1) Remove upper control arm rebound bumper. (2) Raise vehicle so front suspension is in full rebound (under no load). (3) Remove wheel, tire and drum as an assembly. (4) Remove all load from torsion bar by turning adjusting bolt counterclockwise. (5) Remove tie rod end from steering knuckle arm using Tool C-3894. (6) Remove upper ball joint stud from steering knuckle using Tool C-3711. It may be necessary to add approximately 7/16 inch of flat washers over lower ball joint stud to allow the use of Tool C-3711 without damaging threads on lower ball joint stud. Place Tool C-3711 over stud. Turn threaded portion of tool locking it securely against the upper stud (Fig. 17). To use Tool C-3711 as outlined, it may be necessary to modify the tool (Fig. 15). Spread tool enough to place upper stud under a load, then strike steering knuckle sharply with a hammer to loosen stud. Do not attempt to force stud out of steering knuckle with tool alone. (7) Remove two upper bolts attaching steering knuckle to brake support. (8) Remove two lower bolts attaching steering arm to steering knuckle and remove steering knuckle. Support the brake assembly during this operation to

The tie rod end seals should be inspected for damage at all oil change periods. Removal Removal of tie rod ends from the steering knuckle arm or center link by methods other than using Tool C-3894 will damage tie rod end seal.

When removing tie rod ends, idler arm or steering gear arm, all seals should be closely inspected for

' TIE ROD END

IDLER ARM INK tijm'C

TIE ROD END

SLEEVE

SLEEVE NR375

KNUCKLE AR

Fig. 6—Steering Linkage (Coronet-Charger)


FRONT SUSPENSION AND STEERING LINKAGE 2-7 SWAY BAR (Fig. 8)

KNUCKLE ARM

0

KNUCKLE

TIE ROD END

ARM

lee CENTER LINK GI,:

TIE ROD END

SLEEVE IDLER ARM

teev ■

71% ' t ---\±

(1) Loosen and remove upper link nut retainer and rubber insulator on both sides of car. (2) Loosen and remove bolts and nuts attaching both retainer brackets to front crossmember. (3) Remove sway bar link bolt from sway bar followed by rubber insulators, retainers sleeve spacer. (4) Remove the center rubber insulator bracket and turn sway bar toward front of car and remove by sliding out thru opening in front crossmember. (5) If the rubber insulator bushings show excessive wear or deterioration of rubber, install new bushings. The sway bar cushions are serviced separately. Installation—Coronet-Charger

11

-

Removal—Coronet-Charger

STEERING GEAR ARM

NR374

Fig. 6—Steering Linkage (Coronet-Charger)

wear or damage. The tie rod ends are of the semipermanently lubricated type. Damaged seals require removel of the seals and inspection of the tie rod assembly end at the throat opening. If the parts have not lost all the lubricant or are not contaminated, worn or rusted, use new seals and reinstall, otherwise, a new complete tie rod end assembly should be installed. Lubricate the tie rod end assembly with special long-life chassis greases such as Multi-Mileage Lubricant, Part Number 2525035 intended for this purpose. (1) Remove tie rod ends from steering knuckle arms (Fig. 8). Use care not to damage seals. (2) Remove inner tie rod ends from center link. (3) Remove idler arm stud from center link. (4) Remove idler arm bolt from crossmember. (5) Remove steering gear arm stud from center link. (6) Remove steering gear arm. Installation Replace all tie rod and steering arm assemblies that are damaged or worn. (1) Position idler arm assembly in bracket and install bolt. Tighten nut 65 foot-pounds and install cotter pin. (2) Place center link over idler arm and steering gear arm studs and tighten nuts 40 foot-pounds. Install cotter pins. (3) Connect tie rod ends to steering knuckle arms and centerlink. Tighten nuts 40 foot-pounds and install cotter pins. (4) Measure and adjust front wheel toe.

(1) With sway bar ends pointed toward front of car, insert sway bar thru hole in front crossmember into its correct position. (2) Install sway bar cushion retainer brackets and attaching bolts and nuts and tighten to 200 Inchpounds. (3) Position link bolt with retainer and rubber insulator thru sway bar mounting hole. Install other mounting components in correct sequence (Fig. M. (Always making sure the concave side of retainers ore toward the rubber insulators). (4) Position the link bolt, sway bar and the stack up of parts thru mounting bracket hole in lower control arms. Install upper rubber insulator, retainer and nut. Tighten link nut to 100 inch-pounds. LOWER CONTROL ARM AND SHAFT (Fig. 9) Removal ON MODELS EQUIPPED WITH DISC BRAKES, REFER TO GROUP 5 FOR BRAKE DISC REMOVAL

NK:38 ,7

Fig. 7—Removing Tie Rod End Stud From Steering Knuckle Arm


2-8 FRONT SUSPENSION AND STEERING LINKAGE

INSULATOR RETAINER

LOWER CONTROL ARM CROSS MEMBER---. C4ka, -S‘ fes`N INSULATOR RETAINER

RETAINER NUT SLEEVE RETAINER SWAY BAR

Hg. 10—Removing Lower Ball Joint Stud INSULATOR

RETAINER LINK

PY84

Fig. 8—Sway Bar Assembly (Coronet-Charger) AND INSTALLATION PROCEDURES.

(1) Remove the wheel, tire and drum as an assembly. (2) Remove lower shock absorberattaching bolt and push up and out of way, and remove torsion bar from lower control arm. (3) Remove tie rod end from steering knuckle arm using TooL C-3894 (Fig. 7). Use care not to damage seal. (4) Remove sway bar link from lower control arm. (5) Remove steering knuckle arm to brake support bolts and remove steering knuckle arm. Move brake support assembly out of way. (6) Remove ball joint stud from lower control arm using Tool C-3964 (Fig. 10). The bottom portion of tool must be positioned between seal and control arm to avoid seal damage. (7) Remove strut spring pin, front nut and bushing retainer (Fig. 9), from forward end of cross-member. (8) Remove nut and washer from lower control arm shaft. (9) Tap end ot lower control arm Shaft with a "Soft CROSS MEMBER SPRING /3 Na FWD. t "C.,

1:)-0-0-ad NR361

end" hammer to aid in removal of shaft from crossmember. (10) Remove lower control arm, shaft and strut al an assembly. (II) Remove strut hushing from crossmember only if damaged: replace bushing. All models use a two piece bushing and sleeve arrangement (Fig. 11). (12) Remove strut bushing inner retainer from strut. Disassembly

(1) Place strut portion of control arm assembly in a vise and remove strut nut. (2) Remove strut from control arm. (3) Remove torsion bar adjusting bolt and swivel. (4) Place lower control arm assembly in an arbor press with torsion bar hex opening up and with a support under outer edge of control arm. (5) Place a brass drift into hex opening and press shaft out of lower control arm. The bushing inner shell will remain on shaft. (6) Cut and remove rubber portion of bushing from control arm shaft. (7) Remove bushing outer shell by cutting with a chisel. Use care not to cut into control arm. (8) Remove hushing inner shell from pivot shaft. Cut off if necessary. FRONT BUSHING

REAR BUSHING RETAINER.

CONTROL ARM

SHAFT -5)

/ 9-

SWIVEL I _ _ADJUSTING BOLT `213/aCeg,--1 STRUT

KNUCKLE ARM

Fig. 9 —Lower Control Arm (Coronet-Charger)

RETAINER NN47 Fig. 11—Strut Crossmember Bushings (Coronet-Charger)


FRONT SUSPENSION AND STEERING LINKAGE 2-9 Assembly

(1) Position new bushing on shaft (flange end of bushing first) press shaft into inner sleeve until bushing scats on shoulder of shaft. (2) Press shaft and bushing assembly into lower control arm using Tool C-3848 and an arbor press. In some instances it may be necessary to reduce the diameter of shaft shoulder to facilitate use of tool. (3) Install torsion bar adjusting bolt and swivel. (4) Position strut in lower control arm and tighten nut 100 foot-pounds. Installation

(1) On Coronet and Charger models, position front strut bushing half and sleeve into crossmember. Place rear retainer and rear strut bushing on strut and position control arm, shaft and strut assembly into crossmember. install strut bushing outer retainer and nut finger tight only. (2) Install lower control arm shaft washer and nut finger tight only. (3) Position lower ball joint stud into lower control arm and tighten nut 85 foot-pounds. and install cotter pin. (4) Position brake support on steering knuckle and install two upper bolts and nuts finger tight only. (5) Position steering knuckle arm on steering knuckle and install two lower bolts and nuts. (6) Tighten upper bolt nuts 55 foot-pounds. Tighten lower bolt nuts 120 foot-pounds. (7) Inspect tie rod end seal and replace if damaged. Connect tie rod end to steering knuckle arm and tighten nut 40 foot-pounds and install cotter pin. (8) Connect shock absorber to control arm and tighten finger tight only. (9) Install wheel, tire and drum assembly and adjust front wheel bearing (Croup 22). (10) Lower vehicle to floor, adjust front suspension heights anti tighten strut nut, at crossmember 52 footpounds and install strut pin. (11) Tighten lower control arm shaft nut 145 footpounds, and tighten shock absorber nut to 50 footpounds. (12) Measure and adjust front wheel alignment as necessary.

Installation

(1) Install new strut bushings, if necessary. (2) Position strut into control arm and tighten nut 100 foot-pounds. (3) Position strut bushing inner retainer and strut rear hushing on strut and position lower control arm shaft and strut assembly into crossmember. Install strut front bushing, sleeve and retainer. Tighten nut finger tight only. (4) Install control arm pivot shaft washer and nut finger tight only. (5) Connect shack absorber to lower control arm and tighten nut finger tight only. (6) Lower vehicle to floor so full weight is on its wheels. (7) Adjust front suspension heights to specifications. (8) Tighten front strut nut to 52 foot-pounds, and install spring pin. Tighten pivot shaft nut 145 footpounds. Tighten shock absorber nut 50 foot-pounds. (9) Adjust front wheel alignment as necessary. LOWER BALL JOINTS ON MODELS EQUIPPED WITH DISC BRAKES, REFER TO GROUP 5 FOR BRAKE DISC REMOVAL AND INSTALLATION PROCEDURES. Inspection

(1) Raise the front of vehicle and install safety floor stands under both lower control arms as far outboard as possible. The upper control arms must not contact the rubber rebound bumpers. (2) With the weight of vehicle on the control arm, install dial indicator and clamp assembly to lower control arm (Fig. 12). (3) Position dial indicator plunger tip against ball joint housing assembly and zero dial indicator. (4) Measure axial travel of the ball joint housing MORE THAN .070' MOVEMENT . BALL JOINT REPI ACEMENT

LOWER CONTROL ARM STRUT Removal (1) Remove lower control arm, shaft and strut as an assembly. (2) Remove nut holding strut to lower control arm and remove strut from control arm. (3) Inspect strut bushings (Fig. 11). If bushings are worn or deteriorated, install new bushings.

NUIP4 Fig. 12—Measuring Lower Ball Joint Axial Travel


2-10 FRONT SUSPENSION AND STEERING LINKAGE arm with respect to the ball joint stud, by raising and lowering the wheel using a pry bar under the center of the tire. (5) If during measurement you find the axial travel of the housing arm is .070" or more, relative to the ball joint stud, the ball joint should be replaced.

CAM ASSEMBLY

Removal

The lower ball joint is integral with the steering arm and is not serviced separately. Compression type lower bail joints are used on all models. (1) Remove upper control arm rebound bumper. (2) Raise vehicle so front suspension is in full rebound. Remove all load from torsion bar by turning adjusting bolt counterclockwise. If jacks are used to raise vehicle it is essential that a support be used between the crossmember and jack. (3) Remove wheel, tire and drum as an assembly. It may be necessary to back-off the brake shoes to facilitate removal of drum assembly. (4) Remove two lower bolts from the brake support attaching steering arm and ball joint assembly to steering knuckle. (5) Remove tie rod end from steering arm using Tool C-3894. Use care not to damage seal. (6) Using Tool C-3984 remove hall joint stud from lower control arm (Fig. 10), and remove steering arm and ball joint assembly. Installation (1) Place a new seal over ball joint and using Tool C-4039 press retainer portion of seal down on ball joint housing until it is securely locked in position. (2) Position steering arm and ball joint assembly on steering knuckle and install two mounting bolts. Tighten nuts 120 foot-pounds. (3) Install ball joint stud into opening in lower control arm. (4) Install stud retaining nut and tighten 85 footpounds. Install cotter pin and lubricate ball joint, see Lubrication Section Group "0". (5) Inspect tie rod seal for damage and replace if damaged. Connect tie rod end to steering knuckle arm, tighten nut 40 foot-pounds, and install cotter pin. (6) Place a load on torsion bar by turning adjusting bolt clockwise. (7) Install wheel, tire and drum assembly and adjust front wheel bearing (Group 22). (8) Lower vehicle to floor, install upper control arm rebound bumper and tighten nut 200 inch-pounds. (9) Measure front suspension height and adjust if necessary. (10) Measure front wheel alignment and adjust if necessary.

BUSHING CONTROL ARM FWD.

KNUCKLE

ND 55C

Fig. 13—Upper Control Arm (Coronet-Charger)

UPPER CONTROL ARM (Fig. 13) Removal and Disassembly

(1) Place a jack under lower control arm as close to wheel as possible and raise vehicle until wheel clears floor. (2) Remove wheel and tire as an assembly. (3) Remove upper and lower ball joint stud using Tool C-3711. It may be necessary to add approximately 7/16 inch of flat washers over lower ball joint stud to allow the use of Tool 03711 without damaging threads on lower ball joint stud. Place Tool C-3711 over stud. Turn threaded portion of tool locking it securely against the upper stud (Fig. 18). To use Tool C-3711 as outlined, it may be necessary to modify the tool (Fig. 15). (4) Spread tool enough to place upper stud under a load, then strike steering knuckle sharply with a hammer to loosen stud. Do not attempt to force stud out of steering knuckle with tool alone. (5) Remove nuts, lockwashers, cams and cam bolts

*

-4

Gra 32--

Fig. 14—Removing Upper Ball Joint Stud


FRONT SUSPENSION AND STEERING LINKAGE 2-11 attaching upper control arm and bushings (Fig. 13). to support brackets. Lift control arm up and away from support. (6) Remove ball joint (Fig. 16 using Tool C-3560. The seal will come off as ball joint is removed. (7) Assemble Tool C-3710A over bushing and press bushing out of arm (from inside out) (Fig. 17) To remove upper control arm rear bushing support sleeve (used on models with 10 inch front brakes and Coronet police and taxi application) assemble Tool C-3710A, using adaptor SP-3826 in place of adaptor SP-3088, over bushing and press bushing out of arm (Fig. 17). Assembly

When instilling new bushings, be sure control arm is supported squarely at point where bushing is being pressed in. Do not use oil or grease to aid in installation.

(1) Position flange end of new bushing in Tool C3710A, support control arm squarely, and press bushings into control arm (from outside) until tapered portion of bushing seats on the arm. On models with 10 inch front brakes and Coronet police and taxi application, (using bushing support sleeve) remove Tool C-3710A after bushing has been installed and install adaptor SP-3827 in place of SP-3233A cup on tool and install support sleeve on rear bushing only (Fig. 18).

(2) Install ball joint into arm using Tool C-3560. Tighten until seated (125 foot-pounds minimum). The ball joint will cut threads into a new arm during tightening operations. (3) Install a new ball joint seal using a 2" socket, making sure it is seated fully on ball joint housing.

Fig. 76—Removing or Installing Upper Ball Joint

(Group 22). (4) Measure and adjust vehicle height and wheel alignment. Tighten cam bolt nuts 65 foot-pounds.

UPPER BALL JOINTS ON MODELS EQUIPPED WITH DISC BRAKES, REFER TO GROUP 5 FOR BRAKE DISC REMOVAL AND INSTALLATION PROCEDURES.

Removal

(1) Raise vehicle by placing a jack under lower control arm as close as possible to wheel. (2) Remove wheel, tire and drum. (3) Remove upper and lower ball joint stud nuts using Tool C-3711. it will be necessary to add approximately 7/16" of flat washers over lower ball joint

Installation

(1) Slide control arm into position and install cam bolts, cams, washers and nuts (Fig. 13). Tighten nuts in preparation for final adjustments. (2) Slide upper ball joint stud into position in steering knuckle and install nut. Tighten nut 100 footpounds. Install cotter pin and lubricate ball joint. Tighten lower stud nut 85 foot-pounds. (3) Install wheel and tire. Adjust wheel bearing

mu-

9

A. REMOVE I/16 INCH FROM LOWER PART OF TOOL. B. ROUND OFF PORTION OF THE TOOL THAT IS POSITIONED NEXT TO THE STEERING KNUCKLE ARM. NO 127

Fig. 15—Tool C-3711 Modified

Fig. 17—Removing Upper Control Arm Bushing


2-12 SPECIFICATIONS (5) Remove tool, then remove ball joint stud from steering knuckle. (6) Using Tool C-3560, unscrew ball joint from upper control arm (Fig. 16). The seal will come off as ball joint is being removed. Installation When installing a ball joint, make certain the ball joint threads engage those of the control arm squarely if original arm is being used. Balloon type seals should always be replaced once they have been removed.

Fig. 18 — Installing Support Sleeve on Bushing stud to allow the use of Tool C-3711 without damaging threads on lower ball joint stud. Place Tool C-3711 over studs. Turn threaded portion of tool locking it securely against upper stud (Fig. 14). To use Tool C-3711 as outlined it will be necessary to modify it, as shown in (Figure 15). (4) Spread tool enough to place upper stud under a load, then strike steering knuckle sharply with a hammer to loosen stud. Do not attempt to force stud out of steering knuckle with tool alone.

(1) Screw ball joint squarely into control arm as far as possible by hand. (2) Using Tool C-3560, tighten ball joint until it bottoms on housing. Tighten to a minimum of 125 footpounds. If ball joint cannot be torqued to 125 foot-pounds, inspect threads on ball joint and also in control arm and replace as necessary. (3) Position a new seal over ball joint stud and install using a 2" socket making sure it is seated fully on ball joint housing. (4) Position ball joint stud in steering knuckle and install a retaining nut. (5) Tighten nut 100 foot-pounds. Install cotter pin, lubricate ball joint. (6) Install lower ball joint stud nut and tighten 85 foot-pounds. (7) Install wheel, tire and drum assembly and adjust front wheel bearings (Group 22). (8) Lower vehicle and adjust front suspension height.

SPECIFICATIONS Coronet-Charger

CAMBER—Left —Right CASTER—Manual Steering —Power Steering HEIGHT (inches) Standard & Heavy Duty Side to Side Difference (Maximum) STEERING AXIS INCLINATION TOE-IN TOE-OUT ON TURNS When Inner Wheel is 20° outer wheel is TORSION BARS—Length (inches) —Diameter (inches) Std. Suspension (6 cyl) W/Air Conditioning 318, 340 C. I. Engine 383 C. I. Engine Police, 426 & 440 Engine Heavy Duty Suspension Station Wagons TREAD (inches)—Front —Rear WHEEL BASE (inches)

+1/4" to +3/40 (+1/2° preferred) 0° to +1/2° (+1/4° preferred) 0" to —1° (-1/2° preferred) +1/4° to +1-1/4° (+3/4° preferred) 1-7/8 1/8 1/8 7-1/2° 3/32 to 5/32 inch (1/8 preferred) 17.8° 41 0.86 0.86 0.88 0.88 (192 0.90 0.86 59.7 58.7 117


TIGHTENING REFERENCE

2-13

TIGHTENING REFERENCE Foot Inch Pounds

Ball Joint—Upper Nut—Lower —Upper Control Arm Pivot Shaft Nut Rebound Bumpers Crossmember Bolts Engine Mounting Bolts Idler Arm Bolt Nut Shock Absorber Nuts—Front Lower Upper Steering Gear Mounting Bolts Steering Knuckle Bolt Nuts Lower

125 (Min.) 85 100 145

200 150 85 65 50 25 80 120

Foot Inch Pounds

(Disc Brakes) Upper Strut Nuts Front (Coronet-Charger) Rear Sway Eliminator Shaft Frame Bracket Bolt Nut Link Insulator Retainer Bolt Nuts ... Tie Rod Ends Sleeve Clamp Bolt Nut Stud Nuts Wheel Nuts

125 55 52 105 200 100 115 40 65


GROUP 3

REAR AXLE CONTENTS Page

Page

REAR AXLE ASSEMBLY (71/41 RIN G GEAR 4 REAR AXLE ASSEMBLY (81/4") RIN G GEAR 14 REAR AXLE ASSEMBLY (83/4") RIN G GEAR 26 REAR AXLE ASSEMBLY (93/4") RIN G GEAR 44 2 REAR AXLE NOISE DIAGNOSIS

SERVICE DIAGNOSIS SPECIFICATIONS SURE-GRIP DIFFERENTIAL TIGHTENING REFERENCE

1 63 60 65

SERVICE DIAGNOSIS Ccndition

REAR WHEEL NOISE

Possible Cause

(a) Wheel loose. (b) Spalled wheel bearing cup or cone. (c) Defective, brinelled wheel bearing. (d) Excessive axle shaft end play. (e) Bent or sprung axle shaft flange.

SCORING OF DIFFERENTIAL GEARS AND PINIONS

(a) Insufficient lubrication.

(b) Improper grade of lubricant.

(c) Excessive spinning of one wheel.

TOOTH BREAKAGE (RING GEAR AND PINION)

(a) Overloading.

(b) Erratic dutch operation. (c) Ice-spotted pavements.

(d) lmproper adjustment.

REAR AXLE NOISE

(a) Insufficient lubricant.

Correction

(a) Tighten loose wheel nuts. (b) Check rear wheel bearings. If spalled or worn, replace. (c) Defective or brinelled bearings must be replaced. Check rear axle shaft end play. (d) Readjust axle shaft end play. (e) Replace bent or sprung axle shaft. (a) Replace scored gears. Scoring marks on the pressure face of gear teeth or in the bore are caused by instantaneous fusing of the mating surfaces. Scored gears should be replaced. Fill rear axle to required capacity with proper lubricant. See Specification section. (b) Replace scored gears. Inspect all gears and bearings for possible damage. Clean out and refill axle to required capacity with proper lubricant. See Lubrication section. (c) Replace scored gears. Inspect all gears, pinion bores and shaft for scoring, or bearings for possible damage. Service as necessary. (a) Replace gears. Examine other gears and bearings for possible damage. Replace parts as needed. Avoid Overloading. (131 Replace gears, and examine remaining parts for possible damage. Avoid erratic clutch operation. (c) Replace gears. Examine remaining parts for possible damage. Replace parts as required. (d) Replace gears. Examine other parts for possible damage. Make sure ring gear and pinion backlash is correct.

(a) Refill rear axle with correct amount of the proper lubricant. See Specification section. Also check for leaks and correct as necessary. (b) Improper ring gear and pinion adjust- (b) Check ring gear and pinion tooth ment. contact. (c) Unmatched ring gear and pinion. (c) Remove unmatched ring gear and pinion. Replace with a new matched gear and pinion set. (d) Worn teeth on ring gear or pinion. (d) Check teeth on ring gear and pinion for contact. If necessary, replace with new matched set.


3-2 REAR AXLE Correction

Possible Cause

Condition

(e) Adjust drive pinion bearing preload. (e) End play in drive pinion bearings. (f) Adjust differential bearing preload. (f) Side play in differential bearings. (g) Sure-Grip Differential moan and chat- (g) Drain and flush lubricant. See procedure in Sure-Grip section of Group 3. ter. LOSS OF LUBRICANT

(b) (c) (d) (e) (f) (g)

OVERHEATING OF UNIT

(a) Drain excess lubricant by removing filler plug and allow lubricant to level at lower edge of filler plug hole. (b) Replace worn oil seals with new ones. Worn axle shaft oil seals. Prepare new seals before replacement. (c) Repair or replace housing as required. Cracked rear axle housing. Worn drive pinion oil seal. (d) Replace worn drive pinion oil seal with a new one. Scored and worn companion flange. (e) Replace worn or scored companion flange and oil seal. Clogged vent. (f) Remove obstructions. Loose carrier housing bolts or hous- (g) Tighten bolts or cover screws to ing cover screws. specifications and fill to correct level with proper lubricant.

(a) Lubricant level too high.

(a) Refill rear axle. (b) Drain, flush and refill rear axle with correct amount of proper lubricant. See Specification Section. (c) Bearings adjusted too tightly. (c) Readjust bearings. (d) Excessive wear in gears. (d) Check gears for excessive wear or scoring. Replace as necessary. (e) Insufficient ring gear to pinion clear- (e) Readjust ring gear and pinion backance. lash and check gears for possible scoring.

(a) Lubricant level too low. (b) Incorrect grade of lubricant

REAR AXLE NOISE DIAGNOSIS Most rear axle failures are relatively simple to locate and correct, although rear axle noise is a little more difficult to diagnose and make the necessary repairs. The most essential part of the rear axle service is proper diagnosis of the problem. All rear axles are noisy to a certain degree. Gear noise is usually associated with older axles, but this is not always true. New axles can also be noisy if they are not properly adjusted or lack lubrication. Usually when new improperly set gears are noisy; the disturbing noise cannot be "adjusted out" once the gears are broken in. Recent experience has shown that axle gears can often be readjusted to reduce excessive gear noise, if they have been operated at normal break-in speeds for less than 500 miles. Regardless of what you've heard to the contrary, noisy gears will not get quieter with added mileage . . . they will stay the same or get worse. Slight axle noise heard only a certain speeds or under remote conditions must be considered normal. Axle noise tends to "peak" at varying speeds and the

tires, road surfaces, wheel bearings, engine, transmission, exhaust, propeller shaft vibration, universal joint noise or body drumming. A thorough and careful

check should be made to determine the source of the noise before any disassembly and teardown of the rear axle is attempted. The complete isolation of noise in any one unit requires considerable skill and previous experience. Eliminating certain type noises often baffle even the most experienced personnel. Often such practices as raising tire pressures to eliminate tire noise, listening for the noise at varying speeds under different load conditions such as; drive, float and coast, and under certain highway conditions, turning the steering wheel from left to right to detect wheel bearing noise, will aid even the beginner in detecting certain alleged axle noises. Axle noises normally fall into two categories: gear noise and bearing noise. To make a good diagnostic check for rear axle noise a thorough road test is necessary. Select a level smooth blacktop or asphalt road. This will reduce tire noise and body drumming. Drive the car far enough to thoroughly warm up the axle to normal operating

noicp is in no way intlinatiun of trniihlp in fhP nylP

temperature

If axle noise is present in an objectionable form, loud or at all speeds, an effort should be made to isolate the noise as being in one particular unit of the vehicle. Many noises, reported as coming from the rear axle actually originate from other sources such as

Drive the car and note speed at which noise occurs. Then stop car and, with clutch disengaged or automatic transmission in neutral, run engine slowly up and down through engine speeds, corresponding to car speed at which noise was most pronounced, to de-


REAR AXLE 3-3 termine if it is caused by exhaust roar, or other engine conditions. Repeat, while engaging and disengaging clutch (transmission in neutral), to determine if noise can only be isolated by removing propeller shaft and operating transmission in high).

TIRE NOISE Tire noise is often mistaken for rear axle noise even though the noisy tires may be located on the front wheels. Tires that are unbalanced or worn unevenly or have surfaces of non-skid type design, or worn in a saw tooth fashion are usually noisy and often produce noises that seem to originate in the rear axle. Tire noise changes with different road surfaces, but rear axle noise does not. Inflate all tires to approximately 50 pounds pressure (for test purposes only). This will materially alter noise caused by tires, but will not affect noise caused by rear axle. Rear axle noise usually ceases when coasting at speeds under 30 miles per hour; however, tire noise continues but with lower tone, as car speed is reduced. Rear axle noise usually changes when comparing drive and coast, but tire noise remains about the same. Distinguish between tire noise and differential noise by noting if noise varies with various speeds or sudden acceleration and deceleration; exhaust and axle noise show variations under these conditions while tire noise remains constant and is more pronounced at speeds of 20 to 30 miles per hour. Further check for tire noise by driving car over smooth pavements or dirt roads (not gravel) with tires at normal pressure. If noise is caused by tires, it will noticeably change or disappear and reappear with changes in road surface.

FRONT WHEEL BEARING NOISE Loose or rough front wheel bearings will cause noise which may be confused with rear axle noises; however, front wheel bearing noise does not change when comparing drive and coast. Light application of brake while holding car speed steady will often cause wheel bearing noise to diminish, as this takes some weight off the bearing. Front wheel bearings may be easily checked for noise by jacking up the wheels and spinning them, also by shaking wheels to determine if bearings are loose. Rear suspension rubber bushings and spring insulators help to dampen out rear axle noise when properly and correctly installed. Check to see that no metallic interference exists between the springs and spring hangers, shackles or "U" bolts. Metal to metal contact at these points may result in telegraphing road noise and normal axle noise which would not be objectionable if properly installed and tightened to specifications.

GEAR NOISE Abnormal gear noise can be recognized easily because it produces a cycling tone and will be very pronounced through the speed range in which it occurs. Gear noise may be developed under one or more of the following conditions, "drive", "road load", "float" or "coast". Gear noise usually tends to peak in a narrow speed range or ranges. Gear noise is more prominent between 30 to 40 mph and 50 to 60 mph. Abnormal gear noise is quite rare and if present it usually originates from scoring of the ring and drive pinion gear as a result of insufficient or improper lubrication of the axle assembly. The differential side gears and pinions very seldom cause trouble as they are only under loads when the rear wheels travel at different speeds; such as when turning corners. When objectionable axle noise is heard, note the driving condition and speed range. Remove the housing cover on the 7-1/4", 8-1/4" and 9-3/4" axles or remove the differential and carrier from the axle housing on the 8-3/4" axle. Perform a tooth contact pattern check to determine if the best possible pattern has been obtained. If pattern is found to be unacceptable, reshim and adjust to obtain the best possible tooth pattern. If after readjustment noise still persists, replace with new gear set.

PRE-DISASSEMBLY INVESTIGATION A close examination of the rear axle assembly prior to disassembly can often reveal valuable information as to the extent and type of repairs or adjustments necessary. This information coupled with the road test results will provide a basis for determining the degree of disassembly required. Since the most frequent causes of axle noise are improper backlash or differential bearing preload, or both a few simple adjustments may be all that is necessary to correct the complaint. Therefore, before disassembly the following checks should be made; drive gear and pinion backlash, pinion bearing preload, and tooth contact pattern and these results recorded and analyzed. It is felt that these measurements and their results will aid you in making the necessary repairs to the axle assembly.

BEARING NOISE (DRIVE PINION AND DIFFERENTIAL) Defective or damaged bearings generally produce a rough growl or grating sound, that is constant in pitch and varies with the speed of the vehicle. This fact will allow you to diagnose between bearing noise and gear noise. Drive pinion bearing noise resulting from defective


3-4 REAR AXLE or damaged bearings can usually be identified by a constant rough sound. Front pinion bearing noise is usually most pronounced on "coast", whereby rear pinion bearing is loudest on "drive". Pinion bearings are rotating at a higher rate of speed than the differential side bearings or the axle shaft bearings. These particular noises can be picked up best by road testing the vehicle in question on a smooth road (black top). However, extreme caution should be taken not to confuse tire noise with bearing or gear noise. If doubt should exist tire treads should be examined for irregularities that will often produce such noise. Differential bearing noise will usually produce a constant rough tone which is much slower than the noise caused by the pinion bearings.

REAR WHEEL BEARING NOISE Defective or damaged rear wheel bearings produce a vibration or growl which continues with car coasting and transmission in neutral. A brinneled rear wheel bearing causes a whirring noise. Spalied rear wheel bean/11gs normally produce a noise similiar to a growl, created from either flaked or pitted rollers or bearing races. Unless the damage is severe, rear axle bearing noise is seldom heard above 30 mph. To differentiate between wheel bearings and gear noise, road test the vehicle on a smooth road (blacktop) at medium and low speed. With traffic permitting, swerve the vehicle sharply right to left. If the noise in question is caused by wheel bearings, it will usually increase when the vehicle is swerved and will probably be coming from the bearing on the loaded side. If the noise in question cannot be isolated an inspection of bearings will be necessary.

KNOCK AT LOW SPEEDS Low speed knock is usually caused by brinneled universal joints or differential side gear hub to counterbore clearance being too great. Inspect and replace universal joint or differential case and side gear as required.

DRIVE-LINE SNAP A snap on a sudden start, either forward or reverse, may be caused by a loose companion flange. Remove the flange and reinstall 180 degrees from original position. Pinion bearing preload and pinion nut torque

must be reset to original settings upon reinstallation.

BACKLASH CLUNK Excessive clunk on acceleration and deceleration can be caused by anyone of the following items or a combination; (excessive clearance between) (1) Differential pinion shaft to differential case, (2) Axle shaft to differential side gear splines, (3) Differential side gear hub to differential case counterbore, (4) Differential side gear to pinion, (5) Worn thrust washers, (6) Drive gear backlash. Measure and inspect components and replace as required and/or adjust to proper specifications.

ENGINE AND TRANSMISSION NOISE Sometimes noises which seem to originate in the rear axle are actually that of the engine or transmission. To diagnose which unit is actually causing the noise, observe the approximate vehicle speed and conditions under which the noise is most pronounced; stop the vehicle in a quiet place to avoid any interfering noises. With engine running and transmission in neutral, run engine slowly up and down through engine speeds corresponding to approximate car speed at which the noise was most pronounced. If a noise similar is produced in this manner it usually can be assumed that the noise was caused by the engine or transmission and not that of the rear axle.

PROPELLER SHAFT VIBRATION Objectionable vibrations at high speed (65 MPH or higher) may be caused by a propeller shaft that is out of balance or worn universal joints. Out of balance may be due to a damaged or bent shaft. To determine whether propeller shaft is causing the vibration in question; road test the vehicle through speed range and note speed at which vibration is most pronounced. Shift transmission into lower gear range and drive car at same engine speed as when vibration was most pronounced in direct drive and note any effect on vibration. If the vibration is still present at the same engine speed, whether in direct drive or in the lower gear, since the propeller shaft speed varies, this cannot be the fault. If the vibration decreases or is eliminated in the lower gear, then propeller shaft is at fault and should be rebalanced or replaced.


REAR AXLE ASSEMBLY 71/4" RING GEAR INDEX Axle Shafts and Bearings Differential Drive Gear and Pinion Backlash Drive Pinion Depth of Mesh Pinion Bearing Cup Installation

Page 5 7 12 10 10

Pinion Installation and Bearing Preload Rear Axle Assembly Removal Installation Lubrication

Page 10 6 6 13 14


REAR AXLE 3-5 GENERAL INFORMATION The 7-1/4" Rear Axle Assembly shown in (Fig. 1), is a semi-floating type which incorporates a unitized rear axle housing assembly. The drive pinion and the differential case with drive gear are mounted directly into the center section of the rear axle housing assembly. Access to the differential, drive gears and bearings is obtained by removal of the carrier cover. Axle shaft bearings, oil seals and drive pinion oil seal can be removed and serviced without removing the complete axle assembly from the vehicle, but the unit should be removed for any additional operations. A Sure Grip Differential is available in the 7-1/4" Axle Assembly, similar to those used in the 8-3/4" axle. Refer to the Sure Grip Differential Section of the Axle Group for the Servicing procedure. Depending on engine application some Coronet and

Charger models with the exception of station wagons, taxi and police application will be equipped with the 7-1/4" diameter axle assembly, that has been widened to the Coronet rear track. All service will be performed the same as standard 7-1/4" diameter axle, except where noted in the service procedure. A hooded breather is attached to the left leg of the axle housing approximately 15" inboard of the flange face. Gear ratio identification is stamped on the front face of the pad at the bottom of housing. SHOULD THE REAR AXLE BECOME SUBMERGED IN WATER, THE LUBRICANT MUST BE CHANGED IMMEDIATELY TO AVOID THE POSSIBILITY OF EARLY AXLE FAILURE RESULTING FROM CONTAMINATION OF THE LUBRICANT BY WATER DRAWN INTO THE VENT HOLE.

SERVICE PROCEDURES AXLE SHAFTS AND BEARINGS CAUTION: It is absolutely necessary that anytime an axle assembly is serviced, and the axle shaft is loosened and removed, both brake support plate gaskets and the inner axle shaft seal must be replaced.

Removal and Disassembly (1) With wheels removed, remove clips holding

brake drum on axle shaft studs and remove brake drum. (2) Disconnect brake lines at wheel cylinders. (3) Using access hole in axle shaft flange, remove retainer nuts. (4) Attach axle shaft remover tool C-3725 to axle shaft flange and remove axle shaft. Remove brake assembly (Fig. 2). (5) Remove axle shaft oil seal from housing.

RETAINER BEARING COLLAR St Al

SHAFT

WASHER NUT ; L ANGE SEAL HOUSING

ONE AND ROGER.> (UP SPACER

HOOD SHAFT CONE AND ROLLERS EN CUP L SPACER ,

SEAL E

GEAR AND PINION CAP

RETAINER

PIN

BOLT Ng' 'Eva

COLLAR BEARING

SHAG

sou CUP CONE AND ROLLERS WASHER

GASKET

/ GASKE1

k

IEL Et, 4

WASHER •

SPACER

WASHER ,

PINION

PLUG COVER GEAR SCREW GASKET W ASHE R

CUP

GEAR CAP BOLT CONE AND ROLLERS

Fig. I-7-1/4" Rear Axle Assembly

NY1606D


3-6 REAR AXLE

Fig.

2—Removing Axle

Shaft

CAUTION: Under no circumstance should axle shaft collars or bearings be removed using a torch. The use of a torch in the removal of the axle shaft collars or bearings is an unsafe practice, because heat is fed into the axle shaft bearing journal and, thereby weakens this area.

(6) Position axle shaft bearing retaining collar on a heavy vise or anvil and using a chisel cut deep grooves into retaining collar at 90c intervals (Fig. 3). This will enlarge bore of collar and permit it to he driveb off of axle shaft. The bearing can now be removed using tool C-3725 and C-3926 (Fig. 4). On Coronet models equipped with 7.1/4 inch axle assembly to remove bearing use tool C-3971 and adapter C-4000 and protective sleeve over bearing race. Tool must be installed with two bolts (Fig. 5) on each side of the hole in axle shaft flange.

Assembly and installation

(1) Install axle shaft retainer plate, bearing, and bearing retainer collar on axle shaft. The axle shaft bearing and bearing retainer collar must fit tightly on bearing journal of axle shaft. Using tool C-3725 and C-3926 press them into place by tightening bolts in tool alternately (Fig. 6). Coronet models equipped with 7-1/4 inch axle, install bearings and retainer collars using Tool C-3971 and adapter C-4000.

(2) Install new axle shaft oil seals in axle housing, using tool C-3734 (Fig. 7). (3) Apply a light film of Multi-purpose Lubricant

Fig. 4—Remov ng Axle Shaft Bearing

NIG( grade 2 EP or equivalent on outside diameter of bearing to prevent rust and corrosion. (4) install a foam gasket on studs of axle housing and position brake support plate assembly on axle housing studs, followed by outer gasket. (5) Carefully slide axle shaft assembly through oil seal and engage splines in differential side gear. (6) Tap end of axle shaft lightly with a non-metallic mallet to position axle shaft bearing in housing bearing bore. Position retainer plate over axle housing studs. Install retainer nuts and tighten 35 footpounds.

REAR AXLE ASSEMBLY Removal

Should it become necessary to remove rear axle assembly for overhaul or repair, proceed as follows: (1) Raise rear of vehicle until rear wheels clear

NK365

Fig. 3—Removing Axle Shaft Collar

Fig. 5—Tool C4725 installation of

Axle Shaft


REAR AXLE 3-7

NY1038 Fig. 6—Installing Rear Axle Shaft Bearing

Fig. 8—Measuring Drive Gear Runauf

floor. Support body at front of rear springs. (2) Block brake pedal in the up position using a wooden block. (3) Remove rear wheels. (4) Disconnect hydraulic flexible line. (5) Disconnect parking brake cable. To maintain proper drive line balance when reassembling, make scribe marks on the propeller shaft universal joint and the pinion flange before removal. (6) Disconnect propeller shaft at differential pinion yoke and secure in an upright position to prevent damage to front universal joint. (7) Remove shock absorber from spring plate studs and loosen rear spring "U" bolt nuts and remove "U" bolts. (8) Remove axle assembly from vehicle.

vent, clean inside the axle housing and differential case and drive gear assembly. (3) Measure for differential side play. Position a screwdriver or pinch bar between left side of axle housing and differential case flange, then using a prying motion determine if side play is present. THERE SHOULD BE NO SIDE PLAY. (4) in preparing to measure drive gear runout on differential case, (provided no side play was found) mount a dial indicator tool C-3339 on pilot stud C3288, and load the indicator stem slightly when plunger is at right angles to back face of drive gear (Fig. 8). (5) Measure drive gear runout by turning drive gear several complete revolutions and reading dial indicator. Mark drive gear and differential case at point of maximum runout. The marking of differential case will be very useful later in checking differential case runout. Total indicator reading should be no more than .005 inch. If runout exceeds .005 inch the differential case may be damaged. A test for ease runout will be described later.

DIFFERENTIAL Removal and Disassembly

Side play and runout checks taken during disassembly will be very useful in reassembly. (1) Remove drain plug in cover assembly and drain lubricant from housing. (2) Remove cover and with a suitable cleaning sol-

TOOLS

YOKE

' TOOL NY 1023

Fig. 7—Installing Axle Shaft Oil Seal

NY1037

Fig. 9—Removing Companion Flange


3-8 REAR AXLE I OC:1 maa-aKika,•=.• .

NYI036

Fig. 10—Removing Pinion Oil Seal (8) Remove drive pinion nut and washer. Using Tool C-452 and holding Tool C-3281, remove drive pinion flange (Fig. 9). (7) Using Tool 0-748 remove drive pinion oil seal (Fig. 10). Remove 'front pinion bearing cone and preload shim. (8) Mark axle housing and differential bearing caps for location in reassembly (Fig. 11). (9) Remove differential bearing caps and locate spreader Tool C-3721 with tool dowel. pins seated in locating holes of axle housing. Turn tool screw finger tight at thiltirne. (10) Install pilot stud, Tool C-3288, on left side of axle housing. Attach dial indicator and load indicator stem slightly against opposite side of axle housing (Fig. 12). (11) Tighten spreader tool nut sufficiently to obtain .012 to .015 inch movement of dial indicator to permit removal of differential ease assembly. (Do not •spread over .020 inch.) (12) Remove dial indicator and remove differential and ring gear assembly from .axle housing. A light prying action must be used to unseat the differential

NY1034

12—Spreading Rear Axle Housing assembly from the housing (Fig. 13), Differential bearing cups and preload adjusting spacers must be kept with respective bearing cones. Do not remove spreader tool. (13) Remove drive pinion and rear bearing asSembly from axle housing. (14) Using a flat end brass drift, remove front and rear bearing cups from housing. (15) Mount differential case and ring gear assembly in a vise equipped with soft jaws (brass). (18) Remove drive gear bolts. BOLTS ARE LEFT HAND THREAD. With a non-metallic hammer tap drive gear loose from differential ease pilot and remove. (17) If drive gear runout exceeded .005 inch in step 4, differential case flange runout should be remeasured. Install differential case with appropriate bearing cups and shims in axle housing. Loosen nut of spreader tool and remove, mount dial indicator in contact with drive gear flange face to take runout readings as in steps 3, 4 and 5. Total allowable runout should not exceed .003 inch. It is often possible to reduce high runout by positioning drive gear 180°

\SS*

PUNCH MARKS PUNCH MARKS

Fig. 11—Bearing Cap Identification

NY1035

ari

NK367/: Fig. 73—Loosening Differential Assembly


REAR AXLE 3-9 from point of maximum runout when re-assembling ring gear on differential case. (18) With small drift remove differential pinion shaft lock pin from drive gear side of case. (19) With a brass drift remove differential pinion shaft. (20) Rotate differential side gears until differential pinions appear at differential case windows and remove. (21) Remove differential side gears and thrust washers. (22) Remove differential bearings using Tool C-293 and #44 plates (Fig. 14). (23) Remove rear pinion bearing cone from pinion stem using Tool C-293 and #40 plates (Fig. 15).

100L

7- P.S.Z:Mr1 al e

N Y1031

IS—Removing Rear Pinion Bearing Cone shaft oil seal surface). (5) if axle shaft bearings, collars and retainers are removed from shafts they are unfit for further use and MUST BE REPLACED. Refer to axle shaft assembly procedure. (6) Differential bearings and front and rear pinion bearing cone and cup assemblies should have a smooth appearance with no broken or dented surfaces on rollers or roller contact surfaces. The bearing roller retainer cages must not be distorted or cracked. (7) Differential side gears and pinions should have smooth teeth with a uniform contact pattern without excessive wear or broken surfaces. The differential side gear hub surfaces and thrust washer contact surfaces should be smooth and free from any scoring or metal pickup. (8) The machined thrust washer surface areas inside the differential case should be polished and with no surface imperfections. The pinion shaft bore in differential case should be round and smooth. The differential pinion shaft should be round and without excessive wear in areas of contact with either differential case or differential pinions. (9) The ring gear and drive pinion teeth should have a uniform contact pattern with smooth and unbroken surfaces without excessive wear. Machined surfaces of the pinion stem (at points of contact with either rear pinion bearing contact journal or rear pinion bearing mounting shim surface) should be smooth. Fig.

Inspection (1) Clean all parts except axle shaft bearings with a suitable cleaning solvent. With oil dampened cloth wipe axle shaft bearing outer race. Clean off all rust and corrosion. To clean axle housing tubes insert a stiff wire into tube, attach a clean cloth to wire at center section and withdraw from center outward. (2) All machined contact surfaces in the axle housing and differential bearing caps should be smooth and free of any raised edges. Front and rear pinion bearing cup bore machined surfaces should be smooth. Raised metal on shoulders of bores incurred in removal of cups should be flattened by use of a flat nosed punch. (3) The axle drive shaft bearing and oil seal bores at both ends of housing should be smooth and free of rust and corrosion. This also applies to the brake support plate and housing flange face area. (4) The axle shaft splines should be smooth and free of excessive wear. The axle shaft oil seal journal should be smooth and free of nicks, scratches or blemishes. To remove any imperfections polish with #600 crocus cloth (without reducing diameter of axle Cleaning and

Fig. 14 — Removing Differential Bearing Cone

Assembling the Differential Lubricate all parts when assembling and adjusting. (1) install thrust washers on differential side gears and position gears in case. (2) Place thrust washers on both differential pinion gears and mesh the pinion gears with the side gears, having pinion gears exactly 180 0 apart. (3) Rotate side gears to align pinion gears and washers with differential pinion shaft holes in case. (4) Install differential pinion shaft with care not to


3-10 REAR AXLE

dainage thrust washers. Hole in pinion shaft must align with lock pin hole in differential case. (5) Install lock pin in differential case from drive gear tooth side. (6) Position drive gear on differential case to separate the points of maximum runout 180° apart and start all bolts through case into drive gear. Finger tighten. (LEFT HAND THREAD.) (7) Tap drive gear against differential case Range with non-metaLlic mallet. Tighten bolts to 55 footpounds. (8) Install differential bearing cones with Tool C4107 (Fig. 16). PINION BEARING CUP INSTALLATION

Rear axle gauge Tool C-3715 is used to install drive pinion bearing cups as well as to determine pinion depth of mesh (Fig. 17). (1) Start both drive pinion bearing cups into axle housing. (2) Place rear spacer SP-3244 on main tool. Seat rear pinion hearing cone on spacer and hold tool in housing. (3) Place centralizing sleeve SP-3245 on tool and place front pinion bearing eone on centralizing sleeve, followed by tool sleeve, centralizing washer and nut. (4) While holding compression sleeve from turning with Tool C-3281, tighten nut, thereby drawing pinion bearing cups into axle housing bearing cup bores. Permit tool to turn several revolutions during tightening operation to permit bearing rollers to align. Leave tool in carrier for determining depth of mesh. DRIVE PINION DEPTH OF MESH (Using Tool C-3715)

(1) With main tool left in axle housing after installing drive pinion bearing cups, loosen tool nut and

MAIN TOOL CROSS BORE ARBOR

CENTRALIZING WASHER

GAUGE BLOCK

9r

'

COMPRESSION NUT COMPRESSION SLEEVE CENTRAI FLING SLEEVE - REAR SPACER

SCREW --'WRENCH

NY1028

Fig. 17—Pinion Setting Gauge tool C4713 re-tighten to produce 15-25 inch-pounds of turning torque. Attach gauge block to main tool using ellen screw. (2) Position cross bore arbor in axle housing differential hearing seats and install bearing caps. Tighten cap bolts lightly. (3) Select rear pinion bearing mounting shim which will fit between cross bore arbor and gauge block.. This fit must be snug but not too tight (similar to the pull of:a feeler gauge) (Fig. 18). If the mark on the pinion head is plus (+2), select a shim that many thousandths thinner for installation. If mark on pinion has a minus (-2), select a shim that tinny thousandths thicker for installation. Treat other pinion markings in a similar manner. Spacera are available in one thousandths of an inch increments from .084 to .100 inch. (4) Remove tool arbor and tool from axle housing. PINION INSTALLATION AND BEARING PRELOAD

Pinion bearing mounting shims are chamfered' on one side and must be installed on the pinion stem with chamfered side toward pinion head.

Ls°7

ARBOR

GAUGE BLOCK SPACER (SELECTIVE) Pig. 16 —Installing Differential Bearing Cone

NY1027

Fig. 18—Measuring Housing For Pinion Shim Thickness •


REAR AXLE 3-11

YOKE TOOL

Fig. 79—Installing Pinion Shim and Rear Bearing Cone (1) Place selected shim and rear pinion bearing cone on pinion stem. Using installing sleeve Tool C3717, press bearing on pinion stem (Fig. 19). (2) Hold drive pinion and bearing assembly in axle housing and install original preload shim (chamfered side toward shoulder), followed by front pinion bearing cone, pinion flange, belleville washer (convex side of washer up) and pinion nut. (3) Position housing with nose up. Tighten pinion nut to 240 foot-pounds (minimum) with torque wrench C-4053, using holding Tool C-3281 on pinion flange. Position holding Tool C-3281 in several positions to make a complete revolution while tightening. Remove holding tool and rotate pinion assembly several revolutions in both directions to align rollers. Recheck torque to 240 foot-pounds. Torque may have diminished as bearing rollers were aligned by

Fig. 21—installing Companion Flange rotating. (4) Using inch pound torque wrench C-685, measure pinion bearing preload by rotating pinion with handle of wrench floating. Take readings while handle is moving through several revolutions. Accurate readings can be made only with nose of axle in upright position. Correct preload is 15-25 inch. pounds. Bearing preload should be uniform during full revolution. A reading which varies during rotation indicates a binding condition which should be corrected. Use thinner shim to increase preload and thicker shim to decrease preload. Always perform steps 3 and 4 in exactly the same manner each time to obtain accurate readings. Preload shims are available in one thousandths of an inch increments from .074 to .106 inch. (5) When front pinion bearing preload is correct, remove pinion nut, washer and flange. (6) Apply a light coat of sealer in drive pinion oil seal bore of axle housing. (7) Install drive pinion oil seal (lip toward pinion head) with Tool C-4002 (double lip synthetic rubber oil seal) or Tool C-3719 (single lip leather oil seal). The proper tool must be used in order to position the

.25e

SPACER

SIDE PLAY •

Fig. 20—installing Pinion Oil Seal

NYI024

NK36.38

Fig. 22—Temporarily Install Thinnest Spacer


3-12 REAR AXLE

•NK.3thAl Fig. 23—Feeler Gauges Measuring Thickness

seal the proper depth into the housing (Fig. 20). (8) Install drive pinion flange using Tool C-496 and holding Tool C-3281 (Fig. 21). (9) Remove Tool C-3718 and install belleville washer, (convex side of washer up) and pinion nut. Tighten nut to 240 foot-pounds. DRIVE GEAR AND PINION BACKLASH (1) With drive pinion and bearings installed and bearing preload set, install differential case and ring gear assembly, and cups. Insert a .254 inch preload adjusting spacer on ring gear side (Fig. 22) of axle housing. Do not install bearing caps. (2) Install a preload spacer on right side of housing that will fit snugly but still leave a slight amount of end play. (3) To measure, move differential to the left side or ring gear side of rear axle housing. Using two sets of feeler gauges, insert feeler gauges between the spacer and the right side of the axle housing above the center line of the case (Fig. 23). Insert the same thickness of feeler gauges between the spacer and the axle housing below center line of case. Increase thickness of gauges until heavy drag is felt. (4) Rotate differential and ring gear assembly several times in both directions to seat bearings and cups and re-check feeler gauge drag. (5) Install a spacer totaling the combined thickness of spacer and feeler gauge. This will provide zero end play. (6) Measure drive gear backlash at 4 positions at approximately 90 degrees intervals (Fig. 24). Refer to "Differential Preload Spacer Chart" for selection of proper spacers to provide .004" to .007" backlash. (7) Remove differential case and ring gear assembly from axle housing. (8) With proper spacers selected for left and right sides of assembly as specified by "Differential Preload Spacer Chart", attach spreader Tool C-3721 with

Fig. 24—Determining Minimum Backlash

tool dowel pins seated in locating holes of axle housing. Tighten tool screw only finger tight at this time. (9) Install pilot stud Tool C-3288 on left side of axle housing. Attach dial indicator and load indicator stem slightly against opposite side of axle housing (Fig. 12). (10) Tighten spreader tool nut sufficiently to obtain .012" to .015" movement of dial indicator to permit installation of differential case assembly. Do not spread over .020 inch. (11) Remove dial indicator. (12) Holding differential assembly with bearing cups on respective bearing and selected preload spacers, carefully install differential and ring gear assembly into axle housing. (13) Loosen spreader tool nut and remove spreader. (14) Install differential bearing caps on respective sides and alternate tightening bolts to 40 footpounds. (15) Install dial indicator to axle housing with indicator parallel to drive gear. With pointer of indicator contacting the drive side of ring gear tooth, measure drive gear backlash. At least four readings should be taken on teeth approximately 90 apart to find the point of least backlash, and mark the tooth. (16) At point of minimum backlash, dial indicator should read .004 to .007 inch. If reading is not within this tolerance, it will be necessary to refer to chart and Install Differential Spacers and re-check backlash to bring within proper specifications. (17) Apply a thin film of red or white lead on both the drive and coast side of the drive gear teeth. Rotate drive gear one complete revolution in both directions while prying with a round bar or screwdriver between the casting and differential case flange. This action creates a load and produces a distinct tooth


REAR AXLE 3-13 DIFFERENTIAL PRELOAD SPACER SELECTION CHART Backlash at Zero End Play

.020 .019 .018 .017 .016 .015 .014 .013 .012 .011

Change Left Spacer Thickness by:

Change Right Spacer Thickness by:

+.026 +.024 +.022 +.022 +.020 +.020 +.018 +.016 +.014 +.014

-.016 -.014 -.012 -.012 -.010 -.010 -.008 -.006 -.004

Backlash at Zero End Play

Change left Spacer Thickness by:

.010 .009 .008 .007 .006 .005 .004 .003 .002 .001

+.012 + .010 +.008 +.008 +.006 +.004 +.002 +.002 +.000 +.000

Change Right Spacer Thickness by: -.002 +.002

+.002 +.004 +.006

+.008 +.008 +.010 +.012

Should the zero end play backlash measure more than .020 (Maximum chart figure) increase the thickness of left spacer from the specified .254" to a thickness great enough to reduce the zero end pray backlash within the chart limits; then follow the recommended procedure.

the

contact pattern on the drive gear teeth. (18) Observe the contact pattern on the drive gear teeth and compare with those in (Fig. 25) to determine if pattern is properly located. If pinion depth of mesh and gear backlash are correct, the heaviest most distinct part of contact pattern should be centered on both drive and coast sides of the drive gear teeth. If your tooth contact resembles that in (Fig. 26), the drive pinion is too far away from centerline of the ring gear, the contact pattern will appear high on the heel on drive side and high on toe on coast side. To correct this type tooth contact pattern, increase the thickness of the rear pinion bearing mounting spacer (Fig. 27), which will cause the high heel contact on drive side to lower and move toward the toe; the high toe contact on coast side will lower and move toward the heel. If the tooth contact pattern resembles that in (Fig. 28), the drive pinion is too close to the ring gear, the pattern will appear low on the toe on drive side and low heel contact on the coast side. To correct this type tooth contact pattern, decrease the thickness of PATTERN CLOSE TO CENTER

the rear pinion bearing mounting spacer (Fig. 29), which will cause the low toe contact on drive side to raise and move toward the heel; low heel contact on coast side will raise and move toward the toe. (19) When correct tooth contact pattern is obtained, and cover and gasket surface is thoroughly clean, install cover with new gasket on housing and insert cover bolts and tighten to 20 foot-pounds. REAR AXLE ASSEMBLY Installation Refer to Paragraph "Axle Shaft Assembly" when installing the rear axle shafts.

(I) With body supported at front of rear spring, position rear axle assembly spring seats over the spring center bolts. (2) Install spring "U" bolts and tighten nuts to 45 foot-pounds and install shock absorbers on spring plate studs. (3) Connect hand brake cable. (4) Install propeller shaft (match scribe marks on propeller shaft universal joint and pinion flange). THICKER SPACER NEEDED TOE END

HEEL END-DRIVE SIDE iCONVEX/

HEEL END-COAST SIDE (CONCAVE! NR198

Fig. 25-Desired Tooth Contact Pattern Under Light Load

HEEL END-DRIVE SIDE (CONVEX)

HEEL END-COAST

(CONOWf NR199

Fig. 26 -Incorrect Tooth Contact Pattern (Increase Spacer Thickness)


3-14 REAR AXLE PATTERN MOVES TOWARD CENTER AND DOWN

PATTERN MOVES INWARD AND UP

TOE END

HEEL END—DRIVE SIDE (CONVEX)

HEEL END—COAST SIDE (CONCAVE) NR200

Fig. 27—Effect on Tooth Contact Pattern as Spacer Thickness is Increased

HEEL END—DRIVE SIDE (CONVEX)

HEEL END— COAST SIDE (CONCAVE)

NR202

Fig. 29—Effect on Tooth Contact Pattern as Spacer Thickness is Decreased

LUBRICATION THINNER SPACER NEEDED

HEEL END—DRIVE SIDE (CONVEX)

HEEL END—COAST SIDE (CONCAVE)

NR201

Fig. 28—Incorrect Tooth Contact Pattern (Decrease Spacer Thickness)

Tighten clamp screws to 15 foot-pounds. (5) Connect brake lines to rear wheel cylinders and connect hydraulic flexible line and bleed wheel cylinder. (6) Install brake drums, and rear wheels and tighten to 55 foot-pounds and adjust brakes.

Multipurpose Gear Lubricant, as defined by MILL-2105B (API GL-5) should be used in all rear axles with conventional differentials: Chrysler Hypoid Lubricant part number 2933565 is an oil of this type and is recommended or an equivalent be used. In Sure-Grip axles on all 1970 Vehicles it is recommended that only Chrysler Hypoid Lubricant part number 2933565 or an equivalent be used. This lubricant, recommended for conventional differentials too, contains special additives to provide proper differential durability and performance. Anticipated Temperature

Above —10°F. As low as —30°F. Below —30°F.

Viscosity Grade

SAE SAE SAE

90 80 75

"SHOULD THE REAR AXLE BECOME SUBMERGED IN WATER, THE LUBRICANT MUST BE CHANGED IMMEDIATELY TO AVOID THE POSSIBILITY OF EARLY AXLE FAILURE RESULTING FROM CONTAMINATION OF THE LUBRICANT BY WATER DRAWN INTO THE VENT HOLE."


REAR AXLE ASSEMBLY 81/4" RING GEAR INDEX Axle Shaft And Bearings Differential Differential Case Differential Bearing Preload And Drive Gear And Pinion Backlash Drive Pinion Depth Of Mesh Gear Tooth Contact Pattern

Page 16 17 19 23 21 24

Pinion Bearing Cup Installation Rear Axle Assembly Removal Installation Removal And Replacement Of Drive Pinion Flange And Oil Seal In Vehicle Lubrication

Page 21 17 17 25 25 26

GENERAL INFORMATION This new 8-1/4" diameter axle assembly shown in (Fig. 1), is of the integral carrier housing hypoid gear type in which the centerline of the drive pinion is mounted below the centerline of the ring gear.

The rear axle housing is an iron casting with tubular legs pressed into and welded to the carrier to form a complete carrier and tube assembly. A removable stamped steel cover bolted to the rear of the carrier,


REAR AXLE 3-15

NU969

Fig. 1-84 /4" Rear Axle Assembly

permits inspection and service of the differential without removing the complete rear axle from the vehicle. A stamped small metal tag is attached beneath one of the cover screws to identify the axle ratio. The drive pinion is supported by two preloaded taper roller bearings. The front and rear pinion bearing cones are a press-fit on the pinion stem. The front and rear pinion bearing cups are a press-fit against a shoulder that is recessed in carrier casting. The drive pinion depth of mesh adjustment is controlled by the use of metal shims which are installed between the rear pinion bearing cup and the carrier casting. Drive pinion bearing preload is obtained by means of a metal collapsible spacer positioned between the front and rear pinion bearing cones. The spacer is compressed to provide the necessary required pinion bearing preload by tightening the pinion flange nut. The differential case is of one-piece construction. Two side gears and two pinion gears are housed within the case and are backed by thrust washers. The two side gears are splined internally to drive each of the axle shafts, and are positioned to turn in machined counterbores in the case. The differential pinion gears have a smooth surface and are held in position by a solid pinion shaft mounted and locked in the case by means of a lock screw. All four of the gears are in mesh with each other, and because the differential pinions turn freely on the pinion shaft, they act as idler gears when the rear wheels are turning a different speed. The differential case is supported in the carrier by two tapered roller bearing cones which are a press-fit on the differential case hubs. A new type threaded differential bearing adjuster is located in each bearing pedestal cap and perform three functions. They

eliminate the differential case side play; they adjust and maintain the backlash between the ring gear and drive pinion; and establish a means of obtaining differential bearing preload. The rear axle shaft wheel bearings are of a straight roller type and roll directly on the axle shaft. The bearing consists of an outer race, bearing cage and rollers and retaining snap rings which retain the cage and rollers in the outer race. The bearing assembly is a snug press-fit to loose fit in the axle housing tube and is held in position by the axle shaft seal. The axle shaft slides into position through the seal and bearing. Both the seal and bearing rollers ride directly on a common ground journal surface on the axle shaft. The axle shaft splines engage the differential side gear with a loose fit. The axle shaft has two machined circular grooves near the inner end of the axle shafts. The axle shafts are retained in the assembly by means of the "C" washers positioned in the circular grooves. When the axle shafts and "C" washers are properly installed, the outer portion of the "C" washer will be positioned in the machined recess of the side gear which will prevent the removal of the washer and axle shaft. With the differential pinion shaft installed, and retained by its lock screw, axle shaft installed, and retained by its lock screw, axle shaft retainers are securely locked in place and cannot slide out. Therefore, with the axial movement of the axle shafts controlled in this way, no axle shaft bearing end play adjustment is required. The axle shaft bearings are lubricated by means of rear axle lubricant level being maintained in the tubes of the housing during operation. Considering the precise nature and the special tools required for proper adjustment of the interrelated


3-16 REAR AXLE

components. replacing worn or damaged components, the following suitable factory approved tools (Fig. 2)

are considered essential in order to properly service the 8-1/4" rear axle assembly.

SERVICE PROCEDURES Removal

(1) Raise vehicle to a good desirable working height and remove the rear wheel and tire assembly and brake drum. (2) Clean all dirt and foreign material froni area of housing cover. (3) Loosen housing cover and drain lubricant from rear axle and proceed to remove cover. (4) Turn differential case to make differential pinion shaft lock screw accessable and remove lock screw and pinion shaft (Fig. 3). (5) Push axle shafts toward center of vehicle and remove the "C" washer locks from recessed groove of axle shaft (Fig. 4). (6) Remove axle shaft from housing being careful not to damage the straight roller type axle shaft bearing which will remain in the rear axle housing. (7) Inspect the axle shaft and bearing roller surfaces for signs of brinneling, spalling or any surface imperfections. Under no circumstances should an axle shaft or bearing showing any of the above mentioned conditions be reused. (The axle shaft and bearing are serviced separately). OR Remove axle shaft seal from housing bore using the button end of axle shaft. The axle shaft splines will cause sharp dents on the end of the housing. Polish these dents smooth or they will tear the rubber on the outside diameter of the seal and cause the seal to leak. (9) To remove the axle shaft bearing from axle housing on Coronet-Charger models, use Tool C-4105 (Fig. 5). Tool C-4I05 damages bearing separator and C-293

I OROUE SP-535 C-452 WRENCH I SP-5380 ALLEN W RENCH 4SP-5385 _.

a now bearing used. Attach Tool C-637 to end of selected remover, using a slide hammer motion, remove axle shaft bearing and inspect and discard if axle shaft or bearing shows any of the conditions in step 7. Never reuse an axle shaft seal under any circumstances once it has been removed. bearing must be discarded and

AXLE SHAFT AND BEARINGS

C. C-3718 Ctic

CAUTION: Inspect housing bearing shoulder for burrs, and remove any if present, otherwise bearing could be cocked during installation.

Installation

U) Wipe axle shaft bearing cavity of axle housing clean. (2) Insert axle shaft bearing onto pilot of proper Rearing Installer (Coronet-Charger) use Tool C-4137.

Fig. 3—Removal or installation of Differential Pinion Shaft Lock Screw

C-4076 75 C-4107 C.637

5382

I

SP-3193 SP5383 SCREW

C,-430 0 C.:439

sv-

534

C.68e SP-3289

SP-5408 c.40,10 ADANERS I - OR NO. 42 00-955 C-4079

ADAPTERS NO. 44

C-748 C.32 INC6910A6

Fig. 2—Essential Tools Needed To Service 8-1/4" Rear Axle

Fig. 4—Removal or installation of Axle Shaft

"C" Washer Locks


REAR AXLE 3-17

Nuw Fig. S—Removing Axle Shaft Bearing and Seal

Insert axle shaft bearing into cavity making sure it is not cocked in bore and bottoms against the shoulder. (3) Install aide shaft bearing seal (Coronet-Charger) use Tool C-4138, (Fig. 6) until the outer flange of tool bottoms against housing flange face. This positions the seal to the proper depth beyond the end of the flange face. (4) Slide axle shaft into place being careful that splines of shaft do not damage oil seal and properly engage with splines of differential side gears. (5) With axle shaft in place, install the "C" washer locks in recessed grooves of axle shaft, and pull outward on shaft so the "C" washer lock seats in the counterbore of differential side gear. (6) Install differential pinion shaft through case and pinions, aligning hole in shaft with lock screw hole. Install lock screw and tighten securely. (7) Clean housing and cover gasket surfaces and using a new gasket, install cover and torque cover bolts to 15-25 foot-pounds, Beneath one of the cover bolts, install the ratio identification tag. (8) Fill axle with lubricant to proper level with Multi-Purpose gear lubricant meeting M1L-L-2105B requirements. Chrysler Part No. 2933505 or an equivalent. (9) install brake drum and wheel and tire assembly torque wheel nuts to 65 foot-pounds in the proper sequence (Fig. 7). (10)Lower vehicle and test operation of brake and axle assembly.

Fig. 7—Proper Wheel Nut Tightening Sequence

REAR AXLE ASSEMBLY Removal Should it become necessary to remove the rear axle assembly for overhaul or repair proceed as follows: (1) Raise vehicle to a comfortable working height that will permit floor stands to be installed at front of rear springs. (2) Block brake pedal in the "up" position using a wooden block. (3) Loosen and remove rear wheels and brake drums. (4) Disconnect hydraulic brake lines at wheel cylinders and cap fittings to prevent loss of brake fluid. (5) Disconnect parking brake cables. To maintain proper drive line balance when reassembling, make scribe marks on the propeller shaft universal joint and the pinion flange before removal. (6) Disconnect propeller shaft at differential pinion flange and secure in an upright position to prevent damage to front universal joint. (7) Remove shock absorbers from spring plate studs and loosen rear spring "U" bolts nuts and remove "U" bolts. (8) Remove axle assembly from vehicle. (9) Using a suitable cleaning solvent wash and clean the outer surface of axle assembly and blow dry with compressed air. DIFFERENTIAL

NU974

Fig, 6—Installing Axle Shaft Oil Seal

Removal and Disassembly (1) Position axle assembly in a suitable holding device, such as the jaws of a vise with housing cover facing upward. (2) Loosen and remove housing cover screws and remove cover. Tilt assembly and drain lubricant into a container. (3) Using a suitable cleaning solvent wash and clean differential bearing ring gear and pinion and internal surfaces and blow dry with compressed air.


3-18 REAR AXLE

NU977

Fig. 10—Removing Drive Pinion Companion Flange PINCH BAR

ABIjusaNI.1975

Fig. 8—Checking Differential Side Play

(4) Measure for differential side play. Position a screwdriver or pinch bar between left side of axle housing and differential case flange, then using a prying motion determine if side play is present. There should be no side play. (Fig. 8).

(5) Apply an even coating of either red or white lead to the gear tooth surfaces. Using a pinch bar or screw driver apply force between housing and differential case rim. Turn pinion each direction so a distinct pattern will be reproduced on the teeth. Compare the pattern appearing on the teeth with those in Figs. 27, 28, 30 and determine if proper depth of mesh can be achieved. (6) In preparing to measure drive gear runout on differential case, (provided no side play was found) mount a dial indicator tool C-3339 on pilot stud and load the indicator stem slightly when plunger is right angles to back face of drive gear (Fig. 9). (7) Measure drive gear runout by turning drive

.9745 Fig. 9—Measuring Drive Gear Runout

gear several complete revolutions and reading dial indicator. Mark drive gear and differential case at point of maximum runout. The marking of differential case will be very useful later in checking differential case runout. Total indicator reading should be no more than .005 inch. If runout exceeds .005 inch the differential case may be damaged. A test for case runout will be described later. (8) Using an inch-pound torque wrench, measure pinion bearing preload and record. Remove drive pinion nut and washer. Using Tool C-452 and holding Tool C-3281 remove drive pinion flange (Fig. 10). (9) Using a screwdriver tip and hammer, remove the drive pinion oil seal from carrier casting and discard. (10) Mark axle housing and differential bearing caps for proper relocation during reassembly (Fig. 11). (11) Loosen and remove differential bearing cap bolts and remove bearings caps and threaded adjusters. (12) Remove differential case and ring gear assentPUNCH MARKS

PUNCH MARKS

Fig. 11—Marking Bearing Caps and Housing for proper Identification


REAR AXLE 3-19 bly from rear axle assembly. A possible light prying action might be necessary to unseat the differential. Differential bearings cups and threaded adjusters must be kept with respective bearing cones. (13) To remove drive pinion or front pinion bearing cone, the pinion stem must be driven rearward out of the bearing. This will result in damage to bearing rollers and cup and both bearing cone and cup must be replaced with new parts. (14) Using a flat end brass drift and hammer, remove front and rear bearing cups from housing. Remove the shim from behind rear bearing cup and record thickness which can be very helpful during reassembly. Discard the damaged shim. (15) Remove rear bearing cone from drive pinion stein using Tool C-293 and adapters No. 42. Care must be taken to insure that the adapters are located so as not to pull on bearing cage (Fig. 12). Disassembly (1) Mount differential case anti ring gear assembly in a vise equipped with soft jaws (brass). (2) Remove drive gear bolts. Bolts are left hand thread. With non-metallic hammer or brass drift, tap drive gear loose from differential case pilot and remove. (3) If drive gear runout exceeded .005 inch in step 7 (under "Differential Removal and Disassembly"), recheck the case as follows: Install differential ease and respective bearing cups. caps and adjusters in axle housing. (4) Using differential bearing adjusting wrench C4079 turn in adjusters to eliminate all side play and tighten pedestal cap bolts snugly. (5) Mount dial indicator in contact with drive gear

Fig. 13—Checking Drive Gear Mounting Flange Face Runout Range face and measure runout as described in step 7. Total allowable runout should not exceed .003 inch. It is often possible to reduce excessive runout by positioning drive gear 180 degrees from point of maximum runout when reassembling ring gear on differential case (Fig. 13). (8) Loosen and remove pedestal cap bolts and remove differential case assembly from carrier and tube assembly. (7) Loosen and remove pinion shaft lock screw and remove pinion shaft. (8) Rotate differential side gears until differential pinions appear at differential case window opening and remove. (9) Remove differential side gears and thrust washers. (10) Remove differential beating cones using Tool C-293 and adapter plates No. 44 (Fig. 14).

Fig. 72—Removing Drive Pinion Rear Bearing Cone

Fig. 14—Removing Differential Searing Cone

DIFFERENTIAL CASE


3-20 REAR AXLE Cleaning and inspection

(1) Wash and clean all parts in a suitable cleaning solvent and with the exception of bearings, dry with compressed air. To clean axle housing tubes, insert a stiff wire into tube, attach a clean cloth to wire at center section and withdraw from center outward. (2) All machined contact surfaces in the axle housing and differential bearing caps should be smooth and free of any raised edges. Front and rear pinion bearing cup bore machine surfaces should be smooth. Raised metal on shoulders of bores incurred in removal of cups should be flattened by use of a flat nosed punch. (3) Axle shaft oil seal bores at both ends of housing should be smooth and free of rust and corrosion. This also applies to brake support plate and housing flange face surface. (4) Axle shaft bearings should be washed and cleaned and inspected for setting. spallings or imperfections in axle shaft roller surface or bearing rollers. If either or both are found to be unfit for further use, discard and replace with new parts. (The axle shaft and bearing are serviced separately.) (5) The axle shaft splines should be smooth and free of excessive wear. The axle shaft oil seal journal should be smooth and free of nicks, scratches or blemishes. To remove any imperfections, polish with No. 600 crocus cloth (without reducing diameter of axle shaft oil seal surface). (6) Differential bearings and front and rear pinion bearing cone and cup assemblies should have a smooth appearance with no broken or dented surfaces on rollers or roller contact surfaces. The bearing roller retainer cages must not be distorted or cracked. When replacing bearings, always replace the cup and cone in a set only. (7) Inspect drive gear and pinion for worn or chipped teeth or damaged attaching bolt threads. If replacement is necessary, replace both the drive gear and drive pinion as they are available in matched sets only. (8) Inspect universal joint flange for cracks, worn splines, pitted, rough or corroded oil seal contact surface. Repair or replace universal joint flange as necessary. (9) Inspect drive pinion bearing shim for breakage or distortion and replace if necessary during the establishment of setting depth of mesh. (10) Differential side gears and pinions should have smooth teeth with a uniform contact pattern without excessive wear or broken surfaces. The differential side gear hub surfaces and thrust washer contact surfaces should be smooth and free from any scoring or metal pickup. (U) The machined thrust washer surface areas inside the differential case should be polished and with

no surface imperfections. The pinion shaft bore in differential case should be round and without excessive wear in areas of contact with either differential case or differential pinions. (12) Inspect axle shaft "C" lock washers for signs of cracks or wear and replace if necessary. Assembling The Differential

Lubricate all components before assembly with lubricant as specified in (Lubrication Group "0".) (1) Install thrust washers on differential side gears and position gears in counterbores of differential ease. (2) Position thrust washers on both differential pinion gears and mash the pinion gears with the side gears, having pinion gears exactly 180 degrees apart. (3) Rotate side gears to align pinion gears and washers with differential pinion shaft holes in case. (4) Install differential pinion shaft with care not to damage thrust washers. Hole in pinion shaft must align with lock screw hole in differential case. (5) The contact surface of the drive gear and differential case flange must be clean and free of all burrs. (6) Using an Arkansas stone, relieve the sharp edge of the chamfer on the inside diameter of the ring gear (Fig. 15). This is very important otherwise during the installation of ring gear on differential case, the sharp edge will remove metal from the pilot diameter of case and can get imbedded between differential case flange and gear; causing ring gear not to seat properly. (7) Position drive gear on differential case pilot, aligning threaded holes of drive gear with those in differential case flange. (8) Insert drive gear screws (Left Hand Threads) through case flange and into drive gear. After all cap screws are properly started, tap drive gear against differential case flange with a non-metallic mallet. (9) Position unit between brass jaws of a vise and alternately tighten each screw to 55 foot-pounds.

Fig. 13—Stoning Chamfer of Ring Gear


REAR AXLE 3-21 housing bores making sure they are not cocked. (2) Assemble spacer SP-5408 on main stem SP-5385 followed by rear pinion bearing cone and insert into axle carrier from rear side. (3) While holding assembly in carrier, install front pinion bearing cone over spacer SP-5382 and position on stem of tool followed by compression sleeve SP535, Centralizing washer SP-534 and main screw nut SP-3193. Hold compression sleeve with companion flange holding Tool C-3281 and tighten nut (Fig. 18) allowing tool to rotate as nut is being tightened in order not to brinnel bearing or cups: Do not remove tool after installing cups. Pinion depth of mesh will be determined next.

DRIVE PINION DEPTH OF MESH

Using Tool C-3715 and Adapter C-4084

Fig. 16—Installing Differential Bearing Cone

(10) Position each differential bearing cone on hub of differential case (taper away from drive gear) and with installing Tool C4107 install bearing cones. An arbor press may be used in conjunction with installing tool (Fig. 16). CAUTION: Never exert pressure against the bearing cage, since this would damage the bearing.

PINION BEARING CUP INSTALLATION Rear axle pinion setting gauge 'Tool C-3715 and adapter set C-4084 is used to install drive pinion bearing cups as well as to determine pinion depth of mesh (Fig. 17). LUBRICATE ALL PARTS BEFORE ASSEMBLY WITH LUBRICANT AS SPECIFIED UNDER LUBRICATION. (1) Start both drive pinion bearing cups into axle REAR PINION BEARING

The 8-1/4" axle with the tapered drive pinion stem uses the collapsible spacer for bearing preload and requires the pinion depth of mesh setting first and preload last. The position of the drive pinion with respect to the drive gear (depth of mesh) is determined by the location of the bearing cup shoulders in the carrier and by the portion of the pinion in back of the rear bearing. The thickness of the rear pinion bearing mounting shim suitable for the axle can be determined by using Tool C-3715 and Adapter C-4084. (1) With main tool left in axle housing after installing drive pinion bearing cups, loosen tool nut and retighten nut to produce 10-30 inch-pounds of preload. Rotate after tightening to align bearing rollers. Make sure bearing rollers are lubricated otherwise a false reading could occur. (2) Install gauge block SP-5383 on main tool and tighten screw with an Allen wrench securely. (3) Position cross bore arbor SP-5380 in axle housing differential bearing seats. Center the arbor so that an approximate equal distance is maintained at

SP-38O

FRONT PINION BEARING ellluitattos ' SP-535

SP-5408

re .0" .-

itar itimi,g SP S382

SP-5383 SP-5385

SP.1193

SP 534 NU983

Fig. 17 — Rear Axle Setting Gauge Tool C - 3715 and

Adapter Set C-4084

t:Uitc“

Fig. 18—Seating Bearing Cups in Axle Housing


3-22

REAR AXLE

both ends. Position bearing caps and attaching bolts on carrier pedestals and insert a piece of 1)02 inch shim stock between arbor and each cap. Tighten cap bolts to 10 foot-pounds. (4) Using a feeler gauge select the proper thickness of shims that will snugly fit between arbor and gauge block_ This fit must be snug but not too fight (similar to the pull of a feeler gauge). This measurement is then used in determining the correct thickness shim pack for installation behind the rear pinion bearing cup and carrier casting (Fig. 19). (5) To select a shim pack for installation, read the markings on the end of the pinion head (-0. —1. —2, +1, H-2. etc.). When marking is -- (minus). add that amount to the thickness of shim pack selected in step (4). When the marking is — (plus), subtract that amount. Treat other pinion markings in a similar manner. Shims are available in increments of .001" from .061" thru .078". (6) Remove the tool arbor and tool from axle housing. (7) Using a brass drift or soft punch and hammer, remove rear pinion bearing cup from casting. (8) Position the correct thickness shim in axle housing cup bore and install rear bearing cup as described previously in steps (1 thru 3). When cup is properly seated, remove tool and pinion bearing cones. (9) Lubricate rear drive pinion bearing tone and install bearing cone on pinion stem using Tool C-4040 or DD-955. An arbor press may be used in conjunction with Tool (Fig. 20). (10) Insert drive pinion and bearing assembly up through axle casting and install collapsible spacer followed by front pinion bearing cone on pinion stem Install companion flange using Tool C-3718 and holding Tool C-3281. This is necessary in order to properly install front pinion bearing cone on stem due to interference fit. Remove tool and flange from pinion FEELER GAUGE

/"--

EP:E55

NU92.6 Fig. 20—Installing Drive Pinion Rear Bearing Cone

stem. CAUTION: During the installation of front pinion bearing be careful not to collapse the spacer. (11) Install drive pinion oil seal using Tool C-4076 until the seal flange contacts the housing flange face (Fig. 21). The outside diameter of seal is precoated with a special sealer so no sealing compound is required. (12) With pinion supported in axle ascPmbly, install anti-clang washer on pinion stem followed by companion flange. Using Tool C-3718 and holding Tool C-3281 (Fig. 22) draw flange into position. (13) Remove tools and install Belleville Washer (convex side of washer up) and pinion nut. (14) Hold universal joint flange with holding Tool C-3281 and tighten pinion nut to remove end play in pinion, while rotating the pinion to insure proper bearing roller sealing. (15) Remove holding tool and rotate pinion several complete revolutions in both directions to permit bearing rollers to seat_

Nuns

Fig. 19—Determining Proper Shim Pack Thickness for Drive Pinion Depth of Mesh

N1_19.S7 Fig. 21—installing Drive Pinion Oil Seal


REAR AXLE 3-23

Fig. 22—Installing Drive Pinion Companion Flange

Fig. 24—Measuring Drive Pinion Bearing Preload

(16) Tighten pinion nut to 170 foot-pounds and measure pinion bearing preload by rotating pinion using an inch-pound torque wrench. The correct bearing preload specifications are 20-35 inch-pounds for new bearings with the pinion nut tightened to 170 foot-pounds minimum (Figs. 23, 24). If when rebuilding the axle and the original rear pinion bearing and a new front pinion bearing are used, the correct bearing preload is 10 inch-pounds more than the reading you got at time of tear down with a minimum of 170 foot-pounds of torque on the pinion nut. Correct bearing preload readings can only be obtained with nose of carrier in upright position. If correct preload cannot be obtained at 170 foot-pounds, continue tightening pinion nut in small increments and checking until proper preload is obtained. Bearing preload should be uniform during complete revolution. A preload reading that varies during rotation indicates a binding

condition which must be corrected. The assembly is unacceptable if final pinion nut torque is below 170 foot-pounds or pinion bearing preload is not within specifications.

TORQUE WRENCH

Fig. 23 —Tightening Drive Pinion Nut

NU989

NOTE: UNDER NO CIRCUMSTANCES SHOULD THE PINION NUT BE BACKED OFF TO LESSEN PINION BEARINGS PRELOAD. IF THE DESIRED PRELOAD IS EXCEEDED A NEW COLLAPSIBLE SPACER MUST BE INSTALLED AND NUT RETIGHTENED UNTIL PROPER PRELOAD IS OBTAINED.

DIFFERENTIAL BEARING PRELOAD AND DRIVE GEAR AND PINION BACKLASH (1) With drive pinion bearings installed and bearing preload set, install differential case and ring gear assembly with their respective bearing caps and adjusters flush with bearing cap; otherwise you will not be able to get Tool C-4079 in position to turn bearing adjuster. Align identification marks and tighten both cap bolts on each cap to 10 inch-pounds. (2) Using Tool C-4079 turn right adjuster in until the assembly has approximately M05" spread. Using torque wrench tighten all four (4) cap bolts to 60 footpounds. Back off right adjuster until all spread is removed. (3) Turn adjusters in using Tool C-4079 until bearing free play is eliminated and so some backlash exists between the ring gear and drive pinion (Fig. 25). Rotate drive pinion and ring gear several revolutions in both directions in order to seat the bearing rollers. This is necessary before setting• backlash. (4) Install dial indicator and position the contact point against back face of ring gear tooth. Check backlash at 4 positions at approximately 90 degree intervals around the circumference of the gear (Fig. 26). (5) Rotate gear to position where least backlash exists. Turn both adjusters the same amount, and in the same direction, until gear backlash is .001" to .002". (6) Turn right bearing adjuster (tooth side of drive


3-24 REAR AXLE PATTERN CLOSE TO CENTER TOE EINID

HEEL ENO—COAST S!DE (CONCAVE)

HtEL ENT; DRivE

SrE :CONVEX!

Fig. 25-Adjusting Differential Bearings to Eliminate

Free Play gear) in until .006" to .008- minimum backlash is obtained. By setting the proper backlash this will provide the required differential bearing preload. (7) Tighten differential bearing cap bolts to 55 foot-pounds and install bearing adjuster locks. GEAR TOOTH CONTACT PATTERN

The gear tooth contact pattern %sill disclose whether the correct rear pinion bearing mounting shim has been installed and the drive gear backlash set properly. Backlash between the drive gear and pinion must be maintained within the specified limits until correct tooth contact pattern is obtained. (1) Apply a thin film of red or white lead on both the drive and coast side of the drive gear teeth. Rotate drive gear one complete revolution in both directions while load is being applied with a round bar or screwdriver between the carrier casting and differential case flange. This action will leave a distinct contact pattern on both the drive and coast side of the

NR;SE

Fig. 27-Desired Tooth Contact Under Light Load drive gear teeth. (2) Observe the contact pattern on the drive gear teeth and compare with those in Figs. 27, 28 and 30 to determine if pattern is properly located. With pinion depth of mesh and gear backlash set properly, your contact pattern should resemble that in Fig. 27. Notice that the correct contact pattern is well centered on both drive and coast sides of the teeth. When tooth contact patterns are obtained by hand, they are apt to be rather small. Under the actual operating load, however, the contact area increases. (3) If after observing the contact paUern and you find it resembles that in Fig. 28, the drive pinion is too far away from centerline of the ring gear, the contact pattern will appear high on the heel on drive side and high on toe on coast side. To correct this type tooth contact pattern, increase the thickness of shim pack located behind the rear pinion bearing cup (l•Ig. 29), which will cause the high heel contact on drive side to lower and move toward the toe; the high toe contact on coast side will lower and move toward the heel. (4) If after observing the contact pattern and you find it resembles that in Fig. 30. the drive pinion is too close to the ring gear. the pattern will appear low on the toe on drive side and low heel contact on coast side. To correct this type tooth contact pattern, deTlitCKER SPACER NEEDED TOE END

I A

HEEL S:DE r.CYNN7EX:

Fig. 26-Measuring and Adjusting Backlash between Drive Gear and Pinion

HEEL END—COAST S!DE !CONCAVE) ban 99

Fig. 28-Incorrect Tooth Contact Pattern (Increase Spacer Thicknatc)


REAR AXLE 3-25 PATTERN MOVES TOWARD CENTER AND DOWN

PATTERN MOVES INWARD AND UP

, TOE END

TOE / END /

14 00

HEEL END- DRIVE SIDE (CONVEX)

HEEL END-COAST SIDE (CONCAVE) NR200

HEEL END-DRIVE SIDE (CONVEX)

HEEL END- COAST SIDE (CONCAVE)

NR202

Fig. 29—Effect on Tooth Contact Pattern as Spacer Thickness is increased

Fig. 31—Effect on Tooth Contact Pattern as Spacer Thickness is increased

crease the thickness of shim pack located behind the rear pinion bearing cup (Fig. 31), which will cause the low toe contact on drive side to raise and move toward the heel; low heel contact on coast side will raise and move toward the toe.

(7) Install rear universal joint of propeller shaft in same position as removed (match scribe marks on propeller shaft universal joint and pinion flange). Tighten universal joint clamps to 170-200 inch-pounds. (8) Install rear wheels and tighten nuts to 65 footpounds in the proper tightening sequence.

REAR AXLE ASSEMBLY REMOVAL AND REPLACEMENT OF DRIVE PINION FLANGE AND OIL SEAL IN VEHICLE

Installation

(1) Making sure the gasket surfaces of both the cover and carrier housing are clean, install a new gasket followed by the cover and tighten the cover bolts to 15-25 foot-pounds. Beneath one of the cover bolts, install the ratio identification tag. (2) For correct procedure when installing axle shafts and bearings, see "Axle Shafts and Bearings". (3) With body supported at front of rear springs, position rear axle assembly spring pads over the spring center bolts. (4) Install spring "U" bolts and tighten nuts to 45 foot-pounds and install shock absorbers on spring plate studs. (5) Connect parking brake cables. (6) Connect hydraulic brake lines at wheel cylinders, install brake drums, adjust brakes and bleed brakes. THINNER SPACER NEEDED

HEEL END-DRIVE SIDE (CONVEX)

HEEL END-COAST SIDE (CONCAVE)

Fig. 30—Incorrect Tooth Contact Pattern (Decrease Spacer Thickness)

NR201

On 8-1/4" rear axle assemblies using the collapsible spacer to obtain pinion bearing preload, the following procedure for the removal and replacement of the drive pinion flange and pinion oil seal must be followed to assure that the proper bearing preload is maintained in the axle assembly. If this procedure is not followed it could result in a premature failure of the axle. (1) Raise vehicle on hoist and make scribe marks on propeller shaft, shaft universal joint, drive pinion flange and end of pinion stem. (2) Disconnect propeller shaft at pinion flange and secure in an upright position to prevent damage to front universal joint. (3) Remove the rear wheels and brake drums to prevent any drag or a possible false preload reading could occur. (4) Using inch-pound torque wrench C-685 measure pinion bearing preload by rotating pinion with handle of wrench floating, read the torque while wrench is moving through several complete revolutions and record. This operation is very important because preload must be carefully reset when reassembling. (5) With Tool C-3281 hold companion flange and remove drive pinion nut and Belleville washer. (6) Install companion flange remover Tool C-452 and remove flange. Lower rear of vehicle to prevent lubrication leakage. (7) Using a screwdriver and hammer, remove the pinion oil seal from the carrier and clean the oil seal seat.


3-26 REAR AXLE (8) Check splines on pinion shaft stem to be sure they are free of burrs or are not worn badly. If burrs are evident remove them using crocus cloth by working in a rotational motion. Wipe the pinion shaft clean. (9) Inspect companion flange for cracks, worn splines, pitted, rough or corroded oil seal contacting surface. Repair or replace companion flange as necessary. (10) The outside diameter of the seal assembly is precoated with a special sealer so no sealing compound is required for installing. Install the anti-clang washer on the pinion stem. Install seal using Tool C-4076 until the seal flange contacts the housing flange face. (11) Position companion flange on pinion stem being careful to match scribe marks made previously before removal. (12) Install companion flange with installing Tool C-3718 and holding Tool C-3281. (13) Remove tool and install Belleville washer (convex side of washer up) and pinion nut. (14) Hold universal joint flange with holding Tool C-3281 and tighten pinion nut to 170 foot-pounds. Rotate pinion several complete revolutions to assure that bearing rollers are properly seated. Using an inch-pound torque wrench C-685 measure pinion bearing preload. Continue tightening pinion nut and checking preload until preload is at the original established setting you found in Step 4. Under no circumstances should the preload be more than 10 inchpounds over the established setting found at time of checking in Step 4 of procedure. Bearing preload should be uniform during a complete revolution. A preload reading that varies during rotation indicates a binding condition which has to be

corrected. The assembly is unacceptable if final pinion nut torque is below 170 foot-pounds or pinion bearing preload is not within the correct specifications. CAUTION: UNDER NO CIRCUMSTANCES SHOULD THE PINION NUT BE BACKED OFF TO LESSEN PINION BEARING PRELOAD. IF THE DESIRED PRELOAD IS EXCEEDED A NEW COLLAPSIBLE SPACER MUST BE INSTALLED AND NUT RETIGHTENED UNTIL PROPER PRELOAD IS OBTAINED. IN ADDITION, THE UNIVERSAL JOINT FLANGE MUST NEVER BE HAMMERED ON OR POWER TOOLS USED.

(15) Install propeller shaft (match scribe marks on propeller shaft universal joint and pinion flange). Tighten clamp screws to 170-200 inch-pounds. (16) Install the rear brake drums and wheels and tighten nuts 65 foot-pounds. (17) Raise the vehicle to a level position so axle assembly is at correct running position and check lubricant level. Add the correct type of lubricant required to bring the lubricant to proper level.

LUBRICATION Refill axle assembly with Multipurpose Gear Lubricant, as defined by MIL-L-2105B (API GL-5) should be used in all rear axles with conventional differentials; Chrysler Hypoid Lubricant part number 2933565 is an oil of this type and is recommended or an equivalent be used. Anticipated Temperature Range

Above — 10°F. As low as —30°F. Below —30°F.

Viscosity Grade

SAE SAE SAE

90 80


REAR AXLE ASSEMBLY VA" RING GEAR INDEX Axle Shafts and Bearings Axle Shaft End Play Differential and Carrier (Removal) Differential and Carrier (Installation) Differential Case Drive Gear and Pinion Backlash Gear Tooth Contact Pattern Lubrication Pinion Bearing Cup Installation

Page 27 30 31 42 32 41 42 43 35

Page

Pinion Bearing Preload and Pinion Setting Using Tool C-758-D-4 Small Stem Step Pinion Large Stem Step Pinion Large Stem Pinion With Collapsible Spacer .... Pinion Bearing Preload and Pinion Setting Without Using Tool C-758-D4 Rear Axle Housing Removal and Replacement of Drive Pinion Flange and Oil Seal in Vehicle

35 36 37 39

40 30 43

GENERAL INFORMATION The 8-3/4" Rear Axle Assembly shown in (Fig. 1), is a semi-floating type and may be divided into four subassemblies; flanged axle drive shafts with related parts (Fig. 2.) differential with drive gear, drive pinion

with carrier, and the axle housing. Servicing of the above mentioned subassemblies, with exception of the axle housing may be performed without removing the complete rear axle assembly from the vehicle.


REAR AXLE 3-27 Gear ratio identification numbers will be stamped on a metal tag and attached by means of the rear axle housing-to-carrier bolt. Some 8-3/4" large stem differential and carrier assemblies have incorporated a collapsible spacer which bears against the inner races of the front and rear bearing. This collapsible spacer is used to establish preload on the pinion bearings. Adjustment of pinion depth of mesh is obtained by placing a machined shim between the pinion head and the rear bearing cone. The differential bearings are larger on both the conventional and Sure-Grip Differentials and are not interchangeable with previous years bearings.

A new Sure-Grip Differential is available as optional equipment in both the 7-1/4" and 8-3/4" rear axle assembly. The Sure-Grip Differential is of a two piece construction similar to the old type and is completely interchangeable with the previous type and will be serviced as a complete assembly only. Refer to the "Sure Grip Differential" Section of the Axle Group for the servicing procedure. SHOULD THE REAR AXLE BECOME SUBMERGED IN WATER, THE LUBRICANT MUST BE CHANGED IMMEDIATELY TO AVOID THE POSSIBILITY OF EARLY AXLE FAILURE RESULTING FROM CONTAMINATION OF THE LUBRICANT BY WATER DRAWN INTO THE VENT.

SERVICE PROCEDURES AXLE SHAFTS AND BEARINGS CAUTION: It is absolutely necessary that anytime an axle assembly is serviced, and the axle shafts are loosened and removed, the axle shaft gaskets and inner axle shaft oil seals must be replaced.

Removal

(1) With wheels removed, remove clips holding brake drum on axle shaft studs and remove brake drum. (2) Using access hole in axle shaft flange, remove retainer nuts, the right shaft with threaded adjuster in

retainer plate will have a lock under one of the studs that should be removed at this time. (3) Remove parking brake strut. (4) Attach axle shaft remover Tool C-3971 (Fig. 3) to axle shaft flange and remove axle shaft. Remove brake assembly and gaskets. (5) Remove axle shaft oil seal from axle housing using Tool C-637 (Fig. 4). (6) Wipe axle housing seal bore clean and install a new axle shaft oil seal using Tool C-839 (Fig. 5). Disassembly CAUTION: To prevent the possibility of damaging ADJUSTER SHAFT

OIL SEAL RETAINER GASKET COLLAR

HOUSING

GASKET STUD CUP

TEE SCREW

CONE OIL SEAL

WASHER

RIGHT

BOLT GASKET SUPPORT

BOLT

NUT

GASKET

NUT

CONE CUP SHAFT

OIL SEAL

STUD

COLLAR

CARRIER AND CAP

GASKET

FLANGE LEFT

OIL SEAL RETAINER

Fig. 1 -84/4" Rear Axle Assembly

NK967B


3-28 REAR AXLE

GASKETS

ADJUSTER

LEFT

7;=f r= SHAFT

RIGHT LOCK

CUP SEAL

COLLAR

BEARING NK59A NKS6

Fig. 2—Axle Shaft Disassembled

axle shaft seal surface, slide protective sleeve SP-5041 over the seal surface next to bearing collar. CAUTION: Under no circumstances should axle shaft collars or bearings be removed using a torch. The use of a torch in the removal of the axle shaft collars or bearings is an unsafe practice, because heat is fed into the axle shaft bearing journal and, thereby weak. ens this area.

(1) Position axle shaft bearing retaining collar on a heavy vise or anvil and using a chisel, cut deep grooves into retaining collar at 90 0 intervals (Fig. 6). This will enlarge bore of collar and permit it to be driven off of axle shaft. (2) Remove bearing roller retainer flange by cutting off lower edge with a chisel (Fig. 7). (3) Grind a section off flange of inner bearing cone (Fig. 8) and remove bearing rollers (rig. 9). (4) Pull bearing roller retainer down as far as possible and cut with a pair of side cutters and remove (Fig. 10). (5) Remove roller bearing cup and protective sleeve SY-5041 from axle shaft. BLOCKS BEARING REMOVING SP.5020

ADAPTER SP-5021

SCREWS 5P-5026

SLEEVE SP-5041

RING-BLOCK HOLDING SP-5017

Fig. 3—Tool Set C-3971

Fig. 4—Removing Axle Shaft Oil Seal

Fig. 5—Installing Axle Shaft Oil Seal

CAUTION: Sleeve SP-5041 should not be used as a protector for the seal journal when pressing off the bearing cone, as it was not designed for this purpose.

(6) To avoid scuffing seal journal when bearing cone is being removed, it should be protected by single wrap of .002 thickness shimstock held in place by a rubber band (Fig. 11). (7) Remove the bearing cone using Tool C-3971

NK,160A

Fig. 6—Notching Bearing Retainer Collar


REAR AXLE 3-29

SLEEVE SP-5041

Fig. 7—Removing Roller Retainer

10—Cutting Out Roller Bearing Retainer

Fig. 8—Flange Ground Off Inner Cone

Fig. II—Seal Journal Protection

(Fig. 3). Tighten bolts of tool alternately until cone is removed (Fig. 12). (8) Remove seal in bearing retainer plate and replace with new seal.

shaft. (2) Lubricate wheel bearings with Multi-Purpose Grease NLGI, grade 2 E.P. or an equivalent. (3) Install a new axle shaft bearing cup, cone and collar on shaft using Tool C-3971 (Fig. 13) and tighten bolts of tool alternately until bearing and collar are seated properly.

Assembly (1) Install retainer plate and seal assembly on axle

SLEEVE SP-5041

BEARING

ROLLER

NK358

Fig. 9 —Removing Bearing Rollers

Fig. 12—Removing Bearing Cone with Tool C-3971


3-30 REAR AXLE

G

rre'wer-'ar!"_37r4\

arasee

) NK 362

And Collar (4) Inspect axle shaft seal journal for scratches and polish with #600 crocus cloth if necessary. Fig. 13—Installing New Bearing

Installation (1) Clean axle housing flange face and brake support plate thoroughly. Install a new rubber asbestos gasket on axle housing studs, followed by brake support plate assembly on left side of axle housing. (2) Apply a thin coating of Multi-Purpose Grease, NLG1 grade 2 E.P. or equivalent to the outside diameter of the bearing cup prior to installing in the bearing bore. This operation is necessary as a corrosion preventative. (3) Install foam gasket on the studs of axle housing and carefully slide axle shaft assembly through oil seal and engage splines in differential side gear. (4) Tap end of axle shaft lightly with a nonmetallic mallet to position axle shaft bearing in housing bearing bore. Position retainer plate over axle housing studs. Install retainer nuts and tighten 30-35 foot-pounds. Start by tightening bottom nut. (5) Repeat step (1) for right side of axle housing. (6) Back off threaded adjuster of right axle shaft assembly until inner face of adjuster is flush with inner face of retainer plate. Carefully slide axle shaft assembly through oil seal and engage splines in differential side gears. (7) Repeat step (4).

AXLE SHAFT END PLAY CAUTION: When setting axle shaft end play, both rear wheels must be off the ground, otherwise a false end play setting will occur.

(1) Using a dial indicator mounted on the left brake support (Fig. 14), TURN THE ADJUSTER CLOCKWISE UNTIL BOTH WHEEL BEARINGS ARE SEATED AND THERE IS ZERO END PLAY IN THE AXLE SIIAFTS. BACK OFF THE ADJUSTER COUN-

Play TERCLOCKWISE APPROXIMATELY FOUR NOTCHES TO ESTABLISH AN AXLE SHAFT END PLAY OF .008-.018 INCH. (2) Tap end of left axle shaft lightly with a nonmetallic mallet to seat right wheel bearing cup against adjuster, and rotate axle shaft several revolutions so that a true end play reading is indicated. (3) Remove one retainer plate nut, install adjuster lock. If tab on lock does not mate with notch in adjuster, turn adjuster slightly until it does. Install nut and tighten 30-35 foot-pounds. (4) Recheck axle shaft end play. If it is not within the tolerance of .008-.018 inch, then repeat adjustment procedure. (5) Remove dial indicator and install brake drum, drum and wheel. Fig. 14—Measuring Axle Shaft End

REAR AXLE HOUSING Removal Should it become .necessary to remove rear axle assembly for repair proceed as follows: (1) Raise vehicle, and support body at front of rear springs. (2) Block brake pedal in the up position using a wooden block. (3) Remove rear wheels. (4) Disconnect hydraulic brake hose at connection on left side of underbody. (5) Disconnect parking brake cable. To maintain proper drive line balance when reassembling, make scribe marks on the propeller shaft universal joint and the pinion flange before removal. (6) Disconnect propeller shaft at differential yoke and secure in an upright position to prevent damage to front universal joint. (7) Remove shock absorber from spring plate studs and loosen rear spring "U" bolt nuts and remove "U" bolts. (8) Remove the assembly from vehicle.


REAR AXLE 3-31 Installation (1) With body of vehicle supported at front of rear springs, position the rear axle assembly spring seats over the spring center bolts. (2) Install spring "U" bolts and tighten nuts to 45 foot-pounds and install shock absorbers on spring plate studs. (DO NOT OVER TIGHTEN "U" BOLT NUTS.) (3) Install propeller shaft (match scribe marks on propeller shaft universal joint and pinion flange). Tighten clamp screws to 15 foot-pounds. (4) Connect parking brake cable. (5) Connect hydraulic brake hose, bleed and adjust brakes. (6) Install rear wheels. (7) If carrier was removed from axle housing during the removal operation, fill axle with proper amount and type of lubricant; see "Specifications" in Lubrication section Group "0". Welding Rear Axle Housing The axle housing should be completely disassembled if it is to he welded with arc welding equipment. It is also possible to weld the assembled housing with gas welding equipment, if precaution is taken to protect gaskets and heat treated parts. DIFFERENTIAL AND CARRIER Removal (1) Remove flanged axle drive shafts. (2) Disconnect rear universal joint and support propeller up and out of the way to prevent damage to the front universal joint. (3) Remove the rear axle lubricant. (4) Loosen and remove the carrier-to-housing attaching nuts and lift the carrier assembly from axle housing. Disassembly Side play and runout check taken during disassembly will be very useful in reassembly. (1) Mount carrier in Stand DD-1014 and attach dial indicator Tool C-23:19 to differential carrier flange in a position so pointer of indicator squarely contacts back face of ring gear (Fig. 15). With a screw driver positioned between bearing cap and differential case flange, then using a prying motion determine if side play is present. If side play is evident, remove adjuster lock and loosen adjuster slightly and retighten adjuster sufficiently to eliminate side play. (2) Rotate drive gear several complete revolutions while noting total indicator reading. Mark drive gear and differential case at point of maximum runout. The marking of differential case will be very useful later in checking differential case runout. Total indicator reading should be no more than .005 inch. If runout

Fig. 15 —Checking for Runauf and

Zero End Play exceeds .005 inch the differential case may be damaged, and a second reading will be required after drive gear has been removed. This operation is covered during "Differential Disassembly". Remove dial indicator. (3) With Tool C-3281 hold companion flange and remove drive pinion nut and Belleville washer. (4) Install companion flange remover Tool 0-452 and remove flange (Fig. 16). (5) Using a screwdriver and hammer, remove the drive pinion oil seal from the carrier. (6) While holding one hand over nose end of carrier, invert carrier in stand. The front pinion bearing cone, shim pack and bearing spacer (where used) will drop from carrier. (7) Apply identifying punch marks on differential bearing pedestals of carrier, differential bearing caps and bearing adjusters for reassembly purposes (Fig. 17). (8) Remove both differential bearing adjuster lock screws and locks. (9) With a 3/4 inch socket, loosen bearing cap bolts (one on each side) and back off bearing adjusters slightly using spanner wrench Tool C-406A; to remove differential bearing preload. Remove bearing cap bolts, caps and bearing adjusters.

Fig. 76.-Removing Companion Flange


3-32 REAR AXLE SCRIME MARKS

Fig. I7—Marking Bearing Caps and Adjusters

(10) Remove differential and ring gear assembly with bearing cups. Differential bearing cups must be kept with respective bearing cones. (11) Remove drive pinion and rear bearing assembly from carrier. Rear Pinion Bearing Removal (1) Remove drive pinion rear bearing from small stem pinion with Tool C-293 and four (4) No. 36 plates, or four (4) No. 37 plates on large stem step pinion or large stem pinion using a collapsible spacer (Fig. 18). (2) Using a flat end brass drift, remove front and rear pinion bearing cups. DIFFERENTIAL CASE Disassembly (1) Mount differential case and ring gear assembly in a vise equipped with soft jaws (brass). (2) Remove drive gear bolts. BOLTS ARE LEFT HAND THREAD. With a non-metallic hammer, tap drive gear loose from differential case pilot and remove.

Fig. IB—Rentoving Drive Pinion Rear Bearing

(3) If drive gear runout exceeded .005 inch in step 2 (under "Carrier Disassembly"), recheck the case as follows: Install differential case and respective bearing cups in carrier. (4) Install bearing caps, cap bolts and bearing adjusters. Tighten bearing cap bolts down tightly and screw in both adjusters with spanner wrench Tool C-406A. (5) Tighten cap bolts and adjusters sufficiently to prevent any side play in bearings. (6) Attach a dial indicator Tool C-3339 to carrier flange so pointer of indicator squarely contacts drive gear surface of differential case flange between outer edge flange and drive gear bolt holes (Fig. 19). (7) Rotate differential case several complete revolutions while noting total indicator reading. This reading must not exceed .003 inch runout. If runout is in excess of .003 inch, differential case must be replaced. In a case where the runout does not exceed .003 inch it is often possible to reduce the runout by positioning the drive gear 180° from point of maximum runout when reassembling drive gear on differential case. (8) With a flat nose drift and hammer, remove differential pinion shaft lock pin from back side of drive gear flange. (The hole is reamed only part way through, making it necessary to remove lock pin from one direction.) (9) With a brass drift and hammer, remove differential pinion shaft and axle drive shaft thrust block. (10) Rotate differential side gears until each differential pinion appears at large opening of case. Remove each pinion and thrust washer at that time. (11) Remove both differential side gears and thrust washers. Cleaning and Inspection (Figs. 20,2? and 22). (1) Clean all parts in a fast evaporating mineral

Fig. 19—Checking Drive Gear Mounting Flange Face Runout


3-33

REAR AXLE THRUST WASHER BEARING I CONE i I

BOLT AND LOCKWASHER SHAFT / DIFFERENTIAL CASE 7 / PIN ' BEARING CONE

_

,

\ 'n CUP \ BOLT

SPACER

LOCK

BEARING CONE \ ADJUSTER

SEAL

CUP

FLANGE

\

CUP

I CAP /

GUARD

DRIVE GEAR AND PINION

NUT

SHIMS \

1 BOLT

WASHER PLUG

0/ /

I SIDE GEAR II f THRUST WASHER / PINION I SIDE GEAR THRUST WASHER

\

CUP 14 1 4 'Pa; 4 / I BOLT / ADJUSTING WASHER / CAP / BEARING CONE ADJUSTER THRUST BLOCK THRUST WASHER

CARRIER OCK BOLT AND LOCKWASHER KP2B

Fig. 20—Differential Carrier Assembly (Small Stem Step Pinion)

spirits or a dry cleaning solvent and with the exception of bearings, dry with compressed air. (2) Inspect differential bearing cones, cups and rollers for pitting, spalling or other visible damage. If replacement is necessary, remove bearing cones from differential case with Tool C-293 and adapter plates No. 43 (Fig. 23). (3) Inspect differential case for elongated or enlarged pinion shaft hole. The machined thrust washer surface areas and counterbores must be smooth and without metal deposits or surface imperfections. If any of the above conditions exist, satisfactory correction must be made or the case replaced. Inspect case for cracks or other visible damage which might render it unfit for further service. (4) Inspect differential pinion shaft for excessive

wear in contact area of differential pinions. Shaft should be smooth and round with no scoring or metal pickup. (5) Inspect differential side gears and pinions, they should have smooth teeth with a uniform contact pattern without excessive wear or broken surfaces. The differential side gear and pinion thrust washers should be smooth and free from any scoring or metal pickup. (6) Inspect axle shaft thrust block for excessive wear or visible damage. The wear surface on the opposite ends of the blocks, must be smooth. (7) Inspect differential pinion shaft lock pin for damage or looseness in case. Replace pin or case as necessary. (8) Inspect drive gear and pinion for worn or

SHAFT THRUST WASHER

BOLT AND LOCKWASHER I

BEARING CONE \

DIFFERENTIAL CASE

CUP \ BOLT

/ BEARING CONE

LI ttff

I

CAP \

-

\

>,

!VI

"---/

\

4c WASHER

CUP

(

NUT

SEAL

BOLT

j t,

SHIMS CARRIER

/ DRIVE GEAR AND PINION

Jo: 7 I I

\ ADJUSTER

,/ CUP

1.)

FLANGE

BEARING CONE

LOCK

RI N

41)) ./4/

IARD

PLUG CUP

) SIDE GEAR I I i THRUST WASHER I I PINION SIDE GEAR THRUST WASHER

--ADJUSTER THRUST BLOCK HRUST WASHER

BOLT SEARING CONE

LOCK \ BOLT AND LOCKWASHER

ADJUSTING WASHER

Fig. 21 -Differential Carrier Assembly (Large Stem Step Pinion)

KP B


3-34 REAR AXLE SHAFT BOLT AND LOCKWASHER

THRUST WASHER BEARING CONE 1 CUP BOLT

DIFFERENTIAL CASE PIN

I

BEARING CONE

\ I

CUP

"Th \

FLANGE

BEARING CONE COLLAPSIBLE \ ADJUSTER SPACER CARRIER CAP \ 1\

LOCK

SEAL NUT

;

r ci

I

WASHER

11: \tie

GUARD

PLUG

ifs/

/

SIDE GEAR I THRUST WASHER PINION SIDE GEAR THRUST WASHER

WASHER '

,

'-er

e r

CUP WASHER < el

BOLT

THRUST BLOCK

----ADJUSTER LOCK 'BOLT AND LOCKWASHER

THRUST WASHER

KP1D

Fig. 22—Differential Carrier Assembly (Large Stem Tapered Pinion)

chipped teeth or damaged attaching bolt threads. If replacement is necessary, replace both the drive gear and drive pinion as they are available in matched sets only. (9) Inspect drive pinion bearing cones, cups and rollers for pitting, spalling, excessive wear, or other visible damage. If inspection reveals that either are unfit for further service, replace both cup and cone, (10) Inspect differential carrier for cracks or other ‘‘:

visible damage which would render it unfit for further service. Raised metal on the shoulder of bearing cup bores incurred in removing pinion cups should be flattened by use of a flat nose punch. (11) Inspect drive pinion for damaged bearing journals and mounting shim surface on excessively worn splines. If replacement is necessary, replace both the drive pinion and drive gear as they are available in matched sets only. (12) Inspect companion flange for cracks, worn splines, pitted, rough or corroded oil seal contacting surface. Repair or replace companion flange as necessary. (13) Inspect drive pinion bearing shim pack for broken, damaged or distorted shims, or Collapsible spacer. Replace if necessary during establishment of pinion bearing preload. ASSEMBLY LUBRICATE ALL PARTS BEFORE ASSEMBLY WITH LUBRICANT AS SPECIFIED IN (LUBRICATION GROUP "0')

Fig. 23—Removing Differential Bearings

(1) Install thrust washers on differential side gears and position gears in case. (2) Place thrust washers on both differential pinions and through large window of differential case, mesh the pinion gears with the side gears, having pinions exactly 180 degrees opposite each other. (3) Rotate side gears 90 degrees to align pinions and thrust washers with differential pinion shaft holes in case. (4) From pinion shaft lock pin hole side of case, insert slotted end of pinion shaft through case, and the conical thrust washer, and just through one of the pinion gears.


REAR AXLE 345

(5) Install thrust block through side gear hub, so that slot is centered between the side gears. (6) While keeping all of these parts in proper alignment, push pinion shaft into case until locking pin hole in pinion shaft is in exact alignment with its respective hole in case. Install pinion shaft lock pin through hole in case from pinion shaft side of drive gear flange. The contacting surfaces of the drive gear and differential case flange must be clean and free of all burrs. (7) Using an Arkansas stone, relieve the sharp edge of the chamfer on the inside diameter of the ring gear (Fig. 24). This is very important otherwise during the installation of ring gear on differential case, the sharp edge will remove metal from the pilot diameter of case and can get imbedded between differential case flange and gear; causing gear not to seat properly. (8) Position drive gear on differential case pilot, aligning threaded holes of drive gear with those in differential case flange. (9) Insert drive gear screws (LEFT HAND THREADS) through case flange and into drive gear. After all cap screws are properly started, tap drive gear against differential case flange with a nonmetallic mallet. (10) Position unit between brass jaws of a vise and alternately tighten each cap screw to 35 foot-pounds. (11) Position each differential bearing cone on hub of differential case (taper away from drive gear) and with installing Tool C-4086, install bearing cones. An arbor press may be used in conjunction with installing tool. CAUTION: Never exert pressure against the bearing cage, since this would damage the bearing.

PINION BEARING CUP INSTALLATION

(1) Position pinion bearing cups squarely in bores of carrier. Assemble Tool C-758-D4 (Fig. 25), by plae-

SLEEVE SP-2920 GAUGE BLOCK SP-528 OR 5P4250 8%" AND 9%" AXLE CROSSBORE ARBOR WRENCH SP-S51 8%" AxLE SP5I83 934" AXLE eiCk SPACER COMPRESSION SCREW WASHER MAIN BODY SLEEVE 5P435 SI1/4538

3T cy 6-

SKS%

SPACER 1, r-WASHER SP-3639 SIC VC ,..SP-1 70 SP-2921 OR 5387 v-CENTRALIZING - WASHER 83/4" AXLE jpe SP-534 111 '4-4 SP-5184 93/4" AXLE

T

StEEV SPACER SP-I682 5P•1730

SPACER WASHER SP. 1 371

C

= a COMPRESSION PINION NUT SP.533 LOCATING + O....SPACER SPACER 51%539 $P-2919 NU4I8A

Fig. 25—Rear Axle Setting Gauge Tool C-758-04

ing spacer SP-2919 followed by rear pinion bearing cone over main screw of tool and inserting it into carrier from gear side. (2) Place front pinion bearing cone over main screw of tool followed by compression sleeve SP-535, centralizing washer SP-534, and main screw nut SP. 533. Hold compression sleeve with the companion flange holding Tool C-3281 and tighten nut (Fig. 26), allowing tool to rotate as nut is being tightened in order not to brinnel bearing cone or cups. Do not remove tool after installing cups.

PINION BEARING PRELOAD AND DEPTH OF MESH SETTING USING TOOL C-758-D4

The 8-3/4" axle incorporates three types of pinions. The method of determining pinion depth of mesh and bearing preload are the same for the small and large stem step pinions; however, the sequence of making the two adjustments change. Small stem pinions require the bearing preload adjustment first while large stem step pinions require the depth of mesh adjustment first. The large stem pinion using a collapsible 44-00)

Nu:M:1 Fig. 24 — Stoning Chamfer of Ring Gear

Fig. 26—Seating Bearing Cups in Carrier Housing


3-36 REAR AXLE spacer for bearing preload requires the depth of mesh setting first also. The position of the drive pinion with respect to the drive gear (depth of mesh) is determined by the locadon of the bearing cup shoulders in the carrier and by the portion of the pinion in back of the rear bearing. The thickness of the rear pinion bearing mounting shim suitable for the carrier can be determined by using Tool C-758-D4.

GAUGE BLOCK (TOOL)

PINION BEARING PRELOAD WITH BEARING SPACER (Small Stem Step Pinion) Bearing Preload (1) With tool installed in carrier, remove main screw nut, centralizing washer, compression sleeve and front pinion bearing cone. (2) Install the pinion bearing spacer, larger bore of spacer next to rear bearing. (3) Position sleeve (SP4730) in front bearing cone making sure sleeve is flush with rear of bearing. (4)_ Position original shims, previously removed from drive pinion stem, over the sleeve and slide the sleeve, bearing and shims over main screw of tool until shims rest against spacer (Fig. 27). (5) Install tool compression sleeve (SP-535) (square end out), centralizing washer (SP-534) and main screw nut (SP-533). Turn carrier in stand to bring nut on top. (6) Tighten tool nut to 240 foot-pounds with a torque wrench, using holding Tool C-3281 on the compression sleeve to hold the assembly in several positions to make a complete revolution while tightening. Remove holding tool and rotate the pinion several revolutions in both directions to seat the bearing rollers. Recheck torque to 240 foot-pounds (torque may have diminished as bearing rollers were seated by rotating). Correct bearing preload reading can only be obtained with nose of carrier up. (7) Using inch-pound torque wrench C-685, measure pinion bearing preload by rotating pinion with handle of wrench floating, read the torque while

/ I.fl tv

/1 .II

I srzo ,

i

:

: ---•---,„ yd. at II /

KP16

Fig. 28—Installing Gauge Block on Tool

wrench is moving through several complete revolutions. Correct preload setting is 20-30 inch-pounds for a new bearing and 0-15 inch-pounds for original bearing. Bearing preload should be uniform during complete revolution. A reading that varies considerably during rotation of pinion indicates a binding condition which requires correction. Use a thinner shim pack to Increase preload and a thicker shim pack to decrease preload. Preload shims are

available in two thousandths of an inch increments from .014-.026 inch. After correct pinion bearing preload is set, DO NOT REMOVE THE TOOL.

Depth of Mesh (1) Reverse carrier in stand and install gauge block SP-528 on end of tool and securing it to tool with Allen screw. The flat portion of gauge block should be facing differential bearing pedestals (Fig. 28). Tighten screw with Allen wrench. (2) Position arbor SP-561 (part of Tool C-758-D4) in differential bearing pedestals of carrier (Fig. 29). Center the arbor so that an approximate equal distance is maintained at both ends. Position differential

PINION LOCATING WASHER OR MIN SP•3250(.>. ASSEMBLY OF SP-526 CARRipit OR \\ \ /ASSEmBLY 1 1% % SP-578 / SP.2919

I4I If1i%.

ARBOR {TOOL)

GAUGE BLOCK (TOOL)

- I

Ni tr \ I1.

,..___-_,SP.1730

6/

Fig. 27—Pinion Preload with Spacer (83/4" Ring Gear)

KPI52A KP17 Fig. 29-installing Arbor in Carrier


REAR AXLE 3-37 bearing caps and attaching bolts on carrier pedestals, and insert a piece of .002 inch shim stock between arbor and each cap. lighten cap bolts to 10 footpounds. (3) Select a rear pinion bearing mounting shim which will fit between cross arbor and gauge block. This fit must be snug but not too tight (similar to the pull of a feeler gauge) (Fig. 30). This shim is then used in determining the correct thickness shim for installation. (4) To select a shim for installation, read the marking on end of pinion head (-0. —1, —2. il, 4-2 etc.). When marking is —(minus), add that amount to the thickness of shim selected in step (3). When the marking is I (plus), subtract that amount. Example: With a shim .086 inch thick and a pinion marked —2, .002 = .088). install a shim .088 inch thick. (.086 Example: With a shim .086 inch thick and a pinion marked + 2, install a washer .084 inch thick, (.086 — .002 = .084) or when a shim .086 inch thick is too loose and .088 inch too tight. use .086 inch shim. Treat other pinion markings in a similar manner. Shims are available in two thousandths of an inch Increments. Mounting shims differ in diameter, depending on which pinion they are used on. (5) Remove tool arbor from carrier. (6) Remove tool and bearings out of carrier. (7) Remove shims, spacer, tool sleeve and rear bearing cone from tool main screw. (8) With stem of pinion facing up, install correct shim on pinion stem. Shims are chamfered on one side and must be installed on the pinion stem with chamfered side toward pinion head. (9) Position rear bearing cone on pinion stem (small side away from pinion head). Make certain that the contacting surfaces of correct shim, pinion head shim contact surface and rear bearing cone are perfectly clean and free of any foreign particles.

(10) Using installing Tool DD-996 press bearing on pinion stem. An arbor press may be used in conjunction with tool. (11) Install bearing tubular spacer on pinion stem (large bore facing rear bearing cone). (12) Install selected shim pack (13) Lubricate front and rear pinion bearing cones with lubricant as specified in (Lubrication Group (14) Position front pinion bearing cone in its cup in carrier. (15) Apply a light coat of sealer in seal bore of carrier and install drive pinion oil seal into carrier using Tool C-4109 or C-3980 (double lip synthetic rubber oil seal) or Tool C-3656 (single lip leather oil seal). The proper tool must be used in order to position the seal the proper depth into the carrier casting. (16) Insert drive pinion and bearing assembly up through carrier. While supporting pinion in carrier, Install companion flange with installing Tool C-496 or DD-999 and holding Tool C-3281. (17) Remove tools and install Belleville washer (convex side of washer up) and pinion nut. (18) Hold companion flange with holding Tool C3281 and tighten pinion nut to 240 foot-pounds. Rotate pinion several revolutions in both directions to seat bearing rollers. Recheck torque to 240 footpounds (torque may have diminished as bearing rollers were seated by rotating). PINION BEARING PRELOAD (Large Stem Step Pinion) Inspect bearing cups and carrier for grit and dirt or other foreign material. Clean all parts in a fast evaporating mineral spirits or a dry cleaning solvent and with the exception of bearing cones, dry with compressed air. (1) Assemble spacer SP-2921 to main section of tool followed by spacer SP-1730. Install rear pinion bearing cone over spacer SP-1730 and against spacer SP-2921 (Fig. 31). SP 561 PINION LOCATING WASHER SR3250 OR ç, NO WASHER OR SPACER

It

SP-52S \ \

SP-2921 OR SP-5387

Ng. 30—Deteresiain Spacer Wass

SP-1730

ASSEMBLY OF SP-526 NU419

Fig. 33—Tool C-758-04 installed is Hewing (8.314" Large Pinion)


3-38 REAR AXLE (2) Insert assembly into carrier and install front pinion bearing cone over tool shaft and in its proper position in bearing cup. Install tool spacer, tool thrust washer and tool nut on shaft. (3) With nose of carrier up, place flange holding Tool C-3281 on compression sleeve. Allow assembly to rotate while tightening nut to not more than 25-50 foot-pounds. Always make sure bearing cones are

(11) Remove rear pinion bearing cone from tool. (12) Remove front pinion bearing cone from carrier housing. (13) With stem of drive pinion facing up, add rear pinion bearing mounting shim you selected on pinion stem. Shims are chamfered on one side and must be

lubricated with hypoid gear lubricant.

(14) Position rear pinion bearing cone on pinion stem (small side away from pinion head). Make certain that the contacting surfaces of correct shim, pinion head shim contact surface and rear bearing cone are perfectly clean and free of any foreign particles. (15) Lubricate front and rear pinion bearing cones with hypoid gear lubricant. Install rear bearing cone onto pinion stem, using Tool DD-996, press bearing cone into place. An arbor press may be used in conjunction with tool. (16) Insert pinion and bearing assembly up through carrier and install the original preload shim pack on pinion stem. (17) Install front pinion bearing cone on pinion stem followed by drive pinion flange, bellville washer and nut. Using flange holding Tool C-3281 and torque wrench, tighten pinion nut to 240 foot-pounds. Hold the assembly in several positions to make a complete revolution while tightening. (18) Remove holding tool and rotate tool several complete revolutions in both directions to permit bearing roller to seat. Recheck torque to 240 footpounds (torque may have diminished as bearing rollers seated). (19) Measure pinion bearing preload by rotating pinion using an inch-pound torque wrench. The correct preload specifications are 20-30 inch pounds for new bearing and 0-15 for original bearings. Correct bearing preload readings can only be obtained with nose of carrier in up right position. Bearing preload should be uniform during complete revolution. A reading that varies during rotation indicates a binding condition which should be corrected. Use a thin-

(4) Turn tool several complete revolutions in both directions to permit bearing rollers to seat. After bearing rollers are properly seated, check bearing preload by rotating tool with an inch-pound torque wrench. The correct bearing preload should be from 20-30 inch-pounds for new bearings and 0-15 inchpounds for the original bearings. (5) With proper bearing preload set, invert carrier in stand and install gauge block SP-528 or SP-3250 to the main screw attaching it with Allen screw securely (Fig. 28). The flat portion of gauge block should be facing differential bearing pedestals. (6) Position tool arbor SP-561 in differential bearing pedestals of carrier (Fig. 29). Center the arbor so that an approximate equal distance is maintained at both ends. Position differential bearing caps and attaching bolts on carrier pedestals, and insert a piece of .002 inch shim stock between arbor and each cap. Tighten cap bolts to 10 foot-pounds. (7) Select a rear pinion bearing mounting shim which will fit between cross arbor and gauge block. This fit must be snug but not too tight (similar to the pull of a feeler gauge. (Fig. 30). This shim is then used in determining the correct thickness shim for installation. (8) To select a shim for installation, read the marking on end of pinion head (-0, —1, —2, +1, etc.). When marking is — (minus), add that amount to the thickness of shim selected in step (7). When the marking is + (plus), subtract that amount. Example: With a shim .086 inch thick and a pinion marked —2, install a shim .088 inch thick (.086 + .002 = .088). Example: With a shim .086 inch thick and a pinion marked —2, install a washer .084 inch thick, (.086 — .002 = .084) or when a shim .086 inch thick is too loose and .088 inch too thick, use .086 inch shim. Treat other pinion markings in a similar manner. Shims are available in two thousandths of an inch increments. Mounting shims differ in diameter, depending on which pinion they are used on. (9) Remove differential bearing caps and remove tool arbor from carrier. (10) Reverse carrier in stand so nut of tool is in upright position. Loosen compression nut, and support lower portion of tool in carrier with one hand, remove tool nut, centering washer and compression sleeve. Lower tool down and out of carrier.

installed on the pinion stem with chamfered side toward pinion head.

ner shim pack to increase preload and a thicker shim pack to decrease preload. Preload shims are available

in two thousandths of an inch increments from .014.026 inch. (20) Loosen and remove drive pinion nut, washer and flange after proper bearing preload has been established. (21) Apply a light coat of sealer in seal bore of carrier and install drive pinion oil seal into carrier using Tool C-4109 or C-3980 (double lip synthetic rubber oil seal) or Tool C-3656 (single lip leather oil seal). The proper tool must be used in order to position the seal the proper depth into the carrier casting. (22) While supporting pinion in carrier, install


REAR AXLE 3-39

companion flange with installing Tool C-496 or DD999 and holding Tool C-3281. (23) Remove tools and install Belleville washer (convex side of washer up) and pinion nut. (24) Hold universal joint flange with holding Tool C-3281 and tighten pinion nut to 240 foot-pounds. Rotate pinion several revolutions in both directions to seat bearing rollers. Recheck torque to 240 footpounds (torque may have diminished as bearing rollers were seated by rotating). DEPTH OF MESH (Large Stem Pinion With Collapsible Spacer) Inspect differential bearing cups and cones, carrier for grit and dirt or other foreign material. Clean all parts in fast evaporating mineral spirits or a dry cleaning solvent and with the exception of bearing cones, dry with compressed air. Front Pinion Bearing Cone and Cup Must Never Be Reused Under Any Circumstances.

(1) Assemble spacer SP-5387 to main section of tool followed by spacer SP-1730. Install rear pinion bearing cone over spacer SP-1730 and against spacer SP-5387 (Fig. 31). (2) Insert assembly into carrier and install front pinion bearing cone over tool shaft and in its proper position in bearing cup. Install tool spacer, tool thrust washer and tool nut on shaft. (3) With nose of carrier up, place flange holding Tool C-3281 on compression sleeve. Allow assembly to rotate while tightening nut to not more than 25-50 foot-pounds. Always make sure bearing cones are lubricated with hypoid gear lubricant.

(4) Turn tool several complete revolutions in both directions to permit bearing rollers to seat. After bearing rollers are properly seated, check bearing preload by rotating tool with an inch-pound torque wrench. The correct bearing preload should be from 20-30 inch-pounds for new bearings. (5) With proper bearing preload set, invert carrier in stand and install gauge block SP-528 or SP-3250 to the main screw attaching it with Allen screw securely (Fig. 28). The flat portion of gauge block should be facing differential bearing pedestals. (6) Position tool arbor SP-561 in differential bearing pedestals of carrier (Fig. 29). Center the arbor so that an approximate equal distance is maintained at both ends. Position differential bearing caps and attaching bolts on carrier pedestals, and insert a piece of .002 inch shim stock between arbor and each cap. Tighten cap bolts to 10 foot-pounds. (7) Select a rear pinion bearing mounting shim which will fit between cross arbor and gauge block. This fit must be snug but not too tight (similar to the pull of a feeler gauge. (Fig. 30). This shim is then

used in determining the correct thickness shim for installation. (8) To select a shim for installation, read the marking on end of pinion head (-0, —1, —2, +1, +2, etc.). When marking is — (minus), add that amount to the thickness of shim selected in step (7). When the marking is + (plus), subtract that amount. Example: With a shim .036 inch thick and a pinion marked —2, install a shim .038 inch thick (.036 + .002 = .038). Example: With a shim .036 inch thick and a pinion marked +2, install a washer .034 inch thick, (.036 — .002 .-r_ .034) or when a shim .036 inch thick is too loose and .038 inch too thick, use .036 inch shim. Treat other pinion markings in a similar manner. Shims are available in one thousandths of an inch increments. (9) Remove differential bearing caps and remove tool arbor from carrier. (10) Reverse carrier in stand so nut of tool is in upright position. Loosen compression nut, and support lower portion of tool in carrier with one hand, remove tool nut, centering washer and compression sleeve. Lower tool down and out of carrier. (11) Remove front pinion bearing cone from carrier housing. (12) With stem of drive pinion facing up, add rear pinion bearing mounting shim you selected on pinion stem. PINION BEARING PRELOAD (Large Stem Pinion With Collapsible Spacer)

(1) Position rear pinion bearing cone on pinion stem (small side away from pinion head). Make certain that the contacting surfaces of selected shim, rear bearing cone and pinion head are perfectly clean and free of any foreign particles. (2) Lubricate front and rear pinion bearing cones with hypoid gear lubricant. Install rear pinion bearing cone onto pinion stem, using Tool C-3095, press bearing cone into place. An arbor press may be used in conjunction with tool. (3) Insert drive pinion and bearing assembly up through carrier and install collapsible spacer followed by front pinion bearing cone on pinion stem. Install companion flange using Tool C-496 or DD-999 and holding Tool C-3281. This is necessary in order to properly install front pinion bearing cone on stem due to interference fit. Remove tool from pinion stem. CAUTION: During the installation of the front pinion bearing be careful not to collapse the spacer. (4) Apply a light coat of sealer in seal bore of carrier casting and install drive pinion oil seal into carrier using Tool C-4109 or C-3980 (double lip synthetic rubber oil seal) or Tool C-3656 (single lip leather oil seal). The proper tool must be used in order to position


3-40 REAR AXLE the seal the proper depth into the carrier casting. (5) With pinion supported in carrier, install anticlang washer on pinion stem. Install companion flange with installing Tool C-496 or DD-999 and holding Tool C-3281. (6) Remove tools and install Belleville washer (convex side of washer up) and pinion nut. (7) Hold universal joint flange with holding Tool C-3281 and tighten pinion nut to remove end play in pinion, while rotating the pinion to insure proper bearing seating. (8) Remove holding tool and rotate pinion several complete revolutions in both directions to permit bearing rollers to seat. (9) Tighten pinion nut to 100 foot-pounds and measure pinion bearing preload by rotating pinion using an inch-pound torque wrench. The correct preload specifications are 20-35 inch-pounds for new bearings or 10 inch-pounds over the original if the old rear pinion bearing is being reused. Correct bearing preload readings can only be obtained with nose of carrier in upright position. Continue tightening of pinion nut in small increments and checking pinion bearing preload until proper preload is obtained. Bearing preload should be uniform during complete revolution. A preload reading that varies during rotation indicates a binding condition which has to be corrected. The assembly is unacceptable if final pinion nut torque is below 170 foot-pounds or pinion bearing preload is not within the correct specifications. NOTE: UNDER NO CIRCUMSTANCES SHOULD THE PINION NUT BE BACKED OFF TO LESSEN PRELOAD. IF THIS IS DONE A NEW COLLAPSIBLE SPACER MUST BE INSTALLED AND NUT RETIGHTENED UNTIL PROPER PRELOAD IS OBTAINED. PINION BEARING PRELOAD AND PINION SETTING (Without Using Tool C-758-1;14) If the differential assembly was satisfactorily quiet before being disassembled, the drive pinion may be assembled with the original components. If replacement parts are installed, a complete readjustment is necessary; the proper thickness shim must be selected and installed. The drive gear and pinion are manufactured and lapped in matching sets and are available in matched sets only. The adjustment position in which the best tooth contact is obtained is marked on the end of the pinion head. To obtain the proper pinion setting in relation to the drive gear, the correct thickness mounting shim must be selected before the drive pinion is installed in the carrier. The pinion bearing mounting shims are available in two thousandths increments from .084 to .100 inch, (small stem or large stem step type pinions) or .020-.038 inch in increments of .001 inch (large

stem pinion with collapsible spacer). To select the proper thickness shim, proceed as follows: It will be noted that the head of the drive pinion is marked with a plus (+) or minus (—) sign followed by a number ranging from 1 to 4, or zero (0) marking. Depth of Mesh

If the old and new pinion have the same marking and if the original bearing is being reused, use a mounting shim of the same thickness. But if the old pinion is marked zero (0) and the new pinion is try a .002 inch thinner shim. If the new marked pinion is marked —2, try a .002 inch thicker shim. Pinion Bearing Preload If the bearings are being replaced, place the new bearing cup in position in the carrier and drive the cups in place with a suitable drift. After properly positioning the bearing cups in the carrier, assemble the drive pinion mounting shim (chamfered side down toward gear) on the drive pinion stem. Install the tubular spacer (if so equipped) and the preload shims on the pinion stems. Insert the pinion assembly into the carrier. Install the front pinion bearing cone, universal joint flange, Belleville washer (convex side of washer up) and nut. DO NOT INSTALL THE OIL SEAL. Rotate the drive pinion after tightening the flange nut to 240 foot-pounds, to properly seat the bearing rollers in the bearing cups. The preload torque required to rotate the pinion with the bearings oiled should be 20-30 inch-pounds for new bearing and 0-15 inch-pounds for used bearings. Use a thinner shim pack to increase preload and a thicker shim pack to decrease preload. After the correct pin-

ion depth of mesh has been established and correct bearing preload obtained, remove the drive pinion flange. Apply a light coat of sealer to drive pinion oil seal and carrier casting bore and install drive pinion oil seal with Tool C-4109 or C-3980 (synthetic rubber seal) or Tool C-3656 (leather seal). Install the pinion flange, washer and nut and tighten nut to 240 footpounds. Pinion Bearing Preload (Large Stem Pinion with Collapsible Spacer) After selecting the correct pinion bearing mounting shim and installing it behind the rear pinion bearing cone proceed as follows: Install the pinion assembly into the carrier. Install the new collapsible spacer followed by new front pinion bearing cone on pinion stem. Press front pinion bearing cone on pinion stem, being careful not to collapse the spacer. Apply a light coat of sealer to drive pinion oil seal and carrier casting bore and install drive pinion oil seal with Tool C-4109 or C-3980 (synthetic rubber seal or Tool C-3656 (leather seal). Install anti-clang washer


REAR AXLE 3-41

and universal joint flange. Belleville washer 4convex side of washer up) and nut Tighten the pinion nut to 170 foot-pounds and using an inch-pounds torque wrench rotate the pinion to determine preload. The correct preload specifications are 20-30 inch-pounds for new bearings or 10 inch pounds over the original if the old rear pinion bearing is being reused. If preload is not correct, continue to tighten pinion nut in small increments and checking preload until preload on pinion bearings is correct. A minimum of 170 footpounds of torque is required on pinion nut. Under no circumstances should the pinion nut be backed off to lessen preload If this is done a new pinion bearing colla psible spacer must be installed and nut retightened until proper preload is obtained_ Installation of Differential and Ring Gear in Carrier

(1) Holding differential and ring gear assembly with bearing cups on respective bearing cones, care-

fully install the assembly into carrier (2) Install differential bearing caps. on respective sides, making certain that identification marks on caps correspond with those on carrier. Install cap bolts and tighten bolts of each cap by hand. (3) Install differential bearing adjusters, on respective sides, making certain that identification marks corre-spond. Screw adjuster in by hand_ No attempt should be made to apply any excessive pressure at this time (4) Using spanner wrenches Tool C-406A to square bearing cups with bearing cone, turn adjusters -LN" until cups are properly square with bearings and end play is eliminated with some backlash existing between the drive gear and pinion :Fig. 32). (5) Tighten one differential bearing cap bolt on each side to 85-90 foot-pounds.

properly set is .006 to .008 inch at point of minimum backlash. Rotate drive gear and ring gear several revolutions in both directions in order to seat the bearing rollers. This is necessary before setting backlash. 1 I Attach a dial indicator Tool C'-3339 to carrier flange so pointer of indicator is squarely contacting one drive gear tooth (drive side) (Fig. 33 12) Measure backlash between drive gear and pinion at four positions. approximately 90 degrees apart_ After point of least backlash has been determined, mark drive gear. Do not rotate drive gear frorn point of least backlash until all adjustments have been completed.

(3) Using Tool C-406A (spanner wrench) turn both bearing adjusters equally (in same direction) until backlash between drive gear and pinion is .0005 to .0015 inch_ This backlash variation is given to permit alignment and installation of the bearing adjuster lock, lockwasher and attaching screw. The adjuster must only be turned in a clockwise direction and under no circumstances should be backed off.

(4) Install adjuster lock on bearing cap, back-face side of drive gear. Tighten lock screw to 15 to 20 foot-pounds Differential Bearing Preload (11 Turn bearing adjuster (tooth side of drive gear) (Fig. 33) in a notch at a time (notch referred to is the adjuster lock holes( until backlash between drive gear and pinion is a minimum of .006 to .008 inch. This will preload differential bearings and establish correct backl Ash (2) Tighten the remaining two differential bearing cap bolts to 85-90 foot-pounds. (3( Install remaining adjuster lock, lockwasher and attaching screw. Tighten to 15-20 foot-pounds

DRIVE GEAR AND PINION BACKLASH

Correct drive gear and pinion backlash when

Fig.

32 — Adjusting Differential Bearings

Fig.

33—Measuring Backlash Between Drive Gear and Pinion


3-42 REAR AXLE GEAR TOOTH CONTACT PATTERN The gear tooth contact pattern will disclose whether the correct rear pinion bearing mounting shim has been installed and the drive gear backlash set properly. Backlash between the drive gear and pinion must be maintained within the specified limits until correct tooth contact pattern is obtained. (1) Apply a thin film of red or white lead on both the drive and coast side of the drive gear teeth. Rotate drive gear one complete revolution in both directions while load is being applied with a round bar or screwdriver between the carrier casting and differential case flange. This action will leave a distinct contact pattern on both the drive and coast side of the drive gear teeth. (2) Observe the contact pattern on the drive gear teeth and compare with those in figures 34, 35 and 37 to determine if pattern is properly located. With pinion depth of mesh and gear backlash set properly, your contact pattern should resemble that in (Fig. 34), Notice that the correct contact pattern is well centered on both drive and coast sides of the teeth. When tooth contact patterns are obtained by hand, they are apt to be rather small. Under the actual operating load, however, the contact area increases. (3) If after observing the contact pattern and you find it resembles that in (Fig. 35), the drive pinion is too far away from centerline of the ring gear, the contact pattern will appear high on the heel on drive side and high on toe on coast side. To correct this type tooth contact pattern, increase the thickness of the rear pinion bearing mounting spacer (Fig. 36), which will cause the high heel contact on drive side to lower and move toward the toe; the high toe contact on coast side will lower and move toward the heel. (4) If after observing the contact pattern and you find it resembles that in (Fig. 37), the drive pinion is too close to the ring gear, the pattern will appear low on the toe on drive side and low heel contact on coast side. To correct this type tooth contact pattern, decrease the thickness of the rear pinion bearing PATTERN CLOSE TO CENTER

THICKER SPACER NEEDED TOE END

HEEL END-DRIVE SIDE (CONVEX)

HEEL END-COAST SIDE (CONCAVE)

NR199

Fig. 35—Incorrect Tooth Contact Pattern (Increase Spacer Thickness) PATTERN MOVES TOWARD CENTER AND DOWN TOE END

HEEL END- DRIVE SIDE (CONVEX)

HEEL END-COAST SIDE (CONCAVE) NR200

Fig. 36—Effect Tooth Contact Pattern as Spacer Thickness Is Increased

mounting spacer (Fig. 38), which will cause the low toe contact on drive side to raise and move toward the heel; low heel contact on coast side will raise and move toward the toe.

DIFFERENTIAL AND CARRIER Installation (1) Thoroughly clean the gasket surfaces of the carrier and rear axle housing. (2) Using a new gasket, install the carrier assembly THINNER SPACER NEEDED

\ TOE END

HEEL END-DRIVE SIDE (CONVEX)

HEEL END-COAST SIDE (CONCAVE) NI/R198

Fig. 34—Desired Tooth Contact under Light Load

HEEL END-DRIVE SIDE (CONVEX)

HEEL END-COAST SIDE (CONCAVE)

Fig. 37—Incorrect Tooth Contact Pattern (Decrease Spacer Thickness)

NR201


REAR AXLE 3-43 PATTERN MOVES INWARD AND UP TOE

HEEL END—DRIVE SIDE (CONVEX)

HEEL END— COAST SIDE (CONCAVE)

NR202

Fig. 38 — Effect on Tooth Contact Pattern as Spacer Thickness Is Decreased

into the axle housing. Tighten the carrier to axle housing nuts to 45 foot-pounds. (3) Refer to "Installation of Rear Axle Shaft," when installing and setting axle shaft end play. (4) Install propeller shaft (match scribe marks on propeller shaft universal joint and pinion flange). Tighten clamp screws to 15 foot-pounds. (5) Remove wooden block from under brake pedal and bleed and adjust brakes. (6) Install rear wheel and tighten to 65 foot-pounds.

LUBRICATION Refill axle assembly with Multipurpose Gear Lubricant, as defined by MIL-L-210513 (API GL-5) should be used in all rear axles with conventional differentials; Chrysler Hypoid Lubricant part number 2933565 is an oil of this type and is recommended or an equivalent be used. In Sure-Grip axles on all 1970 Vehicles it is recommended that only Chrysler Hypoid Lubricant part number 2933565 or an equivalent be used. This lubricant, recommended for conventional differentials too, contains special additives to provide proper differential durability and performance. Anticipated Temperature Range

Above — 10°F. As low as — 30°F. Below — 30°F.

Viscosity Grade

SAE 90 SAE 80 SAE 75

REMOVAL AND REPLACEMENT OF DRIVE PINION FLANGE AND OIL SEAL IN VEHICLE On large stem carriers which use the collapsible spacer to obtain pinion bearing preload, the following procedure for the removal and replacement of the drive pinion flange and pinion oil seal must be followed to assure that the proper bearing preload is maintained in the axle assembly. If this procedure is not followed it could result in a premature failure of the axle. (1) Raise vehicle on hoist and make scribe marks on

propeller shaft universal joint, drive pinion flange and end of pinion stem. (2) Disconnect propeller shaft at pinion flange and secure in an upright position to prevent damage to front universal joint. (3) Remove the rear wheels and brake drums to prevent any drag or a possible false preload reading could occur. (4) Using inch-pound torque wrench C-685 measure pinion bearing preload by rotating pinion with handle of wrench floating, read the torque while wrench is moving through several complete revolutions and record. This operation is very important because preload must be carefully reset when reassembling.

(5) With Tool C-3281 hold companion flange and remove drive pinion nut and Belleville washer. (6) Install companion flange remover Tool C-452 and remove flange. Lower rear of vehicle to prevent lubricant leakage. (7) Using a screwdriver and hammer, remove the pinion oil seal from the carrier and clean the oil seal seat. (8) Check splines on pinion shaft stem to be sure they are free of burrs or are not worn badly. If burrs are evident remove them using crocus cloth by working in a rotational motion. Wipe the pinion shaft clean. (9) Inspect companion flange for cracks, worn splines, pitted, rough or corroded oil seal contacting surface. Repair or replace companion flange as necessary. (10) Apply a light coat of sealer in seal bore of carrier and install drive pinion oil seal into carrier using Tool C-4109 or C-3980 (Double lip synthetic rubber oil seal) or Tool C-3656 (single lip leather oil seal). The proper tool must be used in order to properly position the seal the correct depth into the carrier casting. (11) Position companion flange on pinion stem being careful to match scribe marks made previously before removal. (12) Install companion flange with installing Tool C-496 or DD-999 and holding Tool C-3281. (13) Remove tool and install Belleville washer (convex side of washer up) and pinion nut. (14) Hold universal joint flange with holding Tool C-3281 and tighten pinion nut to 170 foot-pounds. Rotate pinion several complete revolutions to assure that bearing rollers are properly seated. Using an inch-pound torque wrench C-685 measure pinion bearing preload. Continue tightening pinion nut and checking preload until preload is at the original established setting you found in step 4. Under no circumstances should the preload be more than 5 inch-pounds over the established setting found at time of checking in step 4 of procedure. Bearing preload should be uniform during a complete revolution. A preload reading that varies during


3-44 REAR AXLE rotation indicates a binding condition which has to be corrected. The assembly is unacceptable if final pinion nut torque is below 170 foot-pounds or pinion bearing preload is not within the correct specifications. CAUTION: Never back off the pinion nut to lessen pinion bearing preload. If the desired preload is exceeded a new collapsible spacer must be installed and nut retightened until proper preload is obtained. In addition, the universal joint flange must never be hammered on, or power tools used.

(15) Install propeller shaft (match scribe marks on propeller shaft untiversal joint and pinion flange). Tighten clamp screws to 15 foot-pounds. (16) Install the rear brake drums and wheels and tighten nuts 65 foot-pounds. (17) Raise the vehicle to a level position so axle assembly is at correct running position and check lubricant level. Add the correct type of lubricant required to bring lubricant to proper level.


REAR AXLE ASSEMBLY 93/4" RING GEAR INDEX Axle Shafts and Bearings Differential (Removal and Disassembly) Differential (Cleaning and Inspection) Differential Bearing Preload and Drive Gear and Pinion Backlash Differential Case and Drive Gear (Installation) .. Differential Case (Sure-Grip) Differential Noise

Page 46 49 52 58 54 50 45

Page Drive Pinion Depth Of Mesh Setting (Using Pinion Depth Gauge Tool DD 1244) Drive Pinion Depth Of Mesh Setting (Using Tool C-758-D4) Gear Tooth Contact Pattern Lubrication Pinion Bearing Preload Rear Axle Assembly (Removal) Rear Axle Assembly (Installation)

55 56 58 60 58 49 59

GENERAL INFORMATION With the increased torque output of the 440 cubic inch engine with Power Pak and the 426 cubic inch Hemi engine in vehicles equipped with 4-speed manual transmission, the 9-3/4" rear axle assembly will appear on Coronet and Charger models that are so equipped (Fig. 1). The standard differential case used in both in-

stances will be of the plate clutch type Sure-Grip Differential. In some instances where a high numerical ratio gear set is installed, a new differential case will have to be purchased and installed due to the difference in ring gear mounting dimensions. The standard ratio gear set used with both the 440 and 426 engines will be 3.54 ratio. Optional matched gear sets with ratios of 4.10, 4.56 and 4.88 will be available for dealer installation on models equipped with the 9-3/4" diameter axle assembly. The rear axle is of the integral carrier-housing, hypoid gear type in which the centerline of the drive pinion is mounted below the centerline of the ring gear. The rear axle housing is an iron casting with tubular legs pressed into and welded to the carrier to form a carrier and tube assembly. A removable stamped steel cover is bolted to the rear of the carrier to permit visual inspection of the differential without removing the complete rear axle from the vehicle. A small metal tag is attached beneath one of the cover screws to identify the axle ratio. This tag is stamped with the number of teeth on the drive pinion

and ring gear, and by dividing the larger number (ring gear teeth) by the smaller number (drive pinion) the axle ratio can be determined. The drive pinion is supported by two preloaded taper roller bearings. The rear pinion bearing cone is a tight press-fit on the pinion stem. The front pinion bearing is a light-press fit to a close sliding fit on the pinion stem. The front and rear bearing cups are a press-fit against a shoulder recessed in the carrier. The drive pinion depth of mesh adjustment is controlled by locating shims, which are installed between the rear pinion bearing cup and the carrier casting. Drive pinion bearing preload is maintained by using different thicknesses of shim packs between the drive pinion bearing shoulder and front pinion bearing cone. The differential case is supported by two taper roller bearing cones which are a press-fit on the differential case hubs. Shims installed between the bearing cone and shoulder of hub of differential case, perform three functions: They eliminate the differential case side play; they adjust and maintain the backlash between the ring gear and drive pinion; and establish a means of obtaining differential bearing preload. The rear axle shafts are mounted on taper roller bearings which are located at the outer ends of the axle housing tubes. The bearings are pressed onto the shoulder of the shaft and held in place by a collar that has a very tight interference fit. The bearings are lubricated with Multi-Purpose Grease NLGI Grade


REAR AXLE 3-45 GASKET

COVER

RING GEAR

CASE RALF atARING CONE k CLUTOI PLATES AND DISCS

KU

PINION

r

autos RATES CASE HALF

AND DISCS

DIFFERENTIAL ADJUSTING SHIMS

sioE tkOletAPIE PINION

a

.,16°Iir-• .et kx.t. 1) _ . -< 1 DIFFERENTIAL ADJUSTING SHLMS

THRUST sPAaR G 01,1 SHAFTS SIDE GEAR EAR NIN\ F, "--PJNG -Boo CAP / (BEARING CONE \ - I CUP CA, • stuttsC

a°LT

AXLE SHAFT AND SEARING ASSEMBLY VENT

1190/ GA ET

boa BEARING CONE MA ICUP ADJUSTER \es

BEARING CONE

0 1 . BOLT

SHAFT

BOLT

. Cf9SIDE GEAR RING

BEARING CONE \ CUP \ BOLT

t ---t let

f

I GEAR d o

HOUSING

I SEAL \ COLLAR RETAINER GASKET RANGE

smeiNG SHIMS

PLUG PINION

SLINGER aveGASKET ae„,..SEAL RANGE je,WASHER 4/-

NUT

NW IOWA

Fig. 1-94/4" Rear Axle Assembly

2 R.P. or equivalent. Oil seals are pressed into the outer ends of the housing tubes to prevent oil leakage from the center section of the axle into the wheel bearings and onto the brake assembly. The outer retainer clamps the hearing and cup into the housing bore and

also clamps the brake support plate to the studs of the housing tube. Axle shaft end play is adjusted by means of a threaded adjuster located in the right axle shaft bearing retainer. Axle shaft end play must be maintained at .008"-.012".

SERVICE PROCEDURES CAUTION: When servicing cars equipped with 9-3/4" axles, DO NOT use the engine to rotate axle components unless both wheels arc clear. These axles can exert significant driving force with one wheel.

DIFFERENTIAL NOISE (Chatter-Moan) It is suggested that before the axle assembly is disassembled for any type noise complaint, that the lubricant be changed. An improper lubricant can cause such noises as chatter and moan as well as scoring of the differential clutch plates and discs resulting in a possible failure of the unit.

(1) With lubricant of rear axle assembly at operating temperature raise car on hoist so rear wheels are free to turn. (2) Loosen and remove drain plug and drain out as much of the old lubricant as possible. (3) Fill to proper level with special Sure-Grip Lubricant Part Number 2585318 or equivalent. Reinstall fill plug and tighten. (4) Start engine of vehicle and engage in gear and run on hoist with rear wheels free to turn at approximately 40 (MPH) for ten (10) minutes. This thoroughly circulates the lubricant and brings it to operating temperature.


3-46 REAR AXLE (5) Stop vehicle and remove drain plug and drain as much of the old lubricant as possible. (6) Refill axle to proper level with new Sure-Grip Lubricant Part Number 2585318 or equivalent. Reinstall fill plug and tighten. (7) Lower car on hoist and return to customer to drive and evaluate for approximately 100 miles to determine if lubricant corrects the noise condition. 11 after driving vehicle approximately 100 miles and the differential noise is still evident, remove the axle assembly and service the differential with the

BLOCKS REARING REMOVING SP-5020

ADAPTER SP-5023

SCREWS SP-5026

necessary parts.

AXLE SHAFTS AND BEARINGS CAUTION: It Is absolutely necessary that anytime an axle assembly is serviced, and the axle shafts are loosened and removed, the axle shaft gaskets and Inner axle shaft oil seals must be replaced. CAUTION: Under no circumstances should axle shaft collars or bearings be removed using a torch. The use of a torch in the removal of the axle shaft collars or bearings is an unsafe practice, because heat Is fed into the axle shaft bearing journal and, thereby weakens this area.

Whenever the rear axle shafts have been removed from the axle assembly, always determine that the thrust spacers have not fallen out of the pinion shaft. The spacers may be observed through the axle shaft opening of the axle housing. This may be done with the aid of a small flashlight If the spacers are out of place, it will be necessary to dicaccemble the differential to reinstall them

Removal

remove clips holding and remove brake studs shaft brake drum an axle drum. (2) Using access hole in axle shaft flange, remove retainer nuts, the right shaft with threaded adjuster in retainer plate will have a lock under one of the studs that should be removed at this time. (3) Remove parking brake strut. (4) Attach axle shaft remover Tool C-3971 (Fig. 2) to axle shaft flange and remove axle shaft. Remove brake assembly and gaskets. (5) Remove axle shaft oil seal from axle housing using Tool 0437 (Fig. 3). (6) Wipe axle housing seal bore clean and install a new axle shaft oil seal using Tool 04026 (Fig. 4). The above tool positions the seal the proper dimension from the axle shaft bearing shoulder in the axle housing in order that seal will definitely contact the machined sealing surface of the axle shaft. (1) With wheels removed,

SLEEvE 5P-5041

RING-v.00C HOLDING 52-5017

NK360A

Fig. 2—Tool Set C-3971 axle shaft seal surface, slide protective sleeve SP-5041 over the seal surface next to bearing collar.

(1) Position a.xle shaft bearing retaining collar on a heavy vise or anvil and using a chisel, cut deep grooves into retaining collar at 90t intervals (Fig. 51. This will enlarge bore of collar and permit it to be driven off of axle shaft. (2) Remove bearing roller retainer flange by cutting off lower edge with a chisel (Fig. 6). (3) Grind a section off flange of inner bearing cone (Fig. 7), and remove bearing rollers (Fig. 8). (4) Pull bearing roller retainer down as far as possible and cut with a pair of side cutters and remove (Fig. 91. (5) Remove roller bearing cup and protective sleeve SP-504l from axle shaft. CAUTION: Sleeve SP-5041 should not be used as a protector for the seal journal when pressing off the bearing cone, as it was not designed for this purpose.

(6) To avoid scuffing seal journal when bearing

NX56

Disassembly

CAUTION: To prevent the possibility of damaging

Fig. 3—Removing Axle Shaft Oil Seal


REAR AXLE 3-47

Fig. 4—Installing Axle Shaft Oil Seal Fig. 7—Flange Ground Off inner Cone

Fig. 5—Notching Bearing Retainer Collar

cone is being removed, it should be protected by single wrap of .002 thickness shimstock held in place by a rubber band (Fig. 10). (7) Remove the bearing cone using Tool 03971 (Fig. 2). Tighten bolts of tool alternately until cone is removed (Fig. 11). (1:) Remove seal in bearing retainer plate and replace with new seal.

(1) Install retainer plate and seal assembly on axle shaft. (2) Lubricate wheel bearings with Multi-Purpose Grease NLGL grade 2 E.P. or equivalent (3) install a new axle shaft bearing cup, cone and

Fig. 6—Removing Roller Retainer

Fig. 9—Cutting Out Roller Bearing Retainer

Ng. 8—Removing Bearing Rollers

Assembly


3-48 REAR AXLE

oameimu

NK362

Fig. 10—Seal Journal Protection

Fig. 12—Installing New Bearing and Collar

collar on shaft using Tool C-3971 (Fig. 12), and tighten bolts of tool alternately until bearing and collar are seated properly. (4) Inspect axle shaft seal journal for scratches and polish with #600 crocus cloth if necessary.

housing studs. Install retainer nuts and tighten 30-35 foot-pounds. Start by tightening bottom nut. (5) Repeat step (1) for right side of axle housing. (6) Rack off threaded adjuster of right axle shaft assembly until inner face of adjuster is flush with inner face of retainer plate. Carefully slide axle shaft assembly through oil seal and engage splines in differential side gears. (7) Repeat step (4).

Installation (1) Clean axle housing flange face and brake support plate thoroughly. Install a new rubber asbestos gasket on axle housing studs, followed by brake support plate assembly on left side of axle housing. (2) Apply a thin coating of Multi-Purpose Grease, NLG1 grade 2 E.P. or equivalent to the outside diameter of the bearing cup prior to installing in the bearing bore. This operation is necessary as a corrosion preventive. (3) Install foam gasket on the studs of axle housing and carefully slide axle shaft assembly through oil seal and engage splines in differential side gear. (4) Tap end of axle shaft lightly with a nonmetallic mallet to position axle shaft bearing in housing bearing bore. Position retainer plate over axle

AXLE SHAFT END PLAY CAUTION: When setting axle shaft end play, both rear wheels must be off the ground, otherwise a false end play setting will occur.

(1) Using a dial indicator mounted on the left brake support (Fig. 13), TURN THE ADJUSTER CLOCKWISE UNTIL BOTH WHEEL BEARINGS ARE SEATED AND THERE IS ZERO END PLAY IN THE AXLE SHAFTS. BACK OFF THE ADJUSTER COUNTERCLOCKWISE APPROXIMATELY FOUR NOTCHES TO ESTABLISH AN AXLE SHAFT END PLAY OF .008-.012 INCH.

NK361

Fig. 11—Removing gearing Con. with Tool £4971

Fig. 13—Measuring Axle Shaft End Play


REAR AXLE 3-49 (2) Tap end of left axle shaft lightly with a nonmetallic mallet to seat right wheel bearing cup against adjuster, and rotate axle shaft several revolutions so that a true end play reading is indicated. (3) Remove one retainer plate nut, install adjuster lock. If tab on lock does not mate with notch in adjuster, turn adjuster slightly until it does. Install nut and tighten 30-35 foot-pounds. (4) Recheck axle shaft end play. If it is not within the tolerance of .008-.012 inch, then repeat adjustment procedure. (5) Remove dial indicator and install brake drum and wheel. REAR AXLE ASSEMBLY Removal Should it become necessary to remove rear axle assembly for overhaul or repair, proceed as follows: (1) Raise rear of vehicle until rear wheel clear floor. Support body at front of rear springs. (2) Block brake pedal in the up position using a wooden block. (3) Remove rear wheels. (4) Disconnect hydraulic brake lines at wheel cylinders and cap fittings to prevent loss of brake fluid. (5) Disconnect parking brake cables. To maintain proper drive line balance when reassembling, make scribe marks on the propeller shaft

universal joint and the pinion flange before removal. (6) Disconnect propeller shaft at differential pinion flange and secure in an upright position to prevent damage to front universal joint. (7) Remove shock absorbers from spring plate studs and loosen rear spring "U" bolts nuts and remove "U" bolts. (8) Remove axle assembly from vehicle. DIFFERENTIAL Removal and Disassembly (1) Position carrier and tube assembly in a suitable holding device; such as the jaws of a vise with the carrier cover facing upward. Thoroughly clean the outer area of carrier and tubes with a suitable cleaning solvent and Now dry with compressed air. (2) Loosen and remove cover screws and remove carrier cover. Tilt assembly and drain lubricant into a container. (3) Using a suitable cleaning solvent wash and clean differential, bearings, ring gear and pinion and internal surfaces and blow dry with compressed air. (4) In preparing to measure drive gear back face runout (provided no side play was found) mount a dial indicator Tool C-3339 on pilot stud (Fig. 14), and load the indicator stem slightly when plunger is at right angles to back face of drive gear.

Fig. 14—Measurin9 Drive Gear Renate

(5) Measure drive gear back face runout by rotating drive gear several complete revolutions and reading dial indicator. Mark drive gear and differential case at point of maximum runout. The marking of differential case will be very helpful later in checking differential case runout. Total indicator readings in excess of .006 inch might indicate possible loose drive gear or damaged differential case. A test for differential case runout will be described later. (6) Check the clearance between the differential bearing cap and bearing cup by trying to insert a piece of .003 inch feeler stock between them. A .003 inch feeler should not enter between the bearing cap and cup. A clearance of more than .003 inch could be caused by bearing cup having turned in carrier, causing excessive wear. (7) Note identifying letters stamped on bearing caps and face of carrier housing seal surface (Fig. 15). Letters stamped on left side are in horizontal position while right side are in vertical position. Always match identifying letters for proper reassembly. (8) Loosen and remove the differential bearing caps

NNI021

Fig. 15—Rearing Cap Identification


3-50 REAR AXLE

and locate spreader Tool W-129 with tool dowel pins seated in locating holes of axle housing. Turn tool screw finger tight at this time. (9) Install pilot stud on left side of axle housing. Attach dial indicator and load indicator stem slightly against opposite side of axle housing (Fig. 16). (10) Tighten spreader tool nut sufficiently to obtain .015 inch movement of dial indicator to permit removal of differential case and ring gear assembly. DO NOT SPREAD OVER .020 INCH AS IT WILL RESULT IN PERMANENT DAMAGE TO CARRIER CASTING.

(11) Remove dial indicator and remove differential case and ring gear assembly from axle housing. A light prying action with a screwdriver or pinch bar will loosen assembly for easy removal (Fig. 17). Pry up differential case and ring gear as straight up as possible using leverage against differential case and carrier to prevent damage. Keep respective bearing cups with bearing cones, if they are not worn or damaged and are to be reassembled. (12) Place the differential case between the soft jaws of a vise and remove the drive gear screws and discard. Using a fiber mallet, tap the drive gear loose from the differential case pilot and remove. (13) If the drive gear runout exceeded .006 inch In step 5 differential case flange runout should be re measured. Install differential case with respective bearing cups into axle housing. Loosen nut of spreader tool and remove. Install bearing caps and tighten snugly. Mount dial indicator in contact with flange face of differential case (Fig. 18), and measure runout as described in Step 5. Total allowable runout should not exceed .003 inch. It is often possible to reduce excessive runout by positioning drive gear 180 degrees from point of maximum runout when reassembling ring gear on differential case. (14) Position carrier and tube assembly in vise with nose of carrier in the up position. Remove drive pinion nut and washer. Using Tool C-452 and holding Tool 03281, remove drive pinion flange.

Nti102-3

Fig. 17—Removing Differential and Drive Gear Assembly

(15) Using Tool 0748, remove drive pinion oil seal. Remove stinger, gasket, front pinion bearing cone and preload slum pack. Record the thickness of the shims in case they should be lost. (16) Position the carrier and tube assembly on an arbor press, then press out the drive pinion stem and rear bearing cone assembly. (17) With the aid of a brass drift and hammer, drive out the front and rear pinion bearing cups from housing. Remove the shim from behind the rear bearing cup and record the thickness of shim pack. (18) Remove rear bearing cone from drive pinion stem using Tool DD-914C or Tool C-293 and adapters No. 37. (19) Remove differential bearing cones from differential case hubs using Tool DD-914C or Tool C293 and adapters No. 82 (Fig. 19). Care must be taken to insure that bearing remover adapters are located so as not to pull on bearing cage. (20) Remove the shims located behind each bearing and record thickness to aid in reassembly. DIFFERENTIAL CASE

The sure-grip differential (Figs. 20, 21 and 22) is

NN1024

Fig.

16—Spreading Rear Axle Housing

Fig. 18—Measuring Differential Case Drive Gear Mounting Flange Face Runout


REAR AXLE 3-51

AXLE DRIVE GEAR

AXLE DRIVE PINION

DIFFERENTIAL CASE

AXLE SHAFT AXLE SHAFT

DIFFERENTIAL SIDE GEAR

Fig. 19—Removing Differential Bearings

similar to the conventional differential except for the addition of friction plates and Belleville plates and discs for clutching the differential case to the differential gears and a means for engaging these plates. The Belleville plates and discs accomplish a positive engagement of the clutch discs and plates at all times by placing a preload on the plates and discs. It has four pinion gears, positioned in the case by two pinion shafts which are at right angles to each other and loose fitting at their inter-section. Both ends of each shaft have two flat surfaces, or ramps, which mate with identical ramps in the differential case. There is additional clearance in the case to permit a slight peripheral movement of the ends of the pinion shafts within the case.

DIFFERENTIAL PINION

KR 261 Fig. 21—Power Flow Axle Shafts Turning at Same Speed

•••• i l AXLE DRIVE GEAR

AXLE DRIVE PINION

CLUTCH PLATES

DIFFERENTIAL CASE

DIFFERENTIAL PINION DIFFERENTIAL CASE AXLE SHAFT

I PINION SHAFT

AXLE SHAFT

CLUTCH PLATES

DIFFERENTIAL SIDE GEAR

PINION SHAFT

AXLE SHAFT DIFFERENTIAL PINION

PINION THRUST MEMBER

KR 262

DIFFERENTIAL PINION KR260A

Fig. 20—Sure-Grip Differential (Schematic)

Fig. 22—Power Flow Axle Shafts Turning at Different Speeds


3-52 REAR AXLE BELLEVILLE PLATE

CLUTCH PLATES

SIDE GEAR AND RETAINER

KR720B

Fig. 25— Removing Installing Clutch Plates (Cap Side) Fig. 23—Case Halves Scribed for Proper Reassembly

Disassembly U) Remove axle drive gear. Measure runout of the drive gear mounting flange. Replace both case halves if runout exceeds .003 inch. (2) Before disassembling case halves, place scribe marks on each half to aid in aligning the case when reassembling (Fig. 23). Remove case cap attaching bolts and remove case cap (Fig. 24). Remove clutch plates (Fig. 25). (3) Remove side gear retainer (Fig. 261, and side gear (Fig. 27). (4) Remove pinion shafts with pinion gears (Fig. 28). (5) Remove remaining side gear (Fig. 29). side gear retainer (Fig. 30). and clutch plates (Fig. 31).

SIDE GEAR SIDE GEAR RETAINER

KR72IA

Fig. 26—Removing or Installing Side Gear Retainer (Cop Side)

CLEANING AND INSPECTION (1) Wash and clean all parts in a suitable cleaning solvent and with the exception of bearing cones, dry with compressed air. To clean axle housing tubes,

insert a stiff wire into tube, attach a clean cloth to wire at center section and withdraw from center outward.

SIDE GEAR

_AXLE SHAFT THRUST SPACER

CASE CAP— CLUTCH PLATES SIDE GEAR RETAINER

KR7I9

Fig. 24—Removing or Installing Differential Case Cap

KR 722

Fig. 27—Removing or Installing Side Gear (Cap Side)


REAR AXLE 3-53 PINION SHAFTS ;

THRUST SPACER.

PIMON GEARS

-

K;723

Fig. 28—Removing or Installing Pinion Shafts and Gears (2) All machined contact surfaces in the axle housing and differential bearing caps should be smooth and free of any raised edges. Front and rear pinion bearing cup bore machine surfaces should be smooth. Raised metal on shoulders of bores incurred in removal of cups should be flattened by use of a flat nosed punch. (3) Axle shaft oil seal bores at both ends of housing should be smooth and free of rust and corrosion. This also applies to brake support plate and housing flange face surface. (4) Axle shaft bearings should be washed and cleaned and inspected for any pitting, spalling or imperfections in surface of bearing cup. If bearings are found to be unfit for further use they must be replaced. See "Axle Shaft Assembly Procedure.IS) Axle shaft splines should be smooth and straight and free of excessive wear. The axle shaft oil seal journal should be smooth and free of nicks, scratches

Fig. 29—Removing or Installing Side Gear from Differential Can

Installing Side Gear Retainer or corrosion. To remove any imperfections, polish the area with =600 crocus cloth (without reducing diameter of axle shaft oil seal journal). (6) Differential bearings and front and rear pinion bearing cone and cup assemblies should have a smooth appearance with no broken or dented surfaces on rollers or roller contact surfaces. The bearing roller retainer cages must not be distorted or cracked_ When Fig. 30—Removing or

replacing hearings, always replace the cup and cone in a sat only.

(7) Inspect drive gear and pinion for worn or chipped teeth or damaged attaching bolt threads. If replacement is necessary, replace both the drive gear and drive pinion as they are available in matched sets only. (8) Inspect universal joint flange for cracks, worn splines. pitted. rough or corroded oil seal contacting surface. Repair or replace universal joint flange as necessary. 19) Inspect drive pinion bearing shim pack for

Fig. 31—Removing or Installing Clutch Plates and Discs


3-54 REAR AXLE broken, damaged or distorted shims. Replace, if necessary, during establishment of pinion bearing preload. (10) Clean all differential parts and inspect parts for wear, nicks and burrs. The inner and outer flat clutch plates and outer flat clutch disc should be replaced if they are worn or distorted. If either case half is worn, it will be necessary to replace both halves.

ASSEMBLING THE DIFFERENTIAL CASE (1) Position clutch plates and discs in their proper location in each half of the case (Fig. 32). (2) Place side gears in their retainers. Insert splines of retainers through the splines of clutch discs. (3) Place aligning pin through one axle shaft thrust spacer. Assemble pinion shafts on aligning pin. (4) Place pinion gears on shafts and install assembly in drive gear half of case. (5) Slide cap half of case over the edge of bench far enough to insert one finger up through the assembly to hold it together. Place the assembly on drive gear half, matching scribe marks. (6) Make sure markings on each differential case half coincide. Install the differential case bolts and turn in a few threads. (7) With shafts installed, center the cross shafts between the two ramp surfaces in differential case. Tighten differential case bolts evenly by alternately turning opposite bolts until all are tightened to 45 foot-pounds. To keep splines of the side gear and clutch plates in exact alignment during the tightening procedure, move axle shafts back and forth as bolts are being tightened. After assembly, slight misalignments of the splines can be corrected by moving axle shafts back and forth until free. Remove axle shafts. FLAT PLATE¼

FLAT DISC

DISHED DISC

ii 9

SIDE GEAR AND RETAINER

1.1 FLAT PLATE

DISHED

PLATE NO126C

Fig. 32—Arrangement of Plates and Discs 9-3/4" Differential

NN1026A

Fig. 33 —Installing Differential Bearing Cones

INSTALLATION-DIFFERENTIAL CASE AND DRIVE GEAR The contacting surfaces of the drive gear and differential case flange must be clean and free of all burrs. Dress down surfaces with a file as needed. (1) Position drive gear on differential case pilot, aligning threaded holes of drive gear with those in differential case flange. (2) Insert drive gear screws through case flange and into drive gear. After all cap screws are properly started, tap drive gear against differential case flange with a non-metallic mallet. (3) Clamp unit between brass jaws of a vise and alternately tighten each cap screw to 100-120 footpounds. (4) Position each differential bearing cone on hub of differential case (without shims), smajl end away from drive gear, using Tool C-4025 (Fig. 21). An arbor press may be used in conjunction with installing Tool. CAUTION: Never exert pressure against the bearing cage, since this would damage the bearing and make it unfit for further use.

(5) Position differential bearing cups on their respective cones and insert differential case in carrier. Install bearing caps in their correct positions and tighten bearing cap bolts finger tight. (6) Install dial indicator fixture with indicator pointer contacting back face of drive gear. (7) Insert a screwdriver blade between bearing cup and housing and pry case assembly as far as possible to one side of housing (Fig. 34). Set dial indicator at zero. Using screwdriver, pry case to opposite side of housing and record the reading. This reading indicates the amount of shims needed to take up the clearance between the differential bearing cups and the ease. The shim pack thickness to be placed on bearing hub between bearing cone and differential case will he calculated later in the procedure after installation of drive pinion and depth of mesh

setting.


REAR AXLE 3-55 PRI7S5

TOOL--•-

RFAR BEARING CONE

DRIVE PINION

Fig. 34—Determining Shims to Obtain "0" End Marano,

(8) Remove dial indicator, loosen bearing cap bolts and remove bearing caps. Remove differential assembly from housing.

DRIVE PINION DEPTH OF MESH SETTING (Using Pinion Depth Gauge Tool DD1244) Note the figures etched on the head of the drive pinion and observe (Fig. 35). One figure is found on both the drive pinion and ring gear and indicates a matched gear set. Directly opposite this figure will be one with a + or — before it, or if not a or —, the figure will be 0. This number must be positively identified before continuing with the assembly procedure. Midway between the two sets of figures described above are numbers and letters. These numbers and letters are etched for manufacturing purposes only, but as one of these numbers may he 0, it might be confused with the number needed for assembly procedure. A rule to follow would be to first examine the shaft end for a + or — number. If a + or — number is not etched on the pinion head, then the number will be 0. (1) Install rear drive pinion bearing cup and shim pack in carrier. The starting shim pack to be placed PRODUCTION NUMBERS NO SIGNIFICANCE

PINION DEPTH ADJUSTMENT FIGURE

GEAR MATING MARK (SAME AS ON DRIVE GEAR) Fig. 35 — Drive Pinion Markings

NY425A

K0382

Fig. 36—Installing Roar Pinion Bearing Cone

between the rear cup and carrier can be determined from the shims removed and the etched marking on the pinion. The + or — figure indicates the variation from the nominal distance between the front of the pinion and the center line of the carrier. For example, if a pinion marked +2 was originally installed with a shim pack .035 inch and the new pinion is marked —1, the shim pack should be increased .003 inch to bring the new pinion to its correct position and the new shim pack would be .038 inch. This will give an approximate setting of the pinion. A pinion depth gauge should be used for final setting of the pinion, see steps 6 through 14. Shims are available in .003, .005 and .010 inch thickness. (2) Install front pinion bearing cup in carrier. (3) Lubricate rear drive pinion bearing cone with Sure-Grip Lubricant, Part Number 2585318, or equivalent, and install bearing cone on pinion stem with Tool C-3095 (Fig. 36). (4) Position drive pinion and bearing assembly in carrier and install front pinion bearing cone on pinion stem. Do not install preload shims behind front pinion bearing at this time. (5) Install universal joint pinion flange followed by washer and nut. Tighten nut just enough to obtain 10-30 inch-pounds of preload. Rotate drive pinion while tightening to seat bearing rollers. (6) The pinion depth gauge Tool DD-1244 (Fig. 37), is a direct reading precision micrometer, mounted in an arbor and is calibrated to show the distance from the end of the anvil to the centerline of the gauge set. To check the accuracy of the gauge, install the micrometer and arbor in the master gauge. Install the checking block and read the micrometer, it should be accurate within less than .0005 inch (Fig. 38). (7) Select the proper adapters from the gauge set that fits the differential bearing cup bores. Install the adapters on the arbor and position in carrier housing.


3-56 REAR AXLE

Fig. 39—Determining Pinion Depth Setting Fig. 37—Pinion Depth Gauge Tool DD-1244

Install bearing caps and tighten cap bolts up snug. (8) Install the step plate clamp assembly on the carrier housing. Position step plate over pinion and Lighten step plate screw against step plate. Make sure the four step plate feet are squarely positioned on the pinion. (9) Adjust the micrometer so it is directly over and at a 90 degree angle to the step plate. Screw the micrometer down until the anvil contacts the top of the step plate (Fig. 39). Read the micrometer and make a note of the reading. The step plate measures .400 inch thick, therefore, add the .400 inch step plate thickness to the micrometer reading. (10) Figure 40 shows the nominal pinion setting dimensions for 0 (zero) marked pinion. Pinions with a or — marking require a different pinion setting. For example, if a pinion marked -2 is being installed in a 9-3/4" axle, add the -i-2 to pinion setting dimensions 3.125 which will be the corrected dimension of

8.127. (11) If pinion setting is within —.001 inch to +.003 inch, the pinion position can be assumed to be correct. If the setting is outside these limits, it should be corrected by adding or removing the proper thickness shim behind the rear pinion bearing cup. (12) Remove the drive pinion depth gauge and drive pinion. (13) If shim adjustment is necessary, remove drive pinion rear bearing cup and add or remove shims as determined in preceding Step 9. Measure each shim separately with a micrometer. (14) Reinstall drive pinion rear bearing cup and shims and recheck pinion depth measurement, described previously. DRIVE PINION DEPTH OF MESH (Using Tool C-758-D4)

Rear axle setting gauge Tool C-758-D4 is used to install drive pinion bearing cups as well as to determine pinion depth of mesh. (1) Start both drive pinion bearing cups into axle housing. AXLE PINION MODEL SETTING - 3.125 —es

.-----,.......

I

/2 I ...../..--------- CENTER LINE OF AXLE NU897

Fig. 38—Checking Gauge in Muster Gauge Assembly

Fig. 40—Pinion Setting Dimension


REAR AXLE 3-57

(2) Assemble Tool C-758-D4 by positioning spacer SP-5184 on main screw of tool. Position rear pinion bearing cone on tool screw and insert into axle housing. (3) Position front pinion bearing cone over main screw of tool followed by compression sleeve SP-535. centralizing washer SP.534, and main screw nut SP-533. (4) Lubricate drive pinion bearing cones with SureGrip Lubricant, Part Number 2585318. or equivalent. (5) To install pinion bearing cups, hold compression sleeve from turning with Tool C-3281. tighten nut, thereby drawing pinion bearing cups into axle housing bearing cup bores. Permit tool to turn several revolutions during tightening operation to permit bearing rollers to align and prevent brinnelling of bearing cups. Do not remove tool after installing cups. Pinion depth of mesh will be determined next

(6) With main tool left in axle housing after installing drive pinion bearing cups. loosen tool nut and re-tighten nut to produce 10-30 inch-pounds of preload. Rotate while tightening to align bearing rollers. (7) Install gauge block SP-528 on main tool and tighten screw with an Allen wrench securely. (8) Position cross bore arbor SP-5183 in axle housing differential bearing seats. Center the arbor so that an approximate equal distance is maintained at both ends. Correctly position differential bearing caps and insert bolts and tighten to 10 foot-pounds. (9) Using a feeler gauge select the proper thickness of shims that will snugly fit between arbor and gauge block. This fit must be snug but not too tight (similar to the pull of a feeler gauge). This measurement is then used in determining the correct thickness shim pack for installation behind the rear pinion bearing CUD and carrier casting (Fig. 41). (10) To select a shim pack for installation, read

the markings on the end of pinion head (-0, —1, —2. - 1. 2. etc.). When marking is — (minus), add that amount to the thickness of shim pack selected in step (9). When the marking is (plus), subtract that amount. Treat other pinion markings in a similar manner. Shims are available in .003. .005. and .010 inch thickness. 11 1 Remove the tool arbor and tool from axle housing (12) Using a brass drift or soft punch and hammer, remove rear pinion bearing cup from casting. (131 Position the correct shim pack in axle housing cup bore and install rear bearing cup as described previously in steps (1 thru 5). When cup is properly seated, remove tool and pinion bearing cones. 114) Lubricate rear drive pinion bearing cone with Sure-Grip Lubricant. Part Number 2585318 or equivalent and install bearing cone on pinion stem using Tool C-3095. An arbor press may be used in conjunction with tool (Fig. 361. (15) Install drive pinion and bearing assembly in carrier and install the original front pinion bearing shim pack followed by the bearing cone. Do not install oil seal at this time. 1161 Install universal joint flange. washer and nut. Tighten nut 250-270 foot-pounds. Rotate pinion several complete revolutions to seat bearing rollers. (17) Using an inch-pound torque wrench C-685. measure pinion bearing preload by rotating pinion with handle of wrench floating (Fig. 42). Take reading while handle is moving through several complete revolutions. Accurate reading can be made only with nose of axle in upright position. Correct preload is 10-20 inch-pounds. Add shim to decrease preload and Subtract shims to increase preload. Shims are available in the following thicknesses: .003. .005, .010, and .030 inch. 118r After the correct pinion bearing preload has

ti?.d

Fig. 41—Determining Shim Pock Thickness for Drive Pinion Depth of Mesh

Fig.

42—Checking Pinion Bearing Preload


3-58 REAR AXLE been established, remove the universal joint flange, nut and washer. (19) Install oil slinger and gasket. Using pinion seal installing Tool C-3719, install drive pinion oil seal. (20) Install universal joint flange washer and nut. Tighten nut 250-270 foot-pounds.

PINION BEARING PRELOAD (1) Remove universal joint flange, washer, nut and front pinion bearing cone. (2) Install the original front pinion bearing shim pack followed by the bearing cone. Do not install oil seal at this time. (3) Install universal joint flange washer and nut. Tighten nut 250-270 foot-pounds. Rotate pinion several complete revolutions to align and seat bearing rollers. (4) Using an inch-pound torque wrench C-685, measure pinion bearing preload by rotating pinion with handle of wrench floating (Fig. 42). Take reading while handle is moving through several complete revolutions. Accurate reading can be made only with nose of axle in upright position. Correct preload is 10-20 inch-pounds. Add shims to decrease preload and subtract shims to increase preload. Shims are available in the following thicknesses: .003, .005, .010, and .030 inch. (5) After the correct bearing preload has been established, the pinion depth setting should be rechecked. (6) Remove universal joint flange nut and washer. (7) Install oil slinger and gasket. Using Tool C3719, install drive pinion oil seal. (8) Install universal joint flange, washer and nut. Using Tool C-3281 to hold flange, tighten pinion nut 250-270 foot-pounds. Recheck pinion bearing pre-load.

DIFFERENTIAL BEARING PRELOAD AND DRIVE GEAR AND PINION BACKLASH (1) With drive pinion and bearings installed and bearing preload set, install differential case and ring gear assembly with their respective bearing cups. Install bearing caps in their positions, align identification marks and tighten cap bolts finger tight. Refer to the measurement taken previously in step (7) of "Installation-Differential Case and Drive Gear". This reading taken before the drive pinion was installed represents the total clearance between the differential bearing cups and the carrier casting. Perform the following steps to determine the thicknesses of shims required behind each bearing cone to take up the clearance and establish the correct bearing preload and backlash. (2) Install a dial indicator and position the contact

point against back face of ring gear. Move the differential and ring gear assembly tight against the drive pinion, set the dial indicator on 0. Move the differential and ring gear assembly in the opposite direction as far away from pinion as possible and note the reading on dial indicator. This reading represents the thickness of shim pack necessary to take up the clearance between the bearing cup and the case on the ring gear side of the differential assembly. Subtract this reading from the previously recorded total reading to obtain the amount of shims necessary to take up the clearance between the bearing cup and the case at the pinion side of the differential. (3) Remove differential and ring gear assembly from carrier. (4) Remove differential bearing cones. Install the correct thickness shim pack as determined in step 2 between bearing cone and differential case hub shoulder using Tool C-4025. Add an additional .015 inch shims to the drive gear side of differential and install the differential bearing cones. This additional .015 inch shim pack provides the correct bearing preload and backlash. (5) Position spreader Tool W-129 in locating holes of carrier and tighten screw finger tight. Install dial indicator and spread carrier .015 to .020 inch Do not exceed this limit to permit placing of differential and ring gear assembly in carrier. (6) Install the bearing caps in their respective positions as indicated by identification marks on caps and carrier. Remove the spreader tool. Coat the bearing cap bolt threads with sealing compound and install and tighten bolts snugly. (7) Tap the drive gear lightly with a rawhide hammer to properly seat the differential bearing and cups. Care must be taken in this operation to prevent nicking the teeth of ring gear or drive pinion as they are meshed together. Tighten the bearing cap bolts to 70-

90 foot-pounds. (8) Attach a dial indicator to carrier and with indicator contact point contacting ring gear tooth (Fig. 43), measure the backlash between the ring gear and drive pinion. (9) Check backlash at four equally spaced points around circumference of ring gear. Backlash must be held between .004-.009 inch and cannot vary more than .002 inch between the four positions checked. If backlash does not fall within these specifications, change shim pack thickness on both differential bearing hubs to maintain proper bearing preload and backlash.

GEAR TOOTH CONTACT PATTERN The gear tooth contact pattern will disclose whether the correct rear pinion bearing mounting shim has


REAR AXLE

3-59

THICKER SPACER NEEDED

TOE END

HEEL END-COAST ,,,, SIDE (CONCAVE) NRin

HEEL END-DRIVE SIDE (CONVEX)

Fig. 45—Incorrect Tooth Contact Pattern (increase Shim Pack Thickness) NNI031 Fig. 43—Checking Backlash Between Drive Gear and Pinion

been installed and the drive gear backlash set prop. erly. Backlash between the drive gear and pinion must be maintained within the specified limits until correct tooth contact pattern is obtained. (1) Apply a thin film of red or white lead on both the drive and coast side of the drive gear teeth. Rotate drive gear one complete revolution in both directions while load is being applied with a round bar or screwdriver between the carrier casting and differential case flange. This action will leave a distinct contact pattern on both the drive and coast side of the drive gear teeth. (2) Observe the contact pattern on the drive gear teeth and compare with those in figures 44, 45 and 47 to determine if pattern is properly located. With pinion depth of mesh and gear backlash set properly, your contact pattern should resemble that in (Fig. 44). Notice that the correct contact pattern is well centered on both drive and coast sides of the teeth. When tooth contact patterns are obtained by hand. they are apt to be rather small. Under the actual operating load, however, the contact area increases. (3) If after observing the contact pattern and you find it resembles that in (Fig. 45), the drive pinion PATTERN CLOSE TO CENTER

is too far away from centerline of the ring gear, the contact pattern will appear high on the heel on drive side and high on toe on coast side. To correct this type tooth contact pattern, increase the thickness of shim pack located behind the rear pinion bearing cup (Fig. 46), which will cause the high heel contact on drive side to lower and move toward the toe; the high toe contact on coast side will lower and move toward the heel. (4) If after observing the contact pattern and you find it resembles that in (Fig. 47), the drive pinion is too close to the ring gear, the pattern will appear low on the toe on drive side and low heel contact on coast side. To correct this type tooth contact pattern, decrease the thickness of shim pack located behind the rear pinion bearing cup (Fig. 48), which will cause the low toe contact on drive side to raise and move toward the heel; low heel contact on coast side will raise and move toward the toe.

REAR AXLE ASSEMBLY Installation

(1) Making sure the gasket surfaces of both the cover and carrier housing are clean, install a new gasket followed by the cover and tighten the cover bolts to 15-20 foot-pounds. Beneath one of the cover PATTERN MOVES TOWARD CENTER AND DOWN TOE END

HEEL END-DRIVE SIDE (CONVEX)

HEEL END-COAST SIDE (CONCAVE) NR198

HEEL END- DRVF SIDE (CONVEX:

HEEL END.. COAST SIDE (CONCAVE)

NR2OO

Fig. 46—Effect on Tooth Contact Pattern as Shim Fig. 44—Desired Tooth Contact Under Light Load

Pack Thickness is Increased


3-60 REAR AXLE PATTERN MOVES INWARD AND UP

THINNER SPACER NEEDED \ TOE END

HEEL END-DRIVE SIDE (CONVEX)

HEEL END-COAST SIDE (CONCAVE)

NR201

Fig. 47—Incorrect Tooth Contact Pattern (Decrease Shim Pack Thickness)

bolts, install the ratio identification tag. (2) For correct procedure when installing axle shafts and bearings and setting axle shaft end play, see "Axle Shafts and Bearings". (3) With body supported at front of rear springs, position rear axle assembly spring pads over the spring center bolts. (4) Install spring "U" bolts and tighten nuts to 45 foot-pounds and install shock absorbers on spring plate studs. (5) Connect parking brake cables. (6) Connect hydraulic brake lines at wheel cylinders and bleed brakes, install brake drums and adjust brakes. (7) Install rear universal joint of propeller shaft in same position as removed (match scribe marks on propeller shaft universal joint and pinion flange).

HEEL END-DRIVE SIDE {CONVEX)

HEEL END- COAST SIDE (CONCAVE)

Fig. 48—Effect on Tooth Contact Pattern Pack Thickness is Decreased

NR202

as Shim

Tighten universal joint clamps to 170-200 inch pounds. (8) Install rear wheel and tighten nuts to 65 footpounds in the proper tightening sequence.

LUBRICATION Refill axle housing and carrier assembly with 5-1/2 pints of lubricant. Sure-Grip differentials, use only the special multi-purpose gear lubricant intended for axles equipped with plate-clutch Sure-Grip differentials. Such a lubricant is available under Part Number 2585318, Special Sure-Grip Lubricant or equivalent. "SHOULD THE REAR AXLE BECOME SUBMERGED IN WATER, THE LUBRICANT MUST BE CHANGED IMMEDIATELY TO AVOID THE POSSIBILITY OF EARLY AXLE FAILURE RESULTING FROM CONTAMINATION OF THE LUBRICANT BY WATER DRAWN INTO THE VENT HOLE."


SURE-GRIP DIFFERENTIAL INDEX Page Installing Sure Grip Differential and Carrier Assembly Lubrication Sure Grip Differential Identification Sure Grip Differential Noise

63 63 61 61

Sure Grip Differential Removal Cleaning & Inspection Assembly Testing Sure Grip Differential

Page 62 62 62 63

61

GENERAL INFORMATION A new Sure-Grip differential being offered as a special equipment option in the 7-1/4" and 8-3/4" rear axles only (Fig. 1). The Sure-Grip differential design is basic and simple and consists of a two piece case construction and is completely interchangeable with the conventional differential and also the previous type Sure-Grip differential (Fig. 2). A conventional differential allows the driving wheels to rotate at different speeds while dividing the driving torque equally between them. This function

is ordinarily desirable and satisfactory. However, the total driving torque can be no more than double the torque at the lower-traction wheel. When traction conditions are not the same for both driving wheels, a portion of the available traction cannot be used. The SURE-GRIP differential allows the driving wheel with the better traction condition to develop more driving torque than the other wheel, so that the total driving torque can be significantly greater than with a conventional differential. SURE-GRIP is not a locking differential. In normal


REAR AXLE 3-61

NU404

Fig. I—Sure-Grip Differential

driving conditions the controlled internal friction is easily overcome during cornering and turning so that the driving wheels can turn at different speeds. Extreme differences in traction conditions at the driving wheels may permit one wheel to spin. SURE-GRIP has been engineered to perform its specialized functions with minimum effect on normal vehicle operations. The cone clutch SURE-GRIP differentials are similar to corresponding 8-3/4" conventional differentials except for the incorporation of the helix-grooved

cones that clutch the side gears to the differential case. The grooves assure maximum lubrication of the clutch surface during operation. The cones and side gears are statically spring preloaded to provide an internal resistance to differential action within the differential case itself. This internal resistance provides pulling power while under extremely low tractive conditions such as mud, snow or ice when encountered at one of the rear wheels. During torque application to the axle, the initial spring loading of the cones is supplemented by the gear separating forces between the side gears and differential pinions which progressively increases the friction in the differential. It should be remembered that the Sure-Grip differential is not a positive locking type and will release before excessive driving force can be applied to one wheel.

SURE-GRIP DIFFERENTIAL IDENTIFICATION Identification of sure-grip differential assembly can easily be made by lifting both rear wheels off the ground and turning them. If both rear wheels turn in the same direction simultaneously, the vehicle is equipped with a Sure-Grip Differential. Another means of identification is by removing the filler plug and using a flashlight to look through the filler plug hole to identify the type of differential case.

SERVICE PROCEDURES SURE-GRIP DIFFERENTIAL NOISE (Chatter-Moan) Noise complaints related to rear axles equipped with cone-clutch SURE-GRIP should be checked to determine the source of the noise. If a vehicle ride check produces the noise in turns but not straight ahead, the probable cause is incorrect or dissipated rear axle lubricant. The following draining and flushing procedure has been established for the Sure-Grip Differential before it is removed from the vehicle and replaced. CAUTION: When servicing vehicles equipped with Sure-Grip differentials do not use the engine to rotate axle components unless both rear wheels are off the ground. Sure-Grip equipped axles can exert a significant driving force if one wheel is in contact with floor and could cause the vehicle to move.

(1) With lubricant of rear axle assembly at operating temperature raise car on hoist so rear wheels are free to turn. (2) Loosen and remove fill plug and using a suction gun remove as much of the old lubricant as possible. (3) Fill axle to proper level with Multi-Purpose Hypoid Gear Lubricant Part Number 2933565 or equiva-

lent. Reinstall fill plug and tighten. (4) Start engine and engage in gear and run on hoist with rear wheels free to turn at approximately 40 MPH for ten (10) minutes. This thoroughly circulates the lubricant and brings it to operating temperature. (5) Stop vehicle and remove the fill plug and using a suction gun remove as much of the lubricant as possible. (6) Refill axle to proper level with multi-Purpose Hypoid Gear Lubricant Part Number 2933565 or equivalent. Reinstall fill plug and tighten. (7) Lower vehicle on hoist and return to owner to drive and evaluate for approximately 100 miles to determine if lubricant corrects the noise complaint. If after the vehicle is driven approximately 100 miles and the noise condition is still evident, remove the differential and carrier assembly and replace the Sure-Grip Differential. The Sure-Grip Differential and the internal parts are serviced as an assembly only.

TESTING SURE-GRIP DIFFERENTIAL The Sure-Grip differential can be checked to determine if its performance is satisfactory without remov-


3-62

REAR AXLE DIFFERENTIAL CASE

ifffrifffrq(09,plis l‘ PINIONS

SIDE GEARS

CONE CLUTCH COIL SPRING

LUBRICATION POCKET

LUBRICATION GROOVES NU405

Fig. 2—Sure-Grip Differential (Schematic)

ing the differential and carrier assembly from the vehicle. (1) Position vehicle on a hoist with engine off and the transmission selector lever in park if automatic or in low gear if manual. (2) Attempt to rotate wheel by applying turning force with hands gripping tire tread area (Fig. 3). (3) If you find it extremely difficult, if not impossible to manually turn either wheel, you can consider the sure-grip differential to be performing satisfactorily. If you find it relatively easy to continuously turn either wheel the differential is not performing properly and should be removed and replaced. The Sure-Grip Differential and internal parts are serviced as a complete assembly only. Under no circumstances

Removal Follow the same procedure outlined under conventional differential removal. Cleaning and Inspection (1) Clean the Sure-Grip differential assembly in a fast evaporating mineral spirits or a dry cleaning solvent and with exception of bearings, dry with compressed air. (2) Inspect differential bearing cones, cups and roll-

should the differential be removed and disassembled and reinstalled.

SURE-GRIP DIFFERENTIAL CAUTION! During removal and installation of axle shafts, DO NOT rotate on axle shaft unless both are in position. Rotation of one axle shaft without the other in place may result in misalignment of the two spline segments with which the axle shaft spline engages, and will necessitate difficult realignment procedures when shaft is installed.

fig. 3—Testing Sure-Grip Differential Effectiveness


SPECIFICATIONS 3-63 ers for pitting, spalling or other visible damage. If replacement is necessary, remove bearing cones from differential case using Tool C-293 and adapter plates No. 43. (3) Visually inspect differential case for cracks or other visible damage which might render it unfit for further service.

Assembly If during cleaning and inspection the differential bearings were found to be unfit for further use and were removed follow this procedure for installation of new bearings. (1) Position each differential bearing cone on hub of differential case (taper away from drive gear) and with installing Tool C-4086, install bearing cones. An arbor press may be used in conjunction with installing tool. CAUTION: Never exert pressure against the bearing cage, since this would damage the bearing.

(2) If the ring gear was removed from the suregrip differential case or is being replaced with a new ring gear for any reason, new nylok drive gear screws must be installed. IMPORTANT: The procedure for installing the ring gear on differential case for the 8-3/4" axle differs from that of the 7-1/4" axle. This procedure must be followed so the ring gear seats on the differential case properly. (3) Using an Arkansas stone, relieve the sharp edge of the chamfer on the inside diameter of the ring gear (Fig. 24), in 8-3/4" Axle section of this group). This is very important, otherwise during the installation of ring gear on differential case, the sharp edge will remove metal from the pilot diameter of case and can get imbedded between differential case flange and gear; causing gear not to seat properly. (4) Position ring gear on differential case pilot aligning threaded holes of ring gear with those in differential case flange. (5) Insert drive gear screws (left hand threads) through case flange and into ring gear. After all cap screws are properly started, tap ring gear against differential case flange with a non-metallic mallet.

(6) Position differential case unit between brass jaws of a vise and alternately tighten each cap screw to 55 foot-pounds. NOTE: Before installation of differential ease into carrier lubricate the inside of differential assembly with Multi-Purpose Hypoid Gear Lubricant Part Number 2933565 or equivalent. Do not use any other lubricant other than this special lubricant. (7) Follow procedure outlined in conventional axle assembly for setting drive pinion depth of mesh, drive gear backlash adjustment and bearing preload adjustment.

INSTALLING SURE-GRIP DIFFERENTIAL AND CARRIER ASSEMBLY (1) Using a new gasket install carrier assembly in axle housing. Tighten mounting nuts to 45 footpounds. (2) Refer to "Installation of Rear Axle Shaft", when installing axle shafts. (3) Connect the rear universal joint. (4) Before lowering the rear wheels of the vehicle to the floor, adjust rear brakes. CAUTION: Both rear wheels must be raised off the floor when adjusting brakes.

LUBRICATION Every six months check the fluid level in the axle through the filler plug hole. When checking the level, be sure the vehicle is in a level position on an axle or drive on type hoist. "See Lubrication Section" for proper level of specific axle assembly. In Sure-Grip Differentials, use only the Multi-Purpose Hypoid Gear Lubricant Part Number 2933565 or equivalent. Do not use any other lubricant other than this special lubricant. Anticipated Temperature Range

Above — 10°F. As low as — 30°F. Be low — 30° F.

Viscosity Grade

SAE 90 SAE 80 SAE 75


SPECIFICATIONS 7-1 / 4" Axle TYPE

Ring Gear Diameter Number of Differential Pinions DIFFERENTIAL BEARINGS Adjustment by Carrier Bearing Preload Spread PINION AND DRIVE GEAR BACK LASH PINION BEARING PRELOAD ADJUSTMENT BY

Semi-Floating Hypoid 7.250 2 Spacer Washer .254-.284 inch in .002 inch graduations .003-.006 004-.007" at point of minimum back lash Spacer Washers .074.106 inch in .001 variations


3-64 SPECIFICATIONS

PINION BEARING DRAG TORQUE PINION DEPTH OF MESH ADJUSTMENT BY

15-25 inch-pounds Spacer Washers •084-.100 inch in .002 inch graduations .005 inch Maximum Single Row Sealed Ball

RUNOUT-CASE AND DRIVE GEAR WHEEL BEARING TYPE LUBRICATION 2 pints (1-3/4 Imperial) Capacity Type Multi-Purpose Gear Lubricant as defined by MIL-L-2105B (API GL-5) should be used on all rear axles; such a lubricant is available under Part No 2933565 Chrysler Hypoid Gear Lubricant or an equivalent be used. 8-1/4"Axle TYPE Ring Gear Diameter PINION BEARINGS Type Number Used Adjustment Pinion Bearing Preload New Bearings Used Rear And New Front DIFFERENTIAL Bearings (Type) Number Used Preload Adjustment RING GEAR AND PINION Serviced In Pinion Depth Of Mesh Adjustment Pinion and Ring Gear Backlash

Semi-Floating Hypoid 8.250" Taper Roller Two Collapsible Spacer 20-35 Inch-Pounds 10-25 Inch-Pounds Conventional Taper Roller Two Threaded Adjustment Hypoid Matched Sets Select Shims .006-.008" At Point Of Minimum Backlash .006" Maximum

Runout-Differential Case and Ring Gear Backf ace WHEEL BEARINGS Type Straight Roller Adjustment None End Play Built-In Lubrication Rear Axle Lubricant LUBRICATION Capacity 4.4 PTS. (3-1/2 Imperial) Type Multi-Purpose Gear Lubricant, as defined by MIL-L-2105B (API GL-5) should be used in all rear axles with conventional differentials, such a lubricant is available under Part No. 2933565 Chrysler Hypoid Gear Lubricant or an equivalent be used. 8-3/4" Axle

TYPE Ring Gear Diameter PINION BEARINGS Type Number Used Adjustment (Small Stem or Large Stem Step Pinions) (Large Stem Tapered Pinion) Pre-Load Torque (Seal Removed) DIFFERENTIAL BEARINGS Type Number Used Adjustment RING GEAR AND PINION Serviced in Ring Gear Runout Back Lash DIFFERENTIAL SIDE GEAR CLEARANCE With Gauge

Semi-Floating Hypoid 8.750 Tapered Roller 2 Select Shims Collapsible Spacer 20-30 inch-pounds Tapered Roller 2 Adjusting Nut Matched Sets .005" Max. .006 to .008" .001 to .012"


TIGHTENING REFERENCE 3-65 WHEEL BEARINGS Type Adjustment End Play Lubrication

Tapered Roller Adjusting Nut .008,018 Multi Purpose Grease NLGI grade 2 E.P.

LUBRICATION Capacity 4.4 Pints (3-1/2 Imperial) Type Multi-Purpose Gear Lubricant as defined by MIL-L-2105B (API GL-5) should be used on all rear axles; such a lubricant is available under Part No. 2933565 Chrysler Hypoid Gear Lubricant or an equivalent be used.

9- 3/4" Axle

TYPE Ring Gear Diameter PINION BEARINGS Type Number Used Adjustment Pinion bearing drag Torque (seal removed) DIFFERENTIAL Bearings (Type) Number Used Pre-Load Adjustment RING GEAR AND PINION Serviced in Pinion depth of mesh adjustment Pinion and Ring Gear Backlash Runout-differential case and ring gear backface WHEEL BEARINGS Type Adjustment End Play Lubrication LUBRICATION Capacity Type

Semi-Floating Hypoid 9.750 Taper Roller 2 Select Shims 10-20 inch-pounds Sure-Grip Taper Roller 2 Select Shims Hypoid Matched Sets Select Shims .004-.009" at point of minimum backlash .006" maximum Taper Roller Threaded Adjusting Nut .008-.012 Automotive Multi Purpose Grease NLGI grade 2

5-1/2 Pts. (4-1/2 Imperial) Use only the special multi-purpose lubricant intended for use in Plate. Clutch Sure-Grip differentials. Such a lubricant is available under Part No. 2585318, Special Sure-Grip Lubricant or an equivalent be used.

TIGHTENING REFERENCE 7-1/4" Axle Pounds Foot Inch

Differential Bearing Cap Bolts Ring Gear to Differential Case Bolts (Left Hand Thread) Drive Pinion Flange Nut Carrier Cover Bolts Axle Shaft Retainer Nuts Propeller Shaft Bolts (Rear) Spring Clip (U Bolt) Nuts Wheel Stud Nuts Shock Absorber Stud Nuts (Lower)

40 55 240 (Min.) 20 35 15 40 (Max.) 55 50


3-66 TIGHTENING REFERENCE 8-1 / 4"Axle Pounds Foot

Differential Bearing Cap Bolts Ring Gear To Differential Case Bolts Drive Pinion Flange Nut Carrier Cover Bolts Brake Support Plate Retainer Nuts Propeller Shaft Bolts (Rear) Spring Clip (U Bolt) Nuts Wheel Stud Nuts Shock Absorber Stud Nuts

55 55 170 (Min.) 15-25 30-35

Inch

170-200

45 65 50 8-3/4" Axle Pounds Foot Inch

Differential Bearing Cap Bolts Ring Gear to Differential Case Bolts (Left Hand Thread) Drive Pinion Flange Nut (Small Stem or Large Stem Step Pinions) (Large Stem Tapered Pinions) Carrier to Axle Housing Bolt Nuts Axle Shaft Retainer Nuts Propeller Shaft Bolts (Rear) Spring Clip (U Bolt) Nuts Wheel Stud Nuts Shock Absorber Stud Nuts (Lower)

90 55 240 (Min.) 170 (Min.) 45 35 15 45 65 50 9-3/4" /Ude Pounds Foot Inch

Differential Bearing Cap Bolts Differential Case Half Retaining Bolts Ring Gear To Differential Case Bolts Drive Pinion Flange Nut Carrier Cover Bolts Axle Shaft Retainer Nuts Propeller Shaft Bolts (Rear) Spring Clip (U-Bolts) Nuts Wheel Stud Nuts Shock Absorber Stud Nuts

70-90 35-45 100-120 250-270 15-25 30-35 170-200 45 65 50


GROUP 5

BRAKES CONTENTS Page

DISC BRAKES (KELSEY HAYES) GENERAL INFORMATION MASTER CYLINDERS PARKING BRAKES POWER BRAKES (BENDIX)

22 1 10 & 34 15 19 & 20

Page

POWER BRAKES (MIDLAND-ROSS) SERVICE BRAKES SERVICE DIAGNOSIS SPECIFICATIONS WHEEL CYLINDERS

17 5 1 39 13

GENERAL INFORMATION The new Models are equipped with servo contact, two shoe, internal expanding brakes with application adjusters. The lower ends of the brake shoes are con-

netted by a tubular star wheel adjusting screw, (Fig. 1, 2 or 3). Cars with heavy duty brakes are not selfadjusting.

SERVICE BRAKES SERVICE DIAGNOSIS Condition

PEDAL GOES TO FLOOR

Possible Cause

(a) Fluid low in reservoir. (b) Air in hydraulic brake system. (c) Improperly adjusted brake. (d) Leaking wheel cylinders. (e) Loose or broken brake lines. (f) Leaking or worn master cylinder. (g) Excessively worn brake lining.

Correction

(a) Fill and bleed master cylinder. (b) Fill and bleed hydraulic brake system. (c) Repair or replace self-adjuster as required. (d) Recondition or replace wheel cylinder and replace both brake shoes. (e) Tighten all brake fittings or replace brake line. (f) Recondition or replace master cylinder and bleed hydraulic system. (g) Reline and adjust brakes.

(a) Air in hydraulic system.

SPONGY BRAKE PEDAL

(a) Fill master cylinder and bleed hydraulic system. (b) Improper brake fluid (low boiling (b) Drain, flush and refill with brake fluid. point). (c) Excessively worn or cracked brake (c) Replace all faulty brake drums. drums. (d) Broken pedal pivot bushing. (d) Replace nylon pivot bushing.

BRAKES PULLING

(a) Contaminated lining. (b) Front end out of alignment. (c) Incorrect brake adjustment (d) Unmatched brake lining.

(e) (f) (g) (h) SQUEALING BRAKES

Brake drums out of round. Brake shoes distorted. Restricted brake hose or line. Broken rear spring.

(a) Glazed brake lining. (b) Saturated brake lining. (c) Weak or broken brake shoe retaining spring. (d) Broken or weak brake shoe return spring. (e) Incorrect brake lining. (f) Distorted brake shoes. (g) Bent Support Plate. (h) Dust in brakes or scored brake drums.

(a) (b) (c) (d)

Replace contaminated brake lining. Align front end. Adjust brakes and check fluid. Match primary, secondary with same type of lining on all wheels. (e) Grind or replace brake drums. Replace faulty brake shoes. (g) Replace plugged hose or brake line. (h) Replace broken spring. (al Cam grind or replace brake Ming. (b) Replace saturated lining. (c) Replace retaining spring. (d) Replace return spring. (e) (f) (g) (h)

Install matched brake lining. Replace brake shoes. Replace support plate. Blow out brake assembly with compressed air and grind brake drums.


5-2 BRAKES Correction

Possible Cause

Condition

CHIRPING BRAKES

(a) Out of round drum or eccentric axle (a) Repair as necessary and lubricate support plate contact area (6 places). flange pilot.

DRAGGING BRAKES

(a) Incorrect wheel or parking brake ad- (a) justment. (b) (b) Parking brake engaged. (c) Weak or broken brake shoe return (c) spring. (d) Brake pedal binding. (d) (e) (e) Master cylinder cup sticking. (f) Obstructed master cylinder relief port. (f)

HARD PEDAL

Free up and lubricate brake pedal and linkage. Recondition master cylinder. Use compressed air and blow out relief port. Replace brake lining. Grind or replace faulty brake drum.

(g) (h)

(a) Brake booster inoperative. (b) Incorrect brake lining. (c) Restricted brake line or hose.

(a) Replace brake booster. (b) Install matched brake lining. (c) Clean out or replace brake line or hose. (d) Free up and lubricate brake linkage.

(a) Contaminated brake lining. (b) Loose or torn brake lining. (c) Wheel cylinder cups sticking. (d) Incorrect wheel bearing adjustment.

(a) Reline both front or rears of all four brakes. (b) Replace brake lining. (c) Recondition or replace wheel cylinder. (d) Clean, pack and adjust wheel bearings.

BRAKES FADE (HIGH SPEED)

(a) Incorrect lining. (a) (b) (b) Overheated brake drums. (c) Incorrect brake fluid (low boiling (c) temperature). (d) (d) Saturated brake lining.

PEDAL PULSATES

(a) Bent or out of round brake drum.

BRAKE CHATTER AND SHOE KNOCK

(a) Out of round brake drum. (b) Loose support plate. (c) (d) (e) (f)

BRAKES DO NOT SELF ADJUST

Release parking brakes. Replace brake shoe return spring.

(g) Saturated brake lining. (h) Bent or out of round brake drum.

(d) Frozen brake pedal linkage. WHEEL LOCKS

Adjust brakes and check fluid.

Replace lining. Inspect for dragging brakes. Drain, flush, refill and bleed hydraulic brake system. Reline both front or rear or all four brakes.

(a) Grind or replace brake drum.

(a) Grind or replace brake drum. (b) Tighten support plate bolts to proper specifications. Bent support plate. (c) Replace support plate. (d) Replace brake shoes. Distorted brake shoes. Machine grooves in contact face of (e) Grind or replace brake drum. brake drum. (Shoe Knock) Replace either front or rear or all Contaminated brake lining. four linings.

(a) Adjuster screw frozen in thread. (a) (b) Adjuster screw corroded at thrust (b) washer. (c) Adjuster lever does not engage star (c) wheel. (d) (d) Adjuster installed on wrong wheel.

Clean and free-up all thread areas. Clean threads and replace thrust washer if necessary. Repair, free up or replace adjuster as required. Install correct adjuster parts.

SERVICE PROCEDURES ADJUSTING SERVICE BRAKES Normally self adjusting brakes will not require manual adjustment but in the event of a brake reline it may be advisable to make the initial adjustment manually to speed up the adjusting time. (1) Jack up vehicle so all wheels are free to turn. (2) Remove rear adjusting hole cover from all brake supports of vehicle.

(3) Be sure parking brake lever is fully released, then back off parking brake cable adjustment so there is slack in cable.

(4) Insert adjusting tool C-3784, into star wheel of adjusting screw. Move handle of tool upward until a slight drag is felt when road wheel is rotated. (5) Insert a thin screwdriver into brake adjusting hole and push adjusting lever out of engagement with star wheel. (Care should be taken so as not to bend


BRAKES 5-3

LEVER

STAR WHEEL

ADJUSTER SPRING BRAKE SHOE WEB ADJUSTING SCREWDRIVER

NDS042,

Fig. I—Adjusting Brakes

While holding adjusting lever out of engagement, back off star wheel to insure a free wheel with no brake shoe drag. (6) Repeat above adjustment at each wheel. The adjustment must be equal at all wheels. Install adjusting hole covers in brake supports. (7) Adjust parking brake after wheel brake adjustment. It Is important to follow the above sequence to avoid the possibility of the parking brake system causing brake drag as may occur if the parking brakes are adadjusting lever (Fig. 1).

justed before the service brakes. TESTING APPLICATION ADJUSTER OPERATION

Place the vehicle on a hoist, with a helper in the driver's seat to apply the brakes. Remove the plug from the rear adjustment slot in each brake support plate to observe the adjuster star wheel. Then, to exclude the possibility of maximum adjustment, that is, the adjuster refuses to operate because the closest possible adjustment has been reached, the star wheel should be backed off approximately 30 notches. It will be necessary to hold the adjuster lever away from the star wheel to allow backing off of the adjustment. Spin the wheel and brake drum in the reverse direction and apply the brakes vigorously. This will provide the necessary inertia to cause the secondary brake shoe to leave the anchor. The wrap up effect will move the secondary shoe, and the cable will pull the adjuster lever up. Upon application of the brake pedal, the lever should move upward, turning the star wheel. Thus, a definite rotation of the adjuster star wheel can be observed if the automatic adjuster is working properly. If by the described procedure one or more adjusters do not function properly, the

Fig. 2—Wheel Stud Nut Tightening Sequence

respective drum must be removed for adjuster servicing. BLEEDING BRAKE SYSTEM

Clean all dirt and foreign material from the cover of the master cylinder to prevent any dirt from falling into the master cylinder reservoir when the cover is removed. living thc onc man bleeder tank C-3490-13 (with adaptor) provides a convenient means of keeping the master cylinder full while pressurizing the hydraulic system for bleeding. (Complete bleeding of the dual master cylinder is important! See Bleeding the Master Cylinder in this section.) Manual bleeding is not recommended because of reduced fluid flow.

Fig. 3—Cutting and Flaring Steel Tubing


5-4 BRAKES Tighten the brakes of each wheel until the brakes are locked. (This reduces the movement of the wheel cylinder cups and assists in bleeding.) Starting with the right rear wheel clean all dirt from the bleeder valve. Place bleeder hose C-650 on the bleeder valve and insert the other end of the bleeder hose into a clean jar half filled with clean brake fluid. (This will permit the observation of air bubbles as they are being expelled from the hydraulic system and also prevent air from being drawn back in to the system. (Follow the manufacturers instructions in the use of the bleeder tools.) Continue this bleeding operation on the other wheels, starting with the left rear wheel, then the right front and finishing with the left front wheel. If necessary, repeat this bleeding operation if there is any indication (a low, soft or spongy brake pedal) of air remaining in the hydraulic system. Readjust the brakes as described previously.

TEST FOR FLUID CONTAMINATION To determine if contamination exists in the brake fluid (as indicated by swollen or deteriorated rubber cups), the following test can be made. Place a small amount of the drained brake fluid into a small clear glass bottle. Separation of the fluid into distinct layers will indicate mineral oil content. If there is any question of mineral oil content, as indicated by swollen or deteriorated rubber parts, drain and flush thoroughly and replace all rubber parts.

WHEEL STUD NUT TIGHTENING The tightening sequence and tightening of the wheel stud nuts is of great importance to insure efficient brake operation. The use of an impact or long handled wrench may distort the drum.

A criss-cross tightening sequence should be used (Fig. 2). Tighten all the stud nuts to one-half the specified tightening first (30 ft. lbs.) and then repeat sequence tightening to the specified 65 foot pounds on 10 and 11 inch brakes.

BRAKE HOSE AND TUBING The flexible hydraulic brake hose should always be installed in the vehicle by first tightening the male end of the hose in the wheel cylinder or rear axle housing tee. The hose is then clipped to the hose bracket in a manner to give minimum twist. Excessive twist can result in hose interference problems with possible hydraulic system failure. Inspectivn uf indite lame and tubing should be included in all brake service operations. The hoses

should be checked for: (1) Correct length, severe surface cracking, pulling scuffing or worn spots. (Should the cotton fabric casing of the hose be exposed by cracks or abrasions in the rubber hose cover, the hose should be replaced. Even-

tual deterioration of the hose can take place with possible burst failure). (2) Faulty installation to cause twisting, wheel, tire or chassis interference. Always use factory recommended hose to insure quality, correct length and superior fatigue life. Care should be taken to make sure that the tube and hose mating surfaces are clean and free from nicks and burrs. New copper seal washers should be used and the tube nuts and connections should be properly made and tightened. Double wall steel tubing should always be used to insure superior fatigue life. Care should be taken when replacing brake tubing, to use the proper bending and flaring tools and to avoid routing the tubes against sharp edges, moving components or in hot areas. All tubes should be properly attached with recommended retaining clips. Steel tubing is used to conduct hydraulic pressure to the front and rear brakes. Flexible rubber hose is used at both front brakes and at a rear axle junction block. Steel tubing is used from the junction block to both rear wheel cylinders. All fittings, tubing and hoses should be inspected for rusted, damaged or faulty flaring seats. The steel tubing is equipped with a double flare or inverted seat to insure more positive seating in the fitting. To repair or reflare tubing proceed as follows: (1) Using Tool C-3478, cut off damaged seat or damaged tubing (Fig. 3). (2) Ream out any burred or rough edges showing on inside edges of tubing. This will make ends of tubing square and insure better seating of flared end of tubing. Place compression nut on tubing prior to flaring tubing.

(3) To flare tubing, open handles of flaring Tool C-3838 and rotate jaws of tool until mating jaws of tubing size are centered in area between vertical posts. (4) Slowly close handles with tubing inserted in jaws but do not apply heavy pressure to handle as this will lock tubing in place. (5) Place gauge "Form A" on edge over end of tubing and push tubing through jaws until end of tubing contacts recessed notch of gauge matching size of tubing (Fig. 3). (6) Squeeze handles of flaring tool and lock tubing in place. (7) Place proper sized plug of gauge "A" down in end of tubing. Swing compression disc over gauge and center layered flaring screw in recess of masc. (8) Lubricate taper of flaring screw and screw in


SERVICE BRAKES 5-5 until plug gauge has seated on jaws of flaring tool. This action has started to invert extended end of tub. ing. (9) Remove gauge and apply lubricant to tapered end of flaring screw and continue to screw down until

tool is firmly seated in tubing. (10) Remove tubing from flaring tool and inspect seat. (11) Clean seat and tube of any lubricant before connecting to hydraulic system.

SERVICE DRAKES

INDEX Page

Brake Drum Removal Front Brake Drums Rear Brake Drums Brake Shoe Removal Front Brake Shoes Rear Brake Shoes Cleaning and Inspection

Page Grinding Recommendations

5 5 5 5 6

Brake Shoe Installation Front Brake Shoes Rear Brake Shoes Brake Drum Installation Front Brake Drums Rear Brake Drums

7 a 9 9 9


SERVICE BRAKES INDEX Page Brake Drum Removal Front Brake Drums Rear Brake Drums Brake Shoe Removal Front Brake Shoes Rear Brake Shoes Cleaning and Inspection

5 5 5 5 6

Grinding Recommendations Brake Shoe Installation Front Brake Shoes Rear Brake Shoes Brake Drum Installation Front Brake Drums Rear Brake Drums

Page 7 8 9 9 9

SERVICE PROCEDURES The eleven inch brakes used on taxi vehicles, (Fig. 3) are equipped with manual adjusters. The service procedures covering these brakes are identical to the passenger car, with exception of reference to application adjusters. Illustrations of the various service procedures will not always show any one specific brake.

BRAKE DRUM REMOVAL Removing Front Brake Drums To aid in brake drum removal loosen brake star adjusting wheel. (1) Remove rear plug from brake adjusting access hole. (2) Insert a thin screw driver into brake adjusting hole and push adjusting lever away from star adjusting wheel. Care should be taken not to bend adjusting lever.

(3) Insert Tool C-3784 into brake adjusting hole and engage notches of brake adjusting star wheel. Release brake adjustment by prying down with adjusting tool. (4) Remove wheel cover, grease cap, cotter pin, lock, adjusting nut, outer wheel bearing and remove wheel and drum assembly from spindle to expose brake linings. (Figs. 1, 2 or 3). (5) Inspect brake lining for wear, shoe alignment, or contamination from grease or brake fluid. Removing Rear Brake Drums (1) Remove rear plug from brake adjusting access hole. (2) Insert a thin screw driver into brake adjusting hole and hold adjusting lever away from notches of adjusting screw. (3) Insert Tool C-3784 into brake adjusting hole and engage notches of brake adjusting screw. Release

brake by prying down with adjusting tool. (4) Remove rear wheel and clips from wheel studs that holds drum on axle. Remove drum. (5) Inspect brake lining for wear, shoe alignment or contamination from grease or brake fluid.

BRAKE SHOE REMOVAL Removing Front Brake Shoes (1) Using Tool C-3785 remove brake shoe return springs (Fig. 4). (Note how secondary spring overlaps primary spring). (Fig. 1). (2) Slide eye of automatic adjuster cable off anchor and unhook from adjusting lever. Remove cable, overload spring, cable guide and anchor plate. (3) Disengage adjusting lever from spring by sliding forward to clear pivot, then working out from under spring. Remove spring from pivot. Remove automatic adjuster spring from secondary shoe web and disengage from primary shoe web. Remove spring. (4) Remove brake shoe retainers, springs and nails, using Tool C-4070, (Fig. 5). (5) Disengage primary and secondary shoes from push rods and remove from support. Remove adjusting star wheel assembly from shoes. Removing Rear Brake Shoes (1) Remove rear wheel, and drum retaining clips. Remove drum. (2) Using Tool C-3785, remove brake shoe return springs (Fig. 6). (Note how secondary spring overlaps primary spring). (Fig. 1). (3) Slide eye of automatic adjuster cable off anchor and then unhook from adjusting lever. Remove cable, overload spring, cable guide and anchor plate. (4) Disengage adjusting lever from spring by sliding


5-6 SERVICE BRAKES WHEEL CYLINDER PUSH ROD SECONDARY SHOE RETURN SPRING

ANCHOR

DUST BOOT

PRIMARY RETURN SPRING

LOCK SPRING WASHER

DUST BOOT SECONDARY SHOE RETURN SPRING

PRIMARY LINING AND SHOE STRUT

SECONDARY SHOE AND LINING

ANTI-RATTLE SPRING

CABLE GUIDE

PUSH ROD

SHOE RETAINER SPRING

SHOE RETAINER SPRING (2) ADJUSTER CABLE

SHOE TABS (3) SHOE RETAINING NAIL (2)

SHOE RETAINER (4)

ADJUSTER OVERLOAD SPRING

PRIMARY SHOE AND LINING

LEVER SPRING RIGHT FRONT

PARKING BRAKE LEVER SECONDARY SHOE AND LINING ADJUSTING LEVER

SUPPORT PLATE SHOE TABS I3) ADJUSTER SCREW ASSEMBLY AUTOMATIC ADJUSTER SPRING (STAR WHEEL) LEFT RkAR + FRONT OF VEHICLE NU53A FRONT OF VEHICLE +

Fig. 1—ten Inch Brake Assembly

forward to clear pivot, then working out from under spring. Remove spring from pivot. Remove automatic adjuster spring from secondary shoe web and disengage from primary shoe web. Remove spring. (5) Remove brake shoe retainers, springs and nails. Using Tool C-4070, (Fig. 7). (6) Spread anchor ends of primary and secondary shoes and remove parking brake lever strut and antirattle spring (Pig. 8). (7) Disengage parking brake cable from parking brake lever. (8) Disengage primary and secondary shoes from push rods and remove from support. Remove adjustWHEEL CYLINDER ANCHOR

PUSH ROD PRIMARY RETURN SPRING ANTI-RATTLE SPRING PRIMARY SHOE AND LINING St RUT

ADJUSTER SCREW ASSEMBLY (STAR WHEEL) LEFT REAR

CLEANING AND INSPECTION Wipe or brush clean (dry) the metal portions of the brake shoes. Examine the lining contact pattern to determine if the shoes are bent. The lining should show contact across the entire width, extending from heel to toe. Shoes showing contact only on one side should be replaced. Shoes having sufficient lining but lack of contact at toe and heel should be measured for proper grind. Clean the support, using a suitable solvent, then SECONDARY RETURN SPRING

ANCIIOR PLATE LOCK SPRING WASHER

DUST BOOT

CABLE

PRIMARY GUIDE RETURN SPRING SECONDARY SHOE AND LINING PARKING BRAKE LEVER RETAINER SPRING

SHOE TABS (3) AUTOMATIC ADJUSTER SPRING

ing star wheel assembly from shoes.

ADJUSTER CABLE ADJUSTER OVERLOAD SPRING SUPPORT PLATE PRIMARY SHOE ADJUSTING LEVER AND LINING LEVER SPRING ADJUSTER SPRING FRONT OF VEHICLE

LEFT FRONT

2—fleven Inch Brake Assembly

/SECONDARY SHOE i AND LINING SHOE TABS (3) RETAINER RETAINING NAIL L2) ADJUSTER CABLE OVERLOAD SPRING ADJUSTING LEVER LEVER SPRING SUPPORT PLATE

4 FRONT OF VEHICLE NU54A


SERVICE BRAKES 5-7 SKONDARY SHOE WHEEL RETURN SPRING CYLINDER

WHEEL CYLINDER PRIMARY SHOE RETURN SPRING BOOT BOOT STRUT

ANCHOR SECONDARY SHOE AND LINING

ANTI.RATTLE SPR:NG

ANCHOR PLATE ANCHOR PUSH ROD WAVE WASHER HORSESHOE CUP

PARKING BRAKE

SHOE TAB (3)

iEvre

NAIL 12) SPRING RETAINER (4)

SHOE TAB (3) RETAINER

PRIMARY SHOE AND LINING

SUPPORT PLATE RIGHT FRONT$

NAIL (2) SHOE TAB (3)

STAR WHEEL LOCK SPRING ADJUSTING STAR WHEEL

*EFT REAR NU2IBA

Brake Assembly Maxi/ inspect for burrs. Remove if necessary. Clean and ing assemblies, always check them in the drum they inspect the adjusting screws for pulled or stripped are to be used with to insure that they have the threads, then apply a thin film of lubricant to the recommended radius grind. This grind, which should provide at least .004 inch heel and toe clearance, is threads. necessary for proper lining to drum contact during New brake shoe return springs and hold down brake application. springs should be installed where the old springs have Drum Refacing—Measure the drum runout with been subjected to overheating or if their strength is an accurate gauge. Drum runout should not exceed questionable. Spring paint discoloration or distorted .006 inch out of round. If the drum runout is in excess end coils would indicate an overheated spring. of .006 inch. (total indicator run-out) the drum should be refaced. Remove only as much material as is necGRINDING RECOMMENDATIONS essary to clean up the drum. It is recommended the front drums be refaced with the wheel and tire Brake Shoe Lining—New lining should be measmounted. Do not reface more than .060 inch ow the ured and ground .060" to .080" (maximum under the standard drum diameter. drum diameter). When replacing brake shoe and linFig. 3—Eleven Inch

PRIMARY SHOE RETURN SPRING

SECONDARY SHOE RETURN SPRING ADJUSTER CABLE

SECONDARY SHOE AN: IIN

PR:PAARY SHOE AND tiNtNG

SPECIAL TOOL SPECIAL TOOL 'REMOVING AND INSTALLING) ADJUSTER SPRING 40

SPRINC: NAIL

ADJUSTING LEVER LEVER SPRING NU24IA

Fig. 4—Removing or Installing Shoe Return Springs (Left Front)

RETAINER NU242

Fig. 5—Removing or Installing Shoe Retainers, Springs and Nails (Right Foot)


5-8 SERVICE BRAKES SPECIAL TOOL (REMOVING AND INSTALLING)

PRIMARY SHOE RETURN SPRING

SECONDARY SHOE RETURN SPRING

TAB ANTI-RATTLE SPRING

PRIMARY SHOE RETURN SPRING TM OF ANTI RATTLE SPRING

ANCHOR PLATE ADJUSTER CABLE STRUT

-X;

ADJUSTER CABLE

LEVER SPRING ADJUSTING LEVER NU243A

ADJUSTER SPRING

PRIMARY SHOE AND LINING

Installing Front Brake Shoes Lubricate with a thin film the shoe

tab contact area (6 places) on support plate with Chrysler support plate lubricant, Part number 2932524 or equivalent (Fig. 11). (1) Match a primary with a secondary brake shoe and /Aare them in their relative position on a work bench. (2) Install adjusting star wheel assembly between primary and secondary shoes, with a star wheel next to secondary shoe (Fig. 1). (The left star wheel adjusting stud end is stamped "L" which indicates its posifion on vehicle). The left side star wheel is cadmium plated. The right is black, and the adjusting stud end is not stamped. (3) Install adjuster spring in secondary shoe and hook other end in web of primary. Install adjusting TAB OF AN11. PATTI F SPRING IIND SHOE WEB)

SECONDARY SHOE AND LINING

NU245

Fig. 8–Removing or Installing Parking Brake Strut and Spring (Left Roar)

Fig. 6–Removing or Installing Shoe Return Springs (Left Rear)

BRAKE SHOE INSTALLATION

PARKING RAKE CABLE

lever spring over pivot pin on shoe web. Install adjusting lever under spring and over pivot pin. Slide lever slightly rearward to lock in position (Fig. 1). (4) Spread anchor ends of brake shoes to hold star adjusting wheel assembly in position. (5) Holding brake shoes firmly, place assembly on support plate, and at the same time engage shoe webs with push rods (Fig. 9). (6) Using Tool C-4070, install shoe retaining nails, springs and retainers. (Fig. 5). (7) Install anchor plate over anchor. (8) Slide "eye" of adjusting cable over anchor and against anchor plate. Engage end of primary shoe return spring in shoe web and install other end over anchor, using Tool C-3785. (9) Install cable guide in secondary shoe web. Holding in position, engage secondary shoe return spring through guide and into web. Install other end over anchor, using Tool C-3785. (Be sure cable guide rePRIMARY SHOE AND LINING

SECONDARY SHOE AND LINING

SPECIAL TOOL

SPRING NAIL PR imA RY SHOE AND LINING —P.

RETAINER NU24 4

Fig. 7 – Removing or installing Shoe Retainers, Spring and Nails (Right Rear)

aft STAR "ADJUSTING WHEEL

ADJUSTER\ SPRING ,Nt1246

Fig. 9–Installing Brake Shoes (Left Front)


SERVICE BRAKES 5-9 PRIMARY SHOE RETURN SPRING

ANCHOR PLATE WAVE WASHER HORSESHOE CLIP

PISTON STOP SUP POR

TAB OF ANT I-RAITI.k SPRING'

ADJUSTER CABLE RETAINING NAIL

PRIMARY SHOE AND LINING

ONDARY SHOE AND LINING NU247

5410E CONTACT AREA 16'

NR107

Fig. JO—Installing Brake Shoes (Loft Rear)

Fig. II—Shoe Contact Area on Support

mains fiat against shoe web, and that secondary spring overlaps primary). (Fig. 1). Using pliers, squeeze ends of spring loops (around anchor) until paralleL (10) Thread adjuster cable over guide and hook end of overload spring in lever (Fig. 1). (Be sure -eye" of cable is pulled tight against anchor and in a straight line with guide)

(6) Install cable guide in secondary shoe web. Holding in position, engage secondary shoe return spring through guide and into web. Install other end over anchor. using Tool C3785. (Be sure cable guide remains flat against shoe web and that secondary spring overlaps primary). (Fig. 1). Using pliers, squeeze ends of spring loops (around anchor) until parallel. (7) Install adjusting star wheel assembly between primary and secondary shoe, with star wheel next to secondary shoe. (Fig. 1). The left star wheel adjusting stud end is stamped "L" which indicates its position on vehicle. The left side star wheel is cadmium plated. The right is black, and the adjusting stud end is not stamped. Install adjuster spring between shoes (Fig. 1). (Engage secondary shoe first). (8) Install adjusting lever spring over pivot pin on shoe web. Install adjusting lever under spring and over pivot pin. Slide lever slightly rearward to lock in position. (9) Using Tool C-4070, install shoe retaining nails retainers and springs. (Fig. 7). (10) Thread adjuster cable over guide and hook end of overload spring in lever. (Fig. 1). (Be sure eye of cable is pulled tight against anchor and in a straight line with guide).

Installing Rear Brake Shoes

I.ubricate with a thin film the shoe tab contact area (6 places) on support plate with Chrysler support plate lubricant, Part number 2932524 or equivalent (Fig. 11). (1) Install parking brake lever on inner side of secondary shoe web after lubricating pivot with support plate lubricant. Secure with wave washer and horseshoe clip. (2) Engage parking brake lever with cable, then slide secondary shoe against support plate, and at the same tune engage shoe web with push rod and against anchor. (3) Slide parking brake strut behind hub and into slot in parking brake lever. Slide anti-rattle spring over free end of strut. (Fig. 8). On ten inch brakes, be sure spring tab is pointing rearward and up on outside of shoe web (Left Brake), and pointing frontward and down behind shoe web (Right Brake) (Fig. 8). On eleven inch brakes, be sure spring tab is pointing forward and down and outside of shoe web (Left Brake), and pointing frontward and down behind shoe web (Right Brake) (Fig. 3). (4) Slide primary shoe into position and engage with push rod and free end of strut. Install anchor plate over anchor, then install eye of adjuster cable over anchor. (Fig. 10). (5) Engage primary shoe return spring in web of shoe and install free end over anchor, using Tool C3785. (Fig. 6).

Installing Front Brake Drums

(1) Lubricate wheel bearings and install brake drum and adjust wheel bearing to proper preload. (2) Adjust brakes as described under "Service Procedures" at front of this Section.

Installing Rear Brake Drums

(1) Install brake drum. Reinstallation of retaining clips is not necessary. Install wheel and tire assembly. (2) Adjust brakes as described under "Service Procedures" at front of this Section.


5-10 MASTER CYLINDER MASTER CYLINDER (Drum Brakes) INDEX Page 12 11 10 10 12

Bleeding Master Cylinder Cleaning and Inspection Disassembling Master Cylinder General Information Hydraulic System Safety Switch

Installing Master Cylinder Master Cylinder Removal Reassembling Master Cylinder Testing Master Cylinder

Page 12 10 11 12

GENERAL INFORMATION The tandem master cylinder (Fig. 1) is of the compensating type with the reservoirs cast integrally. The master cylinder consists of a front and rear piston (in tandem) two outlets, each contain a residual pressure valve and spring (Fig. 4). The front outlet tube from the master cylinder is connected to the hydraulic system safety switch (Fie. 8 and 9) and thence to the rear brakes. The rear outlet tube from the master cylinder is also

connected to the safety switch and the front brakes. The master cylinder used on vehicles not equipped with power brake unit is serviced in the same manner as the master cylinder with power brakes, with one exception, the master cylinder for power brakes does not include the push rod. The disc brake master cylinder is different than the standard drum brake master cylinder and is covered In the disc brake section of the brake group.

SERVICE PROCEDURES MASTER CYLINDER REMOVAL (1) Disconnect front and rear brake tubes from master cylinder (residual pressure valves will keep cylinder from draining). (2) Remove nuts that attach master cylinder to cowl panel and/or power brake unit (if so equipped). (3) Disconnect pedal push rod (manual brakes) from brake pedal. (4) Slide master cylinder straight out from cowl panel and/or power brake unit (if so equipped). DISASSEMBLING MASTER CYLINDER

stalled at reassembly if air pressure is used.

To disassemble the master cylinder, (Figs. 1 and 4) clean outside of master cylinder thoroughly. HOLD DOWN CLAMP

CLAMP RETAINING BOLT

(1) Remove cover retaining bolt, and clamp then remove cover and gasket. Empty brake fluid from reservoirs. (2) Loosen piston retainer screw then press in on rear piston and flip retainer down to release rear piston assembly (Fig. 3). Slide rear piston assembly out of cylinder bore. (3) Remove screw and gasket that retains front piston; then, upending master cylinder, tamp (open end down) on bench to remove front piston. If front piston sticks in bore of cylinder, use air pressure to force piston out of cylinder. New cups must be in(4) Remove front piston compression spring from bore. SPECIAL TOOL

COVER GASKET TAR PISTON RETAINER SCREW

COVER

REAR BRAKE TUBE OUTLET

FRONT BRAKE REAR TUBE OUttET PISTON

FRONT PISTON RETAINING SET SCREW

PISTON RETAINING

MASTER CYLINDER BODY NP 175

Fig. I—Tandem Master Cylinder Assembly

TUBE SEAT

Fig. 2—Removing Tube Seats


MASTER CYLINDER 5-11 RESIDUAL PRESSURE VALVE AND SPRING

RESIDUAL PRESSURE VALVE

PISTON RETAINER SCREW

TUBE SEAT PISTON RETAINER RESIDUAL PRESSURE VALVE SPRING

that have deep scratches or scoring may be honed, providing the diameter of the bore is not increased more than .002 inch. If master cylinder bore does not clean up at .002 inch when honed, the master cylinder should be discarded and a new master cylinder installed. If master cylinder pistons are badly scored or corroded, replace them with new ones. The piston cups and seals should be replaced when reconditioning a master cylinder. When overhauling a master cylinder, use all parts furnished in repair kit. Discard all used rubber parts.

NP I9A

Fig. 3—Removing or installing Residual Pressure Valve

REASSEMBLING MASTER CYLINDER

(5) Remove rubber cups from pistons, after noting positions of cup lips.

Front Piston

Before assembling the master cylinder, dip all component parts in clean brake fluid and place on a clean shop towel or paper (assembling seals dry can ruin them). (1) Carefully work primary cup on end of front piston with the lip away from piston (Fig. 4). (2) Slide "0" ring over the rear end of front piston and into correct land. (3) Carefully work front piston secondary cup (Fig. 4) into rear land, with the cup lip away from piston. (4) Slide cup retainer over front end of piston, followed by piston spring (Fig. 4). (5) Install piston spring, piston cup retainer, piston and cups into bore of master cylinder (Fig. 5).

Do not remove the primary cup of the rear piston. If cup is damaged or worn, Install a new rear piston assembly.

(6) Using 'Tool T-109-178 (or an easy out) remove tube seats by threading tool firmly into seat, tap tool and seat out of cylinder body. (Fig. 2). (7) Remove two residual pressure valves and springs (Fig. 3).

CLEANING AND INSPECTION Clean master cylinder thoroughly, using a suitable solvent and dry with compressed air. Wash the cylinder bore with clean brake fluid and inspect for scoring or pitting. Master cylinder bore walls that have light scratches or show signs of corrosion, can usually be cleaned with crocus cloth. However, cylinder bores

Be sure the lip of cups enter bore evenly in order not to damage sealing qualities of cups. (Keep well lubricated with brake fluid.)

COVER

COVER RETAINING BOLT

COVER GASKET

COVER CLAMP

PISTON RETAINING SET SCREW AND GASKET PISTON SPRING CUP RETAINER SECONDARY CUP FRONT PISTON PRIMARY CUP

RESIDUAL PRESSURE VALVE SPRING TUBE SEAT

RESIDUAL PRESSURE VALVE

REAR PISTON ASSEMBLY SECONDARY CUP

THIN WASHER

MASTER CYLINDER BODY

"0" RING SECONDARY CUP

RETAINER SCREW

tteatt li PISTON RETAINER A

Ng. 4—Tandem Master Cylinder (Exploded View)

4

NP20B


5-12 MASTER CYLINDER PISTON SPRING

AIR PUBBLES

0 RING

WOODEN DOWEL

FRONT PISTON RETAINING SCREW AND GASKET

PISTON CUP

PISTON CUP FRONT PISTON NP21A

BLEEDING TUBES

Fig. 3—installing Front Piston and Spring

NPTIA

Rear Piston (1) Carefully work secondary piston cup over rear end of rear piston with lip of cup toward piston (Fig. 4). (2) Center spring retainer of rear piston assembly over shoulder of front piston. Push piston assemblies into bore up to center piston cup. Carefully work cup into bore then push piston in up to rear cup. Carefully work lip of rear cup into bore, then push in on piston until seated (Fig. 6). (3) Holding piston in seated position, move piston retainer over piston and tighten securely. (4) Install front piston retaining set screw and gasket in cylinder body and lighten securely (Fig. 1). (5) Install residual pressure valves and springs in outlet ports and install tube seats, firmly. BLEEDING MASTER CYLINDER Before installing the master cylinder on vehicle, it must be bled on the bench as follows: (1) Clamp master cylinder in a vise and attach bleeding tubes Tool C-4029 (Fig. 7). (2) Fill both reservoirs with approved brake fluid. (3) Using a wooden stick or dowel (power brake equipped vehicles) depress push rod slowly and allow the pistons to return under pressure of springs. Do this several times until all air bubbles are expelled. (Fig. 7). (4) Remove bleeding tubes from cylinder and install FRONT PISTON

REAR PISTON SPRING

PISTON Oa

11\ FRONT PISTON RETAINING SCREW AND GASKET

REAR PISTON ASSEMBLY

Fig. 6—Installing Rear Piston Assembly

NP22A

Fig. 7—Bleeding Master Cylinder cover and gasket. (As tubes are removed, fluid remaining in tubes will syphon out.) (5) Install cover retaining clamp and clamp screw. (6) Remove from vise and install master cylinder on vehicle as follows: INSTALLING MASTER CYLINDER (1) Install master cylinder on vehicle, aligning push rod with cowl panel opening (manual brakes) or power brake push rod with cylinder piston. (2) Slide over mounting studs. Install attaching nuts and tighten to 9 foot-pounds. Connect push rod to brake pedal. (3) Connect front and rear brake tubes and tighten to 150 inch-pounds. (4) Bleed brakes at wheel cylinders using regular procedure, being sure fluid level is maintained. (See Bleeding the Brake System.) TESTING MASTER CYLINDER Be sure that the master cylinder compensates at both ports. This can be done by applying the pedal lightly with the engine running (power brakes) and observing for a gyser of fluid squirting up in the reservoirs. This may only occur in the front chamber and so to determine if the rear compensating port is open, It will be necessary to pump up the brakes rapidly and, then, hold the pedal down. Have an observer watch the fluid in the rear reservoir while the pedal is raised. A disturbance in the fluid indicates that the compensating port is open. HYDRAULIC SYSTEM SAFETY SWITCH The hydraulic system safety switch (Figs. 8 and 9) is used to warn the vehicle operator that one of the hydraulic systems has failed. A failure in one part of the brake system does not result in failure of the entire hydraulic brake system. As an example, failure of the rear brake system will leave the front brake system still operative.


WHEEL CYLINDER 5-13 81111/11V1 44,

SPRING

\-4 OUTLET TO RIGHT FRONT BRAKE TUBE

FROM MASTER CYLINDER PORT STAMPED "F'' SWITCH BODY OUTLET TO LEFT FRONT BRAKE TUBE

A SAFETY SWITCH N

SAFETY SWITCH BODY ASSEMBLY SEAL

PISTON SEAL "0" RING SWITCH SEAL "0" RING

.VO

111101111111110041 pretrir., "se.

A

PLUG MOUNTING BRACKET

NP24

SWITCH ASSEMBLY PISTON ASSEMBLY FROM MASTER CYLINDER PORT STAMPED "R" OUTLET TO REAR BRAKE TUBE

INSERT

U.

PLUG

NPI 6A

Fig. 8—Hydraulic System Safety Switch (Sectional)

As pressure falls in one system, the other system's normal pressure forces the piston to the inoperative side contacting the switch terminal, causing a red warning light to come on in the instrument panel,

Fig. 9—Hydraulic System Safety Switch (Exploded View)

thus warning the operator of the vehicle that one of the systems has failed and should be repaired. The safety switch is mounted on the frame in a vertical position, with the brake tubes connected. (Fig, 8). If a malfunction occurs within the switch, disconnect tubes from body assembly and install a new assembly. The component parts of the switch body are not serviced. However, the terminal unit can be removed if a malfunction occurs and a new terminal unit installed. If a new body is installed, bleed the brake system.


WHEEL CYLINDERS INDEX Assembling Wheel Cylinders Disassembling Wheel Cylinders Installing Brake Supports

Page 14 13 15

Installing Wheel Cylinders Removing Brake Supports

Removing Wheel Cylinders

Page 14

15 13

GENERAL INFORMATION A piston stop (Fig. 3) is welded to the support plates to prevent the pistons from moving out far enough to lose brake fluid. The piston boots are of the press-on type and prevents moisture from entering the wheel cylinder. To perform service operations or inspections of the wheel cylinders, it will be necessary to remove the cylinders from the support plate and disassemble on the bench.

REMOVING WHEEL CYLINDERS Front or Rear

With all the brake drums removed, inspect the wheel cylinder boots for evidence of a brake fluid leak. Visually check the boots for cuts, tears, or heat cracks, and if any of these conditions exist, the wheel cylinders should be completely cleaned, inspected and

new parts installed. (A slight amount of fluid on the boot may not be a leak, but may be assembly fluid used at assembly. (1) In case of a leak, remove brake shoes, (replace if soaked with grease or brake fluid.) (2) Disconnect brake hose from brake tube at frame bracket (front wheels) or disconnect brake tube from wheel cylinder (rear wheels). (3) Disconnect brake hose from wheel cylinder (front). Remove wheel cylinder attaching bolts (front or rear), then slide wheel cylinder assembly out of support.

DISASSEMBLING WHEEL CYLINDERS Front or Rear

To disassemble the wheel cylinders, (Fig. 1) proceed as follows:


5-14 WHEEL CYLINDER REAR-HOUSING

FRONT-HOUSING

PY426

Fig. 1—Wheel Cylinders 10 and 11 Inch Brake (Front and Rear)

(1) Using a suitable tool, pry boots away from cylinders and remove. Remove push rods (if so equipped). (2) Press in on one piston and force out piston, cup, spring cup and piston. (3) Wash wheel cylinder, pistons, and spring in clean brake fluid or alcohol; clean thoroughly and blow dry with compressed air. Inspect cylinder bore and piston for scoring and pitting. (Do not use a rag as lint from the rag will adhere to bore surfaces.) Wheel cylinder bores and pistons that are badly scored or pitted should be replaced. Cylinder walls that have light scratches, or show signs of corrosion, can usually be cleaned with crocus cloth, using a circular motion. Black stains on the cylinder walls are caused by piston cups and will not impair operation of cylinder.

(4) Install hoots with push rods over ends of cylinder and press over ends until boot is seated against cylinder shoulder. Use care so as not to damage boot. INSTALLING WHEEL CYLINDERS Front or Rear

(1) Slide wheel cylinder into position on support (front or rear). Install mounting screws and torque to 220 inch-pounds. (2) Connect brake tube to rear wheel cylinder and torque to 115 inch pounds. Connect brake hose to front wheel cylinder, using a new gasket. Torque to 25 foot pounds, before attaching brake hose to frame bracket. Should hose be connected to wheel cylinder

ASSEMBLING WHEEL CYLINDERS Front or Rear

To assemble the wheel cylinders (Fig. 1) proceed as follows: Before assembling the pistons and new cups in the wheel cylinders, dip them in clean brake fluid. If the boots are deteriorated, cracked or do not fit tightly on the push rods (if so equipped) or shoe tang, as well as the cylinder casting, new boots must be installed. (1) Coat cylinder bore with clean brake fluid. (2) Install expansion spring in cylinder. Install cups in each end of cylinder with open end of cups facing each other. (3) Install pistons in each end of cylinder with recessed end of pistons facing open ends of cylinder.

CABLE ASSEMBLY

CABLE RETAINING CUP NF 596 Fig. 2—Removing Brake Cable from Support


PARKING BRAKES 5-15 last, tightening of the hose into wheel cylinder will twist hose, and can result in suspension or tire interference.

3. Connect brake line to brake hose and torque to 115 inch-pounds. REMOVING BRAKE SUPPORT (Front)

(11 Disconnect brake line from brake hose at frame bracket. (21 With wheel and brake drum removed, remove four support attaching nuts and washers. 13) Remove support and brake assembly from spindle. (Rear)

11) With wheel and brake drum removed. remove support attaching nuts and washers. (21 Remo% e rear axle shaft and retainer. (3) Disconnect hydraulic brake line from wheel cylinder. (41 Disengage brake cable from parking brake lever. (5) Using a suitable tool compress three flared legs of cable retainer and pull brake cable out of support (Fig. 3 /. (61 Remove brake support from rear axle housing. INSTALLING BRAKE SUPPORT (Front)

41 Place support plate on spindle and install attaching bolts, nuts, and washers. Tighten bolts that mount through support plate knuckle to 55 footpounds. The bolts that go through the support plate. knuckle, and steering arm must be torqued to 120 foot-pounds

Fig. 3—Wheel Cylinder Piston Stops (2) Connect brake hose to wheel cylinder and torque to 25 foot-pounds. before connecting brake hose to frame bracket Should hose be connected to wheel cylinder last, tightening of hose into wheel cylinder will twist hose, which can result in suspension or tire interference problems. 131 Connect brake line to brake hose and torque to

115 inch-pounds (4) Install brake drum and wheel bearings. Adjust bearings. Bleed and adjust brakes. (Rear) 11) Install

support onto rear axle housing. (21 Insert rear axle shaft and retainer into housing and install axle retainer nuts and washers. Tighten retainer nuts to 35 foot-pounds. ‘31 Attach brake line to wheel cylinder and tighten to 115 inch-pounds. 141 Insert parking brake c-able into support plate and attach cable to parking brake lever. 151 Install brake drum and wheel. Bleed and adjust brakes.


PARKING BRAKES

INDEX Adjusting Parking Brake General Information Installing Front Parking Brake Cable Installing Rear Parking Brake Cable

Page 16 15 17 16

Removing Front Parking Brake Cable Removing Rear Parking Brake Cable Service Diagnosis

Page 16 16 15

GENERAL INFORMATION The rear wheel service brakes also act as parking

The wheel brake cables are joined together by a for-

brakes. The brake shoes are mechanically operated by ward brake cable and equalizer extending to the a lever and strut connected to a flexible steel cable.

parking brake pedal or release handle, (Figs. 1 and 2).

SERVICE DIAGNOSIS Condition

DRAGGING BRAKE

Possible Cause

Correction

(a) Improper cable or brake shoe adjust- (a) Properly adjust service brakes then ment. adjust parking brake cable. (b) Broken brake shoe return spring. (b) Replace any broken return spring.


5-16 PARKING BRAKES Condition

Correction

Possible Cause

(c) Replace broken retainer spring. (d) itepiace grease seal or recondition wheel cylinders and replace both brake shoes. (e) Replace cables. Sticking or frozen brake cable. Broken rear spring. (f) Replace broken rear spring. Bent or rusted cable equalizer. (g) Straighten, or replace and lubricate equalizer. Heat set parking brake cable springs. (h) Replace parking brake cable.

(c) Broken brake shoe retainer spring. (a) urease or brake fluid soaked lining. (e) (f) (g) (h) BRAKE WILL NOT NOLO

(a) Broken or rusted brake cable. (b) Improperly adjusted brake or cable. (c) Soaked brake lining. (d) Rachet or pedal mechanism worn.

(a) (b) (c) (d)

Replace cable. Adjust brakes and cable as necessary. Replace brake lining. Replace pedal assembly.

SERVICE PROCEDURES

(1) Release parking brake lever and loosen cable adjusting nut to insure cable is slack, (Fig. 1). Before loosening cable adjusting nut, clean threads with wire brush and lubricate with grease. (2) Tighten cable adjusting nut until a slight drag is felt while rotating wheel, loosen cable adjusting nut until both rear wheels can be rotated freely, then back off cable adjusting nut two full turns. (3) Apply parking brake several times, then release and test to see that rear wheels rotate freely without dragging.

brake cable (rear) for installation of a new cable, see (Fig. 2) Wheel Cylinders. (1) With vehicle jacked up or on a suitable hoist, remove rear wheels. (2) Disconnect brake cable from equalizer. (3) Remove retaining clip from brake cable bracket. (4) Remove brake drum from rear axle. (5) Remove brake shoe return springs. (6) Remove brake shoe retaining springs. (7) Remove brake shoe strut and spring from brake support and disconnect brake cable from operating arm. (8) Compress retainers on end of brake cable housing and remove cable from support. (Fig. 2) Wheel Cylinders.

REMOVING REAR PARKING BRAKE CABLE

INSTALLING REAR PARKING BRAKE CABLE

The independent rear brake cables are attached to an equalizer, (Fig. 1). The front cable is adjusted at the equalizer. Should it become necessary to remove the parking

When installing a new brake cable, lubricate the cable with short fibre grease at the contact points.

ADJUSTING PARKING BRAKES The service brakes must be properly adjusted before adjusting the parking brake.

RIGHT REAR CABLE ASSEMBLY LEFT REAR CABLE ASSEMBLY

CABLE ADJUSTING NUJ PARKING BRAKE ASSEMBLY -

EQUALIZER CABLE ASSEMBLY ,, -

.SCREW & WA. ASSY.

RIGHT REAR C - ABLE BRACKET -Thil-1" RETAINER FRONT REAR Ar CABLE r ' % t CABLE ASSEMBLY FRAME TO SILL ASSEMBLY _.,-,- \-.. REAR EXHAUST REINFORCEMENT HANGER BRACKET VIEW B REAR ENGINE VIEW A NN558A CROSSMEMBER

Fig. 1 —Parking Brake Cable Routing

(1) Insert brake cable and housing into brake support plate making certain that housing retainers lock housing firmly into place. (2) Holding brake shoes in place on support plate, engage brake cable into brake shoe operating lever. Install parking brake strut and spring. (3) Install brake shoe retaining springs, and brake shoe return springs. (4) Install brake drum and wheel. (5) Insert brake cable and housing into cable bracket and install retaining clip. (6) Insert brake cable into equalizer. Note different size slot for corresponding cable and fitting. (7) Adjust service brakes and parking brake cable.

REMOVING FRONT PARKING BRAKE CABLE (1) Disengage front parking brake cable from equalizer bar. Refer to (Fig. 1). (2) Disengage cable from guide clip. (3) Using a screw driver force cable housing and


MIDLAND ROSS-POWER BRAKE 5-17 attaching clip out of body crossmember. (4) Fold back left front edge of floor mat and remove rubber cable cover from floor pan. (5) Depress parking brake pedal and work brake cable up and out of brake pedal linkage, (Fig. 2). (6) Using a screw driver force upper end of cable housing and clip down out of pedal assembly bracket. (7) Remove cable to floor pan clip and work cable and housing assembly up through floor pan.

PARKING BRAKE ASS

NUT

--r !\\

INSTALLING FRONT PARKING BRAKE CABLE (1) Insert rear end of brake cable and housing down through cable and routing hole in floor pan. (2) Push upper end of cable and housing assembly up through pedal assembly bracket and firmly attach housing and clip into bracket. (3) Depress parking brake pedal and insert end of cable into parking brake pedal clevis. (4) Insert cable through body crossmember and firmly press into housing and attaching clip. (5) Attach front cable to equalizer bar.

NUT & WASHER-121 BUMPER BOLT WASHER ASSEMBLY FRONT CABLE ASSEMBLY NN559 Fig. 2—Parking Brake Pedal

(6) Adjust service brakes and parking brake cable. (7) Apply brakes several times and test for free wheel rotation when parking brake is in "off" position.


MIDLAND ROSS POWER BRAKE (Single Diaphragm) INDEX Page 17 18

General Information Installing Power Brake

Page 18 17

Removing Power Brake Service Diagnosis

GENERAL INFORMATION The Midland Ross power brake, (Fig. 1) is located on the engine side of the dash panel. The front cover of the Power Brake Unit supports the master cylinder.

The power brake derives its power from the intake manifold vacuum and atmospheric pressure. It does not require a vacuum reservoir.

SERVICE DIAGNOSIS Possible Cause

Condition

DRAGGING BRAKES (ALL WHEELS)

Brake shoes improperly adjusted. Brake pedal linkage binding. Excessive hydraulic seal friction. Compensator port plugged. Fluid cannot return to master cylinder. (f) Parking brake not returning. (g) Disc brake metering valve malfunction.

(a) (b) (c) (d) (e)

Correction

(a) Adjust brakes. (b) Free up linkage. (c) Lubricate seal. (d) Clean out master cylinder. (e) tnspect pedat return. (f) Free up as required. (g) Replace metering valve.

GRABBING BRAKES

(a) Grease or brake fluid on linings.

(a) Inspect for a leak and replace lining as required.

PEDAL GOES TO FLOOR (OR ALMOST TO FLOOR)

(a) Self-adjusters not operating. (b) Air in hydraulic system.

(a) Inspect self-adjuster operations.. (b) Bleed brakes.


5-18 POWER BRAKE-MIDLAND ROSS PL TE

TANDEM MASTER CYLINDER (DRUM BRAKES) POWER BRAKE ASSEMBLY HOSE

CLAMP SEAL

CLAMP

SEAL LOWER PIVOT BOLT LEVER ASSEMBLY AND PUSH ROD NUT

NUT AND WAS ER ASSEMBLY CONNECTION

BRACKET ASSEMBLY

BUSHING LOWER PIVOT BOLT SCREW AND WASHER ASSEMBLY

BUSHING

VIEW A

SLEEVE

LEVER ASSEMBLY

NP280

Fig. 1—Power Brake and Master Cylinder (Drum Brakes) Condition

Correction

Possible Cause

Hydraulic leak. (c) Locate and correct leak. (d) Fluid low in master cylinder. (d) Add brake fluid. (e) Shoe hanging up on rough platform. (e) Smooth and lubricate platforms.

(C)

HARD PEDAL (POWER UNIT TROUBLE)

(a) (b) (c) (d) (e)

Faulty vacuum check valve. Collapsed or leaking vacuum hose. Plugged vacuum fittings. Leaking vacuum chamber. Diaphragm assembly out of place in housing. (f) Vacuum leak in forward vacuum housing.

(a) Replace check valve.

(b) Replace hose. (c) Clean out fittings. (d) Replace unit. (e) Replace unit.

(f) Replace unit.

SERVICE PROCEDURES REMOVING POWER BRAKE (1) Remove nuts attaching master cylinder to brake unit. Remove master cylinder. (Fig. 1).

(2) Disconnect vacuum hose from power brake. (3) From under instrument panel, remove nut and attaching bolt from power brake input push rod and brake pedal blade. Remove lower pivot retaining bolt. (4) Remove four power brake attaching nuts and washers. (5) Remove power brake and linkage from vehicle. INSTALLING POWER BRAKE (1) Install power brake assembly into dash and

tighten attaching nuts 150 inch-pounds. (2) Install master cylinder on power brake. Tighten mounting nuts to 100 inch-pounds. With power brake attached to dash panel and vacuum supplied to unit, the master cylinder should compensate (force jet of fluid up through front chamber compensation port). (3) Connect vacuum hose. (4) Using Lubriplate, or equivalent, coat the bearing surface of bolt that connects power brake pedal link with brake pedal linkage. Install bolt and nut. Tighten to 30 foot-pounds. (5) Check stop light operation. CAUTION: Do not attempt to disassemble brake booster as this unit will be serviced by Manufacturer's Service Station.


BENDIX—POWER BRAKE 5-19 CHECK VALVE

'S

DIAPHRAGM

(S k k_ 3 IS -1)

4

;Mt-"CC

MOUNTING STUDS

MASTER CYLINDER MOUNTING STUDS

PUSH ROD

DIAPHRAGM SPRING

NR161 Fig. 1—Power Brake Assembly (Bendix) Drum Brakes

POWER BRAKE–BENDIX (Single Diaphragm) GENERAL INFORMATION The single diaphragm type power brake (Fig. 1) is a self contained vacuum hydraulic power braking unit. It is of the vacuum suspended type which utilizes engine intake manifold vacuum and atmospheric pressure for its power. This type of units does not require a vacuum reservoir. The Bendix Power Brake Unit can be identified by the twist lock method of attaching the housing and cover together. The basic elements of the vacuum unit are as follows: A mechanically actuated control valve integral with the vacuum power diaphragms, controls the degree of power brake application or release in accordance

with the foot pressure applied to the valve operating rod through the brake pedal linkage. The control valve is of a single poppet type valve with the atmospheric port and a vacuum port. The vacuum port seat is a part of the valve body attached to the diaphragm assembly. The atmospheric port is a part of the valve plunger which moves within the valve housing and vacuum power diaphragm assembly. A hydraulic master cylinder which contains all of the elements of the standard brake master cylinder except for the special hydraulic push rod which is a part of the power brake.


5-20 POWER BRAKE-BENDIX SERVICE PROCEDURES REMOVING POWER BRAKE (1) Remove nuts attaching master cylinder to brake unit. Remove master cylinder from unit. (2) Disconnect vacuum line from check valve. (3) From under instrument panel, remove nut and bolt from power brake link and brake pedal. (On linkage type power brake, remove lower pivot bolt). (4) From under instrument panel remove four brake unit attaching nuts and washers. (5) Withdraw brake unit assembly from vehicle. INSTALLING POWER BRAKE (1) Install power brake and linkage assembly (if so equipped) into dash panel. Install attaching nuts and washers. Tighten nuts to 150 inch-pounds.

(2) Using Lubriplate, or equivalent, coat the bearing surface of bolt that connects power brake pedal link with brake pedal. Install bolt and nut. Tighten to 30 foot-pounds. Install lower pivot bolt (if so equipped). (3) Attach vacuum hose to check valve. (4) Install master cylinder on power brake. Tighten mounting nuts to 100 inch-pounds. With power brake attached to dash panel and vacuum supplied to unit, the master cylinder should compensate (force jet of fluid up through front chamber compensation port). (5) Inspect adjustment of stop light switch. CAUTION: Do not attempt to disassemble brake booster as this unit will be serviced by Manufacturer's Service Station.


POWER BRAKE—BENDIX (Tandem Diaphragm) GENERAL INFORMATION The tandem diaphragm type power brake (Fig. 1 or 2), is a self contained vacuum hydraulic power braking unit. It is of the vacuum suspended type which utilizes

engine intake manifold vacuum and atmospheric pressure for its power. This type of unit does not require a vacuum reservoir.

CHECK VALVE

PUSH ROD IIIIiIIIIIIlII

LINKAGE

TANDEM MASTER CYLINDER

BOOT

POWER BRAKES

Fig. I —Power Brake Assembly (Bendix) Disc Brakes

NR162


BENDIX-POWER BRAKE 5-21 CONNECTOR

H SE

CLAMP (2)

PLATE NUT AND WASHER ASSEMBLY

GA KET

POWER BRAKE UNIT ASSEMBLY

' CLIP

GASKET

ACTUATOR

NUT AND WASHER ASSEMBLY (4) NUT AND WASHER ASSEMBLY SCREW AND WASHER ASSEMBLY TANDEM MASTER CYLINDER (DRUM BRAKE)

NP293

Fig. 2—Power Brake Assembly (Bendix) Drum and Disc Brakes (426 Hemi Only)

The Bendix Power Brake Unit can be identified by the crimped edge method of attaching the housing and cover together. The basic elements of the vacuum unit are as follows; (a) The vacuum power chamber consists of a front and rear shell, a center plate, front and rear diaphragm, hydraulic push-rod and a vacuum diphragm return spring. (b) A mechanically actuated control valve integral with the vacuum power diaphragms, controls the degree of power brake application or release in accordance with the foot pressure applied to the valve

operation rod through the brake pedal linkage. The control valve is of a single poppet type valve with the atmospheric port and a vacuum port. The vacuum port seal is a part of the valve body attached to the diaphragm assembly. The atmospheric port is a part of the valve plunger which moves within the valve housing and vacuum power diaphragm assembly. (c) A hydraulic master cylinder which contains all of the elements of the standard brake master cylinder except for the special hydraulic push rod which is a part of the power brake.

SERVICE PROCEDURES washers. Tighten nuts to 150 inch-pounds. REMOVING POWER BRAKE (2) Using Lubriplate, or equivalent, coat the bear(1) Disconnect master cylinder from power brake ing surface of bolt that connects power brake pedal unit. link with brake pedal linkage. Install bolt and nut. (2) Disconnect vacuum line from check valve. Tighten to 30 foot-pounds. (Install lower pivot bolt, if (3) From under instrument panel, remove push rod so equipped.) nut and bolt from power brake and brake pedal. (On (3) Attach vacuum hose to check valve. linkage type power brake, remove lower pivot bolt.) (4) Install master cylinder on power brake. Tighten (4) From under instrument panel remove four mounting nuts to 100 inch-pounds. With power brake unit attaching nuts and washers. brake attached to dash panel and vacuum supplied to (5) Withdraw brake unit assembly from brake supunit, the master cylinder should compensate (force port bracket. jet of fluid up through front chamber compensation port). (5) Inspect adjustment of stop light switch. INSTALLING POWER BRAKE (1) Install power brake and linkage assembly (if so equipped) into dash panel. Install attaching nuts and

CAUTION; Do not attempt to disassemble brake booster as this unit will be serviced by Manufacturer's Service Station.


5-22 DISC BRAKE—KELSEY-HAYES

KELSEY-HAYES DISC BRAKE (FLOATING CALIPER) INDEX Assembling Caliper Bleeding Disc Brake Brake Shoe Installation Brake Shoe Removal Cleaning and Inspection Checking Braking Disc for Run-out and Thickness Disassembling Caliper Disc Brake Service Precautions General Information

Page 30 33 27 27 27-29 31 28 27 23

Installing Brake Disc and Hub Installing Caliper Metering Valve Proportioning Valve Refinishing (Refacing) Braking Disc Removing Braking Disc and Hub Removing Caliper from Vehicle Routine Maintenance-30,000 Miles Service Diagnosis Specifications

Page 33 30 26

34 33 32 28 26 22 39

SERVICE DIAGNOSIS Condition

Possible Cause

Correction

EXCESSIVE PEDAL TRAVEL

(a) Air, leak, or insufficient fluid in sys- (a) Check system for leaks and bleed. tem or caliper. (b) Warped or excessively tapered shoe (b) Install new shoe and linings. and lining assembly. (c) Excessive disc runout. (c) Check disc for runout with dial indicator. Install new disc. (d) Rear brake adjustment required. (d) Check and adjust rear brakes. (e) Loose wheel bearing adjustment. (e) Readjust wheel bearing to specified torque. (f) Damaged caliper piston seal. (f) Install new piston seal. (g) Improper brake fluid (boil). (g) Drain and install correct fluid. (h) Power brake malfunction. (h) Check and correct power unit.

BRAKE ROUGHNESS OR CHATTER (PEDAL PUMPING)

(a) Excessive thickness variation of brak- (a) Check disc for thickness variation ing disc. using a micrometer. (b) Excessive lateral runout of braking (b) Check disc for lateral runout with dial disc. indicator. Install new disc. (c) Rear brake drums out-of-round. (c) Regrind rear drums and check for out-of-round. (d) Excessive front bearing clearance. (d) Readjust wheel bearings to specified torque.

EXCESSIVE PEDAL EFFORT

(a) Brake fluid, oil or grease on linings. (a) Install new shoe linings as required. (b) Incorrect lining. (b) Remove lining and install correct lining. (c) Frozen or seized pistons. (c) Disassemble caliper and free up pistons. (d) Power brake malfunction. (d) Check and correct power unit.

PULL

(a) (b) (c) (d) (e) (f) (g) (h) (i) (j)

NOISE

Brake fluid, oil or grease on linings. (a) Install new shoe and linings. Unmatched linings. (b) Install correct lining. Distorted brake shoes. (c) Install new brake shoes. Frozen or seized pistons. (d) Disassemble caliper and free up pistons. Incorrect tire pressure. (e) Inflate tires to recommended pressures. Front end out of alignment. (f) Align front end and check. Broken rear spring. (g) Install new rear spring. Rear brake pistons sticking. (h) Free up rear brake pistons. Restricted hose or line. (i) Check hoses and lines and correct as necessary. Caliper not in the proper alignment (j) Remove caliper and reinstall. Check to braking disc. alignment.

Groan— Brake noise emanating when slowly releasing brakes (creep-groan) (a) Not detrimental to function of disc brakes—no corrective action required. (Indicate to operator this noise may be eliminated by slightly increasing or decreasing brake pedal efforts.)


KELSEY-HAYES—DISC BRAKE 5-23 Condition

Possible Cause

Correction

Rattle— Brake noise or rattle emanating at low speeds on rough roads, (front wheels only). (a) Shoe anti-rattle spring missing or not (a) Install new anti-rattle spring or poproperly positioned. sition properly. (b) Excessive clearance between shoe (b) Install new shoes and lining assemand caliper. blies. Scraping— (a) Mounting bolts too long.

(a) Install mounting bolts of correct length. (b) Readjust wheel bearings to correct specifications.

(b) Loose wheel bearings. FRONT BRAKES HEAT UP DURING DRIVING AND FAIL TO RELEASE

(a) Operator riding brake pedal. (b) (c) (d) (e) (f)

LEAKY WHEEL CYLINDER

(a) Instruct owner how to drive with disc brakes. Stop light switch improperly adjusted. (b) Adjust stop light to allow full return of pedal. Sticking pedal linkage. (c) Free up sticking pedal linkage. Frozen or seized piston. (d) Disassemble caliper and free up piston. Residual pressure valve in master (e) Remove valve. (See Fig. 15). cylinder. Power brake malfunction. (f) Check and correct power unit.

(a) Damaged or worn caliper piston seal. (a) Disassemble caliper and install new

seal. (b) Scores or corrosion on surface of (b) Disassemble caliper and hone cylincylinder bore. der bore. Install new seal.

GRABBING OR UNEVEN BRAKING ACTION

(a) Causes listed under "Pull." (b) Power brake malfunction.

BRAKING PEDAL CAN BE DEPRESSED WITHOUT BRAKING EFFECT

(a) Air in hydraulic system or improper (a) bleeding procedure. (b) Leak past primary cup in master cyl- (b) inder. (c) Leak in system. (c) (d) Rear brakes out of adjustment. (d) (e) Bleeder screw open. (e)

(a) Corrections listed under "Pull." (b) Check and correct power unit.

Bleed system. Recondition master cylinder. Check for leak and repair as required. Adjust rear brakes.

Close bleeder screw and bleed entire system.

GENERAL INFORMATION The Kelsey-Hayes single piston, floating caliper disc brake assembly (Fig. 1), consists of the hub and disc assembly, the caliper, shoes and linings, splash shield and adaptor. The cast iron braking disc has 40 (forty) cooling fins (or louvres) that are cast integrally between the two machined braking surfaces (Fig. 2). When the wheel is in motion, the rotation of the disc cooling fins supplies air circulation between the braking surfaces for efficient cooling of the disc and prolonged lining life. The braking disc is protected from road splash (inboard side) by a shield bolted to the steering knuckle and by the wheel and tire on the outboard side. The single piston caliper assembly floats through four rubber bushings on two steel guide pins threaded into the adaptor. Two of the bushings are inserted in the outboard portion of the caliper and two on the

aft. Two positioners installed over the guide pins, control the movement of the caliper along with the piston seal, and assists in maintaining proper shoe clearance and are also required to hold the inner bushing in place. The guide pins are also used to radially locate and restrain both shoes, while all of the braking force is taken by the caliper on the outboard shoe and machined lug (Fig. 9) on the adapter for the inboard shoe. The caliper is a one piece casting with the inboard side containing the single piston cylinder bore. The steel piston is 2-3/4 inches in diameter and is nickle and chrome plated for anti-corrosion and long wear. The square cut rubber piston seal is located in a machined groove in the cylinder bore and provides a hydraulic seal between the piston and the cylinder wall (Fig. 4). The adaptor is mounted to the steering

inboard girl° (Fig 2) Four marhinari ahntinantc on

knurklP hy two cparial nylnek bate (Fig. 5).

the adaptor, position and align the caliper, fore and

A moulded rubber dust boot installed in a groove in


5-24 DISC BRAKE-KELSEY-HAYES SHOE AND LINING CALIPER BUSKNG UN CALIPER)

BUSHING

30-35 FT LBS. ?IN

PISTON

Fig. 7—floating Caliper Assembly (Single Piston)

the cylinder bore and piston, keeps contamination from the cylinder wall and piston. The boot has a wiping lip (Fig. 6) that prevents contamination in the bore area. As the brake pedal is depressed, hydraulic pressure is applied against the piston. This force is transmitted to the inboard brake shoe and lining and the inboard braking surface of the disc. As force increases against the disc from the inner lining, the caliper assembly moves inboard, sliding on the guide pins, thus providing a clamping force on the disc. BUSHING

BLEED SCREW ADAPTOR POSITIONS

NIrtA Fig. 2—Floating Caliper Assembly (Sectional)

When the brake pressure is released, the piston seal (distorted by applied pressure) returns to its normal position, pulling the piston back to released position, while the two positioners force the caliper outboard to create a slight running clearance between outer shoe and the disc COOLING FINS (LOUVERS)

AND-RATTLE SPRING DISC BRAKE LINING

ADAPTOR

DISC

=c-1

SHOE

ADAPTOR

POSMONER

BUSHING

PIN

:ALP:2 POSiTIONER

LINING BLEEDER SCREW

Fig. 3—Floating Caliper Assembly (Sectional)

WASHER (PART OF BUSHING

NU3A


KELSEY-HAYES-DISC BRAKE 5-25

CALIPER WHEEL

I BOOT

SEAL

P:STON

Va*M.:424,W •MN.

SHOE AND LINING

BRAKING DISC

/1,11:4Az

sot "atwa+S

tr i ta

WHEEL STUD

MOUNTING BOLT

NNER stARING

SPINDLE ADAPTOR

MOUNTING BOLT

OW ER BEARING STEERING KNUCKL HUB

BRAKING DISC

NU4A

Fig. 4 -Disc Brake Assembly (Sectional)


5-26 DISC BRAKE—KELSEY-HAYES

Automatic adjustment is obtained by outward relocation of the piston as the inboard lining wears and the inward movement of the caliper as the outboard lining wears, thus maintaining correct adjustment at all times.

PISTON \ CYLINDER BORE PISTON SEAL BRAKE II PRESSURE ON

<=

PISTON SEAL BRAKE PRESSURE OFF

CALIPER HOUSING

METERING VALVE

All Kelsey-Hayes Floating Caliper disc brake equipped vehicles are equipped with a pressure metering valve. The valve is located on the left frame rail. The use of the metering valve is to better match the front disc brakes with the rear drum brakes on the vehicle. This results in improved braking and steering control on icy surfaces. ROUTINE MAINTENANCE-30,000 Miles Check Brake Lines, Hoses and Linings Raise all four wheels. Remove one of the front wheel and tire assemblies and inspect the braking disc, linings and caliper. Inspect front brake flexible hose for signs of cracking or deterioration. Replace brake hose if rubber cover is penetrated. (The wheel bearings should be inspected at this time and repacked if necessary). The caliper assembly must be removed in order to inspect the inner wheel bearing. (Refer to "Brake Shoe Removal" paragraph). Do not get oil or grease on the braking disc or linings. If the linings (pads) are worn to within .030 inch of the shoe, replace both sets of shoe and lining assemblies, (inboard and outboard) on the front wheels. It is necessary that both front wheel sets be replaced whenever a respective shoe and lining is worn beyond specifications or damaged. FLEXIBLE BRAKE HOSE CALIPER PIN BLEEDER SCREW CALIPER ASSEMBLY CALIPER PIN

CALIPER \ ADAPTOR SPLASH SHIELD ADAPTOR MOUNTING BOOS NU9

Fig. 5 —Disc Brake Caliper Mounting

DUST BOOT

NN473B

Fig. 6—Piston Seal Function for Automatic Adjustment

Check all brake tube connections for possible leaks. Install new flexible hoses as required. Check adapter plate to knuckle bolts for specified torque (75 to 100 foot pounds). Shoe and Lining Wear If a visual inspection does not adequately determine the condition of the lining, a physical check will be necessary. To check the amount of lining wear, remove the wheel anti tire assemblies, and the calipers. Remove the shoe and lining assemblies. (See "Brake Shoe Removal" paragraph). Three (3) thickness measurements with a micrometer should be taken across the center of the shoe and lining. One reading at each end and one reading in the center. When an assembly has been worn to a thickness of .180 inch, it should be replaced. If a shoe and lining does not require replacement, reinstall, making sure each shoe and postHoner is returned to their original positions. (See "Brake Shoe Installation" paragraph). It is normal for the inboard lining to show slightly more wear than the outboard. Brake Roughness The most common cause of brake roughness (or chatter) with disc brakes are excessive variation in disc thickness and/or excessive disc face runout. These can be easily checked with a dial indicator and a 2" micrometer (vernier type preferred). If either of the measurements are out of specification, the disc must be refinished or replaced. Refer to "Refinishing (Refacing) Braking Disc paragraph. Other less prevalent causes of roughness can be the use of some types of non-standard lining and extreme abrasion of the disc faces. Also, vehicles which stand unused for periods of time in areas of high humidity or salt air may incur rust on the disc which could cause a temporary brake surge and roughness. Normally however, this condition should correct itself after a short period of usage. If rust is severe enough roughness will not clear up and the disc must be resurfaced or replaced.


KELSEY-HAYES-DISC BRAKE 5-27 DISC BRAKE SERVICE PRECAUTIONS (1) Grease or any other foreign material must be kept off the caliper assembly, surfaces of the braking disc and external surfaces of the hub, during service procedures. Handling the braking disc and caliper should be done in such a way as to avoid deformation of the disc and scratching or nicking the brake linings (pads). (2) If inspection reveals that the square sectioned caliper piston seal is worn or damaged, it should be replaced immediately. (3) During removal and installation of a wheel and tire assembly, use care not to strike the caliper. (4) The front wheel bearing end play is important and must be within specifications. (5) Re sure vehicle is centered on the hoist before servicing any of the front end components to avoid

bending or damaging disc splash shield on full right or left hand turns. (6) Before vehicle is moved after any brake service work, be sure and obtain a firm brake pedal. (7) Dragging the brakes (common result of left foot application) should be avoided during vehicle operation. (8) The wheel, tire, hub and disc assembly cannot be removed as an assembly. The caliper assembly must be removed before removal of the hub and disc assembly. (9) As lining wears, reservoir level will go down. If fluid has been added between relines, then reservoir overflow may occur when the piston is pushed back into the new lining position. Overflowing can be avoided in this case by removal of a small amount of fluid before overflow occurs.

SERVICE PROCEDURES (1) Slowly and carefully push piston back into bore BRAKE SHOE REMOVAL until it is bottomed. Watch for possible reservoir over(1) Raise vehicle on a hoist or jackstands. flow. See Step 9 of "Disc Brake Service Precautions". (2) Remove front wheel covers, and wheel and tire (2) Install new inner guide pin bushings in caliper assemblies. (3) Remove caliper guide pins, positioners that attech caliper to adaptor and anti-rattle spring. (4) Remove caliper from disc by slowly sliding caliINNER SHO AND LININ per assembly out and away from braking disc (Fig. OUTER 7). Support caliper firmly so as not to damage flexible SHOE AND LINING POSITIONE. brake hose. sA ANTI-RATTLE m (5) Slide outboard shoe and lining assembly out of SPRING caliper. Slide inboard shoe and lining assembly out of adaptor (Fig. 8). (6) Remove outer bushings from caliper by pressing LALIPLR FIN ADAPTOR out of bore (Fig. 13), using a suitable tool. Discard bushings. (7) Slide inner bushings (flanged) off guide pins and discard. Remove positioners from guide pins and discard. CLEANING AND INSPECTION Check for piston seal leaks (evident by brake fluid in and around booth area and inboard lining) and for any ruptures of piston dust boot. If boot is damaged, or fluid is evident, it will be necessary to disassemble caliper assembly and install a new seal, boot, (and piston if damaged or corroded.) (Refer to "Disassembling Caliper Assembly" paragraph). Check the mating surfaces of the abutments on the caliper and adaptor. If corroded or rusty, clean surfaces with wire brush. Inspect braking surfaces of disc. BRAKE SHOE INSTALLATION When Installing new shoe and lining assemblies, it will be necessary to also install new positioners, inner bushings and outer bushings.

OUTER PUSHING CUTER BRAKE SI-I Ot "

; AND INING "

BPAIGNG DISC . .

INNER SHO AND LINING r

_Jar, J TER

\

NU 10A

Fig. 7—Removing

or Installing Caliper


5-28 DISC BRAKE—KELSEY-HAYES BRAKE SHOE AND LINING WW2

(7) Pump brake pedal several times until a firm pedal has been obtained. (81 Check and refill master cylinder reservoirs (if necessary) with approved brake fluid as required. (It should not be necessary to bleed the system after shoe and lining removal and installation). However, if a firm pedal cannot be obtained bleed the brake system as described in "Bleeding Brake System" paragraph. It may have been necessary to remove fluid to put in new linings as fluid is pushed back into master cylinder.

(9) Install wheel and tire assemblies and wheel covers. (10) Remove jackstands or lower hoist. SHAKE SHOE AND I/ . - LINING •!OJTER; BRAKING

NI) 11

Fig. 8—Removing or installing Brake Shoes and Lining

with flanged end on inboard side (Fig. 3). Compress flanges of outboard bushing in fingers and work into position in hole from the outboard side of caliper (Fig. 18). (3) Slide new shoe and lining assemblies into position in adaptor and caliper (Fig. 8), being sure that metal portion of shoe is fully in recess of caliper and adaptor. (4) Holding outboard lining in position, carefully slide caliper down into position in adaptor and over disc. Align guide pin holes of adapter, inboard and outboard shoes. (Fig. 3). (5) Install new positioners over guide pins with open ends toward outside, and with stamped arrows pointing upwards (Fig. 1). Install assembled guide pins through bushing, caliper, adaptor, inboard and outboard shoes into outer bushings in caliper and antirattle spring. (6) Press IN on end of guide pins and thread pin into adaptor, USING EXTREME CARE SO AS NOT TO CROSS THREADS. Tighten from 30 to 35 foot-pounds. Be sure tabs of positioners are over machined surfaces of caliper (Fig. 1).

REMOVING CALIPER FROM VEHICLE It will be necessary to remove the caliper to install a new piston seal and boot. (1) Raise vehicle on a hoist or jackstands. (2) Remove front wheel covers and wheel and tire assemblies. (3) Disconnect front brake flexible hose from tube at frame mounting bracket. Plug brake tube to prevent loss of fluid or prop brake pedal to any position below the first inch of travel. Disconnect hose from caliper. (4) Remove guide pins and positioners that attach caliper to adaptor. Carefully slide caliper out and away from disc and adaptor, while holding outboard shoe and lining assembly. Remove inboard shoe and lining from adaptor.

DISASSEMBLING CALIPER (1) Mount caliper assembly in a vise equipped with protector jaws (Fig. 10). (Caution: Excessive vise pressure will cause bore distortion and binding of piston). (2) Remove dust boot. (Fig. 11). (3) Using Tool C-4087, remove piston from caliper (Fig. 10). Care must be used so as not to scratch, burr or otherwise damage piston on onside diameter. To do so effects sealing qualities of piston. Draw piston straight out of its bore. If a piston becomes cocked removal is more difficult and piston or bore may be damaged. CAUTION: UNDER NO CONDITION SHOULD AIR PRESSURE BE USED TO REMOVE PISTON FROM BORE. PERSONAL INJURY COULD RESULT FROM SUCH PRACTICE. (4) Using a small, pointed, wooden or plastic stick, work piston seal out of its groove in piston bore (Fig. 12.) Discard old seal. Do not use a screwdriver or other metal tool for this operation, because of possibility of scratching piston bore or burring edges of seal groove. (5) Remove outer bushings from caliper by pressing out of bore, (Fig. 13) using a suitable tool. Discard bushings. (6) Remove inner bushing and discard. Remove bleeder screw.


KELSEY-HAYES--DISC BRAKE 5-29 ir

zit41 INNER BUSHING

tr!,

ojet4----BLEEDER SCREW

r

POSITIONER

ANTI-RATTLE SPRING OUTER BUSHING PIN SEAL

POSITIONER INNER BUSHING

PISTON

CALIPER

ADAPTER ---1 eiv

BUSHING OUTER

,

SHOE AND LINING

NU5A Fig. 9—Caliper Assembly (Exploded View)

CLEANING AND INSPECTION Clean all parts using alcohol or a suitable solvent and blow dry, using compressed air. Blow out all drilled passages and bores. (Whenever a caliper has been disassembled, and a new boot and seal must be installed at reassembly). Inspect the piston bore for scoring or pitting. Install a new piston if it is pitted, scored or the plating is severely worn. Bores that SPECIAL TOOL

show light scratches or corrosion, can usually be cleared with crocus cloth. However, bores that have deep scratches or scoring should be honed, using Tool C-4095, providing the diameter of the bore is not increased more than .002 inch. If the bore does not clean up within this specification, a new caliper housing should be installed. Black stains on the piston are caused by the piston seal and will do no harm. When using Hone C-4095, coat the stones and bore with brake fluid. After honing the bore, carefully clean the seal and boot grooves with a stiff non-metalic rotary brusW(Fig. 14). Use extreme care in cleaning the caliper after honing. Remove all dirt and grit by flushing the caliper

CALIPER

osti

CALIPER

SEAL PISTON NSTON

4,4 fig. 10—Removing Piston From Caliper

NU324

PISTON DUST BOOT

PISTO,N 30:E

, Ar,

/: - -----r

NU28

Fig. 11—Removing or Installing Piston Dust Boot


5-30 DISC BRAKE—KELSEY-HAYES WOODEN OR PLASTIC STICK

11

CALIPER

CALIPER

SPECIAI HONE PISTON BORE

PISTON SEAL

PISTON BORE I-f;ja

NO79

Fig. 12—Removing Piston Seal

with brake fluid; wipe dry with a clean, lintless cloth and then clean a second time in the same manner or until clean cloth shows no signs of discoloration.

ASSEMBLING CALIPER (1) Clamp caliper in vise (with protector jaws), (Fig. IQ). Caution: Excessive vice pressure will cause bore distertion and binding of piston.

(2) Dip new piston seal in lubricant (supplied with kit) Ucon 421145724 (or equivalent) and install in groove in bore. Seal should be positioned at one area in groove and gently worked around the groove, using clean fingers, until properly seated. NEVER USE AN OLD PISTON SEAL. (Be sure seal is not twisted or rolled). (Fig. 15). (3) Coat new piston boot with lubricant (as spedfled above) leaving a generous amount of lubricant inside of boot. Install in caliper by working into outer groove, using fingers only. (Boot will seem larger than diameter of groove, but will snap into place when properly positioned in groove. (Fig. 16). Using a forefinger, slide around inside of boot to be sure it is seated, or correctly installed. (4) Plug high pressure inlet to caliper and bleeder screw hole, then coat piston with a generous amount of lubricant (as specified above). With fingers spreading boot, work piston into boot and press down on piston. (The entrapped air below piston will force boot

Fig. 14—Honing Piston Bore

around piston and into its groove as piston is depressed). (Fig. 17). Remove plug, then carefully push piston down the bore until bottomed. Caution: Force must be applied uniformly to avoid cocking.

(5) Install new inner guide pin bushings in caliper with flanged end on inboard side (Fig. 3). Compress flanges of outboard bushing in with fingers and work into position in hole from the outboard side of the caliper (Pig. 18). Press IN on bushing, using finger tips or small plastic stick (Fig. 18) until seated. Be sure flanges extend over caliper casting evenly on both sides. Install bleeder screw. Before installing caliper assembly on vehicle, inspect braking disc. Conditions as described in "Checking Braking Disc for Runout and Thickness" paragraph. INSTALLING CALIPER

(1) Examine lining for wear damage, or fluid con-

CALIPER SEAL IN GROOVE

PISTON SEAL

NI.132 OUTER BUSHING

VOi

WOODEN OR PLASTIC STICK

Fig. IS—Installing Piston Seal

PISTON DUST BOOT

CALIPER

NIJ30

Fig. 13—Removing Outer Bushings

Fig. lb—Installing Piston Dust Boot


KELSEY-HAYES-DISC BRAKE 5-31 (8) Pump brake pedal several times until a firm pedal has been obtained.

(9) After bleeding caliper, check for fluid tightness under maximum pedal pressures. (Recheck master cylinder reservoir level). (10) Install wheel and tire assembly and tighten wheel stud nuts to 65 foot-pounds. This is important. Install wheel cover. (11) Remove jackstands or lower hoist. (12) Road test vehicle and make several stops to wear off any foreign material on the brakes and to seat the linings. The vehicle may pull to one side or the other if this is not done.

/ CT" cdA

NU34

Fig. 17—Instal1ing Piston (through boot)

tamination if its condition is found satisfactory it may be reused. If not usable both front brakes must be relined with new. If old lining is to be reused, be sure linings and positioners are installed in their original position. (2) Connect flexible brake hose to caliper and tighten securely. (3) Install new inboard shoe and lining adaptor (Fig. 8). Holding outboard shoe and lining in position in caliper, carefully slide caliper down into position in adaptor and over disc. Align pin holes of caliper, adaptor and inboard and outboard shoes. (4) Install positioners over guide pins with open ends toward outside and arrows pointing upwards. (Fig. 1). Install assembled guide pins through bushing, caliper, adaptor, inboard and outboard shoes and into outer bushings in caliper. (5) Press IN ON END GUIDE PINS AND THREAD PINS INTO ADAPTOR. USING EXTREME CARE $O AS NOT TO CROSS THREADS. Tighten from 30 to 35

foot-pounds. (Be sure tabs of positioners are over machined surfaces of caliper (Fig. 1). (6) Remove plug from brake tube and install flexible brake hose. Tighten securely. Avoid twisting hose. (7) With bleeder screw open, allow caliper to "gravity" fill with brake fluid, then close bleeder screw. (Be sure all air bubbles have escaped; replenish brake fluid in master cylinder. Bleed brakes as described under "Bleeding Brakes" paragraph. OUTER BUSHING PISTON INSTALLED

CHECKING BRAKING DISC FOR RUNOUT AND THICKNESS

(1) Mount dial indicator C-3339 on steering arm with plunger contacting disc approximately one (1) inch from edge of disc. (Fig. 19). (2) With wheel bearings adjusted to zero end play, check lateral runout. (Both sides of disc). Runout should not exceed .0025 inch. If runout is in excess of specification, install a new disc and hub assembly or reface disc, being careful not to remove more than .015 inch from each side of disc. Be sure and readjust wheel bearings after check. (3) Thickness variation of disc should be made in conjunction with runout. Measure thickness of disc at DISC

MICROMETER '

CALIPER

.

APPROXIMATELY 1 INCH FROM EDGE OF DISC -"ttni

ANTI-RATTLE SPRING ANTI. RATTLE SPRING

4;4 OUTER BUSHING DIAL INDICATOR

DUST BOOT

APPROXIN,,Alla NCR Er:C.,E 0' D SC

CALIPER

^41.1'2A NU35

Fig. 18—Installing Outer Bushings

Fig. 19—Checking Braking Disc Run-out and Thickness


5-32 DISC BRAKE—KELSEY-HAYES RRAKI NG DISC

DAMPER DISC THICKNESS

RUN OUT (MAX. ALLOWABLE) F. I. R.

is sadgearator jut

*

[LIVING TOOL

CUT I !NG

DAMPER

GRINDER ABRASIVE DISC

SURFACE FINISH MICRO INCHES

GRINDING NU36

TOTAL VARIATION IN THICKNESS (12 EQUAL POINTS) NU99

Fig. 20—Disc Specifications

twelve (12) equal points with a micrometer at a radius approximately one (1) inch from edge of disc. If thickness measurements vary by more than .0005 inch, disc should be removed and resurfaced or a new disc and hub assembly installed. (Fig. 19). (4) Light scoring and/or wear is acceptable if heavy scoring or warping is evident, the disc must be refinished or replaced (See Refinishing (Refacing) Braking Disc). If cracks are evident the hub and disc assem-

Fig.

21—Refacing Braking Disc

bly must be replaced.

REMOVING BRAKING DISC AND HUB (1) Raise vehicle on hoist or jackstands. Remove wheel cover and wheel and tire assembly. (2) Remove caliper assembly, as described under "Removing Caliper" paragraph, (but do not disconnect brake line). Suspend caliper from wire hook or loop to avoid strain on flexible hose. (3) Remove grease cap, cotter pin, nut lock, nut, thrust washer and outer wheel bearing. (4) Pull disc and hub off wheel spindle.


KELSEY-HAYES—DISC BRAKE 5-33 INSTALLING BRAKING DISC AND HUB

(1) Slide brake disc and hub assembly on spindle. (2) Install outer bearing, thrust washer and nut. (3) Tighten wheel bearing adjustment nut to 90 inch pounds while rotating disc and hub. Recheck disc runout as described previously. (4) Position lock nut on nut with one pair of slots in line with cotter pin hole. (5) Back off adjusting nut and lock assembly one slot. (6) Clean grease cap, coating inside with wheel grease (do not fill cap) and install cap. Clean both sides of braking disc with alcohol or suitable solvent. (7) Install caliper assembly, as described in "Installing Caliper" paragraph. REFINISHING (REFACING) BRAKING DISC

Before refinishing or refacing a braking disc, the disc should be checked and inspected for the following conditions: (1) Scoring, rust, impregnation of lining material and worn ridges. (2) Runout or wobble. (3) Thickness variation (Parallelism). (4) Dishing or distortion (Flatness). If a vehicle has not been driven for a period of time, the discs will rust in the area not covered by the lining and cause noise and chatter, excessive wear and scoring of the discs and lining. Wear ridges on the discs can cause temporary improper lining contact if ridges are not removed before installation of new lining (pads). Lining deposit on the disc, may cause erratic friction characteristics if new lining is installed without resurfacing or cleaning the disc. Excessive runout or wobble in a disc can increase

pedal travel due to piston knockback and increase seal bushing wear due to necessity of caliper to follow the disc wobble. Thickness variation in a disc can also result in pedal pulsation, chatter and surge due to variation in brake output when disc section is uneven. Dishing or distortion can be caused by extreme heat and abuse of the brakes. Resurfacing Braking Disc This operation can be used when the disc surface is rusty or has lining deposits. A sanding disc attachment will remove surface contamination without removing much material. It will generally follow variations in thickness which are in the disc. Refacing Braking Disc If scoring is deep, runout or thickness variation is beyond limits, or other distortion is apparent, the disc should be refaced on a brake lathe equipped for disc machining. (Fig. 21). After machining a disc, a grinder may be used to remove tool marks. A new disc and hub assembly should be installed if the old one cannot be refaced to bring it within specifications without removing an excessive amount of material. Do not remove more than .050 inch per disc. Brake operation may be affected if an excess of material is removed. Both sides of the braking surface should be machined or ground when servicing since small variations in resurfacing machines may cause the newly finished surface to be out of parallel with the opposite unfinished side resulting in a thickness variation beyond acceptable limits. Disc brakes are very sensitive to thickness variation. The following chart and (Fig. 20) shows the location and tolerances of required specifications when servicing the braking disc:

Brake Design

Thickness

Minimum Thickness

Thickness Variation

Runout

Micro Finish

Kelstar Kelsey-Hayes

1.000-1.010

0.980

.0005

.0025"

15-80

CAUTION:

When refacing a braking disc (Fig. 21), the manufacturers of the refacing equipment instructions should be followed closely, and the correct brake disc mounting adaptors must be used to obtain the required specifications. BLEEDING DISC BRAKE

The disc brake hydraulic system can be bled manually or with pressure bleeding equipment. On disc brake equipped vehicles, the brake pedal will require more pumping, and frequent checking of the fluid level in the master cylinder during the bleeding

operation. Never use brake fluid that has been drained from the hydraulic system, when bleeding the brakes.

On vehicles equipped with disc brakes, be sure that the disc brake pistons are returned to their normal positions and that the shoe and lining assemblies are properly seated. Before driving the vehicle, check the operation of the brakes to be sure that a firm pedal has been obtained. (1) Raise vehicle using a hoist or jackstands. (2) Bleed brakes in usual manner, starting with right rear, then proceeding to left rear, right front and left front in order.


5-34 MASTER CYLINDER REAR BRAKE LINE

"FROMfl FRAME '7" AND MASTER' CYLINDER LINE OWER BRAKE

•-hgr.r.t,"e PROPORTIONING "rz VALVE

TANDEM MASTER CYLINDER

Fig. 23—Proportioning Valve OUTLET PRESSOR

LINE TO FRONT BRAKES

LINE TO FRAME "T" AND REAR BRAKES

NRI63A

Fig. 22—Checking Proportioning Valve

After bleeding the brakes, proceed as follows: (1) Remove jackstands or lower hoist. (2) Test drive vehicle to be sure brakes are operating correctly and that pedal is solid.

TESTING PROPORTIONING VALVE When a premature rear wheel slide is obtained on brake application, it usually is an indication that the fluid pressure to the rear brakes is above the 50% reduction ratio for the rear line pressure and that a malfunction has occurred within the proportioning valve, which should be tested. To test the proportioning valve, proceed as follows: (1) Install one of Gauge Set C4007 and "T" in brake line between master cylinder and proportioning valve and remaining Gauge and "T" at output end of

proportioning valve and brake line. (Fig. 19). Be sure all joints are fluid tight. (2) Have a helper exert pressure on brake pedal (holding pressure). Obtain a reading on master cylinder output of approximately 500 p.s.i. (3) While pressure is being held as above, reading on valve outlet Gauge should be 360405 p.s.i. If proportioning valve pressure readings do not meet specifications, the valve should be removed and a new valve installed. Balancing Front Wheels (Disc Brake Equipped Vehicles)

To balance front wheels on a disc brake equipped vehicle, the normal procedure for static balancing as described under "Wheel Balance" in the Wheels, Bearings and Tires Section of this manual should be followed. Dynamic balancing of front wheels can be accomplished by the normal procedure when wheels are removed from the vehicle, but Manufacturer's recommendations should be followed closely when attempting to balance wheels while on th


MASTER CYLINDER (Disc Brakes) INDEX Bleeding Master Cylinder Cleaning and Inspection Disassembling Master Cylinder General Information Hydraulic System Safety Switch Installing Master Cylinder

Page 36 35 35 34 37 37

Page Master Cylinder Removal Reassembling Master Cylinder Testing Master Cylinder Testing Hydraulic System Safety Switch Pressure Metering Valve

35 36 37 38 38

GENERAL INFORMATION

1/8 inch bore) is of the compensating type with the reservoirs cast integrally. The master cylinder consists of a front and rear pinion (in tandem) two outlets, with 1 containing a residual pressure valve and spring (rear brake line outlet only) (Fig. 3). The front outlet tube from the master cylinder is The tandem master cylinder (Fig. 1) (1 and

connected to the hydraulic system safety switch (Figs. 8 or 9) and thence to the rear brakes. The rear out-

let tube from the master cylinder is also connected to the safety switch and the front brakes. The master cylinder used on vehicles not equipped with power brake units is serviced in the same manner as the master cylinder with power brakes with one


MASTER CYLINDER 545

exception, the master cylinder for power brakes does not include the push rod. The drum brake master cylinder is different than

the disc brake master cylinder and is covered in the service brake section of this group.

SERVICE PROCEDURES MASTER CYLINDER REMOVAL

(1) Disconnect front and rear brake tubes from master cylinder and install a plug in rear outlet. (The residual pressure valve in front outlet will keep cylinder from draining). (2) Disconnect pedal push rod (standard brakes) from brake pedal. (3) Remove nuts that attach master cylinder to cowl panel and/or power brake unit (if so equipped). (4) Slide master cylinder straight out f rom cowl panel and/or power brake unit (if so equipped). DISASSEMBLING MASTER CYLINDER

To disassemble the master cylinder, (Figs. I and 4), clean the outside of the master cylinder thoroughly. (1) Press bail to one side and remove cover and gasket. Empty brake fluid from reservoirs. (2) Remove piston retaining screw and gasket (Fig. 2), then slide rear piston assembly out of cylinder bore. (3) Upend master cylinder and tamp (open end down) on bench to remove front piston and spring. If front piston sticks in bore of cylinder, use air pressure to force piston out of cylinder. New cups must

from front outlet (rig. 3). (7) Remove rubber cups from pistons after noting position of cup lips. Do not remove center cup of rear piston. If cup is damaged or worn, install a new rear piston assembly. CLEANING AND INSPECTION

Clean master cylinder thoroughly, using a suitable solvent and dry with compressed air. Wash the cylinder bore with clean brake fluid and inspect for scoring or pitting. Master cylinder bore walls that have light scratches or show signs of corrosion, can usually be cleaned with crocus cloth. However, cylinder bores that have deep scratches or scoring may be honed, providing the diameter of the bore is not increased more than .002 inch. If master cylinder bore does not clean up at .002 inch when honed, the master cylinder should be discarded and a new master cylinder installed.

CONNECTION TO REAR BRAKE TUBE

TUBE SEAT

be installed at reassembly If air pressure is used.

(4) Remove front piston compression spring from bore. (5) Using Tool '1-109-178 (or an easy out) remove tube seats by threading tool firmly into seat, tapping tool gently with a hammer (Fig. 2). Discard seats. (6) Remove residual pressure valve and spring

TUBE SEAT CONNECTION TO FRONT BRAKE TUBE SPECIAL TOOL

COVER

BAIL

NP36

Fig. 2—Removing Tube Seats

GASKET TAB

MASTER CYLINDER BODY

TUBE SEAT

OUTLET TO REAR BRAKES OUTLET TO FRONT BRAXES REAR PISTON ASSEMBLY

Fig. I —Tandem Master Cylinder

NR37 NP35

RESIDUAL PRESSURE VALVE AND SPRiNG !REAR BRAKE CONNECTION ONLY)

Fig. 3—Removing or installing Residual Pressure Valve and Spring


5-36 MASTER CYLINDER If master cylinder pistons are badly scored or corroded, replace them with new ones. The piston cups and seals should be replaced when reconditioning a master cylinder. When overhauling a master cylinder, use all parts furnished in repair kit. Discard all used rubber parts.

REASSEMBLING MASTER CYLINDER Front Piston Before assembling master cylinder, dip all component parts in clean brake fluid and place on a clean shop towel or paper (assembling seals dry, can ruin them). (1) Slide thin washer over stem of front piston, followed by primary cup. (Be sure lip is away from piston.) (Fig. 4). (2) Carefully work seal cup over rear end of piston and into second land. (Be sure lip of cup is facing front of piston.) (Fig. 4). (3) Carefully work secondary piston cup over piston and into rear land. The lip must be facing toward rear (Fig. 4). (4) Position small end of pressure spring into retainer, then slide assembly into bore of cylinder (Fig. 5). Be sure cups enter bore evenly in order not to damage sealing quality of cups. Keep well lubricated with brake fluid.)

Rear Piston (I) Carefully work secondary cup over rear end of rear piston with lip of cup toward front (Fig. 4). (2) Center spring retainer of rear piston assembly over shoulder of front piston. Push piston assemblies into bore. Carefully work lips of cups into bore, then seat piston assemblies (Fig. 6). (3) Holding pistons in seated position, install piston retaining strew and gasket. Tighten securely (Fig. 6). (4) Install residual pressure valve and spring (Fig. 3) in front brake outlet, then install tube seats firmly. (When the bleeding tubes are attached, the tube seats will be positioned correctly.)

BLEEDING MASTER CYLINDER Before installing master cylinder on vehicle, it must be bled on bench as follows: (1) Clamp master cylinder in a vise and attach bleeding tubes Tool C4029 (Fig. 7). (2) Fill both reservoirs with approved brake fluid. (3) Using a wooden stick or dowel (power brake equipped vehicles) depress push rod slowly. (Note air bubbles.) Allow pistons to return under pressure of springs. Do this several times or until bubbles cease to appear (Fig. 7).

COVER

GASKCI• RESIDUAL PRESSURE VALVE MASILR CYLINDLR BODY

c-sre

ER(..)NI PiSroN SPRING SEAT PRIMARY CUP FRONT PISTON

PRIMARY CUP

SECONDARY CUP TUBE SEAT

WASHER SECONDARY CUP

WASHER REAR PiSION SET SCREW

SEAL Cu? REAR PiSTON ASSEmBLY

NP38A

Hg. 4—Tandem Master Cylinder (Exploded View)


MASTER CYLINDER 5-37 BUBBLES WOODEN STICK OR DOWEL

4••

L,

BLEEDING TUBES

l;."61f9p

NP33A

Fig. 7—Bleeding Master Cylinder

TESTING MASTER CYLINDER

NP39

Fig. S—Installing Front Piston and Spring

(4) Remove bleeding tubes from cylinder and install plug in rear outlet. (As tubes are removed, fluid remaining in tubes will syphon out.) (5) Place cover and gasket over reservoirs and secure with bail. (6) Remove master cylinder from vise and install on vehicle as follows:

INSTALLING MASTER CYLINDER (1) Install master cylinder on vehicle, aligning push rod with cowl panel opening (Manual) or power brake push rod with master cylinder piston. (2) Slide over mounting studs. Install attaching nuts and tighten to 9 foot-pounds. (3) Connect front and rear brake tubes and tighten to 150 inch-pounds. (4) Bleed brakes at, wheel cylinder°, uoing regular procedure, being sure fluid level is maintained. (See "Bleeding Brake System".)

Re sure that the master cylinder compensates at both ports. This can be done by applying the pedal lightly with the engine running (power brakes) and observing for a gyser of fluid squirting up in the reservoirs. This may only occur in the front chamber and so to determine if the rear compensating port is open, it will be necessary to pump up the brakes rapidly and then hold the pedal down. Have an observer watch the fluid in the rear reservoir while the pedal is raised. A disturbance in the fluid indicates that the compensating port is open.

HYDRAULIC SYSTEM SAFETY SWITCH The hydraulic system safety switch (Figs. 8 and 9) is used to warn the vehicle operator that one of the hydraulic systems has failed. A failure in one part SPRING

FROM MASTER CYLINDER PORT STAMPED "F" SWITCH BODY

OUTLET TO RIGHT

OUTLET TO LEFT FRONT BRAKE TUBE

BRAKE TUBE

PISTON SEAL "0" RING SWITCH SEAL "0" RING

46IMF: ," 4 2M \ \XI

ME111\11611V1R1 ‘96

FRONT PISTON

SWITCH ASSEMBLY PISTON ASSEMBLY FROM MASTER CYLINDER PORT STAMPED "R"

REAR PISTON SET SCREW AND GASKET OUTLET TO REAR BRAKE TUBE

INSERT

REAR PISTON ASSEMBLY

NP40

PLUG

Fig. 6 Installing Rear Piston Assembly

NPI6A

Fig. 8—Hydraulic System Safety Switch (Sectional)


5-38 MASTER CYLINDER SAFETY SWITCH

—ThLEFT FRONT BRAKE TUBE FITTING

N.1 SAFETY SWITCH BODY ASSEMBLY

TO SAFETY WARNING LIGHT SWITCH

SEAL BODY RIGHT FRONT BRAKE TUBE FITTING

zn

,PLUG

MOUNTING BRACKET

MOUNTING RRACKET Np24

Fig. 9—Hydraulic System Safety Switch

(Exploded View) of the brake system does not result in failure of the entire hydraulic brake system. As an example, failure of the rear brake system will leave the front brake system still operative. As pressure falls in one system, the other system's normal pressure forces the piston to the inoperative side; contacting the switch terminal, causing a red warning light to come on in the instrument panel, thus warning the operator of the vehicle, that one of the systems has failed and should be repaired. The safety switch is mounted on the frame in a vertical position, with the brake tubes connected, as shown in (Fig. 8). If a malfunction occurs within the switch, disconnect tubes from body assembly and install a new assembly. The component parts of the switch body are not serviced. However, the terminal unit can be removed If a malfunction occurs, and a new terminal unit installed. If a new safety switch body assembly is installed, bleed the brake system. TESTING HYDRAULIC SYSTEM SAFETY SWITCH The brake warning light flashes only when the parking brake is applied with the ignition key turned "ON". The same light will also illuminate should one of the two service brake systems fail when the brake pedal is applied. To test the system turn the ignition key "ON", and apply the parking brake. If the light fails to light, inspect for a burned out bulb, disconnected socket, a broken or disconnected wire at the switch. To test the service brake warning system, raise the car on a hoist and open a wheel cylinder bleeder while a helper depresses the brake pedal and observes the warning light. Tithe light fails to light, inspect for a burned out bulb, disconnected socket, a broken or disconnected wire at the switch. U the bulb is not burned out and the wire continuity is proven, re-

DUST SEAL VALVE STEM

NPI051A

Fig. 1—Metering Valve Assembly place the brake warning switch in the brake line Tee fitting mounted on the frame rail in the engine compartment below the master cylinder. PRESSURE METERING VALVE All disc brake vehicles are equipped with a pressure metering valve (Figs. 1 and 2). The valve is located on the left frame rail. The use of the metering valve is to better match front disc brakes with the rear drum brakes, resulting in improved braking and steering control on icy surfaces. Due to operating characteristics of the valve, which causes complete shut-off of the flow of brake fluid between approximately 3 and 135 pai, front brake bleeding procedures should be done as follows: (1) Gravity Bleed: This method of bleeding is not effected by the metering valve, as fluid pressures are always below 3 psi. Remove master cylinder reservoir cover and gasket, then fill reservoirs with approved brake fluid. Open disc brake bleeder screws, and allow TO MASTER CYLINDER BRAKE TUBE ASSEMBLY-FRONT FRONT BRAKE TUBE (RIGHT) METERING VALVE FRONT BRAKE TUBE(LEFT) —PROPORTIONING VALVE MASTER CYLINDER TO REAR TEE AND SAFETY . BRAKE HOSE SWITCH

TO MASTER CYLINDER BRAKE TUBE -

ASSEMBLY-REAR

di) Fig. 2—Motoring Valve Mounting

PY425


SPECIFICATIONS 5-39 fluid and air to drain until stream of fluid is free of air. (2) Pedal Bleed: This method of bleeding is not effected by the metering valve, as fluid pressures are in excess of 135 psi. Follow normal procedure of pumping pedal and opening bleeder screws. Do not pump master cylinder dry! (3) Pressure Bleed: This

method of bleeding is influenced by the metering valve. Bleed pressure, which is normally about 35 psi, is high enough to cause the metering valve to close, stopping the flow of fluid to the front brakes. However, the valve can be held open manually by using Tool C-4121, to pull the valve stem down. CAUTION: Under no condition should a rigid clamp, wedge or block be used to depress the valve stem as

this can cause an internal failure in the valve, resulting in complete loss of front brakes.

It should be noted that the pressure release valve stem is in its uppermost position when there is no pressure present. No attempt should be made to further depress the valve stem. Checking Metering Valve (1) A slight "bump" can be felt by the foot as the brake pedal is stroked. This bump will occur after the pedal has been stroked about 1 inch. (2) A visual check will show that the valve stem extends slightly when the brakes are applied and retracts when the brakes are released. (3) In case of a metering valve malfunction, remove valve and install a new one.

SPECIFICATIONS BRAKES—SERVICE AND PARKING Coronet-Charger Type DRUM DIAMETER (Heavy Duty) NUMBER OF BRAKE SHOES WIDTH (Standard) Front Rear (HEAVY DUTY) Front Rear BRAKE LINING (10-INCH)

Duo-Servo Single Anchor 10" 11" 8

V-6 & 1133. at Sub. Duo-Servo Single Anchor 10" 11" 8

2-1/2" 1-3/4"

2-1/2" 2-1/2"

3" 2-1/2" Extruded and Moulded Asbestos-Bonded 8-1/2" 11" 8-1/2" 11"

3" 2-1/2" Extruded and Moulded Asbestos-Bonded 8-1/2" 11" 8-1/2" 11"

9-1/4" 12-1/8" 9-1/2" 12-1/8" 3/16" 1/ 4"

9-1/4" 12-1/8" 9-1/4" 12-1/8" 3/16" 1/ 4"

1-3/16" 15/16" 1"

1-3/16" 15/16" 1"

6 Cyl.

Front Primary Front Secondary Rear Primary Rear Secondary BRAKE LINING (11 INCH) Front Primary Front Secondary Rear Primary Rear Secondary Thickness Primary Secondary WHEEL CYLINDER Front Wheel Cylinder Bore Rear Wheel Cylinder Bore MASTER CYLINDER BORE

KELSEY-HAYES DISC BRAKE (Floating Caliper) Type of Brake Location Master Cylinder Metering Valve Location Brake Adjustment Residual Valve Location (Rear Brakes Only) CALIPER ASSEMBLY Shoe and Lining Removal

Floating Caliper Front Wheels Only Horizontal Tandem (Dual) Left Front Frame Rail None Required In Master Cylinder Outlet

Bottom, Caliper Removed


SPECIFICATIONS BRAKES—SERVICE AND PARKING Coronet-Charger

6 Cyl.

Type DRUM DIAMETER (Heavy Duty) NUMBER OF BRAKE SHOES WIDTH (Standard) Front Rear (HEAVY DUTY) Front Rear BRAKE LINING (10-INCH) Front Primary Front Secondary Rear Primary Rear Secondary BRAKE LINING (11 INCH) Front Primary Front Secondary Rear %Primary Rear Secondary Thickness Primary Secondary WHEEL CYLINDER Front Wheel Cylinder Bore Rear Wheel Cylinder Bore MASTER CYLINDER BORE

V-8 & H.D. & Sub.

Duo-Servo Single Anchor 10" 11" 8

Duo-Servo Single Anchor 10" 11" 8

2-1/2" 1-3/4"

2-1/2" 2-1/2"

3" 2-1/2" Extruded and Moulded Asbestos-Bonded 8-1/2" 11" 8-1/2" 11"

3" 2-1/2" Extruded and Moulded Asbestos-Bonded 8-1/2" 11" 8-1/2" 11"

9-1/4" 12-1/8" 9-112" 12-1/8" 3/16" 1/ 4"

9-1/4" 12-1/8" 9-114" 12-1/8" 3/16" 1/ 4"

1-3/16" 15/16" 1"

1-3/16" 15/16" 1"

KELSEY-HAYES DISC BRAKE (Floating Caliper) Type of Brake Location Master Cylinder Metering Valve Location Brake Adjustment Residual Valve Location (Rear Brakes Only) CALIPER ASSEMBLY Shoe and Lining Removal

Floating Caliper Front Wheels Only Horizontal Tandem (Dual) Left Front Frame Rail None Required In Master Cylinder Outlet Bottom, Caliper Removed


5-40 TIGHTENING REFERENCE Number of Pistons Piston Diameter Piston Bore Diameter Maximum Allowable (After Honing) Piston Seal Dust Boot Bleeder Screw Location BRAKING DISC Type Diameter (Outside) (Inside) Disc Run-out (Maximum Allowable) T.I.R Disc Surface Finish Disc Thickness Disc Parallelism (Total Variation in Thickness) BRAKE SHOE AND LINING Type Lining Thickness Wide Long Braking Area Maximum Wear (Minimum Thickness Allowed) MASTER CYLINDER Piston Bore Diameter Maximum Bore Diameter Allowable (After Honing) Residual Valve DISC SPLASH SHIELD Type Mounting WHEELS Type Diameter

1 Each Unit 2-3/4" (2.751"-2.753") 2.757" Moulded Rubber (Square Section) .126" Wide-120" Radial Thickness Moulded Rubber (External) 1 Per Unit Inner Housing 3/8" Ventilated Cast Iron 11.75" 7.725" .0025" 15 to 80 Micro Inches 1.000-1.010 .0005" Bonded .460" (Nominal) 1.80" (At Center) 6.02" 10.0" Not less than .030" Lining at any point or a minimum shoe and lining thickness of .180" 1-1/8" .002" O.S. Rear Brakes Only Vented-Stamped Steel 3 Bolts to Knuckle Drop Center 14x5.00-14x6.00

TIGHTENING REFERENCE POWER BRAKE TIGHTENING REFERENCE Power Brake Pedal Link to Brake Pedal Linkage Bolt Nut Master Cylinder Mounting Nuts Power Brake to Dash Panel Nuts

30 Foot Pounds 100 Inch Pounds 150 Inch Pounds


GROUP 6

CLUTCH CONTENTS CLUTCH—SERVICING CLUTCH HOUSING ALIGNMENT CLUTCH PEDAL FREE PLAY CLUTCH RELEASE BEARING CLUTCH RELEASE FORK PILOT BUSHING—CRANKSHAFT TO TRANSMISSION DRIVE PINION GENERAL INFORMATION

Page 3

8 3 6 6 6

The clutches used on all models are a single, dry disc type (Figs. 1 and 2), with no adjustment for wear being provided in the clutch itself. The clutch pedal linkage, however, is provided with an adjustable rod to maintain specified pedal free play. The three pressure plate release levers are preset during manufacture and no attempt should be made to adjust them in service. The clutch sizes for the various car models are described in specification charts at end of this sect ion. The Semi-Centrifugal type clutch (Fig. 2), combines the feature of low pedal effort with that of a clutch capable of transmitting the full torque of the engine. Some models have centrifugal rollers assembled between the pressure plate and cover. These rollers

GENERAL INFORMATION SERVICE DIAGNOSIS SERVICE PROCEDURES SPECIFICATIONS STEAM CLEANING PRECAUTIONS TIGHTENING REFERENCE TORQUE SHAFT AND BEARINGS

Page

1 2 3 9 9 10 7

are provided to increase the normal load on the disc assembly al, higher engine speeds. As the engine speed increases, the centrifugal force of the rollers causes them to act as wedges between the cover and pressure plate and exert greater force against the disc.

Clutch Pedal and Bracket (Fig. 3) The clutch pedal is connected to the torque shaft through a vertically positioned rod. A non-adjustable over-center spring is provided between the pedal and the pedal bracket to allow easy clutch pedal operation. The upper end of the clutch pedal pivots in the pedal bracket on two needle bearings or nylon bushings. These bearings do not require periodic lubrication.

Disc

NR179

Fig. 1—Clutch Disassembled


6-2 CLUTCH PLATE COVER

PRESSURE SPRING

cs ROLLER RELEASE BEARING

eot, »OP

,

SLEEVE

• DISC

,

PIN EYEBOLT RELEASE LEVER STRUT RELEASE LINER SPRING

EYEBOLT NUTS

NY7OA

Fig. 2—Clutch Disassembled (Semi Centrifugal)

SERVICE DIAGNOSIS Correction

Possible Cause

Condition CLUTCH CHATTER

(a) Worn or damaged disc assembly. (b) Grease or oil on disc facings. (c) Improperly adjusted cover assembly.

(a) Replace disc assembly. (b) Replace disc assembly. (c) Replace clutch assembly.

CLUTCH SLIPPING

(a) Burned, worn, or oil soaked facings. (b) Insufficient pedal free play. (c) Weak or broken pressure springs.

(a) Replace disc assembly. (b) Adjust release fork rod. (c) Replace clutch assembly.

DIFFICULT GEAR SHIFTING

(a) Excessive pedal free play. (b) Worn or damaged disc assembly. (c) Improperly adjusted cover assembly.

(a) Adjust release fork rod. (b) Replace disc assembly. (c) Replace clutch assembly. NUT

SEALING WASHER 12) STUD PLATE

PEDAL BRACKET

et/NUT AND WASHER 0> PEDAL STOP

PIN .

BEARING (8-CYL. AND 6-CYL Ai'SEAL HEAVY DUTY)

••.:7

BUSHING (6-CYL.) 1:7 5 SPRING WASHER

PEDAL SHAFT.

BOLT

OVER-CENTER SPRING BOOT PEDAL

,40 PEDAL ROD

Fig. 3—Clutch Pedal and Linkage (Coronet-Charger)


CLUTCH 6-3 Condition

Possible Cause

Correction

(d) Clutch disc splines sticking. (a) (b) (c) (d) (e) (f)

CLUTCH NOISY

(d) Remove disc assembly and free up splines or replace disc. Dry clutch linkage. (a) Lubricate where necessary. Worn release bearing. (b) Replace release bearing. Worn disc assembly. (c) Replace disc assembly. Worn release levers. (d) Replace clutch assembly. Worn or dry pilot bushing. (e) Lubricate or replace bushing. Dry contact pressure plate lugs in (f) Lubricate very lightly. cover. SERVICE PROCEDURES

CLUTCH PEDAL FREE PLAY The only adjustment required for the clutch is the pedal linkage adjustment to provide the prescribed clutch pedal free play. The adjustment is necessary to restore pedal free play reduced by normal clutch wear. Adjusting Clutch Pedal Free Play (1) Inspect condition of clutch pedal rubber stop (Fig. 3). If stop is damaged, install a new one. (2) On 6 cylinder models with A-903 transmission disconnect gearshift interlock rod by loosening rod swivel clamp screw (Fig. 4). (3) Adjust fork rod by turning self-locking adjusting nut (Fig. 5) to provide 5/32 inch free movement at end of fork. This movement will provide prescribed one-inch free play at pedal. (4) Adjust interlock rod as described below. Gearshift Interlock (Fig. 4)(6 Cylinder only) (1) Disconnect clutch rod swivel from interlock pawl. (2) Adjust clutch pedal free play as specified.

2ND-3RD LEVER SHAFT 1ST.-REVERSE LEVER CLIP PLAIN WASHER SPRING WASHER PLAIN WASHER SCREW CLUTCH ROD SWIVEL

NN107A

Fig. 4—Gearshift Interlock (6 cyl. & A903 Trans. Only)

(3) When first-reverse lever on transmission is in neutral (middle detent) position, the interlock pawl will enter the slot in first-reverse lever. (4) Loosen swivel clamp bolt and slide swivel on rod to enter pawl. Install washers and clip. Hold interlock pawl forward and tighten swivel clamp bolt to 100 inch-pounds. Clutch pedal has to be in full returned position during this adjustment. CAUTION: Do not pull clutch rod rearward to engage swivel in the pawl.

(5) Shift transmission in normal manner from neutral to first, and from neutral to reverse (disengage clutch while shifting and engage clutch when in gear). Clutch action should be normal. (6) Disengage clutch and shift halfway to first or reverse. Clutch should now be held down by interlock to within 1 or 2 inches of floor. CLUTCH—SERVICING Improper operation or excessive wear may impair the clutch function to a point where it may be necessary to remove and replace the disc, and/or clutch assembly. Should this become necessary, proceed as follows: Removal (1) Remove transmission. See "Manual Transmission," Group 21, for detailed procedure. (2) Remove clutch housing pan. (3) Remove one end of return spring from clutch release fork and the other end from torque shaft lever or clutch housing (Fig. 5). (4) Remove spring washer securing fork rod to torque shaft lever pin and remove rod from pin and release fork (Fig. 5). (5) On 6 cylinder models with the A-903 transmission, remove clip and plain washer securing interlock rod to torque shaft lever and remove spring washer, plain washer and rod from torque shaft. (6) Remove clutch release bearing and sleeve assembly from clutch release fork (Fig. 6) then remove release fork and boot from clutch housing. (7) Mark clutch cover and flywheel (Fig. 7) to main-


64 CLUTCH

CLUTCH HOUSING PEDAL ROD

BALL STUD SEAL TORQUE SHAFT ASSEMBLY

DASH PANEL

i

SPRING WASHER LEVER EVER (6-CYL. MODELS ONLY)

SEAL

\ do BALL STUD (LEVER

TORQUE SHAFT RETURN SPRING (6-CYL. MODELS ONLY) TORQUE SHAFT BRACKET NUT

CONE WASHER

FORK RETURN SPRING SPRING WASHER (6-CYL. MODELS ONLY) RELEASE FORK INSULATOR WASHER FORK ROD ADJUSTING NUT HOOK (5-CYL. MODELS ONLY) CLUTCH

BEARING

SPRING BRACKET (6-CYL. MODELS ONLY)

L

FRAME SIDE RAIL INTERLOCK ROD (6 CYL. A903 TRANS. ONLY)

CLIP

HOUSING

PLAIN WASHER \; SPRING WASHER TORQUE SHAFT LEVER PLAIN WASHER FORK RETURN SPRING 8-CYL. EXCEPT 318 CU. IN.

FORK RETURN SPRING 318 CU. IN. ENGINE ONLY RELEASE FORK NR185B

Fig. 3—Torque Shalt and Linkage (Coronet-Charger)

tam n their same relative positions when reinstalling clutch assembly. (8) Loosen and back off clutch cover attaching bolts, one or two turns at a time, in succession, to avoid bending cover flange. (9) Remove clutch assembly and disc from clutch housing. CAUTION: Handle clutch and disc carefully to avoid contaminating the friction surfaces.

Cleaning and inspection (1) Use compressed air to clean dust out of clutch housing. Inspect for oil leakage through engine rear main bearing oil seal and transmission drive pinion seal. If leakage is noted, it should be corrected at this time. RETURN SPRING ITYPICAL MOUNTING) DUST

(2) Friction face of flywheel should have a uniform appearance throughout entire disc contact area. If there is evidence of heavy contact on one portion of wear circle and a very light contact 180 degrees from that portion, flywheel may be improperly mounted or sprung. In either case, a dial indicator mounted on clutch housing with plunger in contact with wear circle, should show no more than .003 inch runout throughout complete rotation of flywheel. (3) Friction face of flywheel should also be free

SPRINGS

sem RELEASE FORK

T. • RETAINING SPRING

arr CLUTCH HOUSING.1.7 NN95 A

Fig. 6—Clutch Release Fork, Bearing and Sleeve

Fig. 7—Marking Clutch and Flywheel


CLUTCH 6-5

from discoloration, burned areas, small cracks. grooves or ridges. (4) The bushing pressed in end of crankshaft should be smooth and show no excessive wear. A new transmission main drive pinion can be used to gauge size of bushing. If necessary to replace bushing. proceed as detailed under "Crankshaft to Transmission Drive Pinion Pilot Bushing." (5) The end of transmission main drive pinion should be smooth and bright, without grooves and ridges. (6) The disc assembly should be handled without touching facings. Replace disc if facings show evidence of grease or oil soakage, or wear to within less than .015 inch of rivet heads. The hub splines and splines on transmission main drive pinion should be a snug fit without signs of excessive wear_ Metallic portions of disc assembly should be dry and clean and show no evidence of having been hot. Each of the arched springs between facings should be unbroken and all rivets should be fight. (7) Wipe friction surface of pressure plate with kerosene, mineral spirits or other suitable solvent. (8) Using a straightedge, check pressure plate for flatness. The pressure plate friction area should be flat within .015 inch and free from discoloration, burned areas, cracks, grooves or ridges. (9) Inner ends of release levers should have a uniform wear pattern. (10) Using a surface plate, test cover for flatness. All sections around attaching bolt holes should be in contact with surface plate within .015 inch. (11) The cover should be a snug fit on pressure plate lugs. If clutch assembly does not meet these require. menu, it should be replaced. (12) Examine condition of clutch release bearing. CAUTION: The clutch release bearing is a prelubricateel, sealed thrust bearing and should not be immersed in solvent.

(2) Clean the surfaces of flywheel and pressure plate thoroughly with fine sandpaper or crocus cloth, and make certain that all oil or grease has been removed. (3) Hold clutch disc, pressure plate and cover in mounting position, with springs on disc damper facing away from the flywheeL Do not touch disc facing, as contamination may result in clutch chatter. Insert a Clutch Disc Aligning Arbor through hub of disc and into bushing (Fig. 8). If an Arbor is not available, use a spare transmission drive pinion. (4( Install clutch cover attaching bolts (after aligning balance punch marks. (Fig. 7), but do not tighten them. The special 12 point bolts used on 11 inch clutches for 383 cu. in. and larger engines, require no lock washers. The use of lock washers would create interference problems. 51 To avoid distortion of the clutch , bolts should be tightened a few turns at a time (alternately) until they are all snug. Tighten 5116 inch bolts to 200 inch-pounds, 3, 8 inch bolts to 30 foot-pounds. Remove Arbor (or drive pinion if used). (6) Fill cavity of bearing sleeve with Lubricant Also apply a film to release fork pads of sleeve (Fig. 9). (7) Position release bearing and sleeve assembly in clutch housing as far forward as possible. 18) Lubricate fork fingers and retaining spring, at pivot contact area (Fig. 9) with a film of grease. (9) Engage fork fingers under clutch sleeve retaining springs. Be sure retaining springs on sleeve have lateral freedom (Fig. 6). (10) Be sure groove in seal is engaged in seal opening flange in clutch housing (Fig. 6). (II) Insert threaded end of fork rod assembly in hole in end of release rod fork (Fig. 5). Install eye end of fork rod on torque shaft lever pin and secure with spring washer. (12) Install one end of return spring to clutch re-

The bearing should turn freely, when held in the hands under light thrust load, with no evidence of roughness. (13) If bearing is noisy. rough or dry, install a new one on sleeve as detailed under "Clutch Release Bearing." Installation The grease recommended for use during reassembly procedures is Automotive Multi-Purpose Grease NLGI Grade 2 E.P. or Multi-Mileage Lubricant, Part Number 2525035.

(1) Lubricate transmission drive pinion pilot bushing in end of crankshaft with about one-half teaspoon of grease. Place lubricant in radius back of bushing.

Fig. 8—Clutch Disc Aligning Arbor


6-6 CLUTCH FORK CONTACT AREAS/

from release fork (Fig. 6). (4) Grasp outer end of clutch fork and pull fork out and free of retaining springs and pivot (Fig. 6). The

SLEEVE CAVITY

RETAINING SPRING

clutch fork has a riveted fiat retaining spring that is engaged in a hole in the pivot. The clutch release fork pivot is an 'L' shaped bracket bolted inside the clutch housing. PIVOT CONTACT AREA

(5) Remove fork from clutch housing. NR133

Fig. 9—Clutch Lubrication Points

lease fork and the other end to torque shaft lever or clutch housing (Fig. 5). (13) On 6 cylinder models with A.903 transmission, install spring washer, plain washer and interlock rod in torque shaft lever and secure with plain washer and clip. CAUTION: Do not lubricate splines or pilot end of transmission drive pinion when installing transmission. These areas must be kept dry.

(14) Install transmission as detailed in "Transmission Installation," Group 21. (15) Adjust clutch linkage as detailed under "Adjusting Clutch Pedal Free Play."

PILOT BUSHING—CRANKSHAFT TO TRANSMISSION DRIVE PINION Tools called out are part of Bushing Service Tool Kit C-3887-A. Removal (1) Thread bushing puller SP-3631 into bushing firmly and squarely, about 3 or 4 turns. (2) Place receiving cup SP-3633 over threaded shaft of puller and install nut SP,1191 down against cup. (3) Hold puller and turn nut to draw bushing out of crankshaft. Installation (1) Soak new bushing in oil before installing. (2) Place handle SP-3549 on head SP-3551 and use this tool to drive new bushing into crankshaft flush to end. (3) Place one-half teaspoon of grease in crankshaft cavity behind bushing.

CLUTCH RELEASE FORK Removal

(1) Remove one end of return spring from clutch release fork and the other end from torque shaft lever or clutch housing (Fig. 5). (2) Remove spring washer securing fork rod to torque shaft lever and remove rod from torque shaft. (3) Pry dust seal out of clutch housing and remove

Installation (1) The grease recommended for use during reassembly procedures is Automotive Multi-Purpose Grease NLGI Grade 2 E.P. or Multi-Mileage Lubricant, Part Number 2525035.

(2) Before installing release fork, lubricate both sides of fork contact areas, pivot contact area, edge of pivot, also the cavity inside clutch sleeve and the fork pads (Fig. 9). (3) Install clutch release fork in housing, being careful to engage flat retaining spring in hole in pivot and under retaining springs of bearing sleeve. (4) Install dust seal over release fork and engage groove of seal in clutch housing (Fig. 6). (5) Insert fork rod assembly in hole in release fork. Install eye end of fork rod on torque shaft lever pin and secure with spring washer (Fig. 5). (6) Install one end of return spring to clutch release fork and the other end to torque shaft lever or clutch housing (Fig. 5). (7) Adjust clutch linkage as described under "Adjusting Clutch Pedal Free Play".

CLUTCH RELEASE BEARING (Removed from Clutch) Removal

(1) Examine condition of bearing. If bearing is noisy, rough or dry when rotated by hand, under light thrust load, remove bearing from sleeve. (2) Support bearing in a vise or press and press out sleeve. (3) Clean sleeve in solvent and remove all old lubricant. Assembly CAUTION: Exercise care when installing a new clutch release bearing to avoid damaging bearing race. Never drive bearing on sleeve with a hammer. Use either of following two methods.

Vise Method (1) Position new bearing on sleeve and place old bearing against face of new bearing. (2) Support parts in a vise and carefully press new bearing on sleeve (Fig. 10). Make certain bearing is seated on shoulder of bearing sleeve. Rotate bearings as they are pressed together.


CLUTCH 6-7 OLD BEARING

RELEASE BEARING SLEEVE

NEW BEARING

NRI34

Fig. 10—Replacing Clutch Release Bearing Press Method 111 Support sleeve on press bed.

(2) Position new bearing on sleeve and place old bearing on new one. (3) Bring press ram into contact with old bearing and apply sufficient pressure to seat new bearing against shoulder of sleeve. Rotate bearings as they are pressed together. Lubrication

Before installing bearings and sleeve assembly, lubricate parts as follows: (1) Fill cavity of bearing sleeve with the previously recommended Automotive Multi-Purpose Grease. NLGI grade 2 EP, (Fig. 9). (2) Also, apply a film of this same lubricant to release fork pads of sleeve. (3) A film of the same type lubricant should be applied to the pivot contact area of fork retaining spring and contact areas of fork fingers. Installation

(1) Install bearing and sleeve assembly in clutch housing, engaging fork under sleeve springs (Fig. 6). Be sure springs have lateral freedom. CAUTION: Do not lubricate splines or pilot end of transmission drive pinion when installing transmission. These areas must be kept dry.

(21 Install transmission as detailed in "Transmiion Installation," Group 21. (3) Adjust clutch linkage as detailed under "Adjusting Clutch Pedal Free Play."

TORQUE SHAFT AND BEARINGS Removal

(1) Remove spring clip securing pedal rod to torque shaft lever pin (Fig. 5) and remove pedal rod from pin. (2) On 8 cylinder models equipped with A-903 transmission, remove clip and plain washer securing gearshift interlock rod to torque shaft lever and remove spring washer, plain washer and rod from torque shaft. (3) Remove one end of return spring from clutch release fork and the other end from torque shaft lever

or clutch housing (Fig. 5). (4) If so equipped, detach outer torque shaft return spring from hook attached to torque shaft lever and spring bracket (Fig. 5). (5) Remove spring clip securing fork rod assembly to torque shaft lever pin and remove rod from pin (Fig. 5), (6) Remove nut and cone washer from frame end ball stud. (7) Unscrew ball stud from clutch housing (Fig. 5). (8) Slide or lift frame end of torque shaft from torque shaft bracket, depending on type of bracket, and remove torque shaft assembly from vehicle. (9) Disassemble torque shaft assembly by removing snap ring, ball studs, seals and bearings. Cleaning and Inspection

(1) Clean all parts in kerosene, mineral spirits or other suitable solvent. Remove all grease from inside torque shaft. (2) The two ball studs should be bright and free from scratches, ridges or other surface imperfections. (3) The inner surfaces of bearings should also be smooth and free from surface scratches or embedded foreign material. The wear pattern should be uniform over entire surface. (4) Replace worn or cracked rubber seals. Installation

(1) Install new seals on ball studs (Fig. 5). (2) Coat counterbored ends of torque shaft, torque shaft bearings and ball studs with Multi-Mileage Lubricant, Part Number 2525035. or Automotive Multi-Purpose Grease, NLGI grade 2 EP. (3) Install bearings on ball studs and push studs and bearings into torque shaft. Install snap ring on frame end of shaft. (4) Place torque shaft assembly in approximate position and thread inner ball stud into clutch housing. Tighten stud to 40 foot-pounds. Position frame end of torque shaft in slotted frame bracket. Install lockwasher and nut on stud and tighten to 40 foot-pounds (Fig. 51. (5) Install pedal rod on torque shaft lever pin and secure with spring washer. (6) Insert threaded end of fork rod assembly in hole in end of release fork. Install eye end of fork rod on torque shaft lever pin and secure with spring washer. (7) Install one end of return spring to clutch release fork and the other end to torque shaft lever or clutch housing (Fig. 5). (13) On models so equipped, connect outer torque shaft return spring between hook on torque shaft lever and spring bracket, (9) If so equipped, install plain washer and gearshift interlock rod in torque shaft lever (Fig. 5) and secure


6-8 CLUTCH

with spring washer, plain washer and clip. (10) Adjust clutch linkage. (11) Adjust interlock rod. CLUTCH HOUSING ALIGNMENT

12

OFFSET DOWEL PINS 0

2

O'CLOCK

When performing adjustments or repairs that involve removing the clutch housing, it will be necessary to check transmission mounting bore runout and squareness to the crankshaft when reassembling. Bore Runout

(1) Replace one flywheel to crankshaft bolt with a bolt about 3 inches long. Mount Dial Indicator C-3339 on this bolt with a "C" clamp (Fig. 11). (2) With C-771 Flywheel Turning Tool, turn flywheel while noting dial indicator needle deflection. Bore out-of-round must not exceed .008 inch maximum total indicator reading, or .004 inch, one-half total indicator reading. (3) Excess bore =out can be corrected by installing correct size offset dowels (Fig. 12 or 13). These dowels are available in three offset sizes and they must be installed in pairs of the same size: .007 inch, Part Number 1736347; .014 inch, Part Number 1736348 and .021 inch, Part Number 1736353. (4) To illustrate recommended correction procedure, assume total indicator reading is .020 inch, in a direction which approximates 2 o'clock on engine block (Figure 12 or 13, depending on model). (5) In this case, housing is off crankshaft centerline .010 inch (one-half total indicator reading) which is .006 inch greater than allowable limit of .004 inch (one-half total indicator reading). (6) In the case under consideration, installation of two .007 inch dowels will bring runout within the allowable limits of .004 inch or .010 inch minus .007 inch (dowels) which equals .003 inch runout. (7) The amount of eccentricity of the dowel will produce a total indicator reading change of double the dowel eccentricity, therefore, select a pair of dowels with the nearest to one-half of total indicator

Fig. 11 — Measuring Clutch Housing Bore Runout

3 REAR FACE OF ENGINE BLOCK

NY 1601A

Fig. 12—Offset Dowel Diagram (6 gel.)

runout of bore. For runout (total indicator reading) of .009" through .020", use a .007" dowel (No. 1736347); .022" through .034", use .014" dowel (No. 1736348) and .036" through .050", use .021" dowel (No. 1736353). (8) To install dowels, remove clutch housing and old dowels from rear face of engine block. (9) Install both dowels with slots parallel and aligned in direction to correct bore runout. (Slot indicates direction of maximum dowel eccentricity). Both dowels must be inserted into engine block, up to offset shoulder. (10) Install clutch housing to engine block bolts. Tighten 7/16 inch bolts to 50 foot-pounds and 3/8 inch bolts to 30 foot-pounds. (11) Remount dial indicator and remeasure bore runout. Small corrections can be made by removing clutch housing (if necessary) and turning dowels with a screwdriver to shift housing and bring bore within limits. Face Squareness

(1) Relocate Dial Indicator (Fig. 14) and rotate fly-

Fig. 13—Offset Dowel Diagram (8 cyl.)


SPECIFICATIONS wheel, using Tool C-771. If total indicator reading is greater than .006 inch, note amount of total indicator reading and location of lowest indicator reading (i.e., point where indicator arm or follower is extended farthest). (2) To correct squareness, place proper thickness shim stock between clutch housing and engine block or between transmission and clutch housing. After remeasuring squareness, tighten 7/16 inch housing bolts to 50 foot-pounds and 3/8 inch bolts to 30 footpounds. (3) Install clutch release bearing, fork, linkage and transmission. Adjust clutch linkage.

STEAM CLEANING PRECAUTIONS Since the clutch housing has provisions for ventilation, condensation from steam vapors tend to accumulate on the internal clutch mechanism when the vehicle is steam cleaned. The facings of the disc will absorb moisture, and the force exerted by the pres-

6-9

DIAL INDICATOR

NRI36

Fig. 14—Measuring Clutch Housing Face Squareness sure plate, will bond the facings to flywheel and/or pressure plate, if car is allowed to stand for some time before use. If this condition ocettro, it will metasitate replacement of disc assembly, flywheel and/or clutch assembly. Immediately after cleaning operation, start engine and "slip clutch" in order to dry off disc assembly, pressure plate and flywheel.

SPECIFICATIONS CORONET-CHARGER CLUTCH APPLICATION CHART Trans. Speeds 3 3 or 4 3 4

Size

9-1/4" 10-1/r 11" 11" 11" 11"

Cover & Press. Plate Any. No. 1 2 3

Disc Assy. No. 1

2

4

5

3 4 5

4

6

5

4

Engine Cu. In. 198-225 318 225 383 426 440

COVER AND PRESSURE PLATE ASS?.

IDENTIFICATION CHART Assy. Size

9-1/4" 10-1/2" 11" 11" 11" 11"

Part Number*

No. & Color

Mounting Bolt Circle Dia.

5

2409682 3410157 3410158

3 Red Stripe 3 White-6 Plain 3 White-6 Plain 6 White-6 Tan 9 White-3 Plain

10-5/8" 11-5/8" 12-5/8" 11-5/8" 11-5/8"

6

3410159

9 White-3 Plain

11-5/8"

No. 1

2 3 4

2525464 2122255

Springs

Centrifugal

Assist Rollers 0 6 0 6 3

6


6-10 TIGHTENING REFERENCE CLUTCH DISC ASSY. IDENTIFICATION CHART Springs No. & Color

Spline Inside Dia.

Assy. No.

Part Number*

Facing Dia. Outside x Inside

9-1/4"

1

2401102

9-1/4" x 6"

6 Enclosed

15/16"

10-1/2"

2

2266232

10-1/2" x 6-1/2"

5 Green-5 Tan

15/16"

11"

3

2409683

11" x 6-1/2"

6 Blue

15/16"

11"

4

3410160

11" x 6-1/2"

5 Green-5 Tan

15/16"

11"

5

3410161

11" x 7"

5 Plain

1-1/16"

Size

*Part Numbers subject to change during model year.

TIGHTENING REFERENCE POUNDS FOOT INCH

Clutch Cover to Flywheel Bolts (5/16").. Clutch Cover to Flywheel Bolts (3/8")... Clutch Fork Pivot Bolts Clutch Housing to Engine Bolts (3/8")... Clutch Housing to Engine Bolts (7/16").. Clutch Housing Pan Bolts

200 30 200 30 50 200

POUNDS FOOT INCH

Flywheel Bolts (All except 426 Hemi) Flywheel Bolts (426 Hemi) Torque Shaft Ball Stud Torque Shaft Ball Stud Nut Torque Shaft Ball Stud Bracket Bolts Transmission to Clutch Housing Bolts..

55 70 40 40 200 50


GROUP 7

COOLING CONTENTS ACCESSORY BELT DRIVES CONVERSION TABLE ENGINE WATER TEMPERATURE GAUGE . FAN FLUID FAN DRIVE PRESSURE TESTING COOLING SYSTEM . PRESSURE TESTING RADIATOR CAP .... RADIATOR RADIATOR HOSES

Page 9 12 9 3 3 8 7 4 7

Page

RADIATOR PRESSURE CAP REVERSE FLUSHING COOLING SYSTEM . SERVICE DIAGNOSIS SPECIFICATIONS TIGHTENING REFERENCE THERMOSTAT TRANSMISSION OIL COOLER WATER PUMP

6 1 10 12 6 5 4

GENERAL INFORMATION In order to provide satisfactory protection for the wide variety of corporation models the cooling system of each must be tailored to specific needs. To do this effectively the Corporation offers five basic systems: (1) Standard (2) Air Conditioning (3) High Capacity Fan (4) Maximum Cooling (5) Trailer Towing The standard system consists of a tube and spacer type radiator, 16 psi radiator pressure cap, centrifugal water pump, 190°F. thermostat*, and a four or seven blade fan. See specifications for application. The cooling system for air conditioned equipped vehicles generally requires a greater capacity radiator along with a fan shroud, special centrifugal water pump, larger fan, and thermostatically controlled fan drive and drive ratio, (in some installations). See specifications for applications. An optional capacity fan to protect against overheating for unusual operating conditions is available.

The maximum cooling system consisting of a larger radiator and on some models radiator shrouds and/ or hood-to-yoke and bumper to yoke seals are used to provide protection against overheating for unusually severe operation requirements. The trailer towing package is a combination of the maximum cooling package and the high capacity fan, as necessary to provide protection against overheating when towing trailers. For internal cooling system protection each cooling system is factory equipped with sufficient permanent type anti-freeze for —20°F. protection. It is recommended that the coolant be changed annually to insure adequate anti-freeze and corrosion protection. Air conditioned cars require year round protection with permanent type anti-freeze with a minimum of +15°F. protection for summer operation and additional anti-freeze in the winter according to the prevailing temperatures. *318-383-2BBL. have a 1950 thermostat.

SERVICE DIAGNOSIS Condition EXTERNAL LEAKAGE

Possible Cause

Correction

(a) Replace the hose clamp. (b) Replace the hose. (c) Repair or replace the radiator as necessary. (d) Water pump leaking through vent (d) Replace the water pump. (a) Loose hose clamp. (b) Hose leaking. (c) Leaking radiator.

hole. (e) Install new core hole plug. (e) Loose core hole plug. (f) Damaged gasket, or dry gasket, if (f) Replace gaskets as necessary. engine has been stored. (g) Cylinder head bolts loose, or tightened (g) Replace the cylinder head gasket and unevenly. torque head in correct sequence. (h) Leak at heater connection. (h) Clean the heater connections and replace the hoses and clamps if necessary. (i) Leak at water temperature sending (i) Tighten the water temperature sendunit. ing unit.


7-2 COOLING SYSTEM Condition

Correction

Passible Cause

(j) Tighten the water pump attaching bolts to 30 foot-pounds. (k) Seal and re-drive the stud. (k) Leak at exhaust manifold stud. (I) Replace the thermostat housing. (I) Cracked thermostat housing. (m) Straighten the radiator inlet or outlet (m) Dented radiator inlet or outlet tube. tube as necessary. (n) Repair or replace the heater core. (n) Leaking heater core. (o) Cracked or porous water pump hous- (o) Replace the water pump assembly. ing. Warped o. cracked cylinder head. (p) Replace the cylinder head. Cracked cylinder block. (q) Replace the cylinder block. Sand holes or porous condition in Cr) Replace the cylinder block or cylinder block or head. head as necessary. Faulty pressure cap. (s) Replace pressure cap. Loose or stripped oil cooler fittings. (t) Tighten or replace as necessary.

(j) Leak at water pump attaching bolt

INTERNAL LEAKAGE

(a) Faulty head gasket (a) Install a new head gasket (b) Refer to causes (f), (g), (p), (q), Cr) and (b) Refer to corrections (f), (g), (P), (q), (t) listed under External Leakage. (r) and (t) listed under External Leakage. (c) Crack in head into valve compart- (c) Pressure test cooling system, replace ment. the cylinder head. (d) Cracked valve port. (d) Pressure test cooling system, replace the cylinder head. (e) Crack in block into push rod compart- (e) Pressure test cooling system, replace ment. the cylinder block. (f) Cracked cylinder wall. (f) Pressure test cooling system, replace the cylinder block. (g) Leaking oil cooler. (g) Repair or replace the oil cooler.

POOR CIRCULATION

(a) Fill radiator to correct level. (a) Low coolant level. (b) Collapsed radiator hose. (A bottom (b) Replace the hose and spring. hose with faulty spring may collapse only at medium or high engine speeds.) (c) Tighten or replace the fan belt as (c) Fan belt lose, glazed, or oil soaked. necessary. (d) Air leak through bottom hose. (d) Reposition hose clamps or replace the hose. Check radiator outlets for dents or out-of-rounds. (e) Replace the thermostat. (e) Faulty thermostat. (f) Water pump impeller broken or loose (f) Replace the water pump. on shaft. (g) Restricted radiator core water pas- (g) Flush the radiator thoroughly or rod sages. out if necessary. (h) Flush the engine cooling system thor(h) Restricted engine water jacket. oughly.

OVERHEATING (refer to Causes and Corrections listed under "Poor Circulation")

(a) (b) (c) (d) (e) (f)

Blocked radiator air passages. Incorrect ignition timing. Low engine oil level. Incorrect valve timing. Inaccurate temperature gauge. Restricted overflow tube.

(g) Faulty radiator pressure cap or seat (h) (i) (j) (k)

Frozen heat control valve. Dragging brakes. Excessive engine idling. Frozen coolant

(I) Faulty fan drive unit. (m) Faulty temperature sending unit.

(a) (b) (c) (d) (e) (f)

Clean out the radiator air passages. Time the engine ignition system. Add engine oil to the correct level. Correct the engine valve timing. Replace the temperature gauge. Remove restriction from overflow tube. (g) Replace the radiator cap. Clean or replace seat. (h) Free up manifold heat control valve. (i) Adjust the brakes. (j) Increase idle R.P.M. or stop engine. (k) Thaw out cooling system, add antifreeze as required. (I) Replace the fan drive unit. (m) Replace the sending unit


COOLING SYSTEM 7-3 Condition

Possible Cause

Correction

OVERFLOW LOSS (Also refer to Causes and Corrections listed under "Poor Circulation and Overheating") CORROSION

(a) Overfilling. (b) Coolant foaming due to insufficient corrosion inhibitor. (c) Blown head gasket. (d) Broken or shifted lower hose spring. (a) Use of water containing large concentration of lime and minerals. (b) Insufficient corrosion inhibitor. (c) Use of antifreeze for extended length of time.

(a) Adjust coolant to the correct level. (b) Flush the radiator and add antifreeze as required. (c) Replace the head gasket (d) Replace lower hose. (a) Use only clean soft water with antifreeze. (b) Use antifreeze as required. (c) Drain cooling system and replace with new antifreeze.

TEMPERATURE TOO LOW—SLOW ENGINE WARM-UP

(a) Faulty thermostat. (b) Inaccurate temperature gauge. (c) Faulty temperature sending unit.

(a) Replace the thermostat (b) Replace the temperature gauge. (c) Replace the sending unit.

WATER PUMP NOISY

(a) Seal noisy. (b) Bearing corroded.

(a) Add Water Pump Lube. (b) Replace water pump.

INSUFFICIENT ACCESSORY OUTPUT DUE TO BELT SLIPPAGE

(a) Belt too loose. (b) Belt excessively glazed or worn.

(a) Adjust belt tension. (b) Replace and tighten as specified.

BELT SQUEAL WHEN ACCELERATING

(a) Belts too loose. (b) Belts glazed.

(a) Adjust belt tension. (b) Replace belts.

(a) (b) (c) (d)

(a) (b) (c) (d)

ACCESSORY DRIVE BELTS

ENGINE

BELT SQUEAK AT IDLE

Belt to loose. Dirt and paint imbedded in belt. Non-uniform belt. Misaligned pulleys.

(e) Non-uniform groove or eccentric pu ley.

Adjust belt tension. Replace belt. Replace belt. Align accessories (file brackets or use spacers as required). Replace pulley.

BELT ROLLED OVER IN GROOVE

(a) Broken cord in belt. (b) Belts not matched (A/C).

Replace belt. Install matched belts.

BELT JUMPS OFF

(a) Belt too loose. (b) Belts not matched (A/C). (c) Misaligned pulleys.

Adjust belt tension. Install matched belts. Align accessories.

SERVICE PROCEDURES FAN

FLUID FAN DRIVE

There are no repairs to be made to the fan. If the fan is bent or damaged it should be replaced.

CAUTION: To prevent silicone fluid from draining into fan drive bearing and ruining the grease, do not place drive unit with shaft pointing downward.

Removal (1) Remove shroud attaching screws, separate shroud from radiator, position shroud rearward on engine. Fan attaching screws can now be removed. (2) On models equipped with fluid fan drive, remove fan drive attaching screws. The fan and fluid fan drive are removed as a unit.

Installation Use correct fan spacer, if required, so clearance between fan blades and radiator is 3/4 to 1-1/4 inches. No fan spacer permitted with fluid fan drive regardless of fan blades to radiator clearance. Install one piece shroud on vehicles so equipped. Tighten fan belt as outlined in "Belt Tension Specifications".

Torque Control Drive The Torque Control Drive (Fig. 1) is a silicone fluid filled coupling connecting the fan to the fan pulley. The unit allows fan to be driven in normal manner at low engine speeds while limiting the top speed of the fan to a pre-determined level at higher engine speeds. Thermal Control Drive Air conditioned vehicles only, the Thermal Control

Drive (Figs. 2 and 3) is essentially the same as the Torque unit except for a thermostatic spring on the drive face. This thermostat senses temperature from the radiator and engages the drive for higher fan


7-4 COOLING SYSTEM

NK480A

NK479A

Fig. 1—Torque Control Fan Drive

speed if temperature from the radiator rises above a certain point. In case of engine overheating during slow car speed or idle operation, increase engine speed to approximately 1000 rpm in neutral gear. If condition is not corrected by increasing engine speed, replace fan drive unit with a unit known to be operating properly and test by operating vehicle under same conditions. Replace original drive unit assembly if trouble was corrected with test unit.

WATER PUMP

Fig. 3—Thermal Control Fan Drive (318-383-440 Cubic Inch Engine with 2.93:1 or Higher Axle Ratio)

(2) Loosen power steering pump, idler pulley and alternator. Remove all belts. (3) Remove fan, spacer (or fluid drive) and pulley. CAUTION: To prevent silicone fluid from draining into fan drive bearing and ruining the grease, do not place drive unit with shaft pointing downward.

(4) Remove the bolts attaching the water puinp body to the housing. Remove the water pump and discard gasket. Installation

Note: The water pump is serviced only as an assembly. When replacing the water pump do not install a standard water pump on any air conditioned vehicle or vice versa. See specifications for proper pump. Removal

(1) Drain the cooling system. (Remove fan shroud if so equipped and set back on engine).

(1) Install water pump body on housing, using a new gasket. (2) Tighten bolts to 30 foot-pounds. Rotate pump shaft by hand to be sure it rotates freely. Install pulley, spacer (or fluid drive) and fan. (3) Tighten nuts to 15 foot-pounds. Install fan shroud if so equipped. Fill the cooling system and test for leaks. Tighten belts as outlined in "Belt Tension Specifications".

RADIATOR Removal

NP541

Fig. 2—Thermal Control Fan Drive (318 Cubic Inch Engine With 2.76:1 Axle Ratio)

(1) Drain cooling system. (2) On vehicles with automatic transmission, disconnect oil cooler lines at radiator bottom tank. (3) Remove upper and lower radiator hoses (using pliers C-3250). (4) Remove shroud attaching screws, separate shroud from radiator, position shroud rearward on engine for maximum clearance. (5) Remove radiator attaching screws. (6) Radiator can now be lifted free from engine compartment. Care should be taken not to damage radiator cooling fins or water tubes during removal. Fan damage should always be avoided.


COOLING SYSTEM 7-5 Installation

(1) Slide radiator down into position behind radiator support and install attaching screws. (2) Install fan shroud (if so equipped), connect hoses, and connect transmission oil cooler lines, if so equipped. (3) Fill cooling system to 1-1/4" below filler neck seat with water and anti-freeze, as required. After warm-up, re-check coolant level. (4) On vehicles with automatic transmission, measure transmission oil level after warm-up and add oil as required. Cleaning

(1) Drain cooling system and refill with clean soft water and a reliable cooling system cleaner. (2) Operate engine according to directions on Cleaner label. (3) After cleaning operation, flush entire cooling system until water runs clean. (4) Regardless of climate, the cooling system should be refilled with sufficient permanent type anti-freeze for —20°F protection. To insure adequate corrosion protection. (5) If vehicle is equipped with air conditioning the cooling system must contain anti-freeze all year round. This is necessary because in the reheat-cycle system used on all vehicles, cold refrigerated air

passes through the heater core. Anti-freeze is necessary to prevent the heater core from freezing in hot weather when the air conditioner is being used.

TRANSMISSION OIL COOLER The transmission oil cooler is located in the bottom radiator tank (water cooled), which is an integral part of the radiator. Some models are equipped with an auxiliary oil cooler (air cooled) mounted ahead of the radiator and is connected in series with the standard transmission oil cooler (Fig. 4). In case of a leak, engine coolant may become mixed with transmission fluid, also, transmission fluid may enter cooling system. Both cooling system and transmission should be inspected in event cooler is leaking. Testing Oil Cooler for Leaks

(1) Disconnect both oil cooler lines at radiator. (2) Connect a pressure gauge to one cooler connection and a shut off valve to the other. Close the valve. (3) Connect a source of air pressure to the valve. (4) Coat all fittings with oil. (5) Open the test valve and apply (up to 100 psi) air pressure. Oil bubbles will identify any fitting joint leaks. Repair all joint leaks.

A OIL COOLER ASSEMBLY CONNECTOR RADIATOR UNION

VIEW B

RADIATOR CROSSMEMBER

RADIATOR YOKE PANEL VIEW A

NR255A Fig. 4—Oil Flow—Transmission Coolers


7-6 COOLING SYSTEM

(6) Close the valve. Gauge reading will then drop if cooler is leaking. Repairing Oil Cooler

The transmission auxiliary oil cooler being all aluminum can be repaired by a local reliable radiator service having the equipment for alumibrazing or heliarc. (1) Remove radiator from vehicle. (2) Remove radiator bottom tank. (3) Melt the soft solder holding the cooler to the tank. (4) Remove the stamped retainer nuts holding the cooler fittings to the bottom tank and remove the cooler. (5) Install a new cooler or repair the old cooler with silver solder and reinstall as follows: (6) Position oil cooler in bottom tank and install the stamped retainer nuts on oil cooler fittings. (7) Use soft solder to secure the cooler in the tank. (8) Attach bottom tank to radiator using soft solder. (9) Install radiator as described in Paragraph "Radiator". (10) Fill cooling system and test for leaks. If the transmission operates properly after repairing the leak, drain the transmission and torque converter while hot, remove the transmission oil pan and inspect for sludge, rust, dirty or plugged inlet filter. If none of these conditions are found, reconditioning may not be necessary. Reassemble, using Transmission Fluid AQ-ATF-2848A. REVERSE FLUSHING THE COOLING SYSTEM

Reverse flushing of the cooling system is the forcing of water through the cooling system, using air pressure in a direction opposite to that of the normal flow of water. Flushing Cylinder Block

(1) Drain radiator and remove hoses at radiator. (2) Remove thermostat and reinstall thermostat housing. (3) Install Tool C-3514, or other suitable flushing gun to inlet hose. (4) Connect water hose of gun to a pressure water source and air hose of gun to a pressure air source. (5) Turn on water, and when cylinder block is filled, turn on air (up to 20 psi) in short blasts. (6) Allow cylinder block to fill between blasts of Mr. (7) Continue this procedure until water runs clean. Test thermostat and if satisfactory, reinstall: otherwise, replace using a new housing gasket. (8) Fill cooling system to 1-1/4 inches below filler

neck, using soft water and anti-freeze, depending on season or if equipped with air conditioning. (9) Engine should be operated until temperature gauge indicates normal operating temperature, then, continue an additional five minutes to release any air trapped in system. (10) Check for leaks and coolant level; correct as necessary. Reverse Flushing Radiator

(1) Drain cooling system and remove hoses from engine. (2) Install Tool C-3514, or other suitable flushing gun in radiator lower outlet. (3) Fill radiator and turn on air in short blasts. CAUTION: Internal radiator pressure must not exceed 20 psi, as damage to radiator may result.

(4) Continue this procedure until water runs clean. It is a good policy to reverse flush heater core any time the radiator is reverse flushed.

(5) Fill cooling system to 1-1/4 inches below filler neck, using soft water and anti-freeze, depending on season or if equipped with air conditioning. (6) Engine should be operated until temperature gauge indicates normal operating temperature, then, continue an additional five minutes to release any air trapped in system. (7) Check for leaks and coolant level; correct as necessary. THERMOSTAT

The thermostat is actuated by a pellet containing a copper-impregnated wax, as shown in (Fig. 5). As the temperature of the pellet increases, the wax expands and opens the valve. A 190° thermostat is standard equipment.* The use of 160° thermostat or alcohol type anti-freeze is not recommended.

If the thermostat does not close completely when cold, the engine will warm up slowly or not at all, and heater performance will also be impaired. Poor heater performance may also be due to valve opening at too low a temperature. Too high a valve opening temperature or a valve that will not open can cause overheating. *318-383-2BBL. have a 195° thermostat.

EIGHT CYLINDER SIX CYLINDER

Fig. 5 —Thermostats

NU3.48


COOLING SYSTEM 7-7 Removal

(1) Drain cooling system down to thermostat level or below. (2) Remove upper radiator hose from thermostat housing. (3) Remove thermostat housing bolts and remove thermostat and housing.

PRESSURE CAP ADAPTER

TOOL

Testing Thermostat

(1) Visually inspect thermostat to make sure valve closes tightly. If valve does not close completely due to dirt, sand or other foreign material, carefully clean the sealing edge making sure the sealing edge is not damaged. If valve does not close tightly when clean, install a new thermostat. (2) Immerse thermostat in a container of warm water so that pellet of thermostat is completely covered. The pellet must not touch bottom or sides of container. (3) Heat the water and stir it continuously (to insure uniform temperature) and cheek water temperature with a thermometer at the point when a .001" feeler gauge can be inserted into valve opening. The feeler gauge should pass freely into the valve opening at a water temperature of 187 0 to 194°F. for a 190" thermostat and a water temperature of 192° to 3.990 for a 195' thermostat. If outside of this range, replace thermostat. (4) Continue heating water to approximately 210°F for a 190" thermostat and 215' temperature for a 195° thermostat. The thermostat valve should be fully open at this temperature. If it is not, replace thermostat. Installation

(1) Using a new gasket, position thermostat so pellet end is toward engine and attach with bolts through thermostat housing. (2) If removed, reinstall or replace the upper hose. (3) Fill cooling system to 1-1/4 inches below filler neck with water and anti-freeze.

KP146

Fig. 7—Testing Pressure Cap

suction at medium or high engine speeds. If this spring is misplaced in hose, it should be repositioned. If this spring is deformed hose must be replaced.

RADIATOR PRESSURE CAP Radiators are equipped with a 16 psi cap, as standard equipment (Fig. 6). WARNING: When removing pressure cap, turn counterclockwise to stop, without downward pressure on cap, permitting built-up pressure to escape through over-flow tube. This will prevent hot water from spraying out of radiator filler opening. To complete removal apply downward pressure and turn counterclockwise.

PRESSURE TESTING RADIATOR CAP Select the short neoprene seal and metal adapter from the kit, Tool C-4080. Slip the seal on the tube at the bottom of the instrument. Then attach either end of the short adapter to the instrument. Dip the pressure cap in water and apply cap to end of adapter. Working the plunger, as shown in (Fig. 7) bring the pressure to 16 pounds on the gauge. If the pressure cap fails to hold the pressure within a range of 14-17 pounds, replace the cap with a new tested cap. The brass vent valve at the bottom of the cap should hang freely. if the rubber gasket has swollen

RADIATOR HOSES The hoses are removed and installed using hose clamp pliers C-3250. A hardened, cracked, swollen or restricted hose should be replaced. The reinforcement spring inside the lower hose is necessary to prevent collapsing of the hose due to

GASK1T VENT

NHI86A

Fig. 6—Radiator Pressure Cap

Fig. 8—Pressure Testing Cooling System


7-8 COOLING SYSTEM

NK481 NK484A

SINGLE BELT ROLLER ASSY.

ROLLER

NK482A NIG185A

Fig. 9—Belt Deflection Location

and prevents the valve from hanging loosely, replace the cap. Do not use a replacement cap without this vent valve. PRESSURE TESTING COOLING SYSTEM (1) With engine not running, wipe the radiator filler neck sealing seat clean. The water level should

be 1/2 inch below neck of radiator. (2) Attach the Tester Tool C-4080 to the radiator, as shown in (Fig. 8) and apply 15 pounds pressure. If the pressure drops inspect all points for external leaks. (3) If there are no external leaks, after the gauge dial shows a drop in pressure, detach the tester, start engine and run the engine to operating temperature in order to open the thermostat and allow the coolant to expand. Reattach the tester and pump to 7 lbs. pressure while the engine is running. Race the engine, and if the needle on the dial fluctuates it indicates a combustion leak, usually a head gasket. WARNING: Pressure builds up fast. Any excessive amount of pressure built up by continuous engine operation must be released to a safe pressure point. NEVER PERMIT PRESSURE TO EXCEED 20 lbs. (4) Remove the wires from the spark plugs on one bank and operate the engine on the opposite bank. If the needle continues to fluctuate, it indicates a leak on the bank still in operation. If the needle ceases to fluctuate, the leak is in the bank, from which combustion has been released. (5) If the needle on the dial does not fluctuate, race the engine a few times and if an abnormal amount


COOLING SYSTEM 7-9 of water emits from the exhaust system at the tail pipe, it may indicate a leak that can be a faulty head gasket, cracked engine block, or the cylinder head near the exhaust ports. (6) If the above pressure test of the cooling system holds without fluctuation, then there is no leak, however, there may be internal leaks which can be determined by removing the oil dip-stick and if water globules appear intermixed with the oil it will indi-

cate a serious internal leak in the engine. If there is an internal leak, the engine must be disassembled, the leak located and necessary new parts installed.

ENGINE WATER TEMPERATURE GAUGE For Removal, Installation and Testing procedures of the water temperature sending and receiving units, refer to "Electrical" Group 8 "Gauges".

ACCESSORY BELT DRIVES

PROPER BELT TENSION Satisfactory performance of belt driven accessories (Fig. 9) depends on the maintenance of proper belt tension. There are two methods by which belt tensions can be properly established. "The Torque Method" and "The Belt Deflection Method". If the specified tensions are not maintained, belt slippage may cause engine overheating, lack of power steering assist, loss in air conditioning capacity, reduced belt life. To avoid any such adverse effects, the following service procedure should be followed: Adjust all belts to the specified "used belt" tension at new vehicle preparation. Any belt that has operated for a minimum for a half-hour is considered to be used. The new belt tension specification apply for all new belt replacements. Torque Method All belts can be adjusted to the specified tension by use of a torque wrench. The alternator belts are adjusted by using a special Tool C-3841 and torque wrench Tool C-3005. The special tool should be hooked at the heavilyribbed section of the alternator rectifier end shield. Other belts can also be tightened by torque wrench if

the adjusting bracket has a square hole. To tighten belts by the torque method, loosen all mounting bolts and apply the specified torque to the accessory or idler. (See Specifications.) Tighten all mounting bolts while the torque is applied to the accessory. If it is not possible to use the torque wrench because of clearance, use an extension. Belt Deflection Method All belts can also be adjusted by measuring the deflection of the belt at the mid-point between two pulleys under a five-pound push or pull. A small spring scale can be used to establish the five-pound load. See Figure 9 for correct location at which to measure deflection. This method should be used only when it is not possible to use the torque method. To adjust belts by the deflection method, loosen all mounting bolts and use a bar to apply tensions to the belts being careful not to damage the accessory. A 1/2 inch square drive hinge handle can be used if the accessory has a square hole. Tighten the mounting bolts and test the deflection. (See Specifications.) It may be necessary to repeat this procedure several times to establish the correct tension.


7-10 SPECIFICATIONS

SPECIFICATIONS CORONET AND CHARGER ENGINE

225

225 POLICE TAXI

318

CAPACITY (With Heater) Quarts—Radiator Width

12-19" 14-22"

13-19" 14-22"

16-19" 17.5-26"

2998936-19" N/A

2998946-19"

RADIATOR—Identification Number—Width Transmission Manual 903 230 833 Automatic 904 727 Air Conditioning Maximum Cooling

2998936-19"

2998973-19"

2998937-19" N/A 2998938-22" 2998939-22"

2998939-22" 2998939-22" 2998939-22"

2998974-26" 2998949-26"

Oil Cooler Size Standard Air Conditioning Maximum Cooling

10" 10" 12"

12" 12" 12"

10" 10" 12”

Shroud Transmission Manual Automatic Air Conditioning Maximum Cooling

None None Yes Yes

None None Yes Yes

None None Yes Yes

Seal Hood to Yoke Bumper to Yoke

Yes*** None

Yes None

Yes None

17-4--1 1/2 17-4--1-1/2 18-4-2 P.T. 18-7-1-1/2

18-4-2 PS. 18-4--2 P.T. 18-4-2 PS. 18-7-1-1/2

18-4-2 B.T. 18-4-2 B.T. 18-1/2-7-2-1/2 18-7--2-1/4

1.24"

1.24"

1.60"

1.24" 1.24"

1.24" 1.24"

Thermal 1.60"

1.07:1 1.07:1 1.07:1

1.07:1 1.07:1 1.071

.95:1 1.3:1 .95:1

3.50"-6 3.50"-6

3.50"-6 3.50"-6

4.38"-8 3.70"-6

FAN (Fan to Crankshaft) Diameter—Number Blades—Width Standard Automatic Air Conditioning High Capacity Spacer Standard Air Conditioning High Capacity Ratio (Fan to Crankshaft) Standard Air Conditioning High Capacity WATER PUMP IMPELLER Diameter—Number Blades Standard Air Conditioning

* Air Conditioning Not Available With 440-6 BBL Engine. ** Auxiliary 10"x14" Oil Cooler (Air Cooled) In Series With Standard Oil Cooler. *** Air Conditioning and Maximum Cooling Only. A 383-4 BBL with High Performance Camshaft.


SPECIFICATIONS 7-11

318 POLICE TAXI

383-2 BBL

383 2 & 4 BBL POLICE

3834 BBL

440 4 & 6 BBL

426 XEMI

17-26"

14.5-22" 16-26"

16-26"

18.5-26"

14.5-22" 16-26"

15.5-22" 17-26"

2998949-26"

N/A

N/A N/A

2998954-22" 2998954-22"

N/A 2998958-26"

2998956-26"

2998949-26" 2998949-26" 2998949-26"

2998957-22" 2998958-26" 2998956-26"

2998959-26" 2998956-26" 2998956-26"

2998960-22" 2998961-26" 2998956-26"

2998960-22" 2998961-261l* 2998956-26"

2998956-26" N/A N/A

12" 12" 12"

12" 12" 12"

12" 12" 12"

12" 12" 12"

12" 1211* 1211*

N/A N/A

Yes Yes Yes Yes

None None Yes Yes

N/A Yes Yes Yes

Yes Yes Yes Yes

Yes Yes Yes* Yes

Yes Yes N/A N/A

Yes None

Yes None

Yes None

Yes None

Yes None

Yes None

18-7-2 18-7-2 18-1/2-7-2-1/2 18-7-2-1/4

N/A 18-7-2 18-1/2-7-2-1/2 18-7-2-1/8

N/A 18-7-2-1/8 18-1/2-7-2-1/2 N/A

18-7-2 18-7-2 18-1/2-7-2-1/2 18-7-2-1/8

18-1/2-7-2-1/2 18-7--2 18-1/2-7-2-1/2* 18-7-2-1/8

18-1/2-7-2-1/2 18-1/2-7-2-1/2 N/A N/A

1.60"

1.06"

1.06"

1.06"

Torque—Manual 1.06"—Automatic

Torque

Thermal 1.60"

Thermal 1.06"

Thermal N/A

Thermal 1.06"

Thermal*

1.06"

N/A N/A

.95:1 1.3:1 .95:1

.95:1 1.3:1 .95:1

.95:1 1.4:1 N/A

.95:1 1.4:1 .95:1

.95:1 1.4:1* .95:1

1.20:1 N/A N/A

4.38"-8 3.70"-6

4.38"-8 3.50"-6

4.38"--8 3.50"--6

4.38"-8 3.50"-6

4.38"--8

3.50"-6 N/A

A A

3.50"-6*


7-12 TIGHTENING REFERENCE

BELT TENSION SPECIFICATIONS TORQUE METHOD TORQUE (FT.-LBS.) TO BE APPLIED TO COMPONENTS Used BeItt Engine Displacement Cubic Inches

225

POWER STEERING BRACKET ALTERNATOR With A/C Without A/C A/C IDLER BRACKET FAN IDLER

New Belt

383 426 Hemi 318 440

225

318

383 426 Hemi 440

45

50

70

80

85

120

15 15 25

40 40 45

ao

45

20 20 35

55 55 65

so

_

ao

70

65

DEFLECTION METHOD Deflection (Inches to be applied at midpoint of belt segment under 5 lb. load—(See Figure 9) Used Beltt Engine Displacement Cubic Inches

225

POWER STEERING FAN BELT IDLER A-C IDLER (Clutch to Idler) ALTERNATOR Without A/C With A/C

New Belt 383 426 Hemi 440

318

5/32"

5/32"

1/8"

3/16"

9/32" 9/32"

3/16" 3/16"

225

383 426 Hemi 318 440

5/32" 3/32"

3/32" 3/32" 3/32" — 1/16" 3/32" — 1/8" —

3/16" 9/32"

3/16" 3/16"

1/8" 3/32" 1/8" 3/16"

t Any belt that has operated for a minimum of a half-hour is considered to be used.

CONVERSION TABLE U. S. Quart

12

13

14

14-1/2

15-1/2

16

17

18-1/2

Imperial Quart

10

10-3/4

11-3/4

12

13

13-1/4

14-1/4

15-1/2

TIGHTENING REFERENCE Inch Pounds

Water Pump Bolts Fan Attaching Bolts Thermostat Housing Bolts Shroud Mounting Bolts Radiator Mounting Bolts Drain Cock Oil Cooler Fittings—To Radiator Lines to Fittings Lines to Auxiliary Cooler Lines to Connector

Foot Pounds

30 15-18 30 12 75 95 150 110 85 85 50

-------

-

Thread Size

-

F-32 1/4-20 1/4-20

-


GROUP 8

ELECTRICAL CONTENTS Page

ALTERNATOR AND VOLTAGE REGULATOR BATTERY ELECTRIC WINDOW LIFT EXTERIOR LIGHTING CONCEALED HEADLAMPS HEADLIGHTS TAIL AND STOP LIGHTS HORNS IGNITION SYSTEM

22 1 80 54 64 54 58 83 34

Page

INSTRUMENT PANELS SPECIFICATIONS STARTING MOTOR TAIL GATE WINDOW LIFT TOP LIFT (Convertible Top) TURN SIGNALS WINDSHIELD WIPER SYSTEM WINDSHIELD WASHERS WIRING DIAGRAMS

67 86 5 81 81 82 74 78 94

BATTERY INDEX Adjustment of Acid Gravity Battery Visual Inspection Charging the Battery

Page 3 1 4

High Rate Discharge Test of Battery Capacity Specifications Specific Gravity Test

Page 4 86 1

SERVICE PROCEDURES BATTERY VISUAL INSPECTION

SPECIFIC GRAVITY TEST

(1) Protect paint finish with fender covers. (2) Disconnect battery cables at battery. (3) Remove battery hold-down clamp and remove battery from vehicle. (4) Inspect battery carrier and fender side panel for damage caused by loss of acid from battery. (5) Clean top of battery with a solution of clean warm water and baking soda. Scrub areas with a stiff bristle brush being careful not to scatter corrosion residue. Finally wipe off with a cloth moistened with ammonia or baking soda in water.

A hydrometer Tool 40-B is used to measure specfic gravity of electrolyte in battery cells. This gives an indication of how much unused sulphuric acid remains in the solution. A hydrometer should be graduated to read from 1.160 to 1.320, in graduations of .005 specific gravity. Graduated markings should be not less than 1/16 inch apart and accurate to within .002 specific gravity. Graduated portion of stem should be about two inches long. Clearance between float and glass barrel, at smallest diameter, should be a minimum of 1/8" around all sides and barrel must be clean. Liquid level of battery cell should be at normal height and electrolyte should be thoroughly mixed with any battery water which may have just been added by charging battery before taking hydrometer readings. See "Adjustment of Acid Gravity." In reading a hydrometer, the gauge barrel must be held vertically and just right amount of fluid be drawn up into gauge barrel with pressure bulb fully expanded to lift float freely so it does not touch the sides, top or bottom of the barrel. Take a reading with eye on level with liquid level in the gauge barrel. DO NOT TILT hydrometer.

CAUTION: Keep cleaning solution out of battery cells to eliminate weakening the electrolyte.

(6) Replace damaged or frayed cables. (7) Clean battery terminals and inside surfaces of clamp terminals with Cleaning Tool MX-75. (8) Examine battery case and cover for cracks. (9) Install battery. (10) Tighten battery hold-down screw nuts to 3 foot-pounds. Observe polarity of battery terminals to be sure the battery is not reversed.

(11) Connect cable clamps to battery posts and tighten securely. Coat all connections with light mineral grease or petrolatum after tightening. (12) If electrolyte level is low, fill to recommended level with mineral-free water.

Hydrometer floats are calibrated to indicate correctly only at one fixed temperature.

Specific gravity of battery electrolyte strength or


8-2 ELECTRICAL—BATTERY density varies not only with the quantity of the acid in solution but also with temperature. As temperature increases, the density of the electrolyte decreases, and specific gravity is reduced. As temperature drops, the density of the electrolyte increases and the specific gravity increases. Specific gravity variations caused by temperatures must be considered and corrected to 80°F. in the analysis of the battery, otherwise specific gravity readings will not give a true indication of state of charge. Use a battery immersion type thermometer of the mercury-in-glass type, having a scale reading as high as 125° F. and designed for not over a 1-inch bulb immersion. A suitable dairy type thermometer may prove satisfactory for the purpose. Draw electrolyte in and out of the hydrometer barrel several times to bring the temperature of the hydrometer float to that of the acid in the cell and then measure the electrolyte temperature in the cell. The temperature correction in specific gravity reading at 80° Fahrenheit is zero. Add .004 specific gravity points for every 10° degrees over 80° F. and subtract .004 specific gravity points for every 10 degrees under 80° F. All readings must be corrected at 80 degrees Fahrenheit. Refer to Figure 1 and examples one and two as follows: Example 1— Hydrometer Reading 1.260 20 degrees Fahrenheit Acid Temperature Subtract Specific Gravity .024 1.236 Correct Specific Gravity is Example 2— Hydrometer Reading 1.255 Acid Temperature 100 degrees Fahrenheit Add Specific Gravity .008 Corrected Specific Gravity is 1.263 A fully charged relatively new battery has a specific gravity reading of 1.260 plus .015 minus .005. Test Conclusions (a) Battery specfic gravity is less than 1.220 battery should be recharged. Make a high rate discharge test for capacity. If battery cells test O.K., recharge and adjust gravity of all cells uniformly. Test voltage regulator setting. Thoroughly test the electrical system for short circuits, loose connections and corroded terminals.

Temirratora Gravity Paha. to Add or Subtract 160 150 140 190 120 110 100 90

+32 +90 +26 +26 +24 +22 +20 +15 +16 +14 +12 +10 + + 6 + • + 2

$0 2 70

— 6

60 50 40 30 20 10

—10 —12 —14 —16 —1$ —22 —24 —26 —211

HK 525

Fig. 1—Hydrometer Reading Correction Chart

Battery Capacity". Test voltage regulator setting and all electrical connections are clean and tight.

TEST BATTERY CONDITION AND STATE OF CHARGE WITH CAD-TIP ANALYZER—Part Number 1-369 (Fig. 2) (1) Check electrolyte level in all cells and add mineral-free water to proper level. When a car is running, the battery is receiving a charge from the alternator. This charge builds up a "surface charge" in the battery that must be removed before an accurate test can be made. (2) Remove the

S11112CP

rharge by homing Hip haarl_

lights "on" for one minute before testing battery. If the battery has not been operating in a car for at least 8 hours prior to testing, Step 2 is not necessary.

(b) Cells show more than 25 points (.025 Specific Gravity) Variation—Short circuit low cell. Loss of

electrolyte by leakage or excessive overcharge; try to recharge battery. See "Charging the Battery." See "Adjustment of Acid Gravity". (c) Battery specific gravity is above 1.220 and all cells are even. Battery state of charge may be satisfactory. Test by making "High Rate Discharge Test of

Fig. 2—Testing Battery Cells with Cad-Tip Battery Cell Analyzer


BATTERY-ELECTRICAL 8-3 IMPORTANT: Be sure that headlights, ignition and all accessories are "off" during test.

(3) Remove battery filler plugs and place the RED probe in the POSITIVE (±) CELL and the BLACK probe in the SECOND CELL. NOTE READING. (There will be no meter reading if the probes are reversed.) A manual set index pointer is provided to assist in making cell comparisons. Set the manual index pointer for reference.

(4) Move RED probe to SECOND CELL and BLACK probe to THIRD CELL; then move RED probe to THIRD CELL and BLACK probe to FOURTH CELL, etc., until all cells have been tested. Note each cell reading so that CELL COMPARISONS CAN BE MADE. Always store probe assembly in the space provided in the meter case.

TEST READING INTERPRETATIONS (Fig. 3) A—If the readings of any two cells vary FIVE scale divisions or more on the TOP scale—regardless of the colored sections in which they may fall on the bottom scale—The battery is at or near the point of failure and should be replaced.

B—If all cells vary LESS than five scale divisions on the TOP scale and all are in the GREEN section of the Bottom Scale—The battery is in good condition and a safe state of charge.

C—If all cells vary LESS than five scale divisions

on the TOP scale but if any of the cells test in the RED section of the BOTTOM scale—the battery is in good condition but is in a low state of charge---Recharge at once to avoid a starting failure.

D—If ANY cell readings are in the "RECHARGE AND RETEST" section of the TOP SCALE and the balance of the readings are within the first four scale divisions—the battery is too low to make an accurate condition test—Recharge battery and retest. CAUTION: Be certain to remove "surface charge" after recharge and before retesting. See "Step 2."

ADJUSTMENT OF ACID GRAVITY Hydrometer floats usually are not calibrated below 1.160 specific gravity and cannot indicate the condition of a battery in a very low state of charge. Therefore, it may be necessary to give the battery several hours charge before a hydrometer reading will indicate that the battery is taking a charge. If the specific gravity of all cells are not within .015 points of specified value, corrected to 80°F. at the end of a full charge, remove some of the electrolyte with a hydrometer and add a like amount of distilled water to reduce the gravity if too high, or add 1.400 Specific Gravity acid to raise specific gravity, if too low. Continue the charge so as to give the electrolyte a chance to mix and then read the gravity after another hour of charge to note the effect of the additions. Continue

wERY CONDIT/Ory

140 • .11 00 7 . G1 A

RGS

6 s4F 005=7"11* o .&o

Fe

RED BAND REPLACEMENT RECOM VARY BY 5 OR MORE S

GRY C0NDIT10

GREEN BAND

RED BAND 4000

GREEN BAND

ED IF CELL READINGS DIVISIONS

A

GREEN BAND

RED BAND

GREEN BAND

NP166 Fig. 3—Battery State of Charge


8-4 ELECTRICAL—BATTERY this adjusting procedure until gravity is brought to the desired value by charging for one hour after each adjustment. Never adjust the specific gravity of any battery cell which does not gas freely on charge. Unless electrolyte has been lost through spilling or leaking, it should not be necessary to add acid to a battery during its life. Acid should never be added unless one is certain that the cell will not come up to normal gravity by continued charging. Always make the temperature correction for hydrometer readings, as warm electrolyte will read low and this might be mistaken for failure of the battery to rise normally in gravity. It could also be falsely concluded that the battery would not take a full charge.

reading is equal to three times ampere hour rating of battery. (5) Maintain this load for 15 seconds; voltmeter should read 9.5 volts or more, which will indicate that the battery has good output capacity. (6) After the 15 second test, turn Battery-StarterTester control knob to the OFF position. If the voltage in the "High Rate Discharge Test" was under 9.5 volt, the battery should be test charged to determine whether the battery can be satisfactorily charged. Charging the Battery Three Minute Charge Test (Fig. .5) This test should not be used if battery temperature is below 60 degree F.

HIGH RATE DISCHARGE TEST OF BATTERY CAPACITY

(1) Connect Battery Charger positive (+) lead to battery positive terminal and negative (—) lead to battery negative terminal.

Satisfactory capacity tests can be made only when battery equals or exceeds 1.220 specific gravity at 80 degrees Fahrenheit. If the reading is below 1.220 the battery should be slow charged until fully charged in order to secure proper test results.

IMPORTANT: Be sure of correct polarity when charging batteries. (2) Trip Battery Charger Power Switch to ON posi-

Test Procedure

(1) Turn control knob of Battery-Starter-Tester to position. (2) Turn Voltmeter Selector Switch to the 16 volt position on test units so equipped. (3) Connect test ammeter and voltmeter positive leads to battery positive terminal. Connect ammeter and voltmeter negative leads to battery negative terminal (Fig. 4). Voltmeter clips must contact battery OFF

posts or cable clamps and not ammeter lead clips.

(4) Turn control knob clockwise until ammeter

tion. Turn timer switch past three minute mark then back to the three minute mark. (3) Adjust Battery Charger Switch to highest possible rate not exceeding 40 amperes. (4) When timer switch cuts off at the end of 3 minutes, turn timer switch back to fast charge. (5) Use the 16 volt scale of the Battery Starter Tester and measure total voltage of battery posts while battery is being fast charged. If total voltage during charge exceeds 15.5 volts, battery is sulphated and should by cycled and slow-charged until specific gravity reaches 1.260 (See "Slow Charging"). A slow charge is preferable to bring the battery up to a full charge.

If specific gravity remains constant after testing battery at one hour intervals for three hours, battery is at its highest state of charge. (6) Make another capacity test. If capacity test does not meet specifications, replace battery. Fast Charging the Battery (Fig. 6)

If adequate time for a slow charge is not available,

Fig. 4 — High Rate Discharge Test

Fig. 5—Three Minute Charge lost


STARTER—ELECTRICAL 8-5 have recently been charged. Do not break live circuits at the terminals of the batteries on charge. A spark will occur where the live circuit is broken. Keep all open flames away from the battery. Slow Charging Batteries

Fig. 6—Fast Charging the Battery

a high rate (FAST) charge is permissible and will give a sufficient charge in one hour enabling the battery and alternator to continue to carry the electrical load. Connect Battery Charger positive (+ ) lead to battery positive terminal and negative (—) lead to battery negative terminal. If battery is not removed from vehicle, BE SURE ignition switch is turned off and all electrical accessories are turned off during charging. CAUTION: The battery can be damaged beyond repair unless the following precautions are taken: (1) Battery electrolyte temperature must NEVER

exceed 125 degrees Fahrenheit. If this temperature is reached, battery should be cooled by reducing charging rate or remove battery from the circuit. (2) As batteries approach full charge electrolyte in each cell will begin to gas or bubble. Excessive gassing must not be allowed. (3) Do not fast charge longer than one hour. If battery does not show a significant change in specific gravity after one hour of "FAST" charge, the slow charge method should be used. Remember to use temperature correction when checking specific gravity. The manufacturers of high rate charging equipment generally outline the necessary precautions and some models have thermostatic temperature limiting and time limiting controls. WARNING: When batteries are being charged an explosive gas mixture forms beneath the cover of each cell. Do not smoke near batteries on charge or which

Many discharged batteries can be brought back to good condition by slow charging; especially batteries that are sulphated. Battery should be tested with a hydrometer and a record kept of the readings taken at regular intervals throughout the charge. When a cell has a specific gravity reading that is 25 points (.025) or more below other cells, that cell is faulty and battery should be replaced. Safe slow charging rates are determined by allowing one ampere per positive plate per cell. Proper slow charging rate would be 4 amperes for a 46 ampere hour battery; 5 amperes for a 59 ampere hour battery; and 6 amperes for a 70 ampere hour battery. The average length of time necessary to charge a battery by the slow charge method at normal rates is from 12 to 16 hours, however, when a battery continues to show an increase in specific gravity, battery charge should be continued even if it takes 24 hours or more. Watch the temperature of batteries carefully and if the temperature of any one of them reaches 110°F., lower the charging rate.

Battery will be fully charged when it is gassing freely and when there is no further rise in specific gravity after three successive readings taken at hourly intervals. Make sure hydrometer readings are corrected for temperature. The rate of charge for a sulphated battery should be no more than 1/2 the normal slow charge rate. Many sulphated batteries can be brought back to a useful condition by slow charging at half the normal charging rate from 60 to 100 hours. This long charging cycle is necessary to reconvert crystalline lead sulphate into active materials. When a battery takes a full charge, but is returned several times in need of a recharge, check for a cracked cell partition with a syringe to provide air pressure; bubbles will appear in an adjacent cell if a crack is present.


STARTER (Direct Drive) INDEX Adjusting Starter Drive Pinion Clearance Amperage Draw Test Assembling the Starter Brushes and Springs Replacement Bushings—Servicing Cteankng the Starter Parts

Page 12 6 11 8 10 7

Disassembling the Starter Drive Unit—Servicing Drive Gear Pinion Clearance—Adjusting Field Coils—Replacement Free Running Test SnstaSSing the Starter

Page 7 11 12 10 7 12


8-6

ELECTRICAL—STARTER

Insulated Circuit Test Removing the Starter Replacement of Brushes and Springs Replacing Field Coils Service Diagnosis Servicing Bushings Servicing Drive Unit Specifications Starter Ground Circuit Test Starter Resistance Test

Page 6 7 8 10 12 10 11 87 7 6

Starter Circuit Tests Insulated Circuit Test Starter Ground Circuit Test Testing Armature Testing Armature for Short Circuit Testing Armature for Ground Testing Commutator Runout Testing Field Coils for Ground Testing Starting Motor (Bench Test)

Page 6 7 9 9 10 10 7

SERVICE PROCEDURES CHECK AMPERAGE DRAW TEST (with Starter Tester) Check battery electrolyte gravity with a reliable hydrometer. Gravity should be not less than 1.220 (temperature corrected). See that battery passes High Rate Discharge Test shown in the "Battery" section of this manual. Turn Battery—Starter Tester CONTROL KNOB to "OFF" position. Turn voltmeter Selector Switch to 16 Volt position. Connect heavy Positive ammeter lead (Red) to Positive battery terminal. Connect heavy Negative ammeter lead (Black) to Negative battery terminal. Connect Positive voltmeter lead (Red) to Positive battery terminal. Connect Negative voltmeter lead (Black) to Negative battery terminal. DISCONNECT ignition primary lead from ignition ballast resistor, or primary wire from either side of coil, to prevent engine from starting. Crank engine with a remote control starter switch and observe Exact reading on Voltmeter. Stop cranking engine. Without cranking engine, turn tester CONTROL KNOB clockwise until voltmeter reads Exactly the same as when engine was being cranked with the remote control starter switch. Ammeter now indicates starter amperage draw. Check specifications. Engine should be up to operating temperature. Extremely heavy oil or a tight engine will increase starter amperage draw.

STARTER RESISTANCE TEST (1) Test battery electrolyte specific gravity. Specific gravity should be 1.220 or above. (2) Disconnect positive battery lead from battery terminal post. Connect a 0 to 300 scale ammeter between disconnect lead and battery terminal post. (3) Connect a test voltmeter with 10 volt scale division between battery positive post and starter switch terminal at starter solenoid. (4) Crank engine and observe reading on voltmeter and ammeter. The voltage should not exceed .3 volt. A reading of voltage that exceeds .3 volt indicates there

is high resistance caused from loose circuit connections, a faulty cable, burned starter relay or solenoid switch contacts. A current that is high and is combined with slow cranking speed, indicates that starter should be removed and repaired.

INSULATED CIRCUIT TEST (1) Test battery electrolyte specific gravity. Specific gravity should be 1.220 or above. (2) Turn Voltmeter Selector Switch to 4 volt position. (3) Disconnect ignition coil secondary cable. (4) Connect voltmeter positive lead to battery positive post and voltmeter negative lead to solenoid connector which connects to starter field coils. The voltmeter will read off scale to the right until starter is actuated. (5) Connect remote control switch to the battery and solenoid terminal of starter relay. (6) Crank engine with a remote control starter switch and observe voltmeter reading. Voltmeter reading should not exceed .3 volt. A voltmeter reading of .3 volt or less indicates voltage drop is normal in the cables, starter relay switch, solenoid switch and connections between battery and starter is normal. See "Starter Ground Circuit Test." If voltmeter reading is more than .3 volt, it indicates high resistance in the starter insulated circuit. Make following tests to isolate point of excessive voltage loss: (a) Remove the voltmeter lead from the solenoid connector and connect to the following points, repeating test at each connection. Starter terminal of solenoid, battery terminal of solenoid, battery cable terminal at solenoid, starter relay and cable clamp at battery. (b) A small change will occur each time a normal portion of the circuit is removed from the test. A definite change in voltmeter reading indicates that the last part eliminated in the test is at fault. Maximum allowable voltage loss is as follows:


STARTER—ELECTRICAL 8-7 .2 volt Battery insulated cable Solenoid switch .1 volt Each connection .0 volt Replace faulty cables. Clean and tighten all connections.

STARTER GROUND CIRCUIT TEST (1) Connect the voltmeter positive lead to starter housing and negative voltmeter lead to battery negative post. (2) Crank engine with a remote control starter switch and observe voltmeter reading. Voltmeter reading should not exceed .2 volt. A reading of .2 volt or less indicates voltage loss in ground cable and connections are normal. If voltmeter reading is more than .2 volt, it indicates excessive voltage loss in starter ground circuit. Make the following tests to isolate point of excessive voltage loss, repeating test at each connection. (a) Starter drive housing. (b) Cable terminal at engine. (c) Cable clamp at battery. A small change will occur each time a normal portion of the circuit is removed from test. A definite change in voltmeter reading indicates the last part eliminated in the test is at fault. Maximum allowable voltage loss is as follows: .0 volt Battery ground cable .2 volt Engine ground circuit .1 volt Each connection

REMOVING THE STARTER (1) Disconnect ground cable at battery. (2) Remove starter cable at starter. (3) Disconnect solenoid lead wire from solenoid. (4) Remove bolts attaching starter to flywheel housing and remove starter.

(Bench Test) FREE RUNNING TEST (1) Place starter in a vise equipped with soft jaws and connect a fully-charged, 12 volt battery to starter as follows: (2) Connect a test ammeter (100 amperes scale) and a carbon pile rheostat in series with battery positive post and starter terminal. (3) Connect voltmeter (15 volt scale) across starter. (4) Rotate carbon pile to full-resistance position. (5) Connect battery cable from battery negative post to starter frame. (6) Adjust rheostat until battery voltage shown on voltmeter reads 11 volts.

(7) Current draw should be 78 amperes maximum at 3800 minimum rpm. Locked Resistance Test (1) Install starter in test bench. (2) Follow instructions of test equipment manufacturer and test the locked-resistance of the starter as follows: With applied battery voltage adjusted to 4 volts; current draw should be as shown in specifications.

DISASSEMBLING THE STARTER (1) Refer to Figure 1, remove through bolts and tap commutator end head from field frame. (2) Remove thrust washers from armature shaft. (3) Lift brush holder springs and remove brushes from brush holders. (4) Remove brush plate (Fig. 2). (5) Disconnect field coil leads at solenoid connector (Fig. 3). (6) Remove solenoid attaching screws and remove solenoid and boot assembly (Fig. 4). (7) Drive out overrunning clutch shift fork pivot pin (Fig. 5). (8) Remove drive end pinion housing and spacer washer. Replace the pinion housing assembly, if the rubber seal (Fig. 1) is damaged (units so equipped). (9) Note position of shifter fork on starter drive and remove shifter fork (Fig. 6). (10) Slide overrunning clutch pinion gear toward commutator end of armature, drive stop retainer toward clutch pinion gear to expose snap ring and remove snap ring. (11) Slide overrunning clutch drive from armature shaft. (12) If it is necessary to replace field coils, remove the ground brushes terminal attaching screw and raise the brushes with terminal and shunt wire up and away from field frame (Fig. 7). Remove pole shoe screws with special pole shoe impact screwdriver, Tool C-3475.

CLEANING THE STARTER PARTS (1) Do not immerse parts in cleaning solvent. Immersing the field frame and coil assembly and/or armature will damage insulation. Wipe these parts with a cloth only. (2) Do not immerse drive unit in cleaning solvent. Drive clutch is pre-lubricated at the factory and solvent will wash lubrication from clutch. (3) The drive unit may be cleaned with a brush moistened with cleaning solvent and wiped dry with a cloth.


8-8 ELECTRICAL-STARTER

NP303A Fig. I —Storter—Cross Section

BRUSHES AND SPRINGS-REPLACEMENT

(1) Brushes that are worn more than 1/2 the length of new brush, or are oil-soaked, should be replaced. Brushes and springs can be replaced after removing commutator end head and brush plate. (2) Disengage brushes from brush holders and remove brush plate. (3) Disconnect series coil and shunt field coil terminal at solenoid connector (Fig. 3). (4) Remove ground brush terminal screw and care-

fully remove ground brush set to prevent breaking shunt field lead. (5) Remove shunt field from old brush set to ensure as much length as possible. (6) Remove field temfinal plastic covering and remove old brushes. Use side cutters to break the weld by rolling the stranded wire off the terminaL (7) Drill a .174 to .184 inch hole in the series coil terminal 3'16 of an inch from top of terminal to centerline of hole (Fig. 7). (Use a number 16 drilL)

SERIES COB. LEAD SHUNT COIL LEAD

NB 20

fig. 2—Removing Brush note

Fig. 3—Field Coil Lends Disconnected from Solenoid Connector


STARTER—ELECTRICAL 8-9 Si FRAME AND FIELD SOLE NOI

ArSCREW - TE 174 DIA r iTgiN D IN FIELD LEAD

N621 Fig. 4—Removing or Installing Starter Solenoid CAUTION: Do not damage the field coil during the drilling operation.

(8) Attach insulated brush set to series field terminal with flat washer and number 8 self-tapping screw. (9) Attach shunt field lead to new ground brush set by making a loop around the terminal and soldering lead to the terminal with resin core solder. (10) Attach ground brush terminal to field frame with attaching screw. Fold surplus shunt field lead back along the brush lead and secure with rubber

GROUND BRUSH ASS?. NKSI 2A

INSULATED BRUSH ASS?.

Fig. 7—Brush Replacement

insulating tape. (11) Measure brush spring tension with a spring scale hooked under spring near brush end. Pull scale on a line parallel to edge of brush and take a reading just as spring end leaves the brush. Spring tension should be :32 to 36 ounces. Replace springs that do not meet specifications. (12) Brush springs can be removed by spreading the retainers and disengaging the springs from retainer legs.

TESTING THE ARMATURE Testing Armature for Short Circuit

Place armature in a growler (Fig. 8) and hold a thin steel blade parallel to the core and just above it. while slowly rotating armature in growler. A shorted armature will cause blade to vibrate and be attracted to the core. Replace shorted armature. Testing Armature for Ground

Touch armature shaft and the end of each commutator bar with a pair of test lamp prods (Fig. 9). If lamp lights, it indicates a grounded armature. Replace grounded armature.

Fig. 5—Removing Shifter Fork Pivot Pin _FM

SHIFTER

FORK

STOP RETAINER SNAP RING SPACER WASHER

Fig. 6—Removing or installing Shift Fork

Ns 23 Fig. 8—Testing Armature for Short


8-10 ELECTRICAL—STARTER

Fig.

(6) Touch one probe to shunt field coil lead and other probe to field frame (Fig. 11). If lamp lights in either test (5) or (6), field coils are grounded. If field coils are grounded, test each coil separately after unsoldering connector wires. Replace grounded field coils. (7) Touch each of the brush holders with one test probe. while holding other test probe against brush ring. Two brush holders that are 180 degrees apart should cause test lamp to light as they are intentionally grounded. The other two brush holders (Fig. 12) should not cause lamp to light when tested as they are insulated. If insulated brush holders cause lamp to light when tested, it indicates that brush holders on brush ring are grounded. Replace brush ring assembly if brush holders are grounded.

9—Testing Armature for Ground

Testing Commutator Runout, Refacing

Place armature in a pair of "V" blocks and check runout with a dial indicator. Check both shaft and commutator. A bent shaft requires replacement of armature. When commutator rtmout exceeds .003 inch, commutator should be refaced. Remove only a sufficient amount of metal to provide a smooth, even surface.

TESTING FIELD COILS FOR GROUND (1) Remove through bolts and commutator end frame. (2) Remove brushes from brush holders and remove brush plate (Fig. 2). (3) Disconnect field lead wires at solenoid connector and separate field leads to make sure they do not touch solenoid connector (Fig. 3). (4) Remove ground brushes attaching screw, and raise brushes with terminal and shunt wire up and away from field frame. (5) Touch one probe of test lamp to series field coil lead and other probe to field frame (Fig. 10). Lamp should not light.

REPLACING FIELD COILS A pole shoe impact screwdriver Tool C-3475 should be used to remove and install field coils to prevent damage to the pole shoe screws and for proper tightening. Pole shoes that are loose and not properly seated may cause armature core to rub on pole shoes. This will decrease starter efficiency and damage armature core. Scribe a mark in the pole shoe and field frame to ensure pole shoes are assembled in their original position.

SERVICING BUSHINGS Inspect armature shaft bearing surfaces and bushings for wear by placing armature core in a vise equipped with soft jaws. Do not squeeze tightly. Try the commutator end frame, drive end frame, and armature support bushings for wear by placing them on shafts and checking for side play. Replace commu-

'

TEST PROBES

SERIES LEAD —

SHUNT LEAD

g 25 Fig.

10—Testing Series Coil for Ground

Fig. 11—Testing Shunt Coil for Ground


STARTER—ELECTRICAL 8-11 ASSEMBLING THE STARTER

(Refer to Figs, 1 and 13)

INSULA I ED BRUSH I iOLDERS

NO

(1) Lubricate armature shaft and splines with SAE 10.W oil or SAE 30 rust preventative oil. (2) Install starter drive, stop collar (retainer), lock ring and spacer washer. (3) Install shifter fork over starter drive spring retainer washer with narrow leg of fork toward the commutator (Fig. 6). This is important, if the fork is not properly positioned starter gear travel will be restricted causing a lockup in the clutch mechanism. (4) Install drive end (pinion) housing on armature shaft, indexing shifting fork with slot in drive end housing. (5) Install shifter fork pivot pin (Fig. 5). (6) With clutch drive, shifter fork, and pinion housing assembled to the armature, slide armature into field frame until pinion housing indexes with slot in field frame. (7) Install solenoid and boot assembly (Flg. 4). Tighten bolts to 60-70 inch-pounds. (8) Connect field coil leads at solenoid connector (Fig. 3). Be sure terminals do not touch field frame. (9) Install brush holder plate (Fig. 2) indexing tang of ring in hole of field frame. (10) Position brushes in brush holders. Be sure field coil lead wires are properly enclosed behind brush holder ring and do not interfere with brush operation. (11) Install thrust washers on commutator end of armature shaft to obtain .010 inch minimum end play. (12) Install commutator end head_

27

Fig. 12—Testing Insulated Brush Holder for Ground

tator end frame and bushing assembly if bushing is worn. Replace drive end bushing if worn. The bushing should be well soaked in SAE 30 engine oil before it is installed. New pro-sized bushings should be pressed into the housing until bushing is flush with inner side of housing to provide proper clearance. Use Tool C3944 to remove and install bushing. SERVICING THE DRIVE UNIT Place drive unit on armature shaft and while holding armature, rotate the pinion. Drive pinion should rotate smoothly in one direction (not necessarily easily) but should not rotate in opposite direction. If drive unit does not function properly, or if pinion is worn or burred, replace drive unit.

ARMATURE

SNAP RING

SCREW PLUNGER

WASHER

CAP

SWITCH\ SpRING

WASHER

IN

I

GROMMET \--BRUSH COIL

BOLT

IIOUSING CLUICH POLE PIECE WASHER

BRUSH SPRING WASHER

SCREW

BRUSH SPRING FRAME

Hg. 13 — Starter —Disassembled View


8-12 ELECTRICAL-STARTING MOTOR in the solenoid when making the pinion clearance test.

(2) Push in on solenoid plunger cage (Fig. 14) (NOT THE FORK LEVER) until plunger bottoms. (3) Measure clearance between end of pinion and pin stop with plunger seated and pinion pushed toward the commutator end. Clearance should be 1/8 inch. Adjust for proper clearance by loosening solenoid attaching screws and move solenoid fore and aft as required. (4) Test starter operation under a "Free Running Test." INSTALLING THE STARTER Fig. 14—Checking Starter Drive Pinion Clearance

(13) Install through bolts and tighten to 40 to 50 inch-pounds. ADJUSTING STARTER DRIVE GEAR (PINION) CLEARANCE (1) Place starter assembly in a vise equipped with soft jaws and tighten vise sufficiently to hold starter. Place a wedge or screwdriver between bottom of solenoid and starter frame to eliminate all deflection

( I ) Before installing the starter, be sure starter and flywheel housing mounting surfaces are free of dirt and oil. These surfaces must be clean to make good electrical contact. (2) Position starter to flywheel housing removable seal (if removed). (3) Install starter from beneath the engine. 14) Tighten attaching bolts securely. (5) Attach the wires to solenoid switch and starter terminal. (6) Install battery ground cable and test operation of starter for proper engine cranking.


REDUCTION GEAR STARTER INDEX Amperage Draw Test Assembling the Starter Brushes and Springs Replacement Bushings Replacement Cleaning the Starter Parts Disassembling the Starter Field Coils Replacement General Information Ground Circuit Test Insulated Circuit Test

Page 14 19 17 18 16 15 18 12 15 14

Installing the Starter Removing the Starter Resistance Test Service Diagnosis Servicing the Starter Clutch Unit Specifications Testing the Starter (Bench Test) Testing Armature Testing Field Coils for Ground

Page 21 15 15 12 19 87 15 18 18

GENERAL INFORMATION The starter has a 3.5 to 1 reduction gear set built into the Starter assembly, which is housed in an aluminum die casting, Fig. 1. The starter utilizes a sole-

noid shift device, the housing of the solenoid is in. tegral with the starter drive end housing.

SERVICE DIAGNOSIS Condition

STARTER FAILS TO OPERATE

Possible Cause

Correction

(a) Test specific gravity. Recharge or replace battery as required. (b) Test and replace switch if necessary. (b) Ignition switch faulty. (c) Loose or corroded battery cable ter- (c) Clean terminals and clamps, replace if necessary. Apply a light film of petminals. rolatum to terminals after tightening. (d) Open circuit, wire between the igni- (d) Inspect and test all the wiring. tion—starter switch and ignition terminal on starter relay.

(a) Weak battery or dead cell in battery.


STARTING MOTOR—ELECTRICAL 8-13 Condition

Possible Cause (e) (f) (g) (h)

STARTER FAILS AND LIGHTS DIM

(e) (f) (g) (h)

Test relay and replace if necessary. Test and repair as necessary. Test and repair. Test and replace solenoid if necessary.

(a) Weak battery or dead cell in battery. (b) (c) (d) (e)

STARTER TURNS, BUT ENGINE DOES NOT ENGAGE

Starter relay defective. Faulty starter. Armature shaft sheared. Open solenoid pull-in wire.

Correction

(a) Test for specified gravity. Recharge or replace battery as required. Loose or corroded battery cable ter- (b) Clean terminals and clamps, replace minals. if necessary. Apply a light film of petrolatum to terminals after tightening. Internal ground in windings. (c) Test and repair starter. Grounded starter fields. (d) Test and repair starter. Armature rubbing on pole shoes. (e) Test and repair starter.

(a) Starter clutch slipping. (a) (b) Broken clutch housing. (b) (c) Pinion shaft rusted, dirty or dry, due (c) to lack of lubrication. (d) (d) Engine basic timing wrong. (e) Broken teeth on engine ring gear.

Replace clutch unit. Test and repair starter. Clean, test and lubricate.

Check engine basic timing and condition of distributor rotor and cap. (e) Replace ring gear. Inspect teeth on starter clutch pinion.

STARTER RELAY DOES NOT CLOSE

(a) Batttery discharged. (b) Faulty wiring.

RELAY OPERATES BUT SOLENOID DOES NOT

(a) Faulty wiring.

(a) Test for open circuit wire between starter-relay solenoid terminal and solenoid terminal post. (b) Faulty solenoid switch or connections. (b) Test for loose terminal connections between solenoid and starter field. (c) Solenoid switch contacts corroded. (c) Test and replace solenoid if necessary. (d) Broken lead or a loose connection in- (d) Test and replace solenoid if necesside solenoid switch (brush holder sary. plate).

SOLENOID PLUNGER VIBRATES BACK AND FORTH WHEN SWITCH IS ENGAGED

(a) Battery low.

(a) Test for specific gravity of batten/. Replace or recharge battery. (b) Faulty wiring. (b) Test for loose connections at relay, ignition-starter switch and solenoid. (c) Lead or connections broken inside (c) Test and replace solenoid if necessolenoid switch cover (brush holder sary. plate) or open hold-in wiring. (d) Check for corrosion on solenoid con- (d) Test and clean the contacts. tacts.

STARTER OPERATES BUT WILL NOT DISENGAGE WHEN IGNITION STARTER SWITCH IS RELEASED

(a) Broken solenoid plunger spring or (a) Test and repair. spring out of position. (b) Faulty ignition-starter switch. (b) Test and replace the switch if necessary. (c) Solenoid contact switch plunger stuck (c) Remove contact switch plunger, wipe in solenoid. clean of all dirt, apply a film of SAE 10 oil on plunger, wipe off excess. (d) Insufficient clearance between wind- (d) Test and repair. ing leads to solenoid terminal and main contactor in solenoid. (e) Faulty relay. (e) Test and replace relay if necessary.

(a) Recharge or replace battery. (b) Test for open circuit, wire between starter relay ground terminal post and neutral starter switch (automatic transmission only). Also test for open circuit; wire between ignition-starter switch and ignition terminal and starter relay. (c) Neutral starter switch on automatic (c) Test and replace the switch if necestransmission faulty. sary. (d) Starter relay faulty. (d) Test and replace if necessary.


8-14 ELECTRICAL—STARTING MOTOR

PLUNGER ASSEMBLY BATTERY TERMINAL

i g

SOLENOID

SEAL

t;4 11reite

POLE SHOE (4)

WASHER

.nt

i it

Ii

:1 102%ii theleip iff-11 Ili morilLii .. alrin (i. —go 1. WI. Zi • _ .1 \ ' g.‘ir_,, i !iniiminiumil ,) • - Icrof

i. , .........

-I P .

WASHER

e•

filaNIMIIIMIli, 11111111a1111111111111 SPIr-111111111111.111.1111111111111

FORK END HEAD

--------ar

RETAINER

I 111111111all 11111111111111111alli

'ad

• 111111111H

4*.

r//'

,h\

n$ . r? " Intiriaramo

/,

A

END HEAD ASSEMBLY AR ATURE FIELD FRAME

6 1

THRUST WASHERS

FIBER WASHER

deLl■A

FRICTION WASHER

SNAP RING RING COVER

CLUTCH NU429A

Fig. 1–Starter Cross Section

SERVICE PROCEDURES AMPERAGE DRAW TEST (with Starter Tester) Check battery electrolyte gravity with a reliable hydrometer. Gravity should be not less than 1.220 (temperature corrected). Or see that battery passes the High Rate Discharge Test shown in the "Battery" section of this manual. Turn Battery—Starter Tester CONTROL KNOB to "OFF" position. Turn voltmeter Selector Switch to 16 Volt position. Connect heavy Positive ammeter lead (Red) to Positive battery terminal. Connect heavy Negative ammeter lead (Black) to Negative battery terminal. Connect Positive voltmeter lead (Red) to Positive battery terminal. Connect Negative voltmeter lead (Black) to Negative battery terminal. DISCONNECT ignition primary lead from ignition ballast resistor, or primary wire from either side of coil, to prevent engine from starting. Crank engine with a remote control starter switch and observe Exact reading on Voltmeter. Stop cranking engine. Without cranking engine, turn tester CONTROL KNOB clockwise until voltmeter reads Exactly the same as when engine was being cranked with the remote control starter switch. Ammeter now indicates starter amperage draw. Check specifica-

tions. Engine should be up to operating temperature. Extremely heavy oil or a tight engine will increase starter amperage draw.

INSULATED CIRCUIT TEST (1) Test battery electrolyte specific gravity. Specific gravity should be 1.220 or above. If battery specific gravity is below 1.220, recharge battery to full charge before proceeding with test. (2) Turn voltmeter selector switch to 4 volt position. (3) Disconnect ignition coil secondary cable. (4) Connect voltmeter positive lead to battery positive post and voltmeter negative lead to solenoid connector which connects to the starter field coils. The voltmeter will read off scale to the right until starter is actuated. (5) Connect remote control switch to battery and solenoid terminal of starter relay. (6) Crank engine with a remote starter control starter switch and observe voltmeter reading. Voltmeter reading should not exceed .3 volt. A voltmeter reading .3 volt or less indicates voltage drop is normal in cables, starter relay switch solenoid switch and connections between battery and starter motor. See "Starter Ground Circuit Test."


STARTING MOTOR—ELECTRICAL 8-15 If voltmeter reading is more than .3 volt, it indicates high resistance in starter insulated circuit. Make following tests to isolate point of excessive voltage loss: (a) Remove voltmeter lead from solenoid connector and connect to the following points, repeating test at each connection. Starter terminal of solenoid, battery terminal of solenoid, battery cable terminal at solenoid, starter relay and cable clamp at the battery. (b) A small change will occur each time a normal portion of the circuit is removed from test. A definite change in the voltmeter reading indicates that the last part eliminated in test is at fault. Maximum allowable voltage loss is as follows: Battery insulated cable .2 volt Solenoid switch .1 volt Each connection .0 volt Replace faulty cables. Clean and tighten all connections.

tion of circuit is removed from the test. A definite change in voltmeter reading indicates that last part eliminated in the test is at fault. Maximum allowable voltage loss is as follows: Battery ground cable .2 volt Engine ground circuit .1 volt Each connection .0 volt

RESISTANCE TEST

TESTING THE STARTER (Bench Test)

(1) Test battery electrolyte specific gravity. Specific gravity should be 1.220 or above. (2) Disconnect positive battery lead from battery terminal post. Connect an 0 to 300 scale ammeter between disconnected lead and battery terminal post. (3) Connect a test voltmeter with 10 volt scale division between battery positive post and starter switch terminal at starter solenoid. (4) Crank engine and observe reading on voltmeter and ammeter. Voltage should not exceed .3 volt. A voltage reading that exceeds .3 volt indicates there is high resistance caused from loose circuit connections, a faulty cable, burned starter relay or burned solenoid switch contacts. A current that is high and is combined with slow cranking speed, indicates starter should be removed and repaired.

Free Running Test (1) Place starter in a vise and connect a fully charged, 12 volt battery to starter as follows: (a) Connect a test ammeter (100 amperes scale) and a carbon pile rheostat in series with battery positive post and starter terminal. (b) Connect a voltmeter (15 volt scale) across starter. (c) Rotate carbon pile to full-r esistante position. (d) Connect battery cable from battery negative post to starter frame. (e) Adjust the rheostat until battery voltage shown on voltmeter reads 11 volts. Amperage draw should be as shown in specifications.

GROUND CIRCUIT TEST (1) Connect test voltmeter positive lead to starter housing and voltmeter negative lead to battery negative post. (2) Crank engine with a remote control starter switch and observe voltmeter reading. Voltmeter reading should not exceed .2 volt. A reading of .2 volt or less indicates the resistance of the ground cable and connections is normal. If voltmeter reading is more than .2 volt, it indicates excessive voltage loss in starter ground circuit. Make the following tests to isolate point of excessive voltage loss. Repeating test at each connection. (a) Starter drive housing. (b) Cable terminal at engine. (c) Cable clamp at battery. A small change will occur each time a normal por-

REMOVING THE STARTER (1) Disconnect ground cable at battery. (2) Remove cable at starter. (3) Disconnect solenoid lead wires at solenoid terminals. (4) Remove one stud nut and one bolt attaching starter to flywheel housing, slide automatic transmission oil cooler tube bracket off the stud (if so equipped) and remove the starter. Do not damage cylinder block seal.

Locked -Resistance Test (1) Install starter in a test bench. (2) Follow instructions of test equipment manufacturers and test starter against following specifications. With applied battery voltage adjusted to 4 volts. Amperage draw should be as shown in specifications.

DISASSEMBLING THE STARTER (1) Place the starter gear housing in a vise equipped with soft jaws. Use the vise as support fixture only. DO NOT clamp. (2) Remove two through bolts and starter end head assembly. (3) Carefully pull armature up and out of gear housing and starter frame and field assembly. Remove steel and fiber thrust washer. The wire of shunt field coil is wrapped on the brush terminal. One set of brushes are connected to this terminal. The other pair of brushes is attached to the series field coils by


8-16 ELECTRICAL-STARTING MOTOR

4. Jr

means of a terminal screw. Carefully pull frame and field assembly up lust enough to expose terminal strew and wire wrap connection of shunt field at brush terminal. Place two wood blocks between starter frame and starter gear housing to facilitate removal of terminal screw, Fig. 2.

7'

SOLENOID LEAD WIRE

(4) Support brush terminal by placing a finger behind the terminal and remove terminal screw. (5) 'Unwrap shunt field coil lead from starter brush terminal. Starter brush holder plate with starter brush terminal, contact and brushes is serviced as an assembly.

(6) Unwrap solenoid lead wire and unwind wire from starter brush terminal (Fig. 3). (7) Remove nut (11/32 wrench), steel washer and insulating washer from solenoid terminal. (8) Straighten solenoid wire and remove brush holder plate with brushes and solenoid as an assembly. (9) Remove solenoid assembly from gear housing well (Fig. 4). (10) Remove nut from starter battery terminal. (11) Remove starter battery terminal from holder plate. (12) Remove solenoid contact and plunger from solenoid. (13) Remove solenoid return spring from well of solenoid housing moving core. (14) Remove dust cover from gear housing (Fig. 5)(15) Release retainer clip that positions driven gear on pinion shaft (Fig. 6).

NU431A

Fig. 3—Unwinding or Winding Solenoid Lead Wire

nylon actuators as an assembly (Fig. 9). (18) Remove driven gear and friction washer. (19) Pull shifting fork forward and remove solenoid moving core (Fig. 10). (20) Remove shifting fork retainer pin (Fig. 11) and remove clutch shifting fork assembly. CLEANING THE STARTER PARTS (1) Do not immerse parts in cleaning solvent. Immersing field frame and coil assembly and/or armaCONTACT WASHER

11\ SOLENOID RELAY SCREW

LEAD

CAUTION: Retainer is under tension and a cloth should be placed over the retainer to prevent it from springing away after removal.

(16) Release retainer ring at front of pinion shaft (Fig. 7). Do not spread retainer ring any greater than outside diameter of pinion shaft otherwise lock ring can be damaged.

(17) Push pinion shaft towards rear of housing (Fig. 8) and remove retainer ring and thrust washers, clutch and pinion assembly, with the two shift fork ■ 111• /4

RUBBER WASHER

NU432

Fig. 4—Solenoid Assembly

FIELD & FRAME ASSEMBLY STAR I ER GEAR HOUSING

BRUSH TERMINAL

DUST COVER

TOOL

NU430A

Fig. 2— Removing or Installing Terminal Screw

tn.thadi . Fig. 3—Removing Dust Cover


STARTING MOTOR-ELECTRICAL 8-17

L

uTCH sASSEmet

PINION SHAFT DRIVEN GEAR

ND211

Fig. 9—Removing or Installing Clutch Assembly

Fig. 6—Removing the Driven Gear Snap Ring

ture will damage insulation. Wipe these parts with a clean cloth only. (2) Do not immerse clutch unit in cleaning solvent. The clutch is pre-lubricated at the factory and solvent will wash lubricant from the clutch. (3) The starter-clutch outer housing and pinion gear may be cleaned with a cloth moistened with cleaning solvent and wiped dry with a clean dry cloth. (4) Clean all corrosion from solenoid assembly and inside of solenoid housing. These metal parts are part

RETAINING RING

of the solenoid hold-in ground circuit and must be clean. (5) Clean terminal contacts and contactor with crocus cloth. (6) Thoroughly clean outside area of brush plate to remove all oil and dirt.

REPLACEMENT OF BRUSHES AND SPRINGS (1) Brushes that are worn more than 1/2 the length of new brushes, or are oil-soaked, should be replaced. (2) When moldering the shunt field and solenoid lead, make a strong low resistance connection using a high temperature solder and resin flux. Do not use acid or acid core solder. Do not break the shunt field wire units, when removing and installing brushes. (3) Measure brush spring tension with a spring scale hooked under the spring near the end. Pull scale on a line parallel to the edge of brush and take a reading just as spring leaves brush. Spring tension

MOVING CORE

THRUST WASHERS ND 209

Fig. 7—Removing or Installing Pinion Shaft Retainer Ring , PINION SHAFT SHIFTING FORK

SHIFTING FORK PIN THRUST wAsi if R ND 21 ND210A

Fig. 8—Removing Pinion Shaft

Fig. 10—Removing or Installing Moving Core


8-18 ELECTRICAL—STARTING MOTOR SHIFTING FORK PIN

SHIFTING FORK

ND213A _

Fig. I1—Removing or Installing Shifting Fork Pin

should be 32 to 36 ounces. Replace springs that do not meet specifications. TESTING ARMATURE Testing Armature for Short Circuit Place armature in growler and hold a thin steel blade parallel to the core and just above it, while slowly rotating armature in growler. A shorted armature will cause blade to vibrate and be attracted to the core. Replace armature if shorted. Testing Armature for Ground Contact armature shaft and each of the commutator riser bars with a pair of test lamp test probes. If lamp lights, it indicates a grounded armature. Replace grounded armature. Testing Commutator Run-Out, and Refacing Place armature in pair of "V" blocks and measure runout with dial indicator. Measure both shaft and commutator. A bent shaft requires replacement of armature. When commutator runout exceeds .003 Inch, commutator should be refaced. Remove only a sufficient amount of metal to provide a smooth, even surface.

REMOVING

be used to remove and install field coils to prevent damage to pole shoe screws and for proper tightening. Pole shoes that are loose and not properly seated may cause armature core to rub on pole shoes. Make sure area between the leads and starter frame is clean. Peen new rivet securely to insure a good electrical contact. SERVICING THE STARTER BUSHINGS Inspect armature shaft bearing, pinion shaft surfaces and bushings for wear. Try the bushings for wear by inserting the shafts and test for side play. Pre-sized starting motor bushings are available as service bushings. Use Tool C-3944 to remove old bush-

SPITZ

A pole shoe impact screwdriver Tool C-3475 should

SP 88

"SP-3563

frame.

REPLACING THE FIELD COILS

NK74

Fig. 12—Removing and installing Pinion Housing End Rushing

Testing Field Coils for Ground (1) Remove field frame assembly from starter. (2) Carefully drill out the rivet attaching the series field coil ground lead and shunt field coil lead to field (3) Insulate field coil leads from field frame. (4) Test for ground using a 110 volt test lamp. Touch one probe of test lamp to series field coil lead and other probe to field frame. Lamp should not light. Repeat the procedure for shunt field coil. If lamp lights, it indicates that field coils are grounded and require replacement.

INSTALLING

SP-3565-A-

_ ji BUSHING

SP-3570 REMOVING

SP-256? NUSFIIM )

INSTAL LING

Fig. 13 —Removing and Installing Pinion Housing

Drive Shaft Bushing


STARTING MOTOR-ELECTRICAL 8-19 SP-3562 SP-3565-A

SP-3562 SP-88

SP-3563

tr

Fl-

BUSHING

SP-3579

INSTALLING

REMOVING

NK76

Fig. 14—Removing and Installing Pin! on Housing Armature Shaft Bushing ings and install the new. No burnishing or reaming is required to fit pre-sized bushings.

The C-3944 Tool and its adaptors are designed to service all of the gear reduction motor bushings with the exception of the end head bushing. End head bushing and end head are serviced as an assembly. Remove and install bushings, (Figs. 12, 13 and 14). SERVICING THE STARTER CLUTCH UNIT

Do not immerse starter clutch unit in a cleaning solvent. Starter clutch is pre-lubricated at the factory and a solvent will wash lubricant from the clutch. The starter clutch outer housing and pinion gear may be cleaned with a cloth moistened with a cleaning solvent and wiped dry with a clean dry cloth. Rotate the pinion. Pinion gear should rotate smoothly in one direction (not necessarily easily), but should not rotate in opposite direction. If starter clutch unit does not function properly, or pinion is worn, chipped or burred, replace starter clutch unit. ASSEMBLING THE STARTER (Fig. 15) The shifter fork consists of two spring steel plates assembled with two rivets. There should be approximately 1/16 inch side movement as shown in Figure 16 to insure proper pinion gear engagement. Lubricate between the plates sparingly with SAE 10 engine oil.

(1) Position shifter fork in drive housing and install shifting fork retainer pin. One tip of pin should be straight, other tip should be bent at a 15 degree angle away from the housing. The fork and retainer

pin should operate freely after bending tip of pin. (2) Install solenoid moving core and engage shifting fork (Fig. 10). (3) Enter pinion shaft into drive housing and install friction washer and drive gear. (4) Install clutch and pinion assembly, thrust washer, retaining and thrust washer (Fig. 9). (5) Complete installation of pinion shaft, engaging shifting fork with clutch actuators. Figure 17 shows correct relation of parts at assembly. The friction washer must be positioned on shoulder of splines of the pinion shaft before driven gear is positioned.

(6) Install driven gear snap ring (Fig. 6). (7) Install pinion shaft retaining ring (Fig. 7). (8) Install starter solenoid return spring into bore of movable core. Inspect condition of starter solenoid switch contacting washer, if top of washer is burned from arcing, disassemble contact switch plunger assembly and reverse the washer.

(9) Install solenoid contact plunger assembly into solenoid and reform double wires to allow for proper entry of terminal stud into brush holder with the double wires curved around the contactor. CAUTION: The contactor must not touch the double wires when solenoid is energized after assembly is completed (Fig. 4). Make sure contact spring is positioned on the shaft of the solenoid contact plunger assembly.

(10) Assemble battery terminal stud in brush holder. Inspect condition of the contacts in brush holder plate. If contacts are badly burned, replace brush


8-20 ELECTRICAL—STARTING MOTOR

NUT (2) HOUSING PIN

ASSEMBLY

SCREW

CORE

SOLENOID

CONTACT

atemte BUSKING

-RING

CL

ffrir SEAL

SEAL

WASH ER "'"1 ,SCREW (2) SPRING

FORK RING

GEAR

CONTACT STUD

WASHER SHAFT

WASHER

BRUSH

POLES (4)

EPR - NG RETAINER FRAME THRUST WASHER

WASHER (STEEL) SCREW INSULATOR

WASHER

WASHER

FIELD COILS

(4) WASHER (FIBER)

Fig. IS—Storter (Exploded View) holder with brushes and contacts as an assembly.

(11) Position seal on brush holder plate. (12) Enter solenoid lead wire through hole in brush holder (Fig. 18) and install solenoid stud, insulating washer, flat washer and nut. (13) Wrap solenoid lead wire tightly around brush

terminal post as shown in Figure 19 and solder securely with a high temperature resin core solder and resin flux.

SHIFTING FORK PIN

CLUTCH ASSEMBLY

RIVET (2 MOVING CORE SIDEWAYS MOVEMEN I

ND 2i 4

Fig. 16—Shifter Fork Assembly

ND 213

SHIFTING FORK

Fig. 17—Shifter Fork and Clutch Arrangement


STARTING MOTOR-ELECTRICAL 9-21 STARTER BATTERY TERm:NAL

SOLENOID

LEAD WIRE

RUBBER WASHER

GASKET BRUSH HOLDER

NU434A

Fig. 18—Assembling Solenoid to Brush Holder Plate

(14) Install brush holder to solenoid attaching screws. (15) Carefully enter solenoid coil and brush plate assembly into bore of gear housing and position brush plate assembly into starter gear housing (Fig. 20) and install housing attaching nuts. Tighten securely. (16) Position brushes with armature thrust washer as shown in Figure 19. This will hold brushes out and facilitate proper installation of armature. (17) Solder shunt coil lead wire to starter brush terminal (Fig. 21). (18) Install brush terminal screw (Fig. 2). (19) Position field frame to the exact position on gear housing and enter armature into field frame and starter gear housing (Fig. 22); carefully engaging splines of shaft with reduction gear by rotating armature slightly to engage the splines. (20) Install thrust washer (fiber) and washer (steel) on armature shaft. (21) Position starter end head assembly and install starter frame lockwashers and through bolts. Tighten through bolts securely. INSTALLING THE STARTER

Fig.

20— Installing Solenoid and Brush Holder Into Gear Housing

a. SOLDER

SOLDERING GUN BRUSH TERMINAL POST

THRUST WASHER SUPPORT TOOL

SHUNT FIELD

COIL

LEAD

(1) Before installing the starter, make sure starter NKR.° Fig. 2I—Soldering Shunt Coll Lead Wire

NK8I

Fig. 19—Soldering Solenoid Winding Lead to Brush Terminal

Fig. 22—Installing Starter Armature


8-22 ELECTRICAL-ALTERNATOR-REGULATOR and flywheel housing mounting surfaces are free of dirt and oil, to insure a good electrical contact. (2) Position starter to flywheel housing removable seal (if removed). (3) Install the starter, washer and bolt, the automatic transmission oil cooler tube bracket (if so equipped) and washer and nut. When tightening at-

taching bolt and nut be sure to hold the starter pulled away from the engine to insure proper alignment.

(4) Attach wire at solenoid switch terminal, and cable to starter terminal. (5) Connect battery ground cable and test operation of the starter for proper engine cranking.


ISOLATED FIELD ALTERNATOR AND ELECTRONIC VOLTAGE REGULATOR INDEX Page 32 27 28 22 24 29

Assembling the Alternator Bench Tests Disassembling the Alternator General Information Output Tests Rectifier (Diode) Testing

Regulator Testing Replacing Slip Rings Service Diagnosis Specifications Voltage Regulator (Electronic)

Page 27 31 22 88 25

GENERAL INFORMATION The alternator (Figs. 1 and 2) is fundamentally an A.C. current generator, with six (6) built-in silicon rectifiers, that convert A.C. current into D.C. current. D.C. current is available at the "output" "BAT" ter-

minal. The main components of the alternator are the rotor, stator, rectifiers, the end shields and the drive pulley.

SERVICE DIAGNOSIS Condition

ALTERNATOR FAILS TO CHARGE (No Output or Low Output)

Possible Cause

(a) Alternator drive belt loose. (b) Worn brushes and/or slip rings. (c) Sticking brushes.

(d) Open field circuit (e) Open charging circuit. (f) Open circuit in stator windings. (g) Open rectifiers.

Correction

(a) Adjust drive belt to Specifications. (b) Install new brushes and/or slip rings. (c) Clean slip rings and brush holders. Install new brushes if necessary. (d) Test all the field circuit connections, and correct as required. (e) Inspect all connections in charging circuit, and correct as required. (f) Remove alternator and disassemble. Test stator windings. Install new stator if necessary. (g) Remove alternator and disassemble. Test the rectifiers. Install new rectifiers if necessary.

LOW, UNSTEADY CHARGING RATE

(a) High resistance in body to engine (a) Tighten ground lead connections. In-

LOW OUTPUT AND A LOW BATTERY

(a) High resistance in charging circuit.

ground lead. stall new ground lead if necessary. (b) Alternator drive belt loose. (b) Adjust alternator drive belt. (c) High resistance at battery terminals. (c) Clean and tighten battery terminals. (d) High resistance in charging circuit. (d) Test charging circuit resistance. Correct as required. (e) Open stator winding. (e) Remove and disassemble alternator. Test stator windings. Install new stator if necessary.

(b) Shorted rectifier. Open rectifier.

(f) Grounded stator windings.

(a) Test charging circuit resistance and correct as required. (b) Perform current output test Test the rectifiers and install new rectifiers as required. Remove and disassemble the alternator. (c) Remove and disassemble alternator. Test stator windings. Install new stator if necessary.


ALTERNATOR-REGULATOR-ELECTRICAL 8-23 Condition

Correction

Possible Cause

EXCESSIVE CHARGING RATE TO A FULLY CHARGED BATTERY

(a) Faulty ignition switch. (a) Install new ignition switch. (b) Regulator base improperly grounded. (b) Connect regulator base to a good ground. (c) Faulty voltage regulator. (c) Test voltage regulator. Replace as necessary.

NOISY ALTERNATOR

(a) Alternator mounting loose. (b) (c) (d)

(e) (f) (g)

EXCESSIVE AMMETER FLUCTUATION

(a) Properly install and tighten alternator mounting. Worn or frayed drive belt. (b) Install a new drive belt and adjust to specifications. Worn bearings. (c) Remove and disassemble alternator. Install new bearing as required. Interference between rotor fan and (d) Remove and disassemble alternator. stator leads or rectifiers. Correct interference as required. Rotor or rotor fan damaged. (e) Remove and disassemble alternator. Install new rotor. Open or shorted rectifier. (f) Remove and disassemble alternator. Test rectifiers. Install new rectifiers as required. Open or shorted winding in stator. (fi) Remove and disassemble alternator. Test stator windings. Install new stator if necessary.

(a) High resistance in the alternator and (a) Clean and tighten all connections as voltage regulator circuit. necessary. SERVICE PROCEDURES

DESCRIPTION OF ELECTRONIC VOLTAGE REGULATOR OPERATION

The silicon transistor voltage regulator is a switch-

ing voltage regulator which regulates voltage by varying the duty cycle of a series of voltage pulses to the alternator field. The frequency of the voltage pulses is controlled by the ignition frequency of the engine,

SPACER INSULATOR

SHIELD

\ HEAT SINK ) ' i I 1

NUT \ WASHER \ \ WASHER \ \ I BUSHING I \ \ \ 'if I

SHIELD CAPACITOR SCREW STATOR

PULLEY

SLIP RINGS -)

RECTIFIER RETAINER

ROTOR

WASHER

RETAINER-■ BRUSH PACKAGE \ INSERT 'BRUSH \ ASSEMBLY NYLON WASHER

THRU BOLT (3) BEARING

SCREW ASSEMBLY BEARING Fig. I —Isolated Field Alternator (Disassembled View)

ND240E


8-24 ELECTRICAL-ALTERNATOR-REGULATOR FIELD BRUSH (HORIZONTAL

OUTPUT TERMINAL "1/4, scprw

NEGATIVES (DIODES) RECTIFIERS

FIELD BRUSH (VERTICAL)

Since the inductance of the alternator field has a relatively long time constant with respect to the operating frequency of the voltage regulator, there is only enough time allowed for a incremental decrease in field current through the suppression diode during the off time of the transistor. ISOLATED FIELD ALTERNATOR

( ■1

POSIT IVE

DIODES) RECTIFIERS

CHARGING CIRCUIT RESISTANCE TEST AND CURRENT OUTPUT TEST (1) Disconnect the battery ground cable. (2) Disconnect the "Batt" lead at the alternator output terminal. (3) Connect a 0-75 ampere scale D.C. ammeter in series between the alternator "Batt" terminal and the disconnected "Batt" lead (Fig. 3). (4) Connect the positive lead of a test voltmeter to the disconnected "Batt" lead. Connect the negative lead of the test voltmeter to battery positive terminal. (5) Disconnect the field lead from the alternator. (6) Connect a "jumper lead from the alternator field terminal to ground. (7) Connect an engine tachometer. Connect the battery ground cable. (8) Connect a variable carbon pile to the battery terminals.

Fig. 2—Alternator Assembly

because the voltage regulator is a peak sensing regulator and the feedback from the ignition system is the highest level ripple on the car electrical system. Once the frequency of operation is established by the ignition system, the voltage regulator controls the voltage by varying the on and off time between the ignition firings. While the voltage across the field and the current through the output transistor is switching completely on and off, the field current of the alternator is only cycling through incremental changes. CARBON PILE - CAR RHEOSTAT Ce, AMMETER

TEST TEST VOLTMETER

ILM METER

BATTERY IGNI1 ION SWITCH

TO IGNITION I

Pk,

g 1

BLUE WITH / WHITE TRACER BALLAST RESISTOR

ELECTRONIC VOLTAGE

REGULATOR 2875400

0 SPARK PLUGS0- I

RIGHT BANK 0 0 0

PM.

ISOLATED FIELD ALTERNATOR

TO IGNITION 2

IGNITION COIL

0°n1 - JUMPER WIRE

DISTRIBUTOR SPARK PLUGS LEFT BANK

BLUE

GREEN

Nu834a Fig.

3—Charging Circuit Resistance Test


ALTERNATOR-REGULATOR—ELECTRICAL 8-25 (9) Start and operate the engine at idle. Immediately after starting, reduce engine speed to idle. (10) Adjust the engine speed and carbon pile to obtain 20 amperes flowing in the circuit. Observe the voltmeter reading. The voltmeter reading should not exceed .7 volts. If a higher voltage drop is indicated, inspect, clean and tighten all connections in the charging circuit. A voltage drop test may be performed at each connection to locate the connection with excessive resistance. If the charging circuit resistance tested satisfactorily, reduce engine speed, turn off carbon pile and turn off ignition switch. (11) Then, to make the current output test, move the negative lead of the voltmeter to a good ground. Move the positive lead of the voltmeter to "Batt" terminal of the alternator (Fig. 4). (12) Start and operate the engine at idle. Imme-

to 7 amperes) than specified, it may be an indication of possible "open" rectifier or other alternator internal problems. If the output is considerably lower than that specified, it may be an indication of a possible "shorted" rectifier or other internal problems. In either case, the alternator should be removed and tested on the bench before disassembly. If the alternator current output tested satisfactorily, reduce engine speed, turn off carbon pile, and turn off ignition switch. (16) Disconnect battery ground cable. (17) Remove test ammeter, voltmeter, tachometer, and carbon pile. (18) Remove jumper between alternator field and ground. Connect the field wire to the alternator field terminal. (19) Connect the battery ground cable.

diately after starting, reduce engine speed to idle.

(13) Adjust the carbon pile and engine speed in increments until a speed of 1250 rpm and a voltmeter reading of 15 volts is obtained.

ELECTRONIC VOLTAGE REGULATOR

(14) CAUTION: Incremental increases in engine speed should not be large enough to allow voltage to go above 16 volts.

(15) Observe the reading on the test ammeter. The output current should be within the limits shown in the "Specifications". If the output is slightly less (5 CARBON PILE RHEOSTAT

VOLTAGE REGULATOR TEST (When Tester C-4133 is Not Available) (1) Clean the battery terminals and check the specific gravity. It should be above 1.200 to allow a prompt regulated voltage check. Tithe specific gravity is below 1.200, charge or use 7Th e

BATTERY

TEST AMMETER

CAR AMMETER IGNITION SWITCH

TO IGNITION 1

BALLAST RESISTOR

TEST VOLTMETER

BLUE WITH WHITE TRACER

g

ELECTRONIC VOLTAGE REGULATOR

Vet,

/P4

BATT FLD

TO IGNITION 2 SPARK PLUGS — RIGHT BANK

(7,

0

0166

n Nu. 0

FLD

IGNITION COIL

00 9

0

SOLATED FIELD ALTERNATOR

BLUE = JUMPER WIRE

DISTRIBUTOR GREEN

SPARK PLUGS LEFT BANK

NU651B

Fig. 4—Current Output Test


8-26 ELECTRICAL-ALTERNATOR-REGULATOR CAR AMMETER TESTar VOLTMETER 4.

a IGNITION SWITCH

BATTERY BODY GROUND

BLUEWITH WHITE TRACER

TO IGNITION 1

BALLAST RESISTOR

ii

ELECTRONIC VOLTAGE REGULATOR

7Th CBATT C FLD

TO IGNITION 2

ISOLATED FIELD ALTERNATOR

IGNITION SPARK PLUGS COIL RIGHT BANK ® 0 rAlre DISTRIBUTOR 01

o66

BLUE

0

GREEN

SPARK PLUGS LEFT BANK

NU6526

Fig. 5—Voltage Regulator Test (Without Tester Tool C-4133)

another battery and do not leave the uncharged battery in the circuit. (2) Connect the positive lead from a voltmeter to the ignition Number one (1) terminal of the ballast resistor. (The Ignition Number one (1) terminal of the ballast resistor is the end which has one or two blue wires connected to it). The other end, Ignition Number two (2), will have a brown and blue wire or just a brown wire connected to it (Fig. 5). (3) Connect the negative lead from the voltmeter to a good vehicle body ground. (4) Start and operate engine at 1250 rpm with all lights and accessories turned off. Check voltmeter, the regulator is working properly if the voltage readings are in accordance with the following chart. AMBIENT TEMPERATURE NEAR VOLTAGE REGULATOR

—20°F 80°F 140°F Above 140°F

VOLTAGE RANGE

14.3 15.3 13.8 14.4 13.3 14.0 Less than 13.8 It is normal for the car ammeter to show an immediate charge and then gradually return to normal position. The duration the ammeter hand remains to the right will be dependent on the length of cranking time.

(5) If the voltage is below limits, proceed as follows: (a) Check for a good voltage regulator ground. Check for voltage drop between cover of voltage regulator and body on low voltage scale of voltmeter. (b) Turn off ignition switch and disconnect voltage regulator connector. (c) Turn on the ignition switch, but do not start car, check for battery voltage at the wiring harness terminal connected to the blue and green leads. Disconnect wiring harness from voltage regulator when checking the leads.

Turn off ignition switch. If voltage is not present at either lead, the problem is in the vehicle wiring or alternator field circuit. DO NOT DISTORT TERMINALS WITH VOLTMETER PROBE.

(d) If the previous steps, 5(a) through 5(c) tested satisfactorily, change the voltage regulatbr and repeat step 4. (6) If the voltage is slightly above the limits shown in chart or is fluctuating, proceed as follows: (a) Check ground between voltage regulator and vehicle body. (b) Check ground between vehicle body and engine. (c) Check ignition switch circuit between battery terminal of ignition switch and voltage regulator. (7) If the voltage is more than one-half (1/2) a volt


ALTERNATOR-REGULATOR—ELECTRICAL 8-27

above limits shown in chart, change the voltage regulator and repeat step 4. (8) Remove the test voltmeter.

ROUND WIR TESTER CONNECTOR

ELECTRONIC VOLTAGE REGULATOR TEST (With Tester Tool C-4133)

(1) Remove connector from Electronic Voltage Regulator on vehicle. (2) Plug in power cord of Voltage Regulator Tester to 110 Volt A.C. 60 cycle source. (3) Connect the ground wire from the voltage regulator tester to a good body ground near the voltage regulator (at voltage regulator mounting screw Figs. 6 and 7). (4) Plug connector of voltage regulator tester on voltage regulator on vehicle. (5) Place knob on the tester to the regulator test position. (6) Press the test button on the voltage regulator tester. The voltage reading should be in accordance with the following: (a) If the voltage regulator temperature is at room temperature (80"F.) or above, the meter reading should be in the green or yellow range. (b) lithe voltage regulator is at room temperature (80"F.) or below, the meter reading should be in the green or blue range. (7) While holding the test button in, depress Black Button (A) (Fig. 6), the meter reading should remain within the limits of step 6. (8) While holding the test button in, depress Red Button (R) (Fig. 7). the meter should read above the red line. (9) If all tests remain within limits the voltage regulator is good. GROUND WIRE

VOI TAGE REGULATOR

LINE '

BLACK BUTTON VOLTMETER POSITIONS

RED BUT TON "B EST BUTTON

PY939

Fig. 7—Voltage Regulator Test (Depressing Test Button "B") The tester may be used as a D.C. Voltmeter by placing tester knob in either the 18 volt or 1.8 volt position. Use the red probe and black clip leads for testing.

ALTERNATOR SERVICE PROCEDURES

If alternator performance does not meet current output specifications limits, it will have to be removed and disassembled for further test and servicing. (1) Disconnect battery ground cable at battery negative terminal. (2) Disconnect alternator output "BA= and field "FIJI)" leads and disconnect ground wire. (3) Remove alternator mounting bolts and remove alternator. BENCH TESTS

Field Coil Draw If alternator field coil draw\ has not been tested on vehicle it may be tested on test bench as follows: (1) Connect a wire between one field terminal of the alternator and the positive terminal of a fully charged battery. Connect test ammeter positive lead to the other field terminal of the alternator and the negative lead to the battery negative terminal. (2) Slowly rotate alternator rotor by hand. Observe ammeter reading. Field coil draw should be 2.3 amperes to 2.7 amperes at 12 volts. A low rotor coil draw is an indication of high resistance In field coil

BLACK BUTTON 'A

TESTER BUTTON REGULATOR TEST PY938

Fig. 6—Voltage Regulator Test (Depressing Test Button and Black Button "A")

circuit, (brushes, slip rings, or rotor coil). A higher rotor coil draw indicates possible shorted rotor coil or grounded rotor.


8-28 ELECTRICAL—ALTERNATOR-REGULATOR Testing Alternator Internal Field Circuit for Ground (1) To test internal field circuit for ground, touch one test probe from a 110 volt test lamp to one of the alternator field brush terminals and remaining test probe to the end shield. If rotor assembly or field brush is not grounded, lamp will not light. (2) If lamp lights, remove field brush assemblies (noting how the parts are assembled) and separate the end shields by removing the three through bolts. (3) Again test by placing one of the test probes to a slip ring and remaining test probe to the end shield. If lamp lights, rotor assembly is grounded and requires replacement. If lamp does not light after removing the field brush and separating the end shields, the cause uf the ground at the fast ground test was a grounded brush. (4) Examine plastic insulator and screw. Screw is a special size and must not be substituted. (5) Install brush holders, terminals, insulated washers, shake proof washers and screws. If the parts were not assembled in this order: this could be the cause of the ground condition. DISASSEMBLING THE ALTERNATOR

To prevent possible damage to brush assemblies, they should be removed before proceeding with disassembly of the alternator. The field brushes are mounted in plastic holders that position the brushes against the slip rings of the rotor. (1) Remove retaining screw lockwasher, insulated washer, and field terminal, and carefully lift plastic holder containing spring and brush assembly from end housing (Fig. 8). (2) Remove the brush screws, insulating nylon washers and lift brush assemblies from end shield. BRUSH ASSEMBLY IVERTICALI

ER

TOOL DRIVE END SHIELD

RECTIFIER END SHIELD

STATOR --

ND108A

fig. 9—Separating Drive End Shield from Stator CAUTION: Stator is laminated, do not burr stator or end shield. (3) Remove through bolts and pry between the stator and drive end shield with blade of a screwdriver (Fig. 9). Carefully separate drive end shield, pulley and rotor assembly away from stator and rectifier shield assembly.

-

Testing the Rectifiers with Tool C 3829 The Rectifier Tester Tool C-3829 provides a quick, simple and accurate test of the alternator rectifiers without the necessity of disconnecting soldered rectifier leads. With alternator rectifier end shield separated from drive end housing proceed with rectifier test as follows: Positive Case Rectifier Test (Fig. 10) (a) Place alternator on an insulated surface. Connect test lead clip to the alternator (BAT) output terminal. (b) Plug in Tool C-3829 power source lead into a 110 volt A.C. power supply. Touch exposed bare metal TEST PROD POSITIVE CASE RECT1F ERS TESTER

NU352A Fig. 8 — Removing or Installing Field Brushes

TO ALTERNATOR "BAT" TERMINAL

Fig. 10 — Testing Positive Rectifiers


ALTERNATOR-REGULATOR—ELECTRICAL 8-29 connections of each of the positive case rectifiers, with test prod. The reading for satisfactory rectifiers will be 1-3 /4 amperes or more. Reading should be approximately the same for three rectifiers. When two rectifiers are good and one is shorted, reacting taken at the good rectifiers will be low, and reading at shorted rectifier will be zero. Disconnect lead to the rectifier reading zero and retest. The reading of the good rectifiers will now be within satisfactory range. When one rectifier is open it will read approximate. ly one ampere, and two good rectifiers will read within satisfactory range. Negative Case Rectifier Test (Fig. I I)

(a) Connect test lead clip to rectifier end housing.

(b) Touch exposed connection of each of the negative case rectifiers with test probe. CAUTION: Do not break the sealing around rectifier lead wire. The sealing material is for protection against corrosion. Always touch test probe to exposed metal connection nearest rectifier.

Test specifications are the same, and test results will be approximately the same as for positive case rectifiers, except meter will read on opposite side of scale.

TESTING RECTIFIERS AND STATOR (When Tool C-3829 is not available) (a) Separate the three (3) stator leads at "Y" connection (Fig. 12). Cut stator connection as close to connector as possible. If they are cut too short it may be difficult to get them together again for soldering. (b) Test rectifiers with a 12 volt battery and a test lamp equipped with a number 67 bulb (4 candle power) by connecting one side of test lamp to positive battery post; other side of test lamp to a test probe with other test probe connected to the negative batTEST PROD NEGATIVE CASE RECTIFIERS

9

"Y" CONNECTION :OPENED)

NU354A

Ng. 12—Separating the Three Stator Leads

tery post. (c) Contact outer case of rectifier with one probe and other probe to wire in center of rectifier (Fig. 13). (d) Reverse the probes, moving probe from rectifier outer case to rectifier wire, and the probe from rectifier wire to rectifier outer case. If test lamp "lights" in one direction but does "not light" in other direction, rectifier is satisfactory. If lamp lights in "both directions," rectifier is "shorted." If test lamp does "not light" in either direction, rectifier is "open." Possible cause of an open or blown rectifier is a faulty capacitor or a battery that has been installed in reverse polarity. If battery Is installed properly and the rectifiers are open, test capacitor capacity—.50 microfarad (plus or minus 20%).

(e) Unsolder rectifier leads from stator leads. Do not blow solder off with air—fine particles of solder can short other rectifiers. (1) 'Test stator for grounds using a 110 volt test lamp (Fig. 14). Use wood slats to insulate the stator from rectifier shield. Contact one prod of test lamp to stator pole frame, and contact the other prod to each TEST LAMP NO. 67 BULB

TESTER

NU3.53A

GROUND LEAD TO END HOUSING NU3J5A

Fig. 11—Testing Negative Rectifiers

Fig. 13—Testing Rectifiers with Test Lamp


8-30 ELECTRICAL-ALTERNATOR-REGULATOR TO 110 VOLT POWER SOURCE

COD

TO TEST PROD

140.7356A

Fig. 14—Testing Stator for Ground of the three stator leads. Test lamp should "not light" If test lamp lights, stator windings are "grounded." (g) Test stator windings for continuity, by contacting one prod of test lamp to all three stator leads at "Y" connection. Contact each of the three stator leads (disconnected from rectifiers). Test lamp should "light" when prod contacts each of the three leads. If lamp does not light stator winding is "open" (Fig. 15). (h) Install a new stator if stator tested is -grounded" or "open". If stator tested satisfactorily, tin the three stator wires and resolder. Tape connector and cement down to stator to make sure the "Y" connector does not short out to end shield. If the rectifiers must be replaced. unsolder the rectifier wire from the stator lead wire at the soldered joint. When removing rectifiers, it is necessary to support end shield and/or heat

PEmOVING ADAPTER NE 42A

Fig. 16—Romoving the Rectifiers

(5) Carefully apply pressure with tool pressure screw until support tool, rectifier end shield, and remover pin, and remover adapter are in alignment then press the rectifier out of end shield or heat sink. (6) The pulley is an interference fit on rotor shaft. remove pulley with Puller Tool C-4068 (Fig. 17). (7) Pry drive end bearing spring retainer from end shield with a screwdriver (Fig. 18). (8) Support end shield and tap rotor shaft with a plastic hammer to separate rotor from end shield. The new bearing is lubricated with a predetermined amount of special lubricant and doss not require additional lubrication.

sink to prevent damage to these castings.

(4) Place Rectifier Removing and Installing Press in a vise and support end shield on clamp anvil under rectifier to be removed (Fig. 16). Make sure bore of tool completely surrounds rectifier during removal process.

Fig. 15—Testing Stator Windings for Continuity

Fig. 17—Reanoving

the Pulley


ALTERNATOR-REGULATOR-ELECTRICAL 8-31

ig. 18—Disengaging Bearing Retainer from End Shield

(9) The drive end ball bearing is an interference fit with the rotor shaft. Remove bearing with Puller Tool C-4068, (Pig. 19). (10) Remove output terminal nuts and washers and remove terminal screw and inside capacitor. The heat sink is also held in place by the terminal screw. (II) Remove insulator 1Fig. 20)

(12) The needle roller bearing in rectifier end shield is a press fit. If necessary to remove rectifier end frame needle bearing, protect end shield by supporting shield with Tool C-3925 when pressing bearing out with Tool C-3770A 21). Make sure notches in tool clear raised section of heat sink. The new bearing is prelubricated and no additional lubricant should In added, as an excessive amount of lubricant will contaminate the slip rings and cause premature brush and rotor failures._

Fig. 20—Removing Heat Sink Insulator

REPLACING SLIP RINGS Slip rings that are damaged can be replaced as follows: (a) Remove rotor plastic grease retainer. (b) Unwind field coil leads from slip ring lugs (Fig. 22) being careful not to break the wire leads. (c) Use a chisel to cut through the copper of both slip rings at opposite points 1180 apart) (Fig. 23). (d) Break the plastic insulator and remove the old slip ring. (e) Clean away dirt and particles of old slip ring from rotor. (1) Scrape ends of field coil wires clean for good electrical contact. tg) Position field coil wires so as to clear path for new slip ring. 1h) Position new slip ring carefully on rotor shaft to insure that slip ring lugs will be in proper position for connecting field coil wires (Fig. 24). Place installing Tool C-3900 over rotor shaft

t14...I1__C 3770 T OO L

REARING RETAINER

NR579 Pig. 19—Removing Bearing from Rotor Shaft

NF65A

Fig. 21—Removing Rectifier End Shield Bearing


8-32 ELECTRICAL—ALTERNATOR-REGULATOR LEAD WIRE

SUP RING SOLDER LUG

SUP RING SOWER LUG

SLIP RING LUG

SLIP RING LUG

SUP RINGS

bk.

ROTOR--

NP366A

Fig. 24—Aligning Slip Ring with Field Lead Wires

NP365

Fig. 22—Solder Points—Slip Ring Installed

and position rotor, slip ring and tool assembly in arbor press (Fig. 25). Press slip ring on shaft. When slip ring is bottomed on rotor fan, the field lead wire (insulated brush ring) should clear the access hole, the fan and pole piece.

(j) Tin field coil lead wires. (k) Coil each field lead wire around the slip ring lug, starting first wrap against shoulder of lug and winding outward. Solder with resin core solder (Fig. 26). (1) Test slip rings for ground with a 110 volt test lamp by touching one test lead prod to rotor pole piece and remaining prod to slip ring. Test lamp should not light. If lamp lights, slip rings are shorted to ground. (m) Test slip ring for continuity by placing one test prod on the positive and the other test prod on

the ground slip ring. Light should go on showing the field circuit is completed. (n) If rotor is not grounded and field circuit is continuous, lightly clean slip rings surface with 00 sandpaper. (a) Position grease retainer on rotor shaft and press retainer on shaft with installer Tool C-3921 (Fig. 27). The plastic retainer is properly positioned when the inner bore of the installer tool bottoms on the rotor shaft.

ASSEMBLING THE ALTERNATOR (1) Check rectifier identification to make sure correct rectifier is being installed. Refer to Parts List for rectifier identification. (2) Start rectifier squarely into mounting hole. (3) Support heat sink or rectifier end shield on installer adapter of Tool C-3928. With the installing adapter positioned on the rectifier, carefully apply pressure with tool pressure screw until the installer tool, rectifier, rectifier end shield or heat sink are in alignment and after determining that rectifier is started squarely in the casting, slowly apply pressure PRESS

TOOL LEAD WIRE

OLD SLIP RING

CUT WITH CHISEL ND526A

Fig. 23—Cutting Old Slip Rings

Fig. 25—Installing Slip Rings


ALTERNATOR-REGULATOR—ELECTRICAL 8-33

FIXTURE RESIN CORE SOLDER

'

V -Cali

INSTALLING ADAPTER

SUP RING LUG ,

INSTALLING SUPPORT

NF

44A

Fig. 28—Installing a Rectifier

Ne3os Fig. 26—Soldering Field Coil Leads

with tool pressure screw until you feel the collar of rectifier bottom against casting (Fig. 28). Make sure installer support adapter fits square around the rectifier inner boss and that pressure is applied on outer rim of rectifier. CAUTION: DO NOT USE a hammer to start the rectifier into its bore in end shield. DO NOT HAMMER OR SHOCK the rectifier in any manner as this will fracture the thin silicon wafer in the rectifier causing complete rectifier failure.

(4) Clean the leads and mate stator lead with rectifier wire and bend the loop snugly around stator lead to provide a good electrical and mechanical connec.lion. Solder wires with resin core solder. Hold rectifier lead wire with pliers just below the joint while soldering (Fig. 29). Pliers will absorb heat from the soldering operation and protect rectifier. After solar TOOL

dering, quickly cool soldered connection; touch a dampened cloth against it. This will aid in forming a

solid joint. (5) After soldering, stator leads must be pushed down into the slots cast into the end shield and cemented with Cement Part Number 2299314 or equivalent to protect the leads against possible inference with the rotor fans. Test each replacement rectifier to make certain rectifier was not damaged by the soldering or pressing operations. Support end shield on Tool C-3925 so that notches in the support tool will clear the raised section of the heat sink and press the bearing into position with Tool SP-3381 (Fig. 30), until bottomed on support tool. New bearings are pre-lubricated, additional lubrication is not required.

(7) Insert drive end bearing in drive end shield and install bearing retainer plate to hold bearing in place. (8) Position bearing and drive end shield on rotor shaft and, while supporting base of rotor shaft, press •

PRESS

GREASE RETAINER

SLIP RINGS

isai•

cr

PRESS

NP369

Fig. 27 —Installing Grease Retainer

RECTIFIER LEAD

NU359A

Fig. 29—Soldering Rectifier and Stator Leads


8-34 ELECTRICAL—IGNITION SYSTEM PRESSING TOOL

PRESS

BEARING RETAINER

TOOL CAPACITOR BEARING STATOR

TOOL

PRESS DRIVE END SHIELD

_

ROTOR

Nu:360

Fig. 30—Installing Rectifier End Shield Bearing

NDII6

Fig. 31—Installing Drive End Shield Bearing

bearing and shield into position on rotor shaft with arbor press and Tool C-3858 (Fig. 31). CAUTION: Make sure bearing is installed squarely at installation; otherwise, damage to bearing will result. Press bearing on rotor shaft until bearing contacts shoulder on rotor shaft fan hub. (9) Install pulley on rotor shaft. Shaft of rotor must

DRIVE END SHIELD

PULLEY

be supported in a manner so all pressing force is on pulley hub and rotor shaft (Fig. 32). Press pulley on rotor shaft until pulley contacts inner race of drive and bearing. Do not exceed 6800 pounds pressure. Do not hammer.

(10) The alternators have the capacitor mounted internally. Make sure heat sink insulator is in place (Fig. 20). (11) Install output terminal screw and capacitor through heat sink and end shield. (12) install insulating washers, lockwashers and lock nuts. (13) Make sure heat sink and insulator are in position then tighten lock nut. (14) Position stator on rectifier end shield. (15) Position rotor and end shield assembly on stator and rectifier end shield assembly. Align through bolt holes in the stator, rectifier end shield and drive end shield. (18) Compress stator and both end shields by hand and install through bolts, washers and nuts. Tighten bolts evenly to 20-30 inch-pounds. (17) Install field brushes in holder. Place one vertical and one horizontal holder in rectifier end shield.

ROTOR SHAFT

Fig. 32—Installing Alternator Pulley

(18) Place nylon washer on each terminal and install lockwashers and attaching screws. (19) Rotate pulley slowly by hand to be sure rotor fans do not hit rectifiers, capacitor lead, and stator connections. (20) Install alternator and adjust drive belt to specifications. (21) Connect (output) "BAT" and (field) "FLO" leads and connect ground wire. (22) Connect battery ground cable. (23) Start and operate engine, and observe alternator operation. (24) Test current output and regula


IGNITION SYSTEM-6-CYLINDER

INDEX Assembling the Distributor Ballast Resistor Distributor Advance Testing

Page 39 43 42

Distributor Contact Dwell Distributor Contacts Distributor Disassembly

Page 37 40 39


IGNITION SYSTEM-ELECTRICAL Page 42 41 38 36 37 35 37 42 37

Distributor Installation Distributor Lubrication Distributor Removal Distributor Resistance Test Dwell Variation General Information Idle R.P.M. Test Ignition Coil Ignition Timing

Installing and Aligning Contacts Lubrication - Distributor Secondary Circuit Inspection Service Diagnosis Shaft and Bushing Wear Test Spark Plugs Specifications Testing Contact Arm Spring Tension Timing - Ignition

8-35 Page 41 41 35 35 38 53 88 40 37

GENERAL INFORMATION The ignition system consists of two separate circuits. The battery, ammeter, ignition switch, ballast resistor, primary winding of the ignition coil, distributor contacts and condenser, vehicle frame, and pri-

mary wiring make up the low voltage primary circuit. The secondary high voltage circuit includes the coil secondary winding, distributor cap and rotor, spark plug cables, spark plugs and vehicle frame.

SERVICE DIAGNOSIS Condition BURNED OR PITTED DISTRIBUTOR CONTACTS

Possible Cause

Correction

(a) Dirt or oil on contacts.

(a) If oil is on contact face, determine cause and correct condition. Clean distributor cam of dirt and grease, apply a light film of distributor cam lubricant to cam lobes; wipe off excess. See "Distributor Lubrication." Replace contact set and adjust as necessary. (b) Alternator voltage regulator setting (b) Test alternator voltage regulator settoo high. ting, adjust as necessary. Replace

contact set and adjust as necessary. (c) Contacts misaligned or gap too small. (c) Align and adjust contacts. (d) Test and replace coil if necessary. Re(d) Faulty coil. (e) Ballast resistor not in circuit.

place and adjust contacts. (e) Inspect conditions, and correctly con-

nect the coil.

(f) Wrong condenser or faulty condenser. (f) Test condenser and replace if necessary. Replace and adjust contacts. (g) Faulty ignition switch. (g) Replace ignition switch. (h) Bushings worn. (h) Replace housing. (i) Touching contacts with the hands dur- (i) Replace and adjust contacts. ing installation. IGNITION COIL FAILURE

(a) Coil damaged by excessive heat from (a) Replace coil. Inspect condition of the engine. distributor contacts. (b) Coil tower carbon-tracked. (b) Replace the coil. (c) Oil leak at tower. (c) Replace the coil.

SERVICE PROCEDURES SECONDARY CIRCUIT INSPECTION Check the high tension cable connections for good contact at the coil and distributor cap towers and at the spark plugs. Terminals should be fully seated. The nipples and spark plug covers should be in good condition. Nipples should fit tightly on the coil cap towers and spark plug cover should fit tight around spark plug insulators. Cable connections that are loose will corrode and increase the resistance and permit water to enter the towers causing ignition malfunction. To maintain proper sealing between the towers and

nipples, cable and nipple assemblies should not be removed from the distributor or coil towers unless nipples are damaged or cable testing indicates high resistance or broken insulation.

Clean high tension cables with a cloth moistened with a non-flammable solvent and wipe dry. Bend cable to check for brittle or cracked insulation. When testing secondary cables for punctures and cracks with an oscilloscope follow the instructions of the equipment manufacturers. If an oscilloscope is not available, secondary cables can be tested as follows:


8-36 ELECTRICAL-IGNITION SYSTEM (a) Engine not running, connect one end of a test probe to a good ground, other end free for probing. (b) Disconnect cable at spark plug end. Insulate cable end from grounding. (e) With engine running, move test probe along entire length of wire. If punctures or cracks are present there will be a noticeable spark jump from the faulty area to the probe. Secondary coil wire may be checked in the same manner, be sure one spark plug cable is disconnected from spark plug while running probe along coil wire secondary cable. Cracked, leaking or faulty cables should be replaced. When installing new cable assemblies, install new high tension cable and nipple assembly over cap or coil tower, entering the terminal into the tower, push lightly, then pinch the large diameter of nipple (Fig. 1) to release trapped air between the nipple and tower. Continue pushing on the cable and nipple until cables are properly seated in the cap towers. Use the same procedure to install cable in coil tower (Fig. 2). Wipe the spark plug insulator clean before reinstalling cable and cover.

Resistance type cable is identified by the words "Electronic Suppression" printed on cable jacket. No additional resistors are necessary. An ohmmeter can be used to check resistance type cables for open circuits, loose terminals or high resistance as follows: (a) Remove cable from spark plug and install the proper adapater between cable and the spark plug. (b) Lift distributor cap from distributor with cables intact. Do not remove cables from the cap. (c) Connect the ohmmeter between spark plug adapter and the corresponding electrode inside the cap, making sure ohmmeter probes are in good contact. If resistance is more than 30,000 ohms, remove cable at cap tower and check cable resistance. If resistance is more than 30,000 ohms on cables under twenty-five inches, or 50,000 ohms on cables over twenty-five inches long, replace cable assembly. Test all spark plug cables in same manner. 'WA Cu

1245

Fig. I—Installing Secondary Cable and Nipples at Distributor Cop Towers

Fig. 2—Installing Secondary Cable and Nipple at Coil Tower

To test coil to distributor cap high tension cable, remove distributor cap with the cable intact. Do not remove cable from the coil or cap. Connect the ohmmeter between center contact in the cap and either primary terminal at coil. If the combined resistance of coil and cable is more than 25,000 ohms, remove the cable at coil tower and check cable resistance. If resistance is more than 15,000 ohms, replace cable. If resistance is less, check for a loose connection at the tower or for a faulty coil. Inspect coil tower for cracks, carbon tracking or oil leaks. DISTRIBUTOR RESISTANCE TEST

This test indicates the resistance of the ignition primary circuit from the distributor side of the coil, through the contacts and distributor ground. Excessive resistance in this portion of the ignition system will prevent the coil from producing sufficient output for good overall ignition. To perform test, proceed as follows: (1) Turn Selector Switch of a Tach-Dwell unit to CALIBRATE position and adjust Dwell Calibrator until Dwell Meter reads on the set line (test leads separated). (2) Leave Selector Switch in CALIBRATE position, connect Tach-Dwell red lead to distributor terminal of coil and black lead to a good ground. (3) Turn ignition switch "ON." Observe dwell meter reading. Meter pointer should be within bar marked "DISTRIBUTOR RESISTANCE." If reading is zero or outside of bar, crank engine with the starter until meter pointer moves as far to the right as possible. (This will indicate that contacts are closed.) A reading now within the bar indicates a normal distributor primary circuit. If reading is outside the bar, high resistance is present in distributor primary circuit. (4) Remove test lead from distributor terminal of coil and connect to the following points: (a) Distributor primary terminal (outside)


IGNITION SYSTEM-ELECTRICAL 8-37

(b) Distributor primary terminal (inside) (c) Contact terminal bracket (insulated bracket) (d) Ground side of contacts. (e) Distributor housing. (5) Repeat test at each connection until a noticeable change occurs in meter reading. If a poor connection or faulty lead is indicated, clean, tighten or replace as necessary and repeat test (3). If faulty contacts are indicated, remove distributor for complete inspection, service, testing and calibration. IDLE RPM TEST

Engine idle rpm setting should be tested and recorded as it is when the vehicle is first brought into the shop for testing. This will assist in diagnosing complaints of engine stalling or complaints of creeping and hard shifting on vehicles equipped with automatic transmissions. Test procedures are as follows: (1) Turn Selector Switch to CALIBRATE position and adjust Dwell Calibrator until Dwell Meter reads on SET line (test leads separated). (2) Connect red lead of the test unit to the distributor primary terminal at the coil and the black lead to a good ground. (3) Turn Selector Switch to the 6 LOBE position. (4) Turn Tach-Dwell RPM Switch to the 1000 RPM position. (5) With engine at normal operating temperature (off fast idle), momentarily open the throttle and release to make sure there is no bind in the linkage and that idle speed screw is against its stop. (6) Note engine RPM on 1000 RPM scale and adjust carburetor idle speed to specifications shown in Fuel System "Specifications." DISTRIBUTOR CONTACT DWELL

The degrees of distributor dwell are the degrees of rotation through which the breaker contacts remain closed. This is also commonly referred to as "dwell angle" or "cam angle." Correct distributor contact dwell is essential for good ignition performance and contact life. Test procedures are as follows: (1) Disconnect vacuum line. (2) Connect Tach-Dwell red lead to distributor terminal of coil and black lead to a good ground. (3) Turn Selector Switch to 6 LOBE position. (4) Start engine and operate at idle speed. (5) Observe Dwell-Meter reading. If dwell reading is within "Specifications," contact gap, cam rubbing block and contact arm are all in satisfactory condition. If dwell reading is not within specifications, incorrect contact gap, worn cam, worn rubbing block or distorted movable contact arm may be indicated.

DWELL VARIATION

This test indicates the mechanical condition of the distributor. Excessive wear in distributor mechanical parts cause dwell variations which will affect ignition timing. Test procedures are as follows: (1) With engine at idle speed, vacuum hose disconnected, and with test leads connected as in Contact Dwell Test, turn the Tach-Dwell RPM Switch to 5000 RPM position. (2) Slowly increase engine speed to 1500 RPM then slowly reduce to idle speed while observing Dwell Meter reading. If dwell reading varies more than 2 degrees from initial reading between idle speed and 1500 RPM, probable wear in the distributor shaft, bushings or breaker plate is indicated. Remove distributor for complete inspection and testing on a distributor tester. Dwell variation at speeds above 1500 RPM does not necessarily indicate distributor wear. IMPORTANT: Dwell and gap of the contacts must both be within their specified limits at the same time. If this cannot be accomplished, it is probable that wrong contacts are installed, the rubbing block or cam lobes are badly worn or the movable contact arm is distorted.

IGNITION TIMING

To obtain maximum engine performance, the distributor must be correctly positioned on the engine to give proper ignition timing. The ignition timing test will indicate timing of the spark at No. 1 cylinder at idle (only). Test procedures are as follows: (1) Disconnect vacuum hose at distributor. (2) Connect secondary lead of Power Timing Light to No. 1 spark plug, red primary lead to positive terminal of battery and black primary lead to negative battery terminal. Do not puncture cables, boots or nipples with test probes. Always use proper adapters. Puncturing spark plug cables with a probe will damage the cables. The probe can separate the conductor and cause high resistance. In addition, breaking the rubber insulation may permit secondary current to arc to ground.

(3) Start engine and set idle to "Specifications" (Transmission in Neutral). (4) Loosen distributor hold-down arm screw just enough so the distributor housing can be rotated in its mounting. (5) Aim Power Timing Light at timing plate on chain case cover. If light flash occurs when timing mark on the vibration damper is located ahead of the specified degree mark on timing plate in the direction of engine rotation, timing is advanced. To adjust, turn


8-38 ELECTRICAL—IGNITION SYSTEM

distributor housing in direction of rotor rotation. If flash occurs when the vibration damper timing mark is located past the specified degree mark in the direction of engine rotation, timing is retarded. To adjust., turn distributor housing against direction of rotor rotation. Refer to "Specifications." (Moving the distributor housing counterclockwise advances ignition timing and clockwise retards timing.) (6) Tighten distributor hold-down arm screw after timing has been set and recheck timing adjustment with a Power Timing Light. (7) When ignition timing is correct, reconnect vacuum hose to distributor. Ignition Timing (with C -744 Test Lamp) (1) Connect C-744 test lamp between distributor primary terminal and battery positive post. (2) Turn engine until number 6 exhaust valve is just closing; continue turning the engine slowly until mark on the crankshaft pulley is at specified degree mark at case cover. (3) Loosen distributor clamp bolt so distributor housing can be rotated with a slight drag, then turn distributor in the normal rotation until test lamp lights. (4) Turn distributor against normal distributor rotation until test lamp goes out. If test lamp lights immediately when connected, turn distributor against normal distributor rotation until light goes out.

(5) Tighten distributor clamp bolt securely and remove test lamp. If operation is performed properly the engine is timed to specifications. If engine is turned beyond the timing mark, continue turning engine for two full revolutions of the crankshaft;

this will place the distributor rotor in approximately the initial position. CAUTION: DO NOT reverse rotation of crankshaft if you have passed the timing mark as this would affect valve timing and distributor timing. DISTRIBUTOR REMOVAL

(1) Disconnect vacuum hose at distributor. (2) Disconnect primary lead wire at coil. (3) Unfasten distributor cap retaining clips and lift off distributor cap. (4) Rotate engine crankshaft until the distributor rotor is pointing toward the cylinder block, scribe a mark on block at this point to indicate position of the rotor as reference when reinstalling distributor. (5) Remove distributor hold-down arm screw. (6) Carefully lift the distributor from the engine, shaft will rotate slightly as the distributor gear is disengaged from the camshaft gear. SHAFT AND BUSHING WEAR TEST (1) Remove distributor rotor. (2) Disconnect primary lead wire at distributor terminal. Do not loosen removable contact arm spring retaining nut. (3) Clamp distributor hold-down arm in a vise equipped with soft jaws and apply only enough pressure to restrict any movement of the distributor during this test. (4) Attach a dial indicator to distributor housing so indicator plunger arm rests against movable arm at rubbing block and with rubbing block of movable contact arm on highest point of a cam lobe (Fig. 3).

Fig. 3—Shaft and Bushing Wear Test


IGNITION SYSTEM—ELECTRICAL 8-39 (5) Place one end of a wire loop around the top of distributor shaft. Hook a spring scale in the other end of the wire loop and pull on a line with the plunger of the indicator gauge. The wire loop must be down on the distributor shaft to insure a straight pull: also be sure that the wire loop does not interfere with the indicator or indicator holding bracket. Apply a five pound pull and read the movement of the plunger on the indicator dial. (Be sure the rubbing block of the movable contact arm is on the highest point of the cam lobe during this test.) If the plunger movement exceeds .006 inch, replace the distributor housing or shaft assembly, see "Distributor Disassembly."

CAP

ROTOR INSULATOR SCREW SCREW

DISTRIBUTOR DISASSEMBLY (Fig. 4) (1) Remove distributor rotor. (2) Remove the two screws and lockwashers attaching the vacuum control unit to distributor housing and remove vacuum control unit. (3) Disconnect primary lead at terminal screw and slide primary lead off the contact plate terininaL Remove wire and grommet as an assembly. (Push grommet towards inside of distributor to remove—Do not pull the wire.) (4) Remove two screws and lockwashers attaching contact plate to the housing and lift out contact plate, contacts and condenser as an assembly. Distributor cap clamp springs are held in place by peened metal around the openings and should not be removed. (5) lithe side play exceeds .006 inch in "Shaft and Bushing Wear Test", replace distributor housing assembly or shaft and governor assembly as follows: (a) Remove distributor drive gear retaining pin and slide gear off end of shaft. If gear is worn or damaged see "Assembling-Distributor" step 5. CAUTION: Support hub of gear in a manner that pin can be driven out of gear and shaft without damaging gear teeth. (b) Use a file to clean burrs from around pin hole in the shaft and remove the lower thrust washer. (c) Push shaft up and remove shaft through top of distributor body. ASSEMBLING THE DISTRIBUTOR

(Refer to Fig. 4) (1) Test operation of governor weights and inspect weight springs for distortion. (2) Lubricate governor weights. (3) Inspect all bearing surfaces and pivot pins for roughness, binding or excessive looseness. (4) Lubricate and install upper thrust washer (or washers) on the shaft and slide the shaft into the distributor body. (5) If gear is worn or damaged, replace as follows: (a) Install lower thrust washer and old gear on low-

NUT

---491-

LEAD WIRE

CONDENSER

CONTACT PLATE--

FELT

SNAP RINC;

SHAFT ASSEMBLY

VACUUM CHAMBER

BASE SCREW (2)

SPRING (2)

"0"

RING —.C) WASHER

a. PIN

”(4-,

GEAR PtATE

4: s

WASHER SCREW NI:477

Fig. 4—Distributor Disassembled View


8-40 ELECTRICAL—IGNITION SYSTEM er end of shaft and temporarily install rollpin. (b) Scribe a line on the end of shaft from center to edge, so line is centered between two gear teeth as shown in Figure 5. Do not Scribe completely across

CENTER UNE OF ROTOR ELECTRODE

the shaft.

(c) Remove rollpin and gear. Use a fine file to clean burrs from around pin hole. (d) Install new gear with thrust washer in place. Drill hole in gear and shaft approximately 90 degrees from old hole in shaft and with scribed line centered between the two gear teeth as shown. If it appears that the new pin hole may interfere with the shaft oil groove, rotate gear to the centerline of the next pair of gear teeth, aligning again with scribe mark on the end of shaft.

(e) Before drilling through shaft and gear, place a .007 feeler gauge between gear and thrust washer and after again observing that the centerline between two of the gear teeth is in line with centerline of rotor electrode (Fig. 6) drill a .124.129 inch hole and install the rollpin. CAUTION: Support hub of gear when installing roll pin so that gear teeth will not be damaged.

(8) Install contact plate assembly, align the condenser lead, movable contact spring, primary lead, and install attaching screws, (7) Attach vacuum advance unit arm to the contact plate. (8) Install vacuum unit attaching screws and washers. (9) Test contact arm spring tension. (10) Adjust contact cap. (11) Lubricate the felt pad in top of distributor cam with 1 drop of light engine oil and install the rotor. CENTER UNE OF ROTOR ELECTRODE

GEAR ROTAlED APPROX 90 DEGREES

HOLE IN SERVICE GEAR MARK ON SHAFT

LENTER ONE OF GEAR TOOTH NP896A

Fig. 6—Aligning Gear Teeth with Centerline of Rotor Electrode

TESTING CONTACT ARM SPRING TENSION (1) Hook a spring scale MTU-38 on contact arm and pull in a straight line at a right angle to the contact surfaces (Fig. 7). Take a reading as contacts start to separate under slow and steady pull of the scale. Spring tension should be 17 to 20 ounces. If reading IS outside these limits, loosen the screw which holds the end of contact arm spring, and slide end of spring in or out, as necessary. (2) Tighten screw and measure spring tension. Just the right amount of contact spring tension is very important for effective ignition and efficient engine performance. Spring tension that is too great, will cause excessive wear on distributor cam and on the nylon block of the movable contact arm. Spring ten sion that is too weak, Is unable to keep the contacts in contact with each other when they close. This Is particularly true as engine speed is increased, causing high-speed misfiring.

DISTRIBUTOR CONTACTS Contact Wear Contacts which have undergone several thousand •• CONTACT ARM AND SPRING

PULL SCALE AuGNmENT MARK ON SHAFT NP895A

Fig. S —Scribe Line on Distributor Shaft

NY 7038

Fig. 7—Testing Contact Arm Tension Spring


IGNITION SYSTEM—ELECTRICAL 8-41

miles of operation will have a rough surface, but this should not be interpreted as meaning that contacts are worn out. If the contact area has a gray color and roughness between the contacts matches so that a large contact area is maintained, the contacts will continue to provide satisfactory service. However, if the contact area is oily, mottled or dark in color, or is badly pitted, the contacts will soon become unsatisfactory for further operation. Not only must they be replaced, but the ignition system and engine must be checked to determine the cause of the trouble so it can be eliminated. Unless the condition causing contact burning or excessive pitting is corrected, new contacts will provide no better service

Pitting of Contacts

Contact pitting results from the transfer of material from one contact to the other so that a tip builds up on one contact while a pit forms in the other. A small amount of pitting in several thousand miles is normal and does not affect the distributor operation. However, excessive pitting such as long sharp spikes is harmful and causes arcing and voltage loss. Contacts with this condition should be replaced. Excessive pitting can be due to too small a contact opening, high primary voltage or wrong condenser capacity. inspect to be certain the condenser capacity, contact spring tension, and contact gap are within the specified range. See "Specifications".

than the old contacts.

INSTALLING AND ALIGNING CONTACTS Burning of Contacts

Contact burning will result from high primary voltage, presence of oil or other foreign material, defective condenser and improper contacts adjustment. High voltage causes an excessively high current flow through the contacts which burns them rapidly. High voltage can result from an improperly adjusted or inoperative voltage regulator. Oil or crankcase vapors which work up into the distributor and deposit on the contact surfaces will cause them to burn rapidly. This is easy to detect since the oil produces a smudgy line under the contacts. Clogged engine breather pipes permit crankcase pressure to force oil or vapors up into the distributor. Over-oiling of the distributor will also cause burning. If contact opening is too small (cam angle too large), arcing will occur between the contacts resulting in low secondary voltage and engine miss. High series-resistance in the condenser circuit will prevent normal condenser action so the contacts will burn rapidly. This resistance may be caused by a loose condenser mounting or lead connection, or by poor connections inside the condenser. TOOL--

STATIONARY CON! ACT

MOVABLk CONTACT ARM

DIAL INDICATOR ARM

• NY11228 Fig. 8 — Adjusting Contact Clearance with Indicator

(1) Loosen the terminal screw nut, and remove primary lead and condenser lead. (2) Remove the stationary contact lock screw and remove the old contact set. (3) Install a new contact set; the sleeve at one end of the adjustable bracket fits over and pivots on the upper contact plate mounting pin. (4) Connect the condenser and primary leads. (5) Align the contacts, if necessary, by bending the stationary contact bracket only. Never bend the movable contact arm to obtain alignment. (6) After aligning the contacts, adjust contact clearance to "Specifications," using dial indicator (frig. 8). Recheck the contact arm spring tension. (7) Test the dwell angle to show proper degree of closure. See Paragraph, "Distributor Contact Dwell." The lock screw should be loosened just enough so that the stationary contact bracket can be moved with a slight drag; otherwise, it will be difficult to set the contacts accurately. After setting the contacts to the correct gap, tighten the stationary bracket lock screw. DISTRIBUTOR LUBRICATION (1) Lubricate the felt wick under the rotor in top of distributor cam with 1 drop of SAE 10W oil. (2) Wipe the distributor cam free of dirt and old grease with a clean lintless cloth, Apply a light film of new distributor cam lubricant Number 1473595 or equivalent over the entire cam surface. Lubricant must be able to adhere to the cam surface thereby resisting being thrown from the cam by centrifugal force, must not melt at operating temperatures and must not harden or dry out with age, must not chemically react or be affected by ozone or cause corrosion or pitting of the metal, must possess moisture control properties to prevent rust formation on the cam. CAUTION: A thin film is all that is required. Do not over-lubricate. Excess grease will be thrown from the distributor cam when engine is running. If this grease


8-42 ELECTRICAL—IGNITION SYSTEM strikes the contacts, arcing and burning of contacts will result.

tions, replace the vacuum advance unit. Retest vacuum advance curve.

DISTRIBUTOR ADVANCE TESTING

DISTRIBUTOR INSTALLATION

Centrifugal Advance Curve Carefully mount distributor assembly (less cap and rotor in a reliable stroboscope-type distributor tester so that gear is not damaged and proceed with tests as follows: (1) Turn the Tach-Dwell switch to the 6 LOBE position and Motor Switch to correct direction of rotation. Refer to "Distributor Advance Specifications" in this manual. (2) Turn battery switch "ON." (3) Regulate tester speed control to operate distributor at 200 distributor rpm. (4) Align the "0" of distributor tester degree ring with any of the arrow flashes. (5) Adjust tester speed control to operate distributor at speeds called for under "Specifications" and observe arrow flashes opposite tester degree ring to determine degrees of advance. (6) If advance is not according to specifications, replace with correct distributor shaft assembly (shaft, cam, yoke, governor weights as complete assembly) or distributor assembly, less cap and rotor.

(1) Position distributor on engine. Make certain the rubber "0" ring seal is in the groove of distributor shank. (2) Carefully engage distributor drive gear with camshaft drive gear so that when distributor is installed properly, rotor will be in line with previously scribed line on cylinder block. If engine has been

Vacuum Diaphragm Leak Test With distributor mounted in Distributor Tester and with vacuum unit attached to distributor, proceed as follows: (1) Place thumb over end of vacuum pump hose and adjust the regulator control knob to give a reading of 20 inches of vacuum with hose closed off to be sure tester hose does not leak. (2) Attach tester vacuum pump hose to the tube on vacuum unit. Vacuum gauge should hold on maximum vacuum obtainable if no leaks exist. (3) Observe breaker plate while performing leak test to test response of the breaker plate. There should be instant response to pull of the diaphragm, moving plate without a drag, bind or jerk in either direction. (4) If leakage is indicated, replace vacuum unit assembly. Vacuum Advance Curve If only the vacuum advance curve is to be checked, connect tester vacuum pump hose to distributor vacuum advance unit and perform operations 1 through 4 under "Centrifugal Advance Curve," then proceed as follows: (1) Turn tester vacuum pump "ON." Adjust vacuum pump regulator to vacuum test specifications. See "Specifications" and observe arrow flashes on tester degree ring to determine degrees of advance. (2) If vacuum advance is below or above specifica-

cranked while distributor is removed, it will be necessary to establish proper relationship between the distributor shaft and Number 1 piston position as follows:

(a) Rotate the crankshaft until number one piston is at top of compression stroke. Mark on inner edge of crankshaft pulley should be in line with the "0" (TDC) mark on timing chain case cover. (b) Rotate rotor to a position just ahead of the number one distributor cap terminal. (c) Lower the distributor into the opening, engaging distributor gear with drive gear on camshaft. With distributor fully seated on engine, rotor should be under the cap number 1 tower with distributor contacts just separating. (3) Install the distributor cap (make sure all high tension wires "snap" firmly in the cap towers). (4) Install hold-down arm screw and tighten finger tight. (5) Attach primary lead wire to the coil. Do not connect distributor vacuum hose at this time.

(6) Connect secondary lead of Power Timing Light to the Number I spark plug (using proper adaptor) and red primary lead to the positive terminal of battery with black primary lead to negative battery terminal. Do not puncture the cable cap nipples or spark plug covers to make a contact. Use proper adapters.

(7) Start engine and run engine at idle speed. (8) Rotate distributor housing so that timing mark on crankshaft damper is aligned with specified degree mark on chain case cover. Refer to "Specifications" (Moving distributor housing counter-clockwise advances timing and clockwise retards timing). (9) Tighten distributor hold down arm screw after timing has been set and recheck timing adjustment with a Power Timing Light. (10) When timing is correct, connect vacuum hose to the distributor. (11) Remove Power Timing Light from engine. IGNITION COIL The ignition coil is designed to operate with an external ballast resistor. When testing the coil for


IGNITION SYSTEM-ELECTRICAL 8-43 output, include resistor in tests. Inspect the coil for external leaks and arcing. Test coil according to coil tester Manufacturer's instructions. Test coil primary resistance. Test ballast resistor resistance. Test coil secondary resistance. Replace any coil or ballast resistor that does not meet specifications. Every time an ignition coil is replaced because of a burned tower, carbon tracking, or any evidence of arcing at the tower, the nipple or boot on the coil end of the secondary cable, replace cable. Any arcing at the tower will carbonize the nipple so that placing it on a new coil will invariably cause another coil failure. If secondary cable shows any signs of damage, cable should be replaced with a new cable with a neo-

prene nipple since the old cable can cause arcing, and therefore, ruin a new coil. BALLAST RESISTOR The ballast resistor is a compensating resistance in the ignition primary circuit. During low speed operation, when primary circuit current flow is high, ballast resistor temperature rises, increasing resistance. This reduces current flow, thereby prolonging ignition contact life. At high speed operation, when primary current flow is low, the ballast resistance cools off allowing more current flow, which is required for high speed operation. During starter operation, the ballast resistor is bypassed, allowing full battery voltage to ignition primary circuit.


IGNITION SYSTEM-8 CYLINDER INDEX Page 50 53 51 46 51 48 52 53 47 45 46 46

Assembling the Distributor Ballast Resistor Contact Arm Spring Tension Distributor Contact Dwell Distributor Contacts Distributor Disassembly Distributor Lubrication Distributor Installation Distributor Removal Distributor Resistance Test Dual Contacts Dwell Variation

General Information Idle R.P.M. Test Ignition Coil Ignition Timing Installation and Aligning Contacts Lubrication Secondary Circuit Inspection Service Diagnosis Shaft and Bushing Wear Test Spark Plugs Specifications Testing Distributor Advance

Page 43 45 53 46-47 51 52 44 43 48 53 89 52

GENERAL INFORMATION The ignition system consists of two separate circuits. The battery, ammeter, ignition switch, ballast

resistor, primary winding of the ignition coil, distributor contacts and condenser, vehicle frame, and pri-

mary wiring make up the low voltage primary circuit. The secondary high voltage circuit includes the coil secondary winding, distributor cap and rotor, spark plug cables, spark plugs and vehicle frame.

SERVICE DIAGNOSIS Condition BURNED OR PITTED DISTRIBUTOR CONTACTS

Possible Cause

Collection

(a) If oil is on contact face, determine cause and correct condition. Clean distributor cam of dirt and grease, apply a light film of distributor cam lubricant to cam lobes; wipe off excess. See "Distributor Lubrication." Replace contact set and adjust as necessary. (b) Alternator voltage regulator setting (b) Test alternator voltage regulator setting, adjust as necessary. Replace too high. contact set and adjust as necessary. (c) Contacts misaligned or gap too small. (c) Align and adjust contacts. (d) Test and replace coil if necessary. Re(d) Faulty coil. place and adjust contacts. (e) Inspect conditions, and correctly con(e) Ballast resistor not in circuit. nect the coil. (a) Dirt or oil on contacts.


8-44 ELECTRICAL-IGNITION SYSTEM Correction

Possible Cause

Condition

(f) Wrong condenser or faulty condenser. (f) Test condenser and replace if necessary. Replace and adjust contacts. (g) Replace ignition switch. (g) Faulty ignition switch. (h) Replace housing'. (h) Bushings worn. (i) Touching contacts with the hands dur- (i) Replace and adjust contacts. ing installation. IGNITION COIL FAILURE

(a) Coil damaged by excessive heat from (a) Replace coil. Inspect condition of the distributor contacts. engine. (b) Replace the coil. (b) Coil tower carbon-tracked. (c) Replace the coil. (c) Oil leak at tower.

Prestolite—Recondition distributor.

SERVICE PROCEDURES SECONDARY CIRCUIT INSPECTION Check high tension cable connections for good contact at the coil and distributor cap towers arid at the spark plugs. Terminals should be fully seated. The nipples and spark plug covers should be in good condition. Nipples should fit tightly on the coil cap towers and spark plug covers should fit tight around spark plug insulators. Cable connections that are loose will corrode and increase the resistance and permit watei to enter the towers causing ignition malfuncfion. To maintain proper sealing between the towers

until cables are properly seated in the cap towers. Use

and nipples, cable and nipple assemblies should not be removed from the distributor or coil towers unless nipples are damaged or cable testing indicates high resistance or broken insulation.

Resistance type cable is identified by the words "Electronic Suppression" printed on the cable jacket. No additional resistors are necessary. Use an ohmmeter to check resistance type cable for open circuits, loose terminals or high resistance as follows: (a) Remove cable from spark plug and install the proper adapter between cable and spark plug. (b) Lift distributor cap from distributor with cables intact. Do not remove cables from cap.

Clean high tension cables with a cloth moistened with a non-flammable solvent and wipe dry. Bend cables to check for brittle or cracked insulation. When testing secondary cables for punctures and cracks with an oscilloscope follow the instructions of the equipment manufacturers. If an oscilloscope is not available, secondary cables can be tested as follows: (a) Engine not running, connect one end of a test probe to a good ground, other end free for probing. (b) Disconnect cable at spark plug end. Insulate cable end from grounding. (c) With engine running, move test probe along entire length of wire. If punctures or cracks are present there will be a noticeable spark jump from the faulty area to the probe. Secondary coil wire may be checked in the same manner, be sure one spark plug cable is disconnected from spark plug while running probe along coil wire secondary cable. Cracked, leaking or faulty cables should be replaced.

the same procedure to install cable in coil tower (Fig. 2).

Use the following procedure when removing the high tension cable from the spark plug. First, remove the cable from the retaining bracket. Then grasp the insulator as close as possible to the spark plug and use a straight and steady pull (Fig. 3). Do not use pliers and do not pull the cable at an angle. Doing so will damage the insulation, cable terminal or the spark plug insulator. Wipe spark plug insulator clean before reinstalling cable and cover.

When installing new cable assemblies, install new high tension cable and nipple assembly over cap or coil tower, entering the terminal into the tower, push lightly, then pinch the large diameter of the nipple (Fig. 1) to release trapped air between nipple and tower. Continue pushing on the cable and nipple

Fig. I—Installing Secondary Cable and Nipple at Distributor Cap Tower


IGNITION SYSTEM—ELECTRICAL 8-45

Fig. 2 —Installing Secondary Cable and Nipple at Coll Tower

(c) Connect the ohmmeter between spark plug adapter and the corresponding electrode inside the cap, making sure ohmmeter probes are in good contact. if resistance is more than 30,000 ohms, remove cable at cap tower and check the cable resistance. If resistance is more than 30,000 ohms on cables under twenty-five inches long or 50,000 ohms on cables over twenty-five inches long, replace cable assembly. Test all spark plug cables in same manner. To test coil to distributor cap high tension cable, remove distributor cap with the cable intact. Do not remove cable from the coil or cap. Connect the ohmmeter between center contact in the cap and either primary terminal at coil. lithe combined resistance of coil and cable is more than 25,000 ohms, remove the cable at coil tower and check cable resistance. If resistance is more than 15,000 ohms, replace the cable. If resistance is less, check for a loose connection at the tower or for a faulty coil. Inspect coil tower for cracks, carbon tracking or oil leaks. DISTRIBUTOR RESISTANCE TEST This test indicates the resistance of the ignition primary circuit from the distributor side of the coil, through the points and the distributor ground. Excessive resistance in this portion of the ignition system

Fig. 3—Removing Secondary Cable and Cover from Spark Plug (Typical)

will prevent the coil from producing sufficient output for good over-all ignition. To perform test, proceed as follows: (1) Turn Selector Switch of a Tach-Dwell unit to CALIBRATE position and adjust Dwell Calibrator until Dwell Meter reads on the set line (test leads separated). (2) Leave Selector Switch in CALIBRATE position, connect Tach-Dwell red lead to distributor terminal of coil and black lead to a good ground. (3) Turn ignition switch "ON." Observe dwell meter reading. Meter pointer should be well within bar marked "DISTRIBUTOR RESISTANCE." If reading is zero or outside of bar, crank engine with the starter until meter pointer moves as far to right as possible. (This will indicate that contacts are closed.) A reading now within the bar indicates a normal distributor primary circuit. If reading is outside the bar, high resistance is present in distributor primary circuit. (4) Remove test lead from distributor terminal of coil and connect to the following points: (a) Distributor primary terminal (outside). (b) Distributor primary terminal (inside). (c) Contact terminal bracket (insulated bracket). (d) Ground side of the contacts. (e) Distributor housing. (5) Repeat test at each connection until a noticeable change occurs in the meter reading. If a poor connection or faulty lead is indicated, clean, tighten or replace as necessary and repeat test (3). If faulty contacts are indicated remove distributor for complete inspection, service, testing and calibration. IDLE RPM TEST Engine idle rpm setting should be tested and recorded as it is when the vehicle is first brought into the shop for testing. This will assist in diagnosing complaints of engine staffing, creeping and hard shifting on vehicles equipped with automatic transmissions. Test procedures are as follows: (I) Turn Selector Switch to CALIBRATE position and adjust Dwell Calibrator until Dwell Meter reads on SET line (test leads separated). (2) Connect red lead of the test unit to distributor primary terminal at coil and black lead to a good ground. (3) Turn Selector Switch to 8 LOBE position. (4) Turn the Tach-Dwell RPM Switch to the 1000 rpm position. (5) With engine at normal operating temperature (off fast idle), momentarily open the throttle and release to make sure there is no bind in the linkage and


8-46

ELECTRICAL—IGNITION SYSTEM

that idle speed screw is against its stop. (6) Note engine RPM on 1000 RPM scale and adjust carburetor idle speed to specifications. See "Fuel Sustern" specifications.

DISTRIBUTOR CONTACT DWELL The degrees of distributor dwell are the degrees of rotation through which the contacts remain closed. This is also commonly referred to as "dwell angle" or "cam angle." The correct distributor point dwell is essential for good ignition performance and contact point life. Test procedures are as follows: (1) Disconnect vacuum line. (2) Connect Tach-Dwell red lead to distributor terminal of coil and black lead to a good ground. (3) Turn Selector Switch to 8 LOBE position. (4) Start engine and operate engine at idle speed. (5) Observe dwell meter reading. If the dwell reading is within "Specifications" the contact gap, cam rubbing block and contact arm are all in satisfactory condition. If dwell reading is not within specifications, incorrect contact gap, worn cam, worn rubbing block or distorted contact arm may be indicated.

DUAL CONTACTS Block one set of contacts with a clean insulator and adjust the opposite set of contacts to specifications using the dwell meter. Loosen stationary contact lock screw just enough, so stationary contact can be moved with a slight drag; otherwise it will be difficult to set contacts accurately.

When one set of contacts has been adjusted for correct clearance tighten stationary contact lock screw. Block adjusted set of contacts with an insulator and adjust remaining set of contacts in the same manner as the first set. Remove insulator and recheck tightness of stationary contact lock screw. If contacts have been properly adjusted the dwell should be as specified for two contact sets.

(2) Slowly increase engine speed to 1500 RPM then slowly reduce to idle speed while observing dwell meter reading. If dwell reading varies more than 2 degrees from initial reading between idle speed and 1500 RPM, probable wear in the distributor shaft, bushings or contact plate bearing and pivot pin is indicated. Remove distributor for complete inspection and testing on a distributor tester. Dwell variation at speeds above 1500 does not necessarily indicate distributor wear. Dwell and gap of the contacts must both be within their specified limits at the same time. If this cannot be accomplished, it is probable that wrong contacts are installed or the rubbing block or cam lobes are badly worn or movable contact is distorted.

IGNITION TIMING (383 Cu. In. 440 Cu. In) (Solenoid Distributor—Fig. 4)

To obtain maximum engine performance, the distributor must be correctly positioned on the engine to give proper ignition timing. The ignition timing test will indicate the timing of the spark at No. 1 cylinder at curb idle (Hot only). Test procedures are as follows: (1) Disconnect vacuum hose at distributor, and plug hose. (2) Connect the secondary lead of a power timing light to No. 1 spark plug, red primary lead to positive terminal of the battery and the black primary lead to the negative battery terminal. Do not puncture cables, boots or nipples with test probles. Always use proper adapters. Puncturing the spark plug cables with a probe will damage the cables. The probe can separate the conductor and cause high resistance. In addition breaking the rubber insulation may permit secondary current to arc to ground.

SOLENOID TO VACUUM HOSE

DWELL VARIATION

This test indicates the mechanical condition of the distributor. Excessive wear in distributor mechanical parts cause dwell variations which will affect ignition timing. Test procedures are as follows: (1) With engine at idle speed, vacuum hose discon• netted, and test leads connected as in "Contact Dwell Test," turn Tach-Dwell RPM Switch to the 5,000 RPM position.

TO

GROUND LEAD

°Y9-33

Fig. 4—Solenoid Retard Distributor Connections


IGNITION SYSTEM—ELECTRICAL 8-47 (3) Loosen the distributor hold-down mounting screw just enough so distributor housing can be rotated in its mounting. (4) Start the engine and set the curb idle as shown in "Specifications". (Transmission in Neutral and Engine Hot). (5) Aim the power timing light at the timing marks on the chain case cover. If the timing light flash occurs when the timing mark on the vibration damper is located ahead of specified degree mark on the timing plate. The timing is advanced. To adjust turn distributor housing (Not Vacuum Chamber) Counter clockwise. Do not use vacuum chamber as a turning handle. If the timing light flash occurs when the timing mark on the vibration damper is located past the specified degree mark on the timing plate. The timing is retarded. To adjust turn distributor housing clockwise. Timing may vary from the specified specifications a plus or minus 2-1/2° and still fall within range, but if the timing is checked it should be adjusted to the specification shown on the distributor charts. (6) To check the distributor solenoid for proper operation, disconnect the wire at the carburetor. Aim the power timing light at the timing marks on the chain case. The timing should advance at least 5-1/2° and the engine speed should increase. (7) Stop the engine and tighten the distributor holddown screw. (8) Reconnect the wire at the carburetor throttle stop. (9) Reconnect the vacuum hose to the distributor. (10) Remove the timing light.

IGNITION TIMING (318 Cu. In. and 340 Cu. In.) To obtain maximum engine performance, the distributor must be correctly positioned on the engine to give proper ignition timing. The ignition timing test will indicate the timing of the spark at No. 1 cylinder at idle (only). Test procedures are as follows: (1) Disconnect vacuum hose at distributor. (2) Connect secondary lead of Power Timing Light to No. 1 spark plug, red primary lead to positive terminal of battery and black primary lead to negative battery terminal. Do not puncture cables, boots or nipples with test probes. Always use proper adapters. Puncturing the spark plug cables with a probe will damage the cables. The probe can separate the conductor and cause high resistance. In addition breaking the rubber insulation may permit secondary current to arc to ground. (3) Start engine and set idle to "Specifications" (Transmission in Neutral). (4) Loosen distributor hold-down arm screw just enough so distributor housing can be rotated in its mounting.

(5) Aim Power Timing Light at timing plate on chain case cover. If light flash occurs when timing mark on vibration damper is located ahead of specified degree mark on timing plate in the direction of engine rotation, timing is advanced. To adjust, turn distributor housing in direction of rotor rotation. If flash occurs when the vibration timing mark is located past the specified degree mark in the direction of engine rotation, timing is retarded. To adjust, turn distributor housing against direction of rotor rotation. Refer to "Specification." (Moving the distributor housing against shaft rotation advances timing and with shaft rotation retards timing. (6) Tighten distributor hold-down arm screw after timing has been set and recheck timing adjustment with a Power Timing Light. (7) When ignition timing is correct, reconnect vacuum hose to distributor. Ignition Timing (with C -744 Test Lamp) (1) Connect C-744 test lamp between distributor primary terminal and battery positive post. (2) Turn engine until number 6 exhaust valve is just closing; continue turning engine slowly until specified degree mark on the crankshaft pulley is at specified degree mark at timing case cover. (3) Loosen distributor clamp bolt so distributor housing can be rotated with a slight drag, then turn distributor in ' the normal rotation until test lamp lights. (4) Turn distributor against normal distributor rotation until test lamp goes out. If test lamp lights immediately when connected, turn distributor against normal distributor rotation until light goes out. (5) Tighten distributor clamp bolt securely and remove test lamp. If the operation is performed properly the engine is timed to specifications. If engine is turned beyond the timing mark, continue turning engine for two full revolutions of the crankshaft; this will place the distributor rotor in approximately the initial position. CAUTION: DO NOT reverse rotation of the crankshaft, if you have passed the timing mark as this would affect valve timing and distributor timing.

DISTRIBUTOR REMOVAL (1) Disconnect vacuum hose at distributor. (2) Disconnect primary lead wire at coil. (3) Unfasten distributor cap retaining clips and lift off distributor cap. (4) Scribe a mark on the edge of distributor housing to indicate position of the rotor as reference when reinstalling distributor. (5) Remove distributor hold-down clamp screw and clamp. (6) Carefully lift distributor from engine.


8-48 ELECTRICAL—IGNITION SYSTEM SHAFT AND BUSHING WEAR TEST (1) Remove distributor rotor. (2) Disconnect primary lead wire at distributor terminal. DO NOT LOOSEN inner nut that holds movable contact arm tension spring to terminal post. (3) Clamp the ribbed section of distributor housing lightly in a vise equipped with soft jaws and attach dial indicator to body of distributor with the indicator plunger arm resting against movable contact arm at the rubbing block and with the rubbing block of contact arm on the highest point of cam lobe (Fig. 5). (4) Place one end of a wire loop around the top of distributor shaft. Hook a spring scale in the other end of wire loop and pull on a line with the plunger of indicator gauge. Be sure wire loop on shaft end is down on the shaft to insure a straight pull and also that wire loop does not interfere with indicator or holding bracket. Apply a five pound pull and read the movement of plunger on indicator dial. (Be sure rubbing block of contact arm is on highest point of the cam lobe during this test.) If plunger movement exceeds .006 inch, replace bushings and/or distributor shaft, see "Distributor Disassembly." DISTRIBUTOR DISASSEMBLY (Figs. 4,6 and 7)

(1) Remove distributor rotor. The distributor cap clamp springs on Chrysler built distributors are held In place by peened metal around the openings and should not be removed. (2) Remove the retainer attaching vacuum advance unit to the contact plate advance arm (Prestolite). (3) Remove the two screws and lockwashers attaching vacuum advance unit to distributor housing and remove the advance unit.

(4) Remove primary lead wire and rubber grommet as an assembly. Push grommet towards inside of distributor to remove. Do not pull on the wire. (5) Remove two screws, and lockwashers attaching the contact plate to housing and lift out the contact plate, contacts and condenser as an assembly. (6) Remove oil wick from the distributor cam well. Remove spring clip from oil well in cam and remove cam and yoke assembly and spacer (Prestolite). (7) If side play exceeded .006 inch in "Shaft and Bushing Wcar Test," (Chrysler Built distributors) replace housing and bushings or shaft and cam assembly as necessary. Prestolite distributors replace bushing and/or distributor shaft as follows: (a) Remove distributor drive collar retaining pin and slide collar off end of shaft. (b) Use a fine file to clean burrs from around pin hole in the shaft and remove lower thrust washer. (c) Push shaft up and remove it through the top of distributor body. Remove upper thrust washer. (d) Remove shaft oiler and lift out oiler wick. (e) Place housing in an arbor press and press out upper and lower bushings from bottom of housing using Driver Tool C-3041 (Fig. 8). (f) Soak new bushings in light engine oil for apapproximately 15 minutes. (g) Position new upper bushing with hole in bushing up and in line with oil hole in housing, then press bushing into distributor housing with Tool C-3041 and tool adapter until adapter bottoms on housing. The bushing will measure .094 inch below the top of the housing bore (Fig. 9). Place a straight-edge on machined surface of housing and measure from bottom face of straight-edge to the top of the bushing. Invert PULL WIRE

--- TOOL

N0326

Fig. 5 —Shaft and Bushing Wear Test


IGNITION SYSTEM-ELECTRICAL 849

CAP CAP

SPRING CONTACT LEAD

- ROTOR

LEAD

SCREW.

CONDENSER

ttlitc.---WASHER CONDENSER SCREW WASHER

CONTACT SET

SCREW CONTACT PLATE BREAKER PLATE

FELT GT-

SNAP RING

WASHER SCREW

FELT

eqO

SNAP RING -

LEAD

CAM SHAH ASSEMBLY SPRING SET

-

• WEIGHT SHAFT SPRING WASHER

IT_

SCREW BEARING HOUSING

-_

HOUSING CtAmP a‘rokk WASHER 2hi SCREW OILER -

CLAMP LOCK WASHER SCREW LOCKRING t---•=7. WASHER

- - - SCREW VACUUM CHAMBER

WASHER COLLAR PY927 Fig. 6-Distributor (Disassembled View)— Chrysler Built (Typical)

BUSHING WASHER -- COLLAR

ND3/CF1

Fig. 7—Distributor (Disassembled View)—Prestolite


8-50

ELECTRICAL—IGNITION SYSTEM

12,4 aocx Fig. 10—Installing Lower Bushing

Fig. 8—Removing Distributor Drive Shaft Bushings

housing and install other bushing flush with the face of distributor base (Fig. 10). (h) Insert a 3/32 inch rod through housing oiler hole to see if the hole in bushing indexes with oiler hole in the housing. If rod cannot be inserted through the housing and bushing, drill a 1/8" hole through the upper bushing by drilling through the oil wick hole. Remove burrs caused by drilling operation. (i) install burnishing tool part of C-3041 tool set and force the burnisher through both bushings (Fig. 11). Correct bushing inside diameter is .4995 to .5000 inch. ASSEMBLING THE DISTRIBUTOR (1) Test operation of governor weights and inspect

weight springs for distortion. Lubricate governor weights. (2) Inspect all bearing surfaces and pivot pins for roughness, binding or excessive looseness. (3) Install cam spacer, chamfered end down on distributor shaft, (Prestolite only). (4) Slide cam and yoke on distributor shaft, engage weight lugs with slots in the yoke. Install cam retaining spring clip. Be sure it is properly seated in the groove of distributor shaft, (Prestolite only). (5) Lubricate and install flat thrust washer. Position washer on distributor shaft and slide shaft into distributor body. Position lower thrust washer and drive the collar on the lower end of shaft. Install retainer pin. (6) Install oiler wick and oiler, (Prestolite only). (7) Install contact plate assembly. Align condenser lead, contact point spring, primary lead and install attaching screw. (8) Install felt wick in the top of distributor cam. BURNISHING TOOL UPPkR BUSHING

283 Fig. 9—Installing Upper Bushing

K D285 Fig. 71—Burnishing Distributor Drive Shaft Bushings


IGNITION SYSTEM—ELECTRICAL 8-51

(9) Attach vacuum advance unit arm to contact plate and install the retainer (Prestolite only). Install vacuum unit attaching screws and washers. (10) Test contact arm spring tension, and adjust contact gap. (11) Lubricate felt pad in the top of distributor cam with 1 drop of light engine oil and install rotor. CONTACT ARM SPRING TENSION

(1) Hook a spring scale Tool MTU-36 on the breaker arm and pull in a straight line at a right angle to the contact surfaces (Fig. 12). Take a reading as the contacts start to separate under the slow and steady pull of the scale. Spring tension should be as shown in specifications. If the reading is outside these limits, loosen the screw which holds the end of the contact arm spring, and slide the end of the spring in or out, as necessary. (2) Tighten the screw and measure the spring tension. Just the right amount of contact spring ten. sion is very important for effective ignition and efficient engine performance. Spring tension that is too great, will cause excessive wear on the distributor cam and on the nylon block of the movable contact arm. Spring tension that is too weak, is unable to keep the contacts in contact with each other when they close. This is particularly true as angina speed is Increased, causing high-speed misfiring.

trouble so it can be eliminated. Unless the condition causing contact burning or excessive pitting is corrected, new contacts will provide no better service than the old contacts. Burning of Contacts

Contact burning will result from high primary voltage, presence of oil or other foreign material, defective condenser and improper contacts adjustment. High voltage causes an excessively high current flow through the contacts which burns them rapidly. High voltage can result from an improperly adjusted or inoperative voltage regulator. Oil or crankcase vapors which work up into the distributor and deposit on the contact surfaces will cause them to burn rapidly. This is easy to detect since the oil produces a smudgy line under the contacts. Clogged engine breather pipes permit crankcase pressure to force oil or vapors up into the distributor. Over-oiling of the distributor will also cause burning of the contacts. If the contact opening is too small (cam angle too large), arcing will occur between the contacts resulting in low secondary voltage and engine miss. High series-resistance in the condenser circuit will prevent normal condenser action so the contacts will burn rapidly. This resistance may be caused by a loose condenser mounting or lead connection, or by poor connections inside the condenser.

DISTRIBUTOR CONTACTS Pitting of Contacts

Contact Wear

Contacts which have undergone several thousand miles of operation will have a rough surface, but this should not be interpreted as meaning that the contacts are worn out. If the contact area has a gray color and the roughness between the contacts matches so that a large contact area is maintained, the contacts will continue to provide satisfactory service. However, if the contact area is oily, mottled or dark in color, or is badly pitted, the contacts will soon become unsatisfactory for further operation. Not only must they be replaced, but the ignition system and engine must be checked to determine the cause of the CONTACT ARM AND SPRING

Contact pitting results from the transfer of material from one contact to the other so that a tip builds up on one contact while a pit forms in the other. A small amount of pitting in several thousand miles is normal and does not affect the distributor operation. However, excessive pitting such as long sharp spikes is harmful and causes arcing and voltage loss. Contacts with this condition should be replaced. Excessive pitting can be due to too small a contact opening, high primary voltage or wrong condenser capacity. Inspect to be certain the condenser capacity, contact spring tension, and contact gap are within the specified ranges. See "Specifications". INSTALLING AND ALIGNING CONTACTS

PULL SCALE

NI1154C Fig. 12—Testing Contact Arm Spring Tension

(1) Loosen terminal screw nut, and remove primary lead and condenser lead. (2) Remove stationary contact lock screw and remove old contact set. (3) Install a new contact set; the sleeve at one end of adjustable bracket fits over and pivots on upper contact plate mounting pin. (4) Connect condenser and primary leads. (5) Align contacts, if necessary, by bending station-


8-52 ELECTRICAL-IGNITION SYSTEM ary contact bracket only. Never bend movable contact arm to obtain alignment. (6) After aligning contacts, adjust contact clearance to "Specifications," using dial indicator (Fig. 13). Recheck contact arm spring tension. (7) Test dwell angle to show proper degree of closure. See Paragraph, "Distributor Contact Dwell." The lock screw should be loosened just enough so stationary contact bracket can be moved with a slight drag; otherwise, it will be difficult to set contacts accurately. After setting contacts to the correct gap, tighten stationary bracket lock screw.

DISTRIBUTOR LUBRICATION (1) Add 3 drops of SAE IOW oil to the oiler on outside of distributor base, (Prestolite only). (2) Lubricate felt wick under the rotor in top of distributor cam with 1 drop of SAE IOW oil. (3) Wipe the distributor cam free of dirt and old grease with a clean hiltless cloth. Apply a light film of new distributor cam lubricant Number 1473595 or equivalent over the entire cam surface. Lubricant must be able to adhere to the cam surface thereby resisting being thrown from the cam by centrifugal force, must not melt at operating temperatures and must not harden or dry out with age, must not chemically react or be affected by ozone or cause corrosion or pitting of the metal, must possess moisture control properties to prevent rust formation on the cam. CAUTION: A thin film is all that is required. Do not over-lubricate. Excess grease will be thrown from the distributor cam when engine is running. If this grease strikes the contacts, arcing and burning of contacts will result.

TESTING DISTRIBUTOR ADVANCE Centrifugal Advance Curve

Mount distributor assembly (less cap and rotor) in a STATIONARY CONTACT

reliable stroboscope-type distributor tester and proceed with tests as follows: Clamp around ribbed section of distributor housing. The bottom section of distributor housing is not a machined surface and concentricity would be affected, causing a wobble.

(1) Turn Tach-Dwell switch to 8 "LOBE" position and Motor Switch to correct direction of rotation. Refer to "Distributor Specifications" in this manual. (2) Turn battery switch "ON." (3) Regulate tester speed control to operate distributor at 200 distributor rpm. (4) Align the "0" of the distributor tester degree ring with any one of the arrow flashes. (5) Adjust tester speed control to operate distributor at speeds called for under "Specifications" and observe arrow flashes opposite tester degree ring to determine degrees of advance. (6) If advance is not according to specifications, replace with a new distributor shaft with correct calibration (shaft, cam, yoke, governor weights and springs as an assembly) or with a new distributor assembly, less cap and rotor. For Prestolite distributors corrections can be attempted by bending the primary and secondary spring tabs on the cam yoke to increase or decrease spring tension. DO NOT attempt calibration of Chrysler built distributors. Vacuum Diaphragm Leak Test

With distributor mounted in distributor tester and with vacuum unit attached to distributor, proceed as follows: (1) Place thumb over end of vacuum pump and hose and adjust regulator control knob to give a reading of 20 inches with hose closed off to be sure tester hose does not leak. (2) Attach tester vacuum pump hose to the tube on the distributor vacuum unit. The vacuum gauge should hold on maximum vacuum obtainable if no leak exists. (3) Observe contact plate while performing leak test to test response of contact plate. There should be instant response to the pull of the diaphragm, moving the plate without a drag or bind. (4) If leakage is indicated, replace vacuum unit assembly. Vacuum Advance Curve

DIAL NDICATOR ARM

NB1488 Fig. 13—Adjusting Contact Clearance

Connect tester vacuum pump hose to the distributor vacuum advance unit and perform operations 1 through 4 under "Centrifugal Advance Curve." Then proceed as follows: (1) Turn tester vacuum pump "ON." Adjust vacuum pump regulator to vacuum test specifications. See "Specifications" and observe arrow flashes on tester degree ring to determine degrees of advance.


IGNITION SYSTEM—ELECTRICAL 8-53

(1) Position distributor on engine. Align rotor with marks previously scribed on distributor housing. Clean

ing at the tower, the nipple or boot on the coil end of the secondary cable, replace cable. Any arcing at the tower will carbonize the nipple so that placing it on a new coil will invariably cause another coil failure. If the secondary cable shows any signs of damage, the cable should be replaced with a new cable with a neoprene nipple since the old cable can cause arcing, and therefore, ruin a new coil.

top of cylinder block to insure a good seal between distributor base and block.

BALLAST RESISTOR

(2) If vacuum advance is above or below specifications, replace vacuum advance unit. Retest vacuum advance curve. DISTRIBUTOR INSTALLATION

(2) Engage tongue of distributor shaft with slot in distributor and oil pump drive gear. If engine has been cranked while distributor is removed, it will be necessary to establish the proper relationship between distributor shaft and NO. 1 piston position as follows:

(a) Rotate crankshaft until number one piston is at top of compression stroke. (b) Rotate rotor to the position of number one distributor cap terminal. (c) Lower distributor into the opening, connect primary lead and install distributor cap. Make sure all high tension wires "snap" firm in cap towers. Install distributor hold-down clamp screw. Tighten screw finger tight. (d) Connect secondary lead of a Power Timing Light to NO. 1 spark plug (using proper adapter). Connect red primary lead to positive terminal of battery and black primary lead to negative battery terminal. (e) Start and operate engine at idle speed. Rotate distributor housing so that specified timing mark and pointer are in alignment (Moving the distributor housing against shaft rotation advances timing and with shaft rotation retards timing). (f) Tighten distributor clamp screw after timing has been set and recheck timing adjustment with a Power Timing Light. (g) If timing is correct, connect vacuum hose to distributor and remove timing light from engine. IGNITION COIL The ignition coil is designed to operate with an external ballast resistor. When testing the coil for output, include resistor in tests. Inspect coil for external leaks and arcing. Always make two tests when testing the coil. One when the coil is cold, the other after the coil has been warmed up. Test coil according to coil tester Manufacturer's instructions. Test coil primary resistance. Test ballast resistor resistance. Test coil secondary resistance. Replace any coil and ballast resistor that does not meet specifications. Every time an ignition coil is replaced because of a butted tower, carbon tracking or any evidence of arc-

The ballast resistor is a compensating resistance in the ignition primary circuit. During low speed operation, when the primary circuit current flow is high, ballast resistor temperature rises, increasing resistance. This reduces current flow, thereby prolonging ignition contact life. At high speed operation, when primary current flow is low, the ballast resistance cools off allowing more current flow, which is required for high speed operation. During starter operation, the ballast resistor is bypassed, allowing full battery voltage to the ignition primary circuit. SPARK PLUGS Spark plug appearance or conditions can reflect a wide variety of engine conditions as follows: Normal Conditions

Normal conditions (Fig. 14). This plug has been running at the correct temperature in a "healthy" engine. The few deposits present will probably be light tan or gray in color with most regular grades of commercial gasoline. Electrode burning will not be in evidence; gap growth will average not more than about .001"/1000 miles. Chances are the plug, as pictured, could be cleaned, the gap electrodes filed, regapped and reinstalled with good results. Cold Fouling Cold fouling or carbon deposits (Fig. 15). This dry black appearance is fuel carbon and can be due to over rich fuel-air mixture, possibly resulting from a faulty choke, clogged air cleaner, improper carburetor idle adjustment, or dirty carburetor. However, if only one or two plugs in a set are fouled like this it is a good idea to check for sticking valves or faulty ignition cables. This condition also results from prolonged operation at idle. If the vehicle is operated extensively at idle and low speeds, improved plug service will be obtained by using the next step hotter spark plugs. Wet Fouling

Wet fouling (Fig. 16) tells you that the plug has drowned in excess oil. In an old engine, suspect worn rings or excessive cylinder wear. Use of a hotter plug may relieve such fouling, but plugs can't take the


8-54 ELECTRICAL--HEADLIGHTS

Fig. 14—Normal Conditions Fig. 1S—Cold Fouling

place of needed engine overhaul. Remember that "break-in" fouling of new engines may occur before normal oil control is achieved. In new or recently overhauled jobs, such fouling plugs can be cleaned and reinstalled. Overheating Overheating (Fig. 17) is indicated by a white or light gray insulator which appears -blistered." Electrode gap wear rate will be considerable in excess of .00 i"/1000 miles. This suggests that a cooler heat range should be used . . . however, over-advanced ignition timing, detonation and cooling system stop-

Fig. 16—Wet Fouling

Fig. 17—Overheating

pages can also overheat the correct spark plug heat ranges. Cleaning and Regapping Carefully clean the spark plugs in an abrasive type cleaner. Use a pin type feeler gauge to check spark plug gap. Reset gaps to .033 inch. Before setting spark plug gap, file center electrode flat, make adjustment by bending ground (side) electrode, never bend the center electrode.

When installing spark plugs, tighten to 30 footpou lids.


EXTERIOR LIGHTING HEADLIGHTS INDEX Page 64 55 54 57 56 56

Page Pre-Aiming Instructions 55 Service Diagnosis 54 Switch See "Instrument Panel" Testing Aimer Calibration 55 Visual Headlight Adjustment (Without Aimers) 57

Dual Headlight System The dual headlight system consists of four sealed

ing lugs for the number one (1) and number two (2) bulbs are offset at different angles. On high beam, the number (1) bulbs provides the high intensity "reach" down the highway and the off focus filament in the number (2) bulbs provides the

Concealed Headlamps—Charger Compensating the Aimers General Information Headlight Sealed-Beam Replacement Measuring Headlight Aim Mounting and Adjusting the Aimers GENERAL INFORMATION

beam bulbs. The two outer bulbs are of the two filament type for low and high beam and are marked by a numeral (2) molded in the lens. The two inner bulbs have only one filament and are marked with a number (1) molded in the glass. The bulbs cannot be installed wrong as the mount-

"body" light which illuminates the side of the road, ditches, etc. On low beam, only the number two (2) bulbs operate.

SERVICE DIAGNOSIS Condition HEADLIGHTS DIM

(engine running above idle)

Possible Cause

(a) High resistance in lighting circuit. (b) Faulty sealed beam units. (c) Faulty voltage regulator.

Correction

(a) Test lighting circuit including ground connection. Make necessary repairs. (b) Replace sealed beam units. (c) Test voltage regulator and alternator. Make necessary repairs.


HEADLIGHTS—ELECTRICAL 8-55 Possible Cause

Condition

Correction

LIGHTS FLICKER

(a) Loose connections or damaged wires (a) Tighten connections and check for in lighting circuit. damaged wiring. (b) Light wiring insulation damaged pro- (b) Test wiring and replace or tape damducing momentary short aged wires.

LIGHTS BURN OUT FREQUENTLY

(a) High voltage regulator setting. (b) Loose connections in light circuit.

(a) Adjust voltage regulator. (b) Tighten connections.

LIGHTS WILL NOT LIGHT

(a) (b) (c) (d)

Discharged battery. Loose connections in lighting circuit. Burned out lamps. Open or corroded contacts in headlight switch. (e) Open or corroded contact in dimmer switch.

(a) (b) (c) (d)

(a) Partly discharged battery. (b) Faulty battery. (c) High resistance in light circuit.

(a) Charge battery. (b) Test battery. Replace if necessary. (c) Test headlight circuit including ground connection. Make necessary repairs. (d) Replace sealed beam units.

HEADLIGHTS DIM

(engine idling or shut off)

(d) Faulty sealed beam units. (e) Corroded battery terminals.

Recharge battery and correct cause. Tighten connections. Replace bulbs or sealed beam unit Replace headlight switch.

(e) Replace dimmer switch.

(e) peen terminals.

SERVICE PROCEDURES PRE-AIMING INSTRUCTIONS

that the target image is centered in viewing port of

transit. (1) Test dimmer switch operation. (2) Observe operation of high beam indicator light mounted in instrument cluster.

(3) Turn dial on side of transit until bubble in spirit level is centered. (4) When bubble is centered, note "plus" or

(3) Inspect for badly rusted or faulty headlight assemblies. These conditions must be corrected before a satisfactory adjustment can be made. (4) Place vehicle on a level floor. (5) Adjust front suspension height as necessary. (6) Inspect tire inflation. (7) Rock vehicle sideways to allow vehicle to assume its normal position. (8) If gasoline tank is not full, place a weight in trunk of vehicle to simulate weight of a full tank (61/4 pounds per gallon). (9) There should be no other load in vehicle other than driver or substituted weight of approximately 150 pounds placed in driver's position. (10) Remove each headlight trim panel. Do not remove sealed beam retainer rims. (11) Thoroughly clean headlight lenses.

"minus" reading on compensator scale. This figure indicates degree of slope of floor and must be trans-

ferred to each aimer. (5) With a screw driver, turn adjusting slot of floor level compensator in each aimer, until correct plus or minus figure (or fractional part) appears in proper window (Fig. 2).

TESTING AIMER CALIBRATION (Fig. 3) (1) Using carpenter or stone mason level of known accuracy, locate a true vertical plate glass window or smooth surface.

COMPENSATING THE AIMERS TARGET

(1) Place transit on floor in line with vertical centerline of right front wheel (Fig. 1). Place split image target in like position at right rear wheel. (2) Adjust range screw on transit until target split image coincides or merges into one unbroken line. Make sure that the line of sight is perpendicular from the eye to the viewing port of the transit and

TRANSIT NH638

RANGE SCREW

Fig. 1—Determining Slope of Floor


8-56 ELECTRICAL—HEADLIGHTS of one headlight on Dart models or the number (2) lens on Coronet and Charger models, bring aimer up to and against headlight lens. Make certain that headlight lens pads are making full contact with aimer mounting flange and that aimer target is facing inboard.

KV433A Sig. 2 — Adjusting Floor [ousel Compensation

(2) Set DOWN-UP pointer on DOWN 2. (3) Set RIGHT-LEFT pointer and floor level compensator at "0." (4) Secure :timers to glass or smooth surface three to five feet apart so split image targets can be located in viewing ports. (5) If bubble is centered in glass dial, vertical calibration is correct. If bubble is not centered, make DOWN-UP adjustment by rotating level adjusting screw until bubble is centered in spirit level. (8) The horizontal aim is correct if targets on opposite aimers are aligned in viewing ports. If targets are not aligned in viewing ports, rotate mirror adjusting screw until target split image becomes aligned.

MOUNTING AND ADJUSTING THE AIMERS (1) While holding an aimer in alignment with lens

LEVEL ISPIRIT)

(2) Push release lever forward (to expel air from suction cup) and while holding aimer firmly against headlight aiming pads, slowly pull release lever back until spring lock engages in the slot, (Fig. 4). (3) Mount second aimer on other side of vehicle, in same manner. (4) On each aimer, set pointer to numeral 2 on DOWN side of the DOWN-UP scale. (5) On each aimer position the pointer, of the RIGHT-LEFT scale, at 2-RIGHT.

MEASURING HEADLIGHT AIM Horizontal Test Turn the RIGHT-LEFT scale knob until tho oplit image is in alignment. if the RIGHT or LEFT portion of scale exceeds the following values, the lights should be aimed. Values given represent inches at 25 feet. Left Right No. 1 Unit 4 4 No. 2 Unit 0 4 Vertical Test Turn DOWN-UP

scale knob until the spirit level is centered. If Down or Up portion of the scale exceeds the following values, the lights should be aimed. No. 1 Unit 1/2 to 3-1/2 down No. 2 Unit 1/2 to 3-1/2 down Horizontal Adjustment (1) With pointer of RIGHT-LEFT scale still set 2RIGHT, sight through aimer viewing port. Make sure that line of sight is perpendicular from eye to viewing port of aimer and that target image is centered

In viewing port of aimer. (2) While sighting through viewing port of aimer,

01

HORIZONTAL ADJUSTING SCREW

"141GHT—LEFT SCALE

VERTICAL ADJUSTING SCREW HEADLIGHTS

DOWN-UP SCALE KU 428

TARGET RELEASE LEVER NN4

Fig. 3—Checking Ajmer Calibration

Fig. 4—Mounting and Adjusting Aimers


HEADLIGHTS—ELECTRICAL 8-57 turn horizontal adjusting screw on headlight until split target image line merges into one unbroken line. To remove backlash, be sure to make a final adjustment by turning headlight horizontal adjusting screw in a clockwise direction, (Fig. 5). (3) Make horizontal adjustment on other side of vehicle in same manner. Vertical Adjustment (1) Turn vertical adjusting screw on headlight in counterclockwise direction to bring bubble of spirit level on aimer to vehicle side of center. Use care to avoid disturbing installed position of aimers. Then turn screw clockwise until bubble is centered for correct aim and elimination of backlash. (2) Make vertical adjustment on other side of vehicle in same manner. (3) Inspect target alignment on each side and readjust the horizontal aim, if necessary. Proceed to adjust number (1) bulbs on dual headlight systems by repeating outlined procedure. Remove aimers by releasing spring lock at rear (bottom) of aimer and pushing release lever forward. Do not attempt to remove the aimers by pulling away from headlight lens—slide suction cup downward and away from lens.

(4) Install headlight trim panels.

SEALED BEAM REPLACEMENT (ALL MODELS) (1) Remove screws from headlight panel and remove panel. (2) Remove screws from interior retaining ring, and remove ring. Do not disturb headlight aimer screws.

(3) Pull out sealed beam unit and unplug connector, pulling straight off. (4) Install new sealed beam unit. (5) Install unit retaining ring. (6) Aim the headlight and install headlight panel. VERTICAL ADJUSTMENT SCREWS

V® -1-2 INCHES

2 INCHES—.-

INIGH INTENSITY ZONE

-4-

r HIGH INTENSITY ZONE

FLOOR LINE

NF689C

Fig. 6—Low Beam Adjustment Pattern

VISUAL HEADLIGHT ADJUSTMENT Low Beam

Place vehicle on a known level floor 25 feet from aiming screen or light colored wall. Four lines are required on screen or wall: (Fig. 6). (a) A horizontal line at the level of centers of headlights, number 2. (b) A center vertical line which must be lined up with center of hood, number 4. (c) A vertical line on left of screen or wall in line with center line of left headlight, number 3. (d) A vertical line on right of screen or wall in line with center line of right headlight, number 5. Remove headlight door. Adjust top adjusting screw for vertical adjustment, adjust side screw for horizontal adjustment (Fig. 5). Adjust low beam of headlights to match the patterns in Figure 6 and the corresponding numbers listed below: (1) Lower beam pattern of both headlights. (2) Horizontal line at level of headlight centers. (3) Vertical line in line with center of left headlight. (4) Vertical line in line with center of hood. (5) Vertical line in line with center of right headlight.

2 INCHES IGH INTENSIT ZONE

2 INCHES IGH INTENSITY ZONE

FLOOR LINE HORIZONTAL ADJUSTMENT SCREWS

ND388B NP273A

Fig. 5 – Headlight Adjusting Points

Fig. 7—High Beam Adjustment Pattern


8-58 ELECTRICAL—HEADLIGHTS TURN SIGNAL INDICATOR LAMP ASSEMBLY

connect lamp socket connector at harness connector. (2) Remove the three screws attaching lamp to shield and remove lamp and socket as an assembly. Lamp bulb can be replaced by removing the lens attaching screws.

COVER STUD LENS

Installation (1) Determine that the "U" nut is in position on air shield, then install the lamp and attaching screws. (2) Connect lamp connector to harness connector.

RETAINER—..

WELT BULB

SOCKET AND CABLE

FRONT FENDER (REFERENCE)

NU601

Fig. 8—Front Fender Turn Signal Indicator Lamp—Coronet

High Beam Adjust high beam of headlights to match the patterns in Figure 7 and the corresponding numbers listed below: (1) High beam pattern of both headlights. (2) Horizontal line at level of headlight centers. (3) Vertical line in line with center of left headlight (4) Vertical line in line with center of hood. (5) Vertical line in line with center of right headlight.

FRONT FENDER TURN SIGNAL INDICATOR LAMP CORONET (Fig. 8) Removal (1) From under fender, disconnect lamp connector from front end lighting harness. (2) Remove nut from lamp stud and pull lamp and wire assembly up and out of fender. To replace lamp bulb, unscrew knurled sleeve of socket and cable from lamp body and lift out bulb. Installation (1) Enter wire and lamp connector through opening in top of fender. (2) Position lamp welt and install stud attaching nut. (3) Connect lamp connector to harness connector.

FRONT PARK AND TURN SIGNAL LAMPS— CORONET (Fig. 10) Removal

(1) From under front bumper disconnect lamp socket connector at harness connector. (2) Remove the two screws attaching lamp to front stone shield and remove lamp assembly. Lens and bulb can be removed without removing lamp by removing the two screws from front face of lamp and removing the lens. Installation (1) Position lamp bracket on front stone shield and install attaching screws. (2) Connect lamp socket connector to harness connector.

HOOD PANEL TURN SIGNAL INDICATOR LAMP AND COVER—CHARGER (Fig. 11) Removal (1) Raise hood and disconnect socket connector from front and lighting harness. (2) Remove two screws attaching lamp to lamp cover and remove lamp assembly. To replace bulb, unscrew lamp socket from lamp and turn out bulb. Installation (1) Position lamp on lamp cover and install attaching screws. (2) Connect lamp connector to harness connector.

LOWER DECK PANEL BACK-UP LAMPS— CORONET (Fig. 12) To replace lens or bulb, snap out len retainer, remove lens and replace bulb.

RADIATOR AIR SHIELD PARK AND TURN SIGNAL LAMP—CHARGER (Fig. 9)

LOWER DECK OPENING PANEL, TAIL STOP, TURN SIGNAL AND BACK-UP LAMP— CORONET (Except Station Wagon) (Fig. 13)

Removal (1) From underneath radiator grille air shield, dis-

Removal (1) Working through trunk compartment remove


HEADLIGHTS-ELECTRICAL 8-59

NUT

RADIATOR AIR SHIELD HOUSING

LAMP ASSEMBLY

SCREW (2) VIEW IN DIRECTION OF ARROW A

GASKET HOU ING

SCREW (2)

LENS BULB NUMBER 1157

SOCKET AND CABLE PY361

Fig. 9—Radiator Air Shield Park and Turn Signal Lamps — Charger

GASKET BULB NUMBER 1157 HOUSING PARK AND TURN SIGNAL LAMP

SOCKET AND CABLE BRACKET

PY409

Fig. 10 — Front Park and Turn Signal Lamps—Coronet


8-60 ELECTRICAL—HEADLIGHTS

BEZEL SOCKET AND CABLE SEAL STRAP BULB NUMBER 330

LENS

STUD (2) WELT

TURN SIGNAL INDICATOR LAMP ASSEMBLY

HOOD OUTER PANEL (REFERENCE)

-

PANEL HOOD INNER (REFERENCE)

NUT (2)

VIEW IN DIRECTION ARROW A

PY405

Fig. II—Hood Panel Turn Signal Indi cator Lamp and Cover—Charger

six nut assemblies from the lamp studs and the two screws from back of lamp housing. (2) Snap out sockets and bulbs and remove lamp. Installation (1) Position lamp and gasket on opening panel and install nuts and screws.

(2) Snap in bulbs and sockets. LOWER DECK OPENING PANEL, TAIL STOP, TURN SIGNAL AND BACK-UP LAMPCORONET—TWO DOOR HARDTOP AND CONVERTIBLE (Fig. 14) Removal (1) Working through the trunk compartment, remove the nut assemblies from lamp studs. (2) Snap out lamp sockets and bulbs and remove lamp.

WIRING CONNECTOR

BUMPER (REFERENCE)

REAR QUARTER EXTENSION, TAIL, STOP, TURN SIGNAL AND SIDE MARKER LAMP— Coronet Station Wagons (Fig. 15)

LAMP SCREW (2)

VIEW IN DIRECTION OF ARROW RETAINER

Installation (1) Position housing gasket on lamp and panel and install attaching nut assemblies. (2) Snap in lamp sockets.

NU608

Fig. 12 —Lower Deck Panel Back-Up Lamp — Coronet

Removal (1) Remove four screws attaching lamp to rear quarter extension. (2) Pull lamp out of panel opening and disconnect socket and cable from body harness connector.


HEADLIGHTS-ELECTRICAL 8-61 LOWER DECK OPENING PANEL

NUT (6)

BULB NUMBER 1156 (BACK-UP LAMP)

FINISH PANEL (REFERENCE) LENS GASKET LENS BEZEL BULB NUMBER 1157 (TAIL STOP, AND TURN SIGNAL LAMP) REAR BUMPER (REFERENCE) HOUSING GASKET HOUSING

TAIL, STOP, TURN SIGNAL AND BACK-UP LAMP

PY406

Fig. 13 —Lower Deck Opening Panel, Tail, Stop, Turn Signal and Back -Up Lamp—Coronet BULB NUMBER 1157 (TAIL, STOP, AND TURN SIGNAL) TAIL STOP, TURN SIGNAL AND BACK-UP LAMP

SCREW (B)

NUT (7)

LENS GASKET

BULB NUMBER 1156 (BACK-UP LAMP)

REFLEX GASKET DECK OPENING LOWER FINISH PANEL

HOUSING GASKET LENS

HOUSING PY407

Fig. 14—Lower Deck Opening Panel Tail, Stop, Turn Signal and Back-Up Lamp—Coronet (Two Door Hardtop and Convertible)


8-62 ELECTRICAL-HEADLIGHTS SOCKET AND CABLE

QUARTER SIDE PANEL REAR EXTENSION ASSEMBLY

SCREW (5) HOUSING

SCREW (2)

LENS GASKET

HOUSING GASKET

LENS

REFLEX LOWER TAIL STOP, TURN SIGNAL AND MARKER LAMP

SCREW (4)

BEZEL PY408

Fig. 15—Rear Quarter Extension, Tail, Stop, Turn Signal and Side Marker Lamp—Coronet Station Wagons / z REAR BUMPER (REFERENCE)

\/

SCREW (4)

GASKET LENS

RETAINER RETAINER

HOUSING ASSEMBLY BULB PY296

Fig. 16—Rear Bumper Back-Up Lamp—Coronet Station Wagons


HEADLIGHTS—ELECTRICAL 8-63 HOUSING

SCREW (8)

HOUSING GASKET LENS GASKET

LENS

NUT AND WASHER (8)

BEZEL

DECK OPENING LOWER PANEL (REFERENCE)

TAIL, STOP AND TURN SIGNAL LAMP

PY952

Fig. 17—Lower Deck Opening Panel, Tail, Stop and Turn Signal Lamp—Charger

To replace the lens or bulb, remove five screws attaching lamp housing to bezel.

(2) Position gasket and lamp on extension housing and install four attaching screws.

Installation (1) Connect lamp socket cable connector to harness connector.

REAR BUMPER BACK-UP LAMP—Coronet Station Wagons (Fig. 16)—Typical for Charger Models To replace lens or bulb, remove retainer and remove lens. LAMP ASSEMBLY

SOCKET AND CABLE

BUMPER (REFERENCE)

LAMP

VIEW IN DIRECTION OF ARROW A

NU585

Fig. 18—Rear Bumper License Lamp—Station Wagons—Coronet

NU603

Fig. I9—Rear Bumper License Lamp—All Models


8-64 ELECTRICAL—HEADLIGHTS LOWER DECK OPENING PANEL TAIL, STOP AND TURN SIGNAL LAMP—Charger (Fig. 17) Removal (1) Raise trunk door and snap out socket connectors. (2) Remove four nut and washer assemblies and remove lamp assembly. Installation (1) Position gasket and lamp on deck panel and install attaching nut assemblies. (2) Snap in socket and harness connectors. REAR BUMPER LICENSE LAMP—Station Wagons (Coronet) (Fig. 18) Refer to Figure 18 and snap lamp lens off socket to replace lens or bulb.

REAR BUMPER LICENSE LAMP—All Models (Fig. 19) Removal (1) Disconnect lamp socket connector from harness connector. (2) Remove two screws attaching lamp to bumper and remove lamp. To replace the lens or bulb, remove two screws attaching lens to lamp body. Installation (1) Position lamp on bumper and install two attaching screws. (2) Connect lamp socket connector to harness connector.

CONCEALED HEADLAMPS—Charger INDEX Headlamp Doors Tests

Page 64 64

Torsion Bar and Motor

Page 66

GENERAL INFORMATION The headlamp doors (Fig. 1) are electrically operated. A single electric motor mounted behind the center of the grille is a series-wound type with two field windings. The motor has a worm gear drive and internal limit switches. A relay and circuit breaker assembly is mounted to the instrument panel lower reinforcement, left of the steering column.

To open the headlamp doors in the event of an electrical failure, disconnect the motor leads FIRST, then rotate the hand wheel located at the lower end of the motor counterclockwise until the headlamp doors are fully opened. CAUTION: Rotating the wheel after the doors reach the end of travel will permanently damage the motor.

SERVICE PROCEDURES TESTS (1) If headlamp doors do not operate and headlights and ignition switch are on (not accessory position), before starting any tests, first check for good ground continuity; terminals fully seated, and connectors free of dirt and corrosion and that the wire from motor terminal is connected to a good body ground. CAUTION: Do not operate motor with headlamp doors disconnected as operating the motor without load will damage motor.

(2) Using jumper wires, test motor operation. Using the car battery as a direct source of power, apply power to motor leads at terminal (not the ground terminal). If motor operates perform Step 3. (3) Use jumper wires at bulkhead disconnect, to see if there is voltage at the terminal for both lights on and off. If there is no voltage for either door position, perform Step 4.

(4) Test for loose wire at the "H" terminal of headlamp switch, loose wires on headlamps motor relay, or faulty circuit breaker as required. HEADLAMP DOORS Removal (1) Disconnect motor leads at harness connector (Fig. 1). (2) Rotate motor hand wheel counterclockwise if doors are closed; or clockwise (Charger) if doors are open; until headlamp doors are at the halfway open position (indicator lug on motor switch plate and lug on gear near rectangular hole are in alignment. Fig. 2). (3) Compress torsion bar to headlamp door crank clip and slide clip from crank (Fig. 1). (4) Force the torsion bar from the crank arm slot by wiggling the door up and down with one hand


INNER BRACKET

OUTER BRACKET

U" NUT (2 PER BRACKET) BUSHING (1) PER BRACKET

SCREW ADJU SCREW

SCREW (3) RUBBER BUMPER (1 PER DOOR) DOOR SCREW (2) LEFT SIDE ONLY

TORSION BAR SCREW (8)

SCREW (2) TORSION BAR RETAINER

LONG SPACERS (8)

SCREW AND WASHER (6) RETAINER SCREW BRACKET (REFERENCE) SCREW AND WASHER (2)

HEADLAMP DOOR CRANK

BUSHING

RADIATOR GRILLE (REFERENCE)

CENTERLINE OF BUMPER (REFERENCE) VIEW IN DIRECTION OF ARROW Z (INBOARD SIDE OF RIGHT DOOR SHOWN) SCREW AND WASHER (REFERENCE)

SCREW (REFERENCE)

Fig. I—Concealed Headlamps Adaptation


8-66 ELECTRICAL—HEADLIGHTS OUT PUT (DRIVE)

SWI1C PLATE

MOTOR LEADS

INDICATOR LUGS (HALF. WAY POSITION)

MOTOR

HAND WHEEL

PYS76

Fig. 2—Manually Aligning indicator Lugs

while pulling the bar out from the slot with your other hand (Fig. 3). (5) Remove inboard sealed beam units. (6) Remove retainer clip from crank assembly (Fig. 1). (7) Remove screw holding the crank assembly to the door arm at the inboard side of door. (8) Remove crank assembly from headlamp door. (9) Remove idler pin from outboard side of door. (10) Remove door from opening. Installation

(1) Position door in grille opening, align crank assembly holes and insert crank. (2) Align idler pin holes and install idler pin. (3) Install retainer on crank. (4) Install screw on side of door, attaching the crank assembly to the door. (5) Position and fully seat torsion bar in slotted area of crank. (Check that the motor is in halfway open position. Fig. 2). (6) Compress and position clip over crank and torsion bar. (7) Install headlamp sealed beam units and connect battery ground strap. (8) Connect motor leads at harness connector (Fig. I). TORSION BAR AND MOTOR The torsion bar and motor is removed as an assem-

bly.

Fig. 3—Removing Torsion Bar from Headlamp

Door Crank Removal (I) Disconnect battery ground strap.

(2) Disconnect motor leads including ground wire from harness. (3) Rotate the hand wheel on the motor counterclockwise if doors are closed; or clockwise if doors are open; until headlamp doors are at the halfway open position (Fig. 2). (4) Compress and remove clips from crank assemblies (Fig. I). (5) Remove torsion bar from slotted areas in cranks as described in headlamp door removal (Fig. 3). (6) Remove motor (3 screws) from motor mounting bracket. (7) Remove torsion bar from motor. Installation CAUTION: Do not bench test new motor. Operating

motor without load will damage motor. (1) Insert torsion bar in motor and position clips on bar. The torsion bar and the hole in the motor are slightly rectangular and can be assembled only one way. (2) Position motor on motor mounting bracket and install mounting screws. Verify that the motor is in the halfway open position (Fig. 2). Tighten attaching screws to 95 inch pounds, plus or minus 20 inch pounds. (3) Position and fully seat torsion bar in slotted areas of cranks. Compress clips and position over cranks and torsion bar. (4) Connect motor to harness and connect battery ground strap. (5) Test operation of doors.


INSTRUMENT PANELS—ELECTRICAL 8-67 INSTRUMENT PANELS INDEX Brake System Warning Light Circuit Breakers Fuse Block General Information Heater or Air Conditioning Controls Instruments Instrument Clusters Light Bulb Replacement

Page 69 72 72 67 73 70 69 69

Page 72 67 94 71 72 72 68 72

Printed Circuit Boards Service Diagnosis Specifications Speedometer Switch Replacement Tachometer (Charger) Tests in Vehicle Tests Out of Vehicle

GENERAL INFORMATION All gauges are of the thermal type and operate on the constant voltage principal. This is accomplished through the use of a voltage limiter connected in parallel with the gauges. Voltage limiters are external plug-in type. Fuel Level Indicating System A hinged float arm on the fuel tank raises or lowers dependent on the fuel level. The float arm contacts a variable resistor in the gauge sending unit that provides a change of resistance in the fuel gauge circuit with any up or down movement of the float. This resistance registers on the instrument panel gauge, metered to the capacity of the tank. When the fuel level in the tank is low, the resistance of the circuit is increased restricting current flow and consequently positions the instrument panel gauge pointer to low. Resistance in the circuit is at a minimum when the tank is full and the float arm is raised. With resistance at a minimum, current flow is high, registering full on the instrument panel gauge. Temperature Indicating System The operation of the temperature indicating system is identical in operation with the fuel system with the exception of the method of varying the resistance of

the sending unit. In this system the sending unit resistance varies in direct relation to the temperature of the coolant. When the engine is cold, the resistance of the disc in the temperature sending unit is high and a low temperature will be indicated on the gauge. Oil Pressure Warning Light The oil pressure warning switch, mounted on the engine, is controlled by the engine oil pressure. When the engine oil pressure is high (normal operating condition of the engine) the switch is held in the "OFF" or "OPEN" position allowing no current to flow to the oil pressure warning lamp on the instrument panel. When the engine oil pressure is low the switch is in the "ON" or "CLOSED" position allowing current to flow to the oil pressure warning lamp on the instrument panel causing the warning light to be illuminated. Oil Pressure Gauge (Charger Only) The oil pressure gauge circuitry is similar to the temperature indicating system. However, the sending unit mounted in an oil passage of the engine, consists of a resistor actuated by a diaphragm as the oil pressure increases or decreases.

SERVICE DIAGNOSIS Condition

Possible Cause

Correction

ALL GAUGES READ HIGH ("against the peg") AFTER IGNITION SWITCH IS TURNED

(a) Test the voltage limiter. Replace as (a) Faulty voltage limiter. (b) Cluster not properly grounded to (b) Tighten cluster mounting screws. panel.

GAUGE POINTERS DO NOT MOVE WHEN IGNITION SWITCH IS TURNED "ON"

(a) Faulty voltage limiter or an open (a) Test voltage limiter. Test wiring, repair or replace as necessary. circuit on battery side (input of limiter).


8-68 ELECTRICAL—INSTRUMENT PANELS Condition

Possible Cause

Correction

TEMPERATURE GAUGE INDICATES NORMAL OPERATION, BUT THE FUEL GAUGE INDICATES A HIGHER OR LOWER FUEL LEVEL THAN ACTUALLY EXISTS

(a) Fuel tank sending unit or instrument (a) Test sending unit and gauge. panel fuel gauge is faulty. (b) Fuel tank is improperly grounded. (b) Test fuel tank for a good ground. Testing the system with the tank sending unit positioned for both "empty" and "full" is usually sufficient to determine the calibration in the range between these positions.

ERRATIC OIL GAGE OPERATION*

(a) Loose or dirty electrical connections. (a) Clean and tighten all electrical connections and test the gauge operation.

FUEL GAUGE INDICATES CORRECTLY BUT TEMPERATURE GAUGE INDICATES HIGHER OR LOWER TEMPERATURE THAN ACTUAL ENGINE TEMPERATURE

(a) Faulty instrument panel temperature (a) Test wiring, repair or replace as necgauge, wiring or faulty temperature essary. Test gauge and sending unit sending unit in engine.

ERRATIC TEMPERATURE GAUGE OPERATION

(a) Loose or dirty electrical connections.

ERRATIC OPERATION OF FUEL GAUGE

(a) Loose or dirty electrical connections (a) Test fuel tank sending unit, and proor faulty fuel tank sending unit. ceed as follows: (1) Clean and tighten all electrical connections. (2) Inspect fuel tank ground strap and make sure tank is grounded to the body.

(a) Clean and tighten all electrical connections and test the gauge operation.

* Charger Only

SERVICE PROCEDURES TESTS IN VEHICLE Voltage Limiter The voltage limiter can be tested in the vehicle or

with the instrument cluster removed. To quickly test the voltage limiter in the vehicle, connect one lead of a voltmeter or test light to the temperature sending unit and the other lead to a good ground. Leave the sending unit lead wire attached to the sending unit. Turn the ignition switch to the "ON" position. A fluctuating voltmeter or a flashing light indicates the voltage limiter is operating. Fuel Gauge

(1) Disconnect wire at fuel tank sending unit. Connect one lead of Tester C-3826 to wire terminal and the other to a good ground. Turn ignition switch on. (2) Turn knob on dial of tester to "H" and observe gauge on panel. It should read "Full," plus 3/32" or minus 1/32". With dial knob on "M," panel gauge should read 1/2. With dial knob on "L," panel gauge should read "Empty," plus 1/32" or minus 3/32". If the panel gauge does not perform as described,

continuity of the circuit from the tank sending unit to the panel unit should be tested, with special attention to the printed circuit board. If continuity has been established, the gauge should be replaced. Should the panel unit perform properly, and the ground strap at the tank suction tube is properly in-

stalled the tank unit should be removed for testing. See "Tests Out Of The Vehicle." Temperature Gauge

Disconnect the terminal from the temperature sending unit on the engine. Connect one test lead of Tester C-3826 to the terminal and the other test lead to a good ground. Place the pointer of the gauge tester on the "L" position and turn the ignition switch to "on." The temperature gauge should show "C" plus or minus 1/8 inch. Thermal gauges are slow in operation. Allow time for gauge to heat up.

Place the pointer on the tester on the "M" position and the temperature gauge should advance to the driving range left of 1/2 position of the dial. Place the pointer of the tester in the "H" position and the gauge should advance to the "H" position of the dial Should the gauge respond to the above tests, but

not operate when the terminal is attached to the sending unit, indications are of a defective sending unit


NSTRUMENT PANELS—ELECTRICAL 8-69

and it should be replaced. Should the gauge fail to respond to the above tests, indications are of possible loose connections, broken wire, open printed circuit, or faulty gauge. The instrument cluster should be removed for further inspection. See "Instrument Cluster Removal." Oil Pressure Warning Light

To test the oil pressure warning light, remove the terminal from the oil pressure sending unit. Connect one lead of the gauge tester to the terminal and the other test lead to a good ground. With the ignition switch in the "on" position and the gauge tester in the "L" position, the warning lamp should not light. With the gauge tester in the "M" position, the warning lamp should show a dull glow. With the gauge tester in the "H" position, the lamp should show full brilliance. Should the oil pressure warning light fail to respond to the above tests, indications are of possible loose connections, broken wire, or a burned out bulb. Oil Gauge—Charger Only

Disconnect wire from the oil pressure sending unit on the engine. Connect one test lead of Tester Tool C-3826 to the removed wire terminal the other test lead to a good ground. Place the pointer of the gauge tester on the "L" position and turn the ignition switch to "on." Do not start engine. The oil pressure gauge should show "L" plus or minus 1/8 inch. Thermal gauges are slow in operation. Allow time for gauge to heat up.

Place the pointer on the tester on the "M" position and the oil pressure gauge should advance to the 1/2 position of the dial. Place the pointer of the tester in the "H" position and the gauge should advance to the "H" position of the dial. Should the gauge respond to the above tests, but not operate when the wire is attached to the sending unit, it should be replaced. Should the gauge fail to respond to the above tests, indications are of possible loose connections, broken wire, or faulty gauge. The instrument cluster should be removed for further tests. See "Instrument Cluster." BRAKE SYSTEM WARNING LIGHT

The brake warning light flashes only when the parking brake is applied with the ignition key turned "ON". The same light will also illuminate should one of the two service brake systems fail when the brake pedal is applied. To test the system turn the ignition key "ON", and apply the parking brake. If the light fails to light, inspect for a burned out bulb, disconnected socket, a broken or disconnected wire at the switch.

To test the service brake warning system, raise the car on a hoist and open a wheel cylinder bleeder while a helper depresses the brake pedal and observes the warning light. If the light fails to light, inspect for a burned out bulb, disconnected socket, a broken or disconnected wire at the switch. If the bulb is not burned out and the wire continuity is proven, replace the brake warning switch in the brake line "Tee" fitting mounted on the frame rail in the engine compartment below the master cylinder. Light Bulb Replacement—Charger

The bulbs are all accessible from under the instrument panel by removing the air conditioning lower center distribution duct and the left distribution duct (so equipped). The upper and lower speedometer illumination bulbs, it will be necessary to drop the steering column for accessibility. Light Bulb Replacement—Coronet

The bulbs are all accessible from under the instrument panel. As an aid in reaching the right turn signal or oil pressure light bulb, first loosen the wire harness from the retaining clip. On air conditioning equipped models, disconnect the left spot cooler hose. INSTRUMENT CLUSTERS Removal–Coronet (Fig. I)

(1) Disconnect battery ground cable. (2) Tape steering column to keep from damaging finish when removing cluster. (3) Remove steering column cover (four screws). (4) Roll carpeting down and remove steering column cover plate (4 bolts). (5) Remove column clamp at instrument panel (two nuts and one bolt). (6) Remove upper trim mounting screws and remove upper trim molding (six screws), (so equipped). (7) Remove left side trim molding (one screw), (so equipped). (8) Remove left side trim plate (one screw) and push top of plate to left side to allow room for cluster roll-out. (9) Remove radio knobs and radio trim plate (four screws). (10) Remove lower bezel mounting screws (nine). Access to one screw required by opening glove box door. (21) Disconnect speedometer cable at speedometer. (12) Remove six screws attaching cluster to panel, rock cluster out far enough to reach and disconnect wiring harness and connectors and remove cluster. Installation

(1) Rest cluster in panel opening; connect wire


1-70 ELECTRICAL—INSTRUMENT PANELS HIGH BEAM INDICATORS

ALTERNATOR INDICATOR DOME AND PANEL LIGHTS

TOP LIFT OR TAILGATE WINDOW

SPEEDOMETER

OIL PRESSURE LIGHT

TEMPERATURE GAUGE

HEATER OR AIR CONDITIONER CONTROLS

CLOCK RADIO

MAP LIGHT

HEADLIGHTS SWITCH

find

AIR CONDITIONER OUTLET AIR CONDITIONER OUTLET SHUT OFF

TURN SIGNAL INDICATORS WASHER CONTROL

FRESH AIR VENT CONTROL

FOUR-SPEED REVERSE LIGHT

WIPER CONTROL

REAR SPEAKER CONTROL

AIR CONDITIONER OUTLET ASH TRAY AND LIGHTER PY686

Fig. 1—Instrument Panel—Coronet

harness and rock cluster into position and install attaching screws. (2) Connect speedometer cable at speedometer. (3) Install lower trim pad. (4) Install radio trim plate and radio knobs. (5) Install left side trim plate and molding. (6) Install upper trim molding. (7) Install column upper clamp and tighten nuts finger tight. (8) Install column lower cover, tighten bolts securely and roll carpet into place. (9) Tighten upper column nuts and bolt securely. Remove protective tape from steering column. (10) Connect battery ground cable and test operation of all instruments.

(7) Remove five screws mounting cluster to panel. (8) Release wire harness from three retaining clips and rock cluster out of panel far enough to disconnect wiring at ammeter, switches, tachometer-clock, light bulbs and printed circuit board connectors then complete cluster roll-out. Installation—Charger (1) Place cluster in panel opening to connect all electric wiring then roll cluster into position and install mounting screws. (2) Connect speedometer cable at speedometer. (3) Install steering column upper clamp and tighten nuts and bolt finger tight. (4) Install steering column lower plate and tighten bolts securely.

Removal—Charger (Fig. 2) (1) Disconnect battery ground cable. (2) Tape steering column to keep from damaging finish when removing cluster. (3) Remove steering column opening cover (four screws). (4) Remove steering column lower support plate (four bolts). (5) Remove steering column upper clamp (two mounting nuts and one mounting bolt). (6) Disconnect speedometer cable at speedometer.

(5) Tighten upper clamp securely and install column opening cover. (6) Connect battery ground cable and test operation of all instruments. INSTRUMENTS Replacement—Charger (1) Remove instrument cluster. See "Instrument Cluster Removal." (2) Remove clock reset knob.


INSTRUMENT PANELS—ELECTRICAL 8-71 ALTERNATOR INDICATOR

HEADLIGHTS SWITCH TURN SIGNAL INDICATORS

OIL PRESSURE GAUGE

DOME AND PANEL LIGHTS

TEMPERATURE GAUGE

HEATER OR AIR CONDITIONER CONTROLS

REAR DEFOGGER MAP LIGHT RADIO

FUEL GAUGE

AIR CONDITIONER OUTLET WIPER CONTROL AIR CONDITIONER OUTLET

REAR SPEAKER CONTROL BRAKE WARNING LIGHT

ODOMETER

AIR CONDITIONER OUTLET

WASHER CONTROL ASH TRAY AND LIGHTER

FOUR-SPEED REVERSE LIGHT

FRESH AIR VENT CONTROL

PY689

Fig. 2—Instrument Panel—Charger

(3) Remove nine cluster bezel mounting screws and remove bezel. (4) Remove nine push-on clips and remove cluster lens. (5) Remove the mounting stud nuts of the gauge to be removed and remove the gauge from front of housing. (6) Position new gauge studs through back of housing and install attaching nuts. Do not overtighten. (7) Carefully position cluster lens on cluster bezel and install push-on clips. (8) Position cluster bezel on cluster and attach mounting screws. (9) Install instrument cluster. See "Instrument Cluster Installation". Replacement —Coronet (1) Remove instrument cluster. See "Instrument Cluster Removal." (2) With cluster face down on padded work bench, remove eight screws retaining cluster bezel to cluster housing. (3) Carefully separate cluster housing from bezel. (4) Remove the mounting stud nuts of the gauge to be removed and remove gauge from front of housing. (5) Position new gauge studs through back of housing and install attaching nuts. Do not overtighten.

(6) Carefully position cluster housing on bezel and install eight retaining screws. (7) Install instrument cluster. See "Instrument Cluster Installation." SPEEDOMETER Replacement—All Models (1) Remove instrument cluster. See "Instrument Cluster Removal". (2) With cluster face down on padded work bench, remove eight screws retaining cluster bezel to cluster housing. (3) Carefully separate housing from bezel. Loosen two fuel gauge mounting nuts. (4) Remove two speedometer mounting screws and rubber washers from back of cluster housing. (5) Carefully lift speedometer head out of housing. (6) Position new or repaired speedometer head in housing, aligning screw holes with holes in speedometer head. (7) Install two rubber washers and retaining screws in back of housing and tighten. Tighten two fuel gauge mounting nuts. (8) Carefully position housing on bezel and install eight retaining screws. (9) Install instrument cluster. See "Instrument Cluster Installation".


8-72 ELECTRICAL—INSTRUMENT PANELS PRINTED CIRCUIT BOARDS Replacement—All Models (1) With the cluster face down on a padded work bench, remove all light bulb sockets and voltage limiter. (2) Remove eight screws retaining cluster bezel to cluster housing and carefully separate. (3) Remove fuel and temperature gauge stud nuts and remove gauges from housing. (4) Remove printed circuit board retaining screws and lift board off from housing. (5) Place new printed circuit board on housing and secure with retaining screws. (6) Position temperature and fuel gauge studs through printed circuit board from housing side and install retaining nuts. Do not overtighten. (7) Transfer light bulb sockets and voltage limiter to new printed circuit board. (8) Carefully position housing on bezel and install eight retaining screws.

TACHOMETER Replacement (1) Remove instrument cluster. See "Instrument Cluster Removal". (2) With cluster face down on a padded work bench, remove eight screws retaining cluster bezel to cluster housing. (3) Carefully separate housing from bezel. (4) Remove four tachometer housing screws and remove through front of cluster housing. (5) Install new or repaired tachometer through front of cluster housing. (6) Install four mounting screws. (7) Position bezel on housing and install eight retaining screws. (8) Install instrument cluster. See "Instrument Cluster Installation".

TESTS OUT OF VEHICLE Printed Circuit Board A visual inspection of the conductors should be made for cracks or damaged circuits. If no visual damage is evident, each circuit should be tested for continuity with an ohmmeter or a test light. Should an open circuit be detected, the printed circuit board should be replaced. Instruments (1) Connect a jumper wire to voltage limiter input terminal. Connect other end of the jumper wire to positive post (-I-) of a 12 volt test battery. (2) Connect a jumper wire from negative (—) post of battery to instrument cluster base (ground).

(3) Connect one lead from Tester C-3826 to gauge sending terminal being tested. (4) Connect remaining tester lead to instrument cluster base (ground). When the gauge tester is in "L" position, the gauge being tested should read on the low side of dial. With gauge tester on "M", the gauge should read in the center of the dial scale and on the high end of the dial when pointer of tester is placed on "H". If gauges do not perform as stated, inspect for an open printed circuit before replacing gauge. Caution: A direct connection from a 12 volt battery will damage the gauges or printed circuit boards.

Fuel Tank Sending Unit Before removing any unit of the fuel level indicating system, the panel fuel gauge should be tested first. See "Tests in Vehicle". If the panel gauge performs properly make sure the fuel tank ground strap on the fuel line at the tank is making a good ground.

Should the gauge perform properly and the ground strap be properly installed, remove the fuel tank sending unit as outlined in "Fuel System", Group 14 and test as follows: (1) Using an ohmmeter with a 0 to 100 ohm scale, connect one lead to body of sending unit and the other lead to terminal in center of unit. (2) Hold unit so float arm contacts "Empty Stop." The reading on ohmmeter scale should be 73 ohms, plus or minus 12.0 ohms. (3) Raise arm to "Full Stop." The reading should now be 9.6 ohms, plus or minus 1 ohm. If the unit does not perform to these specifications, inspect the stops or arm for possible distortion. If the stops or arm cannot be repaired or are not damaged, the unit should be replaced.

FUSE BLOCK (Fig. 3) The fuse block is located at the lower edge of the instrument panel and is retained to the instrument panel lower reinforcement by a self tapping screw. In the fuse block are mounted radio, cigar lighter, air-conditioner or heater, tail-stop-dome light, and accessory fuses. The fuse capacity is printed on the fuse block as an aid to replacement requirements.

CIRCUIT BREAKERS Use only identical type and value circuit breakers as replacements during service. See "Specifications" for the location of circuit breakers.

SWITCH REPLACEMENT Headlight Switch—Charger (1) Remove instrument cluster. See "Instrument Cluster Removal."


NSTRUMENT PANELS—ELECTRICAL 8-73 Windshield Washer Switch—Charger The washer switch is serviced in the same manner as the headlight switch. Windshield Washer Switch —Coronet The washer switch is serviced in the same manner as the windshield wiper switch.

Fig. 3—Fuse Block (2) Disconnect wiring connector. (3) Disconnect heater vacuum hoses for accessibility. (4) Remove the two switch mounting screws. (5) Position new switch and install mounting screws. (6) Connect vacuum hoses at heater switch. (7) Connect wiring connector at headlight switch. (8) Install instrument cluster. See "Instrument Cluster Installation." Headlight Switch —Coronet The headlight switch is serviced from under the instrument panel as follows: (1) Move safety relay out of the way by removing one mounting screw. (2) Remove two mounting screws and move vent controls to one side. (3) Remove left air conditioner distribution duct from path of switch (this is a snap clip operation). (4) Remove two mounting screws from switch, disconnect wires and remove switch. Place wires on switch before installing switch. Windshield Wiper Switch —Coronet (1) Remove steering column cover. (2) Lower steering column (resting steering wheel on front seat cushion). (3) Remove lower trim bezel (See "Cluster Removal"). (4) Remove switch mounting screws, disconnect wires from switch. Place wires on switch when installing switch.

Dimmer Switch —Coronet The dimmer switch is serviced from under the instrument panel as follows: ( I) Move safety relay out of the way by removing one mounting screw. (Relay is located on left side of lower reinforcement). (2) Remove two mounting screws and move vent controls to one side. (3) Remove left air conditioner distribution duct from path of switch (this is a snap clip operation). (4) Remove two mounting screws from switch, disconnect wires, and remove switch. When installing switch, place wires on switch before mounting. Panel Lamp Dimmer Switch —Charger The panel lamp dimmer switch is serviced in the same manner as the headlight switch. Rear Window Defogger Switch —Charger The rear window defogger switch is serviced in the same manner as the headlight switch.

HEATER OR AIR CONDITIONING CONTROLS Removal (1) Remove the four mounting screws. (2) Remove air conditioning ducts (so equipped). (3) Disconnect wiring from harness under panel. (4) Disconnect vacuum hoses at switch controL (5) Disconnect control cable (cut clip from the pin, replace with new clip). (6) Remove cable retainer and remove controls. Installation 11) Position controls into panel and install cable and retainer. (2) Connect vacuum hoses. (3) Connect wiring at control switch. (4) Connect air conditioning ducts (so equipped). 15) After making sure that cables do not interfere with ducts or harness install the four mounting screws and check operation of controls.


8-74 ELECTRICAL-WINSHIELD WIPERS WINDSHIELD WIPER SYSTEM INDEX Page 75 74 77 78 77

End Play Adjustment General Information Links Lubrication Motor Installation

Page 77 75 78 74 75

Motor Removal Panel Switch Tests Pivot Replacement Service Diagnosis Wiper Arm Adjustment

GENERAL INFORMATION The windshield wipers can be operated with the windshield wiper switch only when the ignition switch is in the Accessory or Ignition position. A circuit breaker, integral with the wiper switch protects the circuitry of the wiper system and the vehicle. All models are equipped with a two speed wiper system as standard equipment. A three speed wiper system is offered as optional equipment on Coronet and Charger models. Three speed motors are controlled by resistors in the field circuit. Three speed motors have a high speed resistor mounted on the switch and a resistance wire in the harness for medium speed. Two speed wiper motors have permanent magnet fields and are controlled by feeding power to two different brushes for low and high speed. For low speed operation the current first flows through the

torque limiting resistor and then to the low speed brush (terminal "L" Fig. 3). For high speed, the brush (terminal "H") is fed directly. The depressed parking feature in the three speed systems is accomplished by an internal mechanism within the wiper gear box. When the wiper switch is turned "Off", an eccentric mechanism shifts the position of the motor output shaft, which in effect, lengthens the drive link and parks the blades in a depressed position. Turning "On" the wipers, restores normal shaft position and wipe pattern. All three speed and two speed systems have nonadjustable park switches. The two speed wiper system will complete the wipe cycle and return to the park position when the switch is turned off. All two speed systems park in the lowest portion of the wipe pattern.

SERVICE DIAGNOSIS Condition

Correction

Possible Cause

(c) Linkage disconnected. (d) Faulty motor. (e) Open or grounded wiring.

(a) Relieve binding condition. (b) Test Switch. See "Panel Switch Tests." (c) Repair as necessary. (d) Test motor. See "Motor Testing.". (e) Test wiring for continuity. Repair as

WIPER BLADES NOT PARKING PROPERLY

(a) Arm set at incorrect position.

(a) Adjust arm. See "Wiper Arm Adjust-

BLADES SLAP AGAINST WINDSHIELD MOULDINGS ON DRY GLASS

(a) See "Wiper Arm Adjustment" (a) Improperly adjusted wiper arm. (b) Looseness of the motor crank or (b) Tighten or replace the part. other drive parts.

BLADES CHATTER

(a) Twisted arm holds blade at wrong ( a) Replace wiper arm. Do not attempt to straighten bent or twisted arm. angle to glass. b) Replace blades. (b) Bent or damaged blades. (c) Foreign substances such as body pol- c) Clean the glass or blades. ish on glass or blades.

WIPER FAILS TO OPERATE

MOTOR WILL NOT STOP WHEN INSTRUMENT PANEL SWITCH IS TURNED "OFF"

(a) Binding Linkage. (b) Faulty instrument panel switch.

(b) Motor park switch defective.

necessary. ment." (b) Replace motor assembly.

a) Motor park switch failure in the (a) Replace motor assembly. "closed" position.


WINDSHIELD WIPERS—ELECTRICAL 8-75 Condition

Possible Cause

Correction

MOTOR STOPS IN ANY POSITION WHEN INSTRUMENT PANEL SWITCH IS TURNED -OFF'

(a) Motor park switch failure in the open position. (b) Open parking circuit or open field cir-

NO SPEED CONTROL

(a) Open circuit in red or green wiring (a) Test continuity and correct as neces(3-speed): (red or brown wire-2sary.

cuit

(a) Replace motor assembly. (b) Test continuity of blue and green wiring circuit and correct as necessary.

speed).

(b) Defective control switch.

(b) Replace switch.

SERVICE PROCEDURES WIPER ARM ADJUSTMENT—(Three Speed)

To determine if an adjustment is required, apply a constant upward force of 50 ounces parallel to the windshield glass at the end of the wiper arm t where the blade is attached to the arm). With the force applied, pull the wiper blade away from the windshield glass once or twice to prevent glass friction from affecting upward movement of the wiper arm and blade. With the force applied, the clearance between the tip of the wiper blade and the windshield lower moulding should be as follows: Clearance in Inches Between Tip of Blade and Windshield Moulding Right Left 3

to 2.50

.25 to 223

If the clearance is not in the specified range, use Tool C-3983 and reposition the wiper arm and blade assembly (Fig. 1). Two Speed

To determine if an adjustment is required apply a constant downward force of 25 ounces, parallel to the windshield glass, at the end of the wiper arm (where the wiper blade is attached to the arm). With the 25 ounce force applied pull the wiper blade away from

Fig.

1—Removing Wiper Arm and Blade

the windshield glass once or twice to prevent glass friction from affecting downward movement of the wiper arm and blade. With this force applied the clearance between the tip of the wiper blade and the windshield moulding should be as follows: Clearance in inches Between Tip of Blade and Windshield Moulding Right Left 1.00 to 3,00 .25 to 2.Z

If the clearance is not in the specified range use Tool C-3982 and reposition the wiper arm and blade assembly tFig. 11. CAUTION: The use of a screwdriver or other prying tool to remove an arm may distort it in a manner that will allow it to come off the pivot shaft in the future, regardless of how carefully it is reinstalled. NEVER under any circumstances push or bend the spring clip in the base of the arm in an attempt to release the arm. This clip is self-releasing.

END PLAY ADJUSTMENT (Three Speed)

To adjust the armature shaft end play, turn the adjustment screw in until it bottoms and back-off 1/8 nun (Fig. 2). This adjustment can be made without removing the %Alper motor from the vehicle. PANEL SWITCH TESTS Two-Speed Models This switch contains a circuit breaker between terminals 13 and PI or B and P. To test the switch, disconnect the wiring and remove from the instrument panel. For removal and installation of the wiper switch see Instrument Panels". Using a continuity tester or an ohmmeter, test for continuity (no resistance). between the contact terminals of the switch as shown in the following chart. For test purposes, the first position is the -Or position. The "Low" position is the first detent past the "Off" position. The "High'' petition is the third detent of the switch. In the test chart the reference "Ground" means to attach one lead of the continuity


8-76 ELECTRICAL—WINDSHIELD WIPERS test purposes the first position is the switch "Off" position. The "Low" speed is the position immediately past the "Off" detent and the High position is at the extreme position of the switch travel. In the test chart, the reference "Ground" means to attach one lead of the continuity tester or ohmmeter to the switch case.

MOTOR

Fig. 3—End Play Adjustment

tester or ohmmeter to the case of the switch. The bench test of the switch does not require the use of a 12 volt battery.

SWITCH CONTINUITY CHART Chrysler Manufactured Two Speed Off

Low

High

B to B/U B to P A to F2

B to B/U B to P. B to A

B to B/U B to P. B to Fl

Fl-Open

F2-open Fl-open

F2-open A-Open

Three Speed The three speed switches contain a resistor. In the "OFF" position the switch is designed to provide a circuit to the motor to reverse the current to the field winding which reverses the direction of the armature. A circuit breaker, built into the switch, protects the circuitry. To test the switch, disconnect the wiring to the switch and remove the switch from the instrument panel. For removal and installation of the wiper switch, see "Instruments and Indicators." Using a continuity tester or an ohmmeter, test for continuity (no resistance) between the contact terminals of the switch as shown in the above chart. For

Motor Testing Chrysler Manufactured—Two Speed (1) Disconnect motor leads at motor. Connect juniper from battery positive terminal to motor terminal "H" (Fig. 31. Motor should run at high speed. (The ground circuit is completed through the car body.) Remove jumper. (2) Connect jumper from battery positive terminal to resistor terminal. Connect second jumper from terminal "L" to the second resistor terminal. The motor should run at low speed. Remove jumpers. (3) Connect jumper from battery positive terminal to motor terminal "Pl". Connect a second jumper from motor terminal "P2" to terminal "L". The motor should park. If the wiper blades are near the bottom of the glass, the motor may be parked. Run the motor as in step (2) until the blades are high on the glass. Then repeat step (3) to observe parking.

Vendor Manufactured—Three Speed— Charger and Coronet (1) Disconnect motor leads at bulkhead disconnect. Connect jumper wire from the green lead to ground. (An additional ground is completed through the car body). Connect jumper wires to the red and brown leads in the bulkhead disconnect from the battery positive terminal. CAUTION: The brown lead must be connected only while the red and green leads are connected to prevent possible damage to the motor.

The motor should run continuously. Disconnect leads. (2) Connect juniper wire from green lead to brown lead. Connect red lead to ground. Connect third jumper wire from battery positive terminal to blue

SWITCH CONTINUITY CHART (Vendor Manufactured Three Speed) Off

Low

Medium

High

B to 8/ U. B/U to P.

B to B/U. B/U to A.

B to B/U. B/U to A.

B to B/U.

A to F2.

A to Fl.

A to RI.

Fl to Ground.

F2 to Ground. P-open.

F2 to Ground. P-open.

*A through the rheostat or resistor to R2. F2 to ground. P-open.

B/U to A. Ft to R2


WINDSHIELD WIPERS—ELECTRICAL 8-77

HARNESS CONNECTOR PI

RESISTOR NR530A

Fig. 3—Two Speed Motor

on crank arm. Start and tighten crank arm nut on shaft, being careful that crank arm remains indexed and fully seated on shaft. (On vehicles without air conditioning, it is easier to do step (3) before step (2) from under instrument panel.) (3) Position wiper motor, then install, tighten mounting nuts, being sure that ground strap is attached securely. (4) Connect wiper motor wiring harness. (5) Connect battery ground cable and test operation of windshield wiper system. LINKS

lead. The wiper should run to the park position. CAUTION: Motor can be damaged if not wired correctly.

MOTOR REMOVAL

(1) Disconnect battery ground cable. (2) Disconnect wiper motor wiring harness. (3) Remove three wiper motor mounting nuts. (On vehicles without air conditioning it is easier to remove crank arm nut and crank arm from under instrument panel first and omit steps (4 )and (5). (4) Work motor off mounting studs far enough to gain access to crank arm mounting nuts. CAUTION: Do not force or pry motor from mounting studs as drive link can easily be distorted.

(5) Using a 1/2 inch open end wrench, remove motor crank arm nut. Carefully pry arm off shaft. (6) Remove wiper motor. MOTOR INSTALLATION

Before installing wiper motor, be sure all three spacers are inserted in holes of motor grommets. (1) Balance wiper motor on upper right motor grommet. (2) Index the flats on motor shaft to mate with flats

Removal—All

(1) Disconnect battery ground cable. (2) If air conditioning equipped, remove the duct supply left spot cooler to provide easier access to the left wiper pivot. Insert a wide blade screwdriver between plastic link bushing and the pivot crank arm. Gently twist the screwdriver to force the bushing and link from the pivot pin (Fig. 5). Remove three motor mounting nuts, pull motor away from bulkhead and remove motor crank arm retaining nut. After crank arm is removed from motor shaft, remove drive link assembly from under panel. In heater equipped models, remove motor drive crank arm retaining nut and pry crank arm off of motor shaft. Remove drive link from left pivot crank arm pin and withdraw assembly from under panel. Remove motor drive crank arm from drive link after removal of assembly from vehicle (Fig. 4). (3) To remove connecting link from pivots, remove glove box. Reaching through glove box opening, gently pry the bushing and link from the right pivot pin (Fig. 5). Lift the link from the pivot crank arm pin and repeat operation at left pivot. Withdraw from under left side of panel. FRONT OF CAR

RIGHT PIVOT ASSEMBLY LEFT PIVOT ASSEMBLY MOTOR

MOTOR

(PARK POSITION SHOWN) DRIVE CRANK AND LINK ASSEMBLY DRIVE LINK CONNECTION

CONNECTING LINK

DRIVE LINK FRONT OP CAR

BULKHEAD

RETAINER SPRING WASHER BUSHING MOTOR CONNECTION

TO LEFT PIVOT

DRIVE CRANK AND PIN

NR4848 Fig. 4—Wiper System


8-78 ELECTRICAL—WINDSHIELD WASHERS f•-■,

I

WIPER ARM

COWL

i Fr......PIVOT ASSEMBLY

- 77C. , 1 \amp sase

GASKET

SEALING WASHER

LEFT PIVOT CRANK ARM

PIVOT CRANK ARM DRIVE LINK

PIVOT PIN

MOUNTING NUT CONNECTING LINK

PIVOT PIN BUSHING

RIGHT PIVOT CRANK ARM

RETAINER CONNECTING

LINK

NR485

Fig. 5—Removing Link and Rushing

Lubrication

Use Automotive Multi-purpose Lubricant NLGI2 on all pivot pins and motor crank pins.

Installation

(1) Install bushing on motor crank arm pin, position drive link on bushing so large side of pivot bushing faces away from drive crank arm. Large side of pivot bushing will be on same side of link as crank arm retainer. (2) Install spring washer, convex side towards link and install retainer (Fig. 4). If retainer was distorted in removal, it should be replaced.

(3) In heater equipped vehicles, insert drive link assembly under left side of instrument panel, position crank arm on motor shaft indexing flats on motor shaft with fiats of crank arm and install crank arm retaining nut. On models equipped with air conditioning, install drive link from under instrument panel. Install motor crank arm on motor shaft from engine compartment side of bulkhead. Position motor on studs and secure with three nuts. Place plastic bushing at end of drive link over proper pin on left pivot (Fig. 6) and press into position. Be certain that the plastic bushing is fully seated to assure locking action in the groove on the pivot pin. (4) Insert connecting link into place with "R" (right

LINK BUSHING

UNK BUSHING

LINK NP74tA

Fig. 6—Pivot Arm and Link Assemblies

side) and "L" (left side) stamped in link facing instrument panel side. Press each link bushing fully into place on the pivot crank pins. (5) Reconnect battery cable and test the operation of the wiper system. Reinstall glove box if necessary. PIVOT REPLACEMENT

(1) Remove battery ground cable. (2) Using Tool C-3982, remove wiper arm assembly (Fig. 1). (3) From under instrument panel, remove two retaining nuts from pivot mounting studs and lower pivot far enough to remove connecting link (and drive link on left pivot) from pivot crank arm pin (Fig. 5). if air conditioning equipped, it is necessary to remove glove box for access to right connecting link and pivot retaining nuts. Remove pivot assemblies. (4) Install replacement pivot assembly, with new gasket and sealing washer loosely on the mounting studs. (5) Lubricate pivot pins and snap link bushings fully into position on pivot pins. (6) Tighten pivot mounting nuts. (7) Reconnect battery ground cable and test wiper system for operation and parking action. (8) Replace glove box if required and using Tool C-3982, install and adjust the wiper arm and blade assemblies.

WINDSHIELD WASHERS GENERAL INFORMATION

Charger and Coronet models are equipped with push button electric washers as standard equipment. Electric pump equipped models have the electric

pump assembly mounted directly to the reservoir. A permanently lubricated sealed motor is coupled to a rotor type pump. Fluid, gravity fed from the reser-


WINDSHIELD WASHERS-ELECTRICAL 8-79 voir, is forced by the pump through rubber hoses to the nozzles which direct the streams to the windshields.

The pump and reservoir are serviced as separate assemblies.

SERVICE DIAGNOSIS ELECTRIC PUMP As an aid to determine if the pump assembly is defective, connect a jumper wire from the blade terminal of the pump (Fig. 2), to the positive terminal of the battery. if pump operates, check wiring and Condition

switch. If pump does not operate, it may be defective or frozen. Replace the pump and motor assembly if defective.

Possible Cause

Correction

INTERMITTENT OPERATION OF SYSTEM

(a) Loose wiring connections. (b) Faulty switch. (c) Faulty motor.

(a) Repair as necessary. (b) Replace switch. (c) Replace motor and pump assembly.

MOTOR RUNS DOES NOT PUMP FLUID

(a) Nozzle jets plugged. (b) Broken or loose hose. (c) Faulty pump. (d) Nozzle jet under air intake grille.

(a) Clean nozzle jets. (b) Replace hose. (c) Replace motor and pump assembly. (d) Adjust nozzles.

PUMP ASSEMBLY INOPERATIVE

(a) Poor ground. (b) Loose wiring terminals. (c) Corroded terminals. (d) Broken wires. (e) Faulty switch. (f) Faulty motor.

(a) Clean ground wire terminal and tighten mounting screw. (b) Tighten terminals. (e) Clean and tighten terminals. (d) Repair or replace the wires. (e) Replace switch assembly. (f) Replace motor and pump assembly.

(a) (b) (c) (d)

(a) Adjust nozzles. (b) Clean and tighten terminals. (c) Correct as necessary. (d) Replace motor and pump assembly.

LOW OUTPUT

Low aimed nozzles. Poor electrical connections. Pinched or leaky hoses. Defective motor.

SERVICE PROCEDURES Nozzle Adjustment

To compensate for lateral adjustment, loosen the mounting screws and move the nozzle and bracket assembly until the nozzle is centered between the grille louvers. Vertical nozzle adjustment is made

INTAKE SCREEN AND MOUNTING NUT ASSEMBLY

3 INCH TARGET AREA

10 INCHES \

LOWER OWER SPRAY

BOTTOM OF RESERVOIR

PLASTIC WASHER

CENTER LINE OF WINDSHIELD 14

SPRAY

by bending the tab of the nozzle mounting bracket up or down. Adjust nozzles so that the centers of the streams

INCHES —6....J

17Y INCHES

71/2 INCHPS MEASURE DOWN TO TOP 0 LOWER WINDSHIELD MOULDING Fig. 1 —Washer Aiming Diagram

NP7I Fig. 2—Reservoir and Pump Assembly


8-80 ELECTRICAL—WINDOW LIFTS contact the windshield glass as shown in Figure 1. The oval pattern formed by the stream striking the windshield glass is not "centered" on the center of the stream. The stream is toward the bottom of the oval pattern. Motor and Pump Assembly Removal

(1) Remove reservoir mounting screws, remove reservoir and pump assembly. Empty fluid from reservoir. (2) Disconnect motor feed wire connector and rubber hose from bottom of pump. (3) Using a suitable extension and a 7/8 inch deepwell socket through filler neck, remove pump mounting nut inside reservoir. Remove ground wire. It may be necessary in some older pumps to use a 15/16 in. deep-well socket due to the expansion of the nylon nut through absorption of windshield washer fluid. (4) Remove pump from bottom of reservoir and discard rubber gasket.

Installation

Any time the pump is removed from the reservoir, always replace the rubber gasket. (1) Install new rubber gasket on reservoir (Fig. 2). (2) Install pump assembly through gasket. Place plastic washer under screen and nut assembly, and tighten securely (approximately 25 inch-pounds). Do not overtighten. (3) Reconnect ground wire. Ground wire may be spliced, soldered or recrimped. Crimping may be facilitated by making small cuts along the brass barrel, using diagonal cutters and then peening using a center punch and hammer. (4) Install pump and reservoir in vehicle with mounting screws making sure motor ground wire is installed under one of the mounting screws. (5) Connect motor feed wire connector and rubber hose to pump. Fill reservoir, inspect for leaks and test operation of washer system, making sure the nozzles are adjusted properly.


ELECTRIC WINDOW LIFTS Electrical Tests

Electric window lift motors are the permonent magnet type. The motors are grounded through the master switch by a black wire attached to the left cowl panel (Fig. 1). Circuit Breaker Test

Connect one lead of a test light to output terminal of circuit breaker and other lead to a good ground.

The test bulb should light, if not and wire continuity has been established, replace the circuit breaker. Window Lift Switch

Remove switch from trim panel for testing purposes. Slide a thin blade behind the switch housing (front and back) to depress retaining clips and pull switch out from panel. Carefully separate multiple terminal block from switch body. Connect one lead of

UP UP

MOTOR

DOWN DOWN

UP

FIRST JUMPER

FIRST JUMPER

SECOND JUMPER 0 0

DOWN

MOTOR

SECOND JUMPER 0

MULTIPLE CONNECTOR

0

MULTIPLE CONNECTOR

0

BATTERY FEED (TAN)

BATTERY F ED (TAN)

BODY GROUND (BLACK) Fig.

I —Testing Electrical Switch

BODY GROUND (BLACK)

NN726A


WINDOW LIFTS—ELECTRICAL 8-81

of test light to black wire terminal and touch other lead to tan wire terminal. The test bulb should light, if not, test wires for an open circuit. Use two jumper wires to test continuity of circuits. Connect one jumper to the tan lead and the other end to the Up or Down terminal (opposite of glass position). Connect the other jumper to a good ground and to the opposite terminal (Fig. 1). If motor runs, install switch body on multiple connector and activate switch. Should motor fail to run, replace switch body. Each switch is tested in same manner. The motor should run, if not, test continuity of wiring. Should continuity be established and motor still does not run, replace motor. Motor Bench Test

Connect a jumper from positive terminal of a test battery to one of the motor leads. Connect another jumper from the test battery negative terminal to the other motor lead and the motor should run. To reverse direction of motor rotation, switch leads of jumper wires at test battery terminals. Motor Lubrication

With motor removed from regulator. Remove seal (Fig. 2) from the motor gearbox housing. Apply a liberal amount of the lubricant in the gearbox housing to the entire inside diameter of seal marked "A" and the outside diameter of the gear and pinion assembly marked "B", and diameter "C" where the seal contacts the rubber coupling. If there is no lubricant in the gear box, fill to top of gear with Mopar 2525035 Multi-Mileage Lubricant or Mopar 1064768 Lubri-plate.

dition between the glass and run channels. Correct the binding condition before making electrical tests.

Control Switch

Disconnect black wire at control switch and hold firmly against yellow wire terminal on control switch. The glass (if raised) should lower. Repeat test with brown wire. The glass (in lowered position) should rise. If glass operates during tests, but fails to operate when the control switch lever is moved, the switch is at fault. If glass fails to move during these tests, perform the wire harness test. Wire Harness and Regulator Motor

Disconnect wire harness connector at motor. Connect one wire of a test light to brown wire and the other to a good body ground. Position instrument panel switch in the "UP" position. The bulb should light. Repeat test with the yellow wire, but position switch in the "DOWN" position. If bulb fails to light either time, and all wire terminals are tight, replace the circuit breaker. See "Wiring Diagrams" for appropriate schematic wiring diagram. Should bulb light on one wire but not the other, inspect harness for a broken wire. If bulb lights in both tests, place one wire of test light to black wire terminal on motor and other wire to a good body ground. Position switch in either "UP" or "DOWN" position. If bulb lights, inspect for a bad ground connection or broken black wire. If test bulb does not light and wire harness continuity has been established, replace the motor. See "Group 23".

STATION WAGON—TAIL GATE WINDOW LIFT Electrical Tests A tail gate glass may not move due to a binding con-

CONNECTOR REGULATOR HOUSING

T2-12R

WIRING CLIP

T3-12Y

REGULATOR MOTO

SEAL NU583A WORM GEAR

(30 AMP) CIRCUIT BREAKER

COLOR CODE CIR. COLOR RED BR BROWN YELLOW BK BLACK

MOTOR

GEAR AND PINION

Fig. 2—Window Lift Motor Lubrication

NN653A

Fig. 1 —Wiring Circuit


8-82 ELECTRICAL—TURN SIGNALS TOP LIFT (Convertible Top)

Control Switch Refer to Figure 1 and appropriate wiring diagram (See "Wiring Diagrams") and disconnect red wire at switch. Hold firmly against yellow wire terminal on switch. The top (if raised) should start to lower. Repeat test with the brown wire. The top (in lowered position) should start to rise. If top operates during these tests, but fails to operate when the control switch lever is moved to "UP" or "DOWN" position, the switch is at fault and should be replaced. If the top fails to operate during these tests, inspect and test wires between switch and motor. Circuit Breaker Disconnect the wire harness connector at the motor and connect one wire of a test light to brown wire and the other to a good body ground. Position the

instrument panel switch in the "UP" position. The bulb should light. Repeat this test with the yellow wire but position the switch in the "DOWN" position. If the bulb fails to light either time and wire continuity has been established, replace the circuit breaker. Pump Motor Should the test bulb light on one wire but not the other, inspect wire harness for a broken wire. If the bulb lights in both tests, place one wire of the test light to the black wire terminal (ground) on the motor and the other wire to a good body ground. Position the switch in either "UP" or "DOWN" position. If bulb should light inspect for a poor ground connection or broken black wire. If the bulb does not light and wire harness continuity has been established, test black wire with a needle type connector as close to motor as possible without touching motor. If bulb fails to light, replace the motor (See Group 23)

TURN SIGNALS—EMERGENCY FLASHER INDEX

Page 83 82

Emergency Flasher General Information

Page 82 83

Service Diagnosis Switch

GENERAL INFORMATION

The turn signals are activated with a lever mounted on the left side of the steering column just below the steering wheel. When the driver wishes to signal his intentions to change direction of travel, moving the lever up causes the right turn signals to flash. Moving the lever down causes the left turn signals to flash. After completion of a turn the system is deactivated automatically. As the steering wheel returns to the straight ahead position, a lobe mounted to the underside of the steering wheel contacts one of two canceling cams in the turn signal switch mounted in the

steering column upper housing. Contact of the lobe with the canceling cam returns the switch to the off position. When the system is activated, one of two indicator lights mounted in the instrument cluster or on the front fender flashes in unison with the turn signal lights indicating to the driver that the system is operating. The turn signal flasher is a plug in type mounted on the lower instrument panel to the left of the steering column for Charger and Coronet models.

SERVICE DIAGNOSIS Condition

Possible Cause

Correction

EXTERNAL LAMPS OPERATE NORMALLY, NO INDICATIONS ON INSTRUMENT CLUSTER

(a) Faulty pilot bulb in instrument clus- (a) Replace bulb. ter.

SYSTEM DOES NOT FLASH

(a) Faulty flasher unit. (b) Faulty external bulb. (c) Faulty contact in switch.

(a) Replace flasher. (b) Replace faulty bulb. (c) Replace switch.

SYSTEM DOES NOT CANCEL AFTER COMPLETION OF TURN

(a) Broken or loose cancelling finger. (b) Improperly aligned cancelling finger. (c) Broken or faulty switch.

(a) Replace cancelling finger. (b) Align cancelling finger properly. (c) Replace switch.

ENTIRE SYSTEM DOES NOT OPERATE

(a) Open circuit in feed wire to switch.

(a) Check wiring circuits. Refer to "Wiring Diagrams."


HORNS—ELECTRICAL 8-83 Condition

PILOT LAMP ILLUMINATES BRIGHTLY, EXTERNAL LAMPS GLOWS DIMLY WITH NO FLASH

Possible Cause

Correction

(b) Faulty fuse. (c) Faulty flasher unit (a) Loose or corroded external lamp ground connection.

(b) Replace fuse. (c) Replace flasher. (a) Clean and tighten ground connection.

SERVICE PROCEDURES TURN SIGNAL SWITCH

upper bearing retainer screws and remove retainer and turn signal switch and flasher switch.

Removal

(1) Disconnect negative battery terminal at battery. (2) Remove steering column cover and remove two screws attaching wiring trough (cover) from steering column. (3) Disconnect wiring connectors at steering column. (4) Remove horn ring ornament, horn ring or rim blow switch pad and ornament (if so equipped). (5) Disconnect horn wires at steering wheel hub. (6) Remove horn ring. (7) Loosen steering wheel nut several turns and install steering wheel puller Tool C-3428B. Loosen steering wheel first, then remove steering wheel nut and steering wheel. (8) Remove screw attaching turn signal operating lever and remove lever. Attach a piece of string or fine wire to turn signal switch wiring before removing switch from steering column. When switch is removed leave string or wire in steering column jacket tubes as an aid to replacement of wiring.

(9) Remove screws attaching turn signal switch and

Installation

(1) Attach string or wire left in steering column jacket tube during removal, to turn signal switch wiring and carefully pull string on wire down through column jacket tube until directional switch wires can be connected. Position turn signal switch in steering column jacket tube and install switch retainer and attaching screws. (2) Install turn signal switch actuating lever. (3) Install steering wheel on steering shaft with master splines aligned. (4) Install washer and nut. Tighten nut to 27 footpounds. (5) Install horn switch parts previously removed from steering wheel. (6) Connect horn switch wires. (7) Connect wiring connectors at steering column. (8) Install wiring trough (cover) and steering column cover. (9) Connect battery ground cable, test operation of turn signals and horns.

EMERGENCY FLASHER

The emergency flasher system is energized by a switch on the right side of the steering column just above the ignition switch and is part of the turn signal switch, when the driver wishes to draw attention to the vehicle. When the switch is activated all turn signal lights and the turn signal indicators flash simultaneously. Before the switch is activated, the turn signal switch should be in the neutral position to prevent a characteristic feed back through the accessory circuit causing intermittent operation of the accessories.

When the flasher is operating, application of the brake pedal will override the system and interrupt the flasher. All lights will remain on bright until the brake pedal is released. The flasher switch and lever is a part of the turn signal switch. The system consists of a separate steering column switch and flasher unit. The flasher is a plug-in type mounted on the right lower side of the steering column. The flasher has the number 175 or 552 on the cover.

HORNS GENERAL INFORMATION

The horn circuit consists of a horn switch located in the steering wheel hub and a horn relay mounted

in the engine compartment for Coronet and Charger models. Battery current from the "B" terminal of


8-84 ELECTRICAL—HORNS the starter relay flows to the "B" terminal of the horn relay. When the horn ring or steering wheel rim horn switch (optional) is depressed, the horn ring completes a ground circuit to the horn relay closing a set of points in the relay and allowing battery current to flow from the relay to the horns which are grounded to the sheet metal of the vehicle. The horn full circle insert switch (optional) is

mounted on the inside rim of the steering wheel (Fig. 1). The insert has two metal contact strips running through the center of it with a nylon insulator separating the contact strips at each end of the switch. When any portion of the insert is depressed, the contact strips touch, completing the circuit causing the horn to blow.

SERVICE DIAGNOSIS Condition HORNS WILL NOT SOUND

Possible Cause (a) (b) (c) (d)

Correction

Horn switch contact plate dirty. Improper adjustment Broken or faulty wiring. Faulty horn.

(e) Faulty relay. HORNS SOUND CONTINUOUSLY (Immediately disconnect wires from horns and wire from the "B" terminal of horn relay).

(a) (b) (c) (d)

Remove steering wheel and clean. See "Adjusting." See "Testing." See "Testing." Replace horn if necessary. (e) See "Testing." Replace relay if necessary. (a) See "Testing." (b) See "Testing." Replace relay if necessary. (c) See "Testing"; Replace relay if necessary.

(a) Shorted wiring. (b) Relay sticking. (c) Relay sticking.

SERVICE PROCEDURES Testing

A. Horns will not sound

Should the horns fail to sound, disconnect wire connector at horn and connect one lead of a test light to the connector terminal and the other lead of test light to a good body ground. Depress the horn ring or rim. Should the test light illuminate, the horns are faulty. Replace or adjust horns. If the test light fails to light, reconnect the connector to the horn terminal and connect one lead of test light to the horn relay "B" terminal and the other test light lead to a good body ground. If the light fails to illuminate, inspect for corroded battery terminals, dead battery or an open circuit in the wire from the starter relay to the "B" terminal of the horn relay. Should the test light illuminate, touch a jumper wire from relay "S" terminal to good body ground. Sounding of the horns will indicate a poor ground circuit in the horn switch, an open wire from the "S" terminal of the horn relay or a poorly grounded steering column. To determine if the horn relay is defective, connect a jumper wire from "B" to "H" terminals. If horns operate, the horn relay is faulty and should be replaced. B. Horn sound continuously

Should the horns sound continuously, disconnect wires from horns and the positive wire from "B" ter-

minal of horn relay. Remove wire from "S" terminal of horn relay and place one lead of a test light (with its own battery) to the wire connector and the other lead to a good ground. If the light illuminates; either the wire is shorted to ground or the horn switch is faulty. Remove steering wheel and disconnect wire from horn switch. Repeat above test and if light still illuminates; wire is shorted to ground. Repair or replace wire. If light does not illuminate; horn switch is grounded; Replace horn switch. If the light does not illuminate on the first test; connect one lead of a test light (without integral battery) to the horn wire connector (green wire) and the other lead to a good body ground. If test light illuminates, there is a short in the horn wiring. Repair or replace wire. If the test light does not illuminate; connect the positive lead back on the "B" terminal of the horn relay and repeat above test. If the light now illuminates, then the relay contacts are sticking. Replace horn relay. Adjusting (1) Disconnect connections at each horn to determine which horn is not operating. (2) Remove horn and bracket assembly. (3) With a suitable tool (Fig. 1), turn tone adjuster counterclockwise until there is no vibration (sound). (4) Turn tone adjuster clockwise, approximately


HORNS—ELECTRICAL 8-85

CONTACTS TO HORN SWITCH GROUND STEERING WHEEL SECTION

ADJUSTER

HORN PY931

SPARTON

Fig. 1—Steering Wheel Rim Horn Switch

1/4 turn at a time until tone has a clear mellow sound. Do not turn tone adjuster while horn is sounding. Adjustment will only clear up sound and cannot change horn tone frequency. (5) Connect a test ammeter between positive post of a 12 volt battery and horn terminal post. Connect a jumper lead from negative battery post to horn base. Clean paint from horn bracket where connection is made. Turn adjusting screw to obtain a reading of six amperes minimum to eight amperes maximum for Sparton horns, four amperes minimum to six amperes maximum for Prestolite horns. Amperage must not exceed eight amperes maximum for Sparton horns, six amperes maximum for Prestolite horns.

IGNITION AND STEERING LOCK The ignition lock is located on the right side of the steering column. The ignition switch has five positions. Starting from the fuel counterclockwise position they are: Accessory, Lock, Off, On and Start. In "Lock" or "Accessory" positions, the steering and ignition systems are locked to provide anti-theft protection for the car. The ignition key cannot be turned to the lock position until the gear selector is placed in the Park (P) position for automatic transmissions or reverse gear position for manual transmissions. The Accessory position permits the operation of the electrical accessories when the engine is not running. The "Off" position allows the engine to be turned off without locking the steering. The key can be inserted or withdrawn only on the "Lock" position. Do not attempt to pull the shift lever out of Reverse or Park after the key has been turned to the lock position.

ADJUSTER

PRESTOLITE

NP48

Fig. 2—Horn Adjustments

Removal (1) Disconnect negative battery terminal at battery. (2) Remove steering column cover and remove two screws attaching wiring trough (cover) from steering column. (3) Disconnect wiring connectors at steering column. (4) Remove horn ring ornament, horn ring or rim blow switch pad and ornament (if so equipped). (5) Disconnect horn wires at steering wheel hub. (6) Remove horn ring. (7) Loosen steering wheel nut several turns and install steering wheel puller Tool C-3428R. Loosen steering wheel first, then remove steering wheel nut and steering wheel. (8) Remove screw attaching turn signal operating lever and remove lever. On Tiff Columns, lever screws out. Attach a piece of string or fine wire to turn signal switch wiring before removing switch from steering column. When switch is removed leave string or wire in steering column jacket tubes as an aid to replacement of wiring.

(9) Remove screws attaching turn signal switch and


8-86 ELECTRICAL-SPECIFICATIONS upper bearing retainer screws and remove retainer and turn signal switch and flasher switch. (10) Remove two retaining screws and lift out the ignition key lamp assembly. DO NOT scuff light tube coating as this will result in some loss of light.

(11) Remove snap ring from upper end of steering shaft. (12) Remove three bearing housing attaching screws. (13) With Tool C-3044 attached to the three threaded holes for the turn signal switch retaining screws, pull bearing and housing from steering shaft. (14) Remove the lower snap ring from the steering shaft. (15) Remove the lock plate pin retaining ring from the lock plate hub. Some resistance may be encountered due to the friction of the ring retaining tangs. (16) Use Tool C4113 pin removing and installing tool and press the steering shaft lock plate retaining pin out of the shaft and plate and remove the lock plate. DO NOT attempt removal of the plate by hammering as damage to the collapsible column may result.

(17) Remove the lock lever guide plate screws and plate. (18) With a small probe tool inserted in the access hole provided in the housing boss, depress the key cylinder retainer toward the cylinder to disengage it from the slot in the housing bore, then withdraw the key cylinder from the lock housing. IGNITION AND STEERING LOCK Installation Before installing ignition switch and key cylinder make sure the shift housing is in a lockable position (park with automatic, or reverse with manual transmission). When installing the key cylinder it must be turned to "lock" position, key removed. Also make sure ignition switch is turned to the "lock" position to index its cam with the lock cylinder position.

(1) Install ignition switch and screws. (2) Install ignition switch lock cylinder. (3) Install lock lever guide plate and two screws. (4) Install warning buzzer switch if removed. (5) Install the steering shaft bearing lower snap ring and place the bearing and housing assembly on the steering shaft. (6) Use Tool C-3879 and a steering wheel nut and flat washer to draw the steering shaft up into the bearing and housing assembly until the lower snap ring contacts the bearing, then install the upper snap ring. (7) Install the three bearing housing to lock housing attaching screws. (8) Install lock plate and retaining pin. (9) Install bearing housing on steering shaft. (10) Install bearing housing attaching screws. (11) Install bearing upper snap ring. (12) Install key lamp assembly, retainer and two screws. (13) Attach string or wire left in steering column jacket tube during removal, to turn signal switch wiring and carefully pull string on wire down through column jacket tube until directional switch wires can be connected. Position turn signal switch in steering column jacket tube and install switch retainer and attaching screws. (14) Install turn signal switch actuating lever. (15) Install steering wheel, on steering shaft with master splines aligned. (16) Install washer and nut. Tighten nut to 27 footpounds. (17) Install horn switch parts previously removed from steering wheel. (18) Connect horn switch wires. (19) Connect wiring connectors at steering column. (20) Install wiring trough (cover) and steering column cover. (21) Connect battery ground cable, test operation of turn signals and horns.

SPECIFICATIONS ELECTRICAL BATTERY

Engine-Cubic Inch Displacement

Standard Equipment Battery Part Number

Special Equipment Battery Port Number

225

2875951

318

2875951

383

2875320

2875320 2444564 2875320 2444564 2642967


8-86 ELECTRICAL—SPECIFICATIONS

upper bearing retainer screws and remove retainer and turn signal switch and flasher switch. (10) Remove two retaining screws and lift out the ignition key lamp assembly. DO NOT scuff light tube coating as this will result in some loss of light.

(11) Remove snap ring from upper end of steering shaft. (12) Remove three bearing housing attaching screws. (13) With Tool C-3044 attached to the three threaded holes for the turn signal switch retaining screws, pull bearing and housing from steering shaft. (14) Remove the lower snap ring from the steering shaft. (15) Remove the lock plate pin retaining ring from the lock plate hub. Some resistance may be encountered due to the friction of the ring retaining tangs. (16) Use Tool C-4113 pin removing and installing tool and press the steering shaft lock plate retaining pin out of the shaft and plate and remove the lock plate. DO NOT attempt removal of the plate by hammering as damage to the collapsible column may result.

(17) Remove the lock lever guide plate screws and plate. (18) With a small probe tool inserted in the access hole provided in the housing boss, depress the key cylinder retainer toward the cylinder to disengage it from the slot in the housing bore, then withdraw the key cylinder from the lock housing. IGNITION AND STEERING LOCK

Installation Before installing ignition switch and key cylinder make sure the shift housing is in a lockable position (park with automatic, or reverse with manual transmission). When installing the key cylinder it must be turned to "lock" position, key removed. Also make sure ignition switch is turned to the "lock" position to index its cam with the lock cylinder position.

(1) Install ignition switch and screws. (2) Install ignition switch lock cylinder. (3) Install lock lever guide plate and two screws. (4) Install warning buzzer switch if removed. (5) Install the steering shaft bearing lower snap ring and place the bearing and housing assembly on the steering shaft. (6) Use Tool C-3879 and a steering wheel nut and flat washer to draw the steering shaft up into the bearing and housing assembly until the lower snap ring contacts the bearing, then install the upper snap ring. (7) Install the three bearing housing to lock housing attaching screws. (8) Install lock plate and retaining pin. (9) Install bearing housing on steering shaft. (10) Install bearing housing attaching screws. (11) Install bearing upper snap ring. (12) Install key lamp assembly, retainer and two screws. (13) Attach string or wire left in steering column jacket tube during removal, to turn signal switch wiring and carefully pull string on wire down through column jacket tube until directional switch wires can be connected. Position turn signal switch in steering column jacket tube and install switch retainer and attaching screws. (14) Install turn signal switch actuating lever. (15) Install steering wheel, on steering shaft with master splines aligned. (16) Install washer and nut. Tighten nut to 27 footpounds. (17) Install horn switch parts previously removed from steering wheel. (18) Connect horn switch wires. (19) Connect wiring connectors at steering column. (20) Install wiring trough (cover) and steering column cover. (21) Connect battery ground cable, test operation of turn signals and horns.

SPECIFICATIONS ELECTRICAL BATTERY

Engine-Cubic Inch Displacement

Standard Equipment Battery Part Number

Special Equipment Battery Part Number

225

2875951

318

2875951

383

2875320

2875320 2444564 2875320 2444564 2642967


SPECIFICATIONS-ELECTRICAL 8-87 426 440

2642969 2642969

Battery Part

Capacity Amperes

Number Plates Per Cell

Number

2875951 2875320 2642969 2444564 2642967

46 59 70 70 70

9 11 13 11 13

264967

All Batteries are 12 Volts with Negative Ground Terminal.

GEAR REDUCTION STARTING MOTOR 2875560 Chrysler 12 4(3 Series, 1 Shunt) 4 4 32 to 36 Ounces Solenoid Shift Overrunning Clutch .010"-.045" 155 to 170 Amps. 198 Cu. In. 165 to 180 Amps. 225, 318 Cu. In. 180 to 200 Amps. 383, 426, 440 Cu. In.

Starting Motor Model Make Voltage No. of Fields No. of Poles Brushes Spring Tension Drive End Play *Cranking Amperage Draw Test Free-Running Test Voltage Amperage Draw Maximum Minimum Speed RPM Locked Resistance Test Voltage Amperage Draw Solenoid Switch Pull-In Coil Hold-In Coil

11 90 1925 to 2600 4 400 to 450 13.3 to 14.9 Amps. @6.0 Volts at 77째F. 8.0 to 9.0 Amps. @6.0 Volts at 77째F.

* Engine should be at operating temperature

DIRECT DRIVE STARTING MOTOR (Taxi with 11-Inch Clutch and 225 Cu. In. Engine)

Starting Motor Model Make Voltage Number of Fields Number of Poles Brushes Spring Tension Drive End Play *Cranking Amperage Draw Free Running Test Voltage Amperage Draw Minimum Speed RPM Locked Resistance Test Voltage Amperage Draw Solenoid Switch Pull-In Coil Hold-In Coil

* Engine shoukl be at operating temperature.

1889100 Chrysler 12 4 (3 Series, 1 Shunt) 4 4 32 to 36 Ounces Solenoid Shift Overrunning Clutch .005" Minimum 165 to 185 Amps. 11 78 Amps. Maximum 3800 RPM 4 310 to 445 22.4 to 24.0 Amps. @6 Volts @ 77째F. 8.3 to 9.3 Amps @6 Volts @ 77째F.


8-88 ELECTRICAL-SPECIFICATIONS ALTERNATOR Rotation Voltage Current Output Voltage Output Brushes (Field) Condenser Capacity Field Current Draw Rotating Rotor by Hand @ 12 Volts Current OutputStd. with 198 & 225 Cu. In. Eng Std. (All Other Models) Special Equipment, Heavy Duty and/or Air Conditioning Special Equipment (Fleets)

Clockwise at Drive End 12 Volt System Design Controlled Limited by Voltage Regulator 2 .50 Microfarad ± 20% 2.38 to 2.75 Maximum amperes 26 th- 3 amperes* 34.5 -± 3 amperes* 44.5 -± 3 amperes* 51 ± 3 amperes*

*Plus or minus three ampere tolerance is provided to allow for temperature variation. Current output is measured at 1250 engine RPM and 15 volts at the alternator. If measured at the battery, current output will be approximately 5 amperes lower than above values. Voltage is controlled by variable load (carbon pile) across the battery.

ELECTRIC VOLTAGE REGULATOR Part Number

3438150

The battery specific gravity should be above 1.200 when checking the regulated voltage. The voltage regulator is working properly if the voltage is in accordance with the following chart: Ambient Temerature 1/4" from Voltage Regulator

Voltage Range

-20°F. 80°F. 140°F. Above 140°F.

14.3 - 15.3 13.8 - 14.4 13.3 - 14.0 Less than 13.8

IGNITION SYSTEM WITH CLEANER AIR SYSTEM

Engine Application

Engine Displacement Distributor Part No.-(Chrysler Built) Advance-Centrifugal (Distributor Degrees at Distributor RPM) Advance-Vacuum (Distributor Degrees at Inches of Mercury) Contact Gap Dwell Angle Contact Arm Spring Tension Condenser Capacity Shaft Side Play (New or Rebuilt) Shaft End Play (After Assembly) Rotation Timing Spark Plug Type Size Gap Firing Order Coil

225 Single Barrel Carburetor Manual Transmission

225 Single Barrel Carburetor Automatic Transmission

225 Cu. In. 2875822

225 Cu. In. 2875826

1° to 5° @ 550 RPM 9.2° to 11.2° @ 900 RPM 12° to 14° @ 2000 RPM

1° to 5° @ 550 RPM 9.2° to 11.2° @ 900 RPM 12° to 14° @ 2000 RPM

0.5° to 3.5° @ 10" 0.5° to 3.5° @ 7" 5.25° to 7.75° @ 15" 5.25° to 7.75° @ 10" .017" to .023" .017" to .023" 41° to 46° 41° to 46° 17 to 20 oz. 17 to 20 oz. .25 to .285 mfd. .25 to .285 mfd. .000" to .003" * .000" to .003" * .003" to .017" .003" to .017" Clockwise Clockwise TDC** TDC** N14Y-Champion or *** N14Y-Champion or *** P-6-6P Mopar *** P-6-6P Mopar *** 14MM-3/4" Reach 14MM-3/4" Reach .035" 035" 1-5-3-6-24 1-5-3-6-2-4 Chrysler-Essex -or- Chrysler-Prestolite


SPECIFICATIONS-ELECTRICAL 8-89 Identification Number Primary Resistance @ 70°-80°F Secondary Resistance @ 70°-80°F Ballast Resistor Resistance @ 70°-80°F Current Draw (Coil and ballast resistor in circuit) Engine Stopped Engine Idling

2444241 1.41 to 1.55 Ohms 9200 to 10700 Ohms

2444242 1.65 to 1.79 Ohms 9400 to 11700 Ohms

2095501 0.5 to 0.6 Ohms 3.0 amperes 1.9 amperes

*Service wear tolerance should not exceed .006 inch. ** Plus or minus 2-1/2°. Set at curb idle; See "Fuel System". ***No gaskets required.

IGNITION SYSTEM WITH CLEANER AIR SYSTEM LA-318 2-Barrel Carburetor Automatic Transmission

LA-318 2-Barrel Carburetor Manual Transmission

Engine Application

Engine Displacement Distributor Part No.-(Chrysler Built) Advance-Centrifugal (Distributor Degrees at Distributor RPM) Advance-Vacuum (Distributor Degrees at Inches of Mercury) Contact Gap Dwell Angle Contact Arm Spring Tension Condenser Capacity Shaft Side Play (New or Rebuilt) Shaft End Play (After Assembly) Rotation Timing Spark Plug Type Size Gap Firing Order Coil Identification Number Primary Resistance @ 70°-80°F Secondary Resistance @ 70°-80°F Ballast Resistor Resistance @ 70°-80°F Current Draw (Coil and ballast resistor in circuit) Engine Stopped Engine Idling

318 Cu. In. 3438255

318 Cu. In. 3438255

1° to 6° @ 550 RPM 10 to 6° @ 550 RPM 8.5° to 10.5° @ 803 RPM 8.5° to 10.5° @ 800 RPM 12° to 14° @ 2100 RPM 14° to 16° @ 2100 RPM 125° to 4.25° @12" 1° to 4° @ 10.5" 8.25° to 10.75° at 15" 8.25° to 10.75° @ 15" .014" to .019" 30° to 34° 17 to 20 oz. .25 to .285 mfd. .000" to .003" * .003" to .017" Clockwise TDC** N-14Y Champion or P-6-6P Mopar 14MM-3/4" Reach .035" 1-8-4-3-6-5-7-2 Chrysler-Essex -or- Chrysler-Prestolite 2444241 2444242 1.65 to 1.79 Ohms 1.41 to 1.55 Ohms 9400 to 11700 Ohms 9200 to 10700 Ohms 2095501 0.5 to 0.6 Ohms 3.0 amperes 1.9 amperes

*Service wear tolerance should not exceed .006 inch. **Plus or minus 2-1/2°. Set at curb idle; See "Fuel System."

IGNITION SYSTEM WITH CLEANER AIR SYSTEM

Engine Application

Engine Displacement Distributor Part No.-(Chrysler Built)

383 2-Barrel Carburetor Manual Trans.

383 Cu. In. 3438231

383 2-Barrel Carburetor Automatic Trans.

383 Cu. In. 3438231


8-90 ELECTRICAL-SPECIFICATIONS Advance-Centrifugal (Distributor Degrees at Distributor RPM)

0° to 3.8° @ 550 RPM 7.5° to 9.5° @ 850 RPM 14° to 16° @ 2200 RPM

00 to 3.8° @ 550 RPM 7.5° to 9.5° @ 850 RPM 14° to 16° @ 2200 RPM

Advance-Vacuum (Distributor Degrees at Inches of Mercury) Contact Gap Dwell Angle Contact Arm Spring Tension Condenser Capacity Shaft Side Play (New or Rebuilt) Shaft End Play (After Assembly) Rotation Timing Spark Plug Type Size Gap Firing Order Coil Identification Number Primary Resistance @ 70°-80°F Secondary Resistance @ 70°-80°F Ballast Resistor Resistance @ 70°-80°F Current Draw (Coil and ballast resistor in circuit) Engine Stopped Engine Idling

0.5 0 to 4° @ 7.5" 0.5° to 4° @ 75" 9.3° to 11.8° @ 12" 9.3° to 11.8° @12" .016" to .021" .016" to .021" 28.5° to 32.5° 28.5° to 32.5° 17 to 20 oz. 17 to 20 oz. .25 to .285 mfd. .25 to .285 mfd. .000" to .003"* .000" to .003"* .003" to .017" .003" to .017" Counterclockwise Counterclockwise TDC** 2.5° ** BTC J-14Y Champion or J-14Y Champion or P-3-6P MOPAR P-3-6P MOPAR 14MM 3/8" Reach 14MM 3/8" Reach .035" .035" 1-8-4-3-6-5-7-2 1-8-4-3-6-5-7-2 Chrysler-Essex -or- Chrysler-Prestolite 2444241 2444242 1.41 to 1.55 Ohms 1.65 to 1.79 Ohms 9200 to 10700 Ohms 9400 to 11700 Ohms 2095501 0.5 to 0.6 Ohms 3.0 Amperes 1.9 Amperes

*Service wear tolerance should not exceed .006 inch. ** Plus or minus 2-1/2°. Set at curb idle; See Fuel System."

IGNITION SYSTEM WITH CLEANER AIR SYSTEM

Engine Application

Engine Displacement Distributor Part No.-(Chrysler Built) Advance-Centrifugal (Distributor Degrees at Distributor RPM) Advance-Vacuum (Distributor Degrees at Inches of Mercury) Contact Gap Dwell Angle Contact Arm Spring Tension Condenser Capacity Shaft Side Play (New or Rebuilt) Shaft End Play (After Assembly) Rotation Timing Spark Plug Type Size Gap Firing Order Coil Identification Number Primary Resistance @ 70°-80°F Secondary Resistance @ 70°-80°F

383 4-Barrel Carburetor Manual Transmission

383 4-Barrel Carburetor Automatic Transmission

383 Cu. In. 3438233

383 Cu. In. 3438233

0. to 4.6° @ 600 RPM 5.6° to 7.6° @ 800 RPM 100 to 12° @ 2300 RPM

0° to 4.6° @ 600 RPM 5.60 to 7.6° @ 800 RPM 10° to 12° @ 2300 RPM

05° to 4.3° @105" 0.5° to 4.30 @ 10.5" 9.7° to 12° @ 9.7° to 12.0° @155" .016" to .021" .016" to .021" 28.5° to 32.5° 28.5° to 32.5° 17 to 20 oz. 17 to 20 oz. .25 to .285 mfd. .25 to .285 mfd. .000" to .003"* .000" to .003"* .003" to .017" .003" to .017" Counterclockwise Counterclockwise 2.5° BTC TDC** J-11Y Champion or J-11Y Champion or P-3-4P Mopar*** P-3-4P Mopar*** 14MM-3/8" Reach 14MM-3/8" Reach .035" 035" 1-8-4-3-6-5-7-2 1-84-3-6-5-7-2 Chrysler-Prestolite Chrysler-Essex -or2444242 2444241 1.41 to 1.55 Ohms 1.65 to 1.79 Ohms 9200 to 10700 Ohms 9400 to 11700 Ohms


SPECIFICATIONS-ELECTRICAL 8-91 383 4-Barrel Carburetor Manual Transmission

Engine Application

Ballast Resistor Resistance @ 70°-80°F Current Draw (Coil and ballast resistor in circuit) Engine Stopped Engine Idling

383 4-Barrel Carburetor Automatic Transmission

2095501 0.5 to 0.6 Ohms 3.0 amperes 1.9 amperes

*Service wear tolerance should not exceed .006 inch. ** Plus or minus 2-1/2°. Set at curb idle. See "Fuel System". *** J-11Y Champion. If J-11Y are not available, use Mopar P-3-4P or Champion J-10-Y.

IGNITION SYSTEM WITH CLEANER AIR SYSTEM

Engine Application

Engine Displacement Distributor Part No.-(Chrysler Built) Advance-Centrifugal (Distributor Degrees at Distributor RPM)

Advance-Vacuum (Distributor Degrees at Inches of Mercury) Contact Gap Dwell Angle Contact Arm Spring Tension Condenser Capacity Shaft Side Play (New or Rebuilt) Shaft End Play (After Assembly) Rotation Timing Spark Plug Type Size Gap Firing Order Coil Identification Number Primary Resistance @ 70°-80°F Secondary Resistance @ 70°-80°F Ballast Resistor Resistance @ 70°-80°F Current Draw (Coil and ballast resistor in circuit) Engine Stopped Engine Idling

440 Special Cam 4-Barrel Carburetor Manual Transmission

440 Special Cam 4-Barrel Carburetor Automatic Transmission

440 Cu. In. 3438222

440 Cu. In. 3438222

0° to 46° @ 600 RPM 5.6° to 7.6° @ 800 RPM 10° to 12° @ 2300 RPM

0° to 4.6° @ 600 RPM 5.6° to 76° @ 800 RPM 10° to 12° @ 2300 RPM

0.5° to 4.3° 10.5" 9.7° to 12° @ 15.5" .016" to .021" 28.5° to 32.5°

0.5° to 4.3° @ 105" 9.7° to 12° @ 15.5" .016" to .021" 28.5° to 32.5°

17 to 20.0 oz. .25 to .285 mfd. .000" to .003" * .003" to .017" Counter-Clockwise TDC ** J11Y Champion or P-3-4P Mopar*** 14MM-3/8" Reach .035" 1-8-4-3-6-5-7-2 Chrysler-Essex 2444241 1.41 to 1.55 Ohms 9200 to 10700 Ohms

*Service wear tolerance should not exceed .006 inch. ** Plus or minus 2-1/2°. Set at curb idle; See "Fuel System".

17 to 20 oz. .25 to .285 mfd. .000" to .003" * .003" to .017" Counter-Clockwise 2.5° BTC** J11Y Champion or P-3-4P Mopar*** 14MM-3/8" Reach 035" 1-8-4-3-6-5-7-2 -OrChrysler-Prestolite 2444242 1.65 to 1.79 Ohms 9400 to 11700 Ohms 2095501 0.5 to 0.6 Ohms 3.0 amperes 1.9 amperes


8-92 ELECTRICAL-SPECIFICATIONS IGNITION SYSTEM WITH CLEANER AIR SYSTEM 440 6-Barrel Carburetor Manual Transmission

Engine Application

Engine Displacement Distributor Part No.-(Chrysler Built) (Prestolite Built) Advance-Centrifugal (Distributor Degrees at Distributor RPM) Advance-Vacuum (Distributor Degrees at Inches Mercury)

440 6-Barrel Carburetor Automatic Transmission

440 Cu. In. 3438314 IBS 4014

440 Cu. In. 2875982 IBS 4014D

0° to 4.50 @ 650 RPM 9° to 110 @ 950 RPM 12° to 14° @ 2400 RPM

0° to 5.3° @ 600 RPM 9° to 11° @ 850 RPM 12° to 14° @ 2400 RPM

0.5° to 3.5° @ 11" 0.5° to 3.5° @ 11" 95° to 12.5° @ 15.5" 9.5° to 12.5° @ 15.5" .014" to .019" .014" to .019" One set points 27° to 32° One set points 27° to 32° both set points 37° to 42° both set points 37° to 42° 17 to 21.5 oz. 17 to 21.5 oz. .25 to .285 mfd. .25 to .285 mfd. .000" to .003" .000" to .003" * .003" to .017" .003" to .017" Counterclockwise Counter-Clockwise 5° BTC** 5° 13TC** J11Y Champion or J11Y Champion or P-3-4P Mopar *** P-3-4P Mopar*** 14MM-3/8" Reach 14MM-3/8" Reach .035" .035" 1-8-4-3-6-5-7-2 1-8-4-3-6-5-7-2 Chrysler-Prestolite Chrysler-Essex -Or2444242 2444241 1.41 to 1.55 Ohms 1.65 to 1.79 Ohms 9400 to 11700 Ohms 9200 to 10700 Ohms 2095501 0.5 to 0.6 Ohms

Contact Gap Dwell Angle Contact Arm Spring Tension Condenser Capacity Shaft Side Play (New or Rebult) Shaft End Play (After Assembly) Rotation Timing Spark Plug Type Size Gap Firing Order Coil Identification Number Primary Resistance @ 70°-80°F Secondary Resistance @ 70°-80°F Ballast Resistor Resistor @ 70°-80°F Current Draw (Coil and ballast resistor in circuit) Engine Stopped Engine Idling

3.0 amperes 1.9 amperes

*Service wear tolerance should not exceed .006 inch. ** Plus or minus 2-1/2°. Set at curb idle; See "Idle Speed Adjustment, Fuel System". *** If J-11Y Champion or P-3-3P Mopar are not available, use Champion J-10Y.

IGNITION SYSTEM WITH CLEANER AIR SYSTEM Hemi-426 Engine - A102 Two Four Barrel Carburetors Two 4-Barrel Carburetor Manual Transmission

Engine Application

Engine Displacement Distributor Part No.-(Chrysler Built) (Prestolite Built) Advance-Centrifugal (Distributor Degrees at Distributor RPM) Advance-Vacuum (Distributor Degrees at Inches of Mercury)

• • •

Two 4-Barrel Carburetor Automatic Transmission

426 Cu. In. 2875987 IBS-4014E

426 Cu. In. 2875989 IBS-4014F

0° to 4.5° @ 650 RPM 112° to 14.2° @ 1050 RPM 14° to 16° @ 1600 RPM 0° to 3.5° @ 9" 6.7° to 9.2° @ 13.5"

0° to 4.2° @ 600 RPM 9.7° to 11.7° @ 950 RPM 11.50 to 13.5° @ 1600 RPM 0° to 3.5° @ 9" 6.7° to 9.2° @ 13.5"


SPECIFICATIONS-ELECTRICAL 8-93 Hemi-426 Engine - A102 Two Four Barrel Carburetors Engine Application

Contact Gap Dwell Angle Contact Arm Spring Tension Condenser Capacity Shaft Side Play (New or Rebuilt) Shaft End Play (After Assembly) Rotation Timing Spark Plug Type Size Gap Firing Order Coil Identification Number Primary Resistance @ 70°-80°F Secondary Resistance @ 70°-80°F Ballast Resistor Resistance @ 70°-80°F Current Draw (Coil and ballast resistor in circuit) Engine Stopped Engine Idling

Two 4-Barrel Carburetor Manual Transmission

Two 4-Barrel Carburetor Automatic Transmission

.014" to .019" Individual Contacts 27° to 32° Total Dwell 37° to 42° 17 to 21.5 oz. .25 to .285 mfd. .000" to .003" * .003" to .017" Counterclockwise TDC ** 5° BTC** NlOY Champion*** 14MM-3/4" Reach .035" 1-8-4-3-6-5-7-2 Chrysler-Essex —or— Chrysler-Prestolite 2444241 2444242 1.41 to 1.55 Ohms 1.65 to 1.79 Ohms 9200 to 10700 Ohms 9400 to 11700 Ohms 2095501 0.5 to 0.6 Ohms 3.0 amperes 1.9 amperes

*Service wear tolerance should not exceed .006 inch. ** Plus or minus 2-1/2°. Set at curb idle. See "Fuel System". ***No gaskets required.

LIGHT BULBS Coronet

Air Conditioning Indicator Ash Receiver Back-up Lights Brake System Warning Light Clock Courtesy Lamp Dome and/or "C" Pillar Light Door Adjar Indicator Door or Pocket Panel Lamp Fender Mounted Turn Signal Indicator (Tail Lamp Only) Gear Selector Indicator (Column) Gear Selector with Console Glove Compartment Headlamp Switch Rheostat Valve High Beam Indicator Ignition Lamp Instrument Cluster 2nd Speedometer License Light Map and Courtesy Lamp Oil Pressure Indicator Park and Turn Signal Radio—AM-FM Stereo Radio—AM and Tape Reverse 4-Speed Transmission Indicator Sealed Beam—Hi-Beam (No. 1) Sealed Beam—Hi-Lo Beam (No. 2) Sealed Beam—Single "7" Seat Belts Indicator Stereo Indicator Switches

Charger*

**1892(2) **1445 1156(2) 158 ** 57 89 1004

**1892(2) **1445 1156(2) 57

90 330(2)

90 330(2) 1095(2) ** 161 ** 57

** 161 57 1891 17 Ohms 158 1445 ** 158(4) 67 90 158 1157(2) **1816 **1815 53 4001 4002 53

89 1004

1891 17 Ohms 57 1445 **57(3) 158(3) 67 90 Gauge 1157(2) "1816 53 4001 4002 53


8-94 ELECTRICAL-WIRING DIAGRAMS Coronet

Charger*

** 57 1157(2) 1004 158(2)

Tachometer Tail, Stop and Turn Signal Trunk and/or Under Hood Lamp Turn Signal Indicator (Panel)

1157(4) 1004 158(2)

*- Included in Instrument Cluster Lighting. ** - Headlamp Rheostat Dimming.

FUSES Car Model and Ampere Rating Charger Coronet

20

Accessory Console Emergency Flasher Heater and Air Conditioner (Blower Motor) Instrument Lamps Radio and Back-up Lamps Stop and Dome Lamps Tail Lamps and Cigar Lighter

20 20 20 20 3 20 20 20

20 20 3 20 20 20

CIRCUIT BREAKERS Car Model and Ampere Rating Coronet

Circuit

Concealed Headlamps Convertible Top Headlamps Power Tail Gate Power Windows Windshield Wipers

*optional

Integral with relay below left end of instrument panel Instrument panel cluster behind ammeter Integral with headlamp switch Instrument panel cluster behind ammeter Instrument panel cluster behind ammeter Integral with wiper switch3-speed motor 2-speed motor

Charger

5 30 20

30 20

30 30

30

7.5* 6.0

7.5* 6.0


8-94 ELECTRICAL-WIRING DIAGRAMS Coronet

Charger*

** 57 1157(2) 1004 158(2)

Tachometer Tail, Stop and Turn Signal Trunk and/or Under Hood Lamp Turn Signal Indicator (Panel)

1157(4) 1004 158(2)

*- Included in Instrument Cluster Lighting. ** - Headlamp Rheostat Dimming.

FUSES Car Model and Ampere Rating Charger Coronet

20 20 20 20 3 20 20 20

20

Accessory Console Emergency Flasher Heater and Air Conditioner (Blower Motor) Instrument Lamps Radio and Back-up Lamps Stop and Dome Lamps Tail Lamps and Cigar Lighter

20 20 3 20 20 20

CIRCUIT BREAKERS Car Model and Ampere Rating Coronet

Circuit

Concealed Headlamps Convertible Top Headlamps Power Tail Gate Power Windows Windshield Wipers

Integral with relay below left end of instrument panel Instrument panel cluster behind ammeter Integral with headlamp switch Instrument panel cluster behind ammeter Instrument panel cluster behind ammeter Integral with wiper switch3-speed motor 2-speed motor

Charger

5 30 20

30 20

30 30

30

75* 6.0

75* 6.0

*optional

WIRING DIAGRAMS INDEX Page Alternator Adaptation Wiring Diagram— (60 Ampere—Chrysler Built) Alternator Adaptation Wiring Diagram— (65 Ampere—Leece—Nevel le) Body Wiring Diagram—Charger Body Wiring Diagram—Except Station Wagons—Coronet Body Wiring Diagram—Station Wagons—Coronet Console Wiring Diagram—Coronet Electric Window Lift Wiring Diagram— Coronet and Charger Front End Lighting—Charger Front End Lighting—Coronet

99 99 95 95 96 96 101 100 100

Page Engine Compartment Wiring Diagram—Except Hemi—Engine—Coronet—Charger Engine Compartment Wiring Diagram—HemiEngine Instrument Panel Accessory Wiring Diagram —Coronet Instrument Panel Wiring Diagram—Coronet ... Instrument Panel Wiring Diagram—Charger ... Instrument Panel Wiring Diagram—(With Concealed Head lamps)—Charger Rear Window Defogger Wiring Diagram Speed Control Wiring Diagram

97 98 102-103 104-105 106-107 108-109 110 101


WIRING DIAGRAMS-ELECTRICAL 8-95 M2 18Y_ Ml isp \

Len TO DOME LAMP

DOME LAMP WIRING

D7-18BR

TO INSTRUMENT PANEL WIRING

D7-18BR

.2

TO TRUNK LAMP

M11-18BK -=Egp-M11-186K TO TRUNK ol--M12-188K LAMP SWITCH

TO RIGHT SIDE MARKER LAMP

L7-18BK-taD

V

L7-18BK L7-18BK

TO RIGHT TAIL - STOP AND TURN SIGNAL LAMP

lcn

L7 18BK-tailD OPTIONAL 17-18BK/W* B2A 18V-CD-B2A-18V-1tt TO RIGHT BACK-UP LAMP

TRUNK LAMP WIRING TO FUEL _EQGAUGE

TO INSTRUMENT PANEL WIRING B2 18V

[11 II L7-I8BK

L7-I8BK

D8-18DGN D7 18BR GROUND REAR WINDOW DEFOGGER 1---C13-14BK C14-148K-c0 TO SWITCH WIRING ON REAR WINDOW DEFOGGER WIRING INSTRUMENT C13 186K PANEL 1111

LEGEND

SPLICE INSULATORS VIEWED FROM TERMINAL SIDE

C12 20W RESISTANCE CABLE

mALE

MALE

FEMALE

TO LICENSE LAMP

B2 18V-CD--B2-18V-aD TO LEFT BACK-UP LAMP

G4 18DBL-

26 \0, C11 188K

L7-18BK-CD-L7-18BK OPTIONAL L7-18BK/LGN* =

FEMALE

TO LEFT TAIL, STOP AND 7-188K FM-D ,A***<URN SIGNAL LAMP "OPTIONAL L7-18BK/P* _ COLOR CODE D8-18DGN L7-18BKMD BK BLACK `OPTIONAL L7-18BK/Y* = BR BROWN D8 18DGN u 18BK _ItaD DBL DARK BLUE DON DARK GREEN ""OPTIONAL L7-18BK/Y* LBL LIGHT BLUE L7-188K P PINK OPTIONAL L7-188K/LBL*-V TO LEFT SIDE VIOLET MARKER LAMP W WHITE Y YELLOW WITH TRACER PY106

LJ

Fig. 1 -Body Wiring Diagram-Charger TO RIGHT FRONT DOOR JAMB SWITCH

M2 18Y M2-18Y

TO INSTRUMENT PANEL WIRING

MD

TO RIGHT REAR DOOR JAMB SWITCH DOME LAMP

_croTo

MI 18P DOME LAMP WIRING

M1 18P-1-11-) RIGHT

(OPTIONAL ONLY) L7 I8BK OPTIONAL D7-18BR/W* D7 18BR L7-188K OPTIONAL L7-18BK/W* D7-18BR L7-18BK

IS TO INSTRUMENT M1-18P MI 18P LEFT PANEL WIRING M2-18Y M2 18Y l COURTESY LAMP WIRING CONVERTIBLE ONLY ' L7 1 BK CONVERTIBLE TO TO TRUNK INSTRUMENT e=)-M11-18BK MI1-18BK LAMP PANEL WIRING L7-18BK cm-M12-18BK TO TRUNK __Ca TO FUEL TRUNK LAMP WIR NG LA,MP SWITCH GAUGE B2-18V TO G4 18DBLINSTRUMENT L7 18BK PANEL WIRING D8 18DGN D7-18BR OPTIONAL D8-18DGN/P*

B2A 18V L7 18BK-CD-L7-18BK

TO RIGHT SIDE MARKER LAMP TO RIGHT TAIL STOP - AND TURN SIGNAL LAMP TO RIGHT BACK-UP LAMP TO LICENSE LAMP

OPTIONAL L7-188KAGN*

B2-18V OPTIONAL 132-18V/W* D8 18DGN 1.7-18BK OPTIONAL 1.7-18BK/YVI D8 18DGN L7-188K OPTIONAL L7-1813K/P* OPTIONAL 1.7-18BK/LBL*--r L7-188K TO SWITCH -C11-1813K WIRING ON COLOR CODE REAR WINDOW DEFOGGER INSTRUMENT BK BLACK C12 20W C13-18BK-cD-C13-14BK-e-C14-14BK-E2C) PANEL BR BROWN RESISTANCE CABLE GROUND DBL DARK BLUE REAR WINDOW DEFOGGER WIRING DGN DARK GREEN TO SWITCH LBL LIGHT BLUE WIRING ON U_T2-1211R. =: -LT2-12BR INSTRUMENT LGN LIGHT GREEN T3 12Y T3-12Y-0_° T4 I28K GROUND PANEL P PINK FOLDING TOP FOLDING V MOTOR WIRING TOP MOTOR VIOLET W WHITE TO LEFT FRONT Cr13 M2-18Y TO LEFT REAR Y YELLOW DOOR JAMB SWITCH DOOR JAMB SWITCH WITH TRACER

Fig. 2 -Body Wiring Diagram-Except Station Wagons-Coronet

TO LEFT BACK-UP LAMP TO LEFT TAIL, STOP AND TURN SIGNAL LAMP TO LEFT DE MARKER LAMP (OPTIONAL ONLY) LEGEND SPLICE -110--

MALE

'ff

FEMALE

INSULATORS VIEWED FROM TERMINAL SIDE

PY107


8-96 ELECTRICAL—WIRING DIAGRAMS TO RIGHT T n \SIDE MARKER -L7-18BK-=/- L7-18BK ) LAMP TO RIGHT TAIL STOP GN D ATLULRANim p D7 18BR-1 1_ [ )sAI N L7-18BK

cm TO RIGHT REAR DOOR JAMB SWITCH

M2 18Y TO RIGHT FRONT DOOR JAMB SWITCH

TO RIGHT 82 18y —F+11DBACK - UP LAMP

DOME LAMP MI-18P DOME LAMP WIRING

M2-18Y li

D

M2-18BK

DOME LAMP r M2-18Y AFT DOME LAMP M1-18P M2-18Y M2-18Y AND SWITCH t M2 18Y TAILGATE DOME AND AFT LAMP WIRING LIMIT SWITCH W15-12BR W15-12BR L7 W25-12Y 15 12BR W5 12R 189K 5-12R TO TAILGATE 14DGN W15-12BR WINDOW W25-12Y LIFT SWITCH TAILGATE W15-12BR WIRING ON W15A LOCK W15-12BR W25-12Y INSTRUMENT TO FUEL 148K SWITCH TAILGATE WINDOW PANEL GAUGE LIFT WIRING e_V15-12BR

B2-I8V

O0 TO LEFT TO LAMP

D8-18DGN

—12: )BA LA CM K -P UP

L7 I88K

TO LEFT TAIL, STOP AND TURN SIGNAL LAMP

L7-18BK

alp TO LEFT SIDE MARKER LAMP

LEGEND SPLICE

G4-I8DBL

-4-

t'l

V

FEMALE

MALE

L7 I8BK D8-I 8DGN D7-18BR

cq

Q

TO INSTRUMENT PANEL WIRING

cC

L7-188K

TO LEFT

TAILGATE WINDOW LIFT MOTOR

In

TO RIGHT E-4 t-P-DLICENSE LAMP

11--co-82 18V

G4-1 EIDBL

IFQIW5-12R W25-12Y

17 IBBK

TAILGATE GLASS WASHER MOTOR BODY WIRING-..J TO LEFT FRONT DOOR JAMB SWITCH M2-18Y —MDT° LEFT REAR DOOR JAMB SWITCH

FEMALE

MALE

INSULATORS VIEWED FROM TERMINAL SIDE

BK BR DBL DGN P R T V Y

COLOR CODE BLACK BROWN DARK BLUE DARK GREEN PINK RED TAN VIOLET YELLOW WITH TRACER NU1 10A

Fig. 3-Body Wiring Diagram-Station Wagons-Coronet

GROUND

TO INSTRUMENT PANEL WIRING

MlI8P X2-18BK

M218Y

E2 180

X2-18BK E2 18 r-M2-18Y 1-18P TO COURTESY LAMPS

TO GEAR SHIFT SELECTOR LAMP

AUTOMATIC TRANSMISSION MI 18P M2 18Y

TO INSTRUMENT PANEL WIRING

MI 18P M2 18Y TO DOME LAMP WIRING

M2-18Y M1-18P-

LEGEND

MANUAL TRANSMISSION

SPLICE

MALE

0 MALE

FEMALE

g

FEMALE

INSULATORS VIEWED FROM TERMINAL SIDE

Fig. 4-Console Wiring Diagram-Coronet

BK 0 P Y

COLOR CODE BLACK ORANGE PINK YELLOW PYI05


.12D- TO NUMBER 8DBL ONE SPLICE

CARBURETOR S6-18BK CARBURETOR HOLLEY CARBURETOR

J2E 18DBL DISTRIBUTOR SOLENOID ALTERNATOR 383 CUBIC INCH ENGINE WITH TWO OR FOUR • • : • Fl CARBIatTOR (EQUIPPED WITH DISTRIBUTOR SOL .; GROUNDED AT CARBURETOR TERMINAL) J2DTO NUMBER CARBURETOR 18DBL ONE SPLICE SOLENOID 12E 18DBL

H2A 16DGN /IR*

H2-16 3GN/R* 12D 18DBL R3-18DGN FLD G6ALTERNATOR 18GY R6-12BK H2 6 DGN R* (3-G2-18V

TEMPERATURE GAGE SENDING UNIT DISTRIBUTOR SOLENOID

SPARK PLUGS RIGHT BANK

(STANDARD) TWO-SPEED WINDSHIELD WIPER MOTOR C5 14DGN AIR CONDITIONER MOTOR---ir OW OIL PRESSUREOSRWITCH

BA FLI

J2F-18DBL—criMsnD-18DBL-J0 NUMBER ONE SPLICE _ .12E-18DBL 3-18DBL 440 CUBIC INCH ENGINE WITH ALTERNATOR FOUR BARREL CARBURETOR-HIGH PERFORMANCE (EQUIPPED WITH CARBURETOR CARBURETOR SOLENOID AND DISTRIBUTOR SOLENOID) SOLENOID

B2A18BK*

00o

C2A-18DBL TACHOMETER WIRING SO EQUIPPED

SPARK PLUGS LEFT BANK SPARK PLUGS RIGHT BANK

EIGHT CYLINDER DISTRIBUTOR COUNTER- CLOCK WISE ROTATION FOR 383 AND 440 CUBIC INCH ENGINES FIRING ORDER 1-8-4-3-6-5-7-2

r

T11-1B Y/T* J2B14D BL GN TION COIL

T11-18 GY/T*

SPARK PLUGS EFT BANK

IGNITION COIL 12B-14 DBL BODY ril ENGINE GROUND ' GROUND? i f A2A-1013K .(!)

i

-

FIRING ORDER 1-5-3-6-2-4 *BRAKE WARNING LAMP SWITCH

—13-14BR B2B18BK*

BULKHEAD DISCONNECT NM PL 0

+

BATTERY

WINDSHIELD WIPER MOTORTHREE SPEED NEUTRAL START AND B ACK-UP LAMP SWITCH AUTOMATIC TRANSMISSION

C5 4DGN V6C2 A H 18DBL 18DBL BULKHEADCONNECTOR —54 18BR/Y*

V108BR

FUSIBLE LINK

P5-18BK ✓ W U X

FUS BLE LINK A1C16DBL

S2 18Y

J2 6DBL* 41111 NUMBER, ONE SPLICE R.L.12A16DBL IGNITION BALLAST

.../GROMMET e-

---4 TO INSTRUMENT PANEL DASH • (MANUAL PANEL TRANSMISSION ° CLUTCH J2CSTART SWITCH) 5, 18DBL

ALTERNATOR REGULATOR

A1B-10R--cC3

© G

BACK-UP LAMP SWITCH B2-18BK*

B1-18BK

VS18 DGN

TO INSTRUMENT PANEL WIRING

S BALLAST I. 5 RESISTOR WINDSHIELD WASHER MOTOR

(MANUAL TRANS MISSION)

B1A- V418BK 18R

C218DBL LOW PRESSURE SWITCH

AIR CONDITIONER TO COMPRESSOR

B2 18BK* B1-18BK

V3188R

T11 -18GY*

..* IGNITION COIL

0 L PRESSURE SENDING UNIT

o

FOUR-SPEED TRANSMISSION

12B-14DBL

EIGHT CYLINDER DISTRIBUTOR CLOCKWISE ROTATION FOR 318 CUBIC INCH ENGINES FIRING ORDER 1-8-4-3-6-5-7-2

SIX CYLINDER DISTRIBUTOR (CLOCKWISE ROTATION)

HORNS

DASH L E

440 CUBIC INCH EN IL • : - RR ilistaINti• • (EQUIP - ED(TM • RBUR T•R SOLENOID ONLY)

0

I

GROMMET

CARBURETOR

I

ALTERNATOR

TO INSTRUMENT PANEL

-.---CARTER

54-18BR/Y*_____ 54 18DGN

STARTER RELAY STARTER

S5 12BR MANUAL TRANSMISSION

Fig. 5 -Engine Compartment Wiring Diagram-Except Hemi Engine-Coronet -Charger

0

LEGEND SPLICE —#-----COLOR CODE BK BLACK BR BROWN DBL DARK BLUE DGN DARK GREEN GY GRAY R RED V VIOLET YELLOW Y WITH TRACER PY334

in

5 Co


I- - -

-

IGNITION BALLAST

-i -1 I -1 I II 4-i

V6-18DBL

V3-18BR

I

WINDSHIELD WIPER MOTOR THREE SPEED STANDARD

I B1-188K

A

B2-18BK*

J2A 16DBL- NUMBER ONE SPLICE --*--12-16DBL* G2-18V

82A 18BK BULKHEAD DISCONNECT

P5-188K

J2D 18DBL

J2E-18DBL

C

T11 B-18GY

G6-18GY V 0188R

DCBA EF

Ariodi mi3

BRAKE WARNING LAMP SWITCH

J2C-14DBL

B28 188K*

(FOUR SPEED ONLY)

J2B 14DBL

H2-16DGN/R*

BIA 188K

T11A-18GY* 12A 16DBL

PART OF WINDSHIELD WIPER MOTOR WIRING ASSEMBLY

V5-18DGN

V4 18R

ALTERNATOR REGULATOR

J2C-18DBL

TO INSTRUMENT PANEL DASH LINE PART OF TACHOMETER WIRING ASSEMBLY T11 18GY* TI1A-18GY*--011:1

0 V

52 18Y

D

A C16DB 5

X

314BR G218V

S4-18 R/Y

G2A 18V

1216DBL*

R6128K

G2 18V

R3AR6A-12BK 18DGN

13 14BR

R6 12BK

J2-16DBL* V10-18BR

H2 16DGN/R

53-18BK J2C 14DBL R3A-18DGN IGNITION COIL WINDSHIELD WASHER MOTOR BAT FLD.FL SPARK PLUGS a RIGHT BANK

LOW OIL PRESSURE SWITCH

eli s

H2A-16DGN/R*

H2-16DGN/R*

52-18Y A1C 16DBL 5512BR

8

0 FUSIBLE LINK

BAT SOL Al 68 R

i j TO CARBURETOR l IDLE SOLENOID DASH G2A-18V STEMPERATURE LINE GAUGE a.

TO INSTRUMENT PANEL (MANUAL TRANSMISSION CLUTCH START SAFETY SWITCH)

STARTER R LAY

S4-18DGN

ALTERNATOR

WNW EIGHT CYLINDER %we 0 II DISTRIBUTOR Net, COUNTER-CLOCKWISE ROTATION FIRING ORDER 1-8-4-3-6-5-7-2 SPARK PLUGS LEFT BANK HORNS

G6-18GY

STARTER

G6-18GY

531BBK

0 0 0

V10-18BR

TO ENGINE GROUND 54-18DGN

00 0 0 0 0

A2-2BK

18DGN

CMANUAL

GROMMET

TRANSMISSION (FOUR SPEED)

Fig. 6—Engine Compartment Wiring Diagram—Hemi Engine

A2A 8BK TO BODY GROUND

BATTERY

LEGEND SPLICE COLOR CODE BLACK BK BROWN BR DARK BLUE DBL DGN DARK GREEN GRAY GY RED R VIOLET V YELLOW Y WITH TRACER

I

PY337

CO CO

ELECTRICAL-WIRING DIAGRAMS

BACK-UP LAMP SWITCH B1-18BK(MANUAL TRANSMISSION) C13K* B2-18 (FOUR SPEED) - 82-188K*- -------NEUTRAL START AND BACK-UP 54 18BR/Y* LAMP SWITCH CONNECTION • -B1-188K (AUTOMATIC TRANSMISSION)


WIRING DIAGRAMS-ELECTRICAL 8-99 HORNS

CUT-OFF AND TAPE AT BULKHEAD CONNECTOR

H2A-16DGN/R* -till

{

I

TEMPERATURE GAUGE SENDING UNIT

V10 18BR H216DGN/R*

WINDSHIELD WASHER MOTOR

J1 Ll Q1 R6- I 12BK I

2 41 Al 12R

VOLTAGE REGULATOR G2-18V

47/

R3-18DGN J2D 18DBL R2 8BK

n

ALTERNATOR (CHRYSLER BUILT)

R6A12BK —J

V 018BR

J2C16DBL

BASIC WIRING (REFERENCE ONLY) LEGEND SPLICE

i 12 16DBL* H216DGN/R

IGNITION COIL J2B-14DBL

—4—

J2A 16DBL IGNITION BALLAST

BULKHEAD CONNECTOR

LOW OIL PRESSURE SWITCH J3-14BR

S

-G6-18GY

TERM NAL BLOCK 0 R2-8BK

TO STARTER RELAY

G218V J3 14BR

G6 18GY

R1-8BK

R1-88K A1A-10R

C-14R* - FUSIBLE LINK

COLOR CODE BK BLACK BR BROWN DBL DARK BLUE DGN DARK GREEN GY GRAY RED V VIOLET WHITE YELLOW WITH TRACER PY257

-R6A-12BK— Al 12R

RED AMMETER

GROMMET

Fig. 7—Alternator Adaptation Wiring Diagram—(60 Ampere—Chrysler Built) STUD

HORNS

CUT-OFF AND TAPE AT BULKHEAD CONNECTOR

—0R7-8BK

0

H2A-16DGN/R* TEMPERATURE GAUGE SENDING UNIT

LJ V10 18BR 11 H2WIND3111CLD ,rY1,31-1CFS 16DGN/12MOTOR LEECE NEVILLE REGULATOR

11

reACl>“ 12g-K I ), Al 12R

?// ef y

G2-18V

R4-16BR R3-18DGN —

GRD

R2 8BK

n

ALTERNATOR

T.

FLD

V 018BR

R3 18DGN

BASIC WIRING (REFERENCE ONLY)

12-16DBL* H2-16DGN/R

IGNITION COIL J28-14DBL

R6AI2BK

LEGEND

R5-16DBL IGNIT ON BALLAST

LOW OIL PRESSURE SWITCH J3-14BR

S

-G6-18GY

TO STARTER RELAY -Nist1C-14R - - -

C)=I-

FUSIBLE LINK

TERM NAL BLOCK R2-8BK

GROMMET

SPLICE

BULKHEAD CONNECTOR

G2-_ 18V 13 14BR

G6 18GY R1 8BK A1A-10R

RED AMMETER

R6A-12BK-Al 12R- ---I

COLOR CODE BLACK BROWN DARK BLUE DARK GREEN GRAY RED VIOLET • WITH TRACER PY258

BK BR DBL DGN GY R V

Fig. 8—Alternator Adaptation Wiring Diagram—(65 Ampere—Leece-Neville)

--1,--


8-100 ELECTRICAL-WIRING DIAGRAMS Ir

RIGHT HOOD TURN SIGNAL

14A-16V "'=-18BK L9D-16BKRIGHT DUAL HEADLAMPS L3C 16R L3B 16R

(II

L9D-16BK L9C-16BK RIGHT PARK AND TURN SIGNAL LAMPC RIGHT MARKER LAMP C

D5A 18BK/T*

17-1 Icicr

i54--ISK IC; D5B-18BK/T* D68-18BK/LGN

I.6C-18BK/Y* L9E-18BK

LEFT PARK AND TURN SIGNAL LAMP

i

BULKHEAD DISCONNECT —D5-18BK/T*

-L6-18BK/Y* D618BK/LGN

---kl:)6A-18BK/LGN* L6-18BK "Y*

L6A-18BK 'Y* L6B-18BK Y*—

LEFT MARKER C LAMP

(

L3 16R

InITD-ED DASH LINE

LEFT HOOD TURN SIGNAL

L9B 18BK L3A-16R-

L9C-18BK L9-16BK L9F-16BK

toe HEADLAMP GROUND

- -L3 -16DBL/Y* L28 16BK/R*•-L9F-16BK L9C-16BK HEADLAMP DOOR MOTOR

LEGEND SPLICE -41--

L4-16V*

TO INSTRUMENT PANEL WIRING

L31-16DBUY* L28-16BK/R"

L3B 1OR L9 16BK L9A 16BK LEFT DUAL HEADLAMPS L3A-16R

BULKHEAD CONNECTOR

COLOR rODE BK BLACK DARK BLUE DBL LGN LIGHT GREEN RED TAN V VIOLET YELLOW WITH TRACER PY216

Fig. 9-Front End Lighting -Charger L3C 16R L4A-16V*

RIGHT FENDER TURN INDICATOR

I*I8BK

L9D 16BKR GHT DUAL HEADLAMPS L3C 16R L3B 16R

D5A-18BK /T* D5-18BK /T* L68 18BK/Y* L6C-18BK/ri

L9D-16BK L9C 16BK R GHT PARK AND TURN SIGNAL LAMP --/ RIGHT MARKER LAMP

c===1

CJt1II I

LEFT MARKER LAMP—.--------

LEFT PARK AND TURN 5 GNAL LAMPC .3B 16R 1 L3A-16R L9-16BK L9A 16BK LEFT DUAL HEADLAMPS L3A 16R L3-16R L4A-16V* L4-16V* 9A 16BK

({,;t

A

H aDI

P

D5A18BK/T*

BULKHEAD DISCONNECT BULKHEAD CONNECTOR

D5 18BK/T*

L6C-18BK/Y*— L9E-18BK

L6-1813K/Y* D6-18BKAGN*

L6A-18BK /Y*

icc97 L6B-18BK /Y*

L9B 18BK

D6A-18BK ILGN* D6-18BK /LGN 16 18BK /Y* L6A 18BK/Y*

L9C-16BK HEADLAMP 19-168K tr40 GROUND CD=1{1pro I LEFT FENDER TURN INDICATOR

13 16R L4-16V*

D6A)--188K/LGN=

198 18BK

Fig. 10 -Front End Lighting -Coronet

BK LGN R T V Y

COLOR CODE BLACK LIGHT GREEN RED TAN VIOLET YELLOW WITH TRACER PY222


WIRING DIAGRAMS-ELECTRICAL 8-101 LEFT FRONT DOOR MASTER SWITCH

4

DOWN UP

TO INSTRUMENT PANEL WIRING

RIGHT FRONT DOOR WINDOW LIFT MOTOR DOWN-412-14P*--WW22-14V*-u

RIGHT FRONT DOOR WINDOW LIFT SWITCH

r

1 GROUND TO SIDE COWL

0(

W1 12T 13 W22-14V W1 12T -W8-12BK W12-14P W14 14GY W13 140 W23-14R W24-14DGN

W22-14V cW1 12T-0 W8-12BK W12 14P

W2 12Y W2 12Y .

RIGHT REAR QUARTER WINDOW LIFT MOTOR DOWN-.-W14-14GY--w W24-14DGN-U UP-.-

W14-140Y W13 140-1W23 14R

LEFT FRONT DOOR WINDOW LIFT MOTOR -4-UP

rg_W21

14BR W11 14DBL *4-DOWN TO LEFT REAR QUARTER WINDOW LIFT MOTOR

RIGHT REAR QUARTER WINDOW LIFT MOTOR

W13-140W3 14Y W23-14R

LEFT REAR QUARTER WINDOW LIFT MOTOR

LEGEND SPLICE -4-

MALE FEMALE INSULATORS VIEWED FROM TERMINAL SIDE

-4-UP W23 14R* -1-DOWNW13-140*

g

COLOR CODE BLACK BROWN DARK BLUE DARK GREEN GRAY LIGHT BLUE LIGHT GREEN ORANGE PINK RED TAN V VIOLET WHITE YELLOW WITH TRACER NU111

BK BR DBL DGN GY LBL LGN 0

W24-14DGN

Fig. I 1 -Electric Window Lift Wiring Diagram -Coronet and Charger STOP LAMP AND SPEED BRAKE SWITCH

PUSH BUTTON ACTUATOR

en,

11-X30B-20DBL TURN SIGNAL AND SPEED CONTROL SWITCH LEVER

Li- X30A-20DBL-

-X30B-20DBL X32-20BK X33-20BK X31-18Y*

22DBL 22BK 22W* 22y

-..NDASH LINE X33 20BK* X31-18Y* X30A-20DBL

ii

nn

TO SPEED CONTROL UNIT (ENGINE COMPARTMENT Fig. 12-Speed Control Wiring Diagram

BK DBL Y

COLOR CODE BLACK DARK BLUE YELLOW WITH TRACER PY246


8-102 ELECTRICAL-WIRING DIAGRAMS RIGHT SPEAKER 18DGN /MA 18BK X58-18DGN*

IBBK

Q

CENTER SPEAKER

: 1‘ ...);50B-18BK X5 A 18BK

X59 18LGN

X50-18BK

X5 C 18BK X57 181GN*—

E2D 180 C6A 16LGN

CLOCK X2I IBGY

C5A•14DGN--C5B-14DGNC4-148R

5A I8P

GLOVE BOX LAMP

C7 14T

AIR CONDITIONER HEATER BLOWER MOTOR RESISTOR

C6A 16LGN05A 14DGN C7A 147 T13-18DBLE2E-113 0 — 711 18GY*— E213 18 0

GROMMET ENGINE COMPARTMENT Til 18GY*

M5 18P M2C I8Y

BULKHEAD...a* C7-147 C4-14BR C4A 166R Ci -14BK* C2 18DBL

C7A-14T

C2A 1130BL CIA 18LGN 2A 180BL C4A 16BR

C5B I4DGN C2 I8DBL

VACUUM SWITCH FEED —CO r-DHmAIN ASSEMBLY CI -14BK* RESISTANCE CABLE X6I -I 8V*

BULKHEAD DISCONNECT

X5IA-18v X5113-18V X5OB 18BK

X50E-I8BK X60C -18DGN X6OB 24BR X60A-18DGN X6013 24BR*

250C•18BK X51 18V X52-18DGN X60A I8DGN REAR SPEAKERS CONNECTOR

RIGHT SPEAKER — X58-18DGN*

X5IA-18V

LEFT SPEAKER

%SCE I8BK

'CHANNEL 13' X5OD 18BK

CHANNEL A CENTER SPEAKE X61 -18V*— X61A-18v*

RADIO WITH TAPE

E2E-I8 0 E2D-18 0 E2A -1 8 0—cc E26 IS0-0D

X60C-18DGNW9 18T--7 W9A-18T E2 18 0

X57-I81GN* X50-18BK X5I 18Y X52-18DON k59-113lGN

E2C-I8

E2A ISO TO MAIN HARNESS (SEE INSTRUMENT 0—$ PANEL WIRING DIAGRAM) W9 18T 02C 18BK

W9A 181 E2 ISO

TO MAIN HARNESS m2C-I8Y

m2A 18?

M2A-18Y

TO MAP LAMP AND DOOR SWITCH I > ISE INSTRUMENT PANEL WIRING DIAGRAM)

Oa M2.187 TO RIGHT REAR DOOR SWITCH

SPEED CONTROL BRAKE SWITCH

03 I2R

8DBL 8DBL

5A 18P MS I8P X2I IBGY X30A-DBL

X1A-18PE2 18 0

SPEED CONTROL SERVO

—02C-18BK CIA 18LGN T13 181:1131.

X3I 20Y* X33.20BK X31 20Y* X30A-20DBL PYI21

X33 20BK*

X32 18BK CIO 18LGN X6IA 18V* X31 20Y* X30 20DBL X33 20BK*


WIRING DIAGRAMS-ELECTRICAL 8-103 1E9 SPEAKER IBBK

-X50C-1813K

18DGN

X50C

-X57-18LGNT

3<57 IBLGN* M2D 18? TACHOMETER MAP LAMP SWITCH M2C 18Y

113 I8DBL -C6A-16IGN

M5 18P

TI] 180Y*

C5A 1400N -C7A -141 -T13.18DBL E2E 18 0

I

E2E 180

)

TI 1 -E2B-I8 M5 IBP M2C 18Y

MEDIUM

C6A 16LGN

BATTERY

CA 147

HIGH E2B 18 0

AR CONDITIONER AND HEATER VACUUM SWITCH 14aR I4BK I4T

I6LGN 14BK

C5A 14DGN

14DGN

LilD ASH RECEIVER LAMP

AIR CONDITIONER AND HEATER BLOWER SWITCH

AIR CONDITIONER AND HEATER LAMP AND SOCKET

I8DGN -C 2A -18D131. -C4A-I6BR

a

E2A-I8 0

- X30-180BL X31 113BK

l8Y 1BDBL 18BK I8DGN

X31 20Y CONTROL SWITCH

211/

C2A 18DBL C4A 168R * TIME DELAY RELAY

TOP IF SWITCH 13 12? TI -I2R* T2 I2BR

I BR

TI 12R* W2B 12R

CROSSOVER

-

TURN SIGNAL LEVER AND SPEED CONTROL LEVER

- X33.20BK•

ION DON E2A ISO

PA 12R

2A-121 28 12R 9-181

SAFETY RELAY

TO WINDOW I LIFT (BODY)

W2A 12T-I

HEADLAMP DELAY RELAY 02C-1811K-

03-12R TO MAIN HARNESS

L2-16LGN POCGO-L2-I6LGN -

AMMETER AND CIRCUIT BREAKER

W9-181

-02C-18EIK

rc

TO TOP LIFT (BODYI

IA 12R

M2A•187 -Q3-12R

M2A 18Y

20 AMPERE FUSE

T3 12? UP T2-12BR-DO

raltini TO MAIN HARNESS TO IGNITION SWITCH LAMP

TO REAR SPEAKER (BODY)

ECEI

X5113-18V X614-18V

LEFT REAR DOOR SWITCH

6-18Y*-

TIME DELAY RELAY

15.18Y

XIA 18P

TO BODY (CONSOLE) XIA 18P E2 18 0 X32 I88K -C10-18LGN X61A 18V* X31 20Y X30 18DBL X33 20BK

E2 18 0

I

I

—C10 1BLGN REAR WINDOW DEFOGGER SWITCH

C12-18W

Cl2 18W

11 188K

C11 IBBK

COLOR CODE BK BLACK BR BROWN DBL

DARK GREEN GRAY LIGHT BLUE

LGN 0

LIGHT GREEN ORANGE

TO REAR WINDOW DEFOGGER WIRING (BODY)

PINK RED IAN V

LEGEND

Fig. 13—instrument Panel Accessory Wiring Diagram—Coroner

DARK BLUE

DON GY LBL

VIOLET WHITE YELLOW WITH TRACER


8-104 ELECTRICAL-WIRING DIAGRAMS

IGNITION SWITCH LAMP GROUND cricM6B-18Y* M6A 18Y*

X12 18R* 61 law E2D ISO

1BR \di 54-18 0

RADIO

RIGHT TURN SIGNAL

Icif 181 2E- 0 EI8 W9A 18T

TEMPERATURE GAUGE

CIGAR LIGHTER 16.

XI 16p 013 'BR

WINDOW LIFT ir 5-12P*— W5C-12R SAFETY RELAY ix I W9 IfIT

M6A 18Y M6 I8Y*

V10-18 BR_I VIO 188R WINDSHIELDR6WIPER ESWITCH B VI I6p V5-18DGN-F-2 V6-18D8L-P V3 16BR* V4 18R F'

01313 18R

I6DGN I6LGN 16BR — 1413K -4 HEATER BLOWER MOTOR SWITCH

KEY HEADLIGHTS ON BUZZER 1213-18DBL*

VIOA-18W V OA I8W 0138 I8R 1.6A-18Y* Vv5 12R*175A-188K-

CI 14BK VI -lop 02 128K

HEATER BLOWER MOTOR RESISTOR

11M

G5 113DEIL* G2 18V G6 I8GY 09 113T010-18LGN03 14R* 111 I6V Li 168K* W5C-12R-

02A 148K DI ISEIK

11 I2R R A 12BK R6 12EIK

03 Idle HI 16V 11 16BK *

E2C 1S 0 820 ISO E28-I8 0

E2-18 0 82A-)S 0

2A 180 Q2A 148KAl I2R X12 18R* C1-141314*E2 18 0XI I6R 031 18BK

TO BLOWER MOTOR

M68 18Y* D4 I8W 07-188R

EMERGENCY FLASHER N032-18P 031 18BK 03 I8P*

Dd 18W 07 18BR -08-18DGN D2-18R 032-18P 05 181 06 181GN H3•18BK*

TURN SIGNAL FLASHER DI 18BK 02 I8R ASHRECEIVER AND AIR CONDITIONER LAMP FEED —)—E2C 1■3 0 1

J28 -18D81 G5 18081* 12A 160131*

12 16081*

DB-18DGNH3 188K* 2 I6DGN RtM2A-18Y 18P* 82 18W*

TO RIGHT DOOR SWITCH Cri m2C-IBY -1 8Y*

TO REAR DOOR SWITCH AND MAP LAMP E)cM2C-I8YM2A-18Y

BI I8W

-V3-I68R* —V4-18R -H -I60GN R V10 IBBR 2A 16OBL* R6 12BK L6A 18Y* 05 18T 091ST

82 18

V6 18D8L V5 18DGN G6 18GY Al 12R G2 I8V 13-148R 52 18Y INDICATOR LAMP' 06 18LGN 010 I8LGN 013 18R P5A 18BK L3 I6R L4 16v*

ACCESSORY STAR

2 18Y 02-128K IGNITION 12 16D131* IGNITION 2 13-1411 BATTERY L FEED111 -12R E2B-18 0 K EY BUZZERQI3-18R Q13A•18R KEY BUZZER 013A-18R L3 16R L4 I6V* 5•18R


WIRING DIAGRAMS-ELECTRICAL 8-105 ) INSTRUMENT LAMP INSTRUMENT LAMP

EIDINSTRUMENT LAMP 5 VOLT HIGH BEAM LAMP GROUND 12 VOLT rr

INSTRUMENT LAMP

HIGH BEAM LAMP L5-18R RIGHT TURN SIGNAL (FEED) D9-181 TEMPERATURE GAUGE (SEND) G2-18v

E2A-I8 0 INSTRUMENT LAMP -D10-18LGN LEFT TURN SIGNAL (FEED G4-I8DBL FUEL (SEND) P5-186K BRAKE WARNING(SENDI -

-VICE 18BR--

BRAKE WARNING LAMP

vic) 18BR R6A I2BK

-via-18BR vi0A I8W WINDSHIELD WASHER SWITCH ( RONT AND REAR) -VIDA-18w _Ol3B-18R - 16A-18Y* - W5-1 2R* BATTERY -P5A-18BK G.5-18DB1* _G2-18V _G6-18GY D9 18T _010-181.GN 03 14R* Hi I6V - LI -I6BK* - w5C I2R

ii

WINDSHIELD WASHER SWITCH (wiTHouT TAILGATE WASHER) TAILGATE WINDO SWITCH 12BR 12R I2Y

Jrl

15-I2Y DOWN 15 12BR UP

P5-186K P2 I88K

W5B I2R E2A 18 0 02A 14BK Al I2R - X12-18R * - C1-14BK - E2-18 0 xl I6R D3I 18BK

12BK 18Y I4BR t 6D8 1L 12R 180 I8R 18R

!ill

1213A-18R

...._ ___ ..... L .. .... rimar morm •—.....—........ ........m....-... ILIIIM=Iall •••••■•••■•••■ I

11111§I

MIN •■

_L3-16R

- L4.16V*

L/ -188K L7A-I8BK -R — LI -16BK*-1:1-1 HEADLIGHT SWITCH

INSTRUMENT LAMP IF

ACCESSORY 02A 14BK

SEE ACCESSORY f !RING DIAGRAM

'81 kk

L2A•16LGN

HEATER Ci -14BK* BACK UP LAMPS X12-18R* RADIO — EITERGENC* RASHER D3)14TIBIK STOP AND TAIL LAMPS 18-18P CIGAR LIGHTER AND BUZZER FEED XI I6R INSTRUMENT LAMPS E2-18 0 HI 16V

U-161G14

HORN RELAY

H3 18611* H2 16DGN R* M2B-18Y M2-18Y MI 18P

ESE"

TO DOME LAMP WIRING (BODY)

62 18w* G4 Mal L7 18BK D8 18DGN D7 18BR v1OC 18T

a

LEFT DOOR SWITCH m2B-18Y-ECI —M6B-18Y* -1==

TAIL GATE WINDOW WIRING (BODY) DOWEL W2S-128. UP W15-12Y BATTERY W5B I2R STARTER AND IGNITION SWITCH PARKING BRAKE SWITCH P2 IBBK

TO BODY WIRING

LEGEND SPLICE -RI-COLOR CODE BK BLACK BROWN BR DEL DON

DARK BLUE DARK GREEN

GY

GRAY

LBL LGN 0 P

LIGHT BLUE LIGHT GREEN ORANGE PINK

R T

RED TAN

V

VIOLET

Y *

YELLOW

WHITE

BATTERY L2-I6LGN L3 I6R HIGH L4 I6V * LOW

HEADLAMP DELAY RELAY

41.1 •

TURN SIGNAL SWITCH

- 013A-18R

CIRCUIT BREAKER

Al I2R L2A-16LGN -H IA 12.? 62

L6A-I8Y* 1.6 18Y* 013B-18R L6B-18Y* HEADLIGHT WARNING BUZZER 0I3C I BR DIODE L6 I8Y* L7A 18BK ANEL LAMP El 1ST D mMER M2-I8Y SWITCH % 2A 18Y

mammon.. ...m.ni mom. ■•• •••••■••iiiir•

_D8-1806N - H3-18BK* -H2-16DGN R* - M2A-18Y 03 I8P* - 82.I8W * STOP LAMP SWITCH mi ISP D3 I8P* D4 18W

mcm

R6A I2BK

In lopmm 8BR 8DON BR 8P 8T 8LGN 8BK*

AMMETER

VOLTAGE LIMITER, BRAKE AND OIL WARNING (FEED) G5-IBDBL*

MMMMM

_m6B-18'1* - D4-18W D7 18BR

FUEL GAUGE

W5A I2R

1.•11 11 —.... 1 ImIll ...n

••••••■•••

L_

LEFT TURN SIGNAL LAMP

OIL WARNING (SEND) G6-18GY

OIL WARNING LAgC

--

VOLTAGE UMITER

PRINTED CIRCUIT

L5-113R

WITH TRACER 58)20

Fig. 14—Instrument Panel Wiring Diagram—Coronet

1


8-106 ELECTRICAL-WIRING DIAGRAMS OIL GAUGE (SENNG6-I8GY G2-18V-TEMPERATURE GAUGE (SEND)-FUEL GAUGE (SEND)G4-18DBL 12 VOLT (FEED)GI 188K LIGHT (FEED)E2-18 0 BI 18W X12 I8R* E2E-180 E2F-18 0

18R 18 0

F

09-1ST-

RADIO AMMETER

RIGHT TURN SIGNAL LAMP AI -I2R

-I6DGN I LON 148 16BR

P4.18082 *-

6A -1 28K-

HEATER BLOWER MOTOR SWITCH •

V5 18DGN-F-2 V6-I8DBL-P V3 188R*-A V4 18R CIGAR LIGHTER

B---VI-16P WINDSHIELD WIPER SWITCH

VIOA-18BR WINDSHIELD WASHER SWITCH

XI-16R 013 I8R

RESISTANCE CABLE V7-24BR* NOT REQUIRED FOR 2 SPEED

V10-18BR

12A-16D8L*0 12B 18DBV 12 16DBL 102 18R* PS 18BK L5 I8R E2C-I8 0-

188K P5 -18BK-

P5A 188K

I6DGN MEDIUM

VOLTAGE LIMITER

16LGN 16BR

E2A ISO E2f -18 0./C E2 18 0E2B-I8 0E2D ISO E20-18 0 09 I8T

VI-16P 2-1213K 1 I8BK ...\-.62A 148K -DI -I BBK -

D10 I8LGN GI-186K-

*?,

P2 18BK13B I 8R R6A-128K 02A I4BK

HEA ER BLOWER MOTOR RESISTOR Cl -148K* 28 18DBL* 0136 18R M6A 18Y* M6-18Y*

E20-18 0126-126K M2A-I8Y L6A-18Y*TURN SIGNAL FLASHER

1 I2R G2-I8VG6-18GY

[DI-18BK D2-18R-

Cl 14BK* XI 16R

KEY-IN BUZZER

D32 18P Q13A IBR -H3-18BK* D6 18LGN DS IEIT 032 18P D2 18R 08 I8DGN D7 188R D4 I8W H3-188K -

M2A-I8Y M2C-18Yi M6 18Y*

MAP AND IGNITION LAMP CONNECTOR

TO RIGHT DOOR SWITCH

BULKHEAD

04 I8W

reAm

E2G 18 0

mes )8K*De-1800ND7 10BR

81-18W VS-IBDGNDBL * 16 -IG8p4 .V6D

TO ASH RECEIVER LAMP M6A-I8*M6B-I8Y *

H2 16DGN R*62.18W*-

H2

B2 18W"

IGNITION SWITCH LAMP GROUND V3 I8BR* V4-I8R VIO 18BR -12A-1613131. 86 128K L6A 18Y* D5 -18T D9 181 PSA 18BK

KEY BUZZER KEY BUZZER

MOM

013A-I8R 013 I8R

INDICATOR LAMP-E2E-I8 0

G6 I8GY Al 128 G -18V 13 14812 MMINOMO 5 I8Y D6 18LGN Eral tra ll DIO 18LGN 1,5 ISR arcnia miLECITAIljam

IGNITION 2 IGNITION 1 ACCESSORY STARTER

11.12R 13.146R 12-16DBL* 02 12BK 52.18Y

° 11P 41 L3 168 PYII8

L4 I6V*

L3 168 L4 I6V*


WIRING DIAGRAMS-ELECTRICAL 8-107 - G6-1801'40M GAUGE (SEND/ -G2-18V -G4-I8DBL FUEL GAUGE(SEND) -GI -18BK -12 VOLT (FEED) - E2-I 8 0-LIGHT (FEED)-

iTEmPERATURE f GAUGE (SEND)

E2C 18 0 INSTRUMENT LAMP-E2A-18 HIGH BEAM LAMP

L5 I8R

INSTRUMENT LAMP

D10-18LGNA

D9 I8T LEFT TURN SIGNAL LAMP

X 1-18GY

INSTRUMENT E2B 18 0-C LAMP

TO BRAKE p WARNING LAMP

P5-188K Ed 18DBL*

-P4-18DBL P -

TO HEADLIGHTS L2A 16LGE1 DELAY RELAY InlICL2 161GN rfl L2Al6LGNH L8-18P X2I 18GY L7 18BK: 2 L7A-18BK —R HEADLIGHT SWITCH

M2 18Y m2A 18?

PANE D1MM R SWITCH

ti

El 18T L7A 18BK 16A 18Y*

L I -168K13 *1

X12 18R* PS 18BK L5 18R E2C 180

L6 18TP____I L6A 18Y* L6B 18Y*

01313 I8R 013A I8R

T

E24 ISO E2 ISO E2B 180

DIODE 013C I8R

JI 12R-Dco 168 K P R 03-14R* I 2B 1 R6 128K Hi-by -

- D9-18T -D10-18(GN -G14 8BK - P2-186K -013B-18R - RA/4-128K - 02A 4BK

INSTRUMENT FEED

El 18T 03 14R

BATTERY FEED 2A 148K ACCESSORY FEED

E2D 18 0 -86-12BK m2A BY L6A-18Y*

FUSE BLOCK EMERGENCY r.J FLASHER

II I2R -G2-18V -G6-18GY

D32-18P D31 18BK

SEE ACCESSORY WIRING DIAGRAM 1

Cl I4BK* X1-16R D32 I8P 013A I8R 188K 18LGN 18T I8P I8R 18DGN 18BR I8W H3 18114*

p

- D4-18W

RADI 1(12 I8R* HEATER Cl 141310 D31-188K DOME, STOP AND EMERGENCY FLASHER L8 18P TAIL LAMPS XI 16R CIGAR LIGHTER INSTRUMENT LAMPS F2D-18 0 TO PARK MG P2 18BK 1,0 BRAKE SWITCH

--.... TURN SIGNAL SWITCH

H2 I6DGN R HI I6V H3 I8BK*

EIIU

03 I8PP MI-18P

G4-18DBL L7 18BK D8-18DGN D7 I8BR B2 I8W*

- H2-16OGN R 62 18WP

TO BODY

COLOR CODE TO DOME LAMP WIRING (BODY)

M68 18Y

STARTER AND IGNITION SWITCH

BK BR DBL DGN

M2B I8Y M2 18Y MI I8P

GY

MTh-18Y

LBL LGN

(1 TO LEFT DOOR SWITCH

0

V

- L4 16VT

BROWN DARK BLUE DARK GREEN GRAY LIGHT BLUE LIGHT GREEN ORANGE RED TAN

PRINTED CIRCUIT

IL3 16R

BLACK

PINK FOOT DIMMER SWITCH

-L3 16R

HORN RELAY

STOP LAMP SWITCH

- M613•18Y* - D8-18DGN D7-186R

188 180 I 25 14 BR I6DBL 126K 18Y

t5

LEGEND

L4 IALGN 16VP

Fig. 15—Instrument Panel Wiring Diagram—Charger

SPLICE

VIOLET WHITE YELLOW WITH TRACER


8-108 ELECTRICAL-WIRING DIAGRAMS

BI 18W X12-18R* —E2E-I8 0 E2F-18 0

r R e18 18 0

RADIO

G6-18GY OIL GAUGE (SEND) _ G2-18V TEMPERATURE GAUGE (SEND)— G4 I808L FUEL GAUGE (SENNG1 188K 12 VOLT (PEENE2-I8 0 LIGHT (fEED)— \\___/INSTRUMENT LAMP

INSTRUMENT \ LAMP

D9-I8T —

a INSTRUMENT LAMP

AMMETER TEMPERATURE OIL GAUGE IGAUGE

FUEL GAUGE

Al-12R [I6DGN I6LGN 14BK I6BR

CIGAR LIGHTER

RIGHT TURN SIGNAL LAMP

\ GROUND

ROA-128K--

HEATER BLOWER MOTOR SWITCH

V—COD

V5 I8DGN F 2 V6-I8DBL P V3 I88R* A V4-I8R F-1 WINDSHIELD WIPER SWITCH

12 VOLT VOLTAGE LIMIT R RESISTANCE CABLE V7-24BR* NO REQUIRED FO 2 SPEED

VIOA-IBB

WINDSHIELD WASHER SWITCH

XI -IOR 013 I8R

P4-I8DBL*---

12 12DBL*— X12-18R* P5-18I3KL5-18R E2C 18 0

12C-18DBL*

V10-I SBR

P2 188K P5-1813K

P5A 18I3K

P4-18D111.* 12B-16DBL*)II— 12A-12D8L* —

600N—MEDIUM — 1610N— HIGH I6BR LOW

E2A-18 0— E2 180 E28 18O_

E2F 18 0 E2D-I8 0 E2G 18 0

D9 I8T VI -16P 02 128K G1-188K 02A 14BK — DI -I8BK

D10-18LGNGI I 8BK

SE

P2 ISBK 0138 I8R R6A 12BK 02A-148K -

HEAT R BLOWER MOTOR RESISTOR Cl- K 12C 18DBL* .--013B-18R 18Y* M6-I8Y*

E2D 18 0 R6 12BK M2A 18Y L6A-I8Y*

Lt==j_M6A •

TURN SIGNAL FLASHER

11 I2R G2 18V G6 I8GY

DI -18BK D2-18BR-

CI I4BK* XI I OR

KEY-IN BUZZER M2A 18? M2C-18Y-1

D32 18P 013A-18R_ H318BK* D6 18LGN 05 I8T I• 032-18P D2.18R D8-18OGN D7-188R 0418W H3-188K*--

MO 18?

M2C-18Y BULKHEAD MAP AND IGNITION LAMP CONNECTOR

TO RIGHT DOOR SWITCH

04 I8W — E2G 18 0 81 ISW VS 18DGN V6 18DBL H2 16DGN R 62-18W *

ASH RECEIVER LAMP M6A-18* — MOB -18Y

IGNITION SWITCH LAMP GROUND

— V3 18BR V4-18R VIO I8BR — 128 -I6DBL R 12BK LOA 18Y* D5 I 8T D9 I ST P5A 18BK

M6B-ISY* 08-18DGN — 07 I8BR

G6-18GY Al -12R— G -I8VI4BR S 18? 1 D6 I8LGN E1/21 eKtr Err DID-IS LGN L.5 18R

"'IEM Mir inial1121111i. mm argi MIIMOMM

H2 I6DGN R *— 82 I8W*—

KEY BUZZER 013A-18R KEY BUZZER 013-18R INDICATOR LAMP 82E-18 0 BATTERY (FEED)11-12R IGNITION 2 13-14BR IGNITION I — 12-I2DBL* ACCESSORY 02-128K STARTERS? 18? TO CONCEALED HEADLIGHT WIRING (ENGINE COMPARTMENT) L28.16BK R*_ L31 16DBL Y*—

Eli-

L3 I R L4 16V* PY119

L3 I6RL4-16V*.—


- G6.18GY OIL GAUGE (SEND) - G2-181/ - G4.18DBL FUEL GAUGMEND - 01-188K 12 VOLT WEED/ - E2-18 0 LIGHT (PEED) 091ST

-

P4-I8DBL*

TEMPERATURE GAUGE (SEND/

II

INSTRUMENT LAMP E2C 18 0 INSTRUMENT LAMP E2A 18 0 --CD HIGH BEAM LAMP L.5 I8R

WIRING DIAGRAMS-ELECTRICAL 8-109

1310 I SIGN CLOCK X21-18GY

LEFT TURN SIGNAL LAMP

E28-18 0—CD INSTRU ENT LA

TO BRAKE P5.188K 0 WARNING LAMP Pd 18E181. TO HEADLIGHTS DELAY RELAY \inDricl.2A-16LGN L28-16LGN L2 16LGN H L8 18PB 2 X2I 18GY L7-18BK R HEADLIGHT • L7A 188K R SWITCH

111-I'll' M2 18Y M2A-I BY

- 12A-12D8L*

PANEL DIMMER

-12-12DBL* - x12 I8R* - P5 18BK -L5-18R - E2C-18 0 - E2A.18 0 - E2-I8 0 E28 18 0 -

CONCEALED HEADLIGHTS RELAY L31.16DBL Y* L2 16LGN L28-168K R' L2.4.16LGN J2A 12DBL* 12 12DBL*

El 181 L7A I 8BK 6 18Y*

BK*

II

SWITCH

I.

0138 I8R 013A-IBR

La 18Y_____J L6A I8Y* LAB I8Y*

.111

DIODE 013C-18R

III

D9.1 8T

11-12R R6A-12BK R6 12BK

L1-168K* 03-1411* H1-16V

MIA

"

D10-18LGN -G1 18BK -

P2-18EIK 0138 18R -R6A I2BK -02A-1413K

E2D 180 R6 12BK - M2A 18? - LEA-18Y* 11 I2R -G7-18V - G6-18GY -

C1-14BK* XI I6R

-

D32-18P 013A I8R IBBK 18LGN 18T I8P 18R I8DGN ( 188R 18W H3-I8BK* _D4-18W

_M6B-I8Y* - D8.18DGN - D7-188R _H2-16DGN R * 82 law*

t12DBL

18R 1811 18 0 I2R 148R

"1

1";

EMERGENCY F LASHER

II

FUSE BLOCK

D:3312,111888/Kia

,r-

SEE ACCESSORY WIRING DIAGRAM

101

1

TURN SIGNAL SWITCH

INSTRUMENT FEED El 181 BATTERY FEED 03 14R* ACCESSORY 02A-I4BK FEED

10111

DO

11_,II

RADIO X12 18R* HEATER CI-148K* E STOP AND EMERGENCY FLASHER D31-I8BK TAIL LAMPS L8-I8P CIGAR LIGHTER XI-16R INSTRUMENT LAMPS E2D 180 P2 18BK -OD

_It H2 16DGN R * 111-16V H3 1860--..4 HORN RELAY

STOP LAMP SWITCH D3.18P* MI I8P

TO BODY WIRING G4-I8DBL L7 188K D8-18DGN D7 18BR 82 I8W*

1

aI

m688y.

ra

M28-I8Y

TO DOME LAMP WIRING (BODY) M2B 18Y M2 18Y MI-18P

I28K 18Y

COLOR CODE BK

0 ORANGE PINK RED TAN

FOOT DIMMER SWITCH

-

L4-16V*

BLACK

BR BROWN DBL DARK BLUE DGI9 DAR% GREEN GY GRAY LBL LIGHT BLUE LGN LIGHT GREEN

DOOR SWITCH TO 1 FT

_L28.16BK R -L31-16DBL Y L3 -16R

TO PARKING SWITCH BRAKE

PRINTED CIRCUIT [L3 I6R L28-16LGN Ld I6V*

LEGEND

—IR-- SPLICE

V

VIOLET WHITE YELLOW WITH TRACER

Pig. 16—Instrument Panel Wiring Diagram—(With Concealed Headiamps)—Charger


8-110 ELECTRICAL-WIRING ADAPTATIONS HIGH

C11-18BK

C11 18BK

do 18LGN

C12 18W

C12 18W

LOW

TO BODY WIR MG (REAR WINDOW DEFOGGER) COLOR CODE BK BLACK ION LIGHT GREEN W WHITE PY247

# TO FUSE BLOCK ACCESSORY FEED (SEE "ACCESSORY WIRING DIAGRAM")

PY 247

Fig. 17—Rear Window Defogger Wiring Diagram

WIRING ADAPTATIONS INDEX Page Clock, Reverse Gear Lamp, Emergency Flasher Wiring—Coronet-Charger Instrument Panel Main Harness Hook-up— Coronet-Charger Instrument Panel to Body Wiring Hook-up—

110 111

Coronet-Charger Steering Column Cross Section Tail Gate Window Lift Switch With and Without Washer—Rear Door Switch and Headlamp Delay Relay Wiring—Coronet

Page 112 114 113

TOP LIFT SWITCH

FUSE BLOCK TO CLOCK WIRING

y CLOCK

TOP LIFT WIRING ASSEMBLY

CIRCUIT BREAKER GLOVE BOX

FUSE BLOCK

TO DOME LAMP STOP LAMP AND EMERGENCY FLASHER TERMINAL

REVERSE GEAR INDICATOR LAMP LEFT SPOTLIGHT SWITCH BK

V CAVITY "Z"

BR TO BODY WIRING

REVERSE GEAR INDICATOR LAMP WIRING (4 SPEED MANUAL TRANSMISSION)

Fig. 1—Clock, Reverse Gear Lamp, Emergency Flasher Wiring—Coronet-Charger

BR GY 0 R Y

BROWN GRAY ORANGE RED YELLOW WITH TRACER PY545


WINDSHIELD SWITCH WIRING

WINDSHIELD WIPER TO WASHER SWITCH FEED

COLOR CODE BK BLACK BR BROWN DBL DARK BLUE DGN DARK GREEN GY GRAY LGN LIGHT GREEN 0 ORANGE P PINK R RED RIGHT TURN SIGNAL T TAN LAMP WIRING V VIOLET WHITE YELLOW Y INSTRUMENT WITH TRACER LAMP LEFT TURN SIGNAL LAMP \ZZI. tt.",

WINDSHIELD WIPER SWITCH AMMETER WIRING

TO HEATER BLOWER SWITCH

INSULATOR

PART OF RADIO ASSEMBLY ,

BK R*

NUT LOCKWASHER

BK Y*

, PRINTED CIRCUIT CONNECTOR

FUSE BLOCK

DBL* LGN VIEW Z CHARGER ONLY

LGN

CIGAR LIGHTER WIRING

HEADLAMP SWITCH WIRING

KEY-IN BUZZER TURN SIGNAL,' FLASHER WIRING

a.

IGNITION AND BK R* STARTER WIRING TO CONCEALED HEADLAMP WIRING

HIGH BEAM/ CLOCK DBL Y*

BULKHEAD DISCONNECT

TO LEFT DOOR SWITCH

TO STOP LAMP SWITCH TO FOOT DIMMER SWITCH

DGN BK

GY

DBL

INSTRUMENT LAMP BK V Y* DGN R* TO BRAKE LAMP SWITCH -

LGN V

BR

LGN

TO DOME LAMP WIRING

BR* PRINTED CIRCUIT CONNECTOR

HORN RELAY

TO HEADLAMP DELAY RELAY WIRING

TO BODY WIRING

BR*

CONCEALED HEADLAMP RELAY CHARGER ONLY)

0

LAMP TO TURN SIGNAL SWITCH

DUAL BRAKE SYSTEM WARNING LAMP

TO WINDSHIELD WIPER SWITCH

R p

BK

DBL BR LGN

W R

T VIEW V

BK*

lc."2*R BK

0 R VIEW 11

Fig. 2 — Instrument Panel Main Harness Hook - up— Coronet-Charger

P

WIRINGADAPTATIONS-ELECTRICAL

PRINTED CIRCUIT CONNECTOR

PANEL DIMMER LAMP WIRING

BK-P* VIEW T

PY544 CP


DOME LAMP WIRING

STOPLIGHT SWITCH WIRING

WITHOUT SPEED CONTROL TACHOMETER WIRING WITH SPEED CONTROL

SPEED ; CONTROL \ WIRING

HEATER BLOWER MOTOR RESISTOR

AUTOMATIC DOOR SWITCH

HORN GROUND LOCK NUT TO STEERING COLUMN WIRING

PARKING BRAKE WARNING LAMP SWITCH

HEADLAMP FOOT DIMMER SWITCH

HEATER BLOWER MOTOR SWITCH WIRING HEATER AND DEFROSTER

CONCEALED HEADLAMP WIRING

SPEED CONTROL WIRING

AUTOMATIC DOOR SWITCH

AIR CONDITIONER AND HEATER

BULKHEAD DISCONNECT AIR CONDITIONER AND HEATER WIRING

VIEW IN DIRECTION OF ARROW Y STEERING COLUMN (REFERENCE)

AIR CONDITIONER AND HEATER WIRING

IGNITION LAMP WIRING

SPOT COOLER TUBE LEFT CONNECTOR SPEED CONTROL WIRING

VIEW IN DIRECTION OF ARROW Z TIME DELAY RELAY SWITCH (AIR CONDITIONER)

TURN SIGNAL WIRING STARTER AND IGNITION SWITCH

Fig. 3 — Instrument Panel to Body Wiring Hook-up, Coronet-Charger

PY542

ELECTRICAL-WIRING ADAPTATIONS

STEERING COLUMN CLAMP BRACE


BK BR LGN 0 R T W Y

TAIL GATE WINDOW LIFT SWITCH

COLOR CODE BLACK BROWN LIGHT GREEN ORANGE RED TAN WHITE YELLOW WITH TRACER

BR

WINDSHIELD WIPER SWITCH TO RIGHT REAR DOOR SWITCH WIRING

WASHER SWITCH

1

TAILGATE WINDOW LIFT SWITCH REAR DOOR SWITCH WIRING

CIRCUIT BREAKER -

REAR DOOR SWITCH WIRING

TRUNK LAMP FEED CABLE -....,

jet

IC.

V---BUSS TO BAR TERMINAL

/

CIRCUIT BREAKER

TO ACCESSORY TERMINAL

TRUNK LAMP FEED CABLE HEADLAMP DELAY RELAY WIRING

TAILGATE WINUOw LIFT SWITCH WIRING (WITHOUT WASHER) y R TO TAILGATE BR WINDOW LIFT WIRING

HEADLAMP DELAY RELAY WIRING

g

LEFT REAR DOOR SWITCH WIRING TO TAILGATE WINDOW LIFT WIRING

SAFETY RELAY

TO RELAY LGN R TO TRUNK LAMP WIRING

Fig. 4 —Tail Gate Window Lift Switch with and Without Washer, Rear Door Switch and Headlamp Delay Relay Wiring— Coronet

PY547

WIRINGADAPTATIONS-ELECT RICAL

BR

FUSE BLOCK

SAFETY RELAY

TAILGATE WINDOW LIFT SWITCH WIRING (WITH WASHER)

RADIO

tr

7.3


SPEED CONTROL AND TURN SIGNAL LEVER

IGNITION KEY LAMP

IGNITION AND STARTER SWITCH

KEY-IN BUZZER SWITCH

TO HORN SWITCH

TO STARTER AND IGNITION SWITCH WIRING

TURN SIGNAL SWITCH

HAZARD WARNING SWITCH

TO SPEED CONTROL WIRING

TURN SIGNAL SWITCH WIRING

GEAR SELECTOR INDICATOR LAMP TO IGNITION KEY LAMP ASSEMBLY

Fig. 5—Steering Column Cross Section—Coronet—Charger

KEY-IN BUZZER PY538

ELECTRICAL-WIRING ADAPTATIONS

COLUMN GEAR SELECTOR INDICATOR LAMP


GROUP 9A

CLEANER AIR SYSTEM CLEANER AIR SYSTEM HEATED AIR SYSTEM CARBURETORS AND CHOKE IDLE SPEED SOLENOID

CONTENTS Page LOWER COMPRESSION RATIOS 1 DISTRIBUTOR SOLENOID 1 EVAPORATOR CONTROL SYSTEM 4 5

CLEANER AIR SYSTEM (CAS) The Federal government has imposed more stringent exhaust emissions requirements on all U.S. and most imported cars. These new standards require that exhaust emissions from all cars not exceed 2.2 grams of hydrocarbons and 23 grams of carbon monoxide per vehicle mile as measured during a prescribed test. This constitutes about a 33% decrease in exhaust emission levels. The new grams per mile standards take into consideration that total emission levels are a function of vehicle weight. Several changes have been made to our engines to meet these new standards and maintain or improve vehicle driveability (Fig. 1).

HEATED AIR SYSTEM All engines except the 426 Hemi and 440 CID 3-2V

Page 5 5 5

or engines equipped with the fresh air scoop option have a heated air intake system. This system provides a faster more efficient engine warm up with improved fuel economy and reduced exhaust emissions (Fig. 2). The HEATED AIR SYSTEM is basically a two air flow circuit system. (1) When the under hood air temperature is 10° F or lower, the air flow will be through the stove, into a flexible connector, into the adaptor on the bottom of the snorkel and into the air cleaner. (2) When the under hood air temperature is above 100° F, the air flow will be through the snorkel into the air cleaner. When the under hood air temperature is between approximately 10° F and 100° F, there will be air flow through both circuits after the engine has been started and the exhaust manifold starts to give off heat. The colder the under hood air the greater the

IMPROVED MANIFOLD HEAT VALVE DISTRIBUTOR • REDUCED TOLERANCES • SOLENOID RETARD

CARBURETOR • IMPROVED DISTRIBUTION • LEANER MIXTURES *FASTER ACHNG CHOKE • EXTERNAL IDLE MIXTURE LIMITER • SOLENOID THROTTLE STOP

CRANKCASE VENTILATOR VALVE

HEATED INTAKE AIR REDUCED COMPRESSON RATIOS

INTAKE MANIFOLD

PY943

Fig. 1 -1970 Cleaner Air System


9A-2 CLEANER AIR SYSTEM THERMOSTAT

VACUUM DIAPHRAGM

AIR CONTROL VALVE

COLD AIR ENTERS

AIR HEATED BY MANIFOLD

HEATED AIR ENTERS CARBURETOR

PY944

Fig. 2— Heated Inlet Air System

flow of air through the stove, and the warmer the air the greater the flow through the snorkel. The quantity of air through each circuit is controlled by a heat control door in the snorkel so as to maintain a temperature of 95° to 105° F at the temperature sensor mounted inside the air cleaner housing. The modulation of the induction air temperature is performed by intake manifold vacuum, a temperature sensor and a vacuum diaphragm which operates the heat control door in the snorkel A vacuum hose connects to a hose nipple on the base of the carburetor and leads to one side (either side) of the sensor and another hose connected to the opposite side of the sensor and leads to the vacuum diaphragm on the snorkel.

The sensor is simply a bimetalic strip attached rigidly at one end and controls a small air valve at the other end. This valve is connected into the same vacuum chamber on the bottom of the sensor that the 2 hoses connect into. When the temperature at the sensor is less than 95° F the valve is closed and the intake manifold vacuum is communicated to the vacuum diaphragm which in turn lifts the heat control door and allows heated air from the exhaust manifold stove to enter the air cleaner. When the temperature at the sensor is above 105° F, the valve in the sensor opens and decreases the vacuum at the vacuum diaphragm and the spring in the diaphragm housing pushes the heat control downward decreasing the heated air flow from the stove and increases the air flow through the snorkel. The vacuum diaphragm is simply a bellows type diaphragm mounted in a housing with a spring between the diaphragm and the top of the housing and a hose nipple in the side of the housing to connect to the vacuum hose from the sensor. Permanently connected to the piston of the vacuum diaphragm is a link which hooks into the heat control door. Since the diaphragm is opposed by a spring, it requires not less than 5" Hg to lift the heat control door off the floor of the snorkel and not greater than 9" Hg to raise the door to the top of the snorkel. With the vacuum diaphragm opposed by a spring it is obvious that temperature modulation will occur only at road load throttle positions or when the intake manifold vacuum is above the operating vacuum of the vacuum diaphragm. But should a burst of power be required, and the throttle is opened wide, the intake manifold vacuum drops and the heat control door drops to the floor of the snorkel closing off the hot air and opens the snorkel to eliminate any undue resistance to free breathing of the engine.

SERVICE PROCEDURES HEATED AIR SYSTEM Improper functioning of this system will affect driveability as well as affecting the vehicle exhaust emission control system and may result in failure of the vehicle to meet Federal Emission regulations. To determine whether the system is functioning properly, the following procedure should be used: (1) Make sure all vacuum hoses (Figs. 3 and 4), and the stove to air cleaner flexible connector are properly attached and are in good condition. (2) With a cold engine and ambient temperature in the engine compartment of less than 100 degrees F., the heat control door (valve plate) in the snorkel should be in the up position or heat on position.

(3) With the engine warmed up and running, check the air temperature entering the snorkel or at the sensor. When the air temperature entering the outer end of snorkel is 105 degrees F. or higher the door should be in the down position (heat off). (4) Remove the air cleaner from the engine and allow it to cool down to 90 to 95 degrees F. With 20" Hg vacuum applied to the sensor the door should be in the up position (heat on position). Should the door not rise to the heat on position, check the vacuum diaphragm for proper operation. (5) Check the vacuum diaphragm by applying vacuum directly to the vacuum diaphragm (with Tool C3707 and vacuum pump C-4081) with a vacuum gauge in the line and a bleed valve to control the vacuum in-


CLEANER AIR SYSTEM 9A-3 VACUUM PUMP

VACUUM lEST SET C-3707

VACUUM DIAPHRAGM

BLEED VALVE

PY947

Fig. 5—Inspecting Vacuum Diaphragm TO CARBURETOR VACUUM FITTING PY945 Fig. 3 — Routing

of Vacuum Hoses Single Snorkel Air Cleaner

serted in the line between the gauge and the vacuum source. Apply 20 inches Hg to the vacuum diaphragm and stop off the line and check for diaphragm leaks (Fig. 5). The diaphragm should hold 20" Hg for five minutes. Next release the vacuum on the vacuum diaphragm. Then with the use of the bleed valve build the vacuum slowly and observe the door operation. The door should lift off the bottom of the snorkel at not less than 5 inches Hg and be in the full up position with no more than 9 inches 11g. (6) Should the vacuum diaphragm not perform adequately, replace it and repeat the checks in steps 2 and 3. (7) Should the vacuum diaphragm perform ade-

quately but proper temperature is not maintained, replace the sensor and repeat the temperature checks in steps 2 and 3.

DUAL SNORKEL The dual snorkel air cleaner performs at low temperatures and above 105 degrees F. basically like a single snorkel air cleaner with one exception: (1) On deep throttle accelerations, both snorkels are open (when intake manifold vacuum drops below the 5 inches Hg). (2) The non-heat air snorkel is connected to manifold vacuum through a "TEE" in the vacuum hose between the carburetor and the sensor (Fig. 4). Check second snorkel vacuum diaphragm as one with heat connector.

VACUUM DIAPHRAGM With air cleaner housing removed from vehicle. (1) Bend down lock tab (Fig. 6) and carefully lift forward edge to clear lock tab, then slide forward to disengage rear lock tab, then slide to right to unhook operating rod from heat control door (Fig. 7). (2) Wilh the vacuum diaphragm removed, check the door for freedom of travel. When the door is raised to the up position, it should fall freely when released. VACUUM HOSE NIPPIE

VACUUM DIAPHRAGM

FRONT LOCK TAB

OPERATING ROD

TO CARBURETOR VACUUM FITTING Fig.

PY9-16 PY948

4—Routing of Vacuum Hoses Dual Snorkel Air Cleaner

Fig. 6 — Opening

Front Lock Tab


9A-4 CLEANER AIR SYSTEM VACUUM DTAPHRAG,M

RETAINER CLIPS REAR LOCK TAB

OPERATING ROD

PY949

or installing Vacuum Diaphragm If it does not, observe door to snorkel side walls for interference of foreign matter. Also check hinge pin for foreign matter. Try to release by blowing with compressed air or by releasing the interference. Fig. 7—Ramoving

Installation (1) Insert operating rod into heat control door, then slide rearward engaging the rear lock tab, when front lock is in position press forward edge down. (2) While holding vacuum diaphragm down, apply 9 inches of vacuum to diaphragm hose nipple, door should operate freely. If door operates freely, bend lock tab forward. While supporting snorkel and the lock tab with a piece of flat steel held securely under lock tab, flatten flush with snorkel. Manually operating heater door could cock rod and diaphragm which would restrict operation of the heater door.

(3) Assemble air cleaner. install on vehicle and test operation.

PY950

Fig. 8—Removing Retainer Clips

Exhaust System, Group 11, for service procedures on Air Heaters. CARBURETORS AND CHOKES

All carburetors have leaner mixtures and mixture distribution has been improved on all engines. All two and four barrel carburetors will have dual idle mixture screws with an external adjustment limiting device for better control of idle mixtures. Other carburetor changes include: idle fuel discharged into a bypass air slot for better atomization (383 CID 2V). Used in conjunction with heated intake air is a new fast acting automatic choke control. This unit reacts quickly to hot exhaust gases to provide a shortened period of mixture enrichment, and hence improved fuel economy and reduced emissions. This is achieved by using a removable, thin stamped, stainless-steel cup between the thermostatic choke control unit and the exhaust passage gases in place of the thicker cast-

SENSOR Removal With air cleaner housing removed from vehicle. (I) Disconnect vacuum hoses from sensor, remove retainer clips (Fig. 8), and discard (new clips are sup. plied with a new sensor). (2) Remove sensor with gasket and discard. Installation (1) l'osltiOn gasket on air cleaner housing and install sensor (Fig. 9). (2) Supporting sensor on outer diameter, install new retainer clips securely being sure gasket is compressed to form an air seal. Supporting sensor on plastic guard could damage bl-metal strip. No attempt should be made to adjust sensor. (3) Install vacuum hoses (Figs. 3 and 4). (41 Install air cleaner and test operation. Refer to

Fig. 9—installing Gasket and Sensor


CLEANER AIR SYSTEM 9A-5 in manifold pocket used previously. A gasket is installed between the steel cup and manifold to ensure that no exhaust leak occurs. Also a part of the heated air system is a heat insulating spacer between the intake manifold and carburetor. This is used in place of a gasket and is essential for correct operation.

Hemi and 440 CID 3-2V) have new pistons to reduce compressions by about 0.5. The lower compression ratio reduce hydrocarbon emissions by producing a better combustion chamber shape and by leaving more heat in the exhaust to assist the after combustion reaction.

IDLE SPEED SOLENOID

DISTRIBUTOR SOLENOID

The high performance engines (440, 440 3-2V and 426 Hemi) employ idle speeds between 800 and 1000 rpm to obtain acceptable lower emissions during idle and deceleration. In order to prevent "after running" with such high idle speeds, these engines have an electrical solenoid throttle stop which holds the throttle at the correct idle position when energized but de-energizes when the ignition is turned off, allowing the throttle blades to close more completely. Refer to "Fuel System" Group 14 for service procedures.

LOWER COMPRESSION RATIOS The 318, 383 and 440 CID engines (except the 426

All 383 and 440 engines (except the 440 3-2V) have a solenoid incorporated in the distributor vacuum advance mechanism to retard the ignition timing when the throttle is closed. At closed throttle, electrical contacts on the carburetor throttle stop and with idle adjusting screw in the closed position, causes the distributor solenoid to energize. This retards the ignition timing to provide reduced exhaust emissions under hot idle conditions. Cold or part throttle starting is not penalized because the distributor solenoid is not energized unless the hot idle adjusting screw is against the throttle stop contact. Timing must be set at closed throttle to give ignition full retard.

SERVICE PROCEDURES IGNITION TIMING (383 Cu. In. 440 Cu. In.) (Solenoid Distributor) To obtain maximum engine performance, the distributor must be correctly positioned on the engine to give proper ignition timing. The ignition timing test will indicate the timing of the spark at No. 1 cylinder at curb idle (Hot only). Test procedure are as follows: (1) Dim:wined, vacuum Huse at tllstrlbutur, anti plug

hose. (2) Connect the secondary lead of a power timing light to No. 1 spark plug, red primary lead to positive terminal of the battery and the black primary lead to the negative battery terminal. Do not puncture cables, boots or nipples with test probes. Always use proper adapters. Puncturing the spark plug cables with a probe will damage the cables. The probe can separate the conductor and cause high resistance. In addition breaking the rubber insulation may permit secondary current to arc to ground. (3) Loosen the distributor hold-down mounting screw just enough so distributor housing can be rotated in its mounting. (4) Start the engine and set the curb idle as shown in "Specifications." (Transmission in Neutral and Engine Hot). (5) Air the power timing light at the timing marks on the chain case cover. If the timing light flash occurs when the timing mark on the vibration damper is located ahead of specified degree mark on the timing

plate. The timing is advanced. To adjust turn distributor housing (Not Vacuum Chamber) Counter clockwise. Do not use vacuum chamber as a turning handle. If the timing light flash occurs when the timing mark on the vibration damper is located past the specified degree mark on the timing plate. The timing is retarded. To adjust turn distributor housing clockwise. Timing may vary from the specified specification a plus or minus z-ii z ana sun ran within range, out it tne timing is checked it should be adjusted to the specification shown on the distributor charts. (6) To check the distributor solenoid for proper operation, disconnect the wire at the carburetor. Aim the power timing light at the timing marks on the chain case. The timing should advance above 5-1/2° and the engine speed should increase. (7) Stop the engine and tighten the distributor holddown screw. (8) Reconnect the wire at the carburetor throttle stop. (9) Reconnect the vacuum hose to the distributor. (10) Remove the timing light.

EVAPORATION CONTROL SYSTEM Chrysler Corporation cars sold in California have an Evaporation Control System (ECS) to reduce the loss of fuel from the fuel system to the atmosphere by evaporation. This is a closed system which controls fuel expansion and feeds fuel evaporation emissions from the carburetor or fuel tank. The vapors pass


9A-6 CLEANER AIR SYSTEM CRANKCASE AIR CLEANER

VAPOR-LIQUID SEPARATOR

VENT-LIQUID RETURN LINE PRESSURE VACUUM RELIEF CAP

THERMAL EXPANSION VOLUME TANK PY940 10—iverporettIen Gemini Syaern

through vent lines to the crankcase by way of the crankcase inlet air cleaner. Since fuel vapors are two to four times heavier than air, they settle to the bottom of the crankcase. With the engine running the fuel vapors are purged from the crankcase and together with the normal crankcase vapor are drawn via the crankcase ventilation system, which is an existing part of the Cleaner Air System (CAS) into the base of the carburetor to be burnt by engine combustion. The possible expansion of fuel in a full fuel tank, due to a rise in temperature, is allowed for by a 1.4 gallon over-fill limiter tank inside the main fuel tank which fills much slower than the main tank. When the main tank is filled, it remains essentially empty to allow for thermal expansion (Fig. 10). The loss of any fuel or vapor out of the filler neck is prevented by the use of a filler cap which will release only under significant pressure (1/2 to 1 psi) or vacuum (1/4 to 1/2 psi). This cap is identified by the words pressure-vacuum and must be replaced by a similar unit if replacement is necessary, in order for the system to remain effective. Because the fuel tank is flat on top, four vents are used, one in each corner of the tank and are connected to a vapor-liquid separator by rubber hoses. The vapor-liquid separator is a piece of two inch steel tubing mounted at an angle inside the trunk of the

vehicle (quarter panel on Coronet Station Wagons) which internally holds four vent lines from the tank and a vent line which leads to the crankcase inlet air cleaner. These lines are of different heights so the tank will always be vented regardless of vehicle attitude, and fuel vapor will be transferred to the crankcase. One vent line from the tank is short to provide a drain back to the tank for any liquid fuel which may get into the separator during maneuvers or incline parking. The vent to the crankcase is at the highest point in the separator and has a small orifice to minimize liquid fuel transfer to the crankcase. The ECS system also includes closed ventilation of fuel vapor from the carburetor bowl. On eight cylinder engines this is accomplished via a hose connection from the carburetor bowl to the crankcase inlet air cleaner. For six cylinder engines the hose from the carburetor bowl is connected into the crankcase via a connecting nipple on the fuel pump. This fuel pump also incorporates a bleed device which prevents buildup of pressure in the fuel supply line between the pump and the carburetor. This feature aids hot starting. Six cylinder engines without ECS use a "bleed" fuel pump without the ECS nipple. In event of fuel pump replacement, it is important that the correct pump is used.


CLEANER AIR SYSTEM 9A-7 SERVICE DIAGNOSIS The ECS system should not require any maintenance in normal service. Any loss of fuel or vapor from the fuel filler cap would indicate one or more of the following: (1) An unsatisfactory seal between cap and filler neck. (2) A malfunction of ECS cap release valve. A quick check of the ECS fuel cap may be made by placing against the mouth and blowing into the hole in the release valve housing. An immediate leak with light blowing or lack of release with hard blowing indicates a defective or incorrect unit.

(3) All ECS lines plugged between fuel tank and vapor separator. (4) Plugged ECS line between the vapor separator and the crankcase air inlet filter. (5) Plugged fuel tank expansion chamber inlet hole in main tank. A removable plug is provided in the top surface of ECS fuel tanks, for access to expansion chamber in event of plugging of its fill-drain hole. If purging of the fuel tank is required, the expansion chamber must be purged separately through the top access plug hole.


GROUP 9

ENGINE CONTENTS Page

Page

83 1 1 5 23

426 CUBIC INCH "HEMI" ENGINES .... 65 REPAIR OF DAMAGED OR WORN THREADS 83 SPECIFICATIONS AND TIGHTENING REFERENCE 84100

CRANKCASE VENTILATION SYSTEM . . GENERAL INFORMATION SERVICE DIAGNOSIS 225 CUBIC INCH 6 CYLINDER ENGINES 318 CUBIC INCH V8 ENGINES 383-440 CUBIC INCH ENGINES

43

ENGINE APPLICATION Model Application

Engine Type & Displacement

Coronet & Charger 6 (Std.) 8 (Std.) (Opt.) (Opt.) Super Bee (Std). Charger (Opt.) Rh T (Std.) Rh, Super Bee (Opt.) Rh, Super Bee (Opt.)

225 Cubic Inch 318 Cubic Inch 383 Cubic Inch 383 Cubic Inch 383 Cubic Inch 383 Cubic Inch 440 Cubic Inch 426 Cubic Inch 440 Cubic Inch

Compression Ratio

8.4 to 1 8.8 to 1 8.7 to 1 9.5 to 1 9.5 to 1 9.5 to 1 9.7 to 1 10 25 t o 1 10.5 to 1

Remarks

1 BBL. Carb., Single Exhaust 2 BBL. Carb., Single Exhaust 2 BBL. Carb., Single Exhaust 4 BBL. Carb., Std. Cam, Dual Exhaust 4 BBL. Carb., Spec. Cam, Dual Exhaust 4 BBL. Carb., Spec. Cam, Dual Exhaust 4 BBL. Carb., Spec. Cam, Dual Exhaust 2-4 BBL. Carb., Spec. Cam, Dual Exhaust 3-2 BBL Carb., Spec. Cam, Dual Exhaust

GENERAL INFORMATION Six Cylinder Engine The 6 cylinder engine, (Fig. 1) is inclined toward the right at an angle of 30 degrees from the vertical in the engine compartment. This design permits a lower hood line and allows space in the engine compartment for the long intake manifold branches. The engine has in-line overhead valves and wedge shaped combustion chambers and a nominal compression ratio of 8.4:1. The lubrication system consists of an externally mounted rotor type pump on the lower right side of the cylinder block. A full flow replaceable element type oil filter is mounted on the rear of the oil pump body. Oil is forced by the oil pump to a series of oil passages in the engine (Fig. 44). The semi-series flow cooling system contains an aluminum water pump body with a pressed in ball bearing and seal assembly and stamped steel impeller.

The water pump housing is integral with the cylinder block. 1/8 Engines The V8 engines are all the valve-in-head type with hydraulic tappets. Engines vary in compression ratio, piston displacement, camshafts, valve springs, carburetors, intake manifolds and exhaust systems. The three-two barrel and four barrel carburetor equipped engines use premium fuel. The 426 hemi-head engine (Fig. 2) has twin fourbarrel carburetors, nonsilenced low-restriction air cleaner, low-restriction intake manifold and exhaust headers, hydraulic tappets. Engine oiling system consists of a rotor type oil pump and a full flow oil filter. On the 318 cubic inch engines, the pump is mounted internally. On the 383, 426 and 440 cubic inch engines, the pump is mounted externally. Oil is forced by the oil pump to a series of oil passages in the engine.

SERVICE DIAGNOSIS Condition

ENGINE WILL NOT START

Possible Cause

(a) Weak battery.

Correction

(a) Test battery specific gravity. Recharge or replace as necessary. (b) Corroded or loose battery connec- (b) Clean and tighten battery connections. Apply a coat of petrolatum to tions. terminals. (c) Refer to "Starting Motor." (c) Faulty starter. (d) Moisture on ignition wires and dis- (d) Wipe wires and cap clean and dry.

tributor cap.


9-2 ENGINE-SERVICE DIAGNOSIS

Fig. I—Six Cylinder Engine Cutaway View Condition

Possible Cause

Correction

(e) Faulty ignition cables.

(e) Replace any cracked or shorted cables. (f) Faulty coil or condenser. (f) Test and replace if necessary.* (g) Dirty or corroded distributor contacts. (g) Clean or replace as necessary. (h) Incorrect spark plug gap. (h) Set gap at .035". (i) Incorrect ignition timing. (i) Refer to "Ignition Timing." (j) Dirt or water in fuel line or car- (j) Clean lines and carburetor.** buretor. (k) Carburetor flooded. (k) Adjust float level—check seats.** (I) Incorrect carburetor float setting. (I) Adjust float level—check seats.** (m) Faulty fuel pump. (m) Install new fuel pump.** (n) Carburetor percolating. No fuel in (n) Measure float level. Adjust bowl the carburetor. vent.** Inspect operation of manifold control valve.

ENGINE STALLS

(a) (b) (c) (d) (e)

Idle speed set too low. Incorrect choke adjustment Idle mixture too lean or too rich. Incorrect carburetor float setting. Leak in intake manifold.

(a) (b) (c) (d) (e)

Adjust carburetor.** Adjust choke.** Adjust carburetor.** Adjust float setting.** Inspect intake manifold gasket and replace if necessary.***


SERVICE DIAGNOSIS-ENGINE 9-3

NN1033 Fig. 2-426 Hemi Engine Cutaway View

Condition

ENGINE LOSS OF POWER

ENGINE MISSES ON ACCELERATION

Possible Cause

Correction

(f) Dirty, burned or incorrectly gapped distributor contacts. (g) Worn or hiwned distributor rotor. (h) Incorrect ignition wiring. (i) Faulty coil or condenser. (j) Incorrect tappet lash.

(e) (h) (i) (j)

Install new rotor. Install correct wiring. Test and replace if necessary.* Adjust to specifications.

(a) (b) (c) (d)

(a) (b) (c) (d)

Refer to "Ignition Timing."* Install new rotor. Remove and repair distributor.* Clean plugs and set gap at .035".

(n) Faulty coil or condenser.

(e) Clean lines, carburetor and replace filter.** (f) Adjust float level." (g) Install new pump. (h) Refer to "Checking Valve Timing."*** (i) Install new head gasket.*** (j) Test compression of each cylinder.*** (k) Install new valves.' (I) Install new parts as necessary. (m) Replace any cracked or shorted cables. (n) Test and replace as necessary.*

Incorrect ignition timing. Worn or burned distributor rotor. Worn distributor shaft or cam. Dirty or incorrectly gapped spark plugs. (e) Dirt or water in fuel line, carburetor or filter. (f) Incorrect carburetor float setting. (g) Faulty fuel pump. (h) Incorrect valve timing. (i) Blown cylinder head gasket (j) Low compression. (k) Burned, warped, or pitted valves. (I) Plugged or restricted exhaust system. (m) Faulty ignition cables.

(f) Replace contacts and adjust.*

(a) Dirty, burned, or incorrectly gapped (a) Replace contacts and adjust.* distributor contacts. (b) Clean spark plugs and set gap at (b) Dirty, or gap too wide in spark plugs. (c) Incorrect ignition timing.

(c) Refer to "Ignition Timing."*


9-4 ENGINE-SERVICE DIAGNOSIS Condition

Correction

Possible Cause (d) (e) (f) (g)

Dirt in carburetor. Acceleration pump in carburetor. Burned, warped or pitted valves. Faulty coil or condenser.

(d) (e) (f) (g)

Clean carburetor.** Install new pump.** Install new valves.*** Test and replace if necessary.*

ENGINE MISSES AT HIGH SPEED

(a) Dirty or incorrectly gapped distrib- (a) Clean or replace as necessary.* utor contacts. (b) Dirty or gap set too wide in spark plug. (b) Clean spark plugs and set gap at .035". (c) Worn distributor shaft or cam. (c) Remove and repair distributor.* (d) Worn or burned distributor rotor. (d) Install new rotor. (e) Faulty coil or condenser. (e) Test and replace if necessary.* (f) Incorrect ignition timing. (f) Refer to "Ignition Timing." (g) Clean jets.** (g) Dirty jets in carburetor. (h) Dirt or water in fuel line, carburetor (h) Clean lines, carburetor and replace or filter. filter.**

NOISY VALVES

(a) (b) (c) (d) (e) (f) (g) (h)

CONNECTING ROD NOISE

(a) Insufficient oil supply. (b) Low oil pressure.

High or low oil level in crankcase. Thin or diluted oil. Low oil pressure. Dirt in tappets. Bent push rods. Worn rocker arms. Worn tappets. Worn valve guides.

Check for correct oil level.*** Change oil.*** Check engine oil level.** Clean tappets.** Install new push rods.*** Inspect oil supply to rockers.*** Install new tappets.*** Ream and install new valves with 0/S stems.*** (i) Excessive run-out of valve seats or (i) Grind valve seats and valves.*** valve faces. (j) Incorrect tappet lash. (j) Adjust to specifications.

(c) Thin or diluted oil. (d) Excessive bearing clearance. (e) Connecting rod journals out-of-round. (f) Misaligned connecting rods. MAIN BEARING NOISE

(e) (f) (g)

OIL PRESSURE DROP

(a) Check engine oil level.*** (b) Check engine oil level. Inspect oil pump relief valve and spring.*** (c) Change oil to correct viscosity. (d) Measure bearings for correct clearance.*** (e) Remove crankshaft and regrind journals.*** (f) Replace bent connecting rods.***

(a) Insufficient oil supply. (b) Low oil pressure. (c) (d)

OIL PUMPING AT RINGS

(a) (b) (c) (d) (e) (f) (g) (h)

(a) Check engine oil level.*** (b) Check engine oil level. Inspect oil pump relief valve and spring.*** Thin or diluted oil. (c) Change oil to correct viscosity. Excessive bearing clearance. (d) Measure bearings for correct clearances.*** Excessive end play. (e) Check No. 3 main bearing for wear on flanges.*** Crankshaft journal out-of-round or (f) Replace crankshaft or regrind jourworn. nals. Loose flywheel or torque converter. (g) Tighten to correct torque.

(a) Worn, scuffed, or broken rings. (b) Carbon in oil ring slots. (c) Rings fitted too tight in grooves.

(a) Hone cylinder bores and install new rings.*** (b) Install new rings.*** (c) Remove the rings. Check grooves. If groove is not proper width, replace piston.***

(a) (b) (c) (d) (e) (f)

(a) (b) (c) (d) (e) (f)

Low oil level. Faulty oil pressure sending unit Clogged oil filter. Worn parts in oil pump. Thin or diluted oil. Excessive bearing clearance.

Check engine oil level. Install new sending unit Install new oil filter. Replace worn parts or pump. Change oil to correct viscosity. Measure bearings for correct clearance.***


225 CUBIC INCH-ENGINE 9-5 Condition

Possible Cause

Correction

(g) Remove valve and inspect, clean, and reinstall. (h) Oil pump suction tube loose, bent or (h) Remove oil pan and install new tube cracked. if necessary.

(g) Oil pump relief valve stuck.

* Refer to the "Electrical and Instruments" Group 8 for service procedures. **Refer to the "Fuel System" Group 14 for service procedures. ***Refer to the "Engine" Group 9 for service procedures.


SIX CYLINDER ENGINES INDEX Camshaft Camshaft Bearings Connecting Rods Crankcase Ventilation System Crankshaft Identification Crankshaft Main Bearings Crankshaft Main Journals Cylinder Block Cylinder Head Engine Assembly Installing Piston and Connecting Rod Assembly . Measuring Connecting Rod Bearing Clearance .. Measuring Main Bearing Clearance

Page 13 14 18 83 18 19 18 15 7 5 18 18 19

Oil Filter Oil Pan Oil Pump Pistons, Pins and Rings Rear Main Bearing Oil Seal Repair of Damaged or Worn Threads Rocker Arms and Shaft Assembly Specifications Timing Chain Cover, Oil Seal and Chain Tune-Up Valves and Valve Springs Valve Timing

Page 23 20 21 15 20 83 7 84 11 5 9 11

SERVICE PROCEDURES TUNE-UP (1) Test battery specific gravity, add water if necessary, clean and tighten battery connections. (2) Test cranking voltage. See "Starting Motor Cranking Voltage" Electrical Group 8. (3) Tighten intake and exhaust manifold bolts to 15 foot-pounds. (4) Perform cylinder compression test. Compression should not be less than 100 pounds and not vary more than 25 pounds. The recommended compression pressures are to be used only as a guide to diagnosing engine problems. An engine in good condition may exhibit higher pressures. Many conditions which are difficult to control cause variations in compression readings. An engine should not be disassembled to determine the cause of low compression unless some other malfunction is present. (5) Clean or replace spark plugs as necessary and adjust gap to .035 inch. Tighten to 30 foot-pounds. (6) Test resistance of spark plug cables. Refer to "Ignition System Secondary Circuit Inspection" Electrical Section. (7) Inspect the breaker plate contacts, primary wire and vacuum advance operation. Test coil output voltage, primary and secondary resistance. Test Condenser. Replace parts as necessary, Refer to Ignition System and make necessary adjustments. (8) Reset ignition timing with vacuum advance line disconnected. Ignition timing should be set to com-

pensate for altitudes and/or gasoline grades. (9) Set carburetor idle mixture adjustment. Adjust throttle stop screw to specifications. Perform a combustion analysis. (10) Test fuel pump for pressure and vacuum. Refer to "Fuel System" Group 14, Specifications. (11) Inspect manifold heat control valve in exhaust manifold for proper operation and apply Manifold Heat Control Valve Solvent Part Number 2525054 or equivalent to bushing and shaft. (12) Every 6 months remove filter element and blow out dirt gently with an air hose. Direct air from inside out, and keep nozzle 2 inches away from element to avoid damaging. Clean metal housing and install element. Every two years, install a new factory recommended filter element or equivalent. Service unit more frequently when driving under severe conditions, such as in dusty areas (Fig. 3). (13) Inspect crankcase ventilation system as outlined on page 83. (14) Inspect and adjust accessory belt drives referring to Cooling System, Group 7 for proper adjustments. (15) Road test vehicle as a final test.

ENGINE ASSEMBLY Removal (1) Scribe hood hinge outlines on hood and remove hood.


9-6 ENGINE-225 CUBIC INCH (17) Install engine lifting fixture Tool C-3804 to cylinder head and attach a chain hoist to fixture eyebolt. (18) Remove engine support fixture. (19) Remove front engine mount bolts (Fig. 5). (20) Lift engine from engine compartment and install in engine repair stand. Installation

Fig. 3—Cleaning Filter Element

(2) Drain cooling system and remove battery and carburetor air cleaner. (3) Remove radiator and heater hoses and remove radiator. (4) Remove closed ventilation system and evaporative control system (if so equipped) from cylinder head cover. (5) Disconnect fuel lines, carburetor linkage and wiring to engine. (6) Disconnect exhaust pipe at manifold. (7) Raise vehicle on a hoist. (8) Drain convener housing and transmission. Remove oil cooler lines, filler tube and shift cable. (9) Remove clutch torque shaft, brake cables and rods. (10) Remove speedometer cable and gear shift rods. (11) Disconnect propeller shaft and tie-up out of way. (12) Install engine support fixture Tool C-3487A to support rear of engine. (13) Remove engine rear support crossmeiaaber (Fig. 4). (14) Remove transmission bolts from clutch housing. (15) Remove transmission. (16) Lower vehicle.

(ii Install a suitable engine lifting fixture and attach a chain hoist to fixture eyebolt. (2) Lower engine into engine compartment until front of engine is positioned on front engine mounts. (3) Install front engine mount bolts. Do not tighten. (4) Install engine support fixture Tool C-3487A. (5) Remove chain hoist and engine lifting fixture. (6) Raise vehicle on a hoist. (7) Position rear of engine and install transmission. (81 Install engine rear support crossmember, remove engine support fixture. (9) Connect propeller shaft at transmission. (10) Install speedometer cable and gear shift rods. (11) Install clutch torque shaft, brake cables and rods. (12) Install cooler lines, and transmission filler tube. (13) Lower vehicle. (14) Tighten front engine mount bolts to specified torque. (15) Connect exhaust pipe at the manifold using a new gasket. (16) Connect fuel lines, carburetor linkage and wit. ing to engine. (17) Install closed ventilation system and evaporative control system (if so equipped) on the cylinder head cover. (18) Install radiator hoses, battery and carburetor air cleaner. (19) Install hood using scribe marks for proper alignment B STRUT-USED WITH AIR CONDITIONER ONLY-

REAR a' TRANSMISSION E(T. HOUSING

. . - •

REAR MOUNT (2)

CENTER CROSSMEMSER

TIGHTENING TORQUE 2--

VIEW A RIGHT SIDE

Fig. 4—Engine Rear Support

'A

35 FT. LB.

C.B;)

50 FT. LB. 75 FT. LB.

Fig. 5—Front Engine Mounts

VIEWS LEFT SIDE

NR37A


225 CUBIC INCH—ENGINE 9-7

(20) Close all drain cocks and fill cooling system. (21) Fill engine crankcase and transmission. Refer to "Lubrication" Group 0, for quantities and lubricants to use. Inspect entire system for leaks and correct.

TOP FLAT ON ROCKER SHAFT FRONT

Az ADJUSTING SCREW

Whenever an engine has been rebuilt and/or a new camshaft and/or tappets are installed, one quart of engine supplement, Chrysler Part Number 1879406 or equivalent should be added to the engine oil to aid in break-in. The oil mixture should be left in the engine for a minimum of 500 miles. Drain the oil mixture at the next normal oil change.

(22) Start engine and run until normal temperature is reached. (23) Inspect timing (with vacuum advance line removed), adjust carburetor and transmission linkage as necessary. Connect vacuum line and road test vehicle. ROCKER ARMS AND SHAFT ASSEMBLY

Stamped steel rocker arms are arranged on a single rocker arm shaft. Hardened steel spacers are used between the pairs of rocker arms. The rocker shaft is held in place by bolts and stamped steel retainers attached to the seven brackets on the cylinder head.

ROCKER ARM

BOLT SPACER

RETAINER

NY243A

Fig. 6—Rocker Shaft Assembly

(8) Install closed ventilation system and evaporative control system (if so equipped). CYLINDER HEAD

The chrome alloy cast iron cylinder head (Fig. 7) is held in place by 14 bolts. Spark plugs are located at the wide edge of the combustion chambers and aluminum spark plug tubes serve as spark plug gaskets.

Removal (1) Romnve elcworl vontil9tion cyctom

(2) Remove evaporative control system (if so equipped). (3) Remove cylinder head cover and gasket. (4) Remove rocker shaft bolts and retainers. (5) Remove rocker arms and shaft assembly. Installation

(1) Rocker arms and shaft assembly must be installed, as shown in Figure 6. The flat on the end of rocker shaft must be on top and point toward front of engine. This is necessary to provide proper lubrication to rocker assemblies. (2) Install rocker shaft retainers between rocker arms so they seat on rocker shaft and not on the extended bushing of rocker arm. Be sure to install long retainer in center position only. (3) Install rocker shaft bolts. Install long bolt at the rear of the engine. Tighten all bolts to 25 foot-pounds. (4) Operate engine until normal operating temperature is reached (approximately 190°F. water temperature). (5) Allow engine to idle at 550 rpm at this 190° F. temperature for five minutes. (6) Adjust tappets, Hot; intake .010 inch, exhaust .020 inch. (7) Place new cylinder head cover gasket in position and install the cylinder head cover. Tighten nuts to 40 inch-pounds.

Removal (1) Drain cooling system. (2) Remove carburetor air cleaner and fuel line. (3) Disconnect accelerator linkage. (4) Remove vacuum control tube at carburetor and distributor. (5) Disconnect spark plug wires by pulling straight out in line with the plug. (6) Disconnect heater hose and clamp holding bypass hose. (7) Disconnect heat indicator sending unit wire. (8) Disconnect exhaust pipe at exhaust manifold flange. (9) Remove intake and exhaust manifold and carburetor as an assembly. (10) Remove closed ventilation system, evaporative control system (if so equipped) and cylinder head cover. (11) Remove rocker arms and shaft assembly. (12) Remove push rods and identify to insure installation in original location.

(13) Remove 14 head bolts and remove cylinder head. (14) Place cylinder head in holding fixture Tool C3626 and remove spark plugs and tubes. Installation

(1) Clean all gasket surfaces of cylinder block and cylinder head and install spark plugs. (2) Inspect all surfaces with a straightedge if there


9-8 ENGINE-225 CUBIC INCH

nowa

FRONT MINk

HOLE

\ COOLANT PASSAGES — 'TED HOLE INTAKE VALVES

COOLANT PASSAGc DOWEL HOLE SPARK PLUGS (6) 1

COOLANT PASSAGE (6)

r EXHAUST VALVES 7" ASS

Dr

NY129 Fig. 7—Cylinder Head

is any reason to suspect leakage. If out of flatness exceeds .00075 times the span length in any direction: either replace head or lightly machine the head gasket surface. As an example, if a 12 inch span is .004" out of flat, allowable is 12 x .00075 = .009". Head is OK. The cylinder head surface finish should be 70-180 micro-inches. (3) Coat new gasket lightly with Chrysler Sealer. Part Number 1057794 or equivalent. Install gasket and cylinder head. (4) Install cylinder head bolts. Starting at top center, tighten all cylinder head bolts to 50 foot-pounds in sequence (Fig. 8). Repeat the procedure, retightening all cylinder head bolts to 65 foot-pounds. (5) Install rocker arms and shaft assembly with "FLAT" on end of rocker shaft "ON TOP'S and pointing toward front of engine, as shown in Fig. 6 to provide proper lubrication to rocker assemblies. In-

(8) 'lighten 3 bolts holding intake manifold to exhaust manifold to 15 foot-pounds. Sequence: Tighten inner bolt first, then the outer two bolts.

(9) Connect heater hose and by-pass hose clamp. (10) Connect heat indicator sending unit wire, accelerator linkage and spark plug cables. (11) Install vacuum control tube at carburetor and distributor. (12)Connect exhaust pipe to exhaust manifold flange, (13)Install fuel line and carburetor air cleaner. (14)Fill cooling system.

stall rocker shaft retainers between rocker arms so they seat on rocker shaft and not on extended bushing of rocker arm. Be sure to install long retainer in

center position only. Install rocker shaft bolts (long bolt at rear of engine) and tighten to 25 foot-pounds. (6) Loosen the 3 bolts holding intake manifold to exhaust manifold. This is required to maintain proper alignment. (7) Install intake and exhaust manifold and carburetor assembly to the cylinder head with cup side of the conical washers against manifolds. Tighten nuts to 10 foot-pounds.

Fig. 8—Cylinder Head Tightening Sequence


225 CUBIC INCH—ENGINE 9-9 (15) Operate engine until normal operating temperature is reached (approximately 190 F. water temperature). (16) Allow engine to idle at 550 rpm at this 190 F. temperature for five minutes. (17) Adjust tappets, Hot; intake .010 inch, exhaust .020 inch. (18) Place new cylinder head cover gasket in position and install the cylinder head cover. Tighten nuts to 40 inch-pounds. (19) Install closed ventilation system and evaporative control system (if so equipped). VALVES AND SPRINGS Valves are arranged in line in the cylinder head and operate in guides that are integral with the cylinder heads.

Removal (1) With cylinder head removed, compress valve springs. using Tool C-3422A (Fig. 9). (2) Remove valve retaining locks, valve spring retainers, valve stem cup seals and valve springs. Remove any burrs from valve stem lock grooves to prevent damage to the valve guide when valves are removed. Identify valves to insure installation in original location.

Valve Inspection (1) Clean valves thoroughly and discard burned, warped and cracked valves. (2) Measure valve stems for wear. The intake valve stem diameter (new valve) should measure .372 to .373 inch and exhaust valve stem diameter (new valve) should measure .371 to .372 inch. If wear exceeds .002 inch, replace the valve. (3) Remove carbon and varnish deposits from inside of valve guides, with a reliable guide cleaner. (4) Measure valve stem guide clearance as follows: (a) Install sleeve Tool C-3973 over valve stem

VALVE SLEEVE 1TOOU

• 11

NY154

Fig. 10—installing Valve and Tool C-3973

and install valve (Fig. 10). The special sleeve places the valve at the correct height for measuring with a dial indicator. (b) Attach dial indicator Tool C-3339 to cylinder head and set it at right angle to the valve stem being measured (Fig. 11). (c) Move valve to and from the indicator. The total dial indicator reading should not exceed .017 inch. Ream guides for valves with oversize stems if dial indicator reading is excessive or if stems are scuffed or scored. (5) Service valves with oversize sterns are available in .005, .015 and .030 inch oversize. Reamers to accommodate the oversize valve stem are as follows: Reamer Tool Number

Reamer Oversize

Valve Guide Size

.005 in. C-3433 .379-.380 in. C-3430 .015 in. .389-.390 in. C-3427 .030 in. .404-.405 in. (6) Slowly turn reamer by hand and clean guide thoroughly before installing a new valve. Do not attempt to ream valve guides from standard directly to

TOOL

CYLINDER HEAD ASSEMBLY

0a ■ 1.

`79;-.12:- NYISIA Fig. 9—Compressing Valve Spring

Fig. I I—Measuring Valve Guide Wear


9-10 ENGINE-225 CUBIC INCH .030 inch. Use step procedure of .005, .015 and .030 inch so valve guides may be reamed true in relation to the valve seat.

-t MARGIN INTAKE VALVE

Refacing Valves and Valve Seats

EXHAUST VALVE

FACE

(1) The intake and exhaust valve seats and the intake valve face have a 45 degree angle. The exhaust valve face has a 43 degree angle. The valve face and valve seat angles, are shown in Figure 12. (2) Inspect the remaining margin after the valves are refaced (Fig. 13). Valves with less than 3/64 inch margin should be replaced. (3) When refacing valve seats, it is important that the correct size valve guide pilot be used for reseating stones. A true and complete surface must be obtained. (4) Measure the concentricity of the valve seat using dial indicator No. 13725. Total runout should not exceed .002 inch (total indicator reading). (5) Inspect valve seat with Prussian blue to determine where valve contacts the seat. To do this, coat valve seat lightly with Prussian Blue then set the valve in place. Rotate the valve with light pressure. If the blue is transferred to the center of the valve face, contact is satisfactory. If the blue is transferred to the top edge of valve face, lower the valve seat with a 30" stone. If the blue is transferred to the bottom edge of valve face raise the valve seat with a 60° stone. (6) When the seat is properly positioned the width of intake seats should be 1/16 to 3/32 inch. The width of exhaust seats should be 3/64 to 1/16 inch.

ing on torque wrench at this instant. Multiply this reading by two. This will give the spring load at the test length. Fractional measurements are indicated on the table for finer adjustments. Refer to specifications to obtain specified height and allowable tensions. Discard the springs that do not meet specifications. (2) Inspect each valve spring for squareness with a steel square and surface plate, test springs from both ends, (Fig. 15). If the spring is more than 1/16 inch out of square, install a new spring.

Testing Valve Springs (Fig. 14)

Installation

(1) Whenever valves have been removed for inspection, reconditioning or replacement, valve springs should be tested. As an example, the compressed length of the spring to be tested is 1-5/16 inches. Turn table of Tool C-647 until the surface is in line with the 1-5/16 inch mark on the threaded stud and the zero mark to the front. Place spring over the stud on table and lift the compressing lever to set the tone device. Pull on torque wrench until ping is heard. Take read-

A—SEAT WIDTH (INTAKE 1/16 TO 3/32 INCH EXHAUST: 3/64 TO 1/16 INCH) B FACE ANGLE (INTAKE: 456—EXHAUST: 436) C—SEAT ANGLE (INTAKE: 456—EXHAUST: 450) 0—CONTACT SURFACE Mr= it a =I MN

Fig. 12—Valve Face and Seat Angle

STEM

VALVE SPRING RETAINER LOCK GROOVES

KH330D

Fig 13—Intake and Exhaust Valves

(1) Coat valve stems with lubrication oil and insert them in cylinder head. (2) If valves or seats are reground, test valve stem height with Tool C-3746. If valve is too long, grind off

NI-1645B Fig. 14—Testing Valve Spring


225 CUBIC INCH—ENGINE 9-11 RETAINER SPRING VALVE

VALVE SPRING

CUP SEAL

NY 1538

\.\ KR:455

Fig. 1s—inspecting Valve Spring Squareness

the tip until length is within limits. (3) Install new cup seals on all valve stems (long seal on intake valve and short seal on exhaust valve) and over valve guides (Figs. 16 and 17).—Install valve springs and retainers. (4) Compress valve springs with Tool C-8422A, install locks and release the tool. If valves and/or seats are reground, measure the installed height of springs. Make sure measurement is taken from the bottom of the spring seat in the cylinder head to the bottom surface of the spring retainer. (If spacers are installed, measure from the top of spacer). If height is greater than 1-11/16 inches, install a 1/16 inch spacer in the head counterbore to bring the spring height back to normal 1-5/8 inches to 1-11/16 inches.

VALVE TIMING (1) Rotate crankshaft until No. 6 exhaust valve is closing and No. 6 intake valve is opening. Install a dial indicator so that indicator pointer contacts valve RETAINER

Fig. IF—Installing Valves and Cup Seals

spring retainer on No. 1 intake valve parallel to the axis of the valve stem. (2) Turn No. 1 intake adjusting screw in one complete turn to remove the lash. Adjust dial indicator to zero. Rotate crankshaft clockwise (normal running direction) until valve has lifted .023 inch. The timing of the crankshaft pulley should now read from 12 degrees before top dead center to dead center. Readjust lash. (3) If reading is not within specified limits: (a) Inspect sprocket index marks. (b) Inspect timing chain for wear. (c) Inspect accuracy of "DC" mark on timing indicator.

TIMING CHAIN COVER, OIL SEAL AND CHAIN Cover Removal (1) Drain cooling system. (2) Remove radiator and fan. (3) Install Tool C-3732A and pull vibration damper assembly off end of crankshaft (Fig. 18). (4) Loosen oil pans bolts to allow clearance and re-

SPRING

RETAINER EXHAUST VALVE DAMPER PULLFY

SPRING

— TOOL

INTAKE VALVE

Kt151C

Fig. 16 —Valve Assembly

Y131A

Fig. P8—Removing Vibration Damper Assembly


9-12 ENGINE-225 CUBIC INCH move chain case cover and gasket. It is normal to find particles of neoprene collected between seal retainer and crankshaft oil stinger after seal has been in operation. (5) Slide crankshaft nit stinger off end of crank-

shaft. Measuring Timing Chain for Stretch

(1) Place a scale next to the timing chain so that any movement of the chain may be measured. (2) Place a torque wrench and socket over the camshaft sprocket lock bolt and apply torque in the direction of crankshaft rotation to take up slack; 30 footpounds (cylinder head installed) or 15 foot-pounds (cylinder head removed). With torque applied to the camshaft sprocket bolt, crankshaft should not be permitted to move. It may be necessary to block the crankshaft to prevent rotation.

(3) Holding a scale with dimensional reading even with the edge of a chain link, apply torque in the reverse direction 30 foot-pounds (cylinder head installed) or 15 foot-pounds (cylinder head removed) and note the amount of chain movement (Fig. 19). (4) If chain movement exceeds 3/16 inch, install a new timing chain. (5) If chain is satisfactory, slide the crankshaft oil slinger over the shaft and up against sprocket (flange away from sprocket). (6) If chain is not satisfactory, remove camshaft sprocket attaching bolt and remove timing chain with camshaft sprocket. (7) Turn crankshaft to line up the centerline of camshaft and crankshaft with the timing mark on crankshaft sprocket. (8) Install camshaft sprocket and timing chain. TORGUE WRENCH

TIMING MARKS NU264 Fig. 20—Alignment of Timing Marks

(9) Line up timing marks on the sprockets with the centerline of crankshaft and camshaft (Fig. 20). (10) Tighten camshaft sprocket lock bolt to 35 footpounds. Slide the crankshaft oil stinger over shaft and up against sprocket (flange away from sprocket). Oil Seal Replacement (Cover Removed)

(1) Position remover screw of Tool C-3506 through case cover, the inside of ease cover up. Position remover blocks directly opposite each other, and force angular lip between the neoprene and flange of seal retainer. (2) Place washer and nut on the remover screw. Tighten nut forcing the blocks into the gap to a point of distorting the seal retainer lip (Fig. 21). Remover is only positioned at this point. (3) Place sleeve over the retainer and install the removing and installing plate into the sleeve. (4) Place flat washer and nut on remover screw. Hold center screw and tighten lock nut to remove seal (Fig. 22). (5) Insert remover screw through the removing and installing plate so the thin shoulder will be facing up. (6) Insert the remover screw with the plate through the seal opening (inside of chain case cover facing up). CHAIN CASE COVER

REMOVER BLOCKS (TOOL)

LIP OF SEAL RETAINER

NY160A

I9—Measuring Chain Stretch

Fig. 21—Remover Blocks Expanded to Puller Position


225 CUBIC INCH—ENGINE 9-13 REMOVING AND INSTALLING PLATE CT

INSTALLING PLATE CTOOL1 'fir a L ttev REMOVER SCREW (TOOL)

SEAL RETAINER

REMOVER SCREW (TOOL)

-e

SLEEVE (TOOL)

CHAN CASE COVER

CHAIN CASE COVER

NY161A

NY163A

Fig. 22-Removing Oil Seal

Fig. 24—Installing New Seal

(7) Place the seal in cover opening, with neoprene down. Place seal installing plate into the new seal, with the protective recess toward lip of seal retainer (Fig. 23). (8) Install flat washer and nut on the remover screw; hold screw and tighten nut (Fig. 24). (9) Seal is properly installed when the neoprene is tight against face of cover. Try to insert a .0015 inch feeler gauge between the neoprene and cover (Fig. 25) if the seal is installed properly, the feeler gauge cannot he inserted. Do not over compress neoprene.

(4) Place installing tool, part of puller set Tool C3732A in position and press damper pulley assembly on the crankshaft (Fig. 26).

Cover installation (1) Be sure mating surfaces of chain case cover and cylinder block are clean and free from burrs. (2) Using a new gasket, slide chain case cover over locating dowels and tighten bolts to 15 foot-pounds. Be sure all oil pan gaskets are In place and tighten oil pan bolts to 200 inch-pounds. (3) Place damper pulley assembly hub key in the Slot in crankshaft, lubricate seal lip with tubriplate and slide hub on the crankshaft. INSTALLING PLATE / TOOL) -71\

SEAL ASSEMBLY

CAMSHAFT The camshaft has an integral oil pump and distributor drive gear and fuel pump eccentric (Fig. 27). Rearward camshaft thrust is taken by the rear face of the aluminum camshaft sprocket hub, bearing directly on the front of the cylinder block, eliminating the need for a thrust plate. The helical oil pump distributor drive gear and camshaft lobe taper both tend to produce only a rearward thrust.

Removal (1) Remove tappets, using Tool 0-3661; identify to insure installation in original location. (2) Remove timing sprockets, distributor and oil pump. (3) Remove fuel pump. FEELER GAUGE

•\

SEAL

REMOVER SCREW (TOOL)

CHAIN CASE COVER

CHAIN CASE COVER NY167A Fig. 23 -Positioning Installer Plate

NY164 Fig. 25—Inspecting Seal for Proper Seating


9-14 ENGINE-225 CUBIC INCH

Fig. 28—Installing Camshaft The distributor rotates clockwise. TOOL

NY159A

S:

26—Installing Vibration Damper Assembly (4) Install a long bolt into the front of camshaft to facilitate removal of the camshaft; remove camshaft. being careful not to damage cam bearings with the cam lobes. Fig.

Installation (1) Lubricate camshaft lobes and camshaft bearing journals and insert the camshaft in cylinder block (Fig. 28). Whenever an engine is rebuilt and/or a new camshaft and/or new tappets are installed, one quart of engine supplement, Chrysler Part Number 1879406 or equivalent should be added to the engine oil to aid in break-in. The oil mixture should be left in the engine for a minimum of 500 miles. Drain the oil mixture at the next normal oil change. When replacing camshaft, all of the tappet faces must be inspected for crown with a straight edge. If any negative crown (dish) is observed, tappet must be replaced. The tappet must have a definite crown.

Installation of Distributor Before installing the distributor, time the engine as follows;

CAMSHAFT SPROCKET LOCATING DOWEL WASHER

FUEL PUMP ECCENTRIC (INTEGRAL WITH CAMSHAFT) OIL PUMP AND DISTRIBUTOR DRIVE GEAR (INTEGRAL WITH CAMSHAFT)

/LOCK BOLT 4te NU265

Fig. 27—Camshaft and Sprocket Assembly

(1) Rotate crankshaft until the mark on inner edge of crankshaft pulley is in line with the "0" (TDC) mark on the timing chain case cover. No. 1 cyl. compression stroke (both valves closed). (2) With distributor "0" rings in position, hold the distributor over mounting pad. (3) Turn the rotor to point forward, corresponding to 4 o'clock. (4) Install distributor so that with distributor fully seated on the engine, the gear has spiraled to bring the rotor to a 5 o'clock position. (5) Turn the housing until the ignition contacts are separating and rotor is under No. 1 cap tower. (6) Install hold down bolt and connect the primary wire. (7) Adjust timing to specifications, using a timing light, then re-connect the vacuum line. CAMSHAFT BEARINGS (Engine Removed from Vehicle) Removal (1) With camshaft removed, drive out rear cam bearing welch plug. (2) Install proper size adapters and horse shoe washers (part of Tool C-3132A) at the back of each bearing shell and drive out all bearing shells. Installation (1) Install new camshaft bearings with Tool C3132A by sliding the new camshaft bearing shell over the proper adapter. (2) Position bearing in tool. Install horseshoe lock and drive the bearing shell into place, (Fig. 29). The camshaft bearing oil hole or holes must be in exact alignment with drilled oil passage or passages from the main bearing.

(3) Install remaining shells in like manner. Install NO. 1 camshaft bearing 3/32 inch inward from the front face of the cylinder block.

(4) Apply sealer to the plug and install a new welch plug at the rear of camshaft. Be sure this plug does not leak.


225 CUBIC INCH—ENGINE 9-15 CAMSHAFT BEARING OIL HOLE

am. _TOOL S

Fig. 29—Removing Camshaft Bearings (Tool C4132A)

CYLINDER BLOCK Piston Removal (1) Remove the top ridge of cylinder bores using Tool C-3012 before removing pistons from cylinder block. Keep tops of the pistons covered during this operation.

(2) Pistons and connecting rods must be removed from top of cylinder block Rotate crankshaft so that each connecting rod is centered in the cylinder bore. (3) Inspect connecting rods and connecting rod caps for cylinder identification. Identity them if necessary. (4) Remove connecting rod cap. install connecting rod bolt guide set on connecting rod bolts. Push each piston and rod assembly out of cylinder bore. Be careful not to nick crankshaft journals.

(5) Install bearing caps on mating rods.

Cleaning and Inspection (1) Clean cylinder block thoroughly and check all core hole plugs for evidence of leaking. (2) If new core plugs are installed, coat edges of plug and core hole with Number 1057794 Sealer or equivalent Drive the core plug in so that the rim lies at least 1/64" below the lead-in chamfer. (3) Examine block for cracks or fractures. Cylinder Bore Inspection The cylinder walls should be tested for out-of-round and taper with Tool C-119. If the cylinder bores show more than 005" out-of-round, or a taper of more than .010" or if the cylinder walls are badly scuffed or scored, the cylinder block should be rebored and honed, and new oversize pistons and rings fitted. Whatever type of boring equipment is used, boring and honing operation should be closely coordinated with the fitting of pistons and rings in order that specified clearance may be maintained.

Honing Cylinder Bores Before honing, stuff plenty of clean rags under the bores. over the crankshaft to keep abrasive materials from entering crankcase area (I) Used carefully, the cylinder bore resizing hone Tool C-823, equipped with 220 grit stones, is the best tool for this job. In addition to deglazing, it will reduce taper and out-of-round as well as removing light scuffing, scoring or scratches. Usually a few strokes will dean up a bore and maintain the required limits. (2) Deglazing of the cylinder walls may be done using a cylinder surfacing hone, Tool C-3501, equipped with 280 grit stones (C-3501-3810). if the cylinder bore is straight and round 20-60 strokes depending on the bore condition will be sufficient to provide a satisfactory surface. Inspect cylinder walls after each 20 strokes. Use honing oil C-3501-3880 or a light honing oil available from a major oil distributor. Do not use engine or transmission oil, mineral spirits or kerosene.

(3) Honing should be done by moving the hone up and down fast enough to get a cross-hatch pattern. When hone marks intersect at 60', the cross hatch angle is most satisfactory for proper seating of the rings. (See Pig. 30i (43 After homing, it is necessary that the block be cleaned again to remove all traces of abrasives. CAUTION: Be sure all abrasives are removed from engine parts after honing. It is recommended that a solution of soap and water be used with a brush and the parts then thoroughly dried. The bore can be considered clean when it can be wiped clean with a white cloth and cloth remains clean. Oil bores after cleaning to prevent rusting.

PISTONS, PINS AND RINGS The pistons are cam ground so that the diameter at CROSS HATCH PATTERN

NP998

Fig. 30—Cross Hatch Pattern


9-16

ENGINE-225 CUBIC INCH

the pin boss is less than its diameter across the thrust face. This allows for expansion under normal operating conditions. The expansion forces the pin bosses away from each other, and the piston assumes a more round shape. Inspect pistons for taper and elliptical shape before they are fitted into cylinder bores. (See Fig. 31). Finished Pistons

All pistons are machined to the same weight in grams, regardless of oversize to maintain piston balance. For cylinder bores which have been honed or rebored, all service pistons include pins and are available in standard and the following oversizes: .005, .020, .040 inch. Fining Pistons

The piston and cylinder wall must be clean and dry. Specified clearance between the piston and cylinder wall is .0005 to .0015 inch. (1) Pistons and cylinder bores should be measured at normal room temperature, 70 degrees F. (2) Measure piston diameter at the top of skirt 90 degrees to piston pin axis. (3) Measure cylinder bores halfway down cylinder bore and transverse to engine crankshaft center line. Fitting Rings

(1) Measure piston ring gap about two inches from the bottom of the cylinder bore in which it is to be fitted. (An inverted piston can be used to push rings down to insure positioning rings squarely in cylinder wall). (2) Insert feeler stock in the gap. Ring gap should be .010 to .047 inch for compression rings and .015 to .062 inch for oil ring steel rails in standard size bores. Maximum gap in .005 inch Os bores should be .060 Inch for compression rings and .070 inch for oil ring steel rails. --B

.024 TO .031 IN, LESS THAN DIAMETER AT (C)

(3) Measure side clearance between piston ring and ring land, (Fig. 32). Clearance should be .0015 to .004 inch for top compression ring and intermediate ring. (4) Starting with oil ring expander, place expander ring in lower ring groove and install oil control ring using instructions in package. Steel rail service oil ring should be free in groove, but should not exceed .005 inch side clearance. (5) Install compression rings in middle and top grooves, using ring installer, Tool C4805. Be sure the mark 'Top" on each compression ring is to the top of piston. Piston Pin Removal

(1) Arrange Tool C-3724 parts for removal of piston pin (Fig. 33). (2) Install pilot on main screw. (3) Install screw through piston pin. (4) Install anvil over threaded end of main screw with small end of anvil against piston boss. Be sure spring is removed from anvil. (5) Install nut loosely on main screw and place assembly on the press (Fig. 34). Press piston pin out of connecting rod. When the pin falls free from connecting rod, stop the press to prevent damage to bottom of the anvil. (6) Remove tool from piston. Installation

(I) Measure piston pin fit in the piston. It should be a sliding fit in piston at 70 degrees F. Piston pins are supplied in standard sizes only. (2) Lubricate piston pin holes in piston and connecting rod. (3) Arrange tool parts for installation of piston pin (Fig. 35). (4) Install spring inside the pilot and install spring and pilot in the anvil. (5) Install piston pin over main screw. PISTON RING- — FEELER GAGE RING GROOVE

A THE ELLIPTICA SHAPE OF THE PISTON SKIRT SHOULD BE 00810 010 IN. LESS AT DIAMETER (A) THAN ACROSS THE THRUST FACES AT DIAMETER OA MEASUREMENT IS MADE 14 IN. BELOW LOWER RING GROOVE

DIAMETERS AT (C) AND (D) CAN BE EQUAL OR DIAMETER AT (D) CAN BE .0015 IN. GREATER THAN (C)

Fig. 3I —Piston Measurements

NY221B

'"""•••-•■ ,

KR165 A Fig. 32—Measuring Piston Ring Side Clearance


225 CUBIC INCH-ENGINE 9-17 INDENT—ASSEMBLE TOWARDS FRONT OF ENGINE

NUT (TOOL) — ANVIL (TOOL) --- PISTON PILOT (TOOL) MAIN

/ SCREW (TOOL) GUIDE—SMALL (TOOL)

PISTON PIN CONNECTING ROD KR19513

GUIDE—LARGE (TOOL) OIL HOLE—ASSEMBLE TOWARDS RIGHT SIDE OF ENGINE

Fig. 33—Teel Arrangement for Removing Piston Pin

NY14213

Fig. 36—Connecting Rod Oil Hole

Fig. 34—Removing Piston Pin

(6) Place piston, with "Notch Front" up, over the pilot so that pilot extends through piston pin holes. (7) Position connecting rod over the pilot which extends through piston hole. The oil hole in connecting rod must point toward the direction shown in Figure 36. --- ANVIL (TOOL) SPRING (TOOL) ___--- PILOT (TOOL) NUT (TOOL)

S'Ne ei -tor

.— PISTON PIN

7

‘r

...-PRESS

MAIN SCREW (TOOL)

- PISTON

%. ;

(8) Install main screw and piston pin in piston (Fig. 37). (9) Install nut on main screw to hold assembly together. Place assembly on a press (Fig. 37). (10) Press piston pin in the piston until pin bottoms on pilot, properly positioning pin in connecting rod. (11) Remove tool and arrange tool parts and piston assembly in the same manner, as shown in Figure 33 for measuring pin fit. (12) Place assembly in a vise (Fig. 38). (13) Attach torque wrench to nut and test torque up to 15 foot-pounds. If connecting rod moves down-

MAIN SCREW (TOOL) GUIDE—SMALL ". (TOOL)

PISTON PIN

\•<,:\.,

PISTON

CONNECTING ROD ANVIL (TOOL) KR196 B

GUIDE—LARGE (TOOL) '

sekty

Fig. 35—Tool Arrangement for Installing Piston Pin

-t 1-4a: Fig. 37—Installing Piston Pin

NR009


9-18 ENGINE-225 CUBIC INCH ing with an old bearing. Do not file rods or bearing caps.

NUT TOOL TORQUE WRENCH

MEASURING CONNECTING ROD BEARING CLEARANCE

SOCKET

-41 ANVIL 40010

PISTON

PILOT (TOOL I MAIN SCREW ITOOLI

Natio Fig. 38—Testing Fit of Piston Pin in Connecting Rod

ward on the piston pin, reject this connecting rod and piston pin combination. Install a new connecting rod and repeat the installation and testing procedure. If the connecting rod does not move under 15 footpounds, piston and connecting rod interference is satisfactory. (14) Remove tool. CRANKSHAFT IDENTIFICATION A Maltese Cross stamped on the engine numbering pad on right side of block, on top boss directly behind coil indicates that engine Is equipped with a crankshaft which had one or more connecting rods and/or main bearing journals finished .001 inch undersize, The position of the undersize journal or journals is stamped on the center counterweight of crankshaft. A Maltese Cross with an X indicates that all connecting rods and/or all main bearing journals are .010 inch undersize. Connecting rod journals will be identified by the letter "R," and main bearing journals by the letter . For example "M4" indicates that No. 1 main bearing is .001 inch undersize. CONNECTING RODS Installing Connecting Rod Bearings (I) Install connecting rod hearings so small formed tang fits into machined groove in connecting rod. (2) The limits of taper or out-of-round on any crankshaft journal should be held to .001 inch. Bearings are available in standard .001, .002. .003. .010 and .012 inch undersize. (3) Install bearings in pairs. Do not use a new bear-

Shim Stock Method (1) Smooth the edges of a 1/2 x 3/4 inch piece of brass shim stuck, .001 inch thickness. (2) Oil and place between the bearing and connecting rod journal. (3) Install bearing cap and tighten to 45 footpounds. (4) Turn connecting rod 1/4 turn in each direction. A slight drag should be felt which indicates clearance is satisfactory. Correct clearance is from .0005 to .0015 inch. (Si Side play should be from .006 to .012 inch. INSTALLING PISTON AND CONNECTING ROD ASSEMBLY (1) Compression ring gaps should be located on the left side of the engine and staggered about 60v apart. Neither gap should line up with oil ring rail gaps. (2) Rotate oil ring expander so that ends are at right side of engine. Rotate steel rails so that gaps are approximately opposite and positioned above piston pin holes. (3) Immerse piston head and rings in clean engine on. Slide the ring compressor, Tool C-385, over the piston and tighten with special wrench (part of Tool C-385). Position of rings must not change during this operation. (4) The notch on top of piston must point toward front of engine so that squirt hole in connecting rod is toward right side of engine. (5) Install connecting rod bolt protectors on rod bolts, the long protector should be installed on squirt hole side of connecting rod. Rotate crankshaft so that connecting rod journal is on the center of cylinder

bore. (6) Insert rod and piston into cylinder bore and guide rod over the crankshaft journal (Fig. 39). Be careful not to nick connecting rod journals. (7) Tap piston down in cylinder bore, using handle of a hammer. At the same time, guide connecting rod into position on crankshaft journal. (8) Install rod caps, tighten nuts to 45 foot-pounds. CRANKSHAFT MAIN JOURNALS Crankshaft journals should be inspected for excessive wear, taper and scoring. Limits of taper or outof-round on any crankshaft journal should be held to .001 inch. Journal grinding should not exceed .012


225 CUBIC INCH—ENGINE 9-19

CRANKSHAFT (CONNECTING ROD) JOURNAL /

ings are flanged to carry the crankshaft thrust loads and are not interchangeable with any other main bearings in the engine. Bearings that are not badly worn, scored or pitted should be reinstalled in the same bearing bore. The bearing caps are not interchangeable and the numbers should be marked at removal to insure correct assembly. Bearings are available in standard and the follow lug undersize_s, .001, .002, .003, .010 and .012 inch. Never install an undersize bearing that will reduce the clearance below specifications. Removal

Fig. 39—Removing and Installing Connecting Rod

inch under the standard Journal diameter. Do not grind thrust faces of No. 3 main bearing. Do not nick connecting rod or main bearing journal fillets. After regrinding, remove rough edges from crankshaft oil holes and clean out all oil passages. CRANKSHAFT MAIN BEARINGS

The NOs. 1, 2 and 4 lower main bearings are interchangeable (Fig. 40). The NOs. 2 and 4 upper main bearings are interchangeable. The NO. 1 upper main bearing is not interchangeable and is chamfered on the tab side for timing chain oiling and can be identified by a red marking on the edge of the bearing. Upper main bearings are grooved and lower main bearings are plain and are not interchangeable. The NO. 3 upper and lower main bear2

3

4

.l ) Remove oil pan and inspect the bearing cap identifying numbers. (21 Remove bearing caps one at a time. Remove upper bearing by inserting Tool C-3059 (Fig. 41) into oil hole on crankshaft. (3) Slowly rotate crankshaft clockwise, forcing out upper bearings. Installation Only one main bearing should be selectively fitted while all other main bearing caps are properly

torqued. When installing a new upper bearing shell, slightly chamfer the sharp edges from the plain side. (1) Start bearing in place, and insert Tool C-3059 into oil hole of crankshaft (Fig. 41). (2) Slowly rotate crankshaft counter-clockwise sliding the bearing into position. Remove Tool C-3059. MEASURING MAIN BEARING CLEARANCE Shim Stock Method

(lt Smooth edges of a 1/2 x 3/4 inch piece of brass shim stock. .001 inch thickness. (2) Install bearing in center main bearing cap, bearing tang in groove in cap, lubricate bearing and TOOL

BEAZNG

'COL

BEARING

THRUST BEAR1NG

NY143 Fig. 40—Main Bearing Identification

NSTAIUNG

K8536

Fig. 4I—Removing or Installing Upper Main Bearing


9-20 ENGINE-225 CUBIC INCH

BRIDGE WART OF TOOL/

TOOL

OIL SEAL

SEAL

SEAL RETAINER SEAL. RETAINER SIDE SEAL GROOVES

NY133

Fig. 42-1nstallin9 Rear Main Bearing Oil Seal

position shim stock across the bearing. install cap. tighten bolts to 85 foot-pounds. (3) If a slight drag is felt as crankshaft is turned (moved no more than 1/4 turn in either direction), clearance.is .001 inch or less and is considered satisfactory. If however, no drag is felt, the bearing is too large or if the crankshaft cannot be rotated, the bearing is too small and should be replaced with the correct size. (4) Measure crankshaft end play .002 to .007 inch. If end play is less than .002 inch or more than .007 inch, install a new number 3 main bearing. (5) Fit remaining bearings in same manner. It is permissible to use one .001 inch undersize bearing shell with one standard bearing shell, or one .002 inch undersize bearing shell with one .001 inch undersize shell. Always use the smaller diameter bearing half as the upper. Never use an upper bearing more than .001 inch smaller than the lower bearing half and never use a new bearing half with a used bearing half.

NY132

Fig. 43—Trimming Rear Main Bearing Oil Seal

REAR MAIN BEARING OIL SEAL (Crankshaft Removed)

Upper Seal (1) Install a new oil seal in the cylinder block so that both ends protrude. (2) Tap seal down into position, using Tool C-3743 (with bridge removed) until the tool is seated in the bearing bore. (3) Hold tool in this position and cut off the portion of the seal that extends above the block on both sides. Lower Seal (1) Install a new seal in seal retainer so that ends protrude (Fig. 42). (2) Install the bridge on the tool and tap seal down into position until tool is seated. (3) Trim off portion of seal that protrudes above cap (Fig. 43). (4) Install two side seals in grooves in seal retainer. (5) When installing seal retainer, lighten screws to 30 foot-pounds.

ENGINE OILING SYSTEM (Fig. 44) Inspect oil drain plug and plug hole for stripped or OIL PAN damaged threads and repair as necessary. Install a Removal 225 Cubic Inch Engine new drain plug gasket. Tighten to 20 foot-pounds. (1) Remove oil dipstick, disconnect negative ground Inspect oil pan mounting flange for bends or discable. Raise vehicle on hoist and drain oil pan. tortion. Straighten flange if necessary. (2) Remove center link from steering arm and idler Clean oil screen and pipe thoroughly in clean solarm ball joints, see "Front Suspension". vent. Inspect condition of screen. (3) Disconnect exhaust pipe from manifold and tie Install oil screen and pipe. Turn pipe in until it out of way. begins to tighten in the crankcase, continue tighten(4) Remove oil pan attaching bolts, rotate engine ing until screen is positioned (Fig. 45). Hold a steel crankshaft to clear counterweights and remove oil rule against flat surface inside the case and measpan. ure from edge of rule to edge of oil screen. Measurement should be 1-1/8 inches with screen properly Cleaning and Inspection positioned. Clean oil pan in solvent and wipe dry with a clean cloth. Scrape all gasket material from mounting surScreen must be an interference with bottom of oil face of pan and block. pan.


225 CUBIC INCH—ENGINE 9-21 RIGHT REAR CYLINDER HEAD SCREW

VALVE ROCKER SHAFT

FILTER BY.PASS VALVE

FIITER ELEMENT LOW PRESSURE CAVITY

DRILLED PASSAGES IN NO. 4 \CAMSHAFT JOURNAL

FILTER INLET PRESSURE FILTER OUTLET PASSAGE

HiGH PRESSURE CAVITY PRESSURE RELIEF VALVE

LONGITUDINAL OIL GALLERY ............,

PUMP AND FILTER SIDE VIEW

STRAINER

ALL MAIN BEARINGS ARE LUBRICATED As SHOWN CONNECTING ROD CRANKPIN END BEARINGS ARE LUBRICATED BY HOLES .,DRILLED IN THE CRANKSHAFT BETWEEN THE MAIN AND PIN-JOURNALS

NH646

Fig. 44—Engine Oiling System

Installation 225 Cubic Inch Engine

(i) Using a new oil pan gasket set, install the oil

pan and tighten bolts to 200 inch-pounds. (2) Connect steering and idler arm ball joints to center link. Tighten retaining nuts to 40 foot-pounds and secure with cotter pins. Install dust shield. (3) Install exhaust pipe to manifold, use a new gasket. Tighten to 30 foot-pounds (41 Lower vehicle. install oil dipstick and fill crankcase to recommended level with proper grade of motor oil. Connect negative ground cable to battery.

Installation

( I Using new "0" rings instAll oil pump and tighten to 200 inch-pounds. (2) Lower engine to its original position, install front engine mount bolts. (3) Connect upper and lower radiator hoses. Install fan shroud, if so equipped. (4) Install oil filter. (Si Refill radiator.

OIL PUMP Removal (I) Drain radiator, disconnect upper and lower hoses. Remove fan shroud, if so equipped. (2) Raise vehicle on hoist, support front of engine with a jack stand placed under the right front corner of engine oil pan. (Do not support the engine at the crankshaft pulley or vibration damper.) Remove front engine mount bolts. (3) Raise engine approximately 1-1/2 to 2 inches. (4) Remove oil filter, oil pump attaching bolts and remove pump assembly.

Fig. 43—Positioning Oil Pick-up Tube and Screen


9-22 ENGINE-225 CUBIC INCH GASKET

BODY DRIVE GEAR INNER ROTOR AND SHAFT OUTER ROTOR SEAL RING

OlITFR ROTOR

VALVE

SCREW AND LOCK WASHER

NC

SPRING PLUG /

GASKL I --‘'Yd

SCREW AND LOCK WASHER

NY ?O&'

Fig. 46—Oil Pump Disassembled View

NY 136 Fig. 48—Measuring Outer Rotor Thickness

Disassembly (Fig. 46)

(1) Remove pump cover and seal ring. (2) Press off drive gear. Support gear to keep the load off of aluminum body. (3) Remove pump rotor and shaft and lift out outer pump rotor. (4) Remove oil pressure relief valve plug and lift out spring and plunger. Inspection

(1) Clean all parts thoroughly. Mating face of oil pump cover should be smooth. Replace cover if ills scratched or grooved. (2) Lay a straightedge across the oil pump cover surface (Fig. 47). If a .0015 inch feeler gauge can be inserted between cover and straightedge, cover should be replaced. (3) If outer rotor length measures less than .649 inch (Fig. 48), and the diameter less than 2.469 inches, replace outer rotor. (4) If inner rotor length measures less than .649 inch (Fig. 49), replace inner rotor.

Fig. 49—Measuring Inner Rotor Thickness

(5) Install outer rotor into pump body, pressing to one side with fingers and measure clearance between outer rotor and pump body (Fig. 50). If measurement is more than .014 inch, replace oil pump body. (6) Install inner rotor into pump body and place a straightedge across face between bolt holes (Fig. 51). If a feeler gauge of more than .004 inch can be inOUTER ROTOR

S1RAIGHT EDGE PUMP BODY COVER

--

FEELER GAUGE

FEELER GAUGE NY 140k Fig. 47—Measuring Oil Pump Cover Flatness

Fig. 50—Measuring Outer Rotor Clearance


318 CUBIC INCH—ENGINE 9-23 .FEELER GAUGE

ICFL I R

CiAUGE OU I ER ROTOR _,INNER ROTOR

OUTER ROTOR INNER ROTOR

STRAIGHT EDGE rlY135

Fig. 51 —Measuring Clearance Over Rotors

serted between the rotors and straightedge, replace pump body. (7) If clearance between inner rotor and outer rotor (Fig. 52) is more than .010 inch, replace inner and outer rotors. (8) Inspect oil pump relief valve plunger for scoring and for free operation in its bore. Small scores may be removed with 400 grit wet or dry paper. (9) For 225 cubic inch engines the relief valve spring has a free length of 2-9/32 to 2-19-64 inch and should test 14.85 to 15.85 lbs. when compressed to 1-19/32 inch. Discard spring that fails to meet specifications. (10) If oil pressure is low, inspect for worn bearings, or look for other causes of possible loss of oil pressure. Assembly (1) Assemble pump, using new parts as required.

NY139 Fig. 52—Measuring Clearance Between Rotors

(2) Install new oil seal rings between cover and body. Tighten cover bolts to 95 inch-pounds. (3) Install the oil pump on engine. Tighten attaching bolts to 200 inch-pounds. OIL FILTER

The oil filter should be replaced to coincide with every second oil change. (1) Using Tool C-4065, unscrew filter from base of oil pump and discard. (2) Wipe base clean. (3) Screw new filter on the base until gasket on filter contacts base. (4) To obtain an effective seal, tighten filter by hand the additional number of turns indicated on the replacement filter. Start engine and inspect for leaks.


EIGHT CYLINDER ENGINES 318 CUBIC INCH ENGINE INDEX Page Camshaft 33 Camshaft Bearings 34 Connecting Rods 37 Crankcase Ventilation System 83 Crankshaft Identification 37 Crankshaft Main Bearings 39 Crankshaft Main Journals 38 Cylinder Block 35 Cylinder Heads 26 Distributor Drive Shaft Bushing 35 Engine Assembly 25 Engine Mounts 24-25 Hydraulic Tappets 29 Installing Piston and Connecting Rod Assembly .. 38

Page Measuring Connecting Rod Bearing Clearance ... 38 Measuring Main Bearing Clearance 39 Oil Filter 23 40 Oil Pan Oil Pump 40 36 Piston, Pins and Rings Rear Main Bearing Oil Seals 39 Repair of Damaged or Worn Threads 83 Rocker Arms and Shaft Assembly 25 Specifications 88 Timing Chain Cover, Oil Seal and Chain 31 Tune-Up 24 27 Valves and Valve Springs Valve Timing 31


9-24 ENGINE-318 CUBIC INCH SERVICE PROCEDURES

TUNE-UP (1) Test battery specific gravity, add water if necessary, clean and tighten battery connections. (2) Test cranking voltage. See "Starting Motor Cranking Voltage" Electrical Section of this manual. (3) Tighten the intake manifold bolts to specifications(4) Perform cylinder compression test. Compression should not be less than 100 pounds for SIB Cubic Inch Engine and not vary more than 40 pounds. The recommended compression pressures are to be only as a guide to diagnosing engine problems. An engine in good condition may exhibit higher pressures. Many conditions which .are difficult to control cause variadons in compression readings. An engine should not be disassembled to determine the cause of low compression unless some other malfunction is present. (5) Clean or replace spark plug as necessary and adjust gap to .035 inch. Tighten to 30 foot-pounds using new gaskets. (6) Test resistance of spark plug cables. Refer to "Ignition System Secondary Circuit Inspection" Electrical Section. (7) Inspect the breaker plate contacts, primary wire and vacuum advance operation. Test coil output voltage, primary and secondary resistance. Test Condenser. Replace parts as necessary. Refer to Ignition Systern and make necessary adjustments. (8) Reset ignition timing with vacuum advance line disconnected. Ignition timing should be set to compensate for altitudes and/or gasoline grades. (9) Set carburetor idle mixture adjustment. Adjust throttle stop screw to specifications. Perform a combustion analysis. (10) Test fuel pump for pressure and vacuum. Refer to "Fuel System" Group 14, Specifications. (11) Inspect manifold heat control valve in the right exhaust manifold for proper operation and apply Manifold Heat Control Valve Solvent Part Number 2525054 or equivalent to the bushing and shaft. (12) Every 6 months, remove air cleaner filter element and blow out dirt gently with air hose. Direct air from inside out, and keep nozzle 2 inches away from element to avoid damaging. Clean metal housing and replace element (Fig. 1). Every two years, install a new factory recommended filter element or equivalent Service unit more frequently when driving under severe conditions, such as in dusty areas. (13) Inspect crankcase ventilation system as outlined on page 83. (14) Inspect and adjust accessory belt drives referring to "Cooling System," Group 7, for proper adjustments. (15) Road test vehicle as a final test.

Fig. I—Cleaning filter Element

FRONT ENGINE MOUNTS (Fig. 2) Removal (1) Raise hood and position fan to clear radiator hose and radiator top tank. (2) Disconnect throttle linkage at transmission and at carburetor. (3) Remove torque nuts from insulator studs. (4) Raise engine just enough to remove front engine mount assembly. Installation

(1) Install insulator to engine bracket and tighten to specified torque. (2) Lower engine and install washers and prevailing torque nuts to insulator studs; tighten nuts to specified torque.

-

e-t,-40e-

VIEW A RIGHT SIDE A 4.

Milk/ TIGHTENING TOROUF 50 FT. LB. 55 FT. LB.

t-C."

VIEW B LEFT SIDE

-4/ 8

75 FT. LB. NR4OA

Fig. 2 — Front Engine Mounts-378 Cubic Inch


318 CUBIC INCH—ENGINE 9-25

(3) Connect throttle at transmission and carburetor. REAR ENGINE MOUNTS (Fig. 3) Removal (1) Raise vehicle on hoist. (2) Install transmission jack. (3) Remove rear engine crossmember from frame and remove rear mount. Installation (1) Install rear engine mount to crossmember and tighten nut to specified torque. (2) Install rear crossmember to frame and tighten bolts to specified torque. (3) Remove transmission jack. (4) Install rear engine mount to transmission bolts and tighten to specified torque. (5) Lower vehicle. ENGINE ASSEMBLY Removal (1) Scribe outline of hinge brackets on the hood to assure proper adjustment when installing. Remove hood. (2) Drain cooling system and remove battery. (3) Remove all hoses, fan shroud (if so equipped), oil cooler lines and radiator. (4) Disconnect fuel lines, linkage and wires attached to engine, remove air cleaner and carburetor. (5) Attach engine lifting fixture to carburetor flange studs on intake manifold. (6) Raise vehicle on a hoist and install engine support fixture Tool C-3487A on the chassis to support rear of engine. (7) Drain transmission. (8) Disconnect exhaust pipes at the manifolds, propeller shaft, wires, linkage, speedometer cable, and oil cooler lines at transmission. (9) Remove engine rear support crossmember and remove transmission from vehicle. REAR TRANSMISSION EXT. HOUSING REAR MOUNT (2j

CENTER CROSSMEMBER p

TIGHTENING (A TORQUE 200 N. LBS 40 FT. LBS.

(10) Lower vehicle and attach a crane or other suitable lifting tool to fixture eyebolt. (11) Remove engine front mounts. Raise engine with lifting tool and work engine out of chassis. (12) Place engine in repair stand C-3167 and adapter C-3662 for disassembly using transmission mounting bolts. Installation

(1) Attaching engine lifting fixture to carburetor flange studs on intake manifold. (2) Attach a crane or other suitable lifting tool to fixture eyebolt. (3) Remove engine from repair stand and lower engine carefully until engine is positioned in the chassis with front engine mounts in place. (4) Install engine support fixture Tool C-3487A on chassis to support rear of engine. Remove the crane or lifting tool. (5) Raise vehicle on a hoist, install the transmission, engine rear support crossmember, tighten front engine mounts, remove the engine support fixture, Tool C-3487A. (6) Connect propeller shaft, wires, linkage, speedometer cable, oil cooler lines at transmission, connect exhaust pipes to manifolds. Install transmission filler tube. (7) Lower vehicle and remove engine lifting fixture from engine. Install carburetor and fuel lines. (8) Install radiator, fan shroud, hoses, oil cooler lines and connect all wires and linkage. (9) Install hood using scribe marks for proper alignment. (10) Close all drain cocks and fill cooling system, install battery. (11) Fill engine crankcase and transmission. Refer to "Lubrication" Group 0, for quantities and lubricants to use. Inspect entire system for leaks and correct as necessary. Whenever an engine has been rebuilt and/or a new camshaft and/or tappets are installed, one quart of engine supplement, Chrysler Part Number 1879406 or equivalent should be added to the engine oil to aid in break-in. The oil mixture should be left in the engine for a minimum of 500 miles. Drain the oil mixture at the next normal oil change.

(12) Start engine and run until normal operating temperature is reached. (13) Test timing (with vacuum advance line removed) and adjust carburetor and transmission linkage as necessary. Connect vacuum lines, install air cleaner and road test the vehide. ROCKER ARMS AND SHAFT ASSEMBLY

90 FT. LBS.

NU281

Removal Fig. 3—Engine Rear Support

(1) Disconnect spark plug wires by pulling on the


9-26

ENGINE-318 CUBIC INCH

boot straight out in line with plug. (2) Disconnect closed ventilation system and evaporative control system (if so equipped) from cylinder head cover. (3) Remove cylinder head cover and gasket. (4) Remove five rocker shaft bolts and retainers. (5) Remove rocker arms and shaft assembly.

tive control system (if so equipped) and cylinder head covers. (8) Remove intake manifold, ignition coil and carburetor as an assembly. (9) Remove exhaust manifolds. (10) Remove rocker arm and shaft assemblies. Remove push rods and identify to insure installation in

Installation

original location. 01) Remove the

(1) Install rocker arm and shaft assemblies with "NOTCH" on end of rocker shaft pointing to centerline of engine and toward front of engine on the left bank and to the rear on right bank, making sure to install the long stamped steel retainers in the number two and four positions, tighten to 210 inch-pounds. (2) Inspect cylinder head cover for distortion. Straighten if necessary. (3) Install cylinder head cover and tighten to 40 inch-pounds. (4) Install closed crankcase ventilation system and evaporative control system (if so equipped).

CYLINDER HEADS The chrome alloy cast iron cylinder heads shown in Figure 4 are held in place by 10 bolts. The spark plugs are located in peak of the wedge between the valves. Removal

(1) Drain cooling system and disconnect battery ground cable. (2) Remove alternator, carburetor air cleaner and fuel line. (3) Disconnect accelerator linkage. (4) Remove vacuum control hose between carburetor and distributor. (5) Remove distributor cap and wires. (6) Disconnect coil wires, heat indicator sending unit wire, heater hoses and by-pass hose. (7) Remove closed ventilation system and evaporaSPARK INTAKE oll FEED DOWEL HOLE

. suabe• COOLANT PASSAGE

VALVES

PLUGS

10 head bolts from each cylinder heads. cylinder head and remove in holding fixture Tool heads cylinder (12) Place plugs. spark Remove C-3626. Installation

(1) Clean all gasket surfaces of cylinder block and cylinder heads. (2) Inspect all surfaces with a straightedge if there is any reason to suspect leakage. If out of flatness exceeds .00075 times the span length in any direction; either replace head or lightly machine the head gasket surface. As an example, if a 12 inch span is .004" out of flat, allowable is 12 x .00075 :.--_- .009". Head is OK. The cylinder head surface finish should be 70-180 micro-inches. (3) Coat new gaskets lightly with number 1057794 Sealer and install on cylinder block. (4) Remove cylinder heads from holding fixtures Tool C-3626 and place heads on engine. (5) Install cylinder head bolts. Starting at top center, tighten all cylinder head bolts to 50 foot-pounds in sequence, as shown in Figure 5. Repeat procedure, retighten all cylinder head bolts to 85 foot-pounds. (6) Inspect push rods and replace worn or bent rods. (7) Install push rods, rocker arm and shaft assemblies with the "NOTCH" on the end of rocker shaft pointing to centerline of engine and toward front of engine on the left bank and to the rear on right bank, making sure to install the long stamped steel retain-

HOLES

r. FXHAUST VALVFS

NK6

4U266

Fig. 4—Cylinder Head Assembly

Fig. 5 — Cylinder Head Tightening Sequence


318 CUBIC INCH—ENGINE 9-27

era in the number two and four positions, tighten to 210 inch-pounds. (8) Coat intake manifold side gaskets lighlly willi number 1057794 sealer or equivalent and end gaskets with 1316241 sealer or equivalent. Install intake manifold gaskets with the bead down and end seals locked in the tangs of head gasket. Add a drop of sealer in the "17- notches at ends of side seals after installation. (9) Position intake manifold on engine and install the twelve attaching cap screws "Finger Tight." Tighten cap screws one through four to 25 foot-pounds and tighten remaining cap screws to 25 foot-pounds. in the tightening sequence shown in Figure 6, then refighten cap screws one through four to 35 foot-pounds and follow by retightening the remaining cap screws to 35 foot-pounds in sequence shown. (10) Install exhaust manifolds with new gaskets, the extended shield is used on left side, tighten to 30 foot-pounds. (11) Adjust spark plugs to .035 inch gap and install the plugs tightening to 30 foot-pounds. (12) Install coil wires, heat indicator sending unit wire, heater hoses and by-pass hose. (13) Install vacuum control hose between carburetor and distributor. (14) Install accelerator linkage and adjust as necessary. (15) Install distributor cap and wires. (16) Install fuel line, alternator and drive belt. Tighten alternator mounting bolt to 30 foot-pounds and adjusting strap bolt to 200 inch.pounds. See Coolmg Section on adjusting belt tension. (17) Place new cylinder head cover gaskets in posi tion and install cylinder head covers. Tighten to 40 inch-pounds. (18) Install closed crankcase ventilation system and evaporative control system (if so equipped). (19) Fill cooling system and install battery ground cable. VALVES AND VALVE SPRINGS

The valves arc arranged in-line in the cylinder heads and inclined 18 degrees. The rocker shaft support and the valve guides are cast integral with the heads. Removal (1) With cylinder head removed, compress valve springs using Tool C-3422A, as shown in Fig. 7. (2) Remove valve retaining locks, valve spring retainers, valve stern cup seals and valve springs. (3) Before removing valves, remove any burrs from valve stem lock grooves to prevent damage to the valve guide. Identify valves to Insure installation in original location.

Fig. 6—Intake Manifold Tightening Sequence Valve Inspection (1) Clean valves thoroughly and discard burned, warped and cracked valves. (2) Measure valve stems for wear. New intake valve stem diameter should measure .3715 to .3725 inch and exhaust valve stem diameter should measure .3705 to .3715 inch. If wear exceeds .002 inch, replace valve. (3) Remove carbon and varnish deposits from inside of valve guides with a reliable guide cleaner. (4) Measure valve stem guide clearance as follows: (a) Install sleeve Tool C-3973 over valve stem (Fig. 8) and install valve. The special sleeve places the valve at the correct height for checking with a dial indicator. (b) Attach dial indicator Tool C-3339 to cylinder head and set it at right angle of valve stem being measured (Fig. 9). (c) Move valve to and from the indicator. The total dial indicator reading should not exceed .017 inch. Ream the guides for valves with oversize stems if dial

CYLINDER HEAD ASSEMBLY

REPAIR STANDS

Fig. 7 —Compressing Valve Spring

TOOL

NK9


9-28 ENGINE-318 CUBIC INCH

A—SEAT WIDTH ONTAKE 1/16 TO 3/32 INCH EXHAUST: 3/64 TO 1/16 INCH/ 8—FACE ANGLE (INTAKE: 45°—EXHAUST: 430) C—SEAT ANGLE IINTAKE: 45°—EXHAUST: 45°) D—CONTACT SURFACE

MI ANN

MIKA= B

NH6458

Fig. 10 Valve Face and Seat Angle Fig. 8 – Installing Valve and Tool C3873

indicator reading is excessive or if the stems are scuffed or scored. (5) Service valves with oversize stems are available in .005, .015 and .030 inch oversize. Reamers to accommodate the oversize valve stem are as follows: Reamer Tool Number

Reamer Oversize

Valve Guide

Size .379-.380 i n. .005 in. C-3433 .015 in. .389-.390 in. C-3430 .404-.405 in. .030 in. C-3927 (6) Slowly turn reamer by hand and clean guide thoroughly before installing new valve. Do not attempt to ream the valve guides from standard directly to .030 Inch. Use step procedure of .005, .015 and .030 inch so the valve guides may be reamed true In relation to the valve seat. Refacing Valves and Valve Seats (1) The intake and exhaust valve seats and intake valve face have a 45 degree angle. The exhaust valve face has a 43 degree angle. The valve face and valve seat angles are shown in Figure 10. (2) Inspect the remaining margin after the valves

are refaced (Fig. 11). Valves with less than 3/64 inch margin should be discarded. (3) When refacing valve seats, it is important that the correct size valve guide pilot be used for reseating stones. A true and complete surface must be obtained. (4) Measure the concentricity of valve seat using dial indicator No. 13725. Total runout should not exceed .002 inch (total indicator reading). (5) Check the valve seat with Prussian blue to determine where the valve contacts the seat. To do this, coat valve seat lightly with Prussian blue then set valve in place. Rotate the valve with light pressure. If the blue is transferred to the center of valve face, contact is satisfactory. If the blue is transferred to top edge of valve face, lower valve seat with a 30° stone. If the blue is transferred to bottom edge of valve face raise valve seat with a 60° stone. (6) When seat is properly positioned the width of intake seats should be 1/16 to 3/32 inch. The width of the exhaust seats should be 3/64 to 1/16 inch. Testing Valve Springs (fig. 12) (1) Whenever valves have been removed for inspect MARGIN

EXHAUST VALVE

FACE

STEM

VALVE SPRING RETAINER LOCK GROOVES

XH330.0 Fig. 9—Measuring Valve Guide Wear

Fig. II—Intake and Exhaust Valves


318 CUBIC INCH—ENGINE 9-29

Fig. 14—Measuring Valve Stem Length

Fig. 12—Testing Valve Springs

tion, reconditioning or replacement, valve springs should be tested. As an example the compression length of the spring to be tested is 1-5;16 inches. Turn table of Tool C-647 until surface is in line with the 1-5/16 inch mark on the threaded stud and the zero mark to the front. Place spring over stud on the table and lift compressing lever to set tone device. Pull on torque wrench until ping is heard. Take reading on torque wrench at this instant. Multiply this reading by two. This will give the spring load at test length. Fractional measurements are indicated on the table for finer adjustments. Refer to specifications to obtain specified height and allowable tensions. Discard the springs that do not meet specifications. (2) Inspect each valve spring for squareness with a steel square and surface plate, test springs from both ends (Fig. 13). If the spring is more than 1/16 inch out of square, install a new spring.

installation 111 Coat valve stems with lubrication oil and insert them in cylinder head. 12i If valves or seats are reground, check valve stem height with Tool C-3968 (Fig. 14). If valve is too long, grind off the tip until length is within limits. (3) Install new cup seals on all valve stems and over valve guides (Fig. 15). Install valve springs and retainers. (4) Compress valve springs with Tool C-3422A, install locks and release tool. If valves and/or seats are reground, measure the installed height of springs. Make sure measurement is taken from bottom of spring seat in cylinder head to the bottom surface of spring retainer (if spacers are installed, measure from the top of spacer). If height is greater than 1-11/16

inches, install a 1116 inch spacer in head counterbore to bring spring height back to normal 1-5/8 inches to 1-11/16 inches.

HYDRAULIC TAPPETS Preliminary to Checking the Hydraulic Tappets (1) Before disassembling any part of the engine to RETAINER SPRING INTAKE VALVE SEAL

NKI 3 KRI4 8

Fig. 13—Checking Valve Spring Squareness

Fig. IS—installing Valve, Cup Seals, Spring and Retainer


9-30 ENGINE-318 CUBIC INCH correct tappet noise, read the oil pressure at the gauge (Install a reliable gauge at pressure sending unit if vehicle has no oil pressure gauge), and check the oil level in the oil pan. The pressure should be between 45 and 65 pounds at 1000 R.P.M. (2) The oil level in the pan should never be above the "full" mark on dipstick, or below the "add oil" mark. Either of these two conditions could be responsible for noisy tappets. Oil Level Too High If oil level is above "full" mark on dipstick, it is possible for the connecting rods to dip into the oil while engine is running and create foam. Foam in oil pan would be fed to the hydraulic tappets by the oil pump causing them to lose length and allow valves to seat noisily. Oil Level Too Low Low oil level may allow oil pump to take in air which, when fed to the tappets, causes them to lose length and allows valves to seat noisily. Any leaks on intake side of pump through which air can be drawn will create the same tappet action. When tappet noise is due to aeration, it may be intermittent or constant, and usually more than one tappet will be noisy. When oil level and leaks have been corrected, engine should be operated at fast idle for sufficient time to allow all of the air inside of the tappets to be bled out. Tappet Noise Diagnosis (1) To determine source of tappet noise, operate engine at idle with cylinder head covers removed. (2) Feel each valve spring or rocker arm to detect noisy tappet. The noisy tappet will cause the affected spring and/or rocker arm to vibrate or feel rough in operation. Worn valve guides or cocked springs are sometimes mistaken for noisy tappets. If such is the case, noise may be dampened by applying side thrust on the valve spring. If noise is not appreciably reduced, it can be assumed the noise is in the tappet. Inspect the rocker arm push rod sockets and push rod ends for wear.

(3) Valve tappet noise ranges from light noise to a heavy click. A light noise is usually caused by excessive leakdown around the unit plunger which will necessitate replacing the tappet, or by the plunger partially sticking in the tappet body cylinder. A heavy click is caused either by a tappet check valve not seating, or by foreign particles becoming wedged between the plunger and the tappet body, causing the plunger to stick in the down position. This heavy click will be accompanied by excessive clearance between the valve stem and rocker arm as valve closes. In either case, tappet assembly should be removed for inspection and cleaning.

Tappet Removal (1) The tappets can be removed without removing cylinder heads by following this recommended procedure: Remove cylinder head covers. (2) Remove rocker arms and shaft assembly. (3) Remove push rods and identify to insure installation in original location.

(4) Slide a magnetic pickup tool through opening in cylinder head and seat tool firmly in the head of tappet. (5) Pull tappet out of bore with a twisting motion. If all tappets are to be removed, identify tappets to insure installation in original location. CAUTION: The plunger and tappet bodies are not interchangeable. The plunger and valve must always be fitted to the original body. It is advisable to work on one tappet at a time to avoid mixing of parts. Mixed parts are not compatible. Do not disassemble a tappet on a dirty work bench.

Disassembly (Fig. 16) (1) Pry out plunger retainer spring clip. (2) Clean varnish deposits from inside of tappet body above plunger cap. (3) Invert tappet body and remove plunger cap, plunger, flat check valve, check valve spring, check valve retainer and plunger spring. Cleaning and Assembly (1) Clean all tappet parts in a solvent that will remove all varnish and carbon. (2) Replace tappets that are unfit for further service with new assemblies. (3) If plunger shows signs of scoring or wear and valve is pitted, or if valve seat on end of plunger indicates any condition that would prevent valve from seating, install a new tappet assembly. (4) Assemble tappets (Fig. 16). Testing (1) Fill a pan with clean kerosene. (2) Remove cap from plunger and plunger from tappet body. (3) Fill tappet body with kerosene and install plunger. PLUNGER SPRING

PLUNGER PLUNGER RETAINER CHECK VALVE SPRING CLIP I

TAPPET BODY RETAINER CHECK VALVE SPRING PLUNGER CAP

NR68

Fig. 16—Hydraulic Tappet Assembly (Disassembled View)


318 CUBIC INCH—ENGINE 9-31 (4) Unseat check valve with a brass rod to permit complete installation of plunger. Replace cap. (5) Hold tappet in an upright position and insert lower jaw of pliers, Tool C-3160, in the groove of tappet body (Fig. 17). (6) Engage jaw of pliers with top of tappet plunger. Test leakdown by compressing the pliers. If plunger collapses almost instantly as pressure is applied, disassemble tappet. clean and test again (Fig. 17). (71 If tappet still does not operate satisfactorily after cleaning. install a new tappet assembly.

The timing of the crankshaft pulley should now read from 10 degrees before top dead center to 2 degrees after top dead center. Remove spacer. (5) If reading is not within specified limits: (a) Check sprocket index marks lb) Inspect timing chain for wear. (c) Check accuracy of DC mark on timing indicator.

If the tappet or bore in cylinder block is scored, scuffed, or shows signs of sticking, ream the bore to next oversize.

TIMING CHAIN COVER, OIL SEAL AND CHAIN

Installation (1) Lubricate

tappets. 12) Install tappets and push rods in their original positions_ (3) Install rocker arm and shaft ace-Pmbly. 141 Start and operate engine. Warm up to normal operating temperature.

CAUTION: To prevent damage to valve mechanism, engine must not be run above fast idle until all hydraulic tappets have filled with oil and have become quiet.

VALVE TIMING (1) Turn crankshaft until the NO. 6 exhaust valve is closing and NO. 6 intake valve is opening. 121 Insert a 14 inch spacer between rocker arm pad and stem tip of No. 1 intake valve. Allow spring load to bleed tappet down giving in effect a solid tappet. (3) Install a dial indicator so plunger contacts valve spring retainer as nearly perpendicular as possible. Zero the indicator. (4) Rotate crankshaft clockwise (normal running direction) until the valve has lifted .010 inch for 318 cubic inch engines.

Fig. 17—Testing Tappet Using Tool C-3160

CAUTION: Do not turn crankshaft any further clockwise as valve spring might bottom and result in serious damage.

Cover Removal

Drain cooling system and remove radiator, fan belt and water pump assembly. (2) Remove pulley from vibration damper and bolt and washer securing vibration damper on crankshaft. (3) Install Tool C-3688 and pull vibration damper from end of crankshaft (Fig. 18). (4) Remove fuel lines and fuel pump. (5) Loosen oil pan bolts and remove the front bolt at each side. 161 Remove chain case cover and gasket using extreme caution to avoid damaging oil pan gasket. It is normal to find particles of neoprene collected between the crankshaft seal retainer and crankshaft oil slinger.

(7) Slide crankshaft oil slinger from end of crankshaft. Measuring Timing Chain for Stretch

(1) Place a scale next to timing chain so that any movement of chain may be measured. 12) Place a torque wrench and socket over camshaft sprocket attaching bolt and apply torque in direction of crankshaft rotation to take up slack; 30 foot-pounds (with cylinder head installed) or 15 footpounds (cylinder heads removed). With a torque applied to the camshaft sprocket bolt, crankshaft should

Fig. 18—Removing Vibration Damper Assembly


9-32 ENGINE-318 CUBIC INCH not

be permitted to move. It may be necessary to block crankshaft to prevent rotation.

(3) Holding a scale with dimensional reading even with edge of a chain link, apply torque in the reverse direction 30 foot-pounds (with cylinder heads installed) or 15 foot-pounds (cylinder heads removed) and note amount of chain movement (Fig. 19). (4) Install a new timing chain, if its movement exceeds 3/16 inch. (5) If chain is satisfactory, slide the crankshaft oil stinger over shaft and up against sprocket (flange away from sprocket). (6) If chain. is not satisfactory, remove camshaft sprocket attaching cup washer, fuel pump eccentric and remove timing chain with crankshaft and camshaft sprockets. When installing timing chain, use Tool C-3509 to prevent camshaft from contacting the welch plug in the rear of engine block. Remove distributor and oil pump-distributor drive gear. Locate tool against rear side of cam gear and attach tool with distributor retainer plate bolt (Fig. 20).

(7) Place both camshaft sprocket and crankshaft sprocket on the bench with timing marks on exact imaginary center line through both camshaft and crankshaft bores. (8) Place timing chain around both sprockets. (9) Turn crankshaft and camshaft to line up with keyway location in crankshaft sprocket and in camshaft sprocket. (10) Lift sprockets and chain (keep sprockets tight against the chain in position as described). (11) Slide both sprockets evenly over their respective shafts and use a straight edge to check alignment of timing marks (Fig. 21). (12) Install the fuel pump eccentric, cup washer, and camshaft bolt. Tighten bolt to 35 foot-pounds. (13) Check camshaft for .002 to .006 inch end play with a new thrust plate and up to .010 inch end play with a used thrust plate. if not within these limits install a new thrust plate. 316 INCH1 Re—a__ r

1 .;:k.

DISTRIBUTOR LOCK BOLT

Fig. 20 —Camshaft Holding Tool C4509

(14) If within limits, slide the crankshaft oil stinger over shaft and up against sprocket (flange away from sprocket). Oil Seal Replacement (Cover Removed)

(1) Position remover screw of Tool C-3506 through case cover with inside of case cover up. Position puller blocks directly opposite each other, and force the angular lip between the neoprene and flange of the seal retainer. (2) Place washer and nut on remover screw. Tighten nut, forcing the blocks into the gap to a point of distorting the seal retainer lip, (Fig. 22). This is important, remover is only positioned at this point. (3) Place sleeve over the retainer and place removing and installing plate into sleeve. (4) Place flat washer and nut on remover screw. Hold tool center screw and tighten tool lock nut to remove seal, (Fig. 23). (5) Insert remover screw through removing and installing plate so that the thin shoulder will be facing UP. (6) Insert remover screw with plate through the seal opening (inside of chain case cover facing up). (7) Place seal in the cover opening, with neoprene down. Place the seal installing plate into the new seal,

9116-/ -NY 4

IORQUE WRENCH NU268 fly. 79— Measuring Timing Chain Stretch

Fig. 21—Alignment Timing Marks


318 CUBIC INCH—ENGINE 9-33 LIP OF SEAL RETAINER

CHAIN CASE COVER

.

REMOVER SCREW (TOOL!

INSTALLING PLATE (TOOL)

\14)

SEAL RETAINER

CHAIN CASE 0\Z/VER

REMOVER BLOCKS nom) NKIE1A

yes.

NK21A

Fig. 22— Remover Blocks Expanded to Puller Position REMOVtNG AND INSTALLING PLATE (TOOL) REMOVER SCREW (TOOL/ SLEEVE

CHAIN CASE COVER

NKI9A

Fig. 23—Removing Oil Seal

with protective recess toward lip of seal retainer (Fig. 24). (8) Install flat washer and nut on remover screw, hold screw and tighten the nut (Fig. 25). (9) Seal is properly installed when neoprene is tight against face of cover. Try to insert a .0015 feeler gauge between neoprene and cover (Fig. 26). If the seal is installed properly, the feeler gauge cannot be inserted. Do not over compress neoprene.

Cover Installation (1) Be sure mating surfaces of chain case cover and cylinder block are clean and free from burrs. "

Fig. 25—Installing New Seal

(2) Using a new gasket carefully install chain case cover to avoid damaging oil pan gasket. Tighten chain case cover capscrews to 30 foot-pounds first then tighten oil pan capscrews to 15 foot-pounds. (3) Lubricate seal lip with lubriplate, position damper hub slot on key in crankshaft, and slide hub on crankshaft. (4) Place installing tool, part of Puller set Tool C-3688 in position and press damper hub on crankshaft (Fig. 27). (5) Slide pulley over the shaft and attach with bolts and lockwashers. Tighten the bolts to 15 footpounds. (6) Install damper hub retainer washer and bolt. (7) Install fuel pump and fuel lines. (8) Install water pump and housing assembly using new gaskets. Tighten bolts to 30 foot-pounds. (9) Install radiator, fan and belt, hoses and close drains. (10) Fill cooling system. (11) With timing indicator on "0" install distributor drive gear with slot pointing to the first intake manifold bolt on left side of engine (Fig. 28).

CAMSHAFT (Engine Removed from Vehicle) The camshaft has an integral oil pump and distrib-

1 IP,STALLING PLATE (TOOL)

it

s

RLMOVER SCREW

(toot'

CHAIN CASE COVER SEAL ASSEMBLY

.1110 —st

Fig. 24—Positioning Installer Plate

NK2DA

Fig. 26—Inspecting Seal for Proper Seating


9-34 ENGINE-318 CUBIC INCH

LOCK BOLT

TULL PUN, FCCFNTRIC

THRUST PLATE OIL PUMP AND DISTRIBUTOR DRIVE GEAR INTEGRAL WITH CAMSHAFT

CUP WAS,IER Fig.

318 CUBIC INCH CAMSHAFT SPROCKET

NU378

29—Camshaft and Sprocket Assembly (Disassembled View)

Fig. 27—Installing Vibration Damper Assembly

utor drive gear and a bolt on fuel pump eccentric, as shown in (Fig. 29). With engine in repair stand C-3167 and adapter C-3662. Remove intake manifold, cylinder head covers, timing case cover, and timing chain. Removal

(1) Remove rocker arm and shaft assemblies. (2) Remove push rods and tappets; identify so each part will be replaced in its original location. (3) Remove distributor and lift out the oil pump and distributor drive shaft. (4) Remove camshaft thrust plate and carefully withdraw the camshaft being careful not to damage cam bearings with the cam lobes. Installation

(1) Lubricate camshaft lobes and camshaft bearing journals and insert the camshaft to within 2 inches of its final position in cylinder block. (2) Install Tool C-3509 with tongue back of distributor drive gear, (Fig. 20). (3) Hold tool in position with distributor lock plate screw. This tool will restrict camshaft from being pushed in too far arid prevent knocking out the welch plug in rear of cylinder block. Tool should remain installed until the camshaft and crankshaft sprockets DISTRIBUTOR DRIVE

41111111mir

and timing chain have been installed. Whenever an engine has been rebuilt and/or a new camshaft and/or tappets are installed, one quart of engine supplement, Chrysler Part Number 1879406 or equivalent should be added to the engine oil to aid in breakin. The oil mixture should be left in the engine for a minimum of 500 miles. Drain the oil mixture at the next normal oil change. Whenever the camshaft is replaced, all of the tappet faces must be inspected for crown with a straightedge. If any negative crown (dish) is observed, tappet must be replaced. CAMSHAFT BEARINGS (Engine Removed from Vehicle) Removal

(1) With engine completely disassembled, drive out rear cam bearing welch plug. (2) Install proper size adapters and horse shoe washers (part of Tool C-3132A) at back of each bearing shell to be removed and drive out bearing shells, (Fig. 30). Installation

(1) Install new camshaft hearings with Tool C. 3132A by sliding the new camshaft bearing shell over proper adapter. (2) Position rear bearing in the tool. Install horse shoe lock and by reversing removal procedure, carefully drive bearing shell into place. atakrait.r rf

• 'MAIN BEARING 'OIL HOLE 41 Fig.

28—Positioning of Distributor Drive Gear

A•

Fig. 30—Removing Camshaft Bearings

NK•26


318 CUBIC INCH—ENGINE 9-35

31—Removing Distributor Drive Shaft Bushing (3) Install remaining bearings in the same manner. Bearings must be carefully aligned to bring oil holes into full register with oil passages from the main bearings. Also. Number two bearing must index with the oil passage to the left cylinder head and Number four bearing must index with the oil passage to the right cylinder head. If the camshaft bearing shell oil holes are not in exact alignment, remove and reinstall them correctly. Install a new core hole plug at the rear of camshaft. Be sure this plug does not leak. Fig.

DISTRIBUTOR DRIVE SHAFT BUSHING Removal

(1) Insert Tool C-3052 into old bushing and thread down until a tight fit is obtained, (Fig. 31). (2) Hold puller screw and tighten puller nut until bushing is removed. Installation

(1) Slide new bushing over burnishing end of Tool C-3053 and insert the tool and bushing into the bore. (2) Drive bushing and tool into position, using a hammer (Fig. 32). (3) As the burnisher is pulled through the bushing by tightening the puller nut, the bushing is expanded tight in block and burnished to correct size, (Fig. 33). DO NOT REAM THIS BUSHING.

Fig. 33—Burnishing Distributer Drive Shaft Bushing

Distributor Timing Before installing the distributor and oil pump drive shaft, time engine as tollows: (1) Rotate crankshaft until No. 1 cylinder is at top dead center on the firing stroke. (2) When in this position, the straight line on vibration damper should be under ("0") on the timing indicator. (3) Coat shaft and drive gear with engine oil. Install the shaft so that after gear spirals into place, it will index with the oil pump shaft, so slot in top of drive gear will point to the first intake manifold bolt on left side of engine as shown in (Fig. 28). Installation of Distributor (I) Hold the distributor over the mounting pad on cylinder block with vacuum chamber pointing toward right of engine. (2) Turn rotor until it points forward and to am proximate location of No. 1 tower terminal in distributor cap. (a) Place distributor gasket in position. (4) Lower the distributor and engage the shaft in the slot of distributor drive shaft gear. (5) Turn distributor clockwise until breaker contacts are just separating and install hold down clamp. CYLINDER BLOCK Piston Removal

Fig. 32—Installing Distributor Drive Shaft Bushing

(1) Remove top ridge of cylinder bores with a reliable ridge reamer before removing pistons from cylinder block. Be sure to keep tops of pistons covered during this operation. Pistons and connecting rods must be removed from top of cylinder block. When removing piston and connecting rod assemblies from the engine, rotate crankshaft so that each connecting rod is centered in cylinder bore. (2) Inspect connecting rods and connecting rod caps for cylinder identification. Identify them if necessary. (3) Remove connecting rod cap. Install connecting


9-36

ENGINE-318 CUBIC INCH

rod bolt guide set on connecting rod bolts. Push each piston and rod assembly out of cylinder bore. Be care-

CROSS-HATCH PATTERN

ful not to nick crankshaft journals.

(4) After removal, install bearing cap on the mating rod. Cleaning and inspection

(1) Clean cylinder block thoroughly and check all core hole plugs for evidence of leaking. (2) If new core plugs are installed, coat edges of plug and core hole with Number 1057794 Sealer or equivalent. Drive the core plug in so that the rim lies at least 1/64" below the lead-in chamfer. (3) Examine block for cracks or fractures. Cylinder Bore Inspection

The cylinder walls should be checked for out-ofround and taper with Tool C-119. If the cylinder bores show more than .005" out-of-round, or a taper of more than .010", or if the cylinder walls are badly scuffed or scored, the cylinder block should be rebored and honed, and new pistons and rings fitted. Whatever type of boring equipment is used, boring and honing operation should be closely coordinated with the fitting of pistons and rings in order that specified clearances may be maintained. Honing Cylinder Bores

Before honing, stuff plenty of clean rags under the bores, over the crankshaft to keep abrasive materials from entering crankcase area. (1) Used carefully, the cylinder bore resizing hone C-823 equipped with 220 grit stones, is the best tool for this job. in addition to deglazing, it will reduce taper and out-of-round as well as removing light scuffing, scoring or scratches. Usually a few strokes will clean up a bore and maintain the required limits. (2) Deglazing of the cylinder walls may be done using a cylinder surfacing hone, Tool C-3501, equipped with 280 grit stones (C-3501-3810) if the cylinder bore is straight and round. 20430 strokes depending on the bore condition will be sufficient to provide a satisfactory surface. Inspect cylinder walls after each 20 strokes. Use honing oil C-3501-3880 or a light honing oil available from major oil distributors. Do not

NP998 Fig. 34 — Cross Hatch Pattern

the parts then thoroughly dried. The bore can be considered clean when it can be wiped clean with a white cloth and cloth remains clean. Oil the bores after cleaning to prevent rusting.

PISTONS, PINS AND RINGS

The pistons are cam ground so that the diameter at the pin boss is less than its diameter across the thrust face. This allows for expansion under normal operating conditions. Under operating temperatures, expansion forces the pin bosses away from each other, thus, causing the piston to assume a more nearly round shape. It is important that pistons be checked for taper and elliptical shape before they are fitted into the cylinder bore (Fig. 35). Finished Pistons

All pistons are machined to the same weight in grams, regardless of oversize to maintain piston balance. For cylinder bores which have been honed or .017 TO 025 IN. LESS THAN DIAMETER AT (0

d

use engine or transmission oil, mineral spirits or kerosene.

(3) Honing should be done by moving the hone up and down fast enough to get a cross-hatch pattern. When hone marks intersect at UN, the cross hatch angle is most satisfactory for proper seating of rings (Fig. 34). (4) After honing, it is necessary that the block be cleaned again to remove all traces of abrasives. CAUTION: Be sure all abrasives are removed from engine parts after honing. It is recommended that a solution of soap and water be used with a brush and

318 CUBIC INCH THE ELLIPTICAL SHAPE Or TIIE PISTON SKIRT SHOULD BE .010 TO .013 IN. LESS AT DIAMETER (A) THAN ACROSS IHE THRUST FACES AT DIAMETER (B)

DIAMETER (11) SHOULD BE .0000 TO .001 INCH LARGER THAN TO NU249

Fig. 35-318 Cubic Inch Piston Measurements


318 CUBIC INCH—ENGINE 9-37

rebored, pistons are available in standard and the following oversizes: .005..020, .040 inch. Fitting Pistons Piston and cylinder wall must be clean and dry. Specified clearance between the piston and the cylinder wall is .0005 to .0015 inch. Piston diameter should be measured at the top of skirt 90 degrees to piston pin axis. Cylinder bores should he measured halfway down the cylinder bore and transverse to the engine crankshaft center line. Pistons and cylinder bores should be measured at normal room temperature, 70 degrees F.

Piston Pins (1) With new piston and new pins at room temperature, 70°F., pin should be a light thumb push fit in the piston and connecting rod. Replacement is necessary if there is excessive clearance between the pin and the piston. Ream piston and connecting rod to next oversize. New pistons are supplied with properly fitted pins. (2) Assemble pistons and rods for the left hand cylinder bank (1-3-5-7) with piston boss marked "Front" and indent on piston head on the same side as the larger chamfer on large end of connecting rod. Assemble pistons and rods to be used in the right cylinder bank (2-4-6-8) with "Front" and indent opposite the large chamfer in the connecting rod. Fitting Rings (1) Measure piston ring gap about two inches from bottom of cylinder bore in which it is to be fitted (An inverted piston can be used to push the rings down to insure positioning rings squarely in the cylinder wall before measuring). (2) Insert feeler stock in the gap. The ring gap should be between .010 to .020 inch for compression rings and .015 to .002 inch for oil ring steel rails in standard size bores (for new service rings). Maximum gap in .005 inch 0/S bores should be .060 inch for compression rings and .070 inch for oil ring steel rails. (3) Measure side clearance between piston ring and ring land (Fig. 36). Clearance should be .0015 to .003 Inch for the top compression ring and the intermediate ring. Steel rail service oil ring should be free in groove, but should not exceed .005 inch side clearance. (4) The keys on the spacer expander must be inserted into the hole in the oil ring grove over the piston pin front boss. (5) Install compression rings in middle and top grooves use ring installer Tool C-3586 for 318 cubic inch engine. Be sure the mark "Top" on each compression ring is to the top of piston when ring is installed.

Fig. 36—Measuring Piston Ring Clearance

CRANKSHAFT IDENTIFICATION

A crankshaft which has one or more connecting rod or main hearing journals undersize will be steel stamped on the milled flat on the #8 crankshaft counterweight (Fig. 37). Identification Location Stamp

Undersize Journal

.001 inch R1-1R2-R3 or R4 .010 inch RX .001 inch M1424,13-M4 or MS .010 inch MX A crankshaft which has .010 inch undersize journals will have all rod journals; all main journals or both.

CONNECTING RODS Installation of Connecting Rod Bearings Fit all rods on one bank until completed. Do not alternate from one bank to another, because when the rods are assembled to pistons correctly, they are not interchangeable from one bank to another.

The bearing caps are not interchangeable and should be marked at removal to insure correct assembly. Each bearing cap has a small "V" groove across the parting face. When installing the lower bearing shell, make certain that the "Si" groove in the shell is in

Irritas

"RM4- {POD) m.1 -•• (MAIN) IMP

!-‘•

41..■

/-

1.■. ■1

EMMEN.

••■•11

1■11

../

N1:57

Fig. 37—S howLocation of Internal Marking of No. B Counterweight


9-38 ENGINE-318 CUBIC INCH

line with the "V" groove in the cap. This provides lubrication of the cylinder wall in the opposite bank. The bearing shells must be installed so that the tangs are in the machined grooves in the rods and caps. Limits of taper or out-of-round on any crankshaft journals should be held to .001 inch. Bearings are available in .001, .002, .003..010 and .012 inch undersize. Install the bearings in pairs. Do not use a new

Iii.

a 0

(:)B

C

bearing half with an old bearing half. Do not file the rods or bearing caps.

B

8

8

Or

MEASURING CONNECTING ROD BEARING CLEARANCE

Shim Stock Method (1) Place an oiled .001 inch brass shim stock (1/2 inch wide and 3/4 inch long between the bearing and connecting rod journal. (2) Install bearing cap and tighten to 45 footpounds. (3) Turn crankshaft 1/4 turn in each direction. A slight drag should be felt which indicates clearance is satisfactory. Correct clearance is from .0005 to .0015 inch. (4) Side play should be from .009 to .017 inch (two rods).

A

I

a D

8

D a D a. D GD

a

CI

OS

a

ci

8

A

a

B ,

8

FRONT -

A

TOP VIEW OF BLOCK

A-EXPANDER GAPS

B•RAIL GAPS

IF YOU HAVE FOLLOWED THE INSTRUCTIONS. THE RING WILL BE IN THIS POSITION ON THE PISTON. TOP RAIL GAP -f•-3"-i

• BOTTOM RAIL GAP

INSTALLING PISTON AND CONNECTING ROD ASSEMBLY NP513

(1) Before installing pistons, and connecting rod assemblies into the bore, be sure that compression ring gaps are staggered so that neither is in line with oil ring rail gap. (2) Before installing the ring compressor, make sure the oil ring expander ends are butted and the rail gaps located as shown in figure 38. (3) Immerse the piston head and rings in clean engine oil, slide the ring compressor, Tool C-3M, over the piston and tighten with the special wrench (part of Tool C-385). Be sure position of rings does not change during this operation. (4) Install connecting rod bolt protectors on rod bolts, the long protector should be installed on the numbered side of the connecting rod. (5) Rotate crankshaft so that the connecting rod journal is on the center of the cylinder bore. Insert rod and piston into cylinder bore and guide rod over the crankshaft journal (Fig. 39). (6) Tap the piston down in cylinder bore, using a hammer handle. At the same time, guide connecting rod into position on crankshaft journal. (7) The notch or groove on top of piston must be pointing toward front of engine and the larger cham-

Fig. 38—Proper Oil Ring Installation

fer of the connecting rod bore must be installed toward crankshaft journal fillet. (8) Install rod caps, tighten nuts to 45 foot-pounds. CRANKSHAFT MAIN JOURNALS

The crankshaft journals should be checked for excessive wear, taper and scoring. Limits of taper or out-of-round on any crankshaft journals should be

_

CRANKSHAFT JOURNAL

Fig. 39— Removing or Installing Connecting Rod


318 CUBIC INCH—ENGINE 9-39 held to .001 inch. Journal grinding should not exceed 1112 inch under the standard journal diameter. Do NOT grind thrust faces of Number 3 main bearing. Do NOT nick crank pin or main bearing fillets. After regrinding. remove rough edges from crankshaft oil holes and clean out all oil passages. CRANKSHAFT MAIN BEARINGS Rearing caps are not interchangeable and should be marked at removal to insure correct assembly. Upper and lower bearing halves are NOT interchangeable. Lower main bearing halves of L 2 and 4 are interchangeable. Upper main bearing halves of 1, 2 and 4 are interchangeable. Upper and lower Number 3 bearing halves are flanged to carry the crankshaft thrust loads and are NOT interchangeable with any other bearing halves in the engine. (Fig. 40). Bearing shells are available in standard and the following undersizes: .001. .002. .003, .010 and .012 inch. Never install an undersize bearing shell that will reduce clearance below specifications. Removal as Remove oil pan and identify bearing caps before removaL (2) Remove bearing caps one at a time. Remove upper half of bearing by inserting Tool C-3059 (Fig. 41) in to oil hole of crankshaft. (3) Slowly rotate crankshaft clockwise, forcing out upper half of bearing shell. Installation Only one main bearing should be selectively fitted while all other main bearing caps are properly torqued. When installing a new upper bearing shell, slightly chamfer the sharp edges from the plain side.

(I) Start bearing in place, and insert Tool C-3059 into oil hole of crankshaft (Fig. 41).

Fig. 41—Removing or Installing Upper Main Bearing 123 Slowly rotate crankshaft counter-clockwise sliding the bearing into position. Remove Tool C-3059.

MEASURING MAIN BEARING CLEARANCE Shim Stock Method U' Smooth edges of a 1.2 x 3/4 inch piece of brass shim stock. .001 inch thickness. )21 Install bearing in center main bearing cap. bearing tang in groove in cap, lubricate bearing and position shim stock across the bearing, install cap. tighten bolts to 85 foot-pounds. i3) If a slight drag is felt as crankshaft is turned (moved no more than 1 4 turn in either direction). clearance is .001 inch or less and is considered satisfactory. If. however, no drag is felt, the bearing is too large or crankshaft cannot be rotated, bearing is too small and should be replaced with the correct size. (4) Measure crankshaft end play .002 to .007 inch. If end play is less than .002 inch or more than 007 inch. install a new number 3 main bearing. (5) Fit remaining bearings in same manner. It is permissable to use one .001 inch undersize bearing shell with one standard bearing shell or one .002 inch undersize bearing shell with one .001 inch undersize shell. Always use the smaller diameter bearing half as the upper. Never use an upper bearing half more than .001 inch smaller than the lower bearing half and never use a new bearing half with a used bearing half.

REAR MAIN BEARING OIL SEAL (Crankshaft Removed)

Fig. 40—Main Bearing Identification

Upper Seal (1) Install a new rear bearing oil seal in the cylinder block so that both ends protrude. (2) Using Tool (>3511 tap seal down into position until tool is seated in bearing bore. (Fig. 42).


9-40 ENGINE-318 CUBIC INCH

O S. SE A L

TOOL

OIL SEAL, /

NK33A NK34A Fig. 42—Instal ling Rear Main Upper Oil Seal

Fig. 43—Trimming Rear Main Upper Oil

(3) Hold tool in this position and cut off the portion of seal that extends above the block on both sides, (Fig. 43). Lower Seal (1) Install a new seal in bearing cap so that ends

Seal

protrude. (2) Using Tool C-3511 tap the seal down into Position until tool is seated in bearing bore. (3) Hold tool in this position and cut off the portion of seal that extends above the cap on both sides.

ENGINE OILING SYSTEM (Fig. 44) OIL PAN

Removal (1) Disconnect negative (ground) cable from the battery, and remove dipstick. (2) Raise vehicle on a hoist, drain the oil. Remove engine to torque convener left housing strut. (3) Remove steering and idle arm ball joints from steering linkage center link. (4) Remove exhaust pipes from exhaust manifolds and leave hang without disconnecting from the muffler on single exhaust system. (5) Remove the oil pan bolts and oil pan. Installation

(1) Inspect alignment of oil strainer. Bottom of strainer must be parallel with the machined surface of the cylinder block. Bottom of strainer must touch bottom of oil pan. (2) Install oil pan using a new gasket and seals. Install engine to converter housing strut. (3) Connect exhaust pipes to manifolds. (If removed). (4) Connect steering and idler arm ball joints to steering center link. (5) Lower vehicle, install dipstick, fill with proper grade and quantity of motor oil, connect battery ground. OIL PUMP

It is necessary to remove the oil pan, and remove

the oil pump from rear main bearing cap to service the oil pump. Disassembly (1) To remove the relief valve, proceed as follows: (a) Remove cotter pin, drill a 1/8 inch hole into the relief valve cap and insert a self-threading sheet metal screw into cap. (b) Clamp screw into a vise and while supporting oil pump, remove cap by tapping pump body using a soft hammer. Discard cap and remove spring and relief valve. (Fig. 45). (2) Remove oil pump cover bolts and lockwashers, and lift off cover. (3) Discard oil seal ring. (4) Remove pump rotor and shaft and remove outer rotor. (5) Wash all parts in a suitable solvent and inspect carefully for damage or wear. (Fig. 46).

Inspection

(1) The mating face of the oil pump cover should be smooth. If cover is excessively scratched or grooved, it should be replaced. (2) Check for excessive cover to rotor wear by laying a straightedge across cover surface. If a .0015 inch feeler gauge can be inserted between the cover and straightedge, discard cover and install a new one (Fig. 47). (3) Measure diameter and thickness of outer rotor. If outer rotor measures less than .825 inch (Fig. 48)


ROCKER SHAFT OIL PASSAGE

TO MAIN BEARINGS

TO CAMSHAFT BEARINGS

ROCKER SHA T BRACKET OIL FLOWS TO ONLY ONE BRACKET BRACKET IS ON EACH HEAD. SECOND FROM REAR ON RIGHT HEAD. BRACKET IS SECOND FROM FRONT ON LEFT HEAD.

OIL GALLERY

PASSAGE TO CYLINDER HEAD

TAPPET

OIL PASSAGE FOR OIL PRESSURE INDICATOR LIGHT

\

OIL FILTER

PASSAGE TO CAMSHAFT REAR REARING .)."

OIL PUMP OIL INTAKE

OIL FROM FILTER TO SYSTEM

y

TO CONNECTING ROD BEARINGS

...)

ie-r-- OIL '0 FILTER FEED FROM OIL GALLERY TO =2 MAIN BEARING AND PASSAGE TO HEAD MAIN

I CRANKSHAFT

NP267A

rRom OIL PUMP

Fig. 44—Engine Oiling System

3N19143-H3NI 31E1113 81.£

RIGHT OIL GALLERY


9-42 ENGINE-318 CUBIC INCH OIL PUMP ASSEMBLY

SPRING

RELIEF VALVE tr--RETAINER

NF9SIB

Fig. 45—Relief Valve Spring and Retainer Removed and the diameter is less than 2.469 inches, install a new outer rotor. (4) Measure thickness of inner rotor. (5) If inner rotor measures less than .825 inch, a new inner rotor should be installed (Fig. 49). (6) Install outer rotor into pump body, pressing to one side with lingers and measure clearance between outer rotor and pump body (Fig. 50). If measurement is more than .014 inch. replace oil pump body. (7) Install inner rotor and shaft into pump body. If BODY INNER ROTOR AND SHAFT

Fig. 48—Measuring Outer Rotor Thickness clearance between inner rotor and outer rotor (Fig. 51) is more than .010 inch, replace inner and outer rotors. (8) Place a straightedge across face between bolt holes (Fig. 52). If a feeler gauge of more than .004 inch can be inserted between the rotors and straightedge, replace pump body. (9) Inspect oil pump relief valve plunger for scoring and for free operation in its bore. Small scores may be removed with 400 grit wet or dry paper.

DRIVE SHAFT ci;5 AND GEAR 0

voce COTTER PIN

COVER

-c'\ / c r -0" RING RELIEF VALVE

SPRING RETAINER

\OUTER ROTOR Nr930B

46—Oil Pump Assembly (Disassembled View)

Fig. 49—Measuring inner Rotor Thickness

FEELER GAUGE

OUTER ROTOR PUMP BODY W935

Fig. 47—Measuring Oil Pump Cover Flatness

Fig. 50—Measuring Outer Rotor Clearance


383-440 CUBIC INCH—ENGINE 9-43

CHAMFER

OUTER RO(OR

INNER ROTOR

NP565 Fig. 5I—Measuring Clearance Between Rotors

Fig. 53—Proper Retainer Cap Installation

(10) The relief valve spring has a free length of 2-1/32 to 2-3/64 inch and should test 16.2 to 17.2 lbs. when compressed to 1-11/32 inch. Discard spring that fails to meet specifications. (11) Install the relief valve spring, a new retainer cap. (Spring seals inside retainer cap). Press retainer in housing so that top of retainer cap is within the relief valve bore diameter as shown in figure 53. Install cotter pin. (12) If oil pressure is low. inspect for worn bearings, or look for other causes of possible loss of pressure.

(2) Tighten cover bolts to 95 inch-pounds. (3) Prime oil pump. (4) Install oil pump and strainer to rear main bearing cap. Tighten bolts to 35 foot-pounds.

Assembly

(1) When assembling oil pump, be sure to use a new oil seal ring between cover and body.

RAIGI IT EDGE ,-FEELER GAUGE

NRIN Fig. 52—Measuring Clearance Over Rotors

Servicing the Oil Pressure Relief Valve It is necessary to remove the oil pan, and remove

oil pump from rear main bearing cap to service the pressure relief valve. To remove the relief valve, proceed as follows: (1) Remove cotter pin, drill a 1/8 inch hole in the relief valve cap and insert a self-threading sheet metal screw into cap. (2) Clamp screw into a vise and while supporting oil pump, remove cap by tapping pump body using a soft hammer. Discard cap. (3) Remove spring and plunger. (4) Clean parts thoroughly. Inspect oil pump relief valve for scoring and free operation in its bore. Small scores may be removed with 400 grit wet or dry paper providing extreme care is used not to round off the sharp edge portion of the valve. (5) The relief valve spring has a free length of 2-1/32 to 2-3/64 inch and should test 16.2 to 17.2 lbs. when compressed to 1-11/32 inch. Discard spring that do not meet specifications. (6) Install the relief valve, spring and a new retainer cap. (Spring seats inside retainer cap). Press retainer in housing so that top of retainer cap is within the relief valve bore diameter as shown in Figure 53. Install cotter pin.


383-440 CUBIC INCH ENGINES INDEX Camshaft Camshaft Bearings Connecting Rods Crankcase Ventilation System Crankshaft Identification

Page 54 55 60 83 59

Crankshaft Main Bearings Crankshaft Main Journals Cylinder Block Cylinder Heads Distributor Drive Shaft Bushing

Page 61 61 56 46 55


9-44

ENGINE-383-440 CUBIC INCH

Page Engine Assembly 45 Engine Mounts 44-45 Engine Oiling System 62 Hydraulic Tappets 50 Installing Piston and Connecting Rod Assembly .. 60 Measuring Connecting Rod Bearing Clearance ... 60 Measuring Main Bearing Clearance 61 Oil Filter 65 Oil Pan 62 Oil Pump 63

Piston, Pins and Rings Repair of Damaged or Worn Threads Rear Main Bearing Oil Seal Rocker Arms and Shaft Assembly Specifications Timing Chain Cover, Oil Seal and Chain Tune-Up Valves and Valve Springs Valve Timing

Page 57 83 62 46 92 52 44 47 52

SERVICE PROCEDURES TUNE-UP (1) Test battery specific gravity, add water if necessary, clean and tighten battery connections. (2) Test cranking voltage. See "Starting Motor Cranking Voltage" Electrical Section of this manual. (3) Tighten the intake manifold bolts to 50 footpounds. (4) Perform cylinder compression test. Compression should not be less than 100 pounds for 383 Cubic Inch Engine with two barrel carburetor and not vary more than 40 pounds. 110 pounds for 383, 440 Cubic Inch Engine with four or six barrel carburetor and should not vary more than 40 pounds. The recommended pressures are to be used only as a guide to diagnosing engine problems. An engine in good condition may exhibit higher pressures. Many conditions which are difficult to control cause variations in compression readings. An engine should not be disassembled to determine the cause of low compression unless some other malfunction is present. (5) Clean or replace spark plugs as necessary and adjust gap to .035 inch. Tighten to 30 foot-pounds using new gaskets. (6) Test resistance of spark plug cables. Refer to "Ignition System Secondary Circuit Inspection" Electrical Section. (7) Inspect the breaker plate contacts, primary wire and vacuum advance operation. Test coil output voltage, primary and secondary resistance. Test Condenser. Replace parts as necessary. Refer to Ignition System and make necessary adjustments. (8) Reset the ignition timing with the vacuum advance line disconnected. The ignition timing should be set to compensate for altitudes and/or gasoline grades. (9) Set carburetor idle mixture adjustment. Adjust throttle stop screw to specifications. Perform a combustion analysis. (10) Test the fuel pump for pressure and vacuum. Refer to "Fuel System" Group 14, Specifications. (11) Inspect the manifold heat control valve in the right exhaust manifold for proper operation and apply Manifold Heat Control Valve Solvent Number 2525054 or equivalent to the bushing and shafts.

(12) Every 6 months, remove filter element and blow out dirt gently with air hose. Direct air from inside out, and keep nozzle 2 inches away from element to avoid damaging (Fig. 1). Clean the metal housing and replace the element. Every two years install a new factory recommended filter element or equivalent. Service the unit more frequently when driving under severe conditions, such as in dusty areas. (13) Inspect crankcase ventilation system as outlined on page 83. (14) Inspect and adjust the accessory belt drives referring to "Cooling System" Group 7 for proper adjustments. (15) Road test vehicle as a final check.

FRONT ENGINE MOUNTS (Fig. 2) Removal (1) Raise hood and position fan to clear radiator hose and radiator top tank. (2) Disconnect throttle linkage at transmission and at carburetor. (3) Remove torque nuts from insulator studs. (4) Raise engine just enough to remove front engine mount assembly.

Fig. I—Cleaning Niter Element


383-440 CUBIC INCH-ENGINE 9-45 ENGINE ASSEMBLY Removal

(1) Scribe the outline of hinge brackets on hood to assure proper adjustments when installing. (2) Remove hood. (3) Drain cooling system and remove battery. (4) Remove all hoses, fan shroud, disconnect oil cooler liner and remove radiator.

(1) Install insulator to engine bracket and tighten to specified torque. (2) Lower the engine and install washers and prevailing torque nuts to insulator studs; tighten nuts to specified torque. (3) Connect throttle at transmission and carburetor.

(5) Disconnect fuel lines and wires attached to engine units. Remove air cleaner and carburetor. (6) Attach engine lifting fixture to carburetor flange studs on intake manifold. (7) Raise vehicle on a hoist and install engine support fixture Tool C-3487A to support rear of engine. (8) Drain transmission and torque converter. (9) Disconnect exhaust pipes at manifolds, propeller shaft, wires, linkage, cable, and oil cooler lines at the transmission. (10) Remove engine rear support crossmember and remove transmission from vehicle. (11) Lower vehicle and attach chain hoist to fixture eyebolt. (12) Remove engine front mounting bolts. Raise engine with a chain hoist and work engine out of chassis. (13) Place engine in repair stand Tool C-3167 and adapter C-3662 for disassembly, using transmission mounting bolts.

REAR ENGINE MOUNTS (Fig. 3)

Installation

VIEW A RIGHT SIDE A /

VIEW B LEFT SIDE

TIGHTENING TORQUE

NR42A Fig. 2—Front Engine Mounts

Installation

Removal

(1) Raise vehicle on hoist. (2) Install transmission jack. (3) Remove rear engine crossmember from frame and remove rear mount. Installation

(1) Install rear engine mount to crossmember and tighten nut to specified torque. (2) Install rear crossmember to frame and tighten bolts to specified torque. REAR TRANSMISSION TRANSMISSION EXT. HOUSING REAR MOUNT (2)

CENTER CROSSMEMBER /

T GHTENING (4 TORQUE 200 IN. LBS. 40 FT. LBS. 90 FT. LBS.

NU281 Fig. 3—Engine Rear Support

(1) Attach engine lifting fixture to carburetor flange studs on intake manifold. (2) Attach chain hoist to fixture eyebolt. (3) Remove engine from repair stand and lower engine carefully until engine is positioned in vehicle. (4) Install engine support fixture Tool C-3487 and adjust to support rear of engine. (5) Remove chain hoist from fixture eyebolt. (6) Raise vehicle on hoist, install and tighten engine front support mounting bolts. (7) Install transmission and engine rear support crossmember. (8) Lower engine into position and install engine rear support crossmember bolts. Remove engine support fixture Tool C-3487A. (9) Connect propeller shaft, wires, linkage, cable, oil cooler lines at the transmission, connect exhaust pipes to manifold using new gaskets. Install transmission filler tube. (10) Lower vehicle and install radiator, fan shroud, hoses, oil cooler lines and connect all wires and linkage. (11) Remove engine lifting fixture from intake manifold and install carburetor and fuel lines. Connect throttle linkage.


9-46 ENGINE-383-440 CUBIC INCH

(12) Install hood, using scribe marks for proper alignment. (13) Close all drain cocks and fill cooling system. (14) Fill engine crankcase and transmission. Refer to "Lubrication" Group 0 for quantities and lubricants to use and check entire system for leaks and correct as necessary. Whenever an engine has been rebuilt and/or a new camshaft and/or tappets are installed, one quart of engine supplement, Chrysler Part Number 1879406 or equivalent should be added to the engine oil to aid in break-in. The oil mixture should be left in the engine for a minimum of SOO miles. Drain the oil mixture at the next normal oil change.

(15) Start engine and run engine until normal operating temperature is reached. (16) Inspect ignition timing and adjust carburetor as necessary. (17) Adjust accelerator and transmission linkages. Road test vehicle.

number two and four positions. (2) Install rocker shafts so that 3/16 inch diameter rocker arm lubrication holes point downward into the rocker arm, so that the 150 angle of these holes point outward towards the valve end of the rocker arms, (Fig. 5). This is necessary to provide proper lubrication to the rocker assemblies. The 15 0 angle of the rocker arm lubrication holes is determined from the center line of the bolt holes through the shaft which are used to attach the shaft assembly to the cylinder head.

(3) Tighten rocker shaft bolts to 25 foot-pounds. (4) Inspect cylinder head cover for distortion. Straighten if necessary. (5) Place new cylinder head cover gaskets in position and install cylinder head covers. Tighten nuts to 40 inch-pounds. (6) Install closed crankcase ventilation system and evaporative control system (if so equipped). CYLINDER HEADS

ROCKER ARMS AND SHAFT ASSEMBLY

The rocker arms are of stamped steel and are arranged on one rocker arm shaft, per cylinder head. The push rod angularity tends to force the pairs of rocker arms toward each other where oilite spacers carry the side thrust at each rocker arm. The rocker shaft is held in place by bolts and stamped steel retainers attached to the five brackets on the cylinder head. Removal (1) Remove cylinder head cover and gasket. (2) Remove rocker shaft bolts and retainers and remove rocker arms and shaft assembly. (3) If rocker arm assemblies have been disassembled for cleaning, inspection, or replacement, refer to Figure 4 for proper reassembly.

The chrome alloy cast iron cylinder heads are held in place by 17 bolts. The spark plugs enter the cylinder head horizontally and are located at the wedge of the combustion chambers. Removal (1) Drain cooling system. (2) Remove alternator, carburetor, air cleaner and fuel line. (3) Disconnect accelerator linkage. (4) Remove closed ventilation system and evaporative control system (if so equipped). i -'I ROCKER SHAFT BOLT – -

ROCKER SHAFTS

Installation (1) Install rocker arms and shaft assembly making sure to install the long stamped steel retainers in the

PUSH RODS

ROCKER ARM LUBRICATION HOLES ND 23 Fig. 4—Rocker Arm Assemblies installed

RIGHT BANK

LEFT BANK

Fig. 5—Rocker Arm Lubrication Holes


383-440 CUBIC INCH—ENGINE 9-47

(5) Remove vacuum control hose at carburetor and distributor. (6) Disconnect distributor cap, coil wires and heater hose. (7) Disconnect heat indicator sending unit wire. (8) Remove spark plugs. (9) Remove intake manifold, ignition coil and carburetor as an assembly. (10) Remove tappet chamber cover. (11) Remove cylinder head covers and gaskets (12) Remove exhaust manifolds. (131 Remove rocker arm and shaft assemblies. Remove push rods and identify to insure installation in original location. (14)Remove the 17 head bolts from each cylinder head and remove cylinder heads. (15) Place cylinder head in holding fixture Tool C-3626. Installation

(1) Clean gasket surfaces of the cylinder block and cylinder head. Remove all burrs from edges of cylinder heads. (2) Inspect all surfaces with a straightedge if there is any reason to suspect leakage. If out of flatness exceeds .00075 times the span length in any direction; either replace head or lightly machine the head gasket surface. As an example, if a 12 inch span is .004" out of flat, allowable is 12 x .00075 .009". Head is OK. The cylinder head surface finish should be 70-180 micro-inches. (31 Coat new gaskets lightly with a suitable sealer. Chrysler Number 1057794 or equivalent. Install gaskets and cylinder heads. (4) Install cylinder head bolts. Starting at top center. tighten all cylinder head bolts to 40 foot-pounds in sequence (Fig. 6). Repeat the procedure, tightening all head bolts to 70 foot-pounds. (5) Inspect push rods and replace any worn or bent rods. (6) Install push rods in the tappets maintaining alignment, using rod. (Fig. 7).

CYLINDER HEAD INTAKE PLISH RODS ASSENVELIES "3! *I. ?Et gr,

tNSTAWNG ROD

W-

err% EXHAUST PUSH RODS

7—Push Rods Installed i71 Install rocker arm and shaft assembly starting each push rod into its respective rocker arm socket (Fig. 4) making sure to install the long stamped steel retainers in the number two and four positions. Tighten bolts to 25 foot-pounds. (8) Place new cylinder head gasket in position and install cylinder head covers. Tighten nuts to 40 inchpounds. (9) Install exhaust manifolds and tighten nuts to 30 foot-pounds. (10) Adjust spark plugs to .035 inch gap and install plugs, tighten plugs to 30 foot-pounds. (11)Install a new tappet chamber cover and tighten end bolts to 9 foot-pounds. 112) Install intake manifold, carburetor and ignition coil as an assembly and tighten manifold bolts to 40 foot-pounds. (13) Install distributor cap. Connect the coil wire. heat indicator sending unit wire, accelerator linkage, spark plug cables and insulators. (14) Install vacuum control hose at carburetor and distributor. (15)Install closed ventilation system and evaporative control system (if so equipped). (16)Install alternator and drive belts. lighten alternator adjusting strap bolt to 200 inch-pounds. and alternator mounting bolt to 30 foot-pounds. (17) Install fuel line and carburetor air cleaner. (18)Fill cooling system. Adjust belt tensions as outlined in "Cooling System" Group 7. Fig.

VALVES AND VALVE SPRINGS

Valves are arranged in-line in the cylinder heads and inclined 30 degrees outward from verticaL The intake and exhaust valves operate in guides that are cast integral with the heads. Removal

Fig. 6—Cylinder Head Tightening Sequence

(1) With cylinder head removed, compress valve springs, using Tool C-3422A. (Fig. 8).


9-48 ENGINE-383-440 CUBIC INCH (5) The special sleeve places the valve at the correct height for measuring with a dial indicator. Attach dial indicator Tool C-3339 to the cylinder head and set it at a right angle to the valve stem being measured (Fig. 10). (6) Move valve to and from the indicator. Total dial indicator reading should not exceed .017 inch. If the dial indicator reading is excessive or if the stems are scored or worn excessively, ream the guides for new valves with oversize stems. (7) Service valves with oversize stems are available in .005, .015 and .030 inch oversize. Reamers to accommodate the oversize valve stem are as follows:

TOOL CYLINDER HEAD ASSEMBLY

Reamer Tool Number REPAIR STAND ITOOLI KRI4IA

Fig. 8—Compressing Valve Spring

(2) Remove valve retaining locks, valve spring retainers, valve stem cup seals and valve springs. (3) Before removing valves, remove any burrs from valve stem lock grooves to prevent damage to the valve guide. Identify valves to insure installation in original location.

Valve Inspection

(1) Clean valves thoroughly, and discard any burned, warped or cracked valves. (2) Measure valve stems for wear. Refer to specifications for proper size. If wear exceeds .002 inch, replace the valve. (3) Remove carbon and varnish deposits from inside of valve guides with a reliable guide cleaner. (4) Measure valve stem guide clearance as follows: Install sleeve Tool C-3973 over valve stem (Fig. 9) and install valve.

Reamer Oversize

Valve Guide Size

.379-380 in. C-3433 .005 in. .389-.390 in. C-3430 .015 in. .404-.405 in. C-3427 .030 in. (8) Slowly turn reamer by hand and clean the guide thoroughly before installing new valves. Do not attempt to ream the valve guides from standard directly to .030 inch. Use step procedure of .005, .015 and .030 inch so the original valve guide centers may

be maintained. Refacing Valves and Valve Seats

The intake and exhaust valve faces have a 45 degree angle. Always inspect the remaining valve margin after the valves are refaced (Fig. 11). Valves with less than 3/64 inch margin should be discarded. (1) The angle of both the valve and seat should be identical. When refacing valve seats, it is important that the correct size valve guide pilot be used for reseating stones. A true and complete valve seat surface must be obtained. (2) Inspect valve seat with Prussian blue to determine where valve contacts seat. To do this, coat valve seat lightly with Prussian blue, then set valve in place. Rotate valve with light pressure. If the blue is transferred to the center of the valve face, the contact is satisfactory. If the blue is transferred to the top edge of the valve face, lower the valve seat with a 30°

---VALVE

tialSof Fig. 9—Installing Valve and Tool C- 3973

Fig. 10—Measuring Valve Guide Wear


383-440 CUBIC INCH—ENGINE 9-49

FACE

FACE

EXHAUST VALVE

I

I

INTAKE VALVE

VALVE SPRING GROOVES

RETAINER Ica

PY40)

Fig. II—Intake and Exhaust Valves stone. If the blue is transferred to the bottom edge of the valve face raise the valve seat with a 60- stone. (3) When the seat is properly positioned the width of the intake seats should be 1/16 to 3/32 inch_ The width of the exhaust seats should be 3/64 to 1 16 inch. (4) Measure the concentricity of the valve seat using dial indicator No. 13725. The total runout should not exceed .003 inch Itotal indicator reading). (5) When valves and seats are reground, the position of the valve in the cylinder head is changed. shortening the operating length of the hydraulic tappet. This means that the plunger is operating closer to its "bottomed" position, and less clearance is available for thermal expansion of the valve mechanism during high speed driving. (6) The design of the valve mechanism includes a safety factor to allow for a limited amount of wear, and the refacing of the valves and seats. (7) To insure that limits have not been exceeded, the dimension from valve spring seat in the head to the valve tip should be measured with gauge, Tool C-3648 (Fig. 121.

MAXIMUM MEASUREMENT

(8) The end of the cylindrical gauge and the bottom of slotted area represent the maximum and minimum allowable extension of the valve stem tip beyond the spring seat. (9) lithe tip exceeds the maximum, grind stem tip to within gauge limits. Clean tappets if tip grinding is required. Testing the Valve Springs (Fig. 13)

ill Whenever valves are removed for inspection, reconditioning or replacement, the valve springs should be tested. As an example, the compressed length of the spring to be tested is 1-15/32 inches. Turn the table of Tool C-647 until the surface is in line with the 1-15/32 inch mark on the threaded stud and the zero mark to the front. Place the spring over the stud on the table and lift the compressing lever to set the tone device. Pull on the torque wrench until a ping is heard. Take the reading on torque wrench at this instant. Multiply this reading by two. This will give the spring load at the test length. Fractional measurements are indicated on the table for finer adjustments. Refer to specifications to obtain specified height and allowable tension. Discard the springs that do not meet specifications. (2) Inspect each valve spring for squareness at both ends with a steel square and surface plate (Fig. 14i. (3) If the spring is more than 1/16 inch out of square. install a new spring. Installation

(1) Coat valve stems with lubricating oil and insert them in position in cylinder head. (2) Install new cup seals on the intake and exhaust valve stems and over valve guides (Fig. 15 and 16) and install valve springs and retainers.

KR14411

Hg. 12—Measuring Valve Stem Length

Fig. 13—Testing Valve Springs


9-50 ENGINE-383-440 CUBIC INCH RETAINER....... VALVE SPRING INTAKE VALVE

ss)

Fig. 16—Installing Valve, Spring, Cup Seal and Retainer Fig. 14—Inspecting Valve Spring

(3) Compress valve springs with Tool C-3422A. Install locks and release tool. If valves and/or seats are reground, measure installed height of the springs. Make sure measurement is taken from the bottom of spring seat in cylinder head to bottom surface of spring retainer. If the height is greater than 1-57/64 inches, install a 1/16 inch spacer in the head counterbore to bring the spring height back to normal 1-53/64 to 1-57/64 inch. (If spacers are installed, measure from the top of the spacer).

HYDRAULIC TAPPETS Preliminary to Checking the Hydraulic Tappets (1) Before disassembing any part of the engine to correct tappet noise, read the oil pressure at the gauge (Install a reliable gauge at pressure sending unit if vehicle has no oil pressure gauge). and check RETAINER SPRING

the oil level in the oil pan. The pressure should be between 45 and 65 pounds at 1000 R.P.M. (2) The oil level in the pan should never be above the -full" mark on dipstick, or below the "add oil" mark. Either of these two conditions could be responsible for noisy tappets. Oil Level Too High If oil level is above the "full" mark on dipstick, it is possible for the connecting rods to dip into the oil while engine is running and create foam. Foam in oil pan would be fed to the hydraulic tappets by the oil pump causing them to lose length and allow valves to seat noisily. Oil Level Too Low Low oil level may allow oil pump to take in air which, when fed to the tappets, causes them to lose length and allows valves to seat noisily. Any leaks on intake side of pump through which air can be drawn will create the same tappet action. When tappet noise is due to aeration, it may be intermittent or constant, and usually more than one tappet will be noisy. When oil level and leaks have been corrected, engine should be operated at fast idle for sufficient time to allow all of the air inside of the tappets to be bled out. Tappet Noise Diagnosis (1) To determine source of tappet noise, operate engine at idle with cylinder head covers removed. (2) Feel each valve spring or rocker arm to detect noisy tappet. The noisy tappet will cause the affected spring and/or rocker arm to vibrate or feel rough in operation.

INTAKE VAtVE

SPRING

EXHAUST VAI.VE PY601

Fig. 15 —Valve Assembly (Disassembled View)

Worn valve guides or cocked springs are sometimes mistaken for noisy tappets. If such is the case, noise may be dampened by applying side thrust on the valve spring. If noise is not appreciably reduced, it can be assumed the noise is in the tappet. Inspect the


383-440 CUBIC INCH—ENGINE 9-51 rocker arm push rod sockets and push rod ends for wear.

(3) Valve tappet noise ranges from light noise to a heavy click. A light noise is usually caused by excessive leakdown around the unit plunger which will necessitate replacing the tappet, or by the plunger partially sticking in the tappet body cylinder. A heavy click is caused either by a tappet check valve not seating, or by foreign particles becoming wedged between the plunger and the tappet body, causing the plunger to stick in the down position. This heavy click will be accompanied by excessive clearance between the valve stem and rocker arm as valve closes. in either case, tappet assembly should be removed for inspection and cleaning. Tappet Removal (1) The tappet can be removed without removing intake manifold or cylinder heads by following this recommended procedure: Remove cylinder head covers. (2) Remove rocker arms and shaft assembly. (3) Remove push rods and identify to insure installation in original location.

(4) Slide a magnetic pickup tool through push rod opening in cylinder head and seat tool firmly in the head of tappet. (5) Pull tappet out of bore with a twisting motion. If all tappets are to be removed, identify tappets to insure installation in original location. A diamond shaped marking stamped on the engine numbering pad indicates that some tappet bodies are .008 inch oversize. CAUTION: The plunger and tappet bodies are not interchangeable. The plunger and valve must always be fitted to the original body. It is advisable to work on one tappet at a time to avoid mixing of parts. Mixed parts are not compatible. Do not disassemble a tappet on a dirty work bench.

Disassembly (Fig. 17) (I) Pry out plunger retainer spring clip. (2) Clean varnish deposits from inside of tappet body above plunger cap. (3) Invert tappet body and remove plunger cap, plunger, flat check valve, check valve spring, check valve retainer and plunger spring. Cleaning and Assembly (1) Clean all tappet parts in a solvent that will remove all varnish and carbon. (2) Replace tappets that are unfit for further service with new assemblies. (3) If plunger shows signs of scoring or wear and valve is pitted, or if valve seat or end of plunger indicates any condition that would prevent valve from seating, install a new tappet assembly. (4) Assemble tappets (Fig. 17).

RETAINER

CHECK VALVE SPRING

PLUNGER RETAINER SPRING CLIP

J TAPPET BODY

t/

PLUNGER SPRING CHECK VALVE

PLUNGER PLUNGER CAP

NR65

Fig. 17—Hydraulic Tappet Assembly (Disassembled View) Testing

(1) Fill a pan with clean kerosene. (2) Remove cap from plunger and plunger from tappet body. (3) Fill tappet body with kerosene and install plunger. (4) Unseat check valve with a brass rod to permit complete installation of plunger. Replace cap. (5) Hold tappet in an upright position and insert lower jaw of pliers, Tool C-3160, in the groove of tappet body (Fig. 18). (6) Engage jaw of pliers with top of tappet plunger. Test lealcdown by compressing the pliers. If plunger collapses almost instantly as pressure is applied, disassemble tappet, clean and test again (Fig. 18). (7) If tappet still does not operate satisfactorily after cleaning, install a new tappet assembly. If the tappet or bore In cylinder block is scored, scuffed, or shows signs of sticking, ream the bore to next oversize.

installation (1) Lubricate tappets. (2) Install tappets and push rods in their original positions. (3) install rocker arm and shaft assembly.

Tool CLEAN KEROSENE

Fig. 18—Testing Tappet Using Tool C4160


9-52 ENGINE-383-440 CUBIC INCH (4) Start and operate engine. Warm up to normal operating temperature. CAUTION: To prevent damage to valve mechanism, engine must not be run above fast idle until all hydraulic tappets have filled with oil and have become quiet.

3688, and pull damper assembly off end of crankshaft (Fig. 19). (4) Remove chain cover and gasket. It is normal to find particles of neoprene collected between seal retainer and crankshaft oil slinger after seal has been in operation.

(5) Slide crankshaft oil slinger off end of crankshaft.

VALVE TIMING (All Models) (1) Turn crankshaft until NO. 6 exhaust valve is closing and NO. 6 intake valve is opening. (2) Insert a 1/4 inch spacer between rocker arm pad and stem tip of NO. 1 intake valve (second valve on the left bank). (3) Install a dial indicator so plunger contacts valve spring retainer as nearly perpendicular as possible. (4) Allow spring load to bleed tappet down giving in effect a solid tappet. Zero the indicator. (5) Turn the crankshaft clockwise (normal running direction) until intake valve has lifted .025 inch with 256-260 0 camshaft and .033 inch with 268-284u camshaft. See specifications for engine application. The timing on the timing indicator, located on the chain case cover, should read from 10 degrees BTDC to 2 degrees ATDC. lithe reading is not within specified limits: Inspect timing sprocket index marks, inspect timing chain for wear, and determine accuracy of the DC mark on timing indicator. Turn crankshaft counterclockwise until valve is closed and remove the indicator and spacer. CAUTION: Do not turn crankshaft any further clockwise, as the valve spring might bottom and result in serious damage.

TIMING CHAIN COVER, OIL SEAL AND TIMING CHAIN Cover Removal (1) Drain cooling system and remove radiator and water pump assembly. (2) Remove crankshaft vibration damper attaching bolt. (3) Remove two of the pulley bolts, install Tool C-

Measuring Timing Chain for Stretch (1) Place a scale next to the timing chain so any movement of the chain may be measured. (2) Place a torque wrench and socket over camshaft sprocket attaching bolt and apply torque in the direction of crankshaft rotation to take up slack; 30 foot-pounds (with cylinder heads installed) or 15 footpounds (cylinder heads removed). With torque applied to the camshaft sprocket bolt, crankshaft should not be permitted to move. It may be necessary to block crankshaft to prevent rotation.

(3) Holding a scale with dimensional reading even with edge of a chain link, apply torque in the reverse direction 30 foot-pounds (with cylinder heads installed) or 15 foot-pounds (cylinder heads removed), and note amount of chain movement (Fig. 20). (4) Install a new timing chain, if its movement exceeds 3/16 inch. (5) If chain is satisfactory, slide crankshaft oil slinger over shaft and up against sprocket (flange away from sprocket). (6) If chain is not satisfactory, remove camshaft sprocket attaching bolt and remove timing chain with crankshaft and camshaft sprockets. When installing timing chain, use Tool C-3509 to prevent camshaft from contacting the welch plug in the rear of engine block. Remove distributor and oil pump-distributor drive gear. Locate tool against rear TORQUE WRENCH— — ••••3 Its INCH

-CHAIN CASE COVER •

TIMING INDICATOR —CYLINDER BLOCK ..• TIMING MARK VIBRATION DAMPER

(R149 A

Fig. 19—Removing Vibration Damper Assembly

KRIS] A

Fig. 20—Measuring Tinting Chain Stretch


383-440 CUBIC INCH—ENGINE 9-53

Fig. 21—Camshaft Holding Tool

C4509

side of cam gear and attach tool with distributor retainer plate bolt (Fig. 21). 47) Place camshaft sprocket and crankshaft sprocket on the bench with timing marks on exact imaginary center line through both camshaft and crankshaft sprocket bores. (8) Place timing chain around both sprockets. 191 Turn crankshaft and camshaft to line up with keyway location on crankshaft sprocket and dowel hole in camshaft sprocket. (101 Lilt sprockets and chain (keep sprockets tight against chain in position as described). (Ili Slide both sprockets evenly over their respective shafts. (12) Use a straight edge to measure alignment of timing marks (Fig. 22.. 1131 Install washer and camshaft sprocket bolt.

Fig. 23—Remover Blocks Expanded to Puller Position tighten to 35 foot-pounds_ Check to be sure that rear face of aluminum camshaft sprocket is flush with end of camshaft. Slide the crankshaft oil slinger over shaft and up against sprocket (flange away from sprocket). Oil Seal Replacement (Cover Removed)

U Position remover screw of Tool C-3506 through case cover, inside of case cover up. Position remover blocks directly opposite each other, and force the angular lip between the neoprene and flange of seal retainer. 12) Place washer and nut on remover screw. Tighten nut, forcing the blocks into the gap to a point of distorting the seal retainer lip (Fig. 23). This is important. remover is only positioned at this point. (3) Place sleeve over retainer and place removing and installing plate into the sleeve. t4) Place flat washer and nut on the remover screw. Hold center screw and tighten remover nut to remove the seal (Fig. 24!. 15) Insert remover screw through the removing and installing plate so thin shoulder will be facing up. 16) Insert remover screw with the plate through seal opening inside of chain ease cover facing up 7:r Place seal in cover opening, with neoprene down. Place seal installing plate into the new seal, with protective recess toward lip of seal retainer (Fig. REMOVER scRE‘v ;TOOL) REMOVING AND INSTALLING PLATE TOOL1 ■ SLEEVE cTOOL)

Fig. 22—Alignment of Timing Marks

Fig.

CitkiN CAS=

24—Removing Oil Seal


9-54 ENGINE-383-440 CUBIC INCH FEELER GAUG INSTALLING PLATE ITOOL)

SEAL

REMOVER SCREW (TOOL) CHAIN CASE COVER

SEAL"ASSEMBLY

KR156A

CHAIN CASE

Hg. 27—inspecting Seal for Proper Seating KR) 5413

to 135 foot-pounds. (6) Slide belt pulley over shaft and attach with bolts and lockwashers. Tighten bolts to 200 inchpounds.

en

Fig. 25—Positioning Installer Plate

25). The lip of the neoprene seal must be toward source of oil. (8) Install flat washer and nut on remover screw. hold screw and tighten nut (Pig. 26). (9) The seal is properly installed when the neoprene is tight against face of cover. Try to insert a .0015 inch feeler gauge between the neoprene and the cover (Fig. 27). If the seal is installed properly, feeler gauge cannot he inserted. Do not over compress neoprene.

Cover Installation

(1) Be sure mating surfaces of chain case cover and cylinder block are clean and free from burrs. (2) Using a new gasket slide chain case cover over locating dowels. Install and tighten bolts 15 footpounds. (3) Lubricate seal lip with lubriplate, place damper hub slot on key in crankshaft, and slide vibration damper on crankshaft. (4) Place installing tool, part of Tool C-3688 in position and press damper on the crankshaft (Fig. 28). (5) Install damper retainer washer and bolt. Tight-

CAMSHAFT The camshaft has an integral oil pump and distributor drive gear and fuel pump eccentric (Fig. 29). The rearward camshaft thrust is taken by the rear face of the aluminum camshaft sprocket hub, bearing directly on the front of cylinder block, eliminating need for a thrust plate. The helix of the oil pump and distributor drive gear and camshaft lobe taper both tend to provide a rearward thrust.

Removal (1) With tappets and the timing chain and sprockCHAIN CASE COVER • TIMING INDICATOR • CYLINDER BLOCK ..-- TIMING MARK VIBRATION DAMPER TOOL

REMOVER SCREW (T0001 V KR157A

Fig. 28—Installing Vibration Damper Assembly BOLT WASHER

INSTALLING PLATE IMOD SEAL RETAINER

CHAIN CASE COVER KR 1558

Fig. 26—Installing New Seal

CAMSHAFT SPROCKET

CAMSHAFT

- -DISTRIBUTOR DRIVE GEAR (CAMSHAFT) FUEL PUMP ECCENTRIC (CAMSHAFT) LOCATING DOWEL

Fig. 29—Camshaft and Sprocket (Disassembled View)

KRIM

Assembly


383-440 CUBIC INCH—ENGINE 9-55 ets removed, remove distributor and lift out oil pump and distributor drive shaft_ (2) Remove fuel pump to allow fuel pump push rod to drop away from cam eccentric. (3) Remove camshaft, being careful not to damage camshaft bearings with the cam lobes. Installation (1) Lubricate camshaft lobes and camshaft bearing journals and insert camshaft to within 2 inches of its final position in cylinder block. (2) Modify Tool C-3509 by grinding off index lug holding the upper arm on the tool and rotate arm 180 degrees. (3) Install Tool C-3509 in place of distributor drive gear and shaft, as shown in Figure 21. (4) Hold tool in position with distributor lock plate screw. This tool will restrict camshaft from being pushed in too far and prevent knocking out the welch plug in the rear of cylinder block. The tool should remain installed until camshaft and crankshaft sprockets and timing chain have been installed. Whenever an engine has been rebuilt and/or a new camshaft and/or new tappets are installed, one quart of engine supplement Chrysler Part Number 1879406 or equivalent should be added to the engine oil to aid in break-in. The oil mixture should be left in the engine for a minimum of 500 miles. Drain the oil mixture at the next normal oil change. Whenever camshaft is replaced, all of tappet fates must be inspected for crown with a straight edge. If any contact surface is dished or worn, tappet must be replaced.

CAMSHAFT BEARINGS (Engine Removed from Vehicle) Removal (11 With engine completely disassembled, drive out camshaft rear bearing welch plug. (2) Install proper sire adapters and horse shoe washers (part of Tool C-3132A) at the back of each bearing to be removed and drive out bearings (Fig. 30).

CRANKSHAFT • MAIN BEARING OIL HOLE CAMSHAFT BEARING OIL HOLE EI M

KR164

Fig. 30—Removing Camshaft Bearing block must be in exact register to insure proper lubrication (Fig. 30). The camshaft bearing index can be inspected after installation by inserting a pencil flashlight in the bearing. The camshaft bearing oil hole should be perfectly aligned with the drilled oil passage from the main bearing. Other oil holes in the camshaft bearings should be visible by looking down on the left bank oil hole above and between NO. 6 and NO. 8 cylinders to NO. 4 camshaft bearing and on the right bank above and between NO. 5 and 7 cylinders to NO. 4 camshaft bearings. If camshaft bearing oil holes are not in exact register, remove and reinstall them correctly. Install a new welch plug at rear of camshaft. Be sure this plug does not leak. DISTRIBUTOR DRIVE SHAFT BUSHING Removal (1) Insert Tool C.3052 into the old bushing and thread down until a tight fit is obtained (Fig. 31). (2) Hold remover screw and tighten nut until bushing is removed. Installation (1) Slide a new bushing over burnishing end of Tool C.3053 and insert tool bushing into the bore. BUSHING TOOL

Installation (1) Install new camshaft bearings with Tool C3132A. Place new camshaft bearing over proper adapter. (2) Position bearing in the tool. Install the horse shoe lock and by reversing removal procedure, carefully drive hearing into place. (3) Install remaining bearings in like manner. Install the NO. 1 camshaft bearing 1/32 inward from the front face of cylinder block.

The oil holes in camshaft bearings and the cylinder

KR159

fig. 3I—Removing Distributor Drive Shaft Bushing


9-56

ENGINE-383-440 CUBIC INCH DISTRIBUTOR AND OIL PUMP DRIVE . GEAR

Fig. 32—Installing Distributor Drive Shaft Bushing

(2) Drive bushing and tool into position, using a hammer (Fig. 32). (3) As the burnisher is pulled through the bushing by tightening remover nut, the bushing is expanded tight in the block and burnished to correct size (Fig. 33). DO NOT REAM THIS BUSHING.

Distributor Timing

Before installing distributor and oil pump drive shaft, time the engine as follows: (1) Rotate crankshaft until NO. 1 cylinder is at top dead center on the firing stroke. (2) When in this position, the straight line on the vibration damper should be under "0" on timing Indicator. (3) Coat shaft and drive gear with engine oil. Install the shaft so that after gear spirals into place, it will index with the oil pump shaft, so slot in top of drive gear will be parallel with center line of crankshaft (Fig. 34).

Installation of Distributor (1) Hold distributor over mounting pad on cylinder block with vacuum chamber pointing toward center of engine. BUSHING TOOL

00," CENTER LINE OF CRANKSHAFT

Fig. 33—Burnishing Distributor Drive Shaft Bushing

1

KR163A

Fig. 34—Distributor Drive Gear installed

(2) Turn rotor until it points forward and to approximate location of No. 1 tower terminal in the distributor cap. (3) Place distributor gasket in position. (4) Lower the distributor and engage the shaft in the slot of distributor drive shaft gear. (5) Turn distributor clockwise until breaker contacts are just separating, install and tighten hold down clamp.

CYLINDER BLOCK The cylinder block is of the deep block design which eliminates the need for a torque converter housing adapter plate. Its sides extend three inches below the crankshaft center line.

Piston Removal (1) Remove top ridge of cylinder bores with a reliable ridge reamer before removing pistons from cylinder block. Be sure to keep tops of pistons covered during this operation. The pistons and connecting rods must be removed from the top of the cylinder block. When removing piston and connecting rod assemblies from the engine, rotate the crankshaft so each connecting rod is centered in cylinder bore. (2) Inspect connecting rods and connecting rod caps for cylinder identification. Identify them if necessary. (3) RV1110VC connecting rod cap. Install connecting rod bolt guide set on connecting rod bolts. Push each piston and rod assembly out of cylinder bore. Be careful not to nick crankshaft journals. (4) Install bearing caps on mating rods.

Cleaning and Inspection ‘ 14 KR161

$LOT

(1) Clean cylinder block thoroughly and inspect all core hole plugs for evidence of leaking. (2) If new core plugs are installed, coat edges of


383-440 CUBIC INCH—ENGINE 9-57

plug and core hole with Number 1057794 Sealer or equivalent Drive the core plug in so that the rim lies at least 1/64" below the lead-in chamfer. (3) Examine block for cracks or fractures.

CROSSHATCH PATTERN

Cylinder Bore Inspection

The cylinder walls should be measured for out-ofround and taper with Tool C-119. If the cylinder bores show more than .005" out-of-round, or a taper of more than .010" or if the cylinder walls are badly scuffed or scored, the cylinder block should be rebored and honed, and new pistons and rings fitted. Whatever type of boring equipment is used, boring and honing operation should be closely coordinated with the fitting of pistons and rings in order that specified clearance may be maintained.

NPOPE1 Fig. 33—Cross Hatch Pattern

Honing Cylinder Bores

Before honing, stuff plenty of clean rags under the bores, over the crankshaft to keep the abrasive materials from entering the crankcase area. (1) Used carefully, the cylinder bore resizing hone C-822 equipped with 220 grit stones and 390 extensions necessary with 383 and 440 cubic inch engines is the best tool for this job. in addition to deglazing, it will reduce taper and out-of-round as well as removing light scuffing. scoring or scratches. Usually, a few strokes will clean up a bore and maintain the required limits. (2) Deglazing of the cylinder walls may be done using a cylinder surfacing hone, Tool C-3501, equipped with 280 grit stones (3501-3810) tithe cylinder bore is straight and round. 20 to 60 strokes depending on the bore condition will be sufficient to provide a satisfactory surface. Inspect cylinder walls after each 20 strokes, Use honing oil C-3501-3880 Or a light honing oil available from major oil distributors. Do not use engine or transmission oil, mineral oil or kerosene. 13) Honing should be done by moving the hone up and down fast enough to get a cross-hatch pattern. When hone marks intersect at 60-, cross hatch angle is most satisfactory for proper seating of rings (See Fig. 35). (4) After honing, it is necessary that the block be cleaned again to remove all traces of abrasives. Wash cylinder block and crankshaft thoroughly. CAUTION: Be sure all abrasives are removed from the engine parts after honing. It is recommended that a solution of soap and water be used with a brush and the parts then thoroughly dried. The bore can be considered clean when it can be wiped clean with a white cloth and the cloth remains clean. Oil bores after cleaning to prevent rusting.

PISTONS, PINS AND RINGS Pistons

The pistons are cam ground so that the diameter at the pin boss is less than its diameter across the thrust face. This allows for expansion under normal operating conditions. Under operating temperatures, expansion forces the pin bosses away from each other, thus causing the piston to assume a more nearly round shape. It is important that old or new pistons be measured for taper and elliptical shape before they are fitted into the cylinder bore (See Fig. 36). Finished Pistons

All pistons are machined to the same weight in grams, regardless of oversize so piston balance can be maintained. For cylinder bores which have been honed or rebored, pistons are available in standard and the following oversizes: .005_020, and .040 inch.

Fitting Pistons

Piston and cylinder wall must be clean and dry. A-3

— 020 TO .0213 IN LESS — ?HAN DIAMETER AT (0 •-••••

.•••••■

D-n L 1NE ELLIPTICAL SHAPE OF THE PISTON SKIRT SHOULD 3E .010 TO .012 IN. LESS AT DIAMETER (A) THAN ACROSS THE THRUST FAC ES AT DIAMETER IS). Mu! ': SURFMENT IS MADE IN. BELOW LOWER RING GROOVE

DIAMETERS AT (C) AND (0) CAN BE EQUAL OR DIAMETER AT (0) CAN BE .0015 IN GREATER THAN (C)

Fig. 36—Piston Measurements

NU258


9-58 ENGINE-383-440 CUBIC INCH Specified clearance between the piston and the cylinder wall is .0003 to .0013 inch. Piston diameter should be measured at the top of skirt 90 degrees to piston pin axis. Cylinder bores should be measured halfway down the cylinder bore and transverse to the engine crankshaft center line. Pistons and cylinder bores should be measured at

NUT (TOOL) ANVIL (TOOL) PISTON - PILOT (TOOL)

• A--; *

normal room temperature, 70 degrees F.

All service pistons include pins, and are available in standard and the following oversizes: .005, .020 and .040 inch. Fitting Rings

(1) Measure piston ring gap about two inches from bottom of cylinder bore in which it is to be fitted. (An inverted piston can be used to push rings down to insure positioning rings squarely in cylinder wall before measuring.) (2) Insert feeler stock in the gap. Ring gap should be between .013 to .052 inch for the compression rings and .015 to .062 inch for the oil ring steel rails in standard size bores. Maximum gap on .005 inch 0/S bores should be .060 inch for compression rings and .070 inch for the oil ring steel rails (3) Measure side clearance between piston ring and ring groove (Fig. 37). Clearance should be .0015 to .003 inches for the top compression ring and intermediate ring. Steel rail service oil ring should be free in groove, but should not exceed .005 inch side clearance. (4) Install the three piece oil ring in lower ring groove using instructions in ring package. (5) Install compression rings in middle and top groove as shown on Instruction sheet. Be sure the mark "top" on each compression ring faces top of piston. (6) For the two top rings use ring installer Tool C-3673 for 333 cubic inch engines and Tool C-4001 for the 440 cubic inch engines.

GUIDE-SMALL (TOOL)

PISTON PIN CONNECTING ROD GUIDE-LARGE (TOOL)----

KR195B

Fig. 38-Tool Arrangement for Removing Piston Pin

Piston Pin Removal

(1) Arrange Tool C-3684 parts for removal of piston pin, (Fig. 38). (2) Install pilot on main screw. (3) Install main screw through piston pin. (4) Install anvil over threaded end of main screw with small end of anvil against piston boss. Be sure spring is removed from anvil.

(5) Install nut loosely on main screw and place assembly on a press, (Fig. 39). (6) Press piston pin out of connecting rod. When pin falls free from connecting rod, stop press to prevent damage to bottom of anvil.

(7) Remove tool from piston. Installation

(1) Test piston pin fit in the piston. It should be a sliding fit in the piston at 70 degrees F. Piston pins are supplied in standard sizes only. (2) Lubricate piston pin holes in the piston and connecting rod. (3) Arrange Tool C-3684 parts for installation of piston pin (Fig. 40). (4) Install spring inside the pilot and install spring

MAIN SCREW (TOOL)

PRESS

PISTON RING — -

MAIN /SCREW (TOOL)

FEELER GAGES

PILOT (TOOL)

RING GROOVE

PISTON

PISTON PIN ve)

!cc se ANVIL

KR165

Fig. 37 -Measuring Piston Ring Clearance

A

ir : aT Fig. 39—Removing Piston Pin

(TOOL)

NR808


383-440 CUBIC INCH-ENGINE 9-59

NUT

ANVIL (TOOL) SPRING (TOOL) -- PILOT (TOOL) ----- PISTON

(rom)

TORQUE WRENCH

--PISTON PIN

SOCKET

. MAIN SCREW

(TOOL)

'

GUIDE —SMALL

(TOOL) CONNECTING ROD

KR196B

GUIDE—LARGE (TOOL)

Fig. 40—Tool Arrangement for installing Piston Pin

and pilot in the anvil. Install piston pin over main screw. (5) Place piston, with "front" up, over the pilot so pilot extends through piston pin hole. (6) Position connecting rod over the pilot which extends through piston pin hole. Assemble rods to pistons of the right cylinder bank (2, 4, 6, and 8) with indent on piston head opposite to the larger chamfer on the large bore end of connecting rod. Assemble rods to pistons of the left cylinder bank (1, 3, 5, and 7) with indent on piston head on the same side as the large chamfer on the large bore end of the connecting rod. (7) Install main screw and piston pin in piston, (Fig. 40). (8) Install nut on puller screw to hold assembly together. Place assembly on a press (Fig. 41). (9) Press piston pin in until piston pin "bottoms" on the pilot. This will position pin in connecting rod. (10) Remove tool and arrange tool parts and piston assembly in same manner (Fig. 38). (11) Place assembly in a vise (Fig. 42). (12) Attach torque wrench to nut and tighten up to

NR810

Fig. 42—Testing Fit of Piston Pin In Connecting Rod

15 foot-pounds. If the connecting rod moves downward on piston pin, reject this connecting rod and piston pin combination. Obtain a connecting rod with proper small end bore diameter and repeat the installation and tightening procedure. (13) If connecting rod does not move under 15 foot-pounds, piston pin and connecting rod interference is satisfactory, remove tool. CRANKSHAFT IDENTIFICATION IMPORTANT: A Maltese Cross stamped on the engine numbering pad (Fig. 43) indicates that engine is equipped with a crankshaft which has one or more connecting rods and/or main bearing journals finished .001 inch undersize. The position of the undersize journal or journals is stamped on a machine surface of the NO. 3 counterweight (Fig. 44). A Maltese Cross

PRESS

MAIN SCREW (TOOL)

PISTON

ANVIL (TOOL)

NR809

Fig. 41-Installing Piston Pin

Fig. 43—Showing Location of External Engine Numbering Pad


9-60 ENGINE-383-440 CUBIC INCH (2) Install bearing cap and tighten to 45 footpounds. (3) Turn crankshaft 1/4 turn in each direction. A slight drag should be felt which indicates clearance is satisfactory. 383 engine with 2-barrel carburetor, correct clearance is from .0005 to .0015 inch; 383 with 4-barrel carburetor and 440 with tri-metal bearings correct clearance is from .001 to .002 inch. (4) Side play should be from .009 to .017 inch (two rods).

KR 162 Fig. 44—Showing Location of Internal Marking of Counterweight with an X indicates .010 inch undersize journals.

The connecting rod journals are identified by the letter "R" and main bearing journals by the letter "M." For example "111-1" indicates that NO. 1 main bearing is .001 inch undersize. CONNECTING RODS Installation of Connecting Rod Bearings Fit all rods on one bank until complete. Do not alternate from one bank to another, because when rods are assembled to the pistons correctly, they are not interchangeable from one bank to another.

Each bearing cap has a small "V" groove across parting face. When installing the lower bearing shell, make certain "V" groove in shell is in line with "V" groove in cap. This allows lubrication of the cylinder wall. The bearings should always be installed so that the small formed tang fits into the machined grooves of the rods. The end clearance should be from .009 to .017 inch (two rods). Limits of taper or out-of-round on any crankshaft journals should be held to a maximum of .001 inch. Bearings are available in .001, .002, .003, .010 and .012 inch undersize. Install the bearings in pairs. Do not use a new bearing half with an old bearing half. Do not file the rods or bearing caps.

INSTALLING PISTON AND CONNECTING ROD ASSEMBLY (1) Before installing pistons, rods, and rod assemblies in the bore, be sure that the compression ring gaps are staggered so that neither are in line with oil ring rail gaps. (2) The oil ring expander ends should be positioned toward the outside of the "V" of the engine. The oil ring rail gaps should be positioned opposite each other and above the piston pin holes. (3) Immerse piston head and rings in clean engine oil, slide ring compressor, Tool C-385. over the piston and tighten with special wrench (part of Tool C-385). Be sure position of rings does not change during this operation.

(4) Install connecting rod bolt protectors on rod bolts, the long protector should he installed on the numbered side of the connecting rod. (5) Rotate crankshaft so that the connecting rod journal is on the center of the cylinder bore. insert rod and piston into cylinder bore and guide rod over the crankshaft journal (Fig. 45). (6) Tap piston down in cylinder bore, using handle of a hammer. At the same time, guide connecting rod into position on crankpin journal. (7) The notch or groove on top of piston must be pointing toward front of engine and larger chamfer of CRANKSHAFT JOURNAL NW-

MEASURING CONNECTING ROD BEARING CLEARANCE

Shim Stock Method (1) (a) 383 engine with 2-barrel carburetor, place an oiled .001 inch brass shim stock (1/2 inch wide and 3/4 inch long) between the bearing and connecting rod journal. (b) 383 engine with 4-barrel carburetor and 440 with tri-metal bearings, use an oiled .002 inch brass shim stock (1/2 inch wide and 3/4 inch long) between the bearing and connecting rod journal.

Fig. 45—Installing Connecting Rod


383-440 CUBIC INCH—ENGINE 9-61 connecting rod bore must be installed toward crank pin journal fillet. (8) Install rod caps, tighten nuts to 45 foot-pounds.

CRANKSHAFT MAIN JOURNALS Crankshaft main bearing journals should be inspected for excessive wear, taper and scoring. Journal grinding should not exceed .012 inch under the standard journal diameter. DO NOT grind the thrust faces of the NO. 3 main bearing. Do not nick crankpin or main bearing fillets. After regrinding, remove rough edges from crankshaft oil holes and clean out all oil passages.

CRANKSHAFT MAIN BEARINGS New lower main bearings halves Numbers 1, 2, 4, 5 are interchangeable (Fig. 48). New upper main bearing halves Number 2, 4 and 5 are also interchangeable. Upper and lower bearing halves are not interchangeable because upper bearing is grooved and lower bearing is not. The NO. 1 upper main bearing IS NOT INTERCHANGEABLE AND IS CHAMFERED on the tab side for timing chain oiling and can be identified by a red marking on edge of bearing. Upper and lower NO. 3 bearings are flanged to carry the crankshaft thrust loads and are not interchangeable with any other bearings in the engine. Bearings that are not badly worn or pitted must be reinstalled in the same position.

Bearing caps are not interchangeable and should be marked at removal to insure correct assembly. Bearings are available in standard and the following undersizes: .001, .002, .003, .010, .011 and .012 inch. Do not install an undersize bearing that will reduce clearance below specifications. 3

5

111,

Removal

(1) Remove oil pan and identify bearing caps before removal. (2) Remove bearing caps one at a time. Remove upper half of bearing by inserting Tool C-3059 (Fig. 47) into oil hole of crankshaft. (3) Slowly rotate crankshaft clockwise, forcing out upper half of bearing. Installation Only one main bearing should be selectively fitted while all other main bearing caps are properly torqued. When Installing a new upper bearing shell, slightly chamfer the sharp edges from the plain side.

(1) Start bearing in place, and insert Tool C-3059 into oil hole of crankshaft (Fig. 47). (2) Slowly rotate crankshaft counter-clockwise sliding the bearing into position. Remove Tool C-3059.

MEASURING MAIN BEARING CLEARANCE Shim Stock Method (1) Smooth edges of a 1/2 x 3/4 inch piece of brass shim stock, .001 inch thickness. (2) Install bearing in center main bearing cap, bearing tang in grove In cap, lubricate bearing and position shim stock across the bearing, install cap, tighten bolts to 85 foot-pounds. (3) If a slight drag is felt as crankshaft is turned (moved no more than 1/4 turn in either direction), clearance is .001 inch or less and is considered satisfactory. If, however, no drag is felt, the bearing is too large or crankshaft cannot be rotated, bearing is too small and should be replaced with the correct size. (4) Measure crankshaft end play .002 to .007 inch. If end play is less than .002 inch or more than .007 inch, install a new number 3 main bearing. BEARING

urPER

THRUST fIrARING

II

MI

fi s

LOWER 1--•

Fig. 46-Main Rearing Identification

4-

N1J256

REMOVING

INSTALLING

Fig. 47-Removing or Installing Upper Main Bearing


9-62 ENGINE-383-440 CUBIC INCH : , L 4Th osse BRIDGE iPART OF TOOL) . 7s..----

SEAL

eli -ocran'

SEAL RETAINER

1 --Thr SIDE SEAL GROOVES c.

KR237

Fig. 48—Installing Rear Main Bearing Lower Oil Seal

Fig. 49 — Trimming Rear Main Bearing Lower 011 Seal

(5) Fit remaining bearings in same manner. It is permissable to use one .001 inch undersize bearing shell with one standard bearing shell or one .002 inch undersize bearing shell with one .001 inch undersize shell. Always use the smaller diameter

Lower Rear Main Seal Installation (1) Install a new seal in seal retainer so ends protrude (Fig. 48). (2) Install bridge on tool and tap the seal down into position with Tool C-3625 for 383 Cubic Inch Engines or Tool C-3743 for 440 Cubic Inch Engines until tool is seated. (3) 'Prim off that portion of the seal that protrudes above the cap (Fig. 49).

bearing half as the upper. Never use an upper bearing half more than .091 inch smaller than the lower bearing half and never use a new bearing half with a used bearing half.

REAR MAIN BEARING OIL SEAL (Crankshaft Removed)

Side Seals Installation

Upper Rear Main Seal Installation (1) Install a new rear main bearing oil seal in cylinder block so that both ends protrude. (2) Tap seal down into position, using Tool C-3625 for 383 Cubic Inch Engines or Tool C-3743 for 440 Cubic Inch Engines, with bridge removed until tool is seated in bearing bore. (3) Hold the tool in this position and cut off portion of seal that extends above the block on both sides.

(I) Apply mineral spirits or diesel fuel to the side seals. (2) Install seals immediately in the seal retainer grooves. (3) Install seal retainer and tighten screws to 25 foot-pounds.

Perform the following operations as rapidly as possible. These side seals are made from a material that expands quickly when oiled.

Failure to pre-oil the seals will result in an oil leak.

ENGINE OILING SYSTEM (Fig. 50) OIL PAN Removal (1) Disconnect battery cable and remove dipstick. (2) Raise vehicle on a hoist and disconnect steering linkage from idler arm and steering arm. (3) Disconnect exhaust pipe branches from right and left manifolds. (4) Remove clamp attaching exhaust pipe to extension and remove exhaust pipe. (5) Drain crankcase oil. (6) Remove converter dust shield.

(7) Remove oil pan bolts. Turn flywheel until counterweight and connecting rods at front end of crankshaft are at their highest position to provide clearance, and lower the pan. Turn pan counterclockwise to clear oil screen and suction pipe as it is lowered.

Installation (1) Inspect alignment of oil strainer. The bottom of the strainer must be on a horizontal plane with machined surface of cylinder block. The bottom of the strainer must touch the bottom of oil pan.


383-440 CUBIC INCH—ENGINE 9-63

RIGHT BANK LUBRICATION

ROCKER ARM LEFT BANK LUBRICATION

ROCKER SHAFT RIGHT ROCKER SHAFT

NO. 4 CAMSHAFT BEARING

OIL SUPPLY TO PUSH ROD

FRONT VIEW

OIL FEED HOLE

LEFT MAIN OIL GALLERY

RIGHT MAIN OIL GALLERY

LEFT ROCKER SHAFT

OIL FILTER

OIL PUMP

OIL PRESSURE RELIEF VALVE NU257

Fig. 50—Engine Oiling System

(2) Install oil pan. (3) Install converter dust shield. (4) Connect exhaust pipe branches to the manifolds and to the exhaust extension. (5) Connect steering linkage at idler arm and at pitman arm. (6) Connect battery cable, install dipstick. (7) Install drain plug and refill crankcase with the proper grade and quantity of oil.

Inspection and Assembly (1) Clean all parts thoroughly. The mating face of PLUG GASKET

W

BOLTS AND WASHERS COVER OIL FILTER

7

SPRING RELIEF VALVE PLUNGER

OUTER ROTOR INNER ROTOR AND SHAFT

OIL PUMP

BODY

Removal Remove oil pump attaching bolts and remove pump and filter assembly from bottom side of engine. Disassembly (1) Remove filter base and oil seal ring. (2) Remove pump rotor and shaft and lift out outer pump rotor. (3) Remove the oil pressure relief valve plug and lift out the spring and relief valve plunger (Fig. 51).

DRIVE SHAFT AND GEAR

SEAL RING GASKET "0" RING KR173

PIN

Fig. 51—Oil Pump and Filter Assembly (Disassembled View)


9-84 ENGINE-383-440 CUBIC INCH COVER .-„..

...- OUTER ROTOR

STRAIGHT EDGE - PUMP BODY KR176

Fig. 55—Measuring Outer Rotor Clearance

FEELER GAUGE

KR174:,

Fig. 52—Measuring Oil Pump Cover Flatness

filter base (oil pump cover) should be smooth. Replace filter base if it is scratched or grooved. (2) Lay a straightedge across oil pump filter base surface (Fig. 52). If a .0015 inch feeler gauge can be inserted between the base and straightedge, filter base should be replaced. (3) If outer rotor length measures less than .943 inch (Fig. 53) and diameter less than 2.469 inches, replace outer rotor. (4) If inner rotor length measures less than .942

inch (Fig. 34), a new inner rotor should be installed. (5) Install outer rotor into pump body, pressing to one side with fingers and measure clearance between outer rotor and pump body (Fig. 55). If measurement is more than .014 inch, replace oil pump body. (6) Install inner rotor into pump body and place a straightedge across the face between bolt holes (Fig. 56). If a feeler gauge of more than .004 inch can be inserted between the rotors and straightedge, replace pump body. (7) If the tip clearance between inner and outer rotors (Fig. 57) is more than .010 inch, replace inner and outer rotor. Servicing Oil Pressure Relief Valve Inspect oil pump relief valve plunger for scoring and free operation in its bore. Small scores may be removed with 400 grit wet or dry paper providing extreme care is used not to round off the sharp edge portion of the valve. STRAIGHT EDGE

DIAMETER K8668

Fig. 53—Measuring Outer Rotor Thickness FEELER GAUGE

Fig. 56 — Measuring Clearance Over Rotors OUTER ROTOR — INNER ROTOR FEELER GAUGE

KB b7A Fig. 54—Measuring Inner Rotor Thickness

KR177

Fig. 57—Measuring Clearance Between Rotors


428 CUBIC INCH—ENGINE 945

The relief valve spring has a free length of 2-9/32 to 219/64 inch and should test 14.85 to 15.85 lbs. when compressed to 1-19/32 inch. Discard spring that fails to meet specifications. If the oil pressure is low, inspect for worn bearings, or look for other causes of possible loss of oil pressure. When assembling the oil pump, be sure to use new oil seal rings between filter base and pump body. Installation

(1) Install a new "0" ring seal on the pilot of oil pump before attaching oil pump to cylinder block. (2) Install oil pump on engine, using a new gasket on engine and tighten attaching bolts to 30 footpounds. Install oil filter element. OIL FILTER REPLACEMENT

The "spin on" oil filter should be replaced preferably to coincide with every second oil change. Removal Use care so as not to damage transmission oil cooler lines.

58—Removing Oil Filter (1) Using Tool C-4065 unscrew the filter from the base on bottom side of engine and discard (Fig. 58). (2) Wipe base clean. Fig.

Installation

(1) Install the "spin" oil filter by hand, finger tight. Do not use tool. (2) To obtain an effective seal, tighten filters by hand the additional number of turns indicated on the replacement filter. Start engine and insp .


426 CUBIC INCH HEMI ENGINE INDEX Page Camshaft 75 Camshaft Bearings 76 Connecting Rods 79 Crankcase Ventilation System 83 Crankshaft Identification 79 Crankshaft Main Bearings 79 Crankshaft Main Journals 79 Cylinder Block 77 Cylinder Heads 67 Distributor Drive Shaft Bushing 76 Engine Assembly 66 Engine Mounts 66 Engine Oiling System 81 Hydraulic Tappets 71 Installing Piston and Connecting Rod Assembly .. 79

Page

Measuring Connecting Rod Bearing Clearance ... Measuring Main Bearing Clearance Oil Filter Oil Pan Oil Pump Piston, Pins and Rings Repair of Damaged or Worn Threads Rear Main Bearing Oil Seal Specifications Tappet Adjustment Timing Chain Cover, Oil Seal and Chain Tune-Up Valves and Valve Springs Valve Timing

79 80 83 81 81 78 83 81 96 71 73 65 69 72

SERVICE PROCEDURES TUNE-UP (1) Test battery specific gravity, add water if necessary, clean and tighten battery connections. (2) Test cranking voltage. See "Starting Motor Cranking Voltage" Electrical Section of this manual. (3) Tighten the intake manifold bolts to specifications. (4) Perform cylinder compression test. Compression should not be less than 110 pounds and not vary more than 40 pounds. The recommended compression pressures are to be used only as a guide to diagnosing

engine problems. An engine in good condition may ex-

hibit higher pressures. Many conditions which are difficult to control cause variations in compression readings. An engine should not be disassembled to determine the cause of low compression unless some other malfunction is present. (5) Clean or replace spark plugs as necessary and adjust gap to .035 inch. Tighten to 30 foot-pounds. Aluminum spark plug tubes serve as spark plug gaskets. (6) Test resistance of spark plug cables. Refer to

"Ignition System Secondary Circuit Inspection" Electrical Section. (7) Inspect the breaker plate contacts, primary wire


9-66 ENGINE-426 CUBIC INCH and vacuum advance operation. Test coil output voltage, primary and secondary resistance. Test Condenser. Replace parts as necessary. Refer to Ignition System and make necessary adjustments. (8) Reset the ignition timing with the vacuum advance line disconnected. The ignition timing should be set to compensate for altitudes and/or gasoline grades. (9) Set carburetor idle mixture adjustment. Adjust engine RPM to specifications. Perform a combustion analysis. (10) Test the fuel pump for pressure and vacuum. Refer to "Fuel System" Group 14, Specifications. (11) Inspect the manifold heat control valve in the right exhaust manifold for proper operation and apply Manifold Heat Control Valve Solvent Number 2525054 or equivalent to the bushing and shaft. (12) Every oil change remove filter element and blow out dirt gently with air hose. Direct air from inside out, and keep nozzle 2 inches away from element to avoid damaging. Clean the metal housing and replace the element. Every year install a new factory recommended filter element. Service the unit more frequently when driving under severe conditions, such as in dusty areas. (13) Inspect crankcase ventilation system as outlined on page 83. (14) Inspect and adjust the accessory belt drives referring to "Cooling System" Group 7 for proper adjustments. (15) Road test vehicle as a final check. FRONT ENGINE MOUNTS

2780673 BRACKET RIGHT CROSS/ MEMBER

2780672 BRACKET LEFT FWD. et!,

2468184 INSULATOR ASSEMBLY LEFT

TIGHTENING---TORQUE RIGHT SIDE

20 FT. LB.

FWD.

30 FT. LB. 35 FT. LB.

LEFT SIDE 50 FT. LB. 75 FT. LB.

CROSS MEMBER NR43B

—

Fig. 1 Front Engine Mounts

(2) Install transmission jack to support rear of engine. (3) Remove extension housing mounting bolts, crossmember attaching bolts and remove crossmember. (4) Remove insulator from crossmember. Installation (1) Install insulator to crossmember. (2) Install crossmember, tightening attaching bolts to specifications. (3) Install extension housing mounting bolts tightening to specifications (Fig. 2). (4) Remove transmission jack and lower vehicle. ENGINE ASSEMBLY

Removal

(1) Disconnect throttle linkage from bellcrank at rear of engine. (2) Position fan to clear radiator top tank and hoses. (3) Remove engine mount to frame bolts; on the right side disconnect flexible line and fitting from fuel pump and move line to side; on left side remove splash shield. (4) Raise engine and remove engine mounts with brackets. Remove insulators from brackets.

Removal

(1) Scribe hood hinge outlines on hood and remove hood. (2) Drain cooling system, remove battery and air cleaner. (3) Disconnect radiator hoses, heater hoses and cooler lines if so equipped. Remove radiator and shroud. (4) Disconnect fuel line, throttle cable, electrical REARar

Installation

(1) Install insulators to brackets loosely. (2) Install engine mounts to engine, lower engine. into position and install engine mount to frame bolts. Tighten to specifications (Fig. 1). (3) On right side install fitting and flexible line to fuel pump; on left side install splash shield. (4) Install throttle linkage to bellcrank.

TRANSMISSION EXT. HOUSING REAR MOUNT (2)

CENTER CROSSMEMBER

(4

TIGHTENING TORQUE 00 IN. LBS. 40 FT. LBS.

REAR ENGINE MOUNTS Removal (1) Raise vehicle on hoist.

90 FT. LBS.

NU281 Fig. 2—Engine Rear Support


426 CUBIC INCH—ENGINE 9-67

connections to alternator, coil, temperature and oil pressure sending units. (5) Raise vehicle on a hoist and remove transmission as outlined in Group 21 of this manual. Remove clutch torque shaft if so equipped. (6) Remove attaching bolts and stud nuts from front engine mount insulators. (7) Disconnect exhaust pipes from manifolds and tie out of the way. Lower vehicle. (8) Install lifting straps to engine, attach front strap to front of left cylinder head and rear strap to rear of right cylinder head. Caution: Do not use intake manifold to remove engine assembly. Remove carburetors to prevent damage.

(9) Attach hydro-crane lifting hooks to lifting straps, remove engine assembly from chassis and install engine in a repair stand. Installation

(1) Attach hydro-crane lifting hoots to lifting straps and remove engine from repair stand. (2) Lower engine into chassis until the front engine mounts line up with "K" member support. Install attaching bolts and stud nuts, do not tighten at this time. (3) Install engine support fixture C-3487A, engaging the hooks in holes in frame side members. Be sure support ends are up against the underside of the oil pan flange. (4) Remove hydro-crane lifting hooks. Raise vehicle on a hoist. (5) Install transmission as outlined in Group 21 of this service manual. (6) Install clutch torque shaft, linkage and adjust clutch pedal to 1 inch free play if so equipped. (7) Install exhaust pipes to manifolds. Torque front engine mounts to specifications. Lower vehicle. (8) Connect electrical connections to alternator, coil, temperature and oil pressure sending units, fuel line. (9) Install carburetors, linkage, throttle cable and adjust. (10) Install radiator, connect heater hoses, cooler lines and fill cooling system. (11) Install hood using scribe marks for proper alignment. (12) Install battery, fill crankcase to capacity. Whenever an engine has been rebuilt and/or a new camshaft and/or new tappets are installed, one quart of engine supplement Chrysler Part Number 1879406 or equivalent should be added to the engine oil to aid in break-in. The oil mixture should be left in engine for a minimum of 500 miles and drained at next normal oil change.

(13) Start engine, adjust engine idle and timing

SUPPORT BRACKET BOLTS

IP; CYLINDER HEAD OUTER BOLTS

NN97I

Fig. 3 —Cylinder Head Attaching Bolts

to specifications, install air cleaner and road test vehicle. CYLINDER HEADS

Each chrome alloy cast iron cylinder head is held in place by 13 bolts (Fig. 3) and 5 studs, nuts and washers (Fig. 4). The stud nuts are tightened from inside of the tappet chamber. Aluminum spark plug tubes (shown in cross section in Figure 5) serves as spark plug gaskets. The tubes project through the cylinder head cover and are sealed against oil leaks. Removal (1) Disconnect battery ground cable at battery. (2) Remove air cleaner, distributor cap with spark plug cable and coil secondary cable as an assembly. (3) Grasp secondary cables at spark plug covers and pull covers straight out. (4) Remove spark plugs. (5) On left bank, disconnect brake lines at master cylinder, remove cotter pin and clevis pin from linkage in back of power brake. (6) Remove the 4 nuts attaching booster to mounting bracket and remove power brake and master cylinder assembly. (7) Remove cylinder head coven and gaskets.

Cylinder Head Cover

STUD NUTS (40 EACH HEAD

Fig. 4—Removing or Installing Cylinder Head Stud Nuts


9-68 ENGINE-426 CUBIC INCH

NN1034

Fig. 5-14emi 426 Engine Combustion Cross Section

Rocker Arms and Shafts Removal (1) With cylinder head cover removed, remove the five bolts, (3/4 inch hexagon) that attach the rocker arm support brackets to the cylinder head and block (Fig. 3). (2) Remove rocker arm assemblies. (3) Remove push rods and identify to insure installation in original location. Cylinder Head Removal (1) With cylinder head cover and rocker arm assemblies removed, remove alternator, disconnect accelerator cable and transmission throttle rod from upper bellcrank. Drain cooling system. (2) Disconnect fuel line at tee fitting. (3) Disconnect intake manifold heat tubes located at rear of manifold. Remove air tube between automatic choke and exhaust manifold. (4) Remove the intake manifold attaching screws. (There are three locating dowels at each end of manifold.) (5) Remove intake manifold with ignition coil, both carburetors, fuel lines, fuel filters, throttle linkage ind upper bellcrank as an assembly. (6) Disconnect exhaust headers from cylinder heads and tie out of way. (7) Remove the lower eight cylinder head bolts (Fig. 3). (8) Remove the four stud nuts, (9/16 inch hexagon) from cylinder head studs inside of tappet chamber (Fig. 4). (9) Remove cylinder heads and place in holding fixture tool C-3626. To protect studs do not set cylinder head down on studs at any time. Cylinder Head installation (1) Clean gasket surfaces of cylinder block, cylinder head and remove all burrs from edges of cylinder head. (2) Inspect all surfaces with a straightedge if there

is any reason to suspect leakage. If out of flatness exceeds .00075 times the span length in any direction; either replace head or lightly machine the head gasket surface. As an example, if a 12 inch span is .004" out of flat, allowable is 12 x .00075 =_ .009". Head is OK. The cylinder head surface finish should be 70-180 micro-inches. If the cylinder head studs were removed or come loose, the studs will have to be coated with Chrysler Sealer Part Number 1057794 or equivalent and torqued to 20 foot-lbs. (3) Coat new gasket lightly with Chrysler Sealer Part Number 1057794 or equivalent. With the raised bead toward cylinder block, install gasket and cylinder head. (4) Install the cylinder head stud nuts inside of tappet chamber and the eight short outer cylinder head bolts. Do not tighten at this time. Rocker Arms and Shaft Installation (1) Install push rods through push rod holes in head. The short rods in upper holes (intake) and long rods in lower holes (exhaust). If the rocker arm assembly had been disassembled for cleaning, inspection or replacement, refer to Figure 6 for proper reassembly noting oil holes in number two and four brackets. (2) Position the rocker shaft support brackets on the cylinder head and install the five long cylinder head bolts into rocker shaft support brackets and cylinder head, lining up all push rods to their respective rocker arms. (3) Starting at the center, tighten all head bolts and stud nuts to 50 foot-pounds in sequence shown in Figure 7 then repeat the procedure, tightening to 75 foot-pounds in the same sequence. (4) Adjust tappets. See "Tappet Adjustment Procedure." (5) Install exhaust headers with new gaskets and tighten to 35 foot-pounds. (6) Place new cylinder head cover gaskets in posi-

Fig. 6—Rocker Shafts Assembly (Bottom View)


426 CUBIC INCH-ENGINE 9-69

0

(14) Adjust ignition timing and carburetors to specifications. Road test vehicle.

0

VALVES AND VALVE SPRINGS

0

@

CD

The valves are a lateral arrangement which pro. vides the maximum amount of space and permits direct and unrestricted intake and exhaust porting. Valve guides are integral with the heads.

@

0

0 Cit NN1036

Fig. 7—Cylinder Head Tightening Sequence

tion and install cylinder head covers. Tighten nuts to 40 inch-pounds. (7) Adjust spark plug gaps to .035 inch. Slide spark plug tube seals over tubes. With a six inch extension on a spark plug socket insert spark plug, slide spark plug tube over assembly, insert assembly in cover and cylinder head, being careful not to drop plug as this would change gap setting. Tighten spark plugs to 30 foot-pounds. (8) Install new intake manifold gaskets and intake manifold; make sure end gaskets are positioned over locating dowels marked "A" in Figure 8. Tighten screws marked "B" to 72 inch-pounds, and screws marked "C" to 48 inch-pounds. Repeat the tightening procedure in the sequence shown until all screws maintain their specified torque. (9) Connect fuel line, automatic choke, intake manifold heat tubes, transmission throttle rod to upper bell crank, accelerator cable and adjust as necessary. (10) Install crankcase ventilation hose, distributor cap with spark plug cables, and coil wire and cable. (11) Install alternator, battery ground cable and heater hoses if removed. (12) Connect power brake booster, if so equipped and bleed brakes. (13) Fill the cooling system. Start engine and check for leaks.

INTAKE MANIFOLD

©

0 ® 0

0

Removal (1) With cylinder head removed, compress valve springs with Tool C-3422A (Fig. 9). (2) Remove valve retaining locks, valve spring retainers, valve stem cup seals (intake valves only) and valve springs. Remove any burrs from the valve stem lock grooves to prevent damage to the valve guide when valves are removed. Identify valves to Insure installation in original location.

Valve Inspection (1) Clean valves thoroughly and discard burned, warped or cracked valves. (2) Measure valve stems for wear. New intake valve stem diameter should measure .3085 to .3095 inch and exhaust valve stem diameter should measure .3075 to .3085 inch. If wear exceeds .002 inch, replace valve. (3) Remove carbon and varnish deposits from inside of valve guides with a reliable valve guide cleaner. (4) Measure valve stem guide clearance as follows: (a) Install sleeve Tool C-3973 over valve stem (Fig. 10) and install valve. The special sleeve places the valve at the correct height for checking with a dial indicator. (b) Attach dial indicator Tool C-3339 to cylinder

0

0 r N N1037

Fig. 8—Intake Manifold Tightening Sequence

Fig. 9—Compressing Valve Spring


9-70 ENGINE-426 CUBIC INCH

FACE

INTAKE VALVE

Fig. 10—Installing Valve and Tool C-3973

head and set it at right angle to the valve stem being measured (Fig. 11). (c) Move valve to and from the indicator. The total dial indicator should not exceed .017 inch. Ream guides for valves with oversize stems if dial indicator reading is excessive or if the valve stems are scuffed or scored. (d) Service valves with oversize stems are available in .005, .015 and .030 inch oversize. (e) Slowly turn reamer by hand and clean guide thoroughly before installing a new valve. Do not attempt to ream the valve guides from standard dimctly to .030 inch. Use step procedure of .005, .015 and .030 inch so the valve guides may be reamed true in relation to the valve seat. Refacing Valves and Valve Seats

(1) The intake and exhaust valve seats and valve faces have a 45 degree angle. (2) Inspect the remaining margin after the valves are refaced (Fig. 12). Valves with less than 3/64 inch margin should be discarded.

NPI21

i 2 –intake and Exhaust Valves (3) When refacing valve seats, it is important that the correct size valve guide pilot be used for reseating stones. A true and complete surface must be obtained. (4) Measure the concentricity of valve seat using dial indicator No. 13725. Total runout should not exceed .002 inch (total indicator reading). (5) Inspect valve seat with Prussian Blue to determine where the valve contacts the seat. To do this, coat valve seat lightly with Prussian Blue then set the valve in place. Rotate the valve with light pressure. If the blue is transferred to the center of the valve face, contact is satisfactory. If the blue is transferred to the top edge of valve face, lower the valve seat with a 30° stone. lithe blue is transferred to the bottom edge of valve face, raise the valve seat with a 60" stone. (6) When the seat is properly positioned, the width of intake seats should be 1/16 to 3/32 inch. The width of exhaust seats should be 3/64 to 1/16 inch. Fig.

Testing Valve Springs (Fig. 13)

Fig. I I–Measuring Valve Guide Wear

(1) Whenever valves have been removed for inspection, reconditioning or replacement, valve springs should be tested. As an example, the compressed length to be tested is 1-1/2 inches. Turn table of Tool 0-647 until surface is in line with the 1-1/2 inch mark on the threaded stud and the zero mark to the front. Place spring over stud on the table and lift compressing lever to set tone device. Pull on torque wrench until ping is heard. Take reading on torque wrench at this instant. Multiply this reading by two. This will give the spring load at test length. Fractional measurements are indicated on the table for finer adjustments. The valve spring (with surge damper removed) should test 110 to 120 pounds when compressed to 1-55/64 inches (valve closed), and


426 CUBIC INCH—ENGINE 9-71 bring spring height back to the normal 1-53/64 to 1-57/46 inches.

TAPPET ADJUSTMENT

Fig. 13—Testing Valve Spring

300 to 320 at 1-3/8 inches ivalve open). Discard springs that do not meet these specifications. (2) Inspect each valve spring for squareness with a steel square and surface plate, test springs from both ends (Fig. 14) If the spring is more than 1/16 inch out of square, install a new spring. Installation (1) Coat valve stems with lubrication oil and insert them in cylinder head. (2) Install new seals on intake valve stems and over valve guides. Install valve springs and retainers. (3) Compress valve springs with Tool C-3422A, install locks and release tool. If valves and/or seats are reground, measure the installed height of springs. Make sure measurement is taken from bottom of

spring retainer (if spacers are installed, measure from the top of spacer). If height Is greater than 1.59/64 inch, install a 1/16 inch spacer in head countorboro to

The 426 Cu. in. engine is equipped with adjustable rockers and special hydraulic tappets with limited plunger travel and a heavy duty snap ring for more reliability in high speed operation. To adjust tappets. postion crankshaft as indicated in the following procedure and adjust only the tappets indicated in the chart. Set the rocker adjusting screw so that there is no clearance (zero lash) in the system. Then turn the screw into the rocker 1-1 '2 turns. Torque the lock nut to 25 ft lbs. When adjusting tappets on the 426 Cu. in. engine (cold setting) it is very important that the setting be made with each tappet at the lowest point of the camshaft; that is on the base circle. The procedure used on standard engines cannot be used because of the overlap and duration with the special camshaft. The following procedure will assure proper position of the camshaft when making the adjustment. An indicating light may be used in the ignition primary circuit to more clearly define the various positions of the camshaft. Intake Exhaust

A. Adjust ignition timing to WC, chalk mark TDC and 180' opposite TDC on the front crankshaft damper. B. Set crankshatt so No. 1 cylinder is at TDC (Compression stroke, points opening). Adjust C. Rotate crankshaft 180° in normal running direction until points open for No. 4 cylinder. Adjust D. Rotate crankshaft an additional 1800 until points open for No. 6 cylinder. Adjust E. Rotate crankshaft an additional 1800 until points open for No. 7 cylinder. Adjust F. Reset ignition timing to operating specifications and install valve covers.

2 and 7 4 and 8

1 and 8 3 and 6

3 and 4 5 and 7

5 and 6 1 and 2

HYDRAULIC TAPPETS

Kp145F,

Fig. 14—Inspecting Valve Spring Squareness

Preliminary to Checking the Hydraulic Tappets (I) Before disassembling any part of the engine to correct tappet noise, read the oil pressure at the gauge (Install a reliable gauge at pressure sending unit if vehicle has no oil pressure gauge) and check


9-72 ENGINE-426 CUBIC INCH the oil level in the oil pan. The pressure should be between 45 and 65 pounds at 1000 R.P.M. (2) The oil level in the pan should never be above the "full" mark on dipstick, or below the "add oil" mark. Either of these two conditions could be responsible for noisy tappets. Oil Level Too High If oil level is above the "full" mark on dipstick, it is possible for the connecting rods to dip into the oil while engine is running and create foam. Foam in oil pan would be fed to the hydraulic tappets by the oil pump causing them to lose length and allow valves to seat noisily. Oil Level Too Low

recommended procedure. Remove cylinder head covers. (2) Remove rocker arms and shaft assembly. (3) Remove push rods and identify to insure installation in original location.

(4) Remove intake manifold. (5) Pull tappet out of bore with a twisting motion. If all tappets are to be removed, identify tappets to insure installation in original location. A diamond shaped marking stamped on the engine numbering pad indicates that some tappet bodies are .008 inch oversize.

Disassembly The tappets in the 426 Hemi engine are a special

Low oil level may allow oil pump Lu Lake in air

dcaign with limited plunger travel and a apccial heavy

which, when fed to the tappets, causes them to lose length and allows valves to seat noisily. Any leaks on intake side of pump through which air can be drawn will create the same tappet action. When tappet noise is due to aeration, it may be intermittent or constant, and usually more than one tappet will be noisy. When oil level and leaks have been corrected, engine should be operated at fast idle for sufficient time to allow all of the air inside of the tappets to be bled out.

duty snap ring. The snap ring is designed to remain in place at high engine speeds.

Tappet Noise Diagnosis (1) To determine source of tappet noise, operate engine at idle with cylinder head covers removed. (2) Feel each valve spring or rocker arm to detect noisy tappet. The noisy tappet will cause the affected spring and/or rocker arm to vibrate or feel rough in operation.

These tappets are not to be disassembled for cleaning. If the tappet or bore in cylinder block is scored, scuffed or shows signs of sticking, ream the bore to next oversize.

Installation (1) Lubricate tappets. (2) Install tappets and push rods in their original positions. (3) Install rocker arm and shaft assembly. (4) Install intake manifold. (5) Start and operate engine. Warm up to normal operating temperature.

Worn valve guides or cocked springs are sometimes mistaken for noisy tappets. If such is the case, noise may be dampened by applying side thrust on the valve spring. If noise is not appreciably reduced, it can be assumed the noise is in the tappet. Inspect the rocker arm push rod sockets and push rod ends for wear.

CAUTION: To prevent damage to valve mechanism, engine must not be run above fast idle until all hydraulic tappets have filled with oil and have become quiet.

(3) Valve tappet noise ranges from light noise to a heavy click. A light noise is usually caused by excessive leakdown around the unit plunger which will necessitate replacing the tappet, or by the plunger partially sticking in the tappet body cylinder. A heavy click is caused either by a tappet check valve not seating, or by foreign particles becoming wedged between the plunger and the tappet body, causing the plunger to stick in the down position. This heavy click will be accompanied by excessive clearance between the valve stem and rocker arm as valve closes. In either case, tappet assembly should be removed for inspection and cleaning.

(1) Turn crankshaft until NO. 6 exhaust valve is closing and No. 6 intake valve is opening. (2) Insert a 1/4 inch spacer between rocker arm pad and stem tip of NO. 1 intake valve (First valve on top rocker shaft on right bank as viewed from front of engine). (3) Install a dial indicator so plunger contacts valve spring retainer as nearly perpendicular as possible. (4) Allow spring load to bleed tappet down giving in effect a solid tappet. Zero the indicator. (5) Rotate crankshaft clockwise (normal running direction) until valve has lifted .094 inch. CAUTION: Do not turn crankshaft any further clockwise, as the valve spring might bottom and result in

Tappet Removal (1) The tappet can be removed by removing the intake manifold or cylinder heads by following this

VALVE TIMING

serious damage.

The timing of the crankshaft pulley should now read


426 CUBIC INCH—ENGINE 9-73 from tO degrees before top dead center to 2 degrees after top dead center. (6) If reading is not within specified limits: (a) Check accuracy of DC mark on crankshaft pulley. (b) Check sprocket index marks. (c) Inspect timing chain for wear. (7) Turn crankshaft counterclockwise until valve is closed and remove the indicator and spacer.

TORQUE WRENCH — --3/16 INCH

TIMING CHAIN COVER, OIL SEAL AND CHAIN Cover Removal (1) Drain cooling system and remove radiator, fan belt and water pump housing. Remove power steering pump and tie out of the way, if so equipped. (2) Remove pulley from vibration damper, bolt and washer securing vibration damper on crankshaft. (3) Install Tool C-3688, and pull damper assembly off end of crankshaft (Fig. 15). (4) Remove the two front pan bolts. (5) Remove chain case cover and gasket using extreme caution to avoid damaging oil pan gasket. It is normal to find particles of neoprene collected between the crankshaft seal retainer and crankshaft oil

stinger. (6) Slide crankshaft oil slinger from end of crankshaft.

Measuring Timing Chain for Stretch (1) Place a scale next to the timing chain so any movement of the chain may be measured. (2) Place a torque wrench and socket over camshaft sprocket attaching bolt and apply torque in the direction of crankshaft rotation to take up slack; 30 foot-pounds (with cylinder heads installed) or 15 foot-pounds (cylinder heads removed). With torque applied to the camshaft sprocket bolt,

KRI51A

Fig. 16—Measuring Timing Chain Stretch (Typical) crankshaft should not be permitted to move. It may be rt y to block crankshaft to prevent rotation.

(3) Holding a scale with dimensional reading even with edge of a chain link, apply torque in the reverse direction 30 foot-pounds (with cylinder heads installed) or 15 foot-pounds (cylinder heads removed), and note amount of chain movement (Fig. 16). (4) Install a new timing chain, if its movement exceeds 3/16 inch. (5) If chain is satisfactory, slide crankshaft oil slinger over shaft and up against sprocket (flange away from sprocket). (6) If chain is not satisfactory; remove camshaft sprocket attaching bolts and remove timing chain with crankshaft and camshaft sprockets. When installing timing chain, use Tool C.3509 to prevent camshaft from contacting the welch plug in the rear of engine block. Remove distributor and oil pump-distributor drive gear. Locate tool against rear side of cam gear and attach tool with distributor retainer plate bolt (Fig. 17).

(7) Place camshaft sprocket and crankshaft sprock-

NP29I

Fig. 15—Removing Vibration Damper Assembly

DISTRIBUTOR DRIVE GEAR (CAMSHAFT)

-aroma. VOWS '

Fig. 17—Camshaft Holding Tool 04509


9-74 ENGINE-426 CUBIC INCH REMOVER SCREW (TOOL) REMOVING AND INSTALLING PLATE (TOOL) SLEEVE (TOOL)

CHAIN CASE COVER

KRI536

Fig. 20—Removing Oil Seal

Fig. 8—Alignment of Timing Marks

et on the bench with timing marks on exact imaginary center line through both camshaft and crankshaft sprocket bores. (8) Place timing chain around both sprockets. (9) Turn crankshaft and camshaft to line up with keyway location on crankshaft sprocket and dowel hole in camshaft sprocket. (10) Lift sprockets and chain (keep sprockets tight against chain in position as described). (11) Slide both sprockets evenly over their respective shafts. (12) Use a straight edge to measure alignment of timing marks (Fig. 18). (13) Install camshaft sprocket bolts and tighten to 40 foot-pounds. Slide the crankshaft oil slinger over shaft and up against sprocket (flange away from sprocket). Oil Seal Replacement (Cover Removed) (1) Position remover screw of Tool C-3506 through case cover, inside of case cover up. Position remover blocks directly opposite each other, and force the REMOVER BLOCKS IMOD CHAIN CASE COVER I .a.ra

LIP OF SEAL RETAINER

angular lip between the neoprene and flange of seal retainer. (2) Place washer and nut on remover screw. Tighten nut, forcing the blocks into the gap to a point of distorting the seal retainer lip (Fig. 19). This is important, remover is only positioned at this point. (3) Place sleeve over retainer and place removing and installing plate into the sleeve. (4) Place flat washer and nut on the remover screw. Hold center screw and tighten remover nut to remove the seal (Fig. 20). (5) Insert remover screw through the removing and installing plate so thin shoulder will be facing up. (6) Insert remover screw with the plate through seal opening (inside of chain case cover facing up). (7) Place seal in cover opening, with neoprene down. Place seal installing plate into the new seal, with protective recess toward lip of seal retainer (Fig. 21). The lip of the neoprene seal must be toward source

of oil. (8) Install flat washer and nut on remover screw, hold screw and tighten nut (Fig. 22). (9) The seal is properly installed when the neoprene is tight against face of cover. Try to insert a .0015 inch feeler gauge between the neoprene and the cover INSTALLING„ PLATE (TOOL)

REMOVER SEAL ASSEMBLY

sc:Rew iTOOL! CHAIN CASE COVER

KR1528

Fig. I9—Remover Blocks Expanded to Puller Position

KR 15.46

Fig. 21 —Positioning installer Plate


426 CUBIC INCH—ENGINE 9-75

INSTALLING PLATE ITOOLI SEAL RETAINER

CHAIN CASE COVER

22—Installing New Seal (Fig. 23). If the seal is installed properly, feeler gauge cannot be inserted. Do not over compress neoprene. Fig.

Cover Installation (1) Be sure mating surfaces of chain case cover and cylinder block are clean and free from burrs. (2) Using a new gasket slide chain case cover over locating dowels. Install and tighten bolts 15 footpounds. (3) Lubricate seal lip with lubriplate, place damper hub slot on key in crankshaft, and slide vibration damper on crankshaft. (4) Place installing tool part of Tool (-3688 in position and press damper on the crankshaft (Fig. 24). (5) Install damper retainer washer and bolt. Tighten to 135 foot-pounds. (6) Slide belt pulley over shaft and attach with bolts and lockwashers. Tighten bolts to 200 inchpounds. CAMSHAFT The camshaft has an integral oil pump and distributor drive gear and fuel pump eccentric. FEELER GALIGF

SEAL

CHAIN CASE

KR I 56A

Fig. 23—inspecting Seal for Proper Seating

Fig. 24—Installing Vibration Damper Assembly

The rearward camshaft thrust is taken by the rear face of the cast iron camshaft sprocket hub, bearing directly on the front of cylinder block, eliminating need for a thrust plate. The helix of the oil pump and distributor drive gear and camshaft lobe taper both tend to provide a rearward thrust. Removal (1) With tappets and the timing chain and sprockets removed, remove distributor and lift out oil pump and distributor drive shaft. (2) Remove fuel pump to allow fuel pump push rod to drop away from cam eccentric. (3) Remove camshaft, being careful not to damage camshaft bearings with the cam lobes. Installation (1) Lubricate camshaft lobes and camshaft bearing journals and insert camshaft to within 2 inches of its final position in cylinder block. (2) Modify Tool C-3509 by grinding off index lug holding the upper arm on the tool and rotate arm 180 degrees. (3) Install Tool C-3509 in place of distributor drive gear and shaft, as shown in Figure 17. (4) Hold tool in position with distributor lock plate screw. This tool will restrict camshaft from being pushed in too far and prevent knocking out the welch plug in the rear of cylinder block. The tool should remain installed until camshaft and crankshaft sprockets and timing chain have been installed. Whenever an engine is rebuilt and/or a new camshaft and/or new tappets are installed, one quart of engine supplement, Chrysler Part Number 1879406 or equivalent should be added to the engine oil to aid in break-in. The oil mixture should be left in the engine for a minimum of 500 miles. Drain the oil mixture at the next normal oil change.


9-76 ENGINE-426 CUBIC INCH Whenever camshaft is replaced, all of tappet faces must be inspected for crown with a straight edge. If any contact surface is dished or worn, tappet must be replaced.

BUSHING TOOL

CAMSHAFT BEARINGS (Engine Removed from Vehicle) Removal

(1) With engine completely disassembled, drive out camshaft rear bearing welch plug. (2) Install proper size adapters and horse shoe washers (part of Tool C13I32A) at the back of each bearing to be removed and drive out bearings (Fig. 25). Installation

(1) Install new camshaft bearings with Tool C3132A. Place new camshaft bearing over proper adapter. (2) Position bearing in the tool. Install the horse shoe lock and by reversing removal procedure, carefully drive bearing into place (Fig. 25). (3) Install remaining bearings in like manner. Install the No. 1 camshaft bearing 1/32 inward from the front face of cylinder block.

The oil holes in camshaft bearings and the cylinder block must be in exact register to insure proper lubrication. The camshaft bearing index can be inspected after installation by inserting a pencil flashlight in the bearing. The camshaft bearing oil hole should be perfectly aligned with the drilled oil passage front the main bearing. Other oil holes in the camshaft bearings should be visible by looking down on the left bank oil hole above and between No. 6 and No. 8 cylinders to No. 4 camshaft bearing and on the right bank above and between No. 5 and 7 cylinders to No. 4 camshaft bearing. if camshaft bearing oil holes are not in exact register, remove and reinstall them correctly. Install a new welch plug at rear of camshaft. Be sure this plug does not leak.

KR159

Fig. 26—Removing Distributor Drive Shaft Bushing

DISTRIBUTOR DRIVE SHAFT BUSHING Removal

(I) Insert Tool C-3052 into the old bushing and thread down until tight fit is obtained (Fig. 26). (2) Hold remover screw and tighten nut until bushing is removed. Installation

(i) Slide a new bushing over burnishing end of Tool C-3053 and insert tool bushing into the bore. (2) Drive bushing and tool into position, using a hammer (Fig. 27). (3) As the burnisher is pulled through the bushing by tightening remover nut, the bushing is expanded tight in the block and burnished to correct size (Fig. 28). DO NOT REAM THIS BUSHING. Distributor Timing

Before installing distributor and oil pump drive shaft, time the engine as follows: (1) Rotate crankshaft until No. 1 cylinder is at top dead center on the firing stroke. (2) When in this position, the straight line on the vibration damper should be under "0" on timing indicator. / BUSHING TOOL

'C BEARING OIL HOLE KRIM Kin 60

Fig. 25—Removing Camshaft Bearing Using Tool C-3 / 32A

Hg. 27—installing Distributor Drive Shaft Bushing


426 CUBIC INCH—ENGINE 9-77 housing adapter plate. The cylinder block reinforced in the vicinity of the main bearing web. Number 2, 3 and 4 main bearing caps receive added support from a pair of horizontal tie-bolts which anchor the bearing caps to the sides of the cylinder block. The sides extend three inches below the crankshaft center line.

BUSHING TOOL

Piston Removal (1) Remove top ridge of cylinder bores with a reliable ridge reamer before removing pistons from cylinder block. Be sure to keep tops of pistons covered 4111 KR161 Fig. 28 — Burnishing Distributor Drive Shaft Bushing

(3) Coat shaft and drive gear with engine oil. Install the shaft so that after gear spirals into place, it will index with the oil pump shaft, so slot in top of drive gear will be parallel with center line of crankshaft (Fig. 29). installation of Distributor (1) Hold distributor over mounting pad on cylinder block with vacuum chamber pointing toward center of engine. (2) Turn rotor until it points forward and to approximate location of No. 1 tower terminal in the distributor cap. (3) Place distributor gasket in position. (4) Lower the distributor and engage the shaft in the slot of distributor drive shaft gear. (5) Turn distributor clockwise until breaker contacts are just separating, install and tighten hold down clamp. CYLINDER BLOCK The cylinder block is of the deep block design which eliminates the need for a torque converter DISTRIBUTOR AND OIL PUMP DRIVE GEAR

CENTER LINE OF CRANKSHAFT

SLOT

KRloiA

Fig. 29—Distributor Drive Gear Installed

during this operation. The pistons and connecting rods must be removed from the top of the cylinder block. When removing piston and connecting rod assemblies from the engine, rotate the crankshaft so each connecting rod is centered in cylinder bore.

(2) inspect connecting rods and connecting rod caps for cylinder identification. Identify them if necessary. Remove connecting rod cap. (3) Install suitable connecting rod guides on rod bolts and push each piston and rod assembly out of cylinder bore: (Connecting rod guides to cover the complete threaded area can be made from copper or aluminum tubing and the inside threaded with a 7/16"-20 tap.) (4) After removal, install the corresponding bearing cap on the rod. Cleaning and inspection (1) Clean cylinder block thoroughly and inspect all core hole plugs for evidence of leaking. (2) If new core plugs are installed, coat edges of plug and core hole with Number 1057794 Sealer or equivalent. Drive the core plug in so that the rim lies at least 1/64" below the lead-in chamfer. (3) Examine block for cracks or fractures. Cylinder Bore Inspection The cylinder walls should be measured for out-ofround and taper with Tool C-119. If the cylinder bores show more than .005" out-of-round, or a taper of more than .010" or if the cylinder walls are badly scuffed or scored, the cylinder block should be rebored and honed, and new pistons and rings fitted. Whatever type of boring equipment is used, boring and honing operation should be closely coordinated with the fitting of pistons and rings in order that specified clearance may be maintained. Honing Cylinder Bores Before honing, stuff plenty of clean rags under the bores, over the crankshaft to keep the abrasive materials from entering the crankcase area. (1) Use carefully, the cylinder bore resizing hone C-823 equipped with 220 grit stones and 390 extensions necessary with the 426 cubic inch engine is the best tool for this job. In addition to deglazing, it will


9-78 ENGINE-426 CUBIC INCH

reduce taper and out-of-round as well as removing light scuffing, scoring or scratches. Usually, a few strokes will clean up a bore and maintain the required limits. (2) Deglazing of the cylinder walls may be done using a cylinder surfacing hone, Tool C-3501, equipped with 280 grit stones (3501-3810) if the cylinder bore is straight and round. 20 to 60 strokes depending on the bore condition will be sufficient to provide a satisfactory surface. Inspect cylinder walls after each 20 strokes. Use honing oil C-3501-3880 or a light honing oil available from major oil distributors. Do not use engine or transmission oil, mineral oil or kerosene. (3) Honing should be done by moving the hone up and down fast enough to get a cross-hatch pattern. When hone marks intersect at 60°, cross hatch angle is most satisfactory for proper seating of rings (see Fig. 30). (4) After honing, it is necessary that the block be cleaned again to remove all traces of abrasives. Wash cylinder block and crankshaft thoroughly. CAUTION: Be sure all abrasives are removed from the engine parts after honing. It is recommended that a solution of soap and water be used with a brush and the parts then thoroughly dried. The bore can be considered clean when it can be wiped clean with a white cloth and the cloth remains clean. Oil bores after cleaning to prevent rusting. PISTONS, PINS AND RINGS Pistons The pistons are cam ground so that the diameter at the pin boss is less than its diameter across the thrust face. This allows for expansion under normal operating conditions. Under operating temperatures, expansion forces the pin bosses away from each other, CROSS-HATCH PATTERN

NP9913

Fig. 30—Cross Hatch Pattern

thus causing the piston to assume a more nearly round shape. It is important that old or new pistons be measured for taper and elliptical shape before they are fitted into the cylinder bore. Finished Pistons All pistons are machined to the same weight in grams, regardless of oversize so piston balance can be maintained. For cylinder bores which have been honed or rebored, pistons are available in standard and the following oversizes: .005, .020, and .040 inch. Fitting Pistons Piston and cylinder wall must be clean and dry. Specified clearance between the piston and the cylinder wall is .0025 to .0035 inch. Piston diameter should be measured at the top of skirt 90 degrees to piston pin axis. Cylinder bores should be measured halfway down the cylinder bore and transverse to the engine crankshaft center line. Pistons and cylinder bores should be measured at normal room temperature, 70 degrees F. All service pistons include pins, and are available in standard and the following oversizes: .005, .020 and .040 inch. Fitting Rings (1) Measure piston ring gap about two inches from bottom of cylinder bore in which it is to be fitted. (An inverted piston can be used to push rings down to insure positioning rings squarely in cylinder wall before measuring.) (2) Insert feeler stock in the gap. Ring gap should be between .013 to .025 inch for the compression rings and .015 to .062 inch for the oil ring steel rails in standard size bores. Maximum gap on .005 inch 0/S bores should be .060 inch for compression rings and .070 inch for the oil ring steel rails. (3) Measure side clearance between piston ring and ring groove. Clearance should be .0015 to .003 inches for the top compression ring and intermediate ring. Steel rail service oil ring should be free in groove, but should not exceed .005 inch side clearance. (4) Install the three piece oil ring in lower ring groove using instructions in ring package. (5) Install compression rings in middle and top groove as shown on instruction sheet. Be sure the mark "top" on each compression ring faces top of piston. (6) For the two top rings use ring installer Tool C-3673. Piston Pins (1) The piston pin should be a tight thumb press fit in connecting rod and piston at normal room temperature, 70°F. If proper fit cannot be obtained with standard pins, hone or ream piston and connect-


426 CUBIC INCH—ENGINE 9-79 ing rod, and install oversize piston pin. Piston pins are supplied in standard and the following oversizes: .003 and .008 inch. (2) Position the left cylinder bank (1-3-5-7) pistons so the arrow indicating front is to the left of the operator and the connecting rod insert locating tang or number is facing the operator. Install piston pin and lock rings with the bevel edge away from the piston pin, using Tool C-3915. (3) Assemble the right cylinder bank (2-4-6-8) so the arrow is to the right of the operator with the connecting rod insert locating tang or number is facing the operator. Install piston pin and lock rings with the bevel edge away from the piston pin using Tool C-3915.

CRANKSHAFT IDENTIFICATION IMPORTANT: A Maltese Cross stamped on the engine numbering pad indicates that engine is equipped with a crankshaft which has one or more connecting rods and/or main bearing journal finished .001 inch undersize. The position of the undersize journal or journals is stamped on a machine surface of the No. 3 counterweight. A Maltese Cross with an X indicates .010 inch undersize journals.

The connecting rod journals are identified by the letter "R" and main bearing journals by the letter "M". For example "M-1" indicates that No. 1 main bearing is .001 inch undersize.

CONNECTING RODS Installation

of Connecting Rod Bearings

Fit all rods on one bank until complete. Do not alternate from one bank to another, because when rods are assembled to the pistons correctly, they are not interchangeable from one bank to another.

The bearings should always be installed so that the small formed tang fits into the machined grooves of the rods. The end clearance should be from .009 to .017 inch (two rods). Limits of taper or out-of-round on any crankshaft journals should be held to a maximum of .0005 inch. Bearings are available in .001, .002, .003, .010, .011 and .012 inch undersize. Install the bearings in pairs. Do not use a new bearing half with an old bearing half. Do not file the rods or bearing caps.

MEASURING CONNECTING ROD BEARING CLEARANCE Shim Stock Method

(1) Place an oiled .002 inch brass shim stock (1/2 inch wide and 3/4 inch long) between the bearing and connecting rod journal.

(2) Install bearing cap and tighten to 75 footpounds. (3) Turn connecting rod 1/4 turn in each direction. A slight drag should be felt which indicates clearance is satisfactory. Correct clearance is from .0015 to .0025 inch. (4) Side play should be from .009 to .017 inch.

INSTALLING PISTON AND CONNECTING ROD ASSEMBLY IN CYLINDER BLOCK (1) Before installing pistons, rods, and rod assemblies in the bore, be sure that the compression ring gaps are staggered so that neither are in line with oil ring rail gaps. (2) The oil ring expander ends should be positioned toward the outside of the "V" of the engine. The oil ring rail gaps should be positioned opposite each other and above the piston pin holes. (3) Immerse piston head and rings in clean engine oil, slide ring compressor, Tool C-385, over the piston and tighten with special wrench (part of Tool C-385). (4) Be sure the position of rings does not change during this operation. Screw connecting rod bolt protectors on rod bolts. Rotate crankshaft so connecting rod journal is on center of cylinder bore.

(5) Insert rod and piston into cylinder bore. Guide the rod over crankshaft journal. (6) Tape piston down in cylinder bore, using handle of a hammer. At the same time, guide connecting rod into position on crankpin journal. (7) The arrow on top of piston must be pointing toward front of engine and the number or the connecting rod insert locating tang must face outboard. (8) Install rod caps, tighten nuts to 75 foot-pounds.

CRANKSHAFT MAIN JOURNALS Crankshaft main bearing journals should be inspected for excessive wear, taper and scoring. Journal grinding should not exceed .012 inch under the standard journal diameter. DO NOT grind the thrust faces of the No. 3 main bearing. Do not nick crankpin or main bearing fillets. After regrinding, remove rough edges from crankshaft oil holes and clean out all oil passages.

CRANKSHAFT MAIN BEARINGS The number 2, 3 and 4 main bearing caps have two horizontal tie-bolts which anchor the bearing caps to the sides of the block (Fig. 31). New lower main bearings halves Number 1, 2, 4, 5 are interchangeable (Fig. 32). New upper main bearing halves Number 2, 4 and 5 are also interchangeable. Upper and lower bearing halves are not interchangeable because upper bearing is grooved and lower bearing is not.


9-80 ENGINE-426 CUBIC INCH Installation Only one main bearing should be selectively fitted while all other main bearing caps are properly torqued. When installing a new upper bearing shell, slightly

chamfer the sharp edges from the plain side. (1) Start bearing in place, and insert Tool C-3059 into oil hole of crankshaft (Fig. 33). (2) Slowly rotate crankshaft counter-clockwise sliding the bearing into position. Remove Tool C-3059. NE41038A Fig. 3I —Main Bearing Cap with Horizontal Tie-Bolts

The No. 1 upper main bearing IS NOT INTFR. CHANGEABLE AND IS CHAMFERED on the tab side for timing chain oiling and can be identified by a red marking on edge of bearing. Upper and lower No. 3 bearings are flanged to carry the crankshaft thrust loads and are not interchangeable with any other bearings in the engine. Bearings that are not badly worn or pitted must be reinstalled in the same position. Bearing caps are not interchangeable and should be marked at removal to insure correct assembly. Bearings are available in standard and the following undersizes: .001, .002, .003, .010, .011 and .012 inch. Do not install an undersize bearing that will reduce clearance below specifications. Removal (1) Remove oil pan and identify bearing caps before removal. (2) Remove bearing caps one at a time. Remove upper half of bearing by inserting Tool C-3059 (Fig. 33) into oil hole of crankshaft. (3) Slowly rotate crankshaft clockwise, forcing out upper half of bearing.

a2

MEASURING MAIN BEARING CLEARANCE Shim Stock Method (1) Smooth edges of a 1/2 x 3/4 inch piece of brass shim stock, .002 inch thickness. (2) Install bearing in center main bearing cap, bearing tang in groove in cap, lubricate bearing and position shim stock across the bearing, install cap and horizontal tie bolts. Tighten cap bolts to 100 foot-pounds, then horizontal tie bolts to 45 footpounds. (3) If a slight drag is felt as crankshaft is turned (moved no more than 1/4 turn in either direction), clearance is .002 inch or less and is considered satisfactory. If, however, no drag is felt, the bearing is too large or crankshaft cannot be rotated, bearing is too small and should be replaced with the correct size. (4) Measure crankshaft end play .002 to .007 inch. If end play is less than .002 inch or more than .007 inch, install a new number 3 main bearing. (5) Fit remaining bearings in same manner. It is permissable to use one .001 inch undersize bearing shell with one standard bearing shell or one .002 inch undersize bearing shell with one .001 inch undersize shell. Always use the smaller diameter bearing half as the upper. Never use an upper bearing half more than .001 inch smaller than the lower TOOL

5

1

BEARING

UPPER 116‘,

4-

BEARING

Wit NS MI -

Ita

■ _S

1

Fig. 32—Main Bearing Identification

LOWER

NO256

REMOVING

INSTALLING

KBS:38

Fig. 33— Removing or Installing Upper Main Bearing


426 CUBIC INCH—ENGINE 9-81

BRIDGE WART OF TOOL)

SEAL — SEAL RETAINERSIDE SEAL GROOVES

KR 237

Fig. 34—Installing Rear Main Bearing Lower Oil Seal bearing half and never use a new bearing half with a used bearing half.

REAR MAIN BEARING OIL SEAL (Crankshaft Removed) Upper Rear Main Seal Installation

(1) Install a new rear main bearing oil seal in cylinder block so that both ends protrude. (2) Tap seal down into position, using Tool C-3743 with bridge removed until tool is seated in bearing bore. (3) Hold the tool in this position and cut off portion of seal that extends above the block on both sides.

Lower Rear Main Seal Installation

(1) Install a new seal in seal retainer so ends protrude (Fig. 34).

35—Trimming Rear Main Bearing Lower Oil Seal (2) Install bridge on tool and tap the seal down into position with Tool C-3743 until tool is seated. (3) Trim off that portion of the seal that protrudes above the cap (Fig. 35). Fig.

Side Seals Installation Perform the following operations as rapidly as possible. These side seals are made from a material that expands quickly when oiled.

(1) Apply mineral spirits or diesel fuel to the side seals. (2) Install seals immediately in the seal retainer grooves. (3) Install seal retainer and tighten screws to 25 foot-pounds. Failure to pre-oll the seals will result in an oil

leak.

ENGINE OILING SYSTEM (2) Install oil pan. OIL PAN (3) Install converter dust shield. Removal (4) Connect steering linkage at idler arm and at (1) Disconnect battery cable and remove dipstick. pitman arm. (2) Raise vehicle on a hoist and disconnect steering (5) Connect battery cable. linkage from idler arm and steering arm. (6) Install drain plug and refill crankcase with the (3) Drain crankcase oil. proper grade and quantity of oil. (4) Remove converter dust shield. (5) Remove oil pan bolts. Turn flywheel until OIL PUMP counterweight and connecting rods at front end of Removal crankshaft are at their highest position to provide Remove oil pump attaching bolts and remove pump clearance, and lower the pan. Turn pan counterand filter assembly from bottom side of engine. clockwise to clear oil screen and suction pipe as it is lowered. Disassembly installation

(1) Inspect alignment of oil strainer. The bottom of the strainer must be on a horizontal plane with machined surface of cylinder block. The bottom of the strainer must touch the bottom of oil pan.

(1) Remove filter base and oil seal ring. (2) Remove pump rotor and shaft and lift out outer pump rotor. (3) Remove the oil pressure relief valve plug and lift out the spring and relief valve plunger (Fig. 36).


9-82 ENGINE-426 CUBIC INCH PLUG GASKET

jerir BOLTS AND WASHERS OIL FILTER COVER

SPRING RELIEF VALVE PLUNGER

-- OUTER ROTOR .— INNER ROTOR *kr AND SHAFT – BODY DRIVE SHAFT AND GEAR

SEAL RING

KB 67A GASKET

Fig. 39—Measuring Inner Rotor Thickness

"0" RING KR173

PIN

Fig. 36-00 Pump and Filter Assembly (Disassembled View)

Inspection and Assembly (1) Clean all parts thoroughly. The mating face of filter base (oil pump cover) should be smooth. Replace filter base if it is scratched or grooved. (2) Lay a straightedge across oil pump filter base COVER

STRAIGHT EDGE

surface (Fig. 37). If a .0015 inch feeler gauge can be inserted between the base and straightedge, filter base should be replaced. (3) If outer rotor length measures less than .943 inch (Fig. 38) and diameter less than 2.469 inches, replace outer rotor. (4) If inner rotor length measures less than .942 inch (Fig. 39), a new inner rotor should be installed. (5) Install outer rotor into pump body, pressing to one side with fingers and measure clearance between outer rotor and pump body (Fig. 40). If measurement is more than .014 inch, replace oil pump body. (6) Install inner rotor into pump body and place a straightedge across the face between bolt holes (Fig. 41). If a feeler gauge of more than .004 inch can be inserted between the rotors and straightedge, replace pump body. „- OUTER ROTOR

FEELER ----GAUGE

KR174

Fig. 37 –Measuring Oil Pump Cover Flatness --- PUMP BODY KRI 76

Fig. 40 – Measuring Outer Rotor Clearance STRAIGHT EDGE

DIAMETER KB668

Fig. 38–Measuring Outer Rotor Thickness

FEELER GAUGE

Fig. 41–Measuring Clearance Over Rotors


426 CUBIC INCH—ENGINE 9-83 OUTER ROTOR - INNER ROTOR FEELER ,.- GAUGE

Fig. 42–Measuring Clearance Between Rotors

(7) If the tip clearance between inner and outer rotors (Fig. 42) is more than .010 inch, replace inner and outer rotor.

Fig. 43–Removing Oil Filter

CRANKCASE VENTILATION SYSTEM Servicing Oil Pressure Relief Valve

Inspect oil pump relief valve plunger for scoring and free operation in its bore. Small scores may be removed with 400 grit wet or dry paper providing extreme care is used not to round off the sharp edge portion of the valve. The relief valve spring has a free length of 2-9/32 to 2-19/64 inch and should test 22.3 to 23.3 lbs. when compressed to 1-19/32 inch. Discard spring that fails to meet specifications. If the oil pressure is low, inspect for worn bearings, or look for other causes of possible loss of oil pressure. When assembling the oil pump, be sure to use new oil seal rings between filter base and pump body.

Installation

(1) Install a new "0" ring seal on the pilot of oil pump before attaching oil pump to cylinder block. (2) Install oil pump on engine, using a new gasket on engine and tighten attaching bolts to 30 footpounds. Install oil filter element. OIL FILTER REPLACEMENT

The "spin on" oil filter should be replaced preferably to coincide with every second oil change. Removal Use care so as not to damage transmission oil cooler lines.

(1) Using Tool C-4065 unscrew the filter from the base on bottom side of engine and discard (Fig. 43). (2) Wipe base clean.

A fully closed crankcase ventilation system is installed on all vehicles. The fully closed crankcase ventilation system operates by unfiltered air drawn in from the air cleaner (ahead of the filter) through the crankcase inlet air cleaner (where it is filtered) by means of a hose (Fig. 1). Air is circulated through the engine and drawn out of the cylinder head cover by manifold vacuum into the combustion chambers and dispelled with the exhaust gases. A ventilation valve is installed in the outlet vent of the cylinder head cover, and a hose. The hose it connected between the outlet vent and the lower part of the carburetor body. The function of the valve is to regulate the flow of crankcase ventilation at various throttle positions. If the ventilation valve is plugged, fumes flow into the air cleaner and are burned in the combustion chamber prior to reaching the atmosphere to prevent atmospheric contamination. The valve and hose are subject to fouling with sludge and carbon formation due to the nature of the material carried by the ventilation system. The valve will operate effectively as long as normal maintenance is applied. A plugged vent system may in turn cause excessive engine crankcase sludge formation and may also cause rough or erratic engine idle or excessive oil leakage. The ventilation system should be cleaned every six months and valve replaced every year in average service and more frequently if the vehicle is used extensively for short trips—driving less than 10 miles— with frequent idling, such as city traffic. See the "Lubrication and Maintenance" section, Group 0 of this manual for proper service procedures.

Installation

(1) Install the "spin" oil filter by hand, finger tight. Do not use tool. (2) To obtain an effective seal, tighten filters by hand the additional number of turns indicated on the replacement filter. Start engine and inspect for leaks.

REPAIR OF DAMAGED OR WORN THREADS

Damaged or worn threads can be repaired by the use of Heli-Coils. Essentially, this repair consists of drilling out worn or damaged threads, tapping the


9-84 SPECIFICATIONS AIR CLEANER HOSE

AIR CLEANER HOSE

CRANKCASE INLET AIR CLEANER

VENTILATOR VALVE HOSE

VENTILATOR VALVE HOSE

CRANKCASE INLET AIR CLEANER CYLINDER HEAD COVER CYLINDER HEAD COVER

VENTILATOR VALVE ASSEMBLY

THIS WASHER IS COLOR CODED TO IDENTIFY VENT VALVE ASSEMBLY V-8 ENGINES SIX-CYLINDER ENGINES NP1258

Fig. I—Fully Closed Ventilation System (Typical)

hole with a special Heli-Coil Tap, and installing a Heli-Coil Insert into the tapped holes. This brings the hole back to its original thread size (See Fig. 2). The following chart lists the threaded hole sizes which are used in the engine block and the necessary tools and inserts for the repair of damaged or worn thread. Heli-Coil tools and inserts are readily available from automotive parts jobbers.

STANDARD SCREW FITS IN

HELI-COIL INSERT IN . . .

NF845

Fig. 2—Hell-Coll Installation Inserting Tool

Extracting Tool

Part No.

Part No.

Part No.

Hell-Coil Insert Drill

HELI COIL TAPPED HO E.

Tap

Thread Size

Part No.

Insert Length

17/64(266) Q(.332) X(.397) 29/64(453)

4 CPB 5 CPB 6 CPB 7 CPB

528-4N 528-5N 528-6N 528-7N

1227-6 1227-6 1227-6 1227-16

33/64(.516)

8 CPB

528-8N

1227-16 MyMopar.com

1/2-20

1185-4

5/16-18

1185-5

3/8-16 7/16-14 1/2-13

1185-6 1185-7

3/8" 15/32" 9/16" 21/32"

1185-8

3/4"

Size


SPECIFICATIONS SIX CYLINDER ENGINE 225 Cubic Inch Engines

Type Number of Cylinders Bore Stroke-225 Cubic Inch Piston Displacement Compression Ratio-225 Cubic Inch Minimum Compression Pressure with Engine Warm, Spark Plugs Removed, Wide-Open Throttle Maximum Variation Between Cylinders (any one engine) Firing Order Basic Timing —225 Cubic Inch CRANKSHAFT Type Bearings

In-Line OHV 6 3.40" 4.125" 225 Cubic Inch 8.40 to 1 100 psi 25 psi 1-5-3-6-24 TDC-±2-1/2° Fully Counter-Balanced Steel-Backed Babbitt


SPECIFICATIONS 9-85 Main Bearing Journal Diameter Connecting Rod Journal Diameter Maximum Out-of-Round Permissible Number Main Bearings Clearance Desired Maximum Clearance Allowance Before Reconditioning End Play Thrust Taken by Finish at Rear Seal Surface Interchangeability of Bearings MAIN BEARING (service) All available in Standard and the following Undersizes CONNECTING RODS AND BEARINGS Type Length (Center to Center) Weight (Less Bearing Shells) Bearings Diameter and Length Clearance Desired Maximum Allowable before Reconditioning Side Clearance Bearings for Service Piston Pin Bore Diameter CAMSHAFT Drive Bearings Number Thrust Taken by Clearance Maximum Allowable before Reconditioning CAMSHAFT BEARING JOURNALS Diameter No. 1 No. 2 No. 3 No. 4 CAMSHAFT BEARINGS Diameter (after reaming) No. 1 No. 2 No. 3 No. 4 TIMING CHAIN Number of Links Pitch Width TAPPETS Type Clearance in Block Body Diameter Clearance Between Valve Stem and Rocker Arm Pad (Engine Hot) PISTONS Type Material Land Clearance (diametral) Clearance at Top of Skirt Weight (std. through .040 oversize) Piston Length (overall) Ring Groove Depth No. 1 No. 2

2.7495" to 17505" 2.1865" to 2.1875" .001" 4 .0005" to .0015" .0025" .002" to .007" No. 3 Main Bearing Diagonal Knurling Upper Nos. 2, 4 Lower Nos. 1, 2, 4 .001, .002, .003, .010, .012" Drop Forged "I" Beam 225-6.697" to 6.701" 225-26.8 oz. Steel-Backed Babbitt 2.1870" x 1.015" .0005" to .0015" .0025" .006" to .012" Standard .001, .002, .003, .010, .012" 0.5. .8995" to .9000" Chain Steel-Backed Babbitt 4 Cylinder Block .001" to .003" .005"

1.998" to 1.999" 1.982" to 1 983" 1967" . to 1968" 1.951" to 1.952"

2.000" to 2.001" 1.984" to 1.985" 1.969" to 1.970" 1.953" to 1.954" 50 .50" .88" Mechanical .0012" to .0025" .9040" to .9045" .010" Intake .020" Exhaust Aluminum Alloy Tin Coated Horizontal Slot w/Steel Struts .024" to .031" .0005" to .0015" 465 gms. 3.51" .179" .179"


9-86 SPECIFICATIONS No. 3 Piston for Service PISTON PINS Type Diameter Length Clearance in Piston Interference in Rod Piston Pins for Service Direction Offset in Piston PISTON RINGS Number of Rings per Piston Compression Oil Oil Ring Type Ring Width Compression Oil—Cast iron Steel rails Ring Gap Compression Oil—Cast iron Steel rails Ring Side Clearance Compression Oil—Cast iron Steel rails Service Rings Ring Gap Compression Oil (Steel rails) Cast Iron not available Ring Side Clearance Compression Oil (Steel rails) Cast Iron not available

VALVE TIMING Intake Opens (BTC) Closes (ABC) Exhaust Opens (BBC) Closes (ATC) Valve Overlap Intake Valve Duration Exhaust Valve Duration VALVES—Intake Material Head Diameter Length (to gauge dim. Line) Stem Diameter Stem to Guide Clearance Maximum Allowable Before Reconditioning Valve Face Angle Adjustment Lift VALVES—Exhaust Material *With Tools C-3973 & C-3339 using wobble method.

.181" Std. .005, .020, .040" O.S. Press Fit in Rod .9007"—.9009" 2.955"-2.975" .00045" to .00075" .0007" to .0012" Standard Only Toward Right Side of Engine 3 2 1 3-piece steel rail chrome-face .0775"-.0780" 025" .010"-.020" .015"- 055" .0015"-.0030" .0002"-.005"

.010"-.047" .015"-.062" .0015"-.004" .0002"-.005" 10° 50° 500 6° 16° 240° 236°

Carbon Manganese Steel 1.615"-1.625" 4.6878"-4.7028" .372" to .373" .001" to .003" .017" 45° Rocker Arm Screw .395" Nitrogen Treated Manganese Chromium Nickel Steel


SPECIFICATIONS 9-87 Head Diameter Length (to gauge dim. Line) Stem Diameter Stem to Guide Clearance Maximum Allowable Before Reconditioning Valve Face Angle Adjustment Lift VALVE SPRINGS Number Free Length Load when Compressed to (valve closed) Load when Compressed to (valve open) Valve Springs I.D. Valve Spring Installed Height (spring seat to retainer) Use 1/16 inch spacer to reduce spring height when over specifications CYLINDER HEAD Combustion Chamber Valve Seat Run-Out (maximum) Intake Valve Seat Angle Seat Width (finished) Exhaust Valve Seat Angle Seat Width (finished) Cylinder Head Gasket Compressed (thickness) CYLINDER BLOCK Cylinder Bore (standard) Cylinder Bore Out-of-Round (Max. allowable before reconditioning) Cylinder Bore Taper (Max. allowable before reconditioning) Reconditioning Working Limits (for taper and out-of-round) Maximum Allowable Oversize Cylinder Bore Tappet Bore Diameter Distributor Lower Drive Shaft Bushing (press fit in block) Ream to Shaft to Bushing Clearance ENGINE LUBRICATION Pump Type Capacity (qts.) Pump Drive Operating Pressure at 1000 RPM Pressure Drop Resulting from Clogged Filter OIL FILTER Type Spin On

1.355"-1.365" 4.6878"-4.7028" .371" to .372" .002" to .004" .017" 43° Rocker Arm Screw .395" 12 1,92" 49-57 lbs. @ 1-11/16" 137-150 lbs. @ 1-5/16" 1.010" to 1.030" 1-5/8"-1-11/16"

Wedge Type .002" 45° .070" to .090" 45° .040" to .060" .022" 34000" 005" .010" 001" 040" .9050"—.9058" .0005"—.0040" 4865"—.4880" .0007"—.0027" Rotary, Full Pressure 4 U.S. or 3-1/4 Imperial**

Camshaft 45 to 60 lbs. 7 to 9 lbs. Full Flow Replaceable

*With Tools C-3973 & C-3339 using wobble method. **When Filter Element is Replaced, Add 1 U.S. Quart or 3/4 Imperial Quart.

OIL PUMP-INSPECTION LIMITS FOR REPLACEMENT Oil Pump Cover Outer Rotor Length Outer Rotor Diameter Inner Rotor Length Clearance Over Rotors—Outer Inner Outer Rotor Clearance Tip Clearance Between Rotors

.0015 inch or more .649 inch or more 2.469 inch or less .649 inch or less .004 inch or more .004 inch or more .014 inch .010 inch or more


9-88 SPECIFICATIONS

OVERSIZE AND UNDERSIZE ENGINE COMPONENT MARKINGS Engine Displacement

225 Cu. in.

Condition

Identification

.001" U/S Crankshaft

Maltese Cross

.010" U/S Crankshaft

M-2-3 etc. (indicating No. 2 & 3 main bearing journal) and/or R-1-4 etc. (indicating No. 1 & 4 connecting rod journals) Maltese Cross and X M-10 (indicates .010" U/S all main journals) and/or R-10 (indicates .010" U/S all rod journals)

.020" 0/S Cylinder Bores .008" 0/S Tappets

Location of Identification

Top of front pad—Right side of block Crankshaft counterweight

Top of front pad—Right side of block Crankshaft counterweight

A

Top of front pad—Right side of block

Top of front pad—Right side of block

EIGHT CYLINDER ENGINES ENGINE Type Number of Cylinders Bore Stroke Piston Displacement Compression Ratio Minimum Compression Pressure with Engine Warm, Spark Plugs Removed, Wide-Open Throttle Maximum Variation Between Cylinders (any one engine) Firing Order Basic Timing CYLINDER NUMBERING (front to rear) Left Bank Right Bank CYLINDER BLOCK Cylinder Bore (standard) Cylinder Bore Out-of-Round (Max. allowable before reconditioning) Cylinder Bore Taper (Max. allowable before reconditioning) Reconditioning Working Limits (for taper and out-of-round) Maximum Allowable Oversize (cylinder bore) Tappet Bore Diameter Distributor Lower Drive Shaft Bushings (press fit in block) Ream to Shaft to Bushing Clearance

"318" 90°V 8 191" 3.31" 318 cu. in. 8.8 to 1 100 psi 40 psi 1-8-4-3-6-5-7-2 TDC:±2-1/2° 1-3-5-7 2-4-6-8

3.910"-3.912" .005" .010" .001" .040" .9050"-.9058" .0005"-.0040" A865"-.4880" .0007"-.0027"


SPECIFICATIONS 9-89 "318" PISTONS Type Material Land Clearance (diametral) Clearance at Top of Skirt Weight (Std. through .040" oversize) Piston Length (overall) Ring Groove Depth No. 1 No. 2 No. 3 Pistons for Service PISTON PINS Type Diameter Length Clearance in Piston (Light Thumb Push @ 70°F.) End Play Clearance in Rod Pins for Service PISTON RINGS Number of Rings per Piston Compression Oil Oil Ring Type Ring Width Compression Oil—Steel rails Ring Gap Compression Oil—Steel rails Ring Side Clearance Compression Oil—Steel rails Service Rings Ring Gap Compression Oil—Steel rails Ring Side Clearance Compression Oil—Steel rails CONNECTING RODS Length (Center to Center) Weight (less bearing shells) Side Clearance (two rods) Piston Pin Bore Diameter CONNECTING ROD BUSHING Type CONNECTING ROD BEARINGS (Type) Diameter and Width Clearance desired Maximum Allowable Bearings for Service CRANKSHAFT Type Bearings

Autothermic Alloy Tin Coated .019"-.027" .0005"-.0015" 592 gms. 3.21" .205" .205" .194" Std. .005", .020", .040" Oversize Full Floating .9841"-.9843" 2.990"-3.000" .0000"-.0005" .004"-.026" .0000"-.0005" Std. .003", .008" Oversize 3 2 1 3-piece steel rail chrome-face .0775"-.0780" .025" .010"-.020" .015"-.055" .0015"-.0030" .0002"-.005"

.010"-.020" .015"-.062" .0015"-.004" .0002"-.005" 6.123" 726 gms. .006"-.014" 1.027"-1.039" Steel Backed Bronze Steel Backed Grid Type 2 126" x .842" .0005"-.0015" .0025" Std., .001", .002" .003", .010", .012" Fully Counter-Balanced Steel Backed Babbitt


9-90 SPECIFICATIONS "318" No. 3 Main Bearing .002"-.007" .010" .0005"-.0015" .0025" Diagonal Knurling

Thrust Taken By End Play Maximum Allowable Diametral Clearance Desired Diametral Clearance Allowed Finish at Rear Oil Seal Surface MAIN BEARING JOURNALS Diameter Maximum Allowable Out-of-Round and/or Taper Bearings for Service Available in Standard and the following undersizes CONNECTING ROD JOURNALS Diameter Maximum Allowable Out-of-Round and/or Taper CAMSHAFT Drive Bearings Number Diametrical Clearance Maximum Allowable before Reconditioning Thrust Taken by End Play Maximum Allowable CAMSHAFT JOURNALS Diameter

CAMSHAFT BEARINGS Diameter

VALVE TIMING Intake Opens (BTC) Intake Closes (ABC) Exhaust Opens (BBC) Exhaust Closes (ATC) Valve Overlap Intake Valve Duration Exhaust Valve Duration TIMING CHAIN Number of Links Pitch Width TAPPETS Type Body Diameter Clearance in Block Service Tappets Available CYLINDER HEAD Valve Seat Run-Out (Maximum) Intake Valve Seat Angle Seat Width (finish) Exhaust Valve Seat Angle Seat Width (finish) Cylinder Head Gasket (Thickness compressed) VALVE GUIDES Type Guide Bore Diameter

2 4995"-2.5005" .001" .001", 002" 003", .010", .012" 2 124"-1125" .1" Silent Chain Steel Backed Babbitt 5 .001"-.003" .005" Thrust Plate .002"-.006" .010" No. 1 No. 2 No. 3 No. 4 No. 5

1.998"-1 a99" 1.982"-1.983" 1.967"-1.968" 1.951"-1.952" 1.5605"-1.5615"

No. 1 No. 2 No. 3 No. 4 No. 5

2.000"-2 001" 1.984"-1.985" 1.969"-1.970" 1.953"-1.954" 1.5625"-1.5635" 10° 50° 58° 10° 20° 240° 248° 68 .375" .625" Hydraulic .9035"-9040" .0010"-.0023" Std., .001", .008", 030" .2" 45° .060"- 085" 45° .040"-.060" .029" Cast in Head .374"-.375" Std.


SPECIFICATIONS 9-91 "318" VALVES—(I NTAKE) Head Diameter Length (to center of valve face) Stem Diameter (Standard) Stem to Guide Clearance Maximum Allowable Face Angle Valve for Service (Oversize Stem Diam.) Lift (Zero Lash) VALVES—(EXHAUST) Head Diameter Length to (center of valve face) Stem Diameter (Standard) Stem to Guide Clearance Maximum Allowable Face Angle Valve for Service (Oversize Stem Diam.) Lift (Zero Lash) VALVE SPRINGS Number Free Length Load when Compressed to (valve closed with surge damper removed) Load when Compressed to (valve open with surge damper removed) Valve Springs I.D Maximum Allowable Out of Plumb Valve Spring Installed Height (spring seat to retainer) Using 1/16" Spacer to Reduce Spring Height When Over Specifications ENGINE LUBRICATION Pump Type Capacity (pts.) Pump Drive Minimum Pump Pressure © 500 R.P.M. Operating Pressure at 1000 R.P.M. Pressure Drop Resulting from Clogged Filter Oil Filter Type

1.780" 4.90" .372"-.373" .001"-.003" .017"* 45° Std., .005", .015", .030" .373" 1.563" 4.90" 371"-.372" .002"-.004"

mr*

43° Std., .005", .015", .030" .399" 16 2.00" 78-88 lbs. @ 1-11/16" 170-184 lbs. © 1-5/16" 1.010"-1.030" 1/16" 1-5/8" - 1-11/16"

Rotary Full Pressure 4 U.S. or 3-1/4 Imperial** Camshaft 20 PSI 45-65 lbs. 7-9 lbs. Full-Flow

With tools C-3973 & C-3339 using wobble method. **When Filter Element is Replaced, Add 1 U.S. Quart or 3/4 Imperial Quart.

OIL PUMP-INSPECTION LIMITS FOR REPLACEMENT 318 Cu. In. Engines

Oil Pump Cover Outer Rotor Length Outer Rotor Diameter Inner Rotor Length Clearance Over Rotors—Outer Inner Outer Rotor Clearance Tip Clearance Between Rotors

.0015 inch or more .825 inch or less 2.469 inch or less .825 inch or less .004 inch or more .004 inch or more .014 inch or more .010 inch or more


9-92 SPECIFICATIONS

OVERSIZE AND UNDERSIZE ENGINE COMPONENT MARKINGS Displacement

318 Cu. in.

Condition

Location of Identification

Identification

.001" U/S Crankshaft

Milled flat on number eight R or M crankshaft counterweight M-2-3 etc. (indicating No. 2 & 3 main bearing journal) and/or R-1-4 etc. (indicating No. 1 & 4 connecting rod journal)

.010" U/S Crankshaft

Milled flat on number eight RX or MX MX (indicates .010" U/S crankshaft counterweight all main journals) and/or RX (indicating .010" U/S all rod journals)

.020" 0/5 Cylinder Bores

A

Following engine serial number

.008" 0/5 Tappets

3/8" diamond shaped stamp— Top pad—Front of engine and flat ground on outside surface of each 0/S tappet bore.

.005" 0/5 Valve Stems

X

Milled pad adjacent to two 3/8" tapped holes on end of cylinder head.

EIGHT CYLINDER ENGINES "383"

ENGINE

90° V 8 4.25" 3.375" 383 cu. in. 8.7 to 1* 9.5 to 1**

Type Number of Cylinders Bore Stroke Piston Displacement Compression Ratio Minimum Compression with Engine Warm, Spark Plugs Removed, Wide-Open Throttle Maximum Variation Between Cylinders (any one engine) Firing Order Basic Timing Manual Automatic Manual Hi. Perf. Automatic Hi. Perf. All 3-2 BBL. CYLINDER NUMBERING (front to rear) Left Bank Right Bank CYLINDER BLOCK Cylinder Bore (Standard) Cylinder Bore Out-of-Round (Max. allowable before reconditioning) Cylinder Bore Taper (Max. allowable before reconditioning) *2 BBI. Carb.

A

**4 BBL Carb.

AA

"440" 900 V 8 4.320" 3.750" 440 cu. in. 9.7 to 1A 10.5 to IAA

100 psi* 110 psi**

110 psi

40 psi 1-8-4-3-6-5-7-2 TDC±2-1/2° 2.5°BTC-±2-1/2° — — —

40 psi 1-84-3-6-5-7-2 — TDC-1:2-1/2° 2.5°BTC±2-1/2° 5°BTC±2-1/2°

1-3-5-7 2-4-6-8

1-3-5-7 2-4-6-8

4.2495"-4.2515"

4.320"-4.322"

.005"

.005"

.010"

.010"

Std. Hi. Perf. and 3-2 BBL.


SPECIFICATIONS 9-93 "383" Reconditioning Working Limits (for taper and out-of-round) Maximum Allowable Oversize (cylinder bore) Tappet Bore Diameter Distributor Lower Drive Shaft Bushing (press fit in block) Ream to Shaft to Bushing Clearance PISTONS Type Material Land Clearance (diametral) Clearance at Top of Skirt Weight (Std. through .040" oversize) Piston Length (overall) Ring Groove Depth No. 1 No. 2 No. 3 Pistons for Service PISTON PINS Type Diameter Length Clearance in Piston (Light Thumb Push @ 70°F.) Intereference in Rod Pins for Service PISTON RINGS Number of Rings per Piston Compression Oil Oil Ring Type

Ring Width Compression Oil (Steel rails) Ring Gap Compression Oil (Steel rails) Ring Side Clearance Compression Oil (Steel rails) Service Rings Ring Gap Compression Oil (Steel rails) Ring Side Clearance Compression Oil (Steel rails) CONNECTING RODS Length (Center to Center) Weight (less bearing shells) Side Clearance (two rods) Piston Pin Bore Diameter CONNECTING ROD BUSHING Type CONNECTING ROD BEARINGS (Type) Diameter and Width

2 BBI. Carb. 4 BBI. Carb.

"440"

.001" .040" .9050"-.9058"

.001" .040" .9050"-.9058"

,0005"-.0040" .4865"-A880" .0007"-.0027"

.0005"-.0040" A865"-A880" .0007"-.0027"

Autothermic W/Steel Struts .021"-.029" .0003"-.0013" 770 gms. 3.874"

Autothermic W/Steel Struts .023"-.030" .0003"-.0013" 857.5 gms. 3.650"

.220" 220" .208" Std., .005", .020", .040" Oversize

.220" 220" .208" Std., .005", .020", .040" Oversize

Press Fit in Rod 1.0935"-1.0937" 3.555"-3.575" .00045"-.00075" .0007"-.0012" Standard Only

Press Fit in Rod 1.0935"-1.0937" 3.555"-3.575" .00045"-.00075" .0007"-.0012" Standard Only

3 2 1 3-piece Chrome-plated rails with Stainless steel expander-spacer

3 2 1 3-piece Chrome-plated rails with Stainless steel expander-spacer

.0775"-.0780" .025"

.0775"-.0780" .025"

.013"-.023" .015"-.055"

.013"-.023" .015"-.055"

.0015"-.0030" .0000"-.005"

.0015"-.0030" .0000"-.005"

.013"-023" .015"-.062"

.013"-023" .015"-.062"

.0015"-.004" .0000"-.005"

.0015"-.004" .0000"-.005"

6.356"-6.360" 812 ± 4 gms. .009"-.017" 1,0923"-1.0928"

6.766"-6.770" 846 -a7 4 gms. .009"-.017" 1.0923"-1.0928"

None Steel Backed Babbitt Tr-metal Steel Backed 2.376"-.927"

None Tr-metal Steel Backed 2.376"-.927"


9-94 SPECIFICATIONS "383" Clearance desired

2 BBL Carb. 4 BBI. Garb.

.0005"-.0015" .001"-.002" .0025" Std., .001", .002", .003", .010", .012"

D01"-.002" .0025" Std., .001", .002", .003", .010", .012"

Fully Counter-Balanced Steel Backed Babbitt

Fully Counter-Balanced Steel Backed Babbitt*

No. 3 Main Bearing .002"-.007" 010" .0005"-D015" .0025" Diagonal Knurling

No. 3 Main Bearing .002"-.007" .010" .0005"-.0015" .0025" Diagonal Knurling

2.6245"-2.6255" .001"

2 7495"-2 7505" .001"

.003", .010", .011", .012"

.003, .010", .011", .012"

2374"-2.375" .1"

2.374"-2.375" .001"

Chain Steel Backed Babbitt 5 .001"-.003" .005" Cylinder Block

Chain Steel Backed Babbitt 5 .001"-D03" .005" Cylinder Block

No. 1 No. 2 No. 3 No. 4 No. 5

1.998"-1.999" 1.982"-1.983" 1.967"-1.968" 1.951"-1.952" 1.748"-1.749"

1.998"-1.999" 1.982"-1.983" 1.967"4.968" 1.951"-1.952" 1.748"-1.749"

No. 1 No. 2 No. 3 No. 4 No. 5

2.000"-2.001" 1.984"-1.985" 1.969"-1.970" 1.953"-1.954" 1.750"-1.751"

2.000"-2 001" 1.984"-1.985" 1.969"-1.970" 1.953"-1.954" 1.750"-1.751" RT & Super Bee 21° 67° 79° 25° 46° 268° 284°

Maximum Allowable Bearings for Service CRANKSHAFT Type Bearings * #3 Tin Aluminum Alloy Steel Backed Thrust Taken By End Play Maximum Allowable Diametral. Clearance Desired Diametral Clearance Allowed Finish at Rear Oil Seal Surface MAIN BEARING JOURNALS Diameter Maximum Allowable Out-of-Round and/or Taper Bearings for Service Available in Standard and the following undersizes CONNECTING ROD JOURNALS Diameter Maximum Allowable Out-of-Round and/or Taper CAMSHAFT Drive Bearings Number Diametral Clearance Maximum Allowable before Reconditioning Thrust Taken By CAMSHAFT JOURNALS Diameter

CAMSHAFT BEARINGS Diameter

VALVE TIMING Intake Opens (BTC) Intake Closes (ABC) Exhaust Opens (BBC) Exhaust Closes (ATC) Valve Overlap Intake Valve Duration Exhaust Valve Duration TIMING CHAIN Number of Links Pitch Width TAPPETS Type Body Diameter Clearance in Block Service Tappets Available Clearance Between Valve Stem and Rocker Arm Pad (Dry Lash) CYLINDER HEAD Valve Seat Run-Out (Max.)

"440"

RT & Super Bee 21° 67° 79° 25° 46° 268° 284°

18° 58° 660 14° 32° 256° 260° 50 .50" .75"

50 .50" .75"

Hydraulic .9035"-.9040" .0010"-.0023" Std., .001", .008", .030"

Hydraulic .9035"-.9040" .0010"-.0023" Std., .001", .008", .030"

.060"-.210"

.060"-.210"

.2"

.002"


SPECIFICATIONS 9-95

Intake Valve Seat Angle Seat Width (finish) Exhaust Valve Seat Angle Seat Width (finish) Cylinder Head Gasket (Thickness Compressed) VALVE GUIDES Type Guide Bore Diameter VALVES—(INTAKE) Head Diameter Length (to center of valve face) Stem Diameter

,1440”

45° .060"-.080" 45° .040'1-.060" .021"

45° 060"- 080" 45° .040"-.060" .021"

Cast in Head .374"-.375" Std.

Cast in Head .374"-.375" Std.

2.08" 4.87"

2.08" 4.87" 2 BBL. 4 BBL. ALL .3723"-.3730" .371811-.3725" .3718"-.3725" .0010"-.0027" .0015"-.0032" •0015"-.3725" mr* .017" 45° 45° Std., .005", .015", .030" Std. , .005", .015", .030" .425" .425"f .4501 t .450"

Stem to Guide Clearance Maximum Allowable Face Angle Valve for Service (Oversize Stem Diam.) Lift (Zero Lash) VALVES—(EXHAUST) Head Diameter Length to (center of valve face) Stem Diameter Hot End Cold End Stem to Guide Clearance Hot End Cold End Maximum Allowable Face Angle Valve for Service (Oversize Stem Diam.) Lift (Zero Lash) VALVE SPRINGS Number

“383"

1.75" 4.87" 2 BBL. •3713"-3720" 3723"-.3730"

4 BBL .3708'1-.3715" .3718"-.3725"

.0025"-.0042" •0020"-.0037" .0025"-.0042" .0015"-.0032" •0010"-.0027" .0015"-.0032" .017"* .mr* 45° 45° Std., .005", .015", .030" Std., . 005", .015", .030" .435" 4351 .458"tf .4581 t 16

2 BBL. 2.58"

1.75" 4.87" ALL .3708"-.3715" .3718"-.3725"

16 4 BBL. 2.23"

4 BBL. 2.23"

3.2 BBL. Free Length 2.15" Load when Compressed to Valve Closed 121-129@1-55/64" 100-110@1-55/64" 100-110@1-55/64" 110-120@1-55/64" Valve Open 192-208@1-7/16" 236-256@1-23/64" 236-256@1-23/64" 300-320@1-3/8" Valve Spring I.D 1.01"-1.03" 1.07"-1.09" 1.07"-1.09" 1.07"-1.09" Maximum Allowable Out of Plumb .060" .080" .080" .080" Valve Spring Installed Height (spring seat to retainer) 1-53/64"-1-57/64" 1-53/64"-1-57/64" Use 1/16" Spacer to Reduce Spring Height when Over Specifications ENGINE LUBRICATION Rotary Full Rotary Full Pump Type Pressure Pressure Capacity (qts.) 4 U.S. or 3-1/4 6 U.S. or 5 Imperial** Imperial** Pump Drive Camshaft Camshaft Minimum Pump Pressure @ 500 R.P.M. 20 PSI 20 PSI Operating Pressure at 1000 R.P.M. 45-65 lbs. 45-65 lbs. Pressure Drop Resulting from Clogged Filter 7-9 lbs. 7-9 lbs. Oil Filter Type Full-Flow Full-Flow

Without Power Pack

ftWith Power Pack

* With tools C-3973 & C-3339 using wobble method. **When Filter Element is Replaced, Add 1 U.S. Quart or 3/4 Imperial Quart.


9-96 SPECIFICATIONS

OIL PUMP-INSPECTION LIMITS FOR REPLACEMENT 383 and 440 Cu. In. Engines

.0015 inch or more .943 inch or less 2.469 inch or less .942 inch or less .004 inch or more .004 inch or more .014 inch or more .010 inch or more

Oil Pump Cover Outer Rotor Length Outer Rotor Diameter Inner Rotor Length Clearance Over Rotors—Outer Inner Outer Rotor Clearance Tip Clearance Between Rotors

OVERSIZE AND UNDERSIZE ENGINE COMPONENT MARKINGS Displacement

383 cu. in. 440 cu. in.

Identification

Condition

Location of Identification

.001" U/S Crankshaft

Maltese Cross M-2-3 etc (indicating No. 2 & 3 main bearing journal) and/or R-14 etc. (indicating No. 1 & 4 connecting rod journals)

Top pad—Front of engine Crankshaft counterweight

.010" U/S Crankshaft

Maltese Cross and X M-10 (indicates .010" U/S all main journals) and/or R-10 (indicates .010" U/S all rod journals)

Top pad—Front of engine Crankshaft counterweight

.020" 0/5 Cylinder Bores

A

Top pad—Front of engine

.008" 0/S Tappets

Top pad—Front of engine

0.S.

Single bolt boss on end of the head

.005" 0/5 Valve Stems

ENGINE

Type Number of Cylinders Bore Stroke Piston Displacement Compression Ratio Minimum Compression Pressure with engine warm, spark plugs removed—wide open throttle Maximum Variation between Cylinders (any one engine) Firing Order Basic Timing Manual Automatic CYLINDER NUMBERING (front to rear) Left Bank Right Bank CYLINDER BLOCK Cylinder Bore (standard) "A" Size "B" Size "C" Size "D" Size "E" Size Cylinder Bore Out-of-Round (Max. allowable before reconditioning) Cylinder Bore Taper (Max. allowable before reconditioning) Reconditioning Working Limits (for taper and out-of-round) Maximum Allowable Oversize (cylinder bore)

"426" Hemispherical 90°V 8 4.25" 3.750" 426 Cu. In. 10.25 to 1 110 psi 40 psi 1-8-4-3-6-5-7-2 T.D.C. ± 2-1/2° 5° -± 2-1/2° 1-3-5-7 2-4-6-8 4.24975" 4.25025" 4.25075" 4.25125" 4.25175" .005" .010" .001" .040"


SPECIFICATIONS 9-97 "426" Tappet Bore Diameter Distributor Lower Drive Shaft Bushing (press fit in block) Ream to Shaft to Bushing Clearance PISTONS Type Material Land Clearance (diametrical) Clearance at Top of Skirt Weight (Std. through .040" oversize) Piston Length (overall) Ring Groove Depth No. 1 No. 2 No. 3 Pistons for Service PISTON PINS Type Diameter Length Weight Clearance in Piston (Tight Thumb Push @ 70°F.) End Play Clearance in Rod Pins for Service PISTON RINGS Number of Rings per Piston Compression Oil Oil Ring Type

Ring Width Compression Oil (Steel Rails) Ring Gap Compression Oil (Steel Rails) Ring Side Clearance Compression Oil (Steel Rails) Service Rings Ring Gap Compression Oil (Steel Rails) Ring Side Clearance Compression Oil (Steel Rails) CONNECTING RODS Length (center to center) Large End Weight Small End Weight Side Clearance (two rods) Piston Pin Bushing Bore Diameter CONNECTING ROD BUSHING Type CONNECTING ROD BEARINGS Type Diameter and Width Clearance Desired Maximum Allowable Bearings for Service

.9050"-.9058" .0015"-.0040" (Interference) 4865"-.4880" .0007"-.0027" Forged Aluminum (Tin Plated) .033"-.041" .0025"-.0035" 841-845 gms. 4.060" .220" .220" .186" Std., .005", .020", .040" Oversize Full Floating 1.0310"-1.0312" 3.395"-3.405" 204 gms. .0001"-.0006" .006"-.012" .0002"-.0007" Std., .003", .008" Oversize 3 2 1 3-piece Chrome-Plated Rails with Stainless Steel Expander-Spacer .0075"-.0780" .025" .013"-.023" .015"- 055" .0015"-.0030" .01102"-.005" .013"-.023" .015"-.062" .0010"-.003" .0002"-.005" 6.859"-6.863" 770 gms. ± 2 gms. 314 gms. ±. 2 gms. .009"-.017" 1.0314"-1.0317" Steel Backed Bronze Tr-metal Steel Backed 2.376" x .927" .0015"-.0025" .0025" Std., .0005, .001", .002", .003", .010", .011", .012"


9-98 SPECIFICATIONS "426" CRANKSHAFT Type Bearings Thrust Taken By End Play Maximum Allowable Clearance Desired Clearance Allowed Finish at Rear Oil Seal Surface MAIN BEARING JOURNALS Diameter Maximum Allowable Out-of-Round Maximum Allowable Taper Bearings for Service Available in Standard and the following undersizes CONNECTING ROD JOURNALS Diameter Maximum Allowable Out-of-Round Maximum Allowable Taper CAMSHAFT Drive Bearings Number Clearance Desired Maximum Allowable before reconditioning Thrust Taken By CAMSHAFT JOURNALS Diameter No. 1 No. 2 No. 3 No. 4 No. 5 CAMSHAFT BEARINGS Diameter No. 1 No. 2 No. 3 No. 4 No. 5 VALVE TIMING Intake Opens (BTC) Intake Closes (ABC) Exhaust Opens (BBC) Exhaust Closes (ATC) Valve Overlap Intake Valve Duration Exhaust Valve Duration TIMING CHAIN Type Pitch Width TAPPETS Type Body Diameter Clearance in Block Service Tappets Available Clearance Between Valve Stem and Rocker Arm Pad (Dry Lash) CYLINDER HEAD Valve Seat Runout (Maximum) Intake Valve Seat Angle Seat Width (Finish)

Fully Counter-Balanced Tr-metal Steel Backed No. 3 Main Bearing .002"-.007" .010" .0015"-.0025" .0025" Diagonal Knurling 2.7495"-2.7505" .0003" .0005" .001", .002", .003 1, .010", .011", .012" 2.374"-2375" .0003" .0005" Roller Chain Steel Backed Babbitt 5 .001"-.003" .005" Cylinder Block 1.998"-1.999" 1.982"-1.983" 1.967"-1.968" L951"-1.952" 1.748"-1.749" Z000"-2.001" 1.984"-1.985" 1.969"-1.970" 1.953"-1.954" 1.750"-1.751" 36° 68° 80° 24° 600 284° 284° Double Roller 3/8" .860" Mechanical .9035"-.9040" .0010"-.0023" Std., .001", .008", .030" .060"-.150" .002" 45° .060"-.080"


SPECIFICATIONS 9-99 "426" Exhaust Valve Seat Angle Seat Width (Finish) Cylinder Head Gasket (thickness compressed) Combustion Chamber Volumes (with valves and plugs) VALVE GUIDES Type Guide Bore Diameter VALVES—(lntake) Head Diameter Length (to center of valve face) Stem Diameter (Standard) Stem to Guide Clearance Maximum Allowable Face Angle Valve for Service Lift (Zero Lash) VALVES—(Exhaust) Head Diameter Length (to center of valve face) Stem Diameter (Standard) Stem to Guide Clearance Maximum Allowable Face Angle Valve for Service Lift (Zero Lash) VALVE SPRINGS Number Free Length Load when Compressed to (valve closed less surge damper) Load when Compressed to (valve open less surge damper) Valve Springs I.D. Maximum Allowable Out of Plumb Valve Spring Installed Height (spring seat to retainer) Use 1/16" spacer to reduce spring height when over specifications. ROCKER SHAFT ASSEMBLY Rocker Shaft Clearance in Rocker Arm Rocker Shaft Clearance in Bracket ENGINE LUBRICATION Pump Type Capacity (qts.) Pump Drive Minimum Pump Pressure @ 500 rpm. Operating Pressure at 1000 rpm. Pressure Drop Resulting from Clogged Filter Oil Filter Type

45° .050"-.070" .025" 172.2-174.2 cc Cast in Head .3115"-.3125" Std. 2.250" 5.316"-5.331" .3085"-.3095" .002"-.004" .017"* 45° Std., .005", .015", .030" Oversize Stem Diam. .490" 1.940" 4.7543"-4.7693" .3075"-.3085" .003"-.005" .017"* 45° Std., .005", .015", .030" Oversize Stem Diam. .481" 16 Z15" 110-120 @ 1-55/64" 300-320 @ 1-3/8" 1.070"-1.090" .080" 1-53/64" - 1-57/64"

.0007"-.0012" .0009"-.0026" Rotary Full Pressure 6 U.S. or 5 Imperial** Camshaft 15 psi 45-65 lbs. 7-9 lbs. Full-Flow

*With Tools C-3973 and C-3339 using wobble method. **When Filter Element is Replaced, Add 1 U.S. Quart or 3/4 Imperial Quart.

OIL PUMP-INSPECTION LIMITS FOR REPLACEMENT Oil Pump Cover Outer Rotor Length Outer Rotor Diameter Inner Rotor Length Clearance Over Rotors—Outer Inner Outer Rotor Clearance Tip Clearance Between Rotors

.0015 inch or more .943 inch or less 2.469 inch or less .942 inch or less .004 inch or more .005 inch or more .014 inch or more .010 inch or more


9-100 TIGHTENING REFERENCE FOR IDENTIFICATION ENGINES WILL BE STAMPED ON CYLINDER BLOCK BOSS AS SHOWN BELOW EXAMPLE CUBIC INCH

HEMISPHERICAL SERIES 426

8-3-32---ENGINE BUILT THIS DAY MONTH

DAY

OVERSIZE AND UNDERSIZE ENGINE COMPONENT MARKINGS Condition

Identification

Location of Identification

.001" U/S Crankshaft

Maltese Cross M-2-3 etc. (indicates No. 2 & 3 main bearing journal) and/or R-1-4 etc. (indicates No. 1 & 4 connecting rod journals)

Top pad—Front of engine Crankshaft counterweight

.010" U/S Crankshaft

Maltese Cross and X M-10 (indicates .010" U/S all main journals) and/or R-10 (indicates .010" U/S all rod journals)

Top pad—Front of engine Crankshaft counterweight

.020" 0/5 Cylinder Bores

A

Top pad—Front of engine

.008" 0/S Tappets

Top pad—Front of engine

.005" 0/5 Valve Stems

0.S.

Single bolt boss on end of head

TIGHTENING REFERENCE 225 CUBIC INCH ENGINES Torque Foot-Pounds

Thread Size

Connecting Rod Nut Cylinder Head Bolt Main Bearing Cap Bolt Spark Plug Camshaft Lockbolt Carburetor to Manifold Nut Chain Case Cover Bolt Torque Converter Housing Bolt Converter Brace to Aluminum Housing Converter Brace to Engine Block Clutch Housing Bolt Crankshaft Rear Bearing Seal Retainer Cylinder Head Cover Bolt Distributor Clamp Bolt Engine Front Mounting to Frame Nut Engine Front Mounting to Block Nut Engine Rear Mount Bolts

45 65 85 30 35 200 in.-lbs. 200 in.-lbs. 30 40 30 30 30 40 in.-lbs. 200 in.-lbs. 85 45 35

Exhaust Manifold Nut Exhaust Pipe Flange Nut Exhaust Pipe Clamp Bolt Exhaust Pipe Support Clamp Bolt Fan Attaching Bolt Flywheel to Crankshaft

10 35 20 20 200 in.-lbs. 55

3/8-24 7/16-14 1/2-13 14mm 7/16-14 3/8-16 5/16-18 3/8-16 9/16-14 3/8-16 3/8-16 3/8-16 1/4-20 5/16-18 1/2-20 7/16-20 7/16-14 3/8-24 5/16-24 7/16-20 3/8-24 3/8-24 5/16-18 7/16-20


TIGHTENING REFERENCE Flex Plate to Crankshaft Flex Plate to Converter Flywheel Housing to Cylinder Block Bolt Flywheel Housing Cover Bolt Fuel Pump Attaching Bolt Alternator Bracket Bolt Alternator Mounting Nut Alternator Adjusting Strap Bolt Alternator Adjusting Strap Mounting Bolt Intake to Exhaust Manifold Bolt 01 Pan Drain Plug Oi Pan Screw Oi Pump Cover Bolt Oi Pump Attaching Bolt Oi Filter Attaching Stud Oi Pressure Gauge Sending Unit Rocker Shaft Bracket Bolt Starter Mounting Bolt Temperature Gauge Sending Unit Water Pump to Housing Bolt

9-101

55 270 in.-lbs. 50 7 30 30 200 in.-lbs. 15 30 240 in.-lbs. 20 200 in.-lbs. 95 in.-lbs. 200 in.-lbs. 10 60 in.-lbs. 25 50 180 in.-lbs. 30

7/16-20 5/16-24 7/16-14 1/4-20 3/8-16 3/8-16 5/16-18 5/16-18 3/8-16 5/16-18 1/2-20 5/16-18 1/4-20 5/16-18 3/4-16 1/8 N.P.T.F. 3/8-16 7/16-14 1/4 N.P.T.F. 3/8-16

45 85 85 35 210 in.-lbs. 35 30 100 in.lbs. 35 135 40 in.lbs. 55 55 270 in.-lbs. 50 100 in.-lbs. 35 20 200 in.-lbs. 95 in.-lbs. 35 25 30 200 in.-lbs. 30 24

3/8-24 1/2-13 1/2-13 7/16-14 5/16-18 3/8-16 3/8-16 1/4-20

318 CUBIC INCH ENGINES Connecting Rod Nut—Plain Cylinder Head Bolt (318 Cubic Inch) Main Bearing Cap Camshaft Lockbolt Camshaft Thrust Plate Chain Case Cover (Cast) Clutch Housing Bolt Clutch Housing Vent Hole Clutch Housing Pan Drain Plug Crankshaft Bolt (Vibration Damper) Cylinder Head Cover Flywheel to Crankshaft Flex Plate to Crankshaft Flex Plate to Converter Flywheel Housing to Cylinder Block Flywheel Housing Cover Intake Manifold Oil Pan Drain Plug Oil Pan Screws Oil Pump Cover Bolt Oil Pump Attaching Bolt Rocker Shaft Bracket Bolt Spark Plug Vibration Damper Pulley Bolts Water Pump Exhaust Pipe Flange Nut (318 Cubic Inch)

3/4-16 1/4-20 7/16-20 7/16-20 5/16-24 1/4-20 3/8-16 1/2-20 5/16-18 1/4-20 3/8-16 3/8-16 14mm 5/16-24 3/8-16 7/16-20

383-440 CUBIC INCH ENGINES Connecting Rod Nut—Plain Cylinder Head Bolt Main Bearing Cap Bolt Spark Plug Camshaft Lockbolt Carburetor to maniroia Nut Chain Case Cover Bolt Torque Converter Housing Bolt Clutch Housing Bolt Crankshaft Rear Bearing Seal Retainer Crankshaft Bolt (Vibration Damper) Cylinder Head Cover Stud and Nut Distributor Clamp Bolt Exhaust Manifold Nut

45 70 85 30 35 200 in.-IDs. 200 in.-lbs. 30 30 25 135 40 in.-lbs. 200 in.-lbs. 30

3/8-24 7/16-14 1/2-13 14mm 7/16-14

5/16-24

5/16-18 3/8-16 3/8-16 3/8-16 3/4-16 1/4-20 5/16-18 3/8-24


9-102 TIGHTENING REFERENCE Exhaust Pipe Flange Nut Exhaust Pipe Clamp Bolt Exhaust Pipe Support Clamp Bolt Fan Attaching Bolt Flywheel to Crankshaft Flex Plate to Crankshaft Flex Plate to Converter Fan Belt Idler Pulley Nut Fan Belt Idler Pulley Bracket Bolt Flywheel Housing to Cylinder Block Bolt Flywheel Cover Bolt Fuel Pump Attaching Bolt Alternator Mounting Bolt Alternator Adjusting Strap Bolt Alternator Adjusting Strap Mounting Bolt Intake Manifold Bolt Oil Pan Drain Plug Oil Pan Screws Oil Pump Cover Bolt Oil Pump Attaching Bolt Rocker Shaft Bracket Bolt Starter Mounting Bolt Vibration Damper Pulley Bolts Valve Tappet Cover End Bolt Water Pump to Housing Bolt Water Pump Housing to Cylinder Block Bolt A/C Compressor to Engine Bolt

50 20 20 15-18 55 55 270 in.-lbs. 45 30 50 7 30 30 200 in.-lbs. 30 40 20 200 in.-lbs. 10 30 25 50 200 in.-lbs. 9 30 30 30

7/16-20 3/8-24 3/8-24 5/16-18 7/16-20 7/16-20 5/16-24 7/16-20 3/8-16 7/16-14 1/4-20 3/8-16 3/8-16 5/16-18 3/8-16 3/8-16 1/2-20 5/16-18 5/16-18 3/8-16 3/8-16 7/16-14 5/16-18 1/4-20 3/8-16 3/8-16 3/8-16

426 CUBIC INCH HEMI ENGINE Location

Alternator Attaching Bolt Alternator Adjusting Strap Bolt Alternator Bracket Bolt Camshaft Sprocket Cap Screw (3) Carburetor to Manifold Nut Chain Case Cover Bolt, Upper Lower Connecting Rod Nut Crankshaft Bolt (Vibration Damper) Crankshaft Rear Bearing Seal Retainer Bolt Cylinder Head Bolt Cylinder Head Stud Nut Cylinder Head Cover Distributor Clamp Bolt Exhaust Manifold Flange Nut Fan Attaching Bolt (4) Flywheel Cap Screw Clutch Cover to Flywheel Flywheel Pan Screws Flywheel Housing to Block Bolts Fuel Pump Attaching Bolt Intake Manifold Main Bearing Cap Bolt Main Bearing Cap Tie Bolt Oil Pan Screws Oil Pan Drain Plug Oil Pump Attaching Bolt Oil Pump Cover Bolt Rocker Shaft Bracket Bolt Spark Plug Starter Mounting Bolt Torque Converter to Flex Plate Bolt Water Pump to Housing Bolt Water Pump to Cylinder Block Bolt

Ft. Lbs.

30 200 in.-lbs. 30 40 200 in.-lbs. 15-18 15-18 75 135 25 70-75 70-75 40 In. Lbs. 200 In. Lbs. 24 15 70 30 200 In. Lbs. 30 50 30 See Figure 9 100 45 200 in.-lbs. 20 30 10 30 30 50 65 30 30

Thread Size

3/8-16 5/16-18 3/8-16 3/8-16 5/16-24 5/16-18 3/8-16 7/16-20 3/4-16 3/8-16 7/16-14 7/16-20 1/4-20 5/16-18 7/16-20 5/16-18 7/16-20 3/8-16 5/16-18 3/8-16 7/16-14 3/8-16 1/4-20 1/2-13 3/8-16 5/16-18 1/2-20 3/8-16 5/16-18 3/8-16 14MM 7/16-14 7/16-20 3/8-16 3/8-16


GROUP 11

EXHAUST SYSTEM AND INTAKE MANIFOLD CONTENTS CARBURETOR AIR HEATER COUNTERWEIGHT, THERMOSTAT (426 HEMI ENGINE) EXHAUST HEADERS (426 Hemi Engine) .. EXHAUST MANIFOLD (318 Cu. In. Engines) EXHAUST MANIFOLD (383,440 CU. IN. ENGINES) EXHAUST PIPES, MUFFLERS AND TAIL PIPES GENERAL INFORMATION INTAKE AND EXHAUST MANIFOLD ASSEMBLY (6 Cyl. Engines) INTAKE MANIFOLD (318 Cu. In. Engines) INTAKE MANIFOLD (383, 440 Cu. In. Engines)

Page 6 12 10 8 9 5 1 7 8

INTAKE MANIFOLD (426 Hemi Engine) .. INTAKE MANIFOLD HEAT TUBES (426 Hemi Engine) MANIFOLD HEAT CONTROL VALVE 6 Cylinder Engine 318 Cubic Inch Engine 383-440 Cubic Inch Engine 426 Hemi Engine MANIFOLD HEAT CONTROL VALVE REPLACEMENT (426 HEMI) SERVICE DIAGNOSIS SERVICE PROCEDURES TIGHTENING REFERENCE

Page 9 9 10 11 12 12 13 5 5 14

9

GENERAL INFORMATION Exhaust Pipes, Mufflers and Tail Pipes The single line exhaust systems (Figs. 1, 2 and 3) use mufflers made of aluminized steel components. The dual exhaust systems (Figs. 4 and 5) use mufflers U-NUT (2).

made of aluminized and stainless or chromized steel components. The 426 Hemi engine have dual mufflers on each side, the rear mufflers (resonators) are at the rear of the rear axle. The tail pipes on all models are

REFERENCE CROSSMEMBER

MUFFLER

TAIL PIPE

U-BOLT BOLT (2)<>

TAIL PIPE

SADDLE

INSULATOR ASSEMBLY

INSULATOR ASSEMBLY

PLAIN WASHER (2) SCREW AND WASHER

I CLAMP VIEW E

% U-BOLT

EXHAUST PIPE

TAIL PIPE

LOCK WASHER (2)

NUT (2)<>

SCREW

<> BOLT <>

VIEW D

EXHAUST PIPE /EXTENSION

VIEW F ------ SADDLE --J---PLAIN WASHER

VIEW B

'tk'-NUT (2)

BOLT (4) r RETAINER (4)

X -

,,_„_

TIGHTENING TORQUE

-TAIL PIPE

24 FT. LB. 30 FT. LB.

95 IN. LB.

150 IN. LB. 200' IN. LB. EXHAUST PIPE EXTENSION EXHAUST PIPE ASSEMBLY

NUT (4 NR355B Fig. I — Exhaust System (225 Cubic Inch Engines)


11-2 EXHAUST SYSTEM BOLT

EXHAUST PIPE EXTENSION 3Idi U-BOLT

EXHAUST PIPE

U-NUT

PLAIN WASHER (2) SCREW TIGHTENING TORQUE

0

NUT (2)

. 24 FT. LB. *95 IN. LB.

<> 35 FT. LB.

150 IN. LB.

<> 200 IN. LB.

30 FT. LB.

INSULATOR ASSEMBLY BOLT

TAIL PIPE

U-NUT

SADDLE VIEW B

U-NUT

MUFFLER

BOLT VIEW H IEW G U-BOLT INSULATOR ASSEMBLY PLAIN WASHER (2)

TAIL PIPE

NUT (2)<>

—Tfl ,,. „ y- c

,

.

TAIL PIPE

0 -1 1,

Armiloao sserrn EXHAUST PIPE EXTENSION

a

STATION WAGON ONLY

NUT (4)<;) '■

NR3368 Fig. 2—Exhaust System (318 Cubic Inch Engines)

EXHAUST PIPE EXHAUST RAIL PIPE U-BOLT EXTENSION ASSEMBLY W REFERENCE

BOLT

U-NUT U-NUT INSULATOR ASSEMBLY

TAIL

SADDLE PLAIN WASHER (2) VIEW B

CLAMP

VIEW H

SCREW

BOLT Nv..op PLAIN WASHER

TAIL PIPE SCREW TAIL PIPE--0,1 --

TIGHTENING TORQUE . 24 FT. LB. 0. 95 IN. LB.

NUT (2)

_

C> 50 FT. LB. . 150 IN. LB. . 200 IN. LB. 0. 30 FT. LB. EXHAUST PIPE ASSEMBLY

MUFFLER

VIEW E

U-BOLT INSULATOR ASSEMBLY PLAIN WASHER (2) NUT (2)0.

BOLT (4)

— EXHAUST PIPE EXTENSION GASKET (2)

./•\. NUT (41Nev Fig. 3—Single Exhaust System (383 Cubic Inch Engines)

STATION WAGON ONLY

NR337B


EXHAUST SYSTEM 11-3 SCREW

RAIL ASSEMBLY REFERENCE

BOLT

U-NUT U-NUT PLAIN WASHER

BRACKET U-NUT

CLAMP PLATE ASSEMBLY VIEW F

NUT AND WASHER

TIGHTENING TORQUE

t

BOLT

INSULATOR ASSEMBLY

BOLT

TAIL

SCREW

VIEW H

U-BOLT CLAMP TAIL PIPE SCREW C

TAIL PIPE

VIEW C

24 IN. LB. : 95 IN. LB. .50 FT. LB.

fey. ik

INSULATOR ASSEMBLY PLAIN WASHER (2)

150 IN. LB.

200 IN. LB.I EXHAUST PIPE BOLT (4)

MUFFLER

.400-z...„ •

_-----

NUT (2)10

\ TAIL PIPE

bas aW M 11.14

cy

se'

.010.

TAIL PIPE

GASKET (2r).....,egar- t il S : se•••

NUT (4)<B>

EXHAUST PIPE

STATION WAGON ONLY NR338A

Fig. 4—Dual Exhaust System (383 Cubic Inch Engines)

made of aluminized steel. The single line exhaust systems used on models with 6-cylinder engines use an integral exhaust pipe and muffler (Fig. 1). On single line systems with V-8 engines, a U-bolt and saddle clamping arrangement is used between the exhaust pipe and exhaust pipe extension (Figs. 2 and 3). Ball joint connections are used at the juncture of the exhaust manifolds and exhaust pipes on models equipped with 318 cubic inch engines (Fig. 2). No gaskets are used at the ball joint connections. All other V-8 except 426 Hemi and all 6-cylinder engines use gaskets between the exhaust manifolds and pipe flanges. Flexible "C" type supports are used at the rear of the mufflers on all Coronet and Charger models. Fie-ible "I.." type supports are used at the end of the tail pipes on all models except Coronet and Charger with 440 or 426 Hemi which use a metal blade & rubber block type support at the extensions. Coronet or Charger models with 440 cubic inch Power Pak engine or 426 Hemi engine use a chrome plated extension clamped to the ends of the tail pipes. The dual exhaust system used on Coronet and Charger models equipped with the 426 Hemi engine, uses an "H" type exhaust pipe arrangement (Fig. 5). The dual pipes are connected near the center by a

short crossover pipe. Ball joint connections are provided at the juncture of the exhaust headers and exhaust pipes to facilitate installation and alignment of the system. The dual exhaust system used on Coronet models equipped with the 440 cubic inch with Power Pak uses an "H" type exhaust pipe arrangement (Fig. 5). The dual pipes are connected near the center by a short crossover pipe. No ball joint connections are used in this system. Manifold Heat Control Valve A thermostatic heat control valve is incorporated in the left hand exhaust manifold on 6-cylinder models (Fig. 12). On all V-8 models, a similar valve is located in the right hand manifold. On all V-8 models, except those equipped with the 426 Hemi engine, the valve directs exhaust gases to the heat chamber beneath the carburetor mounting flange in the intake manifold to help vaporize the fuel mixture during the warm-up period. On the 426 Hemi engine, a heat tube arrangement incorporated with the exhaust header thermostatic heat control valve (Fig. 11) diverts the hot exhaust gases to a heat chamber in the intake manifold at the base of the rear carburetor during the warm-up peri-


GASKET VIEW D (RIGHT AND LEFT SIDE)

VIEW K RIGHT AND LEFT SIDE

MUFFLER

U- BOLT HEAT SHIELD

EXHAUST PIPE

VIEW E

VIEW C RAIL ASSEMBLY RIGHT SIDE (REFERENCE)

- BOLT AND WASHER

1-NUT SUPPORT (2) TAIL PIPE EXTENSION

SADDLE PLAIN WASHER (2) 4210 CUBIC INCH ENGINE SAME AS MAIN VIEW EXCEPT AS SHOWN EXHAUST PIPE ASSEMBLY

BOLT (4)

PLAIN WASHER BOLT U-BOLT TAIL PIPE

RAIL ASSEMBLY REAR LEFT SIDE REFERENCE SKID-FUEL TANK REFERENCE

PIPE ASSEMBLY CLAAAP e-,--aie.,...--NUT (4)

NUT <> i ,,,EXHAUST PIPE ASSEMBLY

TAIL PIPE EXTENSION '''• 71-1,-II , ASSEMBLY

BOLT AND WASHER°,

INSULATOR ASSEMBLY

PLAIN WASHER NUT (2)C>

SCREW BRACKET

77-7;-",

PLATE ASSEMBLY GASKET (2)

NUT AND WASHER (4).

VIEW F TAIL PIPE AND RESONATOR ASSEMBLY RIGHT HEMI ENGINE (SHOWN) TAIL PIPE ONLY WITH 440 CUBIC INCH ENGINE

CORONET ONLY

TAIL PIPE AND RESONATOR ASSEMBLY TIGHTENING TORQUE

U-BOLT

. 24 FT. LB. .24 IN. LB. 426 HEMI ENGINE

SADDLE

•35 FT. LB. <> 95 IN. LB. 0. 50 FT. LB. 0.150 IN. LB. 200 IN. LB.

Fig. 5 -Dual Exhaust System (426 Hemi, 440 Cubic Inch Engines)

CHARGER ONLY

VIEW J

PLAIN WASHER (2) NUT (2) C>

NR339B

WUSAS iSIIVHX3

MUFFLER


EXHAUST SYSTEM 11-5

od. These tubes are made of aluminized steel to resist corrosion. When the valve is closed, the exhaust gases are diverted to the heat chamber through the right hand

tube (Fig. 11). After circulating through the heat chamber, the gases are returned to the exhaust pipe through the left hand tube.

SERVICE DIAGNOSIS Condition

Possible Cause

Correction

Leaks at pipe joints. (a) Tighten clamps at leaking joints. (b) Replace muffler assembly. Burned or blown out muffler. Burned or rusted out exhaust pipe. (c) Replace exhaust pipe. Exhaust pipe leaking at manifold (d) On 318 cu. in. engines, tighten ball flange. joint connection attaching bolt nuts to 24 foot-pounds. On 426 He engines, tighten the nuts to 24 footpounds. On all other engines, install a new gasket and tighten flange bolt nuts to 50 foot-pounds. (e) Exhaust manifold cracked or broken. (e) Replace manifold. (f) Leak between manifold and cylinder (f) Tighten manifold to cylinder head head. stud nuts or bolts to specifications. (g) Leaks at heat tube pipe connections. (g) Replace gaskets as required. Tighten bolts and nuts and clamp bolt nut to specifications.

EXCESSIVE EXHAUST NOISE

(a) (b) (c) (d)

LEAKING EXHAUST GASES

(a) Leaks at pipe joints. (b) (c) (d) (e)

(a) Tighten U-bolt nuts at leaking joints to 150 inch-pounds. Damaged or improperly installed gas- (b) Replace gaskets as necessary. kets. Restriction in muffler or tail pipe. (c) Remove restriction, if possible, or replace as necessary. Loose heat tube connections. (d) Replace gaskets as required. Tighten stud nuts or bolts to specifications. Burned or rusted out heat tubes. (e) Replace heat tubes as required.

ENGINE HARD TO WARM UP OR WILL NOT RETURN TO NORMAL IDLE

(a) Heat control valve frozen in the open (a) Free up manifold heat control valve position. using a suitable manifold heat control solvent.

MANIFOLD HEAT CONTROL VALVE RATTLE

(a) Thermostat broken. (a) Replace thermostat. (b) Broken, weak or missing anti-rattle (b) Replace spring. spring.

SERVICE PROCEDURES EXHAUST PIPES, MUFFLERS AND TAIL PIPES Removal

(1) Raise vehicle on hoist and apply penetrating oil to all clamp bolts and nuts to loosen rust and corrosion. If only the muffler is to be replaced, cut the extension pipe just forward of the muffler with a hack saw or cutter. It is not necessary to remove the exhaust pipe. The replacement muffler can be installed, using a U-bolt and saddle clamping arrangement at the front of the muffler. (2) Remove clamps and supports from exhaust

pipe, muffler and tail pipe (Figs. 1, 2, 3, 4 and 5). (3) Disconnect exhaust pipe at exhaust manifolds and remove exhaust pipe. On models using gaskets at

exhaust pipe flanges, discard gaskets and carefully clean manifold flanges of any gasket particles. On models with the 426 Hemi engine, also remove heat tube clamp bolt, nut, clamp and heat tube from exhaust connection (Fig. 5).

(4) Remove muffler and extension pipe assembly. (5) Raise rear end of vehicle to relieve the body weight from rear springs and remove tail pipe. Installation (All Models with 225, 318, 383 and 440 Cu. In. Engines)

(1) Assemble exhaust pipe, muffler and tail pipe loosely to permit proper alignment (Figs. 1, 2, 3, 4, and 5). (2) Assemble exhaust pipe to exhaust manifold. On engines without ball loint seating connections,


11-6 EXHAUST SYSTEM use new flange gaskets and tighten bolt nuts to 50 foot-pounds. On models with 318 cubic inch engines, do not tighten ball joint bolt nuts at this time. (3) Adjust tail pipe and muffler supports to provide proper clearance with underbody and adjacent parts. Do not fully tighten attaching bolts and screws at this time.

(4) Tighten all slip joint clamp bolt nuts to 150 inch-pounds, (except exhaust pipe to extension slip joint on Coronet Charger with 318 or 383-2BBL which must use a heavier "U" bolt (3/8"-16 thread) and be tightened to 30 foot-pounds) working from rear to front. (5) Tighten tail pipe support attaching clamp screws to 95 inch-pounds, at same time maintaining proper clearance with adjacent parts. 6) Tighten exhaust pipe ball joint connection bolt nuts to 24 foot-pounds. Alternately tightening nuts to insure parallelism of flanges. Installation (Models with 426 Hemi Engine)

(1) Assemble exhaust pipes, mufflers and tail pipes loosely to permit proper alignment (Fig. 5). (2) Assemble exhaust pipes to exhaust headers, but, do not tighten ball joint nuts at this time.

(3) Adjust muffler and tail pipe supports to provide proper clearance with underbody and adjacent parts. Do not fully tighten attaching bolts and nuts at this time.

(4) Tighten front muffler slip joint U-bolt nuts to 150 inch-pounds. (5) Tighten muffler and tail pipe attaching bolts to 150 inch-pounds, at same time maintaining proper clearance with adjacent parts. (6) Tighten tail pipe U-bolt nuts to 95 inch-pounds. (7) Tighten exhaust pipe ball joint bolt nuts to 24 foot-pounds. (8) Install outlet heat tube on right hand exhaust pipe connection and secure with clamp, bolt, washer and nut. Tighten nut to 150 inch-pounds. Extension installation— RT and 426 Hemi

(1) Install exhaust system as prescribed for other models with the following additional steps: (2) Insert extension bracket in rubber block in support assembly. (3) Position "U" bolt clamp in place on extension, slide extension and support as an assembly on end of tail pipe until it bottoms (Fig. 5). (4) Assemble support to side rail and tighten attaching bolt to 50 foot-pounds. Tighten "U" bolt clamp to 150 inch-pounds.

CARBURETOR AIR HEATER SIX CYLINDER ENGINES Removal

(1) Disconnect air cleaner vacuum line from car-

buretor and flexible connector between air cleaner and carburetor air heater. (Fig. 6). (2) Disconnect breather cap to air cleaner line and remove air cleaner. (3) Disconnect exhaust pipe at exhaust manifold. (4) Remove two screw and washer assemblies attaching carburetor air heater to manifold and remove air heater. (5) Inspect air heater; replace if damaged. Installation

(1) Refer to figure 6, install carburetor air heater with two screw and washer assemblies. Tighten to 200 inch-pounds. (2) Attach exhaust pipe to manifold flange, using a new gasket. Tighten stud nuts to 35 foot-pounds. (3) Install air cleaner and connect air cleaner to breather cap line. (4) Install air cleaner to carburetor vacuum line, and flexible connector between air cleaner and carburetor air heater. Position air cleaner to provide sufficient clearance between heat shield or air conditioning compressor and master brake cylinder if so equipped (Fig. 6).

318 CUBIC INCH ENGINES Removal

(1) Disconnect air cleaner vacuum line from carburetor and flexible connector between air cleaner and carburetor air heater. (2) Disconnect breather cap to air cleaner line and remove air cleaner. (3) Refer to figure 7, to remove carburetor air heater and attaching screws. AIR CLEANER HEAT SHIELD

FLEXIBLE CONNECTOR

VACUUM LINE TO CARBURETOR

BATTERY

n

MANIFOLD

PROVIDE SUFFICIENT CLEARANCE BETWEEN HEAT SHIELD AND AIR CLEANER

CARBURETOR AIR HEATER SCREW AND WASHER ASSEMBLY 2 <>

STUD (2) AIR - CLEANER COMPRESSOR

EXHAUST PIPE

POWER BRAKE MASTER

CENTER AIR CYLINDER CLEANER BETWEEN GASKET NUT POWER BRAKE AND (2), PY416 AIR CONDITIONING

TIGHTENING TORQUE

t

35 FT. LB 200 IN. LB.

Fig. 6—Carburetor Air Heater, Six Cylinder Engines


EXHAUST SYSTEM 11-7 and washer assemblies and remove carburetor air heater. (3) Inspect air heater; replace if damaged.

AIR CLEANER CARBURETOR AIR HEATER CONNECTOR VACUUM LINE TO

CARBURETOR NUT AND WASHER ASSEMBLY TIGHTENING TORQUE

BOLT (2)

MANIFOLD

95 I N.LB.

PY419

Fig. 7—Carburetor Air Heater, 318 Cubic Inch Engines

(4) Inspect air heater; replace if damaged.

Installation (1) Refer to figure 7, install carburetor air heater with attaching screws, bolts, nut and washer assemblies. Tighten to 95 inch-pounds. (2) Install air cleaner and connect air cleaner to breather cap line. (3) Install air cleaner to carburetor vacuum line, flexible connector between air cleaner and carburetor air heater. 383-440 CUBIC INCH ENGINES

.e

Removal (1) Disconnect flexible connector between air cleaner and carburetor air heater. (2) Refer to figure 8, remove attaching screws, nut AIR CLEANER

_

CONNECTOR UPPER CARBURETOR AIR HEATER

ka p1 A-M111 _ •

LOWER CARBURETOR AIR HEATER

( •

NI;11*;;.

I

q1

MANIFOLD

STUDS (2

N. V

f SCREW

VACUUM LINE TO CARBURETOR

% TIGHTENING TORQUE 45 I N.LB. 40 I NIB.

z •■ UT AND WASHER ASSEMBLY 2, PY422

Fig. 8—Carburetor Air Heater 383, 440 Cubic Inch Engines

Installation (1) Refer to figure 8, install carburetor air heater with attaching screws, bolts, nut and washer assemblies. Torque to specifications. (2) Install flexible connector between air cleaner and carburetor air heater. INTAKE AND EXHAUST MANIFOLD ASSEMBLY (6-Cylinder Engines) Removal (1) Disconnect air cleaner vacuum line from carburetor and flexible connector between air cleaner and carburetor air heater. (2) Disconnect breather cap to air cleaner line, crankcase ventilator valve hose and remove air cleaner. (3) Disconnect distributor vacuum control line and carburetor bowl vent line if so equipped. (4) Disconnect fuel line, automatic choke rod and throttle linkage from carburetor and remove carburetor. (5) Disconnect exhaust pipe at exhaust manifold. (6) Remove carburetor air heater. (7) Remove nuts and washers attaching manifold assembly to cylinder head and remove manifold. (8} Remove three screws securing intake manifold to exhaust manifold and separate manifolds.

Cleaning and Inspection (1) Discard gasket and clean all gasket surfaces on manifolds. Wash manifolds in solvent and dry with compressed air. (2) Test mating surfaces of manifolds for parallelism with a straightedge. Surfaces should be flat within .008 inch. (3) Inspect manifolds for cracks or distortion. (4) Test operation of manifold heat control valve. If shaft is binding, apply a suitable manifold heat control valve solvent. Then, work valve back and forth until it turns freely. Installation (1) Install a new gasket between the two manifolds and install the three long screws securing the manifolds. Do not tighten at this time. (2) Position manifold assembly on cylinder head, using a new gasket. Install triangular washers and nuts on upper studs and on the four lower studs opposite numbers 2 and 5 cylinders. The eight triangular washers should be positioned squarely on the machined surfaces of both intake and exhaust manifold retaining pads. These washers must be installed with


11-8 EXHAUST SYSTEM cup side against manifold. Install nuts and washers only when engine is cold.

(3) Install steel conical washers with cup side facing manifold, one on center upper stud and two on center lower studs. Install brass washers at each end with flat side to manifold. Install nuts with flat side away from washer. Tighten nuts to 10 footpounds. CAUTION: Do not over-tighten.

(4) Tighten three screws securing intake manifold to exhaust manifold to 240 inch-pounds, starting with inner screw. (5) Install carburetor air heater. (6) Attach exhaust pipe to manifold flange, using a new gasket and tighten stud nuts to 35 foot-pounds. (7) Install carburetor and connect fuel line, automatic choke rod and throttle linkage. (8) Install distributor vacuum control line and carburetor bowl vent line if so equipped. (9) Install air cleaner and connect breather cap to air cleaner line. (10) Install air cleaner vacuum line to carburetor and flexible connector between air cleaner and carburetor air heater.

INTAKE MANIFOLD (318 Cu. In. Engines) Remove intake manifold as outlined in Group 9, "Engine."

Servicing

(1) Clean manifold in solvent and blow dry with compressed air. Inspect manifold for cracks. (2) Inspect mating surfaces of manifold for parallelism with a straightedge. (3) Inspect exhaust crossover passages through manifold (Fig. 9). If passages are coated with hard, black carbon, they should be scraped clean and sandblasted to remove the carbon deposits. CARBURETOR MOUNTINC FLANGE 75

6 AUTOMATIC CHOKE WELL

EXHAUST CROSSOVER 3_1 PASSAGE

(4) Install intake manifold, using new gaskets. Tighten manifold bolts to 35 foot-pounds.

EXHAUST MANIFOLD (318 Cu. In. Engines) Removal

(1) Remove bolts and nuts attaching exhaust pipe to manifold. (2) Remove bolts, nuts and washers attaching manifolds to cylinder heads. Remove manifolds from cylinder heads. Cleaning and Inspection

(1) Clean mating surfaces on cylinder heads and manifolds, wash with solvent and blow dry with compressed air. Inspect manifolds for cracks. (2) Inspect mating surfaces of manifold for parallelism with a straightedge. Gasket surfaces must be flat within .008 inch. (3) On right hand manifold, test manifold heat control valve for free operation. If necessary to free up, apply a suitable manifold heat control valve solvent to both ends of valve shaft. A suitable solvent is available under Part Number 2525054, Manifold Heat Control Valve Solvent or equivalent. Be sure manifold is COOL and solvent is allowed to soak a few minutes to dissolve deposits. Then, work valve back and forth until it turns freely. Installation CAUTION: If studs came out with the nuts, Install new studs, applying sealer on the coarse thread ends. If this precaution is not taken, water leaks may develop at the studs.

(1) Position two outboard arms of manifolds on the two studs on cylinder heads, using new gaskets. Install conical washers and nuts on studs (Fig. 10). (2) Install two screws and conical washers at inner ends of outboard arms of manifold. Install two screws without washers on center arm of manifold (Fig. 10). Tighten screws and nuts, starting at center arm and working outward, to 15 foot-pounds. (3) Assemble exhaust pipe to manifold, and secure with bolts, nuts and washers. Tighten to 24 footpounds.

4 2 EXHAUST CROSSOVER NK120 PASSAGE

Fig. 9—intake Manifold-318 Cubic inch Engine

10—installing Exhaust Manifold-318 Engine


EXHAUST SYSTEM 11-9 INTAKE MANIFOLD (383, 440 Cu. In. Engines) Remove the Intake Manifold as outlined in Group 9, "Engine."

Servicing

(1) Clean manifold in solvent and blow dry with compressed air. (2) Inspect exhaust crossover passages and pressure test for any leakage into intake passages. (3) Inspect mating surfaces for parallelism. (4) Use new gaskets when installing manifold. Reinstall manifold as outlined in Group 9, "Engine." EXHAUST MANIFOLD (383, 440 Cu. In. Engines) Removal

(1) Remove spark plugs. (2) Remove alternator. (3) Disconnect exhaust pipe at exhaust manifolds. (4) Remove stud nuts attaching exhaust manifolds to cylinder heads. Slide manifolds off studs and away from cylinder heads. Cleaning and Inspection

(1) Clean manifolds in solvent and blow dry with compressed air. (2) Inspect manifolds for cracks and distortion. (3) On right hand manifold test manifold heat control valve for free operation. If necessary to free up, apply a suitable manifold heat control valve solvent to both ends of valve shaft. A suitable solvent is available under Part Number 2525054, Manifold Heat Control Valve Solvent or equivalent. Be sure manifold is COOL and solvent is allowed to soak a few minutes to dissolve deposits. Then, work valve back and forth until it turns freely.

Servicing

(1) Clean manifold in solvent and blow dry with compressed air. (2) Inspect exhaust passages and pressure test for any leakage into intake passages. (3) Inspect mating surfaces for parallelism. (4) Use new gaskets when installing manifold. Reinstall manifold as outlined in Group 9, "Engine". INTAKE MANIFOLD HEAT TUBES (426 Hemi Engine) Removal—Inlet Tube

(1) To remove inlet tube, remove two stud nuts and washers from right hand exhaust header (Fig. 11). (2) Remove screws attaching upper end of inlet tube to rear face of intake manifold. (3) Remove tube and gaskets and discard gaskets. Outlet Tube

(1) To remove outlet tube, remove nut, washer and bolt from tube clamp at exhaust pipe (Fig 11). Remove clamp from tube. (2) Remove two screws attaching heat shield and outlet tube to rear face of intake manifold and remove tube. Installation—Inlet Tube

(1) Clean gasket surfaces of exhaust header and intake manifold of all old gasket particles. (2) Place new gaskets in position on studs and install inlet tube on exhaust header studs. ( GASKET

INTAKE MANIFOLD

( HEAT SHIELD‘.

) HEAT TUBE/ INLET

Installation CAUTION: If studs came out with the nuts, install new studs, applying sealer on the coarse thread ends. If this precaution is not taken, water leaks may develop at the studs.

(1) Install manifolds on cylinder heads. No gaskets are required. Tighten stud nuts to 30 foot-pounds. (2) Install exhaust pipes on exhaust manifolds, using new gaskets. Tighten nuts to 50 foot-pounds. (3) Install alternator and adjust belt tension. (4) Install spark plugs and tighten to 30 footpounds. INTAKE MANIFOLD (426 Hemi Engine) Remove intake manifold as outlined in Group 9, "Engine".

SCREW AND WASHER

BOLT

HEAT TUBE—OUTLET

EXHAUST HEADER—RIGHT

CLAMP LOCKWASHER NUT EXHAUST PIPERIGHT

BALL JOINT CONNECTION CONNECTION NUT

NN962

Fig. 11—Intake Manifold Heat Tube Arrangement

(426 Hemi Engine)


11-10 EXHAUST SYSTEM (3) Install washers and nuts on studs and tighten nuts to 200 inch-pounds. (4) Secure upper end of tube with screws and washers. Tighten screws to 200 inch-pounds.

(3) Assemble inlet heat tube to right hand header, using new gasket. Tighten screws to 200 inch-pounds. (4) Connect choke intake heat tube to lower inside surface of exhaust header. (5) Connect heat tube to exhaust header.

Outlet Tube

(1) Install tube and clamp on exhaust pipe connection. (2) Install new gasket and tube at upper end of outlet tube. (3) Install heat shield and outer screw and washer on outlet tube flange. Install inner screw and washer. Tighten screws to 200 inch-pounds. (4) Install clamp bolt, washer and nut and tighten nut to 100 inch-pounds. EXHAUST HEADERS (426 Hemi Engine) Removal (1) On right hand exhaust header, disconnect carburetor choke heat tube. (2) Disconnect choke intake heat tube from lower inside surface of right hand exhaust header. (3) Remove ball joint bolts connecting exhaust pipes to exhaust headers and separate pipes from headers. (4) Remove screws attaching inlet heat tube to exhaust header and separate tube from header. (5) Remove screws and washers attaching exhaust headers to cylinder heads. Remove headers and gaskets from cylinder heads. Cleaning and Inspection (1) Clean gasket surfaces on cylinder heads and headers, wash with solvent and blow dry with compressed air. Inspect headers for cracks. (2) Inspect mating surfaces of headers for parallelism with a straightedge. Gasket surfaces must be flat within .008 inch. (3) On right hand header test heat control valve for free operation. If necessary to free up, apply a suitable manifold heat control valve solvent to both ends of valve shaft. A suitable solvent is available under Part Number 2525054, Manifold Heat Control Valve Solvent or equivalent. Be sure header is Cool and solvent is allowed to soak a few minutes to dissolve deposits. Then, work valve back and forth until it turns freely. Installation

(1) Place headers In position on cylinder heads, using new gaskets. Install conical washers and screws. Position washers with concave side toward bolting flanges. Tighten screws to 35 foot-pounds. (2) Assemble exhaust pipes to exhaust headers. Secure ball joints with bolts and nuts. Tighten nuts to 24 foot-pounds.

MANIFOLD HEAT CONTROL VALVE (All Engines) Operation of the manifold heat control valve should be inspected periodically. With engine idling, accelerate momentarily to wide open throttle. The counterweight on six cylinder and 426 Hemi engines should respond by moving counterclockwise approximately 1/2 inch and to its original position. On all other engines, the counterweight should move clockwise. If no movement is observed, shaft is binding due to accumulation of deposits or thermostat is weak or broken. The application of a suitable manifold heat control valve solvent, every oil change, to both ends of manifold heat control valve shaft at bushings, will keep valve working freely. A suitable solvent is available under Part Number 2525054, Manifold Heat Control Valve Solvent or equivalent. The solvent should be applied when manifold is COOL and allowed to soak a few minutes to dissolve deposits. Then, work valve back and forth until it turns freely. SIX CYLINDER Remove intake and exhaust manifold as outlined on page 7.

(1) Position valve plate, grind off spot welds from valve plate and shaft. (2) Remove counterweight and shaft assembly, valve plate. (3) Press out bushings and cup seals from manifold (Fig. 12). (4) Inspect vent holes and clean out necessary. Installation (1) Press in cup seals flush with inside walls (Fig. 12) with cupped ends facing outward. (2) Press in bushings flush with outer edge of exhaust manifold. (3) Line ream bushings and seals .3095 to .3110 inch diameter. Test for free fit of shaft in bushings and seals. (4) Mark one end of shaft with a suitable dye at 1.240 inches, press counterweight on marked end of shaft until flush with end of shaft. (5) Install thermostatic spring on counterweight with center end or tab pointing right and outer end or hook pointing left. (6) Install valve stop on counterweight with looped


EXHAUST SYSTEM 11-11 VALVE STOP VALVE

2.05

(11) Complete assembly and installation as outlined on page 7. 318 CUBIC INCH ENGINE Removal (1) Remove exhaust pipe from manifold. (2) Remove exhaust manifold from engine. (3) Position valve plate, grind off spot welds from valve plate and shaft. (4) Remove counterweight and shaft assembly, valve plate. Press out bushings and seals from manifold (Fig. 13). (5) Inspect vent holes and clean out if necessary.

PIN

WITH VALVE PLATE I-A SET SET TO CLOSED INDEX COUNTERWEIGHT TO PUT STOP AGAINST PIN AS SHOWN PRESS COUNTERWEIGHT FLUSH WITH END OF SHAFT

PLATE MUST BE CENTERED BETWEEN SEALS

BUSHING

INSTALL CUPS FLUSH WITH INSIDE WALLS VALVE

ANTI-RATTLE SPRING

Installation (1) Press in cup seals until seals extend into manifold .100 inch on each side with cupped ends facing outward (Fig. 13). (2) Press in bushings flush with outer edge of exhaust manifold. (3) Line ream bushings and seals, .3095 to .3110 inch diameter. Test for free operation of shaft in bushings and seals. (4) Mark one end of shaft with a suitable dye at 1.240 inches, press counterweight on marked end of shaft until flush with end of shaft. PIN

ARC WELD WITH STAINLESS BUSHING STEEL ROD COUNTERWEIGHT DO NOT RUN ARC CURRENT THRU BUSHINGS WHEN WELDING PY414

THERMOSTAT COUNTERWEIGHT

Fig. 12—Proper Manifold Heat Control Valve Installation, Six Cylinder Engines

ends facing away from thermostatic spring hook end. (7) Holding thermostatic spring wrapped 215 degrees in a clockwise direction viewed from counterweight end, install shaft assembly in manifold and valve plate with strap facing outboard; attach hook end of thermostatic spring to stop pin (Fig. 12). (8) With counterweight end of shaft positioned 1.240 inches (previously identified) away from manifold, valve plate centered between seals and positioned 2.05 inches from center of inside tapped hole (intake to exhaust manifold attaching screw) (Fig. 12). (9) Arc weld valve plate to shaft with stainless steel rod. Arc welding ground must be made at counterweight.

(10) Test for free operation. Install anti-rattle spring.

ANTI-RATTLE SPRING

COUNTERWEIGHT FLUSH WITH END .100" OF SHAFT NU502A

Fig. 13—Proper Manifold Heat Control Valve Installation (318 Cubic Inch Engines)


11-12 EXHAUST SYSTEM (5) Position thermostat so center end or tab is pointing left and hook or outer end points down, install thermostat on counterweight. (6) Install valve stop on counterweight so looped ends face away from thermostatic spring hook end. (7) Holding thermostatic spring wrapped 140 degrees in a counterclockwise direction viewed from counterweight end, install shaft assembly through outer bushing, seal and valve plate with center strap facing flange end of manifold; attach hook end of thermostatic spring to stop pin. (8) With counterweight end of shaft positioned 1.240 inches (previously identified) away from manifold, valve plate centered between seals and valve plate closed (Fig. 13). (9) Arc weld Valve plate to shaft with stainless steel rod. Arc welding ground must be made at counterweight. (10) Test for free operation. Install anti-rattle spring. (11) Position new gasket on studs. Install exhaust manifold and tighten to 20 foot-pounds. (12) Install exhaust pipe to manifold (no gasket used) and tighten to 24 foot-pounds.

VALVE STOP â–

WITH VALVE PLATE SET TO CLOSED POSITION INDEX COUNTERWEIGHT UNTIL STOP MAKES CONTACT WITH PIN PIN THERMOSTAT

CLOSED

MANIFOLD PLATE MUST BE CENTERED BETWEEN SEALS

ANTI-RATTLE SPRING

383-440 CUBIC INCH ENGINE Removal Remove exhaust manifold as outlined on page 9. (1) Position valve plate, grind off spot welds from valve plate and shaft. (2) Remove counterweight and shaft assembly, valve plate. (3) Press out bushings and cup seals from manifold (Fig. 14). (4) Inspect vent holes and clean out if necessary. Installation (1) Press in cup seals until seals extend into manifold .100 inch on each side with cupped ends facing outward (Fig. 14). (2) Press in bushings flush with outer edge of exhaust manifold. (3) Line ream bushings and seals .3095 to .3110 inch diameter. Test for free fit of shaft in bushings and seals. (4) Mark one end of shaft with a suitable dye at 1.240 inches, press counterweight on marked end of shaft until flush with end of shaft. (5) Install thermostatic spring on counterweight with center end or tab pointing left and outer end or hook pointing right. (6) Install valve stop on counterweight with looped ends facing away from thermostatic spring hook end. (7) Holding thermostatic spring wrapped 215 degrees in a counterclockwise direction viewed from counterweight end, install shaft assembly in manifold and valve plate with strap facing flange end of mani-

DO NOT RUN ARC ARC WELD CURRENT THRU BUSHINGS PRESS COUNTERWEIGHT FLUSH WHEN WELDING WITH END OF SHAFT PY415

Fig. 14—Proper Manifold Heat Control Valve Installation (383, 440 Cubic Inch Engines)

fold; attach hook end of thermostatic spring to stop pin (Fig. 14). (8) With counterweight end of shaft positioned 1.240 inches (previously identified) away from manifold, valve plate centered between seals and valve plate closed (Fig. 14). (9) Arc weld valve plate to shaft with stainless steel rod. Arc welding ground must be made at counterweight. (10) Test for free operation. Install anti-rattle spring. (11) Complete assembly and installation as outlined on page 9.

COUNTERWEIGHT, THERMOSTAT 426 HEMI ENGINE Removal (1) Remove counterweight from outer end of valve shaft by loosening clamp bolt (Fig. 15). (2) Unhook thermostat from stop pin and slide from valve shaft slot.


EXHAUST SYSTEM 11-13 INSTALLED POSITION THERMOSTAT

RETAINE R

FREE POSIT ION

VALVE SI IAFT

‘Pr i .-------- RETAINER RETAINER

STOP PIN COUNTERWEIGHT

VALVE SHAFT

NN965

Fig. 16—installing Thermostat (426 Herni Engine)

(4) Remove counterweight, thermostat, shaft retainers and anti-rattle spring. (5) Cut valve plate off shaft. (6) Remove shaft and press bushings from manifold.

THERMOSTAT

NUT LOCK BUMPER

NN964A

Fig. 15—Heat Control Valve—Disassembled (426 hem? Engine)

(3) If fabric bumper on counterweight is worn, it may be replaced by sliding it off the tab and sliding on a new one. Installation (1) Be sure shaft retainers (Fig. 15) are in place in grooves in valve shaft and stop pins. Then, turn shaft in the extreme counterclockwise position. (2) Install a new thermostat in slot in shaft (Fig. 16) with outer end of thermostat in lower left hand position. Press innner end of thermostat into shaft and seat firmly. (3) Wrap outer end of thermostat counterclockwise and engage under stop pin. (4) Install counterweight on outer end of valve shaft with lock engaged in valve shaft slot and bumper on right hand side of stop pin (Fig. 17). (5) Tighten clamp bolt to 50 inch-pounds with C-3380 Torque Wrench. Test operation of valve for freedom of movement.

Installation (1) Install new bushings in exhaust manifold. (2) Install shaft in manifold and check shaft for freedom of movement. If shaft fails to turn freely, it will be necessary to hone bushings to shaft size. (3) Pull shaft out far enough to position valve plate on shaft, then slide shaft into position in both bushings. (4) Align hole in valve plate with hole in shaft and insert a drift into both holes to maintain correct positioning of valve plate while it is being welded to shaft. (5) Remove drift from valve plate and shaft. (6) Install new thermostat, anti-rattle spring shaft retainers and counterweight assembly on shaft, as outlined for respective engine. (7) Install manifold on engine assembly.

MANIFOLD HEAT CONTROL VALVE REPLACEMENT (HEMI ONLY) Removal (1) Remove alternator. (2) Remove exhaust pipe from manifold. (3) Remove exhaust manifold from engine.

Fig. 17—installing Counterweight (426 Hem! Engine)


11-14 TIGHTENING REFERENCE (8) Attach exhaust pipe to manifold, using a new gasket where required. (9) Install alternator and adjust belt tension.

(10) Start engine and test operation of manifold heat control valve assembly.

TIGHTENING REFERENCE 6-Cylinder Ft. Lbs. In. Lbs.

Exhaust Header Ball Joint Bolt Nut (426 Hemi Engine) Exhaust Manifold to Cylinder Head Stud Nut 225 Cu. In. Engine 318, 383, 440 Cu. In. Engines Exhaust Manifold to Pipe Flange Ball Joint Bolt Nut .. Exhaust Pipe Flange Bolt Nut Single Exhaust Dual Exhaust Exhaust Pipe U-Bolt Nut Heat Tube Clamp Bolt Nut (426 Hemi Engine) Heat Tube Screw and Stud Nut (426 Hemi Engine) Intake Manifold to Cylinder Head Screw 318 Cu. In. Engines 383, 440 Cu. In. Engines Intake to Exhaust Manifold Screw Rear Muffler Support Bolt and Nut Rear Muffler Support to Underbody Bolt Support Clamp Screw Tail Pipe Support to Underbody Bolt Tail Pipe U-Bolt Nut (426 Hemi Engine)

8-Cylinder In. Lbs. Ft. Lbs.

24 10 30 24 50 50

35

150 95 200

150 10 35 40 240 200 95 200

200 200 95 200 95


GROUP 14

FUEL SYSTEM CONTENTS Page AFB-SERIES CARBURETORS 71 AVS-SERIES CARBURETORS 42 BBD-SERIES CARBURETORS 13-22 FUEL PUMPS 99 FUEL TANKS 103 HOLLEY CARBURETOR (1920 SERIES) ...

Page HOLLEY CARBURETOR (2200 SERIES)... 30 HOLLEY CARBURETOR (2300 SERIES)... 52 HOLLEY CARBURETOR (4160 SERIES)... 81 SERVICE DIAGNOSIS 4 SPECIFICATIONS 112 THROTTLE LINKAGE 109

GENERAL INFORMATION The fuel system consists of the fuel tank, fuel pump, fuel filter, carburetor, fuel lines and vacuum lines. The fuel tank assembly consists of the tank, filler neck cap, air vent, and a fuel gauge sending unit. In operation, the fuel pump draws fuel from the tank and forces it to the filter and carburetor. The carburetor meters the fuel into the air stream drawn into the engine, in quantities suitable for all engine speed and load conditions. The fuel filter is a paper element sealed, disposable type unit, located in the fuel line between the fuel pump and the carburetor. The filter unit should be replaced every 24,000 miles. When checking parts removed from the carburetor, it is at times difficult to be sure they are satisfactory for further service. It is therefore recommended that in such case, new parts be installed. All the carburetors referred to in the Fuel System are either equipped for use with a Cleaner Air System (C.A.S.) or an Evaporation Control System, (E.C.S.) depending on the area in which the vehicle is to be used. The servicing procedures covering these carburetors are nearly identical. Differences between the two types of carburetors are covered (where applicable) in the service procedures.

CLEANER AIR SYSTEM (C.A.S.) The cleaner air system consists of a special air cleaner, breather cap, ventilation valve, carburetor, distributor and various other automatic control devices, (Fig. 3.) as required. The function of the cleaner air system is to reduce the unburned hydro-carbons emitted by the vehicle's engine. Fresh air is drawn into the air cleaner, for consumption by the engine. A portion of this fresh air is diverted through a hose to the breather cap and into the crankcase. Manifold vacuum causes crankcase vapors (including fresh air and unburned hydrocarbons) to flow through the crankcase ventilation

valve to the base (or throttle body) of the carburetor. These vapors are joined with the fuel mixture in the intake manifold and are delivered into the combustion chamber, from which they are ejected as essentially completely burned exhaust products.

EVAPORATION CONTROL SYSTEM (E.C.S.) The evaporation control system consists of the C.A.S. system plus, a special vented fuel tank, separator, fuel tank vapor tube, breather cap, enclosed bowl vent valve, a vacuum pressure relief fuel tank cap and hoses. (Fig. 4). The function of the evaporation control system is to reduce the loss of fuel from the fuel system to the atmosphere by evaporation and reduce the unburned hydro-carbons emitted by the vehicle's engine. When fuel evaporates from the carburetor or fuel tank, it passes through vent hoses or tubes to the crankcase. With the engine running, vapors are purged from the crankcase through the crankcase ventilation system, as in the Cleaner Air System previously described. The fuel tank contains a one gallon overfill limiter tank. When the fuel tank is filled, the overfill limiter tank remains essentially empty, to allow for thermal expansion. Each corner of the fuel tank is vented and each of the hoses from these vents are connected to the separator. A tube from the separator leads to the breather cap. Thus evaporated fuel vapor from the fuel tank, flows through the separator, to the engine crankcase and then through the crankcase ventilation system. In addition, the carburetor fuel bowl vent valve is also included, by a tube from the vent valve to the breather cap, or fuel pump. (6 cylinder engines.) This completely seals the fuel system.

SERVICING THE CARBURETOR Often, the carburetor is blamed for a great variety of trouble which is classed as "POOR CAR PERFORMANCE." Therefore, be definitely sure that the


14-2 FUEL SYSTEM trouble is not located elsewhere before disassembling the carburetor. When overhauling the carburetor, several items of importance should be observed to assure a good job: (1) The carburetor must be completely disassembled. (2) All parts (except choke diaphragm assembly) should be cleaned in a suitable solvent then inspected for damage or wear. (3) Use air pressure only, to clean the various orifices or channels. (4) Replace questionable parts with NEW ONES. CLEANING CARBURETOR PARTS The recommended solvent for gum deposits is denatured alcohol which is easily obtainable. However, there are other commercial solvents which may be used with satisfactory results. The choke diaphragm can be damaged by solvents. Avoid placing the diaphragm assembly in ANY liquid. Clean the external surfaces with a clean cloth or a soft wire brush. Shake dirt or other foreign material from the stem (plunger) side of the diaphragm. Depressing the stem to the retracted position, will provide an additional hole for the removal of dirt. Compressed air can be used to remove loose dirt but should not be connected to the vacuum diphragm fitting. IMPORTANT: If the commercial solvent or cleaner recommends the use of water as a rinse, it should be "HOT." After rinsing, all trace of water must be blown from the passages with air pressure. It is further advisable to rinse all parts in clean kerosene or gasoline to be certain no trace of moisture remains. Never clean jets with a wire, drill, or other mechanical means, because the orifices may become enlarged, making the mixture too rich for proper performance.

AUTOMATIC CHOKE-WELL TYPE A new design well for the automatic choke has been incorporated in all engines except the 440 cu. in. tricarb installation and the 426 Cu. in. Hemi. This new design allows faster opening of the choke mechanism resulting in leaner fuel mixtures during the warm-up period for reduced emissions and fuel consumption. (Figs. 1 or 2.) To function properly, it is important that all parts be clean and move freely. Other than an occasional cleaning, the automatic choke control requires no servicing. However, it is very important that the choke control unit works freely at the thermostatic coil spring housing and at the choke shaft. Move the choke rod up and down to check for free movement in the

CHOKE CONTROL UNIT

THERMOSTATIC COIL SPRING

COVER

GASKET

STAINLESS STEEL CUP PY138

Fig. I—Choke Control (open well) 8 Cylinder

coil housing. If unit binds, a new unit should be installed. The well type choke is serviced as an assembly. Do not attempt to repair or change the setting, unless authorized by service literature. Changes of the choke setting materially affect summer temperature cold starting and seldom are a satisfactory correction of driveability problems, which are generally associated with carburetors or vacuum diaphragms.

Two types of wells are in general usage. One is cast as an integral part of the manifold. The second is a stainless steel cup fastened over a port in the manifold. (Figs. 1 or 2.) The stainless steel well cups are held in place by choke retainer bolts. A steel-asbestos gasket seals the exhaust gas within the manifold. Loosening or removing the choke retainer bolts will allow exhaust gases to escape into the engine compartment. DO NOT RUN THE ENGINE WITHOUT THE CHOKE FIRMLY BOLTED TO THE MANIFOLD. FIRE OR HEAT DAMAGE MAY OCCUR.

When installing the steel well cup, make certain the gasket is in good condition and is in place to prevent exhaust leakage. Do not lubricate any of the choke parts or the control unit. This causes dirt to accumulate, and would result in binding of the choke mechanism. The choke control unit is accurately adjusted when first assembled. Under normal servicing do NOT change the setting or disassemble the control unit. If however, the setting has been disturbed, reset as lotCHOKE CONTROL UNIT COVER

THERMOSTATIC COIL SPRING

MANIFOLD

GASKET

STAINLESS STEEL CUP

PY139

Fig. 2—Choke Control (open well) 6 Cylinder


FUEL SYSTEM 14-3 lows: Loosen locknut and turn shaft with screwdriver until index mark on disc is in alignment with correct mark on the frame. Hold in this position with screwdriver while tightening nut, (Refer to Specifications for indexing). Idle Speed Adjustment (Curb Idle)

To make the idle speed adjustment on carburetors, secure an accurate ignition tachometer and a Sun Electric Combustion-Vacuum Unit, Model 80, Exhaust Condenser, Model EC, and Hose 669-14 or equivalent. (The above analyzer is recommended; however, other reliable makes of analyzers in good condition may be used.) (1) Engine running at normal operating temperature, and timing checked to the specifications shown in the Electrical Group. (2) Air Cleaner installed. (3) Six cylinder engines only—turn headlights on high beam position. (4) Automatic transmissions in neutral position (not in park position). (5) On air conditioned cars, turn air conditioning off.

(6) Connect ignition tachometer. (7) Insert probe of exhaust gas analyzer in the tail pipe as far as possible (2 ft. minimum distance). On dual exhaust cars use left side tail pipe (side opposite heat valve). It is very important that the probe and connecting tubing be free of leaks to prevent erroneous readings. If a garage exhaust system is used to conduct the exhaust gases away, a plenum chamber or other means must be used to reduce vacuum of the exhaust system to 1/2 inch water or less. (8) Connect exhaust gas analyzer, warm up and calibrate according to manufacturer's instructions. (9) Set the idle speed to specified value for the specific engine-transmission combination as follows: IMPORTANT: When adjusting mixture screws to obtain the air/fuel ratio specified, do not turn the mixture screw more than 1/16 turn at a time. The combustion analyzer is so sensitive that the ratio must be changed by very small increments if accurate readings are to be obtained. The meters read in air/fuel ratio so that a higher reading indicates a leaner mixture and vice versa.

(a) Adjust each screw 1/16 turn richer (counterclockwise) and wait 10 seconds before reading the meter. (b) If necessary, repeat step "a" until meter indicates a definite increase in richness (lower reading). This step is very important since the meter reverses its readings and indicates a richer mixture as the

carburetor is leaned out if carburetor is set too lean. (c) When it has been established that the meter is indicating a lower reading (richer mixture) when the idle mixture screws are turned in the richer direction, proceed to adjust the carburetor to give 14.2 air/fuel ratio, turning the screws counterclockwise (richer) to lower the meter reading and clockwise (leaner) to increase the meter reading. Do not remove plastic cap in order to obtain an over-rich mixture.

(d) If the idle speed changes as the mixture screws are turned, adjust the speed to the specified value and readjust the mixture as required so that 14.2 air/fuel ratio is obtained at the specified idle speed.

ROUGH IDLE AND LOW SPEED SURGE Rough idle and low speed surge on vehicles (using 1-1/2" BBD, AVS, and Holley 4160 carburetors) may be the result of improper idle setting balance between the right and left carburetor bores. To correct this condition the following steps should be followed. U) Remove the plastic caps from the two idle screws in base of carburetor (1-1/2" BBD, and AVS) or in the sides of the primary metering block (Holley). (Fig. 1, BBD, AVS and Holley). (2) With engine thoroughly warmed up, install an approved exhaust gas analyzer for carburetor idle speed and mixture adjustment as described under "Idle Speed Adjustment". (3) With a screw driver, turn the two idle screws clockwise until they are both seated. (4) Turn both idle screws 1-1/ 2 turns counterclockwise for 1-1/2" BBD carburetors and 2 to 3 turns counterclockwise for AVS carburetors as a starting point (experience may dictate more or less turns as a rough setting but both screws should be turned equally). (5) Start engine and set specified idle speed for engines with 300 or more miles. Set 75 rpm below CARBURETOR CRANKCASE VENTILATION VALVE

AIR CLEANER BOWL VENT VALVE

CLEANER TO CAP HOSE

BREATHER CAP

VENT VALVE TO CARBURETOR HOSE

CRANKCASE (VAPOR STORAGE AREA) PY598

Fig. 3—Cleaner Air System (C.A.S.)


14-4 FUEL SYSTEM CARBURETOR

AIR CLEANER TO BREATHER CAP HOSE

AIR CLEANER

BOWL VENT VALVE HOSE

FUEL TANK VAPOR VENT LINE

VAPOR SEPARATOR

BREATHER CAP

GAS CAP

BOWL VENT VALVE CRANKCASE VENTILATION VALVE

FUEL TANK

VENT VALVE TO CARBURETOR HOSE CRANKCASE (VAPOR STORAGE AREA)

PY599

Fig. 4—Evaporation Control System (E.C.S.)

specifications if under 50 miles or 50 rpm below specifications if 50 to 300 miles are on engine. (6) Observe air/fuel ratio reading of exhaust gas analyzer. Turn each screw 1/16 turn richer (counterclockwise) and note change in air/fuel meter reading. From this point on, follow instructions for idle setting

until 14.2 air/fuel ratio is obtained at appropriate idle speed. It is very important that both idle screws be turned the same amount on each adjustment so that as finally set both screws will be the same number of turns from the seated position. (8) Install plastic caps over idle screws.

SERVICE DIAGNOSIS Possible Cause

Condition POOR IDLING

Correction

(a) Idle air bleed carbonized or of in- (a) Disassemble carburetor. Then, use correct size.

(b) Idle discharge holes plugged or (b) gummed. (c) Throttle body carbonized or worn (c) throttle shaft. (d) Damaged or worn idle mixture needle. (d) (e) Low grade fuel or incorrect float (e) level.

compressed air to clear idle bleed after soaking it in a suitable solvent. Disassemble carburetor. Then, use compressed air to clear idle discharge holes after soaking main and throttle bodies in a suitable solvent Disassemble carburetor. Check throttle valve shaft for wear. If excessive wear is apparent, replace throttle body assembly. Replace throttle body assembly. Test fuel level in carburetor. Adjust as necessary to obtain correct float level.

(f) Loose main body to throttle body (f) Tighten main body to throttle body screws securely to prevent air leaks. screws. (g) Worn or corroded needle valve and (g) Clean and inspect needle valve and seat. If found to be in questionable seat.

condition, replace assembly. Then, test fuel pump pressure. Refer to Specifications for correct fuel pump

POOR ACCELERATION

pressure. (h) Adjust valves. (h) Incorrect valve lash. (i) Check ignition system. (i) Engine miss (ignition.) (a) Accelerator pump piston (or plunger) (a) Disassemble carburetor. Replace accelerator pump assembly if leather leather too hard, worn, or loose on stem. is hard, cracked or worn. Test followup spring for compression. (b) Faulty accelerator pump discharge (b) Disassemble carburetor. Use comball. pressed air to clean discharge nozzle

and channels after soaking main body in a suitable solvent Test fuel pump capacity.


FUEL SYSTEM 14-5 Condition

Possible Cause

Correction

(c) Faulty accelerator pump inlet check (c) Disassemble carburetor. Check accelball. erator pump inlet, check ball for poor seat or release. If part is faulty, replace. (d) Incorrect fuel or float level. (d) Test fuel or float level in carburetor. Adjust as necessary to obtain correct float level. (e) Worn accelerator pump and throttle (e) Disassemble carburetor. Replace linkage. worn accelerator pump and throttle linkage and measure for correct position. (f) Manifold heat valve sticking. (f) Free up manifold heat control valve, using recommended solvent. (g) Incorrect pump setting. (g) Reset pump. CARBURETOR FLOODS OR LEAKS

(a) Cracked body. (b) Faulty body gaskets.

(c) High float level. (d) Worn needle valve and seat

(e) Excessive fuel pump pressure.

POOR PERFORMANCE MIXTURE TOO RICH

(a) Restricted air cleaner. (b) Leaking float. (c) High float level. (d) Excessive fuel pump pressure.

(e) Worn metering jet.

CARBURETOR MIXTURES LEAN

(a) Air leak bypassing carburetor.

(a) Disassemble carburetor. Replace cracked body. Make sure main to throttle body screws are tight. (b) Disassemble carburetor. Replace defective gaskets and test for leakage. Be sure screws are tightened securely. (c) Test fuel level in carburetor. Make necessary adjustment to obtain correct float level. (d) Clean and inspect needle valve and seat If found to be in a questionable condition, replace complete assembly and test fuel pump pressure. Refer to specifications for correct fuel pump pressure. (e) Test fuel pump pressure. If pressure is in excess of recommended pressure (refer to Specifications), replace fuel pump. (a) Remove and clean air cleaner or replace element. (b) Disassemble carburetor. Replace leaking float Test float level and correct as necessary, to proper level. (c) Adjust float level as necessary to secure proper level. (d) Test fuel pump pressure. Refer to specifications for recommended pressure. If pressure is in excess of recommended pressure, replace fuel pump assembly. (e) Disassemble carburetor. Replace worn metering jet, using a new jet of the correct size and type. (a) Repair.

ENGINE RUNS EXCESSIVELY RICH AFTER COLD START CHOKE SYSTEM RICH

(a) Choke thermostat adjustment richer (a) Correct. than specified. (b) Choke vacuum diaphragm inoperative (b) Correct or replace. or misadjusted. (c) Choke vacuum passage blocked or (c) Correct. leaking.

CARBURETOR RICH

(a) Incorrect gasket or gasket installation (a) Replace or correct. between carburetor and intake manifold.


14-6 FUEL SYSTEM—HOLLEY Correction

Possible Cause

Condition

EXCESSIVE STALLS AFTER COLD START (a) Check items under "Poor Starting— Choke Valve Fails to Close." (b) Choke vacuum diaphragm adjust- (b) Adjust to specifications. ment lean.

(a) Choke System Lean.

ENGINE OUTPUT LOW

(a) Adjust to specification. (a) Fast idle speed low. (b) Fast idle cam position adjustment (b) Adjust to Specifications. incorrect. (c) Engine lubrication oil of incorrect (c) Recommend No. 5W-20. viscosity.

CARBURETOR LEAN

(a) Curb idle set very lean. (CAS Carbs.) (b) Air leak bypassing the carburetor.

(a) Adjust to CAS Specifications. (b) Repair.

POOR COLD ENGINE STARTING (a) Instruct owner.

INCORRECT PROCEDURE

(a) (See Owners Manual.)

CHOKE VALVE FAILS TO CLOSE

(a) Choke thermostat adjustment leaner (a) Adjust. than specified. (b) Choke thermostat corroded such that (b) Replace assembly. it has cracked and distorted lean. (c) Choke linkage, shaft or related parts (c) Repair, clean or replace. corroded, bent or dirty such that the system is not entirely free to move from the open to the closed position. (d) Choke valve improperly seated. (d) Reseat valve. (e) Air cleaner gasket interferes with (e) Reinstall gasket properly. choke valve or linkage.

LOW ENGINE OUTPUT (10°F or lower)

(a) Engine lubricating oil or incorrect (a) Recommended 5W-20. viscosity. (b) Readjust. (b) Valve lash incorrect. (c) Choke thermostat adjustment incor- (c) Adjust to correct setting. rect, rich.

ENGINE RUNS LEAN, FIRST HALF MILE CHOKE LEAN

(a) Check items under (Poor Starting). (a) See "Choke Valve Fails to Close." (b) Diaphragm adjustment lean. (b) Readjust to specification.

ENGINE RUNS LEAN AFTER HALF MILE ENGINE HEAT INSUFFICIENT

(a) Heat valve stuck open. (b) Heat valve thermostat distorted. (c) Heat valve failed within exhaust See engine section for proper diagnosis. (d) Water temperature sub-normal.

(a) Free with solvent (b) Replace thermostat. (c) Replace heat valve. (d) Check thermostat

HOLLEY MODEL NO. 1920 SERIES CARBURETOR INDEX Automatic Choke (well type) Carburetor Adjustments Bowl Vent Choke Vacuum Kick Fast Idle Cam Position Fast Idle Speed (On Vehicle) Idle Speed Adjustment

Page 2 11 13 11 11 12 3

Dashpot Adjustment Cleaning Carburetor Parts Disassembling Carburetor General Information Inspection and Reassembly Specifications

Page 13 2 7 7 10 112


HOLLEY—FUEL SYSTEM 14-7 GENERAL INFORMATION The Holley single throat carburetor models C.A.S. (Cleaner Air System) R-4351A, R-4352A and Taxi application R4355A are used on the 225 Cu. in. engines when the vehicles are equipped with manual or automatic transmissions respectively. (Fig. 1.) The R-4351A is equipped with a dash pot which retards the return of the throttle to idle position. (Manual Transmission Only). The Holley single throat carburetor models E.C.S. (Evaporation Control System) R-4353A, R-4354A and Taxi application R-4363A are also used on the 225 cu. in. engines when the vehicles are equipped with manual or automatic transmissions respectively. (Fig. 2.) These carburetors are equipped with a hot idle compensator valve, which is a thermostatically operated air bleed, to relieve an overrich condition at idle. This condition is the result of excessive heat and resultant overrich mixtures. The R-4353A is equipped with a dash pot which retards the return of the throttle to idle position. (Manual Transmission Only).

The proper adjustment of the dash pot is very important! (See Carburetor Adjustments.)

Fuel from the bowl flows into the four basic fuel metering systems, which are: the idle system, the main metering system, the power enrichment system and the accelerating pump system. The choke valve located in the bore of the carburetor is connected to a well-type automatic choke. Additional fuel for acceleration is supplied by a diaphragm type, spring driven pump. The pump is operated by a lever connected by linkage to the throttle shaft. A two stage power valve mounted in the metering block, actuated by manifold vacuum, delivers the additional fuel necessary for full power and high speed operation. Since the service procedures are identical on all Holley carburetors, the illustrations showing the various disassembly procedures will not always show any one specific carburetor.

SERVICE PROCEDURES DISASSEMBLING CARBURETOR (Figs. 1 or 2)

C-3868, and remove dashpot (if so equipped). (2) Remove vacuum hose between carburetor throttle body fitting and vacuum diaphragm.

(1) Place carburetor assembly on repair stand, Tool CHOKE VACUUM DIAPHRAGM CHOKE VACUUM DIAPHRAGM UNK

BOWL VENT VALVE OPERATING LEVER

CHOKE VALVE

CHOKE VALVE

BOWL VENT VALVE BOWL VENT VALVE FAST IDLE CAM LINK

CHOKE DIAPHRAGM VACUUM HOSE

NEEDLE VALVE, SEAT AND GASKET FUEL BOWL

ACCELERATOR PUMP UNK

THROTTLE LEVER

.

ACCELERATOR PUMP DIAPHRAGM STEM THROTTLE LEVER

IDLE LIMITER CAP (IDLE MIXTURE ADJUSTING SCREW)

ACCELERATOR PUMP LEVER

CLOSED CRANKCASE VENT TUBE FITTING \

DISTRIBUTOR VACUUM ADVANCE TUBE FITTING DASH POT ASSEMBLY (MANUAL TRANSMISSIONS ONLY)

FUEL BOWL FAST IDLE SPEED ADJUSTING SCREW ECONOMIZER COVER

IDLE SPEED ADJUSTING SCREW

AIR CLEANER TO CARBURETOR VACUUM TUBE FITTING

Fig. I — Carburetor Assembly (Holley 1920 Series) C.A.S.

PY387


14-0 FUEL SYSTEM-HOLLEY CHOKE VALVE BOWL VENT VALVE OPERATING LEVER BOWL VENT VALVE PLUNGER STEM

CHOKE VACUUM DIAPHRAGM LINK

ECONOMIZER COVER CHOKE VALVE

CHOKE VACUUM DIAPHRAGM

CHOKE VACUUM DIAPHRAGM

BOWL VENT VALVE TUBE

FAST IDLE CAM LINK

BOWL VENT VALVE TUBE

CHOKE DIAPHRAGM VACUUM HOSE

FAST IDLE CAM

THROTTLE LEVER ECONOMIZER COVER HOT IDLE - COMPENSATOR VALVE COVER CHIC./ .1 _.

,

FUEL BOWL

"9-- CLOSED CRANKCASE VENT TUBE FITTING

FAST IDLE SPEED ADJUSTING SCREW

DISTRIBUTOR VACUUM ADVANCE TUBE FITTING

IDLE SPEED ADJUSTING AIR CLEANER TO SCREW (CURB IDLEI CARBURETOR VACUUM HOT IDLE COMPENSATOR TUBE FITTING

THROTTLE LEVER

IDLE SPEED ADJUSTING SCREW FAST IDLE SPEED (CURB IDLE) ADJUSTING SCREW

AIR CLEANER TO CARBURETOR VALVE COVER VACUUM TUBE FITTING

PY388

Fig. 2—Carburetor Assembly (Holley 1920 Series) E.C.S.

(3) Remove choke vacuum diaphragm, link and bracket assembly. Disengage link from slot in choke lever; place to one side to be cleaned as a special item. (Figs. 1 or 2). As the vacuum diaphragm bracket is being removed, the bowl vent valve rod and spring will fall out. (Fig. 3).

valve and seat. (6) Remove economizer retaining screws, then lift economizer cover, diaphragm and stem out of carburetor, (Flg. 5). (7) Remove fuel bowl attaching screws, then remove fuel bowl, baffle and gasket, (Fig. 6). Slide baffle

(4) Remove screws that attach hot idle compensator valve cover to air horn. Lift off cover, then remove valve and gasket. (Fig, 4.) If so equipped. (5) Using a 5/8" wrench, remove fuel inlet needle 80w1 VENT VALVE

VENT ROD SPRING

BOWL VENT ROD

ECONOMIZER DIAPHRAGM COVER

COVER SCREWS

CHOKE VACUUM DIAPHRAGM TUBE FITTING

HOT IDLE t; COMPENSATOR VALVE LEGS

PY506

NN754 A

Fig. 3—Removing or Installing Bowl Vent Rod

Fig. 4—Removing or Installing Hot idle Compensator Valve (H.I.C.)


HOLLEY-FUEL SYSTEM 149 ECONOMIZER COVER ECONOMIZER DIAPHRAGM

METERING BLOCK

PLATE STEM

PUMP DIAPHRAGM

VACUUM HOLE

GASKET

•POWER JET VALVE LEVER

PY507

Fig. 5—Removing or Installing Economizer

out of bowl. Discard gasket. Remove float damper spring. (8) Using a suitable tool, remove float retaining clip, then slide float off fulcrum pin. (9) Remove screws that attach metering block, then remove metering block (Fig. 7). (10) Tilt pump lever on its pivot until hook on pump diaphragm stem can be released. Slide pump diaphragm and spring out of fuel bowl. (Fig. 8). (11) Using Tool C-3748, remove main jet from metering block. (Fig. 9). (12) Using a suitable tool, remove pump lever retaining clip. Slide lever off pivot and disengage link from throttle lever. (13) Remove fast idle earn retaining screw, then remove cam, and at same time, disengage fast idle cam rod.

BAFFLE

GASKET FUEL BOWL

MAIN JET

BODY SCREWS py509

Fig. 7 —Removing or Installing Metering Mock PUMP DIAPHRAGM

SPRING PUMP DIAPHRAGM STEM NH296A

Fig. 8—Pump Diaphragm and Spring

(14) Remove plastic limiter cap from idle air mixture screw. (Be sure and count number of turns to seat the screw, as the same number of turns (from the seat) must be maintained at installation.) Remove screw and spring from throttle body. Discard plastic cap. (15) Remove fast idle and curb idle speed screws and spring from throttle lever. FLOAT PIVOT

METERING BLOCK VALVE LEVER POWER JET

ECONOMIZER BODY FLOAT BOWL SCREWS PYSOFI

Fig. 6—Removing or Installing Fuel Bowl

MAIN JET NH297C

Fig. 9—Metering Work Assembly


14-10 FUEL SYSTEM—HOLLEY (16) Remove screws that retain bowl vent valve cover to air horn. Remove cover, then lift out valve and spring. (If so equipped.) The carburetor assembly now has been disassembled as far as necessary for cleaning and inspection. It is usually not advisable to remove the throttle shaft and valve from the throttle flange, unless wear or damage necessitates the installation of new parts. INSPECTION AND REASSEMBLY Throttle Shoff and Valve (1) Check throttle shaft for excessive wear in body. If wear is extreme, it is recommended that carburetor assembly be replaced rather than installing a new shaft in old body. During manufacture, the location of the idle transfer port and the spark advance control ports to the throttle valve is carefully established for one particular assembly. If a new shaft should be installed in an old, worn body. it would be very unlikely that the original relationship of the ports to the valve would be obtained. Changing the relationship of the valve to the ports would adversely affect normal car operation between the speeds of 15 and 30 miles per hour. However, if it has been determined that a new shaft or valve is to be installed, adhere to the following instructions: (2) Mark position of throttle valve in bore. (3) Remove screws that hold throttle valve to shaft, then slide valve out of bore. CAUTION: These screws are staked on the opposite side and care should be used at removal so as not to break In the shaft.

(4) Slide throttle shaft out of body. (5) Install new throttle shaft and lever (or new valve). (6) Install NEW screws but do not tighten. Hold valve in place, with fingers pressing on high side of valve. Tap valve lightly with a screwdriver to seat in throttle bore. Now, tighten screws securely and stake by squeezing with pliers. (7) Install idle mixture screw and spring in body. (The tapered portion must be straight and smooth. If tapered portion is grooved or ridged, a new idle mixture screw should be installed to insure having correct idle mixture control.) Do not use a screwdriver. Turn screw lightly against its seat with fingers. Back off number of turns counted at disassembly. Install new plastic cap (blue) with tab against stop. Assembling Carburetor

(1) Loosen choke valve attaching screws slightly. (2) Hold valve closed, with fingers pressing on high side of valve. Tap valve lightly with a screwdriver to

seat in air horn. Tighten attaching screws securely and stake by squeezing with pliers. (3) Test choke valve for binding by rotating lever through extent of its full travel. (4) Install fast idle and curb idle speed screws and springs in throttle lever. (5) Engage pump link hook with throttle lever, then install in pump lever and secure with clip. When installing link, be sure link is in center hole of throttle lever. (6) Slide pump spring (Fig. 8), over pump diaphragm stem. Install assembly in pusition in fuel bowl and at same time, engage hook on diaphragm stem with recess in pump lever. (7) Install main jet in metering block, using Tool C-3748. (Fig. 9). (8) Turn carburetor with bowl opening up then position metering block in carburetor. (Fig. 7). Install screws and tighten securely. (9) Engage choke link with choke lever and fast idle earn. Place cam in position, then install retaining screw. Tighten screw securely. (10) Slide float into position over fulcrum pin and secure with retainer clip. (11) Install fuel inlet needle, seat and new gasket. Tighten seat securely. Install float damper spring. Check float setting as follows: Checking Float Setting

With the carburetor inverted, slide the float gauge C-3903 into position and check the setting on the "touch" leg of the gauge, (Fig. 10). The float should just touch the gauge. Reverse the gauge and check the "No touch" leg. The float should just clear the gauge. If an adjustment is necessary, bend the float tab (which touches the head of the fuel inlet needle) using needle nosed pliers. Do not allow the float tab to contact the float needle head during this operation as the synthetic rubber tip of the needle can be corn,• ,,

FLOAT SPRING

•911 4r

III FLOAT GAUGE

igr i - :". 1s 1111a

lir Sit r, lir

FLOAT

II

A

'4

CARBURETOR t INVERTED

111 " . co of

NI • s

FLOAT TAB

GO , NX668

Fig. to—checking Float Setting


HOLLEY—FUEL SYSTEM 14-11 pressed, giving a false setting. area of float tab with pliers.

Do not touch contact

Recheck float setting as described above after adjustment. (1) Slide economizer diaphragm and stem assembly Into position, making sure vacuum holes are aligned, and that stem is on power valve. (Fig. 5). Install cover and retaining screws. Tighten screws securely. (2) Slide baffle into position in fuel bowl, place fuel bowl gasket on cover. Place fuel bowl in position, install screws and washers and tighten alternately. (Be sure gasket is sealed in recess section of main body. Tighten screws gently so as to compress only lockwashers. (Screws drawn down too tightly could distort fuel bowl and cause a leak.) (3) Install bowl vent valve spring in air horn, followed by valve and cover. Install attaching screws and tighten securely. (If so equipped.) Installing the Choke Vacuum Diaphragm Inspect the diaphragm vacuum fitting to insure that the passage is not plugged with foreign material. Leak check the diaphragm to determine if it has internal leaks. To do this, first depress the diaphragm stem. Then place a finger over the vacuum fitting to seal the opening. Release the diaphragm stem. If the stem moves more than 1/16 inch in 10 seconds, the leakage is excessive and the assembly must be replaced. Install the diaphragm as follows: (1) Slide bowl vent valve rod assembly in position on air horn. Hold rod centered in its grooves, using a finger. (2) Engage choke link in slot in choke lever. (3) Install vacuum diaphragm assembly on air horn, being sure vent rod is in position. Install diaphragm attaching screws and tighten securely. (4) Inspect vacuum diaphragm fitting and remove any dirt or foreign material which could plug vacuum passage. Inspect rubber hose for cracks, before placing it on correct fitting. (Fig. 1). (Install dash pot if so equipped). Do not connect vacuum hose to diaphragm fitting until after vacuum kick adjustment has been made (See Carburetor Adjustments.) (5) Place hot idle compensator valve gasket in position in recess in air horn, followed by valve. (Be sure valve is positioned with legs toward outside of carburetor.) (Fig. 4.) Place cover over opening and install attaching screws. Tighten securely. (If so equipped.)

CARBURETOR ADJUSTMENTS It is very important that the following adjustments be made on a reconditioned carburetor. Fast Idle Speed and Cam Position Adjustment The fast idle engine speed adjustment should be made on the vehicle, as described in "Fast Idle Speed

Adjustment." (On the Vehicle) Paragraph. However, the Fast Idle Cam Position Adjustment can be made on the bench. This adjustment is important to assure that the speeds of each earn step occur at the proper time during engine warm-up. Adjust as follows: (1) With fast idle speed adjusting screw contacting second highest step on fast idle cam (Fig. 11), move choke valve toward closed position with light pressure on choke shaft lever. (2) Insert specified drill between top of choke valve and wall of air horn. (See Specifications at rear of Fuel System Group.) (3) If an adjustment is necessary, bend fast idle link at lower angle, using Tool T-109-213, until correct valve opening has been obtained. (Fig. 11). When the correct fast idle position cam adjustment has been made, the choke unloader (wide open kick) adjustment has also been obtained. No further adjustment is required.

Vacuum Kick Adjustment—(This test can be made ON or OFF vehicle.) The choke diaphragm adjustment controls the fuel delivery while the engine is running. It positions the choke valve within the air horn by action of the linkage between the choke shaft and the diaphragm. The diaphragm must be energized to measure the vacuum kick adjustment. Use either a distributor test machine with a vacuum source or vacuum supplied by another vehicle. Adjust as follows: (1) If adjustment is to be made with engine running, back off fast idle speed screw until choke can be closed to the kick position with engine at curb idle. (Note number of screw turns required so that fast idle can be returned to original adjustment). If an DRILL OR GAUGE FAST IDLE SPEED ADJUSTING SCREW ON SECOND HIGHEST

CHOKE VALVE

CTFI, OP CAM

LIGHT CLOSING • PRESSURE ON CHOKE LEVER BEND FAST IDLE CAM LINK AT THIS ANGLE

FAST IDLE CAM PYS10

Fig, II—Fad idle Cam Position Adjustment


14-12 FUEL SYSTEM—HOLLEY auxiliary vacuum source is to be used, open throttle valve (engine not running) and move choke to closed position. Release throttle first, then release choke. (2) When using an auxiliary vacuum source, disconnect vacuum hose from carburetor and connect it to hose from vacuum supply with a small length of tube to act as a fitting. Removal of hose from diaphragm may require forces which damage the system. Apply a vacuum of 10 or more inches of mercury. (3) insert specified drill (refer to Specifications) between top of choke valve and wall of air horn (Fig. 12). Apply sufficient closing pressure on lever to which choke rod attaches to provide a minimum choke valve opening without distortion of diaphragm link. Note that the cylindrical stem of diaphragm will extend as internal spring is compressed. This spring must be fully compressed for proper measurement of vacuum kick adjustment. (4) An adjustment will be necessary if a slight drag is not obtained as drill is being removed. Shorten or lengthen diaphragm link to obtain correct choke opening. Length changes should be made carefully by bending (open or closing) the bend provided in diaphragm link. CAUTION: DO NOT APPLY TWISTING OR BENDING FORCE TO DIAPHRAGM.

(5) Reinstall vacuum hose on correct carburetor fitting. Return fast idle screw to its original toeslion if disturbed as suggested in Step No. 1 (6) Make following check. With no vacuum applied to diaphragm, the CHOKE VALVE SHOULD MOVE FREELY between open and closed positions. If movement is not free, examine linkage for misalignment or interferences caused by bending operation. Repeat adjustment if necessary to provide proper link operation. '4%bilaiikast

FAST IDLE SPEED ADJUSTING SCREW ON SECOND HIGHEST STEP OF CAM

PY512

Fig. 13—Fast Idle Speed Adjustment (on Vehicle) Idle Speed Adjustment (Curb Idle)

(Refer to General Information at Front of Section). Fast Idle Speed Adjustment (On Vehicle)

Fast idle engine speed is used to overcome cold engine friction, stalls after cold starts and stalls because of carburetor icing. Set this adjustment after the vehicle odometer indicates over 500 miles to insure a normal engine friction level. Prepare engine by driving at least 5 miles. Connect a tachometer and set the curb idle speed and mixture, then proceed as follows: (1) With engine off and transmission in PARK or NEUTRAL position, open throttle slightly. (2) Close choke valve until fast idle screw can be positioned on second highest-speed step of fast idle cam (Fig. 13). (3) Start engine and determine stabilized speed. Turn fast idle speed screw in or out to secure specified speed. (See Specifications.) (4) Stopping engine between adjustments is not nec-

DRILL OR GAUGE

A MINIMUM OF 10 INCHES OF VACUUM REQUIRED

CHOKE VALVE WIDE OPEN

"T" SCALE

CHOKE VALVE

.LIGHT CLOSING PRESSURE ON CHOKE LEVER

TO VACUUM SOURCE DIAPHRAGM STEM RETRACTED BY VACUUM

tilc*.■:' Fig. 12—Checking

MACHINED SURFACE OF CARBURETOR PY511 Choke Vacuum Kick Setting

SURFACE OF FUEL

Fig. 14—Measuring Wet Fuel Level

PY513


BBD—FUEL. SYSTEM 14-13 BOWL VENT VALVE

THROTTLE VALVE FULLY CLOSED

DRILL OR GAUGE THROTTLE LEVER CONTACTING STEM WITHOUT DEPRESSING IT STEM LocKNuT

VALVE SEAT

CARBURETOR BOWL VENT VALVE STEM

BOWL VENT ROD DRILL OR GAUGE

THROTTLE LEVER

•.pY515

Fig. 16—Adjusting Dash Pot

Lace, (Fig. 14). The measurement should be 27/32 inch. If not, adjust float to give proper level.

THROTTLE VALVE FULLY CLOSED

Bowl Vent Adjustment (C.A.S. Carburetors) With throttle valve at curb idle speed, it should be possible to insert a 3/32" (.0937") drill between bowl vent and the seat, (Fig. 15). This measurement should never exceed .125 inch. (1/8" drill).

(E.C.S., CARBURETOR Py51 4

Fig. 15—Checking Bowl Vent Opening

essary. However, reposition fast idle speed screw on cam after each speed adjustment to provide correct throttle closing torque. Before adjusting idle and/or fast idle speeds and mixtures, make sure that basic timing and distributor control valve are correctly adjusted as outlined under Idle Speed Adjustment (Curb Idle). Checking Wet Fuel Level With engine running and car on a level floor, the fuel level can be checked or measured through the economizer diaphragm opening. Using a 6" scale with a depth gauge, measure the distance from the machined surface of the opening to the exact fuel sur-

Bowl Vent Adjustment (E.C.S. Carburetors) With throttle valve at curb idle speed, it should be possible to insert a 1/32 (.030) in. drill or gauge between bowl vent and the seat. (Fig. 15.) If an adjustment is necessary, bend vent rod at horizontal portion until correct clearance has been obtained. Be sure vent rod does not bind in guide after adjusting. Dash pot Setting and Adjustment With the curb idle speed and mixture properly set and a tachometer installed, position the throttle lever so that the actuating tab on the lever is contacting the stem of the dashpot but not depressing it. The tachometer should read 2500 rpm if the setting is correct. To adjust the setting if necessary, screw the dashpot in or out as required. When the desired setting is obtained, tighten the lock nut on the dashpot against the bracket. (Fig. 16). To set the idle speed, refer to the Fuel System General Information Paragraph.


BBD SERIES CARBURETORS (1 ¼") INDEX Automatic Choke (well type) Carburetor Adjustments Accelerator Pump and Bowl Vent Choke Vacuum Kick

Page 2 19 19 20

Fast Idle Cam Position Fast Idle Speed (On Vehicle) Choke Unloader (Wide Open Kick) Idle Speed Adjustment

Page 20 21 21 3


14-14 FUEL SYSTEM—BBD Page Dashpot Adjustment 21 Cleaning Carburetor Parts 2 Disassembling Carburetor 14 GENERAL INFORMATION Ball and Ball dual throat 1-1/4 inch carburetor models C.A.S. (Cleaner Air System) BBD4721S, BED47228 and BBD-4895S are used on the 318 Cu. in. engines when the vehicles are equipped with manual or automatic transmissions respectively. (Fig. 1.) The BBD-4721S is equipped with a dash pot which retards the return of the throttle to idle position. (Manual Transmission Only). BBD-4722S is used on vehicles without air conditioning. BBD-4895S is used on vehicles with air conditioning only and is equipped with a hot idle compensator valve, which is a thermostatically operated air bleed, to relieve an overrich condition at idle. This condition is the result of excessive heat and resultant overrich mixtures. Ball and Ball dual throat 1-1/4 inch carburetor models E.C.S. (Evaporation Control System) BED. 4723S and BBD-47248 are also used on the 318 cu. in.

Page 16 112

Inspection and Reassembly Specifications

engines when the vehicles are equipped with manual and automatic transmissions respectively. (Fig. 2.) Both of these carburetors are equipped with a hot idle compensator valve, which is a thermostatically operated air bleed, to relieve an over rich condition at idle. This condition is the result of excessive heat and resultant overrich mixtures. The BBD-4723S is equipped with a dash pot which retards the return of the throttle to idle position. (Manual Transmission Only). The proper adjustment of the dash pot is very im•

portant! (See carburetor adjustments.) Since the service procedures are identical on all BBD carburetors, the illustrations showing the various disassembly procedures will not always show any one specific carburetor.

SERVICE PROCEDURES C-3225. DISASSEMBLING CARBURETOR (Figs. 1 or 2) (2) Remove hairpin clips and disengage accelerator (1) Place carburetor assembly on repair block Tool pump operating rod. FAST IDLE CONNECTOR ROD CHOKE OPERATING UNK DASH POT (MANUAL TRANSMISSION ONLY)

CHOKE VALVE

ACCELERATOR PUMP ROCKER ARM

CHOKE VACUUM DIAPHRAGM

CHOKE LEVER CHOKE VALVE

DISTRIBUTOR VACUUM ADVANCE TUBE RUING

ACCELERATOR PUMP ROD

ACCELERATOR PUMP ROD

FAST IDLE CONNECTOR ROD

THROTTLE LEVER AIR HORN

BOWL VENT VALVE

CHOKE UNLOADER TANG

FUEL INLET NEEDLE VALVE AND SEAT

FAST IDLE CAM THROTTLE LEVER IDLE SPEED ADJUSTING SCREW (CURB IDLE)

AIR CLEANER TO CARBURETOR VACUUM TUBE FITTING FAST IDLE SPEED ADJUSTING SCREW

FAST IDLE SPEED ADJUSTING SCREW IDLE SPEED ADJUSTING SCREW DASH POT (CURB IDLE) (MANUAL TRANSMISSION PY490 ONLY)

IDLE LIMITER CAP (2) (IDLE MIXTURE ADJUSTING SCREWS)

CHOKE DIAPHRAGM VACUUM TUBE

Fig. 1—Corburetor Assombly (1-1/4 inch 11110) C.A.S.


BBD FUEL SYSTEM 14-15 FAST IDLE CHOKE LEVER CONNECTOR ROD ACCELERATOR PUMP PLUNGER

CHOKE VALVE

CLOSED BOWL VENT VALVE HOUSING

CHOKE OPERATING UNK

FAST IDLE CONNECTOR ROD

CHOKE DIAPHRAGM VACUUM TUBE

DISTRIBUTOR VACUUM ADVANCE TUBE FITTING

CHOKE VALVE CHOKE LEVER

THROTTLE LEVER

"E" CLIP FAST IDLE SPEED ADJUSTING SCREW

WASHER

ACCELERATOR PUMP ROD IDLE SPEED ADJUSTING SCREW ;CURB IDLE) CHOKE DIAPHRAGM VACUUM

THROTTLE LEVER ACCELERATOR PUMP ROCKER ARM IDLE LIMITER CAP (IDLE MIXTURE ADJUSTING SCREW 2)

REPAIR STAND FAST IDLE SPEED ADJUSTING SCREW

FAST IDLE CAM

CHOKE UNLOAUtIt TANG

AIR CLEANER TO CARSUREIOR VACUUM TUBE FITTING

HOT IDLE COMPENSATOR VALVE COVER

AIR CLEANER TO CARBURETOR VACUUM TUBE FITTING

CHOKE DIAPHRAGM VACUUM TUBE

CLOSE CRANKCASE VENT TUBE FITTING

PY491

Fig. 2—Carburetor Assembly (I-1/4 inch MD) E.C.S.

(3) Remove clips and disengage fast idle connector rod from fast idle cam and choke lever. (4) Remove vacuum hose between carburetor main body and choke vacuum diaphragm. (5) Remove clip from choke operating link and disengage link from diaphragm plunger (stem) and choke lever.

(6) Remove choke vacuum diaphragm and bracket assembly and place to one side to be cleaned as a special item. A liquid cleaner may damage diaphragm material.

(7) Remove air horn retaining screws and lift air horn straight up and away from main body, (Fig. 3).

HOT IDLE COMPENSATOR VALVE

PLUNGER SPRING

ACCELERATOR PUMP PLUNGER

FLOAT FULCRUM PIN RETAINER

GASKET

VENTURI CLUSTER COVEI COVER FLOATS t C; STE PUP PISTON

\ or

F Y492

NN694B

Fig. 3—Removing or Installing Air Horn

Fig. 4—Removing or Installing Hot Idle Compensator Valve


14-16 FUEL SYSTEM—BBD Discard gasket. Remove dash pot and bracket (if so equipped). (8) Disengage accelerator pump plunger from rocker arm by pushing up bottom of plunger and sliding plunger shaft off hook. Slide plunger out of air horn and remove bowl vent valve, spring seat and spring. (C.A.S. Carburetors). On E.C.S. Carburetors, remove "E" clip and washer from plunger stem, then slide accelerator pump plunger out of air horn. Remove screws attaching bowl vent housing to air horn. Remove housing, vent valve spring and vent valve. If the old. plunger can be used again, or if a new plunger is to be installed, place plunger in a jar of clean gasoline or kerosene to prevent leather from drying out. (9) Remove fuel inlet needle valve, seat and gasket from main body. (10) Lift out float fulcrum pin retainer, then lift out floats and fulcrum pin. (11) Remove step-up piston retaining screw, and slide step-up piston and rods out of well, (Fig. 5). Now, lift out step-up piston spring. Remove step-up piston gasket from the bottom of well. (12) Remove main metering jets, (rig. 6). (13) Remove venturi cluster screws, then lift venturi cluster and gaskets up and away from main body, (Fig. 7). Discard gaskets. Do not remove the idle orifice tubes or main vent tubes from the cluster. They can be cleaned in a solvent and dried with compressed air. (14) Invert carburetor and drop out accelerator pump discharge and intake check balls. (15) Remove plastic limiter cap from idle air mixture screws. (Be sure and count number of turns to seat the screw, as the same number of turns (from the seat) must be maintained at installation.) Ftemove screws and springs from throttle body. (16) Remove screws that attach throttle body to main body. Separate bodies. (17) Test freeness of choke mechanism in air horn. STEP UP PISTON SPRING (PISTON GASKET AT BOTTOM OF CYLINDERI

SPECIAL TOOL MAIN METERING JET

eL■

MAIN METERING JET NN696B

Fig. 6—Removing or installing Main Metering Jets

The choke shaft must float free to operate correctly. If choke shaft sticks in bearings, or appears to be gummed from deposits in air horn, a thorough cleaning will be required. (18) Remove screws attaching hot idle compensator valve cover to main body. Remove cover, then lift out compensator valve and gasket. (Fig. 4.) (If so equipped.) The carburetor now has been disassembled into three main units, namely, the air horn, main body and throttle body and the component parts of each disassembled as far as necessary for cleaning and inspection. It is usually not advisable to remove the throttle shaft or valves from the throttle body, unless wear or damage necessitates the installation of new parts.

INSPECTION AND REASSEMBLY Throttle Body (1) Check throttle shaft for excessive wear in throttle body. (If wear is extreme, it is recommended that throttle body assembly be replaced rather than installing a new shaft in old body.) VENTURI CLUSTER COVER

GASKET

VENTURI CLUSTER

STEP-UP RODS (2 STAGE) MAIN METERING JETS 121

NN695B

Fig. 5—Removing or Installing Step-up Piston

•PPI PUMP DISCHARGE CHECK BALL

NN697

Fig. 7—Removing or Installing Venturi Cluster


BBD—FUEL SYSTEM 14-17 During manufacture, the location of the idle transfer port and the spark advance control ports to the throttle valve, is carefully established for one particular assembly. (Fig. 8). If a new shaft should be installed in an old, worn throttle body, it would be very unlikely that the original relationship of the ports to the valves would be obtained. Changing the relationship of the valves to the ports would adversely affect normal vehicle operation between the speeds of 15 and 30 miles per hour. However, if it has been determined that a new shaft or valves is to be installed, adhere to the following instruction: (2) Mark position of throttle valves to shaft, then slide valves out of bores. CAUTION: These screws are staked on the opposite side and care should be used at removal so as not to break off in the shaft.

(3) Slide throttle shaft out of throttle body. (4) Slide new throttle shaft into throttle body. (5) Install throttle valves in their respective bores (with valve numbers toward manifold flange). Install new screws but do not tighten. Hold valves in place (idle position) with fingers pressing on high sides of valves. Tap valves with a screwdriver to seat in throttle bores. Tighten screws lightly. Hold up to a strong light to check for a proper position in bore. (They may have to be rotated slightly as the valves are eliptical.) When properly positioned, tighten screws securely and stake, using pliers. (6) Install idle mixture screws and springs in body. (The tapered portion must be straight and smooth. If tapered portion is grooved or ridged, a new idle mixture screw should be installed to insure having correct idle mixture control). DO NOT USE A SCREW DRIVER. Turn screws lightly against their seats with fingers. Back off number of turns counted at disassembly. Install new plastic caps (blue) with tab against stop. Main Body

(1) Invert main body and place insulator in position, then place throttle body on main body and align. Install screws and tighten securely. Pri

IDLE TRANSFER PORTS

ACCELERATOR PUMP INTAKE CHECK BALL AT BOTTOM OF CYLINDER

DISCHARGE CHECK BALL

DISCHARGE PASSAGE

NK683

Fig. 9—Installing Acatierator Pump Discharge

Check Ball (2) Install accelerator pump discharge check ball (5/32 inch diameter) in discharge passage, (Fig. 9). Drop accelerator pump intake check ball (3/16 inch diameter) into bottom of the pump cylinder. To check the accelerator pump system; fuel inlet and discharge check balls, proceed as follows: (3) Pour clean gasoline into carburetor bowl, approximately 1/2 inch deep. Remove pump plunger from jar of gasoline and slide down into pump cylinder. Raise plunger and press lightly on plunger shaft to expel air from pump passage. (4) Using a small clean brass rod, hold discharge check ball down firmly on its seat. Again raise plunger and press downward. No fuel should be emitted from either intake or discharge passage, (Fig. 10). If any fuel does emit from either passage, it indicates the presence of dirt or a damaged check ball or seat. Clean passage again and repeat test. If leakage is still evident, install new check balls. The fuel inlet check ball is located at bottom of the plunger well. Remove fuel from bowl. (5) Install new gaskets on venturi cluster, then install in position in main body. (Fig. 7). Install cluster screws and tighten securely. (6) Before installing step-up piston, be sure step-up rods are able to move freely each side of vertical

ACCELERATOR PUMP PLUNGER

NO FUEL TO BE EMITTED FROM PUMP INLET

SPARK ADVANCE CONTROL PORT NO FUEL TO BE EMITTED PAST BALL

NN69BA

THROTTLE VALVES

Fig. 8—Ports in Relation to Throttle Vafres

Fig. 10—Testing Accelerator Pump Intake and Discharge Check Balls


14-18 FUEL SYSTEM 881:1

STEP-UP PISTON

FUEL INLET NEEDLE VALVE SEAT AND GASKET FLOAT FULCRUM PIN RETAINER

\

STEP-UP RODS MUST MOVE FREELY

CROWN OF FLOATS NK686

Fig. 11—Sterup Piston and 2 Stage Rods

position, (Fig. 11). The step-up rods must be straight and smooth. (7) Slide step-up piston gasket down into position in piston well, then install step-up piston spring and step-up piston and rods. Carefully guide step-up rods into main metering jets. (Fig. 5). Install retaining screw and tighten securely. (8) Install hot idle compensator valve gasket in position in recess in main body, followed by valve. (Be sure valve is positioned with legs toward outside of main body.) (Fig. 4.) Place cover over opening and install attaching screws. Tighten securely. (If so equipped.) A step-up piston stuck in the UP position will cause a rich mixture at part throttle, whereas a piston stuck in the DOWN position will cause a lean mixture at wide open throttle and poor acceleration. Chocking Float Setting

The carburetors are equipped with a synthetic rubber tipped fuel inlet needle. The needle tip is a rubber material which is not affected by gasoline and is stable over a wide range of temperatures. The tip is flexible enough to make a good seal on the needle seat, and to give increased resistance to flooding. The use of the synthetic rubber tipped inlet needle requires that care be used in adjusting the float setting. Care should be taken to perform this accurately in order to secure the best performance and fuel economy. To correctly set the float height, when the carburetor is being overhauled, proceed as follows: (1) Install floats with fulcrum pin and pin retainer in main body. (2) Install needle, seat and gasket in body and tighten securely. (3) Invert main body (catch pump intake check ball) so that weight of floats only, is forcing needle against seat. Hold finger against retainer to fully scat fulcrum pin. (4) Using Tool T-109-282 or a "T" scale, cheek the

NK687A

Fig. 12—Checking Float Setting

float, (Fig. 12). There should be 1/4 inch from surface of fuel bowl to crown of each float at center. If an adjustment is necessary, hold the floats on the bottom of the bowl and bend the float lip toward or away from the needle. Recheck the 1/4 inch setting again then repeat the lip bending operation as required. CAUTION: When bending the float lip, do not allow the lip to push against the needle as the synthetic rubber tip can be compressed sufficiently to cause a false setting which will affect correct level of fuel in the bowl. After being compressed, the tip is

very slow to recover its original shape. It is very important that the float lip be perpendicular to the needle or slanted not more than ten degrees away from the needle when the float is set correctly. Air Horn

(1) Assemble pump plunger, spring and spring seat, (Fig. 13). Slide plunger shaft through opening in air horn. Install bowl vent valve over plunger shaft, then engage with pump rocker arm. (C.A.S. Carburetors.) On E.C.S. carburetors, slide pump plunger spring over plunger stem, then slide plunger up through air horn. Slide bowl vent valve down over plunger stem (with convex side down). Slide valve spring over stem, followed by valve housing. Install attaching screws and tighten securely.

SPRING SEAT

BOWL VENT VALVE CLIP POSITIONS

BOWL VENT VALVE OPERATING CUP

PLUNGER

SPRING NK688

Fig. 13 Ateelerater Pump Anembly


BBD—FUEL SYSTEM 14-19 (2) Place a new gasket on main body, then Install air horn. (Fig. 3). Install attaching screws and tighten securely. (When installing air horn be sure leather on plunger does not fold back.) Install dash pot (if so equipped). (3) Engage fast idle connector rod in choke lever and fast idle cam. Secure with clips. (4) Engage accelerator pump operating rod in proper hole in rocker arm (depending on carburetor) and in center hole in throttle lever. Install clips to secure. Choke Vacuum Diaphragm

Inspect the diaphragm vacuum fitting to insure that the passage is not plugged with foreign material. Leak check the diaphragm to determine if it has internal leaks. To do this, first depress the diaphragm stem, then place a finger over the vacuum fitting to seal the opening. Release the diaphragm stein. If the stem moves more than 1/16 inch in 10 seconds, the leakage is excessive and the assembly must be replaced. Install the diaphragm assembly on the air horn as follows: (1) Assemble to air horn and tighten the attaching screws securely. (2) Install choke operating link in position between diaphragm plunger (stem) and choke lever. Install clip to secure. (3) Inspect rubber hose for cracks before placing it on correct carburetor fitting. (Fig. I). Do not connect vacuum hose to diaphragm fitting until after vacuum kick adjustment has been made. (See Carburetor Adjustments.) (4) Loosen choke valve attaching screws slightly. Hold valve closed, with fingers pressing on high side of valve. Tap valve lightly with a screw driver to seat in air horn. Tighten attaching screws securely and stake by squeezing with pliers.

bowl vent opening instead of measuring and setting the height of the pump plunger. To check or set the adjustment, proceed as follows: (1) Open choke valve so that fast idle cam allows throttle valves to be completely seated in bores. (2) Be sure pump operating rod is in medium stroke hole in throttle lever, and that bowl vent clip on pump stem is in center notch. (3) Close throttle valves tightly. It should be just possible to insert a #69 (.030 ± or — .010") drill between bowl vent and its seat, (Fig. 14). If an adjustment is necessary, bend the pump operating rod, using Tool T-109-213, at lower angle, until the correct bowl vent opening has been obtained. This is an important adjustment, since too much lift at the bowl vent will result in considerable loss in low speed fuel economy. Remember that if the purnp operating rod is moved to either the short or long stroke position, a corresponding change must be made in the location of the bowl vent clip, and the amount of lift of the bowl vent rechecked and adjusted. DRILL OR GAUGE 11111N6, ‘

r

BOWL VENT VENT VALVE

VALVE SEAT

T H;(0171F

CLOSED TOSMON N6996

CARBURETOR ADJUSTMENTS It is very important that the following adjustments be made on a reconditioned carburetor, and in the sequence listed:

THROTTLE IN CLOSED POSITION

Accelerator Pump and Bowl Vent (C.A.S.)

When assembling the accelerator pump to the air horn, note that the hair pin clip (which opens the bowl vent) can be placed in any one of the three positioning notches. These notches correspond to the long, medium and short pump stroke holes in the throttle lever. Normally, the bowl vent clip on the pump stem will be at the middle notch and the pump operating rod in the medium stroke hole. The proper procedure is to adjust the amount of

Fig. NI—Chocking howl Vent Opening


BBD—FUEL SYSTEM 14-21

(6) Make following check. With no vacuum applied to diaphragm, the CHOKE VALVE SHOULD MOVE FREELY between open and closed positions. If movement is not free, examine linkage for misalignment or interferences caused by bending operation. Repeat adjustment if necessary to provide proper link operation. Choke Unloader (Wide Open Kick) The choke unloader is a mechanical device to partially open the choke valve at wide open throttle. It is used to eliminate choke enrichment during cranking of an engine. Engines which have been flooded or stalled by excessive choke enrichment can be cleared by use of the unloader. Adjust the choke unloader as follows: (1) Hold throttle valves in wide open position. Insert specified drill (see Specifications) between upper edge of choke valve and inner wall of air horn. (2) With a finger lightly pressing against valve, a slight drag should be felt as drill is being withdrawn. If an adjustment is necessary, bend unloader tang on throttle lever until correct opening has been obtained. (Fig. 17). Idle Speed Adjustment (Curb idle) (Refer to General Information at Front of Section). Fast Idle Speed Adjustment (On Vehicle) Fast idle engine speed is used to overcome cold engine friction, stalls after cold starts and stalls because of carburetor icing. Set this adjustment after the vehicle odometer indicates over 500 miles to insure a normal engine friction level. Prepare engine by driving at least 5 miles. Connect a tachometer and set f

the curb idle speed and mixture, then proceed as follows: (1) With engine off and transmission in PARK or NEUTRAL position, open throttle slightly. (2) Close choke valve until fast idle screw can be positioned on second highest-speed step of fast idle cam (Fig. 18). (3) Start engine and determine stabilized speed. Turn fast idle speed screw in or out to secure specified speed. (See Specifications.) (4) Stopping engine between adjustments is not necessary. However, reposition fast idle speed screw on cam after each speed adjustment to provide correct throttle closing torque. Before adjusting idle and/or fast idle speeds and mixtures, make sure that the basic timing are correctly adjusted as outlined under Idle Speed Adjustment (Curb Idle). Dash pot Setting and Adjustment Manual Transmission Only With the curb idle speed and mixture properly set and a tachometer installed, position the throttle lever so that the actuating tab on the lever is contacting the stem of the dashpot but not depressing it. The tachometer should read 2000 rpm if the setting is correct. To adjust the setting if necessary, screw the dashpot in or out as required. When the desired setting is obtained, tighten the lock nut on the dashpot against the bracket. To set the idle speed, refer to the Fuel System General Information Paragraph. CHOKE VALVE WIDE OPEN

FAST IDLE SPEED ADJUSTING SCREW ON SECOND HIGHEST STEP ON CAM

CHOKE VALVE THROTTLE IN WIDE OPEN POSITION

DRILL OR GAUGE'

BEND TANG ON THROTTLE LEVER TO ADJUST UNLOADER IFIG. I OR 2/

C

Oinc,

LIGHT CLOSING PRESSURE ON CHOKE LEVER . . IDLE CAM

the Fig. 17—Checking Choke Unloader Setting

PY496

PY497

Fig. 18—Fast idle Speed Adjustment (on Vehicle)


14-22 FUEL SYSTEM-BBD BBD SERIES CARBURETORS (1-1/2") INDEX Page 2 27 27-28 27 27 29

Automatic Choke (well type) Carburetor Adjustments Accelerator Pump and Bowl Vent Choke Vacuum Kick Fast Idle Cam Position Fast Idle Speed (On Vehicle)

Choke Unloader (Wide Open Kick) Idle Speed Adjustment Cleaning Carburetor Parts Disassembling Carburetor Inspection and Reassembly Specifications

Page 28 3 2 23 24 113

GENERAL INFORMATION The Ball and Ball dual throat 1-1/2 inch Carburetor Models C.A.S. (Cleaner Air System) BBD-4725S, BED. 4726S and BBD48948 are used on the 383 Cu. in. Engines when the vehicles are equipped with manual or automatic transmissions respectively. (Fig. 1). BBD47268 is used only on vehicles without air conditioning while BBD-4894S is used only on vehicles with air conditioning. This carburetor is equipped with a hot idle compensator valve, which is a thermostatically operated air bleed, to relieve an overrich condition at idle. This condition is the result of excessive heat and resultant overrich mixtures. These three carburetors are also equipped with a distributor ground switch, which retards the distributor when the carburetor is

at curb idle, for better emission control. The Ball and Ball dual throat 1-1/2 inch carburetor models E.C.S. (Evaporation Control System) BBD47275 and BBD47288 are used on the 383 cu. in. engines when the vehicles are equipped with manual and automatic transmissions respectively. Both of these carburetors are equipped with a hot idle compensator valve which is a thermostatically operated air bleed to relieve an overrich condition at idle. This condition Is the result of excessive heat and resultant overrich mixtures. These two carburetors are also equipped with a distributor ground switch, which retards the distributor when the carburetor is at curb idle, for better emission control.

ACCELERATOR PUMP ROCKER ARM BOWL VENT VALVE

ACCELERATOR PUMP PLUNGER

DISTRIBUTOR GROUND SWITCH TERMINAL CHOKE VALVE

AIR HORN

FAST IDLE CONNECTOR ROD

CHOKE LEVER CHOKE VALVE

CHOKE OPERATING LINK DIAPHRAGM STEM

CURB IDLE SPEED ADJUSTING SCREW CHOKE VACUUM DIAPHRAGM

FUEL INLET NEEDLE, VALVE, SEAT AND GASKET

CHOKE VACUUM HOSE MAIN BODY

FAST IDLE CAM THROTTLE BODY

IDLE LIMITER CAP (2) IIDLE MIXTURE ADJUSTING SCREWS 2)

THROTTLE LEVER

CLOSED CRANKCASE VENT TUBE FITTING

UNLOADER TANG ACCELERATOR PUMP ROD

Fig. I—Carburetor Assembly 011111.1-1/2 inch C.A.S.

IDLE LIMITER CAP (2) (IDLE MIXTURE ADJUSTING SCREWS 2)

DISTRIBUTOR VACUUM ADVANCE TUBE FITTING PY498


BBD—FUEL SYSTEM 14-23

Since the service procedures are identical on all BBD carburetors, the illustrations showing the various disassembly procedures will not always show any one specific carburetor. The Ball and Ball carburetor is of the dual downdraft type. Each throat has its own throttle valve and main metering systems and are supplemented by the float, accelerating, idle and power systems.

On each BBD series carburetor, the model number is stamped on metal tag attached to air horn. Do not remove or destroy this tag, as it is the only means provided for carburetor model identification. Before attempting to repair or overhaul carburetor, refer to model number and secure a repair kit for number indicated on tag.

SERVICE PROCEDURES DISASSEMBLING CARBURETOR (Fig. 1 or 2)

(1) Insert three Tool T109-287S and one Tool T109-288S elevating legs through carburetor throttle body stud holes. (These tools are used to protect throttle valves from damage and to provide a suitable base for working.) (2) Remove hairpin clips and disengage fast idle connector rod from fast idle cam and choke lever. (3) Remove hairpin clip and disengage accelerator rod from throttle lever and pump rocker arm. (4) Remove vacuum hose between carburetor throttle body fitting and vacuum diaphragm. (5) Remove clip from choke operating link and disengage link from diaphragm plunger and choke lever. (Fig. 1 or 2). CHOKE VALVE

(6) Remove vacuum diaphragm and bracket assembly and place to one side, to be cleaned as a special item. A liquid cleaner may damage the diaphragm material.

(7) Remove screws that attach hut idle compensator valve cover to main body. Remove cover and lift out hot idle compensator valve and gasket. (Fig. 3). (8) Remove air horn retaining screws and lift air horn straight up and away from main body. Discard gasket (2 screws recessed). (9) Disengage accelerator pump plunger from accelerator pump arm by pushing up on bottom of plunger and sliding plunger shaft off hook. Slide plunger out of air horn and remove compression spring and seat. Remove bowl vent valve cover. If old plunger can be used again or if a new plung-

BOWL VENT VALVE COVER

FAST IDLE SPEED ADJUSTING SCREW

ACCELERATOR PUMP ROCKER ARM

CHOKE OPERATING LINK

THROTTLE LEVER

BOWL VENT VALVE VENT TUBE FITTING

FAST IDLE CONNECTOR ROD

CHOKE VALVE BOWL VENT VALVE COVER

ACCRERATOR PUMP ARM FAST IDLE CONNECTOR ROD

BOWL VENT VALVE VENT TUBE

DISTRIBUTOR GROUND SWITCH TERMINAL

AIR HORN CHOKE LEVER CURB EDLE SPEED ADJUSTING SCREW AIR CLEANER TO CARBURETOR VACUUM TUBE FITTING

MAIN BODY FUEL INLET NEEDLE, VALVE, SEAT AND GASKET

*trltr°r le IDLE LLWTER CAP ED " IDLE MIXTURE ADJUSTING SCREWS 2)

HOT IDLE COMPENSATOR VALVE COVER

CLOSED CRANKCASE VENT TUBE FITTING

%

CHOKE VACUUM TUBE

DISTRIBUTOR VACUUM ADVANCE TUBE FITTING

CHOKE VACUUM DIAPHRAGM

THROTTLE BODY

FAST IDLE CAM THROTTLE LEVER UNLOADER TANG

ACCELERATOR PUMP ROD

Fig. 2—Carburetor Assembly (810-1-1 /2 Inch) EX.S.

PY499


14-24 FUEL SYSTEM—BBD AIR HORN

GASKET LEG

HOT IDLE COMPENSATOR VALVE PY500

Fig. 3—Removing or Installing Hot Idle Compensator Valve

er is to be Installed, place plunger in a jar of clean gasoline or kerosene to prevent leather from drying out. (10) Remove fuel inlet needle valve, seat and gasket from main body. (11) Lift out float fulcrum pin retainer, and lift out floats and fulcrum pin. (12) Remove step-up piston and retaining screw and slide step-up piston and rods out of well, (Fig. 4). Lift out step-up piston spring. Remove step-up piston gasket from bottom of well.

r

STEP-UP PISTON

STEP-UP RODS

4101.

MAIN METERING JETS

STEP-UP PISTON SPRING (GASKET AT BOTTOM OF WELL) NR379

Fig. 4 —Removing or Installing Step-up Piston

(13) Remove main metering jets (Fig. 5). (14) Remove venturi cluster screws, then lift venturi cluster and gaskets up and away from main body, (Fig. 6). Discard gaskets. Do not remove idle orifice tubes or main vent tubes from cluster. They can be cleaned in a solvent and dried with compressed air. (15) Invert carburetor and drop out accelerator pump discharge check ball and intake check ball. (The intake check ball is the largest.) (16) Remove screws that attach throttle body to main body. Separate the bodies and discard gasket. (17) Remove plastic limiter caps from idle air mixture screws. (Be sure and count number of turns to seat the screws, as the same number of turns (from thc °cat) muot bc maintained at installation.) Remove screws and springs from throttle body. The carburetor now has been disassembled into three sub-assemblies, the air horn, main body and throttle body and the component° of each diaaaaem bled as far as necessary for cleaning and inspection. It is usually not advisable to remove the throttle shaft or valves from the throttle body, unless wear or damage necessitates the installation of new parts. There is about .005 inch clearance between the throttle shaft and the throttle shaft bores in the throttle body. Any clearance over .010 inch, a new throttle shaft and/or throttle body should be installed. INSPECTION AND ASSEMBLY Throttle Body (1) Inspect the throttle shaft and throttle body for excessive wear. If either or both are worn to the point where the carburetor operation will be affected, replace as required. During manufacture, the location of the idle transfer port and the spark advance control ports to the throttle valve, is carefully established for one particular assembly, (Fig. 7). If a new shaft should be installed in an old, worn VENTURI CLUSTER -V.. SCREWS

' VENTURI CLUSTER CAP GASKET

VENTURI CLUSTER SPECIAL TOOL ACCELERATOR PUMP DISCHARGE HOLES

MAIN METERING JETS

NR380A

Fig. 5—Removing or installing Main Metering Jets

ACCELERATOR PUMP DISCHARGE CHECK BALL

GASKET

t

NR381

Fig. 6—Removing or installing Venturi Cluster


BBD—FUEL SYSTEM 14-25 Or

IDLE TRANSFER PORTS "ON_

THROTTLE VALVES I

SPARK ADVANCE PORT

NR392

Fig. 7—Ports in Relation to Throttle Valves

throttle body, it would be very unlikely that the original relationship of the ports to the valves would be obtained. Changing the relationship of the valves to the ports would adversely affect normal car operation between the speeds of 15 and 30 miles per hour. If it has been determined, however, that a new shaft or valves is to be installed, adhere to the following instructions: (2) Mark position of throttle valves in bores. (3) ROLTIOI/C screws that hold throttle valves to shaft and slide valves out of bores. These screws are staked on the opposite side and care should be used at removal so as not to break them off in the shaft.

Remove the staked end of the screws with a file. (4) Slide throttle shaft and lever out of body. (5) Install new throttle shaft and lever. (8) Install throttle valves in their respective bores (with valve numbers toward manifold). Install new screws but do not tighten. Hold valves in place (idle position) with fingers pressing on high sides of valves. Tap valves lightly with a screwdriver to seat in throttle bores. Tighten screws lightly. Hold up to a strong light to check for a proper position in bore. (They may have to be rotated slightly as the valves are eliptical.) When properly positioned tighten screws securely and stake, using pliers. (7) Install idle mixture screws and springs in body. (The tapered portion must be straight and smooth. If tapered portion is grooved or ridged, a new idle mixture screw should be installed to insure having correct ide mixture control.) DO NOT USE A SCREWDRIVER. Turn screws lightly against their seats with fingers. Back off the number of turns counted at disassembly. Install new plastic caps with tab against stop. This screw has a left hand thread. Turn counterclockwise (Richer) and clockwise (Leaner.)

Main Body (1) Invert main body and place a new gasket in position and place throttle body on main body and align. Install screws and tighten securely. (2) Install accelerator pump discharge check ball in discharge passage anti Cheek accelerate? pump system; fuel inlet and discharge check balls as follows:

(3) Pour clean gasoline into carburetor bowl, approximately 1/2 inch deep. Remove pump plunger from jar of gasoline, flex leather several times, then slide down into pump cylinder. Raise plunger and press lightly on plunger shaft to expel all air from pump passage. (4) Using a small clean brass rod, hold discharge check ball down firmly on its seat. Again raise plunger and press downward. No fuel should be emitted from either intake or discharge passage, (Fig. 8). If any fuel does emit from either passage, it indicates the presence of dirt or a damaged check ball seat. Check the passage again and repeat test. If leakage is still evident, install a new check ball. The fuel inlet check ball is located at the bottom of the plunger well. (5) Install new gaskets on venturi cluster, and install in position in main body. Install cluster screws and tighten securely. Test pump discharge by pressing pump plunger down. Two fine streams of fuel should be forced from cluster. If either stream is restricted or diverted, remove cluster and reclean. After test, pour fuel from the bowl and remove pump plunger. (6) Install main metering jets. Tighten securely. (Fig. 5). (7) Before installing step-up piston, be sure step-up rods are able to move freely, each side of the vertical position, (Fig. 9). The step-up rods must be straight, smooth and free to move forward and backward from vertical. (8) Slide step-piston gasket down into position in piston well, then install the step-up piston spring, step-up piston and rods. Carefully guide step-up rods into main metering jets (Fig. 4). Install retaining screw and tighten securely. Check piston for free operation in well. A step-up piston stuck in the Up position will cause s. AC.CHERATOR, PUMP PLUNGER >

NO FUEL TO BE EMITTED PAST PUMP INTAKE CHECK BALL

NR3B3

NO FUEL TO BE EMITTED PAST DISCHARGE CHECK SALL

Pig. 8—fluting Accelerator Pump Intake and Discharge Check ha&


14-26 FUEL SYSTEM—BBD rubber tip can be compressed sufficiently to cause a false setting which will affect correct level of fuel in the bowl. STEP-UP RODS MUST MOVE FREELY

After being compressed, the tip is very slow to recover its original shape. GUIDE SIZE ROAD LOAD STEP INTERMEDIATE POWER !STAGED! MIXTURE STEP

NK617

Fig. 9—Step-up Rods Free Play

a rich mixture at part throttle, whereas a piston stuck in the Down position will cause a lean mixture at wide open throttle and poor acceleration. Measuring Float Setting

The carburetors are equipped with a rubber-tipped fuel inlet needle. The rubber tip is flexible enough to make a good seal on the needle seat, and to give increased resistance to flooding. Care should be taken to perform this operation accurately in order to secure the best performance and fuel economy. (1) To correctly set float height when carburetor is being overhauled, install floats with fulcrum pin and pin retainer in main body. (2) Install rubber-tipped needle, seat and gasket in body and tighten securely. (3) Invert main body so that weight of float only is forcing needle against seat. Hold finger against retainer to fully seat fulcrum pin. (4) Using Tool T-109-280 or a "T" scale, measure float, (Fig. 10). There should be 5/16 inch from surface of fuel bowl to crown of each float at center. If an adjustment is necessary, hold the floats on bottom of the bowl and bend float lip toward or away from needle. Recheck the 5/16 inch setting again and repeat the lip bending operation as required. CAUTION: When bending the float lip, do not allow the lip to push against the needle as the synthetic

FULCRUM PIN RETAINER IN POSITION

fl •

CARBURETOR INVERTED FLOAT GAUGE NR3B4

ONLY WEIGHT OF FLOATS AGAINST INLET Nttlat

Fig. 10—Checking Heat Setting

CAUTION: It is very important that the float lip be perpendicular to the needle or slanted not more than ten degrees away from the needle when the float height is correct.

Air Horn

(1) Test freeness of choke mechanism in air horn. The choke shaft must float free to operate correctly. If choke shaft sticks in bearing areas, or appears to be gummed from deposits in air horn, a thorough cleaning will be required. (2) Remove accelerator pump plunger from gasoline, slide compression spring and spring seat over shaft. Install assembly in air horn and engage with accelerator pump arm. (3) Place a new gasket on main body, and install air horn. install attaching screws and tighten securely. (When installing air horn, be sure leather on plunger does not wrinkle or fold back.) (4) Engage accelerator pump rod with pump rocker arm and install loose end in outer hole of throttle lever. Install hairpin clip to secure (Fig. 1). (5) Engage fast idle connector rod (loop at top) in fast idle cam and in slotted choke lever. Install retaining clips to secure. (6) Install hot idle compensator valve gasket in position in recess in main body, followed by valve. (Be sure valve is positioned with legs toward outside of main body.) (Fig. 3.) Place cover over opening and install attaching screws. Tighten securely. (If so equipped.) Choke Vacuum Diaphragm Inspect the diaphragm vacuum fitting to be sure that the passage is not plugged with foreign material. Leak check the diaphragm to determine if it has internal leaks. To do this, first depress the diaphragm stem, then place a finger over the fitting to seal the opening. Release the stem. If the stem moves more than 1/16 inch in ten (10) seconds, the leakage is excessive and the assembly must be replaced. Install the diaphragm assembly on the air horn as follows: (1) Assemble diaphragm to air horn and tighten attaching screws securely. (2) Install choke operating link in position between diaphragm plunger (stem) and choke lever. Install clip to secure. (3) Inspect rubber hose for cracks before placing it on correct carburetor fitting. (Fig. 1). Do not connect vacuum hose to diaphragm fitting until after vacuum


BBD—FUEL SYSTEM 14-27 kick adjustment has been made. (See Carburetor Adjustments.) (4) Loosen choke valve attaching screws slightly. Hold valve closed, with fingers pressing on high side of valve Tap valve lightly with a screw driver to seat in air horn. Tighten attaching screws securely and stake by squeezing with pliers, CARBURETOR ADJUSTMENTS It is very important that the following adjustments are made on a reconditioned carburetor and in the sequence listed:

Accelerator Pump

(1) Back off idle speed adjusting screw. Open choke valve so that fast idle cant allows throttle valves to be completely seated in bores. Be sure that pump connector rod is installed in outer hole of throttle lever. (2) Close throttle valves tightly. Measure the distance between top of air horn and end of plunger shaft, (Fig. 11). This measurement should be 1.00 inch. (3) To adjust pump travel, bend pump operating rod using Tool T-109-213, at lower angle of rod, until correct setting has been obtained.

Fast Idle Speed and Cam Position Adjustment

The fast idle engine speed adjustment should be made on the vehicle, as described in the Fast Idle Speed Adjustment (On the Vehicle) Paragraph. However, the Fast Idle Cam Position Adjustment can be made on the bench. This adjustment is important to assure that the speeds of each step of the cam occur at the proper time during engine warm-up. (1) With fast idle speed adjusting screw contacting second highest speed step on fast idle cam, move

choke valve toward closed position with light pressure on choke shaft lever. (2) Insert specified drill (see specifications) between choke valve and wall of air horn. An adjustment will be necessary if a slight drag is not obtained as drill is being removed. (3) If an adjustment is necessary, bend fast idle connector rod at lower angle. using Tool T-109-213, until correct valve opening has been obtained_ (Fig. 12.)

Vacuum Kick Adjustment—(This test can be made ON or OFF vehicle.) The choke diaphragm adjustment controls the fuel delivery while the engine is running. It positions the choke valve within the air horn by action of the linkage between the choke shaft and the diaphragm. The diaphragm must be energized to measure the vacuum kick adjustment. Use either a distributor test machine with a vacuum source, or vacuum supplied by another vehicle. (I) If adjustment is to be made with engine running, disconnect fast idle linkage to allow choke to close to the kick position with engine at curb idle. If an amiliary vacuum source is to be used, open throttle valves (engine not running) and move choke to closed position. Release throttle first, then release choke. (2) When using an auxiliary vacuum source, disconnect vacuum hose from carburetor and connect it to hose from vacuum supply with a small length of tube to act as a fitting. Removal of hose from diaphragm may require forces which damage the system. Apply a vacuum of 10 or more inches of mercury. (3) Insert specified drill (refer to Specifications) between choke valve and wall of air horn (Fig. 13). Apply sufficient closing pressure on lever to which choke DRILL OR GAUGE CHOKE VALVE

BEND FAST IDLE CONNECTOR ROD AT ANGLE

FOR ADJUSTMENT, BEND ACCELERATOR PUMP ROD AT ANGLE

BE SURE CURB IDLE SPEED SCREW 15 BACKED OFF PV501

Fig. II—Checking Accelerator Pump Setting

UGHT CLOSING PRESSURE AGAINST CHOKE LEVER

FAST IDLE SPEED ADJUSTING SCREW ON SECOND STEP AND AGAINST FACE OF NEXT STEP OF FAST 10LE CAM PY502

Fig. 12—Fart Me cam Position Adjustment


14-28 FUEL SYSTEM BBD CHOKE LEVER

UGHT CLOSING PRESSURE AGAINST A. CHOKE LEVER

LIGHT CLOSING PRESSURE AGAINST CHOKE LEVER

DRILL OR GAUGE

-

If I

BEND UNLOADER TANG ON THROTTLE LEVER (FIGS. 1 OR 2) 1t

CHOKE VALVE

DRILL OR GAUGE

CHOKE VALVE

CHOKE OPERATING LINK • TO VACUUM SOURCE

DIAPHRAGM STEM RETRACTED

APPLY 10 OR MORE INCHES OF VACUUM ON DIAPHRAGM

PY504

Fig. 14—Checking Choke Unloader Setting PY503

Fig. 13—Checking Choke Vacuum Kick Setting (Wide Open Rick)

rod attaches to provide a minimum choke valve opening without distortion of diaphragm link. Note that the cylindrical stem of diaphragm will extend as internal spring is compressed. This spring must be fully compressed for proper measurement of vacuum kick adjustment (4) An adjustment will be necessary if a slight drag is not obtained as drill is being removed. Shorten or lengthen diaphragm link to obtain correct choke opening. Length changes should be made carefully by bending (open or closing) the bend provided in diaphragm link. CAUTION: DO NOT APPLY TWISTING OR BENDING FORCE TO DIAPHRAGM.

(5) Reinstall vacuum hose on correct carburetor fitting. Return fast idle linkage to its original condition if disturbed as suggested in Step No. 1. (6) Make following check. With no vacuum applied to diaphragm, the CHOKE VALVE SHOULD MOVE FREELY between open and closed positions. If movement is not free, examine linkage for misalignment or interferences caused by bending operation. Repeat adjustment if necessary to provide proper link operation.

Choke Unloader (Wide Open Kick) The choke unloader is a mechanical device to partially open the choke valve at wide open throttle. It is used to eliminate choke enrichment during cranking of an engine. Engines which have been flooded or stalled by excessive choke enrichment can be cleared by use of the unloader. Adjust the choke unloader as follows: (1) Hold throttle valves in wide open position. Insert specified drill (see Specifications) between upper edge of choke valve and inner wall of air horn. (Fig. 14).

(2) With a finger lightly pressing against shaft lever, a slight drag should be felt as drill is being withdrawn. If an adjustment is necessary, bend unloader tang on throttle lever until correct opening has been obtained. (Fig. 15.) Use Tool T109-214. Bowl Vent Adjustment (E.C.S.)

(1) Open choke valve so that fast idle cam allows valves to close, (curb idle). (2) Be sure that pump operating rod is in long stroke hole in throttle lever. Remove bowl vent valve cover if not previously done. (3) Close throttle valves tightly. Using a narrow ruler, measure the distance from top of bowl vent valve (rubber tip) to top of air horn casting. (Fig. 16.) This measurement should be 5/32 inch. (4) If an adjustment is necessary, bend bowl vent

UNLOADER TANG ON THROTTLE LEVER

Fig. 15—Bending Choke Unloader Tong


BBD—FUEL SYSTEM 14-29 BOWL VENT VALVE lIFT ARM

(4) 'With only pressure from buoyant float holding lip against inlet needle, check float setting, using Tool T-109-280, or a "T" scale. There should be 5/16 inch from surface of bowl (gasket removed) to crown of floats at center. If an adjustment is necessary, hold the floats on the bottom of the bowl, then bend the float lip toward or away from the needle. Recheck the 5/16 inch setting again, then repeat the lip bending operation as required. When bending the float lip, do not allow the

SCALE OR RULE TOP EDGE OF AIRHORN CASTING BOWL VENT VALVE TIP VENT VALVE LEAF SPRING

REND SHIFT ARM FOR BOWL VENT ADJUSTMENT (C.A.S.) CARBURETORS

essary precautions to avoid spillage.

j cep, V•

Hp to push against the needle as the rubber tip can be compressed sufficiently to cause a false setting which will affect correct level of fuel in the bowl. After being compressed, the rubber tip is very slow to recover its original shape. It is very important that the float lip be perpendicular to the needle or slanted not more than 10 degrees away from the needle when the float is set correctly. PY5I8

Fig. 16—Measuring Bowl Vent Valve Opening (C.A.S.) (E.C.S.)

lift arm, using a suitable tool, until correct opening has been obtained. (WARNING: DO NOT BEND BOWL VENT VALVE LEAF SPRING DURING BENDING OPERATION OR IMPROPER VENT VALVE OPERATION WILL RESULT.) Install bowl vent valve

cover and secure with attaching screws. (5) On C.A.S. Carburetors, with the throttle valves closed, (curb idle.) there should be 1/16 inch clearance between bowl vent valve and seat on air horn. (Fig. 16). (When measured at outermost or largest dimension with a drill shank.) (8) If an adjustment is necessary, bend vent valve lifter arm until correct clearance has been obtained. Idle Speed Adjustment (Curb Idle) (Refer to General Information at Front of llection). Measuring Float Setting (On Vehicle) (1) Remove hairpin clip and disengage accelerator pump rod from throttle lever and pump rocker arm. Disconnect automatic choke rod by unsnapping clip. (2) Remove air horn attaching screws and lift air horn straight up and away from main body. Remove gasket. (3) Set float fulcrum pin by pressing a finger against fulcrum pin retainer. There should be enough fuel in the bowl to raise floats so that the lip bears firmly against needle. Additional fuel may be admitted by slightly depressing float. If fuel pressure in the line is insufficient to force additional fuel into bowl, add necessary fuel from a clean container. WARNING: Since the manifold may be hot, it Is dangerous to spill fuel onto these surfaces. Take the nec-

(5) After float has been correctly set, reassemble the air horn. Fast Idle Speed Adjustment (On Vehicle) Fast idle engine speed is used to overcome cold engine friction, stalls after cold starts and stalls because of carburetor icing. Set this adjustment after the vehicle odometer indicates over 500 miles to insure a normal engine friction level. Prepare engine by driving at least 5 miles. Connect a tachometer and set the curb idle speed and mixture, then proceed as follows: (1) With engine off and transmission in PARK or NEUTRAL position, open throttle slightly. (2) Close choke valve until fast idle screw can be positioned on second highest-speed step of fast idle cam (Fig. 17). (3) Start engine and determine stabilized speed. Ttim fast. idle speed sorow in nr out to secure specified speed. (See Specifications.) FAST IDLE CAM ■

CHOKE VALVE ••• WIDE OPEN .Ataa'

FAST IDLE SPEED ADJUSTING SCREW ON SECOND HIGHEST STEP OF CAM

PY505

Fig. 17—Fast Idle Speed Adjustment (on Vehicle)


14-30 FUEL SYSTEM-HOLLEY 2200 (4) Stopping engine between adjustments is not necessary. However, reposition fast idle speed screw on cam after each speed adjustment to provide COI"-

rect throttle closing torque. To set the idle speed on vehicles, refer to Fuel Systern General Information Paragraph.


HOLLEY 2200 SERIES CARBURETOR INDEX Page 39 41 41 41 39 41 3

Carburetor Adjustments Accelerator Pump Bowl Vent Choke Unloader (Wide Open Kick) Fast Idle Speed and Cam Position Fast Idle Speed (On Vehicle) Idle Speed

Vacuum Kick Carburetor Systems Cleaning Carburetor Parts Disassembling Carburetor General Information Inspection and Reassembly Specifications

Page 39 30 2 33 30 36 113

GENERAL INFORMATION The Holley dual throat, 2200 series carburetor model C.A.S. (Cleaner Air System) R-4371A, (Fig. 1) is used on the 383 cu. in. engines when the vehicles are equipped with an automatic transmission and without air conditioning only. This carburetor is equipped with a distributor ground switch, which retards the distributor when the carburetor is at curb idle, resulting in better emission control. Each throat of the carburetor has its own throttle

valve and main metering systems and are supplemented by the float, accelerating, idle and power systems.

CARBURETOR SYSTEMS The carburetor utilizes four basic fuel metering systems. The Idle System provides a rich mixture for smooth idle and low speed performance; the AcceleraCHOKE OPERATING LEVER FAST IDLE CONNECTOR ROD

ACCELERATOR PUMP ROCKER ARM ACCELERATOR PUMP ROD BOWL VENT VALVE OPERATING LEVER

FAST IDLE SPEED ADJUSTING SCREW CURB IDLE SPEED ADJUSTING SCREWS CARBURETOR AIR CRANKCASE VENT CLEANER VENT TUBE TUBE FITTING FITTING CHOKE VACUUM DIAPHRAGM

FAST IDLE CAM FAST IDLE CONNECTOR ROD CHOKE VALVE

CHOKE OPERATING LINK CHOKE LEVER DISTRIBUTOR VACUUM ADVANCE—.—■ TUBE FITTING CHOKE VALVE

VENTURI CRANKCASE VENT TUBE FITTING DISTRIBUTOR GROUND SWITCH CONTACT

FAST IDLE SPEED ADJUSTING SCREW ELEVATOR LEGS (d) THROTTLE LEVER

CARBURETOR AIR CLEANER VENT TUBE FITTING CURB IDLE SPEED ADJUSTING SCREW

DISTRIBUTOR GROUND SWITCH CONNECTOR

LONG AIR HORN SCREW BOWL VENT VALVE

BOWL VENT VALVE OPERATING LEVER

ACCELERATOR PUMP SHAFT ACCELERATOR PUMP PLUNGER STEM BOWL VENT VALVE ADJUSTING TANG ACCELERATOR PUMP ROCKER ARM PY834

Fig. 1—Carburetor Assembly (Holley 2210 Series)


HOLLEY 2200—FUEL SYSTEM 14-31 tor Pump System, provides additional fuel during acceleration; the Main Metering System, provides an economical mixture for normal cruising conditions; and the Power Enrichment System, provides a richer mixture when high power output is desired. In addition to these four basic systems, there is a fuel inlet system that constantly supplies the fuel to the basic metering systems, and a choke system which temporarily enriches the mixture to aid in starting and running a cold engine.

IDLE FEED RESTRICTION

IDLE AIR BLEED

TRANSFER SLOT

Fuel Inlet System (Fig. 2)

All fuel enters the fuel bowl through the fuel inlet fitting in the bowl cover. The "Viton" tipped fuel inlet needle seats directly in the fuel inlet seat. The fuel inlet needle is controlled by a nitrophyl float (a cellular buoyant material which cannot collapse or leak) and stainless steel float lever which is hinged by a "Delrin" float fulcrum pin. The fuel inlet system must constantly maintain the specified level of fuel as the basic fuel metering systems are calibrated to deliver the proper mixture only when the fuel is at this level. When the fuel level in the bowl drops, the float also drops permitting addition fuel to flow past the fuel inlet needle into the bowl. A baffle over the needle assists in separating the air bubbles from the fuel to provide a more solid fuel supply in the bowl. The float chamber is vented internally into the air horn. An external vent actuated by the pump lever is opened at curb idle or when the engine is not running to release fuel vapors from the bowl. Idle System (Fig. 3)

Fuel used during curb idle and low speed operation flows through the main metering let into the main well. A horizontal connecting passage permits the fuel to flow from the main well into the idle well. Fuel

IDLE MIXTURE IDLE PORT ADJUSTING NEEDLE PY864

Fig. 3—Idle System

continues up the idle well and through an idle feed restriction into an idle channel where the fuel is mixed with air which enters through idle air bleeds located in the air horn. At curb idle the fuel and air mixture flows down the idle channel and is further mixed or broken up by air entering the idle channel through the transfer slot which is above the throttle valve at curb idle. During low speed operation the throttle valve moves exposing the transfer slot and fuel begins to flow through the transfer slot as well as the idle port. As the throttle valves are opened further and engine speed increases the air flow through the carburetor also increases. This increased air flow creates a vacuum or depression in the venturi and the main metering system begins to discharge fuel. Main Metering System (Fig. 4)

As the engine approaches cruising speed the inMAIN WELL TUBE

HIGH SPEED AIR BLEED

FUEL INLET FITTING

MAIN NOZZLE

FUEL INLET NEEDLE FLOAT DROP TAB

FLOAT

FLOAT ADJUSTING TAB

Fig. 2—Fuel Inlet System

MAIN METERING JET PY863

MAIN WELL

BOOSTER VENTURI

Fig. 4—Main Metering System

PY865


14-32 FUEL SYSTEM—HOLLEY 2200 creased air flow through the venturi creates vacuum (low pressure area) in the venturi of the carburetor. Near atmospheric pressure present in the bowl in the area above the fuel causes the fuel to flow to the lower pressure area created by the venturi and magnified by the booster venturi. Fuel flows through the main jet into the main well: air enters through the main well air bleeds and into the main well through holes in the main well tube. The mixture of fuel and air being lighter than raw fuel responds faster to changes in venturi vacuum and is also more readily vaporized when discharged into the venturi. The main discharge nozzle passage is a part of the booster venturi which is an integral part of the main body casting. Distribution tabs in the main venturi provide further vaporization of the fuel and air mixture. The main metering system is calibrated to deliver a lean mixture for best overall economy. When additional power is required a vacuum operated power system enriches the fuel-air mixture. Power Enrichment System (Fig. 5)

The power enrichment system consists of a power valve installed in the center of the carburetor body between the main jets and a vacuum piston installed in the bowl cover. A vacuum passage leads from the top of the piston down to the manifold flange. When manifold vacuum is high the vacuum piston is raised to the top of its cylinder and the spring on the piston stem is compressed. When manifold vacuum drops to a predetermined level the spring overcomes the vacuum and pushes the piston stem down. The piston stem in turn pushes the power valve stem down opening the power valve and permitting fuel to flow through the power valve through power VACUUM PASSAGE

POWER VALVE PISTON

..2_

POWER VALVE PISTON SPRING 2 STAGE POWER VALVE

POWER VALVE CHANNEL RESTRICTION

Fig. 5—Power Enrichment System

PY866

valve channel restrictions and into the main well on either side of the power valve. Accelerating Pump System (Fig. 6)

When the throttle valves are opened suddenly the air flow through the carburetor responds almost immediately. However, there is a brief time interval or lag before the fuel can overcome its inertia and maintain the desired fuel-air ratio. The piston type accelerating pump system mechanically supplies the fuel necessary to overcome this deficiency for a short period of time. Fuel enters the pump cylinder from the fuel bowl through a slot in the pump well above the normal position of the pump piston. When the engine is turned off, fuel vapors in the pump cylinder are vented through the area between the pump rod and pump plunger. As the throttle lever is moved the pump link operating through a system of levers and a pump override spring pushes the pump piston down. Fuel is forced through a passage around the pump discharge needle valve and out the pump discharge jets which are drilled in the main body. Automatic Choke System (Fig. 7)

The automatic choke provides the richer fuel-air mixture required for starting and operating a cold engine. A bi-metal spring inside the choke housing, which is installed in a well in the intake manifold, holdo the choke valve in the eloped pooition.

When the engine starts, manifold vacuum is applied to the choke diaphragm through a rubber hose from the throttle body to the choke diaphragm assembly. The adjustment of the choke valve opening, when the engine starts and vacuum is applied to the choke diaphragm, is called vacuum kick. PUMP OPERATING LINK

PUMP ASSEMBLY PUMP DISCHARGE RESTRICTION

PUMP ..)\: .)c)• \ OVERRIDE SPRING PUMP CUP

L)

DISCHARGE CHECK NEEDLE

Fig. 6—Accelerating Pump System

PY867


HOLLEY 2200—FUEL SYSTEM 14-33

to the choke housing relaxes the bi-metal spring until it eventually permits the choke to open fully. Distributor Vacuum Advance

P11868 Fig. 7—Automatic Choke System

Manifold vacuum alone is not strong enough to provide the proper degree of choke opening during the entire choking period. The impact of in rushing air past the offset choke valve provides the additional opening force. As the engine warms up manifold heat transmitted

As engine speed increases, the spark timing must be advanced so that the burning in the cylinder may be completed at the proper time to achieve maximum pressure and efficiency. A vacuum spark port located in the throttle bore, just above the closed throttle valve, is connected to the distributor vacuum chamber by a series of passages to a fitting in the carburetor body and a flexible hose. As the throttle is opened, this port is exposed to manifold vacuum which varies with changes in engine speed and load. This changing vacuum is applied to the distributor vacuum diaphragm. The diaphragm, in turn rotates the distributor breaker plate through a connecting rod changing the spark timing to meet engine demands. At curb idle, the curb idle screw contacts the distributor retarding solenoid. This in turn retards the distributor to maximum retard for improved emission control at idle.

SERVICE PROCEDURES DISASSEMBLING CARBURETOR

lift air horn straight up and away from main body. (Long screw in center). USE EXTREME CARE WHEN

(1) Insert three Tool T109-287S and one Tool T109288s elevating legs through carburetor throttle body mounting stud holes. (These tools are used to protect throttle valves from damage and to provide a suitable base for working.) (Fig. 1). (2) Remove nut and washer attaching accelerator pump rocker arm to accelerator pump shaft. Remove arm from flats on pump shaft, then disengage accelerator pump rod from center slot in arm and from hole in throttle lever. (Fig. 2). (3) Remove nut and washer that attaches choke lever to choke shaft. Disengage fast idle connector rod from lever and fast idle cam. (Fig. 3). (4) Remove choke vacuum diaphragm hose from throttle body tube fitting. Remove screws that attach choke diaphragm and mounting bracket to air horn. (5) Remove choke diaphragm and at the same time, disengage choke operating link from slot in choke operating lever. (Fig. 4). Place choke unit to one side to be cleaned as a special item. A liquid cleaner may damage diaphragm material. (6) Remove "E" clip that retains bowl vent valve operating lever on stub shaft of air horn. Slide lever off shaft, being careful not to lose lever spring. (Note position of spring). (Fig. 5). (7) Remove eight air horn attaching screws, then

HANDLING AIR HORN SO AS NOT TO BEND OR DAMAGE MAIN WELL TUBES. (Fig. 6).

(8) Disengage accelerator pump plunger from pump shaft by pushing up on bottom of plunger, then tilting slightly toward center, then slide off pump shaft. Slide plunger stem out of air horn and remove compression spring. (Fig. 7). (9) Slide accelerator pump shaft out of air horn. (Fig. 8). (10) Remove fuel inlet fitting and gasket from air horn. (11) With air horn inverted, remove screw that attaches fuel baffle to air horn. (Fig. 9). (12) Slide nylon float fulcrum pin out of air horn, then remove float. Invert air horn and drop out fuel inlet needle. Using a wide blade screw driver, remove fuel inlet needle valve seat and gasket. (Fig. 10). (13) Remove air horn gasket. (Note: This gasket is a self sealing typz: and will stick to air horn mounting surface. Care should be used at removal so as not to mar or scratch mating surface of air horn. (14) Remove vacuum power piston from air horn, using tool C-4141 (Fig. 11). (This assembly is staked in position and care must be used at removal.) Remove staking using a suitable sharp tool. (15) WARNING: DO NOT ATTEMPT TO REMOVE


14-34 FUEL SYSTEM-HOLLEY 2200 FAST IDLE SPEED ADJUSTING SCREW CURB IDLE SPEED ADJUSTING SCREW

CURB IDLE SPEED ADJUSTING SCREW BOWL VENT VALVE

CHOKE VACUUM DIAPHRAGM THROTTLE VALVES CRANKCASE VENT TUBE FITTING CARBURETOR AIR HORN VENT TUBE FITTING

FAST IDLE CAM FAST IDLE SPEED ADJUSTING SCREW THROTTLE LEVER CHOKE OPERATING LEVER LIMITER CAP (IDLE MIXTURE ADJUSTING SCREW)

ACCELERATOR PUMP ROD

DISTRIBUTOR VACUUM ADVANCE TUBE FITTING CHOKE VACUUM DIAPHRAGM CRANKCASE VENT TUBE FITTING

FUEL INLET FITTING DISTRIBUTOR GROUND SWITCH CONNECTOR

CHOKE VACUUM DIAPHRAGM HOSE

LIMITER CAP (IDLE MIXTURE SCREWS) THROTTLE BODY ATTACHING SCREWS

DISTRIBUTOR VACUUM ADVANCE TUBE FITTING PY83S

CARBURETOR AIR CLEANER VENT TUBE FITTING

Fly. 1—Carburetor Assembly

These tubes are a press fit in air horn, and will be damaged if removed. They can be cleaned in a solvent and blown dry with compressed air. if carburetor parts are cleaned in a basket, be sure other carburetor parts are not striking these tubes. (16) Using Tool TMC-36A, remove main metering jets (Fig. 12). (Number 65 located on throttle lever side of bowl; number 63 on opposite side.)

MAIN WELL TUBES FROM AIR HORN.

ACCELERATOR PUMP ROCKER ARM

CENTER SLOT OF ARM

(17) Using Tool T109-73S, remove power valve assembly (Fig. 13). (18) Invert main body and drop out accelerator pump discharge check needle from discharge passage (Fig. 15). (19) Remove fast idle cam retaining "E" clip, then slide fast idle cam off stub shaft. (Fig. 14). CHOKE VALVE WIDE OPEN

FLATS ON SHAFT

CHOKE LEVER CHOKE LEVER

FLATS ON SHAFT

FAST IDLE CAM ACCELERATOR PUMP ROD THROTTLE LEVER LOCKWASHER

FAST IDLE CONNECTOR ROD

LOCKWASHER NUT EV

PY836

Fig. 2—Removing or Installing Accelerator Pump Rocker Arm

€3w"-NUT

Fig. 3—Removing or Installing Fast Idle Connector Rod

PV837


HOLLEY 2200-FUEL SYSTEM 14-35 AIR HORN GASKET ACCELERATOR PUMP PLUNGER

MAIN WELL TUBES DO NOT BEND

" iiODY

Hg. 4—Removing or Installing Choke Diaphragm

(20) Invert main body and remove throttle body to main body attaching screws. Separate bodies and discard gasket. (21) Turn idle limiter caps to stop. (Top on throttk lever side and bottom of stop on other.) Remove idle limiter caps by prying off with suitable tool. (Be careful not to bend screws.) Be sure and count number of turns to seat the screws, as the same number of turns (from the seat) must be maintained at installation. Remove screws and springs from throttle body. The carburetor now has been disassembled into three sub-assemblies, the air horn, main body, throttle body and the components of each dicassembled as far as necessary for cleaning and inspection. Caution: In normal routine cleaning and overhaul of the carburetor, do not remove throttle valves unless they are nicked or damaged. If necessary to remove, proceed as follows:

VACUUM POWER PISTON STEM

Fig. 6—Removing or Installing Air Horn

ACCELERATOR PUMP SHAFT

ACCELERATOR PUMP PLUNGER STEM P1'24;

Fig. 7—Removing or Installing Accelerator Pump Plunger

11) Remove screws that hold throttle valves in STUB SHAFT

BOWL VENT VALVE OPERATING LEVER

ACCELERATOR PUMP SHAFT FUEL INLET

TUBE FITTING ENDS OF SPRING

BOWL VENT VALVE

SPRING

-r

PYEG9

Fig. 5—Removing or Installing Bowl Vent Valve Operating Lever

S.mAll END OF SPRING

Fig. 8—Removing or Installing Accelerator Pump Shaft

PY842


14-36 FUEL SYSTEM-HOLLEY 2200 SLOTS

FUEL BAFFLE LUGS

SPECIAL TOOL

MAIN WELL TUBES DO NOT REMOVE. SERVICED IN AIR HORN CASTING ONLY

VACUUM POWER PISTON

FULCRUM PIN CENTERED ATTACHING PY843

Fig. 9—Removing or Installing Fuel Baffle throttle shaft. These screws are staked to prevent

loosening and care is necessary to avoid breaking off In shaft. Remove staking with a file. (2) Slide damaged valves out of bores. It should be noted at this time, that the numbered side is on the bottom (or carburetor mounting flange side) and opposite the idle mixture screw ports.

CLEANING CARBURETOR PARTS Refer to General Information Section at front of Fuel System, for cleaning instructions.

PY845

Fig. 11—Removing Vacuum Power Piston

ti I

SPECIAL TOOL

PUMP DISCHARGE CHECK NEEDLE

f

MAIN METERING JET 0463) FLOAT POWER VALVE ADJUSTING TAB (FLOAT DROP)

-4---MAIN METERING JET (=65)

PY846

Fig. 12—Removing or Installing Main Metering Jets

INSPECTION AND REASSEMBLY DO NOT clean any rubber or plastic parts including diaphragms and electrical parts (that may be attached

FLOAT FULCRUM PIN NEEDLE VALVE AND SEAT

SCREWDRIVER

SEAT AND GASKET

FUEL INLET NEEDLE

SPECIAL TOOL

POWER VALVE PY844 PY847

Fig. /0—Removing or Installing Float and Needle Seat

Fig. 13—Removing or Installing Power Valve


HOLLEY 2200—FUEL SYSTEM 14-37

STUB SHAFT

FAST IDLE CAM

4, 4\ STOP LUG

THROTTLE WIDE OPEN PY848

"E- CLIP

Fig. 14—Removing or Installing Fast Idle Cam

to carburetor) in cleaning solvent because of possible damage. Check for cracks, warpage, stripped screw threads, damaged or marred mating surfaces, on all major castings. The passages in the castings should be free of restrictions. Install new castings as required. Check float assembly for damage or any condition that would impair this item from further service. The choke and throttle valves should be replaced if the edges have been nicked or if the protective plating has been removed. Be sure that the choke and throttle shafts are not bent or scored. Replace any broken or distorted springs. Replace all screws and lockwashers that show signs of stripped threads or distortion. Throttle Body lithe throttle valves were removed because of damage, install new valves as follows: (1) Slide new valves into position in throttle shaft, with the valve number on the bottom, (or mounting flange side,) and away from idle air mixture adjusting

screw ports. (2) Install new valve screws but do not tighten. (3) Hold valves in place with fingers. (Fingers pressing on high side of valves.) (4) Tap valve lightly with a screw driver to center in bores. Now, tighten valve attaching screws securely. Operate the throttle shaft. From closed to open position, they must operate smoothly without drag or sticking. Hold throttle body up to a strong light. The light which is visible around the outer diameter of valves in bore should be uniform. Stake screws, using a pair of pliers. (5) Install idle mixture screws and springs in body. (The tapered portion must be straight and smooth. If the tapered portion is grooved or ridged, a new idle mixture screw should be installed to insure having correct idle mixture control.) DO NOT USE A SCREW DRIVER. Turn screws lightly against their seat with fingers. Back off the number of turns (from the seat) counted at disasesmbly. Install new plastic caps with tab against stop. Main Body (1) invert main body and place a new gasket in position. Place throttle body on main body and align. Install attaching screws and tighten securely. (2) Install accelerator pump discharge check needle in discharge passage. (Fig. 15). Check accelerator pump, fuel inlet and discharge systems as follows: (3) Pour clean gasoline into fuel bowl, approximately 1 inch deep. Slide accelerator pump plunger into cylinder. Raise plunger and press down lightly on plunger stern to expell all air from pump passage. (4) Using a small clean brass rod, hold discharge check needle down on its scat. Again raise plunger and press downward. No fuel should be emitted from pump discharge passage. (Fig. 16). If any fuel does emit from discharge passage, it indicates the presence of dirt or a damaged or worn

4,4

CHECK NEEDLE BRASS ROD DISCHARGE PASSAGE

PY849

Fig. 15—installing Accelerator Pump Discharge

Chock Noodle

ACCELERATOR PUMP

NO FUEL SHOULD BE EMITTED FROM PASSAGE OR PARTS

PY850

Fig. 16—Testing Accelerator Pump Discharge Chock Needle


14-38 FUEL SYSTEM-HOLLEY 2200 check needle, or seat. Clean the passage again and retest as above. If leakage is still evident, attempt to form a new seat as follows: (5) With discharge check needle installed, insert a piece of drill rod down on needle. Lightly tap drill rod with a hammer to form a new seat. Remove and discard old needle and install a new one. Retest as described previously. If service fix does not correct the condition, a new main body should be installed. Remove accelerator pump plunger, discharge check needle and fuel from main body. (6) Install power valve, using Tool T109-73S (Fig. 13). Tighten securely. (7) Install main metering jets, using Tool TMC36A (Fig. 12). Tighten securely. (Number 65 on throttle lever side and number 63 on other side of bowl.) (8) Install accelerator pump discharge check needle in pump discharge passage. (Fig. 15). Air Horn

(1) Test freeness of choke mechanism in air horn. The choke shaft must float free to operate correctly. If Choke sticks in bearing bores, or appears to be gummed from deposits in air horn, a thorough cleaning will be required. (2) Install vacuum power piston in its cylinder (Fig. 17). Lock in position by prick punching rim of cylinder (at least three places.) Do not over-stake. Compress piston to be sure no binding exists. If piston sticks or binds enough to hinder smooth operation, a new piston should be installed. (3) Slide accelerator pump plunger compression spring over plunger stem, with small diameter toward plunger. Install pump shaft in air horn. (Fig. 8). (4) As plunger is being installed in air horn, slightly tilt plunger to engage with plunger shaft. (5) Install fuel inlet needle valve seat and gasket in air horn. Tighten securely, using a wide blade

SPECIAL TOOL TO SEAT PISTON RETAINING WASHet

FLOAT STOP AIR HORN INVERTED

DRILL OR GAUGE

PY852

Fig. I 8—Checking Float Setting

screwdriver. Install fuel inlet needle in seat. (Fig. 10). (6) Install float in position, then slide delrin fulcrum pin through float hinge to retain float. Center fulcrum pin. (Fig. 9). (7) Install fuel baffle on bosses with slots engaged lugs. Install attaching screw and tighten securely. (Fig. 9). Measuring Float Setting The carburetors are equipped with a viton tipped fuel inlet needle. The tip is flexible enough to make a good seal on the needle seat, and to give increased resistance to flooding. Care should be taken to perform this operation accurately in order to secure best performance and fuel economy.

(1) To correctly set float height when carburetor is being overhauled, proceed as follows: (2) Invert air horn so that weight of float only is forcing needle against seat. (3) Measure the clearance between top of float and float stop. (Fig. 18). The clearance should be .200 inch ± 1/64 (#7 drill). Be sure drill or gauge is perfectly level when measuring. If an adjustment is necessary, bend float lip toward or away from needle, using a narrow blade screwdriver (Fig. 19), until correct clearance or setting has been obtained. FLOAT

FLOAT RAISED

\\4\> , -4 FLOAT ADJUSTING LIP

PY85I

Fig. 17—Installing Vacuum Power Piston

PY853 Fig. I9—Bending Float Adjusting Lip


HOLLEY 2200—FUEL SYSTEM 14-39 (4) Check float drop, by holding air horn in an upright position. The bottom edge of float should be parallel to underside surface of air horn. (Fig. 201. If an adjustment is necessary, bend tang on float arm until parallel surfaces have been obtained. Installing Air Horn (1) Place a new gasket on air horn, then check to be sure main well tubes are straight. Lower air horn straight down on main body; guiding accelerator pump plunger into its cylinder. Caution: Do not cut lip of plunger on sharp edge of cylinder. Install attaching screws (long screw in center) and tighten securely. (Fig. 6). (2) Install fuel inlet tube fitting and gasket in air horn and tighten securely. (3) Engage hooked end of accelerator pump rod in throttle lever (hook end toward outside). Engage other end of rod in center slot of pump rocker arm. (Fig. 2). (4) Install rocker arm on accelerator pump shaft with flats in alignment. (Fig. 2). Install attaching lockwasher and nut. Tighten securely. (5) Install bowl vent valve lever on air horn, by first inserting spring into position in arm, with end of spring pointing toward fuel inlet fitting. (Fig. 5). Slide assembly over stub shaft on air horn. Align spring and arm with stub shaft and end of spring over raised portion of fuel inlet fitting. Install "E" slip to secure. Vent valve should be in closed position. (6) Install fast idle cam on air horn stub shaft, with steps toward fast idle adjusting screw. Install "E" clip to secure. (Fig. 14). (7) To install fast idle connector rod, engage plain end in slot of fast idle cam (from inside). Engage other end of rod in choke lever. With choke valve wide open, slide lever over choke shaft; (aligning flats) and pointing directly to fast idle cam stub shaft. (Fig. 3). Install attaching lockwasher and nut. Tighten securely. Choke Vacuum Diaphragm Inspect the diaphragm vacuum fitting to be sure AIR HORN

UNDERSIDE SURFACE OF • AIR HORN

FLOAT

BOTTOM

EDGE Or FLOAT

FLOAT SHOULD BE PARALLEL)

Fig. 20—Chocking float Drop

PYB54

that the passage is not plugged with foreign material. Leak check the diaphragm to determine if it has internal leaks. To do this, first depress the diaphragm stem, then place a finger over the fitting to seal the opening. Release the stem. If the stem moves more than 1/16 inch in 10 (ten) seconds- the leakage is excessive and the assembly must be replaced. Install choke diaphragm assembly on the air horn as follows: (1) Engage free end of choke operating link in slot of choke lever. (2) Install choke diaphragm and mounting bracket on air horn. Install attaching screws and tighten securely. (3) Inspect rubber hose for cracks before placing it on correct carburetor fitting, (Fig I) after vacuum kick adjustment has been made. CARBURETOR ADJUSTMENTS It is very important that the following adjustments are made on a reconditioned carburetor and in the sequence listed: Fast Idle Speed and Cam Position Adjustment The fast idle engine speed adjustment should be made on the vehicle, as described in the Fast Idle Speed Adjustment (On Vehicle) paragraph. However, the Fast Idle Cam Position Adjustment can be made on the bench. This adjustment is important to assure that the speeds of each step of the cam occur at the proper time during engine warm-up. Cl) With fast idle speed adjusting screw contacting second highest speed step on the fast idle cam, move choke valve toward closed position with light pressure on choke shaft lever. (2) Insert specified drill (see Specifications) between top of choke valve and wall of air horn. (Fig. 21). An adjustment will be necessary if a slight drag is not obtained as drill shank is being removed. (3) If an adjustment is necessary, bend fast idle connector rod at angle, using Tool T109-213, until correct valve opening has been obtained. Vacuum Kick Adjustment—(This test can be made On or Off vehicle.) The choke diaphragm adjustment controls the fuel delivery while the engine is running. It positions the choke valve within the air horn by action of the linkage betwen the choke shaft and the diaphragm. The diaphragm must be energized to measure the vacuum kick adjustment. Use either a distributor test machine with a vacuum source, or vacuum supplied by another vehicle, (1) If adjustment is to be made with engine running, disconnect fast idle linkage to allow choke to close to the kick position with engine at curb idle. If an


14-40 FUEL SYSTEM-HOLLEY 2200 uGHT CLOSING PRESSURE ON CHOKE LEVER

DRILL OR GAUGE FAST IDLE SPEED ADJUSTING SCREW ON SECOND HIGHEST STEP OF CAM IADJUST SCREW TO OBTAIN FAST IDLE SPEEDS .-- CAM .er,c BEND ROD AT ANGLE FOR ADJUSTMENT Fig.

LIGHT CLOSING PRESSURE ON CHOKE LEVER

BEND TANG ON THROTTLE LEVER TO ADJUST P1857

FAST \ IDLE CAM SCREW P1855

21—Fast Idle Speed and Cam Position Adjustment

auxiliary vacuum source is to be used, open throttle valves (engine not running) and move choke to closed position. Release throttle first, then release choke. (2) When using an auxiliary vacuum source, disconnect vacuum hose from carburetor and connect it to hose from vacuum supply, with a small length of tube to act as a fitting. Removal of hose from diaphragm may require forces which can damage the system. Apply a Vacuum of 10 or more inches of mercury. (3) Insert specified drill (refer to Specifications) between top of choke valve and wall of air horn (Fig. 22). Apply sufficient closing pressure on lever to which choke rod attaches to provide a minimum choke valve opening, without distortion of diaphragm link Note that the cylindrical stem of diaphragm will extend as internal spring is compressed. This spring

Fig. 23—Choke Unload.), Adjustment (Wide Open Kick)

must be fully compressed for proper measurement of vacuum kick adjustment. (4) An adjustment will be necessary if a slight drag is not obtained as drill is being removed. Shorten or lengthen diaphragm link to obtain correct choke opening. Length changes should be made carefully by bending (open or closing) the bend provided in diaphragm link. CAUTION: DO NOT APPLY TWISTING OR BENDING FORCE TO DIAPHRAGM.

(5) Reinstall vacuum hose on correct carburetor fitting. Return fast idle linkage to its original condition if disturbed as suggested in Step No. I. (6) Make following check. With no vacuum applied to diaphragm, the choke valve should move freely between open and closed positions. If movement is not free, examine linkage for misalignment or interferences caused by bending operation. Repeat adjustment if necessary to provide proper link operation. ' ACCELERATOR PUMP PLUNGER STEM

DRILL OR GAUGE MINIMUM OF 10 INCHES OF VACUUM OR DIAPHRAGm (REQUIRED)

TO VACUUM SOURCE

L

LIGHT LOSING PRESSURE ON CHOKE LEVER BEND LINK FOR ADJUSTMENT PY1156

lig. 22—Vacuum Kick Adjustment

ROD IN CENTER SLOT OF BEND ACCELERATOR PUMP ROD FOR ADJUSTMENT

THROTTLE AT FULLY CLOSED POSITION PY858

Fig.

24—Accelerator Pump Adjustment


HOLLEY 2200—FUEL SYSTEM 14-41 DRILL U

CHOKE VALVE WIDE OPEN

THROTTLE AT CURB IDLE

SE T BOWL ENT VALVE

CAM

FAST IDLE SPEED ADJUSTING SCREW ON SECOND HIGHEST STEP OF CAM (ADJUST SCREW TO OBTAIN FAST IDLE SPEED)

(C.A.S. CARBURETOR) FAST IDLE CAM PY959

PY860

Fig. 25—Bowl Vent Adjustment

Fig. 26—Fast idle Speed Adjustment (On Vehicle)

Choke Unloader (Wide Open Kick) The choke unloader is a mechanical device to partially open the choke valve at wide open throttle. It is used to eliminate choke enrichment during cranking of an engine. Engines which have flooded or stalled by excessive choke enrichment can be cleaned by use of the unloader. Adjust the choke unloader as follows: (1) Hold throttle valves in wide open position. Insert specified drill (see Specifications) between upper edge of choke valve and inner wall of air horn. (Fig. 23). (2) With a finger slightly pressing against shaft lever, a slight drag should be felt as drill is being withdrawn. If an adjustment is necessary, bend unloader tang on throttle lever until correct opening has been obtained. (Fig. 23). Use Tool T109-213.

bowl vent valve and seat on air horn when throttle valves are closed. (Fig. 25). (2) If an adjustment is necessary, bend tang on accelerator pump rocker arm, using Tool T109-41, until correct vent valve opening has been obtained.

Accelerator Pump (1) Back off curl, idle speed adjusting screw. Open choke valve so that fast idle cam allows throttle valves to be completely seated in bores. Be sure that pump connector rod is installed in center slot of accelerator pump rocker arm. (2) Close throttle valves tightly. Measure the distance between top of air horn and end of plunger shaft, (Fig. 24). This measurement should be 9/16 inch. (3) To adjust pump travel, bend pump operating rod, using Tool T109-213, at loop of rod, until correct setting has been obtained. Bowl Vent (1) With curb idle speed adjusting screw at curb idle, there should be 5/64 inch clearance between

Idle Speed Adjustment (Curb Idle) (Refer to General Information at Front of Section.) Fast Idle Speed Adjustment (On Vehicle) Fast idle engine speed is used to overcome cold engine friction stalls, after cold starts and stalls because of carburetor icing. Set this adjustment after the vehicle odometer indicates over 500 miles to insure a normal engine friction level. Prepare engine by driving at least 5 miles. Connect a tachometer and set the curb idle speed and mixture, then proceed as follows: (1) With engine off and transmission in PARK or NEUTRAL position, open throttle slightly. (2) Close choke valve until fast idle screw can be positioned on second highest speed step of fast idle cam. (Fig. 26). (3) Start engine and determine stabilized speed. Turn fast idle speed screw in or out to secure specified speed. (See Specifications.) (4) Stopping engine between adjustments is not necessary. However, reposition fast idle speed screw on cam after each speed adjustment to provide correct throttle closing torque. To set idle speed on vehicles, refer to Fuel System General Information Paragraph.


14-42. FUEL SYSTEM—AVS AVS SERIES CARBURETOR INDEX Page 2 48 49 51 50 49 49 48 51

Page Idle Speed 3 Secondary Throttle Lever 50 Secondary Throttle Lockout 50 Cleaning Carburetor Parts 2 Closed Crankcase Vent System (Group 9—Engine) Disassembling Carburetor 44 General Information 42 Inspection and Reassembly 46 Specifications 114

383 Cubic Inch Engine The Carter four barrel carburetor models C.A.S. (Cleaner Air System) AVS-4736S and AVS-4732S are used on the 383 cu. in engines when the vehicles are equipped with automatic transmissions. AVS-4732S is used on vehicles with air conditioning only, and is equipped with a hot idle compensator valve. This valve is a thermostatically operated air bleed, to relieve an overrich condition at idle. This condition is the result of excessive heat and resultant overrich mixtures. (Fig. 2). The Carter four barrel carburetor model E.C.S. (Evaporation Control System) AVS-4734S is used when the vehicle is equipped with an automatic transmission. This carburetor is also equipped with a hot idle compensator valve, as AVS-4732S above. (Fig. 2). All of these carburetors are equipped with a distributor ground switch, which retards the distributor when the carburetor is at curb idle, for better emission control.

er idle speed when the vehicle is running and allows the throttle to close to a low idle speed throttle position when the ignition key is turned off, to prevent "after running." Since the service procedures are identical on all Carter AVS carburetors, the illustrations showing the various disassembly procedures will not always show any one specific carburetor. The throttle valves of the secondary half of the carburetor are mechanically connected to the primary valves and open with the primary after an approximate 60° lag; and continue to open until both primary and secondary throttle valves reach the wide open position simultaneously. As engine speed increases, the forces exerted by the velocity of intake air down through the venturis of the carburetor increases and tends to overcome the air valve spring attached to the air valve, permitting the air valve to position its self according to engine requirements. The AVS (air valve secondary) carburetor contains many features, some of which are the locations for the step-up rods and pistons. The step-up rods, pistons and springs are accessible for service without removing the air horn or the carburetor from the engine. The primary venturi assemblies are replaceable and contain many of the calibration points for both the high and low speed system. One fuel bowl feeds both the primary and secondary nozzles on the right side while the other fuel bowl takes care of the primary and secondary nozzles on the left side. This provides improved performance in cornering, quick stops and acceleration. All the major castings of the carburetor are aluminum, with the throttle body cast integral with the main body. This allows an overall height reduction in the carburetor. The section containing the accelerator pump is termed the primary side of the carburetor. The rear section is the secondary. The five conventional systems used in previous four barrel carburetors are also used in this unit. The five conventional systems are, two float systems, two low speed systems,

Automatic Choke (well type) Carburetor Adjustments Accelerator Pump Air Valve Secondary Bowl Vent Valve Choke Unloader (Wide Open Kick) Choke Vacuum Kick Fast Idle Cam Position Fast Idle Speed (On Vehicle)

GENERAL INFORMATION

440 Cubic Inch Engine The Carter four barrel carburetor models C.A.S. (Cleaner Air System) AVS47375, AVS-4738S and AVS-4741S are used on the 440 cu. in. engines when the vehicles are equipped with a standard or automatic transmission respectively. AVS-4741S is used with air conditioning only and has a hot idle compensator valve, as described previously. (Fig. 2). The Carter four barrel carburetor models E.C.S. (Evaporation Control System) AVS-4739S and AVS4740S are used on the 440 cu. in. engines when the vehicles are equipped with standard or automatic transmissions respectively. These two carburetors are also equipped with a hot idle compensator valve as is AVS4741S above. (Fig. 2). These five AVS carburetors are equipped with a distributor ground switch, which retards the distributor when the carburetor is at idle, for better emission control. The idle speed solenoid which is mounted on these carburetors, (Fig. 21) is used to maintain a high-


AVS-FUEL SYSTEM 14-43

CHOKE VALVE

ACCELERATOR PUMP PLUNGER STEM CLOSED CRANKCASE VENT TUBE F TING ACCELERATOR PUMP ROCKER ACCELERATOR PUMP ARM PLUNGER LINK

CHOKE VALVE ACCELERATOR PUMP ROCKER ARM

MR VALVE STEP UP PISTON COVFR PLATE "21

CHOKE VACUUM DIAPHRAGM

sTEAuP PISTON COVER PLATE 121

BOWL VENT

VALVE ARM CIS-IMMO VACUUM ADVANCE TUBE FITTING

FUEL INLET TUBE FITTING

BOWL VENT VALVE

ACCELERATOR PUMP ROD {CENTER HOW

CHOKE CONTROL LEVER FAST IDLE 1CONNECTOR CHOKE Ari ROD DIAPHRAGM LINK FAST IDLE CAM

CLOSED CRANKCASE VENT TUBE FITTING

ACCELERATOR PUMP ROD CURB IDLE SPEED ADJUSTING SCREW ACCELERATOR PUMP PLUNGER STEAL

CURB IDLE SPEED ADJUSTING SCREW

UNLOADER TANG SECONDARY TIIROTTLE LEVER THEymy

IDLE MIXTURE ADJUSTING 3CROY LIMITER CAr3

ACCELERATOR THROTTLE rUmr ROD 4 BODY FAST IDLE SPEED CONNECTOR LINK DIAPHRAGM IDLE MIXTURE ADJUSTING VACUUM HOSE ADJUSTING SCREW CHOKE SCREW LIMITER CAPS ACCELERATOR PUMP VACUUM DIAPHRAGM PLUNGER STEM DISTRIBUTOR VACUUM ADVANCE TUBE FITTING CARBURETOR ASSEMBLY AvS C.A.S.

CHOKE VALVE

ACCELERATOR PUMP ACCELERATOR PLUNGER LINK PUMP ROCKER ARM

STEP•UP PISTON COVER MATE (2)

AM VALVE BOWL VENT VALVE TUBE FITTING

BOWL VENT VALVE (CHECKING OPENING) PLUG

CHOKE VALVE ACCELERATOR PUMP ROCKER ARM AIR VALVE

FUR INLET TUBE FITTING

FUEL INLET TUBE FITTING

CHOKE LEVER

CURB IDLE SPEED ADJUSTING J SCREW

BOWL VENT VALVE TUBE FITTING CHOKE DIAPHRAGM LINK

THROTTLE LEVER

AIR CLEANER TO CARBURETOR VENT TUBE BOWL VENT VALVE OPERATING LEVER

CURB IDLE SPEED ADJUSTING SCREW FAST IDLE CONNECTOR ROD

CHOKE UNLOADER TANG (BEND TO Al) IIIST

THROTTLE LEVER

/

\

CHOKE CONTROL LEVER

ACCELERATOR PUMP 'ROD

FAST IDLE SPEED ADJUSTING SCREW

THROTTLE LEVER

AIR HORN

\ DISTRIBUTOR VACUUM ADVANCE CHOKE TUBE FITTING VACUUM DIAPHRAGM

DISTRIBUTOR GROUND SWITCH TERMINAL CLOSED CRANKCASE VENT TUBE FITTING

IDLE MIXTURE ADJUSTING SCREW LIMITER CAPS

BOWL VENT VALVE OPERATING LEVER (REND TO ADJUSTI CARBURETOR ASSEMBLY AVS Py726 Fig. 1—Carburotor Assembly


14-44 FUEL SYSTEM—AVS (primary side only) two high speed systems, one accelerator pump system and one automatic choke

control system.

SERVICE PROCEDURES DISASSEMBLING CARBURETOR (Fig. 1) (1) Place carburetor assembly on repair stand Tool C-3400 or T-109-287S elevating legs. These tools are used to protect throttle valves from damage and to provide a suitable base for working. (2) Remove hairpin clip that attaches fast idle connector rod to fast idle cam. Disengage rod from cam then swing rod at an arc until it can be disengaged from choke operating lever. (3) Remove hairpin clip that holds throttle connector rod in center hole of accelerator pump arm. Disengage rod from arm and throttle lever, then remove from carburetor. (4) Remove screws attaching step-up piston and rod cover plates. Hold cover down with a finger to prevent piston and rods from flying out. Lift off plates and slide step-up pistons and rods out of air horn, (Fig. 2). Remove step-up piston springs. (5) Remove vacuum hose between carburetor throttle body and vacuum diaphragm. (6) Remove clip from choke operating link and disengage link from diaphragm plunger (stem) and choke lever. (Fig. 2). (7) Remove vacuum diaphragm and bracket assembly and place to one side to be cleaned as a special item. A liquid cleaner may damage diaphragm material. (81 Remove screws that attach idle solenoid bracket and solenoid to air horn and main body. Remove solenoid assembly from carburetor. (If so equipped.) (9) Remove eight screws that attach air horn to main body. Lift air horn straight up and away from STEP UP PISTON AND METERING ROD STEP VP PISTON SPRING

STEP UP PISTON

STEP UP PISTON SPRING `Ol COVER PIATE

3 STAGE METERING ROD NR!3A

Fig. 2-4tesnaving or installiag Stone Piston and Rods

main body. When removing air horn, use care so as not to bend or damage floats. Remove accelerator pump, plunger lower spring from pump cylinder. (10) Remove hot idle compensator and gasket. (if so equipped). Disassembling Air Horn

Place air horn in an inverted position on bench (to protect the floats) then proceed to disassemble as follows: II) Using a suitable tool, remove float fulcrum pins, (left and right) then lift float up and out of bosses on air horn. It is suggested that the float on the pump side be marked so that floats can be reinstalled in their respective positions. (2) Remove two needle valves from their respective seats, after marking one on pump side for identification. Using a wide blade screw driver, remove needle valve seats. Be SUM each needle valve is returned to its original seat at reassembly. (3) Remove shoulder screw and spring holding accelerator pump rocker arm and bowl vent arm to air horn. (C.A.S.) Remove arms and disengage pump link from pump stem. Slide acelerator pump plunger and spring out of air horn. Remove gasket. (4) Place accelerator pump plunger in a jar of clean gasoline or kerosene, to prevent leather from drying out. (5) Remove fuel inlet fitting and filter screen from air horn. (6) Test freeness of choke mechanism in air horn. The choke shaft must float free to operate correctly. If choke shaft sticks in bearing area, or appears to be gummed from deposits in air horn, a thorough cleaning will be required. Main Body Disassembly

(1) Remove screws that attach accelerator pump jet housing to main body. Lift out jet housing and gasket (Fig. 3). Discard gasket. Now, invert main body and drop out discharge check needle from discharge passage. (2) Using Tool T-109-58, remove main metering jets (primary side), (Fig. 4). The primary and secondary main metering jets are not interchangeable. It Is very Important that these jets be installed in their respite. five locations in the main body at reassembly.

(3) Again using Tool T-109-58, remove main metering jets (secondary side), (Flg. 4). Remove intake check. (4) Remove screws that attach primary venturi (choke and pump sidel to main body. Lift venturi


AVS-FUEL SYSTEM 14-45 ACCELERATOR PUMP JET HOUSING PRIMARY VENTURI CLUSTER (PUMP SIDE?'

DISCHARGE PASSAGt PRIMARY VENTURI CLUSTER [CHOKE SIDE!

INTAKE CHECK BALL ASSEMBLY NR514 Fig. 3—Removing or Installing Accelerator Pump Jet Housing

SPECIAL IOOL

INTAKE CHECK ASSEMBLY ACCELERATOR PUMP WELL

MAIN METERING JET :SECONDARY (2)

la

MAIN METERING JET PRIMARY (2) INTAKE CHECK ASSEMBLY

NR515

Fig. 4—Removing or Installing Main Metering Jets

straight up and away from main body, (Fig. 5). Discard gaskets. The venturi assemblies are not inter. changeable, side for side and must be reinstalled in GASKET

PRIMARY VENTURI ) CLUSTER IPUMP SIDE) PRIMARY VENTURI CLUSTER (CHOKE SIDE)

their original locations at reassembly.

(5) Using Tool T-109-59, screw driver bit, remove accelerator pump intake check valve located inside fuel bowl, adjacent to accelerator pump cylinder. (6) Remove plastic limiter caps from idle air mixture screws. (Be sure and count number of turns to seat the screws (from stop), as the same number of turns (from seat) must be maintained at installation.) Remove screws and springs from throttle body. The carburetor now has been disassembled into two units, namely air horn and the main and throttle body casting. The component parts of each have been disassembled as far as necessary for cleaning and inspection. It is usually not advisable to remove the throttle shafts or valves unless wear or damage necessitates the installation of new parts. During the manufacture of the carburetor, the location of the idle transfer ports and the idle discharge ports to the valve is carefully established for one particular assembly, (Fig. 6). The valves are milled to give proper port relation. If new throttle shafts should be installed in an old worn body, it would be very unlikely that the original relationship of these ports to the valves would be obtained. A very slight change in the port relationship to the valves would adversely affect normal carburetor operation, between the speeds of 15 and 30 miles per hour. lt is recommended that if the throttle shafts are excessively worn, that a new carburetor be installed. However, if the throttle valves have become nicked, burred or damaged, new valves may be installed, providing the following instructions are carefully followed. The screws that attach the throttle valves are staked on the opposite side and care should be used in removal so as not to break the screws in the throttle shaft. Remove the staked portion of the screws with a file.

Remove the screws that attach the primary throttle valves to the throttle shaft and slide valve (or valves) out of bares. Remove the screws that attach the secondary throtSPARK ADVANCE PORT IDLE DISCHARGE PORTS PRIMARY THROTTLE VALVES

ATTACHING SCREWS .

r

NR516 Fig. 5—Removing or Installing Primary Venturi Cluster

SECONDARY THROTTLE VALVES

IDLE TRANSFER PORTS

Fig. 6—Ports in Relation to Throttle Valves

NR5I7


14-46 FUEL SYSTEM—AVS tie valves to the throttle shaft and slide valve (or valves) out of bores. The primary valves and secondary valves are not interchangeable and should be kept separate in order that each may be returned to its respective bore. (Fig. 7).

INSPECTION AND REASSEMBLY (1) Slide primary throttle valve (or valves) into their respective bores, install new screws, but do not tighten. Be sure idle speed adjusting screw is backed out. Hold valves in place with fingers. (Fingers pressing on high side of valves.) (2) Tap valves lightly in this position, tighten screws securely. Stake screws by squeezing with pliers. (3) Install idle mixture screws and springs in throttle body. (The tapered portion must be straight and smooth. If tapered portion is grooved or ridged, a new idle mixture screw should be installed to insure having correct idle mixture control.) DO NOT USE A SCREW DRIVER. Turn screws lightly against their seats with fingers. Back off the number of turns counted at disassembly. Install new plastic caps with tab against stops. This screw has a left hand thread. Turn counterclockwise (Richer) and clockwise (Leaner). (4) Be sure all the metering holes and vent tubes are clean, in the primary venturi. Place new primary

venturi gaskets in position, then install the primary venturi (pump and choke side) by lowering straight down on gaskets. (Fig. 5). Install attaching screws and tighten securely. (5) Install primary and secondary main metering jets, using Tool T-109-58. (Fig. 4.) Tighten jets securely. Install intake check. (6) Install accelerator pump intake check ball using Tool T-109-59. (7) Install hot idle compensator and gasket, (if so equipped). Tighten screws securely. SECONDARY VALVE

PRIMARY VALVE KF946C

Fig. 7 —Throttle Valve Identification

Accelerator Pump Test (1) Pour clean gasoline into carburetor bowl (approximately 1/2 inch deep). Remove accelerator pump plunger from jar of gasoline. Flex leather several times, then slide into pump cylinder. (2) Install accelerator pump discharge check needle in discharge passage. Raise pump plunger and press lightly on plunger shaft to expel air from pump passages. Using a small clean brass rod, hold discharge check needle firmly on its seat. Again raise plunger and press downward. No fuel should be emitted from either the intake or discharge passage. (3) If fuel does emit from intake passage, remove intake check ball and reclean the passage. Fuel leakage at discharge check needle indicates presence of dirt or a damaged check needle. Clean again and then install a new check needle. Retest for leakage. (4) If either intake check assembly or discharge check needle leaks after above test and service fix, attempt to reseat as follows: Intake Check Ball Remove the intake check assembly from the throttle body. Install a new check assembly, then retest as described previously (Fig. 4). Discharge Check Needle (1) With discharge check needle installed, insert a piece of drill rod down on needle. Lightly tap drill rod with a hammer to form a new seat. Remove and discard old needle and install a new one. Retest as described previously. If service fix does not correct the condition, a new carburetor will have to be installed. (2) Install accelerator pump discharge check needle, jet housing and gasket. Install housing and attaching screws. Tighten screws securely. (3) Press down on accelerator pump plunger shaft, and as plunger is being depressed, a clear straight stream should emit from each jet. If streams are not identical, (if either one is diverted or restricted) a new accelerator pump jet housing should be installed. After test, pour gasoline from carburetor bowl and remove pump plunger. Assembling Air Horn (1) Slide fuel inlet screen into fuel line fitting, then install in air horn. Tighten securely. (2) Check to see if leather on accelerator pump plunger is hard, cracked or worn. If any sign of wear or deterioration is evident, install a new plunger assembly. Install pump link. (3) Place pump arm in position over boss of air horn and engage pump link. Install bowl vent arm in position over pump arm. Slide spring over pivot screw and install through arms and boss. Be sure


AVS—FUEL SYSTEM 14-47 shoulder of screw enter arms. Tighten securely. Engage ends of spring with tang on vent arm and pin on air horn. Check for proper operation. (CA S The carburetors are equipped with synthetic rubber tipped fuel inlet needles. The needle tip is a rubber material which is not affected by gasoline and is stable over a wide range of temperatures. The tip is flexible enough to make a good seal on the needle coat, and to give increased recistance to flooding. The use of new inlet needles require that care be used when making float adjustments. Avoid applying any pressure on the floats which might compress the tip of the fuel inlet needles. The tip can be compressed sufficiently to cause a false setting which will affect correct level of fuel in the bowl.

(4) Place a new air born to main body gasket in position on air horn, then install float needle valve seats. (Be sure each needle seat and needle is reinstalled in iLs original position.) (5) Slide right and left floats into position in air horn, then install float fulcrum pins. (Be sure marked

GASEE; IN PLACE

1104/ FLOAT GAUGE

GA US: OUTER END OF FLOAT NRSI? Fig.

9—Checking Float Height

lever should be as parallel as possible to inner surfaces of lugs of casting. Float Level Setting

(6) After floats have been installed, cheek float alignment. level and drop settings as follows:

(1) With air horn inverted, air horn gasket in place and float needle seated, slide float gauge (refer to specifications for carburetor being worked on) between top of the float (at outer end) and air horn gasket. (Fig. 0). Float should just touch gauge (T-1091071. (2) Check other float in same manner. If an adjustment is necessary, bend float arm using Tool T-109-22. until correct clearance has been obtained. After bending arm, recheck the float alignment

Float Alignment Setting

Float Drop Setting

float is installed on pump side of the air horn.) See disassembly procedures.

(1) Sight down side of each float shell to determine If side of the float is parallel to outer cage of air horn casting (Fig. 8). (2) If sides of float are not in alignment with edge of casting, bend float lever by applying pressure to end of float shell with thumb. To avoid damage to the float, apply only enough pressure to bend the float lever. (3) After alining floats, remove as much clearance as possible between arms of float lever and lugs of air horn. To do this, bend float lever. The arms of float THESE SURFACES MUST BE PARALLEL 1 WITH EDGE OF castinin — MINIMUM CLEARANCE WITHOUT BINDING GASKET

A

Float drop is the distance the floats move from the (float level setting position) to the airhorn in upright position. (I) With air horn inverted (upside down) place air horn in upright position and measure the distance floats move from inverted to upright position. This measurement should be 1/2 inch. (Fig. 10). Air horn gasket installed. If an adjustment is necessary, bend stop tabs on float levers until correct drop setting has been obtained. Bend tab toward needle seat to lessen drop, or away from seat to increase drop. (2) After floats have been checked and adjusted, continue to assemble carburetor as follows: (3) Place accelerator pump plunger lower spring in pump cylinder, then lower air horn carefully down on main body. Care must be taken to center Small brass main bleed tubes so that they will pass through holes in air horn without being damaged. Be sure inverted air horn

LEVEL FLOAT POSITION

Bowl. VENT

,c16

I

VALVE

OPERATING /LEVER

BOWL VENT VALVE VALVE SPRING

Fig. 8 —Checking Float Alignment

PY727

1St- NU STOP I AM ACI I 1104

Fig. 10—Checking Float Drop

NR570


14-48 FUEL SYSTEM—AVS the fuel baffles on the air horn, slide down in front, (bowl side) of the float chamber baffles, or the air horn will not index correctly with the main body and can cause the floats to hang up. Be sure the leather on the plunger does not curl or wrinkle. Accelerator pump operation will be affected if this precaution is not observed. Place curb idle solenoid in position on

carburetor. Install attaching screws and tighten securely. (If so equipped.) (4) Install air horn attaching screws and tighten securely. The change from low speed, best fuel economy, road load Mixtures to richer wide open throttle full power mixtures is now accomplished in two steps. This has made it possible to secure best low speed fuel economy without sacrificing performance in the intermediate speed range. To do this, there is a step-up piston, new metering rods with two diameters, and primary metering jets (Fig. 11). (5) Slide step-up piston spring into piston cylinders, followed by step-up pistons and step-up rods. Install cover plates and attaching screws while holding stepup pistons down in position. Tighten screws securely. (6) Check fit of choke valve in air horn. The valve should be evenly spaced on all sides. Loosen screws and reposition if necessary. (7) Engage throttle connector rod with hole in throttle lever. Install other end in accelerator pump rocker arm, (center hole) and install hairpin clip to secure. (8) Engage upper end of fast idle connector rod in slot of choke operating lever. Swing rod in an arc and engage with fast idle cam. Secure with hairpin clip. Installing Vacuum Diaphragm

Inspect the diaphragm vacuum fitting to be sure that the passage is not plugged with foreign material. Leak check the diaphragm to determine if it has internal leaks. To do this, first depress the diaphragm stem, then place a finger over the vacuum fitting to seal the opening. Release the diaphragm stem. If the stem moves more than 1/16 inch in ten (10) seconds, the leakge is excessive and the assembly must be replaced. Install the diaphragm assembly on the carburetor as follows:

(1) Assemble to carburetor and tighten attaching screws securely. (2) Install choke operating link in position between diaphragm plunger (stem) and choke lever. Install clip to secure. Secure choke lever end with spring clip. (3) Inspect rubber hose for cracks, before placing it on correct carburetor fitting. (Fig. 1). Do not connect the vacuum hose to the diaphragm fitting until after the vacuum kick adjustment has been made. (See Carburetor Adjustments.)

CARBURETOR ADJUSTMENTS The following adjustments should be made with the carburetor on the bench for ease of working, and, should be made in the following order: Fast idle Speed Cam Position Adjustment

The fast idle engine speed adjustment should be made on the vehicle, as described in the Fast Idle Speed Adjustment (On Vehicle Paragraph.) However, the Fast Idle Cam Position Adjustment can be made on the bench. This adjustment is important to assure that the speeds of each cam step occur at the proper time during engine warm-up. Adjust as follows: (1) With fast idle speed adjusting screw contacting second highest speed step on fast idle cam, move choke valve toward closed position with light pressure on choke shaft lever. (2) Insert specified drill (refer to Specifications), between choke valve and wall of airhorn (Fig. 12). An adjustment will be necessary if a slight drag is not obtained as the drill is being removed. (3) To adjust, bend fast idle connector rod at angle, using Tool T-109-213 until correct valve opening has been obtained. (Fig. 12.) DRILL OR GAUGE LIGHT CLOSING PRESSURE ON CHOKE LEVER

Sr-

BEND FAST IDLE CONNECTOR ROD AT THIS ANGLE

FAST tDLE r CAM

2 STEPS

SCREW STEP-UP PISTON SPRING

2 STAGE STEP-UP PISTON

JET-NEW TYPE

STEP UP ROD SCREW

NI3171A

Fig. I 1—Step-up Piston, Rod and Jet

NR52IA

FAST IDLE SPEED ADJUSTING SCREW

FAST IDLE SPEED SCREW ON 2ND HIGHEST STEP OF CAM AND RIDING AGAINST FACE OF HIGHEST STEP

Fig. 12—fast idle Cam Position Adjustment


AVS—FU EL SYSTEM 14-49 Vacuum Kick Adjustment—(This test can be made ON or OFF vehicle.) The choke diaphragm adjustment controls the fuel delivery while the engine is running. It positions the choke valve within the airhorn by use of the linkage between the choke shaft and the diaphragm. The diaphragm must be energized to measure the vacuum kick adjustment. Use either a distributor test machine with a VACUUM source, or vacuum supplied by the vehicle. (1) If adjustment is to be made with engine running, disconnect fast idle linkage to allow choke to close to kick position with engine at curb idle. If an auxiliary vacuum source is to be used, open throttle valves (engine not running) and move choke valve to closed position. Release throttle first, then release choke. (2) When using an auxiliary vacuum source, disconnect vacuum hose from carburetor and connect it to hose from vacuum supply with a small length of tube to act as a fitting. Removal of hose from diaphragm may require forces which damage the system. Apply a vacuum of 10 or more inches. (3) Insert specified drill (refer to Specifications) between choke valve and wall of air horn iFig. 13). Apply sufficient closing pressure on lever to which choke rod attaches to provide a minimum choke valve opening without distortion of diaphragm link. Note that on most units, a cylinderical stem extends as an internal spring is compressed. This spring must be fully compressed for proper measurement of vacuum kick adjustment. (4) An adjustment will be necessary if a slight drag is not obtained as drill is being removed. Shorten or lengthen diaphragm link to obtain correct choke opening. Length changes should be made by care„ IOKE VALVE

fully opening or closing the bend provided in diaphragm link. CAUTION: DO NOT APPLY TWISTING OR BENDING FORCE TO DIAPHRAGM. (5) Reinstall vacuum hose on correct carburetor fitting. Return fast idle linkage to its original condition if disturbed as suggested in step no. 1. (6) Make following check. With no vacuum applied to diaphragm. CHOKE VALVE SHOULD MOVE FREELY between open and closed positions. If movement is not free, examine linkage for misalignment or interferences caused by bending operation. Repeat adjustment if necessary to provide proper link operation. Choke Unloader Adjustment The choke unloader is a mechanical device to partially open the choke at wide open throttle. It is used to eliminate choke enrichment during cranking of an engine. Engines which have been flooded or stalled by excessive choke enrichment can be cleared by use of the unloader. Adjust the system as follows: (1) Hold throttle valves in wide open position. Inset/ specified drill (refer to Specifications), between upper edge of choke valve and inner wall of air horn. (Fig. 14). (2) With a finger lightly pressing against choke lever, a slight drag should be felt as drill is being withdrawn. If an adjustment is necessary, bend unloader tang on fast idle cam, using Tool T-109-22, until correct opening has been obtained. (Fig. 14). Accelerator Pump Adjustment Move the choke valve to wide open position, to release the fast idle cam. Back off the idle speed adjusting screw (curb idle) until the throttle valves are seated in the bores. Measure the distance from the top of the air horn to the top of the plunger shaft, using a "T” scale, DRILL OR GAUGE LIGHT CLOSING PRESSURE UP ON CHOKE LEVER

DRILL OR GAUGE

.HOC LEVER SLOT CHOKE LEVER

MINIMUM OF 10 INCHES OF VACUUM ON DIAPHRAGM 1110 IRED TO VACUUM SOURCE BEND UNLOADER TANG FOR CORRECT OPENING

VACUUM CHOKE L/GHT CLOSING tw TUBE FITTING1 PRESSURE ON CHOKE DIAPHRAGM STEM RETRACTED PYP29 LEVER

Fig. 13—Chocking Choke Vacuum Kick Sifting

THROTTLE IN WIDE OPEN POSMON

NR.1-z3.4

Fig. 14—Checking Choke Onloader (Wide Open Kick)


14-50 FUEL SYSTEM—MS

If an adjustment is necessary, bend the shoe on the secondary throttle lever, using Tool T-I09-22, until correct clearance has been obtained.

TOP OT PLUNGER TO TOP OF AIR HORN

BEND ACCELERATOR PUMP RO AT ANGLE

PY 729

CURB IDLE SPEED ADJUSTING SCREW BACKED OFF TO ALLOW THROTTLE CLOSED PY729 VALVES TO FULLY SEAT

Fig. 1.5—Checking Accelerator Pump Adjustment

(Fig. 15). This distance should be 7/16 inch. If an adjustment is necessary, bend the throttle connector rod at the lower angle, using Tool '1-109213, until correct travel has been obtained. Secondary Throttle Lever Adjustment To check the secondary throttle lever adjustment, block the choke valve in the wide open position and invert the carburetor. Slowly open the primary throttle valves until it is possible to measure 21/64 inch between the lower edge of the primary valve and the bore (opposite idle port) (Fig. 16). At this measurement, the secondary valves should just start to open. If an adjustment is necessary, bend the secondary throttle operating rod at the angle, using Tool T-109213, until correct adjustment has been obtained. With primary and secondary throttle valves in tightly closed position, it should be possible to insert Tool T-109-29 (.020") wire gauge, between positive closing shoes on the secondary throttle levers, (Fig. 17). BEND ROD AT THIS ANGLE

-"I

Fit

Secondary Throttle Lock Out Adjustment Crack the throttle valves, then manually open and close the choke valve. The tang on the secondary throttle lever should freely engage in the notch of the lockout dog. (Fig. 16). If an adjustment is necessary, bend the tang on the secondary throttle lever, until engagement has been made. Use Tool T-109-22 for this operation. After adjustments have been made, reinstall carburetor on engine, using a new gasket. It is suggested that the carburetor be filled with clean gasoline. This will help prevent dirt that is trapped in the fuel system, from being dislodged by the free flow of fuel, as the carburetor is primed. Bowl Vent Adjustment (C.A.S.) To check the bowl vent valve adjustment, proceed as follows: (1) With throttle valves tightly closed, insert a 1/8 inch drill between air horn and valve at smallest opening (Fig. 18). (2) If an adjustment is necessary, bend adjusting tang (on pivot end of lever) until correct opening has been obtained. Bowl Vent Adjustment (E.C.S.) To check the bowl vent valve adjustment, proceed as follows: (1) Using Tool T109-43, remove bowl vent valve checking hole plug in air horn. (2) With throttle valves at closed curb idle position, insert a narrow ruler down through hole. Allow

PRIMARY THROTTLE VALVES

SCALE SECONDARY THROTTLE VALVES SHOULD JUST START TO OPEN NOTCH OF LOCKOUT DOG f. TANG ON SECONDARY LEVER

SLOWLY OPEN ,THROTTLE VALVES

CHOKE VALVE WIDE OPEN NR525A

Fig. I6 — Checking Secondary Throttle Adjustment

SECONDARY SHOE .BEND TO ADJUST _ -

PRIMARY SHO DRILL OR GAUGE PY710

Fig. I7 — Checking Clearance Between Closing Shoes


AVS—FU EL SYSTEM 14-51 It

VENT VALVE

SECONDARY AIR VALVE WIDE OPEN

DRILL GAUGE

SEAT ON AIR HORN

THROTTLE VALVES CLOSED NR528A SECONDARY AIR VALVE

SCALE

,a1,51 CLOSED

BOWL VENT VALVE CHECKING OPENING BOWL VENT VALVE OPERATING ROD

-- TURN 2 FULL TURNS FROM WIDE OPEN POSITION

PY732

Fig. 19—Secondary Air Valve Adjustment

BEND LEVER FOR ADJUSTMENT

THROTTLE VALVES CLOSEC TO CURB IDLE PY731

Fig. 18—Bowl Vent Valve Adjustment (C.A.S.—F.C.S.)

ruler to rest lightly on top of valve. The reading should be 3/4 inch from top of valve to top of air horn casting at opening. (Fig. 18). (3) If an adjustment is necessary, bend bowl vent valve operating lever, until correct valve opening has been obtained. (4) Install new plug and rap lightly to seat, using a hammer. Secondary Air Valve Adjustment (1) Loosen lock screw (Fig. 19) and allow air valve to position itself at wide open position. (2) From wide open position, (spring barely moving valve), turn slotted sleeve two full turns counter clockwise, (Fig. 19). (3) llold in this position with finger, then tighten lock screw securely. Check valve for freedom of movement.

Idle Speed Ad justment—(Curb idle) Refer to General Information at Front of Group. Fast Idle Speed Adjustment (On Vehicle) Fast idle engine speed is used to overcome cold engine friction, stalls after cold starts and stalls because of carburetor icing. Set this adjustment after vehicle odometer indicates over 500 miles to insure a normal engine friction level. Prepare engine by driving at least 5 miles. Connect a tachometer and set curb idle speed and mixture, then proceed as follows: (1) With engine off and transmission in PARK or NEUTRAL position open throttle slightly. (2) Close choke valve until fast idle screw can be positioned on the second highest speed step of fast idle cam. (Fig. 20). (3) Start engine and determine stabilized speed. Turn fast idle speed screw in or out to secure specified speed. (Refer to Specifications). (4) Stopping engine between adjustments is not necessary. However, reposition fast idle speed screw on came after each speed adjustment to provide correct throttle closing torque. Before adjusting idle and/or fast idle speeds and


14-52 FUEL SYSTEM-HOLLEY 2300 HOKE VALVE WIDE OPEN

^-

-

FAST IDLE SPEED ADJUSTING SCREW ; ' 1.• ON SECOND HIGHEST STEP OF CAM

FAST CURB IDLE SOLENOID

i /den

7,`

••■

-

TERMINAL

FAST CURB IDLE

DISTRIBUTOR

Fig. 20—Fast idle Speed Adjustment (On Vehicle)

mixtures, make sure that the basic timing and the distributor control valve are correctly adjusted as outlined under Idle Speed Adjustment (Curb Idle). Idle Speed Solenoid Adjustment (If so equipped) To set idle speed solenoid for correct engine r.p.m. proceed as follows: (1) Warm up engine to normal operating temperature, then attach a tachometer. (2) With engine running, turn idle speed solenoid adjusting screw in or out to obtain 900 r.p.m. for

GROUND SOLENOID SWITCH PLUNGER LEAD

THROTTLE LEVER FAST CURB IDLE ADJUSTING SCREW prm,

Fig. 21—Idle Speed Solenoid Adjustment (If so equipped)

manual transmission equipped vehicles and 800 r.p.m. for automatic transmission equipped vehicles. (Mg. 21). (3) After specified r.p.m. as been obtained and with engine still running (to energize solenoid), adjust curb idle speed screw until end of screw just touches stop on carburetor throttle body. Now, back off 1 full turn to obtain slow curb idle speed setting. (Approximately 650 to 700 r.p.m.)


HOLLEY 2300 SERIES CARBURETORS (TRI-CARB) INDEX Assembling Carburetor (Center Unit) Assembling Carburetor (Outboard) Carburetor Adjustments Accelerator Pump Lever Clearance Bowl Vent Valve Clearance Choke Unloader (Wide Open Kick) Fast Idle Cam Position Fast Idle Speed (On Vehicle) Idle Speed (Curb Idle)

Page 61 71 63 63 64 65 65 68

Outboard Carburetor Throttle Rod Qualifying Choke Control Lever Vacuum Kick Cleaning Carburetor Parts Disassembling Carburetor (Center Unit) Disassembling Carburetor (Outboard) General Information Specifications

Page 68 64 68 58 56 71 52 116

GENERAL INFORMATION Three two barrel Holley 2300 and 2300C Series carburetors are mounted on a cast iron intake manifold and are used on the 440 cubic inch engine. C.A.S. Models (Cleaner Air System) R-4375A and R-4376A (Center) are used when the vehicle is equipped with a Standard or Automatic Transmission respectively. E.C.S. Models (Evaporation Control System) R-4374A and R-4144A are used when the vehicle is equipped with Standard or Automatic Transmissions respectively. The two Outboard Carburetors C.A.S. Models (Cleaner Air System) R-4382A and R-4383A are used

with either Standard or Automatic Transmissions. E.C.S. (Evaporation Control System) Models R-4175A and R-4365A are used with either Standard or Automatic Transmission. (Refer to Specifications.) (Fig. 1). The two outboard carburetors contain all the usual systems except choke, power enrichment, accelerating pump, idle, and spark advance. Each carburetor is equipped with a throttle control vacuum diaphragm (Fig. 1). The two outboard carburetors are connected to the center carburetor's slotted throttle lever by two adjustable connector rods. The slotted throttle


HOLLEY 2300—FUEL SYSTEM 14-53 BOWL VENT (E.C.S. ONLY)

CENTER CARBURETOR .‘ f? ' We

REAR OUTBOARD CARBURETOR

FRONT OUTBOARD CARBURETOR SLOTTED ADJUSTER LINK ASSIST SPRING

RETURN SPRING

REAR CONNECTOR ROD

SLO I TED THROTTLE LEVER

FRONT CONNECTOR ROD FAST IDLE SOLENOID

REAR OUTBOARD CARBURETOR

THROTTLE LEVER SPARK ADVANCE TUBE vAcuum DIAPHRAGM FUEL INLET SUPPLY TUBE FUEL INLET

FRONT oula0ARD CARBURETOR THROTTLE CONTROL VACUUM DIAPHRAGM

THROTTLE CONTROL VACUUM DIAPHRAGM

KIEL INLET DISTRIBUTOR VACUUM ADVANCE TUBE

BOWL VENT

CRANKCASE VENT

VACUUM lAptIRAGm SUPPLY TUBE FUEL SUPPLY TUBE

NU942A Fig. 1-6 Barrel Carburetor Installation

lever of the center carburetor allows the throttle valves to open on the outboard carburetors as vacuum requires and close mechanically with the controlling center carburetor (Pig. 1). The center (or controlling carburetor) provides for easier servicing and adjusting (Fig. 1). Each barrel has its own venhui, idle system, main metering system. booster venturi and throttle valve. The carburetor is equipped with a diaphragm type cam operated. accelerating pump, located on the bottom of the fuel bowl. The pump functions when the pump lever is activated by a cam on the throttle lever. An override spring on the pump lever adjusting screw, allows a prolonged discharge of fuel for smooth acceleration. The supply of fuel necessary for high speed or full power operation, is delivered by a fully automatic power enrichment system. Manifold vacuum on the

power valve diaphragm actuates the power enrichment system. The choke used only on the center carburetors (only) is the well type with a thermostatic coil spring. The well is located in the intake manifold and over the exhaust crossover passage. Heat generated in the well acts on the thermostatic coil spring so that as the engine warms up, the choke valve moves toward the open position. There are four major sub-assemblies of the center carburetors and they are: the main body assembly, the fuel bowl, the metering body assembly and the throttle body. Operation (R-4375A, R-4376A, R-4374A and R-4144A)

The carburetor uses the four basic systems re-


14-54 FUEL SYSTEM—HOLLEY 2300

quired for efficient carburetion. These four systems are: The idle system which provides a rich mixture for smooth idle and low speed performance; The accelerating pump system which provides additional fuel during acceleration; The main metering system which provides an economical mixture for normal cruising conditions; and the power enrichment system which provides a richer mixture when high power output is desired. Supplementing the four systems are: The fuel inlet system which constantly supplies fuel to each basic system; and the choke system which temporarily enriches the fuel mixture to aid in starting and running a cold engine. The difference in air pressure (vacuum) within the carburetor provides the force for proper discharge of fuel for the various engine speed and load conditions. Fuel Inlet System All fuel first enters the fuel bowl (Fig. 2) which stores fuel for the four basic metering systems. The fuel enters the fuel bowl through the fuel inlet valve or needle and seat assembly. The amount of fuel entering the fuel bowl is determined by the space between the movable needle and its seat and also by the pressure from the fuel pump. Movement of the needle in relation to the seat is controlled by the float and hinge assembly which rises and falls with the fuel level. As the fuel level drops, the float drops, opening the needle valve to allow fuel to enter the float chamber. When the fuel reaches a specified level, the float moves the needle valve to a position where it restricts the flow of fuel, admitting only enough to replace that being used. Any slight change in the fuel level causes a corresponding movement of the float, opening or closing the fuel inlet needle valve to immediately restore or hold the proper fuel level. The fuel inlet system must constantly maintain the specified level of fuel as the basic fuel metering systems are calibrated to deliver the proper

mixture only when the fuel is at this level. A float spring is incorporated under the float to assist in minimizing float vibration. The float chamber is vented internally by the vent tube at all times. Choke System The choke permits a richer fuel-air mixture required for starting and operating a cold engine. Most of the vaporized fuel condenses to a liquid upon contact with the cold surfaces of intake manifold. In this liquid form it burns too slowly and incompletely in the cylinders and will cause stalling and loss of power. The choke valve is normally closed during the cranking period and partially open during warm up, confining manifold vacuum below the choke valve. This greater vacuum causes both main metering system and idle system to discharge fuel into the manifold (Fig. 3). Accelerating Pump System As the throttle opening is increased, the air flow through the carburetor responds almost immediately. The fuel, however, is heavier than air and there is a brief interval before the fuel flow responds. It is during this interval that the accelerating pump operates, supplying fuel until the other metering systems can provide the proper mixture. The accelerating pump (Fig. 4) is located in the bottom of the fuel bowl. The pump begins to function when the pump operating lever is actuated by throttle movement. When the throttle is opened the pump linkage, actuated by a cam on the throttle shaft lever, forces the pump diaphragm up. As the diaphragm moves up, the pressure forces the pump inlet check ball on its seat preventing fuel from flowCHOKE VALVE

CHOKE VACUUM DIAPHRAGM

CHOKE ROD

FUEL LEVEL LOCK SCREW AND ADJUSTING NUT FLOAT

DIAPHRAGM LINK

FUEL INLET FITTING

THERMOSTATIC COIL SPRING ROD

FUEL INLET VALVE

Fig. 2 —Fuel Inlet System

THERMOSTATIC COIL SPRING NU943

Fig. 3 — Choke System

NU944


HOLLEY 2300—FUEL SYSTEM 14-55

DISCHARGE NOZZLES DISCHARGE PASSAGE

DISCHARGE CHECK NEEDLE

PUMP INLET CHECK BALI.

DIAPHRAGM RETURN SPRING

DIAPHRAGM NU945

Fig. 4—Accelerating Pump System

ing back into the float chamber. The fuel flows from the short horizontal passage in the fuel bowl into the long diagonal passage in the metering body. The fuel passes into the main body and then in the pump discharge chamber. The pressure of the fuel causes the discharge needle to raise and fuel is discharged into the venturi. As the throttle is moved toward the closed position, the linkage returns to its original position and the diaphragm spring forces the diaphragm down. As the diaphragm returns to its original position the pump inlet check ball is moved off its seat and the diaphragm chamber is filled with fuel from the bowl. Main Metering System When the engine is running, it draws air through the carburetor venturi and booster venturi. The air passing through the throat of a venturi, creates a low pressure called a vacuum. The strength of this low pressure is determined primarily by the velocity of the air flowing through throat of the venturi. This, in turn, is regulated by the speed and power output of the engine. The difference, between the pressure in the booster venturi and the normal air pressure in the float chamber, causes fuel to flow through the main metering system (Fig. 5). MAIN WELL AIR BLEED

TO IDLE WELL

MAIN JET

At cruising speed, the fuel flows from the float chamber through the main jet, which measures or meters the fuel flow, into the bottom of the main well. The fuel moves up the main well past the main well air bleed hole in the side of the well. Filtered air, enters through the air bleed in the main body and then into the main metering body by interconnecting passages. This mixture of fuel and air, being lighter than raw fuel, responds faster to any change in venturi vacuum and vaporizes more readily when discharged into the air stream of the venturi. The mixture of fuel and air moves up the main metering passage and passes into the short horizontal passage leading to the main body, then through the horizontal channel of the discharge nozzle. Idle System At idle and tow speeds, the air flow through the carburetor is not sufficiently strong enough to draw fuel through the venturi for the main metering system. Intake manifold vacuum is high because of the greater restriction to the air flow by the nearly closed throttle valves. This high manifold vacuum is used to provide the pressure differential to operate the idle system (Fig. 6). The carburetor utilizes two identical idle systems, one for each bore. Since, the two passages function identically, only one side will be considered in this explanation. At idle, the normal air pressure in the float chamber causes the fuel to flow through the idle system to the greatly reduced pressure area below throttle valve. Fuel flows from the float chamber through the main jet then into the small angular but horizontal passage that leads across to a vertical passage. The fuel flows up this vertical passage, (idle well) past the idle feed restriction and then it is mixed with air coming in from the idle air bleed. This fuel-air mixture flows through a short horizontal passage and then down another vertical passage. At the bottom of this vertical passage the fuel-air mixture branches in two directions, one through the idle dis RESTR(CTION

BOOSTER VENTURI FUEL BOWL

IDLE AIR BLEED

IDLE TRANSFER PASSAGE

DISCHARGE NOZZLE

MAIN WELL

NU731

Fig. 5 —Main Metering System

MAIN JET

IDLE DISCHARGE IDLE DISCHARGE PASSAGE HOLE IDLE TRANSFER SLOT NU729

Fig. 6— Idle System


14-56 FUEL SYSTEM—HOLLEY 2300

charge passage and the other to the idle transfer passage. The fuel in the idle discharge passage flows through a short passage, down another passage in the main body and into the throttle bore below the throttle valve. During off-idle operation when the throttle valve is moved slightly, the fuel flows through the idle transfer passage from the metering body into the throttle body passage. As the idle transfer slot is exposed to manifold vacuum, fuel is discharged into the throttle bore. As the throttle valve is opened still wider and engine speed increases, the air flow through the carburetor is also increased. This creates an increased vacuum in the venturi to bring the main metering system into operation. The flow from the idle system tapers off as the main metering system begins discharging fuel. The two systems are engineered to provide smooth gradual transition from idle to cruising speeds. This fuel is discharged into the booster venturi and then in the air stream of the carburetor venturi. The throttle valve controls the amount of fuel-air mixture admitted to the intake manifold, regulating the speed and power output of the engine in accordance with accelerator pedal movement. Power Enrichment System

During high speed (or low manifold vacuum) the carburetor must provide a mixture richer than is needed when the engine is running at cruising speed under no great power requirements. The added fuel for power operation is supplied by the power enrichment system (Fig. 7). This system is controlled by manifold vacuum which gives an accurate indication of the power demands placed upon the engine. Manifold vacuum is strongest at idle and decreases as the load on the engine increases. As the load on the engine is increased, the throttle valve must be opened wider to maintain a given speed. Manifold vacuum is thus reduced because the opened throttle valve offers less restriction to air entering the intake manifold. A vacuum passage in the throttle body transmits manifold vacuum to the power valve chamber in the main body. The power valve which is located in the main metering body is affected by this manifold

DISCHARGE NOZZLE

POWER VALVE SPRING

MAIN WELL POWER VALVE

POWER ENRICHMENT PASSAGE

NU732

Fig. 7—Power Enrichment System

vacuum. The manifold vacuum, acting on the diaphragm at idle or normal load conditions, is strong enough to hold the diaphragm closed, and overcomes the tension of the power valve spring. When high power demands, place a greater load on the engine and manifold vacuum drops below a predetermined point, the power valve spring overcomes the reduced vacuum opening the power valve. Fuel flows from the float chamber, through the valve and out the small holes in the side of the valve through the diagonal restrictions in the main metering body and then into the main well. Here the fuel joins the fuel flow in the main metering system, enriching the mixture. As engine power demands are reduced, manifold vacuum increases. The increased vacuum acts on the diaphragm, overcoming the tension of the power valve spring. This closes the power valve and shuts off the added supply of fuel which is no longer required. Spark Advance

The carburetor is teamed with the distributor to effect spark timing that will satisfy all engine speed and load conditions. The spark must be advanced as the engine speed is increased since a definite time is required for the fuel-air mixture to burn and reach its maximum pressure at the right time for highest efficiency of the engine cycle. Because the fuel-air mixture induced into the intake manifold at light loads is not as dense as that during high load operation, it burns more slowly, hence the spark under these conditions must also be advanced.

SERVICE PlIOCEDURES DISASSEMBLING CARBURETOR (Center Unit)

To disassemble the carburetor (Figs. 1, 2 or 3) for cleaning or overhaul, proceed as follows: (1) Install four elevating legs Tool T109-287S in mounting flange holes in throttle body, or use Car-

buretor stand C-3886. (These tools are used to protect the throttle valves from damage and to provide a suitable base for working.) (2) Remove screws and seal washers that attach fuel bowl and metering body to main body. Remove fuel bowl (Fig. 4). Discard screw seal washers.


HOLLEY 2300—FUEL SYSTEM OUTBOARD CARBURETOR (FRONT)

LOCK SCREW

BOWL VENT

CENTER CARBURETOR

VALVE CHOKE TC.A.S.ONLY) VALVE IDLER LIMITER CAP

14-57

OUTBOARD CARBURETOR z {REAR} BOWL VENT ROD THROTTLE CONTROL VACUUM DIAPHRAGM

FUEL LEVEL ADJUSTING NUT

CURB IDLE SPEED CURB ADJUSTING SCREW

PUMP OVERIDE SPRING THROTTLE LEVEREVER

THROTTLE LEVER

PULL BACK SPRING THROTTLE CONNECTOR ROD (REAR)

FAST CURB IDLE SPEED ADJUSTTNG SCREW

SOLENOID PLUNGER

FAST CURB mit SPEED SOLENOID

THROTTLE CONNECTOR ROD (FRONT!

ALUMINUM MANIFOLD THREADED SLEEVE

NU94BA

Fig. I —Tr-Carburetor Installation

(3) Remove metering body, then discard gaskets (Fig. 5). (4) Remove screw and washer that retains choke unloader lever to throttle shaft. Slide lever off flats on end of shaft (Fig. 6). (5) Disconnect choke diaphragm hose from throttle body fitting. Remove choke diaphragm attaching screws, then remove choke diaphragm after disengaging link from choke control lever. (6) Remove "E" clip that retains choke control lever and cam. Slide lever and cam off stub shaft, and at the same time, disengage choke rod from bottom hole of lever (Fig. 7). (Note position of fast idle cam in choke control lever). (7) Remove accelerator pump discharge nozzle retaining screw, then lift out discharge nozzle (Fig. 8). Remove nozzle and retaining screw gaskets and discard. Remove vacuum diaphragm hose. (To outboard carburetors.) (8) Invert main body and drop out accelerator pump check needle from discharge passage (Fig. 9). (9) With carburetor inverted, remove five screws that attach throttle body to main body (Fig. 10). Remove throttle body and discard gasket. Disassembling Fuel Bowl (1) Remove screw that retains bowl vent valve,

plate, spring and rod to fuel bowl (Fig. 11). Remove bowl vent valve assembly. (If so equipped). (2) Remove fuel level adjusting nut lock screw, then remove adjusting nut. Slide needle valve and scat out of fuel bowl (Fig. 12). Discard needle seat "0" ring. (3) Remove screws that attach float lever bracket to fuel bowl. Remove float, spring and fulcrum pin from fuel bowl (Fig. 13). (4) Remove sight plug and gasket from bowl. Discard gasket. (5) Using special clutch head screwdriver Tool CL-13, remove screws that attach accelerating pump cover. Remove cover, then carefully remove diaphragm and return spring (Fig. 14). (8) Remove fuel inlet fitting and discard gasket. Disassembling Main Metering Body (1) Using Tool 03747, remove power valve assembly from metering body (Fig. 15). (2) Using Tool C-3748, remove main metering jets (Fig. 16). (3) Using a suitable tool, pry plastic limiter caps off the two idle air mixture screws. Remove screws and gaskets. (Be sure and count the number of turns to seat screws, as the same number of turns from the seat must be maintained at installation) (Fig. 17).


1458 FUEL SYSTEM—HOLLEY 2300 LOCK SCREW

BOWL VENT VALVE OPERATING ROD

IDLE WAITER ADJUSTING SCREW CAP (21

FUEL. BOWL ATTACHING SCREW AND SEAL WASHERS FUEL LEVEL ADJUSTING NUT

THROTTLE LEVER

BOWL VENT VALVE (CAS. ONLY)

ACCELERATING PUMP ADJUSTING SCREW

FAST CURB IDLE ADJUSTING SCREW ACCELERATING PUMP LEVER

CHOKE VALVE LOCK SCREW THROTTLE LEVER

ADJuSUNG NUT FUEL

sown.

FUEL INLET FUEL LEVEL SIGHT PLUG MAIN BODY

CHOKE DIAPHRAGM CHOKE ROD

CURB IDLE SPEED ADJUSTING SCREW

HOKE LINK

THROTTLE BODY

fast

FAST IDLE CAM

CAA+ ELEVATING LEGS

IDLE

Lev& NUSIS6A

Fig. 2—Carburetor Assembly (Center Unit) there are other commercial solvents, (such as MetalDisassembling Throttle Body clene) which may be used with satisfactory reCaution: In normal routine cleaning and overhaul sults. of the carburetor, do not remove throttle valves unThe choke diaphragm can be damaged by solvents. less they are nicked or damaged. If necessary to Avoid placing the diaphragm assembly in ANY liqremove, proceed as follows: uid. Clean the external surfaces with a clean cloth or (1) Remove screws that hold throttle valves to soft wire brush. Shake dirt or other foreign material throttle shaft. These screws are staked to prevent from the stem side of the diaphragm. Depressing the loosening and care is necessary to avoid breaking off diaphragm stem to retracted position, will provide an in shaft. Remove staking with a file. additional hole for the removal of dirt. Compressed (2) Slide damaged throttle valves out of bores. It air can be used to remove loose dirt, but should not should be noted at this time, that the numbered side be connected to the vacuum inlet fitting. is on the bottom (or carburetor mounting flange side) IMPORTANT: If the commercial solvent or cleaner and opposite the vacuum port. recommends the use of water as a rinse, it should CLEANING CARBURETOR PARTS be "HOT". After rinsing, all trace of water must be blown from the passages with air pressure. It is furThe recommended solvent for gum deposits is dether advisable to rinse all parts in clean gasoline or natured alcohol which is easily obtainable. However,


HOLLEY 2300-FUEL SYSTEM 14-59

ELEVATING LEGS (4)

lOCK SCREW

FUEL LEAL ADJUSTING NUT

VACUUM DIAPHRAJB THROTTLE VALVE CONTROL

Fun BOWL .

tuft iNIET FITTING VACUUM 'RAF FITTING

EUR LEVEL sicHT PLUG N0947

Fig. 3—Carburetor Assembly (Outboard) Front or Rear BOWL VENT VALVE FUEL BOWL

METERING BODY

LOCATING LUGS

IDLE AIR MIXTURE SCREW !LIMITER CAP REMOVEDI

MAIN BODY THRO1 ItE BODY

SPRING

ACCELERATOR PUMP COVER

BOWL SCREW i4 SEAL (4)

THROTTLE LEVER NU1003

Fig. 4— Removing or Installing Fuel Bowl

METER1N BODY METERING BODY GASKET POWER VALVE

NU1004

Fig. 5—Removing or Metalling Metering Body


14-60 FUEL SYSTEM-HOLLEY 2300 ACCELERATING PUMP DISCHARGE CHECK NEEDLE FAST IDLE CAM CHOKE VACUUM DIAPHRAGM

FAST IDLE CAM LEVER

o

FLATS ON SHAFT •

ATTACHING SCREWS

NU1OOS

Fig. 6— Removing or installing Fast idle Cam Lever NU10013 CHOKE ROD CHOKE ROD IN BOTTOM HOLE VACUUM OF EVER DIAPHRAGM HOSE

Fig. 9—Removing or Installing Pump Discharge Check Needle

CHOKE CONTROL LEVER UNLOADER TANG /FAST IDLE CAM

' CHOKE CONTROL LEVER

RETAINER "E" CI IP

FAST IDLE CAM

NU1006

Fig. 7—Removing or installing Choke Control Lever and Fast Idle Cam

"Trr1/41;r*

ACCELERATOR PUMP DISCHARGE NOZZLE

NU 1009

Fig. 10 —Removing or installing Main Body OPERATING ROD LOCK SCREW SLEEVE GASKET FUEL LEVEL ADJUSTING NUT

GASKET

BOWL VENT VALVE OPERATING ROD

SPRING VACUUM GASKET DIAPHRAGM HOSE SOUTROARD CARBURETORS)

FUEL LEVEL SIGHT PLUG ATTACHING SCREW

GASKET NU1007

Fig. 8—Removing or Installing Pump Discharge Nozzle

NU1010

Fig. 11—Removing or installing Bowl Vent Valve (C.A.S.)


HOLLEY 2300—FUEL SYSTEM 14-61 NEEDLE VALVE AND SEAT ASSEMBLY METERING BODY "(Y' RING NEEDLE VALVE GASKET FUEL BOWL

METERING r BLOCK ADJUSTING NUT

:

4 1

SPECIAL TOOL

GASKET

INSTALLATION: TIGHTEN r TO 120 INCH-POUNDS , FLOAT

LOCKSCREW

N U 1011

Fig. 12—Removing or installing Fuel inlet Needle and Seat

kerosene to be certain no trace of moisture remains. Never clean jets with a wire, drill, or other mechanical means because the orifices may become enlarged, FLOAT LEVER BRACKET

FLOAT

FULCRUM PIN

FUEL INLET FITTING

fr ATTACHING SCREWS

FUEL BOWL

POWER VALVE

Fig. 15—Removing or Installing Power Valve making the fuel mixture too rich for proper performance. DO NOT clean any rubber diaphragms in cleaning

solvent because of possible damage. Check for cracks, warpage, stripped screw threads, or damaged or marred mating surfaces, on all major castings. The passages in the castings should be free of restrictions. Install new castings as required. Check the float assembly for damage or any condition that would impair this item from further service. The choke and throttle valves should be replaced if the edges have been nicked or if the protective plating has been removed. Be sure that the choke and throttle shafts are not bent or scored. Replace any broken or distorted springs. Replace all screws and lockwashers that show signs of stripped threads or distortion.

NL/1012

ASSEMBLING CARBURETOR (Center Unit)

Fig. 13 — Removing Float Assembly CLUTCH HEAD SCREWS (BUTTERFLY)

• 141.11-01-4

Throttle Body If the throttle valves were removed because of damage, install new valves as follows: (1) Slide new valves into position on throttle shaft,

.0k:

jg

o

FUEL BOWL PUMP COVER CLUTCH HEAL) SCREWDRIVER

PUMP DIAPHRAGM FUEL BOWL SPECIAL 1001 METERING BODY

PUMP LEVER DIAPHRAGM ACCELERATING SPRING PUMP DIAPHRAGM PUMP COVER

MAIN METERING JET PUMP SPRING

CLUTCH HEAD SCREW—.-

NU1013

Pig. 14—Removing or Installing Accelerating Pump

NU1015

i‘.

Fig. 16—Removing or Installing Main Metering Jets


14-62 FUEL SYSTEM—HOLLEY 2300 MAIN METERING BODY MAIN METERING BODY

GASKET (2)

IDLE AIR MIXTURE SCREW

IDLE AIR MIXTURE SCREW (2) _

NU1016

IDLE AIR -A MIXTURE SCREW i2: .„1

sA

NU1018

Fig. 17—Removing idle Air Mixture Screws and Gaskets

Fig. 19—installing kite Air Mixture Screws and Gaskets

with the valve number on the bottom or mounting flange side, and away from vacuum port (Fig. 18). (2) Install new valve screws but do not tighten. (3) Hold valves in place with fingers. (Fingers pressing on high side of valves.) (4) Tap valves lightly with a screwdriver to center in bores. Now, tighten valve attaching screws securely. Operate the throttle shaft. From closed to open position, they must operate smoothly without drag or sticking. Hold throttle body up to a strong light. The light which is visible around outer diameter of valves in bores should be uniform. Stake screws, using a pair of pliers.

driver. Lightly seat screws, then back off number of turns (from seat) counted at disassembly (Fig. 19). Before installing screws, be sure that the tapered portion is straight and smooth. If tapered portion is grooved or ridged, a new idle mixture screw should be installed to insure having correct idle mixture control. (4) Install new plastic caps over idle screws, with tabls on caps against stops in bore (Fig. 19).

Assembly Main Metering Body (1) Install main metering jets (No. 63) in metering body, using 'Fool C-3747. Tighten securely (Fig. 16). (2) Slide a new gasket over power valve and install in body. Using Tool C-3748, tighten to 120 inch pounds (Fig. 15). (3) Press a new gasket in each of the idle air mixture ports, then thread idle air mixture screws through gasket and into body, using a small screwVACUUM PORT

Reassembling Fuel Bowl (1) Place a new gasket over fuel inlet fitting, then install fitting in fuel bowl. Tighten securely. (2) Install accelerator pump spring in position in fuel bowl, followed by diaphragm and pump cover. (When installing diaphragm, be sure contact button rivet head is toward pump lever in cover (Fig. 14). Install clutch head screws and tighten securely, using Tool CL-13. (3) Install sight plug and new gasket in bowl. (4) Slide float and hinge bracket in position in bowl, with fulcrum pin seated in slot. Install attaching screws and lighten securely (Fig. 20). FLOAT HINGE BRACKET

FUEL BOWL

SCREWS

FLOAT FULCRUM PIN

FULCRUM PIN SLOT THROTTLE SHAFT

THROTTLE VALVE NUMBERS

Fig. 18 —Throttle Valves installed

FLOAT

NU1017

Fig.

20—Installing Float Assembly

NU1019


HOLLEY 2300—FUEL SYSTEM 14-63 POWER VALVE

FUEL BOWL GASKET

VACUUM SPARK ADVANCE TUBE FITTING VACUUM DIAPHRAGM TUBE FITTING

KEYSTONE ClAJAP MAIN METERING BODY

IDLE LIMITER CAP MAIN METERING JETS VACUUM CHOKE TUBE F iT 'NG

VACUUM DIAPHRAGM HOSE NU1020

Fig. 21—Motoring Body installed

(5) Coat a new -0" ring with vasolitte and slide over fuel inlet needle seat and down into position. Install needle and seat in fuel bowl (Fig. 12). (6) Using a new gasket, install fuel level adjusting nut over threaded end of needle seat, with flats aligned. Place a new gasket over lockscrew and install in needle seat and over adjusting nut. (7) Invert main body and install new main to throttle body gasket. Place throttle body in position on gasket. Install attaching screws and tighten securely. (8) Install bowl vent valve on fuel bowl. Install attaching screw and tighten securely. (Be sure spring short loop enters hole in plate from underneath and long end hooked under rod (Fig. 11). (If so equipped). (9) Engage fast idle cam with choke control lever. Be sure cam steps are toward lever side (Fig. 7). Slide cam and lever over pivot pin and at the same time engage choke rod in bottom hole of lever. Secure with "E" clip. (10) Slide fast idle earn lever over flats on throttle shaft. (Be sure lever is installed in such manner so that tab rides on cam steps (Fig. 6). (11) Engage choke link in slot on choke control lever, then place choke diaphragm on main body. Install attaching screws and tighten securely. (12) Install new gaskets on front and rear of metering body, then install in position on main body with jets toward outside (Fig. 21). (13) Slide new seal washers over fuel bowl mounting screws. Install screws through fuel bowl and metering body. (Be sure all gaskets are aligned, then tighten screws to 50 inch pounds). Make sure accelerator pump lever is under adjusting screw of accelerating pump operating lever. (14) Install new keystone clamp over vacuum diaphragm hose (with tee for outboard carburetors), then slide hose over tube fitting (Fig. 22). Clamp with keystone pliers.

PLASTIC "T"

NUICT

Fig. 22—installing Yocum» Diaphragm Hose

CARBURETOR ADJUSTMENTS

It is very important that the following adjustments be mades on a reconditioned carburetor: Qualifying the Choke Control Lever Choke Unloader Adjustment (wide open kick) Fast Idle Cam Position Adjustment Vacuum Kick Adjustment (on or off vehicle) Fast Idle Speed Adjustment (on the vehicle) Checking the Bowl Vent Valve Clearance Checking the Pump Lever Clearance Idle Speed Adjustment (curb Idle) Adjusting the Float Outboard Carburetor Throttle Rod Adjustment Checking Wet Fuel Level Checking the Bowl Vent Valve Clearance To check the bowl vent valve clearance (Pig- 23), proceed as follows: (1) With throttle valves at curb idle, it should be possible to insert a 1/16 inch drill shank between bowl vent valve and top of primary fuel bowl, with the idle speed properly set. (2) if an adjustment is necessary, bend rod to change arc of contact with throttle lever, using Tool T109-212 until correct clearance has been obtained. Checking Accelerator Pump Lever Clearance To check accelerator pump lever clearance (Fig. 24), proceed as follows: (1) With throttle valves wide open, and the pump lever held down, it should be possible to insert a .015 inch (min.) .0625 (max.) gauge between adjusting nut and lever. (2) If an adjustment is necessary, adjust pump over-ride screw until correct clearance has been obtained.


1464 FUEL SYSTEM—HOLLEY 2300 BOWL VENT VALVE

OPAL OR GAUGE

SURFACE OF

FUEL BOWL

ADJUST BOWL VENT VALVE

ROD HERE A-S

THROTT• VALVES IN CL OSED POSITION NU9tI9A

to provide correct relationship between choke valve, thermostatic coil spring and the fast idle cam. It should be checked and adjusted (if necessary) after carburetor assembly or as preparation of the choke system linkage before making the Vacuum Kick. Cam Position or Unloader adjustment These three adjustments must and should be made after qualification of the choke control lever. (1) Open the throttle to mid-position. (2) Close the choke valve by slight pressure on choke control lever. (3) The top of choke rod hole in control lever should be 3-49 64 = 1/64 inch above choke assembly (carburetor on engine) or 1-23/ 32 = 1/64 inch above carburetor base (carburetor on bench) (Fig. 25). (4) Adjust if necessary by bending choke shaft rod at point indicated. CAUTION: Improper bending will cause binding of rod. Test for free movement between open and closed choke positions and

rebend if necessary to eliminate

any interferences.

Fig. 23—Checking Bawl Vent Valve Clearance (3) There must be no free movement of pump leverage when throttle is at curb idle. Qualifying Choke Control Lever Adjustment of the choke control lever is necessary FUmP OVEZDE SPRiNG

THROTTLE VALVES IN WIDE OPEN POSITION

Choke Unloader Adjustment (wide open kick) The choke unloader is a mechanical device to partially open the choke at wide open throttle. It is used to eliminate choke enrichment during cranking of an engine. Engines which have been flooded or stalled by excessive choke enrichment can be cleared by use of the unloader. Adjust the system as follows: (1) Qualify the choke control lever. if necessary. (See Qualifying Choke Control Lever Paragraph). (2) Hold the throttle valves in the wide open position_ Insert the specified drill between the upper edge of the choke valve and the inner wall of the air horn (see specifications). (3) With a finger lightly pressing against the choke control lever, a slight drag should be felt as the drill is being withdrawn. If an adjustment is necesADJUSI AT

THIS POINT

SCALE 4,e, TO TOP EDGE 70F LEVER HOLE

3-49/64' = 1/64' (TO TOP OF LEVER HOLE—CARBURETOR

MOUNTED ON MANIFOLD'

DRILL OR GAUGE NU950

Fig. 24—Checking Accelerator Pump Lever Clearance

Fig. 25—Qualifying Choke Control Lever


HOLLEY 2300—FUEL SYSTEM 1465 THROTTLE VALVES WIDE OPEN

DRILL OR GAUGE

CHOKE VALVE DRILL OR GAUGE

CHOKE VALVE

7:11 FAST IDLE SP ED ADJUSTING TANG FAST !DYE GAM

CAM POSITION ADJUSTING TANG BEND UNLOADER TANG

2ND HIGHES1 SPEED STEP °NIRO! LE'/ER _ CHOKE CONTROL LEVER (UGH' CLOSING PRESSURE) -

Fig. 26—Choke Unkader Adjustment (Wide Open Kick)

sary, bend the indicated tang until correct opening has been obtained (Fig. 26). Fast Idle Speed Adjustment (On Vehicle) Fast idle engine speed is used to overcome cold engine friction, stalls after cold starts and stalls because of carburetor icing. Set this adjustment after the vehicle odometer indicates over 500 miles to insure a normal engine friction level. Prepare the engine by driving at least 5 miles. Connect a tachometer and set the curb idle speed and mixture, then proceed as follows: (1) With the engine off and the transmission in the PARK or NEUTRAL position, open the throttle slightly. (2) Close choke valve until fast idle screw tang can be positioned on the second highest-speed step FAST IDLE AM

-

r fiaihe

TURN SCREWDRIVER FOR ADJUSTMENT

2ND HIGHEST SPEED STEP

FAST IDLE SPEED ADJUSTING TANG

FAST IDLE SPEED LEVER NU953

Fig. 27—fast Idle Speed Adjustment (On Vehicle)

M1954

Fig. 28—Fast idle Cam Position Adjustment

of the fast idle cam (Fig. 27). (3) Start the engine and determine the stabilized speed. Bend the fast idle tang by use of a screwdriver placed in the tang slot to secure the specified speed. CAUTION: Bend only in a direction perpendicular to the contact surface of the cam. Movement in any other direction changes the CAM POSITION ADJUST. MENT described earlier. (4) Stopping the engine between adjustments is not necessary. However, reposition the fast idle tang on the cam after each speed adjustment to provide correct throttle closing torque. Fast Idle Cam Position Adjustment The fast idle engine speed adjustment should be made on the vehicle as described in the Fast Idle Speed Adjustment (on the vehicle) paragraph. However, the Fast Idle Cam Position Adjustment can be made on the bench. This adjustment is important to assure that the speeds of each step of the cam occur at the proper time during engine warm-up. (1) Qualify the choke control lever, if necessary. (See Qualifying the Choke Control Lever Paragraph). (2) With fast idle speed adjusting tang contacting second highest speed step on fast idle cam, move choke valve toward the closed position with light pressure on choke control lever (Fig. 28). (3) Insert specified drill between the choke valve and wall of the air horn (See specifications). An adjustment will be necessary if a slight drag is not obtained as the drill is being removed. (4) To adjust, bend the indicated tang (Fig. 28) until the correct choke valve opening has been obtained.


14-66 FUEL SYSTEM—HOLLEY 2300 Vacuum Kick Adjustment (ON or OFF Vehicle)

The choke diaphragm adjustments controls the fuel delivery while the engine is running. It positions the choke valve within the air horn by use of linkage between the choke shaft and the diaphragm. The diaphragm must be energized to measure the vacuum kick adjustment. Vacuum can be supplied by a distributor test machine, another vehicle or vehicle to be adjusted. (1) If the adjustment is to be made with the engine running, position the fast idle tang (Fig. 29) (Cam position adjustment) to allow choke closure to kick position. If auxiliary vacuum source is to be used, open throttle valves, (engine not running) and move choke to closed position. Release throttle first, then release choke. (2) When using an auxiliary vacuum source, disconnect the vacuum hose from the carburetor and connect it to the hose from the vacuum supply with a small length of tube to act as a fitting. Removal of the hose from the diaphragm may require forces which could damage diaphragm. Apply a vacuum of 10 or more inches. (3) Insert the specified drill (see specifications) between the choke valve and the wall of the air horn (Fig. 29). Apply sufficient closing pressure on the lever to which the choke rod attaches to provide a minimum choke valve opening without distortion of the diaphragm link. Note that the cylindrical stem of the diaphragm will extend as an internal spring is compressed. This spring must be fully compressed for proper measurement of the vacuum kick adjustment. (4) An adjustment will be necessary if a slight drag is not obtained as the drill is being removed. VACUUM DIAPHRAGM (STEM RETRACTED)

CHOKE VALVE DRILL OR GAUGE

Shorten or lengthen the diaphragm link to obtain the correct choke opening. Length changes should be made by carefully opening or closing the bend provided in the diaphragm link. CAUTION: DO NOT APPLY TWISTING OR BENDING FORCE TO DIAPHRAGM. (5) Reinstall the vacuum hose on the correct carburetor fitting. (6) Make the following check. With no vacuum applied to the diaphragm, the CHOKE VALVE SHOULD MOVE FREELY between the open and closed positions. If movement is not free, examine the linkage for misalignment or interferences caused by the bending operation. Repeat the adjustment if necessary to provide proper link operation. Outboard Carburetor Throttle Rod Adjustment

To synchronize the outboard throttle valves with the center, or control carburetor, proceed as follows: (1) Remove air cleaner (if not previously done), then remove outboard throttle connector rod clips and disengage front and rear rods from throttle levers (Fig. 30). (2) If this adjustment is to be done on vehicle, be sure ignition switch is OFF. (This de-energizes fast curb idle solenoid so that clearance is obtained between plunger and fast curb idle adjusting screw.) (3) Close throttle valves on the two outboard carburetors and the center carburetor. Rold in closed position. (4) Shorten or lengthen the front and rear connector rods by turning rod in or out in threaded sleeve, until rod end can enter hole in throttle lever evenly (Fig. 30). (5) Install throttle connector rod in lever and secure with clip. THROTTLE CLOSED

erce .119

t

TO Actium

FRONT ROD SOLENOID PLUNGER

BEND AT it THIS POINI CHOKE CONTROL LEVER (LIGHT CLOSING PRESSURE! L-17/Wir NU9S5

Fig. 29—Vacuum Kick Adjustment

FAST CURB IDLE ADJUSTING SCREW

CURB IDLE ADJUSTING SCREW THREADED SLEEVE

Ss•-ROD CLIP

EAR - ROD CENTERED IN THROTTLE LEVER NU956

Fig. 30—Outboard Carburetor Throttle Rod Adjustment


HOLLEY 2300—FUEL SYSTEM 14-67 Idle Speed Solenoid Adjustment To set the idle speed solenoid for correct engine r.p.m., proceed as follows: (1) Warm up engine to normal operating temperature, then attach a tachometer. (2) With engine running, turn idle speed solenoid adjusting screw in or out to obtain 900 r p.m. for both manual and automatic transmissions equipped vehicles. (3) After specified r.p.m. has been obtained and with engine still running (to energize solenoid), adjust curb idle speed screw until end of screw just touches stop on carburetor throttle body. Now, back off 1 full turn to obtain the slow curb idle speed setting. (Approximately 650 to 700 r.p.m.)

(a) Adjust each screw 1/16 turn richer (counterclockwise) and wait 10 seconds before reading meter. (b) If necessary, repeat step "a" until meter indicates a definite increase in richness (lower reading). This step is very important since meter reverses its readings and indicates a richer mixture as carburetor is leaned out, if carburetor is set too lean When it has been established that meter is indicating a lower reading (richer mixture) when idle mixture screws are turned in richer direction, proceed to adjust carburetor to give 14.2 air/fuel ratio: turning screws counterclockwise (richer) to lower meter reading and clockwise (leaner) to increase meter reading. Do not remove plastic cap (if so equipped) In order to obtain an over-rich mixture.

Idle Speed Adjustment (Curb Idle) To make the idle speed adjustment on carburetors, secure an accurate ignition tachometer and a Sun Electric Combustion-Vacuum Unit. Model 80, Exhaust Condenser, Model EC, and Hose 669-14 or equivalent. !The above analyzer is recommended; however, other reliable makes of analyzers in good condition may be used). Proceed as follows: (1) Engine running at normal operating temperature, and timing checked (refer to Distributor Specifications). (2) Air cleaner installed. (3) Automatic: Transmission in neutral position (Not in park position). (4) On air conditioned vehicles, turn air conditioning off. (5) Connect ignition tachometer. (6) Insert probe of exhaust analyzer in tall pipe as far as possible (2 ft. minimum distance). It is very important that probe and connecting tubing he free of leaks to prevent erroneous readings. If a garage exhaust system is used, to conduct exhaust gases away, a plenum chamber or other means must be used to reduce vacuum of exhaust system to 1/2 inch water or less. (7) Connect exhaust gas analyzer. warm up and calibrate according to manufacturer's instructions. (8) Disconnect hose between distributor vacuum control valve. (if so equipped) and intake manifold. (9) Set idle speed to specified valve for specific engine-transmission combination. (10) IMPORTANT: When adjusting mixture screws to obtain air-fuel ration specified, do not turn the mixture screws more than 1/16 turn at a time. The combustion analyzer is so sensitive that the ratio must be changed by very small increments, if accurate readings are to be obtained. The meters read In air-heel ratio so that a higher reading indicates a leaner mixture and vice-versa.

(d) If idle speed changes as idle screws are turned, adjust speed to specified value and readjust mixture as required so that a 14.2 air/fuel ratio is obtained at specified idle speed. Checking Wet Fuel Level (On Vehicle) Before checking wet fuel level, check the fuel pump pressure to be certain 5 pound reading is obtained. (1) To check fuel level in bowl, start engine and then remove sight plug from fuel bowl (Fig. Si). (2) Using a wrench and screwdriver, turn adjusting nut either up or down until fuel just dribbles out of sight hole (Fig. 31). (3) Reinstall sight plug and gasket and tighten securely. Check other fuel bowls in the same manner. CAUTION: It Is suggested that a suitable precaution be taken by placing a shop towel or a container under the bowl, to catch any fuel that might be liberated due to a high or improper previous setting.

Fig. 31—Adjusting fuel Level (On Vehicle)


FUEL SYSTE M-HOLLEY 2300

Fig. 32—Tr-Carburetor Assemblies (Exploded View)


HOLLEY 2300-FUEL SYSTEM 14-69 LEGENDS (Fig. 32) 1. Carburetor Assembly (Front or Rear) 2. Choke Valve 3. Valve Screw 4. Choke Shaft 5. Operating Rod 6. Seal 7. Choke Control Lever "E" Chip 9. Fast Idle Cam 10_ Link U. Link Pin 12. Screw. Diaphragm Bracket 13. Choke Diaphragm It Vacuum Tube 15. Screw 16. Fast Idle Cam Lever 17. Throttle Body (Center Cart.) 18. Plastic "T" 19. Tube and Clamp 20. Screw, Throttle Body 21. Lever 22. Spring a Nut, Adjusting It bracer 25. Curb Idle Screw and Spring 26. Gasket 27. Screw Accelerator Pump Adj. 28. Main Body (Center Carb.) 29. Discharge Check Needle 30. Gasket 31. Cluster, Discharge 32. Gasket 33. Cluster Screw 34. Nut 35. Sleeve (Rear) 36. Sleeve (Front) 37. Washer, Throttle Rod Sleeve 38. Spacer, Throttle Rod Sleeve 39. Washer, Throttle Rod Sleeve

40. Screw (Throttle Rod) 41. Pivot (Throttle Rod) 42. Throttle Valve UMW 43. Throttle Shaft 44. Throttle Valves 4$. Insulator 46. Adjusting Screw (Solenoid) :7. Nut (Adjusting Screw) hi. Cam, Pump 49. Pump Cam Screw SO. Power Valve 51. Power Valve Gasket 62. Gasket 53. Idle Mixture Screw 54. Idle Mixture Screw Gasket SS. Metering Body 56. Limiter Cap (Plastic) 57. Metering Jet 58. Metering Jet 59. Float 60. Float Hinge (Packet 61. Fulcrum Pin 62. Float Spring 63. Gasket 64. Sight Plug 65. Sight Plug Gasket 66. Fuel Inlet Fitting 67. Fuel Inlet Fitting Gasket 68. Lock Screw 69. Gasket 70. Bowl Vent Rod 71. Bowl Vent Valve 72. Adhating Nut 73, Gasket, Nut 74. Fuel Inlet Needle Seat 75. Seat "0" Ring 76. Fuel Bowl 77. Spring, Pump 78. Diaphragm, Pump

DISASSEMBLING AND ASSEMBLING CARBURETOR (OUTBOARD-Front or Rear) The disassembly and assembly procedure covering the two outboard carburetors are similar to the center or control carburetor. In as much as the outboard carburetors are not equipped with automatic choke, power enrichment, accelerating pump, idle or spark

FUEL OWL

79. Diaphragm Cover 80. Diaphragm Spring 81 Pump Cover and Screw 22. Diaphragm 83. Diaphragm Housing 84. Seal (Bowl Screw) 85. Bowl Screw 86- Main EindY (Front or Rear) 87. Gasket 88. Throttle Body 89. Lever 90. Screw 91. -r Clip 92. Screw, Throttle Body 93. Throttle Valves 94. Valve Screw 95. Throttle Shaft 96. Gasket 97. Plate 98. Gasket 99. Metering Body 100. Float 101.Float Hinge Bracket 102. Float Speuna

103. Fulcrum Pin 104. Fuel Bowl 105. Lock Screw 106. Gasket 107. Adjusting Nut 108. Gasket 109. Inlet Needle Seat 110. Seat "0" Ring 111. Sight Plug 112. Gasket 113. Seal (Bowl Screw) 114. Rawl Screw 115.Gasket 116. Fuel Inlet Fitting 117. Clutch Head Screw (Metering Body)

advance, the servicing of these two carburetors are relatively simple. The following disassembly and assembly procedures will be covered by pictures, step by step, with no text reference. Should written instructions be required, refer to disassembly and assembly procedures as written for the center unit. FLOAT LEVEL LOCK SCREW ADJUSTING NUT FUEL BOWL METERI G BODY

MAIN BODY PLUNGER" STEM-

GASKET

'SE" CUP DIAPHRAGM LEVER

FLOAT ATM NINO scREws (4)

pi

N0993 Fig. I-Removing or Installing Fuel Bowl Screws

MEAD SCREWS (6)

E BODY NU99.4

Fig. 2-Removing or installing Fuel Bowl


14-70 FUEL SYSTEM—HOLLEY 2300

METERING

Boor

Nu99E

Fig. 6—Metering Body

Fig. 3—Removing or installing Metering Body Screws

VACUUM DIAPHRAGM

D!APHRAGM STEM

AT ?ACHING SCREWS

\\' Es CLIP

N1.$99

Fig. 7—Removing or Installing Diaphragm Mounting Screws Fig. 4—Removing or Installing Metering Body, Plate and Gaskets

NUIOD3

Fig. S—Nletering Ratty Plate and Gaskets

Fig- Baterstoving or Installing Vacuum Diaphragm


AFB FUEL SYSTEM 14-71 MAIN BODY

DIAPHRAGM BODY VACUUM DIAPHRAGM--......... COVER SCREW (6)

THROTTLE BODY GASKET

)7 ,

DIAPHRAGM SPRING DIAPHRAGM COVER

VACUUM PORT NU1001

Fig. 9—Vacuum Diaphragm (Exploded View) ALIGNMENT PINS ATTACHING SCREWS .:5) NU 1002

Fig. 10—Removing or Installing Ma


AFB SERIES CARTER CARBURETOR

Automatic Choke (well type) Carburetor Adjustments Accelerator Pump Bowl Vent Valve Choke Piston Index Choke Unloader (Wide Open Kick) Fast Idle Speed Cam Position Fast Idle Speed (On Vehicle)

INDEX Page Idle Speed 2 Secondary Throttle Lever 77 Secondary Throttle Lockout 78 Cleaning Carburetor Parts 80 Disassembling Carburetor 78 General Information 78 77 Inspection and Reassembly Specifications 79

Page 80 79 79 2 72 71 75 116

GENERAL INFORMATION The twin four barrel carburetors (Fig. 1) are used on the 426 Cu. in. Hemi engine. Carburetor Models AFB-4742S (front) arc used on the 426 Cu. in. engine (Street Hemi), when the vehicles are equipped with the manual or automatic transmissions. Carburetor Models AFB-4745S (rear) and AFB4746S (rear) are used on the 426 Cu. in. engine (Street

Hemi). when the vehicles are equipped with the manual or automatic transmissions respectively. These carburetors are equipped with a hot idle compensator valve. (Fig. 2.) This valve is a thermostatically operated air bleed, to relieve an overrich condition at idle. This condition is the result of excessive heat and resultant overrich mixtures.

LEFT HAND VIEW

It*H1 HAND VIEW

_

N N973

Fig. 7 —Twin Four Barrel Carburetor Assemblies


14-72 FUEL SYSTEM—AFB

HOT IDLE COMPENSATOR VALVE

ATTACHING SCREWS

PY799

Fig. 2—Hot Idle Compensator Valve

These carburetors also work in conjunction with an idle speed solenoid, which is used to maintain a higher idle speed when the vehicle is running and allows the throttle to close to a low idle speed throttle position when the ignition key is turned off, to prevent "after running". The idle solenoid is mounted hetwpen the two carburetors, on a bracket held by the carburetor mounting studs and nuts. (Fig. 23.) Since the service procedures are identical on all Carter AFB carburetors, the illustrations showing the various disassembly procedures will not always show any one specific carburetor. The throttle valves of the secondary half of the carburetor are mechanically connected to the primary valves and open with the primary after an approximate 80 0 lag; and continue to open until both primary and secondary throttle valves reach the wide open

position simultaneously. As engine speed increases, the forces exerted by the velocity of intake air down through the venturis of the carburetor increases and tends to overcome the counterweight attached to the velocity shaft, permitting the offset velocity valves to position themselves according to engine requirements. The AFB (aluminum four barrel) carburetor contains many features, some of which are the locations for the step-up rods and pistons. The step-up rods, pistons and springs are accessible for service without removing the air horn or the carburetor from the engine. The venturi assemblies (primary and secondary) are replaceable and contain many of the calibration points for both the high and low speed system. One fuel bowl feeds both the primary and secondary nozzles on the right side while the other fuel bowl takes care of the primary and secondary nozzles on the left side. This provides improved performance in cornering, quick stops and acceleration. All the major castings of the carburetor are aluminum, with the throttle body cast integral with the main body. This allows an overall height reduction in the carburetor. The section containing the accelerator pump is termed the primary side of the carburetor. The rear section is the secondary. The five conventional systems used in previous four barrel carburetors are also used in this unit. The five conventional systems are, two float systems, two low speed systems, (primary side only on front carburetors only) two high speed systems, one accelerator pump system and one automatic choke control system. The carburetors are equipped with a pair of velocity valves, which control the secondary valve operation.

SERVICE PROCEDURES DISASSEMBLING CARBURETOR (Fig. 1) (1) Place carburetor assembly on repair stand Tool C-3400 or T-109-2873 elevating legs. These tools are used to protect throttle valves from damage and to provide a suitable base for working. (2) Remove hairpin clip that attaches fast idle connector rod to choke lever. Disengage rod from lever, then swing rod at an are until it can be disengaged from fast idle cam. (3) Remove retainer that holds throttle connector rod in center hole of accelerator pump arm. Remove hairpin clip that attaches lower end of rod in primary throttle shaft lever. Disengage rod from arm and lever, then remove from carburetor. (4) Remove screws attaching step-up piston and rod cover plates. Hold cover down with a finger to prevent piston and rods from flying out. Lift off plates and slide step-up pistons and rods out of air horn, (Fig.

2). Remove step-up piston springs. Step-up rods are not interchangeable. (5) Remove ten screws that attach air horn to main body. (1 screw in hole in air horn.) Lift air horn straight up and away from main body. When removing air horn, use care so as not to bend or damage floats. Remove accelerator pump, plunger, lower spring from pump cylinder. Remove dashpot (if so equipped). Disassembling the Air Horn

Place air horn in an inverted position on bench (to protect the floats) then proceed to disassemble as follows: (1) Using a suitable Tool, remove float fulcrum pins, (left and right) then lift float up and out of bosses on air horn. It is suggested that the float on the pump side be marked so that floats can be reinstalled in their respective positions.


AFB—FUEL SYSTEM 14-73 ACCELERATOR PUMP ROD (IN CENTER HOLE) ACCELERATOR PUMP ROCKER ARM

BOWL VENT VALVE CHECKING OPENING PLUG

CHOKE VALVE

STEP-UP PISTON COVER PLATE

BOWL VENT VALVE VENT TUBE

CHOKE VALVE ACCELERATOR PUMP LINK STEP-UP PISTON COVER PLATE

ACCELERATOR PUMP PLUNGER

AIR HORN CLOSED CRANKCASE VENT TUBE FITTING FUEL INLET En/LNG

THROTTLE BODY

BOWL VENT VALVE OPERATING ROD

FAST IDLE CONNECTOR ROD THROTTLE tivEt FAST IDLE SPEED ADJUSTING SCREW

SELUNUAKT IHRUIllt LOCKOUT DOG

•ZPIOKE

SECONDARY THROTTLE SHAFT

044

Itt:tuti Vf+XT Val VF

OPERATING LEVER

SECONDARY THROTTLE TAM; CHOKE HEAT Tvig

CURB IDLE SPEED ADJUSTING SCREW

INDEX NDEX MARK

DSTRtaUTOR VACUUM ADVANCE TUSE MING LIMITER CAPS IDLE MIXTURE ADJUSTING SCREWS

Fig. I—Carburetor Assembly MB (E.C.S.)

(2) Remove two needle valves from their respective seats, after marking one on pump side for identification. Using a wide blade screw driver, remove needle valve seats. Be sure each needle valve is returned to its original seat at reassembly. (3) Remove spring clip that holds throttle connector rod in center hole of pump arm. Remove pump arm pivot screw and lift off pump arm, at same time. COVER PLATE AND SCREW

STEP-UP PISTON AND METERING ROD

disengage link from arm and pump stem. Slide accelerator pump plunger and spring out of air horn. Remove gasket. (4) Place accelerator pump plunger in a jar of clean gasoline or kerosene, to prevent leather from drying out (5) Remove fuel inlet fitting and filter screen from air horn. (6) Remove screws and retainer holding thermo-

-

mP JET HOUSING GASKET ACCELERATOR PUMP DISCHARGE PASSAGE

PMMARY

IP VENTURI „SECONDARY vENTuRi COVER PLATE

?"•--scRevi Pig. 2—Removing or Installing Stop-Up Pistons and Rods

PY801

NK402

Fig. 3—Removing or Installing Accelerator Pump Jet Housing


14-74 FUEL SYSTEM—MB

!It

SPECIAL TOOL

MAIN METERING PRIMARY I7)

it

MP'

MAIN METERING JET-441 'SECONDARY IV Fig. 4—Removing

Fig. 6—Removing or Installing Secondary Venturi Cluster

NK403

or Installing Main Metering Jets VELOCITY VALVES

static coil housing to choke housing. Remove housing, gasket and baffle plate. To remove choke piston, remove nut and washer, then slide piston off shaft and work out of well.

COUNTERWEIGHT

Main Body Disassembly

(1) Remove screws that attach accelerator pump jet housing to main body. Lift out jet housing and gasket (Fig. 3). Discard gasket. Now, invert main body and drop out discharge check needle from discharge pas. sage. (2) Using Tool T-109-58, remove main metering jets (primary side), (Fig. 4). The primary and secondary main metering lets are not interchangeable. It is very important that these lets be installed in their respective locations in the main body at reassembly.

(3) Again using Tool T-109-58, remove main meter. ing jets (secondary side), (Fig. 4). (4) Remove screws that attach primary venturi (choke and pump side) to main body. Lift venturi straight up and away from main body. (Fig. 5). DisPRIMARY VENTURI (CHOKE SIDE) VELOCITY VALVE COUNTERWEIGHT

Fig. 7—Removing

or Installing Velocity Valves

card gaskets. The venturi assemblies are not interchangeable, side for side and must be reinstalled in theiroriginal locations at reassembly. Remove screws that attach secondary venturi (choke and pump side) to main body. Lift secondary venturi assemblies straight up and away from body, (Fig. 6). Remove velocity valves (Fig. 7). (5)

SPARK ADVANCE PORT IDLE DISCHARGE PORTS CHOKE HOT AIR PORT

GASKET •PRIMARY VENTURI PUMP SIDE)

•NKett IDLE TRANSFER PORTS Fig. 5—Removing or Installing Primary

Venturi Clutter

Fig. 8—Pons

in Relation to Throttle Valves


AFB FUEL SYSTEM 14-75 (6) Using Tool T-109-59, screw driver bit, remove accelerator pump intake check valve located inside fuel bowl, adjacent to accelerator pump cylinder. (7) Remove screws that attach hot idle compensator valve to main body boss. Remove valve and gasket. (8) Remove plastic limiter caps from idle air mixture screws. (Be sure and count number of turns to seat the screws (from stop), as the same number of turns (from seat) must be maintained at installation.) Remove screws and springs from throttle body. The carburetor now has been disassembled into two units, namely air horn and the main and throttle body casting. The component parts of each have been disassembled as far as necessary for cleaning and inspection. It is usually not advisable to remove the throttle shafts or valves unless wear or damage necessitates the installation of new parts. During the manufacture of the carburetor, the location of the idle transfer ports and the idle discharge ports to the valve is carefully established for one particular assembly, (Fig. 8). If new throttle shafts should be installed in an old worn body, it would be very unlikely that the original relationship of these ports to the valves would be obtained. A very slight change in the port relationship to the valves would adversely affect normal carburetor operation, between the speeds of 15 and 30 miles per hour. It is recommended that if the throttle shafts are excessively worn, that a new carburetor be installed. However, if the throttle valves have become nicked, burred or damaged, new valves may be installed, providing the following instructions are carefully followed. The screws that attach the throttle valves are staked on the opposite side and care should be used in removal so as not to break the screws in the throttle shaft Remove the staked portion of the screws with a file.

Remove the screws that attach the primary throttle valves to the throttle shaft and slide valve (or valves) out of bores. Remove the screws that attach the secondary throttle valves to the throttle shaft and slide valve (or valves) out of bores. The primary valves and secondary valves are not interchangeable and should be kept separate in order that each may be returned to its respective bore. (Fig. 9). INSPECTION AND REASSEMBLY (1) Slide primary throttle valve (or valves) into their respective bores, install new screws, but do not tighten. Be sure idle speed adjusting screw is backed out. Hold valves in place with fingers. (Fingers pressing on high side of valves.)

SECONDARY VALVE

PRIMARY VALVE KF946C

Fig. 9—Throttle Valve Identification

(2) Tap valves lightly in this position, tighten screws securely. Stake screws by squeezing with pliers. (3) Install idle mixture screws and springs in throttle body. (The tapered portion must be straight and smooth. If tapered portion is grooved or ridged, a new idle mixture screw should be installed to insure having correct idle mixture control.) DO NOT USE A SCREW DRIVER. Turn screws lightly against their seats with fingers. Back off the number of turns counted at disassembly. Install new plastic caps with tab against stops. This screw has a left hand thread. Turn counterclockwise (Richer) and clockwise (Leaner). Install velocity valves in position in body. (4) Place new secondary venturi gaskets in position, then install secondary venturi (pump and choke side) by lowering straight down on gaskets. Install attaching screws and tighten securely. Be sure all the metering holes and vent tubes are clean, in both the primary and secondary venturi.

(5) Place new primary venturi gaskets in position, then install the primary venturi (pump and choke side) by lowering straight down on gaskets. (Fig. 5). Install attaching screws and tighten securely. (6) Install primary and secondary main metering jets, using Tool T-109-58. (Fig. 4). Tighten jets securely. (7) Install accelerator pump intake check ball using Tool T-109-59. Accelerator Pump Test

(1) Pour clean gasoline into carburetor bowl (approximately 1/2 inch deep). Remove accelerator pump plunger from jar of gasoline. Flex leather several times, then slide into pump cylinder. (2) Install accelerator pump discharge check needle in discharge passage. Raise pump plunger and press lightly on plunger shaft to expel air from pump passages. Using a small clean brass rod, hold discharge check needle firmly on its seat. Again raise plunger and press downward. No fuel should be emitted from either the intake or discharge passage.


14-76 FUEL SYSTEM—AFB (3) If fuel does emit from intake passage. remove Intake check ball and reclean the passage. Fuel leakage at discharge check needle indicates presence of dirt or a damaged check needle. Clean again and then install a new check needle. Retest for leakage. (4) If either intake check assembly or discharge check needle leaks after above test and service fix, attempt to reseat as follows:

THESE SURFACES 1 MUST BE PARALLEL--. WITH EDGE TN CASTING. MINIMUM CIEARANCE

WITHOUT BiNDNG GASKET

BOWL VENT VALVE OPERATING /LEVER

Intake Check Ball

Remove the intake check assembly from the throttle body. Install a new check assembly. then retest as described previously.

BOWL VENT VALVE

Discharge Check Needle

(1) With discharge check needle installed, insert a piece of drill rod down on needle. Lightly tap drill rod with a hammer to form a new seat. Remove and discard old needle and install a new one. Retest as described previously. If service fix does not correct the condition, a new carburetor will have to be installed. (2) Install accelerator pump discharge check needle, jet housing and gasket. Install housing and attaching screws. Tighten screws securely. (3) Press down on accelerator pump plunger shaft, and as plunger is being depressed, a clear straight stream should emit from each jet. If streams are not identical, (if either one is diverted or restricted) a new accelerator pump jet housing should be installed. After test, your gasoline from carburetor bowl and remove pump plunger. Assembling Air Horn

(1) Slide fuel inlet screen into fuel line fitting, then install in air horn. Tighten securely. (2) Check to see if leather on accelerator pump plunger is hard, cracked or worn, If any sign of wear or deterioration is evident, install a new plunger assembly. (3) Slide the accelerator plunger into air horn, then install the accelerator pump link. When reassembling, make sure the large diameter of pivot screw enters hole in pump arm and that shoulder on screw has not pinched pump arm. The carburetors are equipped with synthetic rubber tipped fuel inlet needles. The needle tip is a rubber material which is not affected by gasoline and is stable over a wide range of temperatures. The tip is flexible enough to make a good seal on the needle seat, and to give increased resistance to flooding. The use of new inlet needles require that care be used when making float adjustments. Avoid applying any pressure on the floats which might compress the tip of the fuel inlet needles. The tip can be com-

PY727

VALVE SPRING

Fig. 10—Checking Float Alignment position on air horn, then install float needle valve seats. (Be sure each needle seat and needle is reinstalled in its original position.) (5) Slide right and left floats into position in air horn, then install float fulcrum pins. (Be sure marked float is installed on pump side of the air horn.) See disassembly procedures.

(6) After floats have been installed, cheek float alignment, level and drop settings as follows: Float Alignment Setting

(1) Sight down side of each float shell to determine if side of the float is parallel to outer cage of air horn casting, (Fig. 10). (2) If sides of float are not in alignment with edge of casting, bend float lever by applying pressure to end of float shell with thumb. To avoid damage to the float, apply only enough pressure to bend the float lever.

(3) After aligning floats, remove as much clearance as possible between arms of float lever and lugs of air horn. To do this, bend float lever. The arms of float lever should be as parallel as possible to inner surfaces of lugs of casting. Float Level Setting

(I) With air horn inverted, air horn gasket in place and float needle seated, slide float gauge (refer to specifications for carburetor being worked on) beGASKET IN PLACt 1-L°A7

Fsgl .

FLOAT GAUGE

CFAII0E OUTER - ' END Of FLOAT

pressed sufficiently to cause • false setting which will affect correct level of fuel in the bowl.

(4) Place a new air horn to main body gasket in

NRSI9

Fig. I I—Checking Float Height


AFB—FUEL SYSTEM 14-77 tween top of the float (at outer end) and air horn gasket, (Fig. 11). Float should just touch gauge (T-109106). (2) Check other float in same manner. If an adjustment is necessary, bend float arm using Tool T-109-22, until correct clearance has been obtained. After bending arm, recheck the float alignment. Float Drop Setting (1) Holding air horn in an upright position, measure distance from the top of floats (outer end) to the air horn gasket, (Fig. 12). This measurement should be 3/4 inch. If an adjustment is necessary, bend stop tabs on float levers until correct drop setting has been obtained. Bend tab toward needle seat to lessen drop, or away from seat to increase drop. (2) After floats have been checked and adjusted, continue to assemble carburetor as follows: (3) Mace accelerator pump plunger lower spring in pump cylinder, then lower air horn carefully down on main body. Care must be taken to center small brass main bleed tubes so that they will pass through holes in air horn without being damaged. Be sure the fuel baffles on the air horn, slide down in front, (bowl side) of the float chamber baffles, or the air horn will not index correctly with the main body and can cause the floats to hang up. Be sure the leather on the plunger does not curl or wrinkle. Accelerator pump operation will be affected if this precaution is not observed. Install dashpot (if so equipped.)

(4) Install 10 air horn attaching screws and tighten securely. (The two long screws should be installed in holes that are located at air cleaner mounting surface. The 1 inch screw at front and 1-1/2 inch at rear.) The change from low speed, best fuel economy, road load mixtures to richer wide open throttle full power mixtures is now accomplished in two steps. This has made it possible to secure best low speed fuel economy without sacrificing performance in the intermediate speed range. To do this, there is a new step-up piston and spring assembly, new metering GASKET IN PLACE

rods with three diameters, and new style primary metering jets, (Fig. 13). (5) Slide step-up piston spring into piston cylinders, followed by step-up pistons and step-up rods. Install cover plates and attaching screws while holding stepup pistons down in position. Tighten screws securely. (6) Slide choke piston down into well. Slide piston arm over shaft and install nut and washer. Tighten securely. Install baffle plate, gasket and coil housing. Install retainer and attaching screws. Turn coil housing to align index marks at two notches rich. (7) Engage throttle connector rod with primary throttle shaft lever, then install hairpin clip. Install clevis clip to rod and pump arm. (8) Engage lower end of fast idle connector rod with fast idle cam, then swing in an arc to lock in cam. Slide other end of rod into choke shaft lever and secure with hairpin clip.

CARBURETOR ADJUSTMENTS (AFB-4745S and AFB-4746S Carburetors Only) The following adjustments should be made with the carburetor on the bench for ease of working, and, should be made in the following order: Fast Idle Speed Cam Position Adjustment The fast idle engine speed adjustment should be made on the vehicle, as described in the Fast Idle Speed Adjustment (On the Vehicle Paragraph.) However, the Fast Idle Cam Position Adjustment can be made on the bench. This adjustment is important to assure that the speeds of each cam step occur at the proper time during engine warm-up. Adjust as follows: (1) With fast idle speed adjusting screw contacting second highest speed step on fast idle cam, move choke valve toward closed position with light pressure on choke shaft lever. (2) Insert specified drill (refer to Specifications), between choke valve and wall of air horn (Fig. 14). An adjustment will be necessary if a slight drag is not obtained as the drill is being removed. (3) To adjust, bend fast idle connector rod at angle, using Tool T-109-213 until correct valve opening has been obtained (Fig. 14). COVER

2 STEPS tere•e•SW, V • I

y,.7* BEND STOP TABS

• I.

:r tt -*--—F

2 STAGE STEP-UP PISTON STEP-UP SPRING PISTON

STEP-UP ROD

EACH FLOAT NH345A

Fig. 72—Checking Float prop

JET-NEW TYPE

Fig. 13—Step-Up Piston, Rod and Jet

NB171A


14-78 FUEL SYSTEM—AFB DRILL OR GAUGE

LIGHT CLOSING PRESSURE ON -ae CHOKE LEVER \

FAST IDLE SPEED ADJUSTING SCREW ON SECOND HIGHEST STEP OF CAM AND AGAINST FACE OF HIGHEST STEP BEND FAST IDLE CONNECTOR ROD AT THIS ANGLE FAST IDLE CAM

SCREW FAST IDLE SPEED ADJUSTING SCREW-44),

PY803

Fig. 14—Fast idle Cam Position Adjustment

CHOKE PISTON INDEX (AFB-4745S and AFB-4746S Rear Carburetors Only)

The choke piston should be indexed to provide proper fuel delivery during warm-up, proceed as follows: (1) Remove choke housing retainer ring, heat tube cap and choke coil housing, bale plate and gasket. (2) Remove throttle return spring so throttle can be set to a mid position. (3) Let choke blade go wide open. (4) Insert an .026 inch wire gauge* into choke piston slot so that hook on the end goes into slot in cylinder (Fig. 15). (5) Push on choke piston lever thermostat tang trapping the wire gauge between piston and cylinder slots with linkage hanging free.

(6) Adjust the link connecting the choke shaft to the choke piston lever by bending the link at an angle to give correct opening between choke valve and wall of air horn. (Refer to Specifications). Remove wire gauge before bending link. (7) Reassemble choke, setting the coil two notches rich and install the throttle return spring. *This gauge can be made by bending a piece of .026 x 2 (inches long) wire bent at a right angle (1/8") as shown. If this size wire is not readily available, .026 inch step-up wire used in BBD Carburetors can be bent to shape and used for this purpose. Choke Unloader Adjustment (Wide Open Kick)

The choke unloader is a mechanical device to partially open the choke at wide open throttle. It is used to eliminate choke enrichment during cranking of an engine. Engines which have been flooded or stalled by excessive choke enrichment can be cleared by use of the unloader. Adjust the system as follows: (1) Hold throttle valves in wide open position. Insert specified drill (refer to Specifications), between upper edge of choke valve and inner wall of air horn (Fig. 16). (2) With a finger lightly pressing against choke valve lever, a slight drag should be felt as drill is being withdrawn. If an adjustment is necessary, bend unloader tang on throttle shaft lever, using Tool T10941, until correct opening has been obtained (Fig. 16). Accelerator Pump Adjustment

Move the choke valve to wide open position, to release the fast idle cam. Back off the idle speed adjustment screw (curb idle) until the throttle valves are seated in the bores. LIGHT CLOSING PRESSURE AGAINST CHOKE VALVE LEVER

LakiLA BEND UNLOADER TANG UNLOADER TANG SHOULD CONTACT THE FAST IDLE CAM

r

THROTTLE IN WIDE OPEN POSITION Fig. 13—Choke Piston Indexing

Fig. 16—Checking Choke Unloader (wide open kick)


AFB—FUEL SYSTEM 14-79

Measure the distance from the top of the air horn to the top of the plunger shaft, using a "T" scale, (Fig. 17). This distance should be 7/16 inch. If an adjustment is necessary, bend the throttle connector rod at the lower angle, using Tool T-109213, until correct travel has been obtained.

BEND ROD AT THIS ANGLE

atfra

h

PRIMARY

ia I THROTTLE VALVES e sSECONDARY THROTTLE VALVES . SHOULD JUST START TO OPEN 1 ,

_At Secondary Throttle Lever Adjustment

To check the secondary throttle lever adjustment, block the choke valve in the wide open position and invert the carburetor. Slowly open the primary throttle valves until it is possible to measure 17/64 inch between the lower edge of the primary valve and the bore (opposite idle port) (Fig. 18). At this measurement, the secondary valves should just start to open. If an adjustment is necessary, bend the secondary throttle operating rod at the angle, using Tool T-109213, until correct adjustment has been obtained. With primary and secondary throttle valves in tightly closed position, it should be possible to insert Tool T-109-29 (.020") wire gauge, between positive closing shoes on the secondary throttle levers. (Fig. 19). If an adjustment is necessary, bend the shoe on the secondary throttle lever, using Tool T-109-22, until correct clearance has been obtained. Secondary Throttle Lock Out Adjustment

Crack the throttle valves, then manually open and close the choke valve. The tang on the secondary throttle lever should freely engage in the notch of the lockout dog (Fig. 18). If an adjustment is necessary, bend the tang on the secondary throttle lever, until engagement has been made. Use Tool T-109-22 for this operation. After adjustments have been made, reinstall carburetor on engine, using a new gasket. It is suggested that the carburetor be filled with clean gasoline. This will help prevent dirt that is

47%4 ?„.

_14r) CA10 NOTCH OF LOCK OUT ROD TANG ON SECONDARY THROME LEVER

SLOWLY OPEN THROTTLE VALVES

IC • CHOKE VALVE WIDE OPEN

rif

NK600A

Fig. IS—Checking Secondary Throttle Adjustment

trapped in the fuel system, from being dislodged by the free flow of fuel, as the carburetor is primed. Fast Idle Speed Adjustment (On Vehicle)

Fast idle engine speed is used to overcome cold engine friction, stalls after cold starts and stalls because of carburetor icing. Set this adjustment after vehicle odometer indicates over 500 miles to insure a normal engine friction level. Prepare engine by driving at least 5 miles. Connect a tachometer and set curb idle speed and mixture, then proceed as follows: (1) With engine off and transmission in PARK or NEUTRAL position open throttle slightly. (2) Close choke valve until fast idle screw can be positioned on the second highest speed step of fast idle cam (Fig. 20). (3) Start engine and determine stabilized speed.

SCALE

BEND THROTTLE CONNECTOR ROD AT THIS ANGLE CURB IDLE SPEED SCREW BACKED OFF

SECONDARY SHOE (BEND TO ADJUST) THROTTLE FULLY CLOSED

// NK599A

Fig. 17—Chocking Act*'orator Pump Adjustment

%%DRILL OR GAUGE

PY804

Fig. 19—Checking Clearance Between Closing Shoes


14-80 FUEL SYSTEM—AFB env , SCALE

CHOKE VALVE WIDE OPEN

ao-

ir_

BOWL VENT VALVE CHECKING OPENING BOWL VENT VALVE OPERATING ROD

FAST IDLE CAM

CA-MN')

■, \SCR E,, FAST IDLE SPEED ADJUSTING SCREW ON SECOND HIGHEST STEP

PYBOS

Fig. 20—Fast Idle Speed Adjustment (On Vehicle)

Turn fast idle speed screw in or out to secure specified speed. (Refer to Specifications). (4) Stopping engine between adjustments is not necessary. However, reposition fast idle speed screw on cam after each speed adjustment to provide correct throttle closing torque. Before adjusting idle and/or fast idle speeds and mixtures, make sure that the basic timing and the distributor control valve are correctly adjusted as outlined under Idle Speed Adjustment (Curb Idle).

Bowl Vent Valve Adjustment (E.C.S.)(Fig. 21) To check the bowl vent valve adjustment, proceed as follows: (1) Using Tool T109-43, remove bowl vent valve checking hole plug in air horn. (2) With throttle valves at closed curb idle position, insert a narrow ruler down through hole. Allow ruler to rest lightly on top of valve. The reading

BEND LEVER FOR ADJUSTMENT

THROTTLE VALVES CLOSED TO CURB IDLE PY731

Fig. 22—Checking Bowl Vent Valve Opening

should be 3/4 inch from top of valve to top of air horn casting at opening. (Fig. 22.) (3) If an adjustment is necessary, bend bowl vent valve operating lever, until correct valve opening has been obtained. (4) Install new plug and rap lightly to seat, using a hammer.

Idle Speed and Mixture AdjustmentAFB.47455 and AFB-47465 Rear Carburetors AFB-47425 Front Carburetor Connect a tachometer and warm-up the engine to

OPERATING LEVER

3 i eir ---4- CURB IDLE r SPEED _. ADJUSTING SCR W

viti.a.ici , OPERATING ROD BOWL VENT VALVE SPRING

1

• \am _ -- Tie • z fir

PY806

Fig. 21—Bowl Vent Valve Assembly

Fig. 23—Curb Idle

Spat' Solenoid Adjustment


HOLLEY 4160—FUEL SYSTEM 14-81 normal operating temperature. Be sure the choke is fully off and that the engine is at curb idle, (transmission in Neutral). Proceed as follows: (1) Turn the idle mixture screws from 1 to 2 turns open. (2) Set the idle screws 2 turns open and adjust the idle speed to 750 rpm. (Manual or Automatic Transmissions). Adjust the idle mixture screws on each carburetor for maximum rpm. Repeat on each carburetor. Before attaching the rod at each carburetor, check the transmission to throttle linkage adjustments, so that the idle position is not disturbed. Accurate carburetor synchronization or balance is extremely important and when performed should be rechecked and rebalanced in the outside ambient temperature after a five mile or more road test. This readjustment will prevent rough engine idle perform-

zinc° and possible engine stalling when the vehicle is returned to the owner.

Idle Speed Solenoid Adjustment To set idle speed solenoid for correct engine r.p.m. proceed as follows: (1) Warm up engine to normal operating temperature, then attach a tachometer. (2) With engine running, turn idle speed solenoid adjusting screw in or out to obtain 900 r.p.m. on automatic transmission equipped vehicles and 1000 r.p.m. on standard transmission equipped vehicles. (Fig. 23). (3) After specified r.p.m. has been obtained and with engine still running (to energize solenoid), adjust curb idle speed screw until end of screw just touches stop on carburetor throttle body. Now, back off 1 full turn to obtain slow curb idle speed setting. (Approximately 650 to 700 r.p.m.)


HOLLEY 4160 SERIES CARBURETOR INDEX Automatic Choke-Well Type Carburetor Adjustments Adjusting the Floats Checking Bowl Vent Valve Clearance Checking Pump Lever Clearance Checking Wet Fuel Level Choke Unloader (Wide Open Kick) Fast Idle Cam Position Fast Idle Speed (On or Off Vehicle)

Page 2 93 96 96 99 97 98 97

Idle Speed (Curb Idle) Secondary Throttle Vacuum Kick (On or Off Vehicle)

Disassembling the Carburetor Cleaning Carburetor Parts General Information Inspection and Reassembly Servicing Carburetor Specifications

Page 3 99 98 88 89 81 91 88 115

GENERAL INFORMATION 383 Cubic Inch Engine

The Holley four barrel carburetor models C.A.S. (Cleaner Air System) R-4367A, R-4368A and R-4369A are used on the 383 Cu. in. engines when the vehicles are equipped with manual or automatic transmissions respectively. Model R-4369A is used with vehicles equipped with air conditioning only and has a hot idle compensator valve. This valve is a thermostatically operated air bleed, to relieve an overrich condition at idle. This condition is the result of excessive heat and resultant overrich mixtures. (Fig. 1). The Holley four barrel carburetor models E.C.S. (Evaporation Control System) R-4217A and R-4218A are also used on the 383 cu. in. engines when the vehicles are equipped with a manual or automatic transmissions respectively. These two carburetors are also equipped with a hot idle compensator valve as is R-4369A above. (Fig. 2). All of these carburetors are equipped with a distributor ground switch, which retards the distributor when the carburetor is at curb idle, for better emission control.

440 Cubic Inch Engine The Holley four barrel carburetor model C.A.S. (Cleaner Air System) R-4366A is used on the 440 cu. in. engine when the vehicle is equipped with an automatic transmission. (Fig. 1). The Holley four barrel carburetor model E.C.S. (Evaporation Control System) R-4360A is also used on the 440 Cu. in. engine when the vehicle is equipped with an automatic transmission. (Fig. 2). Both of these carburetors are equipped with a hot idle compensator valve. This valve is a thermostatically operated air bleed, to relieve an overrich condition at idle. This condition is the result of excessive heat and resultant overrich mixtures. The distributor ground switch retards the distributor when the carburetor is at curb idle, for better emission control. Since the service procedures are identical on all Holley four barrel carburetors, the illustrations showing the various disassembly procedures will not always show any one specific carburetor. The Holley 4160 Series Carburetor (Figs. 1, 2 and 3) can be considered as two dual downdraft carburetors


14-82 FUEL SYSTEM-HOLLEY 4160 SECONDARY FUEL BOWL

CHOKE VALVE

CHOKE I INK

IDLE MIXTURE SCREW (LEFT HAND THREAD) SECONDARY VACUUM DIAPHRAGM BOWL VENT VALVE

METERING BLOCK

CHOKE DIAPHRAGM LINK PRIMARY FUEL BOWL

CAM POSITION ADJUSTING TANG

DISTRIBUTOR VACUUM CONNECTION SECONDARY STOP LEVER

f

CHOKE CONTROL LEVER FAST IDLE CAM CHOKE UNLOADER LEVER

VACUUM DIAPHRAGM HOSE

-

CLOSED CRANKCASE VENT TUBE FITTING

CHOKE I VACUUM DIAPHRAGM NR4498

C.A.S CARBURETOR

CHOKE VALVE GUARD CHOKE VALVE

BOWL VENT VALVE SECONDARY VACUUM DIAPHRAGM FUEL TRANSFER TUBE

FUEL BOWL

IDLE MIXTURE ADJUSTING SCREW LIMITER CAP

CARBURETOR TO AIR CLEANER VENT TUBE FITTING ACCELERATOR PUMP ADJUSIING NUi

HOT IDLE COMPENSATOR VALVE COVER

ACCELERATOR PUMP LEVER THROTTLE BODY CURB IDLE SPEED ADJUSTING SCREW THROTTLE LEVER

SECONDARY THROTTLE SHAFT SECONDARY THROTTLE CONNECTING LINK

Fig. I—Carburetor Assembly (C.A.S.)

PY871


HOLLEY 4160—FUEL SYSTEM 14-83 HOT IDLE COMPENSATOR VALVE COVER

SOW! VENT VALVE OPERATING ROD CHOKE VALVE

FUEL TRANSFER TUBE CHOKE YAWL:

SECONDARY VACUUM DIAPHRAGM

BOWL VENT VALVE

FUEL BOWL

BOWL VENT VALVE OPERATING ROD

CHOKE VACUUM DIAPHRAGM

BOWL VENT VALVE PLUNGER

IDLE MIXTURE ADJUSTING SCREW

DISTRIBUTOR GROUND SWITCH CONNECTOR

SECONDARY VACUUM DIAPHRAGM

IDLE MIXTURE ADJUSTING SCREW

ACCELERATOR PUMP ADJUSTING NUT ACCELERATOR PUMP LEVER

THROTTLE LEVER

CURB IDLE SPEED ADJUSTING SCREW

SECONDARY IDLE AIR BLEEDS

BOWL VENT VALVE VENT TUBE

CARBURETOR TO AIR CLEANER SECONDARY VENT TUBE STOP LEVER FITTING CHOKE SECONDARY CONTROL THROTTLE LEVER SHAFT SECONDARY THROTTLE CONNECTOR LINK

FAST IDLE CAM

CHOKE DIAPHRAGM LINK

VACUUM HOSE

DISTRIBUTOR VACUUM ADVANCE TUBE CONNECTION

CH KE UNLOADER LEVER

PY872

Fig. 2 —Carburetor Assembly (E.C.S.) ,....,....SECONDARY FUEL BOWL SECONDARY HIGH SPEED BLEEDS

SECONDARY VACUUM DIAPHRAGM

SECONDARY IDLE AIR BLEEPS BOOSTER VENTURIS

PRIMARY IDLE AIR BLEEDS

PRIMARY IDLE AIR BLEEDS

CHOKE DIAPHRAGM CURB IDLE AIR BLEEDS BOWL VENT ROD

CURB IDLE AIR BLEEDS PRIMARY HIGH SPEED BLEEDS PRIMARY FUEL BOWL

Nadi B Fig. 3—Carburetor Assembly (Top View)


14-84 FUEL SYSTEM—HOLLEY 4160 mounted side by side, each having its own fuel bowl and float system. The two fuel bowls insure a constant supply of fuel for all the fuel metering systems. Fuel from the bowls flow into the primary and the secondary metering bodies where the fuel is mixed with air for all phases of engine operation. This type of metering provides for adequate diagnosis and easier servicing. The two primary bores have one choke valve, connected to a well type automatic choke. Each bore has its own venturi, booster venturi, main fuel discharge nozzle and throttle valve. Additional fuel for acceleration is supplied by a diaphragm type, mechanically operated pump which is located on the primary fuel bowl. The pump is actuated from a cam on the primary throttle. An override spring on the pump operating lever prolongs the discharge of fuel for smoother acceleration. A power valve, mounted on the primary metering body, which is actuated by manifold vacuum, delivers the additional fuel necessary for full power and high speed operation. The larger volume of fuel, in two separate bowls exposed to the cooling air stream, is an effective means of reducing percolation and hard starting when the engine is hot. An external vent on the primary bowl, vents the primary fuel bowl when the throttle is closed. The primary and/or secondary bowls can be quickly removed to adjust the fuel level or change the fuel inlet valve without removing the carburetor from the engine. Primary Fuel Inlet System All fuel first enters the primary fuel bowl which supplies the four basic metering systems with the required amount of fuel (Fig. 4). The fuel enters the fuel bowl through a fuel inlet fitting and into the fuel inlet valve. The amount of FUEL TRANSFER TUBE

FLOAT SHAFT

FLOAT LEVER SPRING

FUEL INLET

FLOAT

FUEL INLET NEEDLE AND SEAT BAFFLE

Fig. 4 —Primary Fuel Inlet System

NP599B

fuel entering the fuel bowl is determined by the space between the top of the movable needle and its seat and also by the pressure from the fuel pump. The fuel inlet system must constantly maintain the specified level of fuel as the basic fuel metering systems are calibrated to deliver the proper mixture only when the fuel is at this level. A float spring is incorporated under the float to keep the float in a stable position. The float chamber is vented internally by the vent tube at all times. At curb idle or when the engine is stopped, the chamber is also vented by the external vent on top of the primary fuel bowl. This external vent provides a release of excess fuel vapors from the bowl. Idle System (Fig. 5) At idle and low speeds, the air flow through the carburetor is not sufficiently strong enough to draw fuel through the primary barrel venturi for the main metering system. Intake manifold vacuum is high because of the greater restriction to the air flow by the nearly closed throttle valves. This high manifold vacuum is used to provide the pressure differential which operates the idle system. The carburetor utilizes two idle systems, one for each primary barrel. Since the two passages function identically, only one side will be considered in this explanation (Fig. 5). At idle, the near atmospheric pressure in the float chamber causes the fuel to flow through the idle system to the greatly reduced pressure are below throttle plate. Fuel flows from the float chamber through a restriction into the curb idle well. The fuel flows up this vertical idle well through the idle feed restriction, and then it is mixed with air coming in from the idle air bleed. This fuel-air mixture then flows down another vertical passage. At the bottom of this vertical passage the fuel-air mixture is metered by an idle limiter screw. (This adjustment is made at the factory and no field adjustment should be required). However, if an adjustment is necessary, refer to "Rough Idle and Low Speed Surge" paragraph under General Information. The mixture then flows through a channel in the throttle body to the curb idle discharge port. The fuel is discharged into the throttle bore just below the throttle valve. The air that is supplied to the curb idle system is supplied throtigh two idle air bleed restrictions and by a curb idle air bleed adjusting screw. This is the only screw used to adjust curb idle mixture. The screw is located near the primary bowl vent on the choke air horn. Turning the screw clockwise leans the curb idle mixture; counter-clockwise enrichens the mixture.


HOLLEY 4160—FUEL SYSTEM 14-85

CURB IDLE AIR BLEED trPs

CURB IDLE FUEL RESTRICTION IDLE LIMITER NEEDLE CURB IDLE DISCHARGE PORT CURB IDLE SYSTEM IDLEAIRTRANSFER BLEED NON ADJUSTABLE

MAIN WELL IDLE TRANSFER SLOT PRIMARY IDLE TRANSFER SYSTEM NR5568 rig.

Sysrem

Primary idle Transfer System (Fig. 5)

A separate off-idle system is used in the carburetor to provide fuel air mixture from idle operation until the main system is in full operation. Fuel for the idle transfer system enters the main well through the main jet and travels up through the idle transfer tube and crosses over a passage into a vertical channel where air is added from the idle air bleeds. The fuel air mixture is then discharged through the primary transfer slots. As the throttle valve is opened still wider and engine speed increases, the air flow through the carburetor is also increased. This creates an increased vacuum in the venturi to bring the main metering system into operation. The flow from the idle transfer system tapers off as the main metering systems begin discharging fuel. The two systems are engineered to provide smooth gradual transition from idle to cruising speeds.

monly called a vacuum. The strength of this low pressure is determined primarily by the velocity of the air flowing through the venturi. This, in turn, is regulated by the speed and power output of the engine. The difference, between the pressure in the booster venturi and the normal air pressure in the float chamber, causes fuel to flow through the main metering system (Fig. 6). At cruising speed, the fuel flows from the float chamber through the main jet, which measures or meters the fuel flow, into the bottom of the main well. The fuel moves up the main well past the main well air bleed hole in the side of the well. Filtered air, enters through the high speed air bleed in the main body and then into the main metering body by interconnecting passages. This mixture of fuel and air, being lighter than raw fuel, responds faster to any change in venturi vacuum and vaporizes more readily when discharged into the air stream of the venturi. The mixture of fuel and air moves up the main well and passes into the short horizontal passage leading to the main body, then through the horizontal channel of the discharge nozzle. This fuel is discharged into the booster venturi and then in the air stream of the carburetor venturi. The throttle valve controls the amount of fuel-air mixture admitted to the intake manifold, regulating the speed and power output of the engine in accordance with accelerator pedal movement. Power Enrichment System

Baring high power operation, the carburetor ntuot

provide a mixture richer than is needed when the engine is running at cruising speed under no great power requirements. The added fuel for power operation is supplied by the power enrichment system (Fig. 7). This system is controlled by manifold vacuum which gives an accurate indication of the power demands placed upon the engine. Manifold vacuum is BOOSTER VENTURI

HIGH

J

SPEED AIR BLEED

DISCHARGE NOZZLE

IDLE TUBE

MAIN JET

Main Metering System

As the engine is running, the intake stroke of each piston draws the air through the carburetor venturi and booster venturi. The air, passing through the restriction of the venturi, creates a low pressure com-

MAIN WELL

Fig. 6—Main Metering System

NR557A


14-86 FUEL SYSTEM—HOLLEY 4160 HIGH SPEED AIR BLEED

(Th DISCHARGE NOZZLE __ • BOOSTER VENTURI

DISCHARGE NOZZLE

POWER VALVE RESTRICTION PUMP DISCHARGE NEEDLE

MANIFOLD VACUUM

MAIN JET

MAIN WELL

NP602C

Fig. 7—Power Enrichment System

strongest at idle and decreases as the load on the engine increases. As the load on the engine is increased, the throttle valve must be opened wider to maintain a given speed. Manifold vacuum is thus reduced because the opened throttle valve offers less restriction to air entering the intake manifold. A vacuum passage in the throttle body transmits manifold vacuum to the power valve chamber in the main body. The power valve which is located in the main metering body is effected by this manifold vacuum. The manifold vacuum, acting on the diaphragm at idle or normal load conditions, is strong enough to hold the diaphragm closed, and overcomes the tension of the power valve spring. When high power demands place a greater load on the engine and manifold vacuum drops below a predetermined point, the power valve spring overcomes the reduced vacuum opening the power valve. Fuel flows from the float chamber, through the valve and out the small holes in the side of the valve through the diagonal restrictions in the main metering body and then into the main well. In the main well, the fuel joins the fuel flow in the main metering system, enriching the mixture. As engine power demands are reduced, manifold vacuum increases. The increased vacuum acts on the diaphragm, overcoming the tension of the power valve spring. This closes the power valve and shuts off the added supply of fuel which is no longer required. Accelerating Pump System Upon acceleration, the air flow through the carburetor responds almost immediately to the increased throttle opening. Therefore during the brief interval before the fuel, which is heavier than air, can gain speed and maintain the desired balance of fuel and air, the accelerating pump supplies fuel until the other systems can once again provide the proper mixture (Fig. 8). The accelerating pump is located in the bottom of the primary fuel bowl. The pump begins to function

DISCHARGE PASSAGE DIAPHRAGM

DIAPHRAGM RETURN SPRING PUMP INLET CHECK BALL

NP603C

Fig. 8—Accelerating Pump System

when the pump operating lever is actuated by throttle movement. When the throttle is opened, the pump linkage, actuated by a cam on the primary throttle shaft, forces the pump diaphragm up. As the diaphragm moves up, the pressure forces the pump inlet check ball on its seat preventing fuel from flowing back into the float chamber. The fuel flows from the short passage in the fuel bowl into the long diagonal passage in the primary metering body. The fuel passes into the main body and then in the pump discharge chamber. The pressure of the fuel causes the discharge needle valve to raise and fuel is discharged into the venturi. As the throttle is moved toward the closed position, the linkage returns to its original position and the diaphragm spring forces the diaphragm down. As the diaphragm returns to its original position the pump inlet check ball is moved off its seat and the diaphragm chamber is filled with fuel from the float bowl. Secondary Throttle Operating System At lower speeds, the secondary throttle valves remain nearly closed, allowing the engine to maintain satisfactory fuel air velocities and distribution. When engine speed increases to a point where additional breathing capacity is needed, the vacuum controlled secondary throttle valves open automatically. Vacuum taken from one of the primary barrels and one of the secondary barrels acts upon a diaphragm which controls the secondary throttle valves. At high speeds when engine requirements approach the capacity of the two primary bores, the increased primary venturi vacuum moves the diaphragm, compressing the diaphragm spring. The diaphragm, acting through the diaphragm link and lever, will commence to open the secondary throttle valves (Fig. 9). The position of the secondary throttle valves depends on the strength of the vacuum. This in turn, is determined by the air-flow through the bores to the


HOLLEY 4160—FUEL SYSTEM 14-87

DIAPHRAGM CHAMBER

SECONDARY VENTURI PICK-UP

PRIMARY VENTURI PICK-UP

CODE MN FUEL AIR v%%C#MAIN METERING ' ,2FUEL-AIR :,IDLE FUEL-AIR

IDLE AIR BLEED MAIN AIR BLEED IDLE RESTRICTION

DIAPHRAGM DIAPHRAGM ROD

SECONDARY THROTTLE PLATE

AIN METERING RESTRICTION NP604B

UTRANSFER CONSTANT IDLE DISCHARGE IDLE WELL NR558A

Fig. 9—Secondary Throttle Operating System

Fig. 10—Secondary Fuel Metering System

engine. As the air-flow increases, a greater secondary throttle valve opening will result and the secondary barrels will supply a greater portion of the engine's requirements. As top speed is reached, the secondary throttle valves will approach wide open. As the secondary throttle valves begin to open, a vacuum is created in the secondary barrels, first at the throttle valves and then, as air flow increases, at the throat of the secondary venturi. This vacuum assists the secondary metering system to operate. When engine speed is reduced, venturi vacuum in the bores become weaker. As the vacuum acting on the diaphragm is lessened, the load on the diaphragm spring will commence closing the secondary valves. The diaphragm spring is assisted by the design of the secondary valves. Each secondary valve is slightly offset. When the valves are closing, the combined force of manifold vacuum and the air stream has greater effect on the larger, upstream area of the valves forcing the valves to a closed position. The secondary valves are retained in the closed position when the primary valves are fully closed by the secondary throttle connecting rod. This rod, which is fastened to the primary throttle lever, rides in a slot in the secondary throttle lever.

(Fig. 10). A secondary fixed curb idle discharge passage supplies fuel directly to the intake manifold, thus allowing a smoother idle. When the secondary throttle valves are opened further the pressure differential causes the secondary main metering system to begin functioning.

Secondary Fuel Metering Systems The secondary system is supplied with fuel from the secondary fuel bowl, which receives its fuel through a connecting tube, from the primary fuel inlet. The secondary fuel bowl is equipped with a fuel inlet assembly which regulates the flow of fuel into the bowl, the same as the primary fuel bowl. The secondary fuel inlet system must maintain a specified level of fuel as the two secondary fuel systems are calibrated to deliver the proper mixture only when the fuel is at this level. As the valves begin to open the fuel flows through the secondary metering restrictions into the idle well

Automatic Choke The automatic choke supplies enriched fuel-air mixture for starting and operating a cold engine (Fig. 11). Most of the fuel from the carburetor of a cold engine is liquid. This fuel in liquid form burns slowly and incompletely. Power loss and stalls result. The choke valve supplies the extra fuel by restricting air flow during cranking and warm-up. Vacuum created by the restriction causes this fuel flow from both the main metering and idle systems. The thermostat spring of a cold engine pushes the choke valve toward the closed position. When the engine is started, manifold vacuum acts on both the VACUUM DIAPHRAGM

CHOKE CONTROL LEVER VACUUM TUBE THERMOSTATIC COIL SPRING ASSEMBLY

k

FAST IDLE CAM LEVER NP6068

Fig. 1 I—Automatic Choke System


14-88 FUEL SYSTEM—HOLLEY 4160 choke valve and a vacuum diaphragm attached to the carburetor body. This vacuum acts to oppose the thermostat spring and partially opens the choke valve to prevent stalls from richness. The choke shaft does not pass through the center of a choke valve. Instead, it is offset to expose a large area at one side to manifold vacuum. During idle or low temperature crankbig, manifold vacuum is not sufficiently strong to open the choke valve. But air impact against, the valve causes partial opening. These two factors, vacuum and air impact allow ample air to run the engine. Continued running of the engine develops heat and causes the thermostat assembly to move to the open choke position. During the warm-up period, air flow past the partially open offset choke valve acts to open the valve. Just as in the start cycle, vacuum and air impact combine to control the choke valve. The engine required less choking at high speeds. The offset choke valve, vacuum diaphragm and thermostat spring are engineered to provide satisfactory choking for most conditions of engine speed, output and temperature. Fast Idle The choke control lever at the carburetor actuates

a fast idle cam during choking. A cam has a series of steps designed to increase carburetor air flow to maintain satisfactory cold engine speed levels. The proper cam step is moved into position as the choke rod is moved from closed to open conditions. Each step permits a slower idle rpm as engine temperature rises and choking is reduced. Spark Advance The distributor utilizes changes in air pressure within the carburetor to control spark timing to satisfy all engine speed and load conditions. In order to obtain a vacuum to operate the spark advance as dictated by the engine speed and load conditions, a port is located in the throttle bore just above the full closed position of the throttle valves, as the throttle is opened, this port is subject to manifold vacuum, which varies with changes in engine load. This port in the throttle body is connected to the main body by a short vertical passage, and then to a passage in the main metering body. This passage leads to an outlet on the side of the main metering body which connects to a single flexible tube to the distributor.

SERVICE PROCEDURES Servicing the Carburetor Dirt, dust, water and gummy deposits are some of the main causes for poor carburetor operation. However, proper cleaning and the installation of new parts, where required, will return the carburetor to its originally designed performance. When overhauling the carburetor, several items of importance should be observed to assure a good job: (1) All parts should be carefully cleaned in a suitable solvent, then inspected for damage or wear. (2) Use air pressure only to clear the various orifices and channels. (3) Replace questionable parts with New Ones. When checking parts removed from the carburetor, it is at times rather difficult to be sure they are satisfactory for further service. It is, therefore, recommended that in such cases, New Parts be installed. (4) Always use a complete repair kit when overhauling the carburetor. Using the code number stamped on the airhorn, adjacent to the fuel inlet, refer to the parts catalog and order the correct repair kit for the carburetor being worked on.

DISASSEMBLING CARBURETOR To disassemble the carburetor (Fig. 1) for cleaning or overhaul, proceed as follows: (1) Install four elevating legs, Tool T109-287S in mounting flange holes in throttle body, or use Carburetor Stand C-3886. (These tools are used to protect the throttle valves from damage and to provide a suit-

able base for working). (2) Remove primary fuel bowl assembly by sliding straight off balance tube (Fig. 2). (3) Remove primary metering body by sliding straight off balance tube (Fig. 3). Remove plate to body gasket. (4) Remove accelerating pump operating lever "E" clip and slide lever assembly off stub shaft. Remove adjusting nut, spring and screw. (5) Remove fuel transfer tube and "0" rings (Fig. 3). (6) Remove secondary fuel bowl assembly. (7) Using a clutch head screwdriver (Tool CL-13) remove clutch head screws, carefully work secondary metering body, plate and gaskets off balance tube (Fig. 4). (8) Remove balance tube, washers and "0" rings by sliding out of main body (either end). (9) Disconnect choke diaphragm hose from throttle body fitting, then remove diaphragm assembly, at the same time disengaging link from fast idle cam lever. (10) Remove "E" clip that retains fast idle cam lever and cam. Slide lever and cam off stub shaft, and at the same time, disengage choke rod from cam lever. (Note position of fast idle cam to cam lever.) (11) Remove secondary diaphragm attaching screws and remove diaphragm assembly. Disengage diaphragm stem from secondary stop lever. Remove gasket. (12) Remove pump discharge nozzle retaining


HOLLEY 4160—FUEL SYSTEM 14-89 screw, then lift out discharge nozzle. Remove gasket from nozzle (top and bottom). (13) Remove screws that attach hot idle compensator valve cover to main body. Lift off cover, then remove valve and gasket. (Fig. 5). If so equipped. (14) Remove curb idle speed screw and spring. Then remove insulating washer from between lead terminal and stop. Remove distributor ground switch lead. Using a thin blade screw driver, remove insulator bushing from boss on body. (Fig. 5). (15) Invert carburetor and drop out pump discharge jet needle from discharge passage. (16) With carburetor inverted, remove screws that attach the throttle body to main body. Remove throttle body and discard gasket. Disassembling Fuel Bowls (Primary and Secondary) Primary (1) Remove bowl vent valve assembly (Fig. 6). On E.C.S., remove operating rod assembly. (2) Remove float retainer "E" clip, then slide float and spring out of float chamber. (As float is being removed, the fuel inlet needle may drop out of seat assembly.) Remove float baffle. (3) Remove fuel inlet needle valve seat. Discard the gasket. (4) Remove screws attaching accelerator pump cover. Remove cover, then carefully remove diaphragm and spring. (5) Remove fuel inlet fitting and discard gasket. (6) Remove screws attaching bowl vent valve cover iu fuel bowl. Lift oft cover aria remove vent valve, spring and seal. (Fig. 1). Remove seal from bottom of valve. Secondary (1) Remove float retainer "E" clip, then slide float and spring out of float chamber. (As float is being removed, the fuel inlet needle may drop out of seat assembly.) Remove float baffle. (2) Remove fuel inlet needle valve seat. Discard gasket. It should be noted that the Primary and Secondary fuel bowl baffles are of a different design and should be installed in the correct bowl at reassembly.

Disassembling Main Metering Body Primary (1) Using Tool C-3747, remove power valve assembly from primary metering body (Fig. 7). (2) Using Tool C-3748, remove main metering jets. (Fig. 8). (3) Turn idle limiter caps to stops. Remove caps by prying off ends of screws, using a suitable tool. (Be careful not to bend screws.) Be sure and count number of turns to seat the screws, as the same number of

turns (from the seat) must be maintained at installation. Remove screws and springs from metering body. Secondary No disassembly required, but it is very important that the well bleed parts, main metering restrictions and idle feed restrictions are clean (Fig. 9). Disassembling Secondary Diaphragm (1) Remove the diaphragm cover screws and separate diaphragm cover from housing. (2) Remove diaphragm return spring from cover, then slide diaphragm out of housing. Disassembling Throttle Body CAUTION: In normal routine cleaning and overhaul of the carburetor, do not remove the throttle valves unless they are nicked or damaged. If necessary to remove, proceed as follows:

(1) Remove screws that hold throttle valves to throttle shafts. These screws are staked to prevent loosening and care is necessary to avoid breaking off in shaft. Remove staking with a file.

(2) Slide damaged throttle valves out of bores. It should be noted at this time, that the secondary throttle valves are thicker than the primary valves. Do not install secondary valves in primary bores or visa versa as the relationship of the primary valves to the idle transfer port and spark advance control ports is carefully established for one particular assembly.

CLEANING CARBURETOR PARTS The recommended solvent fnr gum dapncite is do. natured alcohol which is easily obtainable. However, there are other commercial solvents, (such as Metalclene) which may be used with satisfactory results. The choke diaphragm can be damaged by solvents. Avoid placing the diaphragm assembly in ANY liquid. Clean the external surfaces with a clean cloth or soft wire brush. Shake dirt or other foreign material from the stem side of the diaphragm. Depressing the diaphragm stem to the retracted position, will provide an additional hole for the removal of dirt. Compressed air can be used to remove loose dirt, but should not be connected to the vacuum inlet fitting. IMPORTANT: If the commercial solvent or cleaner recommends the use of water as a rinse, it should be "HOT". After rinsing, all trace of water must be blown from the passages with air pressure. It is further advisable to rinse all parts in clean gasoline or kerosene to be certain no trace of moisture remains. Never clean jets with a wire, drill or other mechanical means because the orifices may become enlarged, making the fuel mixture too rich for proper performance.

DO NOT clean any rubber diaphragms or plastic parts in cleaning solvent because of possible damage.


FUELSYSTEM-HOLLEY4160

Fig. 1.-Carburetor Assembly (Exploded View)


HOLLEY 4160—FUEL SYSTEM 14-91 1—Lever. Pump Operating 2—Loa:tut 3—Spring override S—Scrert Pump Adjusting 5—Screw. Fuel Bowl (Ptirrary) 6—Gasket, Bowl Screw 7—Fuel BOAri (Primary) 4—Gasket Fuel Bowl 9—Metering Body (Primary Side) 10—Gasket, Metering Body 11—Fuel Tube (Float Bowl Connecting) 12-0 Rings, Fuel Tube 13—Screw, Fuel Bowl (Secondary) 14--Gasket, Bowl Screw 15—Fuel Bowl (Secondary) 16—Screw, Metering Body (Secondary) 17—Metering Body (Secondary) 18—Gasket Metering Body (Secondary) 19—Plate, Metering Body (Secondary) 20-6asfet Metering Body Plate 21—Balance Tube 22—Washers. Balance Tube 23—'0" Rin,a, Balance Tube 24—Choke Link 5—Seal. Choke Rod 26—Throttle Body Screws 27—Main Body 28—TItrottle Body 29—Gasket Main to Throttle Body 30—Screw, Bowl Vent Valve Rod Clamp 31—Clamp, Valve Rod 32—Rod, Bowl Vent Valve 33—Spring. Vent Valve Rod 34—valve, Bowl Vent 35—Retains, Clip, Float 36—Float 37—Spring Float 38—aafile, Flcet 39—Needle Valve and Seat 40—Scrc-rs. Fuel Pump Corer 41—Cover Assembly, Fuel Pump 42--Diaphragro, Fuel Pump 43—Spring, Fuel Pump Diaphragm 44—Fitting. Fuel Inlet 45—Gasket Fuel Inlet Fitting 46—Valve Assembly, Power

47--Gasket Power Vake 48—Primary Jets 49—Needle. Idle Mixture Adjusting 50—Gasket Idle Mixture Needle 51—Screws. Choke Valve 52—Choke Valve 53—Choke Shaft & Lever Assembly 54—Discharge Nozzle Screw. Pump 55—Gasket, Nozzle Screw 56—Nozzle, Pump Discharge 57—Needle, Pump Discharge Jet 58—Cotter Pins, Connecting Rods 59—Rod, Secondary Connecting 60—Screw and !Defroster. Fast Idle Cam Lever 61—Lever, Fast Idle Cam 62—Screws, Primary Throttle Valve El—Throttle Valves, Primary 62—Sc cc's, Pump Cain El-..Purnp Cam 66—Screw and !Dekrastte. Secondary Stop Lever 67—Lever. Secondary Stop 68—Screws, Secondary Throttle Valves 69—Throttle Valves, Seconder/ 70—Fast Idle Cam Lever 71-4ast Idle Cam 72—Retainer (E-Clip) 73—Choke Diaphragm Link 74—Choke Diaphragm Assembly 75—Choke Vacuum Hose 76—Choke Diaphragm Bracket Screw 77—Secondary Diaphragm Cover Screw 78—Diaphragm Cover (Machine) 79—Secondary Diaphragm Return Spring 80—Secondary Diaphragm Assembly 81—Secondary Diaphragm Housing (Machine) 82—Secondary Diaphragm Housing Gasket 83—Secondary Diaphragm Assembly Screw 84—Throttle Connecting Rod Retainer Washer 85—Pump Operating Lever (E-Clip) 86—Secondary Stop Screw 87—Throttle Stop Sas. 88—Throttle Stop Screw Spring 89—Baffle 90—Limiter Cap 91—Bowl Vent Valve Assy. (C.C.S.)

INSPECTION AND REASSEMBLY

vanee control ports. (2) Install new attaching screws but do not tighten. (3) Hold valves in place with fingers. (Fingers pressing on high side of valves.) (41 Tap valves lightly with screwdriver in this position to tenter in bores. Tighten securely. Operate the throttle shafts. From closed to open position, they must operate smoothly without drag or sticking. Hold throttle body up to a strong light. The light which is visible around the outer diameter of the valves and

Throttle Body if the throttle valves were removed because of damage, install new valves as follows: (1) Slide new primary throttle valves in position on throttle shaft, with the valve number on the bottom (flange side) and toward idle transfer and spark adKowa. vEN7 VALVE PRIMARY METERING BALANCE ASSEMBLY TUBE BODY PRIMARY BOWL ASSEMRIY

FUEL TRANSFER TUBE

BALANCE ?UM

"0" RING

Mk TIRING BODY -

FUEL PUMP It

FUEL 5C0A't. :SKR

ACCELERATING PUMP OPERAIINO LEVER

GASXE I NP7S6C

TRANEFER FUSE

NP75511

Fig. 2—Removing or Installing Primary Fuel Bowl

Fig. 3—Removing or Installing Primary Metering Body and Plato


14-92 FUEL SYSTEM—HOLLEY 4160

C ARtURETOR 1 M.A'N BOO! 0450 PLATE GASKET

d -

BALANCE TUB:

SECONDARY METERING BODY

NP757C

74 CLUTCH HEAD SCREW

Fig. 4—Secondary Mitering Body, Plate and Gaskets Fig. 7—Removing or Installing Power Valve DISTRIBUTOR GROUND is SwOCH LEAD

41-

CURB IDtE SPEED AiwusTING scREw GASKET

MAIN METERING SOOT iPRITAARY)--____,. ROWE.?

VALVE

VALVE TCC

VALVE COVER NSULATING BUSIIING

GROUND SWITCH TERMINAL

INSULATING WASHER

pr103

SCREWS

MAIN MtTERING JETS

Fig. 8 —Removing or installing Main Metering Jets

Assembling Main Metering Body (Primary)

Fig. 5—Removing or Installing Hot idle

Compensator Valve

the bores should be uniform. (5) Install secondary throttle valves in the same manner as described previously. The numbers stamped on the valves must be toward idle transfer and spark advance ports in primary bores. For adjustment (See Secondary Throttle Adjustment).

(1) Install idle mixture screws and springs in metering body. (The tapered portion must be straight and smooth. If tapered portion is grooved or ridged, a new idle mixture screw should be installed to insure having correct idle mixture control.) DO NOT USE A SCREW DRIVER. Turn screws lightly against their MAIN AIR

BOWL VENI VAIVE

writ

%AFT I 1- Pi Al I

MAIN WELL AND AIR

run

IDLE FEED RESTRICTION

sr,

IDLE FUEL WELL

0

FLOAT PIVOT PIN FLOAT RETARte E' CLIP FuEt INLET ACCELERATOR PUMP COVER AND LEVER

NY43C

ELL BLEED & SPRING

FLOAT NEEDLE AND st Al ASSEMBLY

Ng. 6—Primary feel Bowl Assembly

NP/S4

SCREW HOLES t4P761A Fig. 9—Secondary Metering Body


HOLLEY 4160—FUEL SYSTEM 14-93 PRIMARY FUEL BOWL DIAPHRAGM RETURN SPRING ACCELERATOR PUMP DIAPHRAGM COMA Cr BUTTON FUEL INLET FITTING PUMP INLET CHECK BALL (NOT REMOVABLE) PUMP LEVER NP762

411t€

GASKt I SEAT FUEL INLET NEEDLE FLOAT RC TA INC R

ACCELERATOR PUMP COVER ASSEMBLY tkan'S

FLOAT BAFFLE LOAT SPRING

PUMP COVER SCREWS

Fig. 10—Accelerating Pump (Exploded

View) seats with fingers. Back off the number of turns counted at disassembly. Install new plastic caps with tabs against stop. (2) Slide a new gasket over power valve and install, using Tool C-3747. Tighten securely (Fig. 7). (3) Install main metering jets (Fig. 8), using Tool C-3748. Tighten securely. Assembling Fuel Bowls Primary

(1) Install accelerator pump spring in position in fuel bowl, followed by diaphragm and pump cover. (When installing diaphragm, be sure contact button is toward pump lever in cover.) (Fig. 10). (2) Place cover over diaphragm (with lever on fuel inlet fitting side) (Fig. 10). Install attaching screws and tighten securely. (3) Install new gasket on fuel inlet needle seat (Fig. 11) then install in fuel bowl. Tighten securely. Slide fuel inlet needle into seat. (4) Install float baffle in position, then slide float hinge over pivot and secure with "E" clip. Install float spring. (5) Install new gasket over fuel inlet fitting, then install fitting in primary fuel bowl. Tighten securely. (6) Install bowl vent valve assembly on fuel bowl, being sure vent valve spring is hooked into bracket and loop of spring under operating rod. Position clamp then install attaching screw and tighten securely. (C.A.S.) Carburetors. (Figs. 1 or 2). (7) On E C.S. carburetors, install seal on bottom of vent valve. Slide plastic valve and seal into cover, with valve recess, mating with shoulder on underside of cover. (8) Install bowl vent valve spring in position in opening in bowl, then install valve and cover over spring. Install attaching screws and tighten securely. (9) Install bowl vent operating rod, clamp and spring in position on bowL Install attaching screw and tighten securely.

PRIMARY

FUEL BOWL

INLE1 run INLET

FLOAT ASSEMBLY

NP763

Fig. 11—Float, Needle, Seat and Baffle (Exploded View)

Secondary

(1) Install new gasket on fuel inlet needle seat (Fig. 11), then install in fuel bowl. Tighten securely. Slide fuel inlet needle into seat. (2) Install float bale in position, then slide float hinge over pivot and secure with "E" clip. Install float spring. Adjusting Floats

(1) Invert the primary fuel bowl and using a 15/64 inch drill shank or gauge, measure the clearance between toe of float and surface of fuel bowl. (Fig. 12). If an adjustment is necessary, bend float tang until correct clearance has been obtained. (2) Invert the secondary fuel bowl and using a 17/64 inch drill shank or gauge, measure the clearance between heel of float and surface of fuel bowl (Fig. 12). If an adjustment is necessary, bend float tang until correct clearance has been obtained. Assembling Main Body

(1) Place a new gasket on throttle body, then lower main body (Fig. 13) down on throttle body, aligning roll pin guides with openings in main body. Be sure primary bores of throttle body are on the same side as primary venturi. (2) Holding assembly together, invert assembly and install attaching screws. Tighten securely. (3) Install balance tube into main body and Stall new "0" rings and washers at each end. Be sure "0" rings are seated in recesses, followed by washers. (4) Install a new secondary metering body to main body gasket (Fig. 4) followed by metering body plate, plate gasket and body. Install clutch head screws and tighten securely. (Be sure the main metering restriction ports are at the bottom). (5) Position balance tube so that only 1 inch extends beyond the secondary metering body (Fig. 14). (Use a 6 inch ruler for this measurement.) (6) Place a new gasket over primary metering body aligning pin. (Rear) Carefully slide metering body


14-94 FUEL SYSTEM—HOLLEY 4160 "i• CLIP

1BAFFLF

FLOAT

FUEL BOWi

SECONDARY FUEL BOWL FUEL INLET

FLOAT SPRING

ACCELERATOR PUMP COVER AND LEVER

NEEDLE AND SEAT ASSEMBLY

PRIMARY FUEL BOW(

HEEL OF --- FLOAT 15.64" DRILL 7-64" DRILL OR GAUGE

TOE OF FLOAT

NP764A

Fig. 12—Checking Float Setting (Primary and Secondary) (Be sure and install distributor ground switch lead over balance tube and down into position against main lead clamp on long screw adjacent to fuel inlet.) and body. Slide a new "0" ring on each end of fuel tube, (9) alignbody metering over gasket new a Slide (7) fuel tube into opening in primary fuel install then body. against position ment studs and carefully on tube end until seated. in Press bowl. balance over bowl fuel primary install (8) Carefully gasnew Slide body. metering slide secondary fuel bowl over balagainst Carefully down and tube (10) kets over the long fuel bowl mounting screws, then ance tube and fuel tube and seat against gasket. Insecurely. Tighten bowl. fuel through install in position stall secondary fuel bowl attaching screws after inIf new gaskets are not used, a fuel leak will develop. installing new gasket. Tighten securely. POWER VALVE (11) Install accelerating pump discharge needle in VACUUM PASSAGE BALANCE TUBE SPARK VACUUM PASSAGE

SECONDARY INF FUEL PASSAGE

SECONDARY METERING BODY . ■•NG

Fig.73—Main Body Identification (Bottom View)

Fig. 14—Positioning Balance Tube

NP766t


HOLLEY 4160—FUEL SYSTEM 14-95 the discharge passage in the center of primary venturi. To test needle for sealing, pour clean gasoline into primary fuel bowl through vent valve opening. Push down on accelerator pump arm to expel air from the pump passages. Using a small clean brass rod, hold the discharge check needle firmly on its seat. Again press down on pump arm. No fuel should be emitted from the discharge passage. Fuel leakage at the discharge needle indicates the presence of dirt or a damaged check needle. Clean again and install a new needle. Retest for leakage. If fuel continues to leak past discharge check needle, attempt to reseat as follows: With the discharge check needle installed, insert a piece of drill rod down on the needle. Lightly tap the drill rod with a hammer to form a new seat. Remove and discard old needle and install a new one. Retest as described previously. If the service fix does not correct the condition, a new carburetor will have to be installed. (12) Install pump discharge nozzle gasket, nozzle and mounting screw and gasket. Tighten screw securely. Test nozzle operation. Press pump lever down. The two streams from the nozzle should be identical and should strike the two venturi in the same spot. (13) Slide the bowl vent valve shaft down between fuel tube and carburetor body. Hold in position, then install clamp, after engaging stub end of spring in clamp. Install retaining screw and tighten securely. (14) Loosen choke valve attaching screws slightly. (15) Tap lightly on choke valve to center valve in air horn. Holding choke valve with the fingers, tighten attaching screws securely. Stake by squeezing with pliers. (16) Engage fast idle cam with fast idle cam lever, then slide assembly onto stub shaft positioning fast idle cam behind fast idle cam lever. At the same time engage fast idle cam lever with choke rod. Install "E" clip to secure. Choke Vacuum Diaphragm Inspect the diaphragm vacuum fitting to be sure that the passage is not plugged with foreign material. Leak check the diaphragm to determine if it has internal leaks. To do this, first depress the diaphragm stem, then place a finger over the fitting to seal the opening. Release the stem. If the stem moves more than 1/16 inch in ten (10) seconds, the leakage is excessive and the assembly must be replaced. Install the diaphragm assembly on the carburetor as follows: (1) Engage choke link in slot in choke lever. (2) Place the diaphragm on the mounting surface Install and tighten the attaching screws securely. (3) Inspect the rubber hose for cracks before placing it on the correct carburetor fitting. Do not connect

the vacuum hose to the diaphragm fitting until after the vacuum kick adjustment has been made. (4) Install hot idle compensator valve gasket in position in recess in main body, followed by valve. (Be sure valve is positioned with legs toward outside of main body.) (Fig. 5). Place cover over opening and install attaching screws. Tighten securely. (If so equipped.) (5) Slide a new distributor ground switch insulated bushing into stop on main body, with the notch aligned with raised portion of boss. Force into position against stop. (6) Place insulating washer over tangs on lead wire terminal, then install curb idle speed screw with spring through terminal and washer. (7) Turn screw into boss, at the same time, keep insulating washer aligned. Assembling Secondary Diaphragm (1) Slide diaphragm into housing (Fig. 15). (2) Position diaphragm so that the vacuum hole in housing is aligned with vacuum hole in diaphragm. (3) Install diaphragm return spring with coiled end snapped over button in cover. (4) Support diaphragm stem in order to keep diaphragm flat as spring and cover are installed. (5) Align vacuum port in cover with port in housing then carefully lower cover. Install attaching screws and tighten securely. (6) Check diaphragm by pressing in on stem and placing finger over port. Diaphragm should stay in retracted position. (7) Install a new gasket in vacuum passage recess in diaphragm housing, then install secondary diaphragm on main body of carburetor and at the same time engage stem with secondary stop lever. Install screws and tighten securely. (8) Install pump lever on stub shaft and secure with "E" clip. Slide spring and locknut between fuel pump lever and pump operating lever. Open throttle valve and install adjusting screw. Tighten 2 or 3 threads to hold. The correct setting of the adjusting screw will be covered under adjustments. °USING

VACUUM HOLE STEM VACUUM HOLE

NP767

Fig. 15—Secondary Throttle Diaphragm (Exploded View)


14-96 FUEL SYSTEM—HOLLEY 4160 CARBURETOR ADJUSTMENTS It is very important that the following adjustments be made on a reconditioned carburetor: Qualifying the Choke Control Lever Choke Unloader Adjustment (wide open kick) Fast Idle Cam Position Adjustment Vacuum Kick Adjustment (On or off vehicle) Fast Idle Speed Adjustment (On the vehicle) Checking the Bowl Vent Valve Clearance Checking the Pump Lever Clearance Idle Speed Adjustment (Curb idle) Adjusting the Float Secondary Throttle Adjustment Idle Mixture Adjustment Checking Wet Fuel Level Checking Bowl Vent Valve Clearance (C.A.S.) To check the bowl vent valve clearance (Fig. 16), proceed as follows: (1) With throttle valves at curb idle, it should be possible to insert a 5/64 inch drill shank between bowl vent valve and top of primary fuel bowl, with the idle speed properly set. BOWL VENT VALVE OPERATING ROD

BOWL VENT VALVE PLUNGER STEM

E.C.S. CARBURETOR

THROTTLE VALVES AT CLOSED CURB IDLE

PY873

ADJUST VENT VALVE ROD HERE

DRILL OR GAUGE

,. Tomit;..

(2) If an adjustment is necessary, bend rod to change arc of contact with throttle lever, using Tool T109-213 until correct clearance has been obtained. Checking Bowl Vent Valve Clearance (E.C.S.) To check the bowl vent valve clearance adjustment, proceed as follows: U) With the throttle valves at curb idle, it should be possible to insert a number 72 drill shank (.005 to .025 Inn) between bowl vent valve plutigei stem and operating rod, (Fig. 16). (2) If an adjustment is necessary, bend rod to change arc of contact with throttle lever, using Tool T109-213, until correct clearance has been obtained. Checking Accelerator Pump Lever Clearance To check accelerator pump lever clearance (Fig. 17), proceed as follows: (1) With throttle valves wide open, and the pump lever held down, it should be possible to insert a .015 inch gauge between adjusting nut and lever. (2) If an adjustment is necessary, adjust pump override screw until correct clearance has been obtained. (3) There must be no free movement of pump leverage when throttle is at curb idle. Qualifying Choke Control Lever Adjustment of the choke control lever is necessary to provide correct relationship between choke valve, thermostatic coil spring and the fast idle cam. It should be checked and adjusted (if necessary) after carburetor assembly or as preparation of the choke system linkage before making the Vacuum Kick, Cam Position or Unloader Adjustment. These three adjustments must and should be made after qualification of the choke control lever. (1) Open the throttle to mid-position. (2) Close the choke valve by slight pressure on choke control lever. (3) The top of choke rod hole in control lever should be 1-11/16 ± 1/64 inch above choke assembly PUMP OVERRIDE SPRING

(51

THROTTLE VALVES IN WIDE OPEN POSITION

dinblep BOWL VENT VALVE SEAT ON AIR HORN

CARBURETOR TOE NT IF !CATION NUMBER C.A.S. CARBURETOR

THROTTLE VALVES IN CLOSED POSITION

NP769C

Fig. 16—Checking Bowl Vent Valve Clearance (C.O.S.) and (E.C.S.)

PUMP OVERRIDE ADJUSTING SCREW Np7698

Fig. 17—Checking Accelerator Pump Lever Clearance


HOLLEY 4160—FUEL SYSTEM 14-97 (carburetor on engine) or 14342 1/84 inch above carburetor base (Carburetor on bench) (Fig. 18). (4) Adjust if necessary by bending choke shaft rod at point indicated. CAUTION: Improper bending will cause binding of rod. Test for free movement between open and closed choke positions and rebend if necessary to eliminate any interferences.

GAUGE OR DRILL CHOKE VALVE

WALL OF AIR HORN

BEND AT THIS FONI

Choke Unloader Adjustment (wide open kick)

The choke unloatier is a mechanical device to partially open the choke at wide open throttle. it is used to eliminate choke enrichment during cranking of an engine. Engines which have been flooded or stalled by excessive choke enrichment can be cleared by use of the unloader. Adjust the system as follows: (1) Qualify the choke control lever, if necessary. (See Qualifying Choke Control Lever Paragraph). (2) Hold the throttle valves in the wide open position. Insert the specified drill between the upper edge of the choke valve and the inner wall of the air horn (see specifications). (3) With a finger lightly pressing against the choke control lever, a slight drag should be felt as the drill is being withdrawn. If an adjustment is necessary. bend the indicated tang until correct opening has been obtained (Fig. 19). Fast Idle Speed Adjustment (On Vehicle)

Fast idle engine speed is used to overcome cold engine friction, stalls after cold starts and stalls because of carburetor icing. Set this adjustment after the vehicle odometer indicates over 500 miles to insure a normal engine friction level. Prepare the engine by driving at least 5 miles. Connect a tachometer and set the curb idle speed and mixture, then proceed as follows: (1) With the engine off and the transmission in the PARK or NEUTRAL position. open the throttle slightly. TO ADJUST, BEND AT THIS POINT,

?sec

CHOKE -48•Nc-;;; CONTROL ' LEVER

j THROTTLE VA. OPEN POSF7

;

NFe.:5A

Fig. 19-Choke Unloader Adjustment (Wide Open Kick)

(2) Close choke valve until fast idle screw tang can be positioned on the second highte_st-speed step of the fast idle earn (Fig- 20). (3) Start the engine and determine the stabilized speed. Rend the fast idle tang by use of a screwdriver placed in the tang slot to secure the specified speed.* CAUTION: Bend only in direction perpendicular to the contact surface of the cam. Movement in any other direction changes the CAM POSITION ADJUSTMENT described earlier.

(4) Stopping the engine between adjustments is not necessary. However, reposition the fast idle tang on the cam after each speed adjustment to provide correct throttle closing torque. *See specifications. FAST IDLE CAM

TOP EDGE Of CHOKE CONTROL ROD HOU

2ND HIGHEST SPEED STEP

FAST IDLE SPEED ADJUSTING TANG

TURN SCREWDRIVER FOR ADJUSTMENT • ;•<

I-11.16 • 1'64 INCH

ABOVE CHOKE ASSEMBLY (CARBURETOR ON ENGINEEt

1'64 INCH t (CARBURETOR ON BENCH) NR452A Fig. la-Qualifying Choke Control Lever

FASt IDLE SPEED (EVER NP772B

Fig. 20-Fast Idle Speed Adjustment (On Vehicle)


14-98 FUEL SYSTEM—HOLLEY 4160 Fast idle Cam Position Adjustment

The fast idle engine speed adjustment should be made on the vehicle as described in the Fast Idle Speed Adjustment (on the vehicle) paragraph. However, the Fast Idle Cam Position Adjustment can be made on the bench. This adjustment is important to assure that the speeds of each step of the cam occur at the proper time during engine warm-up. (1) Qualify the choke control lever, if necessary. (See Qualifying the Choke Control Lever Paragraph). (2) With fast idle speed adjusting tang contacting second highest speed step on fast idle cam, move choke valve toward the closed position with light pressure on choke control lever. (3) Insert specified drill between the choke valve and wall of air horn (see specifications). An adjustment will be necessary if a slight drag is not obtained as the drill is being removed. (4) To adjust, bend the indicated tang (Fig. 21) unIII the correct choke valve opening has been obtained. Vacuum Kick Adjustment (ON or OFF Vehicle)

The choke diaphragm adjustment controls the fuel delivery while the engine is running. It positions the choke valve within the air horn by use of linkage between the choke shaft and the diaphragm. The diaphragm must be energized to measure the vacuum kick adjustment. Vacuum can be supplied by a distributor test machine, another vehicle or vehicle to be adjusted. (1) If the adjustment is to be made with the engine running, position the fast idle tang (Fig. 21) (Cam position adjustment) to allow choke closure to kick position. If auxiliary vacuum source is to be used, open throttle valves, (engine not running) and move choke to closed position. Release throttle first, then FAST 51:Or'..._ IDLE CAM 2ND HIGHEST SPEED STEP

.4

DRILL OR ter— GAUGE

7

CHOKE VALVE

DRILL OR GAU:Jt VACUUM DIAPHRAGM (STEM RETRACTED)

BEND AT THIS POINT A

LIGHTLY PRESS UP ON CHOKE CONTROL LEVER TO VACUUM SUPPLY Fig. 22—Vacuum Kick Adjustment

release choke.

(2) When using an auxiliary vacuum source, disconnect the vacuum hose from the carburetor and connect it to the hose from the vacuum supply with a small length of tube to act as a fitting. Removal of the hose from the diaphragm may require forces which damage the system. Apply a vacuum of 10 or more inches to hose. (3) Insert the specified drill (see specifications) between the choke valve and the wall of the air horn. (Fig. 22). Apply sufficient closing pressure on the lever to which the choke rod attaches to provide a minimum choke valve opening without distortion of the diaphragm link. Note that the cylindrical stem of the diaphragm will extend as an internal spring is compressed. This spring must be fully compressed for proper measurement of the vacuum kick adjustment. (4) An adjustment will be necessary if a slight drag is not obtained as the drill is being removed. Shorten or lengthen the diaphragm link to obtain the correct choke opening. Length changes should be made by

AIR HORN PRIMARY ELIE! BOWL FAST IDLE SPEED, ADJUSTING TANG

NP77311

FAST IDLE SPEED ADJUSTING TANG

SECONDARY FUE BOWL WET LEVEL GAUGE SPACER

CAM POSITION ADJUSTING TANG FAST IDLE CAM

CHOKE CONTROL LEVER (LIGHT CLOSING PRESSURF

2ND HIGHEST SPEED STEP NR4S4A

Fig. 27 — Fas Idle Cam Position Adjustment

NP7:3C3B

TAKE READING ON GRADUATED SCALE

Fig. 23—Checking Wet Fuel Level (on Vehicle)


FUEL PUMP—FUEL SYSTEM 14-99

carefully opening or closing the bend provided in the diaphragm link. CAUTION: DO NOT APPLY TWISTING OR BENDING FORCE TO DIAPHRAGM.

(5) Reinstall the vacuum hose on the correct carburetor fitting. (6) Make the following check. With no vacuum applied to the diaphragm, the CHOKE VALVE SHOULD MOVE FREELY between the open and closed positions. If movement is not free, examine the linkage for misalignment or interferences caused by the bending operation. Repeat the adjustment if necessary to provide proper link operation. Secondary Throttle Adjustment

This adjustment no longer required as valves are pre-adjusted and need no further adjustment.

Idle Speed Adjustment (Curb Idle)

Refer to General Information at front of Group. Checking Wet Fuel Level (On Vehicle)

Before checking wet fuel level, check the fuel pump pressure to be certain 5 pound reading is obtained. To check wet fuel level, remove lower bolt furthest from fuel supply (Primary and Secondary) and install C-4051 wet fuel level gauge (Fig. 23). As screw is being removed, fuel will be lost. Start or crank engine and allow fuel bowls to fill. The reading on level gauge should be 9/16 for Primary and 13/16 inch for Secondary, with 5 pounds fuel pump pressure.*

If an adjustment is necessary remove fuel bowl and bend tang on float until correct specifications are obtained. *Fuel level will vary 1/32 inch for every pound of fuel pump pressure under or over specifications.


FUEL PUMP INDEX

Assembling Fuel Pump (RD-267A) Disassembling Fuel Pump (RD-267A) Fuel Vapor Separator General Information

Page 103 102 103 99

Service Diagnosis Specifications Testing Fuel Pump (On Vehicle)

Page 99 118

100

GENERAL INFORMATION

Fuel pump Model MS-4588SA and MS-4844S (E.C.S.) (Fig. 1), is used exclusively on the 225 cubic inch 6 cylinder engine. Model MS-4587SA (Fig. 2) is used on the 318 Cu. in. engine. Model MS-4589SA (Fig. 3) and Model RD-267A, (Fig. 6) (optional) is used on the 383 and 440 cubic inch engine. Model MS-4024S is used on the 426 Cu. in. engine (Fig. 5). Model MS-4845S is used on the 440 cu. in. H.P. engine (Fig. 3). The fuel pumps are driven by an eccentric cam that is cast on the camshaft in the 225, 383 and 426, 440 cubic inch engines, or by a pressed steel eccentric cam mounted on the gear end of the camshaft in the 318 cubic inch engine. As the camshaft rotates, the eccentric cam presses

down on the pump rocker arm. (On the 383, 426 and 440 cubic inch engine, a push rod operates between the camshaft and the fuel pump rocker arm.) This action lifts the pull rod and diaphragm upwards against the fuel pump main spring, thus creating a vacuum in the valve housing and opens the inlet valve and fuel is drawn into the valve housing chamber. On the return stroke the main spring forces the diaphragm to the down position, which closes the inlet valve and expels the fuel in the valve housing chamber through the outlet valve, to the fuel filter and the carburetor. The fuel filter should be changed every 24,000 miles, to insure having an unrestricted flow of fuel at all times. Do not attempt to clean.

SERVICE DIAGNOSIS Condition

Possible Cause

Correction

FUEL PUMP LEAKS— FUEL

(a) Worn, ruptured or torn diaphragm.

FUEL PUMP LEAKS— OIL

(a) Cracked or deteriorated pull rod oil (a) Install new pump. seal. (b) Loose rocker arm pivot pin. (b) Install new pump. (c) Loose pump mounting bolts. (c) Tighten mounting bolts securely. (d) Defective pump to block gasket. (d) Install new gasket (a) Vent in tank restricted. (This will also (a) Unplug vent and inspect tank for cause collapsed fuel tank.) leaks. (b) Leaks in fuel line or fittings. (b) Tighten line fittings.

INSUFFICIENT FUEL DELIVERY

(b) Loose diaphragm mounting plates. (c) Loose inlet or outlet line fittings.

(a) Install new pump. (b) Install new pump. (c) Tighten line fittings.


14-100 FUEL SYSTEM—FUEL PUMP Possible Cause

Condition

(h) Low pressure. (i) Incorrect fuel pump. (j) Restricted fuel filter.

(c) Install new fuel filter and clean out tank. (d) Install new pump. (e) Thaw lines and drain tank. (f) Install new fuel pump. (g) Install heat shield where lines or pump are near exhaust (h) Install new fuel pump. (i) Install correct fuel pump. (j) Install new filter.

(a) Loose mounting bolts. (b) Scored or worn rocker arm. (c) Weak or broken rocker arm spring.

(a) Tighten mounting bolts. (b) Install new fuel pump. (c) Install new spring.

(c) Dirt or restriction in fuel tank. (d) (e) (f) (g)

FUEL PUMP NOISE

Correction

Worn, ruptured, or torn diaphragm. Frozen gas lines. Improperly seating valves. Vapor lock.

SERVICE PROCEDURES main spring, or improper assembly of diaphragm may TESTING FUEL PUMP (On Vehicle) be cause. If pressure is too high, main spring is too If the fuel pump fails to supply fuel properly to the strong. carburetor, the following tests should be made before removing the fuel pump from the vehicle. Vacuum Test The vacuum test should be made with the fuel line Pressure Test disconnected from the carburetor. (This will allow the (1) Insert a "T" fitting in fuel line at carburetor, pump to operate at full capacity, which it must do to (Fig. 4). prime a dry carburetor.) The minimum reading should (2) Connect a 6 inch piece of hose between "T" be at least 10 inches of vacuum at 500 r.p.m. with the fitting and gauge C-3411. (The hose should not exceed 6 inches. A longer hose may collect fuel and additional weight of fuel would be added to pressure of pump and result in an inaccurate reading.) (3) Vent pump for a few seconds (this relieves air trapped in fuel chamber). If this is not done, pump will not operate at full capacity and low pressure reading will result. (4) Connect a tachometer, then start engine and run at 500 r.p.m. The reading should be as shown in specifications (depending on pump) and remain constant or return to zero very, very slowly when engine is stopped. An instant drop to zero indicates a leaky outlet valve. If pressure is too low a weak diaphragm Fig. 2—Fuel Pump Assembly (318 Cu. In. Engine)

Fig. 3—Fuel Pump Assembly (383 Fig. 1 — Fuel Pump Assembly (6 cylinder Engines)

and 440 Cu. In. Engine)


FUEL PUMP—FUEL SYSTEM 14-101 ROCKER ARM HOUSING

7S0

I N R.P.M

PLUG PIVOT PINY"?'

TACHOMETER (ENGINE SPEED

../NC

\

ROCKER ARM

N FOLLOWER SPRING

6 INCH MAXIMUM

rJ

DIAPHRAGM AND PULL ROD ASSEMBLY

CARBUI TOR FUEslc‘plyltiP KR345A Jig. 4–P

Testing Fuel Pump

AS SCE SRBLY M EW

-- 435 10

VALVE BODY

a

— VALVE-ASSEMBLY (SERVICED ONLY IN VALVE BODY)

fuel line disconnected at the carburetor.

Volume Test The fuel pump should supply 1 quart of fuel in 1 minute or less at 500 r.p.m. Inlet Valve Test To test the inlet valve, connect a vacuum gauge on the inlet fitting while the line is disconnected. (1) Start engine or turn over with starting motor. (2) There should be a noticeable vacuum present, not alternated by blowback. (3) If blowback is present, inlet valve is not seating properly and a new pump should be installed. If fuel pump does not perform to above test requirements, fuel pump should be removed from vehicle. DISASSEMBLING FUEL PUMP (MS-4024S) Before disassembling the fuel pump, mark the housings in such a manner that the "inlet" will be facing the inlet fuel line when reassembled. This is im-

portant! (1) Remove the pivot pin plug, using Tool T10943 (Fig. 5). (2) Disengage the rocker arm follower spring from the rocker arm and rocker arm housing. (3) Turn the pump on its side (pivot pin hole down) and rap gently to remove the pivot pin. (4) Disengage the rocker arm from the diaphragm pull rod, by sliding rocker arm out of housing. (5) Remove the screws that attach the valve body to the rocker arm housing. Separate the valve body and rocker arm housings, and lift out the diaphragm and pull rod assembly. (6) Remove the screws that attach the valve body to the valve housing cover. Separate cover and valve body and remove the outlet air dome diaphragm.

SCREW ASSEMBLY

VAI VF ASSEMBLY (SERVICED ONLY IN VALVE BODY)

AIR DOME DIAPHRAGM \

-

COVER NY189

Fig. 5–Fuel Pump (Exploded View) (426 Cu. In. Engine)

Cleaning Fuel Pump Parts Clean all fuel pump parts (except diaphragm) in a suitable solvent, then blow dry with compressed air. Check the condition of the valve seats and parts for gum deposits. If gum deposits are found, remove with denatured alcohol. If the valves are badly worn or damaged, install a complete new valve body assembly. The valves are not serviced individually. Examine the diaphragm for cracks, torn screw holes or ruptures. Check the rubber oil seal on the end of the pull rod for deterioration. Check the outlet air dome diaphragm for cracks or deterioration. Check the rocker arm for scoring or galling on the camshaft push rod bearing surface. ASSEMBLING FUEL PUMP (Fig. 5) (1) Place the air dome diaphragm in position on the valve body. (2) Align the scribe marks on the cover and the


14-102 FUEL SYSTEM—FUEL PUMP valve body, then install attaching screws. Tighten securely. (3) Slide the diaphragm pull rod up into the rocker arm housing. Place the valve body in position on the diaphragm with the scribe marks aligned. (Be sure the holes in the diaphragm, rocker arm housing and valve bodies are aligned). Compress the unit together, then install the attaching screws, but

FUEL LINE TO CARBURETOR ALTERNATOR BRACKET

ALTERNATOR

LAMP HOSE • VAPOR SEPARATOR • 'ASSEMBLY

DRIVE BELT FUEL PUMP

- CLAMP

do not tighten. Never use shellac or any other adhesive on the diaphragm.

(4) Slide the rocker arm into the housing and engage the diaphragm pull rod. Align the pivot pin holes in the arm with those in the housing, then install pivot pin: Install new plug and drive in securely. (5) Install the rocker arm follower spring over the tab on the rocker arm and over dimple in the housing. (6) Place the pump in a vise (with protector jaws) then push on the rocker arm until full travel is reached. Hold in this position, while tightening the attaching screws. This will prevent tearing of the diaphragm when the pump is in operation with the pump arm in its full stroke. (7) Test the fuel pump as described previously. DISASSEMBLING FUEL PUMP (RD-267A) Before disassembly, mark housings in such manner that the mark "Inlet" will be facing inlet fuel line

when reassembled. This is important! (I) Grind or file off peened end of pivot pin, then, drive out pivot pin. Remove washer. (2) Remove rocker arm follower spring. (3) Remove screws holding rocker arm housing to valve body. Separate body and housing. (4) Press in on diaphragm and disengage rocker

-HOSE FUEL SUPPLY TUBE VAPOR SE ARATOR TO FUEL TANK FITTING 'RETURN)

NR44

Fig. 7—fuel Vapor Separator (440 Cu. In. Engine)

arm from diaphragm pull rod. Remove rocker arm and spacer washers. (5) Slide diaphragm and spring out of rocker arm housing. (6) Remove sleeve from two piece rocker arm, then separate rocker arm pull lever from eccentric arm. Cleaning Fuel Pump Parts

Clean all fuel pump parts (except diaphragm) in a suitable solvent, then blow dry with compressed air. Check the condition of the valve seats and parts for gum deposits. If gum deposits are found, remove with denatured alcohol. If the valves are badly worn or damaged, install a complete new valve body assembly. The valves are not serviced individually. Examine the diaphragm for cracks, torn screw holes or ruptures. Check the rubber oil seal (diaphragm pull rod) in housing for deterioration. If unfit for further service, install a new rocker arm housing. Check the rocker arm for scoring or galling on the camshaft push rod bearing surface. TEE

TO REAR CARBURETOR

TO FRONT CARBURETOR FUEL SUPPLY TUBE

ALTERNATOR

HOSE

4ter_Kitt. VAPOR SEPARATOR $1 1S1 TO FUEL TANK alal FITTING RETURN) ! IA • .441Pr

VAPOR SEPARATOR ASSEMBLY HOSE

V

FUEL PUMP FUEL SUPPLY TUBE

Fig. 6—fuel Pump Assembly (RD-267A) 383 and 440 Cu. In. Engines

Fig. 8—fuel

NR45

Vapor Separator f426 Cu. In. Engine)


FUEL TANK-FUEL SYSTEM 14-103 FUEL VAPOR SEPARATOR

OUTLET

VAPOR SEPARATOR

FILTER SCREEN

RETURN TUBE METERED ORIFICE .060 INCH

INLET NR46

Fig. 9—Fuel Vapor Separator (Sectional View)

ASSEMBLING FUEL PUMP (1) Assemble rocker arm by sliding the pull arm into eccentric cam and install sleeve. (Be sure the hook on the arm is facing up). (2) Grease spacer washers and slide over each side of sleeve shoulder. (3) Install diaphragm and spring in rocker arm housing. (4) Slide rocker arm in position and engage hook of arm with slot in pull rod. (Compress diaphragm and spring to engage arm with pull rod.) (5) Using suitable drift, align rocker arm and washers then install pivot pin. Install retaining washer, then peen pivot pin to retain. (6) Place valve body on diaphragm. Align, then install attaching screws. Draw down evenly. (7) With pump held in vise, compress rocker arm to its full travel. Hold in this position, then tighten screws securely. (This will prevent tearing diaphragm when pump is operated at full stroke.) (8) Install pump arm follower spring between rocker arm and housing. (Be sure spring is seated.) (9) Test pump as described previously.

The fuel vapor separator (Figs. 7, 8 and 9), is used on the 440 Cu. in. High Performance engine and the 426 Hemi engine to prevent vapor lock. The vapor separator is located between the fuel pump and carburetor, depending on model (Figs. 7 or 8) on the right side (front) of the engine. The separator is serviced as an assembly only and consists of a sealed can, a filter screen, an inlet and outlet fitting and a metered orifice outlet fitting for the return line to the fuel tank (Fig. 9). Fuel is drawn from the fuel tank by the fuel pump, through the supply line, into the pump and thence to the vapor separator unit, until the unit is filled with fuel. The outlet tube picks up fuel from the bottom of the separator unit and flows into the carburetor for distribution to the engine. Any fuel vapor (caused by excessive heat) that has gathered in the indrawn fuel rises to the top of the separator unit and is forced out of the metered fitting into the return line to the tank for condensation to liquid fuel. As previously mentioned, the vapor separator unit is serviced only as an assembly. Check to see if the unit is installed correctly (with the inlet fitting and return fitting at the bottom, and the outlet fitting at the top. To check the unit for a restricted or plugged screen, disconnect fuel line at carburetor, then with a container placed under end of line, turn engine over with starting motor. Check the quantity of fuel pumped through the unit. This should be 1 quart of fuel in 1 minute, at 550 r.p.m. If vapor lock is evident, remove the return hose and check to see if the metered orifice is open. If clogged, bend a paper clip and insert through restricted orifice to clear. If necessary, use air pressure to clear return line to fuel tank, after removing filler cap.


FUEL TANK C.A.S. (CLEANER AIR SYSTEM) INDEX General Information Installing Fuel Tank Installing Fuel Tank (Station Wagon)

Page 103 105 105

Removing Fuel Tank Removing Fuel Tank (Station Wagon)

Page 104 104

GENERAL INFORMATION The fuel tank on all models (116.5" wheelbase) is located at the rear of the body under the trunk compartment floor, (Fig. 1). If a car is to be stored for any appreciable length of

system in order to prevent gum formation. If the vehicle has been undercoated, be sure the tank vent tube is open. If this vent is plugged, a collapsed fuel tank will result.

time, the gasoline should be drained from the entire

The fuel tank on all conventional 116.5" W/B cars


14-104 FUEL SYSTEM-FUEL TANK has a 19 gallon capacity (Imperial 15-3/4). The fuel tank is fitted with a gauge unit, including the suction pipe, (Fig. 3). The filter on the end of the suction pipe

is a replaceable unit and prevents the entry of water or foreign material. When installing a tank unit, be sure the filter is pushed down on the pipe until seated.

SERVICE PROCEDURES REMOVING FUEL TANK 116.5" W/B MODELS

Sedans

Station Wagons (Fig. 1)

CAUTION: Be sure the ignition switch is turned off before disconnecting or connecting the gauge wire.

(1) Disconnect rubber elbows from inner filler tube and intermediate filling vent tube. (2) Remove bolts from intermediate vent tube and inner filler tube attaching brackets to frame members. (3) Remove inner filler tube from tank. (4) Cut Keystone clamp from rubber elbow connection between inner and intermediate filling vent tube and disconnect. (5) Disconnect fuel gauge sending unit, lead wire, ground strap and fuel line (Fig. 4). (6) Remove "J" bolts and straps. (7) Lower tank and remove from under vehicle.

(1) Drain tank into a safety can, then disconnect fuel line and wire lead to gauge unit (Fig. 4). (2) Disconnect vent tubes at hose connection at leading edge of tank (Fig. 2). (3) Remove screw that attaches filler tube bracket to rear crossmember. (4) Remove nuts that hold ends of fuel tank hold down straps to frame. Lower front end of tank far enough to disengage filler tube from rear panel and slide out from under vehicle. (5) Remove tank gauge unit, using spanner wrench Tool C-3582 (Fig. 3). Check rubber grommet around filler tube. If cracked or deteriorated, install a new grommet at reassembly. OUTER FILLER TUBE

KEYSTONE CLAMP

SCREWS

RUBBER ELBOW OUTER FILLING VENT TUBE

INNER FILLING VENT TUBE

ATMOSPHERIC VENT SCREWS

FILLER TUBE ELBOW OUTER FILLING VENT ELBOW

KEYSTONE CLAMP

INTERMEDIATE FILLING VENT TUBE

INNER FILLER TUBE SCREW

KEYSTONE CLAMP

Fig. 1—Fuel Tank Assembly (116.5 inch Vehicles) Station Wagons

NN783A


FUEL TANK窶認UEL SYSTEM 14-105

VENT TUBE

VENT TUBE STUD 12/

FUEL TANK

VENT TUBE HOSE INSULATOR RETAINER

GROMMET

FUEL TANK FILLER TUBE CAP FILLER TUBE ASSY

CLAMP

GROMMET CLAMP

(4

REQD.)

-

NUT 121

BRACKET

SEAL SUPPORT STRAP

FILLER TUBE BRKT SCREW FILLER TUBE BRKT SCREW NUT NR12

Fig. 2窶認uel Tank Assembly (116 .5 inch W/B Vehicles) Sedans

TANK INSTALLATION 116.5" W/B MODELS Station Wagons (Fig. 1)

(1) Install "T" end of straps in slots. (2) Install rubber elbow on filling vent tube. Securely fasten new Keystone clamp to avoid leaks. (If tank insulator was torn or damaged during removal of tank, be sure and install a new insulator at reassembly.) (3) Locate insulation pad on top of tank. Raise tank into position, install "J" bolt in keyhole slot, and tighten to 40 in-lbs. (4) Slide Keystone clamp on rubber elbow and insert intermediate filling vent tube through longitudinal into rubber elbow. Securely fasten Keystone clamp (using special tool). (5) Lubricate rubber grommet with lubriplate and install inner filler tube. (6) Lubricate rubber elbows and slide intermediate vent tube and inner filler tube into elbows. (Be sure clamps are installed on tube before installing.) Fasten Keystone clamp to intermediate vent tube elbow and Keystone clamp to outer filler tube elbow securely to avoid leaks. Sedans Before installing the tank gauge unit, check the condition of the filter on the end of suction tube. If the filter is plugged, plastic will not corrode, install a new filter. (1) Position fuel tank gauge unit in tank, using a new gasket. Tighten securely, using Tool C-3582. (If tank insulator was torn or damaged during removal of tank, be sure and install a new insulator at reassembly.) (2) Slide fuel tank under vehicle. Raise tank far

enough to engage filler spout with opening in rear panel, and locator embossments on floor pan. (3) Push tank toward rear to fully engage filler spout in opening. (4) Hold fuel tank in this position, and place hold down straps in position, feeding attaching studs through holes in end of straps. Install nuts but do not tighten. (5) Guide button head of studs into slots in frame FUEL SUPPLY TUBE LEAD

LOCATING TANGS

FILTER

SUCTION TUBE FLOAT NY 1280

Fig. 3窶認uel Gauge Tank Unit CLIP-FUEL GAUGE GROUNDING

TUBE-FUEL LINE WIRING-FUEL GAUGE TANK UNIT TUBE-FUEL GAUGE TANK UNI II T TUBE-FUEL LINE

P /I 0

CLIP-FUEL GAUGE GROUNDING STUD-FUEL GAUGE

1 STUD-FUEL GAUGE UNIT

TURF-FUEL GAUGE TANK UNIT

Fig. 4窶認uel Tank Ground Strap

NR11


14-106 FUEL SYSTEM—FUEL TANK and down into position. Tighten hold down strap attaching nuts securely. (40 in-lbs.) (6) Install filler tube mounting screw and tighten securely. (7) Connect vent tubes and hose connections at leading edge of tank. (8) Connect lead wire to tank gauge unit, reconnect fuel line and ground strap. (9) Refill tank and check for leaks.

REMOVING THE OUTER FILLER TUBE116.5" W/B MODELS Station Wagons (I) Disconnect rubber elbows from inner filler tube and intermediate filling vent tube. (2) Remove quarter panel to filler tube attaching screws. (3) Remove floor pan to filler tube rubber end attaching screws. (4) Remove outer filler tube from underneath vehicle. INSTALLING THE FILLER TUBE116.5" W/B MODELS Station Wagons (I) Slide rubber floor pan to outer filler tube seal on outer filler tube, outer filling vent tube. and atmospheric vent tube. (2) Position Keystone clamp on outer filler tube. new Keystone clamp on outer filling vent tube, slide rubber elbows on tubes, and fasten clamps securely to avoid leaks. (3) On station wagons, outer filler tube and rubber elbow assembly should be installed from underneath through floor pan, install attaching screws and tighten securely.

PHILLIPS HI AD OR 1HEI11 PROOF SCREWS

NP1006A

Fig. 5—Fuel Tank Filler Cap

REMOVING THE OUTER FILLER TUBE116.5" W/B MODELS Sedans (I) Disconnect filler tube attaching screw from rear crossmember. (2) Remove filler tube from license plate access in bumper. INSTALLING THE FILLER TUBE116.5" W/B MODELS (1) Install filler tube through license plate access in rear bumper.

Fuel Tank Filler Cap (If so Equipped) The fuel tank filler cap (Fig. 6) is attached to the filler pipe by theft proof or Phillips head screws. Should it become necessary to remove cap, use special Tool C4058.


FUEL TANK E.C.S. (EVAPORATION CONTROL SYSTEM) GENERAL INFORMATION

Certain Chrysler Corporation Vehicles are equipped with an Evaporation Control System (ECS) to reduce the loss of fuel from the fuel system to the atmosphere by evaporation. This is a closed system which controls fuel expansion and feeds fuel evaporation emissions from the carburetor or fuel tank. The vapors pass through vent lines to the crankcase by way of the crankcase inlet air cleaner. Since fuel vapors are two to four times heavier than air, they settle to the bottom of the crankcase. With the engine running the fuel vapors are purged from the crank-

case and together with the normal crankcase vapor are drawn via the crankcase ventilation system, which is an existing part of the Cleaner Air System (CAS) into the base of the carburetor to be burnt by engine combustion. The possible expansion of fuel in a full fuel tank, due to a rise in temperature, is allowed for by a 1.4 gallon over-fill limiter tank inside the main fuel tank which fills much slower than the main tank. When the main tank is filled, it remains essentially empty to allow for thermal expansion. (Fig. 1).


FUEL TANK-FUEL SYSTEM 14-107 CRANKCASE AIR CLEANER

VAPOR-LIQUID SEPARATOR

VENT-LIQUID RETURN LINE

PRESSURE VACUUM RELIEF CAP

THERMAL EXPANSION VOLUME TANK PY940 Fig. I—Evaporation Control System

The loss of any fuel or vapor out of the filler neck is prevented by the use of a filler cap which will release only under significant pressure (1/2 to 1 psi) or vacuum (1/4 to 1/2 psi). This cap is identified by the words pressure-vacuum and must be replaced by a similar unit if replacement is necessary, in order for the system to remain effective. (Fig. 1). Because the fuel tank is flat on top, four vents are used, one in each corner of the tank and are connected to a vapor-liquid separator by rubber hoses. The vapor-liquid separator is a piece of two inch steel tubing mounted at an angle inside the trunk of the vehicle (quarter panel for wagons) which internally holds four vent lines from the tank and a vent line which leads to the crankcase inlet air cleaner. These lines are of different heights so the tank will always be vented regardless of vehicle attitude, and fuel vapor will be transferred to the crankcase. One vent line from the tank is short to provide a drain back to

the tank for any liquid fuel which may get into the separator during maneuvers or incline parking. The vent to the crankcase is at the highest point in the separator and has a small orifice to minimize liquid fuel transfer to the crankcase. (Fig. 1). The ECS system also includes closed ventilation of fuel vapor from the carburetor bowl. On eight cylinder engines this is accomplished via a hose connection from the carburetor bowl to the crankcase inlet air cleaner. For six cylinder engines the hose from the carburetor bowl is connected into the crankcase via a connecting nipple on the fuel pump. This fuel pump also incorporates a bleed device which prevents buildup of pressure in the fuel supply line between the pump and the carburetor. This feature aids hot starting. Six cylinder engines with ECS use a "bleed" fuel pump without the ECS nipple. In event of fuel pump replacement, it is important that the correct pump is used.

SERVICE D IAGNOSIS The ECS system should not require any maintenance in normal service. Any loss of fuel or vapor from the fuel filler cap would indicate one or more of the following: (1) An unsatisfactory seal between cap and filler neck.

(2) A malfunction of ECS cap release valve. (A quick check of the ECS fuel cap may be made by placing against the mouth and blowing into the hole in the release valve housing. An immediate leak with light blowing or lack of release with hard blowing indicates a defective or incorrect unit.)


14-108 FUEL SYSTEM-FUEL TANK SCREW

REAR CROSSMEMBER

CLAMP

CAP ASSEMBLY

STRAP BRACKET

"U" NUT

RING

"1" BOLT

BRACKET

SEAL

FILLER TUBE

SCREW STRAP

GASKET

NUT

2 DOOR SPECIAL ONLY

FILLER TUBE

SCREW

2 DOOR SPECIAL ONLY

LABEL FUEL TANK

WHEEL HOUSE VAPOR SEPARATOR

PLUG

CLAMP

SCREW

FLOOR PAN

GASKET

REAR CROSSMEMBER

INSULATOR

SHIELD

PY955

Fig. 1 —Fuel Tank Assembly (E.C.S.) (Except Station Wagons) PANEL OUTER

"J" BOLT

STRAP BRACKET

STRAP FILLER TUBE OUTER NUT

FUEL TANK

SCREW GASKET

SCREW

"U" NUT

SCREW LABEL

INSULATOR

CLIP

PLUG FUEL TANK STRAP BRACKET

VAPOR SEPARATOR VAPOR TUBE TO FRONT OF VEHICLE

HOSE

GASKET HANGER BRACKET

HOSE

HOSE

SCREW

VENT TUBE HOSE CLIP SCR6-N .N,.. ELBOW

SEAL

OUTER FILLER TUBE

Fig. 2 —Fuel Tank Assembly (E.C.S.) Station Wagons

PY956


THROTTLE LINKAGE-FUEL SYSTEM 14-109 CLIP—FUEL GAUGE GROUNDING

FUEL SUPPLY TUBE

TUBE—FUEL LINE WIRING—FUEL GAUGE TANK UNIT TUBE—FUEL GAUGE TANK UNIT /1 TUBE—FUEL LINE

/I P

CLIP—FUEL GAUGE GROUNDING STUD—FUEL GAUGE

I _V.-STUD—FUEL GAUGE UNIT

TUBE—FUEL GAUGE TANK UNIT

LOCATING TANGS

FILTER

SUCTION TUBE FLOAT NY1280

Fig. 3—Fuel Gauge (Tank Unit)

(3) All ECS lines plugged between fuel tank and vapor separator. (4) Plugged ECS line between the vapor separator

NR11

Fig. 4—Fuel Tank Ground Strap

and the crankcase air inlet filter. (5) Plugged fuel tank expansion chamber inlet hole in main tank. A removable plug is provided in the top surface of ECS fuel tanks, for access to expansion chamber in event of plugging of its fill/drain hole. If purging of the fuel tank is required, the expansion chamber must be purged separately through the top access plug hole.

THROTTLE LINKAGE ADJUSTMENT and pocket at rear end of throttle cable. Automatic Transmission For adjustment of throttle linkage, refer to Trans(2) Disconnect choke at carburetor or block choke mission Section of this Manual. valve in full open position. Open throttle slightly to release fast idle cam, then return carburetor to curb idle. Manual Transmission (Fig. I) (3) Loosen cable clamp nut (1), adjust position of (V-8 Engines—Except Hemi) (1) Apply a thin film of multi-purpose grease on cable housing ferrule (2) in the clamp so that all slack accelerator shaft where it turns in bracket, ball end is removed from cable with carburetor at curb idle SPRING

CLAMP

CLIP

BRACKET ASSEMBLY

(STUD • THROTTLE \ LEVER •

bUL I

CABLE ASSEMBLY

BRACKET

NU454

Fig. 1—Throttle Linkage Adjustment (118 Engines)


14-110 FUEL SYSTEM-THROTTLE LINKAGE

CLIP PIN CABLE ASSEMBLY BRACKET

SPRING (WHITE)

NUT

MOUNTING BRACKET

CLAMP

NU455

Fig. 2—Throttle Linkage Adjustment (6 Cylinder Engines)

NN974A Fig. 3—Throttle Linkage Adjustment (426 Hemi Engine)


THROTTLE LINKAGE—FUEL SYSTEM 14-111 To remove slack from cable, move ferrule (2) in the clamp in direction away from carburetor lever. (4) Back off ferrule (2) 1/4". This provides 1/4" cable slack at idle. Tighten cable clamp nut (1) to 45 inch-pounds. (5) Connect choke rod or remove blocking fixture. Manual Transmission (Fig. 2) (6 Cylinder Engines)

(1) Apply a thin film of multi-purpose grease on accelerator shaft where it turns in bracket, anti-rattle spring where it contacts shaft, ball end and pocket at rear end of throttle cable. (2) Disconnect choke at carburetor or block choke valve in full open position. Open throttle slightly to release fast idle cam, then return carburetor to curb idle. (3) Loosen cable clamp nut (1), adjust position of cable housing ferrule (2) in the clamp so that all slack is removed from cable with carburetor at curb idle. To remove slack from cable, move ferrule (2) in the clamp in direction away from carburetor lever. (4) Back off ferrule (2) 1/4 inch to provide 1/4 inch cable slack at idle. Tighten cable clamp nut to 45 inch-pounds. (5) Connect choke rod or remove blocking fixture.

accelerator shaft (5) where it turns in bracket ball end and pocket (21) at rear end of throttle cable. (2) Block choke valve in full open position. Open throttle slightly to release fast idle cam, then return carburetor to curb idle. (3) Loosen cable clamp nut (12), adjust position of cable housing ferrule (13) in the clamp (14) so that all slack is removed from cable with rear carburetor at curb idle. To remove slack from cable, move ferrule (13) in the clamp (14) in direction away from carburetor lever. (4) Back off ferrule (13) 1/4". This provides 1/4" free play. Tighten clamp (12) to 45 inch-pounds. (5) Attach carburetor rod (4) assembly between the carburetors with slotted rod end (16) attached to outboard side of inboard lever on rear carburetor. With rear carburetor at wide open throttle, adjust length of connector rod (4) so that front carburetor is also at wide open throttle. To lengthen this rod (4), turn adjusting stud (17) clockwise as viewed from front of engine. Tighten lock nut (18). (6) Remove choke valve blocking fixture.

HOOD FRESH AIR INTAKE SYSTEM (Fig. 1) (If so Equipped) GENERAL INFORMATION

Manual Transmission (Fig. 3) (With Hemi Engine)

(1) Apply a thin film of multi-purpose grease on

Functional hood fresh air intake scoops allow fresh air to flow directly from the outside of the engine

BEZEL

AIR SCOOP

VIEW IN DIRECTION OF ARROW Y

CONTROL CABLE INSTRUMENT PANEL

DASH PANEL CENTER

BEZEL AIR SCOOP

AIR INTAKE DUCT 1 OUTER RIGHT

AIR INTAKE DUCT OUTER LEFT HOOD

VIEW IN DIRECTION OF ARROW 7

RIVET .■•■•■•■

Fig. 1 — Hood Fresh Air Intake System (Typical)

A

RIVET

SEAL NU76


14-112 FUEL SYSTEM-SPECIFICATIONS compartment to the air cleaner. This device increases engine performance. Cable operated doors, enables the driver to close the hood openings during rainy weather or during engine warm-up period. When the fresh air intake doors are closed, warm air is admitted to the air cleaner (from the intake area) through a series of holes in the housing, (in the engine compartment).

Fiberglass-reinforced thermosetting plastic passages, attached to the hood inner panel, extend outboard from the air cleaner to openings on the top of the hood. A rubber gasket forms an airtight seal between the passages and the air cleaner base. Methods of attachment of the fresh air intake system will be found in the Body Section of this Manual.


SPECIFICATIONS HOLLEY 1920 SERIES SINGLE THROAT CARBURETOR

Model Manual Trans. Automatic Trans. Engine Displacement (Cu. In.) Bore Venturi Main Metering Jet Standard One Step Lean Two Steps Lean ADJUSTMENTS Float Setting Float Level Height (Wet) Vacuum Kick (Drill Size) Cam Position Adjustment (Drill Size) Choke Unloader (See Fast Idle Cam Pos. Adj.) Bowl Vent Valve Idle Speed (Curb Idle rpm) Fast Idle Speed (Engine Hot and Screw on 2nd Highest Step of Cam rpm) Manual Trans. Automatic Trans. CHOKE Type Control Setting *With Headlights ON

C.A.S. Taxi

C.A.S.

C.A.S.

E.C.S.

R-4355A R-4363A 225 1-9/16" 1-1/4"

R-4351A — 225 1-11/16" 1-5/16"

— R-4352A 225 1-11/16" 1-5/16"

R-4353A 225 1-11/16" 1-5/16"

R-4-3-54A 225 1-11/16" 1-5/ 16"

50 49 48

57 56 55

56 55 54

57 56 55

56 55 54

Use Gauge

E.C.S.

Use Gauge

27/32" #39

27/32" #39

27/32" #50

27/32" #39

27/32" #50

#52

#52

#52

#52

#52

9/32" 3/32" 650*

9/32" 3/32" 700*

9/32" 3/32" 650*

9/32" 3/32" 700*

9/32" 3/32" 650*

1700 1700

1600

1600 1800

1800

Well Well Thermostatic Coil Spring 2 Notches Rich 2 Notches Rich

BALL AND BALL 1-1/4" BBD CARBURETOR C.A.S.

Type Engine Displacement (cu. in.) Manual Transmission Automatic Transmission Bore Venturi Main Metering Jets Standard One Step Lean Two Steps Lean Step-Up Wire (Standard) Diameters (2 stage) ADJUSTMENTS Float Setting (at center of floats) Bowl Vent Valve (throttle closed)

318 BBD-4721S 1-7/16" 1-3/16"

C.A.S.

C.A.S.

120-309S 120-309S 120-309S 120-299S 120-299S 120-299S 120-3008 120-300S 120-300S 75-1727 75-1849 75-1849 .029" x .025" .031" x .026" .031" x 026" 1/4" 1/32"

E.C.S.

Ball and Ball Dual Downdraft 318 318 318 BBD-4723S **BBE)74722S ***BBD-4895S — — 1-7/16" 1-7/16" 1-7/16" 1-3/16" 1-3/16" 1-3/16"

1/4" 1/32"

1/4" 1/32"

E.C.S.

318 BBD-7 1724S 1-7/16" 1-3/16"

120-309S 120-30% 120-299S 120-299S 120-3005 120-3005 75-1727 75-1849 029" x .025" .031" x .026" 1/4" 1/32"

1/4" 1/32"


SPECIFICATIONS-FUEL SYSTEM 14-113 Choke Unloader Idle Speed R.P.M. (curb idle) Vacuum Kick Adjustment (Drill Size) Fast Idle Cam Position (Drill Size) Fast Idle Speed R.P.M. CHOKE Type Control Setting *After Approx. 500 Miles (if necessary)

1/4" 750

1/4" 700

1/4" 700

1/4" 750

1/4" 700

#20

#20

#20

#20

#20

#41 1600*

#41 2000*

#41 2000*

#41 1600*

#41 2000*

Well

Well Thermostatic Coil Spring

On Index **Without Air Conditioning

On Index ***With Air Conditioning

BALL AND BALL 11/2 INCH BBD CARBURETOR C.A.S.

Type Engine Displacement (Cu. in.) Manual Transmission Automatic Transmission Bore Venturi Main Metering Jet Standard One Step Lean Two Steps Lean Step-Up Wire (Standard) Diameter (2 Stage) ADJUSTMENTS Accelerator Pump Setting Float Setting (at Center of Floats) Vacuum Kick Adjustment Fast Idle Cam Position Adjustment Bowl Vent Valve (at curb idle) Choke Unloader Idle Speed RPM (Curb Idle) Fast Idle Speed RPM CHOKE Type Control Setting *After Approx. 500 Miles (If Necessary)

383 BBD-4725S 1-9/ 16" 1-5/16"

C.A.S.

C.A.S.

E.C.S.

Ball and Ball Dual Downdraft 383 383 383 BBD-4727S **BBD 4726S ***BBD 48945 — 1-9/16" 1-9/16" 1-9/16" 1-5/16" 1-5/16" 1-5/16"

120-329S 120-306S 120-306S 120-3135 120-304S 120-304S 120-303S 120-329S 120-329S 75-1652 75-1730 75-1730 .035" x .027" .042" x .039" .042" x .039" 1.00" 5/16" #20 #28 1/16" 1/4" 750 1700*

1.00" 5/16" #28 #28 1/16" 1/4" 650 1700*

Well Thermostatic Coil Spring 2 Notches Rich ***With Air Conditioning

383 BBD-4728S 1-9/16" 1-5/16"

120-329S 120-306S 120-313S 120-304S 120-303S 120-329S 75-1652 75-1730 035" x .027" .042" x .039"

1.00" 5/16" #28 #28 1/16" 1/4" 650 1700*

1.00" 5/16" #20 #28 1/16" 1/ 4" 750 1700*

1.00" 5/16" #28 #28 1/16" 1/4" 650 1700*

Well Thermostatic Coil Spring 2 Notches Rich **Without Air Conditioning

HOLLEY 2210 SERIES 2-BARREL CARBURETOR Type Engine Displacement (Cu. in.) Manual Transmission Automatic Transmission Bore Venturi Main Metering Jet Standard One Step Lean Two Steps Lean ADJUSTMENTS Accelerator Pump Setting Float Setting Vacuum Kick Adjustment Fast Idle Cam Position Adjustment Bowl Vent Valve (at curb idle) Choke Unloader Idle Speed RPM (Curb Idle) Fast Idle Speed RPM

E.C.S.

Dual Downdraft 383 R-4371A 1-9/16" 1-13/32" #63 #65 #62 #64 #61 #63 9/16" (1/4" Travel) #7 drill (.200) #28 drill #35 drill 5/64" 11/64" 650 1700*


14-114 FUEL SYSTEM-SPECIFICATIONS CHOKE Type Control

Well Thermostatic Coil Spring 2 Notches Rich

Setting * After Approx. 500 Miles (If Necessary)

CARTER AVS SERIES CARBURETORS Type Model Transmission Type Engine Displacement (Cu. In.) THROTTLE BORE Primary Secondary MAIN VENTURI Primary MAIN JET Primary Secondary LOW SPEED JET Primary STEP-UP ROD (2 Stage) Standard ADJUSTMENTS Accelerator Pump (top of plunger to air horn) Fast Idle Cam Position (drill size) Choke Unloader Vacuum Kick (drill size) Bowl Vent Valve Setting Fast Idle Speed (r.p.m ) Idle Speed (r.p.m ) Secondary Throttle Lever Adj. Secondary Throttle Lockout Adj. Float Setting Float Drop Air Valve Spring Tension— (from Vertical-Turns) CHOKE Type Control Setting *After Approx. 500 Miles (If Necessary)

C.A.S. C.A.S. Carter 4 Barrel Downdraft **AVS 47365 ***AVS 4732S Automatic Automatic 383 383

E.C.S.

C.A.S.

AVS-47345 Automatic 383

AVS-4737S Manual 440

1-7/16" 1-11/16"

1-7/16" 1-11/16"

1-7/16" 1-11/16"

1-11/16" 1-11/16"

1-3/16"

1-3/16"

1-3/16"

1-3/16"

.089" .098"

.089" .098"

.089" .098"

.089" .095"

#68-.031"

#68-031"

#68-.031"

#65-.035"

16-546

16-546

16-546

16-617

7/16" #50 1/4" #44 3/64" 1700* 700 19/64" 020" 5/16" 1/2"

7/16" #50 1/4" #44 3/64" 1700* 700 19/64" .020" 5/16" 1/2"

7/16" #50 1/4" #44 3/64" 1700* 700 19/64" .020" 5/16" 1/2"

7/16" #50 1/4" #20 3/64" 2000* 900 23/64" 020" 7/32" 1/2"

2 Well Coil Spring 2 Notches Rich **Without Air Conditioning 2

2

2 Well Coil Spring 2 Notches Rich ***With Air Conditioning

CARTER AVS SERIES CARBURETORS C.A.S.

Type Model Transmission Type Engine Displacement (Cu. In.) THOTTLE BORE Primary Secondary MAIN VENTURI Primary MAIN JET Primary Secondary LOW SPEED JET Primary

**AV5-47385

C.A.S.

E.C.S.

Carter 4 Barrel Downdraft ***AVS 4741S AVS-47395

E.C.S.

AVS-4740S

Automatic 440

Automatic 440

Manual 440

Automatic 440

1-11/16" 1-11/16"

1-11/16" 1-11/16"

1-11/16" 1-11/16"

1-11/16" 1-11/16"

1-7/16"

1-7/16"

1-7/16"

1-7/16"

.101" 095"

.101" .095"

.101" .095"

.101" .095"

#69-029"

#69-.029"

#65,035"

#69-.029"


SPECIFICATIONS-FUEL SYSTEM STEP-UP ROD (2 Stage) Standard ADJUSTMENTS Accelerator Pump (top of plunger to air horn) Fast Idle Cam Position (drill size) Choke Unloader Vacuum Kick (drill size) Bowl Vent Valve Setting Fast Idle Speed (r.p.m Idle Speed (r.p.m ) Secondary Throttle Lever Adj. Secondary Throttle Lockout Adj. Float Setting Float Drop Air Valve Spring Tension—(from Vertical-Turns) CHOKE Type Control Setting **Without Air Conditioning

14-115

16-575

16-575

16-617

16-575

7/16" #50 1/4" #20 3/64" 1800* 800 23/64" .020" 7/32" 1/2"

7/16" #50 1/ 4" #20 3/64" 1800* 800 23/64" .020" 1/32" 1/2"

7/16" #50 1/4" #20 3/4" 2000* 900 23/64" .020" 7/32" 1/2"

7/16" #50 1/4" #20 3/4" 1800* 800 23/64" .020" 7/32" 1/2"

2

2

2

2

Well Coil Spring On Index

Well Coil Spring On Index

***With Air Conditioning

HOLLEY MODEL 4160 SERIES 4-BARREL CARBURETOR Model Engine Displacement (cu. in.) Transmission Type Throttle Bore Primary Secondary Main Venturi Primary Secondary Main Metering Jet Standard 1 Size Lean 2 Size Lean (5,000-10,000 ft.) Adjustments Curb Idle Speed Fast Idle Speed (No. 2 Step) Bowl Vent Valve Unloader Adjustment (wide open throttle)

Vacuum Kick Adjustment Fast Idle Cam Position Float Setting (Dry) Primary Secondary Float Setting (Wet) Primary Secondary Accelerator Pump Override Adjustment (wide open throttle) Power Valve (stamped) Choke Type Control Setting *After Approx. 500 Miles (If Necessary)

C.A.S.

C.A.S.

C.A.S.

R-4367A 383 Manual

E.C.S.

E.C.S.

R-4368A** 383 Automatic

R-4369A*** 383 Automatic

R-4217A 383 Manual

R-4218A 383 Automatic

1-9/16" 1-3/4"

1-9/16" 1-3/4"

1-9/16" 1-3/4"

1-9/16" 1-3/4"

1-9/16" 1-3/4"

1-1/4" 1-9/16"

1-1/4" 1-9/16"

1-1/4" 1-9/16"

1-1/4" 1-9/16"

1-1/4" 1-9/16"

64 63 62

64 63 62

64 63 62

64 63 62

64 63 62

750 2000* 5/64" Drill

750 1800* 5/64" Drill

750 1800* 5/64" Drill

750 2000* #72 Drill

750 1800* #72 Drill

#25 Drill

#25 Drill

#25 Drill

#25 Drill

#25 Drill

#18 Drill #53 Drill

#46 Drill #53 Drill

#46 Drill #53 Drill

#18 Drill #53 Drill

#46 Drill #53 Drill

15/64" 17/64"

15/64" 17/64"

15/64" 17/64"

15/64" 17/64"

15/64" 17/64"

9/16" 13/16"

9/16" 13/16"

9/16" 13/16"

9/16" 13/16"

9/16" 13/16"

.015 Min. 65

.015 Min. 65

.015 Min. 65

.015 Min. 65

.015 Min. 65

Well Coil Spring 2 Notches Rich

Well Coil Spring 2 Notches Rich

**Without Air Conditioning

***With Air Conditioning


14-116 FUEL SYSTEM-SPECIFICATIONS SPECIAL TOOLS Elevating Legs Stand Power Valve Remover-Installer Main Metering Jet Remover-Installer Wet Fuel Gauge Clutch Head Screwdriver

1109-287 C-3886 C-3747 C-3748 C-4051 CL-13

HOLLEY 2300 SERIES CARBURETORS Center C.A.S. C.A.S.

Type Engine Displacement (cu. in.) Manual Transmission Automatic Transmission Bore Main Venturi Main Metering Jet Standard 1 Size Lean 2 Size Lean (5,00040,000 ft.) Adjustments Curb Idle Speed Fast Idle Speed (No. 2 Step) Bowl Vent Valve Unloader Adjustment (wide open throttle) Vacuum Kick Adjustment Fast Idle Cam Position Float Setting (Dry) Accelerator Pump Override Adjustment (wide open throttle) Fuel Level (Wet)

440 R-4375A

Outboard Front Rear

440

Outboard Front Rear

Center E.C.S.

Holley Dual Downdraft 440 440 R-4374A R-4382AF R-4383AR 1-1/2" 1-3/4" 1-3/16" 1-9/16"

E.C.S.

440

440 R-4175AF R-4144A R-4365AR 1-3/4" 1-1/2" 1-3/16" 1-9/16"

1-1/2" 1-3/16"

R-4376A 1-1/2" 1-3/16"

64 63 62

63 62 61

64 63 62

63 62 61

900 2200* #38

900 1800* #38

900 2200* #38

900 1800* #38

5/32" 5/32" 5/32" — #50 #28 #50 — #53 #53 #53 — Center float in bowl with fuel bowl inverted.

5/32" #28 #53

.015" min. .015" min. — 015" min. .015" min. With bowl sight plugs removed, fuel level should be at bottom edge of sight plug hole but not over-flowing. Note that floats are externally adjustable.

Choke Type Control Setting

None None None

Well Coil Spring 2-Notches Rich

Well Coil Spring 2-Notches Rich

None None None

*After Approx. 500 Miles (If Necessary)

SPECIAL TOOLS Elevating Legs Stand Power Valve Remover-Installer Main Metering Jet Remover-Installer Clutch Head Screwdriver

T109-287 C-3886 C-3747 C-3748 CL-13

CARTER AFB SERIES CARBURETORS Type Model Transmission Type Engine Displacement (Cu. In.) THROTTLE BORE Primary Secondary MAIN VENTURI Primary Secondary MAIN JET Primary Secondary

AFB-4742S Manual—Automatic 426 Hemi.

Carter 4 Barrel Downdraft AFB-4745S Manual 426 Hemi.

AFB-4746S Automatic 426 Hemi.

1-7/16" 1-11/16"

1-7/16" 1-11/16"

1-7/16" 1-11/16"

1-3/16" 1-9/16"

1-3/16" 1-9/16"

1-3/16" '1-9/16"

.089" .089"

.089" L* .089" R* .092" L* .077" R*

.089" L* .089" R* .092" L* .077" R*


SPECIFICATIONS-FUEL SYSTEM 14-117 LOW SPEED JET Primary STEP-UP ROD (2 Stage) Standard ADJUSTMENTS Accelerator Pump (top of plunger to air horn) Fast Idle Cam Position (drill size) Choke Unloader Vacuum Kick (drill size) Bowl Vent Valve Setting (at curb idle) Piston Index (Drill) Fast Idle Speed (r.p.m.) Idle Speed (r.p.m.) Secondary Throttle Lever Adj. Secondary Throttle Lockout Adj. Float Setting Float Drop Idle Mixture Screw (turns open) Air Valve Spring Tension—(from Vertical-Turns) CHOKE Type Control Setting *After Approx. 500 Miles (If Necessary)

#70-.028"

#70-.028"

#70-.028"

16-82X

16-543L 16-544R

16-543L 16-544R

7/16"

7/16" #50 1/4"

7/16" #50 1/4" —

3/4" #54 2300* 900 17/64" .020" 7/32" 3/4" 1-2

3/4" #39 2000* 900 17/64" .020" 7/32" 3/4" 1-2

— 900 — 17/64" .020" 7/32" 3/4"

— — —

Well Well Thermostatic Coil Spring 2 Notches Rich 2 Notches Rich

HOLLEY MODEL 4160 4-BARREL DOWNDRAFT CARBURETOR C.A.S. R-4366A 440 Automatic

E.C.S.

Model Engine Displacement (cu. in.) Transmission Type Throttle Bore Primary Secondary

1-9/16" 1-9/16"

1-9/16" 1-9/16"

Main Venturi Primary Secondary

1-1/4" 1-5/16"

1-1/4" 1-5/16"

Main Metering Jet Standard 1 Size Lean 2 Size Lean (5,000-10,000 ft.)

64 63 62

64 63 62

650 1600 5/64" #25 Drill #46 Drill #53 Drill

650 1600 #72 Drill #25 Drill #46 Drill #53 Drill

15/64" 17/64"

15/64" 17/64"

9/16" 13/16"

9/16" 13/16"

.015 Min. 65

.015 Min. 65

Well Coil Spring 2-Notches Rich

Well Coil Spring 2-Notches Rich

Adjustments Curb Idle Speed Fast Idle Speed (No. 2 Step) Bowl Vent Valve Unloader Adjustment (wide open throttle) Vacuum Kick Adjustment Fast Idle Cam Position Float Setting (Dry) Primary Secondary Float Setting (Wet) Primary Secondary Accelerator Pump Override Adjustment (wide open throttle) Power Valve (stamped) Choke Type Control Setting

R-4360A 440 Automatic


14-118 FUEL SYSTEM-SPECIFICATIONS FUEL PUMP SPECIFICATIONS

Fuel Pump

Make Model Type Number of Valves Driven by Pump Pressure (pounds)

6 V-8 V-8 V-8 V-8 V-8 198 Cu. In. 318 Cu. In. 383 Cu. In. 426 Cu. In. 383 Cu. In. 440 Cu. In. 440 Cu. In. H.P. 225 Cu. In. 340 Cu. in. 440 Cu. In. Hemi

Carter Airtex Carter Carter Carter Carter MS-4588SA MS-4587SA MS-4589SA MS-4024S RD-267A MS-4845S MS-4844S (E.0.S.) Diaphragm Diaphragm Diaphragm Diaphragm Diaphragm Diaphragm 3 2 2 2 2 2 Camshaft Camshaft Camshaft Camshaft Camshaft Camshaft 3-1/2 to 5 6 to 7-1/2 3-1/2 to 5 5 to 7 3-1/2 to 5 7 to 8-1/2


GROUP 16

PROPELLER SHAFT AND UNIVERSAL JOINTS CONTENTS Page

CROSS AND ROLLER UNIVERSAL JOINT GENERAL INFORMATION PROPELLER SHAFT ANGULARITY

5 1 1

Page

SERVICE DIAGNOSIS SPECIFICATIONS TIGHTENING REFERENCE

1 8 7

GENERAL INFORMATION The propeller shaft and universal joint applications on the Coronet and Charger model vehicles incorporate an internally splined yoke at the front universal joint. The sliding splined yoke slides fore and aft on the transmission output shaft to compensate for the movement of the rear axle. A bellows type rubber seal on the transmission extension, with a nylon ring which fits over the sliding yoke is used to exclude road splash and other foreign material (Fig. 1). The universal joints and sliding spline yoke are permanently lubricated. The joints should be inspected every time the vehicle is serviced, for external

seal leakage. The joints need not be disassembled or relubricated unless seal leakage is evident. If the cross and roller universal joints are repacked with the recommended lubricant, see "Lubrication", Group 0 of this manual. All models of the Coronet and Charger will use the Internal Vibration Absorber propeller shaft (Fig. 2). This propeller shaft incorporates a vibration absorber inside the shaft in the location of the front universal joint. Servicing of this propeller shaft is the same in all respects as in previous years models.

SERVICE DIAGNOSIS Condition PROPELLER SHAFT VIBRATION

Possible Cause

(a) Undercoating or other foreign matter (a) Clean exterior shaft and wash with on shaft. (b) Loose universal joint flange bolts.

(c) (d) (e) (f) (g)

(h) (i) UNIVERSAL JOINT NOISE

Correction

solvent. (b) Tighten bolt nuts to specified torque. Loose or bent universal joint flange (c) Install new flange. Tighten to specifior high runout. cations. Improper drive line angularity. (d) Correct angularity. See "Propeller Shaft Angularity." Rear spring center bolt not in seat. (e) Loosen spring U-bolts, reseat center bolts and tighten U-bolts to specifications. Worn universal joint bearings or miss- (f) Recondition universal joint ing rollers. Propeller shaft damaged (bent tube) (g) Install new propeller shaft. or out of balance. Broken rear spring. (h) Replace rear spring. Excessive runout or unbalanced con- (i) Reindex propeller shaft 180°, reride dition. and correct as necessary.

(a) Propeller shaft flange bolt nuts loose. (a) Tighten nuts to specifications. (b) Lack of lubrication. (b) Recondition universal joint

SERVICE PROCEDURES

PROPELLER SHAFT ANGULARITY The increased emphasis on the need for a quiet, smooth operating drive line in all cars require that the universal joint angles be maintained within acceptable tolerances. Propeller shaft and rear axle housing angularity may be measured by using the Propeller Shaft Angularity Tool C-3976A (Fig. 3). This

tool makes it possible to check the angularity at the engine and differential and carrier. All joint angle measurements on the vehicle should be made with the car supported by the tires if possible; such as, on an alignment pit or a platform hoist. A two post hoist may be used where other means are not available. The vehicle should be approximately level when taking angle measurements with any


16-2 PROPELLER SHAFT AND UNIVERSAL JOINTS OUTPUT SHAFT

SLIDING YOKE

EXTENSION HOUSING

NUI6A

U.

BUSHING SEAL

SHAFT

Fig. I—Front Univorsal Joint Sliding Yoko

heavy items removed from the luggage compartment or passenger compartment. The fuel tank should be full or the equivalent weight simulated. When using a twin post hoist, the vehicle must be supported by the lower control arms and rear axle housing. DO NOT USE A FRAME CONTACT HOIST WHEN MEASURING PROPELLER SHAFT ANGULARITY.

FRONT UNIVERSAL JOINT ANGLE (1) Attach engine adapter SP-5046 to gauge SP5060. (2) Position gauge on left side of engine so that adapter pins, contact flat surface of engine oil pan flange adjacent to the vertical wall of the oil pan (Fig. 5). On models equipped with six cylinder engines, use right side of the engine. The gauge must be held vertical as shown with arrow on gauge SP-5060 pointing toward the front of car. (3) Adjust position of bubble in spirit level in accordance with the listing for appropriate car model as (st SHAFT RETAINER

shown in Chart (Fig. 13). (4) Remove engine adapter SP-5046 and gauge SP5060 from flange adjacent to the vertical wall of oil pan and separate the gauge from engine adapter. (5) With gauge SP-5060 adjusted for the correct engine angle reference, position gauge SP-5060 squarely and firmly along underside of the propeller shaft (Fig. 6). Make sure Veeway is in alignment and that both adapter pins are contacting propeller shaft Be sure arrow on gauge is pointing toward the front of car. (6) Observe position of bubble in spirit level and compare the position with that shown on Chart (Fig. 13) for front joint angle. A normal joint angle will cause bubble to position itself within the acceptable range. If bubble is found to be slightly forward of the acceptable tolerance range, this means that the angle is actually smaller than that specified and does not need correcting. If bubble in spirit level is found to be rearward of the acceptable range, the angle is too large, and must be corrected. To reduce front universal joint angle, install a flat shim between the transmission extension housing and rear engine mount (Fig. 7). Flat shims 1/8 inch in thickness are required to move the bubble in spirit level one graduation. (7) To install shim, loosen bolts in rear mount to transmission extension housing. (8) Raise transmission sufficiently using a floor stand and block of wood beneath transmission oil pan. (9) Install 1/8" shim, lower transmission, remove floor stand and tighten bolts in rear mount to transmission extension housing to specifications. BUSHING AND KILLERS

SEAL RETAINER

SLIDING YOKE

RETAINER SEAL E.USHING AND ROLLERS

NK995A

Fig. 2—Cross and

Roller Universal Joint—Front


PROPELLER SHAFT AND UNIVERSAL JOINTS 16-3 RUSHING

BUSHING

RETAINER

RETAINER

SHAFT

SEAL

SEAL

RETAINER

FLANGE

14t 1-5 RETAINER SEAL BUSHING

RETAINER

SCREW STRAP

RETAINER

,05 C .

WASHER

CROSS NUT

RETAINER

r----9

WASHER

SEAL BUSHING

NE57111

Fig. 3-Cross and Roller Universal Joint-Rear

(10) Recheck front joint angle, starting with step (1) of "Procedure." CAUTION: If a great amount of shimming is required at the transmission extension rear mount, make sure extension housing and propeller shaft will not make contact with floor pan or make interference with seat belt mounting bolts.

REAR UNIVERSAL JOINT ANGLE (1) Remove pinion bumper plate from differential and carrier housing and position gauge SP-5060 on the machined pads with locating pin in rear bolt hole ....GAUGE (SP-5060)

(Fig. 8). The arrow on gauge should point toward the front of car. On models equipped with 7-1/4 axle place propeller shaft alignment gauge adapter SP-5038 between the gauge and machined pads of the carrier (Fig. 9). On models equipped with 9-3/4" axle, position adapter C-4050 on machined pad of axle and install gauge (Fig. 10). The arrow on gauge should point toward front of car. (2) Adjust position of bubble in spirit level in accordance with the listing for appropriate car model as shown in Chart (Fig. 13). (3) Remove gauge SP-5060 from differential and

rp it F

ADAPTER (DIFFERENTIAL)

(SP.S038) ADAPTER (SP.5053)

ADAPTER (ENGINE) (SP-5046)

G-â–

ADAPTER (DIFFERENTIAL) (C-4050)

NR295

Fig. 4 -Propeller Shaft Angularity Tool C -3976A

Fig. 5-Adjusting Gauge on Engine (Front Joint Angle Reference)


16-4 PROPELLER SHAFT AND UNIVERSAL JOINTS

NN21.1

Fig. 9—Adjusting Gauge on Differential (Models with 7-1/4" Axle) (Rear Joint Angle Reference)

Fig. 6—Measu4ng Front Universal Joint Angle

GAUGE

Fig. 7—Shim Location (Front Universal Joint Angle Correction)

carrier assembly and position it squarely and firmly along underside of propeller shaft (Fig. 11). Make sure Veeway is in alignment and that both adapter pins are contacting shaft. Be sure arrow on gauge is pointing toward the front of car. (4) Observe position of bubble in spirit level and compare the position with that shown on Chart (Fig. 13) for rear joint angle. A normal joint angle will cause the bubble to position itself within the accept-

ADAPTER C-4050 ADJUSTING SCREW --0- SPIRIT/ LEVEL

Fig. 10—Adjusting Gauge on Differential (Models with 9-3/4" Axle) (Rear Joint Angle Reference)

able range. (5) If bubble in spirit level is found outside the acceptable range indicated on Chart (Fig. 13), you will

Fig. 8—Adjusting Gauge on Differential (Rear Joint Angle Reference)

NRI

Fig. 11—Measuring Rear Universal Joint Angle


PROPELLER SHAFT AND UNIVERSAL JOINTS 16-5

have to install a wedge type shim between both rear springs and the axle housing spring pads to bring position of bubble within the acceptable range. To make sure shims are installed properly, remember this rule. If bubble is too far forward, insert shim with thick end toward front of car. If bubble is too far to rear, the nose of differential is too high, so thick end of shim goes toward rear of car (Fig. 12). A 1 shins will move bubble in spirit level about 3 graduations forward or rearward, depending on which way the thick end is installed. Presently, there are a number of makes of wedge type shims available commercially. Always make sure shims you use are made of steel and are the same width as the springs on the car. Chrysler Parts Division has made available steel shims in varying angles of 1/2% I' , 2, and 3'; making it possible with these combinations to set the rear universal joint angle within 1/2 • of a perfect angle. (61 To install shims, loosen spring "U" bolt nuts and install shims between rear springs and axle housing spring pads. (7) Tighten spring "U" bolt nuts to proper specifications. (8) Recheck rear universal joint angle after installation of wedge type shim, to make sure position of bubble in spirit level is within the acceptable range. (9) Reinstall rebound bumper and plate assembly on differential carrier, tighten screws to 200 inchpounds. CAUTION: Under no circumstances should a shim pack be used that is over 1/4 inch thick at the center. If that much shimming is required, look for a possible broken rear spring, miskcated spring seat, etc.

PROPELLER SHAFT Removal—Rear Joint (All Models)

I 1 Remove both rear universal joint roller and

bushing assembly clamps from rear axle drive pinion flange iFig. 3). Do not disturb the retaining strap used to hold bushing assemblies on universal joint cross, If so equipped. CATION: Do not allow propeller shaft to drop or hang loose from either joint during removal. Wire up or otherwise support the loose end of shaft to prevent damage to joint. Front Joint (All Models)

(1) Slide propeller shaft with the front yoke from the transmission output shaft (Fig. 2). Be careful not lo damage splines On output shaft or yoke. Examine sliding yoke seal for evidence of leakage. If no leakage is evident, do not disturb the seal. If necessary to replace the seal, see Transmission. Group 21.

CAUTION: It is important to protect the machined surface of the sliding yoke from damage after propeller shaft has been removed. Installation Front Joint (All Models)

(1) Before installing a propeller shaft, wipe sliding yoke clean and inspect machined surface for scratches, nicks, burrs and correct as necessary. i2) Engage the yoke splines on end of output shaft, being careful not to burr the splines (Fig. 2). Rear Joint (All Models)

111 Install rear universal joint cross and roller bushings in the seats of drive pinion flange. Install bushing clamps and attaching screws (Fig. 3). Tighten clamp screws to 170 inch-pounds on all models. CROSS AND ROLLER UNIVERSAL JOINT Disassembly ill Before disassembling universal joint, mark yoke, cross and bushings to facilitate reassembly if inspection discloses parts are serviceable.

(2) Remove four bushing retainers from universal joint cross assembly. Using a socket approximately the same diameter as bushing, press one bushing and roller assembly out of yoke by pressing opposite bushing in. 13) Press out remaining bushing and roller assembly by pressing on end of cross. (4) Remove cross assembly from yoke. Do not remove seal retainers from cross assembly. The cross and retainers are serviced as an assembly. Cleaning and inspection

Fig.

12—Tapered Wedge Location (Rear Universal Joint Angle Correction)

(1) Clean all parts in a suitable solvent and dry with compressed air. Examine bearing surfaces of cross. They should be smooth and free from ripples and pits. If bearing surfaces or seal retainers are damaged, replace cross assembly.


16-6 PROPELLER SHAFT AND UNIVERSAL JOINTS ANGULARITY MEASUREMENT AND CORRECTION CHART FRONT JOINT ANGLE

REAR JOINT ANGLE

ADJUST POSITION OF BUBBLE WITH GAUGE AT ENGINE OIL PAN FLANGE

ADJUST POSITION OF BUBBLE WITH GAUGE ON DIFFERENTIAL CARRIER

UNIVERSAL JOINT CAR TYPE AND WHEELBASE

-.--- FRONT OF CAR

-4-- FRONT OF CAR DODGE 116" W.B. EXCEPT 2 DR. SEDAN & H.T.

-H. 1111

DODGE 116" W.B. 2 DR. SEDAN & H.T.

DODGE 116" W.B. CHARGER (EXCEPT 426 & 440 CI. ENG.)

DODGE 116" W.B. 426 OR 440 CI. ENG. AUTOMATIC TRANS.

MR

II

—\—rrrrerrrr—

T\--nur— rrrry7

—H —firlirrITI—r[

I I

—\,.

DODGE 116" W.B. 426 OR 440 C.I. ENG. 9V." AXLE

tiliwriir

III ■1I•111

k., [ iii

DODGE 117" W.B. STATION WAGON

ANGLE LOW 1-•

--1

I

ANGLE HIGH I

"1

CDs -1---FRONT OF CAR

CORRECTION PROCEDURE PY267

(III rr

rI

1-1—k'

le ,./

I

iI I

iirwr IT 1

r\zwr 1 1

M IMP' 111

ACCEPTABLE REGION

ACCEPTABLE REGION

FINAL READING ON PROPELLER SHAFT (ALL MODELS)

III 1

ANGLE LOW

I• DV..

I

ANGLE HIGH

1.

si

ITTPCIZEFI 7

-4(---- FRONT OF CAR

ADD SHIMS AT REAR AXLE HOUSING ADD SHIMS AT ENGINE REAR MOUNT SPRING SEATS. 1 WEDGE SHIM MOVES (Vs" FOR EACH GAUGE DIVISION) BUBBLE 3 TO 4 GAUGE DIVISIONS. TO TO REDUCE FRONT JOINT ANGLE. CORRECT LOW ANGLES ONLY IF FLOOR REDUCE ANGLE, INSTALL THICK END OF WEDGE TO FRONT OF CAR. PAN INTERFERENCE IS ENCOUNTERED.

Fig. 13—Universal Joint Angularity Reference Chart


TIGHTENING REFERENCE 16-7 (2) Examine rollers in bushings. Rollers that have operated on a worn cross should be replaced. Rollers should have a uniformly good appearance and roll freely inside bushings.

Assembly (1) Lubricate bushing and roller assemblies with Multi-Purpose Grease NLGI Grade 2 EP or MultiMileage Lubricant part number 2525035 or equivalent. Also, fill reservoirs in the ends of the cross. (2) Place cross in propeller shaft yoke, observing

identification marks made at disassembly. Install bushings and roller assemblies in yoke, matching identifying marks. (3) Press both bushing assemblies into yoke while guiding cross into bushings. Correctly position bushings so retainers can be installed. (4) Position remaining two bushing assemblies on cross. Install retained strap to hold bushings on cross during installation of shaft on drive pinion flange. Lightly tap outer ends of bushings while rotating cross to be sure cross and bushings operate freely.

TIGHTENING REFERENCE Pounds Foot Inch

Pinion Flange Clamp Screw (7-1/4", 8-1/4", 8-3/4" Axles) Pinion Flange Clamp Screw (0-3/4" Axle)

Rear Spring "U" Bolt Nut (7-1/4' Axle) Rear Spring "U" Bolt Nut (8-1/4", 8-3/4", 9-3/4" Axles) Pinion Bumper Plate Screw (7-1/4" Axle) Pinion Bumper Plate Screw (8-1/4", 8-3/4", 9-3/4" Axles)

170

170 40 45 150

200


CORONET-CHARGER Model Application

PROPELLER SHAFT Type AXLE RATIO MANUAL TRANSMISSION 3-SPEED 225 Cl Engine-except Station Wagon 7-1/4" Axle A-903 225 CI Engine-All models including Station Wagon 8-3/4" Axle A-903 225 Cl Engine-All models including Station Wagon 8-314" Axle A-230 318 CI Engine-All models including Station Wagon 8-1/4' & 8-3/4" Axle A-230 383 Cl Engine W/4 BBL Station Wagon 8-374" Axle A-230 383 Cl Engine W/4 BBL-except Station Wagon 8-3/4" Axle A-230 MANUAL TRANSMISSION 4-SPEED 383 Cl Engine W/4BBL-except Station Wagon 8-3/4" Axle A-833 383 Cl Engine W/4BBL-Station Wagon 8-3/4" Axle A-833 426, 440 Cl Engine-except Station Wagon 9-3/4" Axle A-833 AUTOMATIC TRANSMISSION 225 CI Engine-except Station Wagon 7-1/4" Axle A-904 225 Cl Engine-All models including Station Wagon 8-3/4" Axle A-904 225 CI Engine-All models including Station Wagon 8-374" Axle A-727 318 CI Engine-All models including Station Wagon 8-1/4" & 8-3/4" Axle A-904 318 Cl Engine-All models including Station Wagon 8-1/4" & 8-3/4" Axle A-727 383 Cl Engine W/2BBL-except Station Wagon 8-1/4" & 8-3/4" Axle A-727 383 CI Engine W/2BBL-Station Wagon 8-374" Axle A-727 383 Cl Engine W/4BBL-except Station Wagon 8-3/4" Axle A-727 383 Cl Engine W/4BBL-Station Wagon 8-3/4" Axle A-727 426, 440 CI Engine-except Station Wagon 8-3/4" Axle A-727 426, 440 CI Engine-except Station Wagon 9-3/4" Axle A-727 UNIVERSAL JOINTS Type-Front -Rear

*Length-Inches Tubular

Diameter-Inches

2.45

2.71

57.65 _

2.76

2.93

-

-

_

_

2.94

3.23

3.54

3.55

3.91

4.10

3.25(IVA)

-

-

-

_

3.25(IVA)

3.25(IVA) 3.25(IVA)

-

-

3.25(IVA) -

3.25(IVA) 3.25(IVA)

-

3.25(IVA) -

-

-

-

56.17

-

52.03

.-

52.03

-

-

-

52.07

-

-

-

3.25(IVA) -

-

52.07

-

-

-

3.25(IVA) -

3.25(IVA) 3.25(IVA)

52.07

-

-

3.25(IVA) -

3.25(IVA) 3.25(IVA)

-

-

52.07

-

-

-

-

-

3.25(IVA) 3.25(IVA) -

-

-

_

-

3.25(IVA) -

-

3.25(IVA)

-

-

-

3.25(IVA) -

-

-

-

3.25(IVA) -

50.96

-

-

-

-

57.65

-

-

3.250VA)

-

56.17

-

-

-

-

3.25(IVA) 3.25(IVA) -

3.25(IVA) -

52.03

-

-

-

5E17

-

52.03

-

52.03

3.25(IVA) -

52.03

-

52.07

3.25(IVA) 3.25(IVA) -

3.25(IVA) -

3.25(IVA) -

-

3.25(IVA) 3.25(IVA) -

3.25(IVA) -

-

3.25(IVA) -

-

3.25(IVA) 3.25(IVA) -

3.25(IVA) -

_

3.25(1VA) -

3.25(IVA) 3.25(IVA)

-

-

-

3.25(IVA) -

3.25(IVA) 3.25(IVA) -

-

-

-

-

3.25(IVA) -

52.07

-

-

-

-

-

3.25(IVA) -

52,07

-

-

-

-

-

3.25(IVA) -

50.96

-

-

-

-

*From centerline of front yoke bearing bores to centerline of rear bearing bores. OVA) Internal Vibration Absorber at front joint of propeller shaft.

Sliding Spline Cross and Roller Cross and Roller

-

-

3.25(IVA) 3.25(IVA)

-

_ 3.25(IVA)

-

-

-

-

3.25(IVA)

SNOI/V3Ii133dS

SPECIFICATIONS


GROUP 17

SHOCK ABSORBERS AND REAR SPRINGS CONTENTS Page 3 SPECIFICATIONS 1 TIGHTENING REFERENCE

REAR SPRINGS SHOCK ABSORBERS

5 5

GENERAL INFORMATION The rear springs are of the semi-elliptical type and are designed to have little or no camber under very light loads. When the load on the rear suspension is increased, a small amount of reverse spring camber is normal. A relatively flat rear spring gives better lateral stability and reduces side sway which provides a well controlled ride and superior handling and stability characteristics. Rubber bushings inserted into the "eye" of each end of the main leaf are the means by which the springs are attached to the mounting brackets bolted to the body at the front and to spring shackles at the rear. The rubber bushings serve as isolators and reduce noise being transmitted to the body. Heavy duty rear springs offered as part of the heavy duty suspension option have a higher rate for greater stability under loaded conditions. (Trailer Towing). They are part of a complete, engineered option which includes heavy-duty torsion bars, and heavy-duty shock absorbers, a sway bar is included

on some heavy-duty packages and is optional on others. Zinc interleaves are used between the leaves of all springs to reduce corrosion and improve spring life. The double acting shock absorbers do not help support the load, but are a means used to control ride motion. The shock absorbers are matched to the particular suspension of the vehicle. It is not usually necessary to replace shock absorbers in pairs. Their action does NOT change with use. Slight fluid seepage during cold weather operation, resulting in a damp appearance, is normal and does not affect the performance or life of the shock absorber. Replace a shock absorber only if it is broken or leaking badly (not just damp) or has lost resistance in one or both directions, due to internal damage. Resistance in the rebound direction is usually greater than in the jounce direction. Be sure to use the same replacement part as the original equipment.

SERVICE DIAGNOSIS Condition

Possible Cause

Correction

SPRINGS SAG OR BOTTOM

(a) Springs sagged or taken a set. (b) Broken, bent or weak spring leaves.

(a) Replace spring.

SPRING NOISE

(a) Loose "U" bolts.

(a) Tighten "U" bolt nuts to specifications. (b) Replace bushings and tighten shackle bolt nuts to specifications. (c) Install new interliners.

(b) Loose or worn eye bushings. (c) Worn or missing interliners. SPRING BREAKAGE

(a) Loose "U" bolts.

(b) Replace spring.

(a) Replace spring. Inspect "U" bolts for damage. Tighten "U" bolt nuts to specifications.

(b) Replace spring and shock absorber. (a) Replace bushing. (a) Bushing excessively worn. (b) Undercoating on shock absorber res- (b) Clean undercoating off shock abervoir. sorber. (c) Loose bolt or stud. (c) Tighten to specifications. (d) Air trapped in system. (d) Purge shock absorber. (a) Worn seal. (a) Replace shock absorber. (b) Damaged crimp or reservoir. (b) Replace shock absorber. (b) Shock absorber inoperative.

SHOCK ABSORBER NOISY

SHOCK ABSORBER DRIPPING OIL

SERVICE PROCEDURES end of shock absorber piston rod. SHOCK ABSORBERS (2) Raise car so wheels are clear of floor and loosen and remove lower attachment bolt nut. Remove Front Removal (Fig. 1) (1) Loosen and remove nut and washer from upper this bolt from lower shock absorber eye and lower


17-2 SHOCK ABSORBERS AND REAR SPRINGS NUT RETAINER BUSHING

SHOCK ABSORBER

TORSION BAR

Fig.

2—Removing or Installing Shock Absorber Bushing

ND7OD Fig. 1—Front Shock Absorber (Coronet-Charger)

control arm mounting bracket. (3) Compress shock absorber by pushing upward and remove from vehicle by pulling down and out of upper shock absorber mounting bushing. (4) Check appearance of upper shock absorber mounting bushing and if it appears worn, damaged, or deteriorated, remove bushing by first pressing out inner sleeve with a suitable tool then prying out or cutting out the rubber bushing. (This bushing will take some set after it has been in service and should be replaced once it has been removed.) (5) If lower bushing requires replacement, remove it from shock absorber using Tool C-3553 by pressing on flua outer sleeve of bushing (Fig. 21. Pressing on inner sleeve of lower bushing will not remove outer sleeve from the shock absorber. New shock absorbers are furnished with the lower bushing installed; however, bushings are furnished separately for service installation. Test and expel air from shock absorber before installation. Testing and Expelling Air

(1) With shock absorber removed, extend fully in an upright position. (2) Inspect for evidence of fluid running from upper end of reservoir. (Actual leakage will be a stream of fluid running down side and dripping off lower

end of unit. A slight amount of seepage is not unusual and does not affect performance). (3) Test for low fluid level or air trapped in cylinder, by holding shock absorber in its normal vertical position and alternately extending and compressing unit. There should be no lost motion in either direction. (4) Should lost motion be evident hold shock absorber in its normal vertical position and fully extend it. (5) Invert unit and compress it. Do not extend unit while inverted. (6) Repeat steps 4 and 5 several times to expel any air trapped in cylinder. (7) Should lost motion persist, replace shock absorber. Repeat operation 4 and 5 prior to installation of a new shock absorber. (New shock absorbers may have a greater resistance than an old one due to friction of new seal). Installation

(1) To install upper rubber bushing, remove inner steel sleeve and immerse bushing in water (DO NOT use oil or soap) and with a twisting motion, start hushing into hole of upper mounting bracket, then tap into position with a hammer. Reinstall steel inner sleeve in bushing. (2) Install lower mounting bushing in eye of shock absorber using Tool C-3553 (Fig. 2). (3) Test and expel air from shock absorber, then, compress to its shortest length. Position washer on upper rod of shock absorber and insert rod through upper bushing and install upper compression washer and nut and tighten to 25 foot-pounds. (4) Position and align lower eye of shock absorber with that of lower control arm mounting holes. Install bolt and nut and tighten to 50 foot-pounds with the full weight of vehicle on the wheels.


174

SHOCK ABSORBERS AND REAR SPRINGS

Rear—Removal (Fig. 3) (1) Raise vehicle on hoist to a comfortable working position. (2) Using floor stands under axle assembly, raise axle to relieve load on shock absorber. (3) Loosen and remove nut and washer attaching shock absorbers to spring plate mounting stud and remove shock absorber from stud. (4) Loosen and remove nut and bolt from upper shock absorber mounting, and remove shock absorber. (5) Inspect appearance of shock absorber mounting bushings and if they appear damaged or deteriorated, remove and replace. (6) Test and expel air from shock absorber before installation, see "Testing and Expelling Air" procedure. Installation (1) On Coronet and Charger models position and align upper eye of shock absorber with mounting holes in crossmember and install bolt and nut. (2) Position washer on shock absorber mounting stud and install shock absorber on stud followed by remaining cupped washer and nut. (3) Lower vehicle until full weight of vehicle is on the wheels. Tighten upper nut 70 foot-pounds.

Tighten lower nut 50 foot-pounds. REAR SPRINGS (Fig. 4)

Measuring Spring Height When measuring rear spring heights, vehicle should be placed on a level floor, have correct front suspension height on both sides, correct tire pressures, no passenger or luggage compartment load and a full tank of fuel. (1) Jounce car several times (front bumper first). Release bumpers at same point in each cycle. (2) Measure shortest distance from highest point on underside of rear axle bumper strap (at rear of bumper) to top of axle housing. (3) Measure both right and left sides. If these measurements vary by more than 3/4 inch (side to side), it is an indication that one of the rear springs may need replacing.

NUT

BOLT

BUMPER BOLT NUT WASHER

N A

SHOCK ABSORBER

BUSHING WASHER

BRACKET ND68B

Fig. 3—Rear Shock Absorber (Coronet-Charger)

(3) Disconnect rear shock absorber at spring plate lower mounting stud. Lower axle assembly, permitting rear springs to hang free. (4) Loosen and remove "U" bolt nuts and remove "U" bolts and spring plate. (5) Loosen and remove the nuts holding front spring hanger to body mounting bracket (Fig. 4). (6) Loosen and remove rear spring hanger bolts and let spring drop far enough to pull front spring hanger bolts out of body mounting bracket holes. (7) Loosen and remove front pivot bolt from front spring hanger. HANGER INSERT BUSHING SHACKLE

"U" BOLTY NUTS ELATE BUSHINGS azirly‘S iFIACKLE

BOLT

It is normal for rear springs to show some reverse arch, even with no load, so appearance alone should not be reason for spring replacement.

HANGER

SPRING

REPLACEMENT

Removal (1) Raise vehicle on hoist to a comfortable working position. (2) Using floor stands under axle assembly, raise axle assembly to relieve weight on rear spring.

NUT NUT WASHER

BUSHING

ICt

PLATE NUT

Fig. 4— Rear Spring (Coronet-Charger)

NP333A


17-4 SHOCK ABSORBERS AND REAR SPRINGS (8) Loosen and remove shackle nuts and remove shackle from rear spring. Installation Inspect rear spring front pivot bolt bushing and if necessary, replace bushing, see "Pivot Bushing Replacement" procedure. (1) Assemble shackle and bushings in rear of spring and rear spring hanger. (Do not lubricate rubber bushings.) Start shackle bolt nut. Do not tighten. (2) Assemble front spring hanger to front spring eye and install pivot bolt and nut. Do not tighten. (3) Position rear spring hanger to body bracket and install bolts and tighten bolts to 30 foot-pounds. (4) Raise the spring and start the spring hanger bolts in mounting bracket holes (light leverage such as mechanics shoulder under spring might be necessary to position spring hanger studs in mounting bracket holes. Install nuts and tighten to 30 footpounds). (5) Lower axle assembly into correct position with axle centered over spring center bolt. (6) Correctly position the lower spring plate and install "U" bolts and nuts and tighten nuts 40 footpounds (Coronet and Charger with 7-1/4" axle) and 45 foot-pounds (all other models). Do not over tighten "U" bolt nuts. (7) Install shock absorber on stud and tighten nut 50 foot-pounds. (8) Lower vehicle to floor and with full weight of vehicle on the wheels, tighten pivot bolts and/or nuts 125 foot-pounds. Tighten shackle nuts 40 foot-pounds (Coronet and Charger). (9) It is recommended that after a rear spring has been replaced, that the vehicle be driven and the front suspension heights be remeasured and corrected if necessary. Pivot Bushing Replacement The removal of old bushings and installation of new bushings is performed in one operation, using Tool C-3709 (8 Cylinder models) or Tool C-3729 (6 Cylinder models) (Fig. 5). (1) Raise vehicle on hoist to a comfortable working position. (2) Using floor stands under axle assembly, raise axle assembly to relieve weight on rear wheels. (3) Disconnect rear shock absorber at spring plate lower mounting stud. Lower axle assembly, permitting rear springs to hang free. (4) To replace front pivot bushing, remove rear spring front hanger from body bracket. Remove pivot bolt and hanger from spring. (5) Place new bushings on Tool C-3709 (8 Cylinder models) or Tool C-3729 (6 Cylinder models) (Fig. 5). Arrange tool in spring eye, then press out old bushing

SP-92 SP-3179 SP-3180

SP-332

BUSHING

SP-3242

SPRING

)7116 SP-3178 NY204A

Fig. 5—Pivot Bushing Replacement

while pressing new bushing in one operation. (6) Assemble front hanger to spring but do not tighten pivot bolt nut until full weight of vehicle is on wheels. (7) Attach spring hanger to body bracket and tighten mounting bolts to 30 foot-pounds. (8) To replace rear spring shackle bushings remove rear spring hanger from body bracket. Remove shackle, then slide bushings out of spring and hanger. (9) Insert new bushings in spring and hanger then assemble shackle and hanger on spring. Start shackle bolt nuts. (10) Attach hanger to body bracket and tighten mounting bolt to 30 foot-pounds. (11) Lower vehicle to floor and with full weight of vehicle on the wheels, tighten pivot bolts and/or nuts 125 foot-pounds on all models. Tighten shackle nuts 40 foot-pounds (Coronet and Charger). (12) Reinstall shock absorber on spring plate stud and tighten to 50 foot-pounds. Spring Interliner Replacement Removal (1) Raise vehicle on hoist to a comfortable working position. (2) Using floor stands under axle assembly, raise axle assembly to relieve weight on rear spring. (3) Disconnect rear shock absorber at spring plate lower mounting stud. Lower axle assembly, permitting rear springs to hang free. (4) Remove spring alignment clips and discard. (5) Using a tapered pry bar or screwdriver, separate spring leaves and remove interliners. (6) Keeping spring leaves separated, clean mating area of both spring leaves thoroughly. IF rust or

Fig. 6—Zinc interleaf


SPECIFICATIONS 17-5 corrosion is evident, wrap fine sandpaper around a flat file or putty knife and sand until area is smooth and clean.

(7) With spring leaves still separated, insert new interliner with retaining buttons in alignment with locating holes. (8) Press retaining buttons into retainer holes and remove pry bar or screwdriver from spring leaves. (9) Repeat above procedure for balance of interliners. (Do not lubricate interliners.)

(10) Install new alignment clips. (11) Reinstall shock absorber on spring plate stud and install washer and nut, tighten to 50 foot-pounds. (12) Lower vehicle onto its wheels. Zinc Interleaf To remove or install zinc interleaves (Fig. 6), between spring leaves, it will be necessary to remove center bolt and disassemble spring leaves. Tighten spring center bolt nut 10 foot-pounds.

SPECIFICATIONS CornetCharger

REAR SPRINGS Type NUMBER OF LEAVES Standard (225 C. I. Engine) (318 C. I. Engine) (383 C. I. Engine) W/4 BBL. (426 Hemi or 440 C. I. Engine)** Heavy Duty Station Wagon Heavy Duty Taxi Police LENGTH (Inches) WIDTH (Inches) MOUNTING Front Rear SHOCK ABSORBERS Type Mounting

Semi-Elliptical 4-1/2 4-1/2 4-1/2 6, 5-2/2 4-1/2 5-1/2 5-1/2 4-1/2 6 58 2.50 Pivot Rubber Bushing Shackle Rubber Bushing Double Acting Rubber Bushing

**Models equipped with 426 Hemi or 440 C. I. engine use 6 full spring leaves on left side and 5 leaves plus two 1/2 leaves forward of axle on right side.

TIGHTENING REFERENCE Foot Pounds

Foot Pounds REAR SPRINGS Center Bolt Nut Front Hanger Nut Pivot Bolt or Nut—Coronet Charger (8 Cyl ) Rear Hanger Bolt Shackle Nut—Coronet

10 30 125 30 40

"U" Bolt Nut—Coronet-Charger 7-1/4" axle 8-1/4", 8-3/4" and 9-3/4" axle SHOCK ABSORBERS Front Lower Bolt Nut —Upper Shaft Nut Rear Lower Stud Nut —Upper Bolt Nut—Coronet, Charger

40 45 50 25 50 70


GROUP 19

STEERING CONTENTS Page

MANUAL GEAR POWER GEAR

1 7

Page

PUMPS STEERING COLUMNS

19 32

MANUAL STEERING GEAR

INDEX Page 1 1 2 3 3

General Information Service Diagnosis Adjustments Gear Reconditioning Gear Removal

Page 7 3 43 44

Cross Shaft Oil Seal Gear Installation Specifications Tightening Reference

GENERAL INFORMATION The manual steering gear (Fig. 1) is designed to provide easy steering with minimum friction in the steering gear. A ball nut travels up or down on the wormshaft, riding on recirculating balls acting as a screw thread. The wormshaft and ball nut assembly is supported in the gear housing by an adjustable ball thrust type upper and lower bearing. The lower bearing cup is

pressed into the gear housing, and the upper bearing cup is pressed into the wormshaft bearing adjuster. The cross shaft is integral with the sector gear. The sector gear meshes with the rackteeth on the recirculating ball nut. Adjustment at this point is controlled by the cross shaft adjusting screw which extends through the housing cover.

SERVICE DIAGNOSIS Condition

HARD STEERING

Possible Cause

(a) Low or uneven tire pressure. (b) (c) (d) (e)

PULL TO ONE SIDE (Tendency of the Vehicle to veer in one direction only)

(a) Inflate tires to recommended pressures. Insufficient lubricant in the steering (b) Lubricate as necessary. gear housing or in steering linkage. Steering gear shaft adjusted too tight. (c) Adjust according to instructions. Front wheels out of line. (d) Align the wheels. See "Front Suspension." Steering column misaligned. (e) See "Steering Column—Manual Transmission." (a) Inflate tires to recommended pressures. Wheel bearings improperly adjusted. (b) See "Front Wheel Bearing Adjustment." Dragging brakes. (c) Inspect for weak, or broken brake shoe spring, binding pedal. Improper caster and camber. (d) See "Front Wheel Alignment" Incorrect toe-in. (e) See "Front Wheel Alignment." Grease, dirt oil or brake fluid on (f) Inspect, replace and adjust as necbrake linings. essary. Front and rear wheels out of align- (g) Align the front wheels. See "Front ment. Suspension." Broken or sagging rear springs. (h) Replace rear springs. Bent suspension parts. (i) Replace parts necessary.

(a) Incorrect tire pressure. (b) (c) (d) (e) (f) (g) (h) (i)

WHEEL TRAMP (Excessive Vertical Motion of Wheels)

Correction

(a) Incorrect tire pressure.

(a) Inflate tires to recommended pressures. (b) Improper balance of wheels, tires (b) Balance as necessary. See "Wheels and brake drums. and Tires." (c) Loose tie rod ends or steering con- (c) Inspect and repair as necessary. nections.


19-2 STEERING—MANUAL

EXCESSIVE PLAY OR LOOSENESS IN THE STEERING WHEEL

Correction

Possible Cause

Condition

(d) Worn or inoperative shock absorbers. (d) Replace shock absorbers as necessary. (a) Steering gear shaft adjusted too loose (a) Replace worn parts and adjust according to instructions. or badly worn. (b) Replace worn parts. See "Front (b) Steering linkage loose or worn. Wheel Alignment." (c) Front wheel bearings improperly (c) Adjust according to instructions. adjusted. (d) Steering arm loose on steering gear (d) Inspect for damage to the gear shaft and steering arm, replace parts as shaft. necessary. (e) Steering gear housing attaching bolts (e) Tighten attaching bolts to specifications. loose. (f) Steering arms loose at steering (f) Tighten according to specifications. knuckles. (g) Replace the ball joints as necessary. (g) Worn ball joints. See "Front Suspension."

SERVICE PROCEDURES Adjustments

Two adjustments are provided in the steering gear (Fig. 2). The worm-bearing pre-load adjustment, and the ball nut rack sector gear mesh adjustment. Before correct adjustment can be made at ball nut rack and sector gear, it must be determined that worm bearing pre-load is properly adjusted. The worm-bearing pre-load adjustment is controlled by the worm thrust bearing adjuster which threads into the housing at the upper end of the wormshaft. Worm Bearing Pre-Load

(1) Remove steering gear arm retaining nut and lock washer. Remove arm with Tool C-3646 (Fig. 3). (2) Remove horn button or horn ring. (3) Loosen cross shaft adjusting screw lock nut, and

back out adjusting screw approximately two turns. This will relieve any friction load which may be present at closely meshed ball nut rack and sector gear teeth. (4) Turn steering wheel two complete turns from straight ahead position, and place torque wrench Tool C-3380 on steering shaft nut. (5) Rotate steering shaft at least one turn toward straight ahead position, while testing rotating torque with torque wrench. The torque required to keep wheel moving should be between 1-1/2 and 4-1/2 inch-pounds. If reading is not within these limits, adjustment can be made in or out of vehicle as follows: (a) Loosen adjuster lock nut. FILLER PLUG

DIE-CAST ALUMINUM HOUSING STEERING SHAFT

CROSS SHAFT ADJUSTMENT SCREW

BALL BEARINGS

UNIVERSAL COUPLING

CROSS SHAFT GEAR CLEARANCE ADJUSTING SCREW

WORMSHAFT BEARING ADJUSTER

LOCK NUT

LOCK NUT

WORM SHAFT RECIRCULATINGBALL NUT CROSS SHAFT

ND458A Fig. I—Steering Gear

Cross Section

ND 459 Fig. 2—Gear Adjustment Locations


MANUAL—STEERING

SIEERING

STEERING ARM,

TOOL

19-3

column, it is recommended that the steering column be completely detached from floor and instrument panel before steering gear is removed. See Steering Column Section of this manual for proper removal, alignment and installation procedure. (1) Remove steering column. (2) From under vehicle, remove steering arm retaining nut and lock washer. Remove steering arm with Tool C-3646 (Fig. 3). (3) Remove gear to frame retaining bolts and remove gear. Installation

NY 7W

Fig. 3—Removing Steering Gear Arm

(b) Use adjuster wrench from Tool C-3884 set and turn adjuster clockwise to increase pre-load, or counterclockwise to decrease pre-load. (c) While holding adjuster from turning, tighten lock nut securely. Retest worm bearing pre-load. Ball Nut Rack and Sector Mesh

The cross shaft adjusting screw, located in housing cover, raises or lowers the shaft to provide proper mesh load between tapered teeth of sector gear and tapered teeth of ball nut. This adjustment can be accurately made only after proper worm bearing preload has been established.

(1) Turn steering wheel gently from one stop to the other, carefully counting number of turns. Turn steering wheel back exactly half way, to center position. (2) Turn cross shaft adjusting screw clockwise to remove all lash between ball nut rack and sector gear teeth, then tighten adjusting screw lock nut to 35 foot-pounds. (3) Turn steeling wheel about 1/4 turn away from center or "high spot" position. Using torque wrench Tool C-3380, at steering wheel nut, measure torque required to rotate steering wheel through high spot at center position. The reading should be between 8 and 11 inch-pounds. This represents total of worm shaft bearing pre-load and ball nut rack and sector gear mesh load. Readjust cross shaft adjustment screw if necessary, to obtain proper torque reading. (4) After adjustments have been completed, place front wheels in a straight ahead position, and with steering gear and steering wheel centered, install steering arm on cross shaft. (5) Tighten steering arm retaining nut to 180 footpounds. STEERING GEAR Removal

To avoid damage to the energy absorbing steering

(1) Position gear on frame and install gear to frame retaining bolts and lock washers. Tighten to specifications. (2) Rotate worm shaft by hand and center cross shaft to mid point of its travel. Align master serration on cross shaft with splines in steering arm. Install steering arm with lock washer and nut. Tighten to specifications. (3) Align and install steering column as outlined. (See "Steering Columns"). Worm Shaft Replacement

The master serration on the steering gear worm shaft spline, used for centering the steering shaft coupling, is machined after the steering gear is completely assembled. If it should become necessary to replace a steering gear worm shaft, it will be necessary to file a master serration on the spline of the worm shaft, since the replacement part does not have a master serration machined in the spline. To file a master serration on a worm shaft spline, the steering gear must be completely assembled and the worm shaft centered in its travel, then with the steering gear in its normal upright position remove one tooth of the spline, at the 12 o'clock position, with a suitable file. Gear Reconditioning

Thoroughly clean entire outside surface of steering gear before disassembly to avoid contaminating wormshaft and ball nut assembly with dirt or grit. (1) Attach steering gear to holding fixture, Tool C-3323 and install holding fixture in a vise (Fig. 2). (2) Loosen cross shaft adjusting screw lock nut, and back out screw about two turns to relieve load caused by close mesh between ball nut rack and sector gear teeth. Remove cross shaft seal as outlined in "Cross Shaft Oil Seal Replacement."

(3) Position steering wormshaft in straightahead position. (4) Remove bolts from the cross shaft cover, and slowly remove cross shaft while sliding arbor Tool C-3875 into housing (Fig. 4).


19-4 STEERING—MANUAL CROSS SHAFT BEARING TOOL

CROSS SHAFT Ake-

WORmSHAFT AND BALL NUT

ASSEMBLY

NO 440

Fig. 4—Removing Cross Shaft

(5) Remove lock nut from cross shaft adjusting screw and remove screw from cover by turning screw clockwise, (6) Slide adjustment screw and shim out of slot in end of cross shaft. (7) Loosen wormshaft bearing adjuster lock nut with a soft drift and remove the lock nut. Hold wormshaft from turning while unscrewing adjuster, using wrench from Tool Set C-3884 (Fig. 5). (8) Slide worm shaft adjuster off shaft.

CAUTION: The adjuster must be handled carefully to avoid damage to aluminum threads. Be careful that ball nut does not run down to either end of wormshaft. The ball guide ends can be damaged if ball nut is allowed to rotate until stopped at end of worm.

NO ASS

Fig. 6—Removing Worm Shaft and Ball Nut Assembly

assembly only, and are not to be disassembled. Do not remove or disturb ball return guides. Place ball nut and wormshaft assembly in a clean place.

(10) Remove cross shaft needle bearing by placing steering gear housing in an arbor press; insert Tool C-3786 in lower end of housing (Fig. 7) and press both bearings through housing. The cross shaft cover as-

(9) Carefully remove worm and ball nut assembly (Fig. 6). The ball nut and wormshaft are serviced as an PRESS RAM

_ADJUSTER WRENCH

CROSS SHAFT BEARING TOOL

WORMSHAFT BEARING

ADJUSTER

ND462A

\D.461

Fig. 5—Removing Worm Shaft Adjuster

Fig. 7—Removing Cross Shaft Inner and Outer Bearings


MANUAL-STEERING 19-5 sembly, including a needle bearing or bushing, is serviced as an assembly. (11) Remove wormshaft oil seal from wormshaft bearing adjuster. by inserting a blunt punch behind seal and tap alternately on each side of seal until seal is driven out of adjuster. (12) Remove wormshaft spacer and upper bearing cup in same manner. However, this must be done carefully to avoid cocking bearing cup and distorting adjuster counterbore. (13) Remove lower cup if replacement is necessary by positioning locking head jaws of remover Tool C-3868 (Fig. 8) behind bearing cup and expanding remover head by pressing down on center plunger of tool. Withdraw bearing cup by turning remover screw nut in a clockwise direction while holding center screw. 114) Wash all parts in clean solvent and dry with compressed air. (15) Test operation of ball nut assembly on wormshaft If ball nut does not travel smoothly and freely on wormshaft and there is roughness or binding, assembly must be replaced. (16) Extreme care is necessary when handling aluminum worm bearing adjuster to avoid damaging threads. It is equally important to avoid damaging mating threads in gear housing. The wormshaft adjuster must never be screwed into housing without lubrication, or when threads are dirty or damaged. These precautions must be taken to avoid -picking up" threads and raining housing and 'or wormshaft bearing adjuster. (17) Inspect cross shaft for wear and check fit of PULLER WORMSHAFT BEARING LOWER CUP

a.

shaft in housing bearings. Inspect fit of shaft pilot in cover bearing. Make sure wormshaft has not been bent or otherwise damaged. (18) The cross shaft and wormshaft oil seals should be replaced when unit is reconditioned. (19) Install cross ql‘n11 outer needle bearing by placing bearing on end of Tool C-3875 with adapter ring. Press bearing into housing to 112 inch below end of bore to provide space for oil seal. (20) Install inner needle bearing by placing bearing on Tool C-3875 (Fig. 9). Press bearing into inside end of housing bore flush with inside end of bore surface. 121) To install wormshaft bearing cups, position cups in housing and bearing adjuster nut. Then press in place with Tool C-3865 (Figs. 10 and 11). (22) Install wormshaft oil seal by positioning seal in wormshaft adjuster with seal metal retainer UP. Drive seal into place with a suitable sleeve so it is slightly below end of bore in adjuster. (23) Apply a coating of steering gear lubricant to all moving parts during assembly, also place lubricant on and around oil seal lips. (24) Clamp holding fixture and housing in a vise with bearing adjuster opening upward. (25) Place a thrust bearing in lower cup in housing. (26) Hold ball nut from turning (Fig. 6), and insert wormshaft and ball nut assembly into housing with end of worm resting in thrust bearing. (27) Place upper thrust bearing on wormshaft Thoroughly lubricate threads on adjuster and threads in housing. (28) Place a protective sleeve of plastic tape over wormshaft splines so splines do not damage seaL Slide

CROSS SHAFT BE TOOL

NO 163

Fig. 8—Removing Lower Bearing Cup

PRESS RAM

N© 471

Fig. 9—Installing inner Bearing


19-6 STEERING-MANUAL

__— PRESS RAM

BEARING CUP INSTALLER

STEERING GEAR HOUSING

juster lock nut, and retest to be sure preload remains between 1-1/8 and 4-1/2 inch-pounds. (32) Before installing cross shaft, pack wormshaft cavities in housing above and below ball nut with steering gear lubricant. Use steering gear lubricant whenever possible, but if not available, a good grade of multi-purpose lubricant may be used Do not use gear oil. When gear is properly packed with steering gear lubricant it will contain eleven fluid ounces of lubricant, and level of lubricant will be at top of W01111.

NI)464

Fig. JO—Installing Wormshaft Lower Bearing Cup

adjuster assembly over shaft. (29) Thread adjuster into steering housing, and with Tool wrench C-3884 and splined nut set, tighten adjuster to 50 foot-pounds while rotating wormshaft. This is done to effectively seat bearings. (30) Loosen adjuster so no bearing preload exists. Then, using torque wrench Tool C-3380, adjust wormshaft bearing preload from 1-1/8 to 4-1/2 inch-pounds. (31) After adjusting preload, tighten bearing ad-

PRESS RAM

BEARING CUP INSTALLER

(33) Slide cross shaft adjusting screw and shim into slot in end of shaft. (34) Test end clearance (Fig. 12). The screw must be free to turn with zero to .004 inch end play. Three different thickness shims are available to obtain specified clearance. (35) Start cross shaft and adjuster screw into bearing in housing cover. Using a screw driver through hole in cover, turn screw counterclockwise to pull shaft into cover. (36) install adjusting screw lock nut, but do not tighten at this time. (37) Rotate wormshaft to centralize ball nut. (38) Place new cover gasket on housing cover. (39) Carefully install cross shaft and cover assembly into steering gear housing (Fig. 4). The cross shaft and sector teeth should be coated with steering gear lubricant before installing cross shaft in housing. (40) Make certain some lash exists between cross shaft sector teeth and ball nut rack. Install and tighten cover bolts to 25 foot-pounds. (41) Position cross shaft seal on cross shaft with lip of seal facing gear housing. Place installing adapter SP-3828 from Tool C-3880 against seal with short step toward seal (Fig. 14). Position nut from Tool C-3880 on cross shaft and turn it down against adapter, pressing seal into housing until step on adapter contacts end of housing. Remove tool. (42) Turn wormshaft about 1/4 turn away from center of "high-spot" position. Using torque wrench C-3380 and 3/4 inch socket on wormshaft spline,

WORMSHAFT BEARING ADJUSTER

CROSS SHAFT x

SHIM

ADJUSTING SCREW NY) '7316

Fig. I I—Installing Wormshaft Upper Bearing Cup

Fig. 12—Measuring Cross Shaft Adjusting Screw End Clearance


POWER—STEERING 19-7 FICWS!NG TOCA. C 3e2A1

TOOL C35&) NK459 Fig.

13—Removing Cross Shaft Oil Seal

check torque required to rotate shaft through high spot at center position. The reading should be between 8 and 11 inch-pounds. Readjust cross shaft adjusting screw as necessary to obtain proper torque reading. Tighten lock nut to 35 foot-pounds and recheck cross shaft torque. CROSS SHAFT OIL SEAL REPLACEMENT

The cross shaft oil seal may be replaced by the following procedure either on the bench, or without removing steering gear from vehicle. CAUTION: When replacing oil seal in vehicle, clean the exposed portion of cross shaft to help prolong oil seal life.

(1) Remove steering gear arm retaining nut and lock washer. Remove arm with Tool C-3646 (Fig. 3). Use Tool C-3880 to service cross shaft seal. The tool consists of adapter SP-3056; half rings SP1932 and nut SP-3610.

NK461

Fig. 14—Installing Cross Shaft Oil Seal

(2) Slide threaded adapter over end of cross shaft and install nut portion of tool on shaft. (Fig. 13). Maintain pressure on adapter with tool nut while screwing adapter into seal until it grips oil seal firmly. Place two half rings and retainer over both portions of tool. Turn tool nut counterclockwise to withdraw seal from housing. (3) Place seal onto splines on cross shaft with lip of seal facing gear housing. (4) Place installing adapter SP-3052 from Tool C3880 against seal. Press seal in until a gap of 1/4 inch exists between adapter and housings (Fig. 14). (5) Place nut from Tool Set C-3880 on cross shaft, and turn it down against adapter, pressing seal into housing until step on adapter contacts end of housing. (6) Remove tool, install steering arm, lock washer and retaining nut and tighten nut to 180 foot-pounds.


POWER STEERING GEAR INDEX General Information Service Diagnosis Service in Vehicle Service Out of Vehicle Tests and Adjustments Gear Reconditioning Gear Installation

Page 7 8 9 12 18 13 19

Cross Shaft Adjustment Cross Shaft Oil Seal Replace Valve Body Recondition Gear Removal Worm Shaft Oil Seal Replace Specifications Tightening Reference

Page 9 11 9 12 12 43 44

GENERAL INFORMATION

The power steering gear (Figs. 1 and 2) consists of a gear housing containing a cross shaft with sector gear, a power piston with gear teeth broached into the side of the piston which is in constant mesh with the cross shaft sector, and a wormshaft connecting the steering wheel to the power piston through a pot type couplhig. The wormshaft is geared to the piston through

recirculating ball contact. The steering valve, mounted on top of the steering gear, directs the flow of fluid in the system. Fluid is supplied to the steering gear, by an engine driven constant displacement type pump through a pressure hose. Oil is returned to the pump reservoir from the steering gear through a return hose.


19-8 STEERING-POWER SERVICE DIAGNOSIS HARD STEERING

(a) Inflate tires to recommended pressures. Low oil level in pump reservoir (usu- (b) See "Fluid Level," Power Steering Pump. ally accompanied by pump noise). Loose pump belt (c) See "Group 7-Cooling." (d) See "Front Wheel Alignment" Front Improper caster and camber. Suspension Group 2. (e) Pressure test pump. Power steering output low. (f) Repair and lubricate as necessary. Steering linkage binding. (g) Adjust or repair as follows: Steering gear malfunctions. 1. See "Cross Shaft Adjustment" 1. Cross shaft adjustment too tight 2. Repair as necessary. 2. Faulty or damaged valve lever. 3. Inspect for leakage at the lower 3. External leakage. cross shaft oil seal; the cross shaft cover "0" ring. 4. Recondition steering gear. 4. Excessive internal leakage.

(a) Tires not properly inflated. (b) (c) (d) (e) (f) (g)

POOR RECOVERY FROM TURNS

(d) (e) (f)

(a) Tires not properly inflated. (b) (c)

(d) (e) (f) (g) TEMPORARY INCREASES IN EFFORT WHEN TURNING STEERING WHEEL TO THE RIGHT OR LEFT

(a) Inflate tires to recommended pressures. (b) Repair and lubricate as necessary. Steering linkage binding. (c) See "Front Wheel Alignment," Front Improper wheel alignment. Suspension Group 2. Damaged steering tube bearing. (d) Remove jacket tube and replace bearings. Steering wheel column jacket and (e) See "Gear Installation." steering gear improperly aligned. Steering gear malfunctions. (f) Adjust or repair as follows: 1. Improper cross shaft adjustment 1. See "Cross Shaft Adjustment" 2. Column support spanner nut loose. 2. Repair as necessary. 3. Damaged valve lever. 3. Repair as necessary. 4. Improper worm thrust bearing ad4. Recondition steering gear. justment. 5. Worn or damaged cylinder head 5. Recondition steering gear. worm seal ring or faulty worm piston ring. 6. Burrs or nicks in the reaction ring 6. Repair as necessary. grooves in the cylinder head or column support. 7. Dirt or chips in the steering gear 7. Recondition steering gear. unit. 8. Rough worm in the piston as8. Recondition steering gear. sembly. 9. Valve binding. 9. Replace valve assembly.

(a) Tires not properly inflated. (b) (c)

CAR LEADS TO EITHER SIDE

Correction

Possible Cause

Condition

(a) (b) (c) (d) (e)

(a) Inflate tires to recommended pressures; See "Wheels and Tires." Improper wheel alignment (b) See "Front Suspension, Front Wheel Alignment" Group 2. Valve body out of adjustment (c) If vehicle leads to the left, move the steering valve housing up on the steering housing. If vehicle leads to the right, move the steering valve housing down on the steering housing. Valve lever damaged. (d) Repair as necessary. Column support spanner nut loose. (e) Repair as necessary. Coupling not centered. (f) Center coupling. Refer to "Gear Installation." Internal leakage in the steering gear (g) Replace the steering gear valve body valve body. assembly. Oil level low in pump reservoir. Loose pump belts. Oil on pump belt Binding steering linkage. Engine idle too slow.

(a) (b) (c) (d) (e)

See "Fluid Level." See "Group 7-Cooling." Replace the belt and adjust Lubricate and repair as necessary. See "Fuel Specifications." Group 14.


POWER—STEERING 19-9 Condition

Possible Cause (f) Air in the system. (g) Power steering pump output low. (h) Gear malfunction.

Correction

(f) Work the steering wheel from right to left until the air is expelled. (g) See Diagnosis "Hard Steering" correction (e). (h) Adjust and repair as outlined under "Hard Steering"—condition and correction (g).

NOISES

(a) Buzzing noise in neutral and stops (a) Noisy pump, make pressure test and when the steering wheel is turned. repair as necessary. Damaged hydraulic lines or interference of the hoses with components attached to the fender shield. Air in system; work steering wheel from right to left until the air is expelled. (b) Chucking noise. Cause as follows: (b) Correct as follows: 1. Improper cross shaft adjustment I. See "Cross Shaft Adjustment." 2. Improper worm shaft thrust bear2. Recondition steering gear. ing adjustment 3. Coupling loose on the worm shaft. 3. Inspect worm shaft splines for wear. Inspect coupling bolt for tightness, if loose, replace bolt and inspect wormshaft and coupling. 4. Worn worm and piston assembly. 4. Replace worm and piston assembly. (c) Metallic clatter or hissing noise. (c) Replace back pressure valve cushion. (d) Knocking condition at the bracket (d) Rubber stop worn or missing from stop when the engine is running. pump bracket. (e) Loose pump belt. (e) See Group 7 Cooling.

EXCESSIVE STEERING WHEEL FREE-PLAY

(a) Improper cross shaft adjustment.

LACK OF ASSIST (One Direction)

LACK OF ASSIST (Both Directions)

(b) Column support spanner nut loose. (c) Improper worm thrust bearing adjustment. (d) Coupling loose on the worm shaft. (e) Excessive worm-piston side play.

(a) See "Cross Shaft Adjustment." (b) Repair as necessary. (c) Repair as necessary.

(d) Inspect wormshaft splines for wear. (e) Install new worm-piston assembly.

(a) Oil leaking past worm shaft oil seal (a) Recondititon steering gear. ring. (b) Broken or worn ring on worm piston. (b) Recondition steering gear. (c) Piston end plug loose. (c) Replace the worm and piston assembly. (d) Reaction seal missing. (d) Remove the steering gear and repair (a) (b) (c) (d)

Pump belt slipping. Pump output low. Broken or worn ring on worm piston. Piston end plug loose.

as necessary. (a) See Group 7. (b) Pressure test pump. (c) Recondition steering gear. (d) Replace the worm and piston assembly.

(e) Valve binding.

(e) Install new valve assembly.

SERVICE PROCEDURES SERVICE IN VEHICLE Cross Shaft Adjustment (1) Disconnect center link from steering gear arm. (2) Start engine and run at idle speed. (3) Turn steering wheel gently from one stop all the way to the other, counting number of turns. Then turn wheel back exactly half way, to center position. (4) Loosen adjusting screw until backlash is evident in steering gear arm. Feel backlash by holding end of steering gear arm between thumb and forefinger with

a light grip. Tighten adjusting screw until backlash

just disappears. Continue to tighten to 3/8 to 1/2 turn from this position and tighten lock nut to 50 foot-pounds to maintain this setting. Valve Body Recondition (1) Disconnect high pressure and return hoses at the valve body and tie the ends above the reservoir fluid level.


19-10 STEERING—POWER OIL OUTLET

OIL INLET

RIGHT TURN POWER CHAMBER

SPOOL VALVE

Ren e _.

PIVOT LEVER RECIRCULATING BALL GUIDE REACTION SPRINGS

I

STEERING COLUMN CONNECTION WORM SHAFT BALANCING RING

LEFT TURN POWER CHAMBER RIGHT TURN REACTION RING POWER PISTON CENTER THRUST BEARING RACE LEFT TURN REACTION RING, CYLINDER HEAD

PITMAN ARM

WORM SHAFT NI-1717A

Fig. 1—Power Steering Gear

(2) Remove two screws attaching valve body to main gear housing. (3) Lift valve body upward to disengage from valve lever (Fig. 8). (4) Remove the two screws attaching control valve body to steering valve body and separate two bodies (Fig. 3). (5) Remove outlet fitting, washer, spring, valve piston and cushion spring. (6) Carefully shake out spool valve and inspect for nicks, burrs and scores. Do not remove valve body end plug unless inspection indicates a leak at gasket. If spool valve or valve body is damaged, replace valve and body assembly.

Small burrs and nicks may be removed with crocus cloth if extreme care is used not to round off sharp CROSS SHAFT SECTOR GFAR

edges of valve. The sharp edge is vitally important to operation of this valve. (7) Clean valve bodies and valve piston thoroughly in clean solvent. Blow out all passages with corm pressed air. Lubricate pistons and bores with power steering fluid. (8) Install steering spool valve in valve body so valve lever hole is aligned with lever opening in valve body. Valve must be perfectly free in valve body FITTING

CONTROL VALVE BODY

GASKET SPRING).

"0" RINGS STEERING VALVE BODY

PISTON / SPRING

"0" RINGS

SCREW FITTING.'44) GASKET SCREW

SPOOL VALVE

END PLUG

1

GASKET NY 1248

POWER PISTON

Fig. 2—Steering Gear Housing

NR1 89

Fig. 3—Valve Body Disassembled View


POWER—STEERING 19-11 without sticking or binding (Fig. 3). 19i Install a new gasket on end plug (if removed). Tighten plug to 25 foot-pounds. (101 Install piston cushion spring in control valve body being sure it seats in counterbore at bottom of housing Lubricate piston and insert nose end of piston into body bore. Test for smooth operation. Be sure cushion spring is not cocked. (il) Install spring on top of piston. and install copper washer and fitting, tighten to 20 foot-pounds. 1121 Position two new •11:1" rings on control valve body and attach to steering valve body. Tighten the two attaching screws to 95 inch-pounds. 113) If pressure inlet fitting has been removed. tighten fitting to 30 foot-pounds. 1141 Align lever hole in valve spool with lever opening in valve body i 15) Install on gear housing making sure the valve lever enters hole in valve spool and key section on bottom of valve body nests with the keyway in housing. CAUTION: These parts should go together with relative ease. Use of force may damage the lever. If they do not go together easily, lift off valve assembly, realign valve spool hole with lever opening in valve body and install valve body.

(16; Install two screws and tighten to 7 foot-pounds to prohibit leakage during valve centering operation. 117. Connect high pressure and return hoses to valve body. ■181 Start engine. If unit is self-steering tap valve up or down to correct When tapping valve "down," hit valve body on end plug. When tapping valve "up," tap on head of screw attaching the valve body to main valve body Do not hit control valve body.

191 Turn steering w heel from stop to stop several times to expel air from system. Refill reservoir as required. CAUTION: Do not turn hard against ends of travel. This will generate high pressure and may blow out the "On rings since the valve body screws have not been finally tightened.

Fig. 4—Removing Steering Gear Arm 131 Slide threaded adapter SP-3609 of Tool C-3880 over end of cross shaft and thread tool nut SP-3610 on gear shaft. Maintain pressure on threaded adapter with tool nut while screwing adapter far enough to engage metal portion of grease retainer. Place the two half rings SP-1932, and Tool retainer ring over both portions of the Tool (Fig. 5.. Turn the tool nut counter-clockwise to withdraw grease retainer from housing. 141 Remove oil seal snap ring with pliers and remove seal back-up washer. (5) Use Tool C-3880 in same manner as outlined in step (3' to remove inner seal. (6) Place tool adapter SP-3828 with long step of adapter against new seal and slide it over shaft with seal lip toward housing iFig. 61. Install tool nut on gear shaft and tighten tool nut until shoulder of tool adapter contacts gear housing. 171 Remove tool nut and adapter and install seal back-up washer and oil seal snap ring with sharp edge out. 'Si Position grease retainer in housing bore. Place

(20, With steering wheel in straight ahead center position, start and stop the engine several times, tapping the valve body up or down as required until there is no movement of the steering wheel when the engine is started or stopped. 121. The vishe is now centered. Tighten the two screws attaching valve body to housing to 200 inch' pounds. Cross Shaft Oil Seal Replace The cross shaft oil seal may be replaced without removing the steering gear from the vehicle. .1} Remove steering arm nut (2) Disconnect steering gear arm from sector shaft with Tool C-3646 (Fig. 41.

Fig. 5—Removing Cross Shaft Oil Seal


19-12 STEERING—POWER

E AL

(1.,asik

N4633

Fig. 6—Installing Cross Shaft Inner Oil Seal tool adapter SP-3828 with short step of lip against seal (Fig. 7). Install tool nut on gear shaft and tighten tool nut until shoulder of tool adapter contacts gear housing. (9) Place steering gear and front wheels in straight ahead position and install steering gear arm and nut. (10) Tighten steering gear arm nut to 180 footpounds. WORM SHAFT OIL SEAL REPLACEMENT The worm shaft oil seal may be replaced without removing gear from vehicle. Remove steering column as outlined under "Steering Columns" and remove oil seal with Tool C-8688 (Fig. 8). Drive new oil seal in place (lip of seal toward housing) with Tool C-3650 (Fig. 9). Install and align steering column as described in "Steering Columns". SERVICE OUT OF VEHICLE WORM SHAFT AND PISTON REPLACEMENT The master serration on the power steering gear

Fig. ft—Removing Worm Shaft Oil Seal worm shaft spline, used for centering the steering shaft coupling, is machined after the steering gear is completely assembled. If it should become necessary to replace a power steering gear worm shaft and piston assembly, it will be necessary to file a master serration on the spline of the worm shaft, since the replacement part does not have a master serration machined in the spline. To file a master serration on a worm shaft spline, the power steering gear must be completely assembled and the worm shaft centered in its travel, then with the steering gear in its normal upright position remove one tooth of the spline at the 12 o'clock position, with a suitable file. Gear Removal To avoid damage to the energy absorbing steering column, it is recommended that the steering column be completely detached from floor and instrument panel before steering gear is removed. See Steering Column Section of this Manual for proper removal, alignment and installation procedure.

4.41, toir

TOOL

SEAL

&a}

NH632

Fig. 7—Installing Cross Shaft Grease Retainer

Fig. 9—Installing Worm Shaft on Seal


POWER—STEERING 19-13 (1) Remove steering column. (2) Disconnect power steering pressure and return hoses at centering valve on gear. Tie free ends of hoses above pump level to avoid loss of fluid. (3) From under vehicle, remove steering arm retaining nut and lock washer. Remove steering arm with Tool C-3646. (4) Remove three gear to frame retaining bolts (use 1/2 inch twelve point socket) remove gear.

Gear Reconditioning Clean the gear assembly thoroughly in a suitable solvent and install unit in holding fixture Tool C-3323. (1) Drain steering gear through the pressure and return connections by turning steering wormshaft from one extreme of travel to the other. (2) Remove valve body attaching screws, and remove valve body and three "0" rings (Fig. 10). (3) Remove pivot lever and spring. Pry under spherical head with a screw driver (Fig. 11). CAUTION: Use care not to collapse slotted end of the valve lever as this will destroy the bearing tolerances of the spherical head.

(4) Remove cross shaft grease retainer and oil seal as outlined in "Cross Shaft Oil Seal Replacement." (5) Loosen cross shaft adjusting screw locknut and remove cross shaft cover spanner nut with Tool C-3988 (Fig. 10). (6) Rotate wormshaft to position cross shaft sector teeth at center of piston travel. Loosen steering power train retaining nut with Tool C-3989. (7) Position holding Tool C-3323 so cross shaft is in a horizontal position. Place Tool C-3875 on threaded end of cross shaft and slide tool into housing until both tool and shaft are engaged with bearings. (8) Turn wormshaft to full left turn position to compress power train parts. Remove power train retaining nut with C-3989. Remove housing head tang washer. VALVE ASSEMBLY "O.RNGS-

PIVOT LEVER

NH628

Fig. II—Removing Pivot Lever

(9) While holding power train firmly compressed, pry on piston teeth with a screw driver using cross shaft as a fulcrum and remove complete power train (Fig. 12). It is important that cylinder head, center race and spacer assembly and housing head be maintained In close contact with each other. This will eliminate the possibility of reaction rings becoming disengaged from their grooves in the cylinder head and housing head. It will prohibit center spacer from becoming separated from center race and becoming "cocked" in housing which may make it impossible to remove power train without damaging the spacer, the housing, or both.

(10) Place power train vertically in a vise equipped with soft jaws to avoid damaging piston assembly. See Fig. 13 for parts identification. The 33 worm bearing needle rollers will fall out when housing head is removed from wormshaft. Use arbor Tool C-3929 (Fig. 14) to hold rollers in position when housing head is removed.

(11) Raise housing head until wormshaft oil seal -ARBOR cre

PIVOT LEVER

-771 e c:

NH629 ;

Fig. 10—Removing Valve Body Assembly

Fig. 12—Removing Power Train


413

113M0d-9N121331S

SNAP RING GREASE RETAINER

RETAINER SEAL BEARING HOUSING

WORM AND PISTON ASSEMBLY "0" RING PISTON RING SEALING RING

"0" RING

SNAP RING

"0" RING

i WORM SLEEVE SHAFT

"0" RING L WASHER LEVER

SCREW

SPRING FITTING WASHER SPRING CCVER SEAL NUT

SPRING PISTON

\

BODY

"0" RINGS FITTING

NUT

ND PLUG GASKET SPOOL VALVE STEERING VALVE BODY

d

NUT

I SCREW

HEAD RING RACE BEARING SPRING RING BEARING

VALVE ASSEMBLY

RACE

* BEARING RACE AND SPACER SERVICED IN MATCHED SETS

RING SPRING WASHER

BEARING •

NUT SEAL "0" RING

SEAL

NY1214F

Fig. 13—Steering Gear Disassembled View


POWER-STEERING 19-15 Wire brush the knurled sections to remove the chips, then blow out the nut and wormshaft to remove any metal particles.

(171 Remove upper thrust bearing race (thin) and upper thrust bearing. (18) Remove center bearing race. (19) Remove lower thrust bearing and tower thrust bearing race (thick). (20) Remove lower reaction ring and reaction spring.

Fig. 14—Retaining Bearing Rollers with Arbor Tool

just clean top of wormshaft and position arbor tool C-3929 on top of wormshaft and into oil seal. With arbor in position pull up on housing head until arbor is positioned in bearing. Remove housing head and arbor. To reinstall rollers, if they should become dislodged, retain rollers in the cage with wheel bearing lubricant. CAUTION: If the wormshaft oil seal is to be replaced, perform the operation with the housing head assembled in the steering gear housing.

(12) Remove large "0" ring from groove in housing head. (13) Remove reaction seal from groove in face of housing head with air pressure directed into ferrule chamber (Fig. 15). (14) Inspect all grooves for burrs. Make sure passage from ferrule chamber to upper reaction chamber is unobstructed. (15) Remove reaction spring, reaction ring, worm balancing ring and spacer. (16) Hold wormshaft from turning, then turn nut with sufficient force to release staked portions from knurled section and remove nut. AIR NOZZLE

r•L REACTION cat HOUSING HEAD

(21) Remove cylinder head assembly. (22) Remove two "0" rings in two outer grooves in cylinder head. (231 Remove reaction "0" ring from groove in face of cylinder head with air pressure directed into oil hole located between two "0" ring grooves (Fig. 16). (24) Remove snap ring, sleeve and rectangular oil seal ring from cylinder head counterbore (Fig. 17). (25) Test operation of wormshaft. The torque required to rotate wormshaft throughout its travel in or out of piston must not exceed 2 inch-pounds with a 15 pound side load. The worm should run in and out of piston under its own weight. The worm and piston is serviced as a complete assembly and should not be disassembled.

(26) Test for excessive side play with the piston held firmly in a vise with the rack teeth up, and the worm in its approximate center of travel. The vertical side play measured at a point 2-5/18 from the piston flange should not exceed .008 inch when the end of the worm is lifted with a force of 1 pound (Fig. 18). (27) Inspect condition of rubber sealing ring located under cast iron ring and replace if necessary. Install cast iron piston ring as follows: (a) Slide a new piston ring into place in piston groove, then place piston and ring assembly in Tool R!NGS

!Ng

CYLINDER HEAD rmia

AIR 1402111 '

N. CYLINDER HEAD OIL SEAL '0 RING

-0-

REACTION IX RING

RING

FERRULE

NY1245A

K P Lea. Fig. 1S—Removing Reaction Seal from Worm Shaft Support

Fig. 16—Removing Reaction Seal from Cylinder Head


19-16 STEERING—POWER FERRULE ,WORM SLEEVE t

1

- FERRULE "0" RING

s

SLEEVE

RETAINER L. REACTION "0" RING

KRes

Fig. 17—Removing Cylinder Head Oil Steal

Fig. 19—Installing Piston Ring

C-3676 with lower part of piston and ring resting on land of tool (Fig. 19). (b) Press down on piston to seat ring in piston groove, forcing open ends of ring out for ease of locking the ring. (28) Place piston assembly in a vertical position (wormshaft up) in a vise equipped with soft jaws. (29) Inspect cylinder head ferrule oil passage for obstructions and the lands for burrs, then lubricate the two large "0" rings and install them in the cylinder head grooves (Fig. 13). (30) Install worm sleeve seal, sleeve and snap ring (if removed). Make sure snap ring is seated in groove. (31) Install lower reaction seal (0-ring) in cylinder head groove. (32) Slide cylinder head assembly (ferrule up) on wormshaft. Check wormshaft seal ring making sure gap is closed to avoid damaging the ring as the cylinder head moves against piston flange. (33) Lubricate with power steering fluid, and in-

stall parts in the following order: (a) Lower thrust bearing race (thick). (b) Lower thrust bearing. (c) Lower reaction spring (with the small hole over the ferrule). (d) Lower reaction ring (flange up so ring protrudes through reaction spring and contacts the reaction "0" ring in the cylinder head). (e) Center bearing race. (f) Upper thrust bearing. (g) Upper thrust bearing race (thin). (h) Start wormshaft thrust bearing adjusting nut (do not tighten). (34) Turn wormshaft clockwise one-half turn. Hold wormshaft in this position with splined nut, Tool C3637 and socket wrench, and hold in this position through items 35 and 36, then tighten nut to 50 footpounds to prestretch wormshaft threads. (35) Loosen adjusting nut. Place several rounds of cord around center bearing race (Fig. 20). Make a loop in one end of cord and hook loop of a distributor breaker arm spring scale Tool Arru-36 in cord loop. Pulling cord will cause bearing race to rotate. Retighten worm bearing adjusting nut while pulling on cord with scale. When adjusting nut is tightened properly, reading on the scale should be 16 to 24 ounces (20 ounces preferred while the race is turning). (36) Stake upper part of wormshaft adjusting nut into knurled area of shaft. (a) Hold a 1/4 inch flat end punch on center line of wormshaft end at a slight angle to nut flange (Fig. 21). (b) Strike punch a sharp blow with a hammer and test preload.

Fig. 18—Checking Warm Shaft Side Play

If adjusting nut moved during staking operation, it can be corrected by striking the nut a glancing blow in the direction required to regain proper preload.


POWER—STEERING 19-17

WORM SHAFT ADJUSTING NUT

Nto

SCALE (TOOL) FERRULE

KR6SS

Fig. 20—Checking Center Bearing Preload

(c) After retesting for proper preload, stake the nut at three more locations 91:r apart around upper part of the nut. (d) To test total staking, apply 20 foot-pounds of torque in each direction. If nut does not move, staking operation is satisfactory. Retest wormshaft preload to determine that adjustment remains constant after nut is securely locked.

(37) Position spacer assembly over center race, engaging dowel pin of spacer in slot of race, and slot of spacer entered over cylinder head ferrule. This will align the valve pivot lever hole in the center bearing race with the valve pivot lever hole in center bearing spacer assembly. The small "0" ring for the ferrule groove should not be installed until after upper reaction spring and spacer have been installed.

(38) Install upper reaction ring on center race and WORM SHAFT PUNCH

spacer with flange down against spacer. (39) Install upper reaction spring over reaction ring with cylinder head ferrule through hole in reaction spring. (40) Install worm balancing ring (without flange) inside upper reaction ring. (41) Lubricate ferrule "0" ring and install in groove on cylinder head ferrule. (42) If oil seal was removed from housing head, install a new seal with Tool C-3650 (Fig. 7). See "Wormshaft Oil Seal Replacement." With lip of seal toward bearing, drive seal until tool bottoms on the support. (43) Lubricate and install reaction seal in groove in face of nousing man with flat gide Of seal out wig. in and 23). Install "0" ring in groove on housing head. (44) Slide housing head and arbor, Tool C-3929 over the wormshaft carefully engaging cylinder head ferrule and "0" ring and making sure reaction rings enter circular groove in housing head. The power train is now ready for installation in housing. (45) It is generally not necessary to remove sector shaft cover. However, this may be easily accomplished by removing the adjusting screw. While holding the cover, turn adjusting screw clockwise until the shaft becomes disengaged from cover. The adjusting screw will now slide out of the "I" slot in end of shaft. Gear Shaft Assembly

(46) To remove gear shaft needle bearings from housing, remove grease retainer, oil seal snap ring with pliers and remove seal back-up washer. (47) Insert Tool C-3875 in steering housing; place housing in a press and press out bearings and oil seal. (48) To install gear shaft lower needle bearing place bearing on end of Tool C-3875. Press bearing into steering gear housing 1/32 inch below end of bearing bore to provide space for oil seal, back-up washer and snap ring and cross shaft grease retainer. See "Cross Shaft Oil Seal Replacement." CAUTION: The arbor adapter ring must be used with C-3875 Remover and Installer Arbor, otherwise the bearings may be crushed.

ADJUSTING NUT OUTER RACE

(49) To install upper needle bearing, place bearing CENTER RACE CYLINDER HEAD

NFODS

Fig. 2I—Staking Worm Shaft Bearing Adjusting Nut

Fig. 22—Seal Ring In Housing Head


19-18 STEERING—POWER WORM SHAFT BALANCING RING

REACTION SEAL

REACTION RINGL

REACTION SPRING

REACTION RING

gr.

0" RING PY195

Fig. 23—Reaction Rings installed (Cut-away view)

on end of Tool C-3875. Press bearing into housing flush with end surface of bore. (50) Insert gear shaft and adjusting screw into cover and using a screwdriver through the threaded hole in cover, turn screw counterclockwise to pull shaft completely into the cover. Lubricate a new square section seal ring and slide it over adjusting screw into position on top of cover. Install adjusting screw lock nut, but do not tighten at this time. (51) Lubricate cross shaft cover "0" ring with wheel bearing grease and install on shelf of gear housing. (52) Lubricate power train bore of the housing with power steering fluid, and carefully install power train assembly. To keep reaction rings from coming out of their grooves keep worm turned fully counterclockwise. The piston teeth must be facing to the right and the valve lever hole in center race and spacer must be in the "up" position. CAUTION: Make sure the cylinder head is bottomed on the housing shoulder (Figs. 1 and 2).

(53) Align valve lever hole in center bearing race and spacer exactly with the valve lever hole in the gear housing. Turn the housing head by tapping on a reinforcing rib with hammer and drift. Use Tool C3849 to maintain alignment (Fig. 24).

Fig. 24—Aligning Center Bearing Spacer With Steering Valve

hole in steering housing so that slots in valve lever are parallel to wormshaft in order to engage the antirotation pin in center race. Install valve pivot lever spring small end first. Turn worm until the piston bottoms in both directions and observe the action of the lever. It must be in the center of the hole and snap back to its center position when the worm torque is relieved.

(58) Install valve body on housing making sure valve pivot lever enters hole in valve spool (Fig. 1). Be sure "0" ring seals are in place. Tighten valve mounting screws to 7 foot-pounds. (59) Install new gear shaft seal followed by seal back-up washer and snap ring and a new grease retainer as outlined under "Cross Shaft Oil Seal ReplaremAnt " Test and Adjustments

(1) Remove oil reservoir cover and fill reservoir with Power Steering Fluid, Part No. 2084329 or equivalent, to the level mark. (2) Connect test hoses with proper adapters to hydraulic pump on the vehicle with pressure gauge C3309D installed between the pump and steering gear. (3) Start the engine.

The aligning tool should not be removed until the spanner nut is securely tightened.

(54) Install housing head tang washer to index with groove in housing. Install spanner nut and tighten to 110 to 200 foot-pounds with Tool C-3989. (55) Set the power piston at the center of travel and install gear shaft and cover assembly so that sector teeth index with piston rack teeth. Make sure cover "0" ring is properly installed on shelf in housing. (56) Install cover spanner nut and tighten 110 to 200 foot-pounds with Tool C-3988. (57) Install valve pivot lever (double bearing end first) (Fig. 25) into center race and spacer through

Fig. 25—Installing Valve Pivot Lever


PUMP—STEERING 19-19 (4) Center valve until unit is not self-steering. Tap on the head of valve body attaching screws to move valve body up on steering housing, and tap on end plug to move valve body down on housing. Expel all air from the unit by turning wormshaft back and forth through the travel several times. (5) Refill reservoir before proceeding with following tests and adjustments on the bench. (a) With steering gear on center, tighten gear shaft adjusting screw until backlash in steering gear arm just disappears. See "Cross Shaft Adjustment." If power train has been removed, tighten 1-1/4 turns from this position and while holding adjusting screw in this position, tighten lock nut (Fig. 26). This is a temporary adjustment to bring the piston rack and sector teeth in full alignment.

(b) Operate unit through its full travel several times to align piston rack and sector teeth. (c) With gear on center, readjust sector shaft backlash. This will require loosening adjusting screw until backlash is evident. Then retighten adjusting screw until backlash just disappears. Continue to tighten for 3/8 to 1/2 turn from this position and tighten lock nut to 50 foot-pounds to maintain setting. (d) Starting from a point at least one full turn of the wormshaft either side of center, torque at sector shaft required to turn unit through center at 2 rpm in each direction shall not exceed 20 foot-pounds or vary more than 5 foot-pounds from left to right. (e) Adjust torque to be equal in both directions by readjusting the valve. Tighten valve body adjusting screw to 200 inchpounds. (f) With gear at or near full turn in either direction, attempt to return unit to center by applying torque wrench at steering gear shaft. Hold wormshaft until cross shaft torque builds up to SO foot-pounds. Release wormshaft and maintain a constant steady pull at 2 rpm on the gear shaft. If cross shaft torque does not drop to 20 foot-pounds maximum as the unit passes through center, check for too much interior drag; binding valve lever, binding spool valve, or tight cross shaft adjustment. (6) With unit under power, but with no load, torque required to rotate wormshaft through an included angle of 180° (90° either side of center) at 6 rpm (or one revolution every ten seconds) shall be 6-10 inchpounds. Disconnect test equipment and mounting fixture and install unit in vehicle.

Fig. 26—Adjusting Steering Gear Mesh

Gear Installation

(1) Position gear on frame and install three gear to frame retaining bolts and lock washers. Tighten to specifications. (2) Rotate worm shaft by hand and center cross shaft to mid point of its travel. Align master serration on cross shaft with splines in steering arm. Install steering arm with lock washer and nut. Tighten to specifications. (3) From engine compartment, connect pressure and return hoses to centering valve on gear. (4) Align and install steering column as outlined. (See "Steering Columns"). (5) Fill power steering pump with power steering fluid Part No. 2084329 or equivalent. (6) Start engine and turn steering wheel several times from stop to stop to bleed the system of air. Stop engine check oil level and correct if necessary. Hose Installation

When either hose is reinstalled or replaced, it is essential that the sponge sleeve hose protector be installed as follows: (1)Avoid sharp bends in large section of hose (about 10 inch diameter is recommended). (2)Hose must remain at least 1 inch away from all pulleys, battery case and brake lines and 2 inches away from exhaust manifold. (3) Sponge sleeves must be installed where hose contacts composition or metal. (4)Tighten pump end hose fitting to 24 foot-pounds and gear end fitting to 160 inch-pounds.


POWER STEERING PUMP INDEX General Information Flow Control Valve

Page 20 20

94 Model 1.06 Model

Page 27 32


19-20

STEERING—PUMP

Pump Removal Pump Installation Oil Seal Replacement .94 Model 1.06 Model Reconditioning .94 Model 1.06 Model

Page 23 23 23 23 27 23 23 28

Service Diagnosis Service Procedures Inspection .94 Model 1.06 Model Specifications Tightening References

Page 21 22 24 24 28 43 44

GENERAL INFORMATION

Two different power steering pumps are used on Dodge models. The .94 pump can be identified by the long oval shape of the filler neck and a drive pulley secured to the drive shaft with a large nut. (Fig. 1). Rectangular pumping vanes carried by a shaft driven rotor, move the fluid from the intake to the pressure cavities of the cam ring. As the rotor begins to rotate, centrifugal force throws the vanes against the inside surface of the cam ring to pick up residual oil which is forced into the high pressure area. As more oil is picked up by the vanes, oil is forced into the cavities of the thrust plate, through two cross-over holes in the cam ring and pressure plate which empty into the high pressure area between the pressure plate and the housing end plate. Filling the high pressure area causes oil to flow under the vanes in the sloth of the rotor forcing the vanes to follow the inside oval surface of the cam ring. As the vanes rotate to the small area of the cam ring, oil is forced out from between the vanes. The 1.06 pump can be identified by a 3/8 inch threaded hole in the pulley end of the drive shaft (Fig. 2). The operation of the 1.06 pump is similar to the vane type pump but differs in appearance and design. The rotor is star shaped and upon rotation, propels 12 steel rollers against the inside surface of the cam ring. As the rollers follow the eccentric pattern of the cam ring, oil is drawn into the inlet ports

and exhausted through the discharge ports as the rollers are forced into vee shaped cavities of the rotor. FLOW CONTROL VALVE A flow control valve permits a regulated amount of oil to return to the intake side of the pump when excess output is generated during high speed operation. This reduces the power requirements to drive the pump and minimizes temperature build-up. The 1.06 pump incorporates a two-stage flow control valve. High pressure oil passes through two orifices in a metering insert. (The metering insert is located in an oil passage sealed with a 1/8 inch pipe plug.) At low speed, approximately 2.7 gpm is passed to the gear. As speed increases and the valve moves, excess oil is by-passed to inlet and the valve acts to block flow through one orifice. This drops flow to the gear to approximately 1.6 gpm at high speeds. Two-stage flow control provides high flow at low speed for improved steering, while reducing the flow at high speed to reduce the power steering system oil temperature. When steering conditions exceed maximum pressure requirements, such as turning the wheels against the stops, the pressure built up in the steering gear also exerts pressure on the spring end of the flow control valve. This end of the valve houses the pressure relief valve on both the .94 and 1.06 models. High pressure lifts the relief valve ball from its seat and al-

OVAL 511APED FILLER TUBE

KEY

NN 1002 Fig. 1—.94 Pump

Vs INCH THREADED HOLE

N'23') Fig. 2-1.06 Pump


PUMP-STEERING 19-21 lows oil to flow through a trigger orifice located in the outlet fitting of the .94 pump and in the front land of the flow control valve of the 1.06 pump. This reduces pressure on the spring end of the valve which then opens and allows the oil to return to the intake side of the pump. This action limits maximum pressure out-

put of the pump to a safe level. Under normal operating conditions, the pressure requirements of the pump are below maximum, causing the pressure relief ball and the flow control valve to remain closed.

SERVICE DIAGNOSIS Condition

INTERMITTANT OR NO ASSIST

NOISY PUMP

Possible Cause

Correction

(a) (a) Loose belt. (b) (b) Low fluid level. (c) (c) Low pump efficiency. "(d) Pump seizure. (d) (e) Flow control bore plug ring not in (e) place. (f) (f) Flow control valve sticking.

Tighten belt. Inspect and correct fluid level. Service as necessary. Replace pump. Replace snap ring. Inspect groove for depth. Service flow control valve as necessary. (g) Wrong pressure-relief valve setting. (g) Replace flow control valve—.94 pump. Replace pump partial assembly.1.06 pump. (h) Damaged "0" ring on flow control (h) Replace "0" ring. bore plug. (i) Loose plug in end of flow control (i) Tighten plug. See "Tightening Refervalve. ence". (j) Distorted pressure plate. (j) Replace pressure plate—.94 pump. *(k) Cam ring badly worn. (k) Replace cam ring—.94 pump. (I) Vanes improperly installed. (I) Install vanes properly—.94 pump. (m) Plugged metering orifice(s) or trigger (m) Disassemble pump and clean. orifice. (n) Damaged or leaky pressure relief (n) Replace seat and ball-1.06 pump; valve seat (plug) or ball. replace flow control valve—.94 pump. Co) Damaged housing bore "0" ring(s) or (o) Replace "0" rings. pressure plate "0" ring. *(p) Scored pressure plate, thrust plate, (p) Replace rotating group package-1.06 pump. cam, rotor or rollers. (a) Low fluid level. (b) Belt noise. (c) Belt loose (causing pump rattling noise). (d) Foreign material blocking pump housing oil inlet hole. (e) Vanes improperly installed. (f) Vanes sticking in rotor.

(a) Inspect and correct fluid level. (b) Inspect for pulley alignment, paint or grease on pulley and correct. (c) Adjust belt. See "Cooling System" Group 7-1.06 pump. (d) Remove reservoir, visually check inlet oil hole and service as necessary. te) Install properly or replace if necessary—.94 pump. (f) Recondition pump and correct cause —.94 pump. (g) Replace flow control valve—.94 pump. (h) Replace badly scored part or lap in if lightly scored—.94 pump. (i) Replace rotating group package-1.06 pump. (j) Reroute hoses.

(g) Fa ulty,flow control valve. *(h) Pressure plate, thrust plate or rotor scored. *0) Pressure plate, thrust plate, cam, rotor or rollers scored. (j) Pump hose interference with sheet metal or brake lines. (k) Pulley loose. (k) Retorque pulley retaining nut—.94

pump.

PUMP VIBRATION

(a) Pump hose interference with sheet (a) Reroute hoses. metal or brake lines. (b) Faulty or loose belt. (b) Replace or adjust belt as necessary. See "Cooling System," Group 7. (c) Pulley loose or out of round. (c) Replace pulley. (d) Crankshaft pulley loose or damaged. (d) Replace crankshaft pulley.

*Clean and flush high pressure and return hoses Recondition gear valve body (see "Power Steering Gearl.


19-22 STEERING—PUMP Condition

PUMP LEAKS

Correction

Possible Cause

(a) Correct fluid level. (Fluid Level Too High). (b) Resolder or replace reservoir as nec(b) Reservoir solder joints leak. essary. (c) Irspect sealing area of reservoir. Re(c) Reservoir "0" ring leaking. place "0" ring or reservoir as necessary. (d) Replace seal. (d) Shaft seal leaking. (e) Tighten bolts. See "Tightening Refer(e) Loose rear bracket bolts. ence". (f) Loose or faulty pressure hose ferrule. (f) Tighten fitting to 24 foot-pounds, 1.06 pump-20 foot-pounds, .94 pump or replace as necessary. (g) Damaged pressure hole "u" ring. (R) Replace "0" ring-1.05 pump. (h) Housing ball plug leaking. (h) Replace pump partial assembly.1.06 pump. (i) Rear bolt holes stripped or casting (i) Repair, if possible, or replace pump. cracked.

(a) Cap or filler neck leaks.

SERVICE PROCEDURES Checking Fluid Level 1.06 Model

(1) Start engine, turn steering wheel from stop to stop several times to expel air from system, then shut off engine. (2) Wipe reservoir filler cap free of dirt, remove cap and visually inspect oil level in reservoir. Engine at room temperature—Oil should just cover filler neck/reservoir joint (1-3/4 inches to 2 inches from top of filler neck). Engine Het—Oil level should be one-half way up in filler neck. .94 Model

The oil level in the .94 pump should be checked only after pump has reached normal operating temperature. A dip stick, built into the reservoir cap, indicates "FULL" or "ADD". Fluid level should be at the "FULL" mark when hot. Replenish the fluid, if necessary, in all pumps with Power Steering Fluid, Part No. 2084329 or equivalent.

engine and warm up fluid to a temperature between

150 and 170 degrees Fahrenheit. Turning the wheels from stop to stop will aid in warming the fluid. Do not hold wheels against stop for extended period as undue internal pump overheating will result. (5) With engine idling at 600 RPM, and gauge valve open, note pressure while turning steering wheel from one extreme position to the other. Turn the wheels all the way to one or the other stop momentarily and note the maximum pressure. A pressure of at least the minimum pressure shown for the particular pump in "Specifications" should be read. (6) If pressure is under the specified rating, the steering system is not functioning properly. To determine which unit is faulty, momentarily close the pressure gauge valve and note maximum pressure registered on gauge. If the pressure reads less than the maximum pressure shown for the particular pump in "Specifications" the pump is faulty and should be

Pressure Test—All Models (1) Inspect fluid level in reservoir. Fill to correct level indicated on dip stick if necessary.

(2) Measure belt tension and correct if necessary. See "Cooling System," Group 7. (3) Disconnect the high pressure hose at. the steering gear and connect the free end of the hose to the gauge side of C-3309D. Connect a second pressure hose from the valve side of C-3309D to the steering gear. The valve must be installed on the outlet side of the gauge (Fig. 3). (4) Insert thermometer in fluid reservoir, start

Fig. 3—Pressure Test


PUMP—STEERING 19-23

reconditioned. Should pressure reading in step 5 read low but not in step 6, the steering gear is faulty. When removing test equipment, be sure to reinstall hoses in original position to avoid interference with engine or sheet metal. Pump Removal—All Models (1) Loosen pump mounting and locking bolts and remove belt. (2) Disconnect both hoses at pump. (3) Remove mounting and locking bolts and remove pump and bracket.

TOP VIEW HIGH PRESSURE HOSE RETURN HOSE

POWER STEERING PUMP

END VIEW

Pump Installation—All Models (1) Position pump on engine and install mounting and locking bolts. (2) Install drive belt and adjust. See "Cooling System—Group 7". Tighten mounting bolts to 30 footpounds. (3) Connect pressure and return hoses. (Use new pressure hose "0" ring-1.06 pump only). See "Hose Installation". (4) Fill pump reservoir to top of filler neck with Power Steering Fluid, Part No. 2084329 or equivalent. (5) Start engine and turn steering wheel several times from stop to stop to bleed the system. Stop engine, check oil level and correct if necessary. See "Checking Fluid Level". Hose Installation—All Models When either hose is reinstalled or replaced, the following points are essential: (1) Route hoses in same position they were in before removal. (2) Route hoses smoothly, avoiding sharp bends and kinking. (3) When properly installed, the pressure hose tube ends should rest against the outside of the pump reservoir neck on one end, and the outside of the gear valve body on the other end (Fig. 4 and 5). NOTE: The pressure hose tube end is not designed to rest against the gear valve body on the Coronet 426 Cu. inch (Hemi). The gear fitting for the pressure hose on these models is a right angle fitting. (4) Tighten pump end hose fitting to 24 foot-pounds and gear end fitting to 160 inch-pounds. (5) Hoses must remain at least one inch away from all pulleys, battery case and brake lines, and two inches away from exhaust manifold. (6) When used, protective sponge sleeves must be properly positioned to prevent hose contact with other components in engine compartment. (7) After hoses are installed, check for leaks while system is being bled. See "Pump Installation".

STEERING GEAR NU342

Fig. 4—Hose Routing-1.06 Pump 8 Cylinder Engines

.94 MODEL Oil Seal Replacement To service the drive shaft oil seal, it is necessary to remove the pump from the vehicle, disassemble and reassemble the pump as outlined in "Reconditioning—.94 Model." Reconditioning—.94 Model Disassembly (1) Remove pulley retaining nut before loosening power steering pump belts. Remove pump from engine as an assembly. (2) Tap pulley off shaft with plastic hammer. (3) Remove brackets from pump, drain reservoir and clean exterior of pump with solvent. (4) Remove key from drive shaft. (5) Using soft protective jaws, clamp pump (shaft down) in vise between square boss and shaft housing (Fig. 6). (6) Remove two mounting studs and pressure hose

TOP VIEW HIGH PRESSURE HOSE

STEERING GEAR

POWER STEERING

END VIEW

PUMP

RETURN HOSE

SIDE VIEW

NU343

Fig. 5—Hose Routing-1.06 Pump 6 Cylinder Engines


19-24 STEERING-PUMP PLASTIC HAMMER DRIVE SHAFT

NNIC07

Fig. 6—Removing Reservoir

Fig. 8—Removing Drive Shaft Assembly

fitting. Gently tap reservoir tiller tube back and forth with plastic hammer to loosen. Work reservoir off pump body (Fig. 6). Discard reservoir, two mounting stud and pressure fitting "0" rings. (7) Using a punch, tap end cover retainer ring around till one end of ring lines up with hole in pump body. Insert punch in hole far enough to disengage ring from groove in pump bore and pry ring out of pump body (Fig. 7). (8) Tap end cover with plastic hammer to jar it loose. Spring under cover should push cover up. (9) Remove pump body from vise, place in inverted position on fiat surface and tap end of drive shaft with plastic hammer to loosen pressure plate. rotor and thrust plate assembly from body. Lift pump body off of rotor assembly. Flow control valve and spring should slide out of bore also (Fig. 8). (10) Remove and discard end plate and pressure plate "0" rings. (11) Place pump body on flat surface and pry drive shaft oil seal out with a screw driver (Fig. 9). (12) Inspect seal bore in housing for burrs. nicks

or score marks that would allow oil to bypass outer seal surface. (13) If necessary to disassemble flow control valve for cleaning, see "Flow Control Valve Disassembly". (14) After lifting pressure plate and cam ring from rotor, remove ten vanes from slots in rotor. (15) Clamp drive shaft in soft jawed vise, with rotor and thrust plate facing up. (16) Remove rotor lock ring, pry ring off drive shaft using a screw driver (Fig. 10). Exercise care to avoid nicking the rotor end face. Discard ring. (17) Slide rotor and thrust plate off of shaft and remove shaft from vise.

PUNCH INSERTED IN HOLE

RETAINER RING

Inspection (1) Wash all parts in clean solvent, blow out all passages with compressed air and air dry cleaned parts. (2) Inspect drive shaft for excessive wear and seal area for nicks or scoring. Replace if necessary. (3) Inspect fit of vanes in rotor. Vanes must slide freely in slots of rotor without binding. Excessively SCREW DRIVER -NN

SEAL

NN1008

Fig. 7—Removing End Cover Retainer Ring

Fig.

9— Oil Seal Removal


PUMP—STEERING 19-25

Fig. 10—Removing full Diameter Lock Ring loose vanes require replacement of rotor and/or vanes. Binding can be relieved by cleaning or removal of burrs with a thin fine file. (4) Inspect flat surfaces of pressure and thrust plates for wear or scoring. Light scoring can be itmoved by lapping on a fiat surface. Remove all lapping compound thoroughly before reassembly. (5) Inspect inner surface of cam ring for heavy scuff or chatter marks. Replace if necessary. light score or scuff marks can be removed by polishing with a small, flat oil stone. (6) Inspect end cover for nicks or burrs on surface contacting "0" ring and remove with a fine stone. (7) Inspect pump body drive shaft bushing for excessive wear. Replace pump body and bushing as an assembly if badly worn or scored.

Assembly

Fig. 12-1nstalling Thrust Plate in grooves in pump cavity. These rings are the same size. Lubricate with power steering fluid. (4) With drive shaft clamped splined end up in soft jawed vise, install thrust plate on drive shaft (smooth, ported side up) (Pig. 12). (5) Slide rotor over splines with the counterbore of rotor facing down. Install rotor lock ring making sure ring is seated in groove (Fig. 13). (6) Install two dowel pins in holes in pump cavity. Carefully insert drive shaft, rotor and thrust plate assembly in pump cavity indexing locating holes with dowel pins (Fig. 14). (7) Slide cam ring over rotor on dowel pins with arrow on ring facing "UP" (Fig. 15). (8) Install ten vanes in rotor slots with radius edge facing out towards cam ring inner surface (Fig. 16).

(1) Place pump body on flat surface and drive new drive shaft seal into bore with a 7/8 or 15/16 inch socket till seal bottoms on shoulder (Fig. 11). CAUTION: Excessive force will distort the seal. (2) Lubricate seal with power steering fluid and clamp pump body in vise, (shaft end down). (3) Install end cover and pressure plate "0" rings

(91 Position pressure plate on dowel pins. Place a 1-1/4 inch socket in groove of pressure plate and seat entire assembly on "0" ring in pump cavity by pressing down on socket with both thumbs (Pig. 17).

Fig. 11-011 Seal Installation

Fig. 73—Installing Rotor Lock Ring

CAUTION: Vanes installed with flat edge out will result in noisy pump operation.


19-26 STEERING-PUMP

Fig- 14—Rotor and Thrust Plate Installed CAM RING

DOWEL PIN LOCATING HOLES

ARROW UP

12)

NNIOte

Fig. 1S—Installing Cam Ring (10)Place spring in groove in pressure plate and position end cover lip edge UP over spring. (11) Press end cover down below retaining ring groove with thumb and install ring making sure it is seated in groove (Fig. 18).

Fig. 17—Seating Pressure Plate This operation can be performed in an arbor press if available. Care should be exerted to prevent cocking the end cover in the bore or distorting the assembly. (12)fling a punch. tap retainer ring ends around in the groove until opening is opposite flow control valve bore. This is important for maximum retention of the retainer ring (Fig. 18). (13) Replace reservoir "0" ring seal, two mounting stud -0" ring seals and flow control valve "0" ring seal on pump body. lubricate with power steering fluid and carefully position reservoir on pump body. Visually align the mounting stud holes tin studs can be started in threads. (14) Using a plastic hammer, tap reservoir down on pump and insert flow control valve spring and valve (slotted end up). (15) Replace -0- ring on pressure hose fitting and lubricate with power steering fluid (Fig. 19). CAUTION: Be sure "0" ring is installed on upper groove. It is possible to install "0" ring in lower END COVER RETAINER RING ENDS FLOW CONTROL VALVE SORE

NNI017

Fig. 16—Installing Rotor Vanes

Fig. 18—Installing End Cover Plate and Retainer Ring


PUMP—STEERING 19-27 Assembly

-0- RING 114 UPPER GROOVE

(1) Insert spring, guide and pressure relief ball in end of flow control valve (Fig. 20). (2) Install hex head plug using the same number of shims as were removed. Altering shim thickness will change relief pressure.

RELIEF ORIFICE

NNI018

Fig. 19—Installing Pressure Hose Fitting groove. This would restrict relief outlet orifice. (113) Install pressure hose fitting and tighten mount-

ing studs. Tighten pressure hose fitting to 20 footpounds and rear mounting studs 25-35 foot-pounds. (17) Remove pump assembly from vise and install mounting brackets and drive shaft key. (18) Install pulley on shaft and secure with retaining nut. Tighten nut to 45-55 foot-pounds. (19) Install pump assembly on engine and refill reservoir. Start engine and inspect for leaks. Check fluid level. .94 MODEL Flow Control Valve

The flow control valve is serviced as an assembly. Nicks or burrs that might cause the valve to stick in the bore may be removed by rubbing valve over fiat surface covered by crocus cloth. Care should be taken to prevent rounding the sharp edges of the lands. The valve may be disassembled for cleaning if dirt has caused pump failure. It is important that if the valve is disassembled for cleaning purposes, the entire pump should be disassembled and cleaned. Disassembly (1) Remove pressure hose fitting from pump reservoir. Discard "0" ring on fitting. (2) Withdraw valve with a magnet. if valve is stuck in bore, it may be necessary to push in on valve against spring pressure. Release pressure exerted against valve abruptly and allow valve to spring out of bore. (3) Clamp land end of valve in a soft jawed vise and remove hex head plug and shim(s). Note number of shims on plug. Same number of shims should be installed on assembly of valve. (4) Remove valve from vise and remove pressure relief ball, guide and spring.

(3) Install hex head plug and tighten to 50 inchpounds. (4) Insert flow valve spring and valve in bore. Install new "0" ring on pressure hose fitting and lubricate with power steering fluid. (5) Thread fitting into pump body and tighten to 20 foot-pounds. Oil Seal Replacement- 1.06 Model

(I) Remove pump from engine. Drain reservoir and clean exterior before servicing. (2) Clamp pump in vise securely at mounting bracket. (3) Remove pulley with Tool C-4068 (Fig. 21). (4) Position seal remover adapter SP-5323A over end of drive shaft with large opening toward pump. (5) Place seal remover Tool C-4062 over shaft. through adapter and screw tapered thread well into metal portion of seal. Tighten large drive nut and remove seal. (Fig. 22). (6) Inspect seal bore in housing for burrs, nicks or score marks that would allow oil to by-pass outer seal surface. (7) Inspect shaft for scratches or burrs, if any, remove with crocus cloth. Lubricate new seal and in stall with lip toward pump. Use Tool C-4061 to drive seal flush with housing (Fig. 23). (8) Install drive pulley. See "Pulley Installation", (Figs. 33 and 34). (9) With installer shaft clamped securely in vise, tighten drive nut against thrust bearing and press pulley onto shaft. CAUTION: Do not attempt to press pulley on to shaft without the use of special tool as serious damage will result to interior of pump. A small amount of drive shaft end play will be observed when pulley is installed flush with end of shaft. This movement is necessary and will be mini. muted by a thin cushion of oil between the rotor and PRESSURE RELIEF SPRING

PRESSURE RELIEF BALL

FLOW CONTROL VALVE

GUIDE

NN1003

Fig. 20 — Flow Control Valve (.94 Pump)


19-28 STEERING—PUMP

end plates when pump is in operation. (10) Install pump and adjust belt as outlined under "Cooling" Group 7.

around until one end of ring lines up with hole in pump body. Insert punch in hole far enough to disengage ring from groove in pump bore. Remove ring from body (Fig. 25). (8) Tap end cover with plastic hammer to jar it loose. Spring under cover should push cover up. (9) Remove pump body from vise, place in inverted position on clean flat surface and tap end of drive shaft to loosen rotating group. Lift pump body off rotating group. (10) Remove and discard brass seal plate and fibre gasket. (Some pumps may be assembled with brass plates only). The fibre gasket may be found stuck to housing floor; it can easily be lifted or pulled away. Insure that all portions of gasket are removed and that housing floor is not scratched or damaged. (11) Discard pressure plate and end cover "0" rings. (12) Remove snap ring, bore plug, flow control valve and spring from housing. Discard "0" ring. (18) If necessary to disassemble flow control valve for cleaning, see "Flow Control Valve Disassembly".

RECONDITIONING-1.06 Model

Inspection

NR313

Fig. 21—Removing Drive Pulley (1.06 Pump)

Disassembly (Fig. 24)

(1) Remove pump from engine. Drain reservoir and clean exterior before servicing. (2) Clamp pump securely in vise at mounting bracket. (3) Remove pulley with Tool C-4068 (Fig. 21). (4) Remove oil seal as described in "Oil Seal Replacement" section. (5) Remove pump from vise and remove three mounting bracket bolts, remove bracket. (6) Remove reservoir and place pump in vise with shaft down (use vise with soft protective jaws). Discard mounting bolt and reservoir "0" rings. (7) Using a punch, tap end cover retaining ring

(1) Remove clean out plug with alien wrench (Fig. 25). (2) Wash all parts in clean solvent, blow out all passages with compressed air and air dry all cleaned parts. (3) Inspect drive shaft for excessive wear and seal area for nicks or scoring. Replace if necessary. (4) Inspect end plates, rollers, rotor and cam ring for nicks, burrs, or scratches. If any of the components are damaged to a degree that the efficiency of the pump is affected it is recommended that all the interior parts be replaced. (5) Inspect pump body drive shaft bushing for excessive wear. Replace pump with pump partial assembly if badly worn or scored. Pump partial assembly

NP 314

Fig. 22—Removing Shaft Seal

Fig. 23—Installing Shaft Seal


PUMP-STEERING 19-29 OIL SEAL PUMP BODY SEAL PLATE "0" RINGS FRONT PLATE

ROTOR ROLLERS (12)

CAM RING

DRIVE PULLEY

ROTOR MOUNTING BRACKETS

PRESSURE PLATE

FIBRE GASKEI

FILLER CAP

RESERVOIR FLOW CONTROI VALVE ASSEMBLY DOWEL PIN

END

COVER SPRING END COVER RETAINER RING

MOUNTING SCREW

NR254C

Fig. 24-1.06 Pump Disassembled View

includes the entire pump with the exception of the reservoir, filler cap, mounting brackets, and drive pulley. Assembly (1) Install 1/8 inch pipe clean out plug. Tighten to 80 inch-pounds. (2) Place pump body on fiat surface and drive new shaft seal into bore with Tool C-4061. (3) Install new end cover, "0" ring in groove in pump bore. Lubricate with power steering fluid. MOUNTING BOLT SFAI RETAINING RING

0

FLOW CONTROL VALVE

(4) Lubricate new large pump body to reservoir "0" ring and install on pump body. (5) Install new fibre gasket and brass seal plate to bottom of housing floor (fibre gasket on floor and brass seal plate on top of fibre). Note: Pumps originally built with brass seal plate only, must be serviced with both brass seal plate and fibre gasket. Align index notches in plate and gasket with dowel pin hole in housing; cut-out sections of gasket and plate should be in line with core pockets on side of housing bore (Fig. 26). Caution: Pump will not operate properly if either gasket or seal plate are improperly installed.

(6) Carefully install front plate in pump bore. Chamfered edge first. Align index notch in plate with dowel pin hole in housing. CAUTION: Use extreme care in aligning dowel pin. Pump can be completely assembled with dowel pin improperly positioned in end plates and not In indexing hole in housing.

END COVER

OUT PLUG NR317 Fig. 25—Removing End Cover Retaining Ring

(7) Place dowel pin in cam ring and position cam ring inside pump bore. Notch on cam ring must be up or away from pulley end of pump (Pig. 27). If cam ring has two notches, one machined and one cast, install with machined notch up. Machined notch has sharp corners and cast notch rounded corners. If end of dowel pin in cam ring is more than 3/16


19-30 STEERING—PUMP CORE POCKET FIBRE GASKET

DOWEL PIN HOLE

Fig. 28—Installing Rotor PYI60 Fig. 26—fibre Gasket Installed

inch above surface of installed cam ring, it is not seated in index hole in housing. (8) install rotor and shaft in cam ring and carefully place 12 rollers in cavities of rotor (Figs. 28 and 29). Lubricate rotor, rollers, and cam T.D. with power steering fluid. (9) Before installing pressure plate, rotate shaft by hand to make sure rollers are all seated parallel with pump shaft. (10) To insure proper alignment of pressure plate to dowel pin, insert the largest possible number drill into the large 3/16 inch diameter oil hole in the cam ring, next to the cam notch. Select from a number 13 through 18 drill, clean thoroughly, and bottom on housing floor (Fig. 30). (11) install new "0" ring on pressure plate, lubricate with power steering fluid and carefully position in pump bore. Before seating plate in pump bore, align index notch in plate with dowel pin and oil passage slot in plate with number drill. Seat plate on cam ring using a clean 1-1/8 inch socket and plastic hammer (Figs. 31 and 32). Remove drill. Inspect pressure plate at both oil passage slots to insure that plate is

squarely seated on cam ring end face. (12) Place large coil spring over raised portion of installed pressure plate. (13) Position end cover, lip edge UP, over spring Press end cover down below retaining ring groove with thumb and install ring making sure it is seated in groove. Light tapping on the end cover may be necessary to insure that the end cover chamfer is squarely seated against snap ring.

Fig. 29—Installing Rollers In Rotor NUMBER DRILL 316 DIA. OIL HOLE

DOWEL PIN

-4— CAM RING NOTCH

CAM NOTCH NU82

N!.23'15A

Fig. 27—Installing Cam Ring

Fig. 30–Aligning Oil Holes


PUMP-STEERING 19-31

INDEX NOTCH PRESSURE PLATE

DOWEL PIN (

TOOL C-4063

-14 I's

NR32IA

Fig. 33—Pulley Installation-6 Cylinder Engines

Fig. 31—installing Pressure Plate

(14) Replace reservoir mounting bolt seal. (15) Lubricate How control valve with power steering fluid and insert valve spring and valve into bore (spring first then hex plug end of valve). Install new "0" ring on bore plug, lubricate with power steering fluid and carefully install into bore. Install snap ring, with sharp edge UP. CAUTION: Do not depress the bore plug more than 1/16 inch beyond snap ring groove. (16) Place reservoir on pump body and visually align mounting bolt hole. Tap reservoir down on pump with plastic hammer. (17) Remove pump from vise and install mounting brackets with three mounting bolts, tighten to 18 footpounds. (18) Install drive pulley. See "Pulley Installation" (Figs. 33 and 34t Power steering pump drive pulleys installed on six cylinder engines are not pressed flush with the end of the pump shaft. With drive pulley placed on end of PRESSURE PLATE OIL PASSAGE SLOT ;

-

416 ,

NUM

shaft, securely thread installer Tool C4083. without adapter, hull 3/8 inch threaded hole in end of shaft. (Fig. 33). Pumps installed on eight cylinder engines have drive pulleys pressed flush with the end of the pump shaft. With drive pulley placed on end of shaft, securely thread installer Tool C-4063, with adapter SP. 5399, into 3/8 inch threaded hole in end of shaft (Fig. 34). (19) %Stith installer shaft clamped securely in vise, tighten drive nut against thrust bearing and press pulley onto shaft. CAUTION: Do not attempt to press pulley on to shaft without the use of special tool as serious damage will result to interior of pump. A small amount of drive shaft end play will be observed when pulley is installed. This movement is necessary and will be minimized by a thin cushion of oil between the rotor and end plates when pump is in operation.

1 IN SOCKET

ADAPTER SP 5309

NUMBER DRILL

OIL PASSAGE SLOT NUSI

Fig. 32—Seating Pressure Plate

Nu278

Fig. 34—Pulley Installation-11 Cylinder Engines


19-32 STEERING—COLUMN (20) Install pump assembly on engine, connect hoses (using new pressure hose "0" ring), and tighten drive belt see "Cooling System". Group 7. Fill reservoir with power steering fluid, test and inspect for leaks. Disassembly -1.06 Model (1) Remove pump from engine and reservoir from pump. (2) Remove snap ring and plug from flow bore. Discard "0" ring from plug. (3) Depress control valve against spring pressure and allow to spring back. The valve should pop out of bore far enough to be lifted out. Light tapping on rear face of pump body may be necessary to remove a stuck valve. If dirt of foreign particles are found on valve or within valve bore, entire pump should be disassembled, cleaned and rebuilt. The high pressure and return hoses must also be flushed and the steering gear valve body reconditioned see "Power Steering Gear". If valve bore is badly scored, replace pump body and flow control valve. (4) Remove nicks or burrs that might cause the valve to stick by rubbing valve over a flat surface covered with crocus cloth. (5) Clamp land of valve in a soft jawed vise and remove hex head ball seat and shim(s). Note number and gauge of shims on ball seat. Same number and gauge of shims must be installed on assembly of valve. Altering shim thickness will change relief

PRESSURE RELIEF SPRING FLOW CONTROL VALVE BODY

PRESSURE RELIEF BALL

NR327

Fig. 35—Flow Control Valve Disassembled View pressure. (Fig. 35).

(6) Remove valve from vise and remove pressure relief ball, guide and spring. (7) Clean all parts thoroughly. Dirt Particles On Ball or Ball Seat Will Cause Improper Pump Operation.

Assembly (1) Insert spring, guide and pressure relief ball in end of flow control valve (Fig. 35). (2) Install hex head ball seat using the same number and thickness shims as were removed. Tighten to 50 inch-pounds. (3) Lubricate valve with power steering fluid and insert flow valve spring and valve in bore. Install new "0" ring on bore plug, lubricate with power steering fluid and carefully install into bore. Install snap ring. CAUTION: Do not depress the bore plug more than 1/16 inch beyond snap ring groove.


STEERING COLUMN INDEX Assembly Disassembly Inspection

Page 37 34 37

Installation Removal

Page 42 33

GENERAL INFORMATION The steering column under head-on collision conditions is designed to telescope at a controlled rate. The telescoping action reduces the likelihood of the steering wheel being driven rearward toward the driver. If the driver is thrown forward into the wheel, the column can telescope further at the same controlled rate, thereby reducing force of the impact. The column assembly (Fig. 1) has four principal components: 1. A column jacket with a mesh section designed to shorten in "accordion" fashion. 2. A two-piece telescoping transmission gearshift tube interconnected by plastic inserts and shear pins.

3. A two-piece telescoping steering shaft with upper and lower sections connected by plastic friction collars and shear pins. 4. A mounting bracket connecting steering column to the instrument panel, which allows the column to slide forward but blocks its rearward movement toward the driver. The center section of the column jacket has diamond-shaped perforations and is formed with accordion pleats. These pleats allow it to compress like a bellows from impact forces. The gearshift tube is made up of two sections designed to telescope together. These sections are interconnected and held together by injections of plastic


COLUMN—STEERING 19-33 COLUMN BRACKET FORWARD MOUNTING POINT

NUT WASHER

SHIM AS REQUIRED LOCK HOUSING COLUMN BRACKET PIN CLINCH NUT STEERING WHEEL

WASHER

BEARING HOUSING

BOLT

SHIFT HOUSING STUDS (2) COVER

SPRING COLUMN SPRING BRACKET

RING RETAINER

GROUND WIRE INSULATOR RING AUTO. TRANS SHIFT LEVER MANUAL TRANS. SHIFT LEVER

"0" RING

BRACKET TO COLUMN BOLTS (4)

FLOOR PLATE

RETAINER BOLTS (2)

GROUND WIRE NUT

STEERING GEAR

s0)„,

WASHERS (2) COLUMN MOUNTING NUTS (2)

BOLTS SPACERS (3) PIN NU490A

Fig. I—Column Installation

that form the interconnecting inserts and shear pins. Under impact, the pins shear first, followed by a gradual paring away of the inserts by the knife-like edge in the adjoining tube section. The steering shaft is a two-piece assembly. The upper piece is solid and has a double-flatted lower section. The lower piece is hollow and formed to fit over the double-flatted section of the upper piece. The purpose of the flatted section is to provide continued steering action even though completely telescoped. Plastic is injected through two small holes in the hollow piece into a pair of annular grooves on the solid portion of the shaft. The four small holes filled with plastic form the shear pins. Upon impact, the shear pins break off and the shaft gradually telescopes against a resistance provided by the plastic collars in the annular grooves. The mounting bracket is designed to restrain the column from being shifted toward the driver during impact. It incorporates three "break-away capsules" that allow the mounting bracket to slip off the attaching points, permitting the steering column to

compress or yield in a forward direction under a severe impact from the driver side. When the column is installed in a car it is no more susceptible to damage through ordinary usage than previous columns; however, when it is removed, special care must be taken in handling this assembly. When the column is removed from the car such actions as a sharp blow on the end of the steering shaft or shift levers, leaning on the column assembly, or dropping of the assembly could shear or loosen the plastic shear joints that maintain column rigidity. It is, therefore, suggested that the removal and installation, and the disassembly and reassembly procedures be carefully followed when servicing this assembly. IMPORTANT: Bumping, jolting and hammering on the steering shaft and gearshift tube must be avoided during all servicing operations. If the shear pins are broken, the controlled rate of the impact-absorbing features will be destroyed making these parts unfit for further use. The Special Tools required and their usage are covered in the following service procedures.

SERVICE PROCEDURES COLUMN REMOVAL (Figs. 1 and 2)

(1) Disconnect negative (ground) cable from bat

tery. (2) Disconnect linkage from lower end of steering column.


19-34 STEERING—COLUMN

TURN SIGNAL LEVER

RETAINING PLATE TURN SIGNAL SWITCH

[FLASHER WITCH KNOB. PY882

Lever (3) Remove steering shaft lower coupling to wormshaft roll pin. (4) Disconnect wiring connectors at steering column jacket. (5) Remove horn ring ornament assembly. (6) Disconnect wire at horn switch. Remove screws attaching horn ring and switch to steering wheel, then remove horn ring and switch. (7) Remove steering wheel retaining nut and washer. Remove steering wheel with Tool C-3428A. Do not bump or hammer on steering shaft to remove wheel. (8) Remove turn signal lever (Fig. 2). (9) Remove floor plate to • floor pan attaching screws. Remove finish plate from under instrument panel to expose steering column bracket. (10) Remove nuts or bolts attaching steering column bracket to instrument panel support. If so equipped, save shim pack from between bracket forward leg and support for reuse during installation. (11) Carefully pry lower coupling from steering gear wormshaft, then remove column assembly out through passenger compartment being careful not to damage paint or trim. Fig. 2–Turn Signal

Fig. 3 Retainer and Turn Signal Switch

IGNITION KEY LAMP ASSEMBLY

PYS8's Fig. 4–ignition Key Lamp

Steering Shaft

(1) Remove three screws which hold hearing housing to lock housing.

COLUMN DISASSEMBLY (1) Remove four bolts attaching bracket assembly to column jacket. (2) Remove two screws and lift off wiring trough. (3) Attach Column Holding Fixture C-4132 to column jacket and clamp the assembly in a vise. (4) Drive out gearshift lever pivot pin, then remove lever and spring from housing. (5) Remove turn signal switch and upper bearing retainer screws. Remove retainer and lift switch upward out of the way (Fig. 3). (6) Remove two retaining screws and lift the ignition key lamp assembly out of the way (Fig. 4). (7) Remove snap ring from upper end of steering shaft (Fig. 5).

STEERING SHAFT BEARING UPPER .SNAP RING

BEARING HOUSING TO LOCK HOUSING SCREW 3)

PY884 Fig. 5–Steering Shaft Bearing Upper Snap Ring


COLUMN—STEERING 19-35

IGNITION KEY BUZZER swath STEERING SHAFT REMOVING TOOL

PY887

-79:107 _

Fig. 8—Ignition Key Buzzer Switch PY885

Fig. 6—Pressing Shaft Out of Bearing CAUTION: These screws must be removed before steering shaft removal.

(2) Install steering shaft remover C-4044 and press shaft out of bearing and remove bearing housing from shaft (Fig. 6). (3) Remove bearing lower snap ring from shaft. (4) Pry sleeve off steering shaft lock plate hub to expose pin. (3) Install Tool C-4113 on steering shaft lock plate hub to press pin out of shaft. DO NOT HAMMER (Fig. 7). (6) Remove tool and lock plate from shaft. (7) Remove shaft through lower end of column. Lock Housing (1) If equipped with shift indicator quadrant, re-

move pointer attached to shift housing with one screw. (2) Remove two screws and lift out buzzer switch (Fig. 8). (3) Remove two retaining screws and the lock lever guide plate which will expose the lock cylinder release hole (Fig. 9). (4) Place cylinder in "lock" position and remove key. Insert a small diameter screwdriver or similar

tool into lock cylinder release hole and push in to release spring loaded lock retainer. At same time pull lock cylinder out of housing bore (Fig. 10). (5) Remove the three retaining screws and the ignition switch assembly (Fig. 10). (6) Grasp lock lever and spring assembly and pull straight out of housing (Fig. 11). (7) Remove four lock housing to column jacket hex head retaining screws and remove housing from jacket (Fig. 12). Shift Tube (Figs. 13, 14, X5& 16) (1) To remove shift tube front column shift autoLOCK LEVER GUIDE PLATE

STEERING SHAFT TO LOCK PLATE PIN TOOL

IGNITION SWITCH RETAINING SCREWS

Fig. 7—Lock Plate Pin—Removal or Installation

Fig. 9—Lock Lever Guide Plate

PY888


19-36 STEERING-COLUMN TOP OF SHIFI TUBE

SHIFI HOUSiNG

LOCK CYLINDER RELEASE HOLE

IGNITION SWITCH CAM AND PIN PY892 PY889

Fig. 13—Bending Shift Tube Tabs

Fig. 10 — Removing Leek Cylinder LOCK LEVERS AND SPRING ASSEMBLY

TAB IN CASTING FOR SPRING

SNIF1 HOUSING TO SHIFT TUBE SET SCREW WRENCH PY890

Fig. II—Lock Levers and Spring Assembly Installed in Housing

matic or floor shift models, first straighten the tabs at top of shift tube which are bent outward against shift housing casting. Remove shift tube support retaining clip from slots at bottom of jacket. Loosen

Fig. 14—Shift Tube Set Screw

shift tube set screw in shift housing and remove parts from jacket. (2) To remove shift tube from column shift manual SHIFT TUBE SUPPORT RETAINING CLIP

STEERING SHAFT DUST SEAL

LOCK HOUSING TO COLUMN JACKET SCREWS (4)

PY893

\.)

PY89I

Fig. 12—Lock Housing to Column Jacket, Retaining Screws

PY894

Fig. IS—Shift Tube Support Retaining Clip


COLUMN—STEERING 19-37 screws from cam slots in jacket. Pull the tube and lever assembly out of jacket lower end (Figs. 17 and 18). Steering Shaft Coupling (Fig. 19)

(1) Pry cover tangs out from coupling body and pull seal and cover from body. (I) Drive the small short dowel pin at edge of coupling body, down into coupling and discard. (3) Pull body off the shaft and shoe assembly. (-I) Separate and clean all parts.

INSPECTION

Fig. 16—Shift Tube Assembly— Removal or Installation FLOOR PLATEN,........0 ASSEmBI Y ,

BUSHING SUPPORT AND BEARING

After cleaning, inspect all parts for wear or damage. Note condition of shift lever gate and inner end of shift lever. Inspect turn signal switch for distortion, broken or damaged parts. Inspect wiring insulation for worn or bare spots. Inspect steering shaft bearing for smooth operation, and lubricate with Multi-Purpose Chassis Lubricant or similar lubricant If bearing has any signs of roughness or wear, it should be replaced.

COLUMN ASSEMBLY (Fig. 20 or 21) The grease recommended for use during reacsimbly procedures is Automotive Multi-Purpose Grease NLGI Grade 2 E.P. or Multi-Mileage Lubricant, Part Number 2525035. Apply a thin coating to all friction surfaces. (1) Install column holding tool C4132 and clamp column in a vise with both ends of column accessible. (2) Install the 0-ring retainer, 0-ring, and floor plate on lower end of column jacket. This must be

SCREWS (2)

done before installing shift tube. NPSS5A

Fig. 17—Shift Tube & Levers Assembled

models, remove the three bearing support screws at lower end of jacket and the two adjustable bushing SELECTOR SPRING

SHIFT TUBE AND LEVER ASSEMBLY

(3) Coat spring washer with grease and install on lower hub of gearshift housing. Position gearshift housing on the jacket (Fig. 20 or 21). (4) Column Shift Automatics and Floor Shift Models

(a) With dust seal and shift tube support installed on shift tube, slide the assembly into jacket. Guide key on upper end of tube into slot in gearshift housing. Hold firmly together and tighten lock screw in shift housing (Fig. 14). MASTER SPLINE mARK *toe SPRING DOWEL PIN HOLE

SHOES sEm.

COVER

COLUMN JACKET NYLON BUSHING

•-• NO5303

Fig. 18—Shift Tube Assembly Removal or Installation

COUPLING BODY

SigEZNO SHAFT

itQa P.1.4 HOLE STEERLNG SHAFT TO SHOE FIN Fig. 19—Steering

PY22

Shaft "Pot" Coupling Disassembled


RETAINER PLATE-SWITCH AND BEARING

SPRING IN ASSEMBLED POSITION

SCREW (2)

BEARING INSULATOR

PLATE

LAMP-IGNITION SWITCH

TURN SIGNAL AND FLASHER SWITCH ASSEMBLY

LOCK HOUSING REFERENCE

SCREW (2)

BALL BEARING

LEVER SPRING LEVER AND PIN ASSEMBLY

LOCK HOUSING

SCREW (3)

SPRING IN PRE-ASSEMBLED POSITION SHIFT HOUSING SLEEVE-PIN RETAINER

SPRING WASHER SCREW (3) COLUMN JACKET PIN SCREW AND WASHER (4) STEERING SHAFT LOCK PLATE

STEERING SHAFT

SHIFT TUB SET SCREW (EXCEPT COLUMN SHIFT MANUAL TRANSMISSION)

VIEW IN CIRCLE A

PY831

Fig. 20—Steering Column Upper End—Disassembled (Without Quadrant)

NW11103-9N111331S

C4 CO


SCREW (2)

RETAINER PLATE-SWITCH AND BEARING

SPRING IN ASSEMBLED POSITION

PLATE BEARING INSULATOR

LOCK HOUSING

TURN SIGNAL AND FLASHER SWITCH ASSEMBLY

LEVER LAMP-IGNITION SWITCH

BALL BEARING

GATE, SHIFT LEVER

BEARING HOUSING

SCREW (2) SPRING IN PRE-ASSEMBLED POSITION

SCREW (3)

LEVER AND PIN ASSEMBLY SCREW

STEERING SHAFT

PIN

,

POINTER

STEERING SHAFT LOCK PLATE VIEW IN CIRCLE A SCREW AND WASHER (4)

7

SHIFT HOUSING

SHIFT TUBE SET SCREW (EXCEPT COLUMN SHIFT MANUAL TRANSMISSION)

SPRING WASHER

ONI11331S-NW11103

SLEEVE-PIN RETAINER

SCREW AND WASHER (3)

COLUMN JACKET PY830

Fig. 21—Steering Column Upper End — Disassembled (With Quadrant)

r Ca CD


19-40 STEERING—COLUMN SPRING

SHIFT LEVER GATE

SHIFT TUBE SET SCREW

GEAR SELECTOR INDICATOR LAMP

SCREW

DIAL

_

PIN

CROSS-SECTION WITH LEVER AND SPRING IN ASSEMBLED pOSITION PY896

Fig. 22–install Shift Lever–Automatic

(b) Bend corners of shift tube slot out against shift housing casting (Fig. 13). (c) Insert wire retainer in slots in lower end of jacket and into groove in shift tube support (Fig. 15). (d) Column Shift Automatics only Position the shift lever and crossover load spring in the gearshift housing and tap in the pivot pin (Fig. 22). Install the shift lever gate on the lock housing (Fig. 23). Feed gear selector indicator lamp assembly wire through hole behind the indicator quadrant on the lock housing and route wire down through the space between the housing and jacket and insert wire terminal into ignition switch connector. Secure lamp assembly to rear of indicator quadrant with 2 screws (Fig. 24). Secure gear selector indicator lens assembly to front of lock housing gear selector quadrant with 2 screws. (5) Seat the lock housing on top of the jacket, indexing the key in the housing with the slot in the jacket. Insert all four screws and tighten them alternately in steps to insure proper seating of the housing on the jacket. Tighten to 80 inch.pounds (Fig. 12). (6) Column Shift Manual Transmission Only SHIFT LEVER --N..POSITIONS ON GATE

PR NO2I SHIFT LEVER GATE

SCREW LOCK HOUSING PY898 Fig. 24–Gear Selector Indicator Lamp

(a) Turn bushing on shift tube (Fig. 18) so the two holes in bushing are aligned with centerline of 2nd and direct shift lever. Slide shift tube and lever assembly through jacket and into gearshift housing. Start the two bushing retaining screws through slots in jacket but do not tighten. (b) Install spacer (Fig. 17) over crossover blade so it rests against the 2nd and direct shift lever. Install low and reverse lever, then install support and bearing assembly. Install and tighten the three retaining screws to 30 inch-pounds. (c) Rotate bushing (Fig. 17) with screws so all play at shift levers and spacer is eliminated, but no binding occurs. With bushing in this position tighten the two bushing to jacket screws to 30 inch-pounds. (d) Place a screwdriver blade between 2nd and direct shift lever and crossover blade, so it will be held in neutral position half-way between the two shift levers (Fig. 25). (e) Position gearshift lever and spring in housing so ball end with insulator ring engages hole in shift tube key. Align and install retaining roll pin. (Fig. 26). (7) Grease and assemble the two lock levers, lock lever spring, and pin (Fig. 27). (8) Install the resulting assembly in the lock hous-

e

CROSS•OVER BLADE IN NEUTRAL

LOCK HOUSING

SCREWDRIVER Fig. 23– Lock Housing and Shift Gate

A\

Fig. 25–Holding Cross-Over Blade in Neutral Position

NP556A


COLUMN—STEERING 19-41 SHIFT HOUSING NN›.;

INSULATOR RING

SHIFT LEVER-----i „, SPRING PY899

Fig. 26—install Shift Lever—Manual ing. Seat the pin firmly into the bottom of the slots. Make sure that the lock lever spring leg is firmly in place in lock casting notch (Fig. IL (9) Install the lock lever guide plate and retaining screws (Fig. 9). (10) Position ignition switch to center detent (OFF) position. Feed wires down through the space between housing and jacket. Position switch in housing and tighten three mounting screws (Fig. 10). (11) Feed buzzer switch wires behind wiring post and down through space between housing and jacket. Position switch in housing and tighten two mounting screws (Fig. 8). (12) With the ignition key cylinder in the LOCK position, and with the key removed, insert the key cylinder into the lock housing. Press the cylinder into place until contact is made with the pin on the ignition switch cam. Insert the key into the lock and rotate the lock until the slot in the cylinder plate lines up with the pin. Press the key cylinder the remaining way into the lock housing, making sure the retainer bar snaps into its slot in the lock housing. Steering Shaft Coupling Assembly (Fig. 19) (1) Fill coupling body with grease to approximately 1/2 inch from top.

(2) Place cover and seal on shaft. (3) Press shoe pin into steering shaft so that it projects an equal distance on each side of shaft. (4) Place spring on side of shaft, straddling the shoe pin. (5) Place shoes on pin ends with flat side toward spring engaging tangs. (6) Squeeze shoes together, compressing spring, and push assembly into coupling body (Fig. 28) with gage hole in shaft aligned with master spline in coupling. (7) Drive in a new dowel pin flush to outer surface of coupling body. (8) Position seal and cover on body and crimp cover tangs over the projections on body securely. Steering Shaft Installation (1) Insert the steering shaft assembly into the column and shift tube assembly. (2) Install the lock plate on the steering shaft and press the pin into place. DO NOT HAMMER use tool C4113 (Fig. 7). Make sure pin is centered. (3) Install steering column shaft lark plate sleeve over shaft lock plate pin and against lock plate. (4) Install the bearing lower snap ring on the steering shaft. Bearing Housing Assembly (Fig. 20 or 21) (1) Place rubber insulator with ground staple, over column upper bearing and install assembly into bearing housing bore. Use a soap solution or rubber lubricant to ease installation. (2) Install the turn signal switch in the bearing housing, feeding the wires through the opening in the housing. Feed the ignition key lamp assembly wires through the opening in the housing at this time. (3) Install the retaining plate over the switch and tighten 3 screws to 27 in.-lbs. (Fig. 3). (4) Install the turn signal lever or turn signal/ speed control lever on the turn signal switch. If speed control, feed the wires through the opening provided in the bearing housing (Fig. 2). (5) Position the bearing housing assembly on the column jacket assembly, feeding the wires through MASTER SPLINE MARK STEERING SHAFT TO SHOE PIN ROLL PIN HOLE SEAL DOWEL PIN HOLE Z COVER

STEP I STEP PY900

Fig. 27—Lock Levers and Spring—Assembly

SHOES COUPLING BODY SHOE SPRING STEERING SHAFT Fig. 28—Assembling Steering Shaft Coupling


19-42 STEERING—COLUMN THUMB SCREW

SHAFT INSTALLING TOOL

SHIFT LEVER TOOL HINGE

SHAFT SIZE ADAPTER

_--

Fig. 29—Pulling Shaft Into Bearing

the space between the lower housings and the jacket. (6) When installing this housing, the steering shaft must be drawn, not pushed, through the bearing, using the bearing inner race as a reaction member, or damage to the shaft plastic shear pins, lock housing components, or bearing could result. DO NOT DRIVE THE SHAFT INTO THE BEARING. (7) Install on steering shaft, Tool C-3879, with washer and steering wheel nut (Fig. 29). Turn nut to pull shaft through bearing. Remove tool and install upper snap ring on shaft. (8) Install and tighten to 35 in.-lbs. the 3 bearing housing to lock housing screws. (9) Carefully install the ignition key lamp assembly in the bearing housing (2 screws). (10) On column shift automatic only, position pointer under indicator quadrant and tighten attaching screw to shift housing (Fig. 21). (11) Install the wiring trough in place over the wires, being careful to not pinch wires between trough and jacket.

COLUMN INSTALLATION (Fig. 1) (1) Tool C-4134 must be used to hold the steering shaft in the center of the shift tube while installing and aligning the column in the vehicle. (This operation is not necessary on Column shift manual transmission columns.) (a) Remove thumbscrew and open tool to straddle shift tube lever and steering shaft (Fig. 30). (b) Close tool and tighten thumbscrew. (c) If hole in tool is too large to grip steering shaft, add the split insert to adapt tool to smaller shaft diameter. (2) Position bracket assembly on steering column (Fig. 1), install ground wire and tighten the four short retaining screws to 120 inch-pounds. Plastic capsules

PY902

Fig. 30—Shaft Centering tool

should be pre-assembled in bracket slots. Insert column assembly through floor pan opening, being careful not to damage paint or trim. (3) With front wheels in straight ahead position and master splines on wormshaft and coupling aligned, engage coupling with wormshaft and install the roll pin. CAUTION: Do not apply end loads to steering shaft.

(4) Hold column assembly with bracket against the instrument panel support. Install but do not tighten the two upper bracket nuts. (5) Center steering shaft coupling at midpoint of its travel. This is accomplished by moving column

and bracket assembly fore and aft in the instrument panel support so dimension between top of coupling and center of gauge hole is 13/16 inch (Fig. 31). Tighten the two upper bracket nuts to 110 inchpounds. Attach electrical ground wire to one of the rear mounting studs. (6) Position floor plate over floor pan opening, centering it around the column, then install and tighten retaining bolts. Slide "0" ring down the jacket and into recess in floor plate, position retaining plate over "0" ring and secure with the two FLOOR PLATE ASSEMBLY SHIFT LEVERS MASTER SPLINE INDICATOR

13/16" TO GAGE HOLE

WELD LEVER END PI AY ADJUSTMENT BEARING SUPPORT C (3) BEARING SUPPORT BOLTS NR428A

BEARING COUPLING

Fig. 3I—Shaft Coupling Adjustment


SPECIFICATIONS-STEERING 19-43 bolts. Do not pry to align plates and attaching bolts or column misalignment will occur. (7) If so equipped, place shim pack between column bracket forward leg and instrument panel support. Maximum shim pack thickness error must not exceed .060 inch before tightening the bolt. Add shims, if

necessary, then tighten bolt to 110 inch-pounds. (8) Attach finish plate to bottom of instrument panel. (9) Install turn signal lever. (10) Place steering wheel on steering shaft with

master splines aligned. Install retaining nut and washer, tighten nut to 27 foot-pounds. Do not drive wheel on shaft, draw wheel down with retaining nut. (11) Install horn switch parts previously removed from steering wheel. Connect horn switch wire. (12) Connect wiring connectors at steering column jacket. Connect battery ground cable, test operation of lights and horns. (13) Connect and adjust gearshift linkage, refer to "Transmission Group".


SPECIFICATIONS MANUAL STEERING Recirculating Ball Nut 24 to 1 3-Needle Bearings Bronze Bushings 2-Caged Ball Bearings 000-.004 Inch 1 to 4 in. lbs. to Keep Wheel Moving

Type Ratio Cross Shaft Bearings 6 cyl. Worm Shaft Bearings Cross Shaft Adjusting Screw End Play Worm Bearing Pre-Load Sector Mesh Adjustment Pre-Load Torque— Includes worm bearing Pre-Load

8 to 11 in. lbs. Pull through high spot

POWER STEERING GEAR Constant Control Full Time Power 15.7 to 1 3-1/2 2 Needle Bearings and 1 Direct Bearing on Gray Iron Cover 16-24 Ozs. Tighten Adjusting Screw 3/8 to 1/2 turn past Zero Back Lash (Center of High Spot) 4 Pts. (3-3/4 Imperial Pts.) Power Steering Fluid Part No. 2084329 or equivalent

Type Ratio Wheel Turns—Stop to Stop Cross Shaft Bearings Worm Shaft Thrust Bearing Pre-Load Cross Shaft Adjustment Fluid Capacity of Hydraulic System Type of Fluid

PUMPS Type

Maximum Pressure 1.06 pump (318, 383 or 426 HEMI CID engine) .94 pump (318, 383 and 440 CID engine) 1.06 pump (225 CID engine) Pump Output .94 pump 1.06 pump High level Low level Type of Fluid

Constant Displacement—.94 Cu. In. per revolution Constant Displacement,-1.06 Cu. In. per revolution 950 to 1050 PSI 950 to 1075 PSI 750 to 850 PSI 2.1 to 2.6 gpm 2.5 to 3.0 gpm 1.4 to 1.8 gpm Power Steering Fluid—Part No. 2084329 or equivaIentDo Not use Type "A" Transmission Fluid


19-44 TIGHTENING REFERENCE

TIGHTENING REFERENCE MANUAL STEERING Foot Pounds

Foot Pounds

35 25 80

Cross Shaft Adjusting Screw Lock Nut Cross Shaft Cover Bolt Gear Assembly to Frame Bolt

175 27

Steering Arm Nut Steering Wheel Nut

POWER STEERING GEAR Foot Inch Pounds

Foot Inch Pounds

Gear Housing to Frame Bolt Gear Shaft Adjusting Screw Lock Nut Gear Shaft Cover Nut Pump Inlet Fitting Steering Arm Nut

55 50 20 30 120

Steering Column Support Nut Steering Shaft Coupling Bolts Valve Body Attaching Bolts Valve Body End Plug Steering Wheel Nut

110 200 200 25 27

PUMPS Location

High Pressure Hose Fittings Gear End All Models Pump End All Models Bracket Bolts .94 pump 1.06 pump

Foot-Pounds

12-14 21-27 30-40 18

Location

Flow Control Valve Plug .94 pump 1.06 pump Pulley Retaining Nut (.94 pump) . Bracket Mounting Bolts 1.06 pump 1/8 inch pipe clean out plug

Foot-Pounds

4 7 45-55 25-35 7


GROUP 21

TRANSMISSIONS CONTENTS Page

MANUAL TRANSMISSION-4 SPEED .... MANUAL TRANSMISSION-3 SPEED MODEL A-903 MODEL A-230

66 81 92

SPECIFICATIONS TIGHTENING REFERENCE TORGUEFUTE TRANSMISSION

Page 107 110

TORQUEFLITE TRANSMISSIONS (A-904 and A-727) INDEX Page 1 General Information 2 Hydraulic Control System Operating Instructions 13 Service Diagnosis 14 Service in Vehicle Air Pressure Tests 25 Aluminum Thread Repair 20 Band Adjustments 22 Console Gearshift ' 59 Extension Housing and Output Shaft Bearing .. 26 Extension Housing Yoke Seal 26 Gearshift Linkage Adjustment 60 Governor 27 Hydraulic Control Pressure Adjustments 23 Hydraulic Control Pressure Tests 22 Lubrication 20 Neutral Starting Switch 21 Parking Lock Components 28 Speedometer Pinion 25 Throttle Rod Adjustment 60 Valve Body and Accumulator Piston 28 Service Out of Vehicle Assembly—Sub-Assembly Installation 54 Disassembly—Sub-Assembly Removal 32 Installation—Transmission, Converter and Drive Plate 57

Page 63 Fluid Leakage 34 Recondition Sub-Assemblies Accumulator Piston and Spring 38 Extension Housing Bushing and Oil Seal .... 38 42 Front Clutch—A-904 44 Front Clutch—A-727 38 Governor and Support 54 Kickdown Servo and Band 54 Low-Reverse Servo and Band Oil Pump and Reaction Shaft Support 39 —A-904 Oil Pump and Reaction Shaft Support 41 _A-727 52 Overrunning Clutch Parking Lock Sprag 38 49 Planetary Gear Train—A-904 51 Planetary Gear Train—A-727 46 Rear Clutch—A-904 48 Rear Clutch—A-727 34 Valve Body Assembly 29 Removal—Transmission and Converter 31 Pump Oil Seal Starter Ring Gear 30 31 Torque Converter Flushing Specifications 109 110 Tightening Reference

GENERAL INFORMATION The TorqueFlite Transmission model identification marking shown in the following application chart, is cast in raised letters about 3/8 inch high on the lower left side of the bell housing. Transmission usage is determined by the type of engine with which it is installed. The A-727-RG is available for heavy duty police and taxi service with the 6 Cyl., 225 Cu. In. engine.

Because of the similarity in design and in servicing the transmissions, the procedures have been combined in this Manual. Where variations in procedures occur, application is indicated. CAUTION: Transmission operation requirements are

different for each vehicle and engine combination and

some internal parts will be different to provide for this. Therefore, when replacing parts, refer to the seven digit part number stamped on left side of the transmission oil pan flange.

The transmission combines a torque converter and system (Figs. 1 and 2). The converter housing and transmission case are an integral aluminum casting. The transmission consists of two multiple disc clutches, an over-running clutch, two servos and bands, and two planetary gear sets to provide three forward ratios and a reverse ratio. The common sun gear of the planetary gear sets is connected to the front clutch by a driving shell which Is splined to the sun gear and to the front clutch re-

a fully-automatic 3-speed gear


21-2

TRANSMISSIONS—TORQUEFLITE CLUTCH ENGAGEMENT AND BAND APPLICATION CHART

Lever Position

Front Clutch

Rear Clutch

Front (Kickdown) Band

Rear (Low-Rev) Band

Overrunning Clutch

DISENGAGED

DISENGAGED

RELEASED

RELEASED

NO MOVEMENT

DISENGAGED

ENGAGED

RELEASED

RELEASED

HOLDS

DISENGAGED

ENGAGED

APPLIED

RELEASED

OVER RUNS

ENGAGED

ENGAGED

RELEASED

RELEASED

OVER RUNS

DISENGAGED

ENGAGED

APPLIED

RELEASED

OVER RUNS

DISENGAGED

ENGAGED

RELEASED

RELEASED

HOLDS

DISENGAGED

ENGAGED

APPLIED

RELEASED

OVER RUNS

DISENGAGED

ENGAGED

RELEASED

APPLIED

PARTIAL HOLD

ENGAGED

DISENGAGED

RELEASED

APPLIED

NO MOVEMENT

Drive-Ratio

N-NEUTRAL D-DRIVE (Breakaway) 2.45 to 1 (Second) 1.45 to 1 (Direct) 1.00 to 1 KICKDOWN (To Second) 1.45 to 1 (To Low) 2.45 to 1 2-SECOND 1.45 to 1 1-LOW 2.45 to 1 R-REVERSE 2.20 to 1

TRANSMISSION APPLICATION CHART Engine Type

Displacement Cubic Inch

6 Cyl. 8 Cyl. 6 Cyl. 8 Cyl. 8 Cyl.

198-225 318 225 318-340 383-426-440

Identification Marking

A-904-G A-904-LA A-727-RG A-727-A A-727-B

tamer. The hydraulic system consists of an oil pump, and a single valve body which contains all of the valves except the governor valve. Venting of the transmission is accomplished by a drilled passage through the upper part of the oil pump housing. The torque converter is attached to the crankshaft through a flexible driving plate. Cooling of the converter is accomplished by circulating the transmission fluid through an oil-to-water type cooler, located in the radiator lower tank. The torque converter assembly is a sealed unit which cannot be disassembled. The transmission fluid is filtered by an internal "Dacron Type" filter attached to the lower side of the valve body assembly. Engine torque is transmitted to the torque converter then, through the input shaft to the multiple discs clutches in the transmission. The power flow depends on the application of the clutches and bands. Refer to "Clutch Engagement and Band Application Chart."

HYDRAULIC CONTROL SYSTEM The hydraulic control circuits on pages 5 through 12 show the position of the various valves with color coded passages to indicate those under hydraulic pressure for all operations of the transmission. The hydraulic control system makes the transmission fully automatic, and has four important functions to perform. In a general way, the components of any automatic control system may be grouped into the following basic groups: The pressure supply system, the pressure regulating valves, the flow control valves, and the clutches and band servos. Taking each of these basic groups or systems in turn, the control system may be described as follows: Pressure Supply System The pressure supply system consists of an oil pump driven by the engine through the torque converter. The single front pump furnishes pressure for all the hydraulic and lubrication requirements. Pressure Regulating Valves The pressure regulating valves consist of a regulator valve which controls line pressure at a value dependent on throttle opening. The torque converter control valve maintains torque converter operating pressure and transmission lubricating pressure. The governor valve transmits regulated pressure to the transmission (in conjunction with throttle pressure) to control upshift and downshift speeds.


TURBINE

FRONT CLUTCH

STATOR

FRONT PLANETARY GEAR SET

REAR CLUTCH

REAR PLANETARY GEAR SET

IMPELLER LOW AND REVERSE BAND OIL PUMP OUTPUT SHAFT OVERRUNNING CLUTCH

GOVERNOR

BEARING

SEAL

SPEEDOMETER PINION

BUSHING

PARKING LOCK ASSEMBle

VALVE BODY

INPUT SHAFT

EXTENSION HOUSING

OIL FILTER FLEXIBLE DRIVE PLATE ENGINE CRANKSHAFT

KICKDOWN BAND

SUN GEAR DRIVING SHELL

Fig. 1 —TorqueFlit. Transmission and Torque Converter (A-904)

NNI528

TORQUEFLITE TRANSMISSIONS

JI I


FRONT PLANETARY GEAR SET

IMPELLER

REAR

CLUTCH

TRA NSM ISSI ONS-TOR QUEFLITE

TURBINE REAR PLANETARY GEAR SET

FRONT CLUTCH LOW AND REVERSE BAND

OVERRUNNING CLUTCH

GOVERNOR

BEARING

OUTPU r SHAFT SEAL \11.111.1ts.. —1

BUSHING

SPEEDOMETER PINION PARKING LOCK

ASSEMBLY

EXTENSION HOUSING

VALVE BODY KICKDOWN BAND Olt INPUT SHAFT

MLR SUN GEAR DRIVING SHELL

FLEXIBLE DRIVE PLATE

ENGINE CRANKSHAFT

NN1 161 Fig. 2—TorqueFtite Transmission and Torque Converter (A-727)


TORQUEFLITE-TRANSMISSIONS 21-5 II

MANUA

OA PRESSURES

ta

sap.

NSRCM (WITH

5-31)

.u:L1.0* tT

341 n

DC HIGH PRESS. DC REUEF VALVE P CONTROL SYSTEM IN OIL FILTER

PARK ENGINE RUNNING

NN34C Park Hydraulic Circuits

ii

Olt PRESSURES Me

!sw

NAP 91lT44 GIRWISIE

36-55

4111OTR.

5-R to 111E

CONT101. SYSTEM

v4

NEUTRAL ENGINE RUNNING

NN35C Neutral Hydraulic Circuits


21-6 TRANSMISSIONS-TORQUEFLITE

1

REAR CLUTCH

FRONT CLUTCH

L.—

LOW & REV SERVO

II)

TORQUE CONVERIER

OIL PRESSURES 1114

IS psi

WV SUCTION MUM

40 psi 111

WINO W

015 psi

(ORVIRTIR

1015 po

LEIRKANN

ni

3.31 pA

CONTROL SYSTEM IN IC

OC HIGH PRESS. o c REUEF VALVE

DRIVE (BREAKAWAY) HALF THROTTLE

NR733A Drive-Breakaway Hydraulic Circuits


TORQUEFLITE—TRANSMISSIONS 21-7

110 SERVO

REAR CLUTCH

FRONT CLUTCH

1

OIL PRESSINtES 73 To

TtS, Skr•lit 7■027.1 1 ....rat01

;pawn

111 41 p P

p 5 )0 No

TO Lu5

•4

HIGH PRESb. 0 PILO VALVE

CONTROL SYSTEM IN

DRIVE (SECOND) HALF THROTTLE

OIL FILTER

1'4

.z

Drive-Second Hydraulic Circuits

NR734A


21-8 TRANSMISSIONS—TORQUEFLITE

c c0

10—ra

ROPE CLUTCH

.c:ve s P1 SE; •

tA7oR

J.

TOROLPE CO•RARITER

4'

r

OIL PRESSURES LA-

554‘

UI

PAP 0:70M 7N17.:

n all a I-7S ma

USE 0704

7941

teCir Re-F-F VALVE

33 X

111

CONTROL SYSTEM RP

DRIVE (DIRECT)

NR735A Drive-Direct Hydraulic Circuits


TORQUEFLITE—TRANSMISSIONS 21-9

Ott PIESSURE$ 1AR

SI Ps

MO SCAM WI/ SLIMS -11 111

It A. SS As 314S

Sao SW in

1.3

=777 non Patss Rae VALVE

COWM01. SYSTEM

DRIVE

actacoowte

At SO AAP Al

Ok WE;

NR736A Dri-ve-Kickdown Hydraulic Circuits


21-10 TRANSMISSIONS-TORQUEFLITE

RA i CLWCH

LOW & REV, SERVO

_JD A THROPTL/ C'

r

smu ITLE 'vg.

2/71

OIL PRESSURES Lod

SS PO

LII

PUMP Set7ION GOITINOI CONVElltil U.18MAR06

1.55 IM 3015 S-32 pit

LII

CONTROL SYSTEM IN HIGH PRESS. RELIEF VALVE

MANUAL SECOND CLOSED THROTTLE

IL F LIEk

MS it

Selector Lever Second-Hydraulic Circuits

NR737A


TORQUEFLITE-TRANSMISSIONS 21-11

OIL PRESSURES URI

SS Po

PIM? SUCTION Gaitill01

WO pi

(MUM

31 ZS ru

'WOW. CY.41

S2 pc

CONTROL SYSTEM IN

MANUAL LOW CLOSED THROTTL

NR738A Selector Lever Low- Hydraulic Circuits


21-12 TRANSMISSIONS-TORQUEFLITE

SERVO

REAR

o 0 00

auto'

FRONT CLUTCH

t Ow & REV. SERVO

// THROTTLE PLUG

II

‘1_ cr-

11ACCUMULATOR 1--

TORQUE CONVERTER FRONT CLUTCH LUR

MANUAL VA.

OIL PRESSURES 231-Zapv

..5* C

LEP PLMO

WO ON

(CoetrfO LLIK0105

SA pa 5-N fda

0-0 '

I 1

CONTROL SYSTEM IN oq

HIGH PRESS. REUEF VALVE

REVERSE

FliE ,

NR739A Reverse Hydraulic Circuits


TORQUEFLITE--TRANSMISSIONS 21-13

The throttle valve transmits regulated pressure to the transmission (in conjunction with governor pressure) to control upshift and downshift speeds. Flow Control Valves

The manual valve obtains the different transmission drive ranges as selected by the vehicle operator. The 1-2 shift valve automatically shifts the transmission from low to second or from second to low depending on the vehicle operation. The 2-3 shift valve automatically shifts the transmission from second to direct or from direct to second depending on the vehicle operation. The kickdown valve makes possible a forced downshift from direct to second-second to breakaway or direct to breakaway (depending on vehicle speed) by depressing the accelerator pedal past the detent "feel" near wide open throttle. 6-Cylinder Engines (Fig. 3): The throttle pressure plug at the end of the 2-3 shift valve, provides a 3-2 down-shift with varying throttle openings depending upon vehicle speed. Approximately 1/3 throttle at 10 to 20 mph, and 3/4 throttle at the upper limit speed range-40 mph. The shuttle valve has two separate functions and performs each independently of each other. The first is that of providing fast release of the kickdown band, and smooth front clutch engagement when the driver makes a "lift-foot" upshift from second to direct. The second function of the shuttle valve is to regulate the application of the kickdown servo and band when making direct to second kickdowns. Clutches, Band Servos and Accumulator

The front and rear clutch pistons, and both servo pistons are moved hydraulically to engage the clutches and apply the bands. The pistons are released by spring tension when hydraulic pressure is released. On the 2-3 upshift, the kickdown servo pis-

THROTTLE PRESSURE

NU371

Fig. 3—Part Throttle Downshift Hydraulic Circuit

ton is released by spring tension and hydraulic pressure. The accumulator controls the hydraulic pressure on the apply side of the kickdown servo during the 1-2 shift; thereby, cushioning the kickdown band application at any throttle position. OPERATING INSTRUCTIONS

The transmission will automatically upshift and downshift at approximately the speeds shown in the "Shift Pattern Summary Chart." All shift speeds given in the "Chart" may vary somewhat due to production tolerances and rear axle ratios. The quality of the shifts is very important. All shifts should be smooth, responsive, and with no noticeable engine runaway.

Gearshift and Parking Lock Controls

The transmission is controlled by a "lever type" gearshift incorporated within the steering column. The control has six selector lever positions: P (park), R (reverse), N (neutral), D (drive), 2 (second) and 1 (low). Some vehicles are equipped with a "lever type" console gearshift which has the same selector lever positions. The parking lock is applied by moving the selector lever past a gate to the P position. CAUTION: Never apply the parking lock until the vehicle has stopped; otherwise, a severe ratcheting noise will occur.

SHIFT PATTERN SUMMARY CHART (Six Cylinder Vehicles) Vehicle Speed To Axle Ratios 198 and 225 Cu. In. Eng. Condition

2.76:1

2.93:1

Closed Throttle 1-2 Upshift Closed Throttle 2-3 Upshift Wide Open Throttle 1-2 Upshift Wide Open Throttle 2-3 Upshift 3-2 Kickdown Limit 3-1 Kickdown Limit Closed Throttle Downshift

7-13 12-18 30-42 64-76 55-68 28-31 6-12

7-13 11-17 29-40 62-73 53-65 26-30 5-12

3.23:1

6-11 10-15 26-36 55-65 47-58 24-26 5-10


21-14

TRANSMISSIONS—TORQUEFLITE SHIFT PATTERN SUMMARY CHART (Eight Cylinder Vehicles) Vehicle Speed To Axle Ratios

318 Cu. In. Eng. 2.76:1

Condition

1-2 Upshift Closed Throttle 2-3 Upshift Closed Throttle Wide Open Throttle 1-2 Upshift Wide Open Throttle 2-3 Upshift 3-2 Kickdown Limit 3-1 Kickdown Limit Closed Throttle Downshift

7-13 12-18 30-47 70-82 60-73 27-31 5-12

340 8 383 Cu. In. Eng.

3.23:1

6-11 10-15 25-40 59-71 51-63 23-27 5-10

Starting the Engine The engine will start with the selector lever in either the P (park) or N (neutral) positions. (1) As a safety precaution when starting in the N (neutral) position, apply the parking or foot brake. (2) Depress the accelerator pedal one-third of travel to insure proper choke operation. (3) Turn the ignition key all the way to the right to START position. When the engine starts, release the key and it will return to the ON position. NOTE: The TorqueFlite transmission will not permit

starting the engine by pushing or towing.

Mountain Driving When driving in the mountains with either heavy loads or when pulling trailers, the 2 (second) or 1 (low) position should be selected on upgrades which

2.76:1

8-14 13-18 31-49 72-85 63-76 28-32 6-13

High Performance 426 440

3.23:1

3.55:1

3.23:1

3.23:1

6-13 11-17 31-50 62-81 55-73 23-36 5-12

6-10 10-14 28-42 57-67 50-60 22-35 4-9

8-15 13-19 41-58 80-93 70-84 30-45 6-13

7-12 11-16 33-48 68-78 60-70 25-36 5-11

require heavy throttle for 1/2 mile or more. This reduces possibility of overheating the transmission and converter under these conditions. Towing Vehicle Transmission Inoperative: Tow the vehicle with a rear end pickup or remove the propeller shaft. Transmission Operating Properly: The vehicle may be towed safely in N (neutral) with rear wheels on the ground at a speed not to exceed 30 mph. If the vehicle is to be towed for extended distances, it should be done with a rear end pickup or the propeller shaft removed. Because the transmission receives lubrication only when the engine is running, it is good practice to always tow a disabled vehicle with a rear end pickup or remove the propeller shaft.

SERVICE DIAGNOSIS The transmission should not be removed nor disassembled until a careful diagnosis is made, the definite cause determined and all possible external corrections performed. In diagnosing any abnormal shift condition, always make the hydraulic pressure tests before disassembly or replacement of parts. Condition HARSH ENGAGEMENT

IN D, 1, 2 AND R

Possible Cause

Correction

(a) Adjust engine idle speed to specifications. Readjust throttle linkage. (b) Inspect fluid level, then perform hy(b) Hydraulic pressures too high or low. draulic pressure tests and adjust to specifications. (c) Adjust low-reverse band. (c) Low-reverse band out of adjustment. (d) Perform pressure tests to determine (d) Valve body malfunction or leakage. cause and correct as required. (e) Accumulator sticking, broken rings or (e) Inspect accumulator for sticking, broken rings or spring. Repair as respring. quired. (f) Low-reverse servo, band or linkage (f) Inspect servo for damaged seals, binding linkage or faulty band lining. malfunction.

(a) Engine idle speed too high.

Repair as required.

(g) Worn or faulty front and/or rear (g) Disassemble and inspect clutch. Repair or replace as required. clutch. DELAYED ENGAGEMENT IN D, 1,2 AND R

(a) Low fluid level.

(a) Refill to correct level with Automatic Transmission Fluid, AQ-ATF, Suffix A. or (Dexron).


TORQUEFLITE-TRANSMISSIONS 21-15 Condition

Possible Cause

Correction

(b) Incorrect gearshift control linkage (b) Adjust control linkage. adjustment. (c) Hydraulic pressures too high or low. (c) Perform hydraulic pressure tests and adjust to specifications. (d) Oil filter clogged. (d) Replace oil filter. (e) Valve body malfunction or leakage. (e) Perform pressure tests to determine cause and correct as required. (f) Accumulator sticking, broken rings or (f) Inspect accumulator for sticking, brospring. ken rings or spring. Repair as required. (g) Clutches or servos sticking or not (g) Remove valve body assembly and peroperating. form air pressure tests. Repair as required. (h) Faulty oil pump. (h) Perform hydraulic pressure tests. Adjust or repair as required. 0) Worn or faulty front and/or rear (i) Disassemble and inspect clutch. Reclutch. pair or replace as required. (j) Worn or broken input shaft and/or (j) Inspect and replace seal rings as reaction shaft support seal rings. required, also inspect respective bores for wear. Replace parts as required. (k) Aerated fluid. (k) Inspect for air leakage into pump suction passages. RUNAWAY OR HARSH UPSHIFT AND 3-2 KICKDOWN

(a) Low fluid level. (b) Incorrect throttle linkage adjustment. (c) Hydraulic pressures too high or low. (d) Kickdown band out of adjustment. (e) Valve body malfunction or leakage. (f) Governor malfunction. (g) Accumulator sticking, broken rings or spring. (h) Clutches or servos sticking or not operating. (i) Kickdown servo, band or linkage malfunctions. (j) Worn or faulty front clutch. (k) Worn or broken input shaft and/or reaction shaft support seal rings.

NO UPSHIFT

(a) Low fluid level. (b) (c) (d) (e) (f) (g)

(a) Refill to correct level with Automatic Transmission Fluid, AQ-ATF, Suffix A. or (Dexron). (b) Adjust throttle linkage. (c) Perform hydraulic pressure tests and adjust to specifications. (d) Adjust kickdown band. (e) Perform pressure tests to determine cause and correct as required. (f) Inspect governor and repair as required. (g) Inspect accumulator for sticking, broken rings or spring. Repair as required. (h) Remove valve body assembly and perform air pressure tests. Repair as required. (i) Inspect servo for sticking, broken seal rings, binding linkage or faulty band lining. Repair as required. (j) Disassemble and inspect clutch. Repair as required. (k) Inspect and replace seal rings as required, also inspect respective bores for wear. Replace parts as required.

(a) Refill to correct level with Automatic Transmission Fluid AQ-ATF, Suffix A. or (Dexron). Incorrect throttle linkage adjustment (b) Adjust throttle linkage. Kickdown band out of adjustment. (c) Adjust kickdown band. Hydraulic pressures too high or low. (d) Perform hydraulic pressure tests and adjust to specifications. Governor sticking or leaking. (e) Remove and clean governor. Replace parts if necessary. Valve body malfunction or leakage. (f) Perform pressure tests to determine cause and correct as required. Clutches or servos sticking or not (g) Remove valve body assembly and peroperating. form air pressure tests. Repair as required.


2146 TRANSMISSIONS—TORQUEFLITE Condition

Correction

Possible Cause

(h) Perform hydraulic pressure tests, adjust or repair as required. (i) Kickdown servo, band or linkage mal- (i) Inspect servo for sticking, broken seal rings, binding linkage or faulty band function. lining. Repair as required. Worn or faulty front clutch. (j) Disassemble and inspect clutch. Repair or replace as required. (k) Worn or broken input shaft and/or (k) Inspect and replace seal rings as required, also inspect respective bores reaction shaft support seal rings. for wear. Replace parts as required.

(h) Faulty oil pump.

NO KICKDOWN OR NORMAL DOWNSHIFT

(a) Incorrect throttle linkage adjustment (a) (b) Incorrect gearshift control linkage ad- (b) justment. (c) (c) Kickdown band out of adjustment. (d) (d) Hydraulic pressures too high or low. (e) Governor sticking or leaking.

(e)

(f) Valve body malfunction or leakage.

(f)

(g) Clutches or servos sticking or not (g) operating. (h) Kickdown servo, band or linkage (h) malfunction. (i) Overrunning clutch not holding. SHIFTS ERRATIC

Adjust kickdown band. Peform hydraulic pressure tests and adjust to specifications. Remove and clean governor. Replace parts if necessary. Perform pressure tests to determine cause and correct as required. Remove valve body assembly and perform air pressure tests. Repair as required. Inspect servo for sticking, broken seal rings, binding linkage or faulty band lining. Repair as required. Disassemble transmission and repair overrunning clutch as required.

(a) Refill to correct level with Automatic Transmission Fluid, AQ-ATF, Suffix A. or (Dexron). Aerated fluid. (b) Inspect for air leakage into pump suction passages. Incorrect throttle linkage adjustment (c) Adjust throttle linkage. Incorrect gearshift control linkage (d) Adjust control linkage. adjustment. Hydraulic pressures too high or low. (e) Perform hydraulic pressure tests and adjust to specifications. Remove and clean governor. Replace Governor sticking or leaking. parts if necessary. Oil filter clogged. (g) Replace oil filter. Valve body malfunction or leakage. (h) Perform pressure tests to determine cause and correct as required. Clutches or servos sticking or not (i) Remove valve body assembly and perform air pressure tests. Repair as reoperating. quired. Faulty oil pump. (j) Perform hydraulic pressure tests, adjust or repair as required. Worn or broken input shaft and/or (k) Inspect and replace seal rings as rereaction shaft support seal rings. quired, also inspect respective bores for wear. Replace parts as required.

(a) Low fluid level. (b) (c) (d) (e) (f) (g) (h) (i) (j) (k)

SLIPS IN FORWARD DRIVE POSITIONS

(i)

Adjust throttle linkage. Adjust control linkage.

(a) Low fluid level.

(a) Refill to correct level with Automatic Transmission Fluid, AQ-ATF, Suffix A. or (Dexron). (b) Aerated fluid. (b) Inspect for air leakage into oil pump suction passages. (c) Incorrect throttle linkage adjustment (c) Adjust throttle linkage. (d) Incorrect gearshift control linkage ad- (d) Adjust control linkage. justment. (e) Hydraulic pressures too low. (e) Perform hydraulic pressure tests and adjust to specifications. (f) Valve body malfunction or leakage. (f) Perform pressure tests to determine cause and correct as required.


TORQUEFLITE—TRANSMISSIONS 21-17 Condition

Possible Cause

Correction

(g) Accumulator sticking, broken rings or (g) Inspect accumulator for sticking, spring. broken rings or spring. Repair as required. (h) Clutches or servos sticking or not (h) Remove valve body assembly and peroperating. form air pressure tests. Repair as required. (i) Worn or faulty front and/or rear (i) Disassemble and inspect clutch. Reclutch. pair or replace as required. (j) Overrunning clutch not holding. (j) Disassemble transmission and repair overrunning clutch as required. (k) Worn or broken input shaft and/or re- (k) Inspect and replace seal rings as reaction shaft support seal rings. quired, also inspect respective bores for wear. Replace parts as required. SLIPS IN REVERSE ONLY

(a) Low fluid level. (b) (c) (d) (e) (f) (g) (h) (i)

SLIPS IN ALL POSITIONS

(a) Low fluid level. (b) (c) (d) (e) (f)

NO DRIVE IN ANY POSITION

(a) Refill to correct level with Automatic Transmission Fluid, AQ-ATF, Suffix A. or (Dexron). Aerated fluid. (b) Inspect for air leakage into pump suction passages. Incorrect gearshift control linkage (c) Adjust control linkage. adjustment. Hydraulic pressures too high or low. (d) Perform hydraulic pressure tests and adjust to specifications. Low-reverse band out of adjustment (e) Adjust low-reverse band. Valve body malfunction or leakage. (f) Perform pressure tests to determine cause and correct as required. Front clutch or rear servo, sticking or (g) Remove valve body assembly and pernot operating. form air pressure tests. Repair as required. Low-reverse servo, band or linkage (h) Inspect servo for damaged seals, malfunction. binding linkage or faulty band lining. Repair as required. Faulty oil pump. (i) Perform hydraulic pressure tests, adjust or repair as required.

(a) Refill to correct level with Automatic Transmission Fluid AQ-ATF, Suffix A. or (Dexron). Hydraulic pressures too low. (b) Perform hydraulic pressure tests and adjust to specifications. Valve body malfunction or leakage. (c) Perform pressure tests to determine cause and correct as required. Faulty oil pump. (d) Perform hydraulic pressure tests, adjust or repair as required. Clutches or servos sticking or not (e) Remove valve body assembly and peroperating. form air pressure tests. Repair as required. Worn or broken input shaft and/or (f) Inspect and replace seal rings as rereaction shaft support seal rings. quired, also inspect respective bores for wear. Replace parts as required.

(a) Low fluid level. (b) (c) (d) (e) (f) (g)

(a) Refill to correct level with Automatic Transmission Fluid, AQ-ATF, Suffix A. or (Dexron). Hydraulic pressures too low. (b) Perform hydraulic pressure tests and adjust to specifications. Oil filter clogged. (c) Replace oil filter. Valve body malfunction or leakage. (d) Perform pressure tests to determine cause and correct as required. Faulty oil pump. (e) Perform hydraulic pressure tests, adjust or repair as required. Clutches or servos sticking or not (f) Remove valve body assembly and peroperating. form air pressure tests. Repair as required. Torque converter failure. (g) Replace torque converter.


21-18 TRANSMISSIONS-TORQUEFLITE Condition NO DRIVE IN FORWARD DRIVE POSITIONS

Possible Cause

Correction

(a) Perform hydraulic pressure tests and adjust to specifications. (b) Perform pressure tests to determine Valve body malfunction or leakage. cause and correct as required. Clutches or servos, sticking or not (c) Remove valve body assembly and perform air pressure tests. Repair as reoperating. quired. Worn or faulty rear clutch. (d) Disassemble and inspect clutch. Repair or replace as required. Overrunning clutch not holding. (e) Disassemble transmission and repair overrunning clutch as required. Worn or broken input shaft and/or (f) Inspect and replace seal rings as rereaction shaft support seal rings. quired, also inspect respective bores for wear. Replace parts as required.

(a) Hydraulic pressures too low. (b) (c) (d) (e)

NO DRIVE IN REVERSE

(a) Incorrect gearshift control linkage ad- (a) Adjust control linkage. justment. (b) Perform hydraulic pressure tests and (b) Hydraulic pressures too low. adjust to specifications. (c) Adjust low-reverse band. (c) Low-reverse band out of adjustment (d) Perform pressure tests to determine (d) Valve body malfunction or leakage. cause and correct as required. (e) Front clutch or rear servo, sticking or (e) Remove valve body assembly and perform air pressure tests. Repair as renot operating. quired. (f) Low-reverse servo, band or linkage (f) Inspect servo for damaged seals, binding linkage or faulty band lining. malfunction. Repair as required. (g) Disassemble and inspect clutch. Re(g) Worn or faulty front clutch. pair or replace as required.

DRIVES IN NEUTRAL

(a) Incorrect gearshift control linkage ad- (a) Adjust control linkage. justment. (b) Perform pressure tests to determine (b) Valve body malfunction or leakage. cause and correct as required. (c) Inspect clutch and repair as required. (c) Rear clutch inoperative.

DRAGS OR LOCKS

(a) Adjust kickdown band. (a) Kickdown band out of adjustment. (b) Adjust low-reverse band. (b) Low-reverse band out of adjustment (c) Kickdown and/or low-reverse servo, (c) Inspect servo for sticking, broken seal rings, binding linkage or faulty band band, linkage malfunction. lining. Repair as required. (d) Disassemble and inspect clutch. Re(d) Front and/or rear clutch faulty. pair or replace as required. (e) Planetary gear sets broken or seized. (e) Inspect condition of planetary gear sets and replaced as required. (f) Overrunning clutch worn, broken or (f) Inspect condition of overrunning clutch and replace parts as required. seized.

GRATING, SCRAPING GROWLING NOISE

(a) Kickdown band out of adjustment. (b) Low-reverse band out of adjustment. (c) Output shaft bearing and/or bushing damaged. (d) Governor support binding or broken seal rings. (e) Oil pump scored or binding.

OIL LEAKAGE

(a) Speedometer adaptor.

(a) Adjust kickdown band. fia) Adjust low-reverse band. (c) Remove extension housing and replace bearing and/or bushing. (d) Inspect condition of governor support and repair as required. (e) Inspect condition of pump and repair as required. (f) Disassemble and inspect clutch. Re(f) Front and/or rear clutch faulty. pair or replace as required. (g) Planetary gear sets broken or seized. (g) Inspect condition of planetary gear sets and replace as required. (h) Overrunning clutch worn, broken or ( h) Inspect condition of overrunning clutch and replace parts as required. seized.

(b) Speedometer drive pinion seal.

(a) Replace rubber "0" ring seal. Inspect for bore porosity. (b) Replace rubber seal.


TORQUEFLITE-TRANSMISSIONS 21-19 Possible Cause

Condition

Correction

(c) Can often be stopped by tightening the attaching bolts to proper torque (150 in. lbs.). If necessary, replace gasket. Inspect oil pan gasket mounting face for flatness. Caution: Do not overtorque pan bolts. (d) Fluid filler tube. (d) Replace "0" ring seal. Inspect for tube damage, and bore porosity. (e) Fluid lines and fittings. (e) If leakage cannot be stopped by tightening a fitting, replace the defective part. (f) Manual control lever. (f) Replace either or both the manual lever or throttle lever shaft seal. (g) Pipe plugs. (g) Torque to specified torque. If leak persists, replace plug. (h) Rear extension seal. (h) Check for 0.D. Bore damage and replace seal. 0) Replace gasket. (i) Rear bearing access plate. (j) Replace bolt. (j) Extension bolts. (k) Extension gasket. (k) Replace gasket and check for sealing surface damage on case and extension. (I) Kickdown band adjusting screw. (I) Apply sealer. (m) Neutral switch. (m) Replace switch and/or gasket. (n) Fluid leakage in converter housing (n) See section on fluid leakage. area. (c) Oil pan gasket.

BUZZING NOISE

(a) Refill to correct level with Automatic Transmission Fluid, AQ-ATF, Suffix A. or (Dexron). (b) Inspect pump for nicks or burrs on (b) Pump sucking air. mating surfaces, porous casting, and/ or excessive rotor clearance. Replace the parts as required. (c) Valve body malfunction. (c) Remove and recondition valve body assembly. (d) Overrunning clutch inner race dam- (d) Inspect and repair clutch as required. aged.

HARD TO FILL, OIL FLOWS OUT FILLER TUBE

(a) High fluid level. (b) Breather clogged.

(a) Low fluid level.

(c) Oil filter clogged. (d) Aerated fluid. TRANSMISSION OVERHEATS

(a) Refill to correct level with Automatic Transmission Fluid, AQ-ATF, Suffix A. or (Dexron). (b) Adjust kickdown band. Kickdown band adjustment too tight Low-reverse band adjustment too (c) Adjust low-reverse band. tight. Faulty cooling system. (d) Inspect the transmission cooling system, clean and repair as required. Cracked or restricted oil cooler line (e) Inspect, repair or replace as required. or fitting. (f) Inspect pump for incorrect clearance, Faulty oil pump. repair as required. Insufficient clutch plate clearance (g) Measure clutch plate clearance and correct with proper size snap ring. in front and/or rear clutches.

(a) Low fluid level. (b) (c) (d) (e) (f) (g)

STARTER WILL NOT ENERGIZE IN NEUTRAL OR PARK

(a) Drain fluid to correct level. (b) Inspect and clean breather vent opening in pump housing. (c) Replace oil filter. (d) Inspect for air leakage into oil pump suction passages.

(a) Incorrect gearshift control linkage (a) Adjust control linkage. adjustment. (b) Faulty or incorrectly adjusted neutral (b) Test operation of switch with a test lamp. Adjust or replace as required. starting switch. (c) Inspect lead and test with a test lamp. (c) Broken lead to neutral switch. Repair broken lead.


21-20 TRANSMISSIONS—TORQUEFLITE STALL TEST WARNING: DURING TEST LET NO ONE STAND IN FRONT OF VEHICLE. The stall test consists of determining the engine speed obtained at full throttle in D position. This test checks the torque converter stator clutch operation, and the holding ability of the transmission clutches. The transmission oil level should be checked and the engine brought to normal operating temperature before stall operation. Both the parking and service brakes must be fully applied and front wheels blocked while making this test. Do not hold the throttle open any longer than is necessary to obtain a maximum engine speed reading, and never longer than five seconds at a time. If more than one stall check is required, operate the engine at approximately 1,000 rpm in neutral for 20 seconds to cool the transmission fluid between runs. If engine speed exceeds the maximum limits shown, release the accelerator immediately since transmission clutch slippage is indicated.

If stall speeds are 250-350 rpm below specifications, and the vehicle operates properly at highway speeds, but has poor through-gear acceleration, the stator overrunning clutch is slipping. If stall speed and acceleration are normal, but abnormally high throttle opening is required to maintain highway speeds, the stator clutch has seized. Both of these stator defects require replacement of the torque converter.

NOISE A whining or siren-like noise due to fluid flow is normal during stall operation with some converters; however, loud metallic noises from loose parts or interference within the assembly indicate a defective torque converter. To confirm that the noise originates within the converter, operate the vehicle at light throttle in D and N on a hoist and listen under the transmission bell housing.

STALL SPEED SPECIFICATION CHART

STALL SPEED ABOVE SPECIFICATION If stall speed exceeds the maximum specified in chart by more than 200 rpm, transmission clutch slippage is indicated. Follow the transmission oil pressure and air pressure checks outlined in the Service in Vehicle section to determine the cause of slippage.

STALL SPEED BELOW SPECIFICATION Low stall speeds with a properly tuned engine indicate torque converter stator clutch problems. A road test will be necessary to identify the exact problem.

Engine Model (C.I.D.)

Transmission Type

198 225 225 318 318 340-4 BBL. 383-2 BBL. 383-4 BBL. 440-4 BBL. 426-2, 4 BBL.

A904-G A904-G A727-RG A904-LA A727-A A727-A A727-B A727-B A727-B A727-B

Engine Speed (RPM)

1500-1700 1800-2000 1450-1650 2100-2320 1750-1950 2250-2450 1850-2100 2350-2650 2000-2300 2650-2850

SERVICE PROCEDURES SERVICE IN VEHICLE Various transmission components can be removed for repair without removing the transmission from the vehicle. The removal, reconditioning and installation procedures for these components are covered here, except the valve body reconditioning, which is described on page 34.

ALUMINUM THREAD REPAIR Damaged or worn threads in the aluminum transmission case and valve body can be repaired by the use of Heli-Coils. Essentially, this repair consists of drilling out the worn or damaged threads, tapping the hole with a special Heli-Coil Tap, and installing a Heli-Coil insert into the tapped hole. This brings the

hole back to its original thread size. The chart lists the threaded hole sizes which are used in the aluminum case and valve body, and the necessary tools and inserts for the repair of damaged or worn threads. Heli-Coil tools and inserts are readily available from most automotive parts jobbers. NOTE: Some thread drag may occur in screwing a bolt into the installed Heli-Coil insert. Therefore, a torque reading should be taken of the thread drag with an inch-pound torque wrench and added to the specified bolt torque, so that all bolts securing a particular part will be tightened to the same torque.

LUBRICATION The transmission fluid and filter should provide satisfactory lubrication and protection to the auto-


TORQUEFLITE—TRANSMISSIONS

21-21

HELI-COIL CHART Hell-Coil Insert

Drill

Tap

Inserting Tool

Extracting Tool

Thread Size

Part No.

Insert Length

Part No.

Part

Size

No.

Part No.

10-24

1185-3 11854 1185-5 1185-6 1185-7

.285" 3/8" 15/16" 9/16" 21/32"

13/64" (.203") 17/64" (.265") Q (.332") X (397") 29/32" (.453")

3 CPB 4 CPB 5 CPB 6 CPB 7 CPB

528-3N 528-4N 528-5N 528-6N 528-7N

1227-6 1227-6 1227-6 1227-6 1227-16

1/4-20 5/16-18 3/8-16 7 / 16-14

matic transmission and no change is recommended in vehicles used in normal service. Regularly scheduled fluid and filter changes, therefore will not be required, except when the operation of the vehicle is classified as severe. If, for any reason, the factory fill fluid is replaced with another fluid, the fluid must be changed every three years or 36,000 miles in normal service. Hemi Engine Vehicles: The factory fill fluid should be changed after the first 24,000 miles or 24 months, whichever occurs first, and periodically thereafter every 12,000 miles or 12 months. The filter should be changed with each fluid change. If for any reason, the factory fill fluid is replaced with another fluid prior to the 24,000 mile or 24 month interval, the fluid must be changed every 12,000 miles or 12 months. Fluid Level Inspect fluid level every six months with engine and transmission at normal operating temperature. Refer to "Lubrication and Maintenance." Group 0. The transmission should not be idled in gear for long periods.

and tighten retaining screws to 35 inch-pounds. (6) Clean the oil pan, and reinstall using a new gasket. Tighten oil pan bolts to 150 inch-pounds. 17) Pour six quarts of Automatic Transmission Fluid AQ-AT1.1 Suffix "A" or (Dexron) through the filler tube. (8) Start engine and allow to idle for at least two minutes. Then, with parking brake on, move selector lever momentarily to each position, ending in the neutral position. (9) Add sufficient fluid to bring level to the "ADD ONE PINT" mark. Recheck fluid level after transmission is at normal operating temperature. The level should be between the "Full" mark and "ADD ONE PINT" mark (Fig. 5).

CAUTION: To prevent dirt from entering transmission, make certain that dip stick cap Is fully seated onto the filler tube.

BACK-UP LIGHT AND NEUTRAL STARTING SWITCH (Figs. Sand 7)

Trailer Towing Service and Hard Usage If vehicle is used for trailer towing or is used in hard or severe service, more frequent servicing is required as outlined. Drain and refill transmission and replace filter initially at 36,000 miles or 3 years and every 12,000 miles or 12 months thereafter.

Replacement and Test The NEUTRAL STARTLNG SWITCH is the center terminal of the 3 terminal switch. It provides ground for the starter solenoid circuit through the selector lever cam in only Park and Neutral positions. (1) To test switch, remove wiring connector from switch and test for continuity between center pin of switch and transmission case. Continuity should exist only when transmission is in Park or Neutral.

Drain and Refill (1) Raise vehicle on a hoist. Place a drain container with a large opening, under transmission oil pan. (2) Loosen pan bolts at one corner, tap the pan to break it loose allowing fluid to drain, then remove the oil pan. (3) Remove access plate from in front of converter, remove drain plug allowing fluid to drain (Fig. 4). Install and tighten converter drain plug to 110 inchpounds, and install the access plate. (4) If necessary, adjust the reverse band. (5) Install a new filter on bottom of the valve body,

Fig. 4—Converter brain Plug


21-22 TRANSMISSIONS—TORQUEFLITE BOLTS (10)

LOW AND REVERSE BAND ADJUSTING SCREW

HI I ER Huio

I i 1161t4 1 1 .1111 BACK-UP uGHT AND NEUTRAL SWITCH START SWITCH -CIF- PARK OPERATING NEUTRAL REVERSE Cam NU451

Fig. 5—Dip Stick Markings

(2) Check gearshift linkage adjustment before replacing a switch which tests bad. (3) Unscrew switch from transmission case allowing fluid to drain into a container. Move selector lever to Park and then to Neutral positions, and inspect to see that the switch operating lever fingers are centered in switch opening in the case. (4) Screw switch and new seal into transmission case and tighten to 24 foot-pounds. Retest switch with the test lamp. (5) Add fluid to transmission to bring up to proper level. (6) The Back-Up Light Switch Circuit is through the two outside terminals of the 3 terminal switch. (7) To test switch, remove wiring connector from switch and test for continuity between the two outside pins. (8) Continuity should exist only with transmission in Reverse position. (9) No continuity should exist from either pin to the case.

BAND ADJUSTMENTS Kickdown Band

The kickdown band adjusting screw is located on left side of the transmission case. (1) Loosen lock nut and back off approximately five CONI ACT

WIRING CONNECTOR

Fig. 7—Bottom View of Transmission (Pan Removed)

turns. Test adjusting screw for free turning in the transmission case. (2) Using wrench, Tool C-3380 with adapter C-3706, tighten band adjusting screw 47 to 50 inch-pounds. If adapter C-3705 is not used, tighten adjusting screw to 72 inch-pounds which is the true torque. (3) 4-904: Back off adjusting screw 2 turns (198, 225, and 318 Cu- in. engines). Hold adjusting screw in this position and tighten lock nut to 29 foot-pounds. A-727: Back off adjusting screw 2 turns (1-1/2 turns for 426 cu. in. engine). Hold adjusting screw in this position and tighten lock nut to 29 foot-pounds. Low and Reverse Band

(1) Raise vehicle, drain transmission fluid and remove the oil pan. (2) Loosen adjusting screw lock nut and back off nut approximately five turns (Fig. 7). Test adjusting screw for free turning in the lever. (3) Using wrench, Tool C-3380 with adapter C-3705, tighten band adjusting screw 47 to 50 inch-pounds. If adapter C-3705 is not used, tighten adjusting screw to 72 inch-pounds which is the true torque. (4) A-904: Back off adjusting screw 3-1/4 turns (4 turns for 318 cu. in. engine). Hold adjusting screw in this position and tighten lock nut to 35 foot-pounds. A-727: Back off adjusting screw 2 turns. Hold adjusting screw in this position and tighten lock nut to 35 foot-pounds. (5) Reinstall oil pan using a new gasket. Tighten oil pan bolts to 150 inch-pounds. (6) Fill transmission with Automatic Transmission Fluid AQ-ATF, Suffix "A" or (Dexron). HYDRAULIC CONTROL PRESSURE TESTS

Nu450

Fig. 6—Neutral-Park Starting Switch and Back-Up Light Switch

Line Pressure and Front Servo Release Pressure

Line pressure and front servo release pressure tests


TORQUEFLITE—TRANSMISSIONS 21-23

must be made in D (drive) position with rear wheels free to turn. The transmission fluid must be at operating temperature (150 to 200°F). (1) Install an engine tachometer, raise vehicle on a hoist and position tachometer so it can be read under the vehicle. (2) Connect two 0-100 psi pressure gauges, Tool C3292 to pressure take-off-points at side of accumulator and at front servo release (Fig. 8). (3) With control in D (drive) position, speed up engine slightly until transmission shifts into direct. (Front servo release will be pressurized in direct.) Reduce engine speed slowly to 1,000 rpm. Line pressure at this time (1,000 rpm) must be 54-60 psi, and front servo release pressure must not be more than 3 psi below the line pressure. (4) Disconnect throttle linkage from transmission throttle lever and move throttle lever gradually to the full throttle position. Line pressure must rise to a maximum of 90-96 psi just before or at kickdown into low gear. Front servo release pressure must follow line pressure up to kickdown point and should not be more than 3 psi below line pressure. If pressure is not 54-60 psi at 1,000 rpm, adjust the pressure as outlined on Page 25. If front servo release pressures are less than pressures specified and line pressures are within limits, there is excessive leakage in the front clutch and/or front servo circuits. Always inspect external transmIstion throttle lever for looseness on the valve body shaft when making the pressure tests.

Lubrication Pressures The lubrication pressure test should be made at same time that line pressure and front servo release pressure are tested. (1.) Install a "tee" fitting between cooler return line fitting and fitting hole in transmission case at rear left side of the transmission (Fig. 9). Connect a 0-100

FILLER TUBE

••••*-• KICKDOWN SERVO RELEASE LINE PRESSURE OW-REVERSE SERVO

psi pressure gauge, Tool C-3292 to the "tee" fitting. (2) At 1,000 engine rpm, with throttle closed and transmission in direct, lubrication pressure should be 5-15 psi. Lubrication pressure will be approximately doubted as the throttle is opened to maximum line pressure. Rear Servo Apply Pressure (1) Connect a 0-300 psi pressure gauge, Tool 0-3293 to apply pressure take-off point at rear servo (Fig. 9). (2) With transmission control in R (reverse) position and engine speed set at 1600 rpm, reverse servo apply pressure should be 230 to 200 psi. Governor Pressure (1) Connect a 0-100 psi pressure gauge, Tool C-3292 to governor pressure take-off point, located at lower left side of extension near the mounting flange (Fig. 9). (2) Governor pressures should fall within the limits given in the "Governor Pressure Chart." If governor pressures are incorrect at the given vehicle speeds, the governor valve and/or weights are probably sticking. The governor pressure should respond smoothly to changes in mph and should return to 0 to 1-1/2 psi when vehicle is stopped. High pressure at stand still (above 2 psi) will prevent the transmission from downshifting.

Throttle Pressure No provisions are made to test the throttle pressure. Incorrect throttle pressure should only be suspected if part throttle shift speeds are either very delayed or occur too early in relation to vehicle speeds. In which case, the throttle linkage should be adjusted before throttle pressure setting is adjusted. HYDRAULIC CONTROL PRESSURE ADJUSTMENTS Line Pressure An incorrect throttle pressure setting will cause incorrect line pressure readings even though line pressure adjustment is correct. Always inspect and correct throttle pressure adjustment before adjusting the line pressure. Before adjusting line pressure, measure distance between manual valve (valve In blow position) and line pressure adjusting screw (Fig. 10). This measurement must be 1-7/8 inches; correct by loosening spring retainer screws and repositioning the spring retainer. The regulator valve may cock and hang up in its bore if spring retainer is out of position.

Fig. 8—Pressure Test Locations (Right Side of Case)

If line pressure is not correct, it will be necessary to remove valve body assembly to perform the adjustment.


21-24 TRANSMISSIONS—TORQUEFLITE GOVERNOR PRESSURE CHART (Six Cylinder Engines) VEHICLE SPEED TO AXLE RATIOS Pressure 198 and 225 Cu. In. Eng. Limits 2.76:1 2.93:1 3.23:1 psi

18-20 38-46 64-70

17-20 36-46 60-70

15 50 75

16-19 34-44 57-66

GOVERNOR PRESSURE CHART (Eight Cylinder Engines) Fig. 10—Measuring Spring Retainer Locations

VEHICLE SPEED TO AXLE RATIOS 318, 383 or 440 Cu. In. Eng. 3.23:1 2.76:1 3.55:1

19-21 46-55 74-82

14-17 39-51 58-71

ances, the adjustment can be varied to obtain specified line pressure. The adjusting screw may be turned with an Allen wrench. One complete turn of adjusting screw changes closed throttle line pressure approximately 1-2/3 psi. Turning adjusting screw counter-clockwise increases pressure, and clockwise decreases pressure.

Pressure Limits psi

15-17 44-50 64-71

15 50 75

GOVERNOR PRESSURE CHART (High Performance Engines)

VEHICLE SPEED TO AXLE RATIOS 426 Cu. In.

Eng. 3.23:1

20-23 55-64 82-90

383-4 BBL and 440 Cu. In. Eng. 3.23:1

Pressure Limits psi

16-19 46-52 68-73

15 50 75

The approximate adjustment is 1-5/16 inches, measured from valve body to inner edge of adjusting nut (Fig. 11). However, due to manufacturing toter-

LUBRICATION a PRESSURE CCOOLER RETURN 4r 1"W"W"'Ijb FMING) 411111111IMINIV

Throttle Pressure Throttle pressures cannot be tested accurately; therefore, the adjustment should be measured if a malfunction is evident. (1) Remove valve body assembly from transmission to perform adjustment (2) Loosen throttle lever stop screw lock nut and back off approximately five turns (Fig. 12). (3) Insert gauge pin of Tool C-3763 between the throttle lever cam and kickdown valve. (4) By pushing in on tool, compress kickdown valve against its spring so throttle valve is completely bottomed inside the valve body. (5) As force is being exerted to compress spring, tighten throttle lever stop screw finger tight against throttle lever tang with throttle lever cam touching tool and the throttle valve bottomed. Be sure adjust.

GOVERNOR PRESSURE REAR SERVO APPLY PRESSURE

Fig. 9—Pressure rest Locations (Rear End

of Case)

Fig. 11—Line Pressure Adjustment


TORQUEFLITE—TRANSMISSIONS 21-25 TOOL KICKDOWN \ VALVE

LOCK NUT THROTTLE LEVER STOP SCREW NN73A

Fig. 12 —Threttle Pressure Adjustment

ment is made with spring fully compressed and valve bottomed in the valve body.

(6) Remove tool and tighten stop screw lock nut securely.

AIR PRESSURE TESTS A "NO DRIVE" condition might exist even with correct fluid pressure, because of inoperative clutches or bands. The inoperative units, clutches, bands and servos can be located through a series of tests by substituting air pressure for fluid pressure (Fig. 13). The front and rear clutches, kickdown servo, and lowreverse servo may be tested by applying air pressure to their respective passages after the valve body assembly has been removed. To make air pressure tests, proceed as follows: e.„FRONT SERVO APPLY UNE PRESSURE TO ACCUMULATOR 0-4

It

FRONT SERVO RELEASE

p.

• REAR SERVO APPLY

PUMP SUCTION

-•

PUMP PRESSURE FRONT CLUTCH " APPLY

'APPLY TO TORQUE CONVERTER

TO GOVERNOR • r■-• Ti NORA

FROM TORQUE CONVFR !FR C TO COOLER

Fig. /3 — Air Pressure Tests

CAUTION: Compressed air supply must be free of all dirt or moisture. Use a pressure of 30 to 100 psi. Front Clutch

Apply air pressure to front clutch "apply" passage and listen for a dull "thud" which indicates that front clutch is operating. Hold air pressure on for a few seconds and inspect system for excessive oil leaks. Rear Clutch

Apply air pressure to rear clutch "apply" passage and listen for a dull "thud" which indicates that rear clutch is operating. Also inspect for excessive oil leaks. NOTE: If a dull "thud" cannot be heard in the clutch, place finger tips on clutch housing and again apply air pressure. Movement of piston can be felt as the clutch is applied. Kickdown Servo

Direct air pressure into front servo "apply" passage. Operation of servo is indicated by a tightening of front band. Spring tension on servo piston should release the band. Low and Reverse Servo

Direct air pressure into rear servo "apply" passage. Operation of servo is indicated by a tightening of rear band. Spring tension on servo piston should release the band. If clutches and servos operate properly, no up-shift or erratic shift conditions indicate that malfunctions exist in the valve body. Governor

Governor operating failures can generally be diagnosed by a road test or hydraulic pressure test. Refer to "Hydraulic Control Pressure Tests",

SPEEDOMETER PINION Removal and Installation Rear axle gear ratio and tire size determines pinion gear size requirements. Refer to "Speedometer Pinion Chart" in Specifications for pinion usage. (1) Remove bolt and retainer securing speedometer pinion adapter in the extension housing (Fig. 14). (') With cable housing connected, carefully work adapter and pinion out of the extension housing. (3) If transmission fluid is found in cable housing, replace seal in the adapter (Fig. 15). Start seal and retainer ring in the adapter, then push them into adapter with Tool C4004 until tool bottoms (Fig. 16). CAUTION: Before installing pinion and adapter assembly make sure adapter flange and its mating area on extension housing are perfectly clean. Dirt or sand will cause mis-alignment resulting in speedometer pinion gear noise.


21-26 TRANSMISSIONS-TORQUEFLITE

ADAPTER NN744

6 O'CLOCK POSITION

Fig. 14—Speedometer Pinion and Adapter—Installed (Retainer Removed for View) -,,r•RETAINER

ADAPTER 0" RING

#1 : ' BOLT AND WASHER

PINION

OIL SEAL

RETAINER RING

Fig. 17—Removing Extension Housing Yoke Seal

(2) Remove the extension housing yoke seal (Fig. 17) with Tool C-3994 or C-3985. (3) To install a new seal, position seal in opening of extension housing and drive it into the housing with Tool C-3995 or C-3972 (Fig. 18). (4) Carefully guide front universal joint yoke into extension housing and on the mainshaft splines. Align marks made at removal and connect propeller shaft to rear axle pinion shaft yoke.

NN362

Fig.

EXTENSION HOUSING AND OUTPUT SHAFT BEARING

15—Speedometer Drive

(4) Note number of gear teeth and install speedometer pinion gear into adapter (Fig. 15). (5) Rotate the speedometer pinion gear and adapter assembly so that the number on the adapter, corresponding to the number of teeth on the gear, is in the 6 o'clock position as the assembly is installed (Fig. 14). (6) Install retainer and bolt, with retainer tangs in adapter positioning slots. Tap adapter firmly into the extension housing and tighten retainer bolt to 100 inch-pounds.

EXTENSION HOUSING YOKE SEAL Replacement

(1) Mark parts for reassembly then disconnect propeller shaft at rear universal joint. Carefully pull shaft yoke out of the transmission extension housing. CAUTION: Be careful not to scratch or nick ground surface on sliding spline yoke during removal and installation of the shaft assembly. ADAPTER

LOCK RING

Removal

(1) Mark parts for reassembly then disconnect propeller shaft at rear universal joint. Carefully pull shaft assembly out of the extension housing. (2) Remove speedometer pinion and adapter assembly (Fig. 14). Drain approximately two quarts of fluid from the transmission. (3) Remove bolts securing extension housing to the crossmember. Raise transmission slightly with service jack Tool C-3203A, then remove center crossmember and support assembly. (4) Remove extension housing to transmission bolts. Console Shift: Remove two bolts securing gearshift torque shaft lower bracket to extension housing. Swing bracket out of way for extension housing removal. IMPORTANT: In removing or installing extension housing (step 5), the gearshift lever must be in "I" (low) position. This positions parking lock control rod TOOL

affel.0(x Vt" / 969,"'"" /4 1.; /c42 " . 'Artier .1 1117

1/29

TOOL SEAL NP2

Fig. 16—Installing Speedometer Pinion Seal

NNI25 Fig. 18—Installing Extension Housing Yoke Stud


TORQUEFLITE—TRANSMISSIONS 21-27 rearward so it can be disengaged or engaged with the parking lock sprag.

(5) Remove two screws, plate and gasket from bottom of extension housing mounting pad. Spread large snap ring from output shaft bearing with Tool C-3301 (Fig. 19). With snap ring spread as far as possible, carefully tap extension housing oft the output shaft bearing. Carefully pull extension housing rearward, to remove parking lock control rod knob past the parking sprag, then remove the housing.

BEARING SNAP RING FRONT SNAP GROOVE RING

REAR PARK LOCK SNAP RING CONTROL ROD

NNI WA

Fig. 20—Output Shaft Rearing

Bearing Replacement (1) Using heavy duty snap ring pliers C-4020, remove output shaft bearing rear snap ring and remove bearing from the shaft (Fig. 20). (2) If removed, install snap ring in front groove on output shaft. Install a new bearing on shaft with outer race ring groove toward front Wig. 20). then install rear snap ring. NOTE: To replace the extension housing bushing, refer to INDEX. Installation (1) Place a new extension housing gasket on the transmission case. Position output shaft bearing retaining snap ring in extension housing. Slide extension housing on output shaft guiding the parking lock control rod knob past the parking sprag. While spreading large snap ring in housing with Tool C3301A (Fig. 19), carefully tap housing into place, then release the snap ring. Make sure snap ring is fully seated in bearing outer race ring groove. (2) Install and tighten extension housing bolts to 24 foot-pounds. (3) Install gasket, plate and two screws on bottom of the extension housing mounting pad. (4) Install center crossmember and rear mount assembly, tighten retaining bolts to 30 foot-pounds. SNAP RING PLIERS

Lower transmission, install extension housing to support bolts and tighten to 40 foot-pounds. Console Shift: Align gearshift torque shaft lower bracket with the extension housing. Install the two retaining bolts and tighten securely. (5) Install the speedometer pinion and adapter. (6) Carefully guide front universal joint yoke into extension housing and on the output shaft splines. Align marks made at removal and connect propeller shaft to rear axle pinion shaft yoke. (7) Add fluid to transmission to bring up to proper level.

GOVERNOR Removal (1) Remove extension housing and output shaft bearing. (2) Carefully pry snap ring from weight end of governor valve shaft (Fig. 21). Slide valve and shaft assembly out of governor body. (3) Remove large snap ring from weight end of governor body, lift out governor weight assembly. (4) Remove snap ring from inside governor weight, remove inner weight and spring from the outer weight. Figure 22 shows a disassembled view of the governor assembly. GOVERNOR SUPPORT AND PARKING GEAR

SNAP

piNns SNAP RING

GOVERNOR BODY

BOLTS (4) LOCK STRAPS

Fig. 19—Removing or Installing Extension Housing

NN77

Fig. 21—Governor Shaft and Weight Snap Rings


21-28 TRANSMISSIONS—TORQUEFLITE SPRING

EXTENSION \Y.-- HOUSING

BODY

r----

SPRAG

(A-9041 8 ' T011b 8-3/16"--1

VALVE SHAFT

SNAP RINGS INNER WEIGHT

VALVE

SPRING

OUTER WEIGHT

SPRING SNAP RING

PLUG AND PIN SNAP RING

NB 35BA

CONTROL ROD

NN788

Fig. 22—Governor Assembly

Fig. 23—Parking Lock Components

(5) Remove snap ring from behind governor body, then slide governor and support assembly off the output shaft. If necessary remove the four bolts and separate governor body from the support.

the parking sprag and spring (Fig. 23). Remove snap ring and slide the reaction plug and pin assembly out of the housing. (4) To replace the parking lock control rod, refer to "Valve Body—Removal and Installation."

Cleaning and Inspection The primary cause of governor operating failure is due to a sticking governor valve or weights. Rough surfaces may be removed with crocus cloth. Thoroughly clean all parts in clean solvent and inspect for free movement before assembly. Installation (1) Assemble governor body to the support (if disassembled) and tighten bolts finger tight. Make sure oil passage of governor body aligns with passage in the support. (2) Position support and governor assembly on the output shaft. Align assembly so valve shaft hole in governor body aligns with hole in the output shaft, then slide assembly into place. Install snap ring behind governor body (Fig. 21). Tighten the body to support bolts to 100 inch-pounds. Bend ends of lock straps over bolt heads. (3) Assemble governor weights and spring, and secure with snap ring inside of large governor weight. Place weight assembly in governor body and install snap ring. (4) Place governor valve on the valve shaft, insert assembly into the body and through governor weights. Install valve shaft retaining snap ring. Inspect valve and weight assembly for free movement after installation. (5) Install output shaft bearing and extension housing.

PARKING LOCK COMPONENTS Removal (1) Remove extension housing. (2) To replace the governor support and parking gear, refer to "Governor and Support". (3) Slide shaft out of extension housing to remove

Installation (1) Position sprag and spring in the housing and insert the shaft (Fig. 23). Make sure square lug on sprag is toward parking gear, and spring is positioned so it moves sprag away from the gear. (2) Install reaction plug and pin assembly in the housing and secure with snap ring. (3) Install extension housing.

VALVE BODY ASSEMBLY AND ACCUMULATOR PISTON Removal (1) Raise vehicle on a hoist. (2) Loosen oil pan bolts, tap the pan to break it loose allowing fluid to drain, then remove oil pan. (3) Disconnect throttle and gearshift linkage from levers on the transmission. Loosen clamp bolts and remove the levers. (4) Remove E-clip (Fig. 24), securing parking lock rod to the valve body manual lever. (5)Remove Back-Up Light and Neutral Start Switch. (6) Place a drain pan under transmission, then remove the ten hex-head valve body to transmission case bolts. Hold valve body in position while removing the bolts. (7) While lowering valve body down out of transmission case, disconnect parking lock rod from the lever. To remove parking lock rod, pull it forward out of the case. If necessary, rotate propeller shaft to align parking gear and sprag to permit knob on end of control rod to pass the sprag. (8) Withdraw accumulator piston from the transmission case. Inspect piston for scoring, and rings for wear or breakage. Replace as required.


TORQUEFLITE—TRANSMISSIONS 21-29

PARKING LOCK 000.41 CONTROL ROD

k'

BACK-UP LIGHT AND NEUTRAL STARTING SWITCH

NU452

Fig. 24—Parking Leek Central Rod Retaining E-Clip

(9) If valve body manual lever shaft seal requires replacement, drive it out of the case with a punch. (10) Drive a new seal in the case with a 15/16 inch socket and hammer (Fig. 25). Servicing the valve body assembly is outlined under "Recondltion—Sub-assemblies". Installation

I) Make sure Back-Up Light and Neutral Start Switch has been removed. If parking lock rod was removed. insert it through opening in rear of case with knob positioned against the plug and sprag. Move front end of rod toward center of transmission while exerting rearward pressure on the rod to force it past the sprag. (Rotate propeller shaft if necessary). (2) Install accumulator piston in the transmission case. (3) Position accumulator spring on the valve body. (4) Place valve body manual lever in LOW position. Lift valve body into its approximate position, connect

15/16 SOCKET

is* SEAL

Fig. 25—Installing Valve Body Manual Lever Shaft Oil Seal

parking lock rod to manual lever and secure with E-clip. Position valve body in the case, install retaining bolts finger tight. (5) With neutral starting switch installed, place manual lever in the neutral position. Shift valve body if necessary to center neutral finger over the neutral switch plunger. Snug bolts down evenly, then tighten to 100 inch-pounds. (6) Install gearshift lever and tighten clamp bolt. Check lever shaft for binding in the case by moving lever through all detent positions. If binding exists. loosen valve body bolts and re-align. (7) Make sure throttle shaft seal is in place, then install flat washer, lever and tighten the clamp bolt. Connect throttle and gearshift linkage and adjust as required. (8) Install oil pan, using a new gasket. Add transmission fluid to bring it up to proper level.

SERVICE OUT OF VEHICLE

TRANSMISSION AND CONVERTER REMOVAL The transmission and converter must be removed as an assembly; otherwise, the converter drive plate, pump bushing, and oil seal will be damaged. The drive plate will not support a load; therefore, none of the weight of the transmission should be allowed to rest on the plate during removal.

(1) Connect a remote control starter switch, Tool C-763 to starter solenoid and position switch so engine can be rotated from under the vehicle. (2) Disconnect high tension wire from the distributor cap. (3) Remove cover plate from in front of converter to provide access to the converter drain plug and mounting bolts. (4) Rotate engine with remote control switch to bring the drain plug to "6 o'clock" position. Drain torque converter and transmission. (5) Mark converter and drive plate to aid in reassembly. The crankshaft flange bolt circle, inner and outer circle of holes in drive plate, and four tapped holes in front face of converter all have one hole offset so these parts will be installed in original position. This maintains the balance of engine and converter. (6) Rotate engine with remote control switch to locate two converter to drive plate bolts at "5 and 7 o'clock" positions. Remove the two bolts, rotate engine with switch and remove the other two bolts. Do not rotate converter or drive plate by prying with a screw driver or similar tool as the drive plate might become distorted. Also, starter should never be engaged If drive plate is not attached to converter with at least one bolt or if transmission case to engine bolts have been loosened.


21-30 TRANSMISSIONS-TORQUEFLITE

(7) Disconnect negative (ground) cable from the battery. (8) Remove the starting motor assembly. (9) Disconnect wire from the neutral starting switch. (10) Disconnect gearshift rod from the transmission lever. Remove the gearshift torque shaft from transmission housing and left side rail. Console Shift: Remove two bolts securing gearshift torque shaft lower bracket to the extension housing. Swing bracket out of way for transmission removal. Disconnect gearshift rod from the transmission lever. (11) Disconnect throttle rod from throttle lever on the transmission. (12) Disconnect oil cooler lines at transmission and remove oil filler tube. Disconnect the speedometer cable. (13) Mark parts for reassembly then disconnect propeller shaft at rear universal joint. Carefully pull shaft assembly out of the extension housing. (14) Remove rear mount to extension housing bolts. (15) Install engine support fixture, Tool C-3487-A and raise the engine slightly (Fig. 26). (16) Some models have exhaust systems which will have to be partially removed for clearance. See Exhaust Systems, Section 11. (17) Remove crossmember attaching bolts and remove the crossmember. (18) Place a transmission service jack under transmission to support the assembly. (19) Attach a small "C" clamp to edge of bell housing to hold converter in place during removal of the transmission. (20) Remove the bell housing retaining bolts. Carefully work transmission rearward off engine block dowels and disengage converter hub from end of the crankshaft. (21) Lower transmission jack and remove transmission and converter assembly. (22) To remove converter assembly, remove "C" clamp from edge of bell housing, then carefully slide

assembly out of the transmission. STARTER RING GEAR REPLACEMENT

The starter ring gear is mounted directly on outer diameter of the torque converter front cover. With torque converter removed from vehicle, replacement of the gear is as follows: Removal (1) Cut through weld material at rear side of ring gear with a hack saw or grinding wheel (Fig. 27). Be careful not to cut or grind into front cover stamping. (2) Scribe a heavy line on front cover next to front face of ring gear to aid in locating the new gear. (3) Support converter with the four lug faces resting on block of wood. The converter must not rest on the front cover hub during this operation. Using a blunt chisel or drift and hammer, tap downward on ring gear near welded areas to break any remaining weld material (Fig. 27). Tap around ring gear until it comes off the converter. (4) Smooth off weld areas on the cover with a file. Installation Any of the following methods may be used to heat and expand starter ring gear for installation on the converter: Oven: Place ring gear in Oven and set temperature at 200 degrees F. Allow ring gear to remain in oven for 15 to 20 minutes. Roiling Water: Place ring gear in a shallow container, add water, and heat for approximately eight minutes after water has come to a boil. Steam: Place ring gear on a fiat surface and direct a steam flow around gear for approximately two minutes. Flame: Place ring gear squarely on a flat surface.

WOOD

BLOCKS TRANSMISSION JACK ND91C Fig. 26—Engine Lifting Fixture

WELDS 14)

NY 1607 Fig. 27—Removing Stoner Ring

Gear


TORQUEFLITE — TRANSMISSIONS 21-31

Using a medium size tip, direct a slow flame evenly around inner rim of the gear. Do not apply flame to the gear teeth. Place a few drops of water on face of gear at intervals during heating process. When gear is hot enough to just boil the water, installation of gear on the torque converter can be made. (1) After ring gear is expanded by heating, place the gear in position on converter front cover. Tap gear on the cover evenly with a plastic or rawhide mallet until face of gear is even with scribed line (made during removal) on the front cover. Make sure gear is even with scribed line around full circumference of the front cover. (2) Reweld ring gear to torque converter front cover, being careful to place, as nearly as possible, same amount of weld material in exactly same location as was used in original weld. This is necessary in order to maintain proper balance of the unit. Place welds alternately on opposite sides of converter to minimize distortion. (3) The following suggestions are offered as an aid in making the weld: a. Do not gas weld.

b. Use a D.C. welder that is set at straight polarity or an A.C. welder if the proper electrode is available. c. Use a 1/8 inch diameter welding rod, and a welding current of 80 to 125 amps. d. Direct the arc at intersection of the gear and front cover from an angle of 45 degrees from rear face of the gear. (4) Inspect gear teeth and remove all nicks where metal is raised, weld metal splatter. etc., in order to ensure quiet starter operation. TORQUE CONVERTER FLUSHING

When a transmission failure has contaminated the fluid, the torque converter should be flushed to insure that metal particles or sludged oil are not later transferred back into the reconditioned transmission.

This tool adapts a drill motor to an input shaft to spin the turbine and includes a drawing for a simple wooden fixture to hold the converter. This fixture will hold the converter upright for the spinning and dniining operations. (4) Repeat flushing operation at least once, or as many times as required until solvent or kerosene drained out is clear. (5) After flushing, shake and rotate converter several times with drain plug out to remove any residual solvent and dirt. Flush any remaining solvent from converter with two quarts of new transmission fluid.

This will prevent any adverse effect the solvent may have on the transmission seals. Reinstall drain plug and tighten to 110 inch-pounds. (6) Flush and blow out the oil cooler and its lines. MACHINE FLUSHING

Machine cleaning is recommended; using the type which rotates the converter while pumping cleaning fluid through it. The machine automatically adds timed blasts of compressed air to the cleaning fluid as it enters the converter, providing more thorough cleaning than the hand flushing operation. PUMP OIL SEAL Replacement

The pump oil seal can be replaced without removing pump and reaction shaft support assembly from the transmission case. The vent shield shown in (Figs. 28 and 29) is not used or required on the A-904 pumps. (1) A-904: Screw seal remover Tool C-3981 into

seal (Fig. 28), then tighten screw portion of tool to withdraw the seal. A-727: Using Tool C-3861, remove seal in the same planner.

HAND FLUSHING

(1) Place converter in horizontal position and pour two quarts of new clean solvent or kerosene into converter through the impeller hub. (2) Turn and shake converter so as to swirl solvent through the internal parts. Turn the turbine and stator with transmission input and reaction shafts to dislodge foreign material.

(3) Position converter in its normal operating position with drain plug at the lowest point. Remove drain plug and drain solvent. Rotate turbine and stator, and shake converter while draining to prevent dirt particles from settling. Tool C-3963-A is available to do this job faster and more effectively.

NDlEjA Fig. 28—Removing Pump Oil Seal


21-32 TRANSMISSIONS—TORGUEFLITE (2) A-904: To install a new seal, place seal in opening of the pump housing (lip side facing inward). Using Tool C-3757, drive seal into housing until tool bottoms (Fig. 29). A-727: Using Tool C-3860, install new seal in the same manner.

TRANSMISSION VENT SHIELD

DISASSEMBLY—SUB-ASSEMBLY REMOVAL Prior to removing any transmission sub-assemblies, plug all openings and thoroughly clean exterior of the unit, preferably by steam. Cleanliness through entire disassembly and assembly cannot be over-emphasized. When disassembling, each part should be washed in a suitable solvent, then dried by compressed air. Do not wipe parts with shop towels. All mating surfaces in the transmission are accurately machined; therefore, careful handling of parts must be exercised to avoid nicks or burrs. Drive Train End Play Measuring drive train end play before disassembly will usually indicate when a thrust washer change is required, (except when major parts are replaced). The thrust washer is located between reaction shaft support and front clutch retainer on A-727 transmissions. The thrust washer is located between input and output shafts on A-904 transmissions.

(1) Attach a dial indicator to transmission bell housing with its plunger seated against end of input shaft (Fig. 30). Move input shaft in and out to obtain end play reading. End play specifications are: .030 to .089 inch for A-904 transmissions, and .037 to .084 inch for A-727 transmissions. (2) Record indicator reading for reference when reassembling the transmission.

DIAL INDICATOR IT009 •

ND20. ALII

Fig. 30—Measuring Drive Train End Play

For 8 cyl. engines use adapter C-388g, with repair stand to support these transmissions (Fig. 31). If repair stand DD-1014 is available, fabricate two attaching brackets (Fig. 32) and install transmission in the stand (Fig. 33), file out the 7/16 inch holes if necessary to obtain bracket alignment. This stand provides easier disassembly and assembly as the transmission can be rotated as desired. (2) Unscrew oil pan bolts and remove oil pan and

gasket. Valve Body Assembly (1) Loosen clamp bolts and remove throttle and gearshift levers from the transmission. (2) Remove Back-Up Light and Neutral Start Switch.

Oil Pan (1) Place transmission assembly in repair stand, Tool C-3750-A, for 6 cyl. engines. . fiev VENT SHI t

.4

e • TOQL

TOOL (REPAIR STAND) N0174

:Let. Fig. 29—Installing Pump Oil Seal

Fig. 31—Transmission Installed in Repair Stand


TORQUEFLITE—TRANSMISSIONS 21-33

i

518" RIGHT SIDE BRACKET

2-3/4"

DRILL 7/16" HOLES (5 PLACES)

5 -5/W'

LEFT SIDE BRACKET

2- 1/4" MATERIAL-STEEL 3/16" THICK 1.1/2" WIDE

9: 11!8"14— -015/-

Fyn.; sC 5-1/21

NK 162

Fig. 32—Repair Stand Bracket Dimensions (3) Remove the ten hex-head valve body to transmission bolts. Remove Feclip securing parking lock rod to the valve body manual lever (Fig. 24). (4) While lifting valve body upward out of transmission case, disconnect parking lock rod from the lever. Accumulator Piston and Spring (1) Lift spring off accumulator piston and withdraw piston from the case. Extension Housing Before removing extension housing, pull parking lock rod forward out of the case. Rotate output shaft if necessary to align parking gear and sprag to permit knob on end of control rod to pass the sprag. (1) Remove speedometer pinion and adapter assembly.

Fig. 33—Transmission Installed in Repair Stand

(2) Remove extension housing to transmission bolts. (3) Remove two screws, plate and gasket from bottom of extension housing mounting pad. Spread large snap ring from output shaft bearing with Tool C3301A (Fig. 19). With snap ring spread as far as possible, carefully tap extension housing off the output shaft and bearing. (4) Using heavy duty snap ring pliers C-4020, remove output shaft bearing rear snap ring. Remove bearing from shaft, then remove front snap ring. Governor and Support (1) Carefully pry snap ring from weight end of governor valve shaft (Fig. 21). Slide valve and shaft assembly out of the governor body. (2) Remove snap ring from behind governor body, then slide governor body and support assembly off the output shaft. Oil Pump and Reaction Shaft Support UP Tighten front band adjusting screw until band is tight on front clutch retainer. This prevents clutch retainer from coming out with pump which might cause unnecessary damage to the clutches. (2) Remove oil pump housing retaining bolts. (3) Attach Tool C-3752 to pump housing flange, (Fig. 34), in threaded holes in the flange. (4) Bump outward evenly on the two "knocker weights" to withdraw pump and reaction shaft support assembly from the case. Front Band and Front Clutch (1) Loosen front band adjuster, remove band strut and slide band out of the case TRANSMISSION VENT

Fig. 34—Removing Pump and Reaction Shaft Support Assembly


21-34 TRANSMISSIONS—TORQUEFLITE (2) Slide front clutch assembly out of the ease. Input Shaft and Rear Clutch

(1) Grasp input shaft, and slide input shaft and rear clutch assembly out of the case CAUTION: Be careful not to lose thrust washer located between rear end of input shaft and forward end of the output shaft.

Planetary Gear Assemblies, Sun Gear and Driving Shell

(1) While supporting output shaft and driving shell, carefully slide assembly forward and out through the case. CAUTION: Be very careful not to damage ground surfaces on output shaft during removal.

Rear Band and Low-Reverse Drum

(1) Remove low-reverse drum, then loosen rear band adjuster, remove band strut and link, then remove band front the case. (A-904-LA Double Wrap Band): loosen band adjusting screw then remove hand and low-reverse drum. Overrunning Clutch

(1) Note position of overrunning clutch rollers and spring before disassembly to assist in reassembly. (2) Carefully slide out clutch huh and remove rollers and springs. If the overrunning clutch Cam and/or roller spring retainer are found damaged or worn, refer to INDEX for replacement procedures.

Kickdown Servo

(1) Compress kickdown servo spring by using engine valve spring compressor. Tool C-3422. then remove snap ring (Fig. 35). (2) Remove rod guide, springs and piston rod from the case. Be careful not to damage piston rod or guide during removal. (3) Withdraw piston from the transmission ease. Low and Reverse Servo

(1) Compress low and reverse servo piston spring by using engine valve spring compressor, Tool C-3422, then remove the snap ring. (2) Remove spring retainer, spring, and servo piston and plug assembly from the case. RECONDITION SUB-ASSEMBLIES The following procedures cover disassembly, inspection, repair, and assembly of each sub-assembly as removed from the transmission. Heli-Coil inserts are recommended for repairing damaged, stripped or worn threads in aluminum parts. Pre-sized service bushings are available for re-

Fig. 35 — Compressing Kickdown Servo Spring

placement for most all bushings in the TorqueFlite transmission. The two bushings in sun gear are not serviced because of the low cost of sun gear assembly. If bushings are found worn or scored, they should be replaced as outlined in the following reconditioning procedures. The bushing replacement tools listed by "SP" numbers are part of Tool Kit C-3887-A.

The use of crocus cloth is permissible where necessary, providing it is used carefully. When used on valves, use extreme care to avoid rounding off the sharp edges. The sharp edge is vitally important to this type of valve. Sharp edges prevent dirt and foreign matter from getting between the valve and body, thus reducing possibility of sticking. When it becomes necessary to recondition transmission, and vehicle has accumulated considerable mileage, install new seal rings on parts requiring their usage. Coat each part with Automatic Transmission Fluid AOATF Suffix "A" or (Dexron) during assembly.

VALVE BODY ASSEMBLY CAUTION: Never clamp any portion of valve body or transfer plate in a vise. Any slight distortion of the aluminum body or transfer plate will result in sticking valves, excessive leakage or both. When removing or installing valves or plugs, slide them in or out carefully. Do not use force.

Rework valve body repair stand, Tool C-3749 by drilling the 5/16 inch diameter hole to 7/8, and 3/4 inch deep (Fig. 36). The stand can then be used with either the old or new type valve bodies.


TORQUEFL1TE—TRANSMISSIONS 21-35

FLulD Tr..TER

SPRING RETAINER SCREWS (31

- w.z Sc..P

REGULATOR VALVE SPRING T.C. CONTROL VALVE SPRING

Nt479 Fig. 36—Rework Valve Body Repair Stand

Disassembly (1) Place valve body a.s.sPmbly on repair stand, Tool C-3749. (Fig. 37). Remove three screws from fluid filter and lift off the filter. (2) While holding spring retainer firmly against the spring force, remove the three bracket retaining screws (Fig. 37). (3) Remove spring retainer, torque converter control valve spring, and regulator valve spring with line pressure adjusting screw assembly. Do not alter setting of line pressure adjusting screw and nut. The nut has an interference thread and does not turn easily on the screw.

(4) Slide regulator valve out of valve body. Slide torque converter control valve out of valve body. (5) Remove the transfer plate retaining screws. Carefully lift transfer plate and steel separator plate assembly off the valve body. (6) Invert transfer plate assembly and remove the stiffener plate. Remove remaining screws securing TRANSFER PLATE

THROTTLE LEVER AND SHAFT THROTTLE LEVER STOP SCREW

REPAIR STAND

ea- UNE PRESSURE ADJUSTMENT MANUAL LEVER ASSY. NNSOA

Fig. 37—Valve Body and Control Assembly

separator plate to transfer plate, and carefully lift off separator plate (Fig. 38). (7) Remove and note location of 7 steel balls and 1 spring in valve body (Fig. 39). CAUTION: Do Not mix up the two larger balls. The 3:8 inch diameter ball goes on the spring in the corner and is the high pressure relief valve_ The 5/16 diameter ball in the large chamber is the front clutch ball check. 18) Invert valve body and lay it on a clean cloth or paper. Remove E-clip and washer from throttle lever shaft (Fig. 40). Remove any burrs from shaft, then while holding manual lever detent ball and spring in their bore with Tool C-3765 or similar tool, slide manual lever off the throttle shaft. Remove the detent ball and spring. (9) Remove manual valve, carefully slide it out of valve body with a rotating motion. STITTFENER PLATE

SEPARATOR PLATE I NNERIti laitr ieliZ,

NU461A Fig. 38—Transfer and Separator Plate


21-36 TRANSMISSIONS—TORQUEFLITE THROTTLE LEVER SHAFT WASHER AND SEAL .4.).„----E.CLIP

5;16' DIA. BALL ;5) SMALLER STEEL BALLS

DETENT BALL

MANUAL LEVER ASSY.

molia

e

or n PE rt

C was s

int

THROTTLE LEVER STOP SCREW

As No a "IS

E-CLIP MANUAL VALVE

3/8n DR. BALL AND SPRING HIGH PRESSURE REUEF VALVE

SHUTTLE VALVE

cOVER PLATE

,

N U367

NN82A

Fig. 39—Stni Ball Location

Fig. 40—Volvo Body Controls (Assembled View)

(10) Remove throttle lever and shaft from the valve body. (11) Remove shuttle valve cover plate (Fig. 40). Remove E-elip from exposed end of the shuttle valve. (12) Remove throttle lever stop screw assembly (Fig. 41), be careful not to disturb setting any more than is necessary. (13) Remove kickdown detent, kickdown valve, throttle valve spring and throttle valve (Fig. 41). (14) Remove governor plug end plate (Fig. 41). Tip

up valve body to allow shuttle valve throttle plug, spring, shuttle valve, and shift valve governor plugs to slide out into your hand. Note longer stem on 1-2 shift valve plug as a means for identification. (15) Remove shift valve end plate (Fig. 42) and slide out the two springs and valves. Six Cylinder Vehicles: Remove downshift plug cover and plug, then slide out the two springs and valves. (18) Remove regulator valve end plate. Slide regu-

SHUTTLE VALVE E-CLIP

TORQUE CONVERTER CONTROL VALVE

diy

THROTTLE VALVE REGULATOR VALVE

SPRING RETAINER

LINE PRESSURE ADJUSTING SCREW ASSY.

2-3 SHIFT VALVE GOVERNOR PLUG

KICKDOWN DETENT

SHUTTLE VALVE

THROTTLE LEVER STOP SCREW ASSY.

SHUTTLE VALVE THROTTLE PLUG GOVERNOR PLUG END PLATE Fig. 41 —Valve Body — Lover

Side —Disassembled

NN83


TORQUEFLITE—TRANSMISSIONS lator valve line pressure plug, sleeve, and regulator valve throttle pressure plug out of valve body. Cleaning and Inspection

Allow all parts to soak a few minutes in a suitable dean olvent. Wash thoroughly and blow dry with compressed air. Make sure all passages are clean and free from obstructions. Inspect manual and throttle valve operating levers and shafts for being bent, worn or loose. If a lever is loose on its shaft, it may be silver soldered only, or lever and shaft assembly should be replaced. Do not attempt to straighten bent levers. Inspect all mating surfaces for burrs, nicks and scratches. Minor blemishes may be removed with crocus cloth, using only a very light pressure. Using a straight edge, inspect all mating surfaces for warpage or distortion. Slight distortion may be corrected, using a surface plate. Make sure all metering holes in steel plate are open. Using a pen light, inspect bores in valve body for scores, scratches, pits and irregularities. Inspect all valve springs for distortion and collapsed coils. Inspect all valves and plugs for burrs, nicks and scores. Small nicks and scores may be removed with crocus cloth, providing extreme care is taken not to round off sharp edges. The sharpness of these edges is vitally important because it prevents foreign matter from lodging between valve and valve body, thus reducing possibility of sticking. Inspect all valves and plugs for freedom of operation in valve body bores. When bores, valves and plugs are clean and dry, the valves and plugs should fall freely in the bores. The valve body bores do not change dimensionally with use. Therefore, a valve body that was functioning properly when vehicle was new, will operate correctly if it is properly and thoroughly cleaned. There is no need to replace valve body unless if is damaged in handling.

REGULATOR VALVE END PLATE

SLEEVE

21 -37

REGULATOR VALVE THROTTLE PRESSURE PLUG

1°1 DOWNSHIFT REGULATOR VALVE UNE PLUG COVER 3.2 PRESSURE PDX., DOWNSHIFT 1-2 SHIFT VALVE 46 PLUG

CillbtN4Ctflu

NIU

nt 2.3 SHIFT VALVEt

SHIFT VALVE END PLATE 4arr NP146 8-CYL. ONLY

6-r.YL. ONLY

Fig. 42—Valve Body—Shift Valve Side—Disassembled Six Cylinder Vehicles: Install the 3-2 downshift plug and cover, tighten the three screws to 28 inch-pounds. (5) Install regulator valve throttle pressure plug, sleeve, and line pressure plug (Fig. 42). Install regulator valve end plate and tighten the two retaining screws to 28 inch-pounds. (6) Install throttle valve and spring (Fig. 41). Slide kickdown detent on the kickdown valve (counterbore side of detent toward valve), then install assembly in the valve body. (7) install throttle lever stop screw (Fig. 41), and tighten lock nut finger tight. (8) Install manual valve in valve body (Fig. 41). (9) Install throttle lever and shaft on valve body (Fig. 43). Insert detent spring and ball in its bore in valve body. Depress ball and spring with Tool C-3705 or similar tool and slide manual lever over throttle shaft so that it engages manual valve and detent ball. Install seal, retaining washer and Rclip on throttle shaft. (10) Position valve body assembly on the repair stand. WASHER AND SEAL

Assembly

(1) Place separator plate on the transfer plate (Fig. 38). Install stiffener plate and retaining screws exactly as shown. Make sure all bolt holes are aligned, then tighten stiffener plate screws to 28 inch-pounds. (2) Place 1-2 and 2-3 shift valve governor plugs in their respective bores (Fig. 41). Install shuttle valve, spring and shuttle valve throttle plug. Install governor plug end plate and tighten the five retaining screws to 28 inch-pounds. (3) Install E-clip on end of shuttle valve (Fig. 41). Install shuttle valve cover plate and tighten the four retaining screws to 28 inch-pounds. (4) Install 1-2 and 2-3 shift valves and springs (Fig. 42). Install shift valve end plate and tighten the three retaining screws to 28 inch-pounds.

TOOL THROTTLE LEVER SHAFT

DETENT BALI AND SPRING

E-CLIP

A-4

‘,4

MANUAL _EVER ASSY Fig. 43—Installing Detent Ban, Spring and Control Levers

NNSDA


21-38 TRANSMISSIONS—TORQUEFLITE (11) Place six steel balls in valve body chambers with large ball in the large chamber (Fig. 39). Install spring and high pressure relief valve ball (3/8" Dia.). (12) Position transfer plate assembly on valve body. Install 14 retaining screws, starting at center and working outward, tighten screws to 35 inch-pounds. (13) Install torque converter valve and regulator valve (Fig. 41). (14) Position torque converter valve spring and regulator valve spring over ends of their respective valves. Place line pressure adjusting screw assembly on end of regulator valve spring with long dimension of nut at right angles to valve body (Fig. 37). (15) Install spring retainer, making sure converter valve spring is engaged on the tang and position squarely in retainer. Tighten the three retaining screws to 28 inch-pounds (Fig. 37). Measure and if necessary, align spring retainer as shown in Fig. 10.

(16) Install oil filter and tighten the three retaining screws to 35 inch-pounds. After valve body has been serviced and completely assembled, adjust throttle and line pressures (Fig. 11 and 12). However, if pressures were satisfactory prior to disassembly, use original settings.

ACCUMULATOR PISTON AND SPRING Inspection Inspect seal rings for wear and make sure they turn freely in piston grooves. It is not necessary to remove rings unless conditions warrant. Inspect piston for nicks, burrs, scores and wear. Inspect piston bore in the case for scores or other damage. Inspect piston spring for distortion. Replace parts as required.

EXTENSION HOUSING BUSHING AND OIL SEAL Replacement (1) Remove the extension housing yoke seal (Fig. 17) with Tool C-3994 or C-3985. (2) A-904: Press or drive out bushing with Tool C-3996 (Fig. 44). A-727: Remove bushing in the same manner with Tool C-3974. (3) A-904: Slide a new bushing on installing end of Tool C-3996. Align oil hole in bushing with oil slot in the housing, then press or drive bushing into place (Fig. 44). A-727: Using Tool C-3974, install a new bushing in same manner. (4) A-904: Drive a new oil seal into housing with Tool C-3995 (Fig. 18). A-727: Using Tool C-3972, install a new oil seal in same manner.

TOOL INSTALLING BUSHING

BUSHING TOOL 4/

INSTALLING END

REMOVING END NU43

Fig. 44—Replacing Extension Housing Bushing

PARKING LOCK SPRAG Disassembly (1) Slide shaft out of extension housing to remove parking sprag and spring (Fig. 23). Remove snap ring and slide reaction plug and pin assembly out of the housing. Inspection Inspect sprag shaft for scores and free movement in the housing and sprag. Inspect sprag and control rod springs for distortion and tension. Inspect square lug on sprag for broken edges, also lugs on parking gear for damage. Inspect knob on end of control rod for nicks, burrs and free turning. To replace parking gear, refer to "Governor and Support—Disassembly and Assembly." Assembly (1) Install reaction plug and pin assembly in the housing and secure with snap ring (Fig. 23). (2) Position sprag and spring in housing and insert the shaft. Make sure square lug on sprag is toward parking gear, and spring is positioned so it moves sprag away from the gear.

GOVERNOR AND SUPPORT Disassembly (1) Remove large snap ring from weight end of governor body, lift out weight assembly. (2) Remove snap ring from inside governor weight, remove inner weight and spring from outer weight. (3) If lugs on support gear are damaged, remove four bolts and separate support from governor body. Cleaning and Inspection Figure 22 shows a disassembled view of the governor assembly. Inspect all parts for burrs and wear. Inspect inner weight for free movement in outer weight, and outer weight for free movement in governor body. Inspect valve for free movement in governor body. The weights and valve should fall freely in the bores when clean and dry. Rough surfaces may be removed with crocus cloth.


TORQUEFLITE—TRANSMISSIONS 21-39

REACTION SHAH' SUPPORT

INNER ROTOR

GASKET BOLT AND WASHER (6)

SEAL RINGS

OUTER ROTOR

"0" RING

OIL PUMP BODY

NR172A

Fig. 45—Oil Pump and Reaction Shaft Support Disassembled (A-904)

Inspect governor weight spring for distortion. Inspect lugs on support gear for broken edges or other damage. Thoroughly clean all governor parts in clean solvent and test for free movement before assembly. Assembly

(1) If support was separated from governor body, assemble and tighten bolts finger tight. (2) Assemble governor weights and spring, and secure with snap ring inside of large governor weight. Place weight assembly in governor body and install snap ring. OIL PUMP AND REACTION SHAFT SUPPORT— A-904 Disassembly

Figure 45 shows the oil pump and reaction shaft support disassembled. (1) Remove bolts front rear side of reaction shaft support and lift support off the pump. (2) Remove rubber seal ring from pump body flange. (3) Drive out oil seal with a blunt punch.

nee between straight edge and face of rotors. Clearance limits are from .0015 to .003 inch. Also, measure rotor tip clearance between inner and outer rotor teeth. Clearance limits are from .005 to .010 inch. Clearance between outer rotor and its bore in oil pump body should be .004 to .008 inch. Pump Bushing Replacement (A-904) (1) Place pump housing (seal face down) on a smooth firm surface. (2) Place removing head, Tool SP4551 in bushing and install handle, Tool SP-3549 in the removing head (Fig. 46). (3) Drive bushing straight down and out of pump housing bore. Re careful not to cock tool in the bore. (4) Position new bushing on installing head, Tool SP-5117. TOOL HANDLE SP-3549

REMOVAL REMOVING HEAD SP-3551

FRONT PUMP HOUSING BUSHING

Inspection

Inspect interlocking seal rings (Fig. 45) on reaction shaft support for wear or broken locks, make sure they turn freely in the grooves. Do not remove rings unless conditions warrant. Inspect front clutch piston retainer to reaction shaft support thrust washer for wear. Washer thickness should be .043 to .045 inch, replace if necessary. Inspect machined surfaces on pump body and reaction shaft support for nicks and burrs. Inspect pump body and reaction shaft support bushings for wear or scores. Inspect pump rotors for scoring or pitting. With rotors cleaned and installed in pump body, place a straight edge across face of rotors and pump body. Use a feeler gauge to measure clear-

TOOL HANDLE SP-3549 INSTALLING HEAD SP-5117 INSTALLATION

BUSHING ND343C Fig. 46—Replacing Pump Bushing (A-904)


21-40 TRANSMISSIONS-TORQUEFLITE (5) With pump housing on a smooth clean surface, start bushing and installing head in the bushing bore. Install handle, Tool SP-3549 in the installing head (Fig. 46). (6) Drive bushing into housing until tool bottoms in the pump cavity. Be careful not to cock tool during installation. (7) Stake bushing in place by using a blunt punch or similar tool (Fig. 47). A gentle tap at each stake slot location will suffice. (8) Using a narrow-bladed knife or similar tool, remove high points or burrs around staked area (Fig. 47). Do not use a file or similar tool that will remove more metal than is necessary. Reaction Shaft Bushing Replacement (A-904)

In case of a reaction shaft bushing failure, always inspect the support for wear from the input shaft seal ring lands. If worn or grooved, replace support assembly. (1) Assemble remover Tool SP-5324, cup Tool SF 3633, and hex nut Tool SP-1191 (Fig. 48). CAUTION: Do not clamp any part of reaction shaft or support in a vise. (2) With cup held firmly against reaction shaft, thread remover into bushing as far as possible by hand. (3) Using a wrench, screw remover into bushing 3 to 4 additional turns to firmly engage threads in the bushing. (4) Turn hex nut down against cup to pull bushing from reaction shaft. Thoroughly clean reaction shaft to remove chips made by remover threads. (5) Lightly grip bushing in a vise or with pliers and back tool out of the bushing. Be careful not to damage threads on bushing remover. (6) Slide a new bushing on installing head Tool SP-5325, and start them in the bore of reaction shaft (Fig. 48). (7) Support reaction shaft upright on a clean smooth surface and install handle Tool SP-3549 in frak . r

%Or

HEX NUT SP-4191

TOOL HANDLE SP 3549 CUP SP-3633

REMOVER SP-5324 BUSHING

INSTALLING HEAD SP-5325

REACTION SHAFT SUPPORT REMOVAL

REACTION SHAFT

INSTALLATION ND345A

Fig. 48—Replacing Reaction Shaft Bushing (A-904)

installing head. Drive bushing into the shaft until tool bottoms. (8) Thoroughly clean reaction shaft support assembly before installation. Assembly

(1) Place reaction shaft support in assembling Tool C-3759, with hub of support and tool resting on a smooth flat surface bench (Fig. 49). Screw two pilot studs, Tool C-3283 into threaded holes of reaction shaft support flange. (2) Assemble and place rotors in center of the support (Fig. 49). (3) Lower pump body over the pilot studs, insert Tool C-3756 through pump body and engage pump inner rotor. Rotate the rotors with tool to enter rotors in pump body, then with pump body firm against reaction shaft support, tighten clamping tool securely. (4) Invert pump and reaction shaft support assembly with clamping tool intact. Install support to pump body bolts and tighten to 160 inch-pounds. Remove clamping tool, pilot studs and rotor alignment tool. ALIGNING TOOL

NARROW BLADE

PUMP BODY

PILOT STUDS(2/

ASSEMBUNG TOOL REACTION SHAFT SUPPORT PUMP ROTORS _)344A Fig. 47—Staking Pump Bushing (A -904)

NY387

Fig. 49 — Assembling Pump and Reaction Shaft Support (A -904)


TORQUEFLITE—TRANSMISSIONS 21-41 (5) Place a new oil seal in opening of pump housing (lip of seal facing inward). Using Tool C-3757, drive seal into housing until tool bottoms.

OIL PUMP AND REACTION SHAFT SUPPORT— A-727 Disassembly Figure 50 shows the oil pump and reaction shaft support disassembled. (1) Remove bolts from rear side of reaction shaft support, and remove vent baffle and lift support off the pump. (2) Remove rubber seal ring from pump body flange. (3) Drive out oil seal with a blunt punch. inspection Inspect interlocking seal rings (rig. 50) on reaction shaft support for wear or broken locks, make sure they turn freely in the grooves. Do not remove rings unless conditions warrant. Inspect machined surfaces on pump body and reaction shaft support for nicks and burrs. Inspect pump body and reaction shaft support bushings for wear or scores. Inspect pump rotors for scoring or pitting. With rotors cleaned and installed in pump body, place a straight edge across face of rotors and pump body. Use a feeler gauge to measure clearance between straight edge and face of rotors. Clearance limits are from .0015 to .003 inch. Also, measure rotor tip clearance between inner and outer teeth. Clearance limits are from .005 to .010

inch. Clearance between outer rotor and its bore in oil pump body should be .004 to .008 inch. Pump Bushing Replacement (A - 727) (1) Place pump housing on a clean smooth surface with rotor cavity down. (2) Place removing head Tool SP-3550 in the bushing, and install handle Tool SP-3549 in the removing head (Fig. 51). (3) Drive bushing straight down and out of the bore. Be careful not to cock tool in the bore. (4) Position a new bushing on installing head Tool SP-5118. (5) With pump housing on a smooth clean surface (hub end down), start bushing and installing head in the bushing bore. Install handle Tool SP-3549 in installing head (Fig. 51). (6) Drive bushing into housing until tool bottoms in the pump cavity. Be careful not to cock tool during installation. (7) Stake the bushing in place by using a blunt punch or similar tool (Fig. 52). A gentle tap at each stake slot location will suffice. (8) Using a narrow-Waded knife or similar tool, remove high points or burrs around staked area (Fig. 52). Do not use a file or similar tool that will remove more metal than is necessary. (9) Thoroughly clean pump housing before installation. Reaction Shaft Bushing Replacement (A-727) (1) Assemble remover 'Fool SP-5301, cup Tool SPGASKET

OIL VENT BAFFLE --

SEAL RINGS REACTION SHAFT SUPPORT-

-0" RING INNER ROTOR OUTER ROTOR OIL PUMP BODY

THRUST WASHER (SELECTIVE) v

ND22A

BOLTS (61/

Fig. 50 —Oil Pump and Reaction Shaft Support (A-727)


21-42 TRANSMISSIONS—TORQUEFLITE

TOOL HANDLE SP-3549

HEX NUT SP-1191

REMOVAL

TOOL HANDLE SP 3549

REMOVING HEAD SP-3550

'1 i INSTALLING INS TALLING 1i

FRONT PUMP HOUSING

HEAD SP-5302

CUP SP-3633 BUSHING REMOVER S 5301 BUSHING

A aLlr

TOOL HANDLE SP-3549

INSTALLING HEAD SP-5118 REACTION SHAFT SUPPORT

INSTALLATION REMOVAL

I

REACTION SHAFT

INSTALLATION

NP885

Fig. 53—Replacing Reaction Shaft Bushing (A-727) ND347B

Fig. 5I-Replacing Pump Bushing

(A-222)

3633, and hex nut Tool SP-1191 (Fig. 53). CAUTION: Do not clamp any part of reaction shaft or support in a vise.

(2) With cup held firmly against reaction shaft, thread remover into bushing as far as possible by hand. (3) Use a wrench to screw remover into bushing 3 to 4 additional turns to firmly engage threads in the bushing. (4) Turn hex nut down against the cup to pull bushing from reaction shaft. Thoroughly clean reaction shaft to remove chips made by removing threads. (5) Lightly grip bushing in a vise or with pliers and back tool out of the bushing. Be careful not to damage threads on bushing remover. (6) Slide a new bushing (chamfered end first) on installing head Tool SP-5302. and start them in the NARROW BLADE

ND348A Fig. 52-Staking Pump Bushing (A-727)

bore of reaction shaft (Fig. 53). (7) Support reaction shaft upright on a clean smooth surface and install handle Tool SP-3549 in installing head. Drive bushing into shaft until tool bottoms. (8) Thoroughly clean reaction shaft support assembly before installation. Assembly

(1) Assemble pump rotors in the pump housing (Fig. 50). (2) Install reaction shaft support and position vent baffle over vent opening. Install retaining bolts and tighten to 160 inch-pounds. (3) Place a new oil seal in opening of pump housing (lip of seal facing inward) using Tool C-3860 drive seal into housing until tool bottoms. FRONT CLUTCH—A-904 Disassembly

Figure 54 shows a disassembled view of the front clutch assembly. (1) Remove large selective snap ring that secures pressure plate in the clutch piston retainer. Lift pressure plate and clutch plates out of the retainer. (2) Install compressor, Tool C-3575 over piston spring retainer (Fig. 55). Compress spring and remove snap ring, then slowly release tool until spring retainer is free of the hub. Remove tool, retainer and spring. (3) Invert clutch retainer assembly and bump it on a wood block to remove the piston. Remove seal rings from the piston and clutch retainer hub. Inspection

Inspect facing material on all driving discs. Replace discs that are charred, glazed or heavily pitted. Discs


TORQUEFLITE—TRANSMISSIONS 21-43

PISTON SEAL RING (INNER DRIVING DISCS SPRING SNAP RING

PISTON RETAINER ASSEMBLY

PRESSURE PLATE \ SNAP RING I (SELECTIVE)

PISTON PISTON SEAL RING iOUIER)

SPRING RETAINER

CLUTCH PLATES

NY 173 A

Fig. 54—Front Clutch Disassembled A-904)

should also be replaced if they show evidence of material flaking off or if facing material can be scraped off easily. Inspect driving disc splines for wear or other damage. Inspect steel plate and pressure plate surfaces for burning, scoring or damaged driving lugs. Replace if necessary. Inspect steel plate lug grooves in clutch retainer for smooth surfaces, plates must travel freely in grooves. Inspect band contacting surface on clutch retainer for scores, the contact surface should be protected from damage during disassembly and handling. Note ball check in clutch retainer, make sure ball moves freely. Inspect piston seal ring surfaces in clutch retainer for nicks or deep scratches, light scratches will not interfere with sealing of neoprene rings. Inspect clutch retainer inner bore surface for wear from reaction shaft support seal rings. Inspect clutch retainer bushing for wear or scores. Inspect inside bore of piston for score marks, if light, remove with crocus cloth. Inspect seal ring grooves for nicks and burrs. Inspect neoprene seal rings for deterioration, wear, and hardness. Inspect piston spring, retainer and snap ring for distortion.

Drive bushing into clutch retainer until tool bottoms. (5) Thoroughly clean clutch retainer before assembly and installation. Assembly

(1) Lubricate and install inner seal ring on hub of clutch retainer. Make sure lip of seal faces down and is properly seated in the groove (Fig. 54). (2) Lubricate and install outer seal ring on clutch piston, with lip of seal toward bottom of clutch retainer. Place piston assembly in retainer and, with a twisting motion, seat piston in bottom of retainer. (3) Place spring on piston hub and position spring retainer and snap ring on the spring. Compress spring with Tool C-3575 (Fig. 55), and seat snap ring in hub groove. Remove compressor tooL (4) Lubricate all clutch plates, install one steel plate followed by a lined plate until all plates are installed. Install pressure plate and selective snap

TOOL

Front Clutch Retainer Bushing Replacement (A-904)

(1) Lay clutch retainer (open end down) on a clean smooth surface and place removing head Tool SP3627 in the bushing (Fig. 56). Install handle Tool SFin removing head. (2) Drive bushing straight down and out of clutch retainer bore. Be careful not to cock tool in the bore. (3) Lay clutch retainer (open end up) on a clean smooth surface. Slide a new bushing on installing head Tool SP-3626, and start them in clutch retainer bore (Fig. 56). (4) Install handle Tool SP-3549 in installing head.

SPRING RETAINER NY 364

SNAP RING

Fig. 55—Removing or Installing Front Clutch Retainer Snap Ring (4-904)


21-44 TRANSMISSIONS—TORQUEFLITE TOOL HANDLE SP-3549

INSTALLING HEAD SP-3626

REMOVING HEAD SP-3627

FRONT CLUTCH RETAINER

, FEELER GAUGE

TOOL HANDLE SP-3549

FRONT CLUTCH RETAINER

nemovat

BUSHING

INSTALLATION ND346B

Fig. 56-Replacing Front Clutch Retainer Bushing (A-904)

ring. Make sure snap ring is properly seated. The A-904 transmission uses three plates and discs in front clutch for both six cylinder engines. Four plates and discs are used in A-904 transmissions for eight cylinder engines.

(5) With front clutch completely assembled, insert a feeler gauge between pressure plate and snap ring (Fig. 57). The clearance should be .056 to .104 inch for the four plate clutch, and .042 to .087 inch for the three plate clutch. If not, install a snap ring of proper thickness to obtain specified clearance. Snap rings are the same as those used in rear clutch and are available in .060-.062; .068-.070 and .076-.078 inch thickness.

FRONT CLUTCH—A-727

Disassembly Figure 58 shows a disassembled view of the front PISTON SEAL RING :INNER)

r-- _

SELECTIVE SNAP RING ND

Fig. 57-Measuring Front Clutch Plate Clearance

clutch assembly. (1) Remove large selective snap ring that secures pressure plate in clutch piston retainer. Lift pressure plate and clutch plates out of the retainer. (2) Install compressor. Tool C-3863 over piston Spring retainer, (Fig. 50). Compress springs and remove snap ring, then slowly release tool until spring retainer is free of hub. Remove tool, retainer and Springs. (3) Invert clutch retainer assembly and bump it on

PISTON SPRING RETAINER

CLUTCH PLATES

SNAP RING (SELECTIVE) •

MI(

1 PISTON RETAINER ASSEMBLY

PISTON SEAL RING (OUTER)

SPRINGS SNAP RING

DRIVING DISCS PRESSURE PLATE

Fig. 58-Front Clutch Disassembled (A-727)

NOI3A


TORQUEFLITE—TRANSMISSIONS 2145

TOOL HANDLE SP-3549

REMOVER HEAD SP-3629

FRONT CLUTCH RETAINER REMOVAL

TOOL HANDLE SP-3549

INSTALLING HEAD SP-3628

INSTALLATION

ND350A

Fig. 60—Replacing Front Clutch Retainer Bushing Fig. 39—Removing or Installing Front Clutch Retainer Snap Ring (A-727)

a wood block to remove piston. Remove seals from piston and clutch retainer hub Inspection

Inspect facing material on all driving discs. Replace discs that are charred, glazed or heavily pitted. Disc should also be replaced if they show evidence of material flaking off or if facing material can be scraped off easily. Inspect driving disc splines for wear or other damage. Inspect steel plate and pressure plate surfaces for burning, scoring or damaged driving lugs. Replace if necessary. Inspect steel plate lug grooves in clutch retainer for smooth surfaces, plates must travel freely in the grooves. Inspect band contacting surface on clutch retainer for scores. Note ball check in clutch retainer, make sure ball moves freely. Inspect seal surfaces in clutch retainer for nicks or deep scratches, light scratches will not interfere with sealing of neoprene rings. Inspect clutch retainer bushing for wear or scores. Inspect inside bore of piston for score marks. if light, remove with crocus cloth. Inspect seal grooves for nicks and burrs. Inspect neoprene seals for deterioration, wear, and hardness. Inspect piston springs, retainer and snap ring for distortion. Front Clutch Retainer Bushing Replacement (A-727)

(1) Lay clinch retainer (open end down) on a clean smooth surface and place removing head Tool SP3629 in the bushing. Install handle Tool SP-3549 in

removing head (Fig. 60()A42 . 7) (2) Drive bushing straight down and out of clutch retainer bore. Be careful not to cock tool in the bore. 4:3) Lay clutch retainer (open end up) on a clean smooth surface. Slide a new bushing on installing head Tool SP-3628, and start them in clutch retainer bore. (4) Install handle Tool SP-3549 in the installer (Fig. M. Drive bushing into clutch retainer until tool bottoms. (5) Thoroughly clean clutch retainer before assembly and installation. Assembly

(1) Lubricate and install inner seal on hub of clutch retainer. Make sure lip of seal faces down and is properly seated in the groove. 42) Install outer seal on the clutch piston, with lip of seal toward bottom of clutch retainer. Apply a coat-

FRONT CLUTCH CHART (A-727) Engine Type

225 Cu. In. 318 Cu. In. 340 Cu. In. 383 Cu. In. (High Pert) 440 Cu. In. (High Pert) 426 Cu. In,

Clutch Discs

3 3 4 4 4 4 4 5

Plato Clearance

.036 to .086" .036 to .086" .024 to .125" .024 to .125" .024 to .125" .024 to .125" .066 to .123" .022 to .079"

Piston Springs

12 12 6 8 6 6 10 12


21-46 TRANSMISSIONS—TORQUEFLITE

N.

'0145

Fig. 61—Front Clutch Piston Return Spring Location (12 Springs)

ing of wax type lubricant or Door Ease to outer edge of seals for easier installation of piston assembly. Place piston assembly in retainer and carefully seat piston in bottom of retainer. (3) Refer to "Front Clutch Chart" and install springs on piston exactly as shown in Figures 61, 62. 63 or 64. Position spring retainer and snap ring over the springs. Compress springs with Tool C-3863 (Fig. 59), and seat snap ring in hub groove. Remove compressor tooL (4) Lubricate all clutch plates. install one steel plate followed by a lined plate (disc) until the number given in the chart is installed. Install pressure plate and snap ring. Make sure snap ring is properly seated. (5) With front clutch completely assembled, push downward on pressure plate and insert a feeler gauge between pressure plate and snap ring (Fig. 57). The clearance should be within limits given in the chart. If not, install a snap ring of proper thickness to obtain specified clearance. Snap rings are the same as those used in rear clutch

Fig. 63,—Front Clutch Piston Return Spring Location

(8 Springs) and are available in

.060-.062,-074-.076 and .088-.090

inch thickness. REAR CLUTCH—A-904 Disassembly

Figure 65 shows a disassembled view of the rear clutch assembly. (1) Remove large selective snap ring that secures pressure plate in clutch piston retainer. Lift pressure plate, clutch plates, and inner pressure plate out of the retainer. (2) Carefully pry one end of wave spring out of its groove in clutch retainer, then remove wave spring. spacer ring and clutch piston spring. (3) Invert clutch piston retainer assembly and bump it on a wood block to remove piston_ Remove seals from piston. (4) If necessary, remove snap ring and press input shaft from piston retainer. Inspection

Inspect facing material on all driving discs. Replace

NU462 Fig. 62—Front Clutch Piston Return Spring Location (10 Springs)

Fig. 64—Front Clutch Piston Return Spring Location (6 Springs)


TORQUEFLITE—TRANSMISSIONS 21-47 PISTON SEAL RING (OUTER/

DRIVING DISCS

SNAP RING

amass/el

WAVE SPRING LARGE SEAL RING

SPACER RING PISTON

SMALL SEM RING INPUT SHAH

THRUST WASHER

PISTON SPRING SNAP RING PISTON SEAL RING INNER/

PRESSURE PLATE

PRESSURE PLATE

NN86A

CI ',ITCH PLATES

Fig, 65—Rear Clutch Disassembled (4-904)

discs that are charred, glazed or heavily pitted. Discs should also be replaced if they show evidence of material flaking off or if facing material can be scraped off easily. Inspect driving disc splines for wear or other damage. Inspect steel plate and pressure plate surface for burning, scoring or damaged driving lugs. Replace if necessary. Inspect plates and discs for flatness, they must not be warped or cone-shaped. Inspect steel plate lug grooves in clutch retainer for smooth surfaces, plates must travel freely in the grooves. Note ball check in clutch retainer, make sure ball moves freely. Inspect seal ring surfaces in clutch retainer for nicks or deep scratches, light scratches will not interfere with sealing of the neoprene rings. Inspect neoprene seal rings for deterioration, wear and hardness. Inspect piston spring, wave spring, and spacer for distortion or breakage. Inspect interlocking seal rings (Fig. 65) on input shaft and piston retainer for wear or broken locks. make sure they turn freely in the grooves. Do not remove rings unless conditions warrant. Inspect rear clutch to front clutch thrust washer for wear. Washer thickness should be .043 to .045 inch. replace if necessary. Assembly (I) If removed, press input shaft into piston retainer and install snap ring. (2) Lubricate and install inner and outer seal rings on clutch piston. Make sure lip of seals face toward head of clutch retainer, and are properly seated in piston grooves (Fig. 65). (3) Place piston assembly in retainer and, with a twisting motion, seat piston in bottom of retainer. (4) Place clutch piston spring and spacer ring on top of piston in clutch retainer, make sure spring and spacer ring are positioned in the retainer recess. Start one end of wave spring in retainer groove (Fig. M.

then progressively push or tap spring into place making sure it is fully seated in the groove. (5) Install inner pressure plate in clutch retainer with raised portion of plate resting on the spring. (61 Lubricate all clutch plates, install one lined plate followed by a steel plate until all plates are installed. Install outer pressure plate and selective snap ring. NOTE: The A-904 transmission uses two plates and three discs in rear clutch for both six cylinder engines. Three plates and four discs are used In the 4•904 transmissions for eight cylinder engines.

(7) Measure rear clutch plate clearance by having an assistant press down firmly on outer pressure plate, then insert a feeler gauge between the plate and snap ring (Fig. 67). The clearance should be between .032-.055 inch. If not, install a snap ring of proper thickness to obtain specified clearance. Low limit clearance is desirable. Rear clutch plate clearPISTON SPRING

WAVE SPRING SPACER RING

NK 1387A Fig. 66—installing Rear Clutch Spring, Spacer Ring and Wave Spring


21-48 TRANSMISSIONS—TORQUEFLITE clutch assembly. (1) Remove large selective snap ring that secures pressure plate in clutch retainer. Lift pressure plate, clutch plates, and inner pressure plate out of the retainer. (2) Carefully pry one end of wave spring out of its groove in clutch retainer, then remove wave spring, spacer ring and clutch piston spring. (3) Invert clutch piston retainer assembly and bump it on a wood block to remove piston. Remove seals from the piston. (4) If necessary, remove snap ring and press input shaft from clutch piston retainer.

SELECTIVE SNAP RING

Inspection

Inspect facing material on all driving discs. Replace discs that are charred, glazed or heavily pitted. Discs should also be replaced if they show evidence of material flaking off or if facing material can be scraped off easily. Inspect driving disc splines for wear or other damage. Inspect steel plate and pressure plate surfaces for burning, scoring or damaged driving lugs. Replace if necessary. Inspect steel plate lug grooves in clutch retainer for smooth surfaces, plates must travel freely in the grooves. Note ball check in the piston, make sure ball moves freely. Inspect seal surfaces in clutch retainer for nicks or deep scratches, light scratches will not interfere with sealing of neoprene seals. Inspect neoprene seals for deterioration, wear, and hardness. Inspect piston spring, wave spring, and spacer for distortion or breakage.

FEELER GAUGE

ND3

Fig. 67—Measuring Rear Clutch Plate Clearance

ance is very Important in obtaining proper clutch operation. Clearance can be adjusted by the use of various thickness outer snap rings. Snap rings are available in .060-.062, .068-.070 and .076-.078 inch thickness.

REAR CLUTCH—A-727 Disassembly Figure 68 shows a disassembled view of the rear

PISTON SPRING

PRESSURE PLATE

DRIVING DISCS

PISTON RETAINER PISTON SEAL (INNER) CLUTCH RETAINER PRESSURE PLATE

INPUT SHAFT CLUTCH PLATES WAVE SPRING SPACER RING PISTON PISTON SEAL (OUTER)

SNAP RING THRUST WASHER

Fig. 68 —Rear Clutch Disassembled (14-727)

NDI65A


TORQUEFLITE—TRANSMISSIONS 2149

Inspect interlocking seal rings (Fig. 68) on input shaft for wear or broken locks, make sure they turn freely in the grooves. Do not remove rings unless conditions warrant. Inspect bushing in input shaft for wear or scores. Inspect rear clutch to front clutch thrust washer for wear. Washer thickness should be .061 to .063 inch, replace if necessary. Input Shaft Bushing Replacement (A-727 only) (1) Clamp input shaft in a vise with soft jaws, being careful not to clamp on seal ring lands or bearing journals. (2) Assemble remover Tool SP-3630, cup Tool SP3633, and hex nut Tool SP-1191 (Fig. 69). (3) With cup held firmly against clutch piston retainer, thread remover into bushing as far as possible by hand. (4) Using a wrench, screw remover into bushing 3 to 4 additional turns to firmly engage threads in the bushing. (5) Turn hex nut down against cup to pull bushing from input shaft. (6) Thoroughly clean input shaft to remove chips made by remover threads. Make certain small lubrication hole next to ball in end of shaft is not plugged with chips. Be sure no chips are lodged next to the steel ball. (7) Slide a new bushing on installing head Tool SP-3636, and start them in the bore of input shaft. (8) Stand input shaft upright on a clean smooth surface and install handle Tool SP-3549 in the installing head (Fig. 69). Drive bushing into shaft until tool bottoms. (9) Thoroughtly clean input shaft and clutch piston retainer before assembly and installation. Assembly (1) If removed, press input shaft into clutch piston retainer and install snap ring. HEX NUT SP-1191 REMOVER SP-3630

TOOL HANDLE SP-3549 REMOVAL

INSTALLATION

CUP SP-3633 INSTALLING HEAD SP-3636

REAR CLUTCH RETAINER

BUSHING STEEL BALL

INPUT SHAFT ND351A

Fig. 69—Replacing Input Shaft Bushing (A-727)

(2) Lubricate and install inner and outer seal rings on clutch piston. Make sure lip of seals face toward head of clutch retainer, and are properly seated in piston grooves (Fig. 68). (3) Place piston assembly in retainer and, with a twisting motion, seat piston in bottom of the retainer. (4) Position clutch retainer over piston retainer splines and support the assembly so clutch retainer remains in place. (5) Place clutch piston spring and spacer ring on top of piston in clutch retainer, make sure spring and spacer ring are positioned in the retainer recess. Start one end of wave spring in retainer groove (Fig. 66), then progressively push or tap spring into place making sure it is fully seated in the groove. (6) Install inner pressure plate in clutch retainer with raised portion of plate resting on the spring. (7) Lubricate all clutch plates, install one lined plate followed by a steel plate until all plates are installed. Install outer pressure plate and selective snap ring. (8) Measure rear clutch plate clearance by having an assistant press downward firmly on outer pressure plate, then insert a feeler gauge between the plate and snap ring (Fig. 67). The clearance should be between .025 to .045 inch. If not, install a snap ring of proper thickness to obtain specified clearance. Low limit clearance is desirable. Rear clutch plate clearance is very important in obtaining proper clutch or The clearance can be adjusted by the use of various thickness outer snap rings. Snap rings are available in .060-.062, .074-.076, .088-.090 and .106.108 inch thickness.

PLANETARY GEAR TRAIN—A-904

Measure end play of planetary gear assemblies, sun gear and driving shell before removing these parts from output shaft. With assembly in an upright position, push rear annulus gear support downward on the output shaft. Insert a feeler gauge between rear annulus gear support hub and shoulder on output shaft. (Fig. 70). The clearance should be .006 to .033 inch. If clearance exceeds specifications, replace thrust washers and/ or necessary parts. Disassembly (1) Remove selective thrust washer from forward end of output shaft (Fig. 71). (2) Remove selective snap ring from forward end of output shaft, then slide front planetary assembly off the shaft. (3) Remove snap ring and thrust washer from forward hub of front planetary gear assembly, slide front annulus gear and support off planetary gear set (Fig. 71). Remove thrust washer from rear side of planetary gear set. If necessary, remove snap ring from


21-50 TRANSMISSIONS-TORQUEFLITE ring from rear of annulus gear to separate support from annulus gear.

..,..OUTPUT SHAFT FEELER GAUGE

Inspection

REAR ANNULUS GEAR

Inspect bearing surfaces on output shaft for nicks. burrs, scores or other damage. Light scratches, small nicks or burrs can be removed with crocus cloth or a fine stone Inspect speedometer drive gear for any nicks or burrs, and remove with a sharp edged stone. Make sure all oil passages in shaft are open and clean. Inspect bushings in sun gear for wear or scores, replace sun gear assembly if bushings are damaged. Inspect all thrust washers for wear and scores, replace if damaged or worn below specifications. Inspect thrust faces of planetary gear carriers for wear, scores or other damage, replace as required. Inspect planetary gear carrier for cracks and pinions for broken or worn gear teeth, and for broken pinion shaft lock pins. Inspect annulus gear and driving gear teeth for damage. Replace distorted lock rings.

REAR PLANETARY GEAR ASSEMBLY

DRIVING SHELL

NK292

Fig. 70—Measuring End May of Planetary Gear Assemblies

front of annulus gear to separate support from annulus gear. (4) Slide sun gear, driving shell and rear planetary assembly off the output shaft. (5) Lift sun gear and driving shell off rear planetary assembly. Remove snap ring and steel washer from sun gear (rear side of driving shell). Slide sun gear out of driving shell, and remove snap ring and steel washer from opposite end of sun gear if necessary. (6) Remove thrust washer from forward side of rear planetary assembly and remove planetary gear set from rear annulus gear. If necessary, remove snap

Assembly

Refer to Figure 71 for parts reference. (1) Place rear annulus gear support in annulus gear and install snap ring. (2) Position rear planetary gear assembly in rear annulus gear and place thrust washer on front side of planetary gear assembly. (3) Insert output shaft in rear opening of rear annulus gear. Carefully work shaft through annulus gear support and planetary gear assembly. Make sure shaft splines are fully engaged in splines of annulus gear support.

FRONT PLANETARY GEAR ASSEMBLY SNAP RING (SELECTIVE)

DRIVING SHELL

S

THRUST WASHER

Ya SNAP RINGS FRONT ANNULUS GEAR SUPPORT

S

THRUST WASHER (STEEL) REAR PLANETARY GEAR ASSEMBLY SNAP RING

9

SUN GEAR

/ / THRUST THRUST WASHER WASHER (STEEL! 1 1 I SNAP RING

REAR ANNULUS GEAR

SNAP RING LOW AND REVERSE DRUM

FRONT ANNULUS GEAR THRUST WASHER THRUST WASHER (SELECTIVE)

NY 1760

REAR ANNULUS GEAR SUPPORT

OUTPUT SHAFT

Fig. 71—Planetary Gear Train and Output Shaft Disassembled (A-904)


TORQUEFLITE—TRANSMISSIONS 21-51

(4) Install steel washer and snap ring on one end of sun gear. Insert sun gear through front side of driving shell, install rear steel washer and snap ring. (5) Carefully slide driving shell and sun gear assembly on the output shaft, engaging sun gear teeth with rear planetary pinion teeth. (6) Place front annulus gear support in the annulus gear and install snap ring. (7) Position front planetary gear assembly in front annulus gear, place thrust washer over planetary gear assembly hub and install snap ring. Position thrust washer on rear side of planetary gear assembly. (8) Carefully work front planetary and annulus gear assembly on output shaft, meshing planetary pinions with sun gear teeth. (9) With all components properly positioned, install selective snap ring on front end of output shaft. Remeasure end play of the assembly. The clearance can be adjusted by the use of various thickness snap rings. Snap rings are available in .040-.044, .048-.052 and .059-.065 inch thickness.

PLANETARY GEAR TRAIN— A-727

Measure end play of planetary gear assemblies. sun gear and driving shell before removing these parts from output shaft. With assembly in an upright position, push rear annulus gear support downward on output shaft. Insert a feeler gauge between rear annulus gear support hub and shoulder on output shaft (Fig. 70). The clearance should be .010 to .037 inch. If clearance exceeds specifications, replace thrust washers and/or necessary parts. Disassembly

(1) Remove thrust washer from forward end of SNAP RING (SELECTIVE)

FRONT ANNULUS GEAR ASSEMBLY

output shaft (Fig. 72i. (2) Remove selective snap ring from forward end of output shaft, then slide front planetary assembly off the shaft. (3) Slide front annulus gear off planetary gear set 721. Remove thrust washer from rear side of planetary gear set. 44) Slide sun gear, driving shell and rear planetary assembly off output shaft. (5) Lift sun gear and driving shell off rear planetary gear assembly. Remove thrust washer from inside the driving shell. Remove snap ring and steel washer from sun gear (rear side of driving shell) and slide sun gear out of the shell. Remove front snap ring from sun gear if necessary. Note that front end of sun gear is longer than rear. (6) Remove thrust washer from forward side of rear planetary gear assembly. remove planetary gear set and thrust plate from rear annulus gear. Inspection

Inspect bearing surfaces on output shaft for nicks. burrs, scores or other damage. Light scratches, small nicks or burrs can be removed with crocus cloth or a fine stone. Inspect speedometer drive gear for any nicks or burrs, and remove with a sharp edged stone. Make sure all oil passages in shaft are open and clean. Inspect bushings in sun gear for wear or scores, replace sun gear assembly if bushings are damaged. Inspect all thrust washers for wear and scores, replace if damaged or worn below specifications. Inspect thrust faces of planetary gear carriers for wear, scores or other damage, replace as required. Inspect planetary gear carrier for cracks and pinions for broken or worn gear teeth and for broken pinion shaft lock pins. Inspect annulus gear and driving gear

DRIVING SHELL THRUST WASHER / SUN GEAR

REAR PLANETARY GEAR THRUST WASHER ASSEMBLY (STEEL! THRUST WASHER

/

Cnat FRONT PLANETARY GEAR ASSEMBLY

THRUST wAsHER

REAR ANNULUS GEAR ASSEMBLY

re ,

SNAP RING

THRUST WASHER

NK144B

OUTPUT SHAFT

LOW AND REVERSE DRUM

Fig. 72—Planetary Gear Train and Output Shaft Disassembled (4-727)


21-52 TRANSMISSIONS—TORQUEFLITE teeth for damage. Replace distorted lock rings. Assembly Refer to Figure 72 for parts reference. (1) Install rear annulus gear on the output shaft. Apply a thin coat of grease on thrust plate, place it on the shaft and in the annulus gear making sure teeth are over the shaft splines. (2) Position rear planetary gear assembly in the rear annulus gear. Place thrust washer on front side of planetary gear assembly. (3) Install snap ring in front groove of sun gear (long end of gear). insert sun gear through front side of driving shell, install rear steel washer and snap ring. (4) Carefully slide driving shell and sun gear assembly on output shaft, engaging sun gear teeth with rear planetary pinion teeth. Place thrust washer inside the front driving shell. (5) Place thrust washer on rear hub of front planetary gear set, then slide assembly into front annulus gear. (6) Carefully work front planetary and annulus gear assembly on output shaft, meshing planetary pinions with the sun gear teeth. (7) With all components properly positioned, install selective snap ring on front end of output shaft. Remeasure end play of the assembly. The clearance can be adfusted by the use of various thickness snap rings. Snap rings are available in .048-.052, .055-.059 and .062-.066 inch thickness.

OVERRUNNING CLUTCH Inspection Inspect clutch rollers for smooth round surfaces, they must be free of fiat spots and chipped edges. Inspect roller contacting surfaces in the cam and race for brinelling. Inspect roller springs for distortion, wear or other damage. A-727: Inspect cam set screw for tightness. If loose, tighten and restake the case around screw. Overrunning Clutch Cam Replacement— A-904 If overrunning clutch cam or spring retainer are found damaged, they can be replaced with a service replacement cam, spring retainer, and retaining bolts (Fig. 73). The service parts are retained in the case with bolts instead of rivets. To install, proceed as follows: (1) Remove four bolts securing output shaft support to rear of the transmission case. Drive support rearward out of the case with a wood block and hammer. (2) Center punch the rivets exactly in center of each rivet head (Fig. 74).

BOLT AND

WASHER (7)

CAM

SPRING RETAINER

ND2SS

Fig. 73—Overrunning Clutch Service Replacement Cam (A-904)

(3) Drill through each rivet head with a 3/8 inch drill. Be careful not to drill into the transmission case. Chip off rivet heads with a small chisel, then drive rivets and cam from the case with a blunt punch of proper size. (4) Carefully enlarge rivet holes in the case with a 17/64 inch drill. Remove all chips and foreign matter from the case, make sure cam area is free of chips and burrs. (5) To install, position cam and roller spring retainer in the case. Align cam bolt holes with holes in the case, then thread all seven retaining bolt and washer assemblies into cam a few turns. The cone washers must be installed so inner diameter is coned toward the bolt head (Fig. 75). (6) Tap cam firmly into the case if necessary. Draw retaining bolts down evenly, then tighten to IOU inch-pounds. (7) Screw two pilot studs, Tool C-3288 into the case (Fig. 76). Chill the support with ice (preferably dry ice). Quickly position support over the pilot studs,

CENTER PUNCH 7 RIVET HEADS

NN87A

Fig. 74—Center Punch Rivet Heads (A-904)


TORQUEFLITE—TRANSMISSIONS 21-53

rom OUTPUT SHAFT SUPPORT

CAM RETAINING SOD'S (7)

r\NissA Fig. 75—Cam Retaining Bolts Installed (A-904)

and drive it firmly into the case with a wood block and hammer. Overrunning Clutch Cam Replacement— A-727

If overrunning clutch cam and/or roller spring retainer are found damaged, replace cam and spring retainer in the following manner: (1) Remove set screw from the case below clutch cam. (2) Remove four bolts securing output shaft support to rear of transmission case. Insert a punch through bolt holes and drive cam from the case (Fig. 77). Alternate punch from one bolt hole to another so cam will be driven evenly from the case. IMPORTANT: The output shaft support must be In the case to install the overrunning clutch cam. If the support requires replacement, drive it rearward out of the case with a wood block and hammer.

PILOT STUDS ITOOLI

NN12c I

Fig. 77—Removing Overrunning Clutch Corn (A - 727) To install, screw two C-3288 pilot studs into the case (Fig. 78). Chill the support with ice (preferably dry ice). Quickly position support over the pilot studs, and drive it firmly into the case with a wood block and hammer.

(3) Clean all burrs and chips from cam area in the case. (4) Place spring retainer on the cam, making sure retainer lugs snap firmly into notches on the cam. (5) Position cam in the case with cam serrations aligned with those in the case. Tap cam evenly into the case as far as possible with a soft mallet. (6) Install Tool C-3863 and Adapter SP-5124 as shown in Figure 79, tighten nut on tool to seat cam into the case. Make sure cam is firmly bottomed, then install cam retaining set screw. Stake the ease around set screw to prevent it coming loose. (7) Remove cam installing tool. Install and tighten support retaining screws to 140 inch-pounds. Stake the case around cam in twelve places with a blunt chisel (Fig. 80). PILOT STUDS

OUTPUT SHAFT SUPPORT NN89 Fig. 76—Installing Output Shaft Support (A-904)

OUTPUT SHAFT SUPPORT

NN130 Fig. 78—installing Output Shaft Support (A-727)


21-54 TRANSMISSIONS—TORQUEFLITE SEAL RING

SPRING PISTON ROD SEAL

RINGS (2)

SNAP RING

* (0 SPRING PISTON NDI68A

PISTON ROD GUIDE

Fig. 8I—Kickdown Servo

LOW—REVERSE SERVO AND BAND Disassembly Fig. 79—Installing Overrunning Clutch Cam (A-727)

KICKDOWN SERVO AND BAND Inspection

Figure 81 shows a disassembled view of the kickdown servo assembly. The larger outer spring shown in Figure 81 is not used in A-904 transmissions. Also, it is not used in maximum performance vehicles with A-727 transmissions.

Inspect piston and guide seal rings for wear, and make sure they turn freely in the grooves. It is not necessary to remove seal rings unless conditions warrant. Inspect piston for nicks, burrs, scores and wear. Inspect piston bore in the case for scores or other damage. Inspect fit of guide on piston rod. Inspect piston spring for distortion. Inspect band lining for wear and bond of lining to the band. Inspect lining for black burn marks, glazing, non-uniform wear pattern and flaking. If lining is worn so grooves are not visible at ends or any portion of the bands, replace the band. Inspect band for distortion or cracked ends.

(1) Remove snap ring from piston and remove the piston plug and spring Wig. 821. Inspection

Inspect seal for deterioration, wear and hardness. Inspect piston and piston plug for nicks, burrs, scores and wear: piston plug must operate freely in the piston. Inspect piston bore in the case for scores or other damage. inspect springs for distortion. Inspect band lining for wear and bond of lining to the band. If lining is worn so grooves are not visible at ends or any portion of the band, replace the band. Inspect band for distortion or cracked ends. Assembly

(1) Lubricate and insert piston plug and spring in the piston and secure with snap ring.

ASSEMBLY—SUB-ASSEMBLY INSTALLATION The assembly procedures given here include installation of sub-assemblies in the transmission case and adjusting drive train end play. Do not use force to assemble mating parts. If parts do not assembly freely investigate the cause, and correct the trouble before proceeding with assembly procedures. Always use new gaskets during assembly operations.

1

IMPORTANT: Use only Automatic Transmission Fluid AO-ATF Suffix "A" or (Dexron) to lubricate transmission parts during assembly. Overrunning Clutch

(1) With transmission case in an upright position,

SEAL RING ,

PISTON SPRING PISTON PISTON PLUG

PLUG SPRING

SPRING RETAINER

SNAP RING

Fig. 80—Overrunning Clutch Cam Staked (A-727)

SNAP RING NPI41

Fig. 82—Low and Reverse Servo


TORQUEFLITE-TRANSMISSIONS 21-55 ADJUSTING SCREW AND LOCKNUT LEVER SPRING

-- LEVER (SHORT)

ROdER

LOW AND REVERSE LINK BAND V LINK AND ANCHOR CAM

ND 21

HUB (RACE) NO14 .

Fig. 83—Overrunning Clutch, Low and Reverse Band Link

insert clutch hub inside the cam. Install overrunning clutch rollers and springs exactly as shown in Figure 83. Low Reverse Servo and Band

(1) Carefully work servo piston assembly into the case with a twisting motion. Place spring, retainer and snap ring over the piston (Fig. 82). (2) Compress low and reverse servo piston spring by using engine valve spring compressor Tool C-3422. then install snap ring. (3) Position rear band in the case, install short strut, then connect long link and anchor to the band (Fig. 84). Screw in band adjuster just enough to hold strut in place. Install low-reverse drum. A-727: Be sure long link and anchor assembly is installed, as shown in Figure 83 to provide running clearance for the low and reverse drum.

Fig. 84—Low-Reverse Band and Linkage

case and adjusting screw touching center lug on band (Fig. 86). Kickdown Servo

(1) Carefully push servo piston into the case bore. Install piston rod, two springs and guide (Fig. 81). The A-904 transmissions use one small spring only. Also, one small spring only is used in the maximum performance vehicles with A-727 transmissions. 12) Compress kickdown servo springs by using

engine valve spring compressor Tool C-3422. then install snap ring. Planetary Gear Assemblies, Sun Gear, and Driving Shell

(1) While supporting assembly in the case, insert as . atit ADJUSTING SCREW%.7 L%; Er LOCK NUT ' -a-

LEVER

Low-Reverse Band A-904-LA (318 Cu. In. Engine Only)

This transmission has a double-wrap band supported at two points by a band reaction pin in the case and acted upon at one point by the servo lever adjusting screw (Fig. 85 and 86). (1) Push band reaction pin (with new "0" ring) into case flush with gasket surface (Fig. 85). (2) Place band into case resting two lugs against band reaction pin (Fig. 86). (3) Install low-reverse drum into overrunning clutch and band. (4) Install operating lever with pivot pin flush in

• BAND REACTION PIN

NR171

Fig. 85—Double Wrap Band Linkage—Installed (A-9044.A Transmission only)


21-56

TRANSMISSIONS—TORQUEFLITE ADJUSTING SCREW -1-77--4OCK NUT LEVER

Ar-BAND

(5) Align rear clutch plate inner splines, grasp input shaft and lower the two clutch assemblies into the transmission case. (6) Carefully work clutch assemblies in a circular motion to engage rear clutch splines over splines of front annulus gear. Make sure front clutch drive lugs are fully engaged in slots in the driving shell.

PIVOT PIN Front Band

Figure 87 shows a disassembled view of the kickdown band assembly. Anchor not used on A-904. (1) Slide band over front clutch assembly. (2) Install band strut, screw in adjuster just enough to hold strut and anchor in place.

"0" RING ,t• BAND REACTION PIN't

NR170

Oil Pump and Reaction Shaft Support Fig. 86—Double Wrap Band and Linkage— Disassembled (A-904-LA Transmission Only)

output shaft through rear support. Carefully work assembly rearward engaging rear planetary carrier lugs into low-reverse drum slots. CAUTION: Be very careful not to damage ground surfaces on output shaft during installation. Front and Rear Clutch Assemblies

The front and rear clutches, front band, oil pump and reaction shaft support are more easily installed with transmission in an upright position. One method to support transmission, is outlined in Steps 1 and 2. (1) Cut a 3-1/2 inch diameter hole in a bench, in the end of a small oil drum or a large wooden box strong enough to support transmission. Cut or file notches at edge of the 3-1/2 inch hole so output shaft support will fit and lay flat in the hole. (2) Carefully insert output shaft into hole to support the transmission upright, with its weight resting on flange of the output shaft support. (3) A-904: Apply a coat of grease to selective thrust washer (Fig. 71) and install washer on front end of the output shaft. If drive train end play was not within specifications (.030 to .089 inch), when tested before disassembly, replace thrust washer with one of proper thickness. The following selective washers are available for A-904 transmissions. Thickness Color .052-.054 inch Natural .068-.070 inch Red .083-.085 inch Black A-727: Apply a coat of grease on the input to output shaft thrust washer (Fig. 72), and install washer on front end of the output shaft. (4) Align front clutch plate inner splines, and place assembly in position on the rear clutch. Make sure front clutch plate splines are fully engaged on rear clutch splines.

If difficulty was encountered in removing pump assembly due to an exceptionally tight fit in the case, it may be necessary to expand the case with heat during pump installation. Using a suitable heat lamp, heat the case in area of pump for a few minutes prior to installing pump and reaction shaft support assembly. A-904: Install thrust washer on reaction shaft support hub (Fig. 45). A-727: If drive train end play was not within specifications (.037-.084 inch) when measured before disassembly, replace thrust washer on reaction shaft support hub with one of proper thickness (Fig. 50). The following selective thrust washers are available for A-727 transmissions. Thickness Color .061-.063 inch Green .084-.086 inch Red Yellow .102-104 inch (1) Screw two pilot studs, Tool C-3288 in pump opening in the case Wig. 88). Install a new gasket over the pilot studs. (2) Place a new rubber seal ring in the groove on outer flange of pump housing. Make sure seal ring is not twisted. Coat seal ring with grease for easy installation. PLUG

7, STRUT

LEVER

ANCHOR

75)

LEVER SHAFT ADJUSTING SCREW AND LOCKNUT

BAND NDI7 Fig. 87—Kickdown Band and Linkage


TORQUEFLITE —TRANSMISSIONS

21- 57

(3) Install and tighten extension housing bolts to 24 foot-pounds. (4) Install gasket, plate and two screws on bottom of extension housing mounting pad. (5) Install speedometer pinion and adapter assembly. IMPORTANT: Measure drive train end play as decribed under "Disassembly—Sub-assembly Removal". Correct if necessary. Valve Body Assembly and Accumulator

Piston

Fig. RR—Installing Pump and Reaction Shaft Support Assembly

(3) Install pump assembly in the case; tap it lightly with a soft mallet, if necessary. Place deflector over vent opening and install four pump body bolts. (The A-904 does not use a deflector over vent opening.) Remove pilot studs, install remaining bolts and snug down evenly. Rotate input and output shafts to see if any binding exists, then tighten bolts to 175 inch-pounds. Check shafts again for free rotation. Governor and Support (1) Position support and governor body assembly on the output shaft. Align assembly so governor valve shaft hole in governor body aligns with hole in output shaft, then slide assembly into place. Install snap ring behind the governor body (Fig. 21). Tighten body to support bolts to 100 inch-pounds. Bend ends of lock altos against bull heads. (2) Place governor valve on valve shaft, insert assembly into body and through governor weights. Install valve shaft retaining snap ring. Output Shaft Bearing and Extension Housing (1) Install a snap ring in the front groove on output shaft. Install bearing on shaft with its outer race ring groove toward front (Fig. 20). Press or tap bearing tight against front snap ring, then install rear snap ring. (2) Place a new extension housing gasket on the transmission case. Position output shaft bearing retaining snap ring in the extension housing. Spread snap ring as far as possible (Fig. 19), then carefully tap extension housing into place. Make sure snap ring is fully seated in the bearing groove.

(1) Clean mating surfaces and inspect for burrs on both the transmission case and valve body steel plate. (2) Install accumulator piston in transmission case and place piston spring on the accumulator piston (Fig. 89). (3) Insert parking lock rod through opening in rear of case with the knob positioned against the reaction plug and sprag. Move front end of rod toward center of transmission while exerting rearward pressure on rod to force it past the sprag (rotate output shaft if necessary). (4) Place valve body manual lever in LOW position. Place valve body in its approximate position in the case, connect parking lock rod to manual lever and secure with E-clip. Align valve body in the case, install retaining bolts finger tight. (5) With neutral starting switch installed, place manual valve in the neutral position. Shift valve body if necessary to center neutral finger over the neutral switch plunger. Snug bolts down evenly, then tighten to 100 inch-pounds. (6) Install gearshift lever and tighten clamp bolt. Check lever shaft for binding in the case by moving lever through all detent positions. If binding exists, loosen valve body bolts and re-align. (7) Install flat washer and throttle lever, then tighten lever clamp bolt. (8) Adjust kickdown and low-reverse bands. (9) =tall Ott pan, using a new gasket. Tighten pan bolts to 150 inch-pounds. TRANSMISSION—CONVERTER AND DRIVE PLATE INSTALLATION The transmission and converter must be installed as an assembly; otherwise, the converter drive plate, SPRINO

PiStON

ch.41 RINGS NR169

Fig. 89—Accumulator Piston and Spring


21-58 TRANSMISSIONS-TORQUEFLITE pump bushing, and oil seal will be damaged. The drive plate will not support a load; therefore, none of the weight of transmission should be allowed to rest on the plate during installation.

(1) Rotate pump rotors with Tool C-3756 (A-904) or Tool 0-3881 (A-727) until the two small holes in handle are verticle (Fig. 90). (2) Carefully slide converter assembly over input shaft and reaction shaft. Make sure converter impeller shaft slots are also vertical and fully engage pump inner rotor lugs. Test for full engagement by placing a straight edge on face of the case (Fig. 911. The surface of converter front cover lug should be at least 1/2 inch to rear of straight edge when converter is pushed all way into the transmission. (3) Attach a small "C" clamp to edge of bell housing to hold converter in place during transmission installation. (4) Inspect converter drive plate for distortion or cracks and replace if necessary (Fig. 92). Torque Drive Plate to Crankshaft bolts to 55 foot-pounds. When Drive Plate replacement has been necessary, make sure transmission dowel pins are in engine block and protruding far enough to hold transmission in alignment.

(5) Coat converter hub hole in crankshaft with wheel bearing grease. Place transmission and converter assembly on a service jack and position assembly under vehicle for installation. Raise or tilt as necessary until transmission is aligned with engine. (6) Rotate converter so mark on converter (made during removal) will align with mark on drive plate. The offset holes in plate are located next to 1/8 inch hole in the inner circle of plate. A stamped V mark identifies the offset hole in converter front cover

ND6 Fig.

91—Measuring Converter for Full Engagement in Transmission

(Fig. 92). Carefully work transmission assembly forward over engine block dowels with converter hub entering the crankshaft opening. (7) After transmission is in position, install bell housing bolts and tighten to 28 foot-pounds. (8) install and tighten the two lower drive plate to converter bolts to 270 inch-pounds. (9) install starting motor and connect battery ground cable. (10) Rotate engine with remote control switch and install the other two drive plate to converter bolts. Tighten bolts to 270 inch-pounds. — — DRAIN PLUG

(

Ve INCH HOLE

ALIGNMENT HOLES VERTICAL

V MARK NDI69A Fig. 90—Aligning Pump Rotors

ND105

Fig. 92—Convener and Drive Plate Markings


TORQUEFLITE—TRANSMISSIONS 21-59

TRANSMISSION EXT. HOUSING

CENTER CROSSMEMBER

:

TIGHTENING TORQUE 200 IN. LBS. 40 FT. LBS.

0

30 FT. LBS. NU46A

Fig. 93— Center Crossmember and Rear Engine Mount (Coronet/Charger)

(11) Install crossmember (Fig. 93) and tighten attaching bolts to 30 foot-pounds. Lower transmission so extension housing is aligned and rests on rear mount. Install bolts and tighten to 40 foot-pounds. (12) Install gearshift torque shaft and connect gearshift rod to the transmission lever. Console Shift: Align gearshift torque shaft lower bracket with the extension housing. Install the two retaining bolts and tighten securely. Connect gearshift rod to the transmission lever. (13) Carefully guide sliding yoke into extension housing and on the output shaft splines. Align marks made at removal then connect propeller shaft to rear axle pinion shaft yoke. (14) Connect oil cooler lines to the transmission and install oil filler tube. Connect the speedometer cable. (15) Connect throttle rod to the transmission throttle lever. (16) Connect wire to the back-up light and neutral starting switch. (17) Install cover plate in front of the converter assembly. (18) Install the transmission case to cylinder block brace. The converter cover plate must be between

(2) Place gearshift selector lever in PARK position and lock steering column with ignition key. (3) Move shift control lever on transmission all the way to rear (in PARK detent) (Fig. 95). (4) Set adjustable rod to proper length and install with no load in either direction on linkage. (5) Check Adjustment as follows: (a) Shift effort must be free and detents feel crisp. All gate stops must be positive. (b) Detent position must be close enough to gate stops in neutral and drive to assure that hand lever will not remain out of detent position when placed against gate and then released. (c) Key start must occur with shift lever held down against the park gate.

case and brace. The oil line bracket is attached in

.40

front of the brace. Tighten bolts holding brace to the case before attaching brace to the cylinder block.

(19) Refill transmission with Automatic Transmission Fluid AQ-ATF Suffix "A" or (Dexron).

GEARSHIFT LINKAGE ADJUSTMENT (Column Shift) (Fig. 94) (1) Assemble all linkage parts leaving adjustable rod end free.

STEERING COLUMN LEVER

FRONT ROD (TRANSMISSION CONTROL LEVER

j A)) TORQUE SHAFT 11 4 ,,

‘, ‘

■ •■•■q,

SWIVEL ASSEMBLY REAR ROD NN551

Fig. 94—Column Gearshift Linkage (Coronet/Charger)


21-60 TRANSMISSIONS—TORQUEFLITE TO COOLER, KICKDOWN SAND ADJUSTING SCREW

'L.-, FROM COOLER NEUTRAL STARTING SWITCH

NNEZ

GEARSHIFT CONTROL LEVER

Fig. 95—External Controls and Adjustments

LINKAGE ADJUSTMENT (Console Shift) (Fig. 96)

(1) Assemble all linkage parts leaving adjustable rod ends free. (2) At steering column upper end, line up locating slots in bottom of shift housing and bearing housing. Install suitable tool to hold this alignment and lock column with ignition key. (3) Place console lever in PARK and move shift control lever on transmission all the way to the rear (in PARK detent).

(41 Set adjustable rods to proper length with no load applied in either direction on linkage. (51 Check adjustment as follows: (a) Shift effort should be free enough so detents feel crisp. (b) Detent position must be close enough to gate stops in neutral and drive to assure that hand lever will not remain out of detent position when placed against gate and then released. icl Key start and locking must occur with shift lever held back against the park gate. (61 If console removal is required. disconnect battery ground cable. Remove set screw and shift knob or handle. Proceed as outlined in Body Section 23. 17) After console is in place. install shift knob as follows: with gearshift lever in NEUTRAL, thread button. spring and knob assembly on the cable end until dimension from top of button to top of knob is 13 32" Fig. 97). Secure knob with set screw. (8) Connect battery ground cable. THROTTLE ROD ADJUSTMENT

With engine at operating temperature and carburetor off fast idle cam. adjust idle speed of engine using a tachometer. Refer to "Fuel System" Group 14. for idle speed Specifications and carburetor linkage adjustment

COLUMN LOCK TORQUE SHAFT ASSEM.SLY

COLUMN LOCK FRONT ROD

LOWER ROD

Fig. 96—Console Gearshift Linkage (Coronet/Charger)

PY231


TORQUEFLITE—TRANSMISSIONS 21-61 (3 Hold transmission lever (9) firmly forward against its stop while performing the next two steps. It is important that the lever remain firmly against the stop during these steps to insure a correct adjustment.

BUTTON SPRING

1/2.}. ■111"‘ "

P-

KNOB

*-1— SET SCREW

i

re-CAME END

t---Shan LEVER

UN 17Th

Fig. 97—Console Gearshift Unit

6 Cylinder Models (Fig. 98)

(1) Follow detailed instructions in Lubrication Section for linkage lubrication of all models. (2) Disconnect choke (4) at carburetor or block choke valve in full open position. Open throttle slightly to release fast idle cam, then return carburetor to curb idle.

14) To make transmission rod length adjustment, loosen the slotted link lock bolt (12). Pull forward on the slotted adjuster link (71 so that it contacts carburetor lever pin. (5) Tighten transmission rod adjustment lock bolt (121 to 95 inch-pounds. To check transmission linkage freedom of operation move slotted adjuster link to the full rearward position, then allow it to return slowly, making sure it returns to the full forward position(6) When carburetor throttle is opened. the transmission lever (91 should begin its travel at the same time. 17) Loosen cable clamp nut (5). adjust position of cable housing ferrule (6) in the clamp so that all slack is removed from the cable with carburetor at curb idle. To remove slack from cable. move ferrule (6) in the clamp in direction away from carburetor lever. (8) Back off ferrule (6) 1'4 inch. This provides 1/4 inch free play of cable. with carburetor at curb idle condition. Tighten cable clamp nut to 45 inch-pounds. (9) Connect choke rod (4) or remove blocking fixture.

Fig. 98—Throttle Rod Adjustment (6 Cylinder Models)


21-62 TRANSMISSIONS—TORQUEFLITE 8 Cylinder Models with Three Section Throttle Rod (Fig. 99) (1) Follow detailed instructions in Lubrication Section for linkage lubrication of all models. (2) Disconnect choke (8) at carburetor or block choke valve in full open position. Open throttle slightly to release fast idle cam, then return carburetor to curb idle. (3) Hold transmission lever (11) firmly forward against its stop, while performing adjustments in the next four steps. It is important that the lever remains against the stop during these steps to insure a correct adjustment. (On engines with solenoid idle stop, the solenoid plunger must be in fully extended position).

(4) With a 3/16" diameter rod (9) placed in the holes provided in the upper bellcrank (6) and lever, adjust length of intermediate transmission rod (10) by means of threaded adjustment (2) at upper end. The ball socket (2) must line up with the ball end with a slight downward effort on rod. (5) Assemble ball socket (2) to ball end and remove 3/16" rod (9) from upper bellcrank and lever. (6) Disconnect clip, washer and return spring (13), then adjust length of carburetor rod (12) by pushing rearward on rod with a slight effort and turning the threaded adjustment (1). The rear end of slot should contact carburetor lever pin without exerting any forward force on pin when slotted adjuster link (1) is in its normal operating position against lever pin nut.

(7) Assemble slotted adjustment (1) to carburetor lever pin and install washer and retainer clip. Assemble transmission linkage return spring (13) in place. (8) To check transmission linkage freedom of operation, move slotted adjuster link (1) to full rearward position, then allow it to return slowly, making sure it returns to full forward position. (9) Loosen cable clamp nut (4), adjust position of cable housing ferrule (5) in the clamp so that all slack is removed from cable with carburetor at curb idle. To remove slack from cable, move ferrule (5) in the clamp in direction away from carburetor lever. (10) Back off ferrule (5) 1/4". This provides 1/4" free play of cable, with carburetor at curb idle condition. Tighten cable clamp nut (4) to 45 inch-pounds. (11) Connect choke (8) rod or remove blocking fixture.

Models With 426 Cu. In. Eng. (Fig. 100) (1) Follow detailed instructions in Lubrication Section for linkage lubrication of all models. (2) Block choke valve in full open position. Open throttle slightly to release fast idle cam, then return carburetor to curb idle. (3) Hold transmission lever (10) firmly forward against its stop, while performing adjustments in the next four steps. It is important that the lever remains against the stop during these steps to insure a correct

Fig. 99—Throttle Rod Adjustment (8 Cylinder Models with 3 Section Throttle Rod)


TORQUEFLITE-TRANSMISSIONS 21-63

NN974A Fig. 100—Throttle Rod Adjustment (With 426 Cu. In. Eng.) adjustment. (On engines with solenoid idle stop, the solenoid plunger must be in fully extended position).

(4) With a 3/16" diameter rod (8) placed in the holes provided in upper belkrank and lever (15), adjust length of intermediate transmission rod (9) by means of threaded adjustment at upper end. The ball socket must line up with the ball end with a slight downward effort on rod. (5) Assemble ball socket to ball end and remove 3//16" rod (8) from upper bellcrank and lever (15). (6) Disconnect return spring (11), adjust length of rod (20) by pushing rearward on rod with a slight effort and turning threaded adjuster link (2). The rear end of slot should contact carburetor lever stud without exerting any forward force on the stud when slotted adjuster link is in its normal operating position. (7) Assemble slotted adjuster link (2) to carburetor lever stud and install washer and retainer pin. Assemble transmission linkage return spring (11) in place. (8) To check transmission linkage freedom of operation, move slotted adjuster link (2) to full rearward position, then allow it to return slowly, making sure it returns to the full forward position against the stud. (9) Loosen cable clamp nut (12), adjust position of cable housing ferrule (13) in the clamp (14) so that all slack is removed from cable with rear carburetor at curb idle. (To remove slack from cable, move fer-

rule (13) in clamp (14) in direction away from carburetor lever.) (10) Back off ferrule (13) 1/4". This provides 1/4" free play of cable, with carburetor at curb idle condition. Tighten clamp nut (12) to 45 inch-pounds. (11) Route cable so it does not interfere with carburetor rod (20) or upper bellcrank (15) throughout full throttle linkage travel. (12) Attach carburetor rod assembly (4) between the carburetors with slotted rod end (16) attached to outboard side of inboard lever on rear carburetor. With rear carburetor at wide open throttle, adjust length of connector rod (4) so that front carburetor is also at wide open throttle. To lengthen this rod (4), turn adjusting stud (17) clockwise as viewed from front of engine. Tighten the lock nut (18). (13) Remove choke valve blocking fixture. FLUID LEAKAGE-TRANSMISSION CONVERTER HOUSING AREA (1) Check for Source of Leakage

Since fluid leakage at or around the converter area may originate from an engine oil leak, the area should be examined closely. Factory fill fluid is dyed red and, therefore, can be distinguished from engine oil. (2) Prior to removing the transmission, perform the following checks: When leakage is determined to originate from the


21-84

TRANSMISSIONS--TORQUEFLITE

transmission, check fluid level and torque converter drain plug torque prior to removal of the transmission and torque converter. High oil level can result in oil leakage out the vent located at the top of the front pump housing. if the fluid level is high, adjust to proper level. Oil leakage can also occur at the torque converter drain plug. Torque the drain plug at 110 inch-pounds. After performing these two operations, re-check for leakage. If a leak persists, perform the following operation on the car to determine whether it is the converter or transmission that is leaking.

VENT SHIELD USED A.727 ONLY

il

LEAKAGE TEST PROBE

(1) Remove converter housing dust shield. (2) Position vehicle with front lower than back so that accumulated fluid in converter housing will drain out. Wipe bottom inside of converer housing as dry as possible. A solvent spray followed by compressed air drying is preferable. (3) Fasten test probe (Fig. 1) securely to convenient dust shield bolt hole. Make certain converter is cleared by test probe. Tool must be clean and dry. (4) Run engine at approximately 2,500 rpm with transmission in neutral, for about 2 minutes. Transmission must be at operating temperature. (5) Stop engine and carefully remove tool. (6) If upper surface of test probe is dry, there is no converter leak. A path of fluid across probe indicates a converter leak. Oil leaking under the probe is coming from the transmission converter area (Fig. 2). (7) Remove transmission and torque converter assembly from vehicle for further investigation. The fluid should be drained from the transmission and converter. Re-install converter drain plug and oil pan (with new gasket) at specified torque. Possible sources of transmission converter area fluid leakage shown in (Fig. 2) are: (I) Converter Hub Seal (a) Seal lip cut, check converter hub finish. (b) Bushing moved and/or worn.

2—Transmission Convener Area (c) Oil return hole in front pump housing plugged or omitted. (d) Seal worn out (high mileage cars). (2) Fluid leakage at the outside diameter from pump housing "0" ring seal. (3) Fluid leakage at the front pump to case bolts. (4) Fluid leakage due to case or front pump housing porosity. (5) Oil leakage out the vent. (6) Kickdown lever shaft access plug. Possible sources of converter leakage shown in (Fig. 3) are: (1) Torque converter weld leaks at the outside diameter (peripheral) weld. (2) Front pump hub weld. (3) Crankshaft pilot weld. (4) Fluid leakage from the converter drain plug. These leaks appear at the outside diameter of the converter on the engine side. Fig.

AIR PRESSURE TEST OF TRANSMISSION

The transmission should be prepared for pressure test as follows after removal of the torque converter: (1) Install filler tube bore plug, propeller shaft yoke (tie in with cord or wire), flared tube fitting cap OUTSIDE DIAMETER WELD

5-1/2"

DUST SHIELD BOLT

TORQUE CONVERTER HUB WELD

BOTTOM OF CONVERTER HOUSING MATERIAL: 5-1/2" X 1-1/2" X 1/32" SHEET METAL Fig. 1—Leak Locating Test Probe Tool

RING GEAR

CRANKSHAFT PILOT WELD

- DRAIN /I PLUG PY16

Fig. 3—Torque Converter Cross Section


TORQUEFLITE-TRANSMISSIONS 21-65 VENT PLUG RETAINER

RETAINER

BREAK EDGE

WELD OR BRAZE

MIN.

SUD1NG YOKE WIRED IN P/ACE

MATERIAL: 1-7/8 INCH 0.0. THIN WALLED STEEL TUBING AND 118 INCH STEEL DISC SPRING

CONVERIER HUB SEAL CUP PLUG - MADE FROM OLD FILLER TUBE

PY302

1.876 POLISH OUTSIDE OF OPEN END FOR THIS DISTANCE ON TUBE PY304

Fig. 6 -A-727 -Converter Hub Seal Cup WELD OR BRAZE

BREA K EDGE

1)16" MIN.

Fig. 4—Transmission Prepared for Test Ion front cooler line fitting), and pipe nipple lin case at rear coder line fitting) (Fig. 4 and 5). (2) Remove necessary front pump housing bolts, and vent shield (in A-727 transmission). Install vent plug (rubber stopper), and vent plug retainer (Fig. 4) preferably using longer bolts than those removed. (3) With rotary motion, install converter hub seal CUE) (Fig. 4), over input shaft, and through the eon. verter hub seal until the cup bottoms against the pump rotor lugs. Secure with cup retainer strap (Fig. 4), using converter housing to engine block retaining bolts. (4) Attach and clamp hose from nozzle of Tool C3499 to pipe nipple, which is in rear cooler line fitting position in case (Fig. 5). (5) Pressurize the transmission using Tool C-3499. until the pressure gage reads 8 psi. Position transmission so that pump housing and case front may be covered with soapy solution or water. Leaks are some-

SEAL THIS END AIR TIGHT

POLISH OUTSIDE 1-4-• 1-3/ 4- -4OF OPEN e l'495 1.08 , END FOR 5 THIS DISTANCE ON TUBE MATERIAL: I 1/2 INCH Oa THIN WALLED STEEL TUBING AND 118 INCH STEEL DISC PY305

Fig. 7 — A-904 —Converter Hub Seas Cup

times caused by porosity in the case or pump housing. CAUTION: Do not, under any circumstances, pressurize a transmission to more than 10 psi

If a leak source is located, that part and all associated seals and gaskets should be replaced with new parts. Fabricate equipment needed for test as shown in (Figs. 1.6. 7. 8, 9 and 10). 15/37" DRILL 4 HOLES

1.1'4" + 13!64" 14316" 16-1 2" 17 19 3r

2r FiOSE CLAMP

Fig. S -Pressurizing Transmission

PY3.13

AATERIAL: 114" STEEL STOCK 1 Pr WIDE

Fig. 8 -Hub Seal Cup Retaining Strap

PY306


21-66 TRANSMISSIONS-4 SPEED 13/32" DRILL 2 HOLES

3/8" DRILL 2 HOLES WELD OR BRAZE

WELD OR BRAZE 1/4" ROD 3-3/4" RADIUS

4-1/2" 4-21/32" RADIUS

5" RADIUS

MATERIAL: 3/16" STEEL STOCK

PY307

Fig. 9—A-727—Vent Plug Retainer

TORQUE CONVERTER PRESSURE TEST

If fluid leakage has occurred in the bell housing area, the torque converter can be leak checked as follows after removal from the transmission: (1) Drain all oil from the converter. If flushing is required, flush before checking for leakage. (2) Install tool C-4102 and tighten.

MATERIAL :3/16" STEEL STOCK

PY308

Fig. 10—A-904—Vent Plug Retainer

(3) Apply a maximum of 100 psi air pressure to the converter. (4) Submerge the converter in a tank of water and observe the hub, cup, ring gear, and seam welds for bubbles. Five to ten minutes may be required for bubbles to develop from small leaks. If no bubbles are observed, it can be assumed that the welds are not leaking. If leakage occurs, the converter should be replaced.


MANUAL TRANSMISSION-(A-833) FOUR SPEED INDEX Cleaning and Inspection General Information Service Diagnosis Service in Vehicle Column Lock Linkage Extension Housing Yoke Seal Four Speed Gearshift Gearshift Linkage Adjustment Speedometer Pinion Gear

Page 77 66 67 67 68 70 67 68 68

Service Out of Vehicle Assembling Transmission Disassembling Transmission Extension Housing Bushing Replacement Transmission Installation Transmission Removal Specifications Tightening Reference

Page 71 77 71 78 80 71 108 110

GENERAL INFORMATION The A-833 four speed transmission (Fig. 1) is available for all vehicles except those equipped with 6 cylinder engines. A pad has been provided (Fig. 2) on right side of transmission for identification numbers. SAMPLE NUMBER: PP 833 1861 0250.

The first two letters identify the manufacturing plant. The next three numbers are the transmission model number. The following four numbers are a date

of manufacture code. The last four numbers are a sequence number. The math drive pinion and input shaft is supported by a ball bearing in the transmission case and an olite bushing pressed in the end of the crankshaft. The mainshaft front end is supported by roller bearings in the end of the math drive pinion and a ball bearing in the front of the extension housing. The output end of the mainshaft is splined to the


4 SPEED—TRANSMISSIONS 21-67

sliding universal joint yoke, which is supported by a bushing in the extension housing. The countershaft gear is supported by a double row of needle type roller bearings at each end and the thrust is taken on thrust washers between the ends of the gear and the transmission case. The alignment of the needle type roller bearings within the gear is maintained by a tubular spacer in the center and four thrust washers (one being used between the rows of roller bearings and one at each end). The reverse idler gear is supported on a bronze bushing, pressed into the gear. The gearshifting is manually operated through shift control rods to the transmission. Any forward gear

may be engaged while the vehicle is in motion through the use of synchronizing clutches. The transmission may be used as an aid to deceleration by downshifting in sequence without double clutching or gear clashing, due to the fact that all forward speeds are synchronized. The service procedures covering the four speed transmission used on all vehicles so equipped is identical to the following service procedures except where noted. IMPORTANT: Some internal transmission parts are different from standard on vehicles with high performance engines. These "special" parts are listed in applicable Parts Catalog; therefore, be sure they are used when replacement is necessary.

SERVICE DIAGNOSIS HARD SHIFTING

Correction

Possible Cause

Condition

(a) Incorrect clutch adjustment. (b) Improper cross-over adjustment.

(a) Refer to Clutch Group for corrections.

(a) Linkage interference.

(a) Inspect and remove all linkage interferences. (b) Adjust gearshift rods as outlined in

(b) Perform cross-over adjustment as outlined in "Gearshift Linkage Adjustments." (c) Synchronizer clutch sleeve damaged. (c-d-e) Causes noted can only be corrected by disassembling transmission (d) Synchronizer spring improperly inand replacing damaged or worn parts. stalled. (e) Broken or worn synchronizer stop rings.

TRANSMISSION SLIPS OUT OF GEAR

(b) Gearshift rods out of adjustment.

"Gearshift Linkage Adjustments." (c) Second or direct speed gear synchro- (c) Disassemble transmission and renizer clutch teeth worn. place parts as necessary. (d) Clutch housing bore or face out of (d) Refer to Clutch Group for correction alignment. procedure. TRANSMISSION NOISES

(a) Excessive end play in countershaft (a) Replace thrust washers. gear. (b) Loose synchronizer hub spline fit on (b) Inspect mainshaft and synchronizer hub and replace parts as necessary. mainshaft. (c) Damaged, broken or excessively worn (c) Replace worn gears.

gear teeth. (d) Rough or pitted bearing races or balls. (d) Replace worn bearing.

SERVICE PROCEDURES SERVICE IN VEHICLE FOUR SPEED GEARSHIFT Removal (Figs. 3 and 4)

(1) Disconnect negative (ground) cable from battery. (2) Remove console and wiring if so equipped (See Body Section 23). (3) Remove retaining screws from floor pan boot and slide up and off shift lever. (4) Remove shift lever using a .010" feeler gauge as a tool to release the internal spring clip as shown in (Fig. 8).

(5) Remove retaining clips, washers and control rods from shift unit levers. (6) Remove two bolts and washers which secure shift unit to mounting plate on extension housing and remove unit. Installation (Figs. 3 and

4)

(1) Fasten unit to extension housing mounting plate with two bolts and lock washers and tighten to 30 foot-pounds. (2) Install shift rods, washers and clips. (3) See next paragraph for adjustment procedure. (4) Push Shift lever down into shift unit far enough for spring to click and lock lever in place. Pull up on


21-68 TRANSMISSIONS-4 SPEED

Fig. 1—A433 Four Speed Transmission

lever to make sure it is locked in. (5) Slide boot down over lever and fasten to floor pan. (6) Install console and connect wiring if so equipped (See Body Section 23). (7) Reconnect battery cable. GEARSHIFT LINKAGE ADJUSTMENT

(1) Install floor shift lever aligning Tool C-395I (Mg. 7) to hold the levers in neutral-crossover posilion. (2) With all rods removed from transmicsion shift levers, place levers in neutral detent positions. (3) Rotate threaded shift rods to make length exactly right to enter transmission levers. Start with 1-2 shift rod (it may be necessary to pull clip at shifter end to rotate this rod). (4) Replace washers and clips. (5) Remove aligning tool and test shifting action. COLUMN LOCK LINKAGE (Fig. 5)

(2) Place transmission in reverse gear. (3) At the steering column, line up locating slots at bottom of shift housing and bearing housing. Install suitable tool in slots to hold alignment. (4) Tighten adjustable swivel clamp bolt to 125 inch-pounds. 151 The steering column should now lock when transmission is in reverse gear but should not lock in any other gear. SPEEDOMETER PINION GEAR Removal and Installation

Rear axle gear ratio and tire size determines pinion gear size requirements. Refer to -Speedometer Pinion Chart- in Specifications for pinion usage. (1) Place drain pan under adapter or drain transmission.

(2) Remove bolt and retainer securing speedometer pinion adapter to extension housing (Fig. 8). (3) With cable housing connected, carefully work

For removal or installation of these parts. follow the arrangement of parts shown in (Fig. 7). LINKAGE ADJUSTMENT

(1) Loosen the adjustable rod swivel clamp bolt. LUBRICATION FILL PLUG

P

TRANsmisscwa DRIVE PINION

BOOT ASSEMBLY -FLOOR STEERING COLUMN SCREW (8) COLUMN LOCK FRONT ROD TORQUE SHAFT ASSEMBLY,

FRAME SIDE RAIL RETAINER DRIVE PINION BEARING AND SEAL IDENTIFICATION PAD

COLUMN LOCK ADJUSTMENT

COLUMN LOCK REAR ROD

GEAR SHIFT SELECTOR LEVER ASSEMBLY BOOT ASSEMBLYCONSOLE CONSOLE

FIRST AND SECOND ROD REVERSE ROD PYIE6

Nu_77 .

Fig. 2—four Speed Transmission Identification Pad

Fig. 3—Goorshift Modianistre—Assondairmi (Coronet-Charger)


4 SPEED-TRANSMISSIONS 21-69 LEVER ASSEMBLY

SCREW (4) SCREW (4)

COVER

FIRST AND SECOND ROD

BOOT ASSEMBLY ASSEMBLY GEAR SHIFT CONTROL MECHANISM

CLIP TRANSMISSION CASE THIRD AND FOURTH ROD

PLATE SCREW (3)

LOCK WASHER

TRANSMISSION EXTENSION

WIVEL

BOLT/PIC°

WASHER SW1VEL LOCK WASHER SWIVEL REVERSE ROD WASHER

PY167

Fig. 4 -Gearshift Mechanism-Disassembled (Coronet -Charger) SCREW AND WASHER ASSEMBLY

STEERING COLUMN

SCREW AND WASHER ASSEMBLY

WASHER COLUMN LOCK FRONT ROD

\ its&

BRACKET

CLIP WASHER

BRACKET VIEW C 914" CLUTCH

BRACKET 11" CLUTCH

WASHER

VIEW B 101/2" CLUTCH

CLAMP

CLIP

COLUMN LOCK REAR ROD WASHER RETAINER

WASHER WASHER

SCREW

CLIP SWIVEL

BRACKET TORQUE SHAFT ASSEMBLY SCREW AND WASHER ASSEMBLY BUSHING

CLIP COLUMN LOCK REAR ROD

4 SPEED TRANSMISSION REVERSE LEVER 3 SPEED TRANSMISSION REVERSE LEVER VIEW A PY170

Fig. 5 -Floor Gearshift Column Lock -Ali


21-70 TRANSMISSIONS-4 SPEED -,,r• RETAINER

FlOOR SHIFT ASSEMBLY

ADAPTER -Cr RING

I HAND LEVER .0101' FEELER GAGF DRIVER'S SIDE

PINION

\

BOLT AND WASHER OIL SEAL RETAINER RING NN362

Fig. 9—Speedometer Pinion and Adapter— Disassembled

ometer pinion gear into adapter (Fig. 9). CAUTION: Before installing pinion and adapter as-

1

NU39

Fig. 6—Removing Floor Shift Hand Lever

adapter and pinion out of extension housing. (4) If transmission fluid is found in cable housing, replace seal in the adapter (Fig. 9). Start seal and retainer ring in adapter, then push them into adapter with Tool C-4004 until tool bottoms (Fig. 10). (5) Note number of gear teeth and install speed1-2 SHiF1 ROD

■-•

3-4 SHIFT ROD

BACK UP SWITCH

sembly, make sure adapter flange and its mating area on extension housing are perfectly glean. Dirt or sand will cause mis-alignment resulting in speedometer pinion gear damage.

(6) Rotate the speedometer pinion gear and adapter assembly so that the number on the adapter, corresponding to the number of teeth on the gear, is in the 6 o'clock position as the assembly is installed (Fig. 8). (7) Install retainer and bolt, with retainer tangs in adapter positioning slots. Tap adapter firmly into extension housing and tighten retainer bolt to 100 inch-pounds. (8) Fill transmission to level of fill plug (Refer to Lubrication Section).

EXTENSION HOUSING YOKE SEAL INSTALLED REVERSE ROD DRAIN PLUG REVERSE DETENT ASSEMRI

SPEEDOMETER DRIVE

7

LEVER ALIGNING TOOL if REMOVED NU38

Fig. 7—Gearshift Linkage Adjustment

Replacement (1) Place drain pan under yoke seal. (2) Mark parts for reassembly then disconnect propeller shaft at rear universal joint. Carefully pull shaft yoke out of transmission extension housing. CAUTION: Be careful not to scratch or nick ground surface on sliding spline yoke during removal and installation of the shaft assembly.

(3) Remove extension housing yoke seal (Fig. 11) with Tool C-3985. (4) To install a new seal, position seal in opening of extension housing and drive it into housing with Tool C-3972 (Fig. 12). ADAPTER

LOCK RING

gioui

<Or ftely'alo."462,-a.

ADAPTER SEAL 6 O'CLOCK POSITION

Fig. 8—Speedometer Pinion and Adapter—Installed

NP2

Fig. 10—installing Speedometer Pinion Seal


4 SPEED—TRANSMISSIONS 21-71 croaomcmlx r (rig. 13). (8) Support transmission with a suitable jack and remove center crossmember. Remove transmission to clutch housing bolts. (9) Slide transmission toward rear until drive pinion shaft clears clutch disc, before lowering transmission. (10) Lower transmission and remove from under vehicle. Thoroughly clean exterior of unit, preferably by steam. Mount transmission in repair stand (Fig. 14). DISASSEMBLING TRANSMISSION (Fig. 15) fig. 11—Removing Extension Housing Yoke Seal

(5) Carefully guide front universal joint yoke into extension housing and on mainshaft splines. Align marks made at removal and connect propeller shaft to rear axle pinion shaft yoke. (6) Fill transmission to level of fill plug (Refer to Lubrication Section). SERVICE OUT OF VEHICLE

Gearshift Housing and Mechanism

(1) Remove reverse shift lever from shaft. Remove bolts that attach gearshift housing to transmission case (Fig. 16). With levers in neutral detent position, pull housing out and away from the case. (The first and second, third and fourth shift fork may remain in engagement with synchronizer sleeves.) Work forks out of sleeves and remove from the case. Th• following three steps need only be done, if oil leakage is visible around gearshift lever shafts.

TRANSMISSION REMOVAL (1) Remove console and 4-speed gearshift components, refer to "FOUR SPEED GEARSHIFT." 121 Drain fluid from transmission. (3) Disconnect propeller shaft at rear universal Joint. marking parts to reinstall in same position. Carefully pull shaft yoke out of transmission extension housing CAUTION: Bo careful not to scratch or nick ground surface on sliding spline yoke during removal and installation of the shaft assembly. (4) Disconnect speedometer cable and back-up light switch leads. (5) Some models have exhaust systems which will have to be partially removed for clearance. See Exhaust Systems, Section 11. (6) Install engine support fixture C-3487-A. engaging the hooks in holes in frame side member. Be sure support ends are up against underside of oil pan flange. (7) Raise engine slightly with support fixture. Disconnect extension housing from removable center

NN 25

fig. 12—instolling Extension Housing Yoke Seal

12) Remove nuts, lock-washers and flatwashers that attach first and second, third and fourth speed shift operating levers to the shafts. Disengage levers (tom flats on shafts and remove. CAUTION: Make sure shafts are free of burn before removal; otherwise the bores may be scored resulting in leakage after reassembly. (3) Carefully push gearshift lever shafts out of housing, allowing detent balls to fall free. (4) Slide gearshift interlock sleeve, interlock pin and spring out of housing. Extension Housing and Mainshaft

(I) Remove bolt and retainer securing speedometer pinion adapter in extension housing (Fig. 8). Carefully work adapter and pinion out of extension housing. (2) Remove bolts that attach extension housing to transmission case. (3) Slide third and fourth synchronizer sleeve slightly forward, slide reverse idler gear to tenter of its shaft, then using a soft hammer, tap on extension housing (in a rearward direction). Slide housing and mainshaft assembly out and away from the case (Fig. 17). 441 Refer to (Fig. 18) for location of various gears. synchronizer sleeves and clutches before disassembling mainshaft. (Si Remove snap ring (Fig. 19), that retains 3rd and 4th synchronizer clutch gear and sleeve. slide 3rd and 4th synchronizer assembly off end of mainshaft. (6) Slide 3rd speed gear and stop ring off mainshaft (Do not separate 3rd and 4th speed synchronizer clutch gear. sleeve, shift struts or springs unless inspection reveals a replacement part is required.)


21-72 TRANSMISSIONS-4 SPEED

REAR TRANSMISSION EXT. HOUSING

1rat.....

\4111111114

Lenn

-

A(4) CENTER CROSSMEMBER

TIGHTENING TORQUE 200 IN. LBS. 40 FT.

r€.) H

LBS.

FT. LBS. NU46A.

Fig. I3—Center Crossmember and Rear Engine Mount (Coronet-Charger) speed gear, then press or drive rear bearing off main(7) Using long nose pliers, compress snap ring that shaft. (Be careful not to damage gear teeth.) retains nminstmft ball bearing in extension housing (10) Remove bearing, bearing retainer ring, 1st (Fig. 20). speed gear, and first speed stop ring from the shaft (8) Holding snap ring compressed, pull mainshaft (11) Remove snap ring that retains 1st and 2nd assembly and bearing out of extension housing (Fig. dutch sleeve gear and clutch to mainshaft (Fig. 24). 21). HEAVY DUTY MODEL (Fig. 22) has snap ring in Slide 1st and 2nd clutch sleeve gear and clutch from outer race of bearing. Use snap ring pliers to expand mainshaft (Do not separate clutch sleeve gear and and hold this ring while removing mainshaft and bearclutch, unless inspection reveals a replacement part ing from extension housing. is required.) Remove 2nd speed gear. (9) Remove snap ring that retains mainshaft bearFigure 25 shows various mainshaft bearing surfaces ing on the shaft (Fig. 23). Remove bearing from mainof the gears. Inspect these surfaces for signs of wear, shaft by inserting steel plates on front side of 1st GEARSHIFT ROUSING

MAIN DRIVE PINION r.NION REARING RETA)NER

CASE GASSES BREATHER EXTENSION HOUSING SEAL

3ED AND 4TH OPERATING 111,12 REPAIR STAND

1ST AND 2Nt

RAO( UP UGHT SWITCH

OPERATING LEVER PRVERSt OKRAIING LEVER

Fig. 14—A-833 Transmission in Repair Stand

NH738A


4 SPEED—TRANSMISSIONS 21-73 3RD AND 47H LEVER SHAFT 1ST AND 2ND LEVER SHAFT AND DETENT PLATE AND DETEN1 PLATE DETENT At:

3RD AM) 4TH SPEED SYNCHRONIZER CLUTCH GEAR 3RD SPEED GEAR

1 7-7 SNAP RING SLEEVE

NH7438 1ST AND 2ND GEARSHIFT FORK !NTERLOCK SLEEVE NPI

Fig. 19—Disassembling Mansholt CLUTCH GEAR SHIFT STRUTS (3) 151 AND MD CLUTCH &EVE GEAR

Fig. 16—Shift Housing Assembly

IST SPEED GEAR

STOP RING i

scoring, or any condition that would not allow shaft to be used at reassembly. (12) Using a feeler gauge, measure end play of countershaft gear, by inserting gauge between thrust

2ND SPEED GEAR 1ST AND 2ND SYNCHRONIZER SNAP RING CLUTCH GEAR EXTENSION HOUSING NH744B

PLIERS

Fig. 20—Removing or Installing Mansholt Bearing Snap Ring—Front

NH741

Fig. 17—Removing or Installing Extension Housing and Mainshaft Assembly 1ST AND 2ND CLUTCH

SLEEVE GEAR

'ST SoEED GEAR

1

Enfrisch: HOUSING

washer and gear (Fig. 26). This measurement should be .015 to .029 inch. If measurement is greater than that specified, new thrust washers must be installed at reassembly. Reverse Gear, Lever and Fork

(1) Remove reverse gearshift lever detent spring retainer, gasket, plug and detent ball spring from rear of the case (Fig. 27i. SNAP RiNG GROOVE

SECOND SPUD GEAR

SEAZiNG

tAAIN,SHAFT

SNAP RING

SNAP RING STOP RING

STOP RING JRU ANL) AIH 3RD SPEED GEAR CLUTCH SLEEVE

NH742A

Fig. 1 8—Mainshaft Gear Identification

NH745

MAINSHAEI EXTENSION HOUSING

Fig. 2I—Removing or Installing Mansholt


21-74 TRANSMISSIONS-4 SPEED

Fig. 15—A-8$3 Trastatission Disassnabied


4 SPEED-TRANSMISSIONS 21-75 LEGEND FOR FIG. 15 1. Bearing Retainer 2. Searing Retainer Gasket 3. Bearing Retainer Oil Seal t Snap Ring, Bearing (Inner) 5. Snap Ring. Bearing (Outer) 6. Pinion Bearing 7. Transmission Case & Filler Plug 9. Gear. 2nd Speed 10. Stop Ring 11. Shift Strut Springs 12. Clutch Gear 13. Shift Struts (3) 14. Shift Strut Spring 15. Snap Ring 16. 1st and 2nd Clutch Sleeve Gear 17. Stop Ring 18. 1st Speed Gear 19. Bearing Retainer Ring 20. Rear I3wariiig 21. Snap Ring 24. Battle 25. Gasket. Case to Extension Housing

26. Lockwasher 27. Bolt 28. Extension Housing 29. Mainshaft Yoke Bushing 30. Oil Seal 31. Main Drive Pinion 33. Needle Beanng Rollers 34. Snap Ring 35. Stop Ring 36. Snap Ring 37. Shift Strut Spring 38. Clutch Gear 39. Shift Strut Spring 40. Clutch Sleeve 41. Stop Ring 42. 3rd Speed Gear 43. Mainshaft (Output) 44. Shift Struts (3) 45. Woodruff Key 46. Countershaft 47. Thricavrasher, Gear (1) 48. Thrustwasher, Needle Roller Bearing 49. Needle Bearing Rollers 50. Bearing Spacer

(2) The reverse Idler gear shaft is a very tight fit in the case (Fig. 28). To remove place a 7/16 socket (1/4 or 3/8 inch drive) on end of C-3638 Power Steering "Worm Shaft Seal Remover" or C-3642 -Pump Shaft Seal Remover" (Fig. 29). Place tool in case with socket against end of shaft SNAP RING REMAINS IN EXTENSION HOUSING GROOVE

rit

SNAP RING PLIERS

51. Countershaft Gear (Cluster) 52. Needle Bearing Rollers 53. ntrustwasher, Needle Roller Hearin 51 Thrustwasher. Gear (1) 55. Backup Light Switch 56. Backup Light Switch Gasket 57. Plug. 58. Retainer, Reverse Detent Ball Spring 59. Gasket 60. Spring. Reverse Detent Ball 61. Ball, Reverse Detent 62. Woodruff Key 63. Reverse Idler Gear Shaft 64. Bushing, Reverse Idler Gear 65. Gear, Reverse Idler 66. Fork, Reverse Shifter 67, Reverse Lever 68 Oil Seal, Reverse Lever Shaft 69. Reverse Operating Lever 70. Flahvasher 71. lockwasher 72. Nut

73. Gearshift Control Housing it 1st and 2nd Operating Lever 75, Fiat/masher 76, Lockwasher, Lever 77. Nut. Lest 78. Lockwasher, Lever 79. Flatwasher, Lever 80. 3rd and 4th Operating Lever 81. Detent Ball 82. Detent Dail Pin 83. Deem Ball Sleeve 84. Detent Ball Spring 85. Detent Ball 86. Oil Seal (2) 87. 3rd and 4th Lever 88. 1st and 2nd Lever 89. 3rd and 4th Speed Fork 90. 1st and 2nd Speed Fork 91. Drain Plug 92. Gasket. Shift Control Housing

and other end of tool against the case. Turn screw counterclockwise to press shaft out of the case. Remove woodruff key from shaft. In some cases, a 7/16 deep socket and/or a 3" extension may be required to press shaft completely out of the case.

The following step need only be done if oil leakage is visible around reverngearshift lever shaft. (3) Remove any burrs from shaft so as not to damage the case bore, then carefully push reverse gearshift lever shaft inward and remove it from case (Fig. PLIERS SNAP RING el STOP RING

1ST SPEED GEAR RETAINING KING

SNAP RING GROOVE IN BEARING NU4)

Fig. 22-Removing or Installing Mainshaft (Heavy Duty Modell

2ND SPEED GEAR

CLUTCH

151 AND 2ND Ciirral SLEEVE GEAR NH747A

BEARING

Fig. 24-Removing or installing Clutch Gear Snap Ring PLIERS

BEARING

SNAP RING GROOVE

SNAP RING

GROOVE

SNAP RING

BEARING RETAINING RING NH746

23-Removing or installing Mainshaft Bearing Snap Ring-Rear

SNAP RING GROOVE

Fig. 23-Mainshaft Bearing Surfaces

N11746


21-76 TRANSMISSIONS-4 SPEED THIS HOLE COUNTERBORFO TO ACCEPT SHOULDER BOLT WHICH ACTS AS A COVER LOCATING DOWEL

FEELER GAUGE THRUST WASHER

COUNTERSHAFT GEAR NH750A

Fig. 26—Measuring Countershaft Gear End Play

30). Lift out detent ball from bottom of case. Remove shift fork from shaft and detent plate. Drive Pinion and Countershaft Gear (1) Using countershaft arbor C-3938, and a plastic hammer, drive countershaft out of case, allowing countershaft gear to be lowered to bottom of case. (This will permit removal of main drive pinion.) REVERSE IDLER 4 GEAR SHAFT

REVERSE IDLER GEAR

REVERSE SHIFTER SHAFT AND DEIEN1 PLATE BACKUP LIGHT SWITCH

REVERSE LEVER DEIENT SPRING RETAINER REVERSE SPEED GEARSHIFT FORK

REVERSE GEAR SHIFTER SHAFT NH74913

Fig. 27—Gear, Shaft and Lever Identification

TOOL ASSEMBLY REVERSE SHIFTER ASSEMBLY REMOVED

NU42

BACK UP LIGHT SWITCH

Fig. 29—Removing Reverse Idler Gear Shaft (A-833)

(2) Remove drive pinion bearing retainer attaching bolts, then slide retainer and gasket from pinion shaft. (Fig. 2). Pry pinion oil seal from bearing retainer. To avoid leakage around the new seal, do not nick or scratch the bore in which the seal is pressed, or the surface on which seal bottoms. (3) Remove pinion bearing outer snap ring, using a plastic hammer, drive pinion into case and remove. HEAVY DUTY MODEL (Fig. 31) because of larger bearing can be removed through front of case. (4) Remove pinion bearing inner snap ring. Using an arbor press, remove bearing from pinion. (5) Remove snap ring and 16 bearing rollers from cavity in drive pinion. (6) Remove countershaft gear from bottom of case (Fig. 32). (7) Remove arbor and 76 needle type bearings, s

4.9-jr_ ; ,./.4-4.--;-----4 DETENTAilit PLATE

REVERSE IDLERGEAR SHAFT

rt NH 752

NH75!A

Fig. 28—Removing or Installing Reverse Idler Gear

Fig. 30—Removing or Installing Reverse Shift Fork and Lever


4 SPEED—TRANSMISSIONS 21-77 SNAP RINGS

COUNTERSHAFT GEAR IN CASE BUT NOT INSTALLED

DRIVE PINION AND BEARING ASSEMBLY DRAIN PLUG NU41

Fig. 31—Removing or Installing Drive Pinion Any. (Heavy Duty)

thrust washers and spacer, from center of countershaft gear. CLEANING AND INSPECTION

Clean transmission case thoroughly, using a suitable solvent, dry with compressed air. Inspect case for cracks, stripped threads in various bolt holes and machined mating surfaces for burrs, nicks or any condition that would render the case unfit for further service. The front mating surface should be smooth; if any burrs are present, dress them off with a fine mill file. If threads are stripped, install Helicoil inserts. Ball Bearings Wash ball bearings, using a clean solvent and blow dry with compressed air. CAUTION: Do not spin bearings with air pressure; turn slowly by hand. Spinning unlubricated bearings may cause damage to races and balls.

Be sure ball bearings are clean, then lubricate them with light grade engine oil. Inspect bearings for roughness. This can best be determined by slowly turning outer race by hand. Measure fit of bearings on their respective shafts. :A6

Needle Type Bearing Rollers and Spacers Inspect all bearing rollers for flat spots or brinelling. Inspect all bearing roller spacers for signs of wear or galling. Install new parts as required. Gears Inspect gear teeth on synchronizer clutch gears and stop rings. If there is evidence of chipping or excessively worn teeth, install new parts at reassembly. Be sure clutch sleeve slides easily on the clutch gear. Inspect countershaft gear and all gear teeth for chipped or broken teeth, or showing signs of excessive wear. Small nicks or burrs must be stoned off. Inspect teeth on main drive pinion. If excessively worn, broken or chipped, a new pinion should be installed. If the oil seal contact area on drive pinion shaft is pitted, rusted or scratched, a new pinion is recommended for best seal life. Test interlock sleeve and pin for free movement in bore of shift housing Examine detent balls for signs of brinelling. If lever detents show signs of excessive wear to extent of not locking in gear, install a new part. Inspect shift forks for wear on the shanks and pads. Synchronizer Stop Rings Inspect stop rings for cracks and wear. If rings are cracked or show signs of extreme wear on threaded bore, install new rings at reassembly. Test new rings for good fit on gear cones with minimum wobble. Mainshaft Inspect mainshaft gear and bearing mating surfaces. If gear contact surfaces show signs of galling or are excessively worn, a new mainshaft should be installed. Inspect snap ring grooves for burred edges. If rough or burred, remove condition using a fine file or crocus cloth. Inspect synchronizer clutch gear splines on shaft for burrs.

COUNTERSHAF GEAR

ASSEMBLING TRANSMISSION

The Grease recommended for use during reassembly procedures is Automotive Multi-Purpose Grease, NLGI grade 2 E.P. or Multi-Mileage Lubricant, Part Number 2525035.

C-3938 ARBOR

NI17.53A

Pig. 32—Removing or Installing Countershaft Gear and Arbor

Countershaft Gear and Drive Pinion (1) Using heavy grease, coat inside bore of gear at each end, then install roller bearing spacer. Insert arbor Tool C-3938, into gear and through spacer. Center spacer and arbor. (2) Coat needle type roller bearings with heavy grease, then at each end of gear, install 19 rollers, followed by a spacer ring and 19 more roller bearings and 1 spacer ring (Pig. 15).


21-78 TRANSMISSIONS-4 SPEED (3) If countershaft gear end play exceeded .029" when measured during disassembly (Fig. 26). Install new thrust washers. Coat thrustwashers with heavy grease and install them over arbor with tang side toward the case boss (Fig. 33). (4) Install countershaft gear assembly into the case (Fig. 32). Allow gear assembly to rest on bottom of case. (Be sure thrustwashers stay in position.) (5) Press main drive pinion bearing on pinion shaft. Be sure outer snap ring groove is toward front (Fig. 34). Seat bearing fully against shoulder on gear. (6) Install a new inner snap ring on shaft to retain bearing. Be sure snap ring is seated. This snap ring is a select fit for minimum end play (Fig. 31). (7) Place pinion shaft in a vise (with soft jaws), then install 16 bearing rollers in cavity of shaft. Coat bearing rollers with heavy grease, then install bearing retaining snap ring in its groove. (8) Install drive pinion and bearing through rear of case and position in front bore. Tap lightly into place, using a plastic hammer. Install outer snap ring in bearing groove. HEAVY DUTY MODEL (Fig. 31) because of larger bearing can be installed through front of case. (9) Start countershaft in its bore at rear of case. Raise countershaft gear until teeth mesh with main drive pinion gear. (Be sure thrust washers remain in position on ends of arbor and tangs aligned with slots in the case.) (10) Align countershaft arbor with bores in case, then drive countershaft into the gear. Install the woodruff key. Continue to drive shaft into case until end of shaft is flush with rear face of the case. Remove arbor Tool C-3938. Reverse Gear, Lever and Fork The following step need only be done if the reverse shaft was removed because of oil leak. (1) Install a new oil seal "0" ring on reverse gearshift lever shaft. Coat lever shaft with Multi-purpose grease, then carefully install lever shaft into bore in THRUST WASHER TANG

COUNTER SHAFT GEAR

SNAP RING (OUTER) BEARING TOWARD THE FRONT

MAIN DRIVE PINION SNAP RING

ROLLER BEARINGS 06'

NH755A

Fig. 34—Main Drive Pinion and Bearing Any.

the case (Fig. 30). (2) Install reverse detent spring retainer and gasket. Torque to 50 foot-pounds. Insert ball and spring. Install plug and gasket. Torque to 24 foot-pounds. (3) Place reverse Idler gearshaft in position in end of case, and drive it in far enough to position reverse Idler gear on protruding end of shaft with shift slot toward rear (Fig. 28). At same time, engage slot with reverse shift fork. (4) With reverse Idler gear correctly positioned, drive reverse gear shaft into case far enough to install woodruff key. Drive in shaft, flush with end of case (Fig. 28). (5) Install back-up light and gasket. Torque to 15 foot-pounds. Extension Housing Bushing Replacement (1) Remove extension housing yoke seal (Fig. 11) with Tool C-3985. (2) Drive the bushing out of housing (Fig. 36) with Tool C-3974. (3) Slide a new bushing on installing end of Tool C-3974. Align oil hole in bushing with oil slot in housing, then drive bushing into place (Fig. 36). (4) To install a new seal, position seal in opening of extension housing and drive it into housing with Tool C-3972 (Fig. 12). MAINSHAFT (1) Sub assemble the synchronizer parts in the DRIVE PINION BEARING RETAINER

SEAL INSTALLING TOOL NH754 Fig. 33—Countershaft Gear and Arbor Assembly

NUM Fig. 35—Replacing Seal in Drive Pinion Bearing Retainer


4 SPEED—TRANSMISSIONS 21-79 TO01. INSTAL! ING BUSHING

CLUTCH GEAR StEEVE STOP RING N

STOP RING

/911111/4 INSTALLING END

7.

order shown in (Figs. 37 and 38) as follows: Place a stop ring flat on the bench followed by the clutch gear and sleeve. Drop the struts in their slots and snap in a strut spring placing the tang inside one strut. Turn the assembly over on the stop ring and install second strut spring tang in a different strut. (2) Slide second speed gear over mainshaft (synchronizer cone toward rear) and down against shoulder on shaft (Fig. 24). (3) Slide first and second synchronizer assembly (including stop ring with lugs indexed in hub slots, Fig. 37) over mainshaft, down against second gear cone and secure with a new snap ring (Fig. 24). Slide next stop ring over shaft and index lugs into clutch hub slots. (4) Slide first speed gear (synchronizer cone toward clutch sleeve gear just installed) over mainshaft lutu position against clutch sleeve gear. (5) Install mainshaft bearing retaining ring, followed by mainshaft rear bearing. Using an arbor and a suitable tool, drive or press bearing down into position. Install a new snap ring on shaft to secure bearing (Fig. 23). This snap ring is a select fit for minimum end play. (6) Install partially assembled mainshaft into extension housing far enough to engage bearing retaining ring in slot in extension housing (Fig. 21). Now compress ring with pliers so that mainshaft ball bearing can move in to bottom against its thrust shoulder SNAP RING CLUTCH GEAR STOP RING

aW .- erso

TRUSS

tP

STOP

RING

FORWARD

STRUTS

CLUTCH GEAR

HUG

Fig. 36 — Replacing Bushing in Extension Housing

(POSITION LONG HUB FORWARD)

-\\

STRUT SPRINGS CZ \

CLUTCH SLEEVE AND REVERSE GEAR

STRUT SPRINGS (2) PY 201

Fig. 37-1st-2nd Synchronizer—Disassembled

pLIPOSITION LONG 1 HUB FORWARD)

C-:? FORWARD

LUG-STOP RING SNAP RING TO CLUTCH GEAR

PY202

Fig. 38 -3rd -4th Synchronizer—Disassembled

in extension housing. Release ring and seat it all around its groove in extension housing (Fig. 20). HEAVY DUTY MODEL (Fig. 22). Install mainshaft assembly into extension housing until bearing touches snap ring in housing groove. Then expand ring with pliers so that mainshaft ball bearing can slide in against shoulder in extension housing. Release snap ring and see that it seats in bearing groove. (7) Slide third speed gear over mainshaft (with synchronizer cone toward front) followed by third gear stop ring (Fig. 19). (8) Install third and fourth speed synchronizer clutch gear assembly (including sleeve, Shift plates and springs) on mainshaft (shift fork slot toward rear) against third speed gear (Fig. 19). Be sure and index rear stop ring with clutch gear shift struts. (9) install retaining snap ring (Fig. 19), Then, using heavy grease, position front stop ring over dutch gear, again indexing ring slots with shift struts. CAUTION: It is very important that indexing of all stop rings and positioning of gears and clutches on mainshaft be correct, or mating of extension housing to the case will not be possible without damage. (10) Coat a new extension housing to case gasket with grease (both sides) then place in position on the case. (11) To provide clearance so that assembly will be Possible, slide reverse idler gear to center of its shaft and move the 3rd and 4th synchronizer sleeve as far forward as practical (do not lose struts). (12) Move drive pinion as far forward as possible to give maximum clearance for mainshaft pilot end. (13) Now slowly insert mainshaft assembly into case (Fig. 17) tilting it as required to clear idler and cluster gears and finally entering the pilot rollers in the drive pinion gear. (14) Place 3rd and 4th synchronizer sleeve in neutral position. (15) If everything is in proper position the extension housing will bottom to the case gasket without


21-80 TRANSMISSIONS-4 SPEED force. If not, check to see if a strut, pinion roller, or stop ring is out of position. (16) Install extension housing bolts and tighten to 50 foot-pounds. (17) Using Tool C-3789 or C-3801 for heavy duty model (Fig. 35), install a new oil seal in retainer bore. Install main drive pinion bearing retainer and gasket. Coat threads with sealing compound, then install attaching bolts and tighten to 30 foot-pounds (Fig. 2).

Gearshift Housing and Mechanism The following 4 steps need only be done if gearshift housing was disassembled previously because of leaking seals. (1) Slide interlock sleeve into position in housing (Fig. 17). Install a new oil seal on each lever shaft. Coat one of the shafts with Multi-purpose grease, then carefully install shaft in shift housing. Fill recess around shaft with Multi-purpose grease, then install operating lever (Fig. 15). Tighten nut to 18 foot-pounds. (2) Place a detent ball in the sleeve, followed by spring and interlock pin. Coat other lever shaft with Multi-purpose grease and start shaft into housing. Place remaining detent ball on the spring and compress ball and spring with a small screwdriver, then push shaft in until seated. Fill recess around shaft with Multi-purpose grease, then install operating lever. Tighten nut to 18 foot-pounds. (3) Position lst-2nd and 3rd-4th clutch sleeve gears in neutral. Install gearshift forks in grooves in clutch sleeve gears. Position gasket and as shift housing is installed, align shift fork shafts with holes in levers (Fig. 16). Install retaining bolts finger tight. (4) Eight of the shift housing retaining bolts arc shoulder bolts for accurately locating the mechanism on the transmission. One bolt shoulder is longer and acts as a dowel, passing through the cover and into the transmission case at center of rear flange (Fig. 29). Two bolts are standard, located at lower rear of cover. Tighten all bolts evenly to 15 foot-pounds. The reverse shift lever and 1-2 shift lever have cam surfaces which mate in reverse position (Fig. 39) to lock the 1-2 lever, fork and synchronizer in neutral position. Test for correct action by placing transmission in reverse. Then, while turning input shaft, move 1-2 lever in each direction. If input shaft locks or becomes harder to turn, the synchronizer is partly engaging caused by too much cam clearance. Select new 1-2 shift lever, size "A" or "B" as required (Fig. 39). If too little cam clearance exists it will be difficult or impossible to shift to reverse. (5) Grease reverse shaft and install operating lever and nut. Tighten to 18 foot-pounds (Fig. 14). (6) Install speedometer drive pinion gear and adapter being sure range number, representing number of

1-2 SHIFT LEVER MARKED "A" = MORE CLEARANCE MARKED "8" = LESS CLEARANCE

1-2 SHIFT FORK NEUTRAL POSITION

CAM CLEARANCE (REVERSE POSITION) REVERSE LEVER NEUTRAL POSITION

-

/ 1->

REVERSE DETENT BALL-SPRING RETAINER

.11 11/4 1 Hit )

REVERSE IDLER GEAR SHIFT FORK NN2 00A

DETENT SPRING DETENT DETENT PLUG BALL SPRING

Fig. 39—Reverse Interlock teeth on gear, is in 6 o'clock position (Fig. 8).

TRANSMISSION INSTALLATION Place a small amount of Multi-Purpose lubricant around inner end of pinion shaft pilot bushing in flywheel and on pinion bearing retainer release bearing sleeve area. Do not lubricate end of pinion shaft, clutch disc splines or clutch release levers. (1) With transmission on a suitable jack, slide assembly under vehicle. (2) Raise transmission until drive pinion is centered in clutch housing bore. (3) Roll transmission slowly forward until pinion shaft enters clutch disc. Turn pinion shaft until splines are aligned, then work transmission forward until seated against clutch housing. Do not allow transmission to "hang" after pinion shaft has entered the clutch disc. (4) Install transmission to clutch housing bolts and tighten to 50 foot-pounds. (5) Using a pointed drift, align crossmember bolt holes, then install attaching bolts. Tighten to 30 footpounds (Fig. 13). (6) Remove engine support fixture and disengage hooks from holes in the frame side rails. Install extension housing to rear engine mount bolts and tighten to 40 foot-pounds. (7) Fasten shift unit to extension housing mounting plate with two bolts and lock washers and tighten to 30 foot-pounds. Referring to "Gearshift Linkage Adjustment", connect shift control rods to transmission levers and connect speedometer cable. (8) Carefully guide front universal joint yoke into extension housing and onto mainshaft splines. Con-


3 SPEED-TRANSMISSIONS 21-81 nect propeller shaft to rear axle pinion yoke aligning marks made at removal. (9) Reconnect exhaust pipes (if removed). (10) Fill transmission with Multi-Purpose Gear Oil SAE 140. If shift effort becomes extremely high during cold weather, Multi-Purpose Gear Oil SAE 80 or 90 should be used. Automatic Transmission Fluid AQ-

ATF Suffix "A" (Dexron) may also be used in extremely cold climates. (11) Lower vehicle, install gearshift lever and console, refer to "FOUR SPEED GEARSHIFT." (12) Road test vehicle to make sure transmission shifts smoothly and operates quietly.


MANUAL TRANSMISSION-3 SPEED (A-903) INDEX Page 89 81 81 82 84 85 83 82

Cleaning and Inspection General Information Service Diagnosis Service In Vehicle Extension Housing and Bushing Extension Housing Yoke Seal Gearshift Interlock Gearshift Linkage Adjustment

Speedometer Pinion Gear Service Out of Vehicle Assembling Transmission Disassembling Transmission Transmission Installation Transmission Removal Specifications Tightening Reference

Page 84 85 89 86 91 85 107 110

GENERAL INFORMATION The A-903 transmission (Fig. 1) is used on models with 198 or 225 Cu. in. 6 cylinder engines. A pad has been provided on the right side of the transmission (Fig. 2) for identification numbers. Sample Number: PP903 3262 2220

The first two letters identify the manufacturing plant. The next three numbers are the transmission model number. The following four numbers are a date of manufacture code. The last four numbers are a sequence number. This transmission has the following gear ratios: First-2.95 to 1; Second-1.83 to 1; Third or High—

1 to 1; Reverse-3.80 to 1. A synchronizing clutch is provided between second and third gears to prevent gear clash. The countershaft gear is in constant mesh and is supported by roller bearings at each end. The mainshaft front end is piloted in roller bearings in the end of the main drive pinion, and is supported by a ball bearing in the rear of the case. The rear end of the mainshaft is supported by the sliding yoke and bushing in the extension housing. The speedometer drive gear is integral with the mainshaft.

SERVICE DIAGNOSIS Condition

Possible Cause

Correction

HARD SHIFTING

(a) Incorrect clutch adjustment (b) Improper cross-over adjustment.

TRANSMISSION SLIPS OUT OF GEAR

(a) Inspect and remove all linkage interferences. (b) Gearshift rods out of adjustment. (b) Adjust gearshift rods as outlined in "Gearshift Linkage Adjustments." (c) Second or direct speed gear syn- (c) Disassemble transmission and rechronizer clutch teeth worn. place parts as necessary. (d) Clutch housing bore or face out of (d) Refer to Clutch Group for correction alignment. procedure.

TRANSMISSION NOISES

(a) Excessive end play in countershaft (a) Replace thrust washers. gear.

(a) Refer to Clutch Group for corrections. (b) Perform cross-over adjustment as outlined in "Gearshift Linkage Adjustments.' (c) Synchronizer clutch sleeve damaged. (c-d-e) Causes noted can only be corrected by disassembling transmission (d) Synchronizer spring improperly installed. and replacing damaged or worn parts. (e) Broken or worn synchronizer stop rings. (a) Linkage interference.


21-82 TRANSMISSIONS-3 SPEED

Fig. 1—A-903 Three Speed Trans. Cutaway Possible Cause

Condition

Correction

Inspect mainshaft and synchronizer hub and replace parts as necessary. Inspect low speed sliding gear and ma inshaft. Replace parts as necessary. (d) Damaged, broken or excessively worn (d) Replace worn gears. gear teeth. (e) Drive pinion bearing worn. (e) Replace worn bearing.

(b) Loose synchronizer hub spline fit on (b) mainshaft. (c) Loose spline fit on low speed sliding (c) gear to ma i nshaft spline.

SERVICE PROCEDURES SERVICE IN VEHICLE GEARSHIFT LINKAGE ADJUSTMENT A-903 Column Shift (1) Remove both shift rod swivels from transmission shift levers (Fig. 4). (2) Make sure transmission shift levers are in neutral (middle detent) position (Fig. 3). (3) Move shift lever to line up locating slots in bottom of steering column shift housing and bearing housing. Install suitable tool in slot and lock ignition switch. (4) Place screwdriver or suitable tool between VENT

cross-over blade and 2nd-3rd lever at steering column so that both lever pins are engaged by cross-over blade (Fig. 5). (5) Set 1st-reverse lever on transmission to reverse position (Fig. 3). (6) Adjust 1st-reverse rod swivel by loosening clamp bolt and sliding swivel along rod so it will enter 1streverse lever at transmission. Install washers and clip. Tighten swivel bolt to 100 inch-pounds. (7) Remove gearshift housing locating tool, unlock ignition switch and shift column lever to neutral position. (8) Adjust 2nd-3rd rod swivel by loosening clamp

COVER 2N0-3R0 LEVER

1ST-REVERSE LEVER

SLIDING YOKE

‘Or

1/4 FILL PLUG

SPEEDOMETER DRIVE ASSY. CLUTCH INTERLOCK PAWL

IDENTIFICATION PAD DRIVE PINION BEARING AND SEAL RETAINER

2 3R 1 N N PY60

PY6I

Fig. 2—A-903 Transmission—Right Side

Fig. 3—A-903 Transmission—Left Side


3 SPEED—TRANSMISSIONS 21-83 STRG. COL. .

, 2ND-3RD ROD % FWD.

2ND-3RD LEVER 1ST-REVERSE LEVER INTERLOCK PAWL

1ST-REVERSE ROD 2ND-3R0 ROD

PLAIN WASHER BUSHING FOR "B" ENGINE OR HEAVY \ DUTY ONLY

FWD, <'/; CLIP ASSEMBLED VIEW

STRG. COL.

2ND-3RD

BUSHING GROMMET

PLAIN WASHER

.N1

Rog

sw,v,

FWD

CLIP

PLAIN WASHER---_,4

/

/

1ST-REVERSE ROD BOLT-4, 06) PLAIN ASHER SWIVEL

CLAMP 1ST-REVERSE ROD

BOLIN DETAILS AT TRANSMISSION DETAILS AT STEERING COLUMN

NR23A

Fig. 4-Column Gearshift Linkage (Coronet-Charger)

bolt and sliding swivel along rod so it will enter 2nd3rd lever at transmission. Install washers and clip. Tighten swivel bolt to 100 inch-pounds. (9) Remove tool from cross-over blade at steering column and shift through all gears to check adjustment and cross-over smoothness. (10) Check for proper operation of steering column lock in reverse and second gear positions. With proper linkage adjustment, column should lock in reverse position and should not lock in second position.

Gearshift Interlock (Fig. 6)

(1) Disconnect clutch rod swivel from interlock pawl. (2) Adjust clutch pedal free play as specified in clutch section. (3) When first-reverse lever on transmission is in neutral (middle detent) position, the interlock pawl

CROSS-OVER BLADE IN NEUTRAL

2ND-3R0 LEVER SHAFT 1ST-REVERSE LEVER PAWL

CLIP PLAIN WASHER

7-1 CLAMP

SPRING WASHER PLAIN WASHER CLIP

str.SCREW

CLUTCH ROD SCREWDRIVER

NP556A

Fig. 5-Holding Cross-Over Blade in Neutral Position

SWIVEL Fig. 6-Gearshift Interlock

NNIO7A


21-84 TRANSMISSIONS-3 SPEED will enter the slot in first-reverse lever. (4) Loosen swivel clamp bolt and slide swivel on rod to enter pawl. Install washers and clip. Hold interlock pawl forward and tighten swivel clamp bolt to 100 inch-pounds. Clutch pedal has to be in full returned position during this adjustment. CAUTION: Do not pull clutch rod rearward to engage swivel in the pawl.

(5) Shift transmission in normal manner from neutral to first, and from neutral to reverse (disengage clutch while shifting and engage clutch when in gear). Clutch action should be normal. (6) Disengage clutch and shift halfway to first or reverse. Clutch should now be held down by interlock to prevent clutch engagement.

SPEEDOMETER PINION GEAR Removal and Installation Rear axle gear ratio and tire size determines pinion gear size requirements. Refer to "Speedometer Pinion Chart" in Specifications for pinion usage. (1) Place drain pan under adapter or drain transmission. (2) Remove bolt and retainer securing speedometer pinion adapter in extension housing (Fig. 7). (3) With cable housing connected, carefully work adapter and pinion out of extension housing. (4) If transmission fluid is found in cable housing, replace seal in the adapter (Fig. 8). Start seal and tamer ring in adapter, then push them into adapter with Tool C-4004 until tool bottoms (Fig. 9). (5) Note number of gear teeth and install speedometer pinion gear into adapter (Fig. 8). CAUTION: Before installing pinion and adapter assembly, make sure adapter flange and its mating area on extension housing are perfectly clean and lubricated. Dirt or sand will cause mis-alignment resulting in speedometer pinion gear noise.

(6) Rotate the speedometer pinion gear and adapter assembly so that the number on the adapter, conesponding to the number of teeth on the gear, is in the

_ rile-RETAINER

ADAPTER RING PINION

BOLT AND WASHER

OIL SEAL

RETAINER RING NN362

Fig. 8—Speedometer Pinion and Adaptor—

Disassembled

6 o'clock position as the assembly is installed (Fig. 7). (7) Install retainer and bolt, with retainer tangs in adapter positioning slots. Tap adapter firmly into extension housing and tighten retainer bolt to 100 inch-pounds. (8) Fill transmission to level of fill plug (Fig. 2).

EXTENSION HOUSING AND BUSHING Removal (1) Drain transmission fluid. (2) Mark parts for reassembly then disconnect propeller shaft at rear universal joint. Carefully pull shaft yoke out of transmission extension housing. CAUTION! Be careful not to scratch or nick ground surface on sliding spline yoke during removal and installation of the shaft assembly.

(3) Remove the speedometer pinion and adapter. (4) Remove bolts securing extension housing to crossmember. Raise transmission slightly with service jack and remove center crossmember (Fig. 10). (5) Remove extension housing to transmission bolts and slide extension housing off mainshaft. Bushing Replacement (1) Remove extension housing yoke seal (Fig. 11) with Tool C-3994. (2) Drive the bushing out of housing (Fig. 12) with Tool C-3996. (3) Slide a new bushing on installing end of Tool C-3996. Align oil hole in bushing with oil slot in housing, then drive bushing into place (Fig. 12). (4) Drive a new oil seal into housing with Tool C3995 (Fig. 13). ADAPTER

LOCK RING

fc-7,.5,11111in. f; ';:za7;x•

SEAL NP2

6 O'CLOCK POSITION

Fig. 7—Speedometer Pinion and Adaptor installed

Fig. 9—installing Speedometer Pinion Seal


3 SPEED—TRANSMISSIONS 21-85

REAR ---sr TRANSMISSION EXT. HOUSING

CENTER CROSSMEMBER

TIGHTENING TORQUE 200 IN. LBS. <8)

40 FT. LBS. 30 FT. LBS.

1

NU46A

Fig. 10—Center Crosstnember and Rear Engine Mount (Coronet-Charger) installation

( I) Slide extension housing, with a new gasket, over mainshaft and down against the case. Install and tighten attaching bolts to 50 foot-pounds. (2) Install center crossmember and tighten retaining bolts to 30 foot-pounds. Lower transmission, install extension housing to rear engine mount bolts and tighten to 40 foot-pounds. (3) Install the speedometer pinion and adapter. (4) Carefully guide front universal joint yoke into extension housing and onto mainshaft splines. Align marks made at removal and connect propeller shaft to rear axle pinion yoke. (5) Fill transmission to level of fill plug (Fig. 2).

CAUTION: Be careful not to scratch or nick ground surface on sliding spline yoke during removal and installation of the shaft assembly. (3) Remove extension housing yoke seal (Fig. 11)

with Tool C-3994. (4) To install a new seal, position seal in opening of extension housing and drive it into housing with Tool C-3995 (Fig. 13). (5) Carefully guide front universal joint yoke into extension housing and onto mainshaft splines. Align marks made at removal and connect propeller shaft to rear axle pinion shaft yoke. (6) Fill transmission to level of fill plug (Fig. 2). SERVICE OUT OF VEHICLE

EXTENSION HOUSING YOKE SEAL Replacement (1) Place drain pan under seal. (2) Mark parts for reassembly then disconnect propeller shaft at rear universal joint. Carefully pull shaft yoke out of transmission extension housing.

TRANSMISSION REMOVAL Removal (1) Drain lubricant from the transmission. (2) Mark parts for reassembly then disconnect propeller shaft at rear universal joint. Carefully pull shaft yoke out of transmission extension housing. CAUTION: Be careful not to scratch or nick ground TOOL iNSTALLINC BUSHING

BUSHING TOOL

REMOVING END

tivk INSTALLING rND

Fig. 11—Removing Extension Housing Yoke Seal

NU43

Fig. 12—Replacing Bushing in Extension Housing


21-86 TRANSMISSIONS-3 SPEED SHIFT FORKS 1ST-REVERSE

IN NEUTRAL DRIVE PINION

GF.Ae 90•°•-.—

NNI25.

Fig. 13—installing Extension Housing Yoke Seal surface on sliding spline yoke during removal and installation of the shaft assembly.

(3) Disronnert speedometer cable and back-up light switch leads. (4) Install engine support fixture C-3487-A mounting hooks firmly into holes in side frame members with support ends up against underside of oil pan flange. Use Adapter Leg C-3806 on 6-cyl. engines. (5) Raise engine slightly with support fixture. Disconnect transmission extension housing from removable center crossmember (Fig. 10). (6) Support transmission with a suitable jack and remove center crossmember. Remove bolts that attach transmission to clutch housing. (7) Slide transmission rearward until pinion shaft clears clutch disc before lowering transmission. (This precaution will avoid damaging the clutch disc.)

mAINSHAFT SPLINES

2ND GEAR W

Fig. IS—A-905 Transmission—toyer Removed

(8) Lower transmission and remove from under vehicle. Clean outside of transmission.

DISASSEMBLING TRANSMISSION (Fig. 14) (1) Remove bolts that attach cover to the case. Remove cover and gasket (Fig. 15). (2) Using a pair of feeler gauges, measure synchronizer float. The measurement of "float" should be taken before any further disassembly of transmission.

COVER SCREW

GEAR SPRING GEAR RING RING SLEEVE RING

OMR

FORK

SHAFT BEARING SNAP RING EXTENSION BUSHING

)

RING WASHER -ROLLERS do— –GEAR "WASHER

SPACER ROLLERS WASHER RING

BALL WASP. _

FORK LEVER___ SPRING BEARING SLEEVE cs\GASKET --\\7\ WASHERSCREW

-

-;;;;- PIN . _____„„sitsolo . . i

,

4 RING

ROLLERS PINION OIL SLINGER

SEAL GASKET RETAINER

PY62

RING

CASE

'

SEAL

ROLLERS LEVER

- GASKET PLUG KEY Jeer.— ----- SHAFT KEY SHAFT LEVER PIN PIVOT PIN

i SCREW WASHER GASKET SPRING WASHER

PIN ..-WASHER WASHER

Nur

WASHER LOCK WASHER LOCKWASHER PAWL

Fig. 14—A-903 Transmission Disassembled

CLIP

NK260C


3 SPEED—TRANSMISSIONS 21-87 (3) The synchronizer "float" should be .060 to .117 inch, when measured between synchronizer outer ring pin and opposite synchronizer outer ring (Fig. 16). This measurement must be made on two pins, 180 degrees apart with equal gap on both ends for "float" determination. (4) There should be a snug fit between pins and feeler gauges, similar to that obtained when measuring with a micrometer.

Extension Housing (1) Remove bolt and retainer securing speedometer pinion adapter in extension housing (Fig. 7). Carefully work adapter and pinion out of extension housing. (2) Remove bolts which attach extension housing to transmission case. Slide extension housing off mainshaft. Drive Pinion (1) Remove bolts that attach drive pinion bearing retainer to case, then slide retainer off the pinion. Pry seal out of retainer, using a suitable tool. To avoid leakage around the new seal, do not nick or scratch the bore in which the seal is pressed, or the surface on which seal bottoms. (2) Rotate drive pinion so that the omitted clutch

BEARING AND SNAP RING

3 TEETH OMITTED TO CLEAR CLUSTER GEAR DURING ASSEMBLY

WASHER SNAP RING (SELECT THICKNESS FOR MINIMUM END PLAY)

SLINGER Oft SEAL SURFACE PY69

Fig. 17—Drive Pinion Assembly

MAINSHAFT (1) Remove clutch gear retaining snap ring from mainshaft (Fig. 20). (2) Remove mainshaft bearing retaining snap ring from case (Fig. 21). (3) Slide mainshaft and bearing rearward out of SYNCHRONIZER-OUTER STOP RINGS

PILOT END OF MAINSHAFT

tooth area (Fig. 17) is next to countershaft gear for removal clearance.

(3) Grasp pinion shaft and pull assembly out of case slightly, then slide synchronizer front inner stop ring from the short splines on pinion as assembly is being removed from the case (Fig. 18). (4) Remove snap ring (Fig. 17), which locks bearing on pinion shaft. Remove pinion bearing washer, then carefully press pinion shaft out of bearing, using an arbor press. Remove oil stinger. (5) Remove snap ring and bearing rollers from cavity in end of drive pinion (Fig. 19).

DRIVE PINION AND BEARING

CLUTCH GEAR SLEEVE PY63

Fig. 18—Removing or Installing Drive Pinion

4

MAINSHAFT PILOT MARINO ROLLERS

SNAP RING PY70

Fig. 16—Measuring Synchronizer "Float"

Fig. 19—MaInshaft Pilot Bearing In End Drive Pinion

of


21-88 TRANSMISSIONS-3 SPEED PROP SHAFT SLIDING YOKE SPLINES

CLUTCH GEAR SNAP RING ON MAINSHAFT

151 REVERSE 2ND-GEAR SLIDING GEAR BEARING CLUTCH SPLINES SURFACE GEAR SPLINES

PILOT BEARING SURFACE MAINSHAFT BEARING SNAP RING (SELECT THICKNESS FOR MINIMUM END PLAY) SPRING.SYNCHRONIZER STOP RING

P164

• P 67

Fig. 23—Mainshat and Bearing Assembly

second gear, first.reverse gear, and shift forks from the case.

Fig. 20—Removing or Installing Clutch Gear Snap Ring

Gearshift Mechanism BACK UP LIGHT SWITCH

SPEEDOMETER DRIVE WORM ON MAINSHAFT

MAINSHAFT BEARING TO CASE SNAP RING (SELECT THICKNESS FOR MINIMUM END PLAY)

PY65

Fig. 21—Romoving Mainsheet to Case Snap Ring

case while steadying gears as they drop free (Fig. 22). (4) Remove selective snap ring from shaft (Fig. 23) and press bearing off the mainshaft. (5) Now remove the synchronizer parts (Fig. 24) SYNCHRONIZER INNER STOP RING

(This operation need only be done if the seals are leaking.) (1) Remove operating levers from their respective shafts. (2) Drive out tapered retaining pin from either of the two lever shafts, then withdraw lever shaft from inside transmission. (The detent balls are spring loaded; as shaft is being withdrawn, ball will drop to bottom of the case.) (3) Remove interlock sleeve, spring, pin and both balls from the case (Fig. 25). Drive out remaining rnrprod pin: then slide lever shaft out of transmission. (4) Using a suitable drift, drive out lever shaft oil seals.

SYNCHRONIZER CLUTCH GEAR

Countershaft Gear

(1) Using a feeler gauge, check end play of countershaft gear (Fig. 26). The end play should be .005 to .022. (This measurement will determine if new thrust washers are to be installed at reassembly). (2) Using countershaft bearing arbor, Tool C-578 for A-903 transmission, drive countershaft toward rear of case until small key can be removed from countershaft. CLUTCH GEAR SLEEVE

SPRING

CLUTCH GEAR SNAP RING

OUTER STOP RINGS

MAINSHAFT BEARING

PY66

Fig. 22—Removing Mainshaft from Case and Gear

INNER STOP RINGS PYI40

Fig. 24—A.903 Synchronizer—Disassembled


3 SPEED—TRANSMISSIONS 21-89 turning outer race by hand. Measure fit of the bearings on their respective shafts.

LOW AND REVERSE CA

Needle Type Bearing Rollers and Spacers Inspect all bearing rollers for flat spots or brinelling. Inspect all bearing roller spacers for signs of wear or gaffing. Install new parts as required.

2ND AND DIRECT CAM 2ND AND DIRECT FORK 2ND AND DIRECT LEVER

BALL

PIN

LOW AND REVERSE FORK

‘7,,j

BALL

LOW AND REVERSE LEVER

SLEEVE SPRING NY858A

Fig. 25—A-903 Shift Forks and Levers

(3) Drive countershaft remaining way out of the case, keeping arbor tight against end of countershaft to prevent loss of roller bearings. (4) Remove countershaft gear and thrust washers from the case. (5) Remove bearing rollers, spacer rings and center spacer from countershaft gear. Reverse Idler Gear (1) Using a suitable drift, drive reverse idler gear shaft towards rear and out of the case. Remove woodruff key from end of shaft. (2) Lift reverse idler gear and thrust washers out of the case. Remove bearing rollers from the gear. CLEANING AND INSPECTION Clean transmission case thoroughly, using a suitable solvent, dry with compressed air. Inspect case for cracks, stripped threads in various bolt holes and machined mating surfaces for burrs, nicks or any condition that would render the case unfit for further service. The front mating surface should be smooth; if any burrs are present, dress them off with a fine mill file. If threads are stripped, install Helicon inserts. Ball Bearings Wash ball bearings using a clean solvent and blow dry with compressed air. CAUTION: Do not spin bearings with air pressure; turn slowly by hand. Spinning unlubricated bearings may cause damage to races and balls. Be sure ball bearings are clean, then lubricate them with light grade engine oil. Inspect bearings for roughness. This can best be determined by slowly

Gears Inspect gear teeth on synchronizer clutch gears and stop rings. If there is evidence of chipping or excessively worn teeth, install new parts at reassembly. Be sure clutch sleeve slides easily on the clutch gear. Inspect countershaft gear and all sliding gear teeth for chipped or broken teeth, or showing signs of excessive wear. Small nicks or burrs must be stoned off. Inspect teeth on the main drive pinion. If excessively worn, broken or chipped, a new pinion should be installed. If the oil seal contact area on drive pinion shaft is pitted, rusted or scratched, a new pinion is recommended for best seal life. Test interlock sleeve and pin for free movement in bore of shift housing. Examine detent balls for signs of brinelling. If lever detents show signs of excessive wear to extent of not locking in gear, install a new part. Inspect shift forks for wear on the shanks and pads. Synchronizer Stop Rings Inspect gear teeth and threads on synchronizer inner stop rings for broken teeth or worn threads. Inspect pins on synchronizer outer stop ring assembly for being straight and attached securely. Replace parts as required. Mainshaft Inspect mainshaft gear and bearing mating surfaces. If gear contact surfaces show signs of galling or are excessively worn, a new mainshaft should be installed (Fig. 23). Inspect snap ring grooves for burred edges. If rough or burred, remove condition using a fine file or crocus cloth. Inspect synchronizer clutch gear teeth on shaft for burrs. ASSEMBLING TRANSMISSION (Fig. 14) The grease recommended for use during reassembly procedures is Automotive Multi-Purpose Grease NLGI Grade 2 E.P. or Multi-Mileage Lubricant, Part Number 2525035. Countershaft Gear (1) Slide countershaft gear bearing roller spacer over arbor Tool C-578 for A-903 transmission. Coat bore of gear with lubricant and slide tool and spacer in gear bore.


21-90 TRANSMISSIONS-3 SPEED (2) Lubricate bearing rollers with heavy grease and install 22 rollers in each end of gear in area around arbor. Coat with heavy grease and install bearing spacer rings in each end of gear. (3) If countershaft gear end play was found to exceed .022 during disassembly, install new thrust washers. Coat with heavy grease and install thrust

washer at each end of countershift gear and over arbor. Install gear and arbor in the case making sure tabs on thrust washers slide into grooves in the case. (4) Using countershaft and a soft hammer, drive arbor forward out of countershaft gear and through bore in front of the case. Before driving countershaft all way into case, be sure keyway is positioned in line with key recess in rear of case. Insert shaft key and continue to drive countershaft forward in case until key is bottomed in recess. Gear (I) Position arbor Tool C-464 in reverse idler gear and using heavy grease, install 22 bearing rollers in gear. (2) Place front and rear thrust washers at each end of reverse idler gear, and position assembly in transmission case with chamfered end of gear teeth toward front (Fig. 26). (3) Insert reverse idler shaft into bore at rear of case with keyway to rear, pushing arbor toward front of transmission. (4) With keyway aligned with recess in case, drive shaft forward, inserting key before keyway is obscured. Continue driving shaft forward until key seats in recess.

Reverse Idler

Gearshift Mechanism (Fig.

25) (1) Place new shift lever shaft seals in their bores

BACK-UP LIGHT SWITCH • REVERSE IDLER GEAR

in the case. Using Tool C-3766, drive seals into case, until tool bottoms. (2) Install seal protector, Tool C-3767, on end of low and reverse lever shaft, then slide shaft into rear boss of case and through the seal. Lock in position with tapered pin. Turn lever until center detent is in line with interlock bore. (3) Slide interlock sleeve in its bore in case followed by one of the interlock balls. Install interlock spring and pin. (4) Place remaining interlock ball on top of interlock spring, using Tool C-3765 (Fig. 27). (A good method of installing second ball is to stick ball in tool recess by means of lubricant, then use tool to position ball on detent spring.) (5) Install seal protector Tool C-3767, on second and high lever shaft. Depress interlock ball, using Tool C-3765 and at same time, install second and high lever shaft with center detent aligned with detent ball. Remove the tool. Secure lever shaft with remaining tapered pin. (6) Install operating levers and tighten retaining nuts to 18 foot-pounds. MAI NSH AFT (1) Press bearing on mainshaft then select and install snap ring for minimum end play (Fig. 25). (2) Move shift lever to reverse position then position the 1st-reverse gear and shift fork in the case (Fig. 15 and 291. Note that both shift forks are offset toward rear of transmission (Fig. 25).

(3) Arrange all the synchronizer parts (Fig. 24) with second gear (Fig. 28) and shift fork, so they may be held in one hand as a package. (4) Position this gearset in case and enter shift fork into its lever (Fig. 15 and 29). (5) Carefully work mainshaft through gears and IST-REVERSE LEVER

2ND-3RD LEVER

ETENT" BALL.HO, DING TOOL FEELER GAUGE COUNTERSHAFT GEAR

PY

Fig. 26—Checking Countershaft Gear End Play

PY 42

Fig. 27—Installing Shift Levers and Detent


3 SPEED—TRANSMISSIONS 21-91 SPREADER SPRING

2ND SPEED GEAR

INSERT SHIM ---AGAINST THIS FACE

NH498

Fig. 28 — Synchronizer Shim Location

synchronizer parts until bearing bottoms in rear of case (Fig. 29). (6) Install synchronizer clutch gear snap ring (Fig. 20) on mainshaft. (7) Select and install mainshaft bearing snap ring (Fig. 21) in case. (8) In cases where synchronizer "float" measurement is above .117 inch, synchronizer shims should be installed to reduce "float" to .117 inch or less. Install shim on shoulder of second speed gear, before spreader spring is installed (Fig. 28). If synchronizer "float" is below .060 inch, an equal amount of material should be removed from ends of all six synchronizer pins until synchronizer "float" is above .060 inch. Drive Pinion

(1) Slide oil stinger over pinion shaft and down against gear (Fig. 17). (2) Slide bearing over pinion shaft (snap ring groove away from gear end), then seat on shaft, using an arbor press.

(3) Install keyed washer between bearing and retaining snap ring groove. (4) Secure bearing and washer with selected thickness snap ring. Four snap rings are available to eliminate end play. Be sure snap ring is properly seated. If large snap ring around bearing was removed, install at this time. (5) Place pinion shaft in a vise (with soft jaws), then install 14 bearing rollers in cavity of shaft. Coat bearing rollers with heavy grease, then install bearing retaining ring in its groove. (6) Rotate drive pinion so that the omitted clutch tooth area is next to countershaft gear for assembly clearance (Fig. 17). Guide drive pinion through front of case and engage inner stop ring with clutch teeth, then seat pinion bearing. The pinion shaft bearing is fully seated when snap ring is in full contact with the case. (7) Install a new seal in pinion bearing retainer, using Tool C-3789 (Fig. 30). (8) Position retainer assembly and new gasket on the case. Use threaded sealing compound on bolts then install and tighten to 30 foot-pounds. Extension Housing

(1) Slide extension housing and a new gasket over mainshaft while guiding shaft through bushing and oil seal. Install and tighten attaching bolts to 50 foot-pounds. Use sealing compound on bolt used in one hole tapped through transmission case. (2) Install transmission gasket and cover, install and tighten cover bolts to 12 foot-pounds. (3) Rotate the speedometer pinion gear and adapter assembly so that the number on the adapter, corresponding to the number of teeth on the gear, is in the 6 o'clock position as the assembly is installed. (4) Install and tighten drain plug to 25 foot-pounds and back-up light switch to 15 foot-pounds. TRANSMISSION INSTALLATION

Place a small amount of Multi-Purpose Grease around inner end of pinion shaft pilot bushing in crankshaft and on pinion bearing retainer release bearing sleeve area. Do not lubricate end of pinion DRIVE PINION BEARING RETAINER

r

SUPPORTING GEARSET FOR mAINSNAFT INSTALLATION

SEAL INSTALLING TOOL PY68 Fig. 29—Installing Mainshaft into Gears and Case

NU4A Fig. 30—Drive Pinion Seal Replacement


21-92 TRANSMISSIONS-3 SPEED shaft, clutch disc splines or clutch release levers.

(1) Place transmission on a suitable jack and slide assembly under vehicle. (2) Raise transmission until drive pinion shaft is centered in clutch housing bore. (3) Roll transmission slowly forward until pinion shaft enters clutch disc. Turn pinion shaft until splines are aligned, then push transmission forward until seated against clutch housing. Do not allow transmission to "hang" after pinion has entered clutch disc.

(4) Install transmission attaching bolts and tighten to 50 foot-pounds. Remove the jack. (5) Using a pointed drift, align crossmember bolt holes, then install attaching bolts. Tighten to 30 footpounds (Fig. 10).

(6) Remove engine support fixture and disengage hooks from holes in frame side rails. Install extension housing to rear engine mount bolts and tighten to 40 foot-pounds. (7) Reconnect speedometer cable, gearshift rods and back-up light switch wires. Refer to "Gearshift Linkage Adjustment" and "Gearshift Interlock" in this group. (8) Carefully guide front universal joint yoke into extension housing and onto mainshaft splines. Align marks made at removal and connect propeller shaft to rear axle pinion yoke. (9) Fill transmission to level of fill plug (Refer to Lubrication Group. (10) Road test vehicle, making sure transmission shifts smoothly and operates quietly.


MANUAL TRANSMISSION-(A-230) THREE SPEED INDEX General Information Service Diagnosis Service in Vehicle

Extension Housing Yoke Seal Gearshift Linkage Adjustment Speedometer Pinion Gear Service Out of Vehicle

Assembling Transmission

Page 92 93 104 105 103

Cleaning and Inspection Disassembling Transmission Extension Housing Bushing Replacement Transmission Installation Transmission Removal Specifications Tightening Reference

Page 98 94 102 103 93 108 110

99

GENERAL INFORMATION The A-230 three speed transmission (Fig. 1) has two synchronizer units, providing clash free shifting in all forward gears. A pad has been provided on the right side of the transmission (Fig. 2) for identification numbers. Sample Number: PP 230 3262 2220

The first two letters identify the manufacturing plant. The next three numbers are the transmission model number. The following four numbers are a date of manufacture code. The last four numbers are a sequence number. The main drive pinion (input shaft) is supported by a ball bearing in the transmission case and an olite bushing pressed in the end of the crankshaft. The mainshaft (output shaft) front end is supported by roller bearings in the end of the main drive pinion and a ball bearing retainer in the front of the extension housing. The output end of the mainshaft is splined to the sliding universal joint yoke, which is supported by a bushing in the extension housing. The countershaft gear is supported by a double row of needle type roller bearings at each end and the thrust is taken on thrustwashers between the ends of

the gear and the transmission case. The alignment of the needle type roller bearings within the gear is maintained by six thrust washers (one being used between the rows of roller bearings and one at each end). The reverse idler gear is also supported on needle type roller bearings. The gearshifting is manually operated through shift control rods to the transmission. Any forward gear may be engaged while the vehicle is in motion through the use of synchronizing clutches. The transmission may be used as an aid to deceleration by downshifting in sequence without double clutching or gear clashing, due to the fact that all forward speeds are synchronized. The service procedures covering the A-230 transmission used on all vehicles so equipped is identical to the following service procedures except where noted. IMPORTANT: Some internal transmission parts are different from standard on vehicles with high performance engines. These "special" parts are listed in applicable Parts Catalog; therefore, be sure they are used when replacement is necessary.


3 SPEED—TRANSMISSIONS 21-93 TYPICAL SHIFT LEVER

SPEEDOMETER DRIVE ASSEMBLY DRAIN PLUG

BACK-UP IGHT SWITCH

DRIVE PINION RETAINER

A—rrn.pon-ke

FILL PLUG IDENPEICA I ION NUMB& PAD

Fig. I—A-230 Transmission Cutaway

PY0.74

Fig. 2—A-230 Transmission—Left and Right Sides

SERVICE DIAGNOSIS

Condition

Possible Cause

Correction

HARD SHIFTING

(a) Refer to Clutch Group for corrections. (b) Perform linkage adjustment as outlined in "Gearshift Linkage Adjustments." (c) Synchronizer clutch sleeve damaged. (c-d-e) Causes noted can only be cor(d) Synchronizer spring improperly inrected by disassembling transmission stalled. and replacing damaged or worn parts. (e) Broken Or worn synchronizer stop rings.

TRANSMISSION SLIPS OUT OF GEAR

(a) Linkage interference.

(a) Inspect and remove all linkage interferences. (b) Gearshift rods out of adjustment. (b) Adjust gearshift rods as outlined in "Gearshift Linkage Adjustments." (c) Synchronizer clutch teeth worn. (c) Disassemble transmission and replace parts as necessary. (d) Clutch housing bore or face out of (d) Refer to Clutch Group for correction alignment. procedure.

TRANSMISSION NOISES

(a) Excessive end play in countershaft (a) Replace thrust washers. gear. (b) Loose synchronizer hub spline fit on (b) Inspect mainshaft and synchronizer mainshaft. hub and replace parts as necessary. (C) Damaged, broken or excessively worn CC) Replace worn gears. gear teeth. (d) Rough or pitted bearing races or balls. (d) Replace worn bearing.

(a) Incorrect dutch adjustment. (b) Improper linkage adjustment.

SERVICE PROCEDURES TRANSMISSION REMOVAL I I Remove shift rods from transmission levers. 121 Drain fluid from transmission.

(3) Disconnect propeller shaft at rear universal joint. Mark both parts to reassemble in same position. Carefully pull shaft yoke out of transmission extension housing.

CAUTION: Be careful not to scratch or nick ground surface on sliding spline yoke during removal and installation of the shaft assembly. ;4) Disconnect speedometer cable and back-up light

switch leads. (51 Some models have exhaust systems which will have to be partially removed for clearance See Exhaust Systems, Section 11.


21-94 TRANSMISSIONS-3 SPEED (8) Install engine support fixture C-3487A, engaging the hooks in holes in frame side member. Be sure support ends are up against underside of oil pan flange. (7) Raise engine slightly with support fixture. Disconnect extension housing from removable center crossmember. (8) Support transmission with a suitable jack and remove center crossmember. (9) Remove transmission to clutch housing bolts. Slide transmission toward rear until drive pinion shaft clears clutch disc, before lowering transmission. (10) Lower transmission and remove from under vehicle. Thoroughly clean exterior of unit. DISASSEMBLING TRANSMISSION (Fig. 3) Gearshift Housing and Mechanism

(1) Shift transmission to second gear for shift fork clearance. (2) Remove housing retaining bolts and lift shift mechanism from case (Fig. 4). (3) If shaft "0" ring seals need replacement, proceed as follows: Pull shift forks out of shafts. (4) Remove nuts attaching operating levers to the shafts. Disengage levers from flats on shafts and remove, (5) Remove burrs from shafts before removal from housing to avoid scoring the bores which would cause leakage after reassembly. (6) Push gearshift lever shafts through housing bores and remove. Drive Pinion Retainer and Extension Housing

(1) Remove bolts holding drive pinion bearing retainer to front of transmission case. (2) Slide retainer and gasket forward off the drive pinion. Pry pinion oil seal from bearing retainer. To avoid leakage around the new seal, do not nick or scratch the bore in which the seal is pressed, or the surface on which seal bottoms. (3) Tap drive pinion forward carefully with a brass drift, as far as possible to provide maximum disassembly clearance for mainshaft removal (Fig. 5). (4) Rotate cut away part of second gear next to countershaft gear for mainshaft removal clearance (Fig. 6). Ref. No. Name I. Gear First 2. Rine 3. Spring 4. Sleeve 5. Struts (3) G. Spring 7. Snap Ring 8. Bushing B. Gear Reverse 10. Bearing 11. Snap Ring 12. Snap Rine 13. Retainer

Ref. No. Name 14. Gasket 15. Extension 16. Bushing 17. Seal 18. Yoke 19. Snap Ring 20. Ring 21. Spring 22. Sleeve 23. Struts (3) 24. Spring 25. Ring 26. Gear, Second

Ref. No. Name 27. Shaft, Output 28. Washer 29. Roller 30. Washer 31. Roller 32. Washer 33. Countershaft 34. Washer 35. Roller 36. Washer 37. Roller 38. Washer 39. Retainer

(5) Also shift 2nd-3rd synchronizer sleeve forward for the same reason. (6) Remove bolt and retainer securing speedometer pinion adapter in extension housing (Fig. 2). Carefully work adapter and pinion out of extension housing. (7) Remove bolts that attach extension housing to rear of transmission case. (8) Tap with plastic hammer to break gasket seal and carefully guide housing off rear of mainshaft. Idler Gear and Mainshaft (Fig. 7)

(1) Insert arbor Tool C-464 in case to push reverse idler shaft and key out of case (Fig. 7), (2) Remove idler gear with arbor in place to retain rollers. (3) Remove both thrust washers (Fig. 8). (4) Grasp mainshaft assembly and remove through rear of case (Fig. 8). Countershaft Gear and Drive Pinion

(1) Using a mallet and arbor Tool C-4112 tap countershaft rearward and remove key. Continue to drive countershaft out of case, maintaining contact between shaft and arbor so that washers will not drop between them (Fig. 9). (2) Lower countershaft gear to bottom of case to permit removal of main drive pinion. (3) Remove snap ring from pinion bearing outer race (Fig. 10). (4) Using a plastic hammer, drive the pinion into case and remove through rear (Fig. 11). (5) If bearing is to be replaced, remove snap ring and press bearing off the pinion gear shaft (Fig. 12). (6) Lift countershaft gear and arbor assembly out through rear of case (Fig. 13). Mainshaft Disassembly

(1) Remove the snap ring from front end of mainshaft which retains the 2nd-3rd synchronizer clutch gear (Fig. 14). (2) Slide the 2nd-3rd synchronizer assembly off end of mainshaft along with the 2nd gear stop ring (Fig. 15). (3) Remove 2nd gear from mainshaft (Fig. 16). (4) Spread snap ring in mainshaft bearing retainer to disengage it from bearing groove and slide retainer off the bearing race (Fig. 17). Ref. No. Name 40. Gasket 41. Seal 42. Snap Ring 43. Snap nine 44. Bearing 45. Pinion, Drive 46. Roller 47. Snap Ring 48. Case 49. Plug, Drain 50. Fork 51. Lever 52. Housing

LEGEND FOR FIGURE 3

Ref. No. Name 53. Lever 54. Nut, Locking 55. Switch 56. Lever 57. Bolt 58. Gasket 59. Lever, Interlock 60. Lever 61. Fork 62. Spring 63. Snap Ring 64. Washer 65. Gear, Countershaft

Ref. Name No. 66. Washer 67. Roller 68. Gear, Idler 69. Washer 70. Shaft 71. Key 72. Washer 73. Plug, Filler 74. Gear, Clutch 75. Gear, Clutch 76. Key 77. Gasket


CO

CA

SNOISSIMNVII1

to rn rn a

PY626 Fig. 3-4.230 Transmission—Disassembled


21-96 TRANSMISSIONS-3 SPEED

MAINSHAFT BEARING RETAINER

MAINS HA

INSTALLED HERE, THE LONG SHOULDER BOLT ACTS AS A COVER LOCATING DOWEL PY630

Fig. 4—A-230 With Shift Mechanism Assy., Pinion Bearing Retainer, and Extension Housing—Removed A

IDLER SHAFT AND KCY

mAINSHATT ASSEMBLY ARBOR ftt! CY,LEPc

PY633

Fig. 7—Reverse idler Gear—Removal or Installation

411%, MAINSHAFT

COUNTERSHAFT GEAR DRIVE PINION ASSEMBLY

REVERSE IDLER GEAR THRUST WASHERS

0

PY631

Fig. 5—Tap Drive Pinion Forward for Mainshaft Pilot Clearance SYNCHRONIZER SLEEVES MOVED FORWARD

IDLER SHAFT

posrnon CUT AWAY AREA ON 2ND GSA NEXT TO CLUSTER GEAR FOR CLEARANCE

CU ' NTERSHAFT PY632

PY634

Fig. S—Atestoshaft Assontitly—Rootoval or installation

COLINTERSFIAFT

ARBOR FOR ROLLERS

fi COUNTERSHAPT GEAR

/14 PY635

Fig. 6—Position 2nd Gear and Shift Sleeves for Clearance

Fig. 9—Countershaft Removal


3 SPEED-TRANSMISSIONS 21-97 RETAINER MOUNTING BOLT HOLES (4

SNAP RING BEARING OUTER RACE

HOLE FOR PINION BEARING RETAINER DRAIN PY636

Fig. 10—Snap Ring on Pinion Gear Bearing—Removal

PY638

Fig. 13—Countershaft Gear and Arbor Assembly— Removal or Installation

SNAP RING PLIERS

PY637

COUNTERSHAFT GEAR AND ARBOR ASSEMBLY LYING IN BOTTOM OF CASE

Fig. 11—Drive Pinion and Bearing Assembly— Removal or Installation

PY643

Fig. 14—Snap Ring-2nd3rd Synchronizer Clutch Gear to Mainsha ft—Removal or installation

(5) Remove snap ring securing bearing to mainshaft (Fig. 18). (6) Set up parts in arbor press to force bearing off 2ND GEAR STOP RING

SNAP RING PLIERS

SNAP RING DRIVE PINION GEAR SHAFT

STOP RING LUG 2ND-3RD SYNCHRONIZER ASSEMBLY PY641

Fig. 12—Snap Ring, Pinion Shaft to Bearing— Removal or Installation

PY644

Fig, 15 -2nd -ard Synchronizer Assembly and Stop Ring—Removal or Installation


21-98 TRANSMISSIONS-3 SPEED THRUST FLANGE ON MAINSHAFT

PRESS RAM

FIRST GEAR PY645

SECOND GEAR

SUPPORT MAINSHAFT TO AVOID FALL WHEN CLEAR OF BEARING

Fig. I6 -2nd Gear —Removal or Installation SNAP RING PLIERS PLATES SUPPORTING REVERSE GEAR WHICH SLIDES AGAINST BEARING

GROOVE IN BEARING RACE MAINSHAFT BEARING RETAINER

PY646

Fig 17—Snap Ring Spread, to Remove or Install Retainer on Mainshaft Bearing

mainshaft. By supporting front side of reverse gear it can push the bearing off shaft as pressure is applied to shaft (Fig. 19). When bearing clears shaft, don't let parts drop through. (7) Remove from press and slip off the end of shaft, the mainshaft bearing and reverse gear (Fig. 20). (8) Remove from mainshaft the snap ring which retains the 1st-Reverse synchronizer clutch gear (Fig. 21). (9) Slide 1st-Reverse synchronizer assembly off splines and remove from mainshaft (Fig. 22).

:

SNAP RING PLIERS

MAINSHAFT BEARING

PY647

Fig. 18—Snap Ring—Mainshatt Bearing to Shaft— Removal or Installation

(10) Remove 1st gear and its stop ring from mainshaft (Fig. 23). CLEANING AND INSPECTION Clean transmission case thoroughly, using a suitable solvent, dry with compressed air. Inspect case for cracks, stripped threads in various bolt holes and machined mating surfaces for buns, nicks or any condition that would render the case unfit for further service. The front mating surface should be smooth; if any burrs are present, dress them off with a fine mill file. If threads are stripped, install Helicon inserts.

Bali Bearings Wash ball bearings, using a clean solvent and blow dry with compressed air. GROOVE FOR BEARING SNAP RING

SNAP RING REVERSE GEAR

Fig. I9—Using Press to Remove Meanshaft Bearing

MAINSHAFT BEARING

1ST GEAR

NO STOP RING ON REVERSE SIDE OF SYNCHRONIZER REV'CRSE GEAR

PY653

Fig. 20 —Reverse Gear and Mainshaft Rearing— Removal or Installation


3 SPEED—TRANSMISSIONS 21-99 SNAP RING ON MAINSHAFT

Gears

SNAP RING PUERS

Inspect gear splines on synchronizer clutch gears and stop rings. if there is evidence of chipping or exIS! GEAR

IST.REVERSE SYNCHRONIZER ASSEMBLY

PY6S4

Fig. 21—Snap Ring—Ist-Reverse Synchronizer Clutch Gear—Removal or installation SlOP RING

Synchronizer Stop Rings Inspect stop rings for cracks and wear. If rings are cracked or show signs of extreme wear on threaded bore, install new rings at reassembly. Test new rings for good fit on gear cones with minimum wobble.

151 GEAR MAINSHAFT

1ST REVERSE SYNCHRONIZER ASSEMBLY

cessively worn teeth, install new parts at reassembly. Be sure clutch sleeve slides easily on the clutch gear. Inspect countershaft gear and all gear teeth for chipped or broken teeth, or showing signs of excessive wear. Small nicks or burrs must be stoned off. Inspect teeth on main drive pinion. If excessively worn, broken or chipped, a new pinion should be installed, lithe oil seal contact area on drive pinion shaft is pitted, rusted or scratched, a new pinion is recommended for best seal life.

PY655

Fig. 22-10-Reverse Synchronizer Assembly— Removal or installation CAUTION: Do not spin bearings with air pressure; turn slowly by hand. Spinning unlubrIcated bearings may cause damage to races and balls. Be sure ball bearings are clean, then lubricate them with light grade engine oil. Inspect bearings for

pitting. This can best be determined by slowly turning outer race by hand. Measure fit of bearings on their respective shafts. Needle Type Bearing Rollers and Spacers Inspect all bearing rollers for flat spots or brinelling. Inspect all bearing roller spacers for signs of wear or galling. Install new parts as required.

Mainshaft Inspect mainshaft gear and bearing mating surfaces. If gear contact surfaces show signs of galling or are excessively worn, a new mainshaft should be installed. Inspect snap ring grooves for burred edges. If rough or burred, remove condition using a fine file or crocus cloth. Inspect synchronizer clutch gear splines on shaft for burrs. ASSEMBLING TRANSMISSION

Countorshaft Gear

(1) Slide assembly arbor, Tool C-4112, into countershaft gear. (2) Slide one roller thrust washer over arbor and into gear, followed by 22 Creased Rollers (Fig. 24). (3) Repeat Step 2, adding one roller thrust washer on end. (4) Repeat Steps 2 and 3 at other end of countershaft gear. (Total of 88 Rollers and 6 thrust washers). (5) Place greased front thrust washer on arbor against gear with tangs forward.

THRUST FLANGE BETWEEN 151 AND 2ND GEARS

COUNTERSHAFT GEAR ROLLER

\vist, CLUTCH GEAR SPLINES AND SNAP RING GROOVES

ASSEMBLY ARBOR SPECIAL TOOL

ryt_t• STOP RING

1ST GEAR

PY656

Fig. 23-1st Gear and Stop Ring—Removal or Installation

ROLLER THRUST WASHER

GEARTHRUST • WASHER

PY61/2•9

Fig. 24—Countershaft Gear—Roller Bearing Assembly


21-100 TRANSMISSIONS-3 SPEED (8) Coat rear thrust washer with heavy grease and stick it in place in the transmission case, with tangs rearward. (7) Carefully place countershaft gear assembly in position in bottom of transmission case (Fig. 13). Do not finish installation with countershaft and key until drive pinion is installed.

Pinion Gear (8) Press new bearing on pinion with snap ring groove forward. Install snap ring on shaft (Fig. 12). (9) Install 15 rollers and retaining ring in gear (Fig. 25). (10) Install drive pinion and bearing assembly into case (Fig. 11). (11) Now finish installation of countershaft gear assembly by positioning it and the thrust washers so that the countershaft can be tapped into position (Fig. 26). Be careful to keep the arbor in contact with the

ASSEMBLY ARBOR SPECIAL TOOL

26—Countershoft-4nstalletion MAINSHAFT BEARING SNAP RING-BEARING TO RETAINER RETAINER

countershaft to avoid parts dropping out of position and blocking the installation. Install key in counter-

shaft as installation is finished. (12) Carefully tap drive pinion forward to provide maximum clearance for mainshaft installation (Fig. 5). Mainshaft (Fig. 27) (13) Sub assemble the synchronizer parts in the order shown in (Figs. 28, 29 and 30) as follows: Place a stop ring flat on the bench followed by the clutch gear and sleeve. Drop the struts in their slots and snap in a strut spring placing the tang inside one strut. Turn the assembly over on the stop ring and install second strut spring with tang in a different strut. (14) Slide 1st gear and stop ring over rear end of mainshaft and against flange which separates 1st and 2nd gears (Fig. 23). (15) Slide 1st-Reverse synchronizer assembly over mainshaft, indexing the hub slots to 1st gear stop ring lugs (Fig. 22). (16) Install clutch gear snap ring on mainshaft (Fig. 21). RETAINING RING

MAINSHAFT PILOT BEARING ROLLER

PY657

COUNTERSHAFT

--

FIRST GEAR

GEAR

2ND-3RD SYNCHRONIZER SLEEVE

ISTREVERSE SYNCHRONIZER SLEEVE

STOP RING

SECOND GEAR

STOP RING PY642

Fig. 27—Main:haft Assembled (17) Slide reverse gear and mainshaft bearing in place and take to press, to force bearing on shaft (Fig. 20). (18) Support inner race of bearing and press shaft through to shoulder (Fig. 31). CLUTCH GEAR (POSITION LONG HUB FORWARD)

SNAP RING

STOP RING

CLUTCH SLEEVE

.-e PY640

Fig. 25—installing Rollers in Drive Pinion Geer

STRUT SPRINGS (2)

FORWARD PY203

Fig. 28-10-Reverse Synehronizer—Disossembispel


3 SPEED—TRANSMISSIONS 21-101 CLUTCH GEAR SLEEVE STOP RING STRUT SPRINGS (2)

STOP RING

STRUTS

tt#4 CLUTCH GEAR

k1/41

(POSITION .1)E RviLA ORNDG )

LUG-STOP RING SNAP RING TO CLUTCH GEAR

SYNCHRONIZER CLUTCH GEAR SLEEVE

CP FORWARD

SLOT FOR STRUT

PY202

Fig. 29-2nd-3rd Synchronizer—Disassembled

Be sure snap ring groove on outer race is forward.

(19) Install bearing retaining snap ring on mainshaft (Fig. 18). (20) Spread snap ring in mainshaft bearing retainer groove and slide it over the bearing. Be sure snap ring seats in bearing groove (Fig. 17). (21) Place second gear over front of mainshaft with thrust surface against flange (Fig. 16). (22) Install properly indexed stop ring and 2nd-3rd synchronizer assembly against second gear (Fig. 15). (23) Install 2nd-3rd clutch gear snap ring on shaft (Fig. 14). (24) Move 2nd-3rd synchronizer sleeve forward as far as practical (limited by need to retain struts in place) and install front stop ring (coated with grease to hold it in position) inside sleeve with lugs indexed to struts. (25) Rotate cut out on second gear so it is toward countershaft gear for clearance (Fig. 6). (26) Now slowly insert mainshaft assembly into ease (Fig. 8) tilting it as required to clear cluster gears and finally entering the pilot rollers in the drive pinion gear. If everything is in proper position the hearing retainer will bottom to the case without force. If not, check to see if a strut, pinion roller, or stop ring is out of position. Reverse Idler Gear (27) Place assembly arbor, Tool C464 into idler gear along with 22 greased rollers (Fig. 32). (28) Position reverse idler thrust washers in case with grease to retain them. (29) Now position reverse idler gear with arbor and .rollers in the case (Fig. 7) while installing idler shaft and key. (30) Install extension housing and gasket now, to hold mainshaft and bearing retainer in place (Fig. 33). First, replace bushing and seal, if necessary.

CLUTCH GEAR STOP RING LUG STEPOPLACE CLUTCH GEAR AND CLUTCH SLEEVE ON STOP RING

STEP(2)INSTALL STRUTS IN CLUTCH GEAR SLOTS

TANG ON SPRING INSIDE STRUT

STEPO INSTALL STRUT SPRING

P650

Fig. 30—Assembling Synchronizer Parts


21-102 TRANSMISSIONS-3 SPEED

PRESS RAM

1ST GEAR

PRESS aiD

REVERSE GEAR

Fig. 34-Removing Extension Housing Seal Extension Housing Bushing Replacement

PLATES PPORTING INNER RACE BEARING

Fig. 31-Using Press to Install Mainshaft Bearing

(a) Remove extension housing yoke seal (Fig. 34) with Tool C-3985. (b) Drive the bushing out of housing (Fig. 35) with Tool C-3974. (c) Slide a new bushing on installing end of Tool C-3974. Align oil hole in bushing with oil slot in housing, then drive bushing into place (Fig. 35). (d) To install a new seal, position seal in opening of extension housing and drive it into housing with Tool C-3972 (Fig. 36). Drive Pinion Bearing Retainer (31) Install the outer snap ring on the drive

pinion bearing and tap the assembly back until the snap ring contacts case. (32) Using Tool C-3789 (Fig. 37), install a new oil seal in retainer bore. Position main drive pinion bearing retainer and gasket on front of case. Coat threads with cnling compound, then install attaching bolts and tighten to 30 foot-pounds (Fig. 2). Gearshift Mechanism and Housing (Fig. 38)

ROLLERS

(33)If removed, place the two interlock levers on TOOL INSTALLING BUSING

ray Fig. 32-Reverse Idler Gear-Roller and Arbor Assembly LOCATING KEYWAY FOR SEARING RETAJNER

BUSHING TOOL "■°•".

VENT PASSAGE INSTALLING END

1

az REMOVING END

HUG

Fig. 3$-Replacing Bushing in Extension Housing

EXTENSION HOUSING TO TRANSWSS1ON v,ouNTING SOLT HOLES PY629

Fig. 33-Extension Housing-Froat View

Fig. 36-installing Extension Housing Mei


3 SPEED—TRANSMISSIONS 21-103

at center rear of case (Fig. 4). Tighten bolts evenly to 15 foot-pounds. (39)Install speedometer drive pinion gear and adapter being sure range number, stamped on outside of adapter, representing number of teeth on gear. is in 6 -0" clock position (Fig. 401. TRANSMISSION INSTALLATION Fig. 37—Installing Seal in Drive Pinion Glaring Retainer

the pivot pin with the spring hangers offset toward each other so the spring will install in a straight line, and secure with -E" clip on Pivot pin. (341 Grease and install new "0" ring oil seals on both shift shafts. Grease housing bores and push each shaft into its proper bore. (35) With pliers install the spring on interlock lever hangers. (36) Rotate each shift shaft fork bore, to neutral position (straight up) and install shift forks through bores and under both interlock levers. Install Gearshift Mechanism

(37)Position the 2nd-3rd Synchronizer sleeve in transmission to rear (in 2nd gear). Position the 1streverse synchronizer sleeve to middle of travel tin neutral) (Fig. 4). Place the shift forks in the gearshift mechanism in the same positions. (38) Install gasket and gearshift mechanism on transmission using special shoulder bolts. One bolt has an extra long shoulder which enters the transmission case acting as a locating dowel pin. This hole is SHIFT LEVER TYPICAL) INTERLOCK LEVERS 1ST-REVERSE SHIFT SHAFT

lv

SHIFT FORKS S.

PIVOT PIN CLIP — INTERLOCK PIVOT INTERLOCK LEVER SPRING

clutch disc splines or clutch release levers.

(I) With transmission on a suitable jack, slide assembly under vehicle. (2) Raise transmission until drive pinion is centered in clutch housing bore. 131 Roll transmission slowly forward until pinion shaft enters clutch disc. Turn pinion shaft until splines are aligned, then work transmission forward until seated against clutch housing. Do not allow transmission to "hang" after pinion shaft has entered the clutch disc.

(4) Install transmission to clutch housing bolts and tighten to 50 foot-pounds. (5) Using a pointed drift, align erossmember bolt holes, then install attaching bolts. Tighten to 30 footpounds (Fig. 39). (6) Remove engine support fixture and disengage hooks from holes in the frame side rails. Install extension housing to rear engine mount bolts and tighten to 40 foot-pounds. (7) Referring to -Gearshift Linkage Adjustment". connect shift control rods to transmission levers and connect speedometer cable. (8) Carefully guide front universal joint yoke into extension housing and onto mainshaft splines. Conned propeller shaft to rear axle pinion yoke aligning the marks made at removal. (9) Reconnect exhaust pipes (if removed). Tighten bolts securely. (10) Fill transmission. See Lubrication Section for detailed recommendations. (II) Road test vehicle to make sure transmission shifts smoothly and operates quietly. SPEEDOMETER PINION GEAR Removal and Installation

0- RING OIL SEAL 2ND-3RD SHIFT SHAFT

Place a small amount of Multi-Purpose lubricant around inner end of pinion shaft pilot bushing in flywheel and on pinion bearing retainer pilot, for clutch release sleeve. Do not lubricate end of pinion shaft,

PY6-13

Fig. 38—Gearshift Mechanism and Housing— Disassembled

Rear axle gear ratio and tire size determines pinion gear size requirements. Refer to "Speedometer Pinion Gear Chart" in Specifications for pinion usage. (1) Place drain pan under adapter or drain transmission_ (2) Remove bolt and retainer securing speedometer pinion adapter to extension housing (Fig. 40).


21-104 TRANSMISSIONS-3 SPEED REAR

it)

TRANSMISSION EXT. HOUSING

REAR MOUNT

2) CENTER CROSSMEmBER

N.%

TIGHTENING TORQUE

I

\-„en Lat

200 IN. LBS. 40 FT. LBS. 30F1 LBS. NU46A

Fig. 39—Center Crossmember and Rear Engine Mount

(3) With cable housing connected, carefully work adapter and pinion out of extension housing. (4) If transmission fluid is found in cable housing, replace seal in the adapter (Fig. 41). Start seal and retainer ring in adapter, then push them into adapter with Tool C-4004 until tool bottoms (Fig. 42). (5) Note number of gear teeth and install speedometer pinion gear into adapter (Fig. 41).

CAUTION: Before installing pinion and adapter assembly, make sure adapter flange and its mating area on extension housing are perfectly clean and lubricated. Dirt or sand will cause mis-alignment resulting in speedometer pinion gear damage.

(6) Rotate the speedometer pinion gear and adapter assembly so that the number on the adapter, corresponding to the number of teeth on the gear, is in the 6 o'clock position as the assembly is installed (Fig. 40). (7) Install retainer and bolt, with retainer tangs in adapter positioning slots. Tap adapter firmly into extension housing and tighten retainer bolt to 100 inchpounds. (8) Fill transmission to level of fill plug (Refer to Lubrication Section).

EXTENSION HOUSING YOKE SEAL ADAPTER 6 O'CLOCK POSITION

Fig. 40—Speedometer Pinion and Adapter— Installed in Extension Housing I fa- RETAINER

ADAPTER

LOCK RING

ADAPTER

PINION BOLT AND WASHER

Replacement (1) Place drain pan under yoke seal. (2) Disconnect propeller shaft at rear universal joint. Mark both parts to reassemble in same position.

sue2y.thCara,16,4-?7//,

rsrsssisaza

OIL SEAL RETAINER RING

NN362

Fig. 41—Speedometer Pinion and Adapter— Disassembled

TOOL SEAL NP2

Fig. 42—installing Speedometer Pinion Seal in Adapter


3 SPEED—TRANSMISSIONS 21-105

Carefully pull shaft yoke out of transmission extension housing. CAUTION: Be careful not to scratch or nick ground surface on sliding spline yoke during removal and installation of the shaft assembly.

(3) Remove extension housing yoke seal (Fig. 34) with Tool C-3985. (4) To install a new seal, position seal in opening of extension housing and drive it into housing with Tool C-3972 (Fig. 36). (5) Carefully guide front universal joint yoke into extension housing and on mainshaft splines. Connect propeller shaft to rear axle pinion shaft yoke aligning the marks made at removal. (6) Fill transmission to level of fill plug (Refer to Lubrication Section). GEARSHIFT LINKAGE ADJUSTMENT A-230 Column Shift (1) Remove both shift rod swivels from transmission shift levers (Fig. 43). (2) Make sure transmission shift levers are in neutral (middle detent) position. (3) Move shift lever to line up locating slots in bottom of steering column shift housing and bearing

housing. Install suitable tool in slot and lock ignition switch. (4) Place screwdriver or suitable tool between crossover blade and 2nd-3rd lever at steering column so that both lever pins are engaged by cross-over blade (Fig. 44). (5) Set 1st-Reverse lever on transmission to reverse position (rotate clockwise). (6) Adjust 1st-reverse rod swivel by loosening clamp bolt and sliding swivel along rod so it will enter 1st-reverse lever at transmission. Install washers and clip. Tighten swivel bolt to 100 inch-pounds. (7) Remove gearshift housing locating tool, unlock ignition switch and shift column lever to neutral position. (8) Adjust 2nd-3rd rod swivel by loosening clamp bolt and sliding swivel along rod so it will enter 2nd3rd lever at transmission. Install washers and clip. Tighten swivel bolt to 100 inch-pounds. (9) Remove tool from cross-over blade at steering column and shift through all gears to check adjustment and cross-over smoothness. (10) Check for proper operation of steering column lock in reverse and second gear positions. With proper linkage adjustment, column should lock in reverse position and should not lock in second position.

STRG. COL.

2ND-3RD ROD FWD

2ND-3RD LEVER 1ST-REVERSE LEVER

1ST-REVERSE ROD 2ND-3RD ROD

PLAIN WASHER BUSHING FOR "B" ENGINE OR HEAVY DUTY ONLY

FWD. C21 CLIP PLAIN WASHER

ASSEMBLED VIEW

STRG. COL

2ND-3RD ROD

BUSHING GROMMET

FWD

CLIP

PLAIN WASHERCLIP 1ST-REVERSE ROD BOLT-0-CP CLAMP 1ST-REVERSE ROD BOLT.N.4 DETAILS AT STEERING COLUMN

Fig. 43-Column Shift (A-230)

PLAIN WASHER SWIVEL DETAILS AT TRANSMISSION PY695


21-106 TRANSMISSIONS-3 SPEED (4) Remove retaining screws from floor pan boot and retainer and slide up and off shift lever. (5) Remove shift lever attaching screws and remove lever. (6) Remove retaining clips, washers and shift rods from shift mechanism levers under floor pan. (7) Remove bolts securing shift mechanism to transmission extension housing mounting plate and remove the unit.

CROSS-OVER MADE IN NEUTRAL

Installation and Adjustment (Fig. 45)

(1) Position shift mechanism on transmission extension housing mounting plate and secure with the three mounting bolts. (If equipped with lower boot, place boot on mechanism first and insert long mounting bolt through unit and boot before attaching to mounting plate). (2) Fabricate a lever alignment tool from 1/16 inch thick sheet metal to dimensions shown in figure 45. (3) Insert lever alignment tool into slots in levers and mechanism frame to hold levers in neutral crossover position. (4) Place transmission levers in neutral (middle detent) position and adjust shift rod swivels so rods will install freely to levers. (5) Secure rods with proper washers and clips and remove alignment tool. (if so equipped, work flange port ion of lower boot up above floor pan opening).

NP556A

Ng. 44—Holding Crossover Blade In Neutral Position

THREE SPEED FLOOR SHIFT MECHANISM (Fig. 45) Removal

(1) Disconnect negative (ground) cable from battery. (2) Loosen lock nut and unscrew shift knob. (3) To remove console, if so equipped. see procedure in "Body" section 23.

KNOB

GEARSHIFT SELECTOR LEVER SCREW ;a!

—L— Sift _I-1

NUT

GROMMET (3) SPACER (3)

24/8 1/16 LEVER ALIGNMENT TOOL (SHEET METAL)

COVER

GEARSHIFT CONTROL mECHANISM TRANSMISSION

BOOT ASSEMBLY

SCREw

SCREW (8)

LOCK •.‘ ",.'•-4/. 1j))1i WASHER '•-)•„

:k-

PLATE BOLT

.

GEARSHIFT SELECTOR LEVER

STEERING COLUMN CONSOLE

CLIP (2) ,,c, ,•••

c

0

4.4

SCREw (4)

SCREW AND WASHER ASSEMBLY (3)

ROD — COLUMN LOCK FRONT

TORQUE SHAFT ASSEMBLY ..-

C.

TRANSMISSION EXTENSION

.Nizsr p4

SCREW AND WASHER ASSEMBLY CLIP (2)

SWIVEL (2)

LEVER ALIGNMENT SLOT BOOT

SIDE RAIL —\

ROD — COLUMN LOCK REAR

ROD — FIRST AND REVERSE ROD — SECOND AND THIRD

ROD — SECOND AND THIRD

BOOT ASSEMBLY

ROD — FIRST AND REVERSE

FLOOR PAN PY693

-

Fig. 45 Floor Shift 3 Speed


SPECIFICATIONS 21-107 SCREW AND WASHER ASSEMBLY

STEERING COLUMN WASHER

SCREW AND WASHER ASSEMBLY

COLUMN LOCK FRONT ROD

VIEW C 91/4" CLUTCH

BRACKET

CLIP WASHER

BRACKET 11" CLUTCH

WASHER

VIEW B 101/2" CLUTCH

CLAMP

CLIP BUSHING WASHER

COLUMN LOCK REAR ROD

WASHER S

RETAINER WASHER

SCREW

CLIP/ SWIVEL

BRACKET TORQUE SHAFT ASSEMBLY SCREW AND WASHER ASSEMBLY BUSHING

CLIP COLUMN LOCK REAR ROD

4 SPEED TRANSMISSION REVERSE LEVER 3 SPEED TRANSMISSION REVERSE LEVER VIEW A PY170

Fig. 46—Floor Shift Column Lock (All)

(6) Attach shift lever to mechanism with three mounting screws, grommets and spacers. (7) Slide boot and retainer over shift lever and fasten to floor with four screws each. (8) To install console, if so equipped, see procedure in "Body" section 23. (9) Install shift knob and its lock nut on shift lever. (10) Reconnect battery ground cable and test shifting action for smoothness. COLUMN LOCK LINKAGE ADJUSTMENT

For removal or installation of these parts, follow

the arrangement of parts shown in (Fig. 46). (1) Loosen the adjustable rod locking bolt. (2) Place transmission in reverse gear. (3) At the steering column, line up locating slots at bottom of shift housing and bearing housing. Install suitable tool in slots to hold alignment. A strip of metal 1/16 inch thick and 1/4 inch wide, held in place with tape will do. (4) Tighten adjustable rod locking bolt to 125 inchpounds and remove tool from column. (5) The steering column should now lock when transmission is in reverse gear but should not lock in any other gear.


SPECIFICATIONS 3-SPEED TRANSMISSION (A-903 6 CYL. ONLY) Engine Displacement (Cu. In.)

Gear Ratio First Second Third Reverse

198-225

2.95 1.83 1.00 3.80


21-108 SPECIFICATIONS Downshift Speed Limits 3rd to 2nd 2nd to 1st Lubricant Capacity Type Gear Type Tolerances Second Speed Gear End Play Countershaft Gear End Play Clutch Housing Face Squareness Clutch Housing Bore Run-Out Synchronizer Float

40 to 10 mph Zero mph IMP. Pints U.S. Pints 5-1/2 6-1/2 Auto. Trans. Fluid AQ—ATF Suffix "A" or (Dexron) Helical .002" to .016" .005" to .022" .006" Max. .008" Max. .060" to .117"

3-SPEED TRANSMISSION (A-230 ALL SYNCHRONIZED) Engine Displacement (Cu. In.)

Gear Ratio First Second Third Reverse Downshift Speed Limits 3rd to 2nd 2nd to 1st Lubricant Capacity Type Gear Type Tolerances Clutch Housing Face Squareness Clutch Housing Bore Run-Out

198-225 318

340 383

3.08 1.70 1.00 2.90

2.55 1.49 1..00 3.34

45 to 15 mph 25 to 0 mph U.S. Pints IMP. Pints 4-3/4 4 Auto. Trans. Fluid AQ—ATF Suffix "A" or (Dexron) Helical .006 Max. .008 Max.

4-SPEED TRANSMISSION (A-833)

Gear Ratio First Second Third Fourth Reverse Gear Type Tolerances Countershaft Gear End Play Clutch Housing Face Squareness Clutch Housing Bore Run-Out Lubricant—Capacity and Type Warm Climate—Multi-Purpose Gear Oil Cold Climate—Multi Purpose Gear Oil Downshift Speed Limits 4th to 3rd 3rd to 2nd 2nd to 1st

Std.

Heavy Duty

2.66 1.91 1.39 1.00 2.58

2.65 1.93 1.39 1.00 2.57 Helical (Except Reverse)

.015" to .029" .006" Max. .008" Max. U.S. Pints IMP. Pints 7-1/2 6-1/4 S.A.E. 140 S.A.E. 80 or 90 or Auto. Trans. Fluid AQ—ATF Suffix "A" or (Dexron) 50 to 25 mph 25 to 15 mph 15 to Zero mph


SPECIFICATIONS 21-109 TORQUEFLITE TRANSMISSIONS Transmission Models TYPE TORQUE CONVERTER DIAMETER

A-904

(Std.) (High Pert)

OIL CAPACITY-TRANSMISSION AND TORQUE CONVERTER Use Automatic Transmission Fluid Labeled Type AQ-ATF, Suffix "A" or "Dexron" ..(Std.) (High Perf ) COOLING METHOD LUBRICATION

A-727

Automatic Three Speed with Torque Converter 10-3/4 inches 11-3/4 inches 10-3/4 inches U.S. Measure

Imperial Measure

17 Pts.

19 Pts. 16-1/2 Pts. Water-Heat Exchanger Pump (Rotor Type) 14 Pts.

PUMP CLEARANCES Outer Rotor to Case Bore Outer to Inner Tip End Clearance-Rotors PLANETARY ASSY. END PLAY DRIVE TRAIN END PLAY CLUTCH PLATE CLEARANCE Front Clutch

198-225-318 3 3 3 3 2 2 3 3 First 2.45 to 1

16 Pts. 13-1/2 Pts.

4 4 3 4 Second 1.45 to 1

225-318-340-383440-428 3 3 4 4 4 5 3 3 4 4 4 5 3 3 3 3 3 3 4 4 4 4 4 4 Third Reverse 1 to 1 2.20 to 1

.004" to .008" 005" to 010" .0015" to .003" .006" to .033" .010" to .037" .030 to .089 .037" to .084" .042 to .087" (3 Disc) 056 to 104" (4 Disc)

Rear Clutch SNAP RINGS Front and Rear Clutches Rear Snap Ring (Selective) Output Shaft (Forward End) THRUST WASHERS Output Shaft to Input Shaft (Selective)

.032 to .055"

.036 to .086" (3 Disc) .024 to .125" (4 Disc) .066 to .123 (4 Disc High Pert) .022 to .079" (5 Disc) .025 to .045"

.060 to .062" .068 to .070" .076 to 078" .040 to 044" .048 to 052" .059 to .065"

.060 to .062" .074 to .076" .088 to .090" .048 to .052" .055 to .059" .062 to .066"

.052 to .054" (Natural) .068 to .070" (Red) .083 to .085" (Black)

Reaction Shaft Support to Front Clutch Retainer (Selective) ..

Driving Shell Thrust Plate-Steel (2) Front Planetary Gear to Driving Shell Rear Planetary Gear to Driving Shell Front Annulus Gear Support Front Clutch to Rear Clutch Front Clutch to Reaction Shaft Support Output Shaft to Input Shaft Driving Shell Thrust Plate-Steel (1) Rear Planetary Gear to Driving Shell Front Planetary Gear to Annulus Gear

Imperial Measure

A-727

A-904

CLUTCHES-Engine Cu. In. Number of Front Clutch Plates Number of Front Clutch Discs Number of Rear Clutch Plates Number of Rear Clutch Discs GEAR RATIOS

U.S. Measure

034 to .036" .060 to .062" .060 to .062" .121 to .125" .043 to .045" .043 to .045"

.061 to .063" (Green) .084 to .086" (Red) .102 to .104" (Yellow)

.062 to .064" .034 to .036" .062 to .064" .062 to .064"


21-110

TIGHTENING REFERENCE .062 to .064" .061 to 063" .034 to .036"

Front Annulus Gear to Driving Shell Front Clutch to Rear Clutch Rear Planetary Gear to Annulus Gear BAND ADJUSTMENTS Kickdown (Front) Low-Reverse (Internal)

Engines

Turns*

Engines

All

2

All Except 318 318 Cu. In.

3-1/4 4

All Except 426 426 Cu. In. All

Turns* 2 1-1/2 2

*Backed off from 72 inch-pounds. SPEEDOMETER PINION GEAR CHART ALL TRANSMISSIONS NUMBER OF TEETH ON PINION GEAR LISTED UNDER EACH AXLE RATIO Tire Size 6.45 x 14

6.95 x 14 7.35 x 14 7.75 x 14 8.25 x 14 8.55 x 14

Tire Size

2.45:1

B78 x 14 C78 x 14 D78 x 14 E78 x 14 G78 x 14 H78 x 14 F78 x 14

D70 x 14 E70 x 14 F70 x 14

24 24 25

25 L84 x 14

2.71:1

2.76:1

28 27 27 26 27

27 25

2.93:1

30 29 29 28 27 27 26 28 29 29 28 26

30 29 29 30

30

2.94:1

30 29 29 28 30

30 27

3.23:1

3.54:1

35 34 33 33 32 32 31 32 34 33 32 30

35

37 36

3.55:1

3.91:1

38 37 37 36 35 35 34 36 37 37 36 33

42 41 40 40 39 38 37 39 41 40 39

4.10:1

41

42 41

TIGHTENING REFERENCE Manual A-903, A-230 3-Speed

Foot Pounds

Back Up Light Switch Extension Housing Bolts Extension Housing to Cross Member Bolts Drive Pinion Bearing Retainer Bolts Manual A-833 4-Speed

15 50 40 30

Cooler Line Fitting Cooler Line Nut Converter Drain Plug Converter Drive Plate to Crankshaft Bolt .. Converter Drive Plate to Torque Converter Bolt Extension Housing to Transmission Case Bolt Extension Housing to Insulator Mounting Bolt Governor Body to Support Bolt Kickdown Band Adjusting Screw Lock Nut. Kickdown Lever Shaft Plug Neutral Starter Switch

Gearshift Operating Lever Nuts Transmission to Clutch Housing Bolts .... Transmission Cover Retaining Bolts Transmission Drain Plug

Foot Pounds

Back Up Light Switch Drive Pinion Bearing, Retainer Bolts Extension Housing to Case Bolts Gearshift Housing Bolts Gearshift Operating Lever Nuts Torqueflite A-904 and A-727

Foot Pounds

15 30 50 15 18

Foot Pounds

Reverse Detent Spring Retainer Reverse Detent Spring Retainer Plug Shift Lever Nuts Transmission Drain Plug Transmission to Clutch Housing Bolts ....

Pounds Foot Inch

110 85 110 55 270 24 40 100 29 150 24

18 50 12 25

50 24 18 25 50 Pounds Foot Inch

Oil Filler Tube Bracket Bolt Oil Pan Bolt Oil Pump Housing to Transmission Case Bolt Output Shaft Support Bolt Overrunning Clutch Cam Set Screw Pressure Test Take-Off Plug Reaction Shaft Support to Oil Pump Bolt Reverse Band Adjusting Screw Lock Nut.. Speedometer Drive Clamp Screw Transmission to Engine Bolt Valve Body Screw Valve Body to Transmission Case Bolt....

150 150

175 150 40

75 160 35 100 28 35

100


GROUP 22

WHEELS-BEARINGS-TIRES CONTENTS

Page

BEARINGS (FRONT WHEEL) Removal (Without Disc Brakes) Removal (With Disc Brakes) Cleaning and Inspection Lubrication Installation (Without Disc Brakes) Installation (With Disc Brakes) Bearing Adjustment GENERAL INFORMATION SERVICE PROCEDURES SPECIFICATIONS TIGHTENING REFERENCE TIRES

6 6 6 7 6 7 7 7 1 1 8 10 1

Page

Care of Tires—Cleaning Inflation of Tires Radial Ply Tires Rotation of Tires Repairing Tire Leaks Tire Noise Complaints Tire Wear Patterns Tire Tread Wear Indicators Wide Tread 70 Series Tires WHEELS Tire—Wheel Balance Tire and Wheel Runout Wheel Covers

1 2 3 2 3 4 4 3 3 5 5 6 6

GENERAL INFORMATION The original equipment Load Range B (4) ply rating bias belted factory installed tires on your vehicle are designed and tested to meet all normal operating requirements. These tires are superior tires for the vehicle and provide the best overall performance for normal operation; furthermore, the ride and handling characteristics match the vehicle's requirements. With proper care they will give excellent reliability, traction, skid resistance and tread life. The bias belted (bias breaker) represents a complete departure in tire design. This type of tire construction has the body plies, or layers of cords, running at a bias or criss-crossed angle to the circumference (Fig. 1). In addition, a rugged two-ply glass fiber circumferencial belt is added directly under the tread. The advantages of bias belted tires which are most important to the owner are: Superior ride and handling, improved tread life, improved traction and skid resistance and improved high speed durability because of cooler operating temperatures.

Tire wear and vehicle stability are affected greatly by tire size, tire pressures, wheel rim size, distribution of load within the vehicle, wheel alignment, road surface conditions, and driver operating habits. Tires used at low speeds, in cool climates, and with light loads will have longer life than tires used for high speed driving in hot climates with heavy loads. Abrasive road surfaces will accelerate tire wear. Driving habits have more effect on tire life than any other factor. Careful drivers will obtain, in most cases, much greater mileage than severe or careless drivers. Rapid acceleration and deceleration, severe application of brakes, high speed driving, taking turns at excessive speeds, striking curbs and other obstacles are just a few of the driving habits which will shorten the life of any tire. To obtain maximum vehicle stability and tire life the vehicle should be equipped with the recommended suspension application including the proper tire size and the recommended full rated load should not be exceeded. See Minimum Tire Size—Tire Pressure and Vehicle Load Chart in this section.

SERVICE PROCEDURES TIRES Caro a Tiros—Clowning

Some white side wall tires have a colored protective coating that should be removed from the tires before delivery of the car. This protective coating is not as flexible as rubber and will crack. This may introduce sidewall checking if not removed. In no case should the tires be driven more than 50 miles before this coating is removed.

To remove this coating, wet the tire surface thoroughly with warm water and allow it to soak for one minute. Using a soft bristle brush or sponge, wash the protective coating from the tire. This coating may also be removed by steam cleaning. DO NOT USE GASOLINE OR OTHER SOLVENTS. DO NOT USE A WIRE BRUSH. After the car is in service, ordinary road dirt that


22-2 WHEELS—BEARINGS--TIRES CROSS-BIASED CASING PLIES

RAD■ AL PLY BIAS BELTED :BIAS RIRCAKFR)

NL1551 A

Fig. 1—Tire Cord Angles

collects on white side wall tires may be cleaned with soap or a non-abrasive cleaner and (if necessary) a soft bristle brush. Under no circumstances should gasoline, kerosene, or any cleaning fluid containing a solvent derived from oil be used to clean white sidewall tires. Mineral oil in any form is detrimental to rubber, and a cleaner with an oil base solvent will discolor or injure any tires. Inflation of Tires Tire inflation pressure is one of the most important elements of tire care. Inflation pressures recommended for all vehicle models have been carefully selected to provide a proper balance between ride handling, and tire life. See Tire Inflation Pressure Chart (Rear of this section) or the placard located on the latching pillar of the driver's door. Tire pressures should be checked at least once a month and should be checked and adjusted before any long trips. Check and adjust tire pressures with the tires cold if possible. It is normal for tire air pressure to increase (2-6 psi) due to temperature increases caused by tire flexing. Under no circumstances should inflation pressure of warm tires be reduced. When it

is not possible to check tire air pressure cold, assume a (2-6 psi) increase over cold pressures.

It may be recognized that this method is not as accurate as checking pressures when the tires are cold. NOTE: Always check tire pressure with an accurate

gauge. Higher inflation pressures than shown on the chart can cause deterioration in ride quality, less resistance to various types of impact bruises, rapid wear at the center of tire treads and poor steering returnability. Lower tire pressures than those recommended on the chart can result in greater gasoline consumption, rapid wear toward the edges of tire tread, less resistance to rim bruises and various types of ply and tread separation, cord fatigue or breakage and increased steering effort. Tire valve caps (or valve extensions) should always be reinstalled on the valve and tightened finger tight. They assist in retaining air and also keep foreign material out of the valve. Tire Rotation Under normal operating conditions it is recommended that all tires, especially the wide tread 70 series and fiberglass belted type, should be rotated no later than every second oil change and should be in correct balance to obtain the most uniform tread wear. Tire inspection at every oil change is recommended and if irregular tread wear is evident, ro-


WHEELS—BEARINGS—TIRES 22-3 LEFT FRONT

LEFT REAR

I

alent to the minimum specified tires. Radial ply tires must be used in sets of five (5), and under no circumstances should they be used on the front only. If snow tires are installed on the rear wheel bias belted or cross bias tires must be mounted on the front wheels. Not doing this will result in oversteer and could possibly cause spins on wet or icy roads. The safest policy is never intermix radial ply tires with bias belted or cross bias tires.

RIGHT FRONT

Wide Tread 70 Series Tires RIGHT REAR

NP158

2 —Tire Rotation Diagram-4 Tires tation of tires is suggested at that time. Be sure to always adjust tire pressures properly after rotation, especially on station wagons. If vehicle is equipped with styled wheels or a collapsible spare tire, follow the 4 tire rotation illustration. Proper tire rotation at the recommended intervals reduces the possibility of tire noise and equalizes tire wear. Figures 2 and 3 are the recommended sequence for the rotation of tires. Under conditions of severe service (trailer towing) they should be rotated more frequently. Uneven tire wear is frequently the cause of tire induced noises which are attributed to rear axle gears, bearings etc. Unnecessary work is often performed on other chassis components in an effort to correct tire noises. Fig.

Radial Ply Tires

Your vehicle is designed for bias belted or cross bias tires of the sizes indicated. The use of radial tires is not recommended particularly on station wagons. Should these radial tires be desired then tire sizes and road wheel diameters must be selected to maintain ground clearance and load capacity equiv-

LEFT FRONT

RIGHT FRONT

The use of 70 Series wide tread bias belted or cross bias (again radial not recommended) tires is acceptable on your vehicle if the size is listed in the above charts The use of oversize tires of this construction (that are not listed above) may cause interference with vehicle components under extremes of suspension and steering travel and may cause tire damage. For maximum satisfaction these tires should be used only in sets of five and under no circumstances should they be used on the front only. If snow tires are used they must also be of the same wide tread—low profile 70 Series design. REPAIRING LEAKS Leaks between the tire and wheel require the removal of the tire. Leaks in the tire can often be repaired without removing the tire. Always follow the equipment manufacturers recommendations. Tools used for dismounting and mounting tires must be smooth, free from sharp edges or burrs which could damage the tire or wheel rim. The tire must be completely deflated before the tire beads are removed from the seats. Before mounting the tire on the wheel, make sure all rust scale is removed from the wheel rim. A mild soap solution applied to both tire bead surfaces will aid in installation. Either a commercial type bead expander or a rope tourniquet can be used to seat the tire beads. When installing wheels on the vehicle, progressively tighten wheel nuts in sequence shown in (Fig. 4) to proper torque specifications, 65 foot-pounds all models. Tire Tread Wear Indicators

LEFT REAR

RIGHT REAR

KP23A

Fig. 3—Tire Rotation Diagram-5 Tires

Your potential driving, cornering and braking traction decreases as your tires wear. Furthermore, as the tread depth is decreased the tires have less resistance to road hazards and are more likely to hydroplane on wet pavement. Tread wear indicators have been provided to assist you in determining when your tires are worn so as to require replacement. These indicators are molded into the bottom of the tread grooves and will appear as approximately 1/2 inch wide bands when this tread depth has been reduced to 1/16 inch (Fig. 5). Tire replacement due to tread wear is neces-


22-4 WHEELS-BEARINGS-TIRES located this way. If you have a "thumper", replace the tire. Tire roughness can be caused by a single tire with two or more "thump" spots in it, or by two or more thumping tires at speeds of 40-70 MPH. To isolate the cause of this condition, you may have to substitute the spare for each of the four tires, with all tires inflated to normal pressure. Tire roughness is recognized as a low-frequency rumble or vibration and is very similar to driveline vibration. Positive separation of the two disturbances can only be accomplished by using a known set of good tires or by towing the vehicle with the propeller shaft removed. To correct tire roughness, replace the offending tires. Fig. 4—Wheel Stud Nut Tightening Sequence

sary when these indicators appear in two or more adjacent grooves or a localized worn spot eliminates all the tread. Tire Noise or Vibration Complaints To determine whether tires are causing the noise or vibration drive the car over a smooth portion of highway at various speeds and note the effect of acceleration and deceleration on noise level. Axle and exhaust noise change in intensity under these conditions, while tire noise will usually remain constant. if after road testing the vehicle it was determined that tires may be causing the noise, balance all tires very carefully and inflate to 50 psi. Drive the car over the same route at the same speeds as before to determine whether the disturbance has been changed. If the disturbance is changed or eliminated by overinflating the tires, continue the road test by deflating one lire at a time to normal pressure. When the disturbance returns, the last tire deflated will usually be the offender. Tire thump (sometimes referred to as "tramp") usually occurs in the speed range of 20-40 MPH and can usually be

Tire Wear Patterns An inspection of the tires, together with information as to locality of vehicle operation will usually indicate whether abnormal wear is due to operating conditions or to mechanical faults which should be corrected. Various types of abnormal tire wear with their causes and corrective action are shown in (Fig. 6). Underinflation For the maximum results in stability and handling, ride quality and tire life, tire inflation pressures should not be allowed to go below the recommended inflation pressures. When a lire is underinflated, this results in much faster wear of the shoulders than of the center of tread. Overinflation When tire inflation pressures are maintained within the specifications the tire will wear evenly over the entire tread. A tire that is overinflated wears much faster in the center of the tread. Cracked Treads This is the result of alternate under and over inflation, exceeding the recommended full rated load, high temperature and high speed driving. Excessive Camber Wear Excessive wheel camber, either positive or negative causes the tire to run at an angle to the road. One side of the tread wears much more than the other. For best corrective results have the front wheel camber adjusted to specifications.

N12243

Fig. 5 —Tire Treed Wear Indicator

Toe- in or Toe-out Tread Wear Excessive toe-in or toe-out causes wear on the edges of the front tires. An excessive amount of either toe-in or toe-out actually drags the tire instead of letting the tire roll true. This wear condition will usually produce a tapered or feathered edge


WHEELS—BEARINGS—TIRES 22-5 RAPID WEAR AT SHOULDERS *

RAPID WEAR AT CENTER

CRACKED TREADS

fir\ 1-1-

*

CONDMON

UNDER INFLATION

OVER INFLATION

UNDERINFLATION OR EXCESSIVE SPEED

CAUSE

WEAR ON ONE SIDE

r

i 1,

EXCESSIVE CAMBER

FEATHERED EDGE

, „ ,

BALD SPOTS

1

,

t‘ HI E: w rI firb

INCORRECT TOE

UNBALANCED -i

a

0 0

0

CORRECTION

ADJUST PRESSURE TO SPEOHCATIONS WHEN TIRES ARE COOL

M ADJUST CAMBER TO SPEOFICATIONS

IL ADJUST FOR TOE-IN 1/8 INCH

DYNAMIC OR STATIC BALANCE WHEELS

Fig. 6—Tire Wear Patterns on the outside ribs. Have the toe-in or toe-out adjusted and with unbalance conditions. Regardless of the to specifications to correct. cause of cupped wear on either front tire, no alignment or balance job can prevent future excessive Bald Spot, Cupped or Scalloped Tire Tread wear of the spots. Once a front tire acquires flat or cupped spots additional wear will continue at a rapid Wear Cupping, scalloping and bald spotting of tires is rate. To correct this condition, tire rotation and pcsnpiated with wear on a car driven mostly at highwheel balance are necessary. A cupped tire will parway speeds without the recommended tire rotation tially true itself up on a rear wheel. WHEELS All models use steel drop center wheels. The safety rim wheel (Fig. 7) has raised sections between the rim flanges and the rim well. Initial inflation of the tire forces the bead over these raised sections. Tirewheel separation under extreme hard cornering is prevented by air pressure and these safety humps. Furthermore, in case of a tire failure, the raised sections help hold the tire in position on the wheel until the car can be brought to a safe stop.

the balance weight should be added to the inside of the wheel and the other half to the outside to prevent excessive dynamic unbalance. A wheel and tire, to be in dynamic balance, must first be in static balance and also be in balance from inside to outside. A wheel not in dynamic balance can produce wobble or shimmy.

TIRE-WHEEL BALANCE The need for tire and wheel assembly balancing is indicated by heavy vibration of the steering wheel when driving at speeds above 40 miles an hour. Static (still) balance is equal distribution of the weight of the wheel and tire around the spindle, so that the assembly has no tendency to rotate by itself. An assembly that has a heavy spot is statically out of balance and can produce a bouncing motion. Correction for static unbalance is made by first finding the location of the heavy spot, then adding sufficient weight to counterbalance it (follow the equipment manufacturers recommendations.) Half

Fig. 7—Safety

Type

Rim


22-6 WHEELS—BEARINGS—TIRES TIRE AND WHEEL RUNOUT Wheels and tires may be measured for both radial and lateral runout. Radial runout (eccentricity) is the difference between the high and low points on the tread of the tire; lateral runout is the "wobble" of the wheel and/or tire. Prior to measuring the wheel or tire for runout, the accuracy of the drum at the mounting bolts should be determined. The car should be driven a short distance and immediately lifted off the ground before the measurement is made so that "flat-spotting" of the tire (from being parked) does not affect the runout measurement. (1) Attach dial indicator C-3339 to a firm base so it will be held steady while taking the runout readings. (2) Place plunger of dial indicator against one of the center ribs of the tire tread and rotate the assembly slowly to measure radial runout. This measurement should not exceed .080 inch. (3) To measure lateral runout, position the dial indicator against the side of the tire. This measurement should not exceed .105 inch. Rotating the tire on the wheel may reduce runout or it may be necessary to take dial indicator measurements of the wheel itself in order to determine which unit has the excessive runout. Measure runout at the protected areas "A" and "B" (Fig. 8), where the tire bead pilots. The radial runout, "A" should not exceed .035 inch. The lateral runout "B", should not exceed .045 inch. NOTE: Under no circumstances should point indicated by "C" be used for measuring wheel runout as this metal has been sheared in the manufacturing process and is not an even surface.

Fig. 8—Runeut Checking Area

WHEEL COVERS To avoid damaging the wheel covers during removal and installation, care should be used to be sure the forces are applied to the correct area of the covers. To install the wheel covers, insert the tire valve through the cover valve hole and seat this portion of the cover completely. Apply force 180' from the valve hole to complete the installation. When removing the wheel covers, pry completely loose 180 0 from the valve hole first. Continue prying toward the valve hole until covers are loose. Do not remove the wheel cover at the valve stem hole. The covers are structurally stronger at the outer circumference to withstand the force required for removal and installation. Use a rubber end mallet when installing the covers.

BEARINGS FRONT WHEEL BEARING LUBRICATION Front wheel bearing lubricant should be changed at the recommended intervals or at the time of normal brake reline. Lubricant should not be added to that already in the bearings. Removal (without Disc Brakes) (1) Raise vehicle so front wheels are free of the floor. (2) Remove wheel cover, grease cap, cotter pin, nut lock and bearing adjusting nut. (3) Remove thrust washer and outer bearing cone. (4) Slide wheel, hub and drum assembly off the spindle. (5) Drive out inner oil seal and remove bearing cone.

Removal (with Disc Brakes) (1) Raise vehicle so front wheels are free of floor. (2) Remove wheel cover and loosen and remove wheel nuts and remove wheel and tire assembly. (3) Remove grease cap, cotter pin, nut lock and bearing adjusting nut. (4) Remove bolts that attach disc brake caliper assembly to steering knuckle. (5) Slowly slide caliper assembly up and away from brake disc and support caliper assembly on steering knuckle arm. CAUTION: Do not leave caliper assembly hang by brake hose, as possible brake hose damage may result. (6) Remove thrust washer and outer bearing cone. (7) Slide wheel hub and disc assembly off the spindle. (8) Drive out inner seal and remove bearing cone.


WHEELS—BEARINGS--TIRES 22-7 Cleaning and Inspection (1) Clean the hub and drum assembly and the bearings in kerosene, mineral spirits or other similar cleaning fluids. Do not dry the bearings by air spinning. (2) Examine bearing cups for pitting, brinnel marks or other imperfections. If cups are damaged. remove them from the hub with a soft steel drift positioned in the slots in the hub. (3) Bearing cup areas in the hub should be smooth without scored or raised metal which could keep the cups from seating against shoulders in hub. (4) The bearing cones and rollers should have smooth, unbroken surfaces without brinnel marks. The ends of the rollers and both cone flanges should also be smooth and free from chipping or other damage. instnliation (without Disc Brakes) U) If the bearing cups were removed, start the new cups into hub evenly, driving them flush with hub using a soft steel block and hammer. Seat cups against shoulders of hub, using a soft steel drift and hammer. (2) Fill hub grease cavity (Fig. 9) with recommended wheel bearing lubricant. Lubricant should be even with inner diameter of bearing cups. (3) Force lubrieant between bearing cone rollers or repack using a suitable bearing packer. (4) Install inner cone and a new seal, with lip of seal facing inward. Using Tool C-3893, position seal flush with end of hub. The seal flange may be damaged if tool is not used. (5) Clean the spindle and apply a light coating of wheel bearing lubricant over the polished surfaces. (6) Install wheel tire and drum assembly on spindle. (7) Install outer bearing cone, thrust washer and adjusting nut.

Installation (with Disc Brakes) (1) If bearing cups were removed, start new cup Into hub evenly, driving them flush with hub using a soft steel block and hammer. Seat cups against shoulders of hub, using a soft steel drift and hammer. (2) Fill hub grease cavity (Fig. 9) with recommended bearing lubricant, see Lubrication Group 0. Lubricant should be even with inner diameter of bearing cups. (3) Force lubricant between bearing cone rollers or repack using a suitable bearing packer. (4) Install inner cone and a new seal with lip of seal facing inward. Using Tool C-3893, position seal flush with end of hub. The seal flange may be damaged if tool is not used. (5) Clean the spindle and apply a light coating of wheel bearing lubricant over the polished surfaces. (6) Install hub and braking disc assembly on spindle and install outer bearing cone, thrust washer and adjusting nut. (7) Slowly slide caliper assembly down on brake disc assembly and position correctly. (8) Install caliper assembly over disc and align mounting holes. Install mounting bolts and tighten to 45 to 00 foot-pounds. (9) Install tire and wheel and tighten wheel nut to specifications. Adjustment (1) Tighten wheel bearing adjusting nut to 90 inch-pounds while rotating wheel. (2) Position nut lock (Fig. 10) on nut with one pair of slots in line with cotter pin hole. (3) Back off adjusting nut lock assembly one slot and install cotter pin. The resulting adjustment should be zero (no preload) to .003 inch end play. (4) Clean the grease cap, coat inside with wheel bearing lubricant (do not fill) and install. (5) Install wheel covers and lower vehicle to floor.

WHEEL HUE GREASE CAVITY ND413

9—Whoef Hub Grease Cavity

Hu. 10—Front Wheel Bearing Ad/41,1mM


SPECIFICATIONS Your vehicle, when equipped with the minimum specified tire size shown in the Minimum Tire Size Chart and inflated to the corresponding maximum vehicle capacity pressure listed in Tire Pressure Chart, is designed to operate at any load up to and including the maximum vehicle capacity at all normal highway speeds (up to 75 mph). Owners who prefer a softer ride may use the optional reduced inflation pressure if the load carried is five passengers or less (750 pounds maximum) and the vehicle speed does not exceed 75 mph.

Engine Cubic-Inch Displacement Equipment

Model and Body Style

Sedans—Hardtops and Convertibles

225

Minimum Standard Tire Wheel Size Size

Maximum Vehicle Capacity

Reduced Vehicle Load

(Lbs.) Tire Vehicle Load Capacity Range Maximum

Optional Allowable Tire & Wheel Size

Front

Rear

Front

28

28

24

24

1100

G78-14* 5-1/2 JJ

26

26

24

24

1100

B

C*, D*

F78-14

318 & 383

Inflation Pressure—Cold

Si

Rear

Super Bee

383

F70-14*

6 JJ

30

30

26

26

1100

B

D*

Super Bee & Rh T

440 & 426

F70-14*

6 JJ

30

30

26

26

1100

B

0*

B

B*

225-318-383 Station Wagons 383

2 Seat

G78-14

5-1/211

22

32

1200

3 Seat

H78-14* 5-1/2 JJ

22

32

1200

B—H78-14 (5-1/2 JJ) C—F70-14 (6 JJ) 11" or Disc Brakes D—F60-15 (7 JJ) 11" or Disc Brakes; Extra Heavy Duty Suspension Required. (Not available with 4-Door Models) *Chain Clearance—Tire snow chains are not recommended for use with some tire sizes, as indicated on the Tire Size Chart by the symbol *, because of possible fender interferences. In an emergency, chains may

be used on these tires if the vehicle is moderately loaded and driven cautiously. 1. For All Load Conditions Up To And Including Vehicle Maximum Capacity. Vehicle Maximum Capacity— Sedans, Hardtops and Convertibles: Front seat-3 passengers; Rear Seat-3 passengers; Luggage 200 lbs; Total 1100 lbs. Vehicle Maximum Capacity—Station Wagons: Front seat-3 passengers; Second Seat3 passengers; Third seat or Luggage-2 passengers or 300 lbs.; Total 1200 lbs. NOTE: Reduce by one front seat passenger (150 lbs. total) where equipped with bucket seat, without center seat. 2. Optional Reduced Vehicle Loading For Improved Ride. Front Seat-2 passengers; Second Seat-3 passengers; Luggage or Third Seat-0; Total-750 lbs.

SNOILV314133dS

MINIMUM TIRE SIZE AND INFLATION PRESSURES—CORONET


SPECIFICATIONS

22-9

MINIMUM TIRE SIZE AND INFLATION PRESSURES—CHARGER

Engine Cubic-Inch Displacement

Minimum Standard Tire Wheel Size Size

Inflation Pressure—Cold Maximum Vehicle Capacity

Reduced Vehicle Load

Front

Rear

Front

Rear

Maximum Vehicle Capacity (Lbs.)

Tire Load Range

Optional Allowable Tire & Wheel Size

225

F78-14

5-1/2 JJ

28

28

24

24

1100

318 & 383

G78-14

5-1/2 JJ

26

26

24

24

1100

B

A*, B*

440 & 426

F70-14

6 JJ

30

30

26

26

1100

B

B*

A—F70-14 (6 JJ) 11" or Disc Brakes B—F60-15 (7 JJ) 11" or Disc Brakes & Extra Heavy Duty Suspension Required. 1. For All Load Conditions Up To And Including Vehicle Maximum Capacity. Vehicle Maximum Capacity— Sedans: Front Seat-3 passengers; Rear Seat-3 passengers; Luggage-200 lbs; Total-1100 lbs. NOTE: Reduce by one front seat passenger (150 lbs. total) where equipped with bucket seats, without center seat 2. Optional Reduced Vehicle Loading for Improved Ride: Front Seat-2 passengers; Second Seat-3 passengers; Luggage-0; Total 750 lbs. * Chain Clearance Tire snow chains are not recommended for use with some tire sizes, as indicated on the Tire Size Chart by the symbol*, because of possible fender interferences. In an emergency, chains may be used on these tires if the vehicle is moderately loaded and driven cautiously. TRAILER TOWING TIRE SIZE AND INFLATION PRESSURES—CORONET

Model and Body Style

Tire Size

Inflation Pressure (Cold) Front

Rear

Maximum Vehicle Capacity (Lbs.)

Wheel Size

Sedans—Hardtops and Convertibles

G78-14

5-1/2 JJ

28

28

1100

Super Bee & R/T

F70-14

6 JJ

30

30

1100

Station Wagons

H78-14

6 JJ

22

32

1100

Tire Load Range

TRAILER TOWING TIRE SIZE AND INFLATION PRESSURES—CHARGER Inflation Pressure (Cold)

Engine Cubic-Inch Displacement

Tire Size

Wheel Size

Front

318-383

G78-14

5-1/2 JJ

28

440

F70-14

6 JJ

30

Tire Load Range

Rear

Maximum Vehicle Capacity (Lbs.)

28

1100

B

30

1100

1. Cold inflation pressures must not exceed 32 pounds per square inch (PSI) for 4 ply rating (load range B) and 40 psi for 8 ply rating (load range D) tires. These tire pressures may increase as much as 6 psi when hot. Do not reduce this normal pressure buildup. Cold tire inflation is defined as the pressure after the vehicle has been inoperative for at least three hours and driven less than one mile. 2. All tires must be inflated 4 psi more than specified in the chart but not to exceed pressures indicated above in note No. 1 for sustained speeds above 75 mph. Sustained speeds above 75 mph are not recommended when the 4 psi pressure adjustment would require pressures greater than the allowed maximum indicated on the tire sidewa II.


22-10 TIGHTENING REFERENCE Eight ply rating (load range D) tires inflated an additional 6 psi, but not to exceed 40 psi, are required for these instances where maximum vehicle capacity is carried above 75 mph and maximum allowable 4 ply rating (load range B) tire pressures would be exceeded. We strongly discourage excessive speed, however, if the vehicle must be driven at sustained speeds over 90 MPH special high speed tires inflated to maximum vehicle capacity pressures are required. 3. The use of tires smaller than the specified minimum or larger than the specified maximum could constitute a safety hazard. 4. Cargo loads, particularly in station wagon models, should be distributed as far forward as possible. 5. Vehicles with luggage racks do not have a maximum vehicle capacity greater than indicated in chart. 6. Vehicles with trailer towing packages do not have increased maximum capacity. The allowable passenger and cargo load must be decreased an amount equal to the trailer tongue load on the trailer hitch. 7. Because of vehicle limitations, oversize, 70 Series or load range D (8 ply rating) tires do not provide increased vehicle capacity. They do, however, provide an extra margin of tire service (tread life, etc.). Do not exceed the maximum tire size stated in chart. 8. Snow tires should not be operated at sustained speeds over 70 mph These tires should be operated at maximum vehicle capacity pressures under all load conditions. 9. All tires and especially the wide tread 70 Series, bias belted and radial types must be rotated no later than every second oil change and should be in corrrect balance to obtain the most uniform tread wear. Tire rotation at shorter intervals is recommended if irregular tread wear develops. Coronet

Steel Disc WHEELS Drop Center—Safety Wheel Type 5 Rim 1/2"-20 No. of Wheel Nuts 4-1/2" Stud Size 65 ft.-lbs. Stud Hole Circle 90 in.-lbs. Wheel Nut Torque Bearing Nut Torque (Wheel Spinning) .... Tubeless TIRES (See Minimum Tire Size Chart Type in this Section) Size

Charger

5 1/2"-20 4-1/2" 65 ft.-lbs. 90 in.-lbs.

TIGHTENING REFERENCE Pounds Foot Inch

Pounds Foot Inch

Wheel Bearing Nut (With Wheel Spinning) Coronet-Charger

90

Wheel Stud Nut Coronet-Charger

65


GROUP 23

BODY AND FRAME CONTENTS Page

BODY AND FRAME ALIGNMENT CONVERTIBLE INTERIOR TRIM AND SEATS MAINTENANCE AND CARE REFINISHING PROCEDURES

79 56 42 1 75

Page

SEALING SHEET METAL AND DOORS WINDSHIELD AND REAR WINDOW WOOD GRAIN OVERLAY VINYL ROOF COVERING

63 5 52 73 70

GENERAL INFORMATION "Unibody" Construction

The featured "Unibody" construction is one in which the body shell and underbody (frame) are welded into one unit. To achieve rigidity and strength of the body-shell, two additional heavy-duty crossmembers, one under the rear seat and the other at the extreme rear of the body are welded to the box side rails. Heavy duty roof bows are used providing strength to the roof panel. The front door hinge pillar is one

continuous piece from the roof rail to the body sill. Sheet metal seams overlap for improved sealing. Metal cages, welded to the outside of the cowl side panels, enclose the retaining nuts for attaching fenders and hood hinge supports. Inner hinge reinforcements assure door alignment and maintain proper door adjustment. The radiator support, fender wheelhousings and cowl panels are attached to the body, adding strength to the fore-structure and body.

MAINTENANCE AND CARE INDEX Page APPEARANCE ACRYLIC FINISHES—POLISHING BRIGHT METALS—POLISHING CONVERTIBLE Backlight Boot Top Well GLASS INTERIOR TRIM Body Cloth—Knit Type Cargo Area (Station Wagon)

Carpets and Rubber Mats Color Restoration or Change Door Panels General Instructions Glove Compartment

4 4 2 2 1 2 5 2

4 4 4 3 2 4

Headliners Luggage Compartment Package Shelfs Sealers—Leather and Vinyl Seats Side Cowl Trim Panels Spots and Stains Test for Material Type POLISHING Acrylic Finishes Bright Metals Scratches and Overspray TIRES VINYL ROOF COVERING DRAIN HOLES LUBRICATION

Page 3 4 4 4 3 4 2 2 4 4 4 4 2 5 5

GENERAL INFORMATION The procedures for maintaining "new car" appearance of material covered in the APPEARANCE section are those most generally used. The final results may vary due to application of agents by persons inexperienced at this work and also from the type of foreign element on the material. For satisfactory results, appearance maintenance should be performed by qualified experienced personnel using the recommended agents and established service procedures.

APPEARANCE CONVERTIBLE Never lower a wet top. Dampness may cause formation of mildew, and damage to the fabric will result.

Top—Frequent brushing and vacuuming will keep the top free of abrasive dust and dirt. When washing,

the top material should be thoroughly wet. For scrubbing, use only a soft, natural bristle hand


23-2 BODY AND FRAME scrub brush. Use warm water and naphtha bar type soap as the cleaning agent. Do not wash in direct sunlight. Scrub with soap suds, starting in the center and gradually working toward the edges. Rinse with clean water to remove all traces of soap. Allow to dry completely before lowering. Backlight—The backlight (rear window) is a solid tempered glass. Top Boot and Well—Remove all abrasive dust and dirt from boot and well by brushing or vacuuming. For scrubbing, use only a soft, natural bristle hand scrub brush. Use warm water and naphtha type bar soap. Rinse with clean water. Use a soft absorbent cloth to dry.

VINYL ROOF COVERING In a well ventilated area, saturate a clean cloth with recommended Vinyl Roof Cleaner and Conditioner. Wipe surface using a circular motion. With another clean cloth, wipe excess material from top. Allow to dry for ten minutes.

INTERIOR TRIM Most stains can be removed while they are fresh and have not hardened and set into the fabric. An exception is mud or clay, which should be allowed to dry so that most of it can be brushed off. It is helpful, to know the nature of the staining matter so the correct cleaning agent may be used. General Instructions: Use a piece of clean cotton cheesecloth approximately 3" x 3". Squeeze most of the liquid from the fabric and it is less likely to leave a ring. Wipe the soiled fabric very lightly with a lifting motion. Always work from the outside toward the center of the spot. Turn the cheesecloth over as soon as one side becomes stained to prevent working the stain matter back into the cleaned portion. Use clean cheesecloth as soon as both sides become stained. Testing For Type of Material—Natural cloth will burn like string, slow and smoky. Synthetic material such as nylon, burns fast and "balls up" into a hard mass. Sample material for testing can be found under the seat cushion, sun visor and dome light brackets, or back of the trim panels. Another method of testing is to rub the back of a fingernail over the surface of the material. Synthetic materials appear to "whistle" when this is done. Body Cloth — Knit Type Insert — Spot Cleaning — (Grease, oil, adhesive, crayon, lipstick, similar stains and any stains of undetermined origin). Wipe off as much of the staining material as possible with clean cheesecloth. Using K2R aerosol spotlifter, or equivalent, spray stained area from a distance of 8 to 10

inches. Allow to dry (a white powder will form). Brush or vacuum powder from surface. Repeat operation should any stain remain. Entire Insert—Cleaning Only—(Waterspots, dirt, foodstains, coffee and other water borne stains). Vacuum or brush off as much of the staining material as possible. Shield adjacent cushion or back (not to be cleaned) to prevent wetting. Use a wiping motion outward from the contaminated area to the edges of the insert with clean lukewarm water and clean cheesecloth. Rub with water until entire insert is wet. Do not soak insert. If clear water did not remove soil, use cleaner D-5, or equivalent, diluted one part cleaner to one part water and again clean entire insert. Entire Insert or Pipe—Cleaning Only—(Grease, oil, adhesive, crayon, lipstick and similar stains). Wipe off as much of staining material with clean cotton cheesecloth. Wet another piece of clean cheesecloth with the recommended spot remover and fabric cleaner, or equivalent and squeeze out excess cleaner until cheesecloth is drip free. Use a wiping motion outward from the stained area to the edges of the pipe or bisquit and clean complete area. Unfold cheesecloth to expose clean areas frequently so staining material being removed is not re-deposited on fabric. Continue until foreign matter is no longer visible and entire fabric cover or individual pipe or bisquit is dampened. In cases of severe staining, a second cleaning may be required. Be sure to use the minimum amount of solvent required to clean affected area. Excessive solvent may damage the foam underpadding. Oil and Water Repellent Application—The cleaned area must be completely dried before applying repellent. Perform following operation only in a well ventilated area. Avoid prolonged breathing of vapors or contact with eyes. Using Scotchgard Fabric Protector, or equivalent, hold spray can 6 to 8 inches from fabric and with slow back and forth sweeping motions, spray fabric until evenly wet. Be sure to overlap spray patterns. Repeat spraying operation with a spray pattern perpendicular (at 90 degrees) to the first application. Allow to dry for a minimum of one hour before fabric is sat on. Spots and Stains—When using water to remove a spot, be sure to wash entire section after spot has been removed to avoid water stains. Before cleaning seats, door panels, headliners, etc., remove as many spots as possible. Use a putty knife to break up and remove encrusted foreign matter. Vacuum thoroughly. Apply the recommended spot removing agent with a clean cloth or sponge. Work in a wide circle to prevent making a ring and work toward center. Surface Spots—Brush out with a small hand brush, using care not to damage fabric when brushing.


BODY AND FRAME 23-3 Deep Penetrating Spots—Apply the spot removing agent by brushing. When spot is thoroughly worked and saturated, use high air pressure to blow dirt down through material. Occasionally the entire spot may not be removed and it will then be necessary to cover the area with a light application of dye. Water Stains—Water stains in fabric materials can be removed with a cleaning solution made from one cup of ordinary table salt and one quart of water. Vigorously scrub solution into stain and rinse with clean water. Water stains in nylon and other synthetics should be removed with a commercial type spot remover compounded for the specific material being cleaned. Mildew—Clean area around mildew with warm suds. Rinse with cold watei, soak mildew area with solution of one part common table salt and two parts water, then wash with the recommended upholstery cleaner. Rust Stains—Keep rust remover solution away from your skin. Wash hands immediately if exposed. Clean extra well under fingernails. Read instructions on the bottle before using. Wrap a small strip of cloth around each button to avoid leaving a ring on upholstery material.

Dampen the stained area with water. Apply a commercial rust remover solution. Sponge with clean water to clean rust from upholstery buttons. Moisten buttons with a few drops of water applied with a small piece of sponge or cloth. Apply one or more drops of rust remover. Fast dry clean areas with heat lamps. Chewing Gum and Tar—Avoid using spotting or cleaning solution that will dissolve or soften gum or tar. Place a cube of ice on gum or tar to harden it.

Remove as much as possible with a dull knife when it is in this hardened state. Moisten remainder with cleaning fluid and scrub clean. In some cases soak with cleaning fluid and blow the stain through using high air pressure. Ice Cream and Candy—Use a putty knife to remove as much substance as possible. Use care not to damage fibers of upholstery. Most candy has a sugar base and can be removed by rubbing area with a cloth wrung out in warm water. An oily type of candy, after using warm water, should be cleaned with an upholstery type cleaner that will emulsify with the oil. Rinse with water and remove remaining stains with cleaning fluid. Bloodstains—Never use warm or hot water. Use a clean cloth wrung out in cold water and rub the stain. If stain is not completely removed use spot remover or vinyl cleaner and apply with a brush. Wine or Alcohol—Avoid use of soap. Scrub stain with a cloth moistened in luke warm water. Remove remaining stains with a regular cleaning solution. Shoe Polish—Scrub area with a cloth saturated with

cold water. Remove wax base polishes by sponging with spot remover. Grease, Oil, Lipstick and Related Stains—Use spot remover to avoid leaving a ring. Cleaning from outside of spot and work toward center. When spot has been removed, dry fabric with a clean cloth. Urine—Sponge the stain with a clean cloth saturated with lukewarm soapsuds (mild neutral soap) and then rinse well by rubbing the stain with a clean cloth dipped in cold water. Then saturate a clean cloth with a solution of one part household ammonia water and five parts water. Apply the cloth to the stain and allow solution to remain on affected area for one minute; then, rinse by rubbing with a clean wet cloth. Nausea—Sponge with a clean cloth, dipped in clear cold water. After most of the stain has been removed in this way, wash lightly with soap (mild neutral), using a clean cloth and lukewarm water. Then rub with another clean cloth dipped in cold water. If any of the stain remains after this treatment, gently rub clean with a cloth moistened with a volatile cleaner. Headliners—Cloth Type—Mix a solution of water and a foaming type upholstery cleaner (as shown on the container) to produce thick suds. Use only foam when cleaning, as saturation with liquids may result in streaks, spots or shrinking. On nap type, lay down nap, usually left to right. Do not stop, when washing a headliner. Complete the entire operation at one time using the same cleaning solution.

Starting in a rear corner, clean only one or two sections at a time. Thoroughly work suds into cloth with a natural sponge. Use circular or short back and forth strokes to remove all dirt. When the sponge glides easily, leaving an even distribution of foam and headliner appears clean, finish cleaning with sweeping motions in one direction. Hard Board Type—Apply a solution of upholstery cleaner and water with a sponge. Use circular or short back and forth stroke and wipe with a dry clean cloth. If headliner is extremely dirty, wash with vinyl cleaner using the same procedure. Vinyl Type—Apply vinyl cleaner with a sponge (or if extremely dirty scrub with a brush) wipe clean with a dry clean cloth. Seats and Door Panels—Mix one pint upholstery cleaner to one gallon of water. If extremely dirty, add more cleaner to solution. Do not soak around buttons. Scrub thoroughly with a brush or sponge. Avoid over soaking the material, do one section at a time only. Frequently stains will be evident when material is damp but will disappear when dry. Use care not to damage fabric by attempting to brush out "stubborn" spots. Spots should be removed before washing. After part has been scrubbed, remove loosened dirt by rubbing area


234 BODY AND FRAME briskly with a clean cotton towel or soft rag. Make final strokes on one direction. Nylon or Synthetic Fabrics—For average conditions use methods and materials used in washing cloth upholstery. When material is extremely dirty, use multipurpose cleaner full strength and a stiff scrub brush. Scrub thoroughly in all directions. Wipe off dirt and excess cleaner with a clean cotton towel or soft rags. Leather, Leatherette or Vinyl Fabric—Use multipurpose cleaner full strength and a stiff scrub brush. Apply to surface and let set for two (2) minutes then scrub thoroughly. Clean between all seams and in all cracks and underneath beading. Wipe off dirt and excess material with a clean cotton towel or soft rag. Package Shelf-Hard Board Type—Clean using a solution of upholstery cleaner. Avoid water logging the backing, dry immediately. Vinyl Type—Clean using multi-purpose cleaner. Dry with clean toweling or rags. Side Cowl Trim Panels—Leather—Vinyl—Metal Types—Use multi-purpose cleaner full strength. Use a stiff brush and apply to surface, let set (2) two minutes then scrub thoroughly. Clean seams, cracks and beneath beading. Dry with a clean soft towel or rag. Glove Compartment—Some glove compartments are made of a cardboard type material. Do not waterlog. Vacuum thoroughly. Clean with upholstery cleaner or vinyl cleaner. Rubber Mat—Vacuum thoroughly and clean with upholstery cleaner or multi-purpose cleaner. Use toweling or rags to remove dirt and excess cleaner. Carpeting—Thoroughly vacuum. Mix one pint of upholstery cleaner to one gallon of water. If carpet is faded, discolored or spotted, add upholstery tint to this solution. To determine the right color shade, add tint in small quantities only. Test by dipping a white rag into solution, wring out and inspect shade. The dye will dry a shade or two darker. With a stiff brush apply solution and scrub carpet vigorously. Lay nap down in one direction. When dry, fluff carpets by rubbing with a dry brush. Salt Stains—Vacuum carpet thoroughly. Use a solution made from water and a heavy concentration of ordinary table salt. Soak the stained area to loosen embedded salt (use a wire brush, if necessary). Wash entire carpet with the recommended cleaner. Additional washing may be necessary for satisfactory results. Luggage Compartment—Remove all items from compartment. Use a steel brush to loosen rust and caked dirt and vacuum thoroughly. Wash with upholstery cleaner or multi-purpose cleaner and dry with clean toweling or rags. Cargo-Area (Station Wagon)—Follow same procedure used for Luggage Compartment. Color Restoration or Change—Tints and dyes should be applied by reliable experienced personnel. Dyes or

tints can be applied when stains persist, after cleaning, or a change in color is desired. The instructions for mixing and applying the color must be followed precisely. Use only those recommended for the exact material being worked on. Leather and Vinyl Sealers—To repair holes cut material about 1/2 inch larger than area being repaired. Position patch under hole and apply sealer to contacting areas. Apply masking tape over tear to hold edges in place until sealer dries. After sealer has dried, remove tape and trim all rough edges. Fill visible cracks with sealer. Use a step application procedure in filling deep cracks. After sealer has thoroughly dried, sand lightly with #400 grade sandpaper until smooth. Apply color to repaired area. POLISHING—Acrylic Finishes—Polish at least twice a year to remove all foreign film. When polishing use one pad, made from cheesecloth or an old "turkish" towel, to apply polish and another to remove dried film. Test area by rubbing fingers over polished surface. If not thoroughly cleaned, smears of polish will show. Sand Scratches—Overspray—Foreign Material—Minor conditions can be removed using the following procedure: (1) Using oleum spirits, mineral spirits or kerosene, hand sand affected surface with No. 600 paper. (2) Remove all sanding sludge. (3) Machine polish the sanded surface using rubbing compound until the surface is completely free of scratch marks. Blend with adjacent areas. (4) Buff surface with a clean lambs wool pad using a liquid type final polish. If the appearance of the polished area is noticeably different than adjacent areas, completely buff the adjacent panels. If necessary, polish complete side or horizontal surfaces to assure uniform appearance. (5) Use a clean, soft, cotton cloth, do not use cheesecloth, to hand clean all inaccessible areas. (6) Remove all polish or rubbing compound from mouldings, medallions, name plates or any other exterior ornamentation. Bright Metals—When cleaning anodized aluminum, use care not to rub through the anodized coating. All bright metal should be thoroughly cleaned at least twice a year. The product manufacturer recommendations should always be followed. Clean thoroughly, removing all traces of cleaner from corners. Apply and rub out a coat of good body wax. During winter months and in areas in which salt is used, do not rub out wax. Frequent washing of bright metals by steam necessitate more frequent applications of wax.

TIRES Do not clean tires with scouring powder, steel wool


BODY AND FRAME 23-5 or other abrasive type cleaners. Clean white sidewall fires with a stiff bristle brush and white sidewall cleaner, or multi-purpose cleaner and rinse with clean water. Scuff marks can be dressed down by sanding lightly with #400 sandpaper.

GLASS Do not use putty knives, razor blades, steel wool, or other metal objects to remove deposits from glass.

Interior glass surfaces, including convertible backlight, should be thoroughly cleaned weekly to remove all traces of smoke and other films. Exterior glass surfaces, including convertible backlight, are best cleaned with the use of a commercially made cleaner. Do not scrape off smears from bugs, road tars or other similar objects, use warm water or the recommended solvents to remove. During the winter months, snow, ice and frost can be removed with a plastic or rubber type scraper, or with a commercially made solvent. Do not use metal objects to remove deposits from glass.

DRAIN HOLES The drain holes, in the bottom of cowl plenum chamber, doors and floor sills (rocker panels) should be inspected regularly to insure unobstructed drainage. Remove road tars, mud and other foreign matter immediately. Should bare metal be exposed, surface treat metal and refinish. The drain holes in the quarter panel well areas are sealed with a removable plastic plug. The plugs should only be removed whenever it is necessary to clean or drain fluids from the well area.

LUBRICATION To maintain ease of operation, the hood, door, deck lid and tail gate hinges should be lubricated with the recommended lubricants at the recommended intervals. Refer to the Lubrication and Maintenance Group for type of lubricant and lubrication points.


SHEET METAL-DOORS-EXTERIOR ORNAMENTATION INDEX CORONET-CHARGER BUMPERS COWL Fresh Air Ducts Inlets Control Cable Attachment Routing DECK LID Alignment Hinge Lock Adjustment Cylinder Replacement Torsion Bars Vacuum Operated Weatherstrip DOORS Alignment Arm Rests Glass Convertible Adjustments Regulators Replacement Run Channel—Rear Hardtop Adjustments Regulators Replacement Run Channel—Rear Sedan—Front Adjustments

Page 12 7 6 6 7 6 37 37 38 38 37 37 38 39 15 17 24 26 25 26 24 26 25 26 21

Regulators Replacement Run and Channel Vent Wing Replacement Sedan—Rear Adjustments Regulators Replacement Runs and Channels Stationary Glass Handles Inside Regulator Remote Control Handles—Outside Front Rear Hinge Lock Assembly Cylinder Remote Control Replacement Replacement—Front—Rear Striker and Rotor Trim Panels Weatherstrips Convertible—Door Hardtop—Door Outer Belt—Door Roof Rails Sedan—Door Station Wagon—Door Windcords EXTERIOR ORNAMENTATION

Page 22 21 22 21 23 24 23 24 24 17 17 19 20 17 19 17 18 15-16 15 17 20 20 20 20 20 20 20 42


23-6

BODY AND FRAME Page

FENDERS Alignment Replacement Side Reflector FRESH AIR INLETS Control Cables Routing Ducts GRILLE Alignment Replacement HOOD Alignment Carburetor Fresh Air System Hinge Lock Replacement QUARTER PANELS Garnish Mouldings Glass Convertible Adjustments Regulators Replacement Stabilizer Track—Front Hardtop Adjustments

9 9 9 6 6 7 12 12 8 8 8 8 8 26 29 30 29 30 30

27 28 28 29

Regulators Replacement Track—Rear Sedan

Vent Wing Station Wagon Trim Panels Side Reflector RADIATOR YOKE SUPPORT Air Shield and Cross Bar Replacement TAIL GATE Alignment Glass Adjustments Regulators Replacement Run Channels Handles Regulator Remote Control Lock Linkage Replacement Torsion Bar Trim Panel Weatherstrips and Runs Tail Gate Opening Upper and Pillar Runs Upper Run Retainer and Seal Window Washer System VACUUM CONTROLLED HEADLIGHT DOOR Actuator Door Tests

Page 26 26 26 26 12 10 31 33 34 33 34 32 32 32 31 35 32 35 35 36 35 31 14 12 14

SERVICE PROCEDURES

COWL FRESH AIR INLETS

bracket, under speedometer cable and around air conditioning outlet duct to instrument panel attachment holes on right side of steering column (Fig. 4).

Control Cable On air conditioned equipped vehicles, only the left vent door is used. Attachment

The control cables are attached to the instrument panel lower flange with screws (Fig. 1). The lower end of the cables are retained on a mounting bracket with a clip and screw (Fig. 2). The cable "looped" end is positioned on the fresh air door control crank arm (Fig. 2).

INSTRUMENT PANEL

Routing —with Heater Route cables rearward of heater support brace,

under heater control cables and defroster hoses to the instrument panel attaching points on right side of steering column (Fig. 3).

CONTROL CABLE

With Air Conditioning (Left door only)

Route cables behind steering column support bracket, through spot cooler duct hole in brake pedal

Fig. 1—Fresh Air Control Cable


BODY AND FRAME 23-7 SPEEDOMETER CABLE BRACKET

CONTROL CABLE

CABLE CONTROL CABLE

BRACKET

RETAINER

SCREW RETAINER CRANK ARM

NR130 CONTROL KNOB

Fig. 2—Cable Attachment (Right Side)

Attachment

(1) At lower end of cable, remove screw and clip retaining cable on mounting bracket (Fig. 2). (2) Push control knob in fully and rotate fresh air door control crank arm to the fully closed position. (3) Position clip over cable and on mounting bracket. Install screw, tighten securely and test cable operation. FRESH AIR DUCTS (Fig. 5)

Vehicles equipped with a heater include the right side duct in the heater housing. Vehicles without a heater have a separate duct assembly for the right side. The left side duct assembly is the same for all models. MOUNTING BRACKET

SPOT COOLER NR129

DEFROSTER OUTLET SPEAKER OUTLET

Fig. 4—Cable Routing with Air Conditioning

Without Heater

The fresh air duct assemblies are attached to the plenum opening. The right duct is retained by two hook type rods positioned over the plenum opening flange and held to brackets on the base of the duct with screws (Fig. 5). The left duct assembly is attached directly to the plenum by positioning the duct over the plenum weld studs and securing with nuts. HEATER BRACE

CABLE

CABLE BRACKET

STOP

RETAINER

STOP CRANK ARM

-

CRANK ARM

HEATER CABLE Ir CONTROL KNOBS

DEFROSTER OUTLET

DEFROSTER OUTLET

SPEAKER OUTLET Fig.

3—Cable Routing with Heater

NR132


23-8 BODY AND FRAME

FRONT HOUSING FRAME MOUNTING RETAINER HOOK

CABLE CLIP

SIDE SHIELD

LEFT SIDE HOUSING

NN513A

Fig. 6—Hood Adjustment

HINGE REPLACEMENT

CABLE CLIP RIGHT SIDE WITHOUT HEATER

NR164

Fig. 5—Fresh Air Duds

With Heater The right duct, part of the heater housing is attached to the plenum with a single hook type rod positioned over the plenum flange and secured to the duct base with a screw (Fig. 5). HOOD ALIGNMENT Prior to making any hood adjustment inspect clearances and alignment of hood sides in relation to cowl, fenders and grille. The cowl adjustment must be made first.

The hood hinge (Fig. 6) is attached to the hood and the fender splash shield. Prior to removing hinge screws, prop hood in the wide open position. The prop should be positioned so hood cannot move rearward. LOCK To adjust lock (Figs. 8 and 9) loosen attaching screws and raise or lower until correct adjustment has been obtained. After making any adjustment that requires shifting of hood, always inspect hood striker and lock plate alignment. CARBURETOR FRESH AIR SYSTEM Attachment The carburetor fresh air cleaner system (Fig. 10) is available on Coronet R/T models equipped with a BUMPER

REPLACEMENT Removal (1) Place a protective covering over cowl and fender area. (2) Mark outline of hinges (Fig. 6) on hood to aid in installation. (3) With an assistant, remove hinge-to-hood bolts and remove hood assembly. Use care not to permit hood to slide rearward and damage painted surfaces of the cowl and fender areas.

Installation (1) With an assistant, position hood on hinges and install bolts. Do not tighten. (2) Align scribe markings on hood with hinge and tighten screws to hold in position. (3) Close hood and inspect alignment. (4) Adjust alignment (Figs. 6 and 7) tighten bolts 180 inch-pounds and remove protective coverings.

VIEW IN CIRCLE A BUMPER

FENDER VIEW IN CIRCLE 8

BUMPER VIEW IN CIRCLE C

VIEW IN CIRCLE C (CHARGER ONLY) ADJUSTMENT SCREW

Fig. 7 —Hood Leveling Adjustment

PY98


BODY AND FRAME 23-9 BOLT

( WASHER HANDLE

LATCH

PLATE HANDLE

SUPPORT

CHARGER

PY29 Fig. 8—Hood Lock and Striker (Coronet)

Hemi or 440 cubic inch engine. The component parts of the system are attached to the bottom side of the hood with screws and "pop-rivets". A single cable attaches the right and left outer air intake duct door actuator arms. The doors are controlled through the use of a single master control cable attached to the lower reinforced portion of the instrument panel. The cable looped end is positioned over the right outer duct door actuator arm. The cables are retained on the actuator arms with spring type retainers. The outer ducts are each serviced as an assembly only. The center air scoop, lower seal, door cable and master control cable are serviced separately. Air Scoop The hood air scoop (Fig. 10) is attached to the hood with nuts. The bezel is retained on the front of the air CLIP

scoop with screws. The air scoop and bezel are serviced separately. Cable Adjustment The cable connecting the duct doors and the master control cable are adjusted in the same manner. With the duct doors closed loosen the cable housing clip screws (Fig. 10). Pull out all cable slack from the cable attaching the duct doors and the master control cable at the right duct door. Tighten screws and test cable and door operation.

FENDERS ALIGNMENT The fender should be adjusted to provide for equal spacing at the cowl, door front edge and door top edge. Alignment should be made at bottom of floor sill panel, front of hood and door outer panel upper edge. SIDE REFLECTOR ASSEMBLY The fender side reflector assembly is attached to a recessed portion of the fender panel with nuts (Fig. 11). For assembly of lamp see Electrical Section, Group 8.

SCREW

REPLACEMENT SCREW RELEASE HANDLE Fig. 9 — Hood Lock and Striker (Charger)

N R507

Removal (1) Disconnect battery ground strap. (2) Tape leading edge of front door and cowl to fender area to avoid damaging paint.


23-10 BODY AND FRAME BEZEL

AIR SCOOP

VIEW IN DIRECTION OF ARROW Y

CONTROL CABLE INSTRUMENT PANEL

DASH PANEL CENTER

BEZEL AIR SCOOP

AIR INTAKE DUCT 1 OUTER RIGHT

re,

HOOD

AIR INTAKE RIVET DUCT OUTER LEFT SEAL VIEW IN DIRECTION RIVET — NU76 OF ARROW Z Fig. 10—Carburetor Fresh Air System

(3) Remove front bumper assembly. (4) Disconnect head lamp wires and remove grille extension to fender nuts. (5) Remove nuts and screws attaching fender to cowl, floor sill, splash shields and radiator yoke (Figs. 12 and 13). (6) Remove fender assembly and if necessary remove fender mouldings, ornamentation and head lamp assemblies. Installation (1) Install head lamps, mouldings and ornamentation. (2) Carefully position fender on studs at cowl side and align fender with mounting holes in radiator yoke. Install all screws and nuts. (3) With fender correctly positioned, tighten screws and nuts securely. (4) Connect head lamp wires and install grille to fender nuts. Connect battery ground strap. RADIATOR YOKE SUPPORT

yoke support screws. (4) Remove support to frame screws and support. Installation (1) Position yoke support on frame and install screws finger tight.

BRACKET FRONT FENDER

LAMP AND REFLECTOR

REPLACEMENT Removal (1) Drain and remove radiator. (2) Remove hood lock striker, horn and head lamp wiring from yoke support. (3) From under fenders remove splash shield to

CAP NUT

TERMINAL CONNECTION

VIEW IN DIRECTION OF ARROW Z

PY226 Fig. 11 — Fender Side

Reflector


BODY AND FRAME 23-11 FENDER SIDE SHIELD

FRONT FENDER

LATCH RELEASE HANDLE

HOOD LOCK SUPPORT

SHIELD

FRONT FENDER

VIEW IN SHIM

CIRCLE X

SIDE COWL

BRACKET

YOKE SHIELD PANEL SIDE SILL

VIEW IN CIRCLE Z

FENDER COWL

Lt

SIDE COWL

SHI BODY SIDE SILL

te

VIEW IN DIRECTION Of ARROW Y

HOOD LATCH SIDE RAIL PY86

AIR PANEL

Fig. 12—Fender Attachment (Coronet) LATCH HANDLE

FENDER SHIELD

SHIELD

--

SCREW

NUT STUD

DASH PANEL

FENDER SHIM HOOD LOCK SUPPORT

COWL

VIEW IN CIRCLE Y

'YOKE SCREW SHIM

FENDER/7'

STUD SCREW

FENDER FENDER COWL

BODY SIDE

FENDER SCREW

SPLASH SHIELD COWL

SIDE SILL

SCREW NUT HOOD LATCH

STUD

YOKE

FRAME CROSS MEMBER

U-NUT

AIR SHIELD

VIEW IN NUT

DIRECTION

SCREW

OF ARROW Z VIEW IN CIRCLE X

Fig. 13—Fender Attachment (Charger)

PY71


23-12

BODY AND FRAME

(2) From under fenders, install splash shield to yoke support screws finger tight only. (3) When all screws have been installed, tighten progressively. (4) Attach horn and light wires to yoke support with plastic straps. (5) Install radiator and hoses, fill cooling system and inspect for leaks.

opening. The grille must be held against front face of fenders at outer edges to avoid stressing or fracturing die cast metal Charger Models

Refer to Figure 19 for grille attaching points. VACUUM CONTROLLED HEADLIGHT DOOR

AIR SHIELD AND CROSS BAR

HEADLIGHT DOOR

Refer to Figure 14 for air shield and cross bar attaching points.

Removal (1) Remove headlight bezel. (2) Remove actuator shaft from door actuator bar clip (Fig. 20). (3) Remove retainers from door pivots and remove door from pivots. (4) Remove door actuator bar screws and remove door from opening.

BUMPERS FRONT AND REAR BUMPER Refer to Figures 15, 16 and 17 for front and rear bumper attaching points. GRILLE ALIGNMENT AND REPLACEMENT Coronet

Refer to (Fig. 18) for grille attaching points. When assembling grille, install screws into points marked "X" on left side first to laterally align grille to frame

Installation (1) Install headlight door actuator bar outer side upper attaching screw, circle "A" (Fig. 21) into actuator bar with head of screw on inner side of bar and threaded end facing outward toward door mounting screw hole area. (2) Position headlight door on pivots and install retainers. (3) Insert protruding threaded end of screw, in-

LOWER CROSS BAR

UPPER CROSS BAR

LOCK VERTICAL SUPPORT

LOWER BRACE

E CROSSMEMBER

AIR SHIELD

NN518A

Fig. I4 — Air Shield and Cross Bar


BODY AND FRAME 23-13 MOUNTING SUPPORT

UPPER BUMPER REINFORCEMENT PAD

SUPPORT

BUMPER GUARD

LOWER REINFORCEMENT

REAR BUMPER REAR BUMPER

FRONT SUPPORT GUARD CUSHION

BUMPER BRACE INNER SUPPORT

FRONT BUMPER APLIQUE FRONT BUMPER FRONT BUMPER AND SUPPORT

PY88

Fig. 15—Bumper Attachment (Coronet)

BRACKET FILLER

FRONT FENDER

FILLER

BUMPER BRACE UPPER REINFORCEMENT

BUMPER IMPACT PAD

JACKING BRACKET GUARD CUSHION FRONT BUMPER

BUMPER

LOWER REINFORCEMENT

BRACE OUTER SUPPORT INNER SUPPORT

BUMPER

BUMPER BRACE

LOWER REINFORCEMENT

FRI1NT_ BUMPER

-'FRAME VIEW IN CIRCLE Z

FRONT PY92

Fig. 16—Bumper Attachment (Charger)


23-14 BODY AND FRAME NUT AND WASHER

ACTUATOR REPLACEMENT

QUARTER PANEL LOCK WASHER

RETAINER

WASHER CARRIAGE BOLT

The actuator is retained on a mounting plate with two nuts. Remove the vacuum tubes prior to removing the actuator. Inspect the tubes to make certain they are not cracked or cut.

TESTS

SUPPORT BOLT

STUD BOLT

BUMPER PLATE ATTACHMENT

PY73

Fig. 17—Rear Bumper (Station Wagon)

stalled in actuator bar in step 1, into related hole in door. (4) Align door to actuator bar screw holes and install screws securely. (5) Connect actuator shaft to door actuator bar clip. (6) Test operation of door and install headlight bezel.

When the headlight switch is operated, with engine running, a slight sound of escaping air should be heard. If this condition is not evident, test as follows: (1) Remove large tube from reservoir and if no vacuum, install new tube. (2) If vacuum at tube, replace on tank and remove small tube. (3) Check reservoir connector for vacuum and if not evident, install new reservoir. (4) With vacuum satisfactory at small tube connector replace on tank and remove vacuum tube connector clip and connector at switch. (5) If no vacuum at connector inspect for pinched tubes. Replace the vacuum tube assembly if tubes are pinched or plugged. (6) With vacuum available at switch connector, install a new switch. When air escapes continuously in one position and SCREW

BRACKET

BRACKET

BRACKET

GRILLE SCREW AND WASHER SCREW BUMPER PY34

Fig. 18—Grille Attachment (Coronet)


BODY AND FRAME 23-15

RETAINER SPRING

DOOR

NUT

BRACKET

SCREW

BUSHING CRANK

HOUSING

VIEW IN CIRCLE Y NUT TORSION BAR

TORSION BAR

MOTOR BRACKET

VIEW IN DIRECTION OF ARROW

SCREW MEDALLION SPACER

GRILLE

SCREW

SCREW

VIEW IN CIRCLE X

PY72

Fig. 19—Grille Attachment (Charger)

in the opposite position for a short time, there is a leak in one of the vacuum tubes leading from the switch connector, at the "T" connector, or at one of the tubes leading from the actuators. Should air escape continuously in both switch positions and the vacuum tubes are free of leaks, test the actuator assembly. With switch in the open position, vacuum should be felt at the actuator top tube connector when the engine is running. If no vacuum or extremely weak vacuum, install a new actuator.

Raising outer end of door moves upper part of door forward, when in closed position. Lowering lower part of door moves lower part forward, when in closed position.

only one hinge at a time.

In and Out

Adjustment is made at the pillar hinge half. Adjust only one hinge at a time. Raising outer end of door, moves upper part of door into door opening. Lowering outer end of door, moves lower part of door into door opening.

DOORS The service procedures for internal door components do not include obvious operations, such as removing door or quarter panel trim panels, testing operation of window or inspecting glass fit after adjustments or replacement have been performed.

STRIKER AND ROTOR

ALIGNMENT

The door strikers (Fig. 23) are attached to the pillars. Oversize holes permit up and down and in and out movement. Fore and aft movement is made by adding or removing shims between the striker and post. The striker plate should be adjusted to lift the door slightly.

Up and Down

DOOR REPLACEMENT

Adjustment of the door can be made at either the pillar or door hinge halfs (Fig. 22). Fore and Aft

Adjustment is made at the door hinge half. Adjust

Front Door Removal

On vehicles with electric windows, disconnect wires from regulator motor and remove from door.


23-16 BODY AND FRAME TUBES SCREW

TUBE

RESERVOIR

FENDER SIDE SHIELD VIEW IN CIRCLE W VIEW IN DIRECTION OF ARROW V

SIDE RAIL VIEW IN DIRECTION OF ARROW X

d'WIRING CLIP

VACUUM SWITCH

DASH PANEL VACUUM CONNECTOR Itc..... TUBE CONNECTOR CLIP VIEW IN DIRECTION OF ARROW U

CLIP ACTUATOR BAR

SCREW

SCREW

NUTS

COLOR CODE

BOOT ACTUATOR COLOR CODE

CONNECTOR VIEW IN CIRCLE Y NR446

VIEW IN DIRECTION OF ARROW Z

Fig. 20—Actuator Application

(1) With door in wide open position, place a jack, with a block of wood on lifting plate of jack, as near hinge as possible to support door as hinge bolts are loosened. (2) Remove door interior trim and hardware. (3) Scribe a line around upper and lower hinge plates on door panel. (4) Remove hinge screws from door and remove door for further disassembly. Installation

(1) With door inner hardware installed, place door in position in door opening, supported by a padded jack. (2) Position hinge plates on door and install screws finger tight only. (3) Adjust jack to align scribe marks and tighten

screws. On electric window lifts, install the wiring in the doors and attach to the motor and control switch.

Rear Door Removal On vehicles with electric window lifts disconnect wires from motor, control switch and door, prior to

door removal.

(1) Open rear door and place a padded jack under door near the hinges. (2) Remove door interior trim and hardware. (3) Scribe aligning marks around hinge plates on door. (4) Remove hinge to door screws and remove door. Installation On vehicles with electric window lift, insert wiring into the door and attach to motor and control switch prior to installation of trim panel.


BODY AND FRAME 23-17

HEADLIGHT DOOR

ACTUATOR BAR

SHIM

Fig. 23—Door Striker and Rotor

NR466

Fig. 21—Door Actuator Bay Attachment

(1) With rear door inner hardware installed, support door on a padded jack and position door on hinges. (2) Install hinge screws finger tight. (3) Align hinges with scribe marks, tighten screws, and test door for alignment. (4) Install door trim and hardware. HINGE REPLACEMENT

shaft with an alien set screw. The handles should be positioned on the shaft in approximately a horizontal position with the knobs pointing rearward. Remote Control Handle The remote control handle (Fig. 24) is attached to the control unit with a screw at the rear inner end. ARM RESTS

The arm rests are retained by two metal screws inserted at the bottom of the arm rest base. The pad and base can be separated and the pad may be recovered. TRIM PANELS

The door hinges (Fig. 22) are attached to the doors by screws accessible from the outside. The front door hinges are each attached to the "A" post by three screws. The rear door upper hinges (on station wagon models), are attached to the "B" post by three screws accessible from the outside. On sedan models, the screws are accessible through an access hole in the "B" post. INSIDE HANDLES

Window Regulator Handle The window regulator handles are retained on the TAPPING PLATE

Door Trim Panel Replacement (1) Remove inside handles and arm rests. (2) Remove trim panel to door panel screws. (3) Insert a wide blade screw driver between trim panel and door next to the retaining clips. Snap clips out of door panel and remove trim panel. (4) Before installing trim panel, make certain the watershield is properly cemented in place (Fig. 25). (5) With escutcheon spring placed on regulator shaft align trim panel retaining clips with holes in door and bump into place with heel of hand. (6) Install trim panel to door screws, escutcheon washer, handles and arm rest. LOCK ASSEMBLY

Remote Control Removal (1) Raise door glass and remove remote control base to door panel screws (Figs. 26 and 27).

141 )114r

TAPPING PLATE REAR

FRONT

Fig. 22—Door Hinges

NN522

Fig. 24—Remote Control Handle


23-18 BODY AND FRAME WATERSHIELD

CEMENT

FOUNDATION

INNER PANEL

TRIM PANEL SWITCH VIEW IN CIRCLE X

40 w

CEMENT

TAPE FRONT DOOR BELT WEATHERSTRIP

CEMENT OUTER PANEL TAPE

VIEW IN DIRECTION OF ARROW U (2 DOOR)

VIEW IN CIRCLE T WATERSHIELD

CEMENT

CEMENT

WATERSHIELD

BELT WEATHERSTRIP

VIEW IN DIRECTION OF ARROW W

TAPE

(MANUAL REGULATOR) VIEW IN CIRCLE X

2.00 VIEW IN CIRCLE Y

2.00 VIEWING CIRCLE Z NR241

Fig. 25—Door Watorshields

(2) Remove link from remote control lever and lock assembly. (3) Remove control from door and linkage through large opening in door.

Installation (1) Before installing remote control assembly, coat parts with lubriplate. (2) Install linkage through door opening and connect link to the control lever and lock. (3) Install control attaching screw and test operation. Lock Replacement Removal (1) Disconnect handle to lock link (Figs. 28 and 29). and from lock by pulling link outward. (2) Disconnect locking lever rod (front door only) from lock. (3) Disconnect lock control rod from lock.

(4) Remove lock assembly to door screws. (5) Rotate lock and disconnect remote control link when removing lock. (6) Lubricate all moving points of lock assembly. PUSH ROD

LINK ANTI-RATTLE DOOR PANEL

SEAL

CLIP REMOTE CONTROL LINK

NN766

Fig. 26—Front Door Remote Control


BODY AND FRAME 23-19

CONTROL

ev

CLIP

SLEEVE LINK

LOCK

ANTI-RATTLER VIEW A

NN546

Fig. 27—Rear Door Remote Control

Installation (1) Position lock assembly in door and connect remote control link to lock lever. (2) Install and torque lock retaining screws 30-50 inch-pounds. (3) Connect handle to lock link. (4) Connect locking lever rod (front door only) to lock assembly. (5) Connect locking lever rod and remote control link to lock. Lock Cylinder Removal (1) With window in the up position, disconnect cylinder link (Figs. 30 and 31) from clip on lock lever (4 door only) and from cylinder.

Fig. 29—Roar Door Locking Control (2) On 2 door models, disconnect

lock link from clip on lock lever, remove link control bracket screws and remove cylinder link from cylinder. (3) Remove retainer from cylinder body and cylinder from door. Installation (1) Position cylinder in door and install retainer on cylinder body. (2) Connect the cylinder link to cylinder arm and to clip on lock lever (4 door models). (3) On 2 door models connect cylinder link to cylinder, position link bracket on door face and install screws. Connect lock link to lock. OUTSIDE HANDLE—Front Door Removal (1) With door glass in up position, remove nuts

LINK

SEAL REMOTE CONTROL

SLEEVE LINK

CLIP LATCH

NR193

Fig. 28—Rear Door Remote Control and Latch

NN555

Fig. 30—Door Lock Cylinder (Coronet)


23-20 BODY AND FRAME CYLINDER LINK LATCH LINK

(2) Depress handle button and position link over connector on handle. (3) Install retainer over link and connector.

WEATHERSTRIPS AND WINDCORDS VIEW IN CIRCLE-A

6

GASKET

AN

t' ne

LINK CONTROL LOCK CYLINDER

) /i

SCREW „--e-

L

" LOCK CYLINDER LOCK LEVER

VIEW IN CIRCLE-B

FRONT OF CAR -■-• VIEW IN DIRECTION OF ARROW-C

NR302

Fig. 31—Door Lock Cylinder (Charger)

from mounting studs (Fig. 32) and link from handle to lock. (2) Lift handle up and out of door. Installation (1) Position handle into door and engage handle to lock link. (2) Attach stud nuts and test handle operation.

REAR DOOR Removal (1) With door open and glass in up position, remove retainer from link at handle connector. (2) Depress handle release button and remove link from handle connector. (3) Remove handle to door nuts and handle. Installation (1) Position handle in door and install nuts.

Door Weatherstrips Make sure all weatherstrip particles and cement are removed before installing new weatherstrip. Sedan and Station Wagon Models (1) Apply lower half of weatherstrip, starting at hinge face at belt line, working fasteners into holes in shut face of doors. (2) Apply a 1/8 inch bead of cement to weatherstrip seating area on door upper and lower areas. (3) Install upper half of weatherstrip on door, indexing at the upper corners. (4) Work weatherstrip from index points to a point midway between them. Avoid puckering or stretching of weatherstrip.

Hardtop—Convertible Models (1) Apply a coat of cement to weatherstrip contact area on vent wing, door inner and outer panels at belt line and to contact surface of weatherstrip. (2) Position pillar seal on weatherstrip, making sure lip of weatherstrip dove tails into groove of seal and install screws. (3) Install weatherstrip on door, indexing at top of door at belt line with two fasteners. Roof Rail Weatherstrip Refer to Figure 33 for the attaching points and methods of cementing. The weatherstrip retainers are adjustable through the use of elongated attaching holes. The weatherstrip can be moved in or out for the best possible fit and seal along the top edge of the vent frame, door glass and quarter glass. The glass up-stop must be adjusted so the fully raised glass just curls the outer lip of weatherstrip against the inner lip. When the up-stop, roof rail weatherstrip and glass are properly adjusted, the outer lip of weatherstrip will seal along the top edge of the glass and the inner lip of weatherstrip will seal along the upper inside edge of glass. Outer Belt Weatherstrip The door outer belt weatherstrips are retained in the door panel with spring type retainers.

Fig. 32—Front Door Handle

Windcords Refer to Figure 34 for the starting points and method of attachment for the windcords.


BODY AND FRAME 23-21 RETAINER

GLASS AFTER ADJUSTMENT

WEATHERSTRIP GLASS BEFORE GLASS AFTER ADJUSTMENT ADJUSTMENT

RETAINER

GLASS BEFORE ADJUSTMENT VIEW IN CIRCLE T

WEATHERSTRIP

VIEW IN CIRCLE Li

INDEX VIEW IN DIRECTION OF ARROW V PILLAR SEALER SEAL INDEX HERE

RETAINER

INDEX HERE

WEATHERSTRIP VIEW IN DIRECTION OF ARROW W

VIEW IN DIRECTION OF ARROW X

SEAL

WEATHERSTRIP INDEX NOTCH

SEAL

QUARTER PANEL

VIEW IN CIRCLE Y

INDEX SEAL TO FRONT ENO OF RETAINER VIEW IN DIRECTION OF ARROW Z

PILLAR

NR367

Fig. 33—Roof Rail Weatherstrip

GLASS—SEDAN MODELS—Coronet Front Door Glass and Vent Wing Adjustments

(1) Open door and lower window so glass top is even or slightly below belt line. (2) Move rear run retainer (Fig. 35) against rear edge of glass and tighten screw. (3) Position regulator stop against regulator sector stop and tighten nut. Vent Wing Replacement Removal

(1) Remove screws from vent frame at door front facing. (2) With glass in the down position, remove division channel to support screw at lower end. (3) Move division channel off of glass edge. (4) Disconnect the outer belt weatherstrip for a short distance to provide clearance for division channel. (5) Tilt top of vent frame toward rear of door and up out of door. Installation (1) Tilt top of vent wing toward rear of door and install into door.

(2) Move division channel over glass edge and on lower support. (3) Install screw, but do not tighten. (4) Install vent frame to door screws. (5) Install loosened part of belt weatherstrip. (6) Adjust vent wing and door glass. Door Glass Replacement Removal

(1) Loosen front run channel lower mounting screw (Fig. 36). (2) Move channel forward and slide glass out of channels. (3) Remove regulator arm from lift bracket (Fig. 37). (4) Remove glass from door. (5) Push plug out of lift bracket rivet. (6) Pinch ends of rivet together and remove glass. Installation

(I) Position lift bracket and gasket on glass, install rivet and plug. Before installing glass, lubricate regulator slide channel. (2) Position glass into door and insert regulator arm roller into lift bracket.


23-22 BODY AND FRAME

INDEX POINT

INDEX POINT

QUARTER PANEL INDEX AND STARTING POINT

GARNISH MOULDING

PILLAR

2.50"--■

VIEW IN DIRECTION OF ARROW Y 2 DOOR HARDTOP

QUARTER PANEL VIEW IN DIRECTION OF ARROW X 2 DOOR SEDAN

QUARTER PANEL

r:I

.5cr

N POCKET PANEL STARTING POINT

INDEX AND STARTING POINT

WEATHERCORD DRAIN TROUGH

PILLAR

WINDSHIELD GARNISH MOULDING

SCUFF PLATE (REFERENCE)

VIEW IN DIRECTION OF ARROW Y CONVERTIBLE

SIDE SILL VIEW IN DIRECTION OF ARROW V

STARTING POINT VIEW IN DIRECTION OF ARROW Z 4 DOOR

4 DOOR

NR366

Fig. 34—Door Windcords

(3) Position glass into run channels and adjust door glass. Regulator Replacement

The regulator assemblies are attached by screw and washer assemblies (Fig. 37). When removing, the door

REGULATOR STOP

glass should be fully lowered. Slide regulator rearward to disengage from lift bracket and guide assembly. Lubricate regulator toothed area when reinstalling. Electric Regulator Motor Whenever necessary to remove the regulator motor, it is imperative the linkage be clamped in a vise (Fig. 38) to lock it in place. Failure to do this allows the assist spring to spin the mounting bracket around the lift pivot.

The regulator motor assembly is attached to the door inner panel at the top and bottom areas with screw and washer assemblies.

FORE AND AFT

Electrical Tests Refer to the Electrical Group for tests and wiring diagram on electrically operated window regulators. Glass Run and Channel

FORE AND AFT

IN

OUT NN493

Fig. 35—Front Door Glass Adjustments—Sedan

The glass run (Fig. 39) is a press fit in the door frame and lower run channel. The index notch, at door upper corner should be positioned first to assure correct installation. The lower run channel is post-


-

BODY AND FRAME

23 23

REAR CHANNEL

NN792

CIRCLE A =0CMFT LIFT BRACKET

Fig. 39—Glass Run and Channel—Sedan

REAR DOORS Sedan Models LUBRICANT

NN7813

Fig. 36—Door Glass Replacement—Sedan

honed over the window opening frame from inside the door through the large access opening.

GUIDE

LIFT BRACKET

Adjustments (1) Loosen division channel lower bracket screw (Fig. 40) and lower window 1/2 way. (2) Tighten division channel lower bracket screw. (3) Lower window so top of glass is even or slightly below belt line of outer panel. (4) Position regulator stop against regulator sector stop and tighten nut. Glass Replacement (1) Loosen division channel lower screw (Fig. 41) and move glass out of run channel. (2) Move glass to the rear and remove regulator arm from lift bracket. (3) Remove glass from door. (4) Push plug out of lift bracket rivet (Fig. 41) pinch ends of rivet together and out of glass. Installation (1) Position lift bracket and gasket on glass, install rivet and plug.

ATTACHING POINTS NR95

STATIONARY GLASS

Fig. 37—Regulator Assembly ASSIST SPRING

DIVISION CHANNEL

REGULATOR

PIN IN AND OUT

N14201 Fig. 38—Locking Regulator Linkage in Position

Wall ATOP STOP

Fig. 40—Rear Door Glass Adjustments—Sedan


23-24 BODY AND FRAME (4) With front glass in down position, slide division channel into door and move firmly against stationary glass weatherstrip. (5) Install upper and lower attaching screws loosely and adjust door glass. Regulator Replacement —Manual and Electric

Service procedures are the same as outlined for front doors. Electric Regulator Motor Tests

GASKET

Refer to the Electrical Group for tests and wiring diagrams for electrically operated regulators.

BRACKET RIVET

Replacement APPLICATION AT CIRCLE A

NN786

Fig. 41—Door Glass Replacement

(2) Lubricate slide area of lift bracket. (3) Position glass into door and install regulator arm roller into lift bracket channel. (4) Position glass into run channels and adjust glass.

When removing the motor from the regulator, it is imperative the regulator linkage be locked in position to prevent the mounting bracket (Fig. 38) from spinning around the pivot.

Division Channel Run

The division channel run (Fig. 42) is a press fit into the channel. When replacing, apply a 1-1/2 inch length of sealer to the joint area of division channel.

HARDTOP—CONVERTIBLE MODELS

Stationary Glass Replacement Removal

(1) Remove division channel attaching screws at upper and lower ends (Fig. 42) and remove channel. (2) Move glass and weatherstrip assembly forward and up out of window opening. (3) Inspect the weatherstrip. Installation

(1) Position glass and weatherstrip assembly to window opening and move rearward into upper frame. (2) Insert division channel run into channel. (3) Apply a 1-1/2 inch length of sealer to joint area of division channel. GLASS RUN

Vent Wing and Door Glass Adjustments

(1) Open door and lower glass 1/3 way. (2) Adjust rear run channel upper attachment (Fig. 43) until window is centered between inner and outer belt line weatherstrips and tighten nut. (3) Close door, raise window seating top of glass and front of vent wing fully against and parallel to roof rail weatherstrip. (4) Tighten vent wing belt line screws and nut on front leg of vent wing. UP STOP SCREW REAR FRONT

LOWER FRAME STOP

IN AND OUT

FRONT GLASS

TILT

STATION WAGON

FORE AND AFT INNER BRACKET IN AND OUT CHANNEL SUPPORT REGULATOR STOP

SEDAN IN AND OUT

FORE AND AFT

NN492

NN785

Fig. 42—Rear Door Stationary Glass—Sedan

Fig. 43—Front Door Glass Adjustments—HardtopConvertible


BODY AND FRAME 23-25

(5) Tighten vent wing bracket nuts on inside panel and front face of door. (6) Position and tighten up stop against regulator arm. (7) Tighten division channel support screw and channel to lower support screw. (8) Open door, lower window 1/2 way and tighten rear track lower screw. (9) Tighten support to glass run channel screw. (10) Lower window until top of glass is even or slightly below belt line outer panel. (11) Position and tighten regulator stop against regulator sector stop. (12) Position and tighten stop on glass lower frame against bumper.

NN7137 Fig. 45—Door and Vent Glass Assembly—HardtopConvertible

Glass Replacement Removal

(1) Remove nut and washer from stud on lower end of vent wing leg (Fig. 44). (2) Remove screw and washer assemblies attaching vent wing to belt line. (3) Remove vent wing leg stud from slot in hinge pillar support. (4) Remove vent wing swivel to regulator screw. (5) Move door glass forward disengaging it from rear run channel. (6) Slide glass lift bracket off of regulator arm and remove door glass and vent wing assembly from door. (7) Invert and separate door glass from vent wing, (Fig. 44). (8) Remove glass slide and weatherstrip from door. ANTI-RATTLE

LIFT BRACKET

fr.-- ADJUSTING STUD

(9) Remove plastic rivet attaching lift bracket to glass and remove bracket and gasket. Installation

(1) Install lift bracket assembly and weatherstrip and guide on the door glass. (2) Assemble door glass and frame to vent wing division bar (Figs. 45 and 46). (3) Lubricate slide area of lift bracket guide. (4) With regulator in down position, install door glass and vent wing assembly into door and position vent wing pivot swivel into regulator assembly. (5) Position glass lift bracket on regulator arm and move glass rearward into rear run channel. (6) Position vent wing leg adjusting stud into slot in hinge pillar support. (7) Install vent wing swivel to regulator screw. (8) Install vent wing to belt line screws. SLIDE

LIFT BRACKET

FRAME PIN

GASKET

RIVET VIEW "A" (ASSEMBLED)

LIFT BRACKET NU239

Fig. 44—Vent Wing Replacement—HardtopConvertible

NN791

gip

Fig. 46—Glass Vide and Weatherstrip—HardtopConvertible


23-26 BODY AND FRAME

(9) Install nut and washer on vent wing adjusting stud. (10) Adjust vent wing and door glass.

MANUAL LIFT ELECTRIC LIFT

Regulator Replacement — Manual and Electric The regulators are attached to the door inner panels with screw and washer assemblies (Fig. 37). On electrically operated regulators, the motor is also attached at the bottom end to the door panel.

SEDAN-HARDTOP

Electric Regulator Motor Whenever it is necessary to remove the motor from the regulator, it is imperative the linkage be clamped in a vise (Fig. 38) to lock it in place. Failure to do this allows the assist spring to spin the mounting bracket around the lift pivot.

A-A CONVERTIBLE

Tests Refer to the Electrical Group for tests and wiring diagrams on electrically operated regulators.

Rear Run Channel door inside panel lock face a tthe top and to a support at the bottom with screw and washer assemblies. The The rear run channel (Fig. 47) is attached to the run channel is adjustable at both ends to allow alignment of the glass in the channel.

NN794

Fig. 48—Trim Panel—Coronet

trim panels (Figs. 48 and 49) are attached with screws and clips. When installing, make certain the watershield is properly cemented and positioned. SIDE REFLECTOR

The side reflector is attached to a recessed part of the panel with nuts (Fig. 50). AIR INTAKE ORNAMENT

QUARTER PANELS

Refer to Figure 51 for attachment method of the air intake ornament.

GARNISH MOULDINGS

The garnish mouldings should be positioned and held in place to assure satisfactory alignment. Do not over-tighten the mounting screws, or the moulding will become damaged at the screw hole area. TRIM PANELS

The rear seat cushion and back must be removed to gain access to the trim panel attaching screws. The

GLASS—SEDAN

Two door sedan models are equipped with a vent wing type quarter window (Fig. 52). Elongated holes in the hinge allow correct positioning of the glass assembly to the opening. The release handle assembly (Fig. 53) is attached to the glass with a grommet, washer, retainer and screw.

RETAINER

UPPER PANEL

CHANNEL

APPLICATION AT A-A SUPPORT NR376

NN 816

Fig. 47—Rear Run Channel—Hardtop—Convertible

Fig. 49—Trim Panel—Chargers


BODY AND FRAME 23-27

WASHER PIVOT BRACKET

BEZEL AND GASKET

Fig. SO —Quarter Panel Side Reflector NR510 NUT AND SEAL

Fig. 53—Release Handle—Sedan FORE AND AFT if IN AND OUT f

IN AND OUT UP STOP

1,

ra

fi AIR INTAKE ORNAMENT NU135

UP STOP

Fig. 51 —Air Intake Ornament—Charger

toptagivv-*

HARDTOP MODELS

OUTBOARD

UP AND DOWN IN AND OUT

Adjustments

(1) With door closed, adjust upper rear track (Figs. 54 and 55) until rear of glass lightly touches belt line weatherstrip. To move window in, turn sleeve nut clockwise; to move out, counterclockwise. (2) Raise window seating top of glass against roof rail weatherstrip and front of window level with top of front door window. (3) Adjust upper front track until front of window

■ ■

DOWN STOP REGULATOR STOP

NN495

Fig. 54—Quarter Window Adjustments—Coronet Hardtop

SEAL GLASS FRAME

\

tme HANDLE -"AP-NR377

GLASS

Fig. 52—Quarter Window Vent Glass—Sedan

NN929

Fig. 55—Quarter Window Adjustments—Charger


23-28 BODY AND FRAME is aligned with rear of front door window. To move window in, turn sleeve nut clockwise, to move out, counterclockwise. (4) Adjust lower front track until front of window is aligned rear of front door window at roof rail. (5) Adjust pivot bracket until top of window is fully against and parallel to roof rail weatherstrip. To raise front of window, lower front of bracket, to lower, raise bracket. (6) Move upper front track attachment forward and tighten when quarter window weatherstrip is against front door window. (7) Tighten pivot bracket nuts. (8) Loosen and position front and rear up stops against glass lower frame and tighten screws. (9) Lower window until top of glass is even or slightly below belt line outer panel. (10) Turn lower rear track sleeve nut counter• clockwise until its boss is against outboard side of inner panel. Tighten nut. (11) Position and tighten regulator stop against regulator sector stop. (12) Position and tighten down stop against bumper. Glass Replacement Removal (1) Remove retainers attaching regulator arm studs to glass lower frame (Fig. 56). (2) Support window and remove regulator studs from lower frame. (3) Remove rollers from slots in glass lower frame. (4) Remove glass from quarter panel. (5) Inspect front and rear roller tracks for damage or excessive wear. Installation (1) Apply lubricant to slide areas of lower glass frame.

(2) Position and support window in quarter panel. (3) Insert roller assemblies in glass lower frame. (4) Position regulator arm studs in rollers and bushings and install retainers. (5) Adjust quarter window. Regulator Assembly The regulator assembly (Fig. 57) is attached to the inner panel with screw and washer assemblies. The regulator arm studs are retained in the glass lower frame with retainers. Lubricate the regulator tooth contact area approximately 1/2 inch wide along the entire length of the arc on the outboard side of sector and to front and rear arm roller studs. Electric Regulator Motor Refer to the Electrical Group for tests and wiring diagrams for electrically operated regulators.

Front Track and Brace Removal (1) Remove screws and washers attaching front track brace (Fig. 58) to inner panel and front track and remove brace. (2) Remove nut and washer attaching front track upper end to the inner panel. (3) Remove front track rollers and remove front track. Installation (1) Position front track into panel and insert sleeve nut at top of track into inner panel opening. (2) Install sleeve nut lockwasher and nut, do not tighten. (3) Position brackets and guide (Fig. 58) onto bottom of track and slide up into position into forward upper and lower slots of glass lower frame. BUSHING GLASS LOWER FRAME

ROLLER

SLOE SPRING NUT /

BUSHING

TRACK

ROLLER ROLLER ASSEMBLY GROMMET REGULATOR SCREW PIVOT CHANNEL NR392

Fig. 56—Quarter Window Replacement—Hardtop

ATTACHING POINTS

NR94

Fig. 57—Quarter Window Regulator—Hardtop


BODY AND FRAME 23-29 CONED WASHER

UP STOP STABILIZER IN AND OUT DOWN STOP

IN AND OUT FORE AND AFT UP AND DOWN IN AND OUT IN AND OUT REGULATOR STOP

Fig. 58—Quarter Window Front Track—Hardtop

(4) Position front track brace in panel and install attaching screws loosely. (5) Attach brace to front roller track and adjust glass. Rear Track The rear track (Fig. 59) is positioned over the slide in rear slot of glass lower frame and the sleeve nuts are inserted into the openings in inner panel. Lockwashers and nuts are used to retain the track on the inner panel.

CONVERTIBLE MODELS Adjustments Procedures for Convertible quarter window adjustments (Fig. 60) are the same as for Hardtop Models with the following 3 exceptions. (1) With door closed lower quarter window 1/4 way.

NN497

Fig. 60—Quarter Window Adjustments—Convertible

(2) Adjust upper stabilizer attachment (Fig. 61) until rear of window lightly touches belt line weatherstrip and tighten nut. (3) Lower window until top of glass is even or slightly below belt line outer panel. Allow glass to set lower stabilizer attachment in-out position and tighten screw. Glass Replacement Removal (1) Remove the front track and roller assemblies (Fig. 62). (2) Remove regulator arm stud retainers and studs from glass lower frame. (3) Remove roller from glass frame center slot. (4) Install retainers on regulator arm studs.

GLASS LOWER FRAME

STABILIZER

REAR TRACK —0-

LUBRICANT NN 804

Fig. 59 –Quarter Window Rear Track –Hardtop

Fig. 61—Quarter Window Stabilizer—Convertible


23-30 BODY AND FRAME replacement procedures are the same as those outlined for Hardtop models.

'''--- RETAINER

/01°

,of

ROLLER

1 _; Fi ,. .l e r 4 c \ yr ,,,,...

.

FRONT TRACK

Electric Regulator Motor Refer to the Electrical Group for tests and wiring diagrams for electrically operated regulators.

.

k(

VIEW DIRECTION ARROW A

1/4

Front Track and Brace Removal

7/5 ROLLERS VIEW DIRECTION ARROW B

STABILIZER

(1) Remove screws and washers attaching front track brace (Fig. 64) to inner panel and track. (2) Remove nut and washer attaching upper end of track to the inner panel. (3) Remove the front track from roller assemblies and remove from panel. (4) Remove roller assemblies from glass lower slide. (5) Inspect rollers and front track slide area.

NN 802 Fig. 62—Quarter Window Replacement—Convertible

(5) Remove glass and frame from panel. (6) Inspect slide areas and roller assemblies Installation

(1) Lubricate slide areas of glass lower frame. (2) Lower glass and frame into panel and onto rear stabilizer. (3) Lower glass to regulator arm studs and insert studs into rollers and bushings in glass lower frame. (4) Raise glass and disengage from rear stabilizer. (5) Install front track and roller assemblies. (6) Adjust quarter window.

Installation

(1) Lubricate slide areas of glass lower frame slot slide areas and slide areas of front track. (2) Position front track lower brace in panel and to attaching holes in side sill outer panel reinforcement. (3) Install attaching screws and washers loosely. (4) Install roller assemblies on front track and position assembly in panel. (5) Insert sleeve nut on track upper stud in attaching hole in inner panel and install nut and washer loosely. Install front track brace attaching screws loosely. Adjust quarter window. Stabilizer Channel

Regulator Assembly

The regulator assembly (Fig. 63) is attached to the inner panel with screw and washer assemblies. The

The quarter window stabilizer (Fig. 61) is attached to the inner panel at the upper end and to the side sill outer panel and reinforcement at the lower end. The

GLASS STABILIZER LOWER FRAME

SPRING NUT ROLLER

ROLLER ASSEMBLY

REGULATOR

PIVOT CHANNEL NR93

Fig. 63—Quarter Window Regulator—Convertible

Fig. 64—Quarter Window Front Track—Convertible


BODY AND FRAME 23-31 adjusting stud at the upper end allows "in and out" movement to position glass against out belt weatherstrip. The attachment at the lower end also permits "in and out" movement. TAIL GATE All Vertical adjustment and in and out adjustment are made at the hinge plate (Fig. 65). In and out alignment of the tail gate top is adjusted by moving the striker in or out to permit ease of entry of the tail gate glass into the upper run channel. Lateral adjustment to center the tail gate in the body opening is controlled at the hinge. WINDOW WASHER SYSTEM Refer to the Accessory Group for Service Procedures, Tests and Wiring Diagrams.

REPLACEMENT Ramona/ On cars with an electric window, remove trim panel and disconnect terminals at control switch. Disconnect wiper and washer electrical leads.

(1) Remove check arm and torsion bar guide from pillar guide plates. (2) Support tail gate on jacks or stands. (3) Loosen hinge pivot pin locking screws. (4) Use a pencil and outline hinge plate position on pillar post for future assembly. (5) Remove hinge plate attaching bolts from pillar post (Fig. 65). (6) Slide hinge plate and torsion bar in through guide toward center of tall gate. (7) Lower tail gate down and out of body opening. Installation

(1) With torsion bar and hinge plates pushed in toward center of tail gate, engage hinge plates into lower opening of body. (2) Attach hinge plate attaching bolts into pillar posts and locate hinge plates in relation to previous marked positions. (3) Tighten attaching bolts firmly enough to hold position and inspect alignment. (4) Close tail, gate and center in opening. (5) Attach torsion bar bracket to pillar post. (0) Open tail gatc and tighten loath% act cwa tut

hinge pivot pin. (7) Connect electrical leads and install trim panel. (8) Test window operation and install bumper.

—KNOB GASKET

BEZEL

HANDLE

BOOT

REMOTE CONTROL

LINK

SWITCH

col PLATE

LINK LINK LATCH

SLEEVE

VIEW IN DIRECTION car OF ARROW Z

LATCH it GLASS RUN

HINGE SHIM TORSION BAR BUSHING SPACER

SUPPORT LINK- CLAMP

RIVET

BEARING RETAINER

PANEL

SEAL

SEAL

SPACER

SPRING

REINFORCEMENT

NUT LINK

HINGE RING BEARING PIN

REGULATOR

BRACKET VIEW IN CIRCLE Y PLATE MOUNTING SCREW

NR478A

Fig. 65--Tail Gate Application


23-32

BODY AND FRAME

TRIM PANEL The tail gate trim panel is attached with metal screws. Clean all foreign material from the seating area of the trim panel before installing.

HANDLE GASKET

LOCK To replace the lock assembly (Fig. 65), it is first necessary to remove the glass and runs. The lock assembly is retained on ends of tail gate by screws. Lock Cylinder To replace the lock cylinder (Fig. 66), it is first necessary to remove the glass and regulator to gain access to the lock cylinder retainer (horseshoe type).

NR196

Fig. 67—Tail Gate Outer Handle

HANDLES

LOCK LINKAGE

Adjustment Remote Control Tail gate remote control handle (Fig. 67) adjustment can be made by removing plug located near rotor in lock facing of tail gate. Loosen hex bolt in lock assembly and adjust ratchet levers to allow lock rotor to spin freely when actuator rod is in the open position. Tighten bolt after adjustment has been made. This adjustment must be made on both sides of tail gate.

Installation and Adjustment (Fig. 69) The lower right to upper right lock link and upper right lock to release regulator mechanism arm link can only be adjusted to three total turns from nominal position for all release, interlocking and lock engaging operations. (1) Inspect locks to make certain they are in the fully latched position. (2) Install link to upper right lock detent clip, raise upper right lock actuator until it contacts upper lock detent. (3) Adjust threaded portion of link until aligned with slip hole of actuator and insert link into clip. (4) Connect link to upper right lock remote control lever and to release regulator mechanism actuator. (5) Install link from release regulator arm to the glass restraining bracket. (6) Install link into release regulator mechanism and upper left lock remote lever clip. (7) Install link into lock remote lever. (8) Take up all play in latch remote lever and release regulator mechanism arm and adjust link threaded end to this point.

Regulator Handle With tail gate handle in the unlocked position remove tail gate inner panel and remove nuts attaching handle to door (Fig. 67). To remove a handle which is inoperative and vehicle is fully loaded, prohibiting access to tail gate inner panel, it will be necessary to remove mounting studs from handle by drilling through handle. Refer to Figure 68 for location of drilling points.

SWITCH TAIL GATE PANEL 4-1/4 --

HANDLE C/L ----Th

7/16"/ RETAINER

2-3/4"

I 1-3/4 1-9/32" 1

Nr.

ORNAMENT GASKET /1EW IN CIRCLE A

CYLINDER

80

NK718

NR195

Fig. 66 —Tail Gate Lock Cylinder and Switch

Fig. 68 —Handle Stud Locations


BODY AND FRAME 23-33 LINK SLEEVE

LEVER CONTROL

LINK

UPPER LATCH

SCREW

VIEW IN CIRCLE A

LINK

LINK

SWIVEL CLIP

UPPER LINK CONNECTOR RATCHET HOUSING

VIEW IN CIRCLE D REMOTE CONTROL VIEW IN CIRCLE C

VIEW IN CIRCLE B

PY173

Fig. 69—Tail Gate Latch Linkage

(9) Install link into upper right lock remote lever and test operation of tail gate and door assembly.

GLASS Adjustments

Refer to Figure 70 for the tail gate glass adjusting points. (1) Remove tail gate trim panel and loosen regulator and run channel attaching screws and nuts. (2) With tail gate open, adjust upper attachments of lower run channels so the glass lightly touches outer belt weatherstrip. (3) From inside vehicle and with tail gate closed, run glass half way closed. (4) Adjust upper run channel for proper alignment with glass and tighten two top screws.

(5) Tighten lower nut on bottom of lower run channels. (6) Run glass up to approximately 1/8 inch below glass run. (7) Adjust regulator so top of glass is parallel to glass run. To raise or lower the left or right side of glass, raise or lower regulator on that side. Replacement Removal

(1) With tail gate open, remove the trim panel. (2) Remove the retainers (Fig. 71) from ends of regulator arm studs. RETAINER 7F. I .20LLER

GLASS

N AND OUT

-------IN AND OUT

IN AND OUT

PARALLEL ADJUSTMENT

Fig. 70—Tail Gate Glass Adjustment

N K944

GLASS AND FRAME

Fig. 71—Tail Gate Glass Replacement

NK943


23-34 BODY AND FRAME (3) Remove regulator arm studs from rollers in the glass lower frame. (4) Remove tail gate glass assembly from tail gate. (5) Remove rollers from glass lower frame. (6) Remove washers, spacers and screws attaching glass lower frame and weatherstrip to glass (Fig. 72) and remove the frame and weatherstrip.

MOUNTING SCREW

REGULATOR PLATE

REGULATOR

Installation

(1) Position outer belt weatherstrip on lower glass frame. (2) Position tail gate glass on weatherstrip and lower frame, and install the washers, spacers and retaining screws. (3) Apply lubricant to regulator arm studs and to glass lower frame studs. (4) Position rollers into slots of glass lower frame. (5) With tail gate in vertical position, insert glass assembly into tail gate. (6) Position regulator arm studs in rollers and install retainers on the ends of studs. (7) Adjust tail gate glass and install trim panel. Regulator Replacement Refer to the Electrical Group for Tests and Wiring Diagrams for electrically operated tail gate regulators.

The regulator assembly (Fig. 73) controls the parallel adjustment of the tail gate glass. The regulator assembly is attached to mounting brackets on the tail gate inner panel by screw and washer assemblies.

TAIL GATE SUPPORT

PY175

Fig. 73—Tail Gate Regulator

(2) Remove screw and washer assembly from upper end of glass run channel (Fig. 74). (3) Remove glass run to lower mounting bracket nut and washer. (4) Remove glass run channel assembly. Installation

(1) Insert glass lower run channel into tail gate. (2) Position lower bracket of channel over stud on hinge reinforcement and install washer and nut finger tight only.

Run Channel Removal

(1) Remove tail gate glass assembly. FRAME

SCREW

SCREW A FASTENER

CHANNEL

NUT

GASKET GLASS TAIL GATE SECTION A-A

Fig. 72—Tail Gate Glass Attachment

PY176

BUMPER GLASS theSTOP PY174

Fig. 74—Glass Run Channel


BODY AND FRAME 23-35

(3) Install upper bracket screw and washer finger tight only. (4) Install and adjust tail gate glass. TORSION BAR Removal

(1) Remove trim panel from tail gate. (2) Remove torsion bar clamp to tail gate pillar screws and remove clamp. (3) Remove torsion bar bearing and retainer. (4) Remove torsion bar and hinge to tail gate screws. (5) Remove torsion bar from hinge. Installation

(1) Lubricate torsion bar at right hinge and bearing areas. (2) Install hinge on torsion bar and insert bar into tail gate. (3) Position hinge on tail gate, install and tighten screws 30 foot-pounds. (4) Install bearing and retainer on torsion bar (Fig. 65). Tighten nut 95 inch-pounds. (5) Position clamp over end of torsion bar and from outside end of tail gate install and tighten screws 200 inch-pounds. (6) Install trim panel.

WEATHERSTRIPS AND RUNS Weatherstrip—Tail Gate and Opening

Prior to installing the weatherstrip (Figs. 75 and 76), make certain the seating area is free of all weatherstrip, sealer and other foreign material. Apply an even continuous coat of cement starting at the belt line, down one side, across bottom and up opposite side of lower opening. Install weatherstrip and seal area at belt line. Upper Run Retainer and Seal Removal

(1) Remove screws attaching the glass run retainer on roof rear header and remove retainer (Fig. 77). (2) Remove seal assembly from roof header. (3) Remove headlining rear corner retainer. (4) Remove headlining rear retainer from roof rear header outer reinforcement. Installation

(1) Position headlining rear retainer on roof rear header outer reinforcement and install screws. (2) Install headlining rear corner retainer over end of headlining retainer and install screw. (3) Install a new glass run retainer seal, start lower edge of upper pillar, up and across roof header and down opposite pillar. TAPE

TAILGATE

VIEW IN DIRECTION OF ARROW Z WEATHERSTRIP CLIP INNER CLIP OUTER

CHANNEL BRACKET

VIEW IN CIRCLE X

WEATHERSTRIP

VIEW IN DIRECTION OF ARROW W

TAILGATE

VIEW IN CIRCLE Y

CEMENT SEAL

Fig. 75—Tail Gate Weatherstrip

PY95


23-36 BODY AND FRAME HEADER REINFORCEMENT

SEAL

1/2±1/8 INCH

HEADER RUN RETAINER

1/2 ±1/8 INCH

UPPER RUN

VIEW IN DIRECTION OF ARROW X PILLAR SEAL CHANNEL OUTER RUN

SCREW WEATHERSTRIP

UPPER RUN

LOWER WEATHERSTRIP

CEMENT VIEW IN CIRCLE W UPPER RUN PLASTIC GUIDE 1 / 4 INCH

RIVET

T

UPPER RUN REAR RUN RETAINER

A-

LOWER WEATHERSTRIP

INDEX AT CORNER

CEMENT

SEAL

VIEW IN DIRECTION OF ARROW Z

VIEW IN DIRECTION OF ARROW Y

NN229

Fig. 76—Tail Gate Opening Weatherstrip

(4) Position rear header tail gate glass run retainer on seal and install screws.

inserting upper end into end of header glass run retainer and install screws.

Upper Run and Pillar Run Removal

QUARTER PANEL WINDOW

(1) Remove upper run from retainer (a press fit) (Fig. 78). (2) Remove pillar run to upper end of tail gate lower opening weatherstrip screw. (3) Remove pillar run and retainer to pillar screws and remove run and retainer. Installation

(1) Position pillar glass run and retainer on pillar,

Removal

(1) Unlock weatherstrip (Fig. 79) by prying lip of weatherstrip apart, inserting a fibre wedge and with a slight twist to the wedge, move tool completely around weatherstrip forcing the locking tab out. (2) Carefully loosen weatherstrip from glass on inside and outside surfaces. (3) With an assistant supporting glass on the out

SEAL RETAINER INNER RUN

VIEW IN CIRCLE A

NP638

Fig. 77—Upper Retainer and Seal

SEAL

APPLICATION VIEW A-A

NP640

Fig. 78—Upper and Pillar Runs


BODY AND FRAME 23-37 SEALER

['WEATHERSTRIP

HINGE

SPRING NUT LOCK VIEW-AA TAB

SUPPORT

HINGE PIVOT

SLIDE CAM TORSION BARS

VIEW-CC

VIEW-AA

NR101

NN830

Fig. 79—Quarter Window Replacement

Fig. 80—Deck Lid Hinge and Torsion Bar

side from inside vehicle, force glass out of weatherstrip. (4) Inspect weatherstrip for damage.

Disengage torsion bar roller from hinge being removed. (3) Remove spring nut retaining hinge to hinge bracket (Fig. 80) and remove hinge. under a load.

Installation

(1) When replacing weatherstrip, make certain all foreign material is removed from fence area. (2) Apply sealer in fence and glass groove areas of weatherstrip. (3) Position and fully seat weatherstrip on fence. (4) Position glass on weatherstrip and using a fibre tool, seat glass into weatherstrip. (5) With the palm of hand pound glass in an upward and downward motion to seat it fully. (6) Using a fibre tool, install locking tab.

DECK LID Alignment

The deck lid hinges (Fig. 80) permit only slight adjustment at the hinge attaching points. The hinge brackets are welded in place and are not adjustable. Replacement

The deck lid is attached by two screws on each side. An assistant's aid is recommended when replacing, to prevent it sliding rearward and damaging the paint and also to aid in aligning of the hinge screw holes when installing. Hinge Replacement Removal

(1) Remove the deck lid. (2) Use care when disengaging a torsion bar as it is

Installation

(1) Use a new spring nut and install hinge. (2) Install deck lid and connect torsion bars. (3) Test deck lid adjustment.

TORSION BAR REPLACEMENT Removal

(1) Remove torsion bar (under spring load) from adjustable slot (Fig. 80). (2) Unwind torsion bar and remove from support bracket. (3) Push torsion bar out of roller in hinge arm and remove from hinge support. Installation

(1) Insert bar into hinge support and position end of bar into hinge arm roller. (2) Hook torsion bar into support bracket, and position end of bar into first adjusting slot. (3) Move deck lid to various open positions and test tension of torsion bars. (4) Adjust bars progressively until lid stays in open position. Lock Replacement

The lock assembly (Fig. 81) is attached by two screws. Scribe location of lock mounting flanges to aid in installation.


23-38 BODY AND FRAME

LOWER PANEL CYLINDER CONNECTOR GASKET NU138

CONNECTOR--0.419

NU176

Fig. 81—Dock Lid Lock

Fig. 82—Vacuum Deck Lid Lock Switch

Lock Adjustment Vertical adjustment of the locks is made at the attaching screws. Side adjustment is made at the striker attaching bolts.

front wheel housing, a push button control switch in the glove box (Fig. 82) and a vacuum actuated diaphragm assembly connected to the lock (Fig. 83). Vacuum is supplied to system from intake manifold. Rubber hoses are used to connect component units. If failure of the system is accompanied with a rough engine idle, remove hose from manifold fitting tube and plug end of the tube. If engine idle improves noticeably, inspect hoses for possible leaks. Should system fail to operate entirely, remove hose at the release diaphragm in deck lid and con-

Lock Cylinder The lock cylinder is retained by a spring steel "U" shaped clip attached from within the body. VACUUM ACTUATED DECK LID LOCKS The vacuum actuated deck lid lock release system consists of a vacuum tank mounted over the right TUBE

El

/ /

LATCH BEZEL

CONNECTOR

SWITCH GROMMET TEE CONNECTOR

VIEW IN CIRCLE Z (WITH AIR CONDITIONING) Fig. 83—Vacuum Deck Lid Lock

NU74A


BODY AND FRAME 23-39 QUARTER PANEL

REAR PANEL UPPER PANEL DECK

LOWER PANEL DECK

PANEL EXTENSION SCREW WEATHERSTRIP VIEW IN CIRCLE Z

VIEW IN CIRCLE Y SCREW

PY93

PY33

Fig. 84—Deck Lid Weatherstrip

Fig. 85—Quarter Panel Extension

nect a vacuum gauge to hose. With engine running, actuate button in glove box while a helper observes gauge. If no reading can be obtained, inspect for a pinched hose. A reading of less than 16 inches will

indicate a leak in the system. Weatherstrip

Apply an even continuous coat of cement to entire MOULDING

MOULDINGS

MOULDINGS

REAR DOOR (STATION WAGON)

REAR DOOR (SEDAN)

FRONT DOOR (SEDAN STATION WAGON)

HOLE LOCATION MOULDINGS HOLE LOCATION

CLIP

CLIP NUT

NUT

Tip MOULDING

MOULDING FRONT DOOR (UPPER MOULDING)

FRONT DOOR (LOWER MOULDING)

Fig. 86—Front and Rear Door Mouldings

PY198


23-40 BODY AND FRAME

STAMPED NUT

STAMPED NUT

RETAINER

MOULDING RETAINER

MOULDING SCREW

MOULDING CHARGER WHEEL OPENING

• SCREW

RETAINER

NUT

AIL

WHEEL OPENING FOUR DOOR SEDAN AND

FRONT FENDER FRONT AND REAR MOULDINGS FOUR DOOR SEDAN AND STATION WAGON

STATION WAGON

NUT

4•

RETAINER MOULDING MOULDING

RETAINER I FENDER SIDE MOULDING FOUR DOOR SEDAN AND STATION WAGON

RETAINER CLIP NUT

CLIP FENDER SIDE MOULDING CORONET RETAINER CLIP

FENDER SIDE MOULDING CORONET

MOULDING

PY89

NUT

NAME PLATE

WHEEL OPENING MOULDING HARDTOP-CONVERTIBLE

SECTION A-A

Fig. 87—Fender Ornamentation

NAME PLATE HARDTOP


BODY AND FRAME 23-41

MOULDING SPACER BODY

SECTION A-A

COVER

SIDE DRAIN

A

PILLAR MOULDING

Fig. 89—Hood Ornamentation SPACERS PY178

Fig. 88—Drain Trough Mouldings

weatherstrip contact surface of deck lid opening (Fig. 84). Make sure molded corners of weatherstrip are correctly positioned when installing.

CAP REAR QUARTER PANEL MOULDING DECK MOULDING (SEDAN)

(CHARGER)

FRONT DOOR BELT MOULDING (HARDTOP-CONVERTIBLE)

NUT

RETAINER

MOULDING CLIP DOOR BELT MOULDING (CHARGER)

FRONT QUARTER PANEL MOULDING MOULDING

Fig. 90—Belt Mouldings

(CHARGER)

PY199


2342

BODY AND FRAME NUT

MOULDING

MOULDING MOULDINGS PY177 Fig. 91—Tail Gate Mouldings

QUARTER PANEL EXTENSION Refer to Figure 85 for attachment application of quarter panel extension.

EXTERIOR ORNAMENTATION Refer to Figures 86 through 91 for methods of attaching exterior mouldings and ornaments. MyMopar.com


INTERIOR TRIM AND SEATS INDEX Page BELTS—SEAT INTERIOR TRIM Console Floor Covering Scuff Plates Garnish Mouldings Glove Box—Coronet—Charger Headlining—Fabric—Coronet Charger

43 43 42 42 46 43 45

Hardboard Scuff Plates Trim Panels—instrument Panel Pad Package Shelf SAFETY BELTS SEATS Adjustment Belts—Safety Cover Replacement

Page 45 42 42 47 52 47 52

as

SERVICE PROCEDURE INTERIOR TRIM

Removal and installation procedures for garnish mouldings are covered with the related component.

GARNISH MOULDINGS When removing a garnish moulding positioned under the end of the adjoining moulding, loosen the end attaching screw to prevent possible damage to both mouldings. To assure correct alignment when installing mouldings, install screws finger tight, align moulding at each end and tighten screws. Use care not to draw screws down too much or moulding will be damaged by metal stretching at the screw holes.

INSTRUMENT PANEL TRIM PAD The instrument panel trim pad on Coronet and Charger are attached with stud type retainers and nuts (Fig. 1). Scuff Plates The scuff plates and extensions are retained to the floor sills, quarter inner panels and support brackets with screws. When replacement of a scuff plate is re-


BODY AND FRAME 23-43

covering is positioned under the front covering. To remove the rear floor covering it is necessary to remove the front seat assembly and the rear seat cushion. The well floor covering on station wagons is held in position with three retainers. CONSOLE Coronet and Charger Models NR344A

Fig. I—Trim Pad Application—(Coronet -Charger)

quired, a continuous 1/4 inch bead of sealer should be applied at the ends and outer edges. Floor Covering

The front seat mounting brackets are positioned on top of both front and rear floor covers. The rear floor

The consoles (Fig. 2) are attached to welded brackets on the floor pan tunnel with screws and bolts. To loosen the rear mountings, raise the carpet lower edges to expose the screw and bolt. All other attaching screws are accessible from within the console. HEADLINING Removal—Fabric Type (Coronet—Charger Models)

(1) Remove rear seat cushion, dome light, bezel and

UD

BASE PLATE VIEW A .14111 .s4

Or

P

LOCK

SECTION-DD

CLIP

PLATE

VIEW A (USED WITH COLUMN SHIFT)

BEZEL MOULDING CONSOLE

CARPET SECTION-CC

SECTION-EE NN408A

Fig. 2—Console Adaptation


23-44 BODY AND FRAME CENTER CAP

MOULDING

FASTENER

CENTER CAP ----.

RETAINER

CORNER MOULDING

4 DOOR

RETAINER NR348

NR346

Fig. 3—Rear Window Trim Mouldings—Coronet

Fig. 5—Rear Window Head Lining Retainers

lense, sun visors, rear view mirror, coat hooks and necessary garnish mouldings. (2) Remove rear window trim moulding (Fig. 3). (3) Remove headlining from cemented areas at windshield header and rear window opening. (4) Remove headlining from under shelf panel and from quarter panels. (5) Using a dull bladed putty knife, disengage fabric from the side rail retainers (Fig. 4) by gently forcing material up and off of retainers with the putty knife and while maintaining pressure on fabric, pull disengaged portion down and out. Work only small areas at a time. (6) Remove headlining at windshield header and from fasteners at rear window area (Fig. 5).

(7) Remove listing wires from side rail retainers and support wire from rear listing wire (Fig. 6). (8) Remove all foreign material and cement from windshield header area and rear window opening areas. (9) Remove listing wires from headlining and insert in comparable listing of new liner.

2 DOOR RETAINER

7 RETAINER 4 DOOR NR347

Fig. 4—Listing Wire Retainers

Installation (1) Trim excess listing material even with edges of headlining. (2) Locate centerline of lining and at front and rear ends, cut a small notch as an aid in maintaining headlining alignment during installation. (3) Locate and mark with chalk the centerline points of windshield and rear window. (4) Center headlining at rear window and insert rear listing wire to retainer clips on roof rail extensions. (5) Hook rear listing wire to wire supports (Fig. 6) and stretch material sufficiently to remove all wrinkles while maintaining front to rear alignment. The same amount of material should hang down at both sides. (6) Insert the remaining listing wires into the roof side rail retainers following the same cautions as in step 5. (7) Apply cement to windshield header area and when tacky, start at centerline area of windshield and position headlining to cemented area. (8) Using a dull putty knife, secure liner on barbs at header area, do not install material at top of windshield posts, making sure there are no wrinkles and fabric seam is straight. (9) Locate sun visor mounting bracket screw holes in header and cut holes in headlining slightly larger than attaching screws.


BODY AND FRAME 23-45

SUPPORT C-C LISTING WIRE

VIEW A

A-A

HEADLINING

LISTING WIRE

B-B

NR497

Fig. 6—Headlining Application

(10) Install sun visors and tuck in corners of headlining at top of windshield posts. (11) Locate rear visor mirror bracket screw holes, cut holes in fabric slightly larger than screws and install mirror. (12) When installing headlining at side rail retainers, work only a small section at one time to make certain the seams are straight and material is free of wrinkles. (13) Using a dull putty knife and working alternately from side to side, install headlining on side rail retainers. (14) Apply cement to rear window opening and to quarter panel area, and after cement becomes tacky, install headlining at rear window area, starting at top center and working outward, down sides and at quarter panel area. (15) Install rear seat cushion and coat hooks. (16) Locate dome light and cut out sufficient material for correct lighting. Install dome lamp bezel and lense. Charger Model The headlining is a one piece panel with moulded trim (Fig. 7). To remove the headlining from the side retainers, bow the panel in the center sufficiently to allow one edge of panel to be removed from retainer. Slide opposite side off of other side retainer

and remove from car. The headlining panel side retainers (Fig. 8), are attached to the roof side rail with clips. HARD BOARD LINING

Retainer Moulding Replacement The individual hard board headlining sections are held in position with semi-flexible type plastic mould-

UP STOP SCREW FRONT REAR

LOWER FRAME STOP

IN AND OUT TILT

FORE AND AFT

INNER BRACKET

IN AND OUT CHANNEL SUPPORT REGULATOR STOP

NN492

Fig. 7—Headlining Panel and Retainers—Charger


23-46 BODY AND FRAME

NP570

SEDAN

Fig. 8—Listing Wire Retainers

Fig. 10—Glove Box Attachment—(Coronet-Charger)

ings (Fig. 9) forced over the retainer sections of the roof bows. Starting at either outer end, remove the end cap and pry the moulding off the retainer. When installing moulding, make certain it is fully seated and evenly spaced from side to side. Install end caps in the headliner retainer and over the moulding ends. Lining Section

To remove either front or rear headlining seelions, remove windshield or rear window garnish mouldings and the one moulding at inner edge. All inner sections require only removal of the outer edge mouldings. Removal

(1) Remove mouldings (Fig. 9) at edges of section being removed. (2) Using a fibre tool force liner section off of roof bow and out of side retainers. (3) Inspect section for damaged edges.

Installation

(1) Position section on side retainers and in alignment with mating surface of roof bow. (2) Push section up at center to seat in side retainers and align edges with moulding retainer on roof bows. (3) Install mouldings on retainers and caps over ends. (4) Install garnish mouldings.

GLOVE BOX The Coronet-Charger glove box (Fig. 10) are one piece folded units. Hinges for glove box doors are positioned through openings in instrument panel and are attached to the doors with screws (Figs. 11 and 12).

FASTENER 11

SIDE RAIL RETAINERS

Fig. 9—Hard Type Headlining

NN376

NR499B

Fig. 11—Glove Box Door—(Coronet-Charger)


BODY AND FRAME 2347 Installation

(1) From rear of instrument panel, position glove box in opening and align mounting holes. (2) Install screws at sides to hold in position. (3) Install glove box door and attaching screws.

INSTRUMENT PANEL

SCREW

PACKAGE SHELF PANEL Replacement (Coronet)

HlNGE PY180

Fig. 12—Glove Box Door Hinge

GLOVE BOX LOCK (Fig. 13) Prior to installing lock cylinder make sure the tumbler is in a retracted position and the key is fully inserted.

(1) Remove rear seat cushion and back assembly. (2) Remove rear window side garnish mouldings and defogger outlet. (3) Loosen cemented end edges of panel. (4) Raise panel at front and remove retainers from shelf panel. (5) Slide panel forward and up to remove. (6) Remove retainers from trim panel. The silencer pad is retained on the shelf panel with cement. Raise front edge of pad and using a putty knife, loosen pad from cement and remove. Remove all foreign material and cement from shelf panel. When installing the silencer pad, apply cement evenly to same areas from which removed.

Installation

(1) Install latch assembly to inner panel of glove box door. (2) Insert lock and key into latch through glove box door face. (3) Hold cylinder in position and remove key. (4) Install the glove box spring lock catch to upper flange of instrument panel. (5) Close door and align to panel, open door and tighten all screws. Removal —Coronet

(1) Remove glove box door from hinge (Figs. 11 and 12). (2) Remove top and side attaching screws and remove glove box from rear of instrument panel. KEY

BEZEL

SEATS ADJUSTMENT To raise or lower the front seat (Fig. 14) loosen the adjuster mounting bolt nuts, under floor pan, and remove or install shims between the adjuster base and floor pan. To move seat "fore or aft," reposition the adjuster mounting bolts in the adjuster base. Three holes are provided at each mounting bolt area.

FRONT SEAT BACK LATCH All two door vehicles having split back bench type {4 ize

SCREW

SCREW

CATCH

HOUSING

TUMBLER

VIEW A

INSTRUMENT PANEL SCREW

SPRING NUT BUMPER

HOUSING SECTION A-A

PY181 Fig. 13 —Glove Box Lock


23-48 BODY AND FRAME RELEASE LEVER SEAT FRAME

..4.........._.......■ SEAT FRAME

l';

RELEASE LEVER

KNOB ALLEN SCREW

ALLEN SCREW

SPACER

SPACER CENTER CUSHION

FLOOR PAN 'BENCH SEAT L,--

FLOOR PAN

BUCKET SEAT'

NU96

Fig. 14—Front Seat Adjuster—(Coronet-Charger)

seats incorporate latches to prevent the seat back falling forward. To move seat back forward, move the latch assembly (Fig. 15) until clearance is obtained at the pivot pin. Removal (1) Remove snap ring and flat washer from pivot

Pin. (2) Remove end of spring from latch and remove latch assembly. (3) Remove spring from groove of pivot pin. (4) Remove knob and clip from end of latch. Installation (1) Position spring on pivot pin and align inner end of spring in pivot groove. (2) Install latch assembly on pivot pin and insert outer end of spring in notch on latch. (3) Install flat washer and retainer firmly against latch assembly. (4) Install clip and knob on latch.

REPLACEMENT Front Seat

The front seat cushion is an integral part of the seat frame. All seat frames are attached to the adjusters by studs and nuts. Remove nuts from adjuster mounting bolts (under floor pan) (Fig. 14) and remove seat. Rear Seat Cushion (Except Charger) The rear seat cushion is held in place (Fig. 16) by inserting the rear edge of the cushion under the seat back. The front lower frame of the seat incorporates retainers which fit into slotted brackets welded to the floor pan. CUSHION SEATBACK

SHELF PANEL

ATTACHING HOLES SCREW KNOB]

COVER MATERIAL BRACKETS CONTROL

PROTECTIVE CAP FOR RELEASE HANDLE ESCUTCHEON SET SCREW

RELEASE LATCH

FRONT SEAT BACK CABLE PY536

Fig. 15—Front Seat Back Latch

SEATBACK STRAPS SCREW

BRACKETS

Fig. 16— Rear Seat Attachment

NN183


BODY AND FRAME 23-49 SEAT CUSHION SCREW

SCREW

SILENCER

2ND SEAT BACK

Fig. 17 —Second Seat Back

PY97

BRACKET

PY96

Fig. 19—Cushion—Second Seat Back

Rear Seat Back

The rear seat back (Fig. 16) is held in place by tangs on the seat frame upper edge being positioned over hangers on the shelf panel support. The lower edge incorporates two metal straps which are attached to brackets welded on the floor pan.

STATION WAGON—SECOND SEAT BACK Removal

(1) Remove seat back to hinge screws (Fig. 17). (2) Release the catches on seat back (Fig. 18) and remove seat assembly.

SECOND SEAT CUSHION (Fig. 19) Removal

(1) Raise rear floor hinged panel and remove cushion to floor pan screws. (2) Move cushion rearward to disengage locking bars at front bottom side and remove cushion. Installation

(1) Place cushion in position and engage locking bars brackets on floor pan. (2) Raise floor hinged panel and install cushion mounting strap to floor pan screws.

THIRD SEAT BACK

Installation

(1) Position seat back on hinge assemblies and install screws. (2) Test and adjust engagement of seat back catches.

Removal

(1) With third seat back in the UP position, remove the seat hinge link screws (Fig. 20).

ch--KNOB SCREW

SILENCER

SEAT BACK N

" SCREWS

PUSHROD

LINK

LOCK

Fig. 18—Second Seat Lock

NN507

BACK CUSHION

SEAT CUSHION .>

Fig. 20—Third Seat Back and Cushion

NK853


23-50 BODY AND FRAME INNER LAP BELT-BUCKLE END

COVER-FRONT SEAT LAP BELT TUNNEL ANCHOR BOLT

AC).-----"-SHOULDER BOLT

ALL BENCH SEAT APPLICATIONS BUCKET SEAT WITH CENTER SEAT

CENTER LAP BELT (NOT USED ON BUCKET SEATS WITH OR WITHOUT CONSOLE)

VIEW IN CIRCLE U, V & Z

GROMMET

SHOULDER BOLT WASHER

ALL BUCKET SEAT APPLICATIONS (EXCEPT WITH CENTER SEAT)

RETAINER LAP BELT GUIDE

SEAT LAP BELT OUTBOARD

SHOULDER BOLT VIEW IN CIRCLE X

TYPICAL FOR ALL LOCATIONS

VIEW IN DIRECTION OF ARROW Y

PY46 Fig. 21 — Front Seat

Lap Belts

STATION WAGON HEADLINING

FOUR DOOR SEDAN HEADLINING

ROOF RAIL

ROOF RAIL CLIP HEADLINING SCREW

HARDTOP — SEDAN TWO DOOR

VIEW IN CIRCLE X BELT SHOULDER BOLT

BELT COVER

VIEW IN DIRECTION OF ARROW Y

VIEW IN CIRCLE Z

Fig. 22—Front Seat Shoulder Belts (Except Convertible)

PY48


BODY AND FRAME 23-51

INNER LAP BELT

CENTER LAP BELT REAR SEAT LAP BELT

FRONT SEAT BELT

FRONT SEAT BELT POCKET PANEL

COVER

SHOULDER BOLT

FLOOR PAN

SHOULDER BOLT FLOOR PAN VIEW IN DIRECTION OF ARROW Y

VIEW IN CIRCLE Z

PY50

Fig. 23—Front Seat Shoulder Belts (Convertible)

(2) Remove seat back and support panel assembly. (3) The seat back cushion is retained with screws on the seat panel.

Installation

(1) Position cushion on panel and install screws. (2) Position back and support panel assembly on hinge links and install screws. SHELF PANEL

BOLT

BELT

7

WASHER

VIEW IN CIRCLE Z TRIM PANEL BEZEL

SILENCER PAD

SCREW SHOULDER BELT CENTER LAP BELT

WHEELHOUSE PANEL VIEW IN CIRCLE Y

SHOULDER BELT CENTER LAP BELT

BAR

SHELF PANEL REINFORCEMENT

VIEW IN CIRCLE Z STATION WAGON

OUTER LAP BELT FLOOR

FLOOR

OUTER LAP BELT SHOULDER BELT

VIEW IN CIRCLE X

VIEW IN CIRCLE Y SEDAN-HARDTOP FASTBACK

Fig. 25 — Rear Seat Shoulder Belts (Coronet -Charger)

NU23A


23-52 BODY AND FRAME z

FWD''

/42

r I fl

BELT WASHER

ANTI-RATTLE WASHER

BODY SIDE SCREW VIEW IN CIRCLE U VIEW IN DIRECTION OF ARROW V (2ND SEAT ONLY)

VIEW IN CIRCLE W 3RD SEAT WASHER ANTI-RATTLE WASHER WASHER FLOOR PAN

ANTI-RATTLE WASHER

VIEW IN CIRCLE Y

VIEW IN CIRCLE Z REAR SEAT

VIEW IN CIRCLE X 3RD SEAT NU20A

Fig. 24—Rear and Third Seat Lap Belts (Coronet-Charger)

CUSHION The third seat cushion is attached to hinges which in turn are attached to the quarter inner panels. Removal (1) Remove hinge to quarter panel screws. (2) Remove rear seat cushion assembly. Installation (1) Position cushion assembly on floor pan. (2) Install hinges on quarter panel and tighten securely. (3) Inspect seat fit and alignment test operation of seat.

SAFETY BELTS Refer to Figures 21 through 25 for application of the seat and shoulder belts. Shoulder belts used for rear seats on station wagons are attached to the wheelhousings. Cover Material Installation Prior to installing the original or new cover, make certain the spring pad (where used) and pad cover are centered on the spring and are firmly attached. Make certain all buttons and medallions (where used) are pulled down securely and locked in position.

As an aid in attaching the cover correctly, mark the areas on the spring where the cover was attached with hog rings, screws or drive nails.


WINDSHIELD AND REAR WINDOW INDEX Page REAR WINDOW Cemented-In Type

54

WINDSHIELD (Except Convertible) Convertible

Page 53 54


BODY AND FRAME 23-53 SERVICE PROCEDURE WINDSHIELD

UPPER AND SIDE RETAINER'

Replacement (Except Convertible) Removal (1) Cover cowl, hood and fender area with a protective covering. (2) Remove windshield garnish mouldings. (3) Remove windshield outer mouldings (Fig. 1) using Tool C-4009. (4) Unlock weatherstrip (Fig. 2) by prying lip of weatherstrip apart, inserting a fibre wedge, and with a slight twist to wedge, unlock by moving wedge around weatherstrip. (5) Carefully loosen weatherstrip from glass inner and outer sides. (6) With an assistant supporting one end of windshield, exert pressure, from inside the car, to force windshield out of weatherstrip and carefully remove from opening. (7) Whenever a glass has cracked from pressure at the fence area, remove weatherstrip and correct cause of crack. The fence should be straight, smooth and without burrs or high spots. (8) Inspect weatherstrip for damage.

LOWER RETAINER

VIEW A RETAINER

NN768

Fig. 1—Windshield Outer MouldingsCoronet-Charger

weatherstrip if it is being used. (2) Apply sealer in fence and glass groove portions of weatherstrip. (3) Apply a 3/8 inch bead of sealer cement completely across cowl top panel lower windshield frame area (Fig. 3). (4) Position weatherstrip lower section to tab area,

Installation (1) Remove all old sealer and cement from original

SCREW

MOLDING

GLASS WEATHERSTRIP

COWL

GLASS WEATHERSTRIP

FRAME

WEATHERSTRIP FRAME INSTRUMENT PANEL

INSTRUMENT PANEL V/EW IN URGE

VIEW IN CIRCLE X VIEW IN CIRCLE Z COWL VIEW IN CIRCLE Y SEDAN-HARDTOP

VIEW IN CIRCLE Y CONVERTIBLE

Fig. 2 —Windshield Weatherstrip (C 00000 t-Charger)

py99


23-54 BODY AND FRAME HEADER MOULDINGS GLASS SEAL WASHER

WEATHERSTRIP

VIEW A-A LOCKING TAB

NN277

SIDE MOULDING

Fig. 3—Windshield Installation

starting at corners install over tabs and work toward center. (5) Install weatherstrip on fence at sides and upper opening. With hand pressure, seat weatherstrip fully on fence. (6) With an assistant, slide upper edge of glass into channel of weatherstrip and using a fibre tool, force weatherstrip lip over glass completely around. (7) Seat glass in weatherstrip, pounding glass, with palm of hand using an upward motion. (8) Insert a fibre tool between weatherstrip and glass, at either corner, slide tool across top, and completely around weatherstrip to seat glass in place. (9) Using a fibre tool and working across top, down sides and over bottom, force weatherstrip locking tab into locked position (Fig. 2). (10) Water test windshield area. (11) Install outer mouldings, wiper arms and blades. (12) Install inner garnish mouldings, clean glass inner and outer surfaces and remove protective covering.

CONVERTIBLE MODELS Removal (1) Cover cowl, hood and fender area with a protective covering. (2) Release top locking mechanisms and push header from windshield frame to expose moulding retainer screws. (3) Remove wiper arms and blades. (4) Remove windshield outside mouldings (Fig. 4). (5) Remove inner "A" post side mouldings. (6) Remove sun visors and screws attaching header trim cap to header. (7) Pry header moulding up slightly to clear moulding from weatherstrip, disengage from header and remove. (8). Remove windshield in same method as other models. Installation Install windshield in same manner as described for

LOWER MOULDINGS

NN413

Fig. 4—Windshield Mouldings (Coronet)— (Convertible)

other models, then continue as follows: (1) Position header cap moulding up against weatherstrip, force moulding against weatherstrip, and press rear edge down over header. (2) Install screws loosely to hold in position and lightly tap with a rubber hammer to seat. Be sure cap is evenly spaced across header. (3) Tighten screws securely. (4) Water test windshield area. (5) Install windshield outside mouldings (Fig. 4) and "A" post moulding. (6) Install sun visor, wiper arms and clean windshield.

REAR WINDOW CEMENTED-IN TYPE WINDOW Short cut sealing methods should not be used. To ensure a permanent watertight glass installation, use only the recommended adhesive sealer kit or its equivalent.

Removal (1) Place protective coverings over rear seat cushion and back, shelf panel or shroud, and adjacent exterior body surfaces. (2) Remove window exterior mouldings using Tool C-4009 and inner garnish mouldings. (3) Secure one end of a two foot length of tempered steel wire (.028 gauge max.) to a wooden handle. (4) Insert other end of wire through adhesive at lower corner of window and secure to another wooden handle. (5) With an assistant, carefully cut through adhesive material by pulling wire, in a sawing motion, up one side, across top, down opposite side and across bottom (Fig. 5).


BODY AND FRAME 23-55

tea,

"41.";

vP

4

iis

CUTTING WIR

cep-relit tir ADHESIVE CAULKING

NP188

Fig. 5—Cutting Adhesive Calking

Fig. 7—Spacer Dam Installation

(6) With an assistant, remove glass from opening and if original glass is to be reinstalled, place on a protected surface. (7) All old adhesive should be removed from glass and opening reveal using a putty knife or razor blade. DO NOT use an oil base solvent to remove

(5) Attach suction cups to glass outer surface and position glass in opening. (6) Inspect relationship of glass to fence completely around opening. The spacer dam should fold under and create a cushion for the glass to rest on. The glass to body fence overlap (0.30 inch minimum) should be equal across the top and sides. Use waterproof shims under spacers to obtain required overlap. (7) Apply a piece of masking tape over each side of glass and roof extensions. Slit tape vertically at edge of glass so when glass is installed, tape on glass can be aligned with tape on body. (8) Remove glass from opening and place on a protected surface, with inside surface up.

adhesive.

(8) Using steel wool, remove loose flakes of adhesive and old primer from reveal. Use light air pressure to clean reveal and surrounding areas. Installation

(1) Inspect moulding retaining clips. Remove and straighten clips bent more than 1/32 inch away from the body panel. Use block self-sealing screw-on type clips when necessary to replace. All clips must be attached tightly. (2) Inspect rubber spacers (2) in lower reveal. Spacers are made from .25 x .40 x 1.0 inch block of rubber and placed 17 inches from center line of window (Fig. 6). (3) Clean interior surface of glass. Hand pressure to clean the glass interior surface after installing glass and before adhesive has set up may result in glass being pushed out of opening. (4) Install spacer dam 1/4 inch from edge and positioned so it leans toward edge on glass inner surface (Fig. 7).

(9) Primer solution will damage any paint or trim it comes in contact with. Using a cheesecloth pad

saturated with adhesive primer, thoroughly apply to rear window fence and reveal areas. (10) The adhesive begins to cure immediately upon exposure to air. The working life is limited to approximately 15 minutes. Perform the following steps as quickly as possible.

(11) Insert adhesive tube into a standard household caulking gun, install nozzle on end of tube, and puncture adhesive seal at nozzle. (12) Apply a smooth continuous 3/8 inch bead of adhesive on glass between glass edge and spacer dam (Fig. 8). (13) When positioning glass in opening, alignment must be exact to prevent necessity of moving glass after adhesive contacts fence. (14) With an assistant and using suction cups on glass, align tape on glass with tape on body, make certain glass will set on rubber spacers and install glass in opening (Fig. 9). (15) Press glass lightly to adhere adhesive to fence

Fig. 6—Spacer Installation

flange. (16) Run a flat wooden or fiber tool around entire edge of glass to force adhesive into opening between edge of glass and reveal. (17) Close car doors gently, do not slam and water test window. Use a cold water spray, do not run a


23-56 BODY AND FRAME ADHESIVE CAULKING RUBBER DAM

SPACER DAM ADHESIVE CAULKING NP185

NP189A Fig. 8—Adhesive Application to Glass

Fig. 9—Rear Window Installation

heavy stream of water directly on freshly applied adhesive. If leaks are evident, work applied adhesive

glass exterior surface and remove protective covers. (19) Leave a window open and do not slam any

into leak point. Additional material can be applied and worked into leak point. (18) Install garnish and exterior mouldings, clean

doors for at least one hour. Sufficient pressure could build up in a closed car to force the rear window out of the opening.


CONVERTIBLE INDEX Page 60 59 54 57 61 57 60 60 60 60 59

Page ADJUSTMENTS Cam Control Link Door and Glass Alignment Header Hinge—Front Latching Mechanism Major Minor Roof Side Rail Alignment Shifting Top Stack Height

59 58 57 58 58 58 57 57 57 59 59

COVER REPLACEMENT ELECTRICAL TESTS FOLDING MECHANISM OPERATING THE TOP REAR CURTAIN RESERVOIR WEATHERSTRIPS Header Roof Side Rail Seals and Sealers WELL LINER

SERVICE DIAGNOSIS Condition

Possible Cause

Correction

TOP AND WINDSHIELD HEADERS NOT MEETING AT CORRECT ANGLE

Incorrect side rail adjustment

With top header locked in position, adjust front hinge.

IMPROPER MEETING (fore and aft) OF TOP AND WINDSHIELD HEADERS

Improper power link adjustment

Adjust power link bracket in direction of movement desired.

TOP HEADER NOT ALIGNED WITH GUIDE DOWELS

Improper header adjustment.

Adjust header "fore or aft" to align with guide dowels.

LEAKAGE AT WINDSHIELD HEADER

Header latch not properly adjusted.

Adjust by turning hook in or out


BODY AND FRAME 23-57 SERVICE PROCEDURES OPERATING THE TOP Raise or lower top only when vehicle is standing still. To Lower Top Release safety catch, pull handle down and push top free of the header. Be sure the well compartment is free of articles. Operate engine in neutral slightly above idle and hold switch control to the Down position until top is fully lowered. Top Remove boot, operate engine in neutral slightly above idle and hold switch control in the Up position. As dowels seat in their sockets, pull header down firmly and push locking handles forward until catches engage.

pearance and assure ease of raising and lowering operation. They are also provided to assure correct alignment of the roof side rails with door and quarter glass to prevent leakage. Adjustments are provided to eliminate wrinkles in the top material. Major Adjustments

Major adjustments are at the cam, control link bracket and the outer mounting. These adjustments are necessary to improve roof side rail alignment if minor hinge and header adjustment do not completely correct the condition.

To Raise

RESERVOIR DO NOT add fluid to a reservoir until it is installed in its normal position in the vehicle. Adding fluid to the reservoir in a position other than its normal installed position does not allow for fluid expansion and damage to the reservoir may result. Measure fluid level only when top is lowered. After filling reservoir, raise and lower top several times to expel air that may be trapped in system.

Insufficient fluid in the system may cause slow raising or noise in the pump and motor. Measure fluid level and if low, look for a leak due to a broken line or a loose connection. Fill reservoir (use only AQ-ATF Suffix "A" "Dexron" type transmission fluid) until fluid runs out of filler hole.

Roof Side Rail Alignment

The roof side rail structure (Fig. 2) consists of separate rails, hinged together to enable the top to fold into the well. The rails must be in good alignment and parallel to top edges of vent wings, door and quarter glass to provide a good weatherseal. Alignment of the rails is controlled by the side rail structure mounting support assembly (Fig. 3) cam (Fig. 4) control link and the front hinge set screw (Fig. 2). The front hinge set screw (Fig. 2) is accessible from the bottom surface of the front rail and center rail directly below hinge. Little adjustment is possible at the hinge. Door and Glass Alignment

After making top adjustments, doors, vent wings, door glass and quarter glass must be properly aligned. Misalignment in any of these areas make it impossible to obtain satisfactory results from top adjustments alone. Glass up-stop adjustments should be made after the correct roof side rail alignment to limit the upward travel of the glass and to assure effective sealing between the roof side rail weatherstrip and glass.

FOLDING TOP MECHANISM The electric-hydraulic top folding mechanisms (Fig. 1) consists of two cylinders, a piping system, an electric motor, a pump and reservoir assembly, and a double-throw rotary switch. The wiring and motor are protected by a separate external circuit breaker. The cylinders are serviced only as an assembly. The reservoir end plate "0" ring is replaceable. The pump cover plate is serviced as an assembly and the rotors are serviced as a package with the "0" rings.

PUMP AND RESERVOIR

GROMMETS

=-1

_ CYLINDER

cc I

ADJUSTMENTS Minor adjustments are provided to assist in aligning the top header to the windshield header to prevent leakage into this area; to improve top frontal area ap-

NP508

Fig. I—Folding Top Mechanism


23-58 BODY AND FRAME

BOWS LATCH SECTION A-A

A HEADER ANGLE CHANGE

0° VIEW IN DIRECTION OF ARROW-

VIEW IN CIRCLE

SECTION B-B

SECTION C-C

MOUNTING PLATE

/ NP 274

Fig. 4—Cam Assembly the top material. Dress or file them down.

LINK VIEW IN DIRECTION OF ARROW NN719A

Fig. 2—Folding Structure and Linkage (Coronet)

Latching Mechanism Good sealing at the frontal area is dependent upon proper positioning of the top header on the windshield header. The header locating dowels are cast into the latching mechanism housings and engage sockets in the windshield header to correctly position header. The latch hook should be adjusted to provide proper compression of the outer weatherseal on the folding top header. The locking and unlocking effort of the latching mechanisms are adjustable. Adjust the header catch to show five or six threads for initial setting.

The top header is adjustable at the front roof side rails to permit fore-or-aft movement. The header is attached to the side rails by two screws on each side (Fig. 2). Incorrect alignment between the top header and windshield finish mouldings may result in leakage or cause objectionable locking and unlocking effort. Inspect clearance for uniformity. The dowels control the fore and aft position of the folding top header. To eliminate interference between the header and finish moulding, rotate the cams on the side rail so the cam lobes are forward. It may be necessary to lengthen the control links one or two serrations after the cam adjustment. If cams lobes were already in the

full forward position, it may be necessary to loosen the header-to-side-rail screws and adjust header to provide proper clearance. Front Hinge Adjustment

Header Adjustments Inspect top linkage and mouldings for sharp edges, burrs or screws that are too long which may damage

To facilitate front hinge adjustment, unfasten header latches and partially lower top, before adjusting set screws.

Leakage between the top and door or quarter glass may be caused by poor contact between roof side rail weatherstrip and glass or only a partial contact between roof rails and top edge of glass. If inspection shows leakage is due to incorrect side rail alignment at the front hinge, adjust set screw until front and center side rails provide the proper glassline. When the rails sag, it indicates the control link is too long.

MOUNTING PLATE

NP526A

Fig. 3 —Mounting Plate Attachment (Coronet)

Control Link Adjustment The control links (Fig. 3) incorporate serrated adjusting links. Loosen screws just enough to permit moving links up or down. Raise the side rail assembly by lifting the front end of the center rail until the folding top header is six to eight inches above the windshield header. Loosen the control link adjusting screws and allow the control


BODY AND FRAME 23-59 link to seek its proper position. Tighten screws while rail assembly is held in the position described above.

STAPLE

TACK

Cam Adjustment

The cam assembly (Fig. 4) is used to change top header position in relation to the windshield header. The cams turn inside the rear side rail and the thrust link. When rotated, it changes the relationship between the front and rear side rails by moving the thrust link forward or rearward, The position of the cam high side determines the angle between the center and rear side rails. When the high side is fully forward, the angle is at the minimum and when turned rearward the angle is increased. An increased angle increases the forward "throw" of the entire top assembly.

The cam high side is indicated by a notch in the cam threaded end. Three triangular marks on the side rail indicate the amount of cam rotation when adjusting. The marks are located at the full-forward position of the high side, 45 degrees up and 90 degrees up. When adjusting, the cam high side position can be determined by referring to the notch and the triangular marks. Before adjusting, place top in half raised position to remove all possible strain off the cam. Make sure lock nut is loose. Tap cam threaded end with a soft-faced hammer to loosen any paint bond between cam and linkage. Stack Height Do not move mounting plate positions until control links have been adjusted.

Stack height should be correct if the control links have been adjusted as outlined. If control link adjustment does not correct stack height, loosen lower two of the three mounting plate screws (Fig. 3). Force lower portion of mounting plates to rotate fully forward while exerting pressure downward on both sides at top of side rails. Tighten screws and inspect stack height after raising and lowering top.

WEB STRAP

Fig. S—Web Straps

They also prevent excessive tension on the backlight zipper. The straps are attached to the bow and tacking strip with 8 staples and 1 tack at each end (Fig. 5).

WELL LINER The well liner (Fig. 6) is attached to the tacking strip in the quarter panel belt area with the use of stud snap-on type fasteners. When installing the liner, apply a thin coat of cement to the front face of the liner lower edge approximately two inches wide at the area where liner attaches to the upper face of the rear seat back support. Apply cement to the area contacting the wheelhouse cap. Apply cement to the upper surface of rear seat back support approximately two inches wide. STUD FASTENERS

TACKING STRIP

Top Shifts To One Side

If necessary to pull top to one side to engage locating dowels or top shifts to one side when raising from the windshield header, inspect position of control links. It may be necessary to adjust the control links unevenly to achieve proper alignment of the top.

NP524

SEAT BACK SUPPORT

LINER

ELECTRICAL TESTS Refer to the Electrical Group for Tests and Wiring Diagrams.

CEMENT WHEELHOUSE CAP

WEB STRAPS Two web straps attached to the rear bow and the tacking strip are provided to keep the number 3 bow from moving forward and wrinkling the top material.

NP522

Fig. 6—Well Liner Attachment


23-60 BODY AND FRAME WEATHERSTRIPS Roof Side Rail

After roof side rails have been aligned, inspect the side rail weatherstrip to make sure it is providing a good seal at top of door and quarter glass. If weatherstrip is not sealing properly, the retainer can be adjusted. The retainer has elongated attaching screw holes which permit in and out adjustment (Fig. 7). Raise glass until top edge of glass curls outer lip of weatherstrip inward just enough to contact inner lip. Adjust up-stops to limit further upward travel of glass.

at the header and pillar areas, care should be exercised to see that seals and weatherstrips are firmly seated in correct alignment and are free of twists. Clean all areas thoroughly, before installing weatherstrips and seals. COVER REPLACEMENT Removal

A visual inspection of the weatherstrips for damage or excessive wear should be made before removing the top cover. Inspect the top cover cables to make sure they are correctly connected. Inspect the top cover stay pads for excessive wear or moisture stains. Inspect web straps at rear bow. (1) Place protective covers over the deck lid, deck lid upper panel, hood and cowl areas. (2) Unsnap top boot and lay over rear seat back. (3) Unzip the backlight and lay in well. (4) Remove retainers from ends of tacking strip on rear bow and spread tacking strip (Fig. 9). (5) Using a sharp pointed tool remove staples and tacking strip. Use care not to damage the top material if the original cover is to be reinstalled. In some instances the staples ends may have become peened

Top Header Weatherstrips and Welts

The entrance of water and air between the top and windshield headers is eliminated by a tube type weatherstrip (Fig. 8) secured to the underside of the top header. The forward edge of weatherstrip contacts windshield header outside moulding. A rubber welt is cemented to the header flange. Seals and Sealers

When repairing or replacing a seal, or weatherstrip

SEAL OULDING

SEAL

MOULDING

RETAINER

CEMENT HEATER PANEL WEATHERSTRIP

VIEW IN CIRCLE Z CENTER SIDE RAIL

CEMENT SEAL 1.00

VIEW IN DIRECTION OF ARROW S

VIEW IN DIRECTION OF ARROW V RETAINER

RETAINER

1.00 WEATHERSTRIP

1.00

SPACER BELT BAR

VIEW IN DIRECTION OF ARROW Y

VIEW IN CIRCLE W

VIEW IN CIRCLE R

RETAINER NR197

Fig. 7—Roof Rail

Weatherstrips


BODY AND FRAME 23-61

NPS341

10—Removing Staples and Tacks at Rear Sow

NP523

Fig. 8—Top Header Weatherstrips and Wefts over and If excessive effort is required to remove them, it is advisable to cut the heads off the staples and remove the pieces after the top cover has been removed, otherwise damage to the top material may result.

(6) Remove staples and tacks tone tack used on each side at binding areas and at centerline area attaching top rover to rear bow (Fig. 10). (7) Prop top off of windshield header and remove moulding from top header. The moulding attaching screws are located under the weatherstrip. (8) Raise top to the 1/2 open position and remove rear roof rail weatherstrip (Fig. 7). Mark location of retainer screws on roof rail to aid in reassembling. and remove retainer. (9) Remove top and rear curtain material from

roof rail (Fig. 11). (10) Remove sealing tape, staples, drive nails and tacks at the top header. (111 Mark location of top material bead on ends of cover pads and loosen vent wing seals at corners. (12) Remove front screws from front roof rail weatherstrip retainers and remove locking flaps from between retainer and roof rail. (13) Remove cover cables at front roof rail weatherstrip retainers and at rear pillars (Fig. 12). If original cover is to be reinstalled tie a cord to one end of cables prior to removing. When cables are removed cord should be left in listing. (14) Remove cover from the folding linkage. (15) Remove rear curtain assembly. installation The rear curtain, backlight and zipper is serviced as an assembly.

Prior to installing cover. inspect roof bow felt pads for moisture or damage. The pads are a press fit in the bows. The cover stay pads should be inspected for ZIPPER

CURTAIN

•• ...t•Plie Se—

t% I

REAR BOW

t

7

NP533 Fig. 9—Rear Bow Tacking Strips

Fig. 11—Rear Curtain Assembly


23-62 BODY AND FRAME TACKING STRIPS CENTER

VIEW IN CIRCLE A FRONT OF CAR

NP564

Fig. 14—Cover Tacking Strips (Coronet)

Fig. 12—Cover Tension Cable

damage and moisture. The stay pads are attached to the header and roof bows with tacks (Fig. 13). The rear window zipper top half is tacked to the rear bow (Fig. 10) and the curtain bottom portion is attached to tacking strips (Fig. 14). (1) Insert cables in cover listings. Use cords to install cables in original cover. (2) Locate and mark center line on top header, rear bow, and at each end of new cover and rear curtain. (3) Position rear curtain on rear bow, align centerline marks and tack curtain to bow (Fig. 11). (4) Position curtain centerline notch at bottom to centerline of retainer and secure to tacking strip with 6 tacks. (5) Pull curtain laterally to tacking strip and overlay slots in curtain to slots in retainer. (6) Secure curtain to tacking strips with tacks or

staples. (7) Remove tacks from curtain at roof bow and reposition centerline marks. (8) Secure curtain to bow with tacks or staples. (9) Pull curtain side quarter stay to side tacking strips and making sure all wrinkles are removed secure with 34 tacks or staples. (10) Trim excess material from curtain at bow tacking strip. (11) Position cover on folding structure, align centerline marks at rear bow and install 3 tacks at centerline area (Fig. 10). (12) Starting from either side, pull cover taut, locating quarter window binding and weatherstrip flap to leading edge of "L" shape bracket on rear roof rail. (13) Secure cover to bow, near seam area, with 3 tacks. (14) Perform steps 12 and 13 for opposite side. (15) Install tacks or staples to open areas between cover seams and centerline mark. (16) Install 1 tack (10 oz.) at each seam. (17) Position side tension cables through brackets on rear roof rails and secure eyes of cables to roof rails with screws. (18) Cut notches in cover side quarter material at tacking strip for bolt clearance (Fig. 15). SPACER CORNER CENTER BOUND EDGE

SECTION A-A NP560

Fig. 13—Stay Pad Attachment

Fig. 15 —Cover Application at Rear


BODY AND FRAME 23-63 (19) Apply spacer strips to cover material at belt bar corners and center areas (Fig. 15). (20) Raise and prop top header approximately 12 inches off of windshield header. (21) Apply cement 3 inches wide to underside of top header, allow to dry, lower top and lock in position. (22) Apply cement 3 inches wide to cover material and when it becomes tacky pull cover material to header corners aligning centerline marks of header and cover material. (23) Make certain all wrinkles are removed and position cover to pre-cemented leading edge of header (Fig. 16). (24) Raise and prop top header approximately 12 inches off of windshield header and complete application of cover material on header. (25) Install roof side rail weatherstrips and retainers (Fig. 7).

CEMENT

VIEW IN DIRECTION OF ARROW NP561

Fig. 16—Positioning Cover on Header

(26) Install rear bow tacking strip and retainers (Fig. 9). (27) Remove protective covers.


SEALING INDEX Page APPLICATION Coronet-Charger Belt Bar and Quarter Panel Area Cowl and Floor Pan Area Deck and Tail Gate Area Drain Trough and Pillar Area

65 68 70 67

GENERAL INFORMATION The procedures for weatherstrip sealing and replacement are incorporated with the procedures of the component unit. The sealing illustrations used in this section show

Floor Pan and Side Sills Floor Pans—Rear Floor Pan Plugs Roof Extension and Quarter Panel Station Wagon Rear Area Vent Wing Area

Page 66 64 66 65 69 63

the area sealed during manufacture of the vehicle. These areas should be considered when testing for leaks. When sealing joints with balls of sealer, press the sealer into the area firmly (Figs. 1 thru 12).

SERVICE PROCEDURES TESTING Water Method

Normally a visual inspection of an area will indicate the area for sealing. When testing with water, use a spray simulating rain or a garden hose without the nozzle and regulate the pressure to an approximate 3 inch stream. All water tests must be made starting at the bottom of the door opening or weatherstrip and slowly moving up the joint, seam or suspected area.

HARDTOP-CONVERTIBLE

SEDAN VIEW CIRCLE "V" CORONET SEALER

Powder Method

To test the sealing between the body and the weatherstrips, it is advisable to use trace powder and a test bulb. When the powder is sprayed at the point where a leak is suspected it will leave a trace line through the point of leakage. In hard to reach points, such as the dog leg at the "A" post, blue carpenter's chalk applied to the weath-

HARDTOP

SEDAN DART

VIEW IN DIRECTION OF ARROW"X'

Fig. 1 —Vent Wing Area

NN320A


23-64 BODY AND FRAME HOLD GUN NOZZLE IN DIRECTION OF ARROW

SEALER

DO NOT SPRAY OR FLOW SEALER IN THIS DIRECTION OR FLOW MATERIAL ADJACENT TO JOINT

tc.,1

VIEW IN CIRCLE A RIGHT SIDE

APPLICATION OF SEALER BY FLOW OR SPRAY HIDDEN SURFACE EXPOSED SURFACE

HIDDEN SURFACE

EXPOSED SURFACE

WORK SEAL ON DETAIL SURFACE TO GET GOOD ADHESION EDGE MUST BE FEATHERED AS SHOWN

SEALER

SEALER MUST BE APPLIED S ILLUSTRATED TO LOCK SEAL IN PLACE FORCE SEAL BEYOND HOLE.

SEALER INCORRECTLY APPLIED

APPLICATION OF SEALING PUTTY

VIEW IN CIRCLE B LEFT SIDE REAR PILLAR

HOLD GUN NOZZLE IN DIRECTION OF ARROW IN ORDER TO EFFECTIVELY SEAL METAL JOINTS

DO NOT HOLD GUN NOZZLE IN DIRECTION OF ARROW, SEALER APPLIED AS SHOWN IS INEFFECTIVE

VIEW IN DIRECTION OF ARROW B SEALER AFTER GLASS

PY200

Fig. 4—Rear Pillar and Quarter Window Glass (Station Wagon)

/4 3 METAL THICKNESS 2 METAL THICKNESS APPLICATION OF SEALER WHERE SEAL IS REQUIRED BETWEEN WELDED PANELS.

NY I 446

Fig. 2—Methods of Applying Sealers

erstrip will transfer to the "A" post when the door is closed if a good contact exists.

SEALER

SEALER

SEALER

VIEW IN DIRECTION OF ARROW "C" SEALER

SEALER VIEW IN DIRECTION OF ARROW "B" SEALER

SEALER

VIEW IN DIRECTION OF ARROW "A"

SEALER NN333

Fig. 3—Rear Floor Pans (Coronet-Charger)


23-66 BODY AND FRAME SEALER

SEALER

VIEW IN CIRCLES "A"

SEALER VIEW IN CIRCLE "B"

NN331

Fig. 7 —Floor Pan and Side Sills (C 00000 t-Charger)

FRONT PAN

CENTER PAN NN414

Fig. 8 —Floor Pan Plugs (Coronet -Charger)


BODY AND FRAME 2347 DRAIN TROUGH

SEALER SEALER

QUARTER PANEL

CENTER PILLAR PILLAR

SEALER SEALER

4 DOOR 4 DOOR

LOCK PILLAR

ROOF PANEL

SEALER

SEALER QUARTER PANEL VIEW IN DIRECTION OF ARROW C

DRAIN TROUGH

DRAIN TROUGH

MASKING TAPE

2 DOOR

SIDE SILL PANEL

SEALER VIEW IN DIRECTION OF ARROW F

QUARTER PANEL

WINDSHIELD PILLAR

STATION WAGON UPPER PANEL

2 DOOR SEALER VIEW IN DIRECTION OF ARROW A

4 DOOR

SEALER

VIEW IN DIRECTION OF ARROW B ALL MODELS

LOWER PILLAR

VIEW IN DIRECTION OF ARROW D 2 DOOR SEDAN

SEALER

DRAIN TROUGH

SEALER

QUARTER PANEL LOCK PILLAR VIEW IN DIRECTION VIEW IN DIRECTION OF ARROW D STATION WAGON

Fig. 9 —Drain Troughs and Pillar Area (Coronet -Charger)

OF ARROW E 2 DOOR SEDAN

NU119


23-68 BODY AND FRAME COWL SIDE PANEL

SEALER

DASH PANEL DASH PANEL

FRONT FLOOR PAN

SEALER SIDE SILL DASH PANEL - COWL SIDE - FLOOR

DASH PANEL COWL SIDE - FLOOR PAN

PAN-FRONT FLOOR

APPLICATION IN CIRCLE A WHEELHOUSE

QUARTER PANEL EXTENSION

QUARTER PANEL WHEEL HOUSE

VIEW IN DIRECTION OF ARROW

SEALER

COWL - DASH - SILL

REAR FLOOR PAN REAR FLOOR PAN - FRONT

REAR FLOOR PAN

SEALER REAR FLOOR PAN EXCEPT STATION WAGON

SEALER FLOOR PAN -STATION WAGON

SEALER

VIEW IN CIRCLE S

VIEW IN CIRCLE T

SEALER

VIEW IN CIRCLE VIEW IN DIRECTION OF ARROW V

FLOOR PANS

P AND W NU120

Fig. 10 —Cowl and Floor Pan Area (Coronet -Charger)


BODY AND FRAME 23-69 TAILGATE OUTER FLOOR

SEALER

LOWER PANEL

SEALER

QUARTER PANEL SPA IDE TIRE

INNER LOCK

HOUSING SPARE TIRE LOWER HOUSING

FLOOR PAN

YILLAN

REAR FLOOR PAN

VIEW IN DIRECTION OF ARROW C

QUARTER PANEL

VI W IN DIRECTION OF ARROW F

VIEW IN DIRECTION OF ARROW G

FLOOR PAN SIDE EXTENSION SEALER

SEALER REAR FLOOR PAN SIDE EXTENSION FLOOR PAN CROSSMEMBER

VIEW IN DIRECTION OF ARROW B

VIEW IN DIRECTION OF ARROW I SPARE TIRE HOUSING

SEALER

TIRE WELL AREA

SEALER QUARTER PANEL

IIQUARTER PANEL

EXTENSION

I‘ INNER LOCK VIEW IN PILLAR VIEW IN DIRECTION OF DIRECTION OF ARROW E ARROW H

VIEW IN DIRECTION OF ARROW A SEALER

WHEELBASE PANEL

SPARE TIRE HOUSING

SEALER

VIEW IN DIRECTION OF ARROW D

SEALER

SEALER

SEALER SEALER

TAILGATE AND REAR PILLAR AREA TIRE WELL AREA

Fig. I 1—Station Wagon Rear Area

TAILGATE AND REAR PILLAR AREA NU171


23-70 BODY AND FRAME SEALER

QUARTER PANEL

DECK LOWER PANEL FLOOR PAN SEALER

SEALER

VIEW IN DIRECTION OF ARROW A

VIEW IN DIRECTION OF ARROW Y

QUARTER PANEL

QUARTER PANEL

SEALER

QUARTER PANEL

LOWER DRAIN VIEW IN CIRCLE A TROUGH

(EXCEPT CHARGER) DECK DRAIN AND TAIL LIGHT

IN CIRCLE X

CHARGER

SEALER

SEALER

LOWER PANEL CROSSMEMBER PANEL

QUARTER PANEL

UPPER PANEL

LOWER PANEL

FLOOR PAN VIEW IN DIRECTION OF ARROW W

EXTENSION

DECK DRAIN AND TAIL LIGHT

DECK UPPER PANEL NU132

Fig. 12—Deck and Tail Gate Area (Coronet)

VINYL ROOF COVERING INDEX Air Bubble Removal

Page 72

Page 70

Cover Replacement—Charger-Coronet

SERVICE PROCEDURES COVER REPLACEMENT Removal (1) Remove windshield, rear window and mouldings. On cemented-in-type windows, remove mouldings only. To aid in installation of mouldings, mark clip hole locations with a removable type marker. (2) Remove roof side mouldings. (3) Remove all sealer from drain trough, windshield and rear window reveals and pull old cover off of roof panel. Installation Inspect old existing cement to make certain there are no raised areas or areas without cement. (1) Mask body (Fig. 1) from edge of drain trough across upper "A" pillar, windshield and rear window reveal, top of deck upper and bottom of roof panel at belt line. (2) Locate and mark center line of roof panel and

vinyl cover at front and rear ends. (3) Apply a thin film of cement to center four inches of roof panel and vinyl cover. (4) When cement becomes tacky, position cover on roof aligning centerline marks. (5) Apply cement to one half of roof panel and exROOF PANEL „egret.

CEMENT

VIEW IN CIRCLE Z MASKING TAPE COWL TOP

MASKING PAPER

Fig. 1—Masking the Body—Sedan

NK983


BODY AND FRAME 23-71 VINYL COVER

NK984

Fig. 2—Positioning Cover on Roof—Sedan

Fig. 5—Stapling Cover at Window Reveals—Sedan

tension and to the cover half on same side (Figs. 2 and 3). (6) When the cement becomes tacky position cover on roof panel. (7) Repeat steps 5 and 6 for the opposite side. (8) Using a new paint roller, pressurize cover to the roof working from center area toward drain troughs. (9) Press cover into windshield and rear window reveals using a dull pointed fibre tool (Fig. 4). (10) Starting at top center, secure cover to windshield reveal using staples spaced 1-1/2 inches apart

(maximum) or tacks 1/2 inch apart (Figs. 5 and 6). (11) Position cover to roof panel extension making certain all wrinkles are removed. (12) Starting at top center, secure cover to rear window reveal using staples spaced 1-1/2 inch apart (maximum) or tacks spaced 1/2 inch apart (Figs. 5 and 8). (13) Trim fabric at base of windshield reveal, halfway between upper and lower edges of pillar moulding (Fig. 7). (14) Trim fabric at base of rear window reveal. (15) Using a dull pointed tool, press fabric into drain trough to achieve maximum contact of roof cover material to drain trough (Fig. 8). (16) Grasp outboard edge of cover and while pulling material outward and down, use upper edge

NR72 VIEW IN CIRCLE Z

Fig. 3—Positioning Cover on Roof—Hardtop NR74 ROOF PANEL

Fig. 4—Positioning Cover in Window Reveals

Fig. 6—Stapling Cover at Rear Window—Hardtop

Fig. 7—Trimming and Sealing Cover at Windows


23-72

BODY AND FRAME

NN55

Fig. 8—Positioning Cover at Sides

Fig. 10—Sealing Cover at Rear—Hardtop

of drain trough flange as a breakover for draping material on to outboard drain trough flange face (Fig.

Install sealer along entire length of outboard trimmed edges of cover material to seal exposed edge adjacent to drain trough flange. (24) Apply a 1/4 inch ball of sealer to index studs of pillar mouldings. (25) Position moulding by inserting a locating pin in index hole and align moulding. (26) Using hole in moulding as a guide, drill a .120 diameter hole in pillar and fasten in place with a screw (original installation only). (27) Install side drain trough mouldings (Fig. 9), windshield and rear window mouldings. (28) Remove masking material and inspect cover for air bubbles.

8). Care must be taken to avoid pulling loose the cover material applied to base of drain trough.

(17) Press material against drain trough flange face for full length of outboard sides of roof cover. (18) Trim excess material hanging below drain trough flange about 1/8 inch above lower edge of flange (Fig. 8). (19) Locate and drill index hole for front pillar moulding upper locating boss (Fig. 7). (Original installation only). (20) Apply a bead of sealer to edge of cover and blend upward to form a seal over staples and cover edge. Extend seal across trimmed edge on "A" post (Fig. 7). (21) Locate and punch holes in cover at roof extension belt line. (22) Trim cover on a line 1/4 inch below belt line moulding holes and curving upward to meet drain trough (Figs. 9 and 10). (23) Apply a bead of sealer to trimmed edge of cover at roof panel and smooth out to form a seal (Fig. 7). DRAIN TROUGH MOULDING

NN56

Fig. 9—Sealing Cover at Sides—Sedan

AIR BUBBLE REMOVAL (1) Place strips of masking tape over surface of bubble. (2) Using a No. 19 hypodermic needle and suitable syringe, insert 3M Vinyl Trim Adhesive No. 8064, or equivalent, into bubble area. Extreme care must be used to avoid depositing any adhesive on the top surface of the vinyl cover. The perforation must be

made in center of bubble, through masking tape and vinyl material. Approximately 0.5 mil of adhesive per square inch should be used. (3) Remove needle and work adhesive to cover affected area by pressing vinyl to roof carefully. This will also transfer some of adhesive to surface of vinyl cover. (4) Allow cement to dry 5 minutes at room temperature. (5) Heat bubble area with relative low heat (150°160°F.) until bubble area begins to enlarge in circumference. Infra-red heat lamps provide a suitable source of heat. (6) Remove heat source and allow cover to cool. A method of rapid cooling will be beneficial. (7) Using a DRY No. 19 hypodermic needle, punc-


BODY AND FRAME 23-73 ture cover 4 times equidistant around outer circumference of bubble to provide an escape route for entrapped solvent and air. (8) After bubble collapses, press cover to metal surface, starting from one side of bubble and work-

ing toward opposite side until it conforms to metal surfaces and all raised surfaces disappear. (9) Keep car from hot sunlight and other direct heat sources. (10) Examine top after a 24 hour period.

WOOD GRAIN OVERLAY INDEX Page 73 74 74

Application of Overlay Inspection Minor Repairs

Surface Preparation Temperature Wetting Solution

Page 73 73 73

SERVICE PROCEDURES SURFACE PREPARATION The body surface to which the overlay will be applied must be free of grease, oil and other foreign material. Sand all areas to be covered with the overlay using No. 360 paper soaked in water or mineral spirits. The area to be sanded should be approximately 1/4 inch larger in all dimensions than the overlay, except when the overlay is turned at the door and other comparable areas. All metal and/or paint nibs must be removed prior to application of overlay. Tack off all dust and dirt particles from the sanded areas.

TEMPERATURE The overlay is most easily handled when the air and application surface temperatures are between 70 and 90 degrees. For applications below 70 degrees, use heat lamps to warm the application surfaces.

WETTING SOLUTION Thoroughly mix two to three level teaspoons of mild powdered household detergent per gallon of clean, warm (80 to 95 degree) water in a non-rusting type retainer.

APPLICATION OF OVERLAY (Fig. 1) It is mandatory to remove the paper backing from the overlay and not the overlay from the backing, as possible stretching or tearing may result. Cut overlay 1/2 inch larger than area to be covered and lay on a clean flat surface with the paper backing surface up. Hold overlay firmly and remove backing paper in a smooth 180 degree motion. Under hot, humid conditions, a slight jerking motion will aid in paper backing removal. Thoroughly wet application surfaces of body and the adhesive surface of the overlay with the wetting solution and immediately apply overlay, grained side

out, to the body. Adjust overlay so 1/2 inch of material shows beyond all edges and apply wetting solution to outer surface of overlay. Flat Surfaces Use a plastic squeegee having a cloth sleeve, or is teflon coated and pressurize all flat surfaces with firm, overlapping strokes to remove all air bubbles, water, wrinkles and to assure a good adhesive contact. On vertical surfaces, pressurize and level off entire top edge first with a 3 x 4 inch squeegee, then work from top to bottom. On horizontal surfaces, start at the center and work toward the edges using a 3 x 4 inch squeegee. Do not apply pressure to edges that will be wrapped around doors, fenders, gas cap areas or to compound curve areas. Flange Areas (1) After being sure all metal and/or paint nibs and sanding residue have been removed, hand brush 3M Vinyl Adhesive 8064 (Quart Size Only), or equivalent, to entire flange area with a smooth, even coverage. (2) Warm the unapplied overlay with a heat lamp. (3) Avoid trapping air when turning the edge and wrap overlay around flange area. Press firmly into position with the fingers, making sure overlay overlaps the flange. (4) Using a single edge razor blade, trim off all material extending beyond flange. (5) Pressurize flange area with a 2 inch rubber roller to be sure that overlay is well adhered to the painted metal surface. Contoured Areas (1) Warm the unapplied overlay with a heat lamp, working on an area no more than 1/2 inch larger than the squeegee. (2) Using the 3 x 4 inch plastic squeegee, pressurize and level off the small warmed area.


23-74 BODY AND FRAME

:1 SECTION A-A

SECTION B-B

SECTION C-C

SECTION E-E

SECTION F-F

SECTION G-G

SECTION D-D

SECTION H-H

AREA DESIGNATED FOR OVERLAY AREA DESIGNATED FOR SANDING PY91

SECTION J-J

Fig. 1—Wood Grain Overlay Application

(3) Repeat warming and pressurizing until entire contoured surface is completely adhered and free of air, water and wrinkles. INSPECTION

Upon completion of an area, inspect for blisters due to trapped air or water. All blisters should be worked out with the squeegee, or punctured with a sharp needle or pin and then pressurized until the film adheres to the body surface. All edges must be adhered to the body surface. MINOR REPAIRS

Minor Scratches in Clear Top Coat Caution must be taken during the sanding operation. If base printed wood grain overlay is damaged during sanding, the entire applique must be replaced.

(1) Using No. 400 grit sandpaper, lightly sand and feather out damaged area. (2) Wipe sanded area with a clean cloth dampened with a clean solvent such as VM and P, isopropyl alcohol, heptane or equivalent. (3) Clean sanded area with a tack rag. (4) Using a touch-up-brush, apply the recommended air dry repair clear enamel top coat sparingly. (5) Air dry at room temperature.

Minor Damage to Base Printed Overlay Areas to be repaired should not be larger than .04 square inches (approximately 1/8 x 1/4 inch).

(1) Apply air dry repair touch up paints using a only. The light colored paint should be applied first. (2) After all color repair is completed, apply the recommended air dry repair clear enamel top coat using a touch-up-brush. Apply enamel sparingly. (3) Air dry at room temperature.

touch-up-brush

Sheet Metal Dings in Applique Area (1) To help prevent applique from shattering when hammered, heat dinged area, with a heat gun or lamp, to approximately 150° F. to unbond applique from sheet metal. (2) Bump out dinged area in conventional manner. (3) Using a hypodermic needle, or similar device, insert repair adhesive, such as 3M EC2262 or equivalent, between applique and sheet metal. (4) Using a plastic squeegee pressurize all of the repaired area with firm, overlapping strokes to remove all air bubbles and wrinkles and to assure a good adhesive bond. (5) If top coat or base film has been damaged, repair as outlined in applique repairs.


BODY AND FRAME 23-75

REFINISHING PROCEDURES INDEX Acrylic Finishes Definitions—Technical Terms Galvanized Metals Paint Charts

Page 75 75 76 77

ACRYLIC FINISHES The vehicles are finished in an acrylic enamel. To determine the correct color and past number of the enamel used on the car, refer to the code on the body number plate and then locate the corresponding code on the paint chart. DEFINITIONS OF TECHNICAL TERMS Coat—Single This means one coat overlapping to give complete coverage. Coat—Double A double coat means to first spray a single coat with vertical strokes and then across with horizontal strokes, or vice versa. Drying The drying or hardening of a film goes through several stages. The first is known as "dust-free" and is the time required for a film to reach the condition where, if any dust settles on it, the dust will not become imbedded, but may be wiped off after the film has hardened. The second stage is known as "tackfree" and is the time required for a film to reach the condition where it may be touched with light pressure of the finger. The third is "hard-dry" and is the time required for the film to become thoroughly hard so that it may be rubbed and polished.

Polishing and Buffing Refinishing Spot Repairs Rust Protection

Page 76 76 77 76

Mist Coat This is a coat of thinner to which may be added a small amount of retarder and applied as a final coat to increase flow and lustre of lacquer-type finishes. Priming The function of a primer is to form a bond between the surface and the succeeding product. Puttying A glazing putty is used for filling in small imperfections which are too deep to be taken care of by surfacer coats. It may be applied either before or after the last coat of surfacer. Reducers Reducers are mixtures of volatile liquids used to reduce alkyd, synthetic and orthodox materials to the proper consistency for application. Sanding Block As a rule a sanding block is a flexible rubber block, so arranged sandpaper may be fastened to it securely. It affords a good grip for the operator. Wherever possible sanding should be done with a block as it distributes the pressures and gives a more uniform surface. Surfacing The function of a surfacer is to prepare a smooth surface for the color coats.

Feather -Edging This is the tapering of the edges of a finish so that when the finger is passed over it no break will be felt. Feather-edging is usually done with water and sandpaper on a sanding block.

Tack Rag This is a piece of cheesecloth that has been dipped in thin, non-drying varnish and then wrung out. It is kept in a container so that the varnish will not harden but will remain tacky. The tack rag is used to wipe off a surface or remove dust.

Ferrous and Non-Ferrus Metals Ferrous metals are those which are made from iron (steel). Non-ferrous metals are those which are not made from iron or do not present an iron (steel) surface, such as aluminum, aluminum alloys, brass, copper and magnesium.

Thinners Thinners are mixtures of volatile liquids used to thin lacquer-type finishing materials to the proper consistency for application.

Flash This is the term applied to a coat of a product when enough of the solvent has passed off for recoating.

Undercoats All products used to prepare the surface to receive the color coats are classified as undercoats, such as primers, surfacers, putties, primer-surfacers and sealers.


23-76 BODY AND FRAME PAINT REPAIRS ON GALVANIZED METALS To perform paint repairs on galvanized rocker panels or any other galvanized steel surfaces, care must be exercised when preparing the bare galvanized surface to properly accept the prime-surfacer and finish paint. Do not use short cut methods nor inter-mixing of materials.

Metal Preparation (1) Thoroughly sand the affected area to remove all corrosion products from the exposed metal surface while carefully feathering all paint edges. (2) Wire brush or steel wool entire metal surface and remove all grease or oil by wiping with MOPAR MOPREPX11. (3) Treat bare metal panel with MOPAR METAL PREPX12 or equivalent according to label directions. (4) Rinse with clean water and blow off with compressed air. Refinishing (1) Apply one light coat of MOPAR Zinc Chromatic Primer L38 and as soon as thinner flashes off and within 30 minutes, apply a coat of MOPAR Acrylic Sealer G40 or equivalent. (2) Apply MOPAR MOPRIME Primer Surfacer G 37 Gray, G38 Red, G39 Neutral Gray or equivalent. (3) Sand when dry and proceed with application of finish coats according to the paint manufacturers recommendations. RUST PROTECTION Prior to applying any paint to the sheet metal, clean the area to be repainted with MOPAR MOPREPX 11. Eliminate all fingerprints. Chemically treat all bare metal using MOPAR METAL PREPX12. This conditions the exposed metal to resist rust.

BUFFING AND POLISHING Minor imperfection in the paint finish normally can be removed by sanding, buffing and polishing. The following procedure should be used when working on these minor conditions. (1) Oil sand by hand the affected area using #600 paper which has been soaked in mineral spirits. Caution should be used not to rub too hard over any of the affected areas or on ridges. (2) Tack off the area with a clean soft cloth. (3) Buff the entire area using a fine buffing compound MOPARX14 extra fast dry or X16. REFINISHING Preparation Acrylic System Over Old Acrylic (1) Remove outside accessories, mouldings and bumper face bars (if necessary).

(2) Remove silicone polish, wax, or any other surface contamination with wax and grease remover MOPREPX11. A chemically clean surface allows for effective sanding and assures adhesion of the undercoats and finish color. (3) Sand old finish. This operation removes surface deterioration, feathers out scratches, nicks, stone bruises, or any other minor imperfections. Water sand with MOPAR Multi Purpose #360 grit paper, part No. 1-1474 or its equivalent. (4) Blow off entire car, using high pressure air to eliminate dirt or dust from blowing out on to the surface as paint is applied. (5) Mask off the areas not to be painted. If a complete color change is being made, mask off interior parts adjacent to door openings to prevent paint spray from soiling interior trim and upholstering. (6) Reclean entire area to be painted with wax and grease remover, MOPREPX11, eliminating workman's fingerprints. (7) Chemically treat bare metal with MOPAR Metal PrepX12 or equivalent metal conditioner.

Priming the Surface This operation is the backbone or foundation for the finish color. It primes the metal to insure adhesion and fills minor surface imperfections. Use one of the recommended Mopar lacquer primer surfacers. (8) Apply MOPAR Lacquer Primer Surfacer MOPrime part No. G37 gray, G38 red, and G39 neutral gray or equivalent. (9) To expedite repairs to other surface imperfections use MOPAR putties. Spot Check G41 or 42 gray type, or G43 or 44 red type or equivalent. (10) Sand undercoats. Water sand with MOPAR Multi Purpose No. 400 paper, part No. 1-1475 or finer paper (or its equivalent if other sanding methods or systems are employed). This is the key operation in refinishing. The final finish will be as good as the foundation over which it is applied. (11) Respray with MOPrime or equivalent primer surfacer any area that may have been sanded through to bare metal in step 10. (12) Resand undercoat with MOPAR Multi Purpose grit No. 400 (Part No. 1-1475) or finer paper. (13) When the color is being changed, wash the door jambs and door opening areas. Spray interior. (14) Remove overspray from exterior and reclean entire surface with MOPAR wax and grease remover MOPrepX11. (15) Tack rag the entire surface to remove lint and dust. (16) Apply Chrysler Engineer Approved MOPAR Acrylic Lacquer Colors. (Four to six double coats). Refinishing in the field must be done with acrylic lacquer. The acrylic lacquer can be polished to match original finish gloss. Care must be exercised when


BODY AND FRAME 23-77

selecting paint for refinishing Acrylic Metallics, to select the proper paint code. (17) When the color has dried hard, compound and polish.

The procedures for making spot repairs with acrylic lacquer are the same as for complete panel refinishing with the following exceptions:

An open pattern that appears richer with the metallic flakes less noticeable. A closed pattern is best matched by reducing MOPAR Acrylic Lacquer Color 150% with MOPAR Deluxe Acrylic Lacquer Thinner G35 or equivalent. An open pattern is achieved by lowering the air pressure to 20-30 lbs. at the gun, reducing the MOPAR Acrylic Lacquer Color 100% with a blend of MOPAR Deluxe Acrylic Lacquer Thinner G35 and MOPAR all Purpose Retarder G36.

Sealer Coats

Compounding Color Coats

SPOT REPAIRS

The use of a sealer is not practical where a spot repair is demanded, as it is difficult to spray sealer without leaving an edge. If care is taken in preparation of the surface, a satisfactory repair is possible by sanding the original finish about 2 or 3 inches beyond the area where the acrylic lacquer will be applied. Apply the lacquer directly on the sanded original finish, being careful not to overlap the color on the unsanded enamel. Application of Color Coats Metallic color can appear to vary in richness. The variation can be described as: A closed pattern that appears lighter with fine metallic dispersion.

Compound the sanded area that extends around the refinish lacquer and then compound the lacquer, blending it into the enamel. The hard surface of the acrylic enamel will permit compounding without leaving scratches.

PAINT BAKE OVEN TREATMENT (WITH TEXTURED GRILLES)

To avoid warpage all models with textured grilles and headlamp bezels should be covered with paper or other material to shield the grille assembly from the heat before the car enters the paint bake ovens or be completely removed from the cars.

PAINT CHART EXTERIOR COLORS Paint Code

B3 B5 67 C7 E5 F4 F8 J5 K2 K5 Ll T6 V2 W1 X9 Y1 Y3 Y4

Color Name Light Blue Poly

Bright Blue Poly Dark Blue Poly Plum Crazy Bright Red Light Green Poly Dark Green Poly Sublime Go Mango Dark Burnt Orange Poly Beige Dark Tan Poly Hemi Orange White Black Banana Cream Light Gold Poly

Chrysler Code

Ditzler Code

AY2EB3 AY2EB5 AY2EB7

2018 2019

AY2FC7 AY1FE5 AY2FF4 AY2EF8

2210 2136 2133 43786 2128 2201 2135 22542 2129 2186 2033 9300 2211 81575 2117

AY1FJ5 AY2EK2 AY2FK5 AY1BL1 AY2FT6 AY2EV2 AY1EW1 AY1TX9 AY1FY1 AY1DY3 AY2 FY4

2020


23-78 BODY AND FRAME CORONET AND CHARGER EXTERIOR GLOSS FINISH COLORS Used On: All Integral Mouldings. Door and Quarter Upper and Lower Garnish Door and Quarter Upper Inner Frames. "B" Pillars. Suburban Tailgate Garnish Moulding. Chrysler Code

Color Name

Ditzler Code-chit

White AYIEWI AYITX9 Black Brite Blue Poly AY2EB5 AY2EB7 Medium Dark Blue Poly Medium Gold Poly AY2FY4 AY2FT6 Medium Tan Poly Dark Green Poly AY2EF8 Medium Burnt Orange Poly AY2FK5

Remarks

2033 9300 2019 2020 2117 2129 43786 2135

INTERIOR GLOSS FINISH COLORS Used On: (a) Roof Rails. (b) Quarter Window Upper Mouldings. (c) Quarter Belt Garnish Moulding. (d) Door and Quarter Trim Retainer Moulding. (e) Convertible Rear Seat Shroud. (f) Following Suburban Parts: Seat and floor components and attaching parts. "C" Pillar cover. Quarter window mouldings. Headlining retainer mouldings. Ditzler Code-ddl

Dove White Jewel Black Thunder Blue Poly Baltic Blue Poly Autumn Tan Poly Bayou Green Poly Sunfire Orange Poly

AB1EW1 AB1TX9 AB2EB5 AB2EB7 AB2FT6 AB2EF8 AB2FK5

8743 9000 2019 13697 2129 43926 2135

a,b,c,d,e a,b,c,d,e,f a,d a,b,c,d,e,f a,b,c,d,e,f a,b,c,d,e,f a,b,c,d,e

LOW GLOSS FINISH COLORS Used On: (a) (b) (c) (d) Color Name

Front Seat Manual Adjuster. Convertible Top Mechanism. Backlite Moulding Clip. Bucket Seat Hinge Cover (White only). Chrysler Code

AB5EW1 Dove White AB5TX9 Jewel Black Jewel Black (Semi-Gloss) AB3TX9 AB6EB7 Baltic Blue Poly AB6FT4 Puma Tan Poly AB6FY4 Citron Gold Poly AB6EF8 Bayou Green Poly AB6FK5 Sunfire Orange Poly

Ditzler Code-DIA

Remarks

8745 9028 9293 13670 23275 23276 43929 60572

d a,b,c a (Optional) c c c c c


BODY AND FRAME 23-79 SUEDE FINISH COLORS Used On: (a) Instrument Panel. Steering Column and Components. Windshield Mouldings. (b) Convertible Windshield Mouldings. (c) Rear Window Defogger, (d) Gloxe Box Door (Inner) Black only. (e) Bucket Seat Hinge Cover. Jewel Black AC38VX9 9324 Baltic Blue Poly AC39EB7 13705 Thunder Blue Poly AC39EB5 13848 Puma Tan Poly AC39FT4 23219 Citron Gold Poly AC39FY4 23221 Bayou Green Poly AC39EF8 43925 Sunfire Orange Poly AC39FK5 60557

a,b,c,d,e, a,b,c,e a,b,c,e a,b,c,e a,b,c,e a,b,c,e

TRUNK SPATTER FINISH Three-Tone Black and Gray AC48CAA

DX-1768

BODY AND FRAME ALIGNMENT BODY DIMENSIONS Body alignment may be accurately measured by the following method. Elevate the car to a level position over a clean and smooth floor. Refer to (Fig. 1) and place the line of a plumb-bob on point "A" with the plumb-bob just contacting the floor. Mark the plumb-bola contact point on the floor. Repeat the process at points B, C, D, E and F at both sides of the body. Snap a chalk line between points as illustrated.

Compare dimensions with specifications, all matching point to point dimensions should agree within 1/4 inch. Care should be taken that all diagonals compared represent corresponding

ing points.

In making any body opening measurements, always compare the matching measurements of both sides of the vehicle. All dimensions must be measured at the welded joints of the body to insure uniform measurements.

BODY "0" LINE 2.75 "STATION WAGON PY911 Fig. I — Body Alignment Dimensions


GROUP 24

HEATERS AND AIR CONDITIONING CONTENTS Page

HEATERS

Page

1 AIR CONDITIONING

4

HEATER

INDEX Page 4 1 1

Blower Motor Control Cable Adjustment General Information Heater Core Removal and Installation

Heater Removal and Installation Service Diagnosis Service Procedure

Page 2 1 1

4

GENERAL INFORMATION All models use a "Blend air" type heater (Fig. 1). Fresh air enters the heater through the cowl grille and passes through a plenum chamber to the heater core. A temperature control door in the heater housing directs the fresh air either through or past the heating core. The amount of "blend" is determined by the setting of the temperature lever on the instrument panel. Direction of the "blended air" is controlled by the "Heat-Defrost" lever on the instrument panel. The blower switch determines the speed of the

blower motor and the velocity of the air flow from the heater outlets.

Warm Weather Ventilation Two fresh air intakes are provided to allow outside air to be brought inside the vehicle. The air vent controls are located on the lower edge of the instrument panel on either side of the steering column. During cold weather, be sure the air vent controls are in the closed position.

SERVICE DIAGNOSIS Condition

Possible Cause

(f) Fresh air vent doors leaking. (g) Temperature control door leaking. (h) Kinked hose.

(a) Reposition carpet to clear outlet (b) Fill the radiator to recommended level. (c) Replace thermostat. See Group 7, "Cooling System". (d) Replace heater hoses. (e) Correct leak. Replace hoses if necessary and bleed system of air. (f) Adjust control cables. (g) Adjust control cables. (h) Reroute to eliminate restriction.

TOO MUCH HEAT

(a) Disengaged cable. (b) Thermostat stuck in closed position.

(a) Connect cable. (b) Replace thermostat.

BLOWER MOTOR NOT OPERATING

(a) Blown fuse.

(a) Check for excessive resistance in circuit and replace fuse. (b) Tighten all electrical connections. (c) Replace switch. (d) Replace motor. (e) Replace resistor.

INSUFFICIENT HEAT

(a) Carpet obstructing outlet

Correction

(b) Coolant level too low. (c) Engine thermostat stuck open. (d) Obstructed heater hose. (e) Radiator hoses leaking.

(b) Faulty electrical connection. (c) Faulty blower switch. (d) Faulty motor. (e) Faulty resistor. SERVICE PROCEDURES

Control Cable Adjustment The Temperature control cable and the "Heat-

Defrost" control cable should be positioned, at the control assembly, so that the ends of the cable hous-


24-2 HEATERS ings are flush with the edge of the mounting plate. Final cable adjustments should be made at the heater ends of the cables (Fig. 1). To adjust the "Heat-Defrost" cable, place the control lever on the instrument panel in the defrost position. Remove the cable clip at the heat-defrost door and hold the door in full counterclockwise position. Attach clip. Be sure that the instrument panel control lever remains in the defrost position while installing the cable clip at the heater. Test the heater operation. To adjust the "Temp" control cable, remove the cable clip at the temperature control door. Place the temperature control lever to the minimum heat position (closest to driver). Rotate the temperature control door shaft to the extreme clockwise position and reinstall the cable clip. Be sure the instrument panel control lever remains in the minimum heat position during this adjustment. Fresh Air Vent Control Cable

Push the fresh air control knob in (leave about 1/8 inch between knob and panel). Remove the control cable clip from the door control crank arm bracket. Rotate the crank arm of the door firmly to the closed position (left side counterclockwise; the right side clockwise) and reinstall the cable to the crank arm bracket. HEAT-DEFROST-SHUT-OFF CONTROL CABLE

HEATER Removal (With Console)

On models equipped with console it is necessary to loosen and move the console rearward before removing the heater as follows: (a) From inside console storage compartment remove, two console mounting bolts and two metal screws from the front sides in carpeting. (b) Remove two shift indicator bezel screws, put gear selector in "Drive" position, pull bezel back and turn 90 degrees. Allow bezel to rest across top of console. (c) Remove two mounting screws at rear of gear selector bracket, disconnect back up light switch connector and remove gear selector light bulb. Move console back. Heater may now be removed. After heater is installed, the console is installed as follows: (a) Align console to mounting brackets and install rear mounting bolts in console storage compartment, in rear of gear selecter bracket and install two screws in front sides of console carpet. (b) Connect back-up light switch wire and install gear selector light bulb. PLENUM CHAMBER

TEMPERATURE DOOR CONTROL CABLE

DEFROSTER GRILLE

DEFROSTER GRILLE

MOUNTING NUT (3 PLACES)

\\:,

BULKHEAD INLET OUTLET

GROUND SCRE

BLOWER MOTOR RESISTOR FRESH AIR VENT DOOR CONTROL CABLE

BLOWER MOTOR LOCATION

NN204A

Fig. 1-ifeater-Coronet Charger Models


HEATERS 24-3 (c) Install gear selector bezel by engaging front tabs under console housing lip and securing with the two metal screws at storage compartment end lip. Removal (Without Console)

(1) Drain radiator and disconnect battery ground cable. (2) Remove upper half of glove box. (3) In engine compartment, disconnect heater hoses at bulkhead. Plug hose fittings on heater to prevent any coolant from spilling on interior trim as heater assembly is removed (Fig. 2). (4) From under instrument panel, remove heater to cowl support bracket. (5) Remove defroster hoses and disconnect wiring from heater motor resistor. (6) Disconnect fresh air vent control and shut-off door cables at heater from under instrument panel. Reaching through glove box, disconnect temperature control door cable. (7) From inside engine compartment, remove three nuts that mount heater to bulkhead. (8) Rotate heater assembly until mounting studs are up and carefully remove heater from under instrument panel.

(2) Remove the two screws that mount resistor assembly to heater and remove resistor. (3) Position new or repaired resistor in heater and install the two mounting screws. (4) Connect wiring to resistor assembly.

eel

OUTLET HOSE

SI

INLET HOSE

383 AND 440 CUBIC INCH ENGINE

Installation

(1) Position heater assembly under instrument panel (mounting studs up) and connect temperature control door and defroster door cables. See "Control Cable Adjustments." (2) Rotate heater into position on bulkhead and support heater housing with a suitable block of wood. (3) From inside engine compartment, install retaining nuts. (4) Install heater hoses (Fig. 2). (5) Under instrument panel, install heater to cowl support bracket. (6) Connect and adjust fresh air control and shutoff door cable at heater from under instrument panel. Connect temperature control door cable by reaching through glove box opening. See "Control Cable Adjustments." (7) Connect defroster hoses and wiring to heater blower motor resistor. (8) Refill cooling system and connect battery ground cable. (9) Install upper half of glove box. (10) Start engine, bleed system, inspect for leaks and test operation of heater. Blower Motor Resistor Replacement

(1) From under instrument panel disconnect wiring to resistor.

318 CUBIC INCH ENGINE

OUTLET HOSE

INLET HOSE (C .

(kci± 225 CUBIC INCH ENGINE

PY133

Fig. 2—Heater Hose Routing—Coronet Charger


24-4 AIR CONDITIONING HEATER CORE Removal (1) Remove heater as outlined in "Heater Removal." (2) Remove heater cover to expose heater core. (3) Remove screws that mount core to heater assembly and remove core. Installation (1) Position core in heater assembly and install core mounting screws. (2) Install heater cover. (3) Install heater as outlined in "Heater Installation." (4) Install motor cooler tube. (5) Connect wiring from heater assembly to motor.

BLOWER MOTOR Removal (1) itemove neater as outlined in "heater nemovai."

(2) Disconnect wiring from blower motor to heater assembly. (3) Remove motor cooler tube. (4) Remove heater backplate assembly from heater. (5) Remove fan from motor shaft. (6) Remove blower motor from backplate. Installation (1) Install blower motor on backplate. (2) Install fan on motor shaft. Adjust for clearance between motor and fan. (3) Install motor cooler tube. (4) Install motor and backplate on heater. (5) Connect blower motor feed wire. (6) Install heater assembly as outlined in "Heater Installation".


AIR CONDITIONING INDEX Complete System Discharge and Recharge Evaporator—Heater Assembly Gauge Set Manifold Installation Operating Instructions For Owners

Page 14

28 5 4

Page Service Procedures Servicing The Compressor Test Procedures

18 21 7

OPERATING INSTRUCTIONS FOR OWNERS

with the "Max" button, you can continue cooling with fresh outside air for added comfort by pushing the

Anti-Freeze Required for Summer Operation

"A/C" button and adjusting the fan switch to change fan blower speed. If less cooling is desired, move the fan switch lever to "Low" speed and readjust the cooling outlets for indirect cooling. For warmer air, push the temperature control lever in to obtain the desired temperature.

Air conditioned cars must be protected with a permanent type antifreeze during summer to +15°F. or lower to prevent the heater core from freezing. However, this protection does not provide sufficient corrosion inhibitors for the engine cooling system. Summer protection to —15°F will provide adequate inhibitors for protection of engine cooling system against corrosion. Do not use the same antifreeze for more than one year. Fact Cool Down

If the car has been parked in the hot sun, open the windows and drive the car for several minutes to expel the warm air, and at the same time: (1) Slide the temperature control lever to the "Off" position. (2) Push the "Max. A/C" button in. (3) Push the fan switch to "High". (4) Adjust the four cooling outlet vanes to direct cooled air to the desired area to suit occupants wishes. (5) Close windows. Normal Cooling (Cooling with Fresh Air)

When the desired amount of cooling is obtained

Cooling For Special Conditions

The air conditioner provides maximum dehumidified air at the most comfortable weather conditions above 50°F. During rainy or muggy weather. operate the system as usual, using the temperature control lever to clear the windows and provide interior comfort. If the outside air is extremely humid or too warm for cooling with fresh air as previously described, push the "Max. A/C" button. This method is also recommended when driving through areas which are extremely dusty or have objectionable odors. Operation in Traffic

In extremely slow traffic, additional cooling may be required. When pulling a trailer, when driving through heavy traffic at 10 to 15 mph. or when pulling up steep


AIR CONDITIONING 24-5

hills additional engine cooling may be required. If any or all of these situations are encountered, put the transmission in a lower gear. At stop lights and other stops, put transmission in Neutral and increase engine speed. Radiator Cap Air conditioned vehicles must be equipped with a radiator cap having a holding pressure of 15 to 16 psi. Replace the radiator cap that does not test within these specification's with a cap that does. Condenser Inspect the condensor for obstructions or foreign matter. Clean if necessary. Any obstructions to the free flow of air across the condenser will decrease heat dissipation from the condenser, decrease the efficiency of the condenser and, in turn, decrease the evaporator's efficiency. These conditions result in increasing the discharge pressure and horsepower load on the engine. The use of a bug screen is not recommended as it, too, will decrease the free flow of air. Inspect the condenser for bent or damaged fins. The bent fins on the condenser deflect air flow across the bent portions, decreasing the condenser area. Bug Screens Bug screens should not be installed on vehicles

equipped with air conditioner. A bug screen installed in front of the condenser will reduce air flow and effect air conditioner performance. Under severe heat conditions a bug screen may cause the engine to over-heat. THE GAUGE SET MANIFOLD INSTALLATION

The Gauge Set Manifold is an indispensable test and diagnosis instrument. The gauge set manifold Tool C-3740 has two compound suction gauges and one discharge pressure gauge. Two accurately calibrated suction pressure gauges are required for the evaporator pressure regulator valve test. (Fig. 1). The hoses are shown in the test illustrations for quick reference to distinguish the various adaptations. Evaporator Suction Gauge—at the left side of the

manifold set is calibrated to register 0 to 30 inches of vacuum and 0 to 150 psi. This gauge is connected to the suction service port of the compressor. A special service port adapter, supplied with the gauge set, provides the means of connecting the gauge set manifold hose to the service port. When the adapter is installed at the port and tightened, the stem of the valve in the service port is depressed, opening the service port valve. Discharge Pressure Gauge—at the center of the EVAPORATOR SUCTION GAUGE DISCHARGE PRESSURE GAUGE COMPRESSOR INLET GAUGE SUCTION GAUGE VALVE CENTER MANIFOLD OUTLET DISCHARGE GAUGE VALVE NEEDLE VALVE

DISCHARGE SERVICE PORT

SERVICE PORT ADAPTER COMPRESSOR INLET SERVICE PORT SUCTION LINE

Fig. I—Gauge Set Manifold Connections

NK1457A


24-6 AIR CONDITIONING manifold set is calibrated to register 0 to 300 psi. For all tests this gauge is connected to the discharge service port of the compressor. A service port adapter is used to make this connection. The needle valve, located below the discharge pressure gauge, is used to damp out gauge needle oscillations so that accurate readings can be obtained. Compressor Inlet Gauge—is mounted at the right side of the manifold set. This mounting is for convenience only. There are no passages between this gauge and the gauge manifold. The compressor inlet gauge is calibrated to register 0 to 30 inches of vacuum and 0 to 150 psi. This gauge and the evaporator suction gauge must be accurately calibrated so that the needles of both gauges are exactly at 0 before making tests. The compressor inlet gauge is connected to the compressor inlet service port by a special service port adapter. This gauge is used, when checking the EPR Valve. Center Manifold Outlet—provides the necessary

connection for a long service hose used when discharging the system, using a vacuum pump to "pull a vacuum" before charging the system, and for connecting the supply of refrigerant when charging the system. Manifold Gauge Valves—should be closed when connecting the gauge set manifold to the service ports of the compressor. The suction gauge valve at the left is opened to provide a passage between the suction gauge and the center manifold outlet. The discharge gauge valve at the right is opened to provide a passage between the discharge pressure gauge and the center manifold outlet. Detailed instructions for proper use of the gauge set manifold are contained in the test covering each test and service operation employing these gauges. SAFETY PRECAUTIONS The refrigerant used in all air-conditioning installations is Refrigerant 12. It is transparent and colorless in both the liquid and vapor state. Since it has a boiling point of 21.7 degrees F. below zero, it will be a vapor at all normal temperatures and pressures. The vapor is heavier than air, non-flammable and nonexplosive. It is nonpoisonous except when it is in direct contact with open flame. It is noncorrosive except when combined with water. The following precautions must be observed when handling Refrigerant 12. CAUTION: Wear safety goggles when servicing the refrigeration system.

Refrigerant 12 evaporates so rapidly at normal atmospheric pressures and temperatures that it tends

to freeze anything it contacts. For this reason, extreme care must be taken to prevent any liquid refrigerant from contacting the skin and especially the eyes. Always wear safety goggles when servicing the refrigeration part of the air-conditioning system. Keep a bottle of sterile mineral oil and a weak solution of boric acid handy when working on the refrigeration system. Should any liquid refrigerant get into the eyes, use a few drops of mineral oil to wash them out. Refrigerant 12 is rapidly absorbed by the oil. Next, wash the eyes with the weak solution of boric acid. Call your doctor immediately even though irritation has ceased after first aid treatment. CAUTION: Do not heat Refrigerant 12 above 125 degrees F.

In most instances, moderate heat is required to bring the pressure of the refrigerant in its container above the pressure of the system when charging or adding refrigerant. A bucket or large pan of hot water not over 125 degrees F. is all the heat required for this purpose. Do not heat the refrigerant container with a blow torch or any other means that would raise temperature and pressure above this temperature. Do not weld or steam clean on or near the system components or refrigerant lines. CAUTION: Keep Refrigerant 12 containers upright when charging the system.

When metering Refrigerant 12 into the refrigeration system, keep the supply tank or cans in an upright position. If the refrigerant container is on itg side or upside down, liquid refrigerant will enter the system and damage the compressor. CAUTION: Always work in a well-ventilated room.

Always maintain good ventilation in the working area. Always discharge the refrigerant into the service bay exhaust system or outside the building. Large quantities of refrigerant vapor in a small, poorly ventilated room can displace the air and cause suffocation. Although Refrigerant 12 vapor is normally nonpoisonous, it can be changed into a very poisonous gas if allowed to come in contact with an open flame. Do not discharge large quantities of refrigerant in an area having an open flame. A poisonous gas is produced when using the flame-type leak detector. Avoid inhaling the fumes from the leak detector. CAUTION: Do not allow liquid refrigerant to touch bright metal.

Refrigerant will tarnish bright metal and chrome surfaces. Avoid splashing refrigerant on any surface. Refrigerant in combination with moisture is very corrosive and can cause great damage to all metal surfaces.


AIR CONDITIONING 24-7 TEST PROCEDURES INDEX

Correcting Low Refrigerant Level Expansion Valve and EPR Valve Test Performance Test Over-All Performance Test

Page 10 12 11 11

Page 7 7 7 9

Receiver Drier Refrigerant Level Test System Pressure Testing System For Leaks

charge the system with the proper amount of Refrigerant 12. If pressures are normal, proceed with the next test and adjustment.

TEST 1 TEST SYSTEM PRESSURE (Engine not Running) Install the gauge set manifold. After tightening service port adapters. make sure that the needle valve located below the discharge pressure gauge is open. Purge air from the gauge hoses (Fig. 1) as follows: (1) Open suction gauge valve momentarily, then close it. (2) Open discharge gauge valve momentarily, then close it. (3) Loosen compressor inlet suction hose connection at the manifold momentarily, then tighten it. If vehicle has been parked and the air conditioning system not operating, gauge pressure should be normal for temperature of the system. Refer to the Temperature-Pressure Relationship Chart. If no pressure is indicated on the gauges it means that the system is empty, due to a leak. It will be necessary to evacuate, charge with a sweep-test charge, locate and correct the leak, purge the test charge, replace the drier, vacuum the system and

TEST 2 REFRIGERANT LEVEL

The system must be operated at high blower speed, with vehicle doors and windows open, if the system is a dual system, both units must be operated simultaneously at high blower speed when this test is made, and when adding to the charge. The sight glass is an integral part of the receiverstrainer-drier. The outlet line (liquid) from the condenser must be attached to the connection marked IN. The word IN is stamped on the top face of the inlet connection (Fig. 2). If the receiver-strainerdrier is reversed and the lines are connected wrong, the system must be purged, the lines reversed and the system recharged. Block the air flow across the condenser to raise the discharge pressure to 225 to 250 psi, and check the sight glass for foam. There should be no foam. If sight glass is clear, remove the air restriction from the conHIGH PRESSURE RELIEF VALVE

SIGHT GLASS

RECEIVER DRIER SUCTION GAuGt: VALVE

DISCHARGE GAUGE VALVE

COMPRESSOR INLET HOSE CONNECTOR

LOW PRESSURE CUTOUT SWITCH

NK 1447

PYM Fig. 1—Purge Gauge Hoses

Fig.

2—Receiver Drier


24-8 AIR CONDITIONING denser and allow the discharge pressure to return to normal. If the foam shows in the sight glass when the discharge pressure is 225 to 250 psi, it indicates the system is low on refrigerant. The proper amount of refrigerant required to complete a full charge may be added to the system as follows: Maintaining the discharge pressure at 225 to 250 psi, add refrigerant gas through the suction side of the system until foam is cleared from sight glass, then add exactly one-half (1/2) pound of refrigerant. Low Pressure Cut -Out Switch The Low Pressure Cut-Out switch, which is located on the receiver drier, is wired in series with the compressor magnetic clutch. It cuts off the electrical power supply to the clutch when liquid refrigerant pressure drops to the control point of the switch. (Fig. 2). The switch is a sealed, factory calibrated unit. No attempt shall be made to adjust or otherwise repair it. If it is found to be defective it must be replaced. Switch Test (Engine not running) (1) Remove the two wires from the low pressure

cut-out switch and connect them together. (2) Press the A/C button. (3) Momentarily turn the ignition switch on (do not crank the engine), listen for the compressor clutch engaging. (4) If the clutch does not engage, the clutch, wiring or fuse may be defective. Check the clutch circuit and clutch. (5) If the clutch engages, connect the manifold gauge set and read the discharge pressure. At any pressure of 40 psi and above, the switch must actuate the clutch. (6) Reconnect the wires to the switch and perform step number 3. If clutch does not engage, discharge the system, replace the switch, check compressor oil level, and recharge the system. NOTE: Check compressor oil level before charging the system in accordance with instructions under "Oil Level-Compressor". If the pressure is below 40 psi the system may be low of charge. In this case it is mandatory to follow the procedure described below:

(1) Add partial charge until the pressure gauge reads 40 psi. (2) Perform step number 3 (wires connected to

TEMPERATURE-PRESSURE RELATIONSHIP CHART (FOR REFRIGERANT 12) Press. PSI

Temp. F.

Press. PSI

Temp. F.

Press. PSI

Temp. F.

Press. PSI

Temp. F.

Press. PSI

2 4 6 8

9.2 10.2 11.2 12.0 13.5

35 36 37 38 39

32.6 33.4 34.3 35.2 36.1

so 61 62 63 64

57.7 58.9 6a1 61.3 62.5

85 86 87 88 89

91.8 93.3 94.7 96.5 98.2

110 111 112 113 114

136.4 138 4 140.5 142.6 144.7

10 12 14 16 18

14.6 15.8 17.1 18.4 19.7

40 41 42 43 44

37.0 37.9 38.9 39.8 40.7

65 66 67 68 69

63.8 65.0 66.3 67.6 68.9

90 91 92 93 94

99.8 101.5 103.1 104.8 106.5

115 116 117 118 119

146.8 148.9 151.1 153.2 155.4

20 21 22 23 24

21.0 21.7 22.4 23.2 23.9

45 46 47 48 49

41.7 42.7 43.6 44.7 45.7

70 71 72 73 74

70.2 71.5 72.9 74.2 75.6

95 96 97 98 99

108.3 110.0 111.7 113.5 115.3

120 121 122 123 124

157.7 159.9 161.2 164.4 166.7

25 26 27 28 29

24.6 25.4 26.1 26.9 27.7

50 51 52 53 54

46.7 47.7 48.8 49.9 51.0

75 76 77 78 79

77.0 78.4 79.8 81.3 82.7

100 101 102 103 104

117.2 119.0 120.9 122.7 124.6

125 126 127 128 129

169.1 171.4 173.8 176.2 178.6

30 31 32 33 34

28.5 29.3 30.1 30.9 31.7

55 56 57 58 59

52.5 53.2 54.3 55.4 56.6

80 81 82 83 84

84.2 85.7 87.2 88.7 90.2

105 106 107 108 109

126.6 128.5 130.4 132.4 134.4

130 131 132 133 134

181.0 183.5 185.9 188.5 191.0

Temp. F.


AIR CONDITIONING 24-9

switch). If the clutch engages, the switch is satisfactory; if it does not, it must be replaced. In either case the following steps must be performed: (a) check the system for leaks and repair as necessary. (b) Discharge the system. Check the compressor oil level. Replace the switch if it was found defective and recharge the system. NOTE: Whenever the system is inactivated by the low pressure cut-out switch due to the loss of refrigerant, refrigerant oil may also have been lost. Therefore, to prevent damage to the compressor due to operation without sufficient lubrication, the leak must be repaired and the compressor oil level checked before final charge of the system in accordance with instructions under "Oil Level—Compressor".

High Pressure Relief Valve The High Pressure Relief Valve is located on the receiver drier opposite the low pressure cut-out switch. Its function is to prevent damage to the air conditioning system in the event that excessive pressure develops due to condenser air flow being restricted by, for example, leaves, newspaper, or an overcharge of refrigerant. NOTE: The high pressure relief valve differs from the fusible plug in that it vents only the small amount of refrigerant necessary to reduce system pressure and then reseats itself. The majority of the refrigerant is conserved in the system. The valve is calibrated to vent at a pressure of 475 to 550 psi. therefore, the fact that the valve vented refrigerant, does not mean the valve is defective. The valve is part of the receiver drier assembly and must not be removed nor otherwise disturbed. A mylar disc protects the venting ports of the valve and must not be removed, perforated, or otherwise damaged. The disc is intended to prevent humidity and salt from entering the valve mechanism. A valve in which the protective disc does not seal the venting port shall be repaired by removing the old protective disc and cleaning the surface of the valve so it will be free of oil, grease or other substances. Apply a disc cut from adhesive mylar, or "Scotch" type tape. Be sure that the disc covers the venting port. Avoid the use of masking tape or electrical insulation tape.

TEST 3 TESTING THE SYSTEM FOR LEAKS

The Leak Detector Torch Tool C-3569 is a propane gas-burning torch used to locate a leak in any part of the refrigeration system. Refrigerant gas drawn into the sampling or "snifter" tube will cause

the flame to change color in proportion to the size of the leak. A very small leak will produce a flame varying from yellowish-green to bright green. A large leak will produce a brilliant blue flame. CAUTION: Do not use the lighted detector in any place where explosive gases, dust or vapors are present. Do not breathe the fumes that are produced by the burning of refrigerant gas. Large concentrations of refrigerant in the presence of a live flame become dangerously toxic. Observe the flame through the

window of the burner shield, not through the top of the shield. If the flame remains bright yellow when the tester is removed from possible leak point, insufficient air is being drawn in through the sampling tube, or the reaction plate is dirty. (1) Open the torch valve until you hear a faint hiss of escaping gas. Light the test torch and adjust the valve until the flame is very small. A small flame will detect large as well as small leaks, whereas a large flame will detect only large leaks. As soon as the reaction plate seen through the window in the burner shield becomes red hot, the tester is ready for use. (2) Examine all tube connectors and other possible leak points by moving the end of the sampling hose from point to point. Since Refrigerant 12 is heavier than air, it is good practice to place the open end of the sampling hose directly below the point being tested. Be careful not to pinch the sampling tube since this will shut off the air supply to the flame and cause a color change. (3) Watch for a change in the color of the flame. Small leaks will produce a green color and large leaks a bright blue color. If leaks are observed at tube fittings, tighten the connection, using the proper flare wrenches, and retest. Remove Sweep-Test Charge If the system is free of leaks; or after correcting a leak, and if no air conditioning components have been removed, add the necessary refrigerant as described under TEST 4 "Correcting Low Refrigerant Level." If any parts of the refrigerant system were disconnected, remove the sweep test charge. Close the refrigerant manifold valve so that any refrigerant remaining in the container is sealed. Remove the long test hose from the refrigerant manifold. Insert the free end of this test hose into an exhaust system outlet. Open the right-hand gauge set manifold valve a fraction of a turn to let the sweep-test charge escape slowly. Allow the system to discharge until the discharge pressure gauge registers zero. Open the lefthand gauge valve to allow any refrigerant trapped in the suction side of the system to escape.


24-10 AIR CONDITIONING TEST 4 CORRECTING LOW REFRIGERANT LEVEL Since the refrigeration system is completely sealed, refrigerant level will not be low unless there is a leak in the system or refrigerant has been allowed to escape by depressing one of the service port valves. For detailed instructions on the proper procedure for checking refrigerant level, refer to "Refrigerant Level," TEST 2. Before adding refrigerant where cause of low level is not known, the system should be tested for leaks. Assuming no leaks are present, or that leaks have been corrected without discharging the system, proceed with partial charge. Install and connect.gauge set manifold (Fig. 3). (1) Close both of the gauge set manifold valves. Open the gauge set manifold needle valve. (2) Connect the suction gauge test hose to the suction service port of the compressor. On all models connect the discharge gauge test hose to the discharge service port of compressor. (3) Connect one end of long test hose to center manifold outlet, other end to refrigerant dispensing manifold. (4) Close two of the dispensing manifold valves and

. . LEF "SUCT ION GAUGE VALVE

Ra‘ . jv

open remaining dispensing manifold valve. Remove protective cap from opened valve. (5) Screw a can of Refrigerant 12 to the opened manifold valve. Be sure gasket is in place and in good condition. Tighten refrigerant can and manifold locking nut to insure a good seal. Do not over-tighten since 6 to 8 foot-pounds is sufficient if gasket is in good condition. (6) Turn manifold valve (above the refrigerant can) completely clockwise to puncture the can. This closes the valve and seals the refrigerant in the can. (7) Place the refrigerant in a large pan of water heated to 1259'. Place pan of water containing the refrigerant can on an accurate scale so the amount of refrigerant added can be weighed. Open the refrigerant manifold valve. (8) Purge all air from test hoses. Air in the system will be trapped in the condenser causing abnormally high discharge pressures and interfering with condensation of the refrigerant. (9) Loosen both test hoses at the gauge set manifold. Tighten the hoses as soon as the air is purged. (10) Loosen charging hose connection at gauge set manifold. This will purge air from the charging hose. Tighten connection as soon as air is purged. (11) With vehicle windows open and hood up, operate engine at 1300 rpm.

RIGHT "DISCHARGE GAUGE VA I VE" DISCHARGE SERVICE PORT ADAPTER

CHARGING HOSE HOT WATER 125- F

SUCTION SERVICE PORT ADAPTER REFRIGERANT MANIFOLD

COMPRESSOR INLET SERVICE PORT

SUCTION LINE NK14:3911

Fig. 3 — Adding Partial Refrigerant Charge


AIR CONDITIONING 24-11 (12) Push in "A/C" button, fan switch on high. On dual installation both blowers must be on high speed during charging operation. (13) If necessary, block the condenser to maintain a discharge pressure of 225 to 250 psi. The system must be charged through the evaporator suction service port as follows: (a) Slowly open the suction service gauge valve. Meter flow of refrigerant by adjusting the suction service gauge valve so that pressure registered at the suction service gauge does not exceed 50 psi. Keep refrigerant container upright.

(b) Add refrigerant gas until there is no foam visible at the slight glass. As soon as all foam clears, note the weight registered on the refrigerant scale. (c) Watch the refrigerant weighing scale and add exactly 1/2 pound more refrigerant to the system. Close the suction gauge valve. Too much refrigerant in the system can cause abnormally high discharge pressures. Care must be used so that exactly 1/2 pound of refrigerant is added after foam clears in the sight glass.

(d) Close dispensing manifold valve. Remove test hoses and adapters from the service ports of compressor, and install protective caps at service ports.

TEST 5 OVER-ALL PERFORMANCE TEST Humidity (the amount of moisture in the air) has an important bearing on the temperature of the air delivered to the vehicle's interior. This is true of all air-conditioned systems whether in the home, office or vehicle. It is important to understand the effect humidity has on the performance of the system. When humidity is high, the evaporator has to perform a double duty. It must lower the air temperature and the temperature of the moisture carried in the air. Condensing the moisture in the air transfers a great deal of heat energy into the evaporator fins and tubing. This reduces the amount of heat the evaporator can absorb from the air. In other words, high humidity greatly reduces the evaporator's ability to lower the temperature of the air delivered to the vehicle interior. Evaporator capacity used to reduce the amount of moisture in the air is not wasted. Wringing some of the moisture out of the air entering the vehicle adds materially to the comfort of the passengers. However, an owner may expect too much from his air-conditioning system on humid days. A performance test is the best way to determine whether or not the system is performing up to standard. This test also provides valuable clues to the possible cause of trouble. The preliminary inspections in TESTS 1 thru 4,

outlined previously, should be made before the "OverAll Performance Test." Install gauge set manifold. Air temperature in test room must be 75°F. minimum for this test.

(1) Start the engine, open the windows, temperature control lever must be in the off position. (2) Push in "A/C" button, fan switch on high. Open all grille outlets. (3) Adjust engine to 1300 rpm. (4) Arrange gauge set manifold hoses and tachometer leads to allow hood to be lowered, then close hood. (5) Place motor-driven psychrometer Tool C-3704 at cowl inlet opening. Distilled water should be used with this meter to prevent drying out and hardening the wet sock. (6) Place thermometer Tool C-3623 fully into right outlet grille opening. The left outlet should be fully extended and directed towards rear of vehicle. (7) Operate the air-conditioning system until a stabilized condition on the gauges and thermometers has been established. One of the most important steps in making the over-all performance test is that the engine must be operated at 1300 rpm for approximately five minutes to allow all the under-hood components of the system to reach their operating temperature. (8) Partially close the needle valve, located below the discharge pressure gauge, to minimize oscillation of the pointer. Do not close the needle valve completely since this would prevent the discharge pressure gauge from registering pressure. This test should be performed with the discharge pressure from 190 to 210 psi. The 190 to 210 pound pressure is for test purposes only. To increase pressure restrict the air flow across the condenser using cardboard or paper to decrease pressure, increase air flow across condenser with external floor fans. (9) Observe and record the "Inlet Dry Bulb Temperature" and "Inlet Wet Bulb Temperature" as registered on the psychometer. Observe and record "Discharge Air Temperature" registered by thermometer at right hand grille outlet. From the appropriate "Performance Temperature Chart," for vehicle and type installation being tested (Figs. 4 thru 6), determine the maximum allowable discharge air temperature for the prevailing "Dry" and "Wet" bulb temperatures recorded. If the vehicle's discharge air temperature is at or below the temperature given on the Performance Chart, the air-conditioning is delivering its cooling capacity. However, to assure trouble-free operation, continue with the "Expansion Valve and Evaporator Pressure Regulator Valve Test." If discharge air temperature at the outlet grilles is above the maximum allowable on Performance Chart,


24-12 AIR CONDITIONING SINGLE UNIT INLET AIR WET BULB TEMPERATURE

55 56 57 58 59 60 61 62 63 64 65 66 67 68 69 70 71 72 73 74 75 76 77 78 79 80 81 82 83 84 85 86 87 88 89 90

41 42 43 44 45 46 47 48 49 50 50 50 51 51 52 52 53 53 53 54 54 55 56 57 58 59 59 60 62 64 66 67 68 69 70 71

DISCHARGE AIR DRY BULB TEMPERATURE NK1342 A

INLET AIR DRY BULB TEMPERATURE MUST BE BETWEEN 75° AND 110°F

Fig. 4—Performance Temperature Chart—front Unit Only

perform the "Expansion Valve and Evaporator Pressure Regulator Valve Test." Pilot Operated Evaporator Pressure Regulator (EPR)(Fig..5) An improved version of the Evaporator Pressure Regulator (EPR) Valve, has been introduced this year. Like the EPR valve, it is entirely self contained, requires no external motivation and is located in the suction cavity of the compressor. Its purpose is to restrict the flow of refrigerant under light air conditioning loads. This is done in order to keep the evaporator pressure high enough to prevent freeze-up of the condensate on the external surfaces of the evaporator. Such a condition would restrict air flow, and under extreme circumstances, result in complete loss of capacity. The Pilot Operated EPR differs from the EPR (internally), in that it contains a built-in pilot valve, which "triggers" the main throttling portion of the valve. The valve offers more precise control, and permits system operation at lower ambient temperatures, before evaporator "freeze-up" occurs. NOTE: If the EPR valve must be removed or replaced, it is to be replaced by the pilot operated EPR valve identified by Part Number 3406143. No attempt shall be made to adjust the valve. All further reference to the EPR Valve in this Manual will apply to the Pilot Operated EPR Valve only.

tion 3, the following conditions shall be established. (a) System must be adequately charged. (b) Make sure sensing tubes of the expansion valve are not damaged. Replace any expansion valve that has broken or damaged tube. Be sure sensing tube is properly inserted in its well in the suction line. (Fig. 7). (2) Test Conditions for all Requirements Except 3(d)

(a) Test must be made at room temperature of 75 degrees F. minimum, under hood temperature 86 degrees F. minimum. (b) Close the doors and windows, set the air conditioning controls for Max. A/C, high blower and temperature lever to maximum temperature position. NOTE: An external vacuum source must be used to open the water valve. (c) Set the engine speed at 900 rpm unless otherwise specified. (d) Operate the system for at least ten minutes to obtain partial stabilization and sufficient reheat to load the evaporator. (3) Requirements.

Check the system as follows and refer to Diagnosis Chart if findings are different from these specified. (a) Under conditions in paragraph 2, pressure shall be as follows when the sensing tube of the expansion valve is in its well. Head Pressure 140 to 210 psi

TEST 6 EXPANSION VALVE AND EPR VALVE TEST (In Car) SINGLE UNIT OR FRONT UNIT OF DUAL This test is to be performed after performing Test 1 through 5. The gauge set manifold will be connected as illustrated. (Fig. 6).

STEM

PROTRUSION

"0" RING PY702

(1) Preliminary Checks.

Before performing any of the tests listed in Sec-

Fig. 5 — Pilot Operated EPR Valve


AIR CONDITIONING 24-13 413PSI MINIMUM THERMAL BULB WARM

SAINTAIN 140 TO 210 PSI

21 TO 25 PSI THERMAL BULB IN 37 ICE WATER

EXPANSION VALVE

ICE AND WATER 37° F.

THERMAL BULB

NP6768

Fig. 6—Expansion Volvo and EPR Valve Test

(b) Under conditions in paragraph 2. Remove the expansion valve sensing tube from its internal well and hold it in your hand for several minutes until suction pressure stabilizes. The pressure should read: Evaporator suction pressure 40 psi or more. Compressor inlet pressure no more than 4 psi below evaporator suction pressure. (c) Under conditions in paragraph 2. immerse 5 inches of the sensing tube in a container of ice water at 32 degrees F. The pressure should read: Evaporator suction pressure not more than 27 psi Compressor inlet pressure 17 psi or less. id) This check must be performed under the following conditions: Engine Speed 1500 rpm Blower on Low Speed Max. A/C Button Depressed Temperature Control Lever in Minimum Temperature Position—Disconnect External Vacuum The sensing tube of the expansion valve must be in its well in the suction line. The pressures should read: Evaporator Suction Pressure 23.27 psi Comp Inlet Pressure 17 psi or Less (4) Tests Refer to the Diagnosis Chart.

(a) Remove the sensing tube of the expansion valve from its well and hold it in your hand. Read the evaporator suction pressure, It should read 40 psi or more. If the evaporator suction reads less than 40 psi, replace the expansion valve, lithe evaporator suction pressure reads more than 40 psi, proceed with Test (b). (b) Remove the sensing tube of the expansion valve from its well. Hold it in your hand, allow time for equalization. Observe the differential pressure. If the evaporator suction pressure is more than 40 psi and the differential pressure between the evaporator suction pressure and compressor inlet pressure is more than 4 psi, the EPR valve is defective and should be replaced. SEAL THERMO BULB IN SUCTION LINE WELL

EXPANSION VALVE EQUALIZER TUBE

Fig. 7—Expansion Valve Details

NU399


24-14 AIR CONDITIONING

EXPANSION VALVE AND EPR VALVE DIAGNOSIS CHART Correction

Possible Cause

Condition

Head Pressure Below 140 psi (Ref. 3 a)

Expansion Valve Closed EPR Valve Closed Compressor not Properly Working

See 4(a) See 4(b) Replace valve plates & gasket of compressor

Low Evaporator Suction Pressure Below 23 psi (Ref. 3 b)

Expansion Valve Closed EPR Valve not Controlling (open)

See 4(a)

High Pressure Differential (Ref. 3 b)

EPR Valve (closed)

See 4(b)

Evaporator Suction Pressure Between 27 and 40 psi (Ref. 3b)

Expansion Valve Defective Lack of Capacity

See 4(a)

Compressor Inlet Pressure Higher than 17 psi (Ref. 3 c) Expansion Valve Known to be Good

EPR Valve Defective Compressor Defective

Evaporator Suction Pressure

EPR Valve Not properly set (high control

Does not Drop

See 4W)

See 4(d) Replace valve plates & gasket of compressor

See 4(c)

point)

(Ref. 3 c)

Expansion Valve—Not working properly (sticking open) Compressor Defective

See 4(c)

Evaporator Suction Pressure Not Between 23 and 27 psi (Ref. 3d)

EPR not Set Properly

Replace EPR Valve

Compressor Inlet Pressure Higher than 17 psi (Ref. 3d) Expansion Valve Known to be Good

EPR Valve Defective Compressor Defective

See 4(d) Replace valve plates & gasket of compressor

(c) Perform the test as in (b). Tithe EPR valve is

and expansion valve are working properly, but the

satisfactory, immerse the expansion valve sensing tube in ice water at 32 degrees F. The evaporator suction pressure should drop below 27 psi. If it does not drop to this value raise the engine speed to 1750 rpm and check the evaporator suction pressure again. If it remains above 27 psi and the compressor inlet pressure is more than 4 psi, the EPR valve has too high control point and should be replaced. If the pressure drop is less than 4 psi and the evaporator suction pressure is above 27 psi, the expansion valve is defective and should be replaced. If after raising the engine rpm to 1750, the evaporator suction pressure drops below 27 psi, both EPR

compressor capacity is low. The compressor valve plates and the gaskets should be inspected and replaced if necessary. (d) Remove the sensing tube from its well and hold it in your hand. Read the evaporator suction pressure then immerse the sensing tube in ice water at 32 degrees F. and read the evaporator suction pressure which should be below 27 psi. If the pressure does not drop to this value, read the compressor inlet pressure. It should be 17 psi or less. If it is more than 17 psi, the EPA valve is faulty and must be replaced. If the compressor inlet pressure is still above 17 psi, inspect the valve plates and gaskets and replace them if necessary.

COMPLETE SYSTEM DISCHARGE AND RECHARGE INDEX Charging the System Discharge the System

Page 17 15

Page Evacuate the System Refrigerant Service

17 15


AIR CONDITIONING 24-15 Removing Sweep-Test Charge Replace Receiver Drier

Page 16 16

Sweep-Test Charge Testing the System for Leaks

Page 15 15

REFRIGERANT SERVICE

rapidly since this would sweep some of the refrigerant oil out of the compressor.

Use only Refrigerant 12 in the air-conditioning system. Refrigerant 12 is available in bulk tanks or in sealed 15 ounce cans. The use of canned refrigerant is preferred by most technicians because it provides a very quick and simple means of adding refrigerant or charging the system completely.

(7) Allow the system to discharge until the discharge pressure gauge registers zero. Open the lef thand valve to release any vapor trapped at the suction side of the system.

Refrigerant Charge:

The purpose of the sweep-test charge is to pressurize the system so that a leak test can be made. The sweep-test charge also serves the purpose of drying the system or sweeping out trapped moisture. Repairs and component replacement must be completed before charging with the sweep-test charge. (1) Close both gauge set manifold valves and open the gauge set manifold needle valve. (2) Attach the free end of the long hose used for discharging to the refrigerant dispensing manifold. (3) Attach a single can of Refrigerant 12 to the dispensing manifold. Place the refrigerant in 125 degree water. For detailed instructions on attaching refrigerant can for charging, see "Charging the System" in this section. (4) With vehicle windows open and hood up, operate engine at 1300 rpm. (5) Push in "A/C" button, fan switch on high. On dual installation both blowers must be on high speed during the charging operation. (6) Slowly open the left-hand gauge set manifold valve to meter the refrigerant into the system. When the full can of refrigerant has been metered into the system, close the gauge set manifold valves and the refrigerant manifold valve. If the system has been opened for repair or replacement, a complete leak test must be made to make sure the system is sealed. Also, if the system has accidentally lost its charge it will be necessary to perform a leak test while the sweep-test charge is in the system. Stop the engine and disconnect the test hoses and adapters from the compressor service ports.

3 Pounds 2 ounces to 3 Pounds 6 ounces An accurate scale must be used to insure charging with the proper amount of refrigerant.

Since the use of canned refrigerant is preferred universally, only that method is described. Before the system can be opened for replacement of lines or components, the system must be completely discharged. Whenever the system has been opened, it must be swept with a partial charge, and the entire system tested for leaks. Compressor oil level should be checked and adjusted, if necessary. See "Oil Level". The drier should be replaced and the system evacuated using a vacuum pump to remove all air and moisture. The system should be charged with the proper amount of refrigerant. Detailed instruction for performing these operations follow.

DISCHARGE THE SYSTEM

SWEEP-TEST CHARGE

(1) Be sure the valves of the gauge manifold set are closed before attaching the gauge set manifold (suction test hose to the suction service port and discharge test hose to the discharge service port). Attach the long test hose to the center connection of the gauge set manifold. Lead the other end of this hose into an exhaust ventilation system outlet or to the outside of the building. (2) Open the gauge set manifold needle valve and close both of the gauge set manifold gauge valves. (3) With the vehicle windows open and hood up, operate the engine at 1300 rpm. (4) Push in "A/C" button, fan switch on high. On dual installation both blowers must be on high speed during the charging operation. (51 Allow the system to operate at full capacity for at least 15 minutes at the rpm shown in step 3. This will cause most of the compressor oil in the system to return to the compressor crankcase. (6) Open the discharge right-hand gauge valve a small amount. This will allow the refrigerant vapor to discharge slowly.

The leak detector torch Tool C-3569 is a propane gas-burning torch used to locate a leak in any part of the refrigeration system. Refrigerant gas drawn into the sampling or "snifter" tube will cause the flame to change color in proportion to the size of the leak. A very small leak will produce a flame color varying from yellowish-green to bright green. A large leak will produce a brilliant blue flame.

CAUTION: Do not allow the system to discharge

CAUTION: Do not use the lighted detector in any

TESTING THE SYSTEM FOR LEAKS


24-16 AIR CONDITIONING place where explosive gases, dust, or vapor are present. Do not breathe the fumes that are produced by the burning of refrigerant gas. Large concentrations of refrigerant in the presence of a live flame become dangerously toxic. Observe the flame through the window of the burner shield, not through the top of the shield.

(1) Open the torch valve until you hear a faint hiss of escaping gas. Light the test torch and adjust the valve until the flame is very small. A small flame will detect large as well as small leaks, whereas, a large flame will detect only large leaks. As soon as the reaction plate seen through the window in the burner shield becomes red hot, the tester is ready for use. (2) Examine all the tube connectors and other possible leak points by moving the end of the sampling hose from point to point. Since Refrigerant 12 is heavier than air, it is good practice to place the open end of the sampling hose directly below the point being tested. Be careful not to pinch the sampling tube since this will shut off the air supply to the flame and cause a color change. (3) Watch for a change in the color of the flame. Small leaks will produce a green color and large leaks a bright blue color. If leaks are observed at the tube fittings, tighten the connection, using the proper flare wrenches, and retest.

If the flame remains bright yellow when the tester is removed from a possible leak point, insufficient air is being drawn in through the sampling tube, or the reaction plate is dirty.

REMOVE SWEEP-TEST CHARGE If the system is free of leaks, or after correcting a leak, if no air-conditioning components have been removed, add the necessary refrigerant as described under "Correcting the Low Refrigerant Level." If any parts of the refrigerant system were disconnected remove the sweep-test charge. Close the refrigerant manifold valve so that any refrigerant remaining in the container is sealed. Remove the long test hose from the refrigerant manifold. Insert the free end of this test hose into an exhaust system outlet. Open the right-hand gauge set manifold valve a fraction of a turn to let the sweep-test charge escape slowly. Allow the system to discharge until the discharge pressure gauge registers zero. Open the left-hand gauge valve to allow any refrigerant trapped in the suction side of the system to escape.

REPLACE THE RECEIVER-DRIER The system must be discharged and swept with a test charge before replacing the receiver-drier. To remove the receiver-drier, simply unscrew it

OPERATE VACUUM PUMP A MINIMUM OF 5 MINUTES WITH SUCTION GAUGE REGISTERING 26 TO 28 INCHES OF VACUUM

VACUUM PUMP C-3652

COMPRESSOR INLET SERVICE PORT

SUCTION LINE NKI463A

Fig. 1 —Evacuating the System


AIR CONDITIONING 24-17 at the fittings and disconnect Low Pressure Cut-out wires. When installing a new receiver-drier, use new "0" rings. Tighten the new unit to 40 foot-pounds. Do Not overtighten as this might damage the -0" rings. Connect Low Pressure Cut-out wires. CAUTION: Replacement receiver-drier-strainer units must be sealed while in storage. The drier used in these units is so hungry for moisture that it can saturate quickly upon exposure to the atmosphere. When installing a drier, have all tools and supplies ready for quick reassembly to avoid keeping the system open any longer than necessary.

EVACUATE THE SYSTEM Whenever the system has been opened to atmosphere, it is absolutely essential that the system be swept with refrigerant and evacuated or "vacuumed' to remove all the air and the moisture. If any appreciable amount of air remains m the system when it is charged, the trapped air will concentrate near the top of the condenser and cause abnormally high discharge pressure. Air in the system will reduce the condenser's ability to condense the refrigerant gas and supply adequate liquid refrigerant to the evaporator. To evacuate the system, proceed as fol. lows:

(1) Connect gauge set manifold to compressor and long test hose from gauge set manifold center connection to vacuum pump, Tool C-3652. (Fig. 1). (2) Open both gauge set manifold valves, and the needle valve. (a) Start the vacuum pump and operate until the evaporator suction gauge registers at least 26 inches of vacuum. If system is tight and pump in good condition, vacuum will go as low as 28 inches. (4) Allow vacuum pump to operate with the suction gauge registering 26 to 28 inches of vacuum for a minimum of five minutes. (5) Close both gauge set manifold valves, turn off vacuum pump and remove test hose from vacuum pump. Leave gauge set manifold connected to compressor. Charge system with proper amount of Refrigerant 12. Failure to pull at least 26 inches of vacuum indicates a leak in the refrigeration system or a defective vacuum pump. Locate and correct the trouble before recharging the system.

CHARGING THE SYSTEM (Fig.2) An accurate scale must be used to insure charging with the proper amount of refrigerant.

RIGHT "DISCHARGE GAUGE VALVE"

LEFT "SUCTION GAUGE VALVE'

DISCHARGE SERVICE PORT ADAPTER

CHARGING HOS! RIFRIGERANI MANIFOU)

HO/ WATER 125 F

SuChop; SERVICE PORT ADAP1FR SUCTION LINE NKI445A

Fig. 2—Complete System Charging


24-18 MR CONDITIONING Refrigerant Charge: 3 Pounds 2 ounces to 3 Pounds 6 ounces

The special refrigerant dispensing manifold permits charging three full cans of refrigerant at one time. Keep the refrigerant manifold valves capped when not in use. Keep a supply of extra refrigerant-can-torefrigerant-manifold gaskets on hand so that gaskets can be replaced periodically. This will insure a good seal without excessive tightening of the can or the manifold nuts.

(1) Attach center hose from gauge set manifold to refrigerant dispensing manifold. Turn refrigerant manifold valves completely counterclockwise so they are fully open. Remove protective caps from refrigerant manifold. (2) Screw refrigerant cans into manifold. Be sure manifold-to-can gasket is in place and in good condition. Tighten can and manifold nuts to 6 to 8 footpounds. (3) Turn three refrigerant manifold valves completely clockwise to puncture the cans and close the

manifold valves. (4) Turn refrigerant manifold valves counterclockwise to open them. (5) Momentarily loosen the charging hose at the gauge set manifold to allow the refrigerant gas to purge air out of the charging hose. (6) Place the three cans of refrigerant into a pan containing hot water at a temperature of 125 degrees F. (7) Start engine and adjust speed to 1300 rpm. (a) Charge the system through the suction side of the system by slowly opening the left-hand gauge set manifold valve. Adjust valve as necessary so charging pressure does not exceed 50 psi. Maintain the temperature of the water in the pan by adding warm water as necessary. (b) When all three cans of refrigerant are completely empty, close gauge set manifold valves and refrigerant manifold valves. (c) If more than three cans of refrigerant are necessary to complete charge repeat steps two through six.

SERVICE PROCEDURES INDEX

Anti-Freeze Recommendations Compressor Drive Belt Adjustment Handling Tubing and Fittings

Page 19 19 18

HANDLING TUBING AND FITTINGS Kinks in the refrigerant tubing or sharp bends in the refrigerant hose lines will greatly reduce the capacity of the entire system. High pressures are produced in the system when it is operating. Extreme care must be exercised to make sure that all connections are pressure tight. Dirt and moisture can enter the system when it is opened for repair or replacement of lines or components. The following precautions must be observed. The system must be completely discharged before opening any fitting or connection in the refrigeration system. Open fittings with caution even after the system has been discharged. If any pressure is noticed as a fitting is loosened, allow trapped pressure to bleed off very slowly. Use a suitable tube bender when bending the refrigerant lines to avoid kinking. Never attempt to rebend formed lines to fit. Use the correct line for the installation you are servicing.

A good rule for the flexible hose lines is keep the radius of all bends at least 10 times the diameter of

Radiator Pressure Cap Vacuum Control System Adjustments and Tests

Page 19 20

the hose. Sharper bends will reduce the flow of refrigerant. The flexible hose lines should be routed so that they are at least 3 inches from the exhaust manifold. It is good practice to inspect all flexible hose lines at least once a year to make sure they are in good condition and properly routed. "0" rings and fittings must be in good condition. The slightest burr or foreign material may cause a leak. "0" rings and fittings must be coated with refrigerant oil to allow the connections to seat squarely and to be tightened evenly to the proper torque. Fittings which are not oiled with refrigerant oil are almost sure to leak (Fig. 1). The use of proper wrenches when making connecfions is very important. Improper wrenches or improper use of wrenches can damage the fittings. Always use two wrenches when loosening or tightening tube fittings to prevent distorting of lines and components. The internal parts of the refrigeration system will remain in a state of chemical stability as long as pure-moisture-free Refrigerant 12 and refrigerant oil


AIR CONDITIONING 24-19 of new-car preparation. See Chart, "Accessory Belt Drives." Group 7 "Cnoling". (2) Measure drive belt tension at regular service intervals using torque method, and adjust as needed. (3) Always replace belts in pairs if so equipped, otherwise the old belt will have insufficient tension and the load will be primarily on the new belt.

ANTIFREEZE RECOMMENDATIONS

NEcippF rye

Rthic

4Y88143 Fig. I —Lubricate with Refrigerant Oil (Typical) is used. Abnormal amounts of dirt, moisture or air can upset the chemical stability and cause operational troubles or even serious damage if present in more than minute quantities. When it is necessary to open the refrigeration system. have everything you will need to service the system ready so that the system will not be left open any longer than necessary. Cap or plug all lines and fittings as soon as they are opened to prevent the entrance of dirt and moisture. All lines and components in parts stock should be capped or sealed until they are ready to be used. All tools, including the refrigerant dispensing manifold, the gauge set manifold and test hoses should be kept clean and dry. The special refrigeration oil supplied for the system is as clean and dry as it is possible to make it. Only refrigeration oil should be used in the system or on the fittings and lines. The oil container should be kept tightly capped until it is ready for use, and then tightly capped after use to prevent entrance of dirt and moisture. Refrigerant oil will quickly absorb any moisture svith which it comes in contact.

COMPRESSOR DRIVE BELT ADJUSTMENT If the proper tensions are not maintained, belt slippage will greatly reduce air-conditioning performance and drive belt life. (1) Adjust air-conditioning drive belts at the time

The Air-Conditioning System requires the engine's cooling system to be protected to • 15' F. with a permanent type antifreeze for summer operation. This is to prevent freezing of the coolant in the heater core. However, this protection does not provide sufficient corrosion inhibitors for the engine cooling system. Summer protection to --15uF. will provide adequate inhibitors for protection of engine cooling system against corrosion. In the springtime, after the winter's operation with the cooling system protected with permanent-type antifreeze for the temperatures of the area, it is suggested the system be drained and flushed out with water. When draining, flushing and refilling, have the temperature control lever in the extreme hot position so the heater core is drained, flushed and refilled. Install a gallon of permanent type antifreeze in the system, and add enough water to fill the system. Do not re-use the old antifreeze. The permanent type antifreeze does not lose its antifreeze qualifies during the winter season operation, but the chemical inhibitors for rust and corrosion prevention are weakened and finally exhausted by extended use. Do not add new inhibitor to used antifreeze in hope of revitalizing the used antifreeze. The chemical inhibitors come in various chemical compositions, some are compatible, some neutralize each other, and some form violent reactions to each other causing foaming and other undesirable reactions. Play it sale and use new permanent-type antifreeze.

RADIATOR PRESSURE CAP Air conditioned vehicles must be equipped with a 15 to 16 psi radiator cap. A radiator pressure cap testing below these specifications will permit loss of coolant during a hard pull on a hot day, or in slow moving traffic, or when the engine is stopped on a hot day. Test the radiator pressure cap, using Tool 04080 (Fig. 2). Before assembling adapter and radiator pressure cap to the pump, dip radiator cap and both ends of adapter into clean water to assure a tight seal. Hold the assembled tester in a vertical position with the radiator cap downward. iFig. 2). Stroke the tester


2420 AIR CONDITIONING

Fig. 3 — Adjusting Vacuum Test Bleed Valve Fig. 2—Radiator Cap Tester

pump plunger until the gauge indicates the pressure cap is relieving pressure. It must relieve at a pressure between 14 to 17 psi. Tf within these specifications, reinstall on the radiator. These test specifications are for caps tested at average altitudes. In high altitudes, the test specifications are lowered about one (1) psi for each 2,000 feet above sea level.

If the radiator cap does not test within these specifications, replace it with a cap that does. VACUUM CONTROL SYSTEM ADJUSTMENTS AND TESTS The test of the push-button operation determines whether or not the vacuum and electrical circuits are properly connected and the controls are functioning properly. However, it is possible that a vacuum control system that operates perfectly at the high vacuum provided at engine idle speed may not function properly at high engine speeds. Before starting this test, stop engine and make certain the vacuum source hose at engine intake manifold is tight on its connector. Start vacuum pump (Tool C-3652) and connect to the vacuum test set (Tool C-3707). Adjust bleed valve on test set to obtain exactly 8 inches of vacuum with a finger blocking the prod on end of test hose (Fig. 3). It is absolutely essential that the bleed valve be adjusted so the vacuum gauge pointer will return to exactly 8 inches when the prod is covered by a finger. Otherwise a false reading will be obtained when the control circuit is tested.

intake manifold and insert vacuum tester hose prod into source hose leading to control switch. Place vacuum gauge on the cowl so it can be observed from the driver's position as push buttons are operated. Start the test by pushing the "Heat" button. Vacuum tester gauge needle will drop until the actuator has operated, and then will return to 8 inches. Note how much the vacuum drops below 8 inches. Continue to push buttons; "Off," "Max. A/C", "A/C" "Defrost" and "Heat" allowing time for actuators to operate after each button is pushed, and note the vacuum drop below 8 inches after each operation. The maximum allowable vacuum drcai below 8 inches after each operation is 3/4 inch. If the vacuum drop is more than 3/4 inch, first recheck the tester for reading exactly 8 inches. If correct, inspect the fit of the 7-hole hose connector plug on the control switch (Fig. 4). This plug must be positioned all the way on the 7 prods on the control switch. CAUTION: Do not use lubricant on the switch prods or in the holes in the plug, as lubricant will ruin the vacuum valve in the switch. If it is impossible to properly position the connector plug all the way on the switch prods, put a drop or two of clean water in the

CAUTION: Alternately release and reblock the hose prod several times. Make sure the bleed valve is adjusted so the vacuum gauge pointer returns to exactly 8 inches of vacuum when the prod is covered with a finger.

Disconnect engine vacuum source hose at engine

Fig. 4—Push Button Vacuum Test


AIR CONDITIONING 24-21

Fig. 3—Vacuum Tube Assembly Test holes of the connector plug. This will allow the plug to slide completely on the switch prods.

If vacuum drop is now within limits, proceed with the over-all performance test. If vacuum drop is still in excess of 3/4 inch, remove connector plug from the switch. Insert the vacuum test prod alternately in each of the connector holes except the source hose connector hole (Fig. 5). Note amount of vacuum drop below 8 inches after each actuator has operated. If vacuum test gauge comes back to 8 inches at each of the 6 holes, the hoses and actuators are not leaking. The control switch is faulty and must be replaced. If excessive vacuum drop shows up at one or more holes in connector block, isolate faulty hose or actuator. Inspect hose connections to the actuator involved. Then test whether actuator or hose is at fault; use the test hose on the actuator involved (Fig. 6).

Fig. 6—Vacuum Actuator Test

A leak in a hose may be detected with leak tester by running the fingers along the hose and watching vacuum gauge reading. A faulty spot may be cut out and the hose spliced, using 1/8 inch 00 copper tubing. A vacuum drop in excess of 3/4 inch below the 8 inches needed in this test would not interfere with the engine operation, other than perhaps to cause a rough idle. it could, however, interfere with the proper operation of the air-conditioning and heating controls at high speeds and during acceleration.

SERVICING THE COMPRESSOR INDEX Compressor

Page 22

MAGNETIC CLUTCH The compressor is equipped with an electro-magnetic clutch that is built-in the drive pulley assembly (Fig. 1). An electro-magnetic field coil is mounted on the compressor and electrical connections are made directly to the coil lead. The electro-magnet does not rotate with the drive pulley. therefore, collector rings and brushes are eliminated. Testing Electromagnet Current Draw To test the coil for a short or open circuit, connect an ammeter (0-10 ampere scale) in series with a fully charged 12 volt battery and the field coil lead. The current draw at 12 volts and 68v temperature should be as follows: 2.7 to 3.3 amperes for Warner (Copper Wire). 4.0 to 4.6 amperes for Warner (Aluminum Wire). Note: Housings on Aluminum coils bear the letter "AL".

Magnetic Clutch

Page 21

Removal (All) (1) Loosen and remove the belts. Disconnect clutch field lead wire at the connector. (2) Remove the special locking bolt and the washer from the compressor crankshaft at the front center of the clutch. (3) Insert a 5/8"-11 x 2-1/2" cap screw into the threaded portion of the hub assembly. (4) Support clutch with one hand, then tighten cap screw until clutch is removed. (5) Remove the three hexagon head screws attaching the clutch field assembly to the compressor and lift off the assembly. installation (All) (1) Install clutch field coil assembly on the base of compressor bearing housing. Make sure coil assembly is positioned so lead wire points to left of compressor as viewed from the front. Install the three mounting


24-22 AIR CONDITIONING LEAD WIRE HUB AND SHOE ASSEMBLY

HUB SNAP RING

___--- TOOL ;REMOVER)

CLUTCH BEARING

CLUTCH FIELD ASSEMBLY TOOL --- (SUPPORT}

BEARING SNAP RING PULLEY ASSEMBLY

Mt 32

NB 63

Fig. 1—Warner Clutch

Fig. 3—Removing the Bearing from Pulley Assembly

screws and tighten to 17 inch-pounds. (2) Insert woodruff key in the crankshaft. (3) Insert clutch assembly on crankshaft. (4) Install washer and a new self-locking bolt. Hold clutch from turning with a spanner wrench inserted In the holes of front bumper plate. Tighten to 20 footpounds. (5) Connect field lead wire. (6) Install belts and tighten to the specified tension.

an arbor press and insert a new bearing into the bore. Install Tool C-3807 against the bearing and press into position (Fig. 4). (2) Install pulley assembly with pulley side facing down on Tool C-3807. (3) Start drive hub into the inner bearing race, and press hub into position with an arbor press. (4) Install bearing snap ring and hub snap ring. CAUTION: The pulley assembly and hub assembly are mated parts. They are burnished at the factory

Disassembly

before shipment. No attempt should be made to replace either unit separately as this may reduce the initial torque of the clutch.

(1) Remove the small snap ring from the drive hub. (2) Install drive hub puller Tool C-3787 aligning the three pins of the Tool in the three holes in the hub and shoe assembly. Tighten the hex head bolt down until the drive hub is removed from the bearing (Fig. 2). (3) Remove bearing snap ring from pulley. (4) Place pulley assembly on an arbor press, with pulley side down, and bearing hub centered on Tool C-3825. Install Tool SP-3496 on inner race of bearing and press the bearing from pulley assembly (Fig. 3).

COMPRESSOR The compressor is a two-cylinder, reciprocatingtype designed specifically for the Chrysler Air-Conditioning System. Service parts are available so that the compressor can be repaired in the field. Fig. 5 is a disassembled view of the compressor

A new bearing must be installed every time the magnetic clutch is disassembled. Assembly

(1) Install pulley assembly with pulley side up on PULLER (.3/67

NY896A

Fig. 2—Removing the Hub and Shoe Assembly

Fig. 4—Installing a New Bearing in the Pulley Assembly (Typical)


AIR CONDITIONING 24-23 BOLT PLATE rzGASKET

HEAD GASKET

PISTON LOCK SEAL VALVE FITTING SPRING ( BOLT _,.....--iti

RING

LOCK-11^. ROD GASKET FlTTING BOLT BEARING

KEY

SEAL SEAL

CORE GASKET SCREEN c"----BOLT COVER ROTOR SHAFT ROTOR SEAL

WASHER

BOLT CAP CRANKSHAFT

BOLT

SPRING 0011W."--...____,GASKET SUMP

HOUSING

NB329B Fig. .5—Compressor Disassembled

with the nomenclature of the parts. Some parts are serviced individually and some are serviced in packages which include two or more service parts. Refer to the parts book for this information. CAUTION: The refrig t oil used in the compressor is carried through the entire system by the refrigerant. Some of this oil will be trapped and retained in the system when the refrigerant is discharged for testing or unit replacement. If the compressor is to be removed for repair or replacement, measure the refrigerant oil level in the compressor before the compressor is removed from the vehicle so that the same oil level can be established when the new or repaired compressor is installed on the vehicle.

Too much refrigerant oil in the system can cause abnormal operating pressures and reduce the performance of the entire system. Complete disassembly and assembly of the compressor must be performed with the compressor removed from the vehicle. On some models however, the valve plate and crankshaft gas seal assemblies can be repaired with compressor installed on vehicle. CAUTION: The system must be completely discharged before attempting to perform any disassembly or repair service to the compressor. Before bleeding sys-

tem down, cover clutch with a cloth to pr tamination of clutch pole faces.

t con-

Before disassembling the compressor, clean exterior surfaces thoroughly. Cleanliness is extremely important. The work area must be clean and free of air-borne dust and dirt. All parts must be thoroughly cleaned and blown dry before reassembly. Do not use air to dry the crankshaft front main bearing. Wash bearing in clean mineral spirits and shake out all excess cleaning fluid. Saturate bearing with clean refrigerant oil and assemble immediately. Any dirt in the front main bearing assembly will cause noisy operation and possible damage to bearing. CAUTION: Before reassembly of any unit, all contact surfaces must be liberally coated with clean refrigerant oil. Refrigerant oil must be kept in a sealed container until ready for use to prevent entrance of moisture and dirt. Never use engine oil as a substitute for refrigerant oil.

EPR VALVE Removal (System Discharged) (1) Remove the two "EPR" Valve suction line fit-


24-24 AIR CONDITIONING ling bolts, the fitting which also contains the compressor suction screen, spring, and the gasket. (2) Remove the "EPR" Valve and "0" ring from the compressor using Tool C-3822. by rotating the valve counterclockwise slightly (Fig. 61. CAUTION: Do not handle the "EPR" Valve more than necessary. The valve should be inspected externally and wiped clean with a lint-free cloth. Place the valve in a plastic bag until ready to be installed.

Installation (1) Install new "0" ring on the "EPR" Valve. (2) Lubricate "0" ring with refrigerant oil and install -EPR"- Valve in the compressor with Tool C-3822 while rotating the valve counterclockwise. (3) Install compressor suction screen in the "EPR" Valve suction line fitting. (4) Install suction line fitting gasket, spring, fitting. and tighten the attaching bolts to 8 to 14 foot-pounds. COMPRESSOR Removal (1) Discharge the system. (Refer to -Discharging the System.") (2) Measure and record the refrigerant oil level so that the oil level of a replacement or repaired compressor can be adjusted to the exact level in the compressor removed from the vehicle. See "Oil Level." (3) Disconnect suction line from suction muffler and the discharge line from the muffler fitting. CAUTION: Plug or cap all the lines as soon as they are disconnected to keep the moisture out of the system. (4) Disconnect the magnetic clutch-to-control-unit wire. (5) Loosen and remove compressor pulley belts. (6) Remove the compressor-to-bracket attaching bolts, and remove compressor.

Installation ill Install the compressor to the bracket, and tighten the attaching bolts. (2( Install compressor pulley belts. (3) Connect magnetic dutch-to-control-unit wire. (4i Remove the caps or plugs and connect the suction line to the suction muffler and connect discharge line to the muffler fitting. CAUTION: When replacing the compressor assembly, the crankshaft should be rotated by hand at least two complete revolutions to clear oil accumulation from the compressor head before the clutch is energized to avoid damaging the compressor reed valves. IMPORTANT: After the compressor is installed on the engine, the oil level must be adjusted to at least 6 ounces and not more than 8 ounces. (Fig. 7).

Oil Level When a new compressor is installed at the factory. the compressor contains 10 to 11 ounces of a special wax-free refrigerant oil. While the air conditioning system is in operation. the oil is carried through the entire system by the refrigerant. Some of this oil will be trapped and retained in various parts of the system. Consequently, once the system has been in operation, the amount of oil left in the compressor will always be less than the original charge of 10 to 11 ounces. The compressor oil level should be checked as a matter of routine, whenever the refrigerant has been released from the system.

(1) Operate the system for 15 minutes at 1000 engine rpm. This engine setting will provide a compressor speed of approximately 1200 rpm. (2) Open car windows and keep engine hood raised. (3) Press the A/C button and turn blower switch to high. On completion of the above operations, shut the air conditioning off, without changing any of the described settings. After the system has been bled down, wait ten minutes for refrigerant to boil off and then measure the oil in the compressor by inserting a (lipstick (made up as shown in Figure 7) through the crankcase oil filler hole. Measure the height on the dipstick and determine the amount of oil in the unit by referring to the following chart: Dipstick Reading Engine

Fig. 6—Removing the EPR Valve

318, 383 & 440 Compressor Set Vertically on Bench

Inches @ 6 ounces Minimum

Inches @ 8 ounces Maximum

1-5/8"

2-3/8"

1-518"

2-3/8"


AIR CONDITIONING 24-25

the valves. If valves are broken and the damage ex5/76'1 tends to cylinder bores, examine bores to see if they can be repaired by removing light scoring, sniffing or scratches with a crocus cloth. After conditioning cyl2 1/8' BRAZEI inder bores, clean surfaces of cylinder block, valve -3/16' TO plate and head thoroughly with mineral spirits. ft0D DIPSTICK FOR USE IN COMPRESSOR CRANKCASE Use care to remove all shreds of old gasket from plate, block and head surfaces. Clean attaching stud holes in the block. If valve plate or cylinder head is COMPRESSOR CRANKSHAFT CRANKCASE damaged, replace, using a complete compressor valve OIL FILLER plate replacement package. PL G 1/8•-27 BRASS PIPE FITTING WITH THREADS 3/16' ROD REMOVED

CAUTION: Do not touch or pry the reed valves.

installation

VIEW OF COMPRESSOR FROM FRONT OF CAR

NU6

Fig. 7—Compressor Dipstick Chart Dipstick reading should be not more than eight ounces.

at

least six ounces and

If the sump contains less than six ounces of oil. add fresh clean refrigerant oil to bring the level to the minimum shown in the table. Remove any oil in excess of eight ounces.

CYLINDER HEAD AND VALVE PLATE ASSEMBLY Removal (1) Remove the cylinder head bolts, head and valve plate assembly. If plate does not separate from head. tap the removing lip on the valve plate lightly with a plastic hammer (Fig. 8). Do not pry apart. Inspection After removal of head, plate and gaskets, examine

(1) The valve plate and the cylinder head must be assembled with the reed valve assembled as shown. (Fig. 9). (2) Using the pilot studs as a guide, install the valve plate gasket, valve plate, cylinder head gasket and cylinder head. (Fig. 10) (3) Install the attaching bolts. Tighten each bolt alternately and evenly 18 to 24 foot-pounds (name plate bolts) and 20 to 26 foot-pounds on the remaining bolts. PISTON AND CONNECTING ROD Removal (1) Drain oil from compressor. (2) Remove sump attaching bolts. 13) Separate the sump from the case by tapping with a plastic hammer being careful not to distort the oil pressure relief spring. (4) Remove oil relief spring and (rubber) ball from crankcase. (5) Remove cylinder heads and valve plates. Before removing the pistons, rods or rod caps, mark REED VALVE ASSEMBLY

Fig. 8—Valve Plate and Head Removing Lip

Fig. 9—Valve Plate—Installed Position


24-26 AIR CONDITIONING VALVE PLATE GASKET VALVE PLATE ASSEMBLY CYLINDER HEAD GASKET

TOOL (P1101" STUDS)

(7) Refill with new refrigerant oil after the compressor is installed on vehicle. Do not re-use the oil that was previously drained. CRANKSHAFT BEARING HOUSING AND GAS SEAL

CYLINDER HEAD NB 95

Fig. 10—Installing the Valve Plate and the Cylinder Head

all parts to insure reassembly in the original position. (6) Remove rod caps; remove piston and rod assembly from cylinder. Inspection Inspect piston and rings for score marks. Inspect rod bearing for pits and for chipping. Replace parts if damaged. installation (I) Remove bearing cap and install piston in bore. Use pisum ring compressor to prevent ring damage. (2) Install bearing caps, and tighten screws 50 to 60 inch-pounds. Be sure each cap is installed in its original position. (3) Install valve plates and cylinder heads. (4) Turn compressor upside down. Install pilot studs, gasket, oil pressure relief ball and spring. (5) Install the sump over pilot studs (Fig. 11), making sure the oil pressure relief spring depresses uniformly as the sump is lowered on the case. (6) Tighten sump bolts finger tight to prevent spring micalignment, then tighten 14 to 20 footpounds_

Replacement (System Discharged) The gas seal may be replaced with the compressor installed in the vehicle or with the compressor removed and placed on a workbench. Special care should be taken when installing the new seal in a compressor mounted on the engine, that the carbon ring does not fall out of its housing. Adequate lubrication of the rotating seal assembly prior to installation on the compressor shaft, will prevent the carbon ring from falling out of place. lithe compressor has been removed- from the vehicle, it should be placed on its back, to facilitate seal replacement. The crankshaft gas seal replacement package consists of the crankshaft gas seal assembly and crankshaft bearing housing seal scat plate. Two types of crankshaft seals are supplied for service (Fig. 131. If the replacement package contains the cartridgetype seal, follow the entire installation procedure given below. If the replacement package contains the unitized type seals, follow the appropriate sections only. Removal (1) Loosen belt, remove clutch, coil and drive key. (2) Remove cranhahoft bearing houaing acid bolta. (3) Remove bearing housing from crankshaft, using two screwdrivers inserted in the slots provided to pry the housing from the case (Fig. 12). (4) Remove bearing housing oil seal. (5) Remove gas seal seat plate from the bearing housing. This is part of the gas seal replacement package and must be replaced when the gas seal assembly is replaced. (6) Clean the front bearing housing thoroughly. Installation (1) Immerse the new seal seat in clean refrigerant

PILOT STUDS 17--C.590

SUMP RELIEF SPRING

a At.

Fig. 11—Installing the

Compressor Sump

NU 1

Fig. 12—Removing the Crankshaft Bearing Housing


AIR CONDITIONING

24-27

and loosen the bearing housing screws until shaft loosens up. Again, slowly tighten screws. 112) Check the oil level which should meet the requirements of the oil check. (13) Install clutch package on compressor, applying 20 ft.-lbs. torque to tighten the clutch center mounting bolt. Install and tighten belts. Evacuate system and recharge.

CARBON SEAL

CRANKSHAFT AND BALL BEARINGS Removal

(1) Remove cylinder heads and valve plates. (2) Remove pistons and connecting rods. (31 Remove crankshaft bearing housing and gas seal. The pistons and rods must be completely removed

TANGS CARTRIDGE TYPE

before the crankshaft removal.

UNITIZED TYPE NW,

Fig. 13—Gas Seal

Identification

oil and install in the bearing housing with the smooth (micro finish) side up. Use a sleeve with the minimum inside diameter of 1-3/8" to avoid damaging the micro finish sealing surface of the face plate. Tap the sleeve lightly until the seal seat is fully seated in the housing. (2) Before installing the cartridge-type assembly, inspect the assembly to make sure that the tangs of the carbon seal are indexed in the slots of the mating, steel part (Fig. 131. (3) Immerse the seal assembly in clean refrigerant oil, carbon ring up. (4) Hold the seal assembly firmly at the outside edge. at the same time preventing the ring from coming out of position. Do not touch the sealing face of the carbon seal. (5) When the seal bottoms against the crankshaft bearing, inspect the indexing tangs of the carbon ring again. (Si Oil the bearing housing oil seal and install. (Make certain that the seal is evenly stretched into position.) (71 Wipe the seal seat clean with a lint-free cloth, and re-oil with refrigerant oil (8) Install the bearing housing. taking care to ensure that the "nose" of the crankshaft does not touch the seal seat in the bearing housing. (9) Insert 5. 1:4 x 2u screws and pull bearing housing squarely into position. This must be done 1/2 turn at a time per screw so that the ball bearing outer race will not be jammed by the bearing housing. (10) Replace drive key in shaft. (11) Assemble clutch to compressor and turn crankshaft by turning clutch armature. No more than 10 inch-pounds of torque should be required to turn crankshaft. If shaft is tight, remove clutch

141 Remove crankshaft and thrust washer from crankcase. (5) To remove the crankshaft ball bearing, use a small arbor press. Make sure bearing is properly supported before pressing bearing from shaft. Inspection

(lean and inspect all the parts. Replace questionable parts as required. Lithe crankshaft ball bearing is in good condition arid clean, protect it against entry of dirt and re-use it. If bearing is serviceable but dirty, or there is evidence of dirt, clean it carefully with mineral spirits and shake dry. Saturate bearing with clean refrigerant oil and assemble immediately. If a new bearing is to be installed, leave it wrapped in its protective package until ready for installing. Do not wash a new bearing assembly before installation. Do not spin bearing with air.

Installation

(1) Press crankshaft ball bearing on crankshaft using a sleeve which bears on inner race only. (2) Install crankshaft, making sure the thrust washer is on the rear bearing journal before placing

Fig. 14—Measuring Crankshaft Axial Movement


24-28 AIR CONDITIONING crankshaft in the crankcase. (3) Rotate crankshaft to engage the oil pump shaft in the crankshaft slot. (4) Install new gas seal and crankshaft bearing housing. Use a suitable tool, as shown in Fig. 14 to assure free axial movement. (5) Install pistons and connecting rods. (6) After pistons and connecting rods are installed, turn the crankshaft to check freeness. Shaft should turn without binding. (7) Install oil sump, valve plates and cylinder heads, using new gaskets.

OIL PUMP Removal To remove oil pump, it is not necessary to drain the

refrigerant oil from the crankcase. (1) Remove oil pump cover plate and oil seal. (2) Remove drive shaft and rotors.

Installation (1) Install oil pump drive shaft by rotating the shaft until tang end engages in the crankshaft slot. (2) Install inner rotor on the drive shaft, engaging the drive. (3) Install outer rotor, and rotate it until it will slide forward over inner rotor cams. Turn compressor crankshaft with the oil pump in this position to determine that rotors do not bind. (4) Install oil pump cover seal and plate. (5) Tighten bolts 8 to 14 foot-pounds.

EVAPORATOR HEATER ASSEMBLY INDEX Blower Motor Removal and Installation Control Cable Adjustment Electrical Controls and Circuits General Information Evaporator Removal and Installation

Page 40 35 32 28 37-39

Heater Core Removal and Installation Inspection and Test Procedures Operation of all Controls Vacuum Controls and Circuits

Page 35-36 33 33 28

GENERAL INFORMATION The air conditioner is a combination air conditioning and heating unit which is installed inside the passenger compartment behind the instrument panel. The controls and cooling air outlets are integral with the instrument panel. This system functions on the reheat principle. In the reheat air conditioner unit all the air entering the system passes through both the evaporator coil and the heater core, regardless of whether the heater, defroster or air conditioning is in use. All output air temperatures are controlled by a single slide lever in the instrument panel, which operates the heater water flow control valve through a bowden cable. Airflow is controlled and directed through the unit by a series of doors, operated by vacuum actuators and mechanical linkages. The blower is turned on by any of four push buttons.

Temperature Control Slide Lever—Maintains any desired temperature by sliding the lever right or left and pressing the A/C, Heat or defrost button. No temperature control is available in the Off or MaxA/C position. See "Vacuum Controls and Circuits." Fan Switch—Permits selection of low, medium or high blower speeds—used when operating either the heater or air conditioner. Air Direction Vanes—One at each end, and two in the center of the instrument panel. These are adjusted manually to direct cool air to suit the requirements of the driver and passengers. The center outlets can be rotated to direct air up or down; adjustable vanes direct air to either side. The outlets at each end of the instrument panel are also adjustable or can be shut-off by a damper operated by a turn knob.

Controls

VACUUM CONTROLS AND CIRCUITS

Controls for the system consist of five push-buttons, a temperature control slide lever and a threeposition toggle-type fan blower switch. Push Buttons—Control the source and route of circulating air. "Off" (turns off system); "Max-A/C" (maximum air conditioning); "A/C" fresh air-air conditioning); "Heat" (for heater use only); "Def" (windshield defroster).

When testing or adjusting the doors in the distribution system, it is necessary to know the correct position of each door for each push-button position. It is also necessary to know which vacuum hoses are activated for each push-button position. In the following illustrations air flow is indicated as the vacuum actuator hoses are activated for each push-


AIR CONDITIONING 24-29 TO PUSH BUTTON ASSEMBLY

DEFROSTER OUTLETS SUPPORT BRACKET

FRESH AIR INTAKE

HEATER CORE TUBES

BLOWER MOTOR RESISTOR BLOCK

A/C OUTLETS

WATER VALVE SENSING UNIT

AIR DOOR FRESH RECIRCULATING

APPEARANCE SHIELD

WATER VALVE SHUT-OFF ACTUATOR

WATER VALVE ASSEMBLY HEATER CORE TUBES

EVAPORATOR CORE TUBES

BLOWER MOTOR

MOUNTING STUDS A/C DRAIN TUBE

Fig. 1—Air Conditioning—Heater Assembly

PY784


24-30 AIR CONDITIONING DEFROSTER OUTLETS

RIGHT SPOT COOLER RETAINING CLIP CENTER OUTLETS A/C DUCT LEFT SPOT COOLER

RETAINING CLIP VIEW IN DIRECTION OF ARROW Y

SPOT COOLER SHUT-OFF DISTRIBUTION DUCT DISTRIBUTOR HOUSING VIEW IN DIRECTION OF ARROW X

FLOOR AIR OUTLETS VIEW IN DIRECTION OF ARROW Z PY785

Fig. 2—Air Conditioner Ducts

button position (See Fig. 3) and "Push Button Control Chart."

OFF The OFF button turns the system off. Vacuum application and door positions are the same as MAX A/C position.

MAX A/C The MAX A/C button turns on the blower motor and engages the compressor clutch. The vacuum application is at the back side of all four actuators. The Water valve heater and defroster doors are closed and the air-conditioning door is opened. The fresh air-recirculating door closes off the fresh-air inlet and opens the recirculating inlet. Note: When the water valve actuator is in the closed position it overrides the temperature control lever.

A/C When the car has been cooled to the desired temperature and the A/C button is pushed, the vacuum application at the fresh air-recirculating door actuator is transferred to the rod side. This moves the door

away from the fresh-air inlet, closes the recirculating inlet, and opens the water valve actuator, allowing the water valve to be controlled by the temperature control lever. All other vacuum applications and door positions are the same as for the MAX A/C button.

HEAT Pressing the HEAT button starts the blower, and applies vacuum to the rod side of the air conditioning door actuator and the fresh air recirculating door actuator and to the back side of the defroster door actuator. The fresh air-recirculating door pivots away from the fresh-air inlet and closes off the recirculating inlet, supplying fresh air to the blower, which forces it through the evaporator coils and the heater core. Since the compressor clutch is not engaged, the evaporator has no effect on the airflow temperature. The amount of heat added to the air by the heater core depends on the setting of the water flow control valve. The air-conditioning door actuator forces the door closed. A coil spring, attached to the air-conditioning door linkage, pulls up on the heater door arm, opening the passage to the heater outlets in the bottom of the housing. At the same time a rod between the air conditioning door bell crank and the defroster door


AIR CONDITIONING 24-31 GREEN VACUUM RESERVOIR

SOLID LINE INDICATES ENGINE VACUUM

SOLID LINE INDICATES ENGINE VACUUM VACUUM RESERVOIR

BLEED WIRE

GREEN

BLEED WIRE

ACTUATOR BLACK DEFROSTER

RED

HEAT

RESTRICTORS

WHITE

I PUSH BUTTON CONTROL VACUUM SWITCH HEAT

1 ACTUI ATOR

RED

ACTUATOR

■ •■!ii

DEFROSTER-4--P- HEAT

RESTRICTORS I PUSH 5 -NI BUTTON CONTROL VACUUM SWITCH WATER VALVE ACTUATOR

liPr a

WHITE

WATER VALVE ACTUATOR I tiLir 0CLOSED OPEN WHITE TIME -149P1 DELAY WHITE RELAY RED

CLOSED

OPEN TIME IL* DELAY RELAY

HEAT

1 ACTUATOR

4

ACTUATOR

ACTUATOR

A/C

A/C

RECIRCULATING

FRESH AIR

RECIRCULATING -4-4- FRESH AIR

OFF, MAX A/C

FRESH A/C

SOLID LINE INDICATES ENGINE VACUUM VACUUM RESERVOIR

SOLID LINE INDICATES ENGINE VACUUM VACUUM RESERVOIR

BLEED WIRE

BLEED WIRE ACTUATOR

ACTUATOR DEFROSTER

DEFROSTER -4-*- HEAT

HEAT

RESTRICTORS PUSH BUTTON CONTROL VACUUM SWITCH

I

tiiii WATER VALVE ACTUATOR 0OPEN TIME a etstOP DELAY RELAY

CLOSED

HEAT

e

ACTUATOR

-

RESTRICTORS [ PUSH BUTTON CONTROL VACUUM SWITCH

I

Mr S111 WATER VALVE ACTUATOR CLOSED

HEAT

reo art..)

ACTUATOR

ACTUATOR A/C

RECIRCULATING-1.--r FRESH AIR

OPEN TIME DELAY RELAY

ACTUATOR A/C

RECIRCULATING -4-0- FRESH AIR HEAT

DEFROST

PY664

Fig. 3—Vacuum Circuits A/C and Heater

pivot bell crank forces the defroster doors open slightly, overcoming the defroster actuator, to provide an air bleed to the windshield defrosters. This defroster bleed amounts to about 30 percent of the total airflow.

DEFROST When the heater section is operating on defrost, there is a 30 percent bleed through the heater outlets. The vacuum applications at the air-conditioning door actuator and the fresh air-recirculating door actuator are on the rod side, the same as for heater

operation. The application at the defroster door actuator is transferred from the back to the rod side, opening the defroster doors all the way. As the defroster actuator bell crank is pushed down by the rod, it carries the heater door arm with it, against the coil spring force, toward the closed position. The heater door stops short of the fully closed position, providing the 30 percent bleed to the heater outlets.

AIR-CONDITIONING OPERATION The air-conditioning refrigeration system operates at full capacity constantly when either the "MAX.-


24-32 AIR CONDITIONING A/C" or "A/C" button is pushed. (Full capacity meaning maximum refrigeration according to the existing ambient temperature and humidity.) The temperature of the air at the outlets is controlled by reheating the airflow after it has passed through the evaporator coils.

-0" RINGS

WATER BY-PASS VALVE

- -

REHEAT COOLING CONTROL The heater core inlet lines divides into two branches to feed the core. (Fig. 4). One branch feeds 30 percent of the tubes, around the perimeter of the core. The other branch feeds the 70 percent in the center of the core. The center feed is equipped with a valve, operated by the air-conditioning door, to shut off the flow to the center tubes during air-conditioner operation. The outer 30 percent reheats the refrigerated air to the selected temperature. The amount of reheating is determined by the slide lever of the water flow valve. The temperature can be controlled very closely, and the maximum refrigeration removes excess moisture from the air on extremely humid days. CONDENSATION DRAIN TUBES The system has two drain tubes running from the evaporator drain pan into the engine compartment. CM-16LGN-

AIR CONDITIONER AND HEATER BLOWER MOTOR RESISTOR

LINKAGE

NK1399

Fig. 4—Heater Core and By-pan Valve Assembly

These tubes must be kept open to avoid an accumulation of water, which would be blown out of the heater or air-conditioning outlets. Inspect tubes at regular intervals to make certain they are free of any foreign matter. ELECTRICAL CONTROLS AND CIRCUITS There are two switches, a push button switch (air conditioner and heater vacuum switch), and a fan switch (air conditioner and heater blower switch). The power feed circuit is shown in (Fig. 5). A 20 ampere fuse in the fuse block protects the circuit. The compressor clutch circuit is energized when

LOW

16LGN

BATT

I AIR CONDITIONER B AND HEATER BLOWER SWITCH

14H

148K

SA 14DGN

14DGN

C7A-141* 1/0 48K 14BR

C.58-14DGN

AIR CONDITIONER AND HEATER BLOWER MOTOR

AIR CONDITIONER AND HEATER LAMP AND SOCKET

CT 14T O 0

C4 148R

• 0 0 0

CONNECTOR al-C1 48K" TIME DELAY RELAY

C4A 168R

TO INSTRUMENT PANEL WIRING

--18LON

C2-18D8L

18DGN

C2A 18081 C4A 168R .4a.12

E2A-180

-C1A-18LGN

.1171.4

134C-E2C 180

Q4-14131(

LOW PRESSURE SWITCH AIR CONDITIONER COMPRESSOR

717,1 1 tc l kor

140END WIRING SPLICE •"-+— INSULATORS VIEWED PROM TERMtNAl SIDE

FUSE BLOCK

Fig. 5—Electrical Control Circuit (Coronet and Charger)

E

COLOR CODE BK BLACK BR BROWN DBL DARK BLUE DGN DARK GREEN GY GRAY LBL LIGHT BLUE LGN LIGHT GREEN 0 ORANGE P PINK RED R TAN T V VIOLET W WHITE Y YELLOW * WITH TRACER NR281A


AIR CONDITIONING 24-33 either the "Max.-A/C" (maximum air conditioning) or the "A/C," (fresh air-air conditioning) push buttons are depressed. The "OFF' button turns off the system. Blower Motor (Fan Switch) The power feed line from the push-button switch to the blower switch is energized only when the ignition is on and any push button, other than "Off," is depressed. The switch is controlled by moving the control lever from left (low) to right (high). Time Delay Relay A vacuum actuated time delay relay is located on the bottom of the fresh/recirculating air door housing. The purpose of this relay is to reduce the interior windshield condensation to an acceptable level. When the ambient temperature is above 25 degrees, and the heat or defrost buttons are pressed, the

air conditioner will go on for a period of 1 to 10 minutes. If the system is shut down for less than ten minutes no delay will occur upon restarting. The relay will reset automatically after ten minutes shut down. Restrictors The time delay system includes, in addition to the time delay relay, a plastic restriction in each of the two vacuum hoses leading to the heater door actuator. These restrictors provide some delay in the opening of the defroster door after the "HEAT" or "DEFROST" button is depressed. This delay gives the blower time to expel condensation from the evaporator housing through the heater outlets before it can be blown up onto the windshield. Should it become necessary to replace either of the vacuum hoses leading to the heater door actuators, the correct restrictor should be used.

INSPECTION AND TEST PROCEDURES Satisfactory performance of the combined airconditioning and heating system is dependent upon proper operation and adjustment of all operating controls, as well as proper functioning of all refrigeration system units. The inspections, tests and adjustments should be used to locate the cause of a malfunction. The tests in this manual have been arranged in a logical sequence that has proved to be the surest and shortest route to accurate diagnosis. It is recommended that they be followed and performed in the order in which they are presented. OPERATION OF ALL CONTROLS Operating controls must be tested in the following sequence. (1) Inspect and adjust compressor drive belt. (2) Open vehicle windows. (3) Move temperature control slide lever to "Off" position. (4) Start engine and adjust engine speed to 1600 rpm for 6 cylinder engines and 1300 rpm for 8 cylinder engines. Use a reliable tachometer. (5) Push the Max. A/C button in. (6) Fresh-recirculating door should be closed to fresh air. (7) Test the blower operation at all three speed positions. If the blower does not operate correctly, refer to "Electrical Controls and Circuits." Leave the blower switch in the "Low" position. (8) The compressor clutch should be engaged, the compressor operating, and the air conditioning system in operation. If the clutch does not engage,

test the circuit as outlined under "Electrical Controls and Circuits." Push Button Operation Reduce the engine speed to normal idle. With the engine operating at idle speed, the vacuum will be high and the vacuum actuators should operate quickly. If the actuator operation is slow, check the source hose connection at the engine manifold. Push each button to test the over-all operation of the electrical and vacuum controls. The "Push Button Control Chart" summarizes the actions that should take place when each button is pushed. See "Chart." Also refer to "Vacuum Controls and Circuits." If all the controls operate in the proper sequence but the action of the dampers and doors is slow or incomplete, inspect for mechanical misalignment, binding or improper linkage adjustment. Water Valve Test (Figs. 6 and 7) The temperature control water valve is mounted from the engine compartment side of the dash panel. The sensing unit is located at the lower right-hand corner of the air conditioning housing. Remove the radiator cap to minimize pressure in the car's cooling system. Move the temperature control slide lever on the instrument panel to the extreme "Warm" position and then back to the "Off" position. Push the "Max A/C" button in, and with the blow-


24-34 AIR CONDITIONING

-

TURNBUCKLE CABLE ADJUSTER (INITIAL INSTALLATION ONLY) CABLE FLUSH WITH BRACKET

VIEW IN CIRCLE A

A/C VACUUM HOSE CONNECTOR

NU147

Fig. 6—Water Temperature Control Cable Adjustment

er in the "Low" position, run the air conditioning system for five minutes, then test the water valve by momentarily disconnecting the heater outlet hose at the upper side of the heater.

CONTROL CABLE (Turnbuckle) (Figs. 6 and 7) A turnbuckle has been incorporated in the air con-

DASH PANEL N.41/4

TEMPERATURE CONTROL CABLE

SEAL

TEMPERATURE CONTROL VALVE

SENSING TUBE

VIEW IN DIRECTION OF ARROW "A"

TEMPERATURE CONTROL VALVE

WATER VALVE SHUT-OFF ACTUATOR

SENSING UNIT NP703A

Fig. 7—Water Temperature Control Cable Adjustment at Dash Panel


IR CONDITIONING 24-35 ditioning temperature control cable. This turnbuckle is used to adjust the length of the cable housing with. out removing it from the instrument panel control or the water valve

AIR CONDITIONING ACTUATOR

Adjustment

If the water valve does not fully open or close, the control cable housing may be shortened or lengthened by rotating the turnbuckle (remove glove box to adjust). Replacement cable will be of the standard type. (See control cable adjustment). POINT E

Control Cable Adjustment To adjust the temperature control cable, place the water valve in the full open position and position the end of the control cable housing against the bracket stop. Install eyelet on lever and install the retaining clip. When adjusting the temperature control valve cable on the instrument panel, place the temperature control lever in the extreme right-hand position Warm). Place the water valve in the open position, attach the temperature control cable assembly to the control arm. and clamp the cable housing to the control bracket with the retaining clip. If the temperature control valve does not close completely, reposition the control cable housing in the retaining clip so that the valve does close completely. If the valve cannot be closed completely by adjustment, replace the water valve and retest the adjustment. Linkage Adjustment

With the air conditioner door in the full open posi.

ADJUSTMENT SCREW LEVER C

POINT D

LEVER A

N103928

Fig. 8—Linkage Nomenclature

tion and vacuum applied to the top of the air conditioner and heater door vacuum actuators, raise the heater door vacuum actuator mounting bracket until the levers A, B. and C touch: then, tighten the bracket mounting nuts (Fig. 8). Apply vacuum to shaft side of air conditioner door vacuum actuator and with vacuum applied to top side of heater door vacuum actuator, apply pressure at points I) and E and tighten adjustment screw.

HEATER CORE Removal The heater core is located behind a separate cover attached to the evaporator case forward of the instrument panel (Fig. 9 and 10).

(ii Disconnect cable at battery, drain cooling system, remove air cleaner, and disconnect heater hoses. (2) Remove distribution housing (Fig. 9) glove box

CORONET-CHARGER PUSH BUTTON CONTROL CHART Button

Off

Max. A/C

A/C

Heat

Defrost

Closed

Closed

Open

Open

Open

Recirculating Door

Open

Open

Closed

Closed

Closed

Air Conditioning Door

Open

Open

Open

Closed

Closed

Water Valve

Closed

Closed

Open

Open

Heater Door

Closed

Closed

Closed

Open

Open Closed with Air-Bleed

Closed Hi.-Med. Low

Closed with Air-Bleed Hi.-Med. Low

Open Hi.-Med. Low

On

*Off

*Off

Fresh Air Door

Defroster Doors Blower Speed Compressor Clutch

Closed Off Off

Closed Hi..Med. Low On

*Compressor will be ON for a period of 2 to 10 minutes when the ambient temperature is above 250.


24-36 AIR CONDITIONING RESISTOR BLOCK

DEFROSTER OUTLETS

FRESH AIR RECIRCULATING DOOR HOUSING DISTRIBUTION HOUSING

FLOOR SPOT COOLERS

TEMPERATURE CONTROL VALVE CAPILLARY WELL

NKI 395 A MOUNTING SCREW LOCATION

Fig. 9—Heater and Evaporator—Passenger Side

and heater core inlet-outlet tube assembly (Fig. 11). (3) Remove fresh air-recirculating air inlet hose. (4) Disconnect floor air actuator rod from linkage. (5) Disconnect actuator vacuum hoses and remove fresh air-recirculating door housing assembly (Fig. 12). (6) Remove defroster hoses, disconnect electrical connections from resistor block. (7) Remove the two screws attaching the water bypass valve to heater cover and remove the operating link attaching screw (Fig. 13). EVAPORATOR

ATTACHING SCREWS

NK1397

Fig. 12—Fresh Air-Recirculating Door Housing Removal and installation

(8) Disconnect air conditioning door actuator from mounting bracket and remove the two support braces. (9) Remove five retainer spring clips and ten screws attaching cover to the case. (10) To remove the cover and heater core it will be necessary to pull lower edge rearward, then lift assembly 3/8 inch to unlock the cover lip from the case. Carefully lower the assembly and out to the right side. Installation

Install the water by-pass valve with linkage to the

heater core (if removed). Use new "0" rings on the inlet and outlet tubes (Fig. 14).

CASE MOUNTING STUDS

CASE MOUNTING STUDS

NKI407A

Fig. 10—Heater and Evaporator -Engine Side A/C ACTUATOR

(1) Position heater core on evaporator case. (2) To install the cover it is necessary to hook the cover lip on the evaporator case and roll it down into position. Secure the cover with five retainer spring clips on top and ten screws on the two sides and bottom. (3) Attach water by-pass valve to heater cover and the operating link to air conditioning door. (4) Install air conditioning door actuator with the vacuum hoses (hose with red stripe to the rod side), and the two support braces. AIR CONDITIONING

WATER BY-PASS

DOOJL„.1111amine VALVE MOUNTING SCREW

LINK ATTACHING SCREW

HEATER DOOR

ACTUATOR

NKI396

Fig. 11—Heater Core Water Tube Assembly— Removal and Installation

NK 1398 Fig. 13—Water By-pass Valve Link Attaching Strew


IR CONDITIONING 24-37 WATER BY-PASS VALVE

O RINGS

LINKAGE

Ngt399

Fig. 14—Heater Core and By-pass Volvo Assembly

(5) Install electrical connections to resistor block. (6) Install the vacuum hoses to floor air actuator and the fresh air-recirculating actuator (hose with red stripe to the rod side) and install the fresh air-recirculating door housing. Connect floor air actuator rod to the linkage with the retainer clip. (7) Install fresh air-recirculating air inlet hose. (8) Install the heater core inlet-outlet tube assembly, a drop or two of clean water on the "0" rings will facilitate installation. (9) Install temperature control valve capillary tube in heater core cover. (10) With the air conditioning door open approximately one inch. install the distribution housing.

(11) Install the flexible hoses to the instrument panel outlets. (12) Install glove box assembly. (13) Connect the heater hoses (Figs. 15. 16 and 17) and fill cooling system. For summer operation as well as winter operation, be sure the system is protected with the proper type and amount of antifreeze. (14) Install air cleaner and connect battery cable. (15) Start engine, operate until normal engine operating temperature is obtained and test operation of the heater assembly. Evaporator (Figs. 18 and

The system must be completely discharged before opening any of the refrigerant lines.

To remove the evaporator and case assembly, remove the heater and evaporator as an assembly as follows: (1) Disconnect cable at battery negative post, drain cooling system, remove air cleaner, disconnect heater hoses (Figs. 15, 16 and 17), and remove blower motor air hose. (2) Disconnect suction line and expansion valve from evaporator. Use two wrenches to loosen each of these connections.

INSERT TUBE FROM EXPANSION VALVE uNTiL COMPRESSOR SUCTION END BOTTOMS OUT IN THERMAL WELL AND THEN MUFFLER ASStmaLy -----, PUSH RUBBER SEAL OVER THE PROJECTING END OF WELL TO COMPLETE SEAL -............ HIGH PRESSURE 'EXPANSION VALVE ASSEMBLY

RELIEF VALVE

19)

Removal

DISCHARGE HOSE AND TUBE ASSEMBLY --,.._ ' -..

WATER VALVE ASSEMBLY WATER VALVE TO HEATER CORE HOSE

LIQUID HOSE TO' EXPANSION VALVE LOW PRESSURE COT Out, SWITCH

WEND/ DRIER AND SIGHT GLASS ASSEMBLY

DISCHARGE MUFFLER AND TUBE ASSEMBLY

SUCTION HOSE AND TUBE ASSEMBLY LIQUID TUBE ASSEMBLY HEATER CORE TO PUMP HOSE ENGINE TO WATER VALVE HOSE

'CAPILLARY MUST ROUTE WITHIN 1.00 ABOVE OR BELOW SUCTION TUBE AND MUST NOT ROUTE FURTHER THAN 1-50 TOWARDS LEFT OF CAR FROM SUCTION TUBE

CONDENSER ASSEMBLY

EXTERNAL EOUAUZER MUST NOT ROUTE CLOSER THEN 1' FROM ADJOINING ENGINE COMPONENTS Fig. 1S — Air Conditioning and Heater Plumbing - 383 and 440 Cu. In. Engine

NP677B


24-38 AIR CONDITIONING INSERT TUBE FROM EXPANSION VALVE UNTIL END BOTTOMS OUT IN THERMAL WELL AND THEN PUSH RUBBER SEAL OVER THE PROJECTING END OF WELL TO COMPLETE SEAL.

ENGINE TO WATER VALVE HOSE HEATER CORE TO WATER PUMP HOSE SUCTION MUFFLER ASSEMBLY

*EXPANSION VALVE ASSEMBLY WATER VALVE ASSEMBLY WATER VALVE TO HEATER CORE HOSE LIQUID HOSE AND TUBE LOW PRESSURE CUT OUT SWITCH RECEIVER DRIER ASSEMBLY

----CT'

HIGH PRESSURE RELIEF VALVE SUCTION HOSE AND TUBE ASSEMBLY

LIQUID TUBE ASSEMBLY DISCHARGE MUFFLER AND TUBE ASSEMBLY DISCHARGE HOSE AND TUBE ASSEMBLY

*CAPILLARY MUST ROUTE WITHIN 1.00 ABOVE OR BELOW SUCTION TUBE AND MUST NOT ROUTE FURTHER THAN 1.50 TOWARDS LEFT OF CAR FROM SUCTION TUBE.

CONDENSER ASSEMBLY

EXTERNAL EQUALIZER MUST NOT ROUTE CLOSER THEN 1" FROM ADJOINING ENGINE COMPONENTS

NP678A

Fig. I6—Air Conditioning and Heater Plumbing-3 IS INSERT TUBE FROM EXPANSION VALVE UNTIL END BOTTOMS OUT IN THERMAL WELL AND THEN PUSH RUBBER SEAL OVER THE PROJECTING END OF WELL TO COMPLETE SEAL *EXPANSION VALVE ASSEMBLY

Cu. In. Engine

SUCTION MUFFLER ASSEMBLY DISCHARGE HOSE AND TUBE ASSEMBLY ENGINE TO WATER VALVE HOSE

WATER VALVE TO HEATER CORE HEATER CORE TO PUMP HOSE ASSEMBLY LIQUID HOSE TO EXPANSION VALVE LOW PRESSURE CUT OUT SWITCH RECEIVER DRIER AND SIGHT GLASS ASSEMBLY

DISCHARGE MUFFLER AND TUBE ASSEMBLY

HIGH PRESSURE RELIEF VALVE SUCTION HOSE AND TUBE ASSEMBLY

CONDENSER ASSEMBLY

LIQUID TUBE ASSEMBLY

*CAPILLARY MUST ROUTE WITHIN 1.00 ABOVE OR BELOW SUCTION TUBE AND MUST NOT ROUTE FURTHER THAN 1.50 TOWARDS LEFT OF CAR FROM SUCTION TUBE EXTERNAL EQUALIZER MUST NOT ROUTE CLOSER THEN 1" FROM ADJOINING ENGINE COMPONENTS

Fig. 17—Air Conditioning and Heater Plumbing-223

Cu. In. Engine

NP679A


AIR CONDITIONING 24-39 heater unit from the evaporator unit. (15) Remove the six evaporator attaching screws and carefully remove the evaporator and drain pan from case (Fig. 18).

DRAIN PAN EVAPORATOR

NK I OA

Fig. 18—Evaporator Removed from Case Cap all refrigerant openings to prevent the en. trance of dirt and moisture.

(3) Remove cooler duct and hoses. (4) Remove distribution housing, defroster hoses and fresh air hose. (5) Remove glove box. (6) Disconnect actuator vacuum hose cluster at control switch and at -Tee" source connector. (7) Disconnect electrical connections at resistor block, blower motor and blower motor ground wire. (8) Remove right hand spot cooler duct and spot cooler (held by two button head spring clips). (9) Remove Ranco valve sensing tube and brace at center of housing. (10) Remove the five mounting stud nuts at the firewall. (11) Pull the unit toward rear of car until all studs are clear of firewall, then move the unit towards the right, tilting the unit down and remove from under the instrument panel and to the work bench for disassembly. (12) Remove the floor air actuator bracket. (13) Remove heater core housing seven attaching screws and the two screws attaching the actuator to the housing to facilitate removing the four stud nuts. (14) Raise heater core housing slightly to release from lip of evaporator housing and separate the

I?

TOP 11/ I 4';1

Fig. 19—Evaporator Drain tube Collar and insulator

Installation ( I) Install the evaporator and drain pan, being careful not to damage the case insulation; tighten the six attaching screws. (2) Position the heater core housing on the evaporator case by hooking the housing lip on the evaporator ease and pull it down into position. Secure the housing with the spring clips and screws on the two sides and bottom. (3) Install the floor actuator and bracket. (4) Install the collars and insulators on the two drain tubes (Fig. 19). (5) Enter the complete heater and evaporator under the instrument panel and position the unit against the firewall, indexing the tubes and mounting studs with corresponding holes in the firewall, then carefully move unit forward until unit is posistioned against the firewall. Install the stud nuts but do not tighten until all nuts have been installed and studs centered in their respective holes. (6) Install blower motor wires and air tube. (7) Use new "0" rings with clean refrigerant oil on all connections, then install the suction line and the expansion valve to the evaporator fittings. Use two wrenches to prevent rotation and twisting of the lines.

(8) Connect the heater hoses, (Figs. 15. 16 and 17). (9) Install the Ftanco valve sensing tube. (10) Install the right hand spot cooler and duct. (11) Install the vacuum hoses to floor actuator and the fresh air-recirculating actuator (hose with red stripe to the rod side). Connect floor air actuator rod to the linkage with the retainer clip. (12) Connect actuator vacuum hose cluster at control switch and vacuum source hose at "Fee" connection. (13) Install cooler duct and distribution housing. (14) Install all flexible hoses to instrument panel outlets. (15) Install glove box assembly. (16) Fill cooling system. For summer operation as well as winter operation, be sure the system is protected with the proper type and amount of antifreeze. (17) Install air cleaner and connect battery cable. After the evaporator and heater assembly is installed in the vehicle, it will be necessary to sweep the system, test for leaks and charge the system with the proper amount of refrigerant. It is recommended that the operation of all controls be tested and an overall performance test be made after the repair or replacement of the evaporator assembly.


24-40 AIR CONDITIONING MOUNI !NG PLATE AT !ACHING SCREWS

BLOWER MOTOR

All service to the blower motor is made from the engine compartment side. Removal (1) Disconnect feed wire at the connector and the ground wire. Remove air tube. (2) Remove the three sheet metal screws located on the outer surface of mounting plate (Fig. 20). (3) Remove mounting plate, blower motor and fan as an assembly.

AIR TUBE

Installation If the blower was removed from the mounting plate, be sure the mounting grommets are installed at the attaching bolts. Be sure the blower wheel is free and does not rub.

(1) Install blower motor assembly to the evaporator case with the air tube opening to the bottom. Secure with the three sheet metal screws.

tJK

!407

Fig. 20—Blower Motor Installed

(2) Install air tube, motor ground wire and connect the feed wire. (3) Test operation of blower.


Turn static files into dynamic content formats.

Create a flipbook
Issuu converts static files into: digital portfolios, online yearbooks, online catalogs, digital photo albums and more. Sign up and create your flipbook.