
16 minute read
TOOL TECH
Whether you’re tackling a small honey-do repair, or taking on a major home-improvement project, having the right tools makes it possible to work on projects you never thought were possible, no matter your skill level.
If you’re ready to tackle your next DIY project, but don’t want to go all in on purchasing multiple tools that you may only use once, renting the tools you need could be your best solution.
When making the choice between tool rental and buying, consider a few factors: storage, budget, and usage. Renting tools allows you to use the specific tool you need, for less money, without having to worry about it gathering dust in your garage or shed.
According to the American Rental Association (ARA), there are hundreds of tools you could rent for a variety of projects. The ARA has detailed the top five tools used by DIY’ers when working in and around their homes—floor sander, paint sprayer, power auger, ground tiller, and pressure washer—and what you need to know to get the most from these popular rental tools.
FLOOR SANDER
If you’ve got solid wood floors, maintaining the finish is a must after years of wear and tear. Did you know that depending on the type of hardwood floors in your home, they can be refinished up to 10 times before a complete replacement is needed? Unless you have a friend or neighbor who owns a floor sander, rental is likely your best option since this equipment is expensive to buy. With a floor sander rental, returning the luster to your hardwood flooring has become a much more accessible project for the average homeowner.
There are two primary types of floor sanders: orbital and drum. Before tackling your refinishing project, it’s important to know the differences between the two sanders to properly complete your job.

Orbital floor sanders are more popular for DIY hardwood refinishing. An orbital floor sander allows you to reach the edges and corners, so in many cases renting an edger is not needed. Orbital floor sanders oscillate to sand the surface, eliminating the need to follow the grain of the wood as you work. If you are looking to remove deeper scratches, you will need to make multiple passes, which does take time.
Be sure to take your time, as rushing can cause errors. Moving too quickly, not waiting for the sander to reach the full speed before lowering it to the floor, or turning it off while it’s on the floor can all result in damage.
Drum floor sanders can make quick work of sanding but can be challenging to use for beginners and present the highest risk of causing damage.
Drum floor sanders require a constant, steady pace, following the grain of the wood. Changing pace or stopping—even for a moment—-can cause gouge marks or valleys. It’s best to practice on a testing surface for anyone new to floor sanding. An edge sander is often rented for the same projects as a drum floor sander to sand the edges around baseboards.
When visiting your local rental store, be sure to consult the rental professionals on which type of sander fits your comfort level and flooring needs. They can also help you with selecting the proper sanding grit and may offer training before you start your project.
PAINT SPRAYER
A fresh coat of paint can dramatically change a space, but not too many homeowners get excited about the thought of buying the rollers and drop cloths for a painting session. Renting a paint sprayer could be the answer to adding an accent wall or giving your kitchen cabinets a
fresh color in less time, and with a professional looking finish.
Paint sprayers take a little practice, but once you’re comfortable, the result is smooth and much less time-consuming than traditional painting. With the time and energy saved using a rented paint sprayer, you can paint additional rooms, closet doors, shutters, patio furniture or anything else that needs a fresh finish or color. Paint sprayers are also an option for staining your deck or fence in less time and with less cleanup than a manual application.

With a variety of paint sprayers on the market, it’s important to have the correct one for your project. Be sure to consult the rental professionals at your local rental store on which type of sprayer you need. Some paint sprayers are equipped with multiple spray patterns and pressures and may require paint to be thinned for best results. Your rental partner may also assist with calculating the amount of paint needed based on the size and type of surface. For instance, one gallon of paint will cover about 150 to 200 square feet of wall when applied with a paint sprayer.
POWER AUGER
Ready to finally fix that sagging section of your fence or add a deck to your outdoor oasis? Save yourself time and trouble by avoiding the manual posthole digger and go straight for the
power auger rental. The corkscrew-like machine can give you deeper holes for your fence posts or deck structure in a fraction of the time with virtually no back strain. Power augers come in one-person and two-person sizes, depending on how large of a hole you may need and what type of soil you have. A knowledgeable rental consultant can make sure you have the appropriate auger bits, bit extensions, digging bar and other accessories that you will need to complete your project successfully.
ROTARY TILLER
Setting up a home garden or giving your grass a refresher has never been easier with a rotary tiller. Since this is a tool you

WHETHER YOU HIRE A PRO OR BUILD IT YOURSELF, THESE CONSTRUCTION FUNDAMENTALS WILL HELP YOUR NEW FENCE STAND THE TEST OF TIME.

FENCE BUILDING
BASICS By Matt Weber
3HARD
A new fence can add value, privacy and security to your home. The right
fence design can also keep outdoor pets confined to the yard, and keep stray animals from wandering onto your property. Here are a few tips for fence construction that we’ve learned over the years.
DESIGN
Research the many available fence designs and sketch a rough plan on paper, listing the overall length, height, style, number of posts and stringers. Calculate how many pickets you’ll need for one panel section between two posts (based on picket width and desired pattern), then multiply that figure by the total number of panel sections to determine the total number of pickets you’ll need. For a 6-ft. tall wooden privacy fence, the support posts can be made from 8-ft. treated 4×4s. The posts should be approved for ground contact. The horizontal stringers (also called fence rails or runners) can be made from 8-ft. 2×4 pressure-treated boards. Treated lumber is the most common and budgetfriendly material for framing a fence.
s An air-powered framing nailer will be your best friend when building a wooden fence.

LAYOUT
To begin installation, pinpoint the location of each corner post. Drive a stake into each corner-post location and run a taut string between the stakes. Walk the fence line with your tape measure and spray-paint an “X” to mark each post, which are usually spaced 6 to 8 feet on center. The shorter the distance between fence posts, the stronger the fence. Be sure to avoid spacing the posts any wider than the length of your stringers. When laying out the fence, keep in mind how the ends of the stringers will attach to the posts. Stringers can be fastened between two posts with toenails or hardware, or the stringers can be facenailed to the outside of the posts with their ends butting together in the middle.
POST HOLES
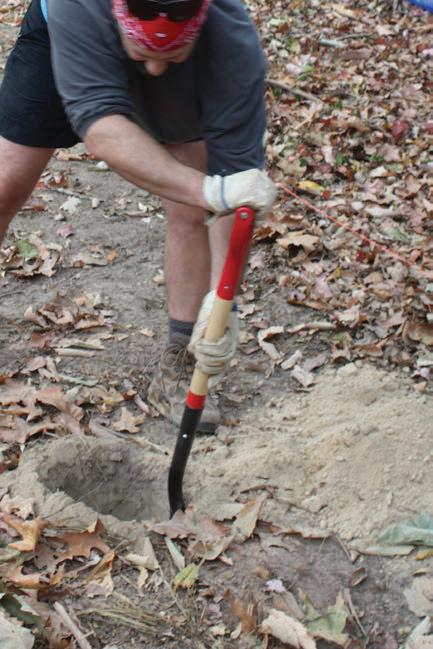
Check your local code guidelines when digging post holes. A good rule of thumb for a strong post installation is to bury 1/3 the depth of the post height. For example, a 6-ft. tall fence will typically require posts made of 8-ft. 4×4 installed in a 2-ft. hole (because 1/3 of 6 = 2). You should also add about
s A drain spade and a post-hole digger are two tools that prove useful during fence construction.
A post level features separate plumb vials that measure two adjacent faces of a post at once. s
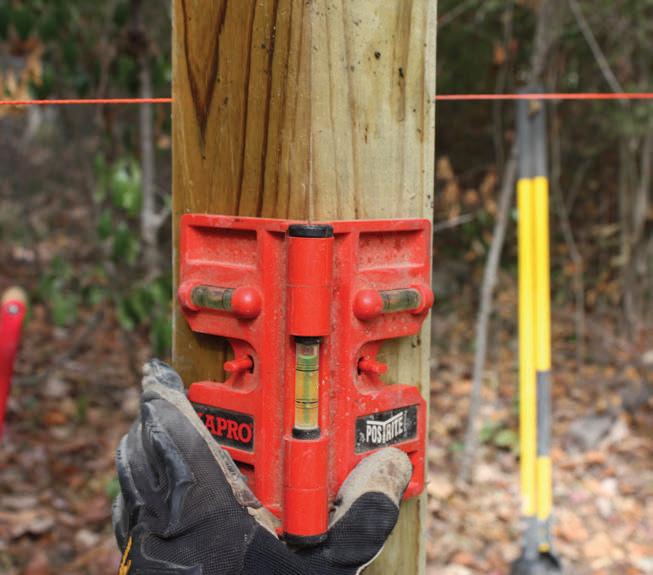

s Align the fence posts between the corner posts using a taut string as a guide.
4 inches to that digging depth to have room for a bed of drainage gravel before setting the posts. The post holes usually measure 12-18 inches wide.
Note that colder climates might require deeper post holes to avoid frost heave. Before digging, it’s also a good idea to call “811” nationally to get any underground utility lines, cables or pipes marked for free.
POSTS
Set the corner posts first. Make sure the square face of the posts will align with the fence path. Use a level to make sure the post is plumb.
You can use ready-mix concrete sold in bags to set the posts. Once you have the corner posts held in plumb position (using temporary braces or an assistant), pour the mix into the hole dry, straight from the bag. Once the post base is covered, pour water over the dry mix according to the amount recommended on the package. For sturdy fence posts, use about 75 lbs. pounds of dry concrete per post.
Run a taut string between the corner posts as a guide to mark and position the remaining fence posts. Keep the string flush with the outside face of the posts and secure it tightly. Set the remaining posts in the same manner, making sure their outside faces are plumb and lined up exactly with the string to keep the fence straight.
Allow the concrete in the posts to set for 24 hours. Once the concrete has hardened, cover it with dirt and use a hand tamper to compact the ground around the bottom, sloping the soil away from the post.
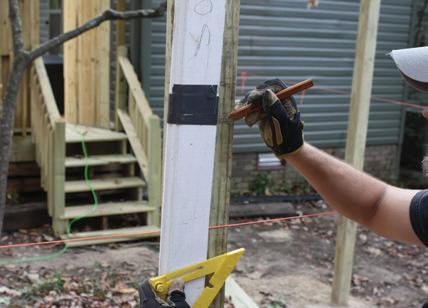
s The white board serves as a “story pole,” which is a scrap board that I marked with black tape. The tape indicates the locations of each stringer height. I align the story pole against each fence post and mark the stringer placement for attachment later.

s You can pour the ready-mix concrete around the post base while it’s still dry, then add water.
STRINGERS
For a standard 6-ft. tall fence, it’s common to position the bottom stringer 10 inches up from the ground. (You might need to alter placement, depending on the height of your fence.) Space the other two stringer rails evenly apart. The spacing between posts will vary a little, so each stringer should be measured and cut to length individually to fit the panel sections. Keep a circular saw and sawhorses handy to cut the stringers.
PICKETS
A pneumatic framing nailer will greatly speed up picket installation. Fasten the pickets to the stringers using hot-dipped galvanized nails (3- to 3-1/2 inches long) with ringed shanks for extra holding power. Make sure your fasteners are approved for exterior use in chemically treated lumber.
If you plan to conceal your posts behind the fence, use a reciprocating saw to chop off all the post tops at the same height (shorter than the pickets) prior to installing the pickets. If you plan to leave the posts exposed above the fence pickets, you can cut them later.
Attach the pickets flush against the stringers. Place the first picket along the corner post and drive one nail through the board at the top. Use the nail to pivot the board plumb, checking its position with a 4ft. level. Once in position, finish nailing the board in place, using at least two nails per stringer location. Place a spacer block next to the first picket and position the second picket against it. Nail the second picket using the same pattern at each stringer location. Repeat for all pickets.
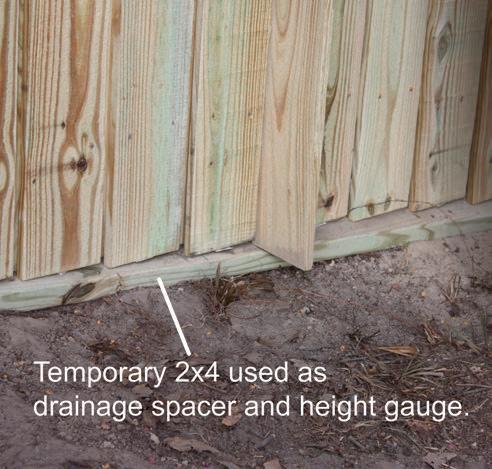
To make sure the fence boards line up consistently, you can level the ground between each pair of posts and lay a temporary 2×4 flat along the ground. By sitting the pickets on the 2×4, the board tops install in a straight line, and the gap beneath them (once the 2×4 is removed) keeps the board ends off the ground to reduce moisture damage and rot.
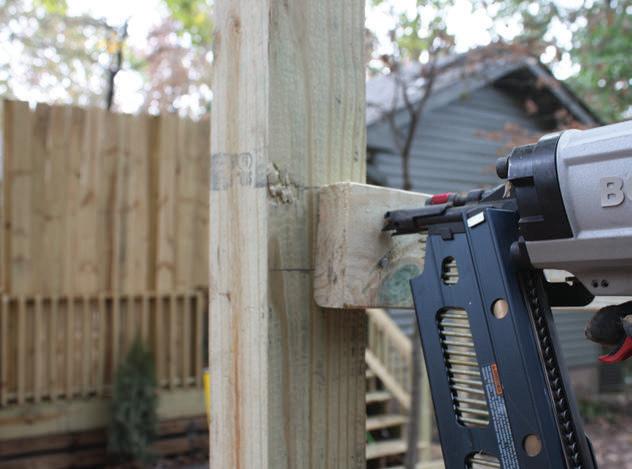
s On this fence we opted to face-nail the stringers over the posts.
On the fence shown, we covered the first layer of fence pickets with a second layer, using the same spacing pattern but staggering the joints. The second layer adds strength and rigidity to the fence.
Each post top was cut level in preparation for a post cap. Post caps protect the posts from rain and moisture soaking into the wood’s end-grain and causing rot.
Protect your new fence with a waterproof stain/sealer, which also provides the opportunity to apply your color tone of choice.
Editor’s Note: Thanks to Jay and Jennifer Whitley for help with this article.
H

s Most privacy fences are built with three stringers per panel section to prevent the boards from bowing, but since this fence had two layers of pickets nailed together, the builders went with two stringers.
The posts were cut in preparation for post caps. s
s No matter what design you select, consistent spacing of the pickets is crucial for a good-looking fence. On the project shown, the pickets were face-nailed together, with the joints staggered between layers.


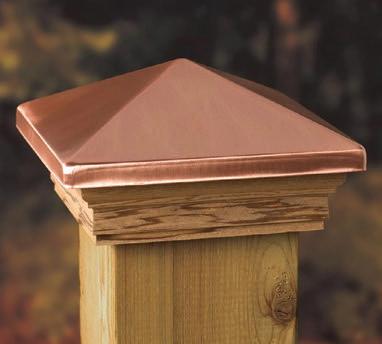
s Post caps protect the posts from rain and moisture soaking into the wood’s end-grain and causing rot. Photo © Deckorators
SMART TIPS FOR A GREAT FENCE
A great fence is one that does the job you want and stands the test of time. It’s beautifully designed, complements the home, and remains straight and solid for years and years after it’s installed. The experts at Great Southern Wood Preserving Co., the makers of Yellawood, offer these insightful secrets to building the best fence.
Ensure solid grounding. Setting posts in concrete footings secures them firmly in place. It’s good practice to extend each footing above ground and to taper the top (like a cone). The taper will ensure that water drains away from the posts. Concrete is crucial beneath large double gates because the leverage imposed by the gates on the posts can pull their tops toward the middle, causing the gates to bind.
Insist on high-quality lumber. “With good design and attention to detail, treated Southern pine makes a long-lasting and attractive fence,” says Ambler, Penn. contractor Mark Clement. “It’s also visually and physically substantial.” High-quality treated wood has a natural beauty that requires no coating, but it can also be stained or painted to match the home.
Seal all end cuts. If you look at the end of a board under a microscope, it looks like a bundle of drinking straws. So, it’s no surprise that’s where water will most likely be sucked into the grain. Sealing field cuts w ith a copper napht preservative is always a good idea.

SMART TIPS FOR A GREAT FENCE (CONT.)
Monroe, LA contractor Mike Davis, a restoration specialist with 30 years’ experience, goes a step further and seals the end of every board in each fence.
Bevel all horizontal surfaces. Many fences include copperclad post caps, but if you’re not using caps, it’s a good idea to cut the post top so that it sheds water. Less common but also very helpful is to bevel the tops of all the rails—top, middle, bottom—for the same reason.
Build in drainage. This is a detail very few fence builders even know about. Installing a drainage mat wherever two boards are sandwiched together goes a long way toward reducing the chance of rot. Use a landscape reinforcement fabric stapled to the back of the horizontal stringer. The mat compresses tightly enough to permit a secure connection between the two boards while leaving just enough gap for the board to dry out.
Space wet fence pickets tightly. When building a stockade fence, it is equally important to butt wet pickets together. Just as with deck boards, some shrinkage will occur as the pickets dry. By butting the pickets together during construction, you will minimize the gap left between the pickets after they dry.
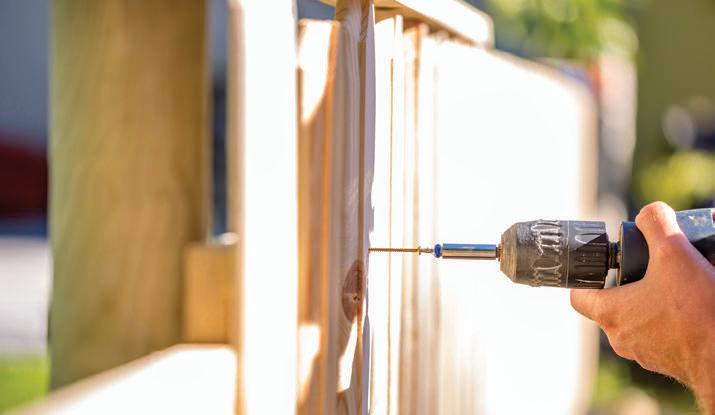
Drill pilot holes. When nailing or screwing near the edge or end of a board, pilot holes will help minimize splitting.
Use corrosion-resistant fasteners. YellaWood® preserved wood products are designed for long-term
performance in outdoor applications and, therefore, require high-quality, corrosion-resistant nails, screws and other fasteners.
Apply a weather-resistant finish. Any exposed wood, pressure-treated or not, should be protected from the weather. Application of a quality, clear water repellent or semi-transparent stain that contains a water repellent will help minimize the cycles of moisture takeup and loss the wood goes through outdoors. One of these products should be applied as soon as possible after construction is completed.
First, thoroughly clean your project. A clear water repellent can then be applied. If you choose to use a semi-transparent stain that contains a water repellent, you need to first check that your project is surface dry to assure proper penetration of the stain. This can be tested by sprinkling a few drops of water on the wood surface. If the wood readily absorbs the water, apply the semi-transparent stain immediately. If the wood does not absorb the water, wait several days and retest.
If you've chosen to build with a product that contains a factory-applied water repellent, an oil-based stain can be applied in 30 to 60 days and water-based stains can be applied after six months.
For the best results, water repellents should be applied annually, and stains should be re-applied as needed. In all instances, follow the manufacturer's directions.
UNCOMMON PRACTICES, UNCOMMON FENCES.
Many contractors understand the wisdom behind these details, but relatively few are in the habit of making bevels, sealing end cuts, or building in drainage. If you want that, you’ll need to write it into the specifications, then confirm that the work gets done. The reason these details are uncommon is that they add cost. It’s up to the homeowner to decide if that’s worth the better quality. But remember that “you get what you pay for” is only a cliché because it’s true.
Learn more about building with treated lumber at www.yellawood.com.
