Determination of Elastic and Mechanical Properties in CA-50 Steel by using Ultrasonic Waves
Álvaro Barbosa de Carvalho Júnior1 , Maria Helena Teles Lopes2 , Maurílio José Inácio3 , Samara Guedes Ramos4 , Debora Santos Rodrigues5 , Gustavo Dias Froes6, Vinícius Marques Botelho Fonseca7 , Jairo Andrei Vieira de Oliveira8
1,2,3,4GraduateProgramofComputationalModelingandSystems,StateUniversityofMontesClaros,Brazil 5,6,7DepartmentofSciencesExact,State UniversityofMontesClaros,Brazil
8EngineeringandMaintenanceCompany, MontesClaros,Brazil
Received: 15 Aug 2022,
Received in revised form: 09 Sep 2022,
Accepted: 14 Sep 2022, Available online: 19 Sep 2022
©2022 The Author(s). Published by AI Publication. This is an open access article under the CC BY license (https://creativecommons.org/licenses/by/4.0/).
Keywords ultrasonic, elastic properties, steel.
I. INTRODUCTION
Abstract The aim of this study was to characterize the elastic and mechanical properties of CA 50 steel using the ultrasonic through transmission technique. The electronic system used is composed of piezoelectric transducers, one emitter and another receiver of ultrasonic waves with 2 MHz frequency. Elastic properties such as Young’s modulus, shear, bulk, Poisson's ratio and anisotropy factor were estimated. In order, to estimate the mechanical properties, one mathematical model proposed in the literature was used, which related the longitudinal ultrasonic velocity with the values of tensile strength. The results obtained were compared with reference values found, attesting the feasibility of low cost method to investigate carbon steels.
Steel bars with minimum yield strength of 500 MPa are widely used in civil construction for structural purposes [1, 2] This steel grade must satisfy some requirements that establish minimum values for the yield and tensile strength, whose properties are important to characterize the final product.
The mechanical properties of structural steel bars are generally determined by conventional destructive testing such as the tensile test [1 3] However, it is important to highlight that the tensile test demand more cost and time, in addition to causing permanent deformation of the material until its rupture, which makes impossible to repeat measurements. It is also known that the results obtained from the tensile test are greatly dependent on the geometry and superficial condition of the samples, besides the stress velocity [4].
On the other hand, the steels hardness is a property which measure the resistance to plastic deformation. A
small indentation is produced by the hardness test and it does not make the material useless. For this reason, it is common that the hardness test is sometimes classified as nondestructive [4].
Over recent years, the hardness measurements have been investigated as a quick way to estimate some mechanical properties of steels. Thus, some mathematical models suggest a possibility to determine wear resistance, yield point and ultimate tensile strength, by using only the hardness test [1 7]. The relationship between mechanical properties and hardness of steels represents an alternative method of characterization which can reduce wastage, cost and time of samples and equipment preparation.
Another possibility to estimate the steel mechanical properties by a single test can be found in the Ultrasonic Technique Ultrasonic testing has a great prominence for relating propagation velocity measurements of ultrasonic waves to some physical and mechanical properties of materials, such as Young’s modulus, shear, bulk, Poisson’s
www.ijaers.com Page | 249
ratio, acoustic impedance, anisotropy factor and hardness [8 12].
With the advancement in knowledge of electronic instrumentation, low cost ultrasonic devices with high level of reliability in measurements can be developed and applied in study of mechanical properties of metallic and non metallic materials [13 15].
Ultrasonic pulse echo and transmission techniques are the most known methods for characterization and inspection of metallic materials. The ultrasonic pulse echo technique uses a single piezoelectric transducer which is capable of generating and detecting ultrasonic waves propagated through the studied material [16]. On the other hand, the ultrasonic pulse transmission technique utilizes two piezoelectric transducers on opposite faces of the material, one of them is responsible for generating and the other for capturing the ultrasonic waves [17].
Recently, a group of researchers from the Graduate Program of Computational Modeling and Systems at the State University of Montes Claros (PPGMCS/ UNIMONTES) has investigated the possibility of non destructive characterization of metallic alloys by using the ultrasonic transmission technique. Developing an electronic system for emission and reception of signals it was possible to verify the viability of this method with interesting results obtained in 6061 aluminum, AZ31 Magnesium and AISI 1020 carbon steel.
Therefore, according to the above reports, this study sought to characterize the elastic and mechanical properties of CA 50 steel using the electronic ultrasonic system developed by researchers from PPGMCS/UNIMONTES. The structural CA 50 steel was chosen for representing one of the primary civil building inputs utilized in Brazil and also for considering the scarcity of researches with ultrasound in this steel grade.
II. MATHERIAL AND METHODS
2.1 Characteristics of the sample
To carry out this study, was acquired a CA 50 steel bar of 25 mm in diameter and 200 mm in length. According to the manufacturer, this bar has a yield strength Ys 500 MPa and a minimum ultimate tensile strength Ts 540 MPa, which corresponds to an 8% increase in the yield strength. CA 50 and TMT 500W structural steels present similar chemical composition and mechanical properties [1, 18, 19].
2.2 Calculation of the ultrasonic velocities
To calculate the velocities of ultrasonic waves propagated through the bar, it was measured the travel
time of the longitudinal waves with an ultrasonic electronic system. In this system, which is based on the ultrasonic transmission technique, the emitter and receiver circuits were powered by symmetrical supplies of 30 V and 12 V, respectively.
The emitter circuit was designed for generating pulses with amplitude of 60 V and length of 400 ns (nanoseconds), in time intervals of 5 ms (milliseconds). The pulses were produced by a piezoelectric transducer of longitudinal waves, model AW190, with 20 mm of diameter and frequency equal to 2 MHz. Another transducer of the same model was used to capture the pulsed signal in the receiver circuit.
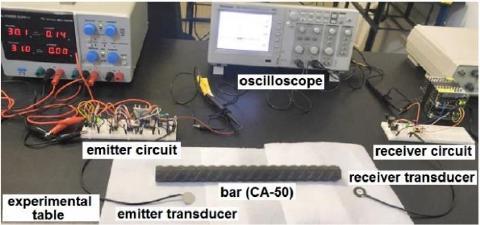
The captured signal in the receiver circuit was amplified using an operational amplifier, model THS4271D, designed to work from supply voltages between 5 V and 15 V. The electronic circuits and the components utilized in the ultrasonic testing with the transmission technique are shown in Figure 1
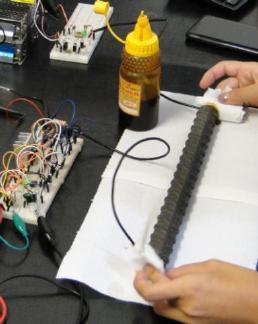
It is important to highlight that the receiver circuit generates an amplified signal with a predefined gain at the output, reducing interferences which may harm the measurement process. Figure 2 shows the transducers aligned at the CA 50 steel bar ends to carry out the measurements
Before carrying out the measurements, the bar ends were polished The bee honey, whose acoustic impedance value Z2 is 2.89 x 10⁶ kg/m2s and density of 1360 kg/m3 , was used as the couplant material between the bar ends and the transducers
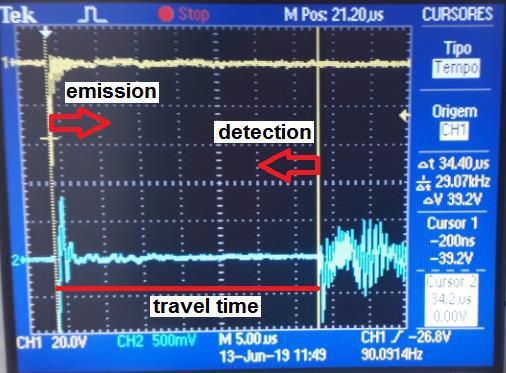
The signal measurements provided at the receiver circuit output were accomplished using a digital oscilloscope, model TBS1062 by Tektronix. The time measured in microseconds between the emitted and detected ultrasonic wave was observed on the oscilloscope screen, as illustrated in Figure 3. Then, the average time was calculated from three measures obtained by removing and repositioning the transducers at the bar ends. All
Fig. 1: Set up of the experiment to generate and capture ultrasonic signals
Carvalho et al. International Journal of Advanced Engineering Research and Science, 9(9) 2022 www.ijaers.com Page | 250
measurements °C.
The distance between the vertical lines displayed on the oscilloscope screen represents the time spent by the ultrasonic wave to travel along the bar length. In that way, Equation 1 was considered to calculate the propagation velocity of the longitudinal wave (VL).
���� = (1)
In which: L = bar length and t = travel time
The ratio between longitudinal and transverse ultrasonic velocities is approximately 0.50 for most metallic materials [16]. Thus, to estimate the value of the transverse ultrasonic wave velocity (VS) was used the ratio VS/VL obtained from the reference values for 1020 steel, which are indicated in Table 1. This procedure was adopted due the scarcity of information about the values of ultrasonic velocities propagated through the CA 50 steel and the similarity between chemical compositions of these steels.
Table. 1: Ultrasonic velocities for the 1020 steel VL (m/s (m/s V V Reference 5890 3240 0.550 [20] 5899 3237 0.549 [21]
Therefore, it was possible to estimate the transverse ultrasonic wave velocity (VS) from the value of the longitudinal velocity (VL) by using the Equation 2.
���� = 055���� (2)
2.3 Density determination
To determine CA 50 steel density, a cylindrical sample was obtained from the bar by a conventional machining process, whose approximate dimensions are of 22.10 mm in diameter and 22 90 mm in height. The dimensions of the cylinder were measured with a digital caliper and the weight was determined using an analytical balance with a resolution of 0 001 g. The bar and the cylindrical sample are illustrated in Figure 4.
The density () was calculated from the determination of weight (kg) and volume (m3), described in Equation 3. The calculated density of the CA 50 steel bar was considered uniform, once the cylinder had constant inertia and homogeneous weight distribution.
�� = ��������ℎ�� (3)
2.4 Hardness measurements
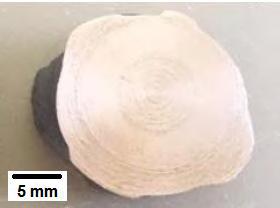
To determine the Brinell hardness, a sample with 10 mm in thickness was cut from the cross section of the bar, as illustrated in Figure 5. Afterward, the sample was undergone Brinell hardness test (HB). The test was executed according to the ASTM E10 standard, using the HBW 2.5/187.5 scale and a 2.5 mm tungsten carbide ball. The applied load was of 187.5 kgf. The average value HB was obtained from four measurements performed on the sample.
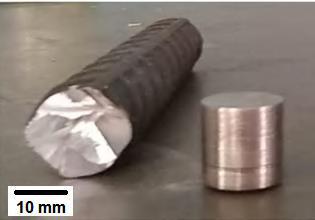 Fig. Positioning of the transducers for emitting and receiving the ultrasonic waves
Fig. 3: Travel time of ultrasonic wave
Fig. 4: CA 50 steel bar and cylindrical sample
Carvalho et al. International Journal of Advanced Engineering Research and Science, 9(9) 2022 www.ijaers.com Page | 251
were executed at an ambient temperature of 25
2:
�� ��
) VS
)
S/
L
������������
Fig. 5: Sample for hardness test
2.5 Calculation of the elastic and physical properties
The elastic properties of the CA 50 steel bar were calculated using the values of density (), longitudinal ultrasonic velocity (VL) and transverse velocity (VS). Table 2 shows some elastic and physical properties which can be described from the ultrasonic velocities and density values. Among them are: Young’s modulus (E), shear modulus (G), bulk modulus (B), Poisson’s ratio (v), acoustic impedance (Z) and anisotropy factor (Ao) [8, 12, 16, 22].
Table. 2: Equations for the elastic properties Property Equation Reference (4) [8] (5) [8] (6) [22] [8] (8) [16] (9) [12]
To calculate the anisotropy factor, the elastic constants in Equation 9 were described as a function of the ultrasonic velocities and the density of the bar, in which: [23].
2.6 Calculation of mechanical properties
The ultimate tensile strength (Ts), yield strength (Ys), modulus of resilience (Ur) and Brinell hardness (HB) were calculated using the mathematical relationships proposed in Table 3. Then, the found results were compared with reference values reported in the literature and discussed according the results of hardness HB measured.
Table. 3: Equations for the mechanical properties
Property Equation Reference
���� =066���� 319429 (10) [24]
���� =����/12 (11) [1]
���� = (����)2 2�� (12) [4]
���� =����/3.45 (13) [4]
Equation 10 relate the ultimate tensile strength (Ts) with the longitudinal velocity (VL) of the ultrasonic waves propagated through cast iron samples [24]. Therefore, this equation was utilized by the authors to verify its application in CA 50 steel.
III. RESULTS AND DISCUSSION
3.1 CA 50 steel density
Table 4 shows the density value calculated for the CA 50 steel bar. The found result was approximately 7848 kg/m3 and it is in accordance with the expectations. For example, some authors report that the structural steels with 0.24% of carbon can have a density of 7851 kg/m3 [12]. In the same way, percentages of carbon around 0.24% are also observed in CA 50 steel.
Table 4: Density of steel bar CA 50 Weight (kg) Volume (10 6m3) (kg/m³) 0.0690 8.7923 7848
Reference value [12] 7851
3.2 Velocities of ultrasonic waves for CA 50 steel
The calculated values of the longitudinal (VL) and transverse (VS) ultrasonic velocities are presented in Table 5. The average travel time of the longitudinal ultrasonic wave was 34 x 10 6 s, which only a small variation in values was observed caused by removing and repositioning the transducers. Thus, the values VL = 5882 m/s e VS = 3235 m/s were calculated for the CA 50 steel bar. These results are very close to the ones reported in the technical notes by Olympus for the 1020 steel, which are VL = 5890 m/s e VS = 3240 m/s [20]. The approximated VL values between these steels also indicates a suitable use of the Equation 2 to estimate the VS value.
Table 5: Ultrasonic velocities for the CA 50 steel
Steel Time (10 6 s) VL (m/s) VS (m/s)
CA 50 34.00 ± 0.01 5882 3235 1020 Reference [20] 5890 3240
Carvalho et al. International Journal of Advanced Engineering Research and Science, 9(9) 2022 www.ijaers.com Page | 252
�� =������ 2 (3���� 2 4���� 2 ���� 2 ���� 2 )
�� =������ 2
�� =��(���� 2 4���� 2 3 )
�� = (���� 2 2���� 2) 2(���� 2 ���� 2) (7)
�� =������
���� = 2��44 ��11 ��12
C11 = VL 2 , C44 = G = VS 2 e C12 = C11 2C44
3.3 Elastic properties of CA 50 steel
Table 6 shows the elastic properties calculated for CA 50 steel. The Young’s modulus (E) represents a proportional relationship between stress and strain of steels subjected to mechanical load, while the shear modulus (G) is an important parameter to investigate the elastic behavior of steels when there is a load applied over the cross section [4]. Generally, carbon steel has E and G values around 207 GPa and 83 GPa, respectively [4]. The E value of 1020 steel, which has a chemical composition similar to CA 50 steel, can vary between 210 98 GPa and 212 01 GPa, and the G value between 81 97 GPa and 82 41 GPa [25]. For TMT 500W, the Young’s modulus is 210.52 GPa at ambient temperature of 25ºC [26]. Therefore, the calculated E and G values for CA 50 steel are similar to those reported for structural steels in other studies.
Bulk modulus (B) represents the stiffness to volumetric deformation, whose values for carbon steel are around 160 GPa [27, 28]. The reference value also agrees with the calculated result of B = 162 GPa for the CA 50 steel.
B/G ratio can be utilized to understand the ductile brittle transition of metallic alloys with cubic structure, in which B/G < 1.75 for brittle materials and B/G > 1.75 for ductile materials [29, 30, 31]. Thus, the achieved value of B/G = 1.97 implies that the CA 50 steel bar presents a ductile property, as expected.
Table. 6: Calculated properties: Young’s modulus (E), Shear modulus (G), bulk modulus (B), Pugh’s modulus (B/G), Poisson’s ratio (v) and impedance acoustic (Z)
E (GPa) G (GPa) B (GPa) B/G 211 82 162 1.97
v Ao Z (10⁶ kg/m2s) 0.28 0.95 46.16
Poisson’s ratio (v) represents the relationship between the transverse and longitudinal strains of materials. For carbon steels, v values can vary from 0.28 to 0.30 [4, 28]. Hence, the calculated result of v = 0.28 for CA 50 steel are in the range of expected values for most carbon steels.
For perfectly isotropic materials the elastic anisotropy factor (Ao) is adopted as 1 [32]. For high resistance, low carbon structural steels the anisotropy value can vary between 0.90 and 1.2 [33]. In this case, the CA 50 steel presents isotropic features as indicated by the calculated value of Ao = 0.95.
Acoustic impedance (Z) can be described as the opposition the passage of acoustic wave energy through a material [16]. This property can be calculated by the
product between density and longitudinal ultrasonic velocity, as shown in Equation 8. Usually, the Z value adopted for carbon steel is 45 x 10⁶ kg/m2s [16]. For 1020 steel, this value is around 45 56 x 10⁶ kg/m2s [34]. As observed, the reference values are close to the result for the CA 50 steel, which was Z = 46.16 x 10⁶ kg/m2s.
3.4 Mechanical properties of CA 50 steel
The calculated values of the CA 50 steel mechanical properties are presented in Table 7. From Equation 10 an attempt was made to estimate the ultimate tensile strength (Ts) using the VL value. As a result, it was found a Ts value of 688 MPa, approximately.
Table. 7: Mechanical properties for the CA 50 steel Ts (MPa) Ys (MPa) Ur (MPa) HB 668 557 735 199
According to the manufacture of the CA 50 steel bar, the minimum Ts value must not be less than 540 MPa. For the TMT 500W steel, which is similar to CA 50 steel, the Ts value may vary from 661 to 703 MPa [27]. However, lower values between 602 and 665 MPa can be found [1]. For this reason, the suggested result of Ts close to 668 MPa agrees with the range of values found for TMT 500W steels.
The Yield strength (Ys) in TMT 500W steels can be estimate by applying Ts in Equation 11. Using this procedure, a Ys value close to 557 MPa was obtained for CA 50 steel. The Ys value in TMT 500W steel can vary between 500 and 550 MPa [1]. Higher values can be observed in some cases, which are between 526 and 590 MPa [27]. Therefore, the calculated result of Ys is also similar to those found for TMT 500W steels.
Modulus of resilience (Ur) was calculated by applying the Ys and E values in Equation 12. Thus, the found Ur value was approximately 735 MPa. Average values of Ys = 559.77 MPa and E = 204.88 MPa are related for TMT 500W steel [27]. Using these values, it can be calculated a result of Ur = 765 MPa for TMT 500W steel, which is not divergent from the one found for the CA 50 steel.
As regards CA 50 steel hardness, the estimated value applying Ts in Equation 13 was 199.42 HB. This value was confirmed by the hardness test, whose average result obtained from the CA 50 steel sample was 200.25 HB ± 0.5 HB This result indicates a good estimation of the Ts value by the mathematical model presented in Equation 10.
Carvalho et al. International Journal of Advanced Engineering Research and Science, 9(9) 2022 www.ijaers.com Page | 253
IV. CONCLUSION
The results of this study showed the possibility of characterizing the elastic and mechanical properties of CA 50 steel with an electronic system that consists of the ultrasonic transmission technique. The values of the properties calculated with the equations proposed for isotropic materials were very close to the reference values reported in the literature, attesting to the feasibility of the non destructive method used.
Regarding the mechanical properties, the mathematical model used to estimate the tensile strength of cast iron seems to be suitable for studying the mechanical properties of CA 50 steel in the as received condition. This hypothesis was reinforced after a comparative analysis between the calculated and measured HB hardness values in the CA 50 steel sample.
REFERENCES
[1] Ahmad, S. & Sajal, W. R. (2020). An experimental investigation of relationship between surface hardness and strength of locally produced TMT 500W bar in Bangladesh International Journal of Applied Engineering Research, 11, pp.113 122.
[2] Bahleda, F., Bujňáková, P., Koteš, P., Hasajová, L. & Nový, F. (2019). Mechanical Properties of Cast in Anchor Bolts Manufactured of Reinforcing Tempcore Steel.Materials,12(13), 2075. Doi: https://doi.org/10.3390/ma12132075
[3] Kabir, I. R. (2014). Modelling of structure property relationshipofTMThighstrengthstructuralsteelbars.
[4] Callister Jr, W. D. & Rethwish, D. G. (2018). Materials science and engineering: an introduction (10th ed.) New Jersey: John Wiley & Sons, Inc.
[5] Pavlina, E. J. & Vantyne, Chester. (2008). Correlation of Yield Strength and Tensile Strength with Hardness for Steels. Journal of Materials Engineering and Performance, 17,pp.888 893.10.1007/s11665 008 9225 5.
[6] Dani, M. S. & Palit, M. P. (2015). Correlation of micro macro properties with mechanical properties in rebar, International Journal of Engineering Research & Technology(IJERT),4(12).
[7] Fujita, Masanori & Kuki, Keiichi. (2016). An Evaluation of Mechanical Properties with the Hardness of Building Steel Structural Members for Reuse by NDT. Metals. 6. 247. DOI:10.3390/met6100247.
[8] Kumar, Anish &Jayakumar, T. &Raj, Baldev &Ray, K.K.. (2003). Correlation Between Ultrasonic Shear Wave Velocity and Poisson's Ratio for Isotropic Solid Materials. Acta Materialia. 51. 2417 2426. DOI: 10.1016/S1359 6454(03)00054 5.
[9] Rodríguez Sastre, M. A., & Calleja, L. (2006). The determination of elastic modulus of slates from ultrasonic velocity measurements. The Geological Society of London. IAEG,775,1 11.
[10] Hamidnia, M., & Honarvar, F. (2013). Measurement of elastic properties of AISI 52100 alloy steel by ultrasonic nondestructive methods. Journal of Mechanics of Materials and Structures, 7(10), 951 961. doi:10.2140/jomms.2021.7.951
[11] Yamagishi, H., Fukuhara, M., & Chiba, A. (2010). Determination of the mechanicalproperties of extruded pure magnesium during tension tension low cycle fatigue using ultrasonic testing. Materials Transactions, 51(11), 2025 2032.DOI:10.2320/matertrans.m2010188
[12] Wiskel, J. B., Kennedy, J., Ivey, D. G., & Henein, H. (2015). Ultrasonic velocity evaluation of three grades of heat treated steel. Department of Chemical and Materials Engineering,UniversityofAlberta,Canada.
[13] Zukri, M.N. & Bakar, E.A. (2018). Motion Analysis of A Low Cost Customized A Scan Non Destructive Testing Unit.
[14] Mestre, P., Calçada, A., Carvalho, N., Serôdio, C., Couto, P., Matias, J., Melo Pinto, P. & Morais, J.J. (2013). Low cost Ultrasonic Probe to Assess Wood Defects and Parameters.
[15] Mak,Se Yuen.(2003).Waveexperiments usinglow cost40 kHz ultrasonic transducers. Physics Education. 38. 10.1088/0031 9120/38/5/310.
[16] Krautkramer, J. & Krautkramer, H. (1990). Ultrasonic testingofmaterials(4thed.)Berlin:Springer Verlag.
[17] Aydin, A. (2013). Upgraded ISRM Suggested Method for Determining Sound Velocity by Ultrasonic Pulse Transmission Technique. Rock Mechanics and Rock Engineering,47,255 259.
[18] Priyesh, K. (2013) Studies on Properties of TMT Steels for Structural Applications. International Journal of engineering researchandtechnology.DOI: 10.17577/IJERTV2IS80657
[19] Domínguez,A.O.,Mennucci,M.M.&Molin,D.C.C.Dal. (2018). Performance Analysis of Corrosion Inhibitors in Pore Solution and Reinforced Concrete for Carbon Steel CA 50.MaterialsResearchProceedings,7,pp428 439.
[20] Olympus (2006). Material Sound Velocities. Recovered: https://blog.mbedded.ninja/docs/olympus ultrasonic transducers technical notes.pdf
[21] Gür, C. H., & Keles, Y. (2003). Ultrasonic characterization of hot rolled heat treated steels. Materials Characterisation 45(9),615 620
[22] Pham, T. V., &Kien, D.T. (2017). Influence of temperature on mechanical characteristics of 1018 low carbon steel estimated by ultrasonic non destructive testing method. Indian Journal of Pure & Applied Physics, 55, 431 435.
[23] Carvajal, Linton, Artigas, Alfredo, Monsalve, Alberto, & Arévalo, Elizabeth. (2017). Monitoring Heat Treatments in Steels by a Non Destructive Ultrasonic Method.Materials Research,20(Suppl. 2), 347 352. Epub August 24, 2017.https://doi.org/10.1590/1980 5373 mr 2016 1083
[24] Orłowicz, W., Tupaj, M., Mróz, M., Guzik, E., Nykiel, J., Zając, A., & Piotrowski, S. (2009). Defining the relation between mechanical properties and ultrasonic wave velocity in spheroidal cast iron manufactured in the foundry Metal Odlews.c.ArchivesofFoundryEngineering,121 124.
Carvalho et al. International Journal of Advanced Engineering Research and Science, 9(9) 2022 www.ijaers.com Page | 254
[25] Freitas, V. L. de A., Albuquerque, V. H. C. de, Silva, E. de M., Silva, A. A., & Tavares, J. M. R. S. (2010). Nondestructive characterization of microstructures and determination of elastic properties in plain carbon steel using ultrasonic measurements. Materials Science and Engineering A, 527(16 17), 4431 4437. doi:10.1016/j.msea.2010.03.090
[26] Shaown, M. R. N., Shahriar, M.S., Islam, M.A. (2018). Fire resistance of locally produced 500W structural steel bars IOP Conf. Series: Materials Science and Engineering. DOI:10.1088/1757 899X/438/1/012034
[27] Kim, S. A., & Johnson, W. L. (2007). Elastic constants and internal friction of martensitic steel, ferritic pearlitic steel, and iron. Materials Sciences and Engineering A.
[28] Fukuhara, M., & Sanpei, A. (1993). Elastic moduli and internal friction of low carbon and stainless steels as a functionoftemperature. ISIJ International
[29] Liu, Yu & Wang, Kai & Xiao, Hui & Gang, Chen & Wang, Zhipeng & Hu, Te & Fan, Touwen & Ma, Li. (2020). Theoretical study of the mechanical properties of CrFeCoNiMo x (0.1 ≤ x ≤ 0.3) alloys. RSC Advances. 10. 14080 14088.DOI:10.1039/D0RA00111B.
[30] Senkov, Oleg & Miracle, Dan. (2021). Generalization of intrinsic ductile to brittle criteria by Pugh and Pettifor for materials with a cubic crystal structure. Scientific Reports. 11.DOI:10.1038/s41598 021 83953 z.
[31] Boucetta (2014)Theoretical studyof elastic,mechanical and thermodynamic properties of MgRh intermetallic compound. Journal of Magnesium and Alloys, 2(1). DOI: 10.1016/j.jma.2014.04.001.
[32] Meyers,M.A.,&Chawla,K.K.(2009).Mechanical behavior of materials (2nd ed.). New York: Cambridge, UniversityPress.
[33] Kalpakjian, S., & Schmid, S. R. (2009). Manufacturing engineering and technology (6th ed.). Upper Saddle River: PrenticeHall.
[34] Ginzel, E., & Turnbull, B. (2016). Determining approximate acousticpropertiesofmaterials. NDT.
Carvalho et al. International Journal of Advanced Engineering Research and Science, 9(9) 2022 www.ijaers.com Page | 255
