1 minute read
Go to the Attribute Setup display

by Jim Logan

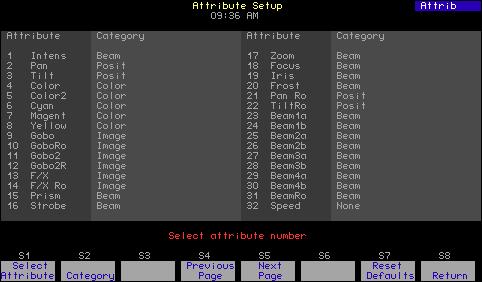
The Attribute Setup display lists all attributes and identifies their category assignments. You can change the categories to which an attribute is assigned by adding or removing them in this display. Every attribute must be assigned to at least one category. Multiple category assignments are allowed except when an attribute is assigned to the None category. 1. Press [Setup] [1][5] [Enter] to display the Moving Light Functions menu. 2. Press [3] [Enter] to go to the Attribute Setup display.
Navigation and Feedback - Attribute Setup display 4 1 7 2 3 5 6 8 9 [S] ±
Advertisement
Select an attribute
X X X X
Select a category
X X
Make a change X Purple coloration Attributes used in the show Gray coloration Attributes not used in the show Yellow coloration Item selected
Changing an attribute’s category assignment:
1. Enter the number of the attribute. Press [Enter]. 2. For each category to be added or removed, enter its assignment number (0=None; 1=Position; 2=Image; 3=Color; 4=Beam). Entering the number either adds or removes the category depending upon whether the attribute is already assigned to it or not. 3. Press [Enter] after you have made all changes. You may start over at any time by pressing [Clear] or typing 0 to choose None.
Resetting defaults:
Each of the 64 attributes has a unique default category assignment. To reset all attributes to their category defaults, go to the Attribute Setup Display. Then, Press [S7], Reset Defaults, followed by [Enter].