
8 minute read
TECHNIQUE TASTERS Easy-to-follow techniques


Welcome to Technique Tasters.
In each issue of Creative Scrapbooker Magazine we will share with you a number of different techniques to inspire your next crafty project. Want MORE Technique Tasters? Visit our video library for technique-rich videos that are fun and easy!
CreativeScrapbooker.ca/Videos
Scan to visit our Video Library

NOEL
Noreen Smith, Calgary, Alberta
SUPPLIES: Creative Memories Seasonal Sightings collection, red cardstock, 12” Trimmer, cardinal border punch, poinsettia Edge Border Maker Cartridge, All-Purpose scissors, Tape Runner, Foam Squares and Dual-Tip pen.
Scraps of Info
The newest tools and the Seasonal Sightings Christmas collection from Creative Memories make it easy to create a lovely border for your traditional holiday scrapbook pages.
Scan this QR Code to watch as Noreen puts this layout together from start to finish.


Use the seasonal words paper for the base. Trim the cardinals paper to 11.5″ square with the 12″ Trimmer and adhere to base page.
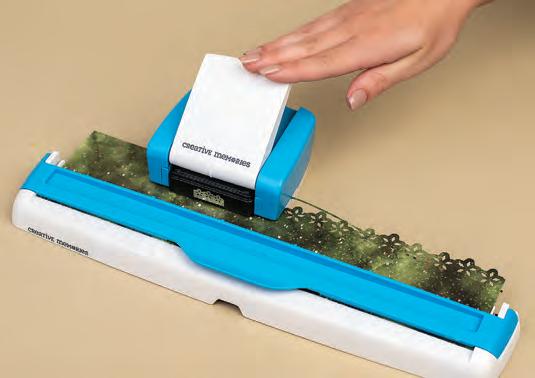
Place one long edge of a 3″ × 12″ strip of dark green patterned paper into the paper tray of the Original Border Maker System. Punch edge with Poinsettia Edge Border Maker Cartridge, and then remove paper from tray, turn around, and punch the other 12″edge.

Adhere the beige border onto the dark green border, using the Tape Runner. Add Foam Squares to the back of the cardinals border, trimming them to size with scissors. Then adhere the cardinals on top of the layered paper border. Ruffle the edges of the green and beige borders to add texture.
2.
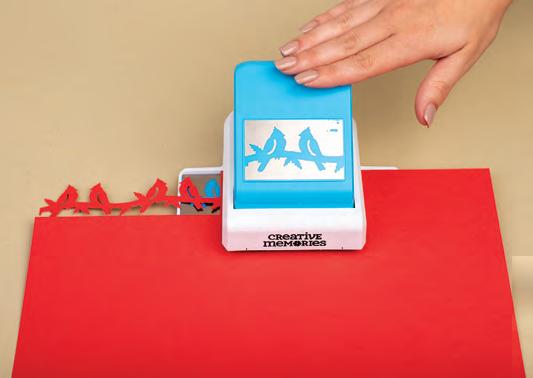
Use the cardinals Border Punch to punch a row of cardinal birds from red cardstock. Align the cardstock with one of the black lines on the front of the punch. Press down on the punch lever, and then move the punched shape along the base plate to match up with the image printed on the plate. Continue punching the length of the paper.
4.
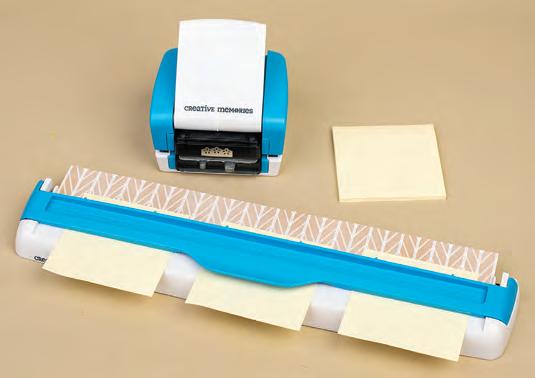
Repeat Step 3 to punch both long edges of a 2″ × 12″ strip of beige patterned paper. Use sticky notes to hold the strip in place on the Original Border Maker paper tray, as needed.

6.
Mat photos and trimmed title card onto red cardstock, and adhere to layout as shown. Finish with a journaling tag and Seasonal Sightings die-cut foiled embellishments.


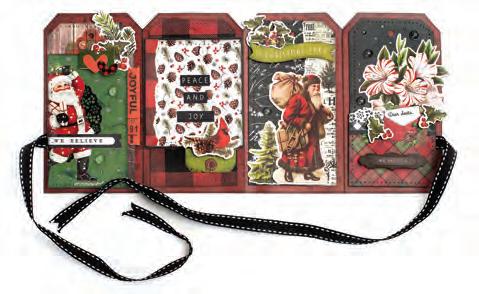
Joyful Mini-Tag Album
Jackie Ludlage, Elk Point, Alberta
SUPPLIES: Simple Stories patterned paper, stickers, stencil and ephemera, Ranger Tim Holtz Distress ink and blending tool, OLFA craft knife and cutting mat, Scor-Pal scor board, Art Impressions stamp, The Robin’s Nest Creative Dew Drops, Tonic Studios Nuvo Deluxe liquid Adhesive and Glitter Drops, Sookwang double-sided tape, Scrapbook Adhesives by 3L 3D Foam Squares, The Stamps of Life ribbon.

Scraps of Info
Jackie added The Robin’s Nest Creative Dew Drops to her mini-tag album randomly and adhered them to the project using Tonic Studios Nuvo Deluxe Liquid adhesives.
Scan the QR Code to watch a Fast Forward Video of Jackie creating the base of this mini-tag album.

Cut a piece of 12″ × 5½″ Simple Stories patterned paper.

Fold accordion style, and trim the edges using an OLFA craft knife and cutting mat.

Create 4 to 8 tags from Simple Stories patterned paper that are slightly smaller than the tags in the mini-tag album. Ink the edges with Distress ink and adhere to the base of the mini-tag album.
2.

Score the patterned paper at 3″, 6″ and 9″ .

4.
Add stenciling and stamping to the front and back of the minialbum, using Ranger Tim Holtz Distress ink. Focus on the edges as the centres will be covered up.

6.
Decorate the front and back, using the Simple Stories Simple Vintage Christmas Lodge patterned paper, stickers, ephemera, and die cuts. Add some ribbon to create a closure.


The Magic
Cathie Allan, Stony Plain, Alberta
SUPPLIES: Creative Scrapbooker Super Stock, Elizabeth Craft Designs dies and stencils, VersaColor pigment ink, WOW! Embossing Pad, Zebra Brush Pen, OLFA craft knife, ruler and cutting mat, The Robin’s Nest Creative Dew Drops, Tonic Studios Nuvo Deluxe Liquid Adhesive, Sookwang double-sided tape, Golden crackle paste, Plaid paint, unknown blending brushes and ribbon.


Scraps of Info
Watch as Cathie Allan creates the gorgeous frame featuring the Elizabeth Craft Designs Shadow Box Frames die set. Visit the Creative Scrapbooker Magazine Video Library > Creative Scrapbooker.ca/Videos.
Scan this QR Code for a direct link to the video.
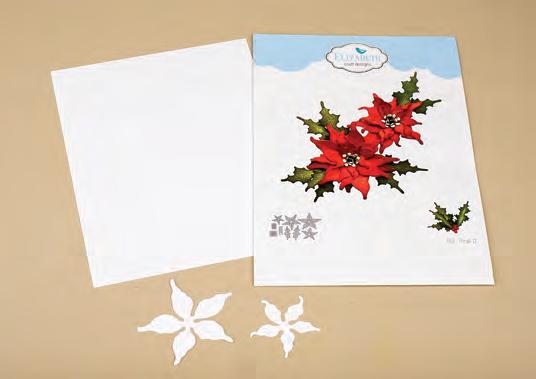
Die cut the poinsettia shapes, using the Elizabeth Craft Designs Floral die set and Super Stock. These poinsettia shapes are now masks.

Place the smaller poinsettia die cut (mask) close to or slightly touching the larger image created. Blend burgundy ink over top with a blending brush. Off load the blending brush to create the perfect shade. Remove the mask.


Edge the panel with a Zebra brush pen.
2.

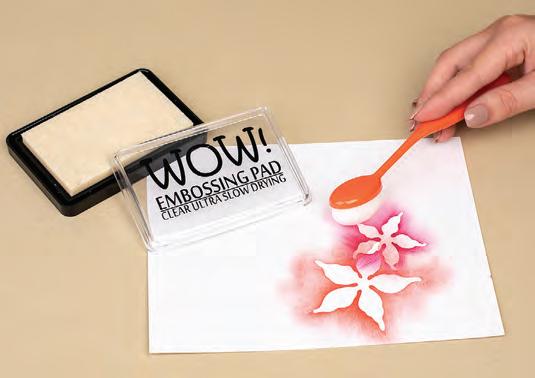
Cut a card front panel from Super Stock. Place the largest poinsettia die cut (mask) on the white panel, and blend cardinal ink gently over top with a blending brush. Remove the mask.
4.
Apply a thin layer of clear embossing ink over both images, and gently blend the colours to the outside edges of the panel and slightly together. Repeat Steps 2 through 4 until the entire panel is covered to your satisfaction
6.
Cut out photos and trim to size, using an OLFA craft knife and cutting mat. Assemble the card as shown. Add ribbon and dies to the background. To learn how to create the frame and background on the card, scan the QR Code on the previous page.

Merry Christmas
Jackie Ludlage, Elk Point, Alberta
SUPPLIES: Creative Scrapbooker Super Stock, Therm O Web Deco Foil Flock Transfer Sheets, Brutus Monroe Foil Transfer Sheets, iCraft Pixie Spray and Deco Foil Transfer Gel Duo, Stampers Anonymous Tim Holtz stencil, Ranger Craft Squeegee, Simon Hurley Create ink and blending tool, Gina K. Designs stamp and dies, Scrapbook Adhesives by 3L E-Z Runner Grand and 3D Foam Squares, Pink & Main gems.
Scraps of Info
Jackie added stars to her foiled trees using the Pink & Main Starlight Gems collection.

Scan this QR Code to watch a Fast Forward video of Jackie putting together her card.

Cut out a rectangle from Therm O Web Deco Foil Flock Transfer Sheets. Cut a slightly larger piece of white cardstock to use as frame. Adhere together.

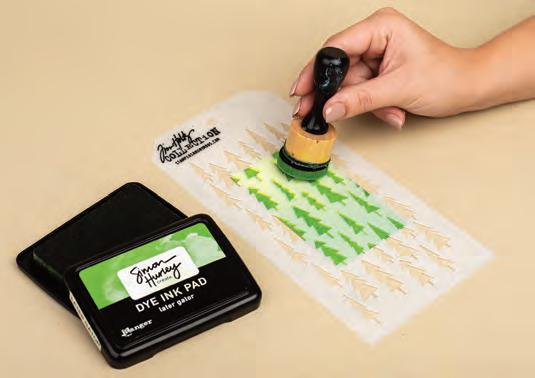
Slightly spray the back of the Stampers Anonymous Tim Holtz Stencil with Therm O Web iCraft Pixie spray. Let dry a minute. This will make the stencil tacky.

Place the clean stencil on the panel. Be sure to shift the stencil so the previous trees created are overlapped slightly but not completely. Add a thin layer of Therm O Web Deco Foil Transfer Gel Duo. Remove the stencil.
2.

Cut a smaller rectangle from white cardstock. Blend two shades of green Ranger Simon Hurley Create ink on the piece. Blend from lightest to darkest. When satisfied with blending, spritz slightly with water.
4.
Place the stencil tacky-side-down on the blended panel created in Step 2. Apply the darker green Simon Hurley Create ink through the stencil. Remove the stencil.

6.
Wait approximately 1 hour for the gel to dry. It will become clear but remain tacky. Lay a piece of Therm O Web Brutus Monroe Foil Transfer sheets shiny-side-up on the panel. Apply pressure, and then peel back the foil. Stamp a sentiment and assemble the card as shown.


