
Desk Handbook
● Clock in/Clock out https://stonly.com/guide/en/how
● Check in clients (incl Gym Attendance
https://stonly com/guide/en/signing
clock in out 9AodzyT8M9/Steps/
clients 9X9rGA0JcT/Steps/

● Class Sign In https://stonly com/guide/en/class check in 9LO4Lkwrf6/Steps/
● Mindbody
https://stonly com/guide/en/where
● How to
https://stonly.com/guide/en/creating
● How
https://stonly com/guide/en/how
● How
purchasing links yWscMQVjra/Steps/
trainer f0JZsCw46M/Steps/
membership 4xkE8bVe50/Steps/
change the price for a membership HwNOof8H8 N/Steps/
https://stonly.com/guide/en/how
● How to activate gift cards https://stonly com/guide/en/adding a gift card YC0Jymsg67/Steps/
● Comping a
● How
https://stonly.com/guide/en/how to
https://stonly com/guide/en/how
a client 59ltKaNuKO/Steps/
o9RapnH6vc/Steps/
Contents
Getting Started
●
●
●
●
●
●
●
●
●
●
●
Classes and
●
Locating

Mindbody

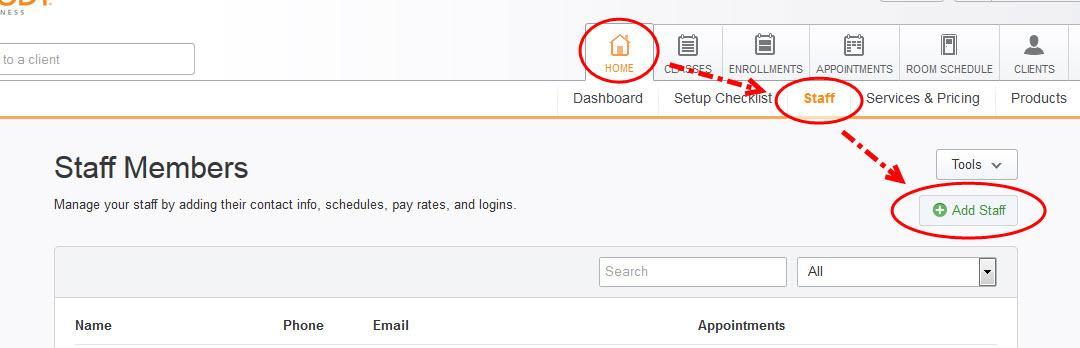
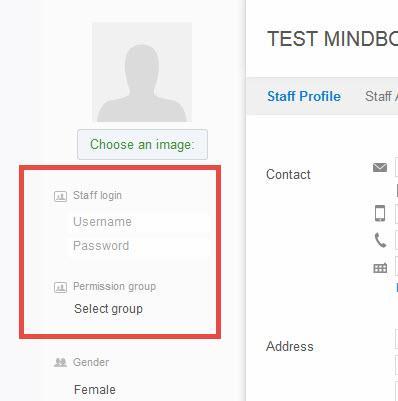
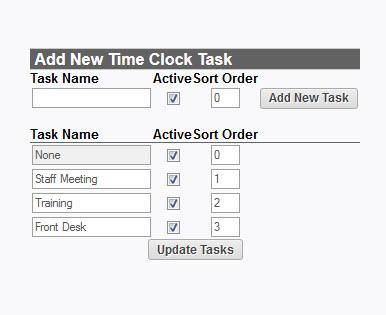

How to Clock In and Out

How to enter in your
availability
How to add a client
1.


How to lookup all clients (Advanced Client Lookup)
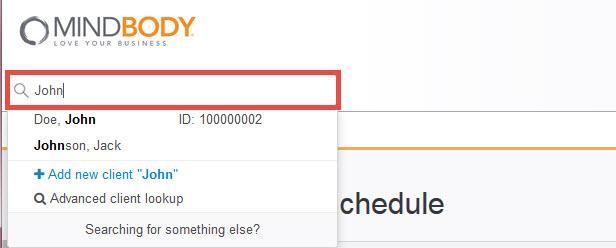
1. Click on the Search for or jump to a client box in the upper left.
2. Select Advanced Client Lookup

3. To generate a list of all clients, click on the Search button.
4. This will pull up the first 1000 clients you have in your software alphabetically
5. To find a selected group of clients, utilize the Filters in the upper left of the Lookup Client page and then click Search.
● This will display the first 1000 clients. Should you wish to see all of your clients, please use the Mailing Lists report.
Client
1. Click on the Search for or jump to a client box.
2. Enter the client's name and search.
3. Once the client's name is generated, click on the correct result.
4. If your Mindbody site defaults to the Client Home page in General Setup & Options, you will see this screen next.

5. If you land on the Client Info screen, you can go to the Home page by clicking on theClient Home submenu.
6. From the Client Home page you can access or view the following:
●
●
●
● Booking option buttons for Classes, Appointments and/or Enrollments, depending on what your business offers
● A colored membership icon (If you hover over the colored icon, it will tell you which membership the client possesses and the valid dates of the membership.)
● A money icon that will symbolize if the client has a positive (green dollar) or negative (red dollar) account balance
● Client Info screen
1. Lookup the client.
2. From the client Home page, click on Info.
3. You also have the option to make the client info screen the default landing page for clients.
4. In the upper right, you can Collapse All, Expand All and Save your preferred view.
5. From the Info screen, you can view and edit the following:
1. Look up the client.
2. Click on Visits from the client Home page or the Visits submenu option from the client info screen.
3. From the Visits screen, you will see the following information:
● Visit date
● Visit time
● Name of the appointment/class/event the client attended
● Service provider
● The visit status
● Which pricing option paid for the service
● Who made the reservation
Appointments
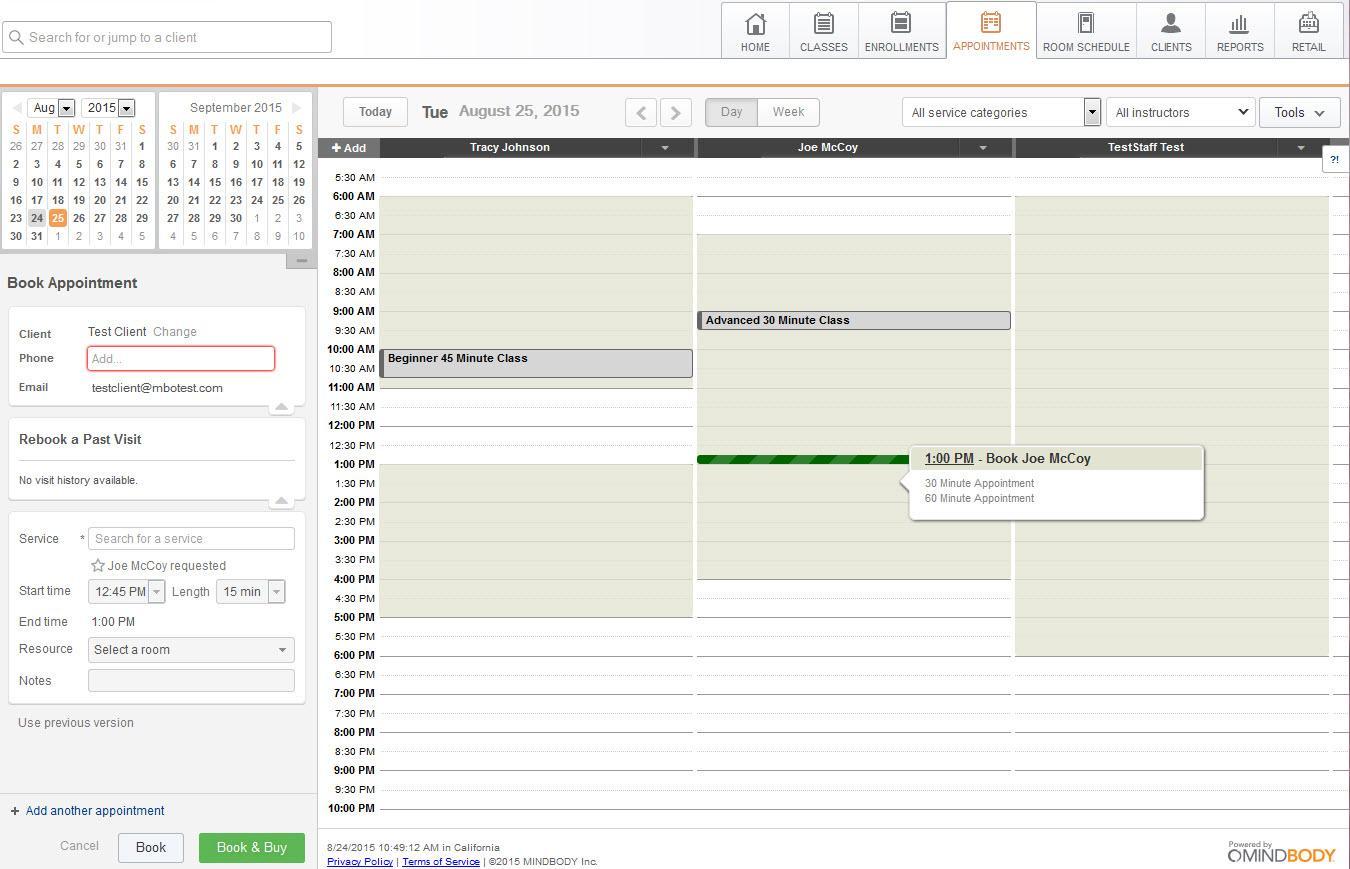
How to book an appointment
1. Click on the Appointments tab.
2. Click on the schedule in the column of the service provider at the time you need to book.
3. Using the Appointment sidebar, enter in the client's name.
4. Enter in the service for the client, or use the Rebook a Past Visit option.
5. Select any other information you may need in the sidebar, such as a requested service provider or room/resource.
6. Click on the Book button to book the appointment as unpaid, or click on Book & Buyto book the appointment and be taken to the retail screen or apply payment for a client with a current pricing option.
● To learn how to book multiple or recurring appointments, click here.
Managing Appointment Requests
1. Click on the Appointments tab.
2. Locate the envelope icon in the lower left of the Appointment sidebar.
3. Click either Show appointment requests, to display them onto the schedule, or View all requests, to see the Manage Appointment Requests screen.
4. You can approve or deny the request directly on the schedule or the Manage Appointment Requests screen.
How to modify or reschedule an Appointment
on the Appointments tab.
the specific appointment you need to modify or reschedule.
have the ability to use the calendar icon in the upper left of the appointment schedule if the appointment is on a different date.

on the specific appointment you need to adjust.
with options will be displayed next to the appointment.
what you wish to do next: Modify or Reschedule
select
, you will be taken to the Modify Appointment screen. Make the desired changes.
, the appointment box will be moved to the left. You'll need to click on the appointment box and drag it to the desired location.
How to cancel an appointment
1. Click on the Appointments tab.
2. Locate the appointment you wish to cancel.
3. Click on the appointment.
4. Select Early Cancel or Late Cancel, depending on the task you wish to complete. Early Cancel will cancel the client's appointment without penalty; Late Cancel will require a form of applied payment to complete.
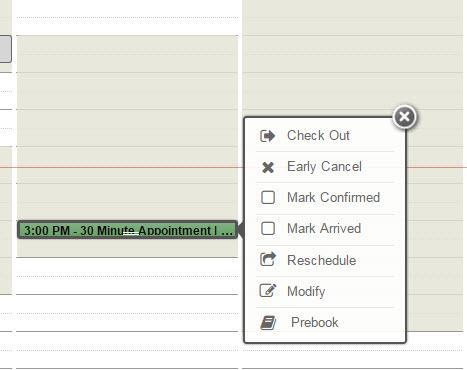
How to confirm an appointment
1. Click on the Appointments tab.
2. Locate the client appointment.
3. Select Mark Confirmed from the pop-up.
4. If you wish to send a client a confirmation email (if enabled), you can click on Modify
5. From the Modify screen, select the Send Email Confirmation button at the top.
How to mark a client as arrived for their appointment
1. Click on the Appointments tab.
2. Locate the client appointment.
3. Click on the appointment and select Mark Arrived from the popup.
How to check out an appointment
● If the client has pre-paid for the service
1. Click on the Appointments tab.
2. Locate the client appointment.
3. Click on the appointment and select Check Out from the pop-up.
4. This will apply the payment and check out the appointment.
● If the client owes for the service
1. Click on the Appointments tab.
2. Locate the client appointment.
3. Click on the appointment and select Check Out from the pop-up.
4. This action will take you to the retail screen.
5. Select the pricing option for the client's service.
6. Enter in a Tip or Gratuity if applicable.
7. Click on Add Item.
8. Select a payment method.
9. Click on Save No Receipt or Save Print Receipt to complete the sale.
● To learn more about appointments, click here
● To learn how a client can pay for another client, click here
Classes and Enrollments/Courses
How to sign a client into class
1. Click on the Classes tab.
2. Locate the day, time and class name that you would like to enter a client into.
3. Click on the Sign In (number signed in/capacity) link.
4. Enter the client's name into the search bar.
5. Click on the client's name from the search results.
6. This will enroll the client in the class.
7.
on your Class & Enrollment Options, your client may be automatically signed in, or you
have to check the box in the Signed In the column to mark the client as signed in.
you want to sign your client up for a recurring reservation, click here for more information.
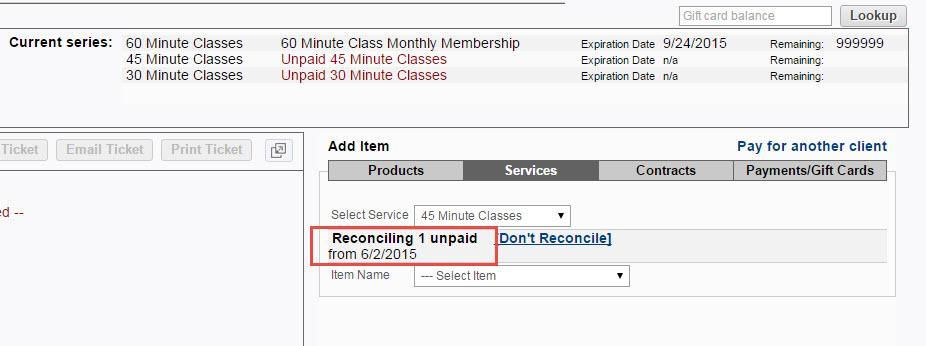
Collecting payment for classes
the Class Sign-In Sheet, it will display in red if a client is signed up as unpaid.


the right of the client's reservation, click on the Buy button.
You'll be taken to the Retail screen.
The screen will prompt you to reconcile the unpaid visit by selecting a pricing option for the client.
Add the item.
Process the sale.
● You can also run the Unpaid Visits Report to locate clients who have signed up for classes as unpaid.
Click on the Reports tab.
Select the Client's left-side tab.
the Unpaid Visits Report.
the time range that you wish to search by
any other filters you wish.
Generate the report.
reconcile for the visit(s), click on the client name from the report.
be taken to the Retail screen.
the Service Category of the pricing option you'd like to purchase the product.
Choose the pricing option for the client.
11. Add the item.
12. Process the sale.
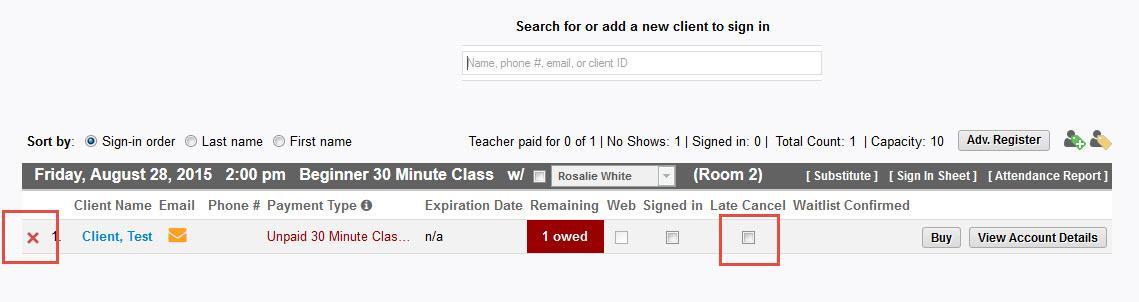
How to cancel a class reservation
When canceling a class reservation, depending on your Cancellation Windows in the Class & Enrollment Options, you will see two options:
● Early Cancel
1. Click on the Classes tab.
2. Click on the Sign In the link for the class you wish to cancel a client from.
3. Press the red "X" to the left of the client's name.
4. This will early cancel the client's reservation without any penalty. If the client had made a purchase for this visit prior, the pricing option will remain in the client's account details for future use and be valid for its set duration.
● Late Cancel
1. Click on the Classes tab.
2. Press the Sign In the link for the class you wish to late cancel a client from.
3. Check the box in the Late Cancel column
4. This will cancel the client's reservation with a penalty. If the client had not previously paid, he will show as owing/unpaid and you will need to collect payment (or a fee if your business has a policy like this in place). If the client had prepaid or had a pricing option with multiple sessions (like a 5 pack or 5-class card) the session will be deducted and no longer be available for use.
How to sign a client into an enrollment/course
1. Click on the Enrollments tab.
2. Locate the enrollment that you wish to sign the client into.
3. Click on the Enroll a Client button.
4. Enter the client's name into the Search bar
5. Once you have selected the client, determine her reservation dates (if you have open enrollment selected) or register from that date forward.
6. Click on Enroll if the client has a valid pricing option or if you wish to go to the Retail screen; click on Enroll as Unpaid if you want the client to pay at a later time.
Managing waitlists
1. Click on the Sign In link next to the to class you wish to view.
2. If a client has been placed on the waitlist, her name will show at the bottom of the WAITLIST section.

3. If an enrolled client early cancels from the class, the waitlisted client will be added to the sign-in sheet automatically by the software.
4. You can also add this client to class manually by clicking on the Add to a class button or you can allow the software to do it automatically. There are specific parameters in which the software will add a client to the class:
● The Waitlist Lock Window must not have passed.
● The Cancellation Window must not have passed.
Learn about waitlists here.
How to use the retail screen
1. Click on the Retail tab.
2. Enter the client's name into the search bar. (If you are selling a service, you will need to enter a client name. If you are just selling a product or gift card, you may select Walk-In Sale.)
3. Once the client is selected, her name will appear in the upper left of the Ticket
4. On the right side, select the item you wish to sell to the client.
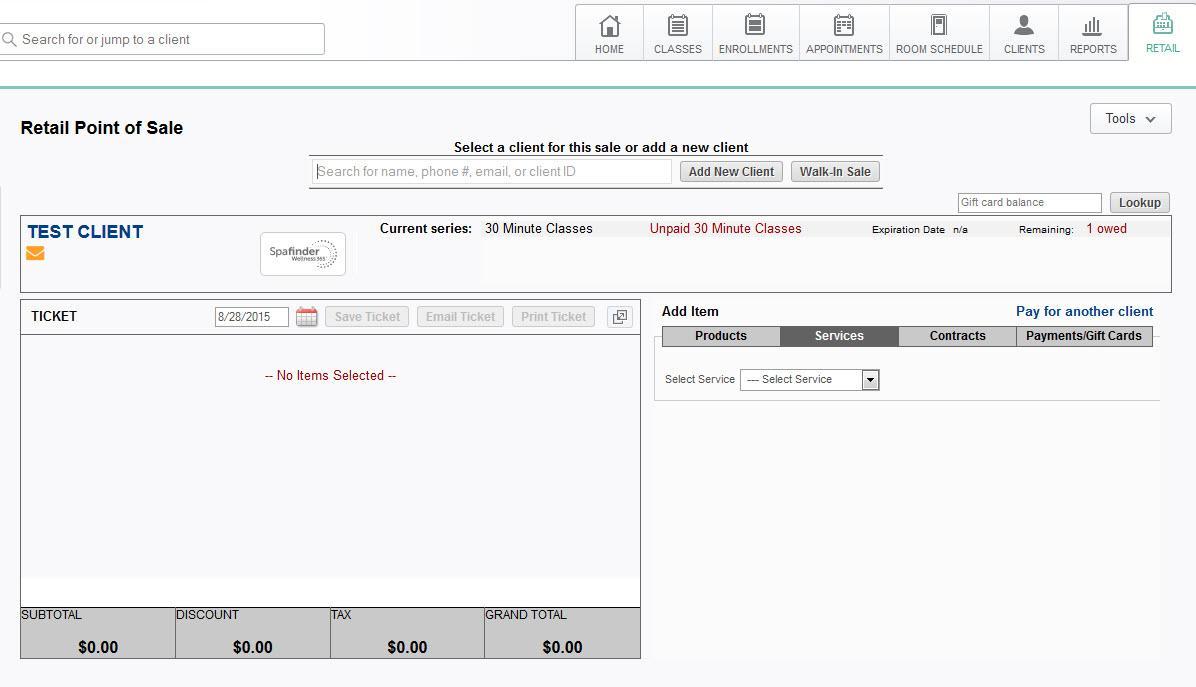
5. Click on the Add Item button to move the item to the Ticket side.
6. Select the Payment Method that the client is using.
7. Process the sale by clicking on Save Print Receipt or Save No Receipt.
● If you wish to save this as an Open Ticket instead of processing the sale, please read about Open Ticket Management here.
● If you would like to learn how one client can pay for another client, please click here
● To learn how to sell and redeem gift cards, click here
● If clients would like to share pricing options (passes/class cards/punch cards), please click here.
Entering discounts
1. Click on the Retail tab.
2. Enter the client name into the search bar.
3. On the right side of the screen, select the item for the client.
4. Once selected, a Discount option will be present. (If you are not able to see this option, you do not have the staff permission to give discounts.)
5. Use the drop-down to choose either Percent or Amount
6. Enter in the discount you wish to apply.
7. Press the Add Item button.
8. Select the payment method the client is using.
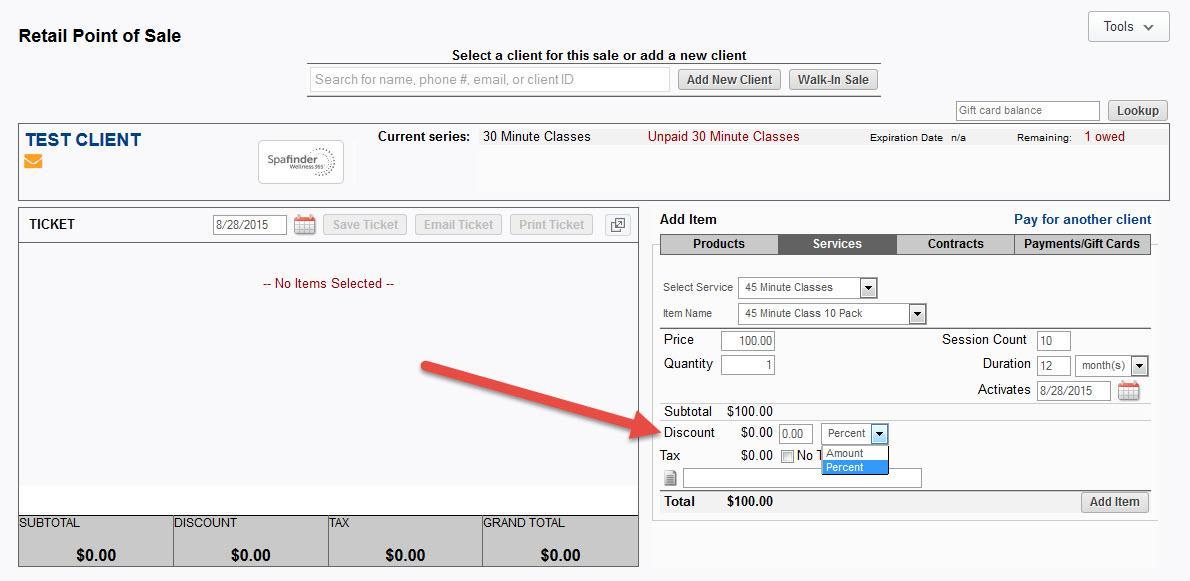
9. Process the sale.
Entering Promo Codes
1. Click on the Retail tab.
2. Enter in the client name.
3. Select the item the client wishes to purchase.
4. Press the Add Item button to bring the item to the Ticket side.
5. On the Ticket side, you'll see a Promotion Code box with an apply button (if you have promo codes setup in your software).
6. Enter the promo code into the box and click the Apply button.
7. Note that the designated amount will be removed from the price.
8. Select the payment method.
9. Process the sale.
How to refund or return a sale
1. Lookup the client you need to process a void, refund or return for.
2. Go to the client's Purchases screen.
3. Click on the Sale ID to the left of the transaction you wish to alter.
4. Locate the item purchased that you wish to return.
5. Click on the [Return this item] link to the right of the Item Cost.
6. Enter in a "Reason for the return."
7. Click on Choose Refund Method
8. Select the Refund method that you want the credit to go to.

9. Confirm the Refund amount is correct. (If you want to use multiple refund methods, check the Use additional refund method? box and enter in the partial amount. You can then select a secondary Refund method.)
10. Press Save No Receipt or Save Print Receipt to complete the return.
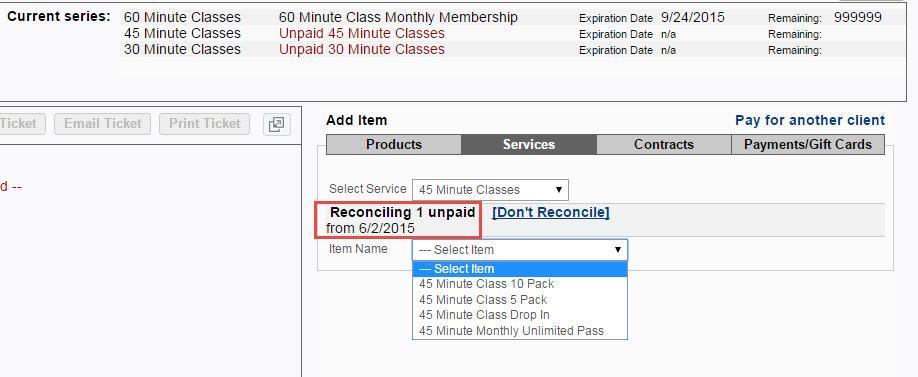
Resolving unpaid visits
From the Class Schedule:
1. Click on the Sign In the link for the class you wish to work with.
2. View the client roster and note which clients have Unpaid classes by their names.
3. Click on the Buy button on the right side of the roster.
4. Reconcile the unpaid visits.
5. Process the client's transaction.
From the Retail Point of Sale screen:
1. Enter the client's name in the search bar
2. Select the client.
3. Under services, select the service category that the client owes for
4. Select an item and Reconcile the unpaid visits.
5. Process the client's transaction.
The Unpaid Visits Report:
1. Click on the Reports tab.
2. Select Clients from the left-side tab.
3. Choose the Unpaid Visits report.
4. Enter the filters for the report you wish to enable.

5. Generate the report.
6. Click on the client name directly from the report results.
7. You'll be taken to the Retail screen.
8. Reconcile the unpaid visits.
9. Process the client's transaction.
Your Schedule
Checking your schedule
There are multiple ways to check your schedule in Mindbody.
● Click on the Appointments tab and view the schedule by the service provider.
● View the Schedule Widget on your Dashboard. (Home=>Dashboard=>Schedule)
● Run the Schedule at a Glance Report.
● Sync your Mindbody schedule with Google Calendar to view your schedule through Google. This is one way to communicate between Mindbody and your Google Calendar. Mindbody can only send information to Google; it cannot import information from Google Calendar.
How to use the Mindbody business app
● Click here to learn how on your mobile device.