4 minute read
Don’t Hesitate to Renovate
Count the Cleats How to add extra cleats to your boat’s deck.
(Top) The right way to install a cleat: The area has been de-cored and sealed, and a properly sized backing plate has been installed. (Middle) A crushed core due to water intrusion. (Bottom) A cleat installation with no backing plate and insuffi ciently sized washers.
CAPT. FRANK LANIER is an award-winning journalist, boat maintenance guru and owner of Capt F.K. Lanier & Associates, Marine Surveyors and Consultants:
CAPTFKLANIER.COM.
I’ve owned and worked on a number of boats over the last 40 odd years and one of the more frustrating boating nits I’ve had to pick are the lack of adequate cleats. As a marine surveyor I’d be hard-pressed to count the times I’ve shaken my head in disbelief at boatbuilders who have skimped on cleat size, number, placement or all three. Fortunately, an undersized or missing cleat is a problem that can be easily corrected with a little planning and an hour or so of DIY time.
Solid vs cored decking Replacing or mounting a new cleat in solid fiberglass is fairly straightforward; however, drilling into a cored deck requires additional steps to protect the coring from water intrusion or crushing.
If the coring is plywood, after drilling or cutting, simply wet the raw edges of the plywood with a few coats of epoxy to prevent water migration into the coring. If the coring is a softer material (such as balsa or foam) it’s best to de-core the area. There are a number of ways to accomplish this, but the below strategy is straightforward and works well. 1. Using the cleat mounting holes as a guideline, take a 1-inch hole saw and remove the coring from the underside of the deck where each bolt is to be installed. Be careful not to drill through or damage the upper layer of fiberglass. You can also remove a single section of coring large enough to encompass more than one bolt. Drill almost through the coring, but leave the last quarter-inch or so to be removed by hand. 2. Once the cutout and coring has been removed, seal the exposed edges of the coring in the holes with epoxy, then mount the cleat using properly sized backing plates or washers and a suitable marine-grade caulk. 3. Another option would be to fill the holes entirely with thickened epoxy, then drill new mounting holes through the epoxy and mount the cleat, again using a good bedding compound. This method not only keeps moisture out of the coring, as your holes are now drilled through a solid epoxy plug, but it also provides a solid backing when tightening the cleat mounting hardware.
Tips for a successful installation 1. For new cleats, verify that the location has adequate access and clearance beneath the deck to carry out the installation.
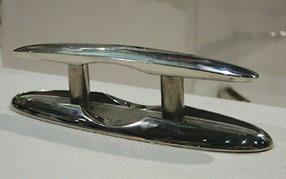
Pop-up cleat
2. Determine the size and type of cleat you want. Mounting a new cleat is primarily a matter of correct placement of the drilling template or cut-out. If upgrading a traditional cleat with a larger one, the footprint of the new cleat probably won’t match the existing hole pattern. If you’re lucky, the base of the new cleat will cover the holes, in which case you can simply seal them with thickened epoxy. Otherwise, you can fill the unused holes and paint over them or install a base for the new cleat of some suitable material (wood, StarBoard, etc.) to cover the holes once sealed. If replacing a traditional cleat with a pop-up or similar style, the best scenario is locating the required cut-out over the existing holes where possible. 3. Cover the mounting area with masking tape to protect the gelcoat from scratches and help prevent chipping while drilling or cutting. 4. For traditional cleats, use templates or the base of the cleat itself to mark the mounting holes. 5. To help prevent chipping when drilling, run the drill in reverse until through the gelcoat, then switch to forward and continue drilling. 6. Pop-up or pull-up cleats require an additional hole be cut in the deck. Most come with a pre-cut backing plate. Place the backing plate where the cleat will be mounted, drill the first hole, insert a bolt to keep the plate in place, then drill the remaining bolt holes. Insert a bolt in each of the holes, then tighten down two bolts at opposite ends to prevent the template from moving and use it as a guide to cut the hole with a Dremel or rotary tool. 7. Once the holes are drilled, dry fit the cleat to ensure a perfect fit prior to bedding (caulking). This should include installation of the backing plate or large, thick fender washers. 8. Bed the cleat with a suitable marine-grade caulking. Polysulfides such as BOATLIFE’s Life-calk or hybrid caulks such as West Marine’s Polyether Multi-Caulk Sealant work well, but avoid Polyurethane adhesives like 3M’s 5200 as they make future removal and re-bedding difficult. 9. Apply caulking to the base of the cleat and top of the backing plate, then snug up the mounting hardware using Nyloc nuts or lock washers until you first see the bedding compound ooze out around the edges. Leave it overnight to set up, forming a gasket. Come back the next day and tighten to the proper torque, but avoid over tightening. ★
Give the next best thing.


Lakeland Boating is the perfect holiday gift for your favorite boater.
Call 800-827-0289 or visit lakelandboating.com to order a gift subscription.


