5 minute read
ENGRAVING ON GLASS WITH A CO2 LASER
Tips and Tricks For The Beginner
By Hope Yoder, Hope Yoder Designs
In the past, I used a vinyl stencil and etching cream to engrave on glass, but it was messy, and the results were often uneven. Nowadays, I’ve discovered a more effective method using a CO2 laser, which yields great results. In this article, I’ll provide beginner-friendly tips on etching a clear wine bottle using a rotary tool. While there are numerous techniques to achieve a beautifully engraved surface, I’ll share some of my favorite tips.
Best Glass To Engrave
To practice the art of laser engraving on glass, the cheaper the glass, the better. Avoid anything with lead or with a titanium coating that helps resist breakage, chips, and scratches. Clear wine bottles or glasses found from the Dollar stores are a great option while mastering your craft.
Supplies
(2) Clear wine or tequila bottles
Blazer Orange
Laser Mask
Roller rotary
Goof Off Pro Strength Remover
Isopropyl alcohol
Lint-free cloth
Dish soap
Sponge
Scraper Gloves
Masking The Glass
1. Applying a laser masking made for glass helps with heat dispensation, minimizing micro-fractures or sharp chards that occur without masking. This yields a smooth finish without sharp edges or flakes of glass. I have tried many different ways to mask but my favorite is using Blazer Orange Laser Mask.
2. Remove the label: Peel as much of the paper label off the bottle as possible.
• Wearing gloves, apply Goof Off Pro Strength Remover over the paper residue, and use a scraper to remove the label and glue.
• Wash the bottle with dish soap and a sponge.
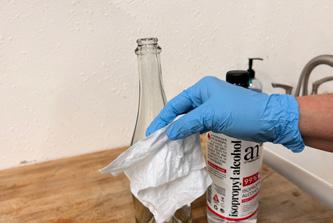
• Wipe the bottle with Isopropyl alcohol using a lint-free cloth.


3. Apply Blazer Orange Laser Mask.
• Remove the clear carrier sheet from the laser mask and discard it.
• Stretch the mask and apply it to the bottle. Remove any wrinkles.
Testing, Testing, Testing
When etching glass, it’s recommended to keep a few “sacrificial glasses or bottles” handy. The results can differ depending on the type and thickness of the glass. Achieving the ideal settings requires time, patience, and knowledge of three variables: speed, power, and lines per inch (or line interval).

1. Speed - The slower you go, the deeper/ darker the engraving. Think about it practically. A slower speed means the laser will stay in one place longer.


• Pick a speed between 200-400 as your starting point.
2. Power - The minimum and maximum power for engraving should always be the same. The higher the power, the deeper/ darker the engraving.
• Pick a power between 25-45 as your starting point.
3. LPI - (Lines Per Inch or line interval) The higher the LPI, the less space between the laser beam rows, which means the higher the number, the deeper/darker the engraving.

• Pick an LPI between 300-400 as your starting point.
Rotary Tips
1. Using a rotary allows the bottle/glass to rotate 365 degrees while keeping the focal height constant, because you level the glass once it’s loaded onto the rotary.

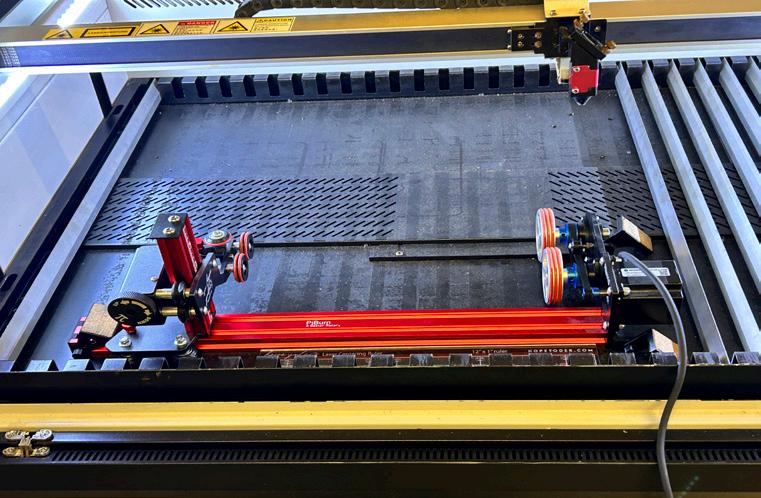
2. In our sample, we used a PiBurn 4.0 with a few simple adjustments so the bottle would rest on the wheels without any obstructions allowing it to rotate smoothly without any hiccups.
• 1.The bottle was turned so the largest diameter was closest to the motor resting on the front wheels.
• 2. The front clamp was removed.
• 3. The back-end stopper was removed.
3. Lower the laser bed as far down as it will go. If necessary, remove the honeycomb tray and grates.
4. Level the glass over the center of the engravable area.
• Please note in the photo, the back stopper was on, but we removed it as it was preventing the bottle from turning smoothly.
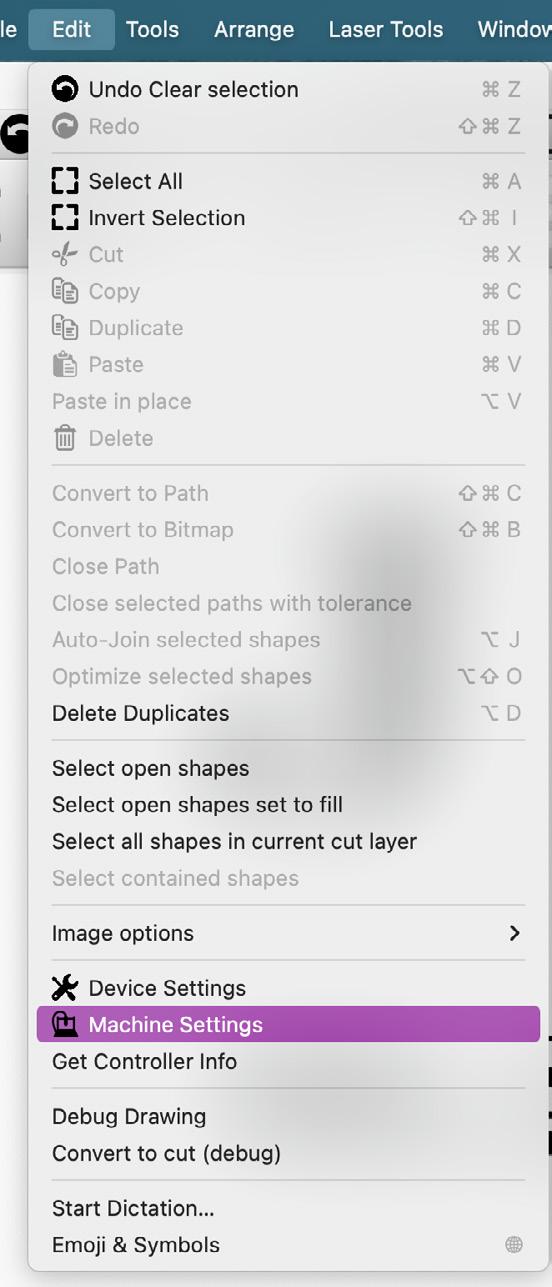
7. In Lightburn Software, go into Edit/ Machine Settings/Load/Load From File/ Write. Please refer to your rotary manual for installation steps.


• For my sample, I am using a Mira 9 (90-watt) CO2 laser, and the manufacturer provides a “preset” Lightburn setting that includes all of the steps per rotation and info needed to switch the “flatbed settings” to rotary settings.

• Check with your laser manufacturer to see if they offer a “preset.”
8. In Lightburn, rotate the file so that the top of the design will engrave on the top of the bottle, being mindful of your rotary and bottle placement.
9. Pick a starting point for your speed, power, and LPI. Write your starting point settings on a sheet of paper and engrave. Our starting point was 300 speed; 45 min, and max power; 400 LPI.
10. Engrave the design.
• 1. It is not recommended to run a second pass when using a rotary. The second pass may not line up correctly.
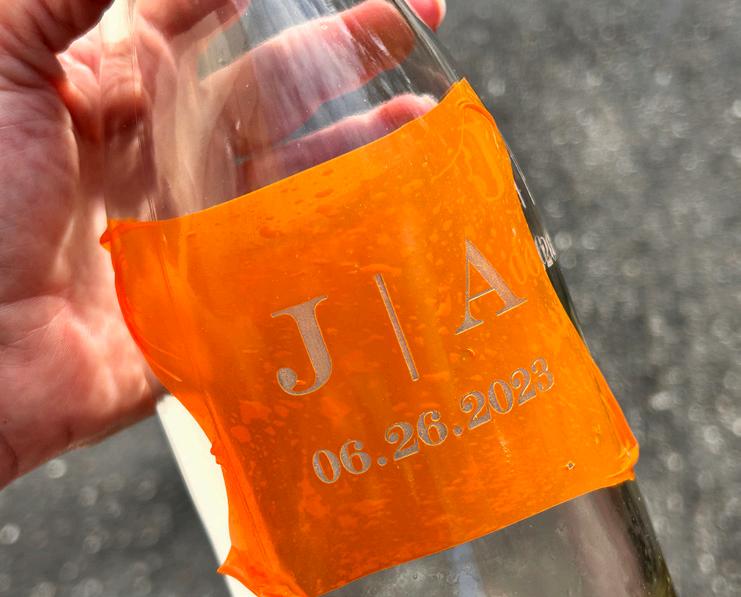
11. Remove the bottle and the masking. Wash the glass with dish soap and inspect the engraving carefully.
• 1. Troubleshooting: If you see areas where there is no glass left, you are heating the glass up too much. Increase the speed by 50 – 100mm/sec or lower the power by 5-10. Do not change more than one variable at a time.
• 2. Troubleshooting: If the engraving is too light, you are not applying enough heat. Lower the speed by 50 – 100mm/sec or increase the power by 5-10. Do not change more than one variable at a time.
12. If you need to troubleshoot and test again, dry the glass and apply another piece of masking.
• 1. Adjust one variable only; speed, power, or LPI.
• 1.1. I tend to leave the LPI as is and adjust the speed or power.
• 1.2. My first practice on a sacrificial bottle (300 speed; 45 min and max power; 400 LPI) was too hot and part of the glass flaked off.


• 2. We kept the speed the same (300) and lowered the power by 10. Our new settings in Lightburn were 300 speed; 35 min, and max power; 400 LPI. Once the settings were adjusted, we sent the file to the laser and tested the new setting.
• 2.1. Engrave and then inspect the area in good lighting.
• 2.2. Does it look good? If so, GREAT! Log that setting in your laser settings notebook.

• 2.3. Does it look bad? Adjust one variable and keep testing, changing one variable at a time until you get the desired results.
14. Once you have found a setting you like, it’s time to prepare the final bottle with masking and engrave using your best setting.

13. Instead of engraving the entire design again, wasting surface area, edit the file in Lightburn and engrave one large element and one small element or the element that didn’t look good.
• 1. In our sample, we chose the “A” portion that looked bad to continue testing rather than use the entire design.
Finding the right setting is crucial, but it’s only half the equation. The other half is logging the settings in a notebook or client folder so you can reproduce the same results again and again without having to go through the testing process!
Hi, I’m Hope, the entrepreneur behind Designs By Hope Yoder. I started my journey in the embroidery and fabric industry by creating products, courses, designs, and fabric for the home market. I have had the privilege of inspiring many along the way with our magazine articles, workshop, and corporate projects. Most days, you can find me dancing to Cupid Shuffle, in front of my computer designing, or behind my laser creating handmade happiness. Find all my social links here, including our Premier Laser Membership, laser courses, files, discount codes and retreats:


