
Thank you for choosing STONE SENSE to provide your worktops.
We use the latest technology available to ensure your worktops are fabricated to a high standard. Your worktops are in safe hands.
Please see below for our ‘Pre-template Checklist’ to ensure you are ready and that we are able to template The Checklist is there to ensure everything from template, fabrication to fitting runs smoothly. If your kitchen units are not ready, or you are still awaiting delivery for certain appliances, you need to let us know prior to coming out. Otherwise you will be charged an additional template fee for the revisit and this will cause delay.
Please Use this guide to ensure you are ready, to reduce the risk of delay.
WORKTOP PREPARATION CHECKLIST
Requirements prior to template
1 Does the quote show the correct material? (Please confirm name and colour is correct)
2 Did you visit the showroom to confirm the sample colours If so, was the sample you saw correct?
3
If there are large pieces, to reduce the joints required , is there adequate access? (We as part of our quote provide 2 people, if more are required you can ask us to quote for this or you can provide extra labour)
4 If Granite did you request for a photo of the slab to be sent by email? If so was the photo of the slab correct?
5 Have all appliances and existing worktops been removed and are the surrounding areas free from obstruction?
6
Are all the units and end panels in place, level and secure?
Note: We strongly recommend that all cupboard doors and drawer fronts are on to give accurate measurements for any overhang you may have (but please ensure these are covered for protection)
Has the necessary support to bear the weight of the stone worktop been installed (including battens where necessary)?
7
Note: Worktop must be supported every 600mm. A worktop without support MUST NOT exceed 250mm at 20mm thick and 300mm at 30mm thick
Have Ranges, Agas and appliances been installed?
8
Note: This must be done prior to our arrival. Please also ensure that the extractor is fitted so we can get the final height of any splashbacks. Hobs need to be onsite but not installed.
Ensure sinks have been pre fitted in the kitchen carcass
9

Note: The minimum front rail on a sink is 70mm, however we recommend 85mm. Sinks should be pre fitted to ensure accurate measurements can be taken
Note: Under mount sinks must always be fitted into units before templating, especially heavy ceramic/porcelain or stone sinks, we don’t recommend attaching the sinks to the worktops.
Are all appliances that need to be fitted to the worktop onsite?
10
11
12
Note: This includes sink, tap, hob, pop up plug, Sample of Led Lighting and any other relevant item.
Have profile edges and worktop overhangs, if applicable, been confirmed? If not please visit showroom prior to template
Note: There is a 2mm tolerance on requested overhangs and thickness of stone.
Full height cladding: Have all electrical boxes been fully fitted?
Note: Front Face Plates must be left disconnected, ensure the fixing screws are long enough to go through the stone splashbacks.
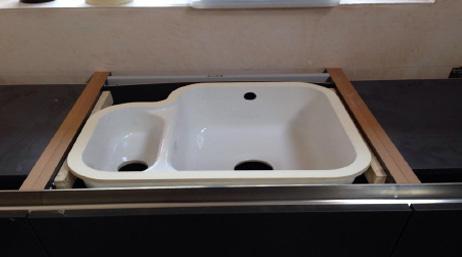
AN EXAMPLE OF HOW SINKS SHOULD LOOK PRIOR TO TEMPLATE


For ceramic sinks read the sink manufacturers guidelines, often the ceramic sink should NOT touch the stone and should have a small gap with silicone used to make waterproof.
For other under-mounted sinks they should be installed in a solid top like below and routered so 1mm lower than the level of the sides of the carcase.
The Sinks will the be templated in the correct location.
WHILST MANUFACTURING
• While we make your worktops please do not make any changes to the kitchen units, walls or positioning of appliances, No Plastering of walls, installation of floors if stone end panels and no additional furniture or fixings should be added once the template has been completed. If there have been any alterations that result in the worktop not fitting as it should, we accept no responsibility and reserve the right to charge the full price of the job regardless. Installation
It is essential that we have reasonable access to site. If, for example, there is a tight stairwell or alley then the worktop may need to be cut to fit.
We will make every effort not to damage any surrounding area, for example the walls in corridors, but we cannot offer any guarantees.
If you have less than the recommended width of front and back strips on Appliance/sink cutouts then we may need to finishing cutting on site, this will result in dust and noise pollution. Please ensure any necessary items are protected in this eventuality.
Every kitchen is different and therefore on occasion, it may prove necessary to cut out part of the plaster of the wall. We will make every effort not to cause any damage but due to the nature of the job, cannot offer any guarantees.
If the kitchen walls are not straight then you may find a gap behind the upstand. Where possible, we recommend putting a joint in the upstand to reduce this gap, any gaps need to be filled with Decorators Caulk as part of the Decorators finishing after the worktops are installed.
PLEASE NOTE:
We will not connect or plumb any appliances. We recommend that you do not book your plumber until the day after your worktops have been fitted to give any silicones and adhesives time to cure, if they do it on the same day often they will twist the fixings and might move the sink, if a sink has moved and we are required to re-silicone we would levy a charge for this. • Tiling must not be started until the installation of the worktop is complete. • Most worktops will come with a manufacturers warranty some you will need to register on the manufacturers website, please call the office if you have any questions.
TIPS ON CLEANING WORKTOPS:
Tip 1 Clean the worktop with a neutral base cleaner. A neutral pH product or detergent like Cif ActiFizz spray is ideal.
Tip 2 Dry-off worktops to avoid dull patches appearing. Hard water and soap residues that may have been left behind during daily use need to be wiped. A light neutral (pH7) detergent may be safely added.
Tip 3 Glass and stainless steel cleaning cloths do a good job of leaving the quartz smear free.
Tip 4 Removal of any remains or waste. These include oil and grease, wine, vinegar, lemon, fizzy drinks, coffee and other similar foods. All that is required is to wipe with a cloth dipped in a neutral pH detergent. We advise using a tripod or chopping board to place your pans on when taken directly from the hob.
Tip 5 Do not expose direct to sunlight. Quartz should not be used outdoors or in places subject to strong direct sunlight or exposed to UV lighting.
Tip 6 Do not expose quartz to excessive heat. We recommend using a tripod or chopping board to place your pans on when taken directly from the hob. Deep fryers and other very hot items can mark the surface. The Warranty is void If you place hot pans directly onto the worktop
Tip 7 Do not use a sealer on the quartz. Quartz is non-porous and therefore if a sealant is applied it will sit on top of the surface and dirt will trap easily, marks will appear and your worktop will become dull. A sealer or water-repellent is not to be used on a composite work surface.
Tip 8 Chipping of Edges. All solid worktops like Quartz, Granite, Dekton, Lapitec, Neolith etc. if the edges are knocked with another object at times this can cause chipping, this is not covered by the warranty.
Tip 9 Removal of stubborn stains (silicon). Silicone stains and stubborn marks can be removed using a small application of acetone or ethanol but it is important that after application these solvents are immediately rinsed and wiped off.
Tip 10 Register the Warranty and read the terms of the warranty and the manufacturers cleaning guides!