11 minute read
Essential Tools for Achieving Consistent Quality in Additive Manufacturing
Source: ATA Scientific Pty Ltd
Australia’s Additive manufacturing (AM) industry is off and running, transforming the way we produce and distribute goods. Also known as 3D printing, AM allows complex parts to be produced, on-demand using digital files in a one-step build process. In the heat of the COVID-19 pandemic, 3D printing stepped up to provide solutions during severe disruptions in supply chains ranging from personal protective equipment (PPE) to emergency dwellings to isolate patients. From aerospace to automotive engineering, and from the medical to the dental industry, AM is an evolving technology revolutionising industries across the country.
Why Do Your Materials Matter?
3D printed structures are usually built layer upon layer, so consistency in the final product relies on the consistency of the materials being laid down. For powder bed AM processes where a laser or electron beam fuses the raw materials together (such as selective laser melting, electron beam melting, and binder jetting), the quality of the finished component will depend on the properties and behavior of the metal, ceramic, or polymer powder being applied. Poor powder quality can produce defects in the end part including pores, cracks, inclusions, residual stresses, and sub-optimal surface roughness, as well as compromise throughput. To avoid these issues, the relationship between material properties, processing performance, and endcomponent properties need to be assessed.
What Makes An Ideal AM Powder?
High purity powders that pack consistently with high density are associated with the production of consistentquality components with fewer flaws, while good flowability enables the powder to spread evenly and smoothly across a bed to form a uniform layer with no air voids. Smooth, regularly shaped particles tend to flow more easily than those that are irregular and/or rougher, because of reduced interparticle friction and a lower risk of mechanical interlocking. Similarly, spherical particles tend to pack more efficiently than those that are irregular, giving rise to higher bulk densities. The forces of attraction between particles increase with decreasing particle size, therefore fine metal powders usually flow less freely than coarser powders. Thus, optimising particle shape and including both coarse and fine particles (finer particles fill the interstices left by larger ones) can enable maximum packing density and maintain good flowability.
How Does The Production Of Metal Am Powders Affect Their Properties?
Most metal powders used in AM are produced by gas atomisation, where a feedstock is melted and ejected through a nozzle into a high-pressure gas stream to create droplets. The size of particles produced can be controlled by varying process parameters such as gas pressure, melt properties, nozzle design, and gas-metal ratio. However,
the resulting powder is not ideal for AM processes, which require a narrower particle size distribution to produce a consistent powder layer of the correct thickness. Additional processes like ‘scalping’ can remove oversize particles but these reduce yield and therefore increase the cost of AM powders. Unwanted features such as satellite formation, where small and larger particles fuse or agglomerate during atomisation can impair flowability and packing. More spherical particles can be produced by Plasma Atomisation or the Plasma Rotating Electrode Process (PREP), but at a higher price. What’s more, when using recycled powders, the risk of mechanical damage, oversized particles, or surface oxide layer formation increases. So, to take full advantage of AM’s sustainability benefits while ensuring that their materials don’t compromise final part quality, manufacturers must ensure they can reliably characterise and optimise their materials.

How Do You Measure Particle Size and Shape Reliably?
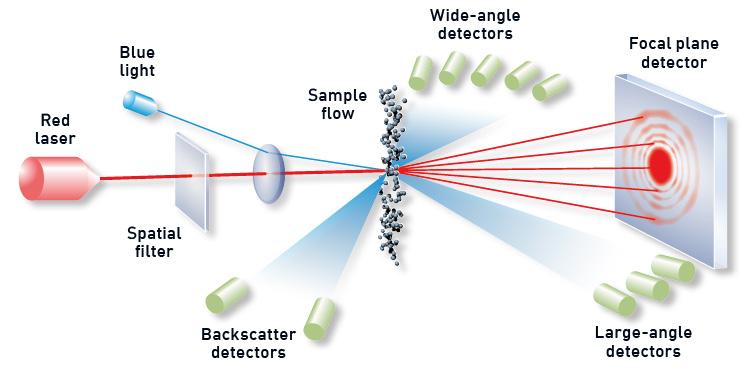
Laser diffraction With a measurement range from 0.01 to 3,500µm, the Malvern Mastersizer 3000 is the particle sizing technology of choice for most AM applications, particularly at smaller size ranges; from <25µm used in Metal Injection Moulding to up to 1mm used in Hot Isostatic Pressing. Particle size distribution (PSD) is determined using Mie theory from the measured angular dependence of the scattered light as a collimated laser beam passes through the sample (Figure 1). Large particles scatter with high intensity at narrow angles relative to the incident beam, while the signal generated by smaller particles is weaker but extends to wider angles. The Mastersizer 3000 is highly automated and offers high-throughput analysis with minimal manual input. It is highly efficient at revealing the presence of any small quantities of oversized or agglomerated material that could cause a powder sample to be out of specification. Insitec
Figure 2: Schematic of a gas-atomisation process for manufacturing metal powders, showing the points where laser diffraction can be employed.
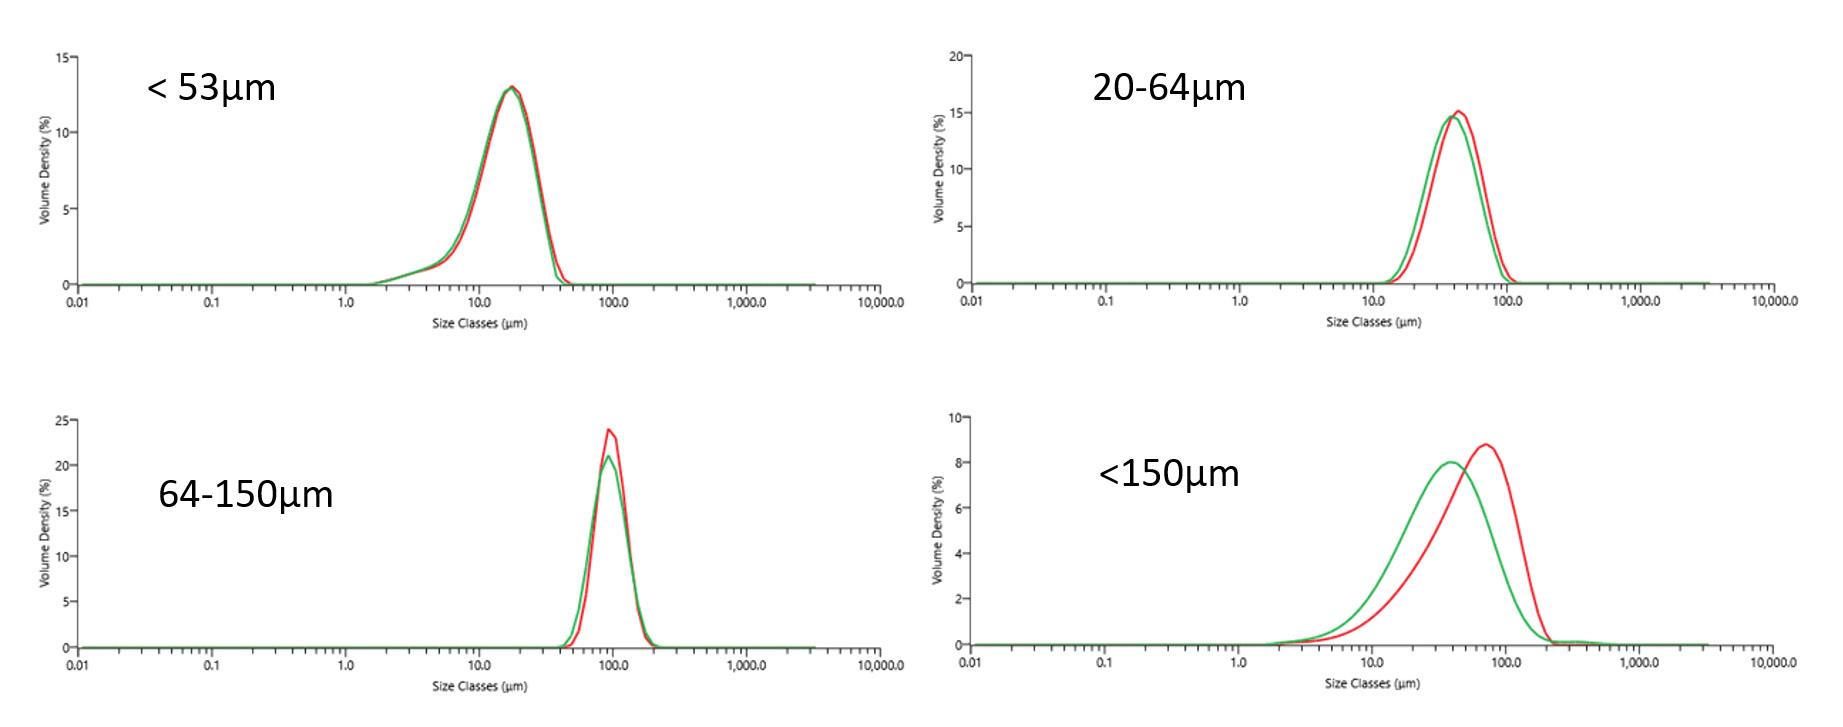
is an online system that deliver real-time particle size monitoring for automated process control. It can be used either to monitor particle size evolution during atomisation, grinding, or spray drying, or at an end-user facility for automated powder handling and recycling (Figure 2). Figure 3 shows measurements for four fractions of metal powders, made using both wet and dry dispersion on the Mastersizer 3000. Both wet and dry dispersion are suitable for analysing metal powders to validate the primary particle size and should give equivalent results. Wet dispersion offers an alternative particularly when particles carry ignition risk or health and safety concerns. For the <150µm fraction, there is a noticeable discrepancy between the wet and dry measurements. This is likely due either to fine particles adhering to larger particles in the dry state which may impact powder flowability, or a difference in sampling.

Figure 3: Comparisons of wet and dry measurements for four stainless-steel 316L powder samples. Red trace shows dry PSD and green trace shows wet PSD. Each trace shows the average result over five measurements.
Dynamic Image Analysis
The Malvern Hydro Insight offers dynamic imaging which can be integrated with the Malvern Mastersizer 3000 to give particle shape information at the same time as particle size measurements. Particles suspended in a flowing stream by the laser diffraction dispersion unit flow through the Hydro Insight and are then photographed by a high-resolution digital camera. The images are stored for viewing and converted to a digital format for real-time image analysis and quantification of size and/or shape (Figure 4). Large numbers of particles are measured quickly with all three particle dimensions captured due to the random orientation of the particles. The Hydro Insight can detect small numbers of oversize particles or contaminants that laser diffraction alone may miss and help to troubleshoot or optimise laser diffraction methods. It also provides a built-in algorithm for correlating particle size data with sieve analysis which tend to correlate better than equivalent circular areas or spherical
diameters reported by laser diffraction, especially when dealing with non-spherical particles.
Static Image Analysis
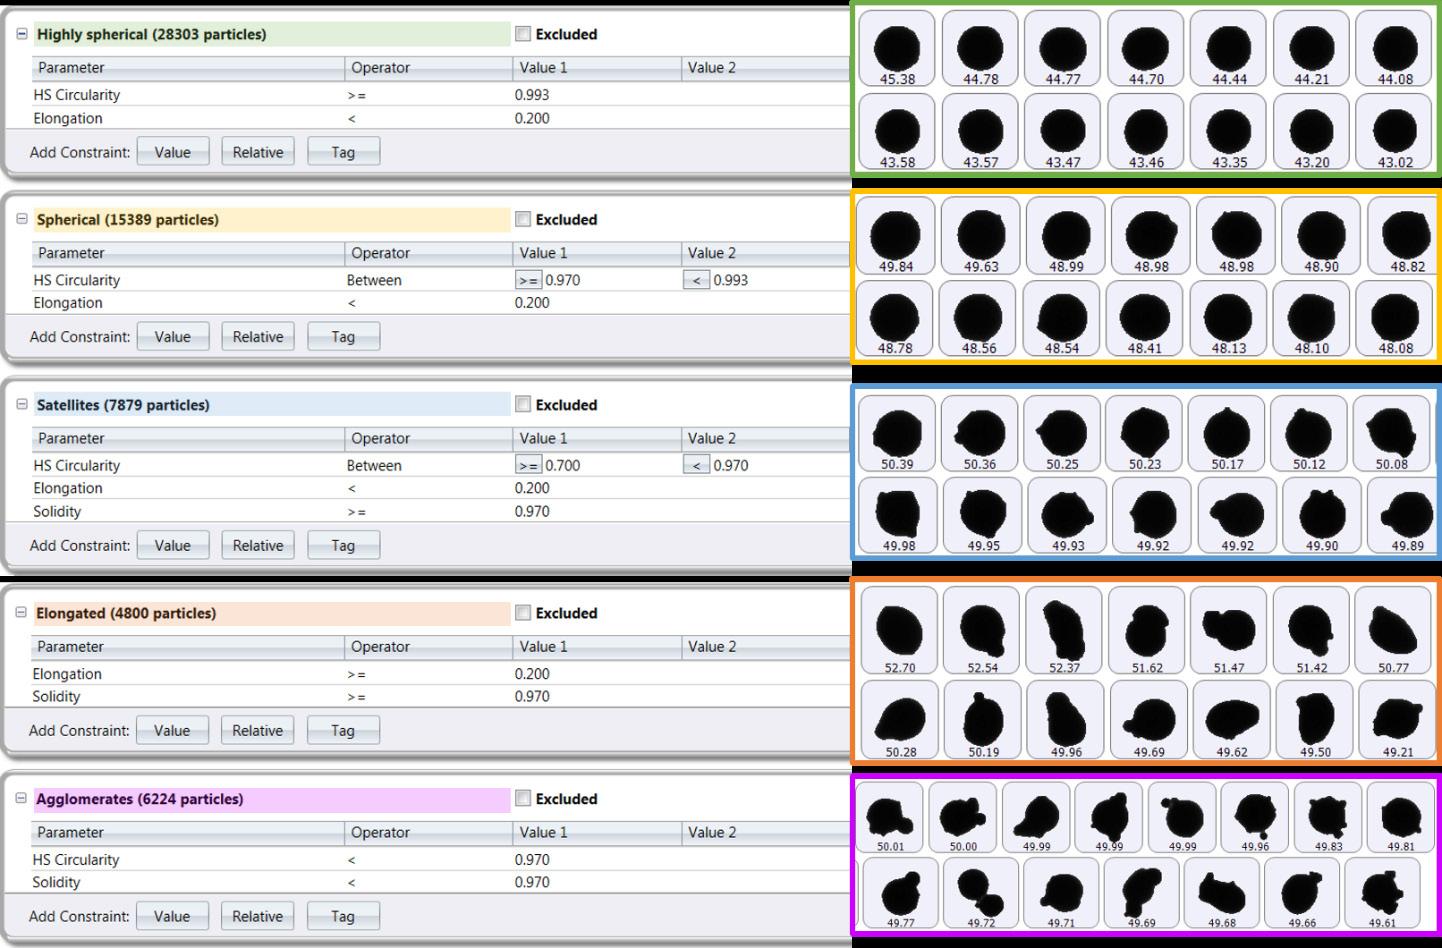
The Malvern Morphologi 4-ID combines all the benefits of automated static imaging with chemical identification of individual particles by Raman spectroscopy in a single measurement. It captures individual images of tens of thousands of particles from approximately 0.5 µm to > 1mm and calculates component specific size and shape parameters, including circularity, elongation, convexity, and solidity (Figure 5). Because the position of each particle is recorded, particles of interest can be revisited with higher magnification for a more detailed study. It can also support customised classifications to examine features such as satelliting.
Conclusions
The size and shape of metal powder particles affect powder bed packing and flowability. In turn, these features impact the build quality and final properties of components manufactured using AM. As such, understanding and optimising particle size and shape is critical to the success of powder-bed AM. Laser diffraction and automated image analysis are complementary tools that can be used to characterise and optimise metal powders for a range of powder-bed AM processes.
Contact us for more information today: ATA Scientific Pty Ltd +61 2 9541 3500 enquiries@atascientific.com.au www.atascientific.com.au

Figure 4: Images of metal powders, captured by Hydro Insight. Reference: Exploring the role and measurement of particle size and shape in metal additive manufacturing https://www.malvernpanalytical.com/en/learn/knowledge-center/ whitepapers/wp20210727particlesizeshapemetalam
Figure 5: Particle classifications for an AM metal powder using the Morphologi 4.

FIVE COMPELLING REASONSFIVE COMPELLING REASONSFIVE COMPELLING REASONSFIVE COMPELLING REASONS TO USE TO USE TO USE TO USE THE PHENOM DESKTOP SEM THE PHENOM DESKTOP SEM THE PHENOM DESKTOP SEM THE PHENOM DESKTOP SEM
Ease of use is what the PhenomEase of use is what the PhenomEase of use is what the PhenomEase of use is what the Phenom Pharos name has come to mean. AllPharos name has come to mean. AllPharos name has come to mean. AllPharos name has come to mean. All -standing -standing-standing-standing FEG-SEM have been housed in aFEG-SEM have been housed in aFEG-SEM have been housed in aFEG-SEM have been housed in a tabletop model with the simplicity thattabletop model with the simplicity thattabletop model with the simplicity thattabletop model with the simplicity that Phenom desktop SEMs are known for.Phenom desktop SEMs are known for.Phenom desktop SEMs are known for.Phenom desktop SEMs are known for.

5 μm 5 μm5 μm5 μm
using Phenom Pharos using Phenom Pharosusing Phenom Pharosusing Phenom Pharos
1.1. 1. 1 Super fast, sharp, high contrast imagesSuper fast, sharp, high contrast imagesSuper fast, sharp, high contrast images. Super fast, sharp, high contrast images
Speeds up projectSpeeds up projectSpeeds up projectSpeeds up projec work and provides high-end imaging and analysis critical for many fields from forensics to industrial manufacturing and even life sciences. work and provides high-end imaging and analysis critical for many fields from forensics to industrial manufacturing and even life sciences. work and provides high-end imaging and analysis critical for many fields from forensics to industrial manufacturing and even life sciences. t work and provides high-end imaging and analysis critical for many fields from forensics to industrial manufacturing and even life sciences. materials,materials, materials, materials,
2.2. 2. 2 Unsurpassed user experienceUnsurpassed user experienceUnsurpassed user experience. Unsurpassed user experience
Easy to use without extensive training or SEM experience means the Phenom is accessible to everyone.Easy to use without extensive training or SEM experience means the Phenom is accessible to everyone. Easy to use without extensive training or SEM experience means the Phenom is accessible to everyone. Easy to use without extensive training or SEM experience means the Phenom is accessible to everyone. 3.3. 3. 3 Multiple detectors revealMultiple detectors revealMultiple detectors reveal. Multiple detectors revea finer detailsfiner detailsfiner detailsl finer details Fully integrated EDS and SE detector together with a low-kV beam (1 kV) allows thin contamination layers on the surface can be observed (Phenom Pharos). Fully integrated EDS and SE detector together with a low-kV beam (1 kV) allows thin contamination layers on the surface can be observed (Phenom Pharos). Fully integrated EDS and SE detector together with a low-kV beam (1 kV) allows thin contamination layers on the surface can be observed (Phenom Pharos). Fully integrated EDS and SE detector together with a low-kV beam (1 kV) allows thin contamination layers on the surface can be observed (Phenom Pharos). 4.4. 4. 4 Intuitive software with advanced automation Intuitive software with advanced automation Intuitive software with advanced automation . Intuitive software with advanced automation
Simply click and go to work or use automated recipes with elemental mapping and line scan functionality.Simply click and go to work or use automated recipes with elemental mapping and line scan functionality. Simply click and go to work or use automated recipes with elemental mapping and line scan functionality. Simply click and go to work or use automated recipes with elemental mapping and line scan functionality. 5.5. 5. 5 Huge time and money saverHuge time and money saverHuge time and money saver. Huge time and money saver Provides rapid,Provides rapid, Provides rapid, Provides rapidmulti-scale information in-house for process monitoring and improvement. multi-scale information in-house for process monitoring and improvement. multi-scale information in-house for process monitoring and improvement. , multi-scale information in-house for process monitoring and improvement.
Phenom Pharos FEG-SEM Phenom Pharos FEG-SEMPhenom Pharos FEG-SEMPhenom Pharos FEG-SEM Phenom XL G2 SEM Phenom XL G2 SEMPhenom XL G2 SEMPhenom XL G2 SEM Phenom ProX G6 SEM Phenom ProX G6 SEMPhenom ProX G6 SEMPhenom ProX G6 SEM


Field Emission Gun (FEG) SEM with 1 - 20 kV range Field Emission Gun (FEG) SEM with 1 - 20 kV range Field Emission Gun (FEG) SEM with 1 - 20 kV range Field Emission Gun (FEG) SEM with 1 - 20 kV range For large samples (100x100 mm) For large samples (100x100 mm) For large samples (100x100 mm) For large samples (100x100 mm) High performance desktop SEMHigh performance desktop SEM High performance desktop SEM High performance desktop SEM
Fully integrated EDS Fully integrated EDSFully integrated EDSFully integrated EDS Automated GSR SEM Automated GSR SEMAutomated GSR SEMAutomated GSR SEM
Dedicated for gunshot residue analysis Dedicated for gunshot residue analysis Dedicated for gunshot residue analysis Dedicated for gunshot residue analysis
Steel, Technical cleanliness and more Steel, Technical cleanliness and more Steel, Technical cleanliness and more Steel, Technical cleanliness and more Fully automated LUXOR sputter coaters reduce risk for sampleFully automated LUXOR sputter coaters reduce risk for sampleFully automated LUXOR sputter coaters reduce risk for sampleFully automated LUXOR sputter coaters reduce risk for sampledamage damage damage damage
Gold orGold orGold orGold o Platinum coatings idealPlatinum coatings idealPlatinum coatings idealr Platinum coatings idea for high resolution FEG-SEM imagingfor high resolution FEG-SEM imagingfor high resolution FEG-SEM imagingl for high resolution FEG-SEM imaging
COMPLETELY AUTOMATED COMPLETELY AUTOMATEDCOMPLETELY AUTOMATEDCOMPLETELY AUTOMATED UNIQUE A² TECHNOLOGY UNIQUE A² TECHNOLOGYUNIQUE A² TECHNOLOGYUNIQUE A² TECHNOLOGY COATING 1 to 100nm THICKNESS COATING 1 to 100nm THICKNESSCOATING 1 to 100nm THICKNESSCOATING 1 to 100nm THICKNESS UPSIDE DOWN DESIGN UPSIDE DOWN DESIGNUPSIDE DOWN DESIGNUPSIDE DOWN DESIGN TRIPLE FUNCTIONALITY TRIPLE FUNCTIONALITYTRIPLE FUNCTIONALITYTRIPLE FUNCTIONALITY ROBUST DESIGN,ROBUST DESIGN, ROBUST DESIGN, ROBUST DESIGN MADE IN GERMANY MADE IN GERMANYMADE IN GERMANY, MADE IN GERMANY


