

Website User Manual
Version 1.1 | April 2024
a)
b)
c)
d)
e)
a)
b)
c)
d)
1. Become a Customer
Click on “Become a Customer” on the Home Page
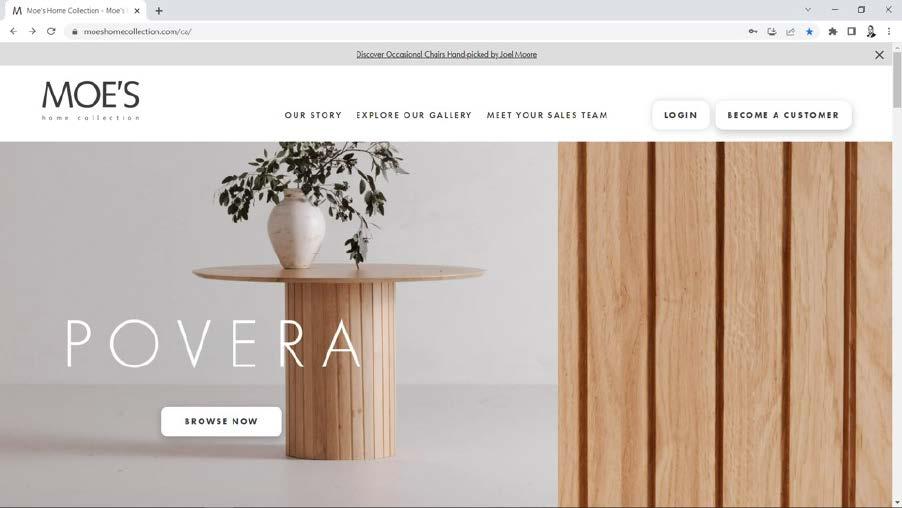
Select a business type that matches your business from those listed

On the next screen, fill in your business details and specify the country you are creating your account for. This is applicable for companies who have operations in the US, as well as in Canada. It is important to select the correct country so that you could see the pricing relevant for that country. If your company is neither in the United States or Canada, kindly select United States as the country.
Next, specify if you are part of a buying group and provide your buying group name and member ID and also complete your tax information.
In the business address section, share the details of your billing address.
Under shipping information, if your shipping address is same as billing address select the checkbox “Shipping address matches my business address”
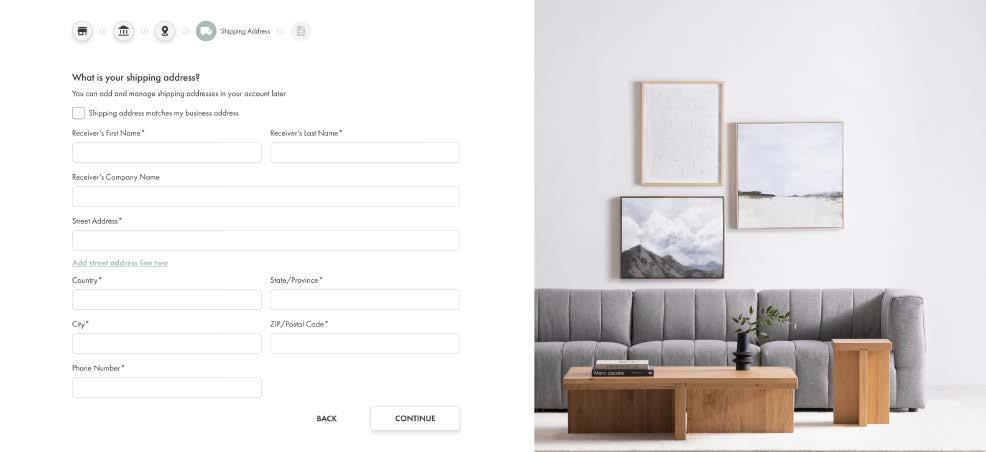
After successfully submitting your completed application, and once your profile is approved (approximately within ~48 business hours), you will receive a welcome email and be able to login.
The email used at the time of registration, by default becomes the admin for the company account that you have created.
2. Logging In to the Website
Click on “Log In”

Use the email and password you registered with to login to the website. Please make sure that you are selecting the correct country for your login. For example, if you are a company that has an account for both the US and Canada, and you select US as a country on the login page, you will see our US catalog and pricing.

3. Resetting your Password
If you have forgotten your password, from the Home Page, choose Log In, then click on “Trouble logging in? Reset my password”
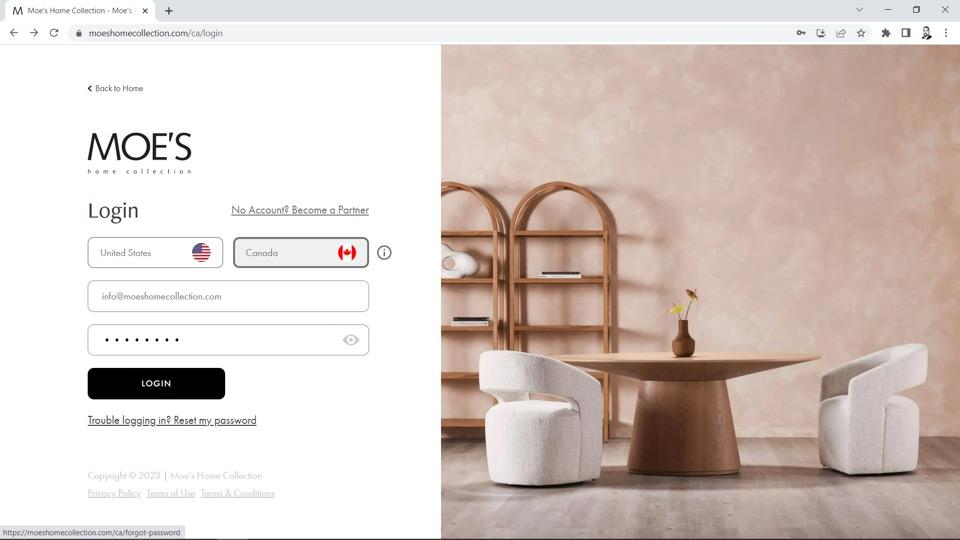
Select the country for which you have forgotten the password and enter your email, then click on “Send Reset Link”
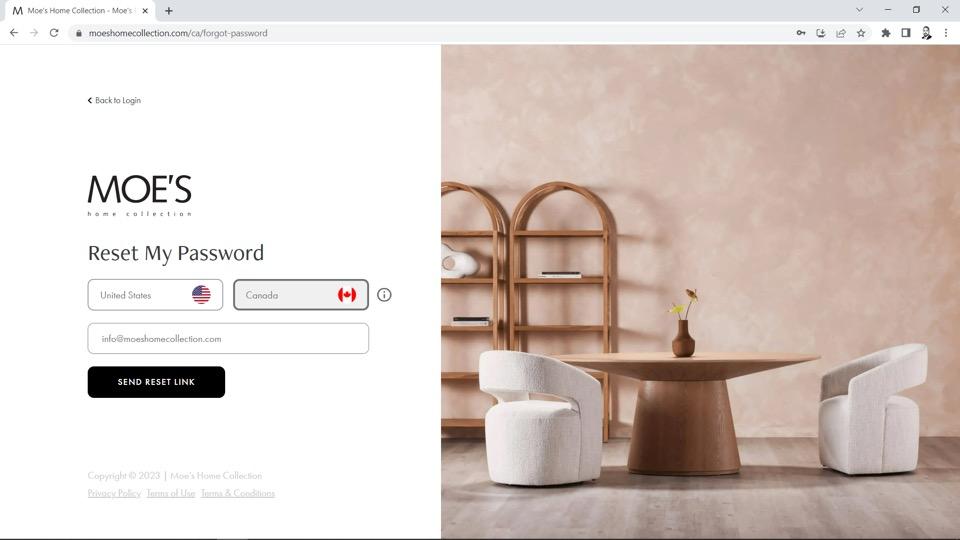
A password reset email will be sent to your email address automatically. Follow the instructions on the email in order to reset your password.

4. Setting up the Account Dashboard
a) Update User Information (Name/Email/Password)
On the home page, next to your name on the upper right corner, click on the down arrow and select Account Dashboard

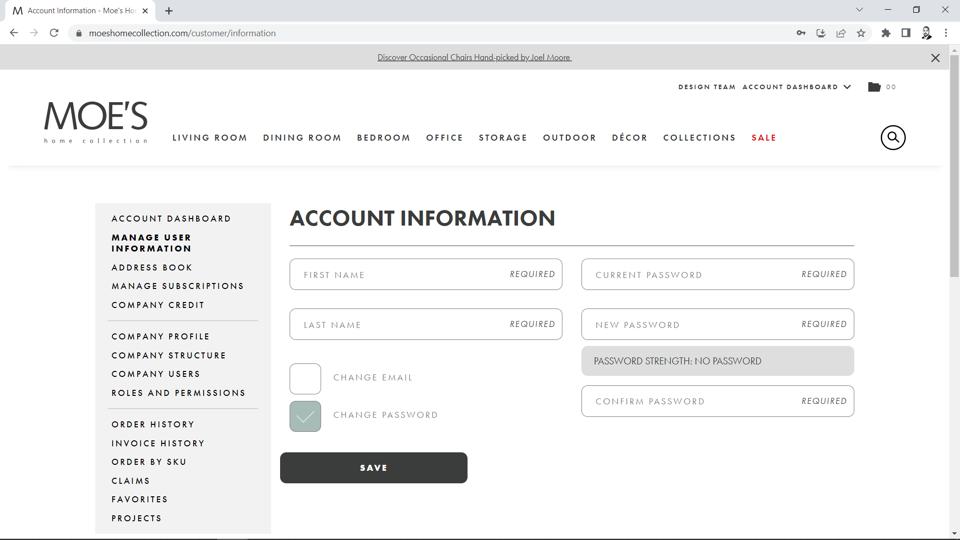
In the navigation bar on the left side of the screen, click on “Manage User Information”

From this page you can change your first name, last name, and password associated with your account
b) Update your Shipping Address(es)
Click on Address Book on the Account Dashboard and the following page will appear

On this page you can change your default shipping address, or edit an existing saved address. Please note you cannot change your company billing address as this can only be changed by the customer care team. Steps to reach out to customer care can be found at the end of this document.
c) Update Vital Company Information
Vital company information such as company name, email, Tax ID, and re-seller ID can be updated on Company Profile page under your Account Dashboard

d) Add New Users to Your Company and Define their User Permissions
Under your Account Dashboard, click on Company Users

Here you can edit or delete an existing user and add new users to your company. To add a new user simply click on “Add New User”
In the second field, “Default User” is pre-selected. You can change this to different role types that you can define in your Account Dashboard. Each role can have different permissions such as if that user is able to complete purchases, view order history, view payment details, etc. Step E below outlines the steps for creating roles and permissions:
Once you’ve chosen a role, enter the remaining required details and select “Save”. When you setup a new user, the user will receive an email with instructions on how to login for the first time. Please wait 2 hours from receiving the user email to login for the first time.

e) Creating Roles & Permissions
Roles & permissions can be edited only by the admin of an account. If you are not an admin for your company, please reach out to them if changes need to be made.
Under Account Dashboard, click on “Roles & Permissions”

You will see all the pre-created roles as well as the ones as an admin you have previously defined. You can delete or edit permissions for any of these roles
You can also simply click on “Add New Role”
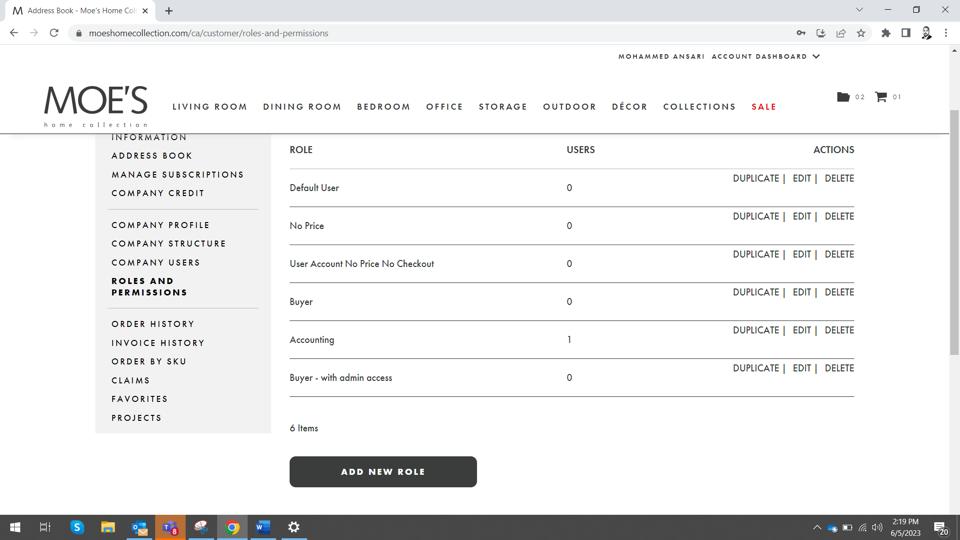
You can then define the permissions associated with the selected role.

5. Browsing the Website
a) What’s on the Home Page
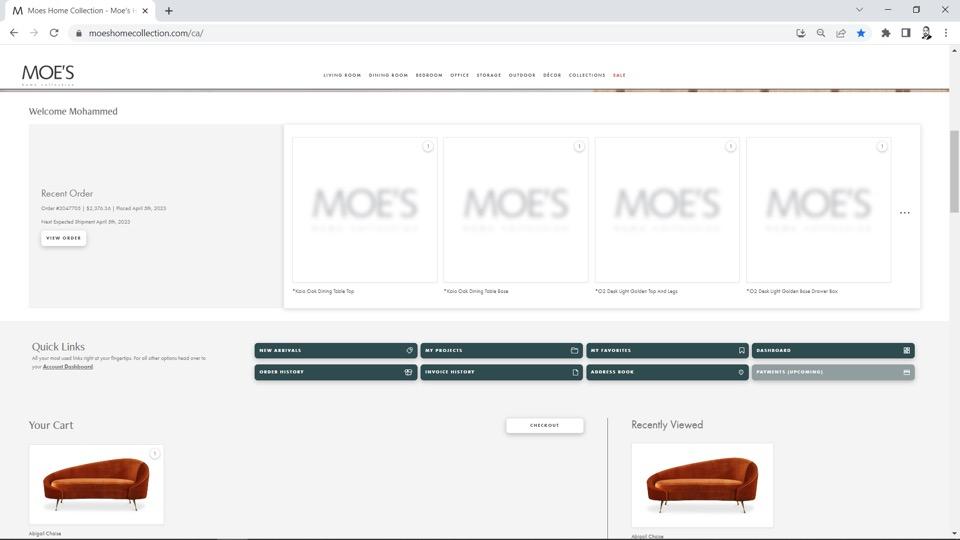
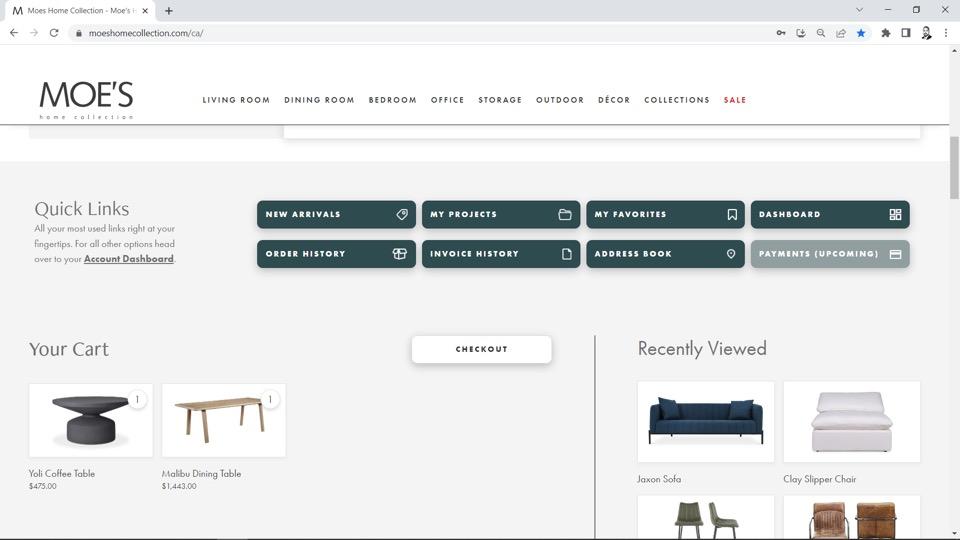
On our logged in home page, you have access to quickly see your most recent order, can use any of the quick links to New Arrivals, Projects, Favorites, Account Dashboard, Order History, Invoice History, Address Book, and Wallet. You also have one click access to products in your cart and recently viewed products.
b) Browsing Via the Top Navigation Bar
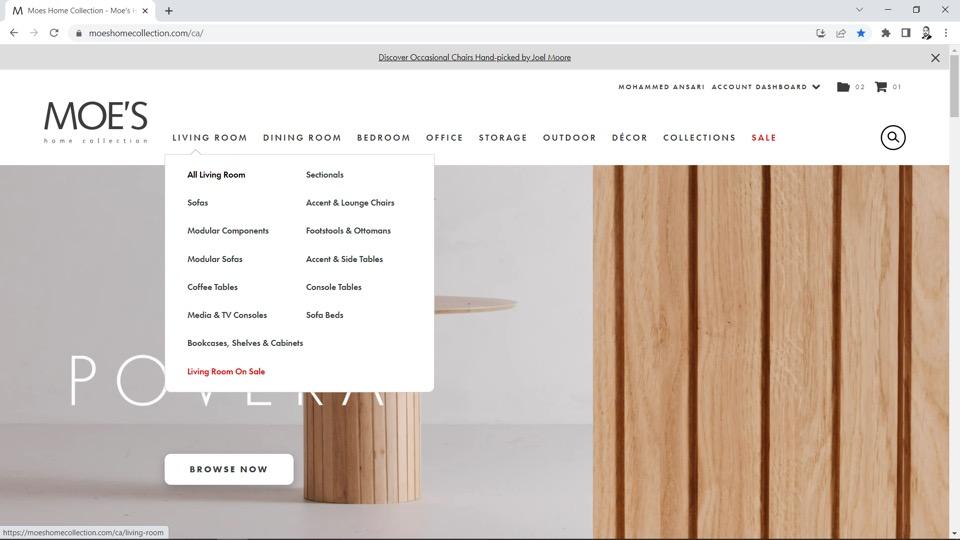
On the top bar of the page you can see the navigation categorized by rooms (such as living room, dining room etc.), Our Collections, and Sale
Our Collections showcases our new launches and curated product recommendations by our In-House product team.
From the top navigation you can easily navigate to the product category of your choosing
c) Browsing Via Search
On the search bar, you can search directly for SKU number, Product Name, or Collection Name. As an example in the screenshot below, when you search for the keyword “O2” all products with the keyword are displayed. You can either click on “Show All” to see all products with that keyword or you can simply click on one of the products showcased in the search bar itself.

d) On a Product Detail Page
1. Set of 2 Badge
Some of our products (such as Bar Stools and Dining Chairs) are sold as a set of 2 and the price that you see on the website is the price for 2 units. Set of two products are clearly called out in the product title – for instance in the below example the product title reads “Alibi Bar Stool – Set of Two”
Set of two may also be showcased by a badge of 2 chairs as shown in the image below

2. Downloading Images
To download a specific image on any product page, simply hover your cursor over the product image you will notice a “Download Icon” on the top left of the image, clicking this will download that image to your computer.
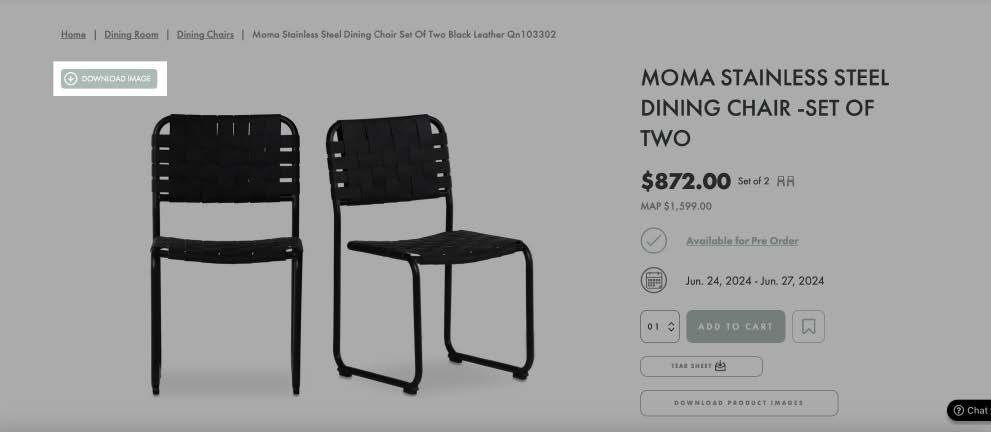
Should you wish to download all images associated with this product, simply click on “Download Product Images” on the bottom right and a folder of the images will be saved on your computer.

3. Inventory Availability
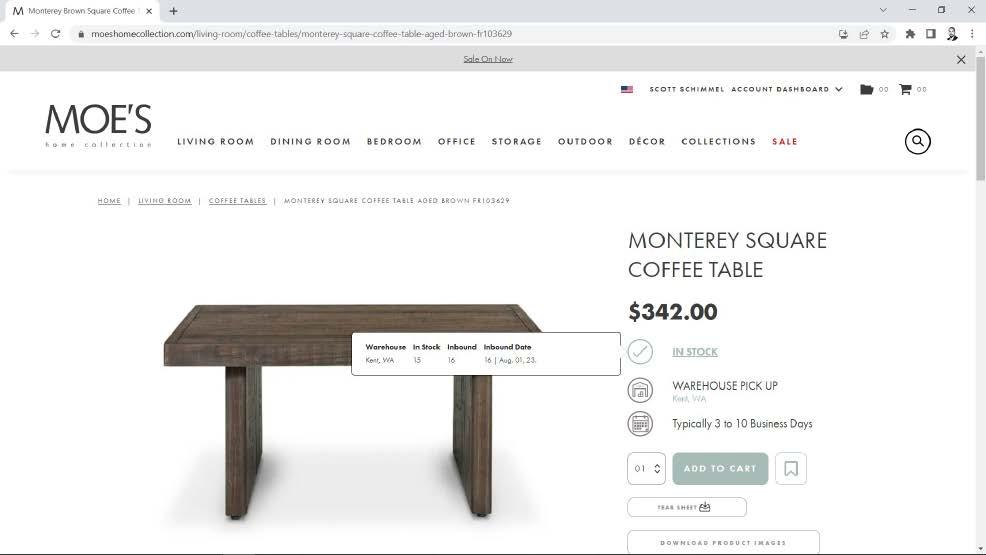
All products which are in stock, have the stock details displayed on the website. Simply hover your cursor on “In Stock” to see how many of the products we have available across our warehouses. In this view you can see inventory that we have “In Stock” and inventory which is “Inbound”. In stock inventory is the inventory which is physically available in our warehouses. Inbound inventory is the inventory which is expected to arrive physically to our warehouse as per the inbound date specified.
4. Tear Sheet
On each of our product detail pages, we have the ability for you to download a tear sheet of all the details associated with the product in one single page.

Simply click on the tear sheet button, define the price that you want to show to your customers and add notes to it to your liking. Then, click “Download” and the tear sheet will be downloaded to your device.

5. Swatch Code
Upholstered products have physical swatch which can be ordered by the customer. To order a swatch, you will need the swatch code. On the product detail page for any upholstered item, if you hover over the swatch (refer to the screenshot below), you will see the swatch code appear next to it. It is also listed under the Specifications section. On our physical swatch book, use that same code to review the true color for a given product

6. Ordering Swatches
If you would like to order swatches, simply click the order swatch button beside eligible products. Then select the colour and add it to your cart.

e) Favorites & Projects
On a product detail page, next to the “Add to Cart” button you can see a save icon.
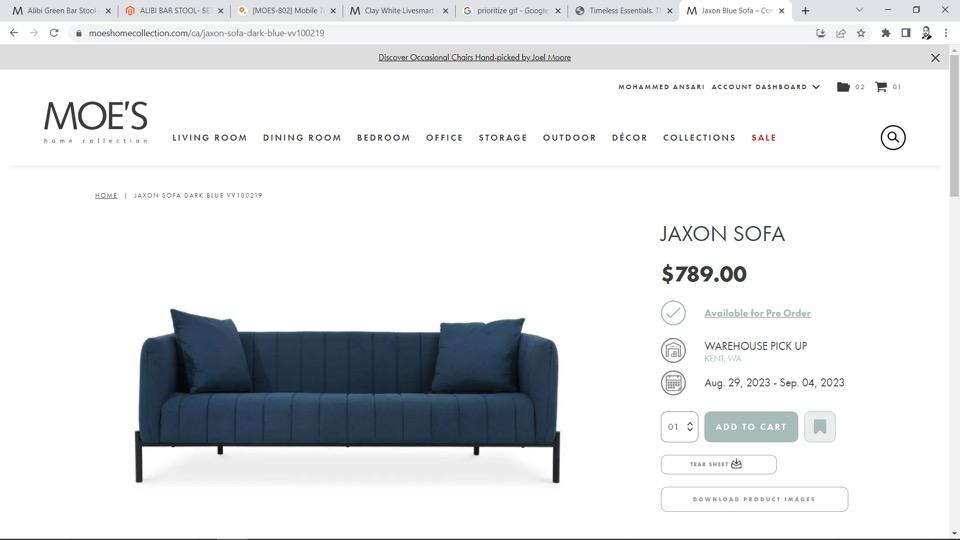
Once you click on the save icon, the favorites and projects window will open up and you can select if you want to add this product to your favorites, an existing project, or a new project by choosing Create New Project. This tool is very helpful for designers working on multiple projects for different clients.

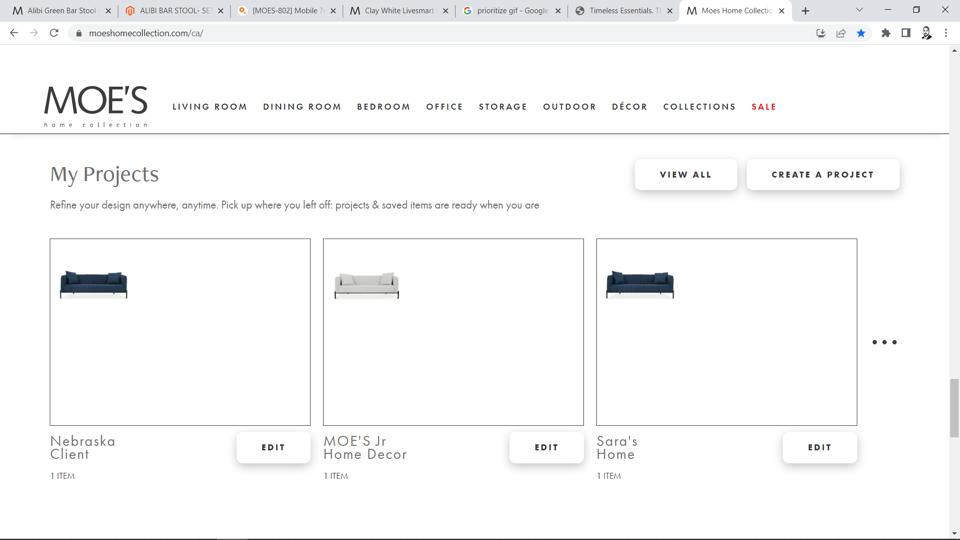
You also have easy access to all your projects from your home page.
6. Check Out - Buying Products Online
a) Shipping Method Selection
Once you have added all the products for your order to your cart, click the Cart icon and choose Check Out
On the cart page, you can chose your preferred shipping method, either have the items delivered to your adddress, or pick them up from a Moe’s warehouse.
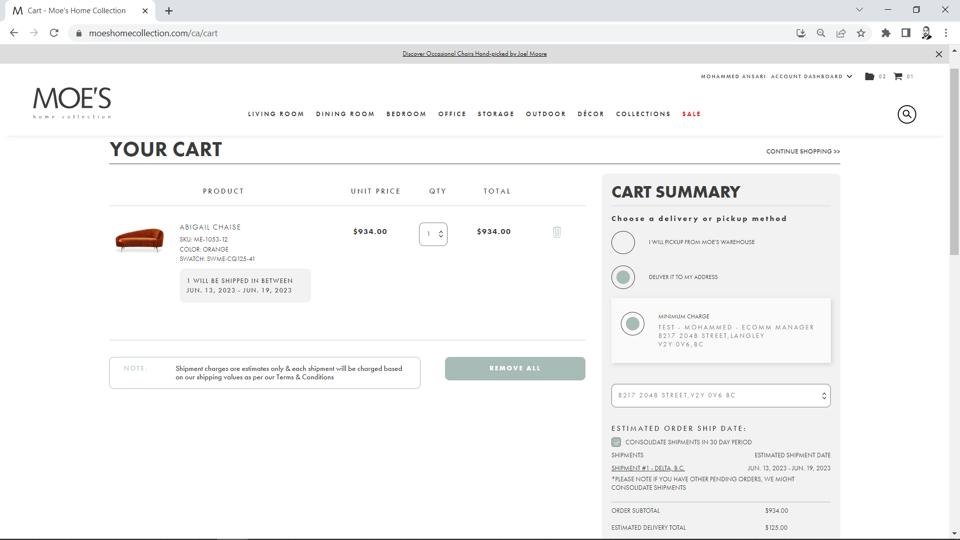
If you select “Deliver to my Address” and click on the address bar, you will be able to see all your saved addresses to select from. You can also add a new address by clicking on “Add New Address”

When adding a new address, you can choose to select “Save This Address”, this will add the address to your Saved Addresses within your account for easier future checkout. If you leave this unselected, this address will only be used for this order and not saved in your account. This feature may come in handy for designers and wholesalers whose ship to address changes based on their clients.
b) Order Consolidation
On your cart, if you select “Consolidate Shipments in 30 days Periods” the website will (should it be possible based on inventory inbound position) automatically reduce the total number of shipments by bundling any items within 30 days of arriving together.
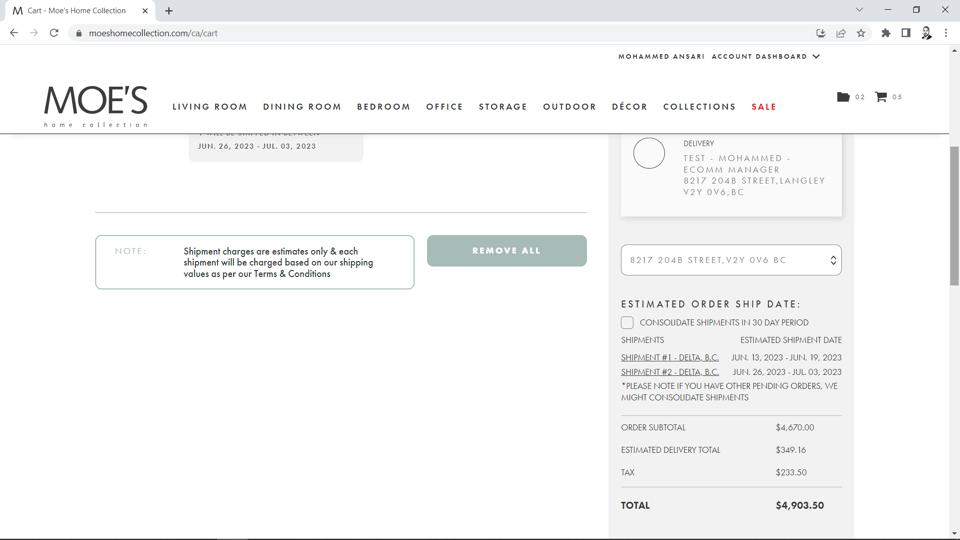
c) Payment Method Selection
We currently have two payment methods available for our customers – “Credit Terms” and “Credit Card” If you don’t have credit terms with us, you will only see “Credit Card” as a method of payment.

If you have credit terms, you can select it and use your available credit as method of payment to place the order.
If you choose credit card as the method of payment, you’re prompted to input your card details. Once you’re complete, ensure to select “Add Card” to save it to your account. The next time you checkout, your saved default card will be preselected. If you wish to edit or add a card, you can do so by clicking “select, edit, or add a card”.
You may also add and edit cards in your Account Dashboard under “Saved Cards”.

d) Shipping Notes & Purchase Order Number
Just before checking out, you have an option of adding any additional notes for us under shipping notes. If you would like to share your PO number with us, you can enter the same in the field PO Number

7. After Placing Your Order
a) Order History & Invoice History
You can find your order history within your Account Dashboard. You can also navigate to your Order History & Invoice History from the home page using the quick links.
Once on the Order History page, you can see all your past orders. To search for a specific order, type the order number or the PO number and select “Search”. You can also search order by date range or filter orders by their status (Open, Closed, or Cancelled)
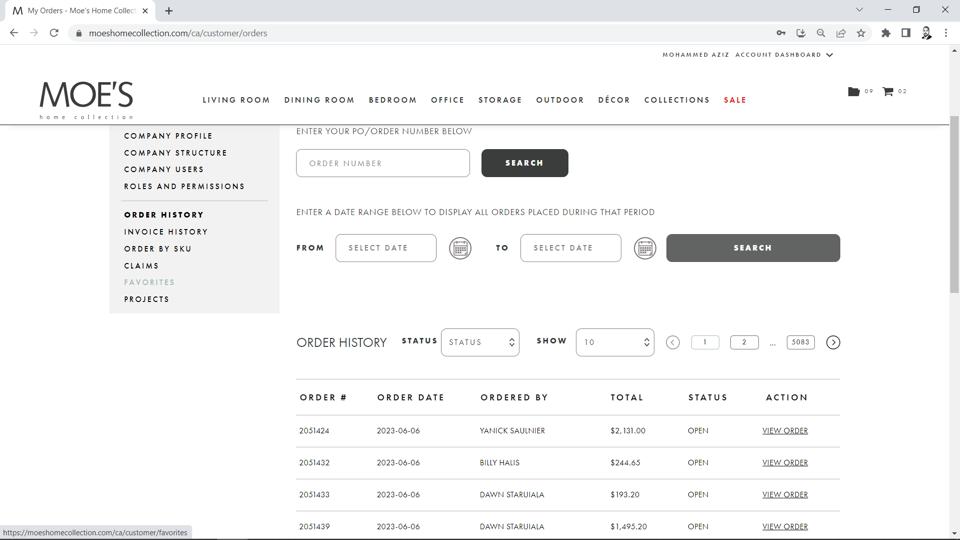
An order placed by you is not invoiced until after our warehouse associates confirm the product is ready to ship or pick up. Once the order is processed by our warehouse it is invoiced. You can see all orders which are invoiced within the Invoice History page. Invoice History has the same search filters as the Order History.
b) Claims
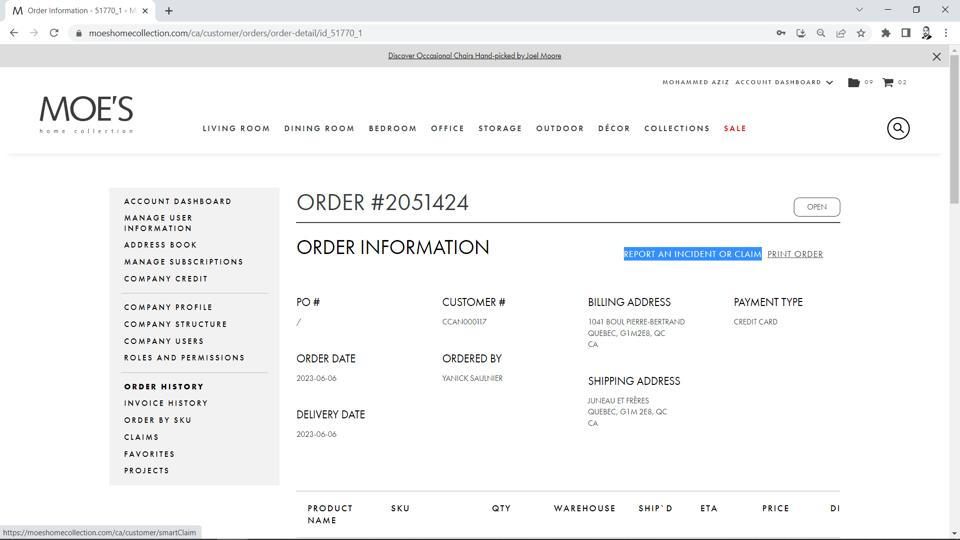
Should you wish to submit a claim for an order, you can do so via the Order History, Invoice History, or Claims pages.
On Order or Invoice History, simply click on View Invoice/View Order

And then click on “Report an Incident or Claim”
Or from the Claims page, choose “Report an Incident or Claim”
Select the most appropriate claim type and follow the steps.
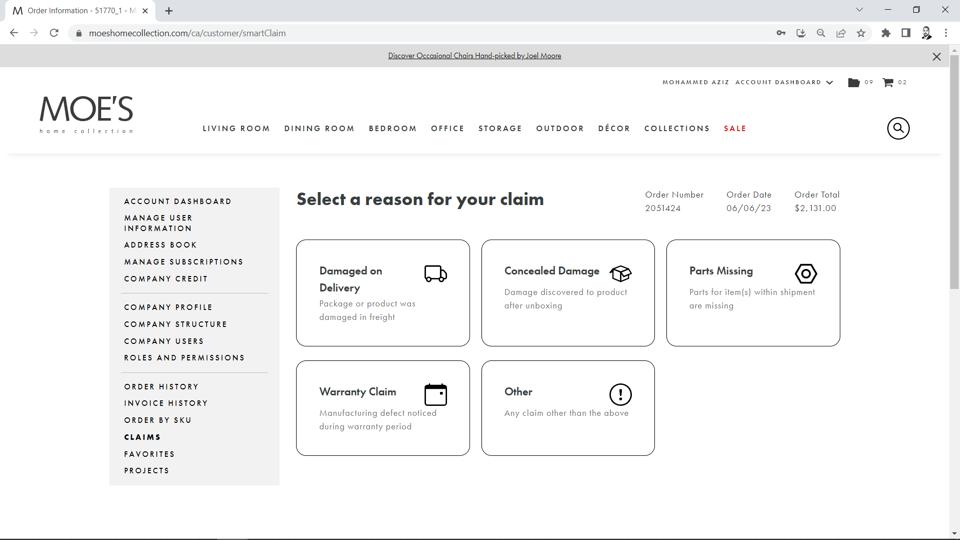
Please note, many of the fields on the claim portal are required (for example, uploading 3 images or more, adding a note etc.) The claim cannot be submitted until you have provided all necessary information for the required fields.
You can see a preview of the expected resolution on the final screen prior to submitting your claim. Once the customer care team has validated the information provided by you, the claim will be processed and a final resolution will be emailed to you.
8. Common user issues & solutions
If for any reason, you notice that a certain feature of the website is not working, please follow these steps to troubleshoot the issue:
a) Login Issues
If you are not able to login to the website, try resetting your password by clicking on “Trouble logging in? Reset my Password” and follow the steps from there before logging in again.

If more than one individual in your company are using the same login credentials you will need to let securely let them know about the updated password.
b) Unable to Use Credit Card for Payment
First, please ensure you have selected “Add Card” so that your card is saved in the system for use. If your card is saved and you still get an error. Please take a screenshot of the error and reach out to our customer care team for further assistance at cscommunications@moeshome.com.
c) Unable to Submit Claim
If you are unable to submit claim, it is possible that one or more of the mandatory fields (such as the required 3 images, or mandatory notes) are missing on your claim. Please double-check all fields and provide any required information before attempting to submit the claim again.
9. Escalations
Before you reach out to us for escalation, you may want to review relevant sections of this document to resolve any issues that you may be facing with the website. However, should you still need assistance, you can reach out to your sales representative or our customer care team at cscommunications@moeshome.com

