

What is On-Campus Video Conferencing?
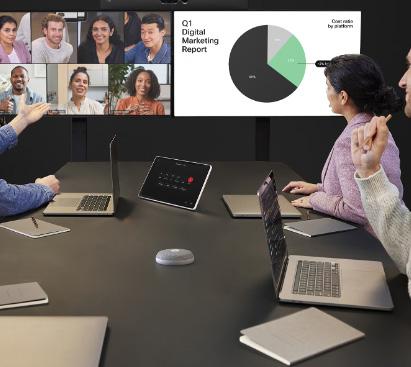
On-Campus Video Conferencing facilitates live, interactive communication, allowing for two-way interaction with individuals at distant locations. This technology enables the sharing of knowledge, content, emotions, and other human elements, creating an immersive experience on a large screen. The room is equipped for meetings, presentations, and device integrations, making content delivery dynamic and engaging.
The Room Kit features a powerful codec, a quad-camera bar with integrated speakers and microphones, and an intelligent Room Navigator control panel. These advanced tools are ideal for fostering collaboration across all our campuses. The sophisticated camera technologies offer speaker-tracking and auto-framing capabilities, enhancing the classroom experience.
While we understand that nothing can fully replace the presence of a teacher in a classroom, we recognize the challenges posed by today’s student demographics and economic climate. On-Campus Video Conferencing provides a viable alternative, ensuring that quality education and interaction can still occur even when physical presence is not possible.
Meeting the Needs of the Educational Master Plan
The 5 R’s of our Educational Master Plan set the stage for reaching as many students as possible with an education that will take them to new places in life. Whether it is an 18 year old right out of high school or a 40 year old single mom who is working full time to support their family- we want to make sure we do everything we can to give them access to a quality education.
On-Campus Video Conferencing is one of the many tools that we have at Mid-State to ensure we can reach as many students as possible.

Introduction to the Room Kit Components

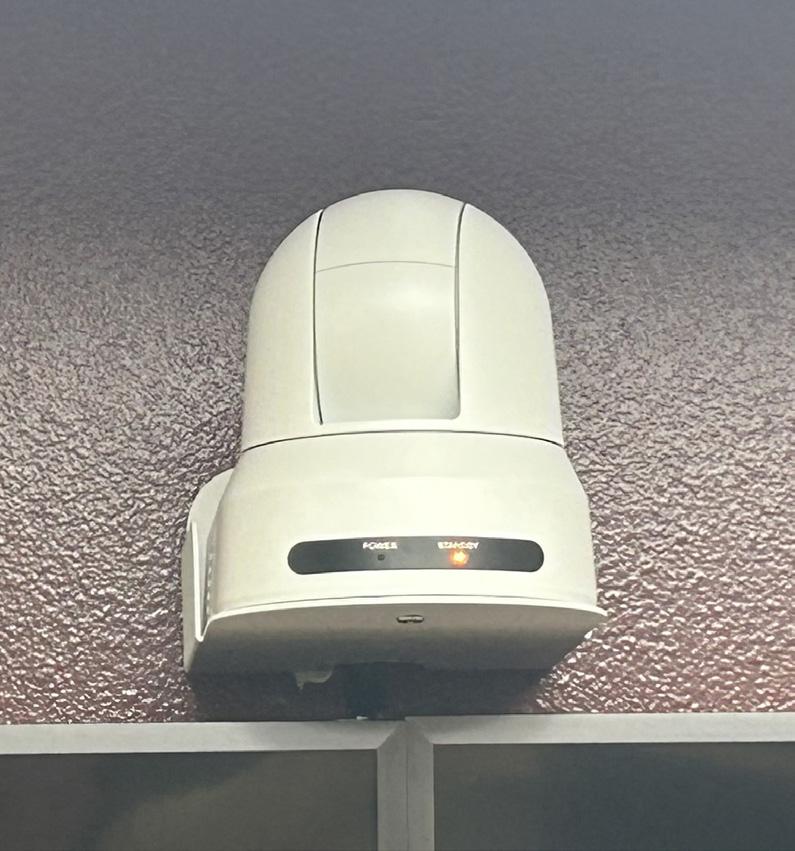
Presenter Track Camera

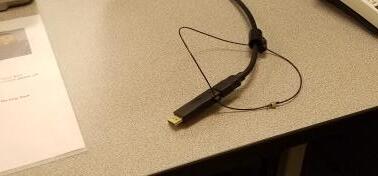
Quad Camera External Microphone
Navigator Panel
On-Campus Video Conferencing Definitions
Cameras
The Codec camera will dynamically track the person in the room who is speaking. The default is to show the entire classroom, but if someone is speaking, it will automatically zoom in on the speaker. When the person is done speaking, it will automatically zoom back out to to show the whole room again.
Note: The microphones are very sensitive so if a person is making a lot of noise such as whispering or opening a chip bag, it will pick that up and zoom in on that student. It is important to let students know that as part of the introduction to the course.
External Microphone
The microphones hang from the ceiling in several locations. Their placement is key for making sure the cameras are picking up the right place at the right time.
Quad Cameras
The Cisco Quad Camera is a video bar that uses its main 83-degree field of view lens and three 50-degree telephoto lenses to facilitate clear video conferencing. You can chose between different views, so everyone is equally framed in the meeting.

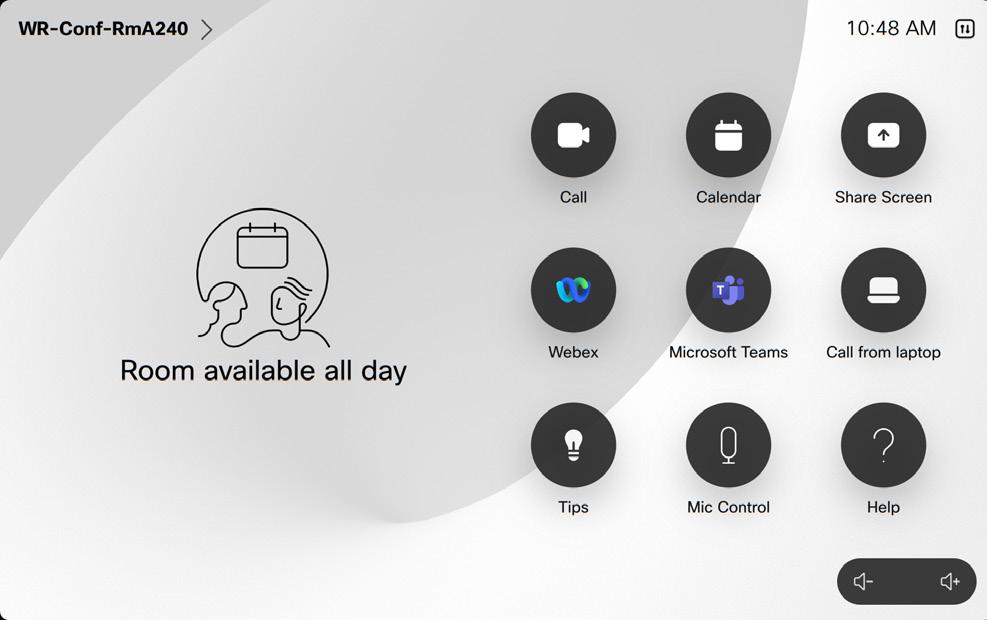
Navigator Panel
The navigator panel is your control of the system. You will be using the panel to share content and change the configuration setting for how you see your students on the other campuses.
Note: The camera controls are also found here, but with the presenter track turned on, you should not have to mess with the camera controls.
Touch Screen Monitor
The touch screen monitor on your instructor desk will allow you to control your screen by touch. Touch the screen, then Click the Yellow + button to access the digital white board, document camera, or computer. If your laptop is plugged into the HDMI cable, you will also have access to your laptop through that button.

Troubleshooting Step: If the video conferencing camera is not working, check the physical connections. Ensure that another application is not using the camera and restart the computer.
Sharing Content
Computer, Doc Cam, Digital Whiteboard, or Laptop
Step 1: Use the Instructor Station Touch Screen Monitor
Log in to the computer. There are two computer monitors on the desktop. One monitor is touch screen, one is your primary computer monitor. Touch the screen to bring up the Yellow + button and choose Whiteboard, Computer, or Doc Cam. If you have a laptop plugged in, you will also see that as an option for sharing. The touch monitor will be the monitor shared on the big screen. The other will be your staging monitor.
Using Your Laptop
If you hook your laptop up to the Display port cable it will automatically open as an option when you touch the Yellow + button.

Step 2: Sharing on the On-Campus Video Conferencing Screen

Once you have logged into the computer -or- you have plugged in your laptop and picked the content you want to share using the Yellow + button
1. Touch the Share button on the navigation panel.
2. When the Share Screen option pops up, click Share Cynap
3. Your content will share on the right monitor On-Campus Video Conferencing Unit
Troubleshooting Notes:
Q: My content is showing up on my computer, but not on the display screen
A: Try dragging the window to the other screen. (Click and hold the mouse on the top of the window to drag the window to the other monitor.)
Q: I was sharing my screen, then the system came up and my screen is no longer sharing
A: Reshare your screen. When the system comes up it resets the screen sharing.
Viewing Students on Other Campuses
The default view for seeing connected students is a filmstrip at the bottom of the video screen. The cameras are voice dynamic and will focus on the classroom that is currently talking, therefore the large segment of the video screen will show that classroom. There is a way to change the viewing options on the screen.
What are the options?
1. Group - The camera will adjust to show everyone.
2. Frames - The camera will zoom and show people individually or in smaller groups.
3. Speaker - The camera will follow the person speaking.
4. Manual - Manually adjust and save the camera views you need.
5. Presenter - The camera will follow the presenter.
6. Room View- The camera will pan out to the classroom

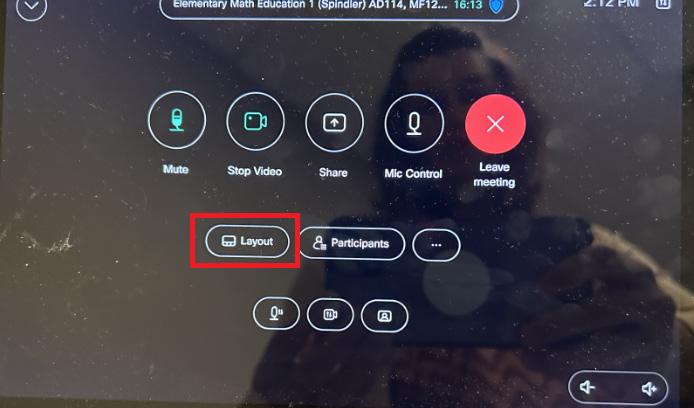
How Do I Change the Options?
• On the navigator panel, click on the Layout option. You will select Grid, Large Gallery, Prominent, or Focus

Tips for Seeing Who You Want to See, When You Want to See Them
If you want to see a particular campus, get them talking. The camera is voice activated, so when they talk, the campus/student will show front and center.
• When asking questions, assign it to a particular campus. For example, “Marshfield - what do you think about . . . ?“ As a student/students in Marshfield start to talk, the camera in Marshfield will show full screen.
• Call on specific students. Students at a distance are initially reluctant to talk. However, they will answer a question directed specifically at them rather than to all students in the class. Example, “Monica, can you give me an example of . . . ?“
• Pair and Share works great over the system if you have more than one student on a campus. Let students pair up to discuss, then share out to the large group. Everyone on every campus gets the chance to talk. If you have one student on a campus, let them pair with someone over the system between campuses while others are sharing among themselves.
Mute Button- mutes your campus only. You will still hear students from the other campuses.
Camera Control Options
Layout-The camera is automatically turned on to the student view. To move the camera to the instructor view, click the “layout” button in the bottom row. The camera will follow the instructor in the room.

Camera Tips
• The other campuses have the same controls on their systems. If a setting needs changed, send them to the panel and walk them through the instructions. The camera will reset itself when the next class starts, so you cannot mess it up.
• You cannot control the camera on another campus.
Camera Options-
In the third row, there are two ways to access Camera Options.

Camera Control will provide group, frames, speaker, manual, and presenter views, along with self view. Toggle between the two options to find the best fit for your class.
See “Camera Control/Selfview Options page for more information.
Teaching to a Camera
• Look into the camera on occassion. You can even interact with the camera with close up looks, the “evil eye”, or a fist bump.
• The quad cam will help you see the students and interact with the camera at the same time.
• Check out the page on changing the configuration
Volume Control
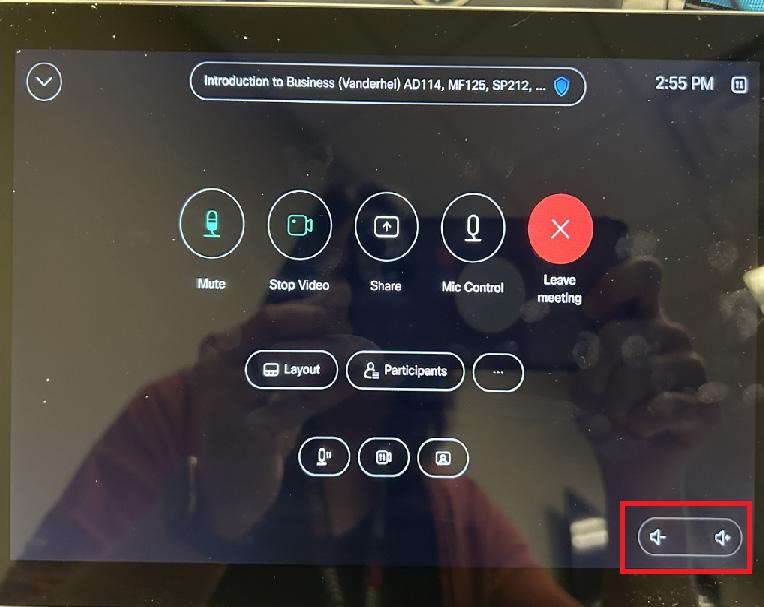
Volume Tips
• The default volume is typically set to a good level. It will only need to be adjusted for specific activites such as group work or extraneous noise.
• The other campuses have the same controls on their systems. If you need a campus to mute or change volume, send them to the panel and walk them through the instructions. The volume will reset itself when the next class starts so you cannot mess it up.
• You cannot control the volume or muting on another campus.
Volume Control - controls the volume heard on your campus only. It does not control the volume on other campuses.
Group Work Ideas
• If you have just a few students on two of your campuses, you can have them work as a group on projects or discussions. Someone in the classroom with the bigger groups can do the following:
• Mute your class the others can’t hear you.
• Turn down the volume so you can’t won’t hear the other class.
• Work out a signal for questions.
• Set a time limit and unmute the system when the time is reached.
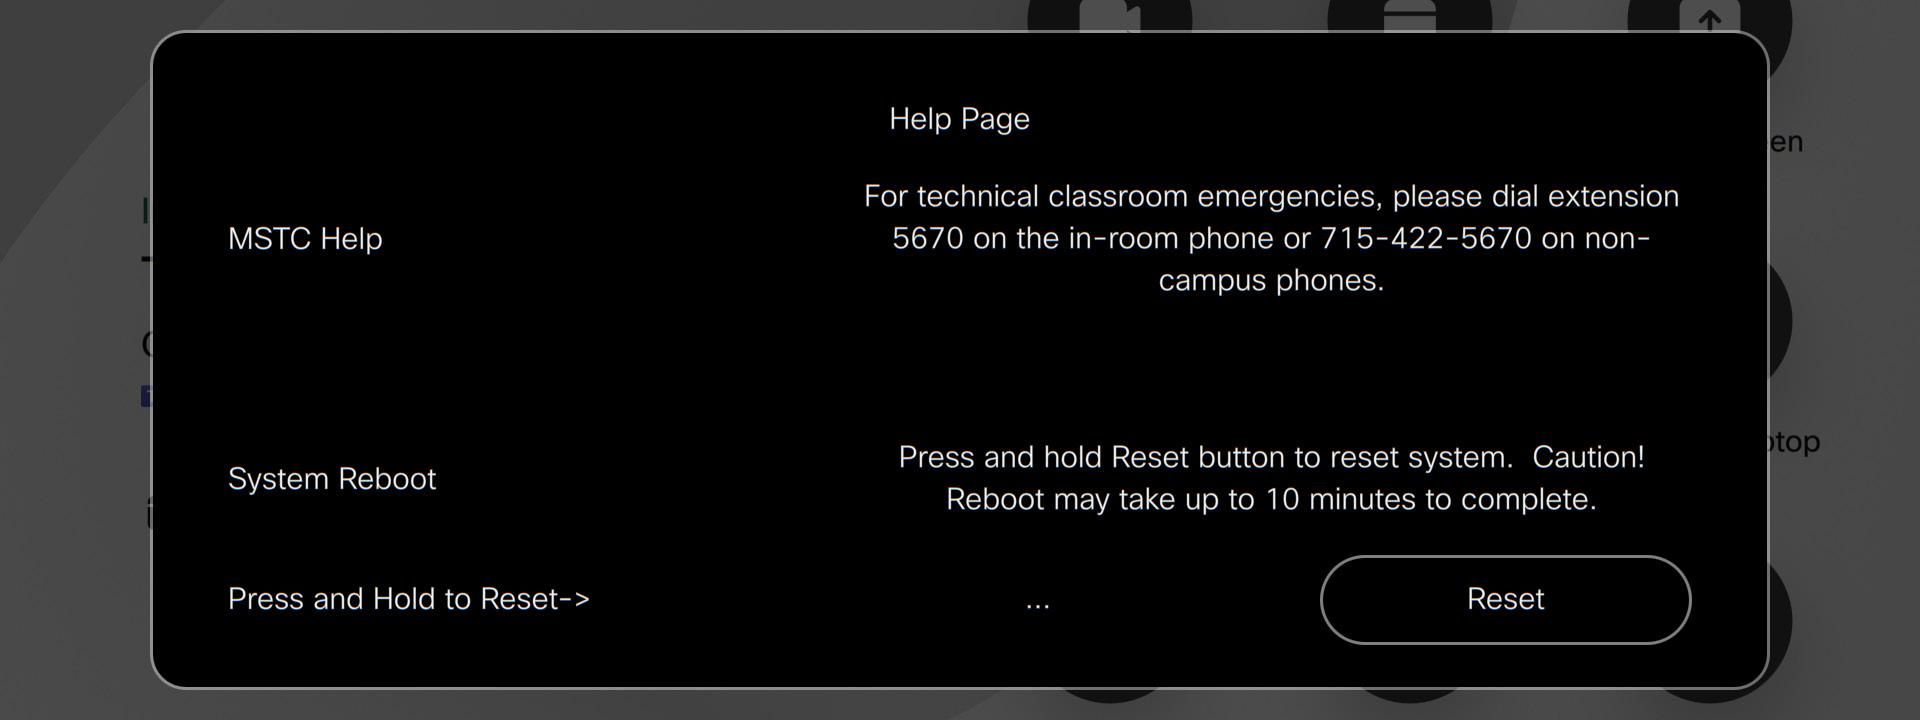
Technology Contact Information
Issue
Classroom Emergency (needs immediate action)
Scheduling/Training
Someone will be available at this number from 7:30 AM to 7:00 PM
Lea Ann Turner
Todd Will
Kristina Topness
*For non-crisis technology support, please contact the Help Desk x5555
x5670
x5480
x3126
x5309
Campus Contact Information
Marshfield 715-387-2538
Stevens Point 715-344-3063
Wisconsin Rapids 715-422-5300

Classroom & Conference Room Phone Numbers
Campus Room Room Type
Adams AD112 Computer Classroom x5113
Adams AD114 Classroom x5107
Adams AD116 Classroom x5108
Adams AD115 Nursing Lab/Classroom x5104
Marshfield MF101 Conference Room x7090
Marshfield MF122 Classroom x7046
Marshfield MF125 Classroom x7008
Marshfield MF105 Classroom x7072
Marshfield MF109 Computer Classroom x7064
Stevens Point SP212 Classroom x1266
Stevens Point SP216 Classroom x1250
Stevens Point SP218 Computer Classroom x1243
Stevens Point SP410 Conference Room x3133
Stevens Point SP411 Computer Classroom x1268
Stevens Point SP417 Classroom x1258
Wisconsin Rapids WRA240 Classroom x5471
Wisconsin Rapids WRA238 Computer Classroom x5472
Wisconsin Rapids WRA166 Classroom x5636
Wisconsin Rapids WRT113 Classroom x5259
Wisconsin Rapids WRE109 Classroom x5604
Wisconsin Rapids WRL118 Auditorium x5465
Wisconsin Rapids WRL134 Conference Room x5437
Wicsonsin Rapids T121 Conference Room x5590
Wisconsin Rapids E116 Workforce Development x5475
Dialing from an On-Campus Video Conferencing Room to another On-Campus Video Conferencing Room
If you need to have a quick ad hoc meeting between two locations, you may dial directly using the point to point dialing option.
Things to note:
• You can only do this if you are con
• Make sure there is nothing already on the schedule. Your meeting will supercede scheduled meetings.
• Make sure that you end the meeting on both units so that future scheduled meetings can come up.
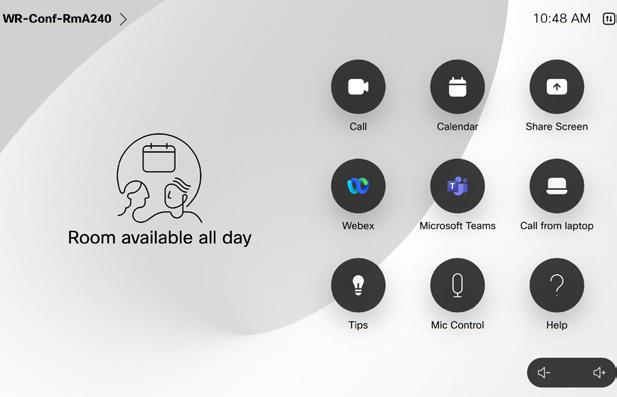
• To dial the room directly, click the dial option on the Navigation panel and dial the number.
Teaching Tips
Engaging the Students on the
Other Campuses
It is natural to engage the students in front of you, but it takes a little more of an intentional effort.
• Create a seating chart for the other campuses the way you see it on the screen and put students names in based on where they sit.
• Deliberately call on different students to answer questions (not by a hand raise) or call on a campus to answer a question rather than an individual.
• Learn as much about the students on other campuses as you can during introductions. While teaching, draw on your knowledge of that student to make direct application to them.
• Facilitate the relationships between students on multiple campuses by letting them talk to each other and ask each other questions.
Be a Movie Star - Teach to the Camera
This is your chance to act like a movie star and prove your “star quality” Hollywood style.
Course Materials
It is easy to pass out materials in a face-to-face course,
video conferencing adds a challenge.
• Put the materials in Blackboard. Ask students to bring a device to class which allows them to open the materials on their device and interact with it. (Do not provide printed copies for one group and ask the others to do it digitally - try to create equity)
• If a student does not have a device, make it okay to partner with someone who does.
• If students need to have printed materials, put it on Blackboard prior to class and communicate with students the need to print the materials before they come to class. Make sure it really needs to be printed - if they can use their device, give them the option. You may prefer print, but many students are okay with a digital format and it reduces costs for them.
Creative Ways to Work in Groups

• Occasionally look directly at the camera when speaking, this gives the illusion to the distance students that you are speaking directly to them.
• Dr. Lance Ford, who is on the forefront of teaching via technology, even brings in the fist bump to reinforce formative assessment. Bump your fist toward the camera and let the students bump back.
• Personalize the experience with your own flair. Help the students on the other end of the camera experience the same you that the students in your classroom
Don’t forgo group work just because of video conferencing. There are creative ways to get students working together.
• If there are sufficient numbers, group students with other students on their campus.
• If there is a campus or campuses with low numbers, group them together. You can mute and turn down the volume on the campuses with more students who are working together and let the smaller populations work together via the system. When it is time, turn the volume back up and unmute. Do keep an eye on the video feed to make sure they aren’t trying to get your attention and/ or do an occasional check in with them.
• Use Blackboard Collaborate or Cisco Spark to let students work together via their laptops/devices. Talk to the Instructional Technology Support.
Create Interaction
Active Learning and engaging students is the most effective way to teach. On-Campus Video Conferencing can feel like a barrier to active learning, but with today’s availability of tools, there are lots of options to keep students actively engaged.

Kahoot is a web/app based tool that allows you to ask questions that students answer, compe- tition style, on their devices. Students can work individually or in teams. It is a fast and fun way to check for understanding and provide formative feedback. Even older adult learners enjoy Kahoot. https://kahoot.com
Padlet
Padlet is like virtual post it notes where students can brainstorm and post ideas, websites, and images in real time from any device. https:// padlet.com/


Mentimeter is a polling tool that gives many options for engaging students. Students can engage from any location on their own devices. https://www.mentimeter. com

Buzzers

Talk to your instructional technology team about checking out buzzers to have in each of your OnCampus Video Conferencing classrooms. Our buzzers have different sounds and you can assign each campus group a sound. You will be amazed at how your students come to life when they have this in their possession.
To Record an On - Campus Video Conferencing Course
Recording the Class
To kick off the recording, someone must join the class via the Teams link. This could be you or a student, but if no one joins via the Teams link from the calendar, the class meeting will not record.
1. Join the class teams meeting on your computer. IF you are in the classroom with the system, choose “Don’t use audio”. (Using computer audio in the same room with the system could cause sound issues.)
2. You can stay in or get out of the meeting. Once everyone leaves the meeting, the recording will go to your Teams chat and be stored in a special OneDrive folder. The link is below and can also be found on the Blackboard It will not stop and render the recording until the last person leaves the meeting.
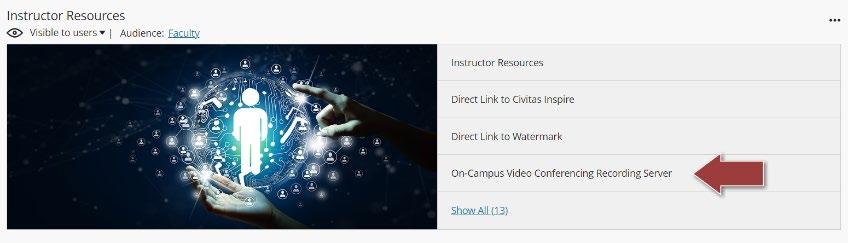
Accessing the Recordings
The recordings are stored on a special OneDrive account. This link can be accessed through Instructor Resources on Blackboard.
1. Select the video that you want to share with students
2. Click Download


3. Follow the Panopto instructions (found in Instructor Resources) to upload the video to Panopto and embed or link in your course.
NOTE: Do not load video files directly into Blackboard, only link or embed from Panopto. The files are too large and prevent archiving and copying courses. They are also not captioned which we require from a UDL perspective.

