
1 IDES 1035 & 1045 Summer 2022 Adi AdrienneIckowiczSheffieldAlexandraBowersAlyssaSowersAndyBermudezArielMcClintonAshleyCampbellBrookeBankesterCarleeColeCarolineDabneyCarrieBallengerCarsonSimmonsClaireRumzieDariaHallDevynFinkelstein Dianna Khan Frances LaFortune GabrielleHannahHadenHuddlestonVancilAndersonHeatherGriffithIsabelRamirezIsabellaPernaIsaiahWrightJenaeZiemannJillianCrossJuanSalasKaidenCoufferKarliJohnsonKatherineLallier Katrina DESIGNFUNDAMENTALSydneyMadelynnLindseyLaurenLaurenJohnsonAcreeBaxleyLaurenSmithDepnerSchmidtMadilynMongMadisonKyleMaggieMarshallMikaylaSpillmanOliverRightPeytonRossSavannahSpencerSunnyJonesBommaritoSKILLSandMETHODS

2 IDESCourse1035 Fundamental Design Skills & IDES 1045 Fundamental Design Methods in Summer 2022 TorreyInstructorStudentsTracy (Coordinator) Ziba *.jinohp@uark.eduContactJinohPublisherMaryTeachingJinohMarjanChristianRajibiSchultzMiriParkAssistantNewberryParkThecopyrightofall design results contained in this book belongs to each (student) designer. Adi DevynDariaClaireCarsonCarrieCarolineCarleeBrookeAshleyArielAndyAlyssaAlexandraAdrienneIckowiczSheffieldBowersSowersBermudezMcClintonCampbellBankesterColeDabneyBallengerSimmonsRumzieHallFinkelstein Dianna Khan Frances KatherineKarliKaidenJuanJillianJenaeIsaiahIsabellaIsabelHeatherHannahHadenGabrielleLaFortuneHuddlestonVancilAndersonGriffithRamirezPernaWrightZiemannCrossSalasCoufferJohnsonLallier Katrina Johnson Lauren Acree Lauren Baxley Lauren SydneySunnySavannahPeytonOliverMikaylaMaggieMadisonMadilynMadelynnLindseySmithDepnerSchmidtMongKyleMarshallSpillmanRightRossSpencerJonesBommarito
1 PUBLISHER’S NOTE
Since the beginning of my teaching career in Korea, I have always wished that I had a book such as this one. This wish may have originated from my 6th grade teacher, who made a graduation workbook containing students’ writings, drawings, and photographs. After my graduation and before my undergraduate years, I was able to see my growth in ways of thinking and understanding as a result of reading the book. With my colleagues, I made a school book including all the graduate projects completed at Hanyang University in 2006. By reading the book, I had been able to cheer up and reenergize myself whenever I was exhausted and burnt out in practice. With these memories, it has been four years since I made the course books for the subjects I taught. During the process of creating this book, I learned something that I had never known before. I am gradu ally improving my skills as an instructor, learning what I have missed as an instructor, what I should remember when teaching next semester, which assignments to emphasize more, and what to emphasize less. Seeing the efforts and thoughts of the students that I had not yet discovered, I smiled at them and regretted that I had not been able to encourage them more. After receiving this book, each recipient may have a different reaction to it. In the past four years, it has been observed that it serves as a tangible teaching portfolio for instructors, a data bank for students in the event of unexpected laptop failures, and an education al experience that motivates students to create their own portfolios. What will be your reaction when you receive this book? In the future, when you are about to graduate, what will you think after reading this book? In keeping with this thought, I complete the process of making the book. A year after I moved to Arkansas, I began to try some thing a little different from this book. My intention is to simplify the layout in order to motivate my colleagues to make their coursebooks even if I am not working with them, so that I can share the joy and pleasure of making this coursebook with them. Likewise, I have ar ranged the book using the class resources without de veloping any new layouts or materials. Despite the fact that there are still many areas that can be improved, I made this book in the hope that it will improve in the Allfuture.my best, Jinoh Park, Publisher
02 CONTENTS IDES 1035 Projects 06 Project #1 | BLIND CONTOUR 10 Project #2 | Gesture Drawing 14 Project #3 | Platonic Solids 18 Project #4 | Nature & Machine as Teacher 22 Project #5 | One Point Perspective 26 Project #6 | Observational Perspective 30 Project #7 | Space Cube 2 CONTENTS


IDES 1045 Projects 34 Project #8 | Designer of Record 10 Project #9 | Movie Stills 14 Project #10 | Lines 18 Project #11 | Habitable Wall 22 Project #12 | Precedent Study 26 Project #13 | Desert Retreat 30 Letters from 3


PROJECT CONTOURBLIND#1 4
Purpose: Performing a blind contour exercise isolates the right-brain’s specialty to see visual detail while inhibiting the leftbrain’s symbol-based control of perception.
Learning to See – Part 1
Objective: Continue to practice the painstaking technique introduced in class.
5
Deliverables: 5 Blind Contour Drawings – (One drawing per 8.5”x11” sheet – Fine Ink Pen) Hand holding keys Hand holding a tool Hand holding a cloth, or piece of clothing Bare foot /or with sandal A person
Directions:sitingMove your eye and pen in slow synchronous motion along the exterior and interior lines of object. Keep your eyes on the object and the pen touching the paper at all times. A contour line follows the edges of the subject, but can travel inward at folds or breaks, can overlap or project, and describe the shapes of spaces and shadows within the form. Draw deliberately and carefully, and not in a sketchy manner. Allow 20 minutes, or until you fill up the page (you can set a timer). To keep your right brain focused, remove yourself from any verbal background noise including music, tv or people talking.

3. As the drawings progress to longer intervals, add more exterior/interior details and tonal shading
1.Directions:UseCharcoal – newsprint and/or charcoal paper
PROJECT Figure|DrawingGesture#2Human
Purpose: Gesture drawing captures the action, form and pose of a figure or object. Gesture drawings are completed quickly using fast, expressive lines, often in a few seconds to a few minutes. The shorter the time interval, the less information you will be able to capture. In the most minimal form, a gesture drawing could be nothing more than a couple of curved lines which indicate the line of action. For longer poses, more detail and tone can be added to the drawing. Usually you would use a soft or wet marking media that is fluid and quick to use, such as charcoal, brushed ink or very wet paint.
6
Objective: Draw a series of gesture drawings in quick succession. Each drawing will increase in length and detailed captured. At a minimum, you should have 8 distinct gestural sketches.
2. Draw the line Action with fluid lines.
https://drawpaintacademy.com/gesture-drawing/https://www.studentartguide.com/articles/line-drawingsReferences: 7

[3] Demonstrate the ability to make use of graphic and model-making technique to synthesize and communicate design [4]ideas.Be familiarized with the ideation process in the conception and formation of ideas. [5] Understand the links between drawing and model and how those further inform three-dimensional strategies.
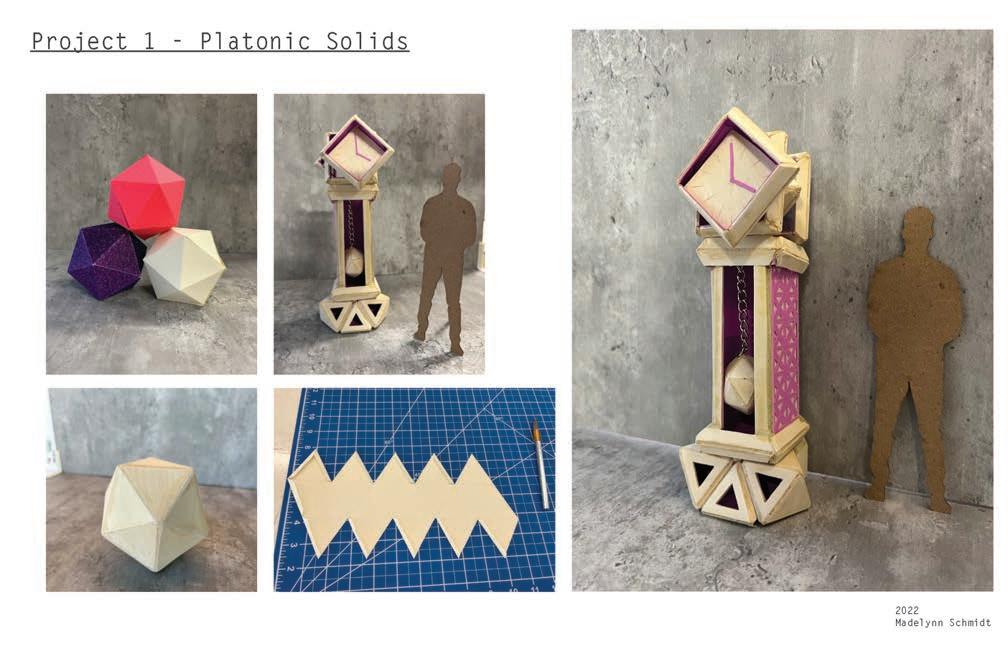
• The icosahedron is associated with water, and enhances creative thought and expression.
[6] Recognize the value of design decisions that is based on research inquiry
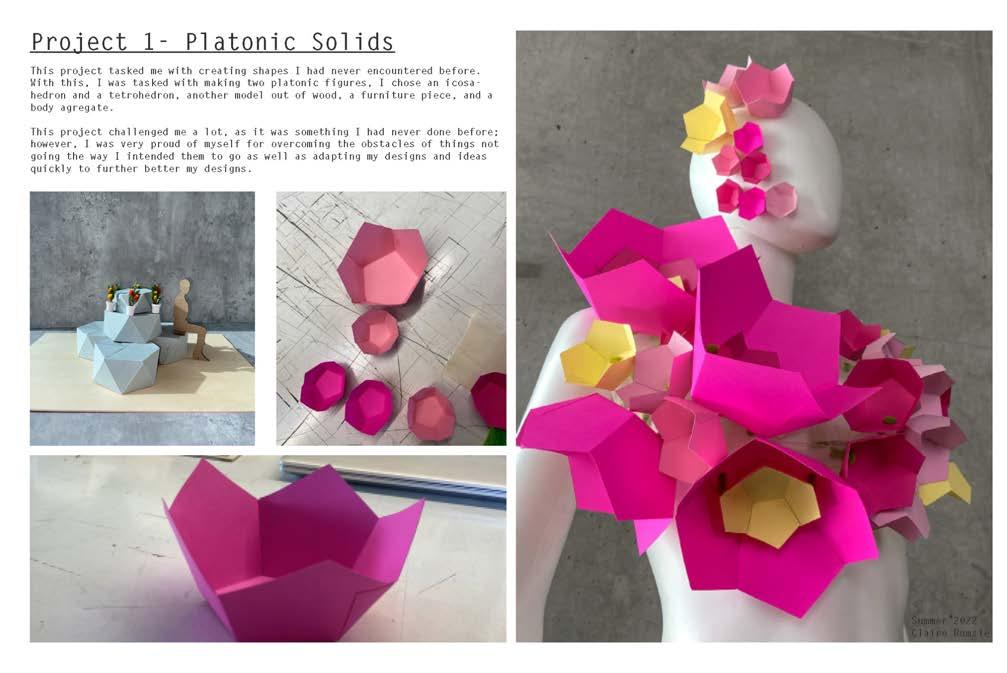
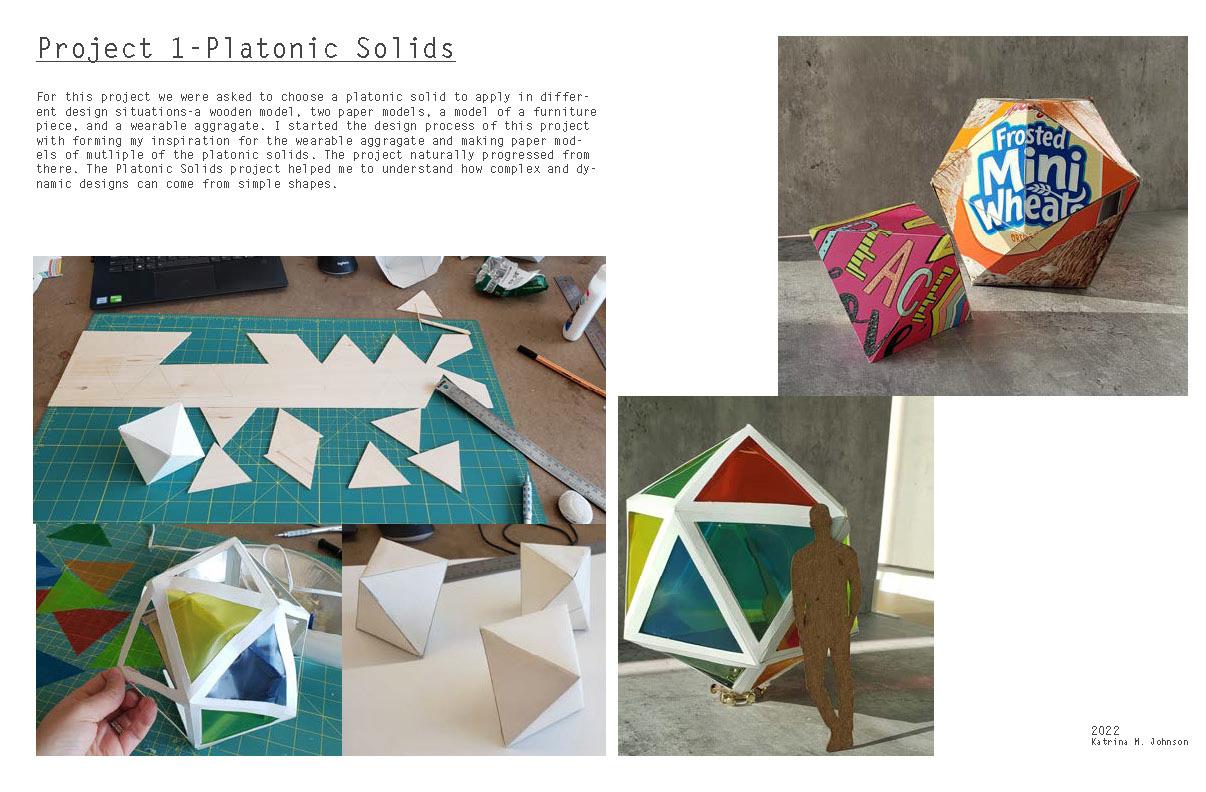
PART I - Make 2 perfect platonic solids of the same scale (no cubes allowed in this assignment) using 2 different materials. You could explore folding paper, cutting chipboard, cardboard, or a combination of a variety of materials. WOOD IS NOT TO BE USED AS ONE OF YOUR ALTERNATIVE MATERIAL CHOICES. A 1:1 annotated scale section drawing (hand drawn) must accompany each model. In addition, you are to create a video that explains your process. Photographic documentation of all progress and final iterations will need to be submitted via digitally. We will discuss the video in terms of a 3-d and timebased diagram.
In three-dimensional space, a *Platonic solid is a regular, convex polyhedron. It is constructed by congruent, regular, polygo nal faces with the same number of faces meeting at each vertex. Five solids meet these criteria: Geometers have studied the Platonic solids for thousands of years.
PROJECT
• The octahedron is associated with air, and cultivating acceptance and compassion.
• The tetrahedron is associated with fire, and perpetuates balance and stability.
• The cube is associated with the earth, and reconnecting energy to nature.
• The dodecahedron is associated with the universe, and represents mystery and meditation. Plato stated that the dodecahe dron “usedwasfor arranging the constellations on the whole heaven:’ The dodecahedron can be seen as representing the universe with the twelve zodiac signs corresponding to the twelve faces of the dodecahedron.
SolidsPlatonic#3
[l]Objectives:Beableto identify multiple means of representing design ideas. [2] Learn to associate knowledge of design processes to current design discourse by putting to use techniques acquired through in-class examples.
PART II - Make a perfect platonic solid ( no cubes allowed in this exercise) using only scale model (bass/ balsa) wood and hand cutting instruments. Your solid is to be cut from individual pieces and assembled with glue. This exercise will help you gain a more sensible understanding of architectural model making. Craft is imperative in this assignment. Photographic documentation of all progress and final iterations will need to be submitted via digitally.
8
ModelDeliverable:anddrawings of the aggregate in a series of plans, sections, perspectives and diagrams. Photographic documenta tion of all progress and final iterations will need to be submitted via digitally. A series of orthographic and/ or diagrammatic drawings depicting final iteration to accompany product (scale to be determined by final product size) 9
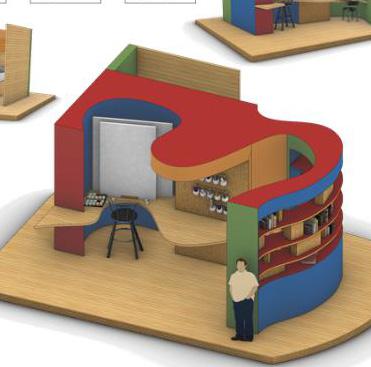
PART III -Scale-Make a scaled piece offurniture from platonic solids. The scale will be set at l “= l ‘ -0” (Imagine the person who will be using the furniture is 6” tall).
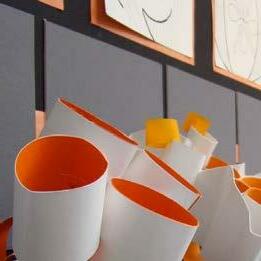
PART IV - Expression- Make an aggregate of platonic solids (size determined by you) that has the capacity to assemble and define space that relates to the scale of the body. You are to experiment with how the solids are attached to each other and their relationship to the body, (i.e. is the aggregate of platonic solids a garment or is it a piece of jewelry? How does the design meet the body?

10


11


12


13


14


15


16


17


18


19

20


21


22


23


24


25


26


27


28


29

30


31


32


33

34


35


36


37


38
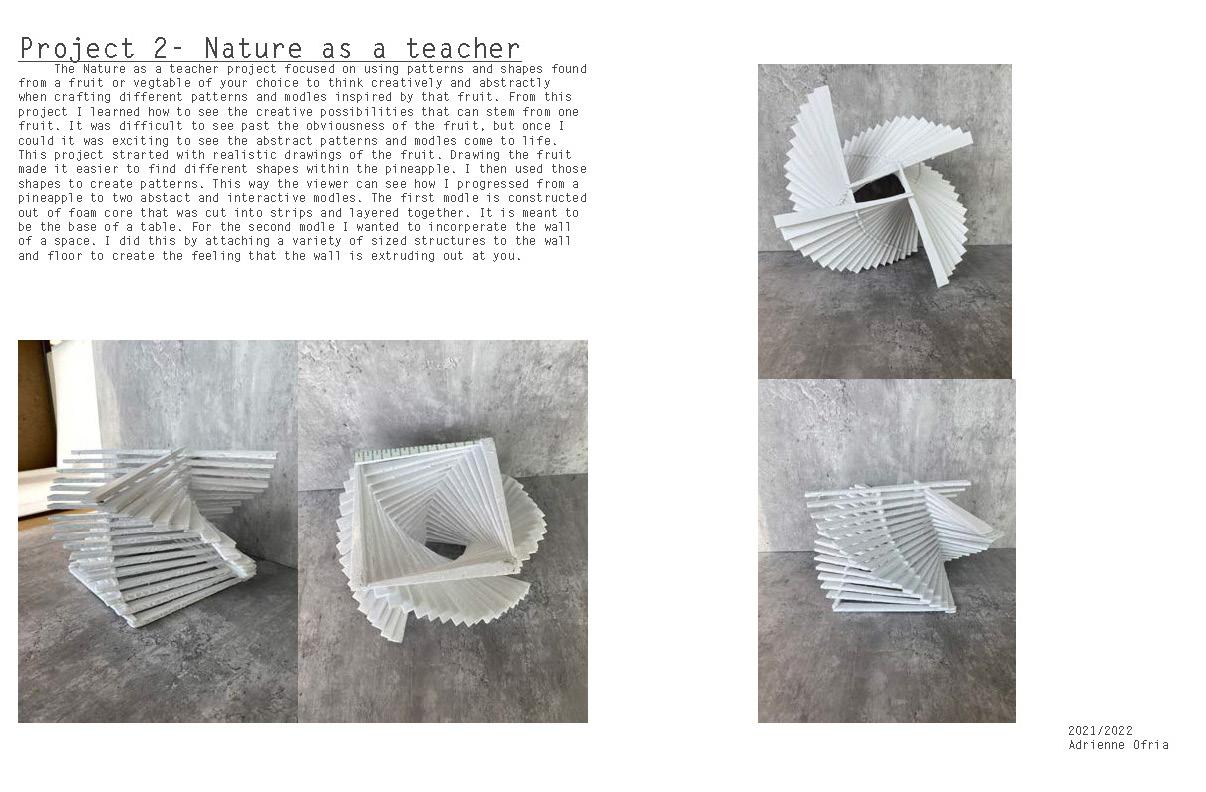
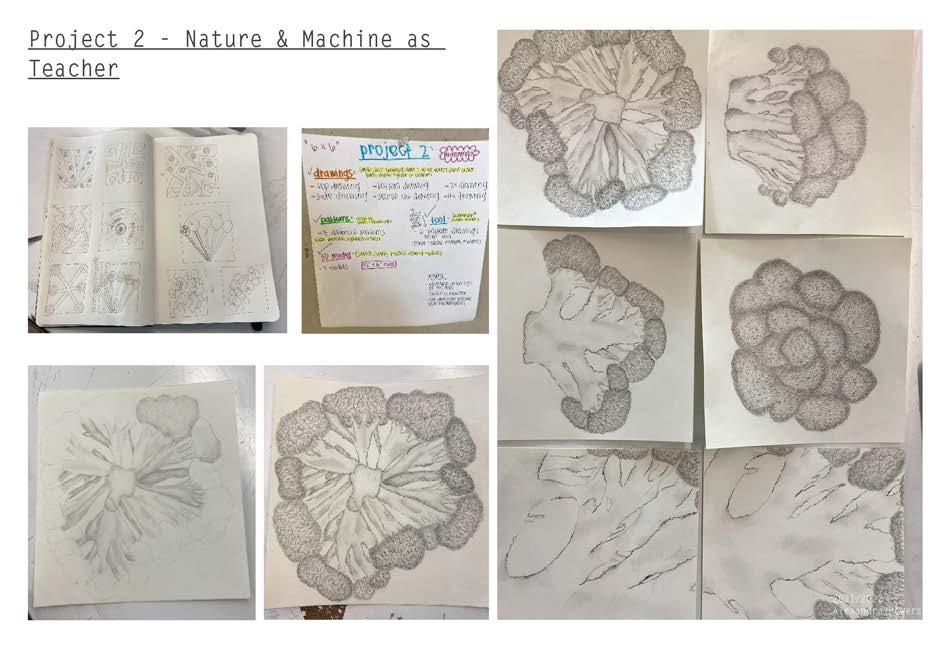
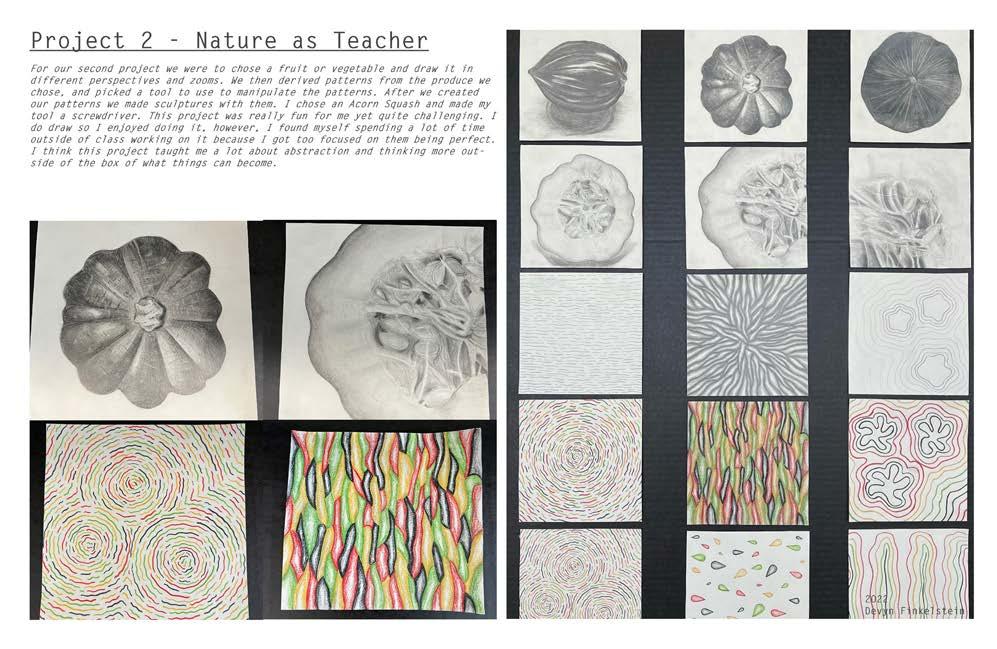
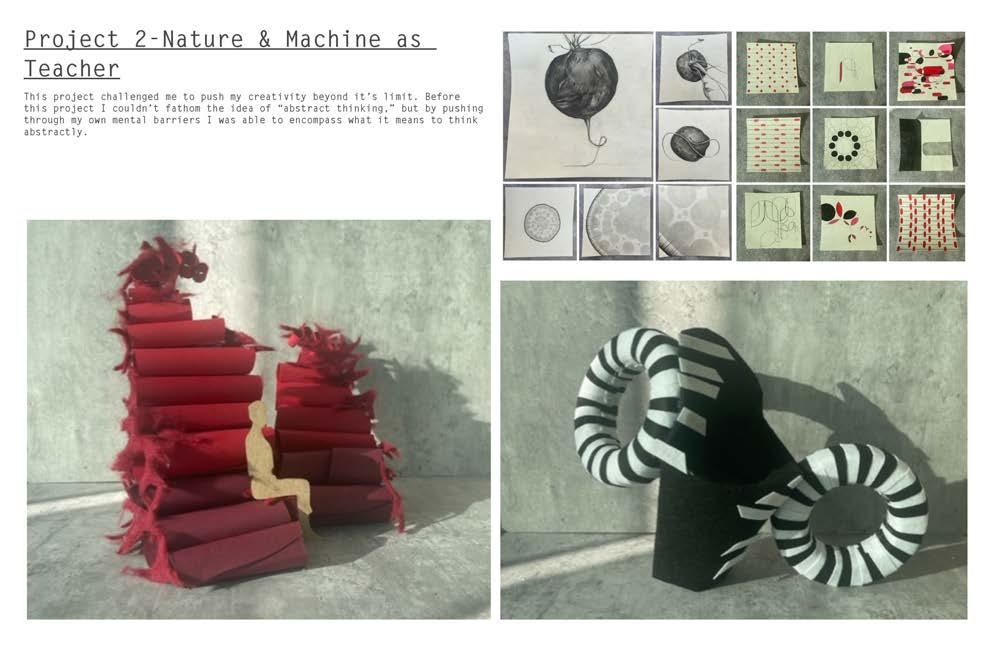
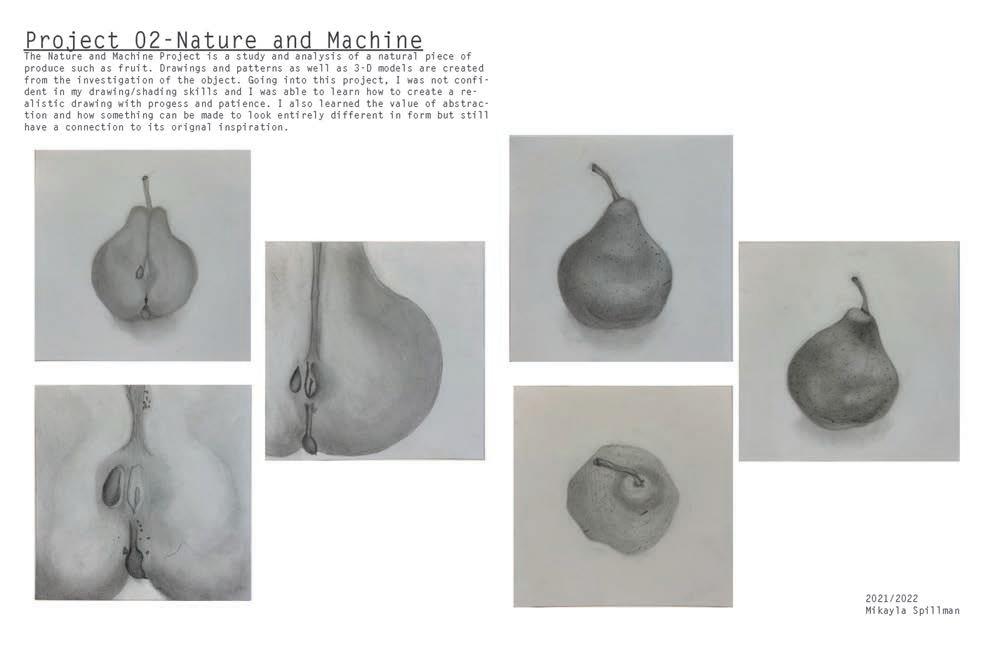
Purpose: In this project you will investigate and record a natural object, fruit or produce. You will extract patterns and relationships from your investigations to create 2 dimensional, 3 dimensional and architectural statements of your revelations. All your submissions should respect a 6x6 format with name and date. Your final presentation should show a timeline of 15+ drawings and 2+ models. These 6” x 6” drawings and models should be a careful selection of the “best” from all previous drawings.
- To explore principles of composition in three dimensional terms. - To acquire and demonstrate skills in model construction.
Machine& as to|TeacherInspirationInterior
- To develop breadth and depth of design process through iterating several different ideas, and iterating to refine one idea to explore its full potential.
PROJECT Nature#4
-Objectives:Tounderstand the qualitative difference between volume and space.
–
– High quality photos uploaded on Box and any missing photos from previous projects. FINAL PRESENTATIONS
– 3 SECTION CUT drawings - FULL SCALE AND ZOOM 2x, 4x Task 2* – 3 pattern drawings derived from previous drawings of fruit & identify a SIMPLE MACHINE/HAND TOOL (You do not need to bring in the actual tool, but rather a printed picture of it).
39
– 1:1 ELEVATION DRAWINGS OF YOUR FINAL MODELS (2d orthographic projections)
– 6 drawings showing how your chosen tool affects the pattern (how does the action of the tool affect the –pattern?)4finished pattern drawings with ink or 6H pencil to include color. Your choices of color are to be inspired by a selected work of contemporary art. (Print out your selected work of art)
– 1st Physical 3d MODEL (begin with sketches/ study models). Model is to be inspired by previous sketches, and can have a sculptural quality to it. Models should be a minium of 12” tall by 6” wide. Study models/sketches can be any size to conveys –Taskideas.32nd MODEL (begin with sketches/ study models) – 2 Refined MODELS – These are refined from your previous study model explorations– Model should have an interior space, incorporate a color strategy, and reward its visitors with a level of interaction. Model is to be inspired by previous sketches. Model should be a minium of 12” tall by 6” wide. Study models/sketches can be any size to conveys ideas. Task 4 – Complete MODELS AND DRAWINGS (all process and study models), address all earlier work if need be.
– Introduce Project-Bring in fruit (or veggie) of choice to studio
Project Schedule: Task 1 (*All drawings to be rendered on 6” x 6” perfectly cut squares of strathmore drawing pad paper)
– DRAWING OF TOP, FRONT AND SIDE OF FRUIT


40


41


42

43

44


45


46


47


48


49


50


51

52


53


54


55


56


57


58

59


60


61


62


63


64


65


66

67


68

69

PROJECT
One#5
Instruction For this weeks exercise you will produce two drawings, each on its own sheet of 18x24 multimedia paper. Use a drawing pencil for both drawings, you can shade with Graphite or your pencil. Steps for the first drawing:
3) Using the center dot as a vanishing point, lightly draw lines from the VP through the intersections of your square grid and extend them out to the edges of the page. You may find you will want to physically rotate your page to draw these lines as straight and accurately as possible.
5) Construct two more layers of cubes, but have these begin from the reference plane and project out towards you/the 6)viewer.Pinup your drawing in decent lighting and get a couple quality head-on photographs before completing step 7.
Perspective One of the most beneficial drawing types for designers is the perspective. There are two primary types of perspective draw ing: one point and two point. A one point perspective creates an illusion of depth in a drawing by radiating from a single point in space. This creates a visual much like the experience of looking down a long straight hallway. Though you know that the walls stay spaced the same distance apart from each other, they appear to converge as your eye looks deeper into the space. In these drawings anything vertical will be drawn at a 90 degree angle, and anything parallel to the viewer stays purely horizontal (0/180 degrees). Depth is the only non orthographic projection.
1) Locate the center of your sheet and mark it as a small dot with a drawing pencil. Centered around that dot measure and draw out a 2” square.
2) Once the first square is drawn you should no longer use any rulers, straightedges, etc. Extend the edges of the square out to build a 9 square grid with your original square as the center geometry. Try to draw your lines as straight as you can, and visually attempt to recreate accurate 2” squares.
4) Thinking of the VP rays as depth in space on the page, visually build a layer of cubes behind the reference plane that your original square inhabits.
7) Lastly, shade one 3x3 grid of a bounding plane (bottom, top, left or right); shade one cube in the rear layer as if it were solid; shade one cube in the middle layer as if it has no front or back. Select your shaded objects with an overall image compositioning in mind.
70
PerspectivePoint
6) Photograph your line drawing, as above before shading.
71
2) Again, measure and draw a 2” square. The top left corner of the square will be located 6” down from the top of the page, and 7” over from the left page border (One inch over and down from your VP).
3) Extend the 2” square into a 3x3 grid of squares. Your original square will occupy the top left position.
1) Locate a vanishing point that is 5” down from the top of the page, and 6” over from the left page border.
4) Connect your grid intersections to the VP and extend them out across your page.
7) Use the same shading rules as above. You can adjust your choices for plane and cubes for a pleasing composition ( they don’t have to be correlated to dwg 1).
Steps for the second drawing:
5) Again, build three layers of cubes. Your original square will occupy the rearmost plane (build all three layers as projecting out towards the viewer).


72 PROJECT #6
Instruction Create one well-crafted observational one-point perspective sketch on a sheet of 18x24 paper (multimedia or charcoal pad). Your drawing does not have to fill the entire sheet but it should exist as a pleasing composition on the page. You may work in graphite, ink, or a combination of the two. The orientation of the page is up to you, and should be informed by the space you are drawing. Strive for perspectival accuracy- it is highly recommended that you roughly build out the extents of your drawing first, then begin to layer in detail. Imagine the space being divided into regular geometries (squares/ cubes or equally proportioned rectangles/prisms) and draw these subdivisions lightly as a skeletal frame for your composition. As these are drawn from observation, your VP should exist at your eye level, which is also likely the line of the horizon. For this first assignment you may want to avoid spaces with complicated geometries such as arches, curves, and stairs. These are sketches, so they don’t have to have the precision of drafting though they should still be crafted. You might review these lnstagram accounts to see various styles that you may try to emulate: @lukeadamhawker (pictured above) @alvindraft ing @jerometryon
PerspectiveObservational
Observational Perspective Building on your new understanding of how one-point perspectives operate, we would like you to sketch an architecturally interesting space of your choosing using this technique- note this may be interior or exterior space. We recommend you find a space that has a dimension that is deeper than it is wide, ideally with interesting layers or repetition. We ask that you do these drawings primarily on-site in active observation, so you should plan to bring your drawing board and find a vantage point that is both comfortable and allows you to spend an extended amount of time in the same place. You don’t necessarily have to place yourself in the center of the primary axis you are drawing, as the examples above show (adjusted right, left, and right, respectively).
73

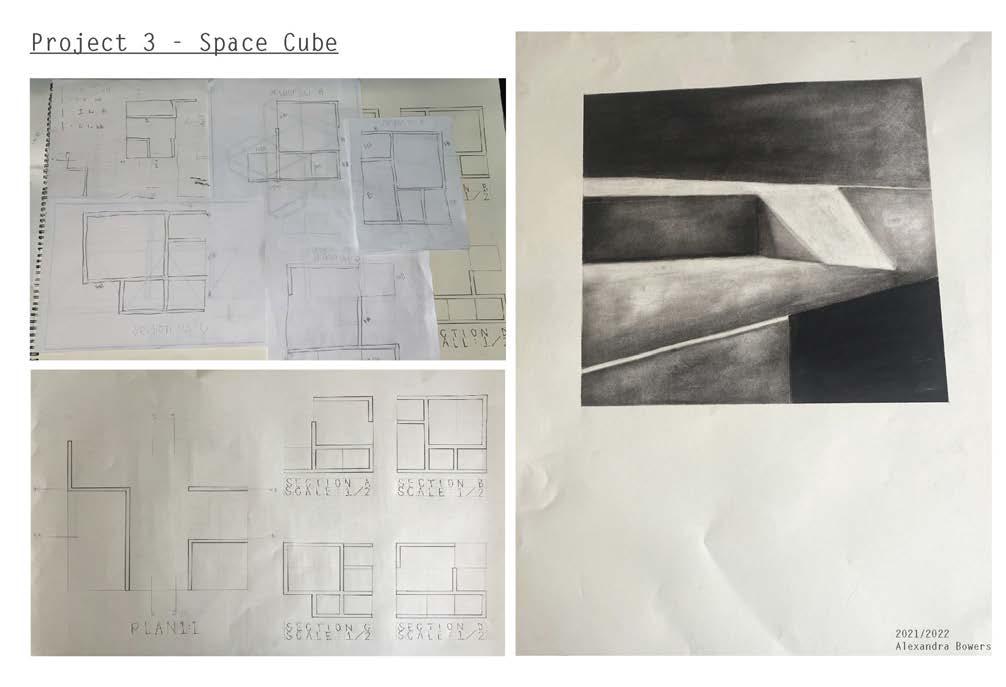
- To develop problem-solving skills and processes in laying out program versus constraints. The definition of space is one of the environmental designers’ prime concerns. In this project, we will look space, including differences between demarcation and enclosure, that is, between explicit statements and implications. When is a space legible? The creation of legible space can come from overt or subtle delineation. Can spaces exist inside of other spaces? Look around you at home. How many spaces can you find? The space cube is a problem for you to explore ideas about spatial delineation and legibility through abstraction. The final artifact in this problem-solving exercise demands you think about the resolution of the project to be a composition - a coherent and visually interesting object that delivers the spatial programs in a structurally sound and well-crafted cube. Exercise Imagine a ‘chunk’ of space. Its maximum exterior dimensions are 9” x 9” x 9”. It is not a model; it is full scale. It is subdi vided on a three-dimensional three inch grid. The limits of all spaces fall on this grid. Within this abstract chunk of space, you are asked to define the following volumetric spaces:
- To develop breadth and depth of design process through iterating several different ideas, and iterating to refine one idea to explore its full potential.
- To acquire and demonstrate skills in model construction.
Objectives: - To understand and demonstrate elementary principles of spatial definition between explicit, implied and undefined. To see -space.Tosee the difference between demarcation and enclosure. -To understand the qualitative difference between volume and -space.Toexplore principles of composition in three dimensional terms.
1. The full limit of the cube, 9” x 9” x 9” or less (but still based on a 3” module.)
2. Two 3” x 3” x 9” spaces.
3. One 6” x 6” x 6” space.
PROJECT CubeSpace#7
4. Two 3” x 3” x 6” semi-solids. This solid should not necessarily be completely solid. It may have open faces. 74
75


76


77


78


79

80


81


82


83


84


85


86


87


88


89


90


91


92


93


94


95


96


97


98


99


100

101

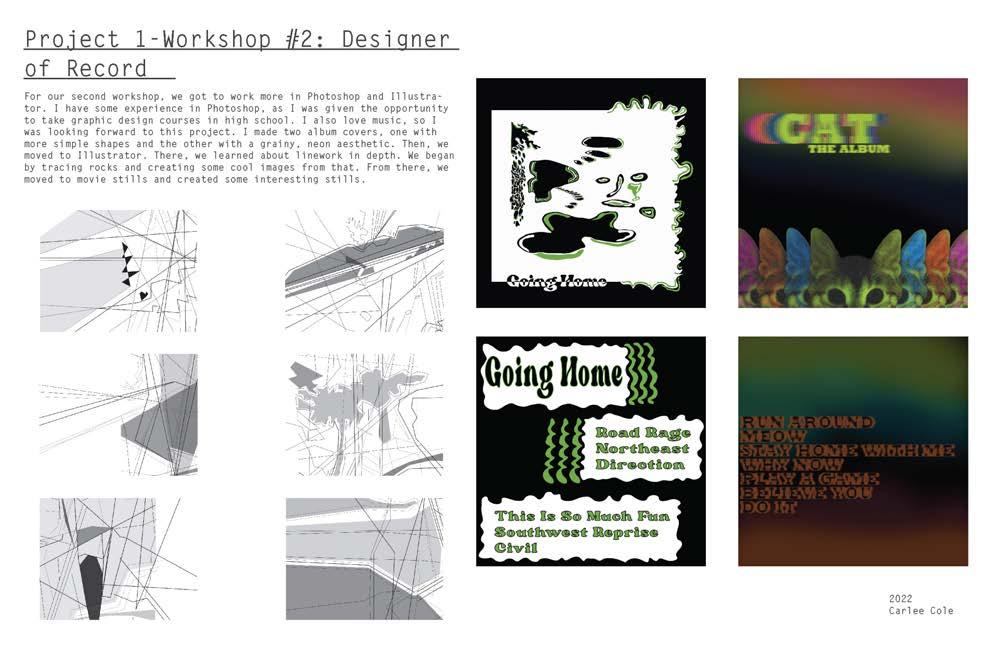
Objectives: - To demonstrate the understanding of composition and color theory, - To develop breadth and depth of the design process through iterative exploration, ultimately leading to the refinement of well-crafted deliverables. - To strengthen craft as well as the understanding of digital media. From the 1950’s through to the 1980’s, the 12” LP record and the 45 rpm record became the major formats for the distribu tion of popular music and spoken word. The LP format remains in use for occasional new releases, though other formats have largely supplanted it. The size of the typical cardboard LP sleeve cover is 12.375 in square. Album covers are one of the various ways in which first impressions affect an audience’s perception of a given musician or band. Album covers’ design cover may also add to how an audience forms an opinion of them and their music. There are various ways in which an album cover is visualized.
ofDesignerRecord
(2) 12” LP “covers” with original art...files will be set-up and saved as an exact size of an LP sleeve cover (2) *The backs of the LP covers (same size as cover) to have song titles, description of record, etc. * Both LP covers can have the same song titles/ information, etc.
You have been commissioned to record a spoken word album, for distribution as a 12” LP record, describing some significan telement of your choosing...who you are...who you have become...your story? What impression will the covers give? Final deliverables will consist of:
102 PROJECT #8
103

104


105


106

107


108


109


110


111


112


113


114


115


116


117


PROJECT StillsMovie#9
Objectives: - To demonstrate the understanding of composition and color theory through the lens of film, - To develop breadth and depth of the design process through iterative exploration, ultimately leading to the refinement of well-crafted deliverables.
118
For this exercise, you will be marrying your new understanding of digital media (Photoshop, InDesign, Illustrator) and diagramming, with *film stills from a movie of your choice (hopefully one of your favorites) to craft unique color palettes and Youdiagrams.areto select six (6) movie stills (same film (or TV show), or six different)...any six that possess a dynamic and rich color approach, to create an individual color palette and informational diagram for each.
*Film stills can be screen shots from online streaming sources
Cinema is from the French cinématographe which comes in part from the greek kinema, meaning movement. So cinema is really just another word meaning moving picture. It also has come to mean more generally the process of film-making and also the building where films are shown. Film, or motion pictures, are a collection of images taken, or depicted to be taken in the case of animation, fractions of a second a part.
Cinema can be wonderful entertainment. As a release from reality, it can temporarily place us in a new world, help us em pathize with a new demographic, or amaze us with technology and wonder. The crafting of a film is a multi-disciplinary and time consuming endeavor with a construction that parallels a built project.
119

120


121


122


123


124


125


126


127


128


129


130


131


132


133


134


135


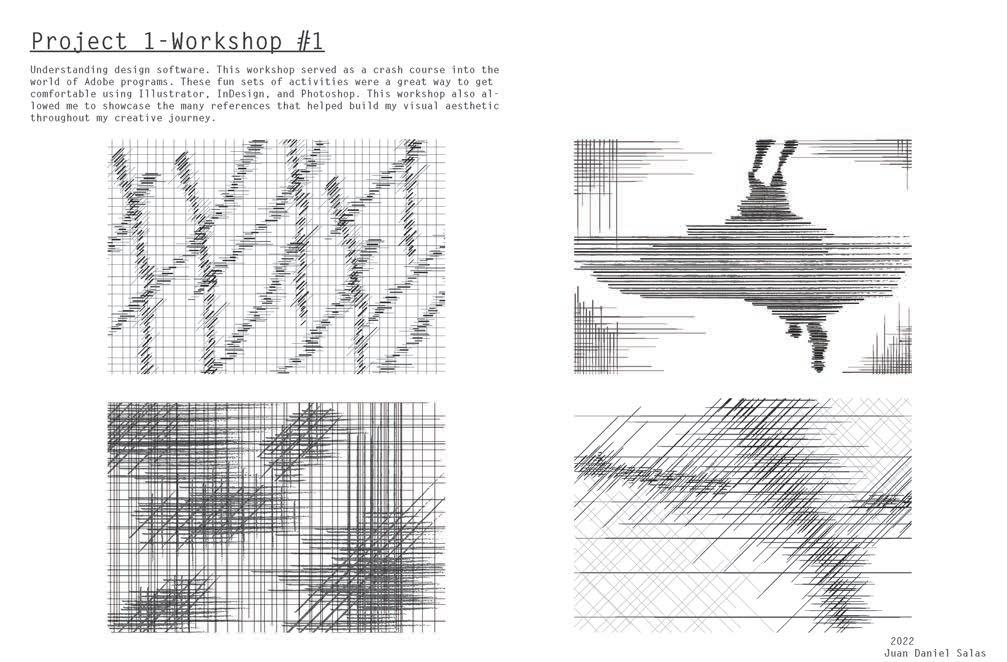
Take two of the “Rock” images provided and develop a series of drawings measuring 11” x 17” using only lines. The series will consist of a total of six (6) drawings (3 per each image you choose). You must utilize three different line weights (for each drawing). All lines must be straight and at least 5 of the lines in your composition must go from the edge to edge of the sheet. You have the option of adding 2 tones your drawing but they should be used sparingly. The majority of your drawing must be empty or white space. You will be evaluated on your ability to compose and develop interest using these basic elements. Each composition should stand on its own and be considered an abstract work that could be appreciated individually.
136 PROJECT #10
Lines


137


138

139
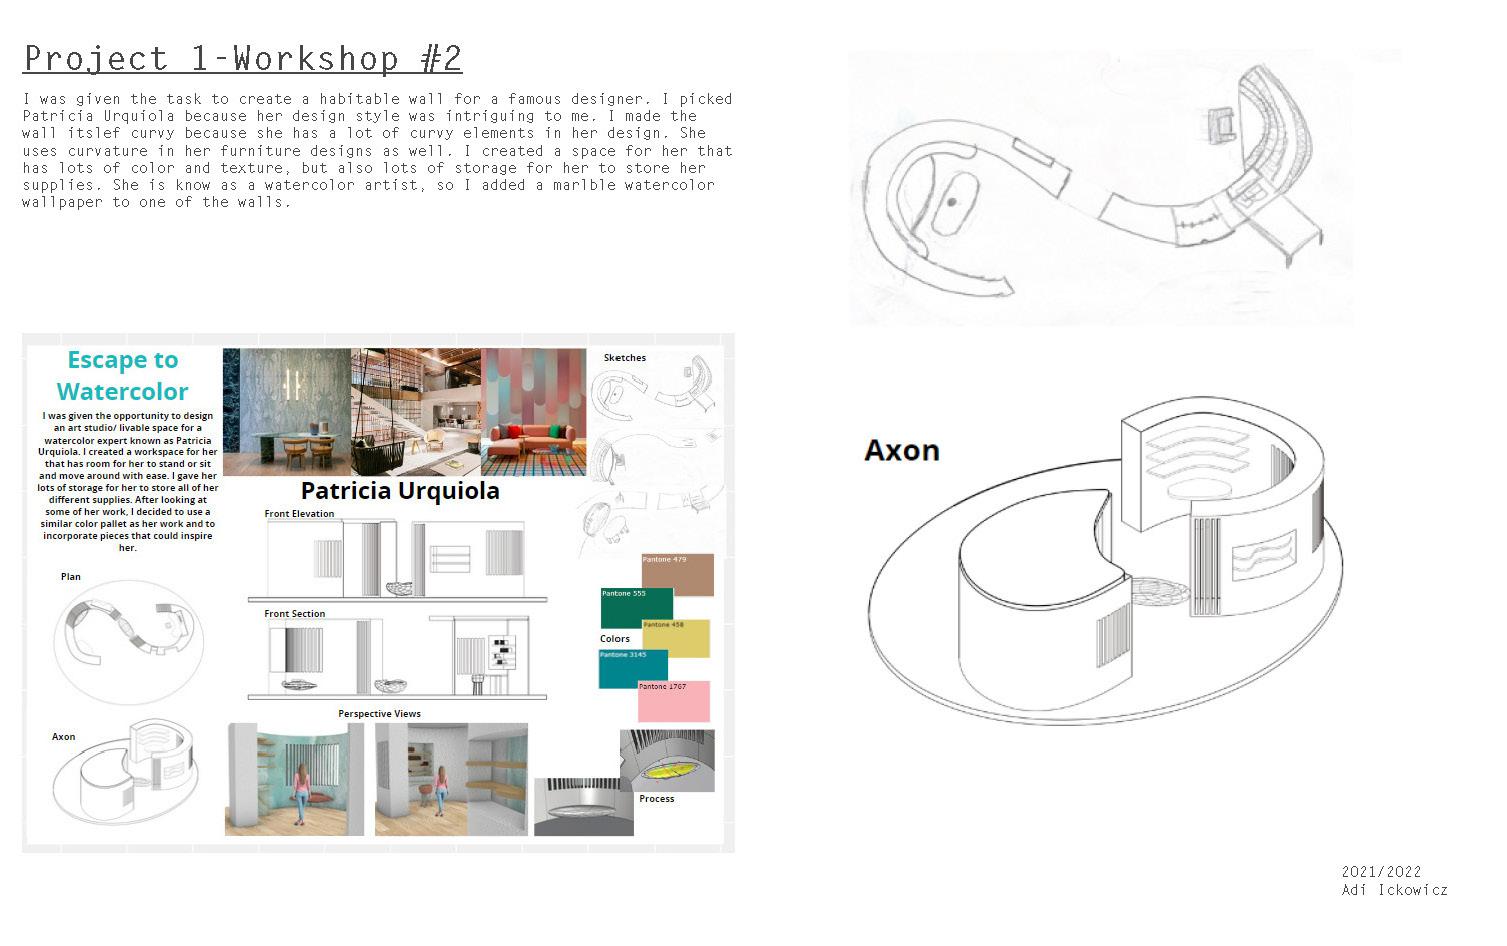
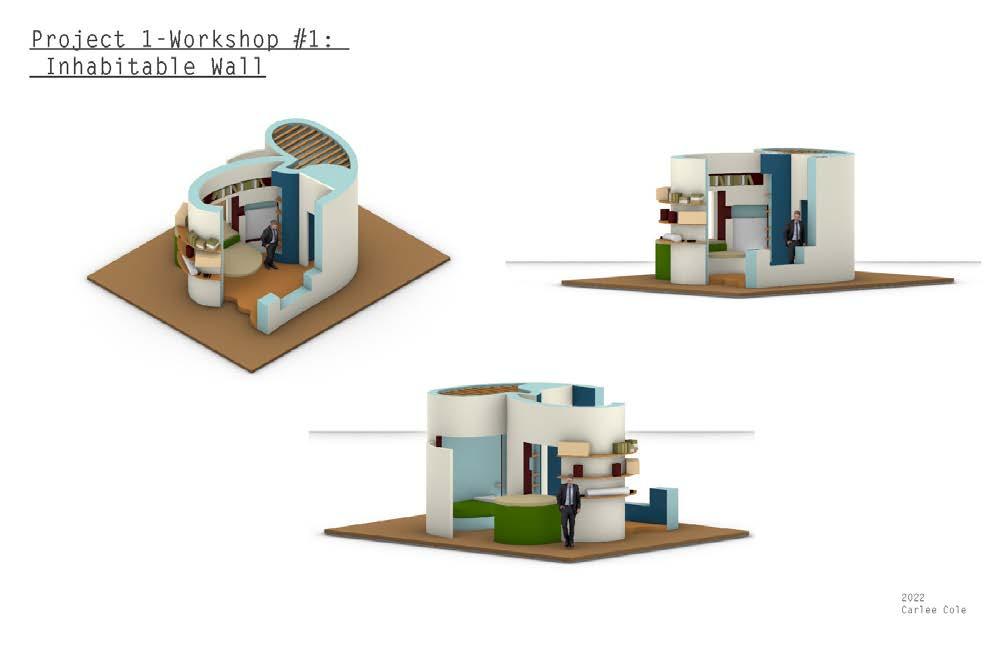
• Each artists studio is a Habitable wall.
• Minimal 6’ Linear of feet of book storage (on display)
• A combination of closed and open tool and supply storage 140
• A place to take a nap, 3’X6’ bed area
• All space modules are located adjacent to a window of walls at one side.
• Space Module footprint is 18’X15’.
• An integrated bench – 18’ deep x 18” high x minimal 3’ long
Context: • Communal Artist studios outfitted in a repurposed industrial warehouse.
• Maximum height of structure is 10’.
• Minimal 2’X4’ work surface standing height (36”)
• Habitable walls must float within the middle of an individual space module located in the warehouse.
Programing (project Requirements)
PROJECT WallHabitable#11
• A minimal of one pass through (opening in wall)
You are to develop a three-dimensional expression of a habitable wall using a basic “client profile”. Your three-dimensional expression will be free standing and exhibited as part of our final presentations with scale drawings, rendered perspectives and process work.
• Enclosed hanging clothes storage – 2’ deep x 18” minimal width x 3’ high
• Minimal 2’X6’ work surface sitting height (30” high)
• Occasionally, artists work overnight and sleep within their habitable space.
Purpose: The habitable wall project will introduce the element of designing for a human, building to the proportion and purpose of a client. You will conceive, design and build a model that engenders and concentrates the meaning of “engageable”, “respon sive”, “enervated”, “habitable”, “ space” and “wall”.
• Shared bathrooms, showers, kitchenette, and small communal lounge are located at one end of the warehouse.
• Artist’s set up their small studio within the module space footprint and tasked with developing their own habitable wall.
Final Deliverables: • 3D views o Axon View (Line weight, rendered with material, color and shading)
o Minimally consider tools and space need for clients type of artwork. Must incorporate one natural material The Wall: o Maximum wall height: 9’
o Perspective at human view height. (Line weight, rendered with material, color and shading).
o Perspective at human view from other side. (Line weight, rendered with material, color and shading).
o Minimum wall thickness: 1’
All project requirements must physically connect to, intersect, project from, recess in or morph from the habitable wall. The habitable wall is the sum components, not a wall with components “attached”.
o Must include a stair for every 6” in height. All minimum requirements must be met but can be expanded upon.
•
o
• Inspiration images from “artist” All drawings should include a person. All 2D drawings should include overall dimensions and human specific dimensions.
o Elevation 2 (90 degree opposed elevation 1) could be a section if appropriate, line weight and material representation. Process images
•
o
141
• 2D Views o Plan (Line weight with proper line weight), no material representation
o Elevation 1 (Line weight and material representation)
o Maximum wall thickness: 2’
Rules • The client: o Must integrate client’s colorway choice into final design.
• Decking (platform)
o Can be 0”, 6”, 12” or 18” high.

142

143


144


145


146


147

148


149


150


151


152


153


154


155


156


157


158


159


160


161


162


163


164


165

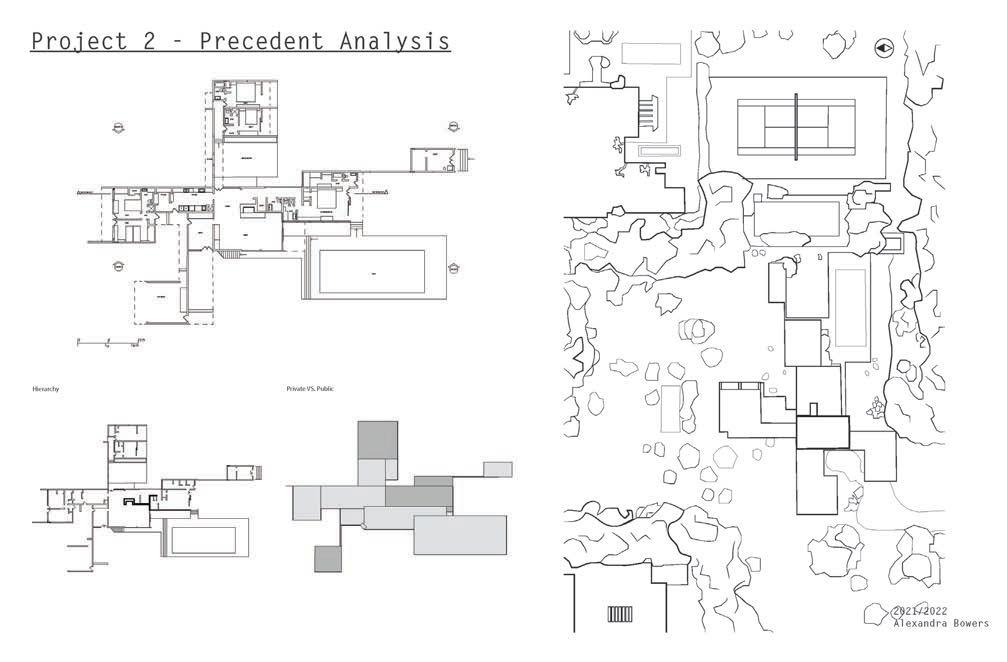
• To develop visual literacy by exposure to these houses, reinforced by thorough graphic and three-dimensional representa tion (drawing and model making) of one of them.
• To introduce history & theory as disciplines of critical investigation, facilitating understanding and discussion of design.
• To introduce research & analysis of precedents as a critical step in the design process.
• To use analysis of existing buildings and projects as introduction to canonical buildings by influential designers.
StudyPrecedent
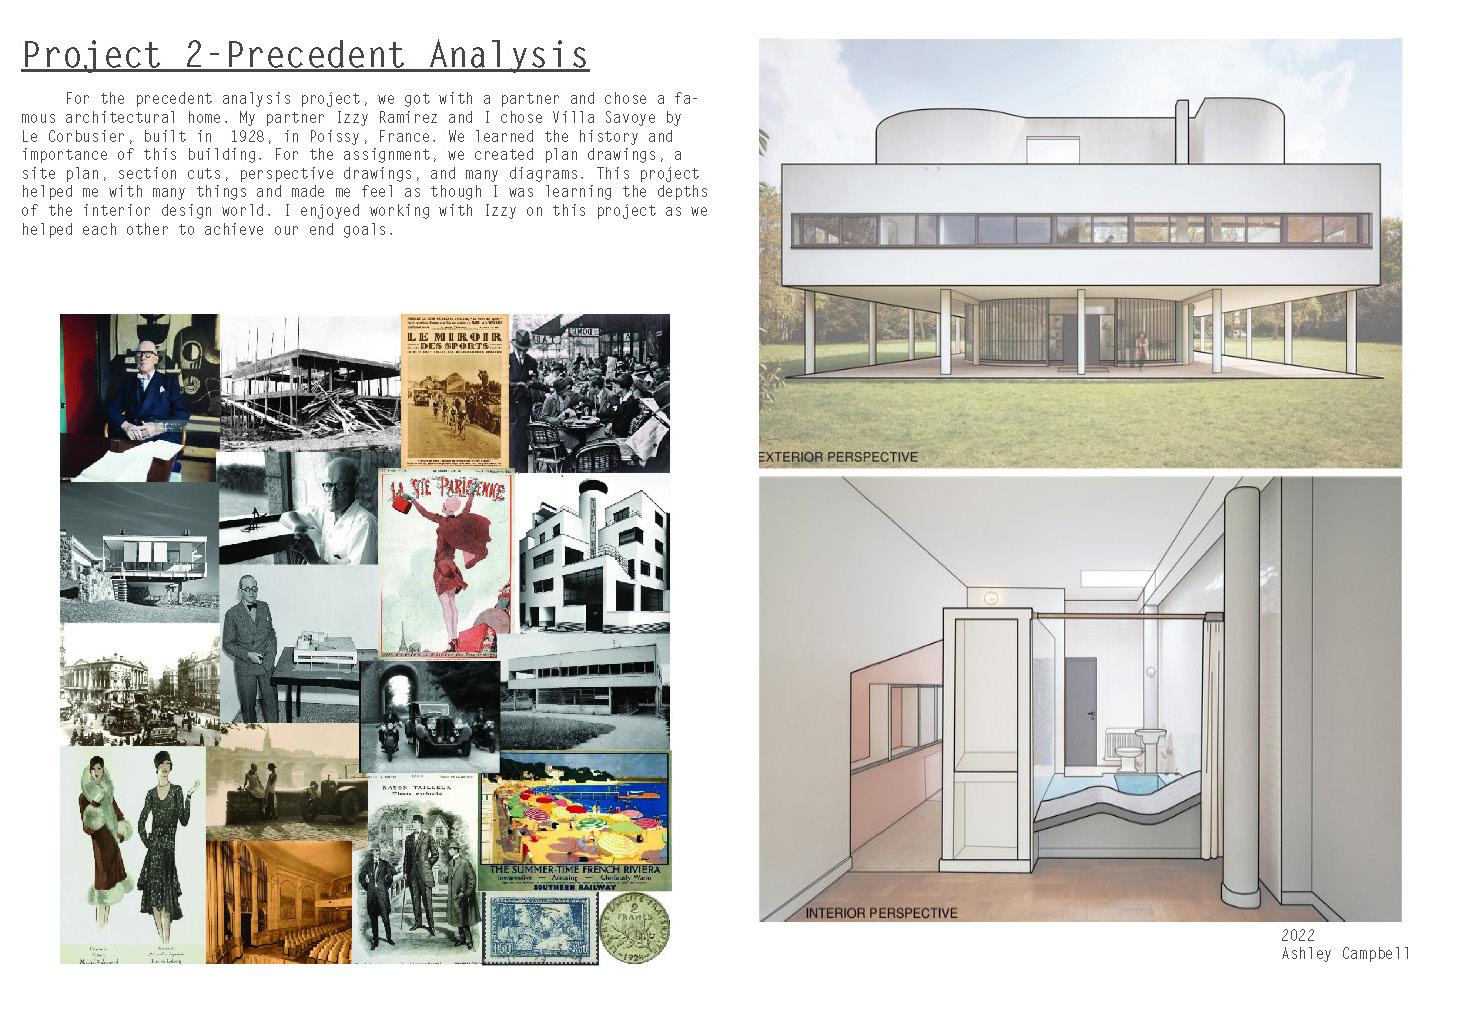
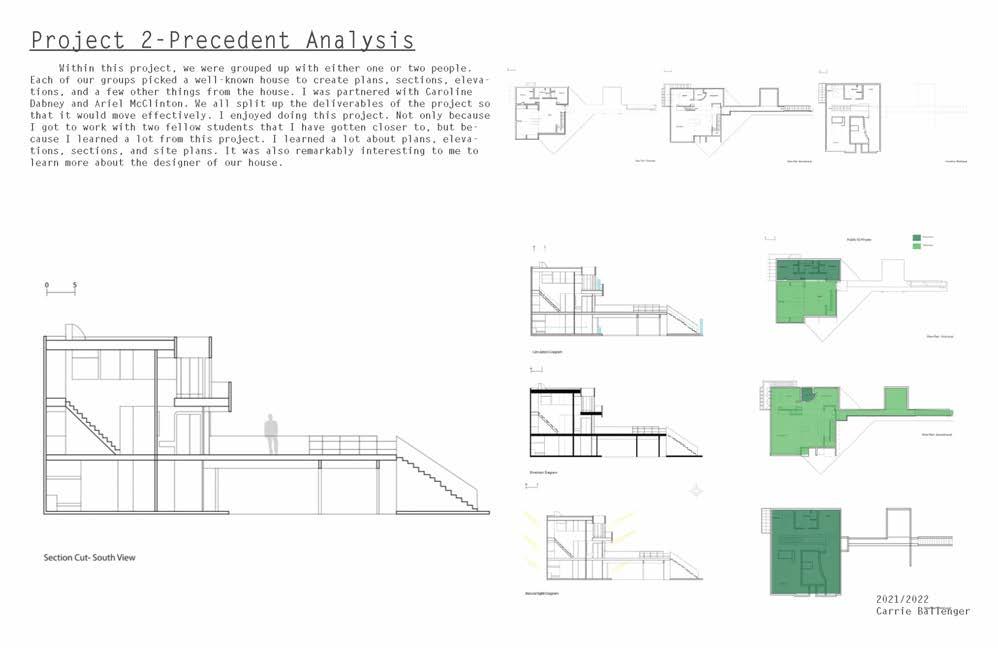
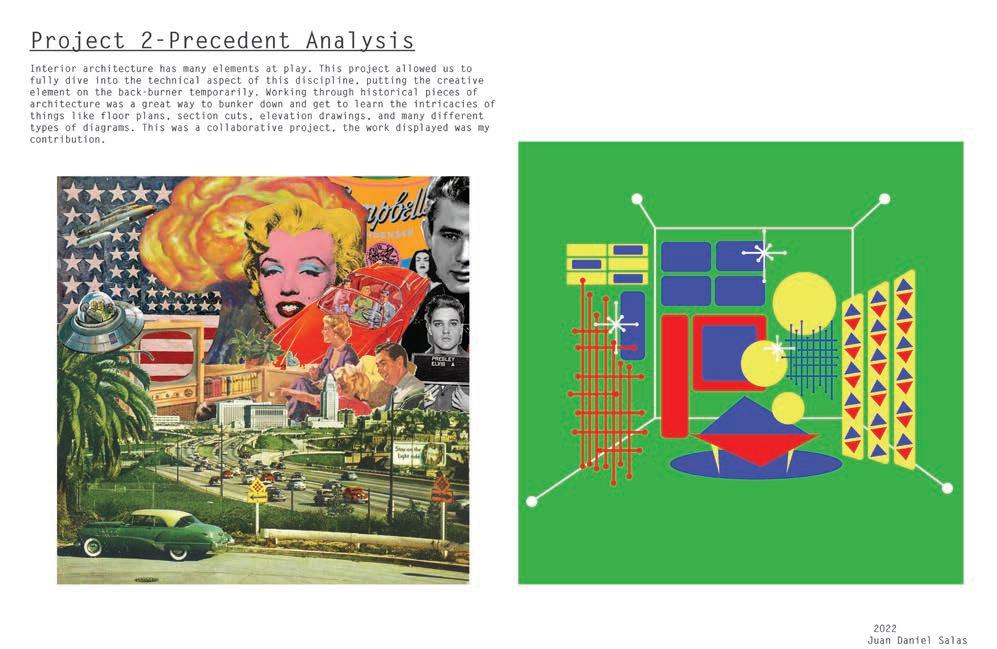
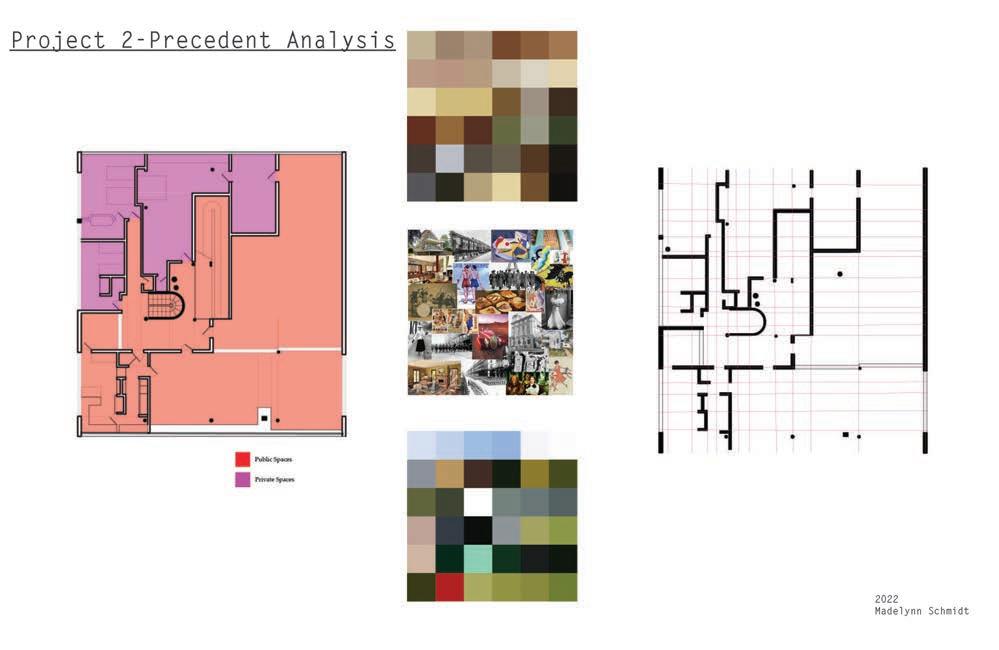
166 PROJECT #12
• To develop research and analysis skills.
• To introduce a number of twentieth-century and contemporary designers and their ideas (theories and processes) by way of a critical study of significant houses.
• To learn how to collaborate on a project in a team environment.
You will work small groups (usually pairs) during this project. Success depends upon the willingness of team members to share tasks and responsibilities in a spirit of cooperation. You and your partner(s) will negotiate mutual obligations in an effort to guarantee fairness and successful completion of this project in the time allotted.
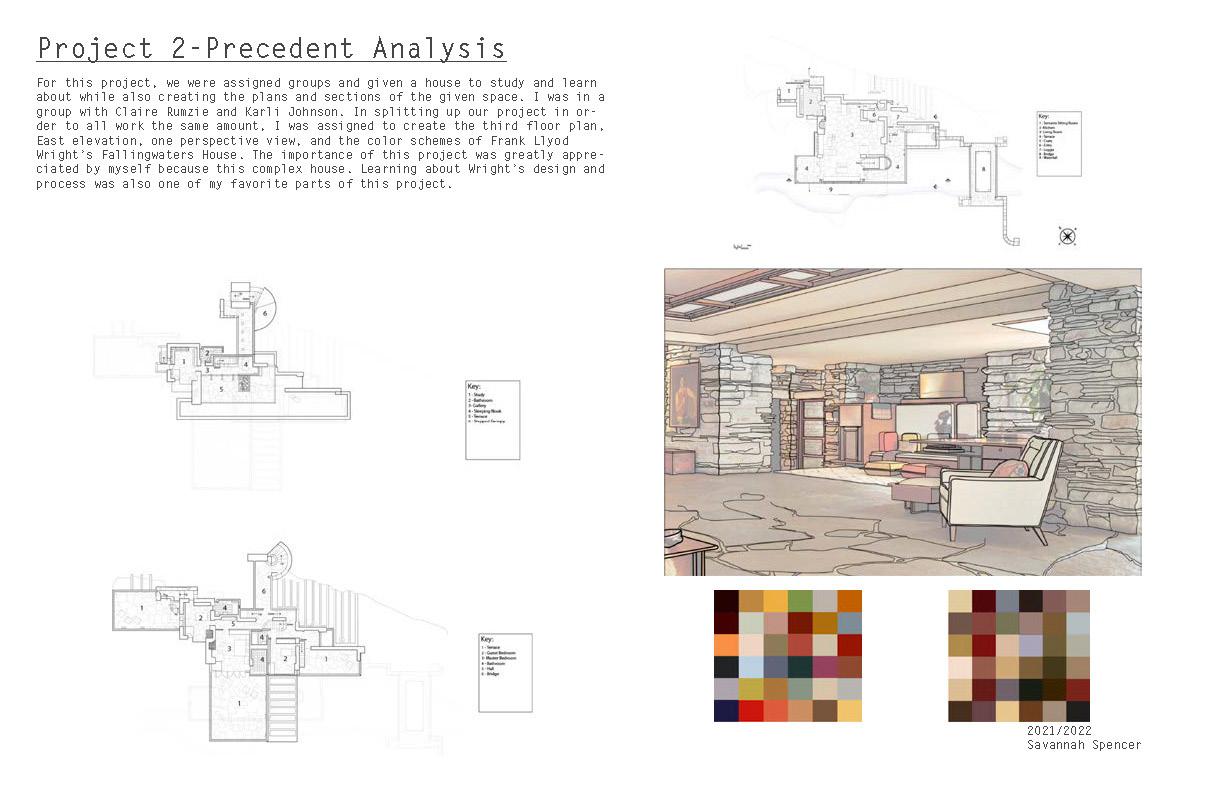
Project : Definitive Residence Investigation Form, Space + Order: Analytical Investigations - Team Project
Introduction: This project entails investigation, analysis, and two- and three-dimensional representation of the abstract, formal, tectonic, and spatial characteristics of a select group of 20th Century and contemporary houses. Through research and analysis of these works you will be introduced to the important designers who imagined them. Your research and analysis will include an ongoing dialog of design ideas, leading to an understanding of ways in which theory and practice are related in the conceptualization and construction of exemplary architecture. The projects you will study include expression of several of the key spatial conceptions of Modernism, Post-modernism and contemporary movements in design. The quality of your analysis will depend on thorough research, collection and deep understanding of textual and graphic information.
Objectives:
167


168


169


170


171

172


173


174

175


176


177

178


179


180


181


182


183


184


185


186


187


188


189


190


191


192


193

194


195


196


197


198


199


200


201

202


203


204


205
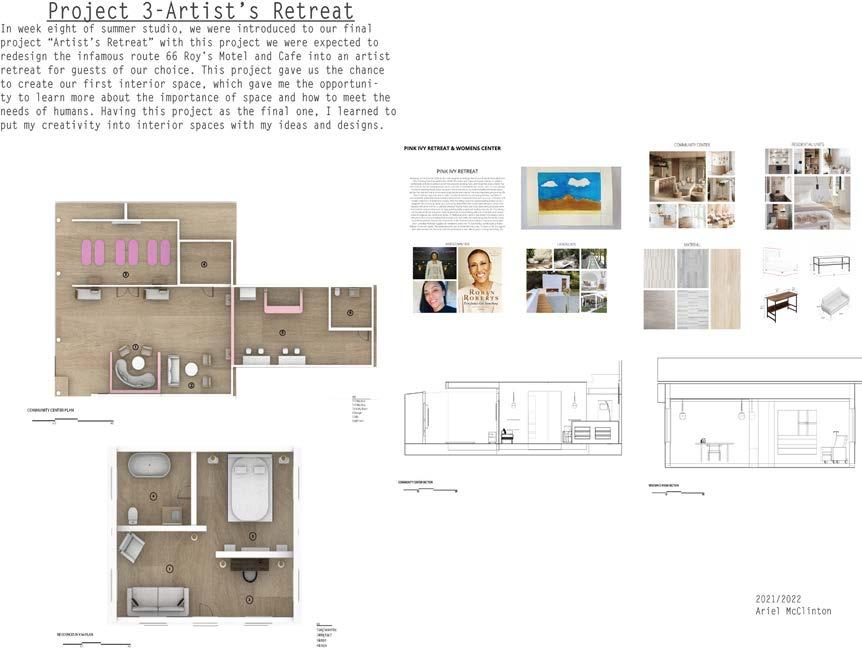
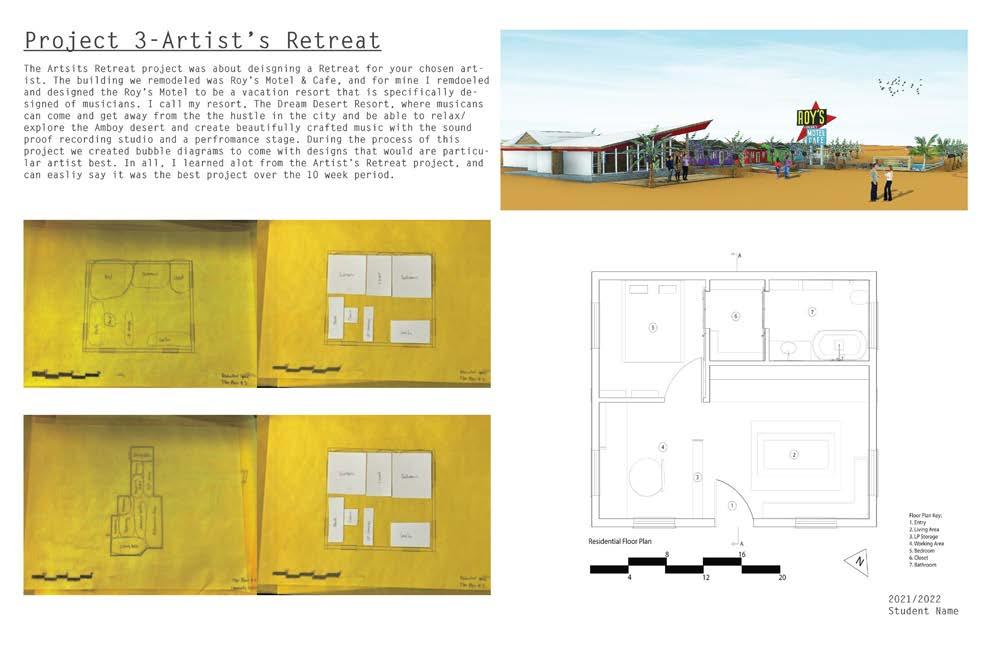
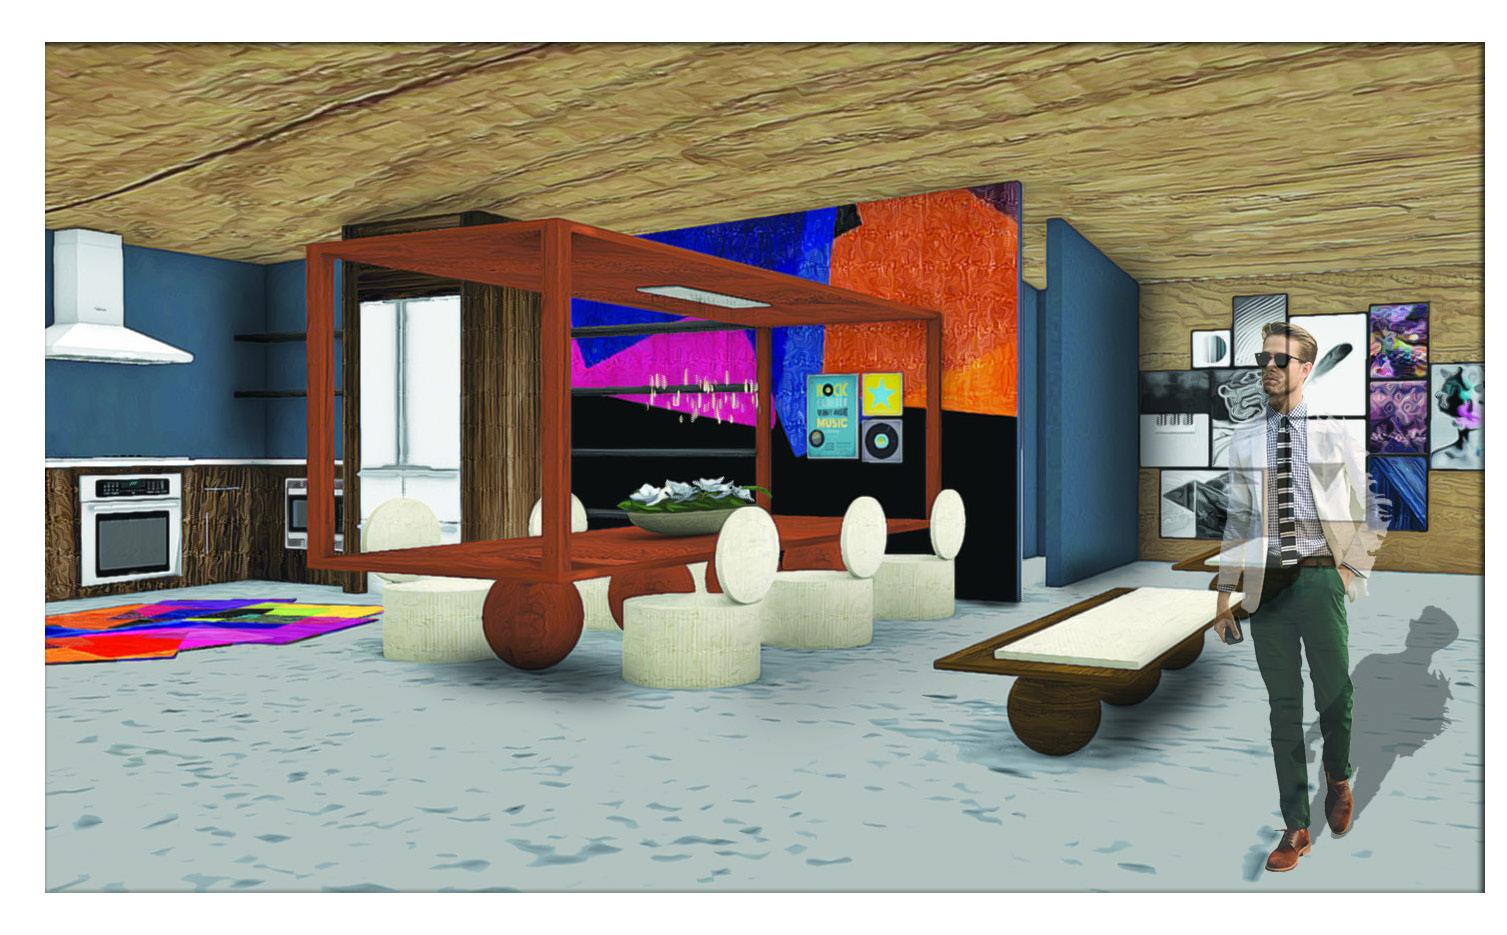
Requirements: It is expected that students will work iteratively and consistently with careful craft and precision of detail. The final require ments for the presentation of work will include plans, sections, and elevations as needed to describe the proposal; and a rendered perspective drawing that captures the essence of the place. Further explanation to be provided on the project start date.
-To demonstrate the ability to present ideas noted above clearly through drawing types including plan, section, and per -Tospectives.demonstrate how to think about making places through site appropriate design, including strategies of climate control and response.
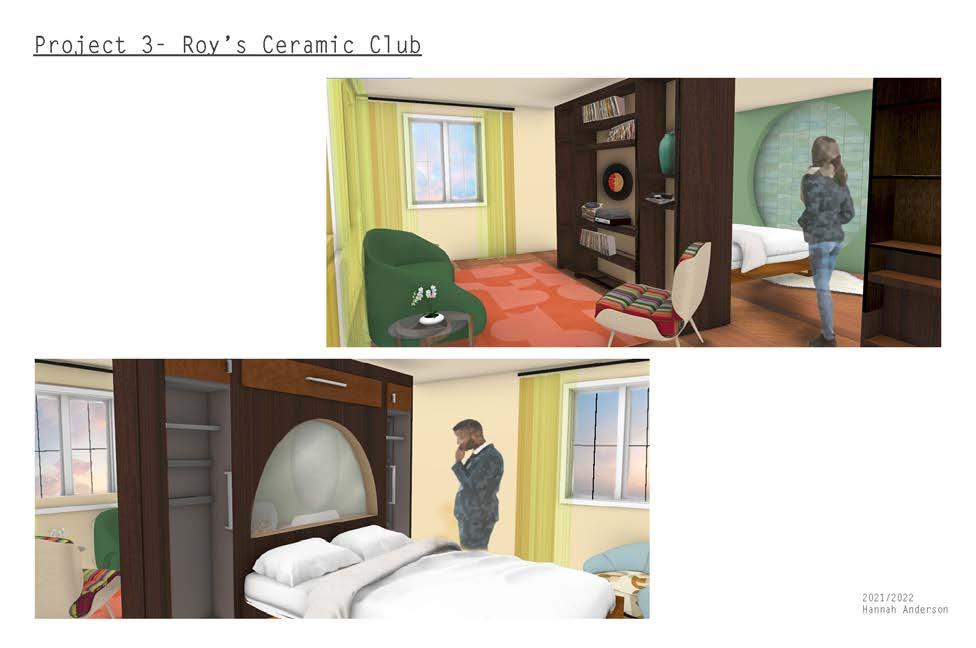
PROJECT RetreatDesert#13
206
The entire town of Amboy – including the mostly defunct Roy’s complex – is owned by and under the stewardship of a private preservationist.[1]
-To demonstrate the ability to incorporate a program into a site in an appropriate manner. Roy’s Motel and Café is a motel, café, gas station and auto repair shop, defunct for many years but now being largely restored, on the National Trails Highway of U.S. Route 66 in the Mojave Desert town of Amboy in San Bernardino County, California. The historic site is an example of roadside Mid-Century Modern Googie architecture.
-To demonstrate the ability to synthesize the skills taught in first year: using masses to create spaces, scaling spaces appropri ately, effectively employ ordering systems and use of clear tectonic/stereotomic vocabulary.
Objectives:
“...the places where people spend their free time. Retreats, where functional necessities are not the priority, portray the essential lifestyle that the residents’ desire... abundant in nature [these sites] present vast landscapes to the residents. At the same time, they lack basic infrastructure, materials, or technology that would be readily available when designing a house in cities. Because of such shortages, [designers] are encouraged to put their experimental concepts into practice.” - A+U 526: Retreat-Primal Concept and Experimental Design (2014)
Citation: 1. Chamberlain, Lisa (2007-06-10). “New Kicks on Route 66 for Commercial Builders”. The New York Times. Cars movie clip: https://www.youtube.com/watch?v=C5BCxH70vHo Google earth location: UFAGShY5HHqF1vAIQ0Wg6tw613AIhoKFl8yc3FBbGlfX1doVnBmQ3RXdHVMV0EQAg5,-115.74367768,196.09549402a,0d,56.37911705y,22.50999893h,93.19046925t,0r/data=CigiJgokCems5d4GD0NAEYRXlzwIBhttps://earth.google.com/web/search/Roy%27s+Motel+%26+Cafe,+National+Trails+Highway,+Amboy,+CA/@34.5583096 207


208


209


210


211


212


213


214


215

216


217


218


219


220


221


222


223


224


225


226


227


228


229


230


231


232


233


234

235


236


237

238


239


240


241

242


243


244


245


246


247


248


249


250


251


252


253


254


255


256


257


258


259


260

261

262 LETTERS from Foundational design taken over 10 weeks during the hottest and muggiest part of a Fayetteville summer is an intense whirlwind of challenges, emotions, vulnerabilities, and insecurities. To be successful, students of foundational design need to channel their inner creative spirit and drive--this can be quite unnerving when it begins amongst strangers. It also requires a disciplined level of time management. However, it can also be one of the most memorable times in a designer’s academic career. It is the start of what I like to refer to as a “lifestyle”, as a career in design far transcends a profession. As the proud coordinator of the Interior Architecture & Design foundational sequence, I endeavor to create projects that strengthen design skills while also highlighting our role as prob lem solvers. In doing so, I often see students struggle trying to grasp the new language of interior architecture with the realities of whether they truly want to be a part of the field. For those who can’t imagine doing anything else and commit fully to the madness that is interior architecture, I can assure you the struggle is very much worth the reward. To one day con tribute to the built environment-ultimately creating something much greater than oneself that may stand the test of time is a priceless and immeasurable reward. Nothing worth its true weight comes easy...this profession takes a lifetime of work. Find a way to relate to the struggles of an academic career in design and embrace the adversity. As time moves forward for the unsure and uncertain, remnants of regret can often be found in the wake. Don’t let that be the case for you. Leave only triumph and success in the rearview, and be makers, not takers. I can’t wait to hear of all the great things you will accomplish, and of all the marvelous spaces you will contribute to.
All the Christianbest,Schultz, Instructor
All the best, Torrey Tracy, Coordinator It was a pleasure working with you. I cannot emphasize enough how essential abstract thinking is in this course. Abstract thinking is the key to an inspiring design as it dictates the steps of a creative process. For instance, when one thinks abstractly, they see an object and deconstruct it into numerous different elements and principles of design, each of which can be the basis and essence of a whole new creative Remainwork. curious, think abstractly, and work creatively.
All the best, Ziba Rajibi, Instructor Generally, the role of an artist and designer requires one to pro fessionally display and present their work. Sharing and speaking about your work can be a vulnerable situation. Conversations with others regarding our work allows for new perspectives and a chance for the artist and designer to evaluate their strengths and weaknesses within the work. It is alway good practice to come prepared to a review or critique with questions in mind about your work. You should always be asking questions about your work while in the studio. Self evaluation is key. Identify the areas you feel are the strongest and the areas you feel need im provement. No design or painting is ever finished; it’s a constant problem being worked and solved and then reworked. Having a captive audience to provide critical feedback (as scary as it can seem at times) can be hard to come by. Your peers, re viewers and any audience you are lucky enough to hold captive and willing to provide feedback should be taken full advantage of. Engage with the process. There are times we struggle with our work. Areas we might feel stuck. A review or critique can be a valuable resource to find solutions. Listen and really try to hear what others are saying. Be open minded and don’t get defensive. Any criticism is an evaluation of the work, not you as a person. Believe in your ability to move your work forward and remember critiques and reviews are in service to you.
263
As a young designer, you must be passionate about your design and own your work. Keep in mind that the first idea is never the best, and there is always some room for improvement. After a while, you will notice your improvement when you look at your sketches. Also, practice having as many ideas as possible and learn when is best to stop adding elements to your design. You are the creator and making balance is the key to a successful MarjanBest,design.
Miri, Instructor In my opinion, the curriculum in the first two years is typically more focused on visualizing ideas by converting them into visu alized outputs that can be shared with others. In the second half, the focus is more on materialization aligned with the realities, such as building codes, social issues, etc. It is my hope that you will be able to improve your ability to visualize and sense scale before the second half. Considering that we are not making ornamental art, but creating a space for people to use, we need to create a space that is usable by people. It is our responsibility to set the width of the passages where people enter and leave or the areas where people interact with one another. The best way to identify this problem is to construct a physical study model by hand. As you build walls and stairs, you can easily discover errors in your de sign. In the event that you are unable to resolve the errors, they will be projected onto your drawings and perspectives. As soon as you have established your sense of scale, you should improve your digital visualization in order to produce persuasive design outputs. It does not matter how good your design is, if you are not able to persuade your client, your design will not be realized. In order to achieve the highest quality visualization, I must ensure that the quality of my visualization is equal to or greater than the quality of the reference images that I use. If, for example, your design does not look as good as the Pinterest image you referenced, your client may suggest making it more similar to your Pinterest image than your own. Regardless of the program you use, modeling is an essential component of 3D Visualization. Lighting and Material deficiencies can be remedied with Photoshop, but Modeling deficiencies cannot be overcome with Photoshop. As a final note, I would like to thank you for all the time I spent with you. Despite the fact that this design studio with you has ended, please feel free to contact me at any time. I will be glad to respond to your contact. It has been a pleasure having you with me this semester.
Jinoh Park, Instructor You made it! All of you should be so proud of not only the beautiful works you produced, but also of the endurance and dedication it took to complete a year’s worth of learning in ten weeks. The time management skills and self-discipline you developed over the summer will be invaluable as you move for ward with the program. Do not forget what you learned in the first five weeks of the summer; those creative skills of abstraction and working with your hands will help you with what comes next! It is tempting to jump on the computer immediately; but sometimes the best and simplest solutions come from exploring with paper and pencil. The best advice I can give is to put your passion into each project and puzzle you are faced with. I hope you realized this summer that when you imbue your personal interests into projects, they become exciting and enjoyable to work on, despite the often-long hours required. It can be easy to become discouraged during the school year, but all of you are incredibly capable of achieving what you set out to accomplish. I wish you the absolute best and will see you around campus!
Your MaryTA,Newberry, Teaching Assistant
264 Fundamental design skills; development of visual and verbal communication skills including observation skills, design technologies, analysis and representation in both 2-dimensions and 3-dimensions through analog and digital tools; creative and critical thinking skills. Fundamental design skills; use of precedents for understanding principles of design and natural and formal or dering systems; design development using both iterative and alternative methods of exploration in 2-dimensions and 3-dimensions using analog and digital tools; continued development of visual and verbal communicationBachelorskills. of Interior Design | Fay Jones School of Architecture and Design, University of Arkansas, Fayetteville YEAR ONE YEAR TWO YEAR THREE ARCH ThinkingDesign1212I ARCH ThinkingDesign1222II ARCH HistoryArchitectural4433III IDES RequirementAbroadStudy IDES Internship4811 for Interior Design IDES DesignInterior2814IV IDES inDigital2723DesignMedia IDES InteriorHistory2883ofDesign IDES forHuman4813FactorsDesign IDES DesignFundamental1035Skills IDES DesignFundamental1045Methods ProfessionalElective IDES AssembliesMaterialsInterior2823Design& IDES SystemsRelatedLighting3843&Building IDES IDESInteriorSystemsBuilding3833forDesign4823ProfessionalPracticeforInteriorDesign IDES DesignInterior2804III IDES DesignInterior4805VIIIDES DesignInterior3815VIIDES DesignInterior3805V IDES DesignInterior4815VIII YEAR FOUR