HIKING IN NORWAY – SOUTH
MULTI-DAY TREKS
by Ute Koninx
JUNIPER HOUSE, MURLEY MOSS, OXENHOLME ROAD, KENDAL, CUMBRIA LA9 7RL www.cicerone.co.uk
© Ute Koninx 2021
Second edition 2021
ISBN 9781783628100
First edition 1998
ISBN 9781852842307
This completely new guide replaces Walking in Norway by Constance Roos.
Printed in China on responsibly sourced paper on behalf of Latitude Press Ltd
A catalogue record for this book is available from the British Library.
All maps in this guide © Kartverket www.norgeskart.no.
All photographs are by the author unless otherwise stated.
To my family
Updates to this Guide
While every effort is made by our authors to ensure the accuracy of guidebooks as they go to print, changes can occur during the lifetime of an edition. Any updates that we know of for this guide will be on the Cicerone website (www.cicerone.co.uk/975/updates), so please check before planning your trip. We also advise that you check information about such things as transport, accommodation and shops locally. Even rights of way can be altered over time. We are always grateful for information about any discrepancies between a guidebook and the facts on the ground, sent by email to
updates@cicerone.co.uk or by post to Cicerone, Juniper House, Murley Moss, Oxenholme Road, Kendal, LA9 7RL.
Register your book: To sign up to receive free updates, special offers and GPX files where available, register your book at www.cicerone.co.uk.
Front cover: Hiker scaling the Besseggen ridge in Jotunheimen (Route 1, Stage 1)
CONTENTS
Map key
Overview map
Route summary table
Author preface
INTRODUCTION
Norway – a hiker’s paradise
Geography and geology
Heritage and outdoor culture
Climate and when to go
Getting to Norway
Getting around Norway
Hiking in Norway
Waymarking and access
Maps and navigation
Accommodation
Equipment
Water, food and supplies
Money
Language
Phones and Wi-Fi
Safety
Emergencies
Using this guide
JOTUNHEIMEN
Route 1 Jotunheimen Besseggen route
Route 2 Jotunheimen classic route
Route 3 Jotunheimen traverse route
RONDANE
Route 4 Rondane summits
Route 5 Rondane traverse route
DOVREFJELL
Route 6 Dovrefjell traverse route
TROLLHEIMEN
Route 7 Trollheimen Trekanten triangle route
Route 8 Trollheimen SignaTur route
Route 9 Trollheimen fells to fjord route
RYFYLKE
Route 10 Lysefjord circuit
Appendix A Overview of routes and daily stages
Appendix B Table of mountain huts and key services provided
Appendix C Useful websites and transport schedules
Appendix D Norwegian berries
Mjølkedalstinden’s secondary top, as seen from Olavsbu (Route 3, Stage 1)
INTRODUCTION
View over Fannaråkbreen glacier into Sognefjellet (Route 3, Stage 3)
Norway – a hiker’s paradise
Southern Norway extends from Kristiansand in the south to Trondheim in the middle of Norway. The fjords and mountain ranges, fish-rich rivers and lakes and superb hunting grounds made the country popular with the earliest tourists and travellers from Continental Europe in the late 19th century. So much so that English mountaineers were among the first to scale many peaks and German aristocracy liked to come for their summer holidays. Much has changed since then – and yet in some ways very little has changed. The natural beauty and magnificent views that attracted the early tourists awe today’s hikers as much as if not more than before.
Much of Norway seems untouched by human activity, and once hiking you will invariably learn that it is firmly in the realm of the natural forces that have shaped it: primarily water and wind. Of course, you will not be alone if you are scaling mighty Galdhøpiggen (Route 2, Stage 4), hiking towards the unique Kjeragbolten boulder (Route 10, Stage 4) or crossing the iconic Besseggen ridge (Route 1, Stage 1). They are popular for a reason, but worth your while nonetheless and therefore included within routes in this guide. However, many route stages will have you hiking in solitude for most of the time, meeting few on the trail as you marvel at the panoramas around you. The stages of each route are designed to end at mountain huts, providing warmth, companionship and comfort at the end of the day. Having said that, it is perfectly possible to hike with a tent, should you wish. Spending time outdoors is part of Norwegian culture.
This guidebook presents a total of 10 multi-day routes, from shorter three-day treks to longer expeditions that require more planning, commitment and stamina. Almost all routes require you to have a head for heights at times. With the exception of the Lysefjord route in Ryfylke that takes you around one of the most beautiful fjords in western Norway, all of the routes are in (high) alpine terrain, with the associated rewards and challenges.
Geography and geology
The Norwegian mountains are often thought to be the remnant of a high mountain range, formed some 450 million years ago and since eroded down to current heights. However, this theory has recently been challenged by the discovery that the continental crust underneath is too thin to have supported such a mountain range, and the scientific
community is divided as to the actual origin of the Norwegian mountains.
Erratics from the last ice age on the high fells plateau (Route 10, Stage 3)
What we do know is that the mountain range has been shaped and moulded during the Quaternary period of the last 2.5 million years. Southern Norway was covered by immense amounts of snow and ice for half of that time; warmer periods led to glacial movements and snowmelts that needed to be discharged into gigantic rivers, shaping the magnificent landscapes that we can see today. The country is marked by fjords that cut deep into the land, as well as mountain ranges and tundra-like plateaus, permafrost and glaciers, leaving only 4% that can be used for agricultural purposes. It has one of the lowest population densities in Europe, and this is concentrated in coastal areas, especially the Oslo fjord. Once you leave towns and villages behind, you will find yourself very quickly in a remote and unspoilt country, with millions of years of geological history under your feet. (If you’re
interested, for more information see Geological Survey of Norway, www.ngu.no – also in English.)
Heritage and outdoor culture
Norwegians have been living in this rugged and often inhospitable landscape for thousands of years, becoming experts at making a living in harsh and difficult conditions. By the end of the 19th century, all the land suitable for agricultural purposes had been developed, and this often included remote farms in faraway mountain valleys. Today, some of these former summer pastures and alms form part of the vast network of mountain huts around the country. The centuries-old drover trails that connected these hamlets have become part of the network of trails that criss-cross the mountains. While hiking in Southern Norway you will find yourself in some of the most beautiful and varied terrain. Expect to be able to walk over and around mountaintops, around glaciers, along streams and lakes in generally magnificent and stunning scenery, where, depending on the route and time chosen, you might be accompanied by many or by none.
Foraging, fishing and hunting are seen by many as part of the traditional Norwegian way of life. You might well come across hunters and fishermen who will only consume meat or fish that they’ve caught. Norwegians like to feel connected to nature, and they have a word in their vocabulary that sums up all these experiences into one: friluftsliv. While untranslatable, it encompasses all the activities around the outdoors that an individual might enjoy. In the context of hiking in the mountains, this extends to berry picking and other foraging activities, hunting and fishing. The allemannsretten, translated as ‘public right of access’, covers these activities in a law, essentially allowing the individual to walk and hike
everywhere in open country and unfenced land, without restriction, regardless of land ownership (search ‘right to roam’ on the official website of Visit Norway, www.visitnorway.com). Hunting, as well as fishing in lakes and rivers, does require a permit (see information on www.inatur.no). Trout, perch and char are abundant in many lakes and rivers and can supplement your diet on the trail. In Southern Norway you are allowed to pick berries and gather mushrooms for your own consumption (note that this should only be done if you are truly knowledgeable about mushrooms as some are potentially lethal). See Appendix D for more information on the berries that are common in the region.
Climate and when to go
Due to Norway’s latitude, the mountainous areas described in this book have a climate that is harsher than might be expected for their altitude. Above 600m you are in alpine territory in Southern Norway. This leads to a relatively short hiking season in the mountains, starting at the beginning of July and running to mid September. Depending on winter snowfall and spring temperatures, many hikes can still have snow cover until well into July or even throughout the summer. In June you may find trails and markers hidden under snow, and summer bridges over meltwater rivers not yet installed. For the same reasons, hiking in late autumn, winter and early spring is not advised – in addition to the potential difficulties caused by snow and swollen rivers, many huts are closed over these months.
A quiet, still autumn morning in Visdalen valley (Route 2, Stage 5)
You will find mid July to mid August to be the busiest times on the trails as these coincide with school holidays and the general ‘summer holiday month’. If you prefer quieter trails and have flexibility in your schedule, go earlier or later in the season. The weather might be a bit more unstable, but you will be rewarded with quieter huts and far fewer people on the trails.
Temperatures in summer in the mountains average around 11ºC at 1000m, and it is not unusual to have frost at night, while temperatures on warm summer days can also easily reach 20ºC. Keep in mind that temperatures fall as you ascend. For every 100m altitude gain the temperature falls by 0.6ºC. Any wind that is present will have fewer obstacles in its way and so can further decrease the felt temperature through the windchill factor.
Southern Norway has two main climate zones. The divide runs along the mountain ranges themselves. This leads to large differences in precipitation across some ranges such as Jotunheimen, Dovrefjell and Trollheimen. The western, coastal areas benefit from the Atlantic Gulf Stream and experience generally mild winters. At the same time, they are fully exposed to Atlantic storms and low-pressure systems, and therefore the western mountains receive much more precipitation (typically 1000mm per year) than the eastern areas (typically 400–500mm). In summer, the mountain ranges prevent warm continental winds from reaching the coast, thereby keeping summer temperatures lower along the western parts. The fact that the mountain ranges act as climatic barrier between a coastal and continental climate can give rise to fast-changing weather conditions in the mountains themselves. Be prepared for these. Staffed mountain cabins will generally display the daily local weather report.
Getting to Norway
Norway is well connected by all means of transportation to Scandinavia and Continental Europe, with networks including plane, ferry, train, bus and car routes. From the UK and the US, direct access is by plane.
Visa
Visitors from the EU/EEA and the US do not need a visa to visit Norway for up to 90 days. US citizens should have a passport that is valid for at least three months beyond the period of stay. They need sufficient funds (NOK 500 per day, unless you’re staying with family) and a return airline ticket. You may be asked to prove this when you enter, for example by showing cash, credit cards or documentation of
prepaid accommodation and transport. Most people from other countries outside the EU/EEA must apply for a visitor’s visa. For information on current visa requirements see www.udi.no/en.
The lush valley around Gjende provides for many different insects (Route 1, Stage 2)
Plane, train and bus
Norway is connected by air to many European and international destinations through the main airports of Oslo, Stavanger and Trondheim, as well as many other smaller airports. Finding a flight is not difficult, but prices can vary significantly based on time of year, time of booking and many other factors. Comparison shopping is recommended (see www.omio.com, for example, which also offers search options for train and bus travel). Airlines flying to Norway include SAS, KLM, Ryanair, Lufthansa, British Airways and many others.
There are some international train connections; these can be researched through websites such as
Another random document with no related content on Scribd:
End view (Exaggerated)
Edge view
Side view
The rake, or pitch of the teeth of a saw is the degree of slant which the cutting edges possess with reference to an imaginary line passing thru the points of the teeth. Fig. 25. The amount of pitch given will depend upon the use to which the saw is to be put, whether for ripping or cross cutting, and somewhat upon the hardness or softness of the wood to be cut. Fig. 26 shows the saw in proper position. It should be held in the right hand with the left hand grasping the board, the thumb of the left hand acting as a guide in the beginning. The thumb should be held firmly on the board and the blade of the saw should be pressed lightly against it. The cutting edge of the saw should be held at an angle of about forty-five degrees to the board and should be started on a backward stroke. The first few strokes should be short ones, increasing gradually in length.
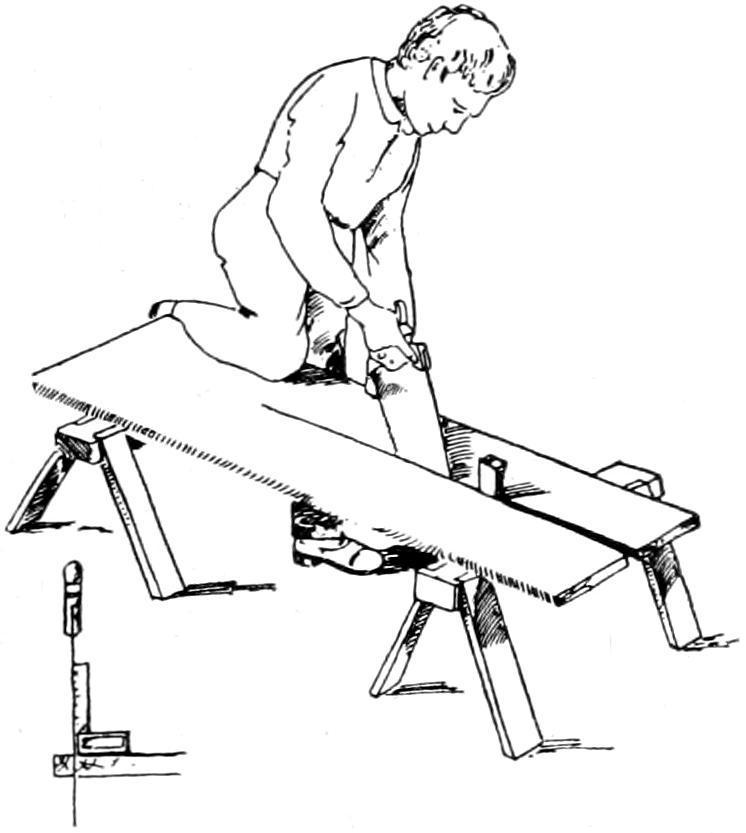
If the tool is sharp, but little pressure will ever be required and, in starting, the tool must be held up so that its weight shall come upon the wood gradually. Saws can be guided better if the index finger of the right hand is allowed to extend along the side of the handle. Test occasionally, sighting down the saw blade to see that the sides of the
saw are at right angles to the surface of the board. A try-square may be used by the beginner, as shown in Fig. 26.
If the saw does not follow the direction of the line, the blade should be slightly twisted, as the sawing proceeds, in the direction it ought to take. This must be carefully done so as not to cause the blade to bind and kink. In sawing a board which has been fastened in the vise, the most convenient position is obtained by sawing at right angles to the surface. Unless the saw has considerable set, difficulty will be experienced in changing the direction of the cutting should this be necessary This may be overcome by lowering the handle so that the cutting edge shall make the same angle with the board as when the board rests on trestles.
When making a long cut, should the kerf bind, a wedge may be inserted as shown in Fig. 26.
All saws will work easier and will be found less likely to rust if their sides are rubbed occasionally with an oily rag or a piece of tallow.
27
12. The Crosscut Saw.
—Fig. 25 shows the teeth of a crosscut saw. This saw is filed so that the cutting
edges are on the sides of the teeth. Every tooth is sharpened to a point, one on the right side, the next on the left, giving two parallel lines of sharp points with a V-shaped groove between.
The pitch given the teeth of a crosscut saw will vary with the hardness or softness of the wood which is to be cut. For all-around use the amount of slant is about one-third of the whole tooth. Fig. 27. —The teeth of the rip-saw are chisel shaped, Fig. 28, and are made by filing straight across the blade. The front or cutting edges are filed so that they are square, or at right angles to an imaginary line passing through the points of the teeth.
13. The Rip-saw.
F�� 28
14. The Back-saw.
—The back-saw, or tenon-saw as it is often called, has a thin blade strengthened by a heavy steel back piece. It is used upon work requiring delicate, accurate cutting, Fig. 29. Fig. 30 shows the shape of the teeth, which differ slightly from those of the cross-cut. These teeth are suitable for both cross-cutting and fine ripping. But little set is given the teeth of the back-saw
29.
30.
In using this saw, Fig. 31, hold the work firmly against the stop of the benchhook with the left hand, guiding the saw with the forefinger or thumb placed against the blade just above the teeth. Begin on the backward stroke, holding the handle end of the saw highest. Begin at the farthest corner, using short, easy strokes. Gradually lower the handle to a horizontal position, meanwhile increasing the number of teeth used, but continuing the slow, regular strokes.
F��.
F��.
In accurate cutting, Fig. 32, where no paring or block-planing is to be done, the saw teeth should cut just by the line, with the kerf in the waste, but with no wood between the line and the kerf. To allow for paring or block-planing, saw about one-sixteenth of an inch in the waste. Fig. 33.
F��. 32.
F��. 33.
34.
35.
When ripping, place the piece in the vise and begin sawing as indicated in Fig. 34. Place the saw so that just the whole of its thickness is in what is to become waste wood. Begin sawing as was done in crosscutting. Gradually lower the handle, while sawing, until most is being cut from the side nearest you. Fig. 35. Reverse the wood several times, working down one side then the other until the cross lines are reached. Fig. 36 illustrates the result of good and bad sawing.
F��.
F��.
Good Sawing Bad Sawing
36
15. The Turning-saw.
—The turning or bow-saw is used for cutting along curved lines. Fig. 37 illustrates the manner of holding this saw. The sides of the blade must be held at right angles to the surface of the wood. Either or both handles may be turned, thus turning the blade with reference to the frame. Avoid turning the blade, however, as much as possible and see that the blade is not twisted by turning one handle more than the other.
F��. 37.
This saw may be used for cutting enclosed curves by boring a hole, releasing one end of the blade and inserting it thru this hole then replacing it in the saw frame.
As the cut of the turning saw is not very smooth, it is advisable to leave about one-sixteenth of an inch between the kerf and the line, to be removed later with the spokeshave.
16. The Compass Saw.
—The compass saw, Fig. 38, is better suited for inside curve sawing. Its use requires a steady hand, else the thin blade will buckle and break.
F��. 38.
17. Saw Filing.
—Learning to sharpen a saw is a difficult thing—so difficult that it is not considered within the province of a book on elementary woodworking to treat of it. One who uses saws, ought, however, to know the steps which are taken to put a saw in order.
39
The teeth are first set. Fig. 39 shows a common form of saw-set in position. Beginning at one end of the saw, every other tooth is bent outward by means of this instrument. The saw is then reversed and the remaining teeth are similarly treated.
As these saw-sets are adjustable, the teeth may be bent much or little as the work to be done demands.
Second, the teeth are jointed. A flat file is run lengthwise over them the full length of the saw so that none of the teeth may project
F��
more than others. Fig. 40 shows a flat file in position for jointing. This block keeps the surface of the file at right angles to the blade of the saw.
Third, the saws are filed, a three-cornered file being used for this purpose. The kind of saw determines the angle or angles at which the file is held with reference to the saw blade. Fig. 41 illustrates the position when filing the crosscut and Fig. 42 the rip-saw.
Fourth, the teeth are side jointed by laying the saw flat upon the bench and rubbing an oil-stone over each side lightly, once. Fig. 43. This is to even the sides of the teeth that the kerf may be smoothly cut.
F��. 40.
F��. 41.
F�� 42
F�� 43
18. Planes.
CHAPTER III.
P�����.
—A standard plane of the present time is shown in Fig. 44. The bottom of this plane is of iron. Fig. 45 shows a plane with the same adjustments in which the bottom is of wood. Planes are made in different sizes. As certain lengths are more suitable for certain kinds of work they have been given distinguishing names such as jack-plane, smooth-plane, fore-plane, jointer. Fig. 44 shows the jack-plane.
F��. 44.
F��. 45.
The two irons of the plane, the plane-iron or plane-bit, and the cap-iron are fastened together by means of a stout screw. Fig. 46.
This cap-iron serves a double purpose. First: It stiffens the plane iron; second, it serves to bend and break the shaving and thereby prevent a splitting action in front of the cutting edge. This action would surely occur were the grain in the least unfavorable and the cap-iron not used. Fig. 47.
1. Plane-Iron.
2. Cap-Iron.
3 Plane-Iron Screw
4 Cap
5 Cap-Screw
6 Frog
7 “Y” Adjustment
8 Adjusting Nut
1. Lateral Adjustment.
2. Frog Screw.
3 Handle
4 Knob
5 Handle “Bolt & Nut”
6 Knob “Bolt & Nut”
7 Handle Screw
8 Bottom
19. Setting the Blade. F��. 46.
—The cap-iron should extend to within onesixteenth of an inch of the cutting edge of the plane-iron in the smooth-plane and three thirty-seconds in the jack-plane. Fig. 48. The screw which holds the plane-iron and capiron together must be fastened with a screwdriver—many carpenters use the plane-iron for this purpose—tightly as possible, otherwise a few strokes of the plane and the plane-iron will have been forced up so that the cutting edge will not touch the wood. The reason for this action will be understood when it is seen that the lever of the brass adjusting nut does not act directly on the cap-iron but only on the plane-iron as it is carried along by being fastened with this screw to the cap-iron.
F�� 47
F�� 48
The cap-iron and plane-iron are fastened in the throat of the plane by a cap on one end of which is a little lever or cam.
Should this cam fail to hold the irons firmly, the screw which holds the cap to the frog should be turned with the screwdriver. It should be remembered, however, that this screw, once set, seldom needs adjusting.
Beginners frequently, in ignorance, place the plane-iron and capiron together so that the side of the plane-iron having the bevel is next the cap-iron. This results in a loose acting cam and they should look to see that the irons are properly set before changing the screw
Should it be impossible to force the cam into place without great pressure, first look to see whether the blade rests flat upon the frog before releasing the screw. Frequently the little lever which should enter the small opening in the cap-iron will be found to have entered the opening in the plane-iron only.
20. Adjustment of the Iron.
—There are two adjustments for the blade of the modern plane. The first consists in turning the thumb-screw or adjusting nut, Fig. 46, that the plane iron may cut a thicker or a thinner shaving. The direction in which it should be turned to give the desired result must be learned by experiment, for in some planes it is the reverse of what it is in others.
A little observation of the action of the screw upon the lever which connects it to the plane iron will show that there is often quite a little lost motion so that it becomes necessary to turn the screw a little before the iron is raised or lowered any. One soon learns by the sense of feeling when the lost motion has been taken up.
The second adjustment is by means of the lever, 9, Fig. 46. Moving this lever to the right or the left serves to straighten the plane-iron, so that the cutting edge shall extend evenly through the mouth and not take a shaving thicker at one side of the iron than at the other.
F��. 49.
In adjusting a plane-iron, turn the plane upside down with the toe towards you, hold it toward the light and sight along the bottom, Fig. 49. If the plane-iron projects, observe whether it projects evenly or not. Usually one side will be found to project more than the other. Move the adjusting lever until it shall project uniformly. The cutting
edge should project about the thickness of a piece of drawing paper for average work.
21. The Jack-Plane.
—The jack-plane is about thirteen inches long. Where a full equipment of planes is at hand, the plane-iron of the jack-plane is ground slightly rounding as is shown in Fig. 50 A. The purpose of this plane is to remove rough or large quantities of wood and this shape of blade is best suited for that purpose. Of course the surface of the wood is left in hollows and ridges, and it is necessary to use another plane with a plane-iron ground straight and set shallower in order to smooth the surface.
In manual-training schools where the jack-plane is made to serve the purpose of smooth-plane also, the plane-iron is sharpened straight across and the corners slightly rounded, B, Fig. 50.
22. The Smooth-Plane.
—The smooth-plane is shorter than the jack-plane. Fig. 51. It is used, as its name implies, for smoothing surfaces. As the straightening is supposed to
F��. 50.


