


38 80 62 120
FUNDAMENTALS 14 Yarn 18 Tools 20 How to Read a Pattern 34 Abbreviations
PATTERNS 38 The Croix Coaster 44 The Les Cayes Wall Hanging 50 The Ennery Twisted Headband 56 The Hinche Throw 62 The Belladère Bobble Pillow 68 The Gonaïves Faux Fur Cowl 74 The Arnaud Basket 80 The Torbeck Beanie 86 The Vache Bolster Pillow 96 The Léogâne Infinity Scarf 102 The Côteaux Tassel 108 The Aquin Velvet Scrunchie 114 The Limbé Linen Scarf 120 The Bainet Throw 126 The Victoire Wreath 132 The Jacmel Blanket Scarf
STITCHES + SKILLS 142 Slip Knot 144 Chain 146 Slip Stitch 148 Single Crochet 150 Half Double Crochet 152 Double Crochet 154 Treble Crochet 156 Herringbone Half Double Crochet 158 Bobble Stitch 162 Magic Ring 164 Sc into a Magic Ring 166 Whip Stitch 168 Credits 174 About the Author
INSIDE 9 Foreword 11 Intro
MODERN CROCHET 10
# M Y MODERNCROCHET
INTRO
I first learned to crochet so that I could make blankets for children growing up in the orphanages of Haiti after the 2010 earthquake. One of my first blankets went to a bright-eyed four-year-old boy named DeBrosse. He is as mischievous as he is lovable, and his friendship forever changed the way I see the world. I founded the DeBrosse brand in 2013, and annually set aside 15 percent of all proceeds to help fund needs at our three partner orphanages. By supporting my work, you are empowering an entire community.
Living in New York City, I am surrounded by a modern, minimal, and neutral lifestyle that is not represented in the craft space. I began designing and innovating to bridge this gap through my work. DeBrosse is now a full-service knitwear brand, challenging the status quo of the crochet aesthetic. After selling thousands of individually handcrafted pieces, I transitioned to selling the patterns to my work, and ultimately created an entire Master Class on exactly how I built a business against the grain.

Every time I sat down to work on this book, I reflected on my own learning experience, and imagined the dream resource I wish I had at day one, and the one I wish to consult in my office today. For first-time crocheters, I recalled the things that held me back, that made the craft seem intimidating and unappealing, and the teaching techniques that helped me learn the most. For seasoned crocheters, I reflected on all the hacks that I felt differentiated my work, the resources that I consult time and time again, and the ways I pivot and add nuance to existing skills to get more modern results.
It is my hope that this book meets you exactly where you are, and equips you for exactly where you want to go. I made every effort to create a comprehensive learning and design experience, replacing the often fractured learning process with a thoughtful workflow. This book is composed of three sections: Fundamentals, Patterns, and Stitches + Skills, all of which are supplemented by an online video library.
In Fundamentals, I’ll walk you through how to pick out your tools and materials, like we’re at the craft store together. I’m then going to take you deep into the world of pattern language, so grab a glass of pinot, because we’ll need a minute.
The real fun begins as we enter the Patterns section, housing 16 unique projects, each named after a Haitian city. This collection features modern stitches, classic textures, chic finishes, and no frills. Projects vary from wearables to home decor, easy giftables to personal must-haves, and mini accessories to oversized throws. They are listed in no particular order, so please feel free to jump around and dive in where inspired. Each pattern begins with a full list of featured stitches and skills, complete with reference page numbers for a quick and easy refresh. Most patterns include step-by-step photos as well as video tutorials, designed to increase your ease and confidence. Oh, and I don’t particularly enjoy projects that take nineteen Saturdays to complete, or require a great deal of counting (because how do you binge-watch Netflix while counting?), so I won’t be asking that of you either.
The Stitches + Skills section is your comprehensive reference guide, not only for patterns in this book, but patterns everywhere. It includes step-by-step written instructions, photos, and videos for the primary building blocks of crochet.
As you work through the book, please take advantage of the Modern Crochet online video library. It features video tutorials for both stitches and project-specific nuances, full reference charts for hook sizes and pattern abbreviations, and shoppable links for all featured tools and materials. Enjoy your private access to debrosse.com/moderncrochet with password: mymoderncrochet.
I can’t wait to see the projects you make, the colors you choose, and the way you grow as a modern maker. Tag me on Instagram @debrosse_nyc, and use the hashtag #mymoderncrochet so we can do this together.
11 INTRO
12
FUNDAMENTALS
13
HOW TO READ A PATTERN

INTRO
Patterns can be written by any maker, anywhere. (You could write your own pattern by the end of this book!) In order to ensure consistent pattern writing across the board, writers adhere to a universally accepted set of abbreviations, terms, and punctuation used within a particular framework. This book is written using standard US terms.
As is the process with picking up any language, it comes with a learning curve. Once you’re familiar with the vocabulary and structure, you’ll be autonomous in both your reading and potential writing of patterns.
This section is designed to cover the information needed to complete all the patterns in this book, but also to set you up for future success in reading patterns from other writers. To do so, I will often indicate the various ways an instruction might be written. I love a good analogy, so think about this as if I were going to teach you how to greet a friend. I might suggest you say “Hey!” while also recognizing that others prefer “Hi” or “Hello” and those are both acceptable and generally mean the same thing. Don’t feel the need to memorize every variation, as I will stick to a single variation throughout the book, but know that this content is available for later reference.
STRUCTURE
Below are the categories of language elements that make up standard pattern language, as well as a few common examples. A full chart can be found on p. 34.
Stitch abbreviations: Every stitch is reduced to an abbreviation. ch chain sc single crochet
Terms: The most common crochet instructions are written in terms. Terms are either an abbreviated version of a word, or a single word standing in for an entire phrase.
rep repeat (do the instruction again) turn turn your work to start a new row
Note: For easy reference, pattern writers often preface a pattern with a legend of stitch and term abbreviations used in the pattern.
Punctuation: In addition to using abbreviations and terms, standard pattern language utilizes common punctuation marks like asterisks *, brackets [ ], and parentheses ( ). These marks serve as shorthand for more verbose instructions, like repeats and groupings. The proper usage of these punctuation marks is explained on p. 30.
Note: More advanced patterns can include symbols and/ or charts. While I don’t cover that content in this book, the abbreviations and terms covered will prepare you to understand the vast majority of patterns on the market.
FUNDAMENTALS 21
LANGUAGE
ROUNDS
JOINS
ROUNDS VS. ROWS
So far, we’ve covered how to crochet in rows and turn at the end of each row to start a new row. This method is great for linear or rectangular pieces like a blanket. But what about something like an infinity scarf or a basket? When you want to work in a circle (whether it’s a tube shape or a flat shape), you’ll swap rows for rounds, and the process is called “working in the round.” A round is very similar to a row, except that the end of a round will meet the beginning of that same round. (If you think back to the rows of a blanket, recall that the beginning and end of a row were on opposite sides.)
There are three ways to join a round: continuous rounds, joined rounds, and joined turned rounds. A pattern will indicate which method(s) to use. In all methods, it is best practice to place a stitch marker (abbreviated pm for place marker) into the first stitch of every row in order to most easily recognize it when getting to the end of the round.
Tip: I always think I’ll remember where the first stitch was...but I never do. Use the stitch marker.
A Crochet stitch markers have an opening, allowing the marker to slide directly into a stitch. A safety pin or scrap piece of yarn will also do the trick.

CONTINUOUS ROUNDS
With continuous rounds, there is no true transition between rows (e.g., a chain or a slip stitch), and the effect is something like a spiral. You’ll work the first stitch of your next row into the first stitch of the previous row. Continuous rounds are one of the most effortless ways to crochet, as there is no turning or joining.
JOINED ROUNDS
Joined rounds have a definitive beginning and end (unlike continuous rounds). At the end of each round, it is connected to the beginning of that same round with a join (often in the form of a slip stitch) to complete the round. This join is most often worked into the first stitch or the first chain, and the pattern will specify.
To create the height to begin the next round, the pattern will call for a chain (or multiple chains, depending on stitch height). This chain acts like the turning chain of rows, but when working in rounds, you won’t turn the work. A joined round will have a slightly visible seam because of the slip stitch and chain.
JOINED TURNED ROUNDS
Joined turned rounds are just as they sound: a joined round that does include a turn. At the end of each round, it is connected to the beginning of that same round with a join to complete the round. Then, a full turning chain is made. A joined round will have a slightly visible seam because of the slip stitch and chain.
MODERN CROCHET 26
A
BUILDING SHAPES IN THE ROUND
Despite its name, a round can be used to make angled shapes like squares, triangles, and hexagons. In this book, however, rounds are used to make circular shapes, both in the form of flat, concentric circles, and tube shapes. Picture a basket—the bottom is a flat circle, while the sides are a tube shape. While both shapes are constructed from rounds, utilizing any one of the three joining techniques listed on the previous page, they have unique starting points worth noting.
TUBE SHAPE
The tube shape begins similar to a project constructed from rows, with an initial foundation chain, but followed by an instruction to join. To do so, bring the opposite end around, ensure the chain isn’t twisted, locate the first chain, then slip stitch into the chain.
Example 9 Begin: With loose tension, ch 88. Sl st to first ch to join (careful not to twist); ch 1, do not turn.
If the chain is twisted prior to joining the work, it will create a twist in the work. In most cases, this is an undesirable effect. However, the occasional pattern may intentionally call for a twisted chain, so be sure to follow suit (as is the case with the Gonaïves Faux Fur Cowl on p. 68).
After the foundation is connected, the remainder of the work simply builds upon this completed circle.
FLAT SHAPE
Flat shapes worked in the round often begin with a technique called the magic ring (see p. 162), rather than a foundation chain. The magical aspect of the ring is that it has a slip knot effect that can be pulled taut after the first row of stitches is worked into it (see p. 164).
Example 10 Begin: Create a magic ring. Ch 1.
Round 1: Sc 7 in ring; sl st to join, ch 1. (7)
When constructing concentric circles, each round needs to be larger, by way of additional stitches, than the previous round. To do so, concentric circles require a technique called increases (written as inc in next st), which is to work multiple stitches into the same stitch (see p. 29). The following example uses the *, which indicates the starting point of a repeated sequence.
Example 11 Round 2: Inc in each st; sl st to join, ch 1. (14)
Round 3: *Sc in next st, inc in next st; rep from * around; sl st to join, ch 1. (21)
Round 4: *Inc in next st, sc in next 2 sts; rep from * around; sl st to join, ch 1. (28)
Round 5: *Sc in next 3 sts, inc in next st; rep from * around; sl st to join, ch 1. (35)
There are a few interesting things happening in Example 11:
+ We started with 7 stitches (Example 10, round 1), so the total stitches for each row is also increasing by 7.
+ These additional 7 stitches show up as one additional stitch between each increase.
+ The rounds alternate between starting and ending with the increase. This technique staggers the increases to create a more rounded result. (When increases align, the piece takes a “number-gon” look. Eight stitches will result in an octagon, 10 will become a decagon, etc.)
FUNDAMENTALS 27
SHAPES
36
PATTERNS
37
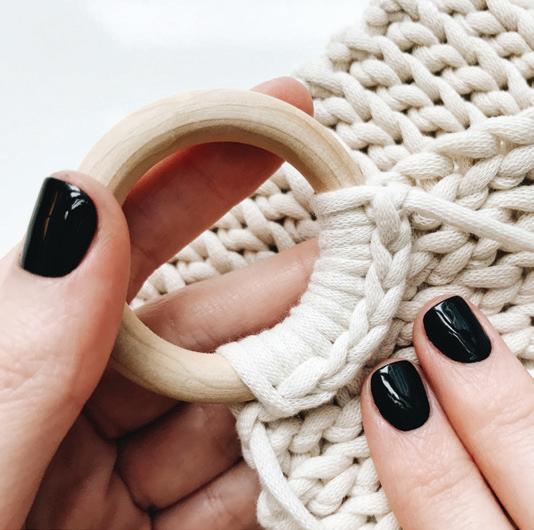
THE CROIX COASTER
This modern take on the coaster provides the perfect pop of chic to your coffee table. The clean lines of the stitch are complemented by the curvature of the wooden ring, creating a simple but stunning pairing of materials.
Construction: The coaster is worked with a slip stitch in the back loop only, creating a texture that looks knitted. On the final few rows, we’ll leave a few stitches unworked in order to carve out a space for the ring. Leaving stitches unworked is a simple but brilliant technique that can be used for many things, and in this case, shaping. We’ll finish the coaster by single crocheting the ring into place.
MODERN CROCHET 38

PATTERNS 39

HOOKS 7 mm 5.5 mm • US size I
YARN Weight 5 • 50 yds per coaster Bernat, Maker Home Dec Color: Cream
OTHER TOOLS Wooden rings, 2” (1 per coaster) Darning needle

GAUGE 30 stitches x 20 rows
FINAL SIZE 5 ¾ x 5 ¾”
PATTERNS 41


MODERN CROCHET 42 A D B E C F G 1 3 2 1 3 2 1 1 2 3 4 5 6 7
PREFACE
The following skills, techniques, and abbreviations are featured in this project. Take a moment to review before starting.
Video + material support: debrosse.com/moderncrochet
back bump / p. 22 blo back loop only / p. 28 ch chain / p. 144 sl st slip stitch / p. 146 st(s) stitch(es) yo yarn over / p. 141
BODY
Body is worked with 7 mm hook. Turning chain does not count as st.
Begin Ch 20.
Row 1 Sl st into back bump in 2nd ch from hook and in each ch across; ch 1, turn. (19) Rows 2–21 Sl st blo in each st across; ch 1, turn. (19)
A Row 22 Sl st blo in 16 sts across, leaving 3 sts unworked; ch 1, turn. (16)
Row 23 Sl st blo in each st across; ch 1, turn. (16)
B Row 24 Sl st blo in 15 sts across, leaving 1 st unworked; ch 1, turn. (15)
Rows 25–27 Sl st blo in each st across; ch 1, turn. (15)
Finish Omit the turning chain after final row. Cut yarn, and draw through loop on hook. Weave in ends.
RING
Start new yarn.
C Use 5.5 mm hook to work sc into each of the 7 indicated sts, using blo in sts 1–3.
D To begin, insert hook in st 1. Leave 6” tail and place yarn over hook. Draw up a loop.
E Place ring over yarn, then yo and draw through loop on hook. (This completes 1 sc.)
F Sc through remaining 6 sts, working over ring as you make the stitch.
Cut yarn, and draw through loop on hook.
G Rotate sts to the back of your work. Weave in ends.
PATTERNS 43
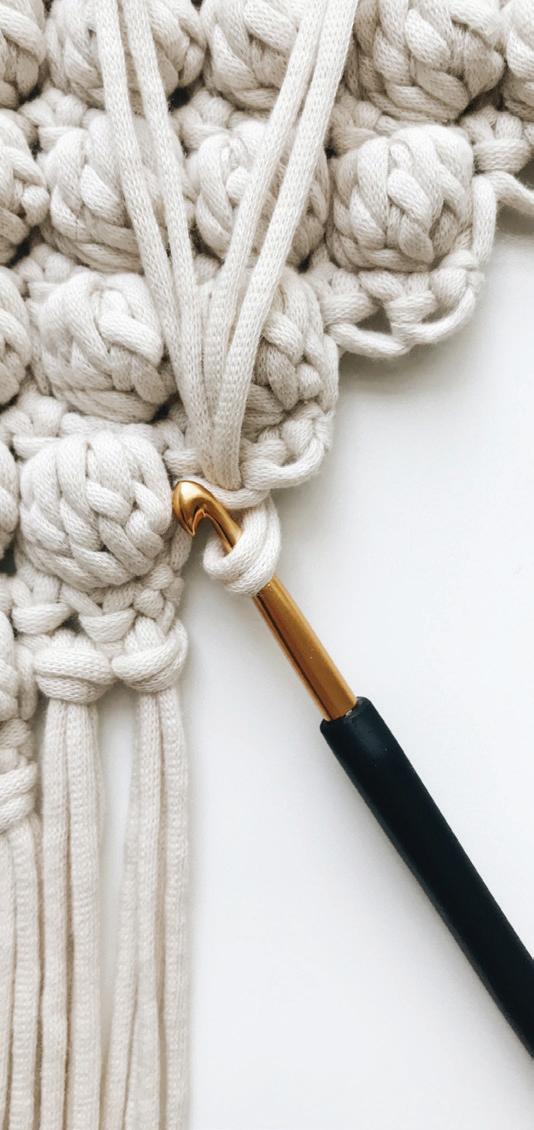
THE LES CAYES WALL HANGING
I dreamt up the Les Cayes Wall Hanging in the spring when I still had the itch to crochet, but could not stomach the thought of anything winter-related. I love the texture and lines that it adds to a wall, while still remaining classically simple.
Construction: This piece is worked from the top down, starting with the widest row and working toward the narrowest. The diagonal is created by leaving stitches unworked, specifically the final bobble and single crochet of each row. Bobbles normally pop away from you while you work them, but to achieve a right-to-left slant, we’ll pop them toward us.
After we’ve completed all the rows, we’ll single crochet the work onto the dowel rod, then add our final tassels.
MODERN CROCHET 44

PATTERNS 45

HOOKS
7 mm 5.5 mm • US size I
YARN Weight 5 • 165 yds Bernat, Maker Home Dec Color: Cream
OTHER TOOLS
Dowel rod (12” x ¼”) Darning needle
GAUGE
Counting bobbles only: 5 stitches x 5 rows

FINAL SIZE
Not including rod or wall attachment: Width: 10” Height: 27”
PATTERNS 47


MODERN CROCHET 48 A C B 1 3 5 4 2
PREFACE
The following skills, techniques, and abbreviations are featured in this project. Take a moment to review before starting.
Video + material support: debrosse.com/moderncrochet
bo bobble stitch / p. 158 ch chain / p. 144 even even numbered rows (4, 6, 8 ... 24) odd odd numbered rows (5, 7, 9 ... 25) rep repeat sc single crochet / p. 148 st(s) stitch(es)
BODY
Wall hanging is worked with 7 mm hook. Turning chain does not count as stitch. Push bobbles through to pop away from you.
Begin Ch 26.
Row 1 Sc in 2nd ch from hook and in each ch across; ch 1, turn. (25)
Row 2 Sc in first st, *bo in next st, sc in next st, rep from * across; ch 1, turn. (25)
Row 3 Sc in each st across; ch 1, turn.
Rows 4–24 even Sc in first st, *bo in next st, sc in next st, rep from * across, leave 2 sts unworked; ch 1, turn.
Rows 5–25 odd Sc in each st across; ch 1, turn.
Finish Omit the turning chain after final row. Cut yarn, and draw through loop on hook. Weave in ends.
ROD
TASSELS
A Using 5.5 mm hook, work 25 sc into foundation chain and around dowel rod to attach. (25)
Each tassel is made up of two pieces of yarn. There are 24 tassels in total, 2 under each bobble stitch along the diagonal edge.
Cut 48 pieces of yarn, 33” each.
B Insert hook from back to front and place 2 pieces of yarn on hook and draw up a loop. Yarn over with all 4 tail ends, and draw through to secure tassel.
Cut 24”piece of yarn.
C Secure to each end of rod with a double half hitch. Weave in ends.
PATTERNS 49
# M Y MODERNCROCHET
