Eighteen months of renovating our home, twelve months of living out of our bedroom, and a construction zone during a global pandemic. Brian, there’s nobody else I would have done it with. And welcome home Truffle, our little fur baby.
TABLE OF CONTENTS
Introduction 7
Color Inspirations 12
Getting Started 32
How to Prepare a Quilted Wall Hanging 60
Quilting Finishes with a Domestic Sewing Machine 66
Bias Binding Tape: What and How 84
General Instructions 104
Quilt Projects
Positive Start Bed Quilt 107
Positive Start Sham Cases 113
Checked Out Sleeping Eye Mask 125
Lasting Warmth Bed Quilt 135
Lasting Warmth Sham Cases 151 Day In, Day Out Lumbar Cushion and Coasters 171 Within the Walls Throw Cushion 179
Soundbars Throw Cushion 193 Brick-by-Brick Floor Cushion 205 Never Far Apart Matching Throw Quilts 215
Game Night Table Runner 231
In Position Placemats 239
In Position Coasters 247
Acknowledgments 257
Templates 258
Terms and Abbreviations 259
About the Author 263

INTRODUCTION
What you hold in your hands is a series of projects that have been brewing in my mind for quite some time. Many came from living in a construction zone and out of our bedroom with my husband for twelve months, most of which happened during a global pandemic that put our renovation to a standstill and forced us to work from home. I thought moving in together after nearly four years of living apart between Perth, Australia, and New York City was extreme. But working and living out of our bedroom 24/7 was next level. It’s a miracle we didn’t kill each other, run into any dis agreements, or make a COVID-19 baby during this extensive time together!
Living out of our bedroom was a huge challenge, and frustrating at times. My desk became the heart and center of our home. Multiple times a day I cleared my workspace so we could cook, eat, work, and park our laptops to watch TV during our non-working hours. Our wardrobe doubled as our “doomsday dungeon,” where we stored all our pandemic lockdown supplies. And my husband requested I go in there when I had to take calls, to drown the sound of talking and laughing.
As you can imagine, my mind often wandered to a hopeful place where we could put our feet up and enjoy our favorite shows and movies, not have to listen to music with headphones, entertain, try new recipes, and work from all corners of our home. I dreamt about how our home would look with all the furniture and décor in it, and of creating a space that brought us positive energy, inspiration, functionality, and com fort. Ultimately, I pictured our home as a place that we never wanted to leave. After all, the two of us are homebodies at heart. But more importantly, as a creative and quilter, I wanted to add personalized touches by introducing handmade goods—specifically, quilted home goods made with my hands. Table runners, coasters, cushion covers, and quilts for the bed and couch were on my to-make list.
It’s been over a year since my husband and I completed our eighteen-month home renovation project, and we continue to switch out, rearrange, and add things to our space to discover what we like. Throughout this process I have learned it takes time to make a home one’s own, and it continues to evolve as our set of responsibilities, com position of households, routines, trends, and tastes change. Our homes are so unique and special to each of us, acting as a reflection of who we are—our passions, interests, personalities, and styles—and the seasons of life we go through.
7
Color Inspirations
One of the most rewarding things as a designer is seeing your interpretations of my designs and how you make them uniquely yours to fit in your space. This section features all the designs from the book in three color ways: neutral; warm and vibrant; and cool and moody. These themes are based on directions someone may consider when designing or decorating their home. They are not here to limit you when making fabric and thread choices for your upcoming project, however, so don’t feel that you have to make your projects in these suggested colors. They are purely here for inspiration and a point of reference.
All the fabrics used throughout the book were inten tionally chosen so they can be easily replicated. All the solid-colored fabrics are Robert Kaufman Fabrics Kona Cotton, which comes in more than 300 colors and is widely available from local and online retailers globally. All the printed and patterned fabrics are from Haw thorne Supply Co., based in Upstate New York, whose in-house designers design their fabrics. These quilting cottons are available print-on-demand from Hawthorne Supply Co.’s online store and can be shipped worldwide. All the fabric details, including source, designer, collec tion name, and color is provided in this section. Note: The fabrics in this book were not sponsored by these companies.
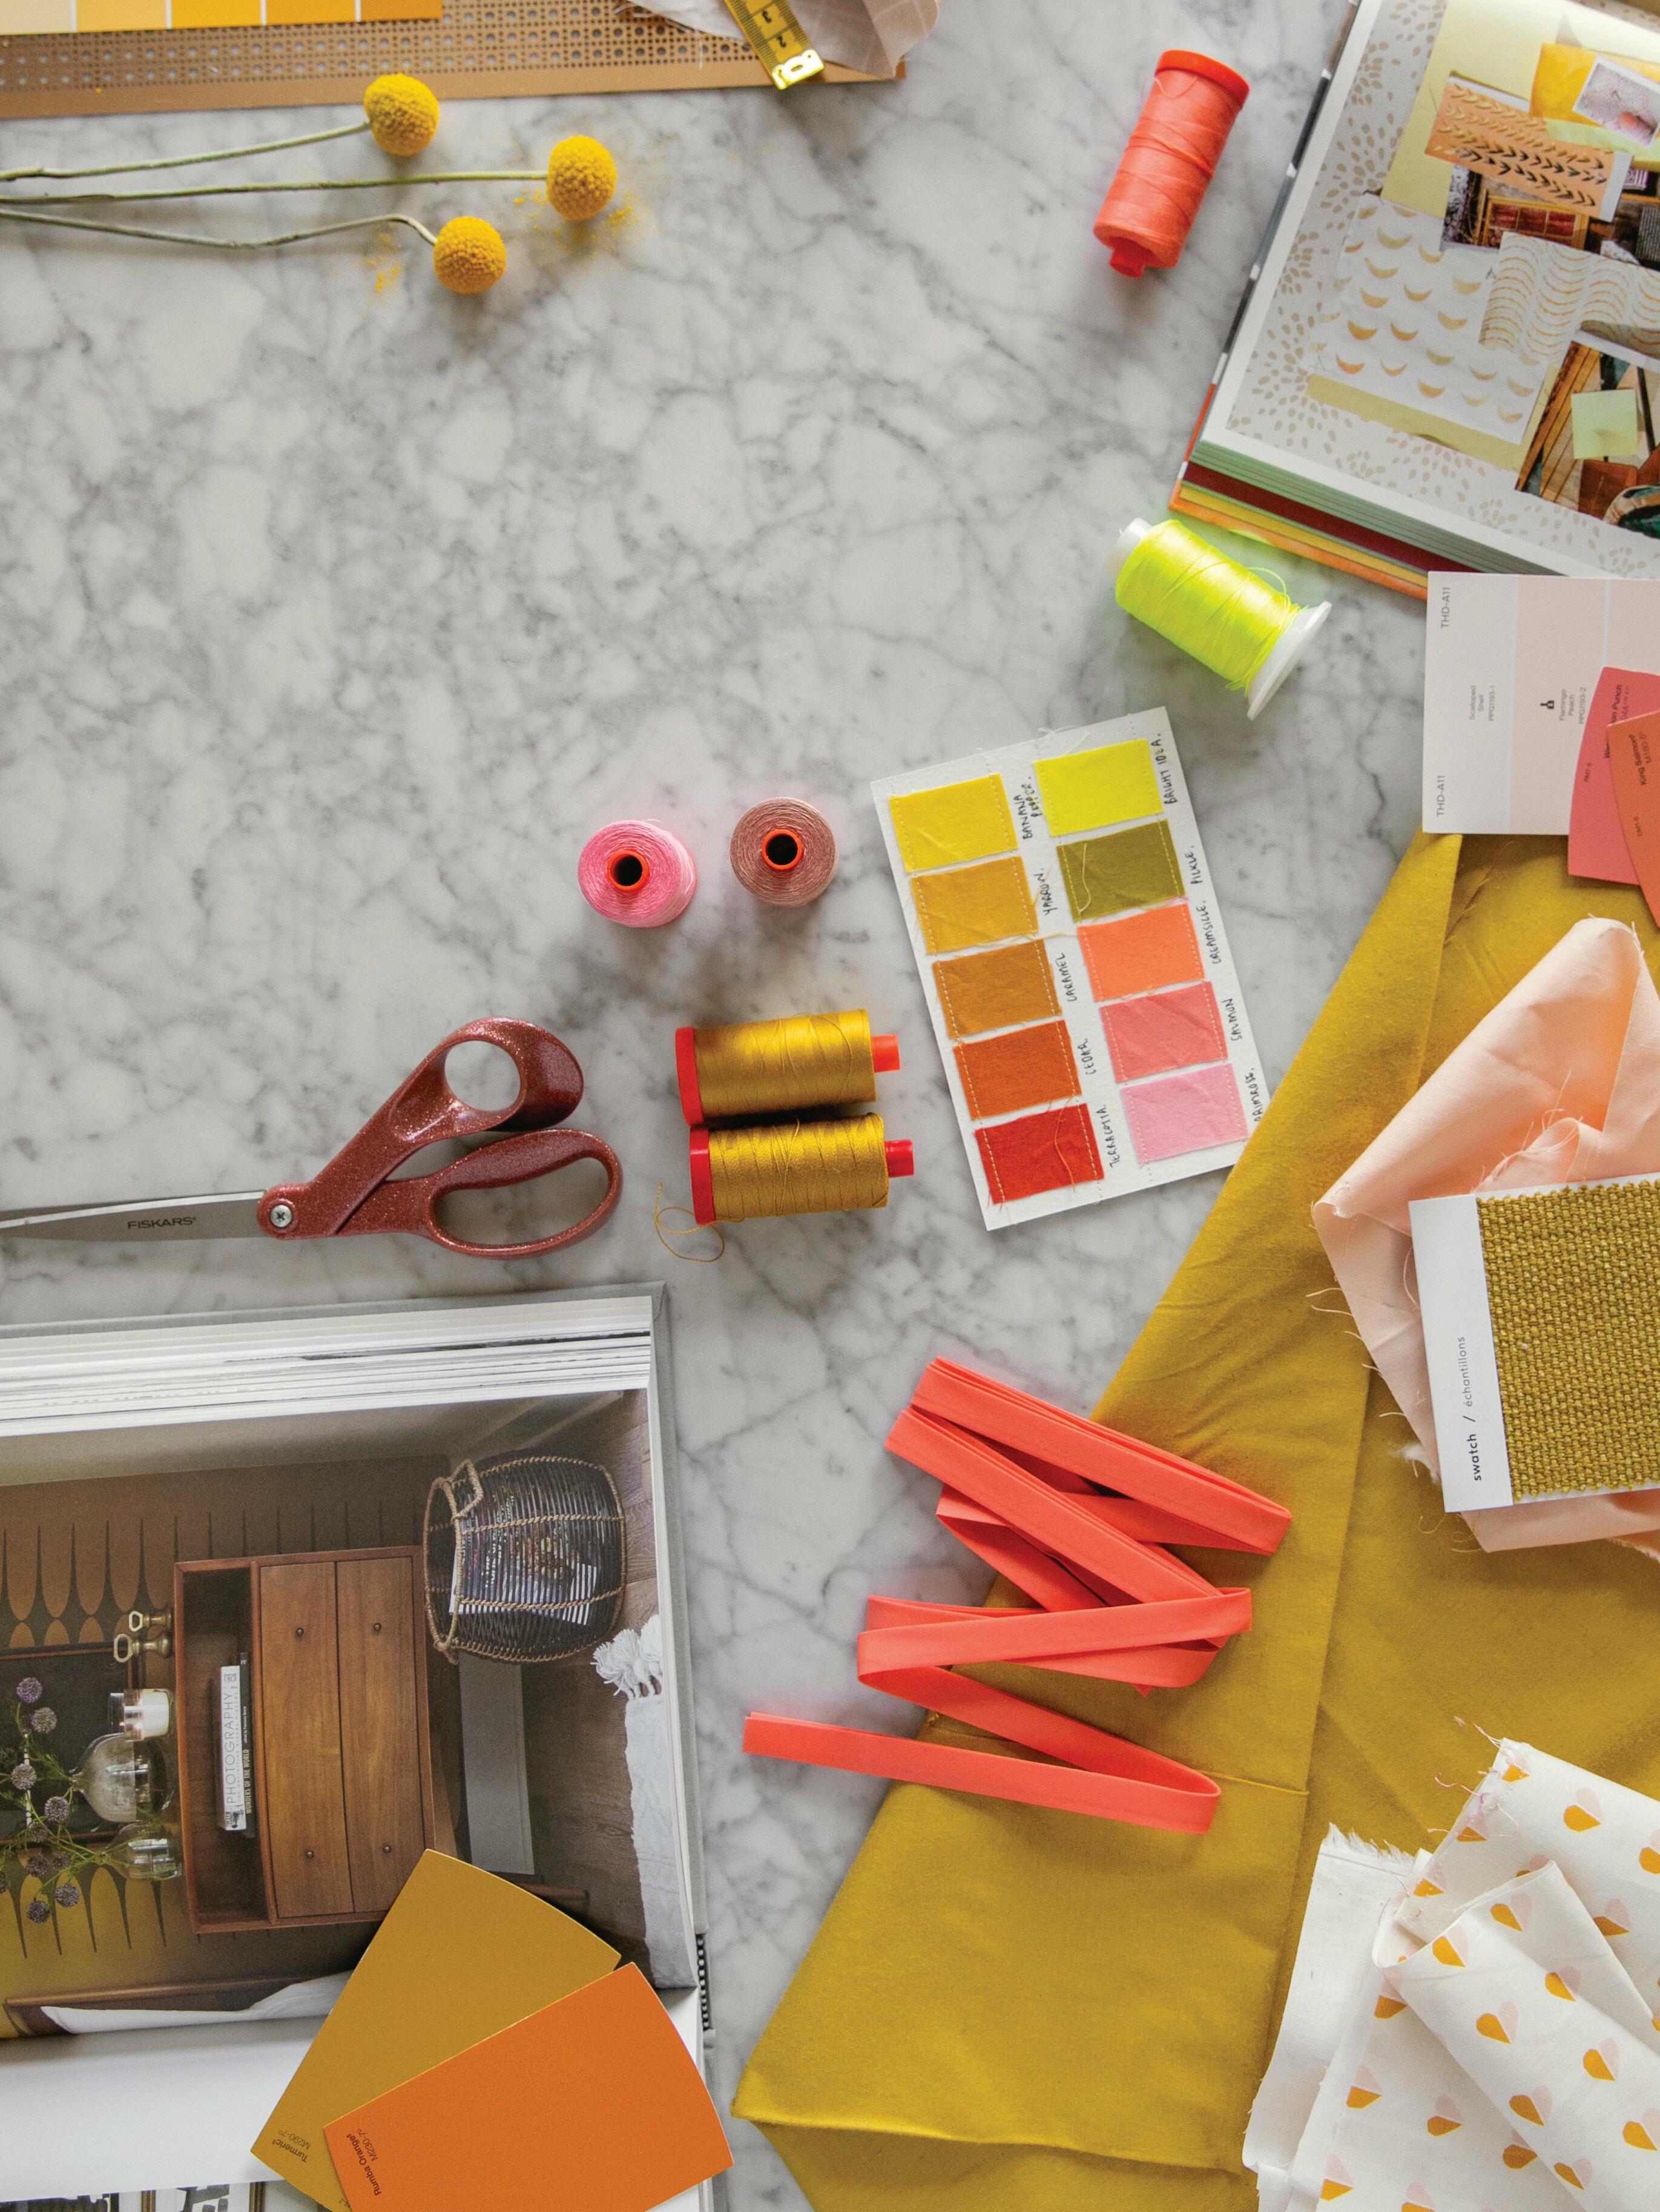
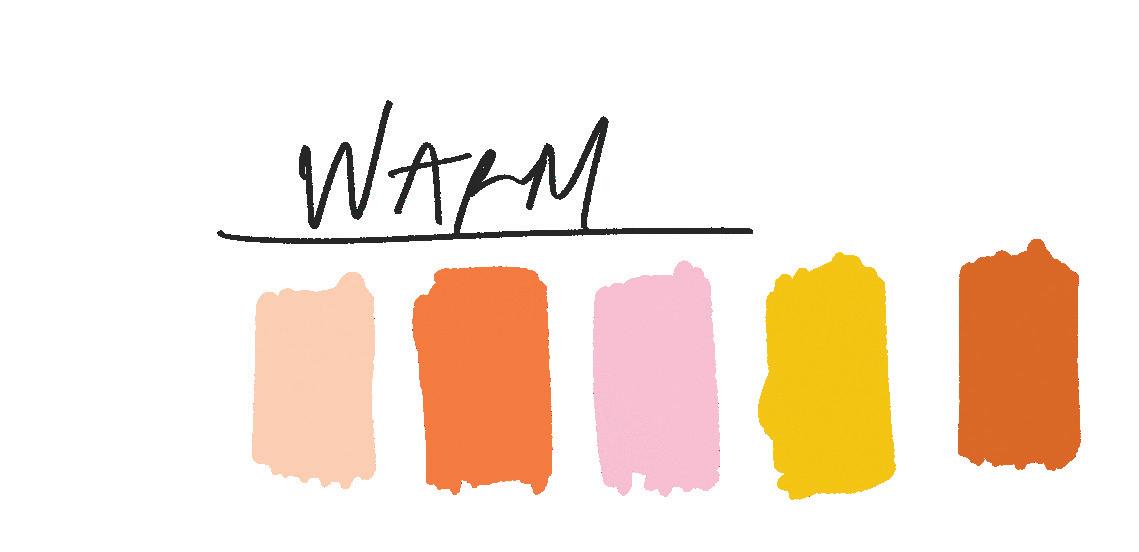
COLORWAY THEME 2: WARM & VIBRANT
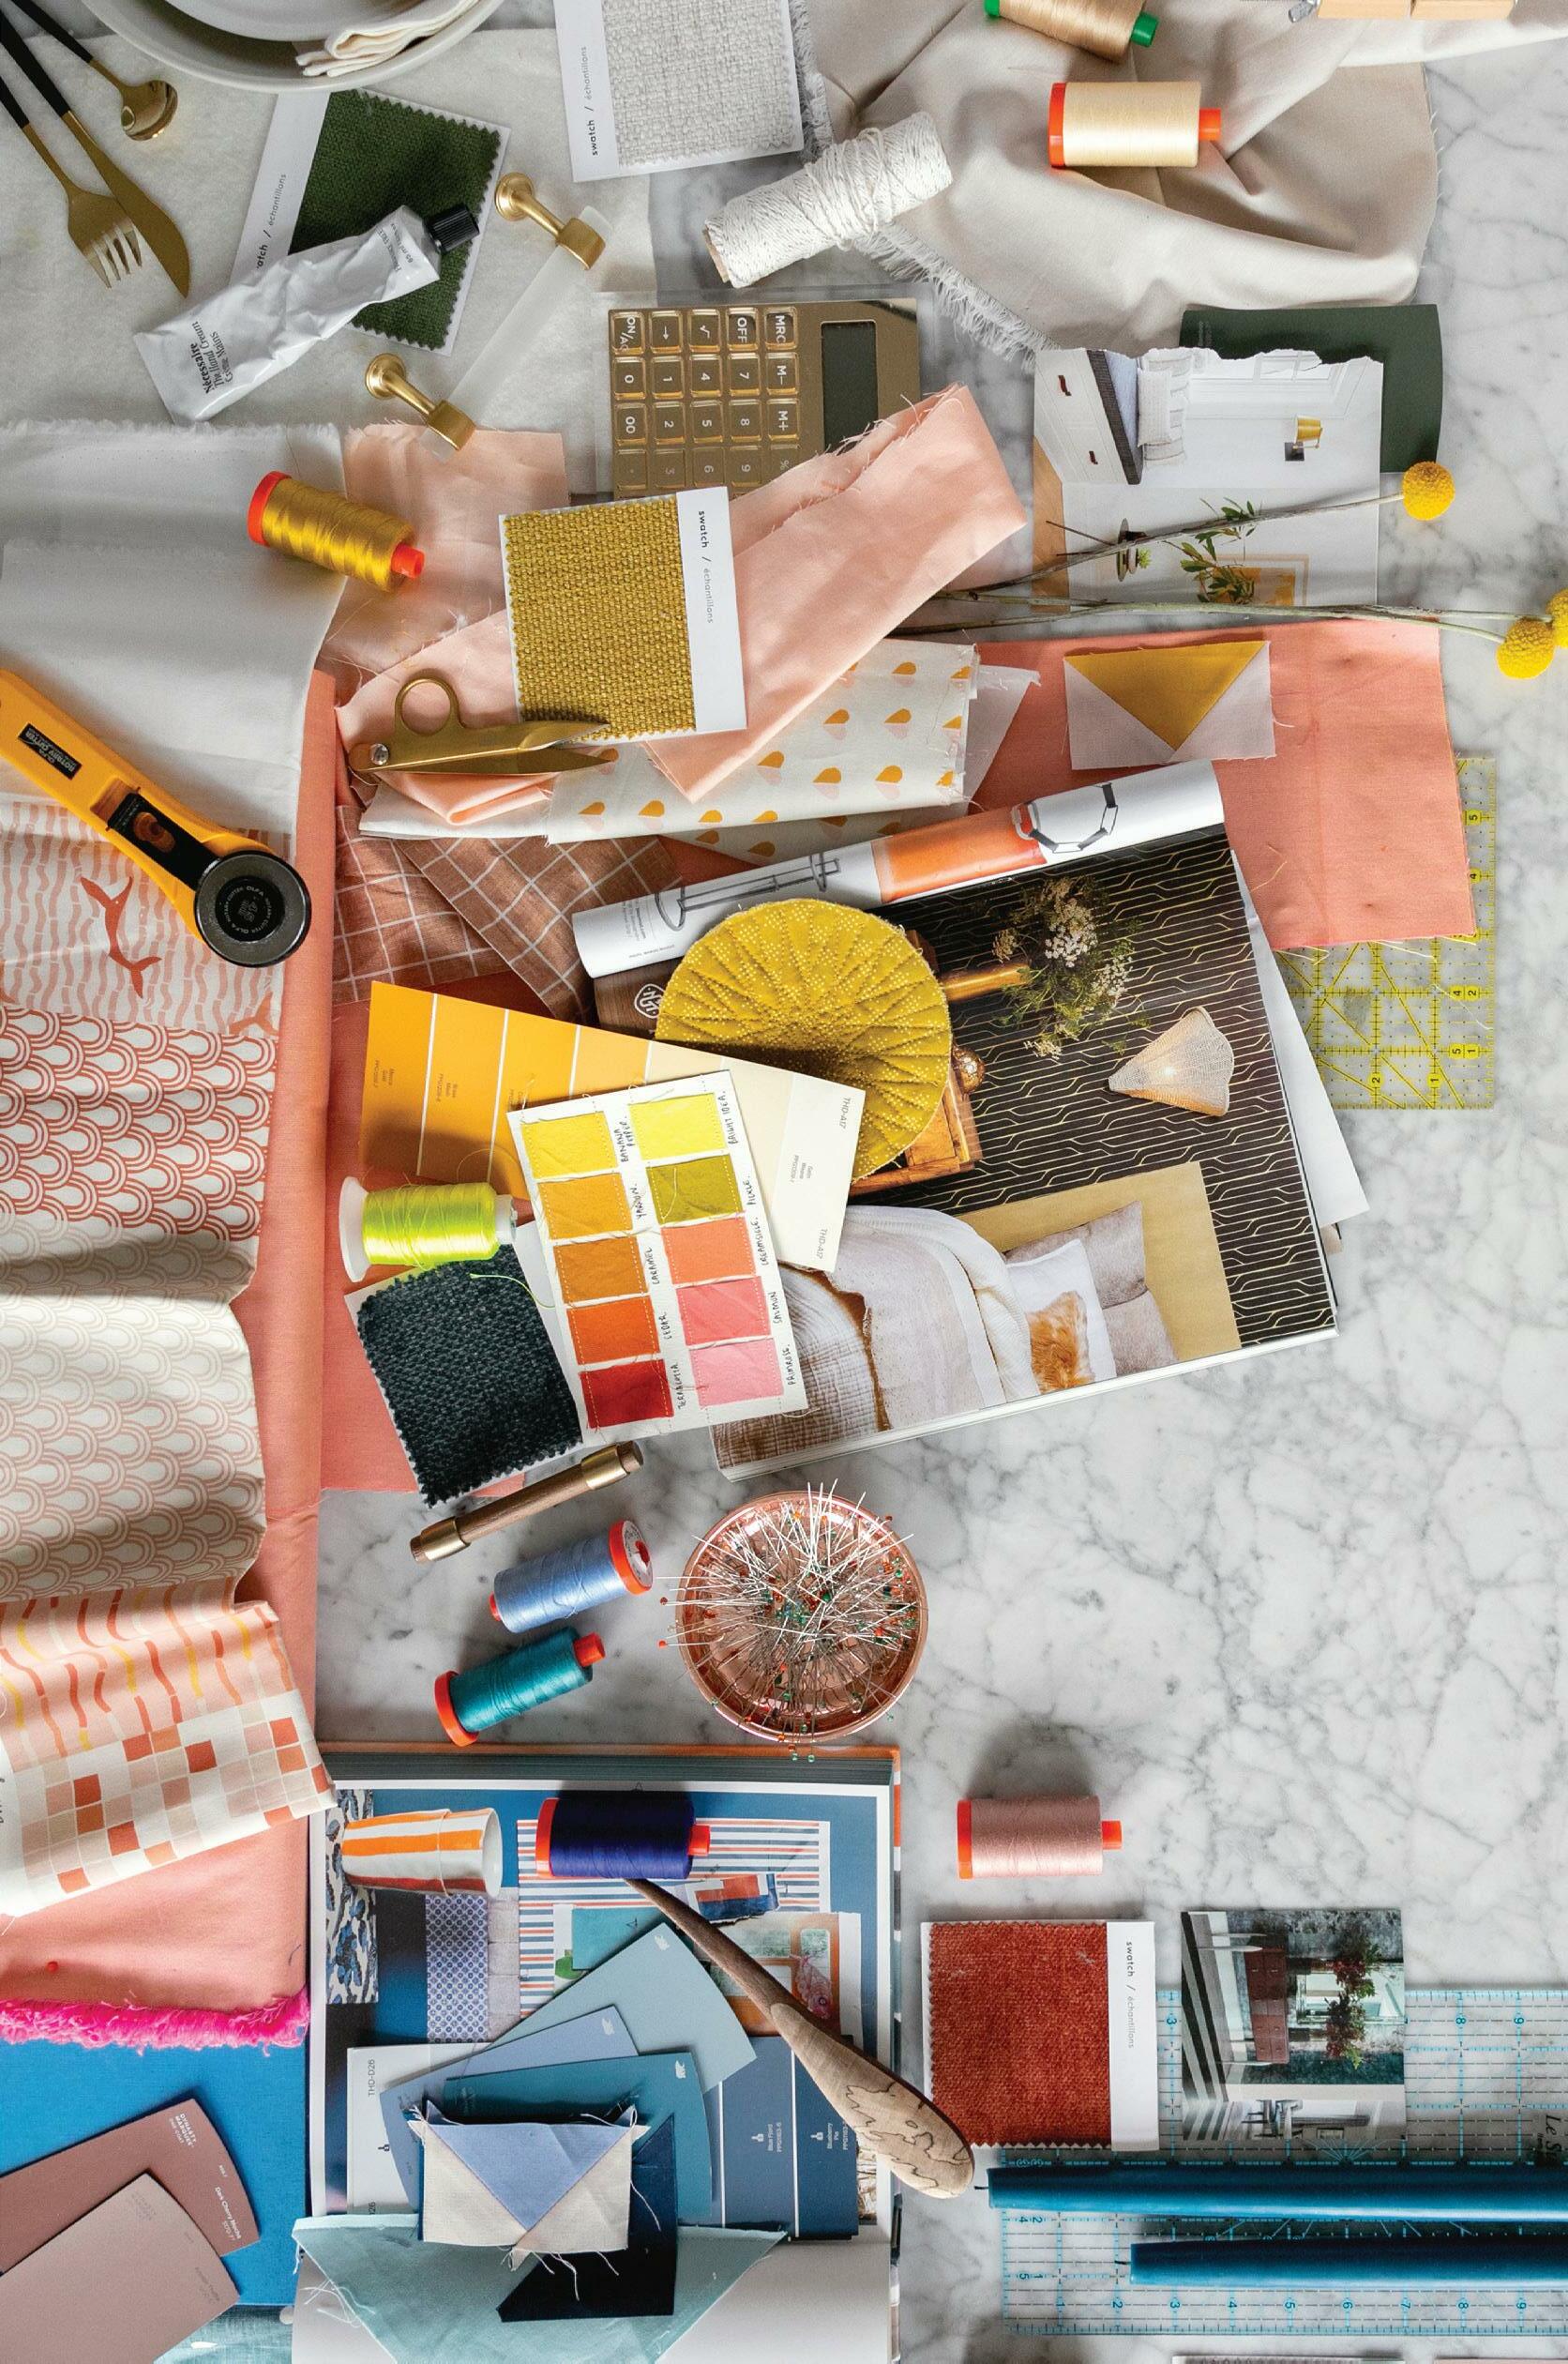
If I had full creative control over what colors our home was decorated in, it would be covered in rusts, pinks, blushes, yellows, and mustards. The introduction of some of these colors in my home and this col orway theme is centered around a yellow pot I picked up from a local plant store a few years back, which sits on our window sill today.
Bursts of warmer colors can create a welcoming and inviting space. And they most certainly have the potential to add personal ity and a focal point in a space that is bland. Warm colors work well paired with neutral colors as a playful and bold addition—one that people will not forget when they leave the room.

21 c olorway Insp I rat I ons
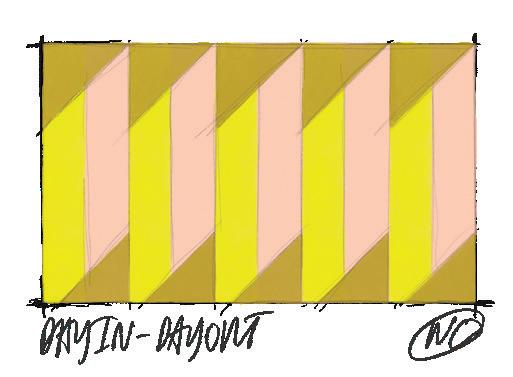




POS ITIVE S TART BED QUILT
FABRIC A (quilt top): Kona Cotton in Ice Peach
FABRIC B (quilt top): Kona Cotton in Terracotta

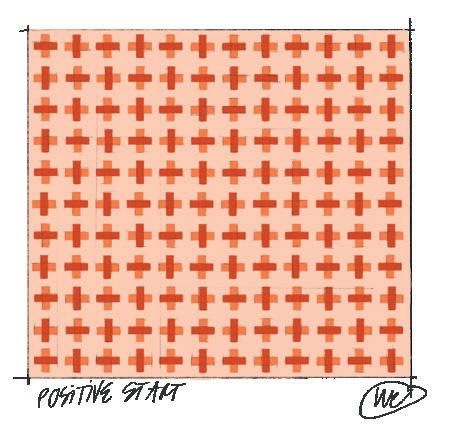

FABRIC C (quilt top): Kona Cotton in Mango
FABRIC D (quilt back): Kona Cotton in Sand
FABRIC E (binding): Kona Cotton in Ice Peach
POSITIVE START SHAM CASES
FABRIC A (sham front): Kona Cotton in Ice Peach
FABRIC B (sham front): Kona Cotton in Terracotta
FABRIC C (sham front): Kona Cotton in Mango
FABRIC D (sham back): Kona Cotton in Ice Peach
FABRIC E (trim): Kona Cotton in Ice Peach
FABRIC F (lining): Kona Cotton in Bone
CHECKED OUT SLEEPING EYE MASK
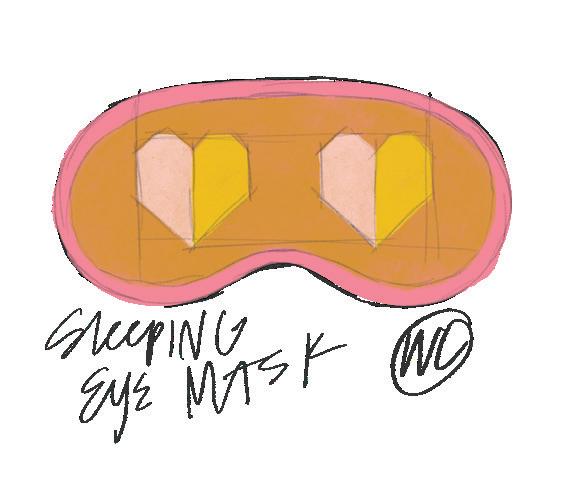
FABRIC A (mask front): Kona Cotton in Curry
FABRIC B (mask front): Kona Cotton in Ballet Slipper
FABRIC C (mask front): Kona Cotton in Banana Pepper
FABRIC D (mask back): Happy Rainbows in Yellow Sunshine*

FABRIC E (elastic casing): Kona Cotton in Woodrose
FABRIC F (binding): Kona Cotton in Woodrose
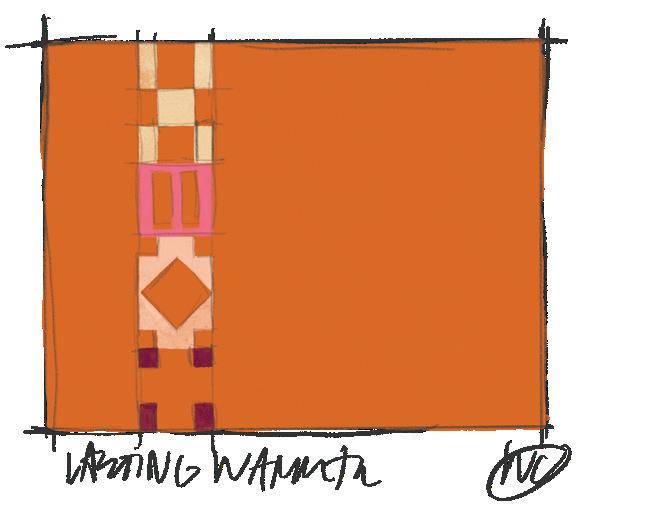
LASTING WARMTH BED QUILT

FABRIC A (quilt top): Kona Cotton in Cedar
FABRIC B (quilt top): Kona Cotton in Ice Peach
FABRIC C (quilt top): Kona Cotton in Champagne

FABRIC D (quilt top): Kona Cotton in Blush Pink
FABRIC E (quilt top): Kona Cotton in Bordeaux
FABRIC F (quilt back): Sea Glass in Sunshine Yellow*
FABRIC G (binding): Kona Cotton in Primrose
LASTING WARMTH SHAM CASES
FABRIC A (sham front): Kona Cotton in Cedar
FABRIC B (sham front): Kona Cotton in Ice Peach
FABRIC C (sham front): Kona Cotton in Champagne
FABRIC D (sham front): Kona Cotton in Blush Pink
FABRIC E (sham front): Kona Cotton in Bordeaux
FABRIC F (sham back): Kona Cotton in Cedar
FABRIC G (trim): Kona Cotton in Cedar
FABRIC H (lining): Kona Cotton in Bone
23 c olorway Insp I rat I ons
DAY OUT LUMBAR CUSHION & COASTERS
FABRIC A (cushion front): Kona Cotton in Ice Peach
FABRIC B (cushion front): Kona Cotton in Acid Lime
FABRIC C (cushion front): Kona Cotton in Pickle
FABRIC D (cushion back): Kona Cotton in Pickle
FABRIC E (trim): Kona Cotton in Pickle
FABRIC F (lining): Kona Cotton in Bone
WITHIN THE WALLS THROW CUSHION
FABRIC A (cushion front): Kona Cotton in Creamsicle
FABRIC B (cushion front): Kona Cotton in Champagne
FABRIC C (cushion front): Kona Cotton in Terracotta
FABRIC D (cushion front): Kona Cotton in Pickle
FABRIC E (cushion front): Kona Cotton in Cedar
FABRIC F (cushion front): Kona Cotton in Banana Pepper
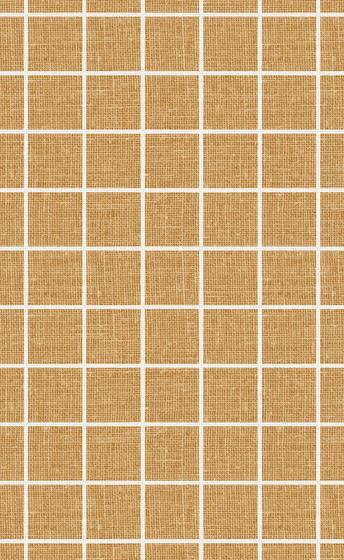
FABRIC G (cushion back): Grid in Clay*


FABRIC H (trim): Grid in Clay*

FABRIC I (lining): Kona Cotton in Bone
SOUNDBARS THROW CUSHION
FABRIC A (cushion front): Kona Cotton in Bone
FABRIC B (cushion front): Kona Cotton in Champagne
FABRIC C (cushion front): Kona Cotton in Lingerie
FABRIC D (cushion front): Kona Cotton in Mango
FABRIC E (cushion front): Kona Cotton in Canary


FABRIC F (cushion front): Kona Cotton in Melon

FABRIC G (cushion front): Kona Cotton in Ice Peach
FABRIC H (cushion back): Grid in Mustard*

FABRIC I (trim): Grid in Mustard*
BRICK-BY-BRICK FLOOR CUSHION
FABRIC A (cushion front): Kona Cotton in Acid Lime
FABRIC B (cushion front): Kona Cotton in Mango
FABRIC C (cushion front): Kona Cotton in Ice Peach
FABRIC D (cushion front): Kona Cotton in Bone
FABRIC E (cushion back): Kona Cotton in Pickle
FABRIC F (trim): Kona Cotton in Pickle
FABRIC G (lining): Kona Cotton in Bone
D AY I N,
24 THE QUILTED HOME HANDBOOK
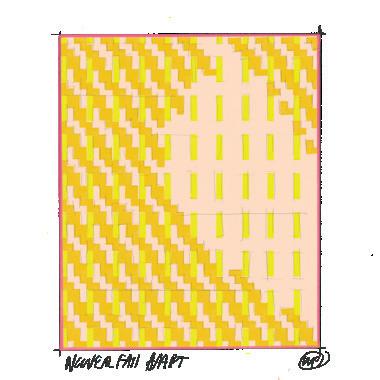
NEVER FAR APART MATCHING THROW QUILTS
FABRIC A (quilt top): Kona Cotton in Light Parfait



FABRIC B (quilt top): Kona Cotton in Acid Lime
FABRIC C (quilt top): Kona Cotton in Banana Pepper



FABRIC D (quilt back): Cupid’s Arrow in Ballet Pink on Egret*
FABRIC E (binding): Kona Cotton in Acid Lime
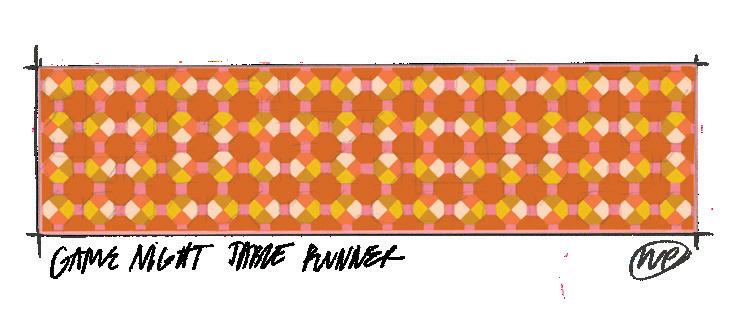
GAME NIGHT TABLE RUNNER
FABRIC A (top): Kona Cotton in Cedar
FABRIC B (top): Kona Cotton in Woodrose
FABRIC C (top): Kona Cotton in Mango

FABRIC D (top): Kona Cotton in Canary
FABRIC E (top): Kona Cotton in Curry
FABRIC F (top): Kona Cotton in Light Parfait

FABRIC G (back): Sea Glass in Summer Coral*
FABRIC H (binding): Kona Cotton in Primrose
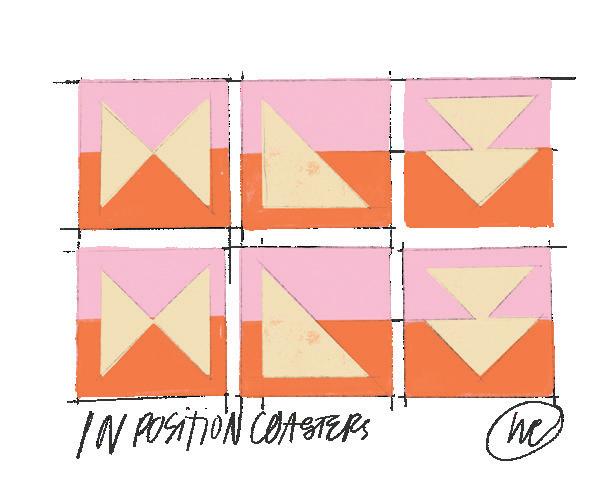
IN POSITION PLACEMATS & COASTERS
FABRIC A (top): Kona Cotton in Champagne
FABRIC B (top): Kona Cotton in Primrose
FABRIC C (top): Kona Cotton in Mango
FABRIC D (back): Sea Glass in Summer Coral*
FABRIC E (binding): Kona Cotton in Mango
FABRIC E (binding): Kona Cotton in Primrose * HAWTHRONE SUPPLY CO. FABRICS ENLARGED:
Erin
Erin
Erin Kendal, Happy Rainbows in Yellow Sunshine
Erin Kendal, Sea Glass in Summer Coral Erin Kendal, Grid in Clay
Kendal, Grid in Mustard
25 c olorway Insp I rat I ons
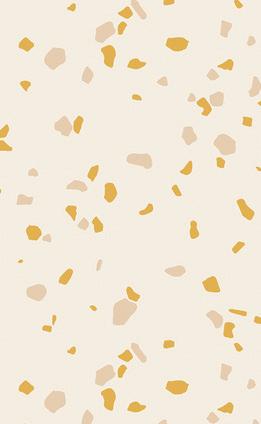
Kendal, Cupid’s Arrow in Ballet Pink on Egret

TOOLS
The following is a list of essential tools. Over time, as you build your confidence, get more comfortable in your workspace, and gain a better feel for how you work, you can invest in other tools, such as smaller and larger rotary cutters and rulers, rotating cut ting mats, wool pressing mats, and more.
ROTARY CUTTER: That pizza cutter–looking thing is a rotary cutter. Although fabric scissors are also on the list of essentials, you’ll use this tool more often. Designed for more accurate and faster fabric cutting and trimming, rotary cutters come in various sizes. The gold standard size is 45mm. This is the perfect size to make all your basic quilting cuts.
SPARE ROTARY CUTTING BLADES: Dull rotary cutting blades slow things down. You know a blade is dull when you need to run the rotary cutter in the same place more than once to make a clean cut. Imagine having to run your rotary cutter more than once to cut each piece—that’s comparable to cutting fabrics for at least two quilts! Keep spare blades available (in the packaging, of course) and replace the blade every two to three projects. With a sharp blade, you should be able to cut through six to eight layers of quilting cotton fabric at once.
FABRIC SCISSORS: Fabric scissors are convenient for making quick snips with out compromising the crisp, fresh cuts you’ve made with your rotary cutter.
QUILTING RULERS: Quilting rulers can be used for cutting, measuring, and marking guidelines on fabrics. Quilting rulers come in various sizes and forms, each with its own purpose and ability to make cutting and measuring easier and faster. The three essential sizes I suggest investing in when starting your quilting ruler family are:
� 6" x 24": With this ruler length, you can cut strips as long as the folded width of the fabric, prepare and trim large pieces, and square up your quilts. If you can only invest in one ruler, this is the one I highly recommend.
� 6" x 12": This smaller ruler is perfect for cutting and trimming smaller pieces. Compared with the 6" x 24" ruler, the length will not weigh you down, and you’ll have better control over your cuts.
� 12½" x 12½": Cutting squares is a common occurrence in quilting, so it just makes sense to invest in a large ruler for all squares, big and small.
35 Gett I n G s tarted
2: CUTTING YOUR FABRIC
Before cutting any squares, triangles, or rectangles for your projects, ensure you have done the following to achieve the most accurate piecing:
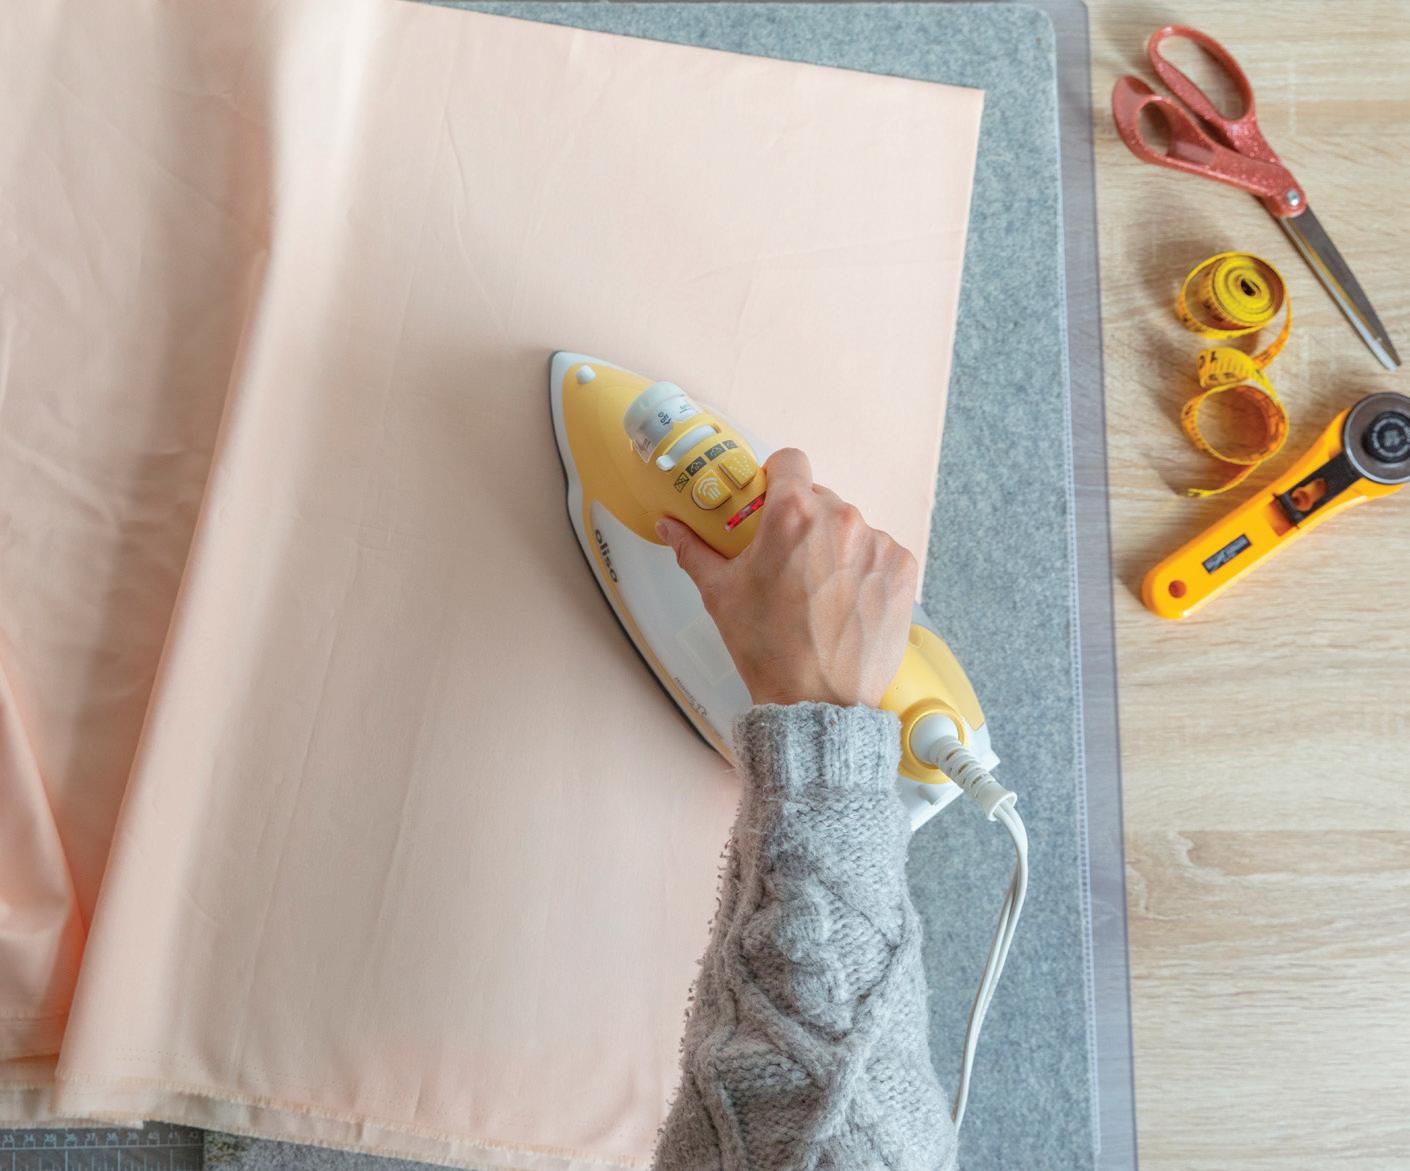
01. Always iron out all creases in the fabric [Photo A]. Sometimes this may mean ironing both sides of the fabric, depending on how it was stored.
02. Check that the cutting blade on your rotary cutter is sharp.
03. Use a ruler and rotary cutter to trim jagged or uneven edges. To do this, use the folded edge of the fabric as a guide to ensure it is straight and right-angled against the width of the fabric [Photo B]. Remember that no matter how straight fabric appears, the naked eye can play tricks on you.
Note that quilters work in inches. This is why all quilting rulers are in inches. If you grew up using the metric system, this can be a little weird. However, I highly recom mended that you do not convert cutting directions into centimeters or millimeters. Designers spend hours calculating the size and number of pieces required to make a project, so you don’t need to do the hard work to figure that out. Converting the direc tions into centimeters and millimeters may result in inaccurate piecing because the individual pieces of fabric and seams will not align with each other. Also, all cutting directions include a standard ¼ " seam allowance.
Cut all larger pieces first. Why? You can maximize the remaining fabric, cutting those remnants into smaller pieces for the project. All cutting directions in this book start with the largest pieces and work down to the smallest, unless a particular order is otherwise specified.
Finally, just a few more cutting tips and housekeeping rules to keep in mind:
� Cut away from the body, not toward yourself.
� Do not cross your arms one over the other while cutting. If you’re right-handed, use your left hand to secure the ruler and hold the rotary cutter in your right hand so you can cut your pieces from right to left. For lefties, right hand on the ruler, rotary cutter in the left hand, and cut from left to right.
� Cutting can turn gruesome if you don’t pay attention. Focus on what you’re doing, and make sure your fingers are not in the way of the cutting blade.
� Stand up when you cut. In doing so, you can use your body weight to apply pres sure on the ruler to prevent the ruler and fabric from shifting, which allows you to achieve accurate cuts.
� Measure twice, cut once. Double-check that your ruler is aligned correctly and ensure you have read the cutting directions carefully before cutting. Cutting the wrong size of pieces can stop a project in its tracks.
STEP
40 THE QUILTED HOME HANDBOOK







G I H J A B C D E F K L M
BINDING TO QUILT
There are two ways to attach binding to a quilt: hand binding and machine binding. For this example, I’ll show you how to attach binding with your sewing machine. This method is faster and the quilts will hold up better over time.
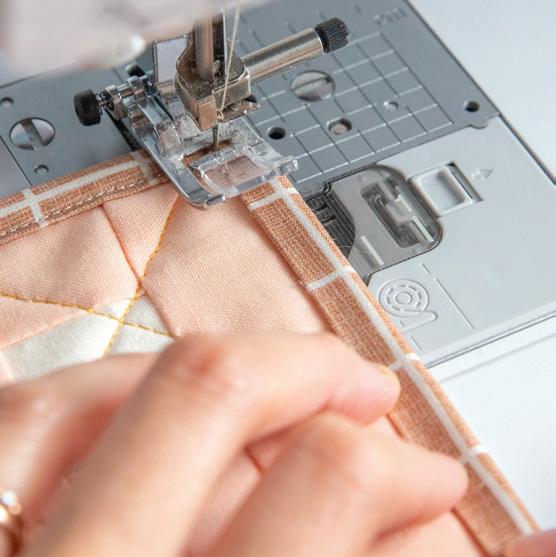
01. Start with the quilt back facing up. Align the raw edge of the binding strip with the raw edge of the quilt sandwich. Start sewing at about 4" from the end of the binding strip and ¼ " from the raw edges [Photo A].
02. Keep sewing until your needle is ¼ " from the corner [Photo B]. Stop here and backstitch. Then remove the quilt from the sewing machine.
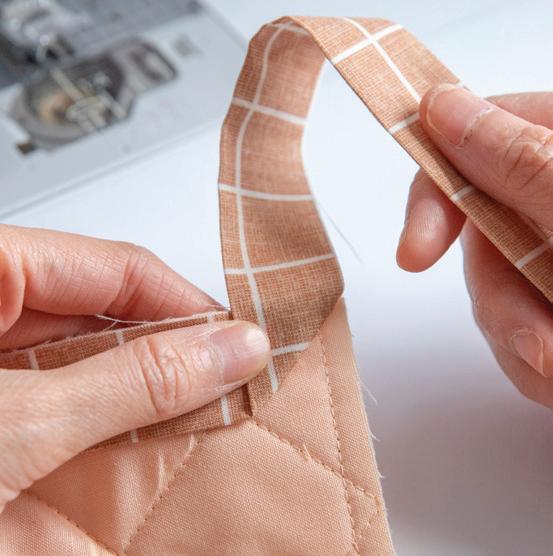
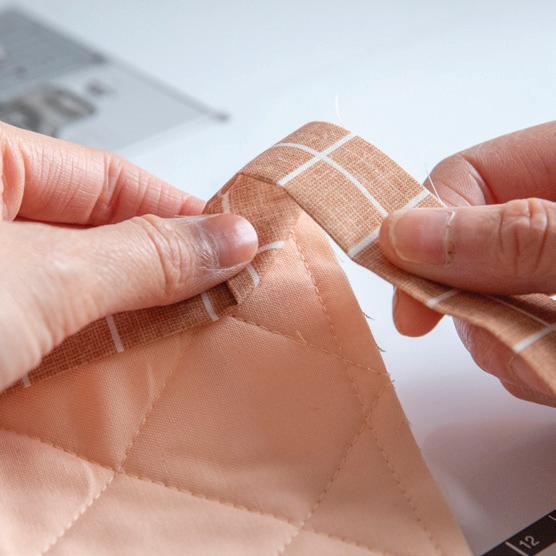
03. Turn the quilt 90 degrees, with the raw edge of the quilt sandwich on the right. Fold the binding at a 45-degree angle [Photos C and D] and then fold the binding strip back down so the raw edge is aligned with the raw edge of the quilt sand wich [Photo E].
04. Continue attaching the binding as in Steps 1–3 [Photo F] until you reach approx imately 6" to 8" from the start of the binding. Then remove the quilt from the sewing machine.
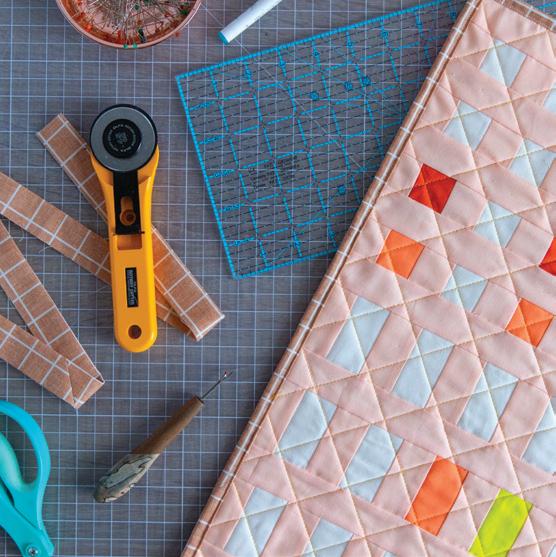
05. Lay the quilt flat with the quilt back and the two ends of the binding strip facing up. Place the end of the binding strip on top of the start of the binding strip. Use a quilt ruler to mark ¼ " past the start of the binding, so the two ends overlap each other [Photo G]. Cut on the marked guideline.
06. With the right sides together, sew the two ends of the binding strips together using a ¼ " seam allowance and press the seams open [Photo H].
07. Attach the rest of the binding to the back of the quilt. Remove the quilt from the sewing machine [Photo I].
08. You’re now in the home stretch! Fold the finished edge of the binding over to the quilt top and sew to secure it. When you reach approximately 2" from the corner of the quilt, stop and leave the needle and presser foot down [Photo J].
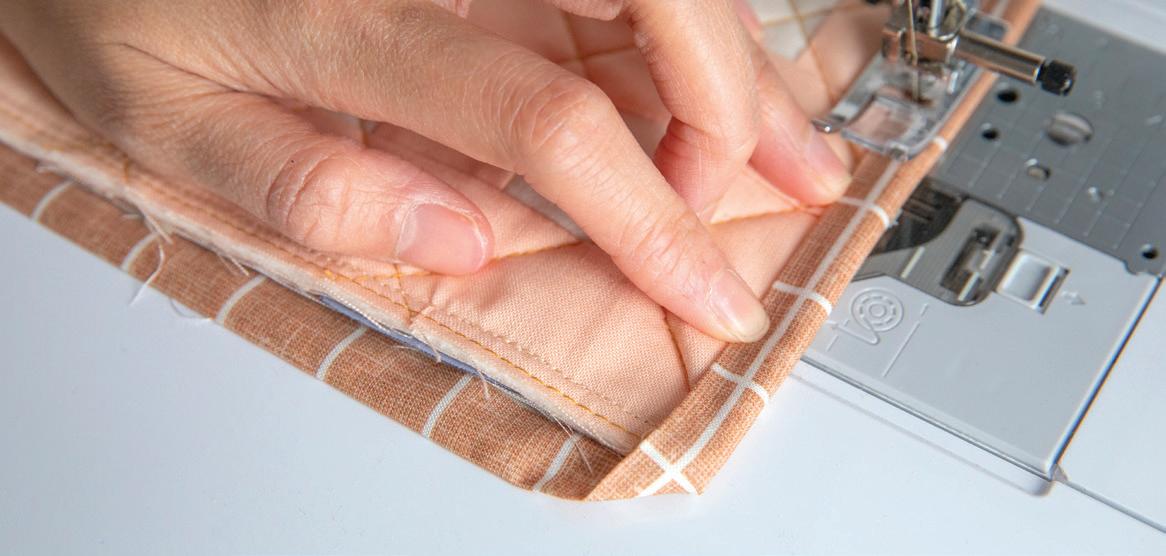
09. Gently fold and hold down the finished edge of the binding on the quilt top so there is a 45-degree angle overhang of binding at the corner of the quilt [Photo J]. Fold the binding perpendicular to the edge you have just attached, toward the center of the quilt, to form the corner of the quilt [Photo K]. You can secure the corner with your hands, pins, or a clip.
10. Continue sewing, and when you get to the tip of the corner fold, leave the needle in. Carefully lift the presser foot to pivot the quilt 90 degrees counterclockwise, and continue sewing the binding to the quilt top [Photo L].
11. Repeat Steps 8–10 to complete the quilt.
12. When you reach the start of the binding, don’t forget to backstitch to strengthen your binding. Trim any loose threads and enjoy! [Photo M]
ATTACH
59 Gett I n G s tarted
PREPARING THE WALL HANGING
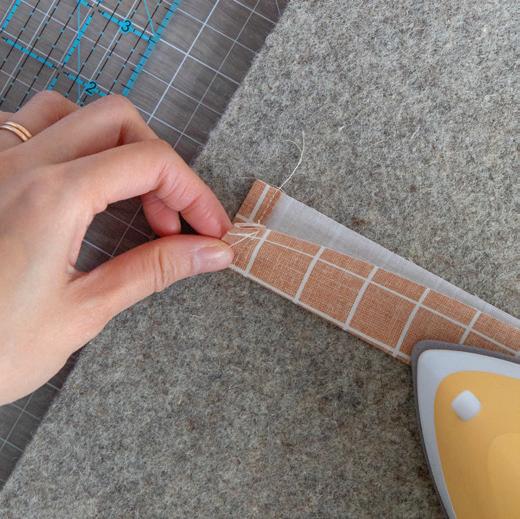
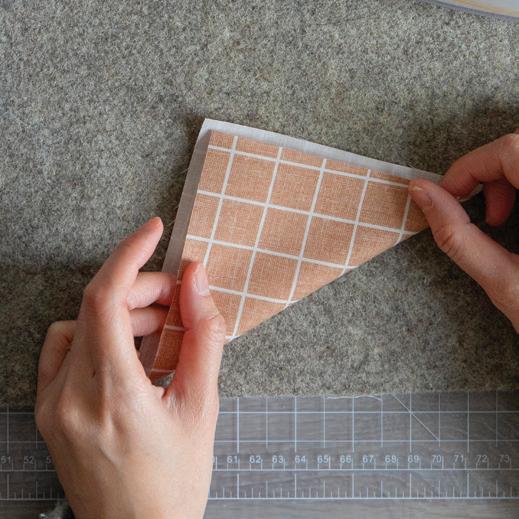
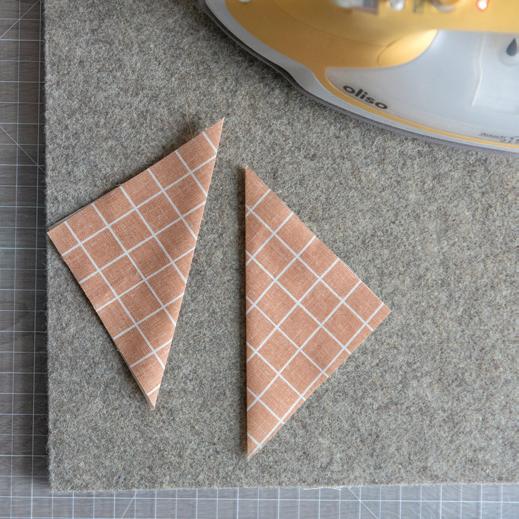
01. Cut two 5" squares from backing or coordinating fabric. With the wrong sides of the fabric facing each other, fold each square diagonally in half [Photo A] and press with an iron. Set aside FOLDED SQUARES for Step 3 [Photo B].
TIP: The larger the squares, the more reinforcement there is. The smaller the squares, the less reinforcement there is. The size of these squares is also dependent on the size of the quilt (i.e., larger squares are required to support the weight of a larger quilt).
02. For the DOWEL CASING, cut one 2 ½ " x 7" rectangle.
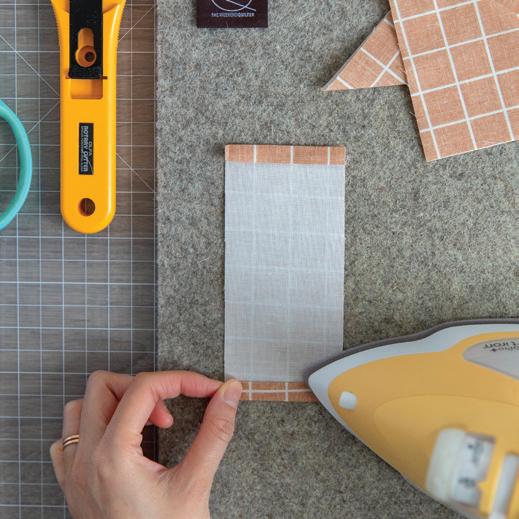
With the wrong side facing up, fold the raw edges on each short end of the rectangle toward the center of the rectangle twice and press [Photo C]. Edgestitch to secure the fold [Photo D]. This will create a hem to prevent the raw edges from fraying when adding and removing the dowel. Next, fold the rectangle in half lengthwise, wrong sides together, and press to complete dowel casing rectangle [Photo E].
For larger quilts, repeat this step to create more dowel casings for additional reinforcement.
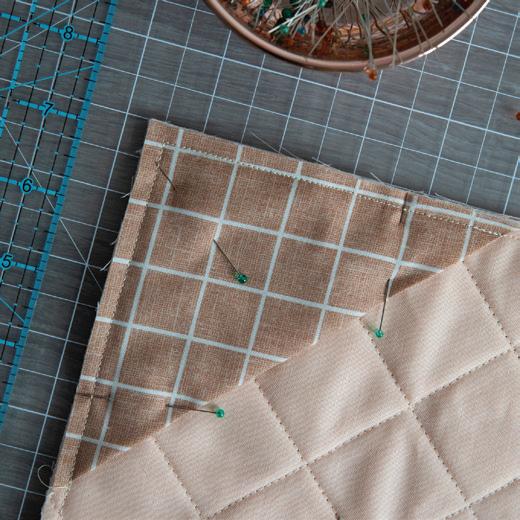
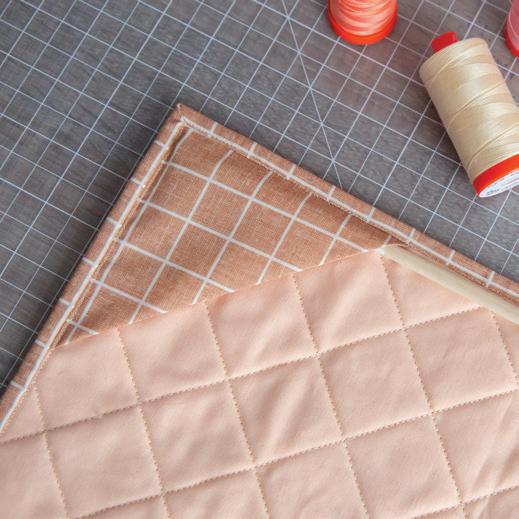
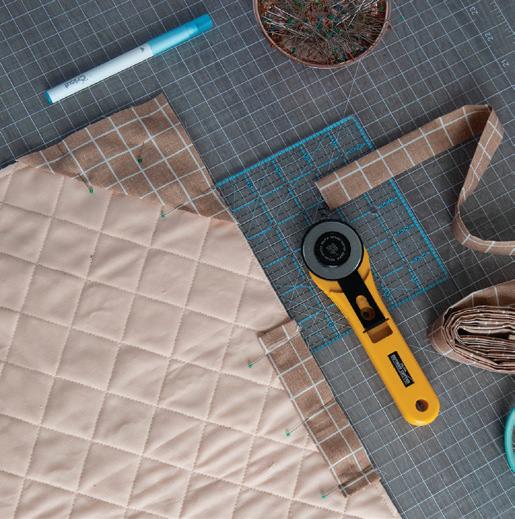
03. As shown in the photo, pin each diagonally folded square (from Step 1) and dowel casing(s) rectangle (from the previous step) to the back of the quilt sandwich, and sew ¼" away from the raw edge to secure these pieces [Photos F and G].
Optional: Attach a quilt label on top of one of the diagonally folded squares or in your preferred location.
04. Attach binding to the quilt using your preferred method (see page 84 for instruc tions on how to bind a quilt) and trim loose threads [Photo H].
05. With a pair of sharp scissors or a saw, trim the wooden dowel to the width of the quilt. Slide the dowel through the dowel casing and folded corner squares [Photo I].
Hang and enjoy!
64 THE QUILTED HOME HANDBOOK



A D B E I C F G H
THE SIMPLE GRID AND VARIATIONS
The Simple Grid motif is the easiest of all the motif designs in this book. It’s also one of the most versatile designs. Once all the grid guidelines are marked and sewn, the look and feel can be completely altered by adding additional lines on top. But let’s not get ahead of ourselves . . . let’s start with the basics of the Simple Grid motif.
THE SIMPLE GRID MOTIF AND RECTANGLE GRID MOTIF
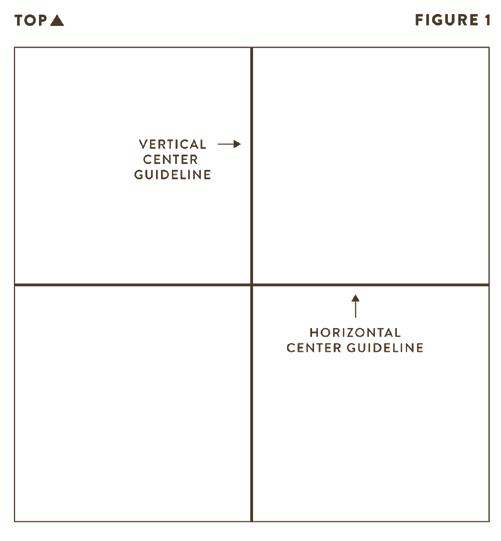
01. Start by finding the center point of the quilt vertically and horizontally, and mark two intersecting lines as shown (Fig. 1).
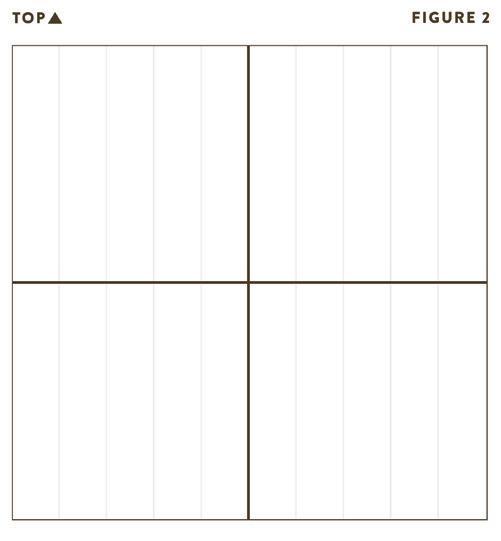
02. Mark equally spaced, parallel lines either vertically (Fig. 2) or horizontally (Fig. 3); either way is fine as long as they all go one direction. Sew on the marked guidelines.
03. Mark equally spaced, parallel lines in the opposite direction (Fig. 4) to form a Simple Grid motif. Sew on the guidelines to complete the look.
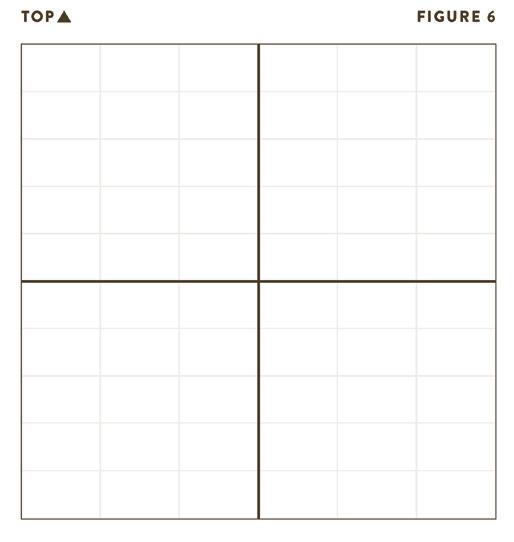
04. The quilting guidelines marked in this step are not limited to the same distance between each line, as per Step 2. The spacing between each horizontal or vertical line can be increased to create a Rectangle Grid motif. See examples shown (Fig. 5 and Fig. 6).
THE SIMPLE GRID MOTIF, VARIATION 1: GOING DIAGONAL
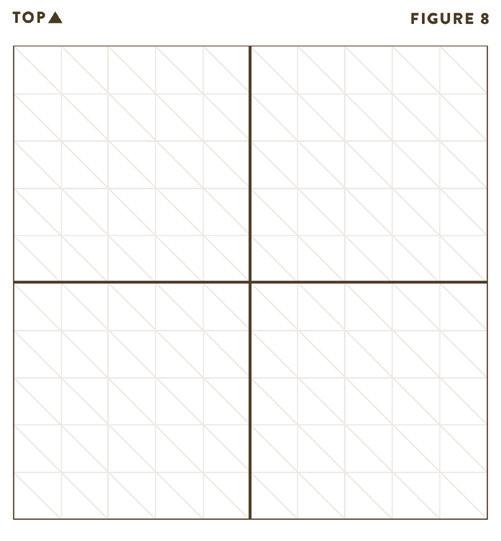
With the Simple Grid motif laid out, using each square grid as a guide, mark a diago nal guideline from one corner to the other within each grid. Repeat to cover the entire quilt top with parallel diagonal guidelines. Sew on the guidelines to complete the Going Diagonal motif.
The diagonal quilting lines could go either way (Fig. 7 and Fig. 8), depending on the quilt top design and personal preference.
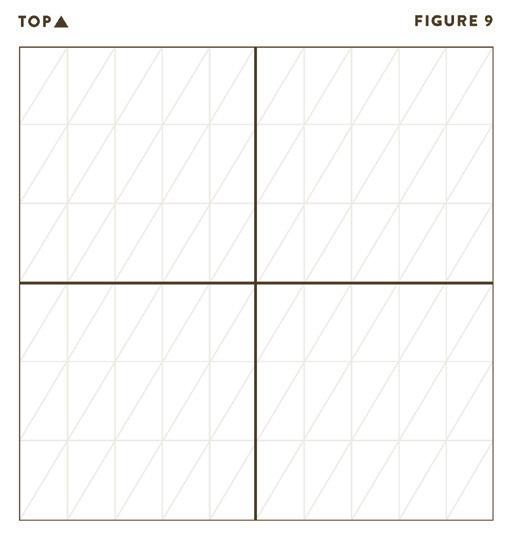
The Going Diagonal motif also works with Rectangle Grid motifs (Fig. 9 and Fig. 10).
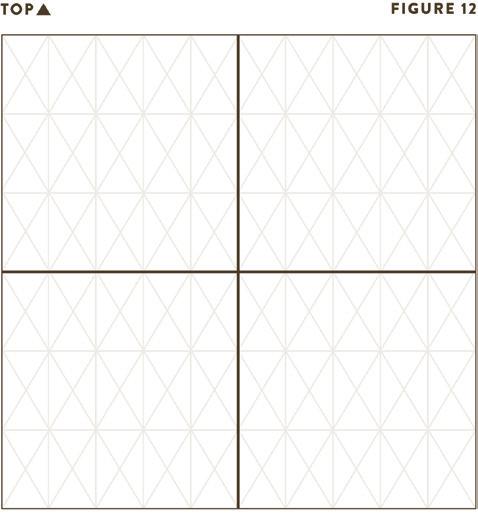
THE SIMPLE GRID MOTIF, VARIATION 2: CROSSWAYS
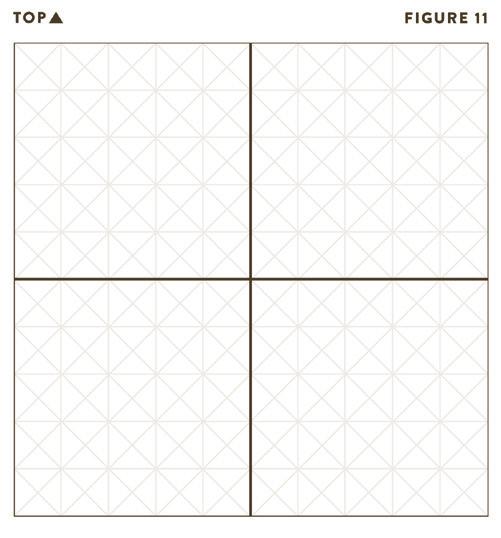
Add another layer of diagonal guidelines to create excitement in the Going Diagonal look. As in the previous look, mark diagonal guidelines going the opposite direction to create a cross within each grid (Fig. 11: square grid and Fig.12: rectangle grid).
76 THE QUILTED HOME HANDBOOK





77 d omest I c s ew I n G m ac HI ne
WHAT IS BIAS BINDING TAPE?
Bias binding tape gets its name from the way the strips of binding are cut: on the fab ric’s bias. To understand where the bias of the fabric is, we need to take a step back and understand what “fabric grain” is.
Fabric grain describes the threads that are arranged and woven together vertically and horizontally to form a piece of fabric. There are three types of fabric grain:
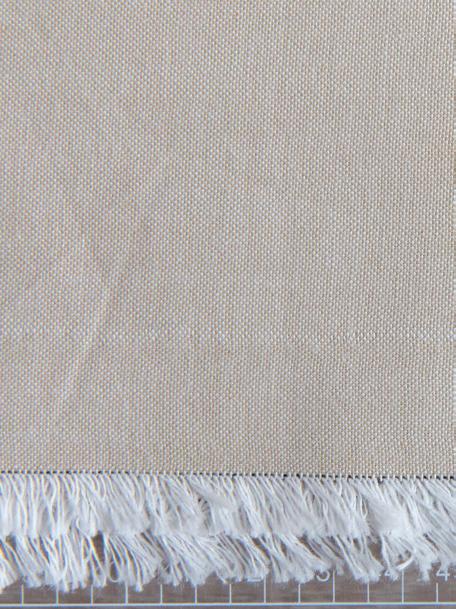

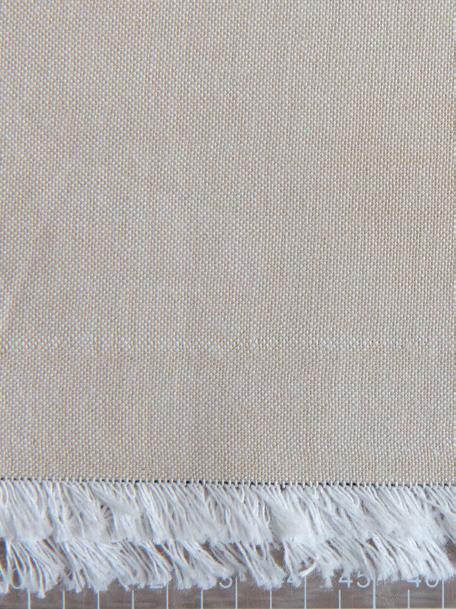
� Lengthwise Grain are the fabric threads that run parallel to the selvedge, or length wise of the fabric [Photo A].
� Crosswise Grain are the fabric threads that run perpendicular to the selvedge, or parallel to the raw edge of the fabric as it comes off the bolt [Photo B].
� Bias Grain is the thread line that is at a 45-degree angle relative to the lengthwise and crosswise grains [Photo C].
A B C
87 B I as B I nd I n G t ape
TAPE STRIPS
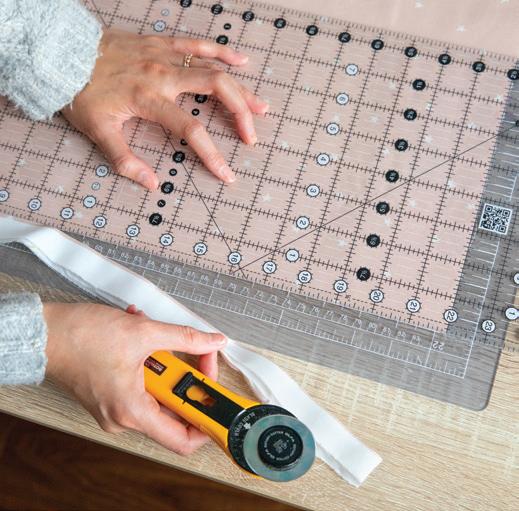
01. Use a long quilting ruler and rotary cutter to trim jagged or uneven edges of the bias binding tape fabric. To do this, use the folded edge of the fabric as a guide to ensure it is straight and right-angled against the width of the fabric [Photo A].
02. Line the long edge of the quilt ruler perpendicular to the trimmed edge and remove selvedges from the bias binding tape fabric [Photo B].
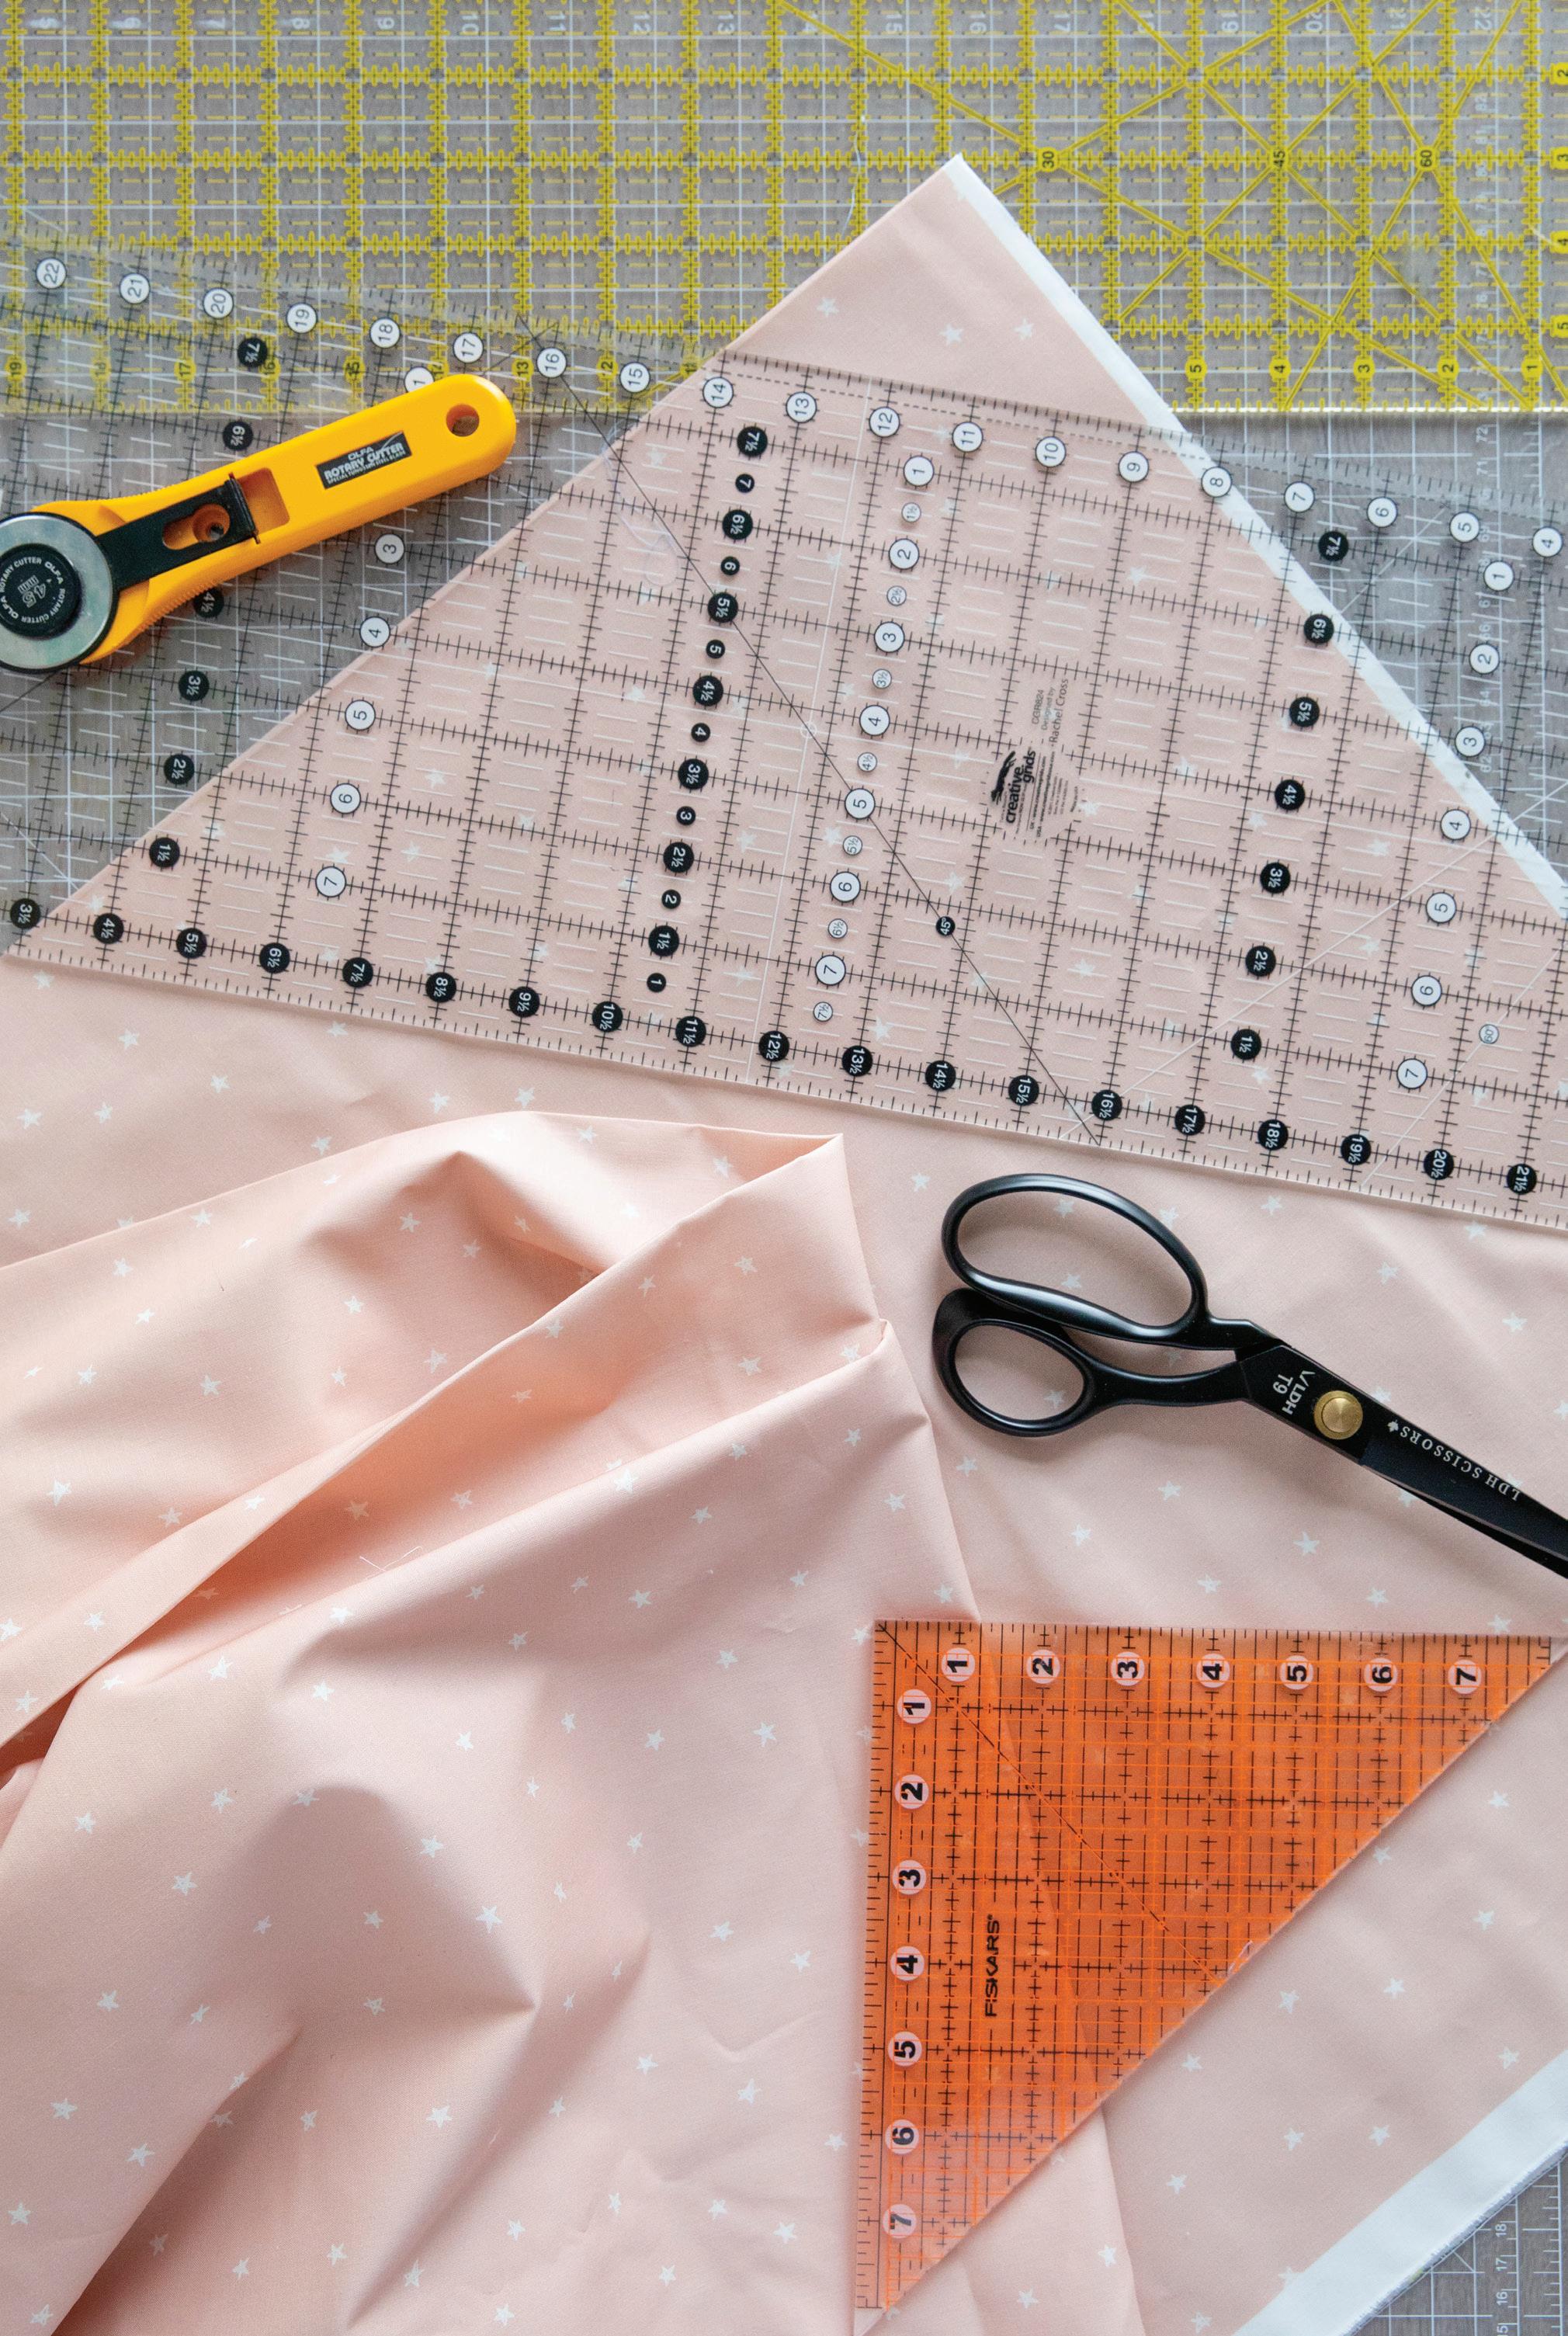
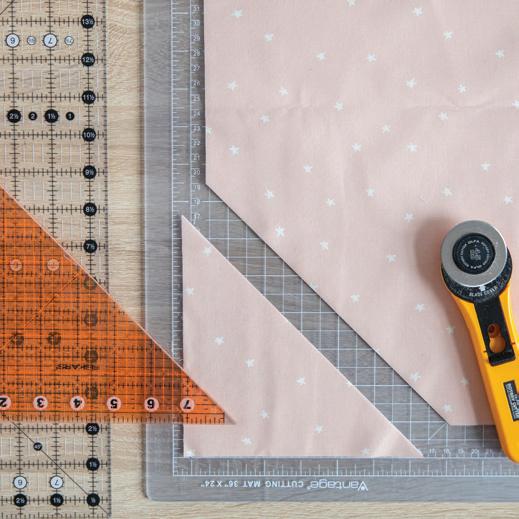
03. With Triangle Ruler: Place the triangle ruler on the bottom-left corner of the fabric (line up the right-angled edges on the ruler with the left and bottom edge of the fabric, with the 45-degree edge of the ruler away from the corner). This is the fabric’s bias grain. Remove the corner to create a 45-degree edge [Photo C].
Without Triangle Ruler: Identify the 45-degree-angle guideline on quilting ruler. Line up the guideline against the left or bottom edge of the fabric. Remove the corner to create a 45-degree edge [Photo D].
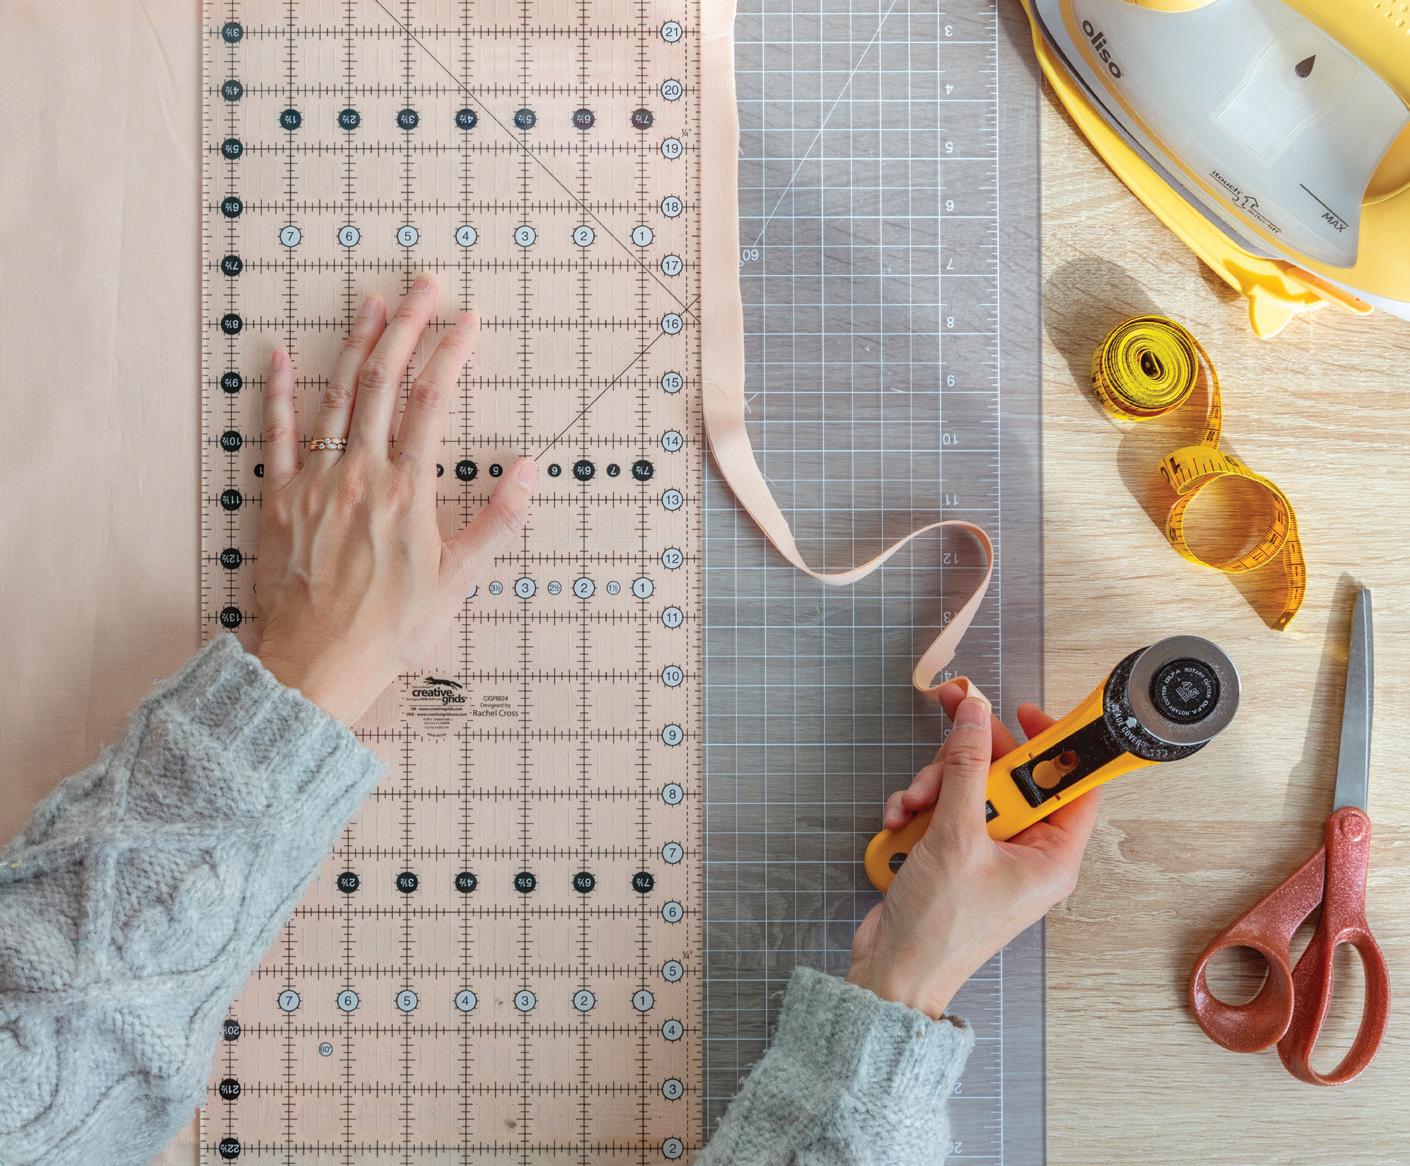
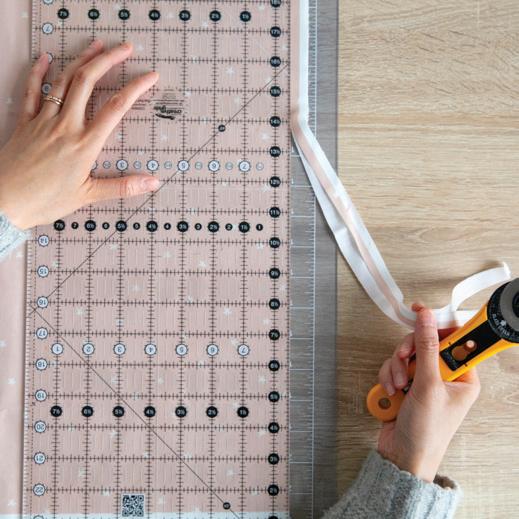
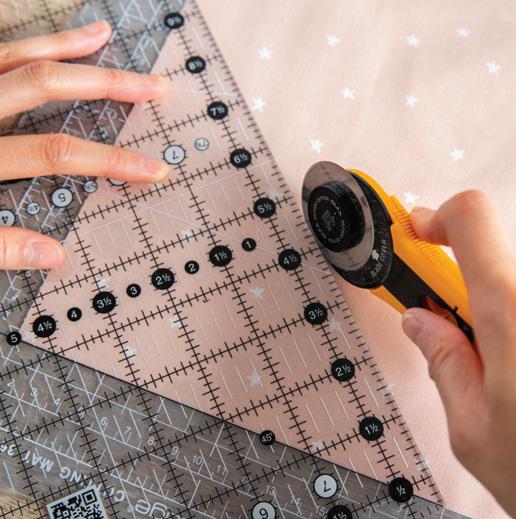
04. Follow the 45-degree edge with longest quilt ruler available. Measure 2 ½ " (or whatever the width of the bias binding tape is) from the 45-degree edge and cut. Make sure the ruler is always lined up against the 45-degree edge and all the cut strips are the same width. Essentially, all the cuts should run parallel and be evenly spaced. Repeat until there is no more fabric to cut [Photo E].
TIP: Place the secondary ruler beside the long quilting ruler to provide additional length for longer cuts. Before cutting, make sure the secondary ruler is also 2 ½ " (or whatever the width of the bias binding tape is) from the 45-degree edge of the fabric [Photo F]. Alternatively, skip the secondary ruler, and move the long quilting ruler as you cut, along the 45-degree edge, maintaining its distance from the edge of the fabric.
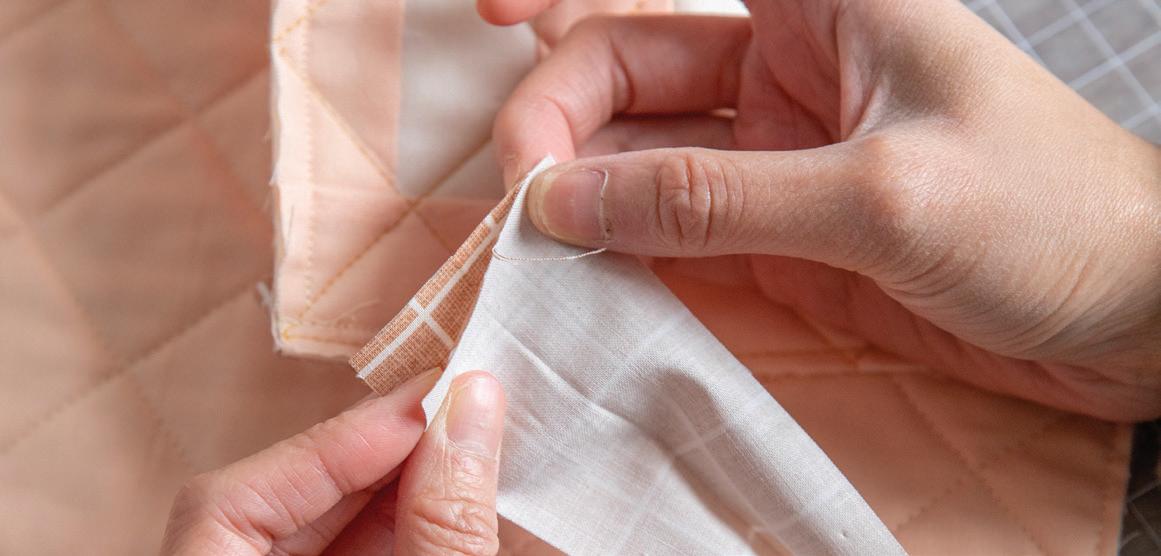
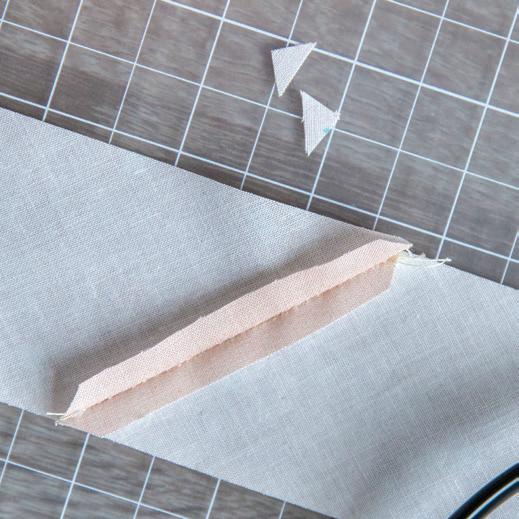
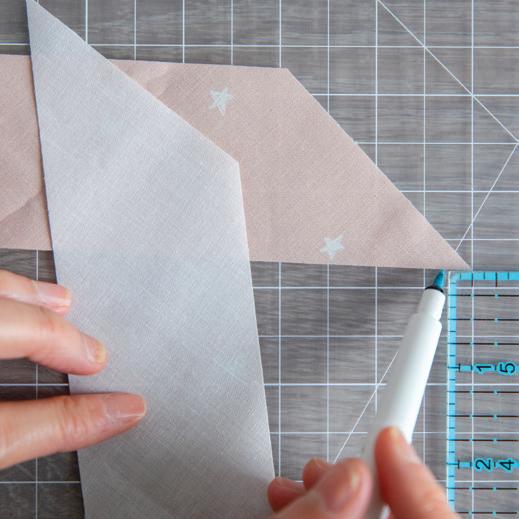
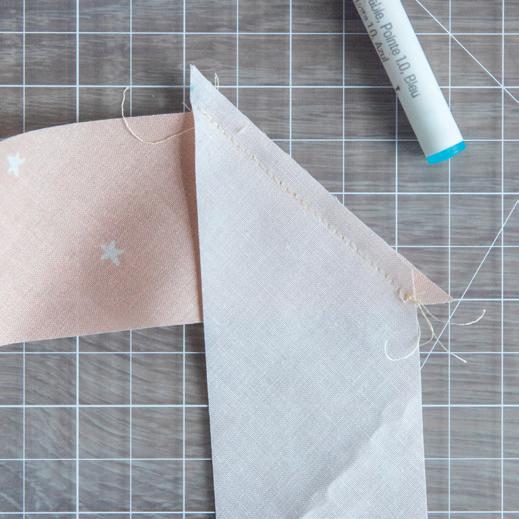
05. Next, with right sides together, join the strips. It’s tempting, but do not flush the diagonal edges of the two strips and sew. The strips won’t line up when opened. The correct way to join these strips is to line up the diagonal edges of the two strips. Position the top strip so the top diagonal edge extends ¼ " past the top of the bottom strip, and vice versa. Pin to secure the strips [Photos G and H].
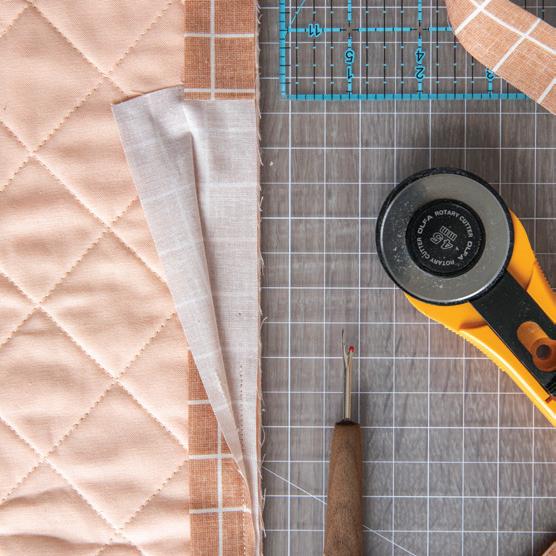
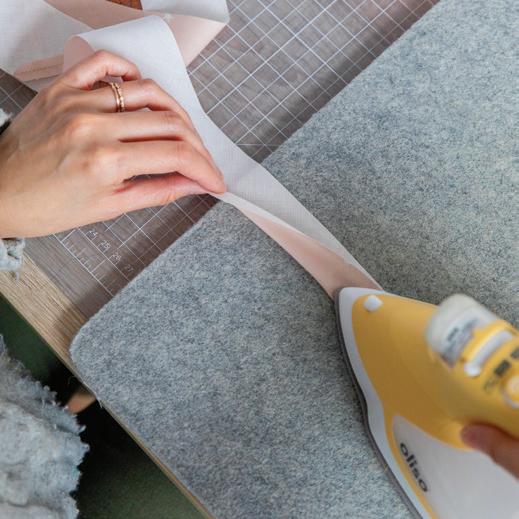
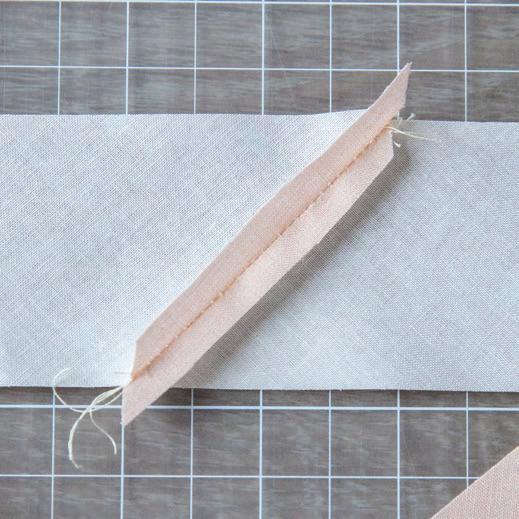
06. Sew ¼ " away from the diagonal edge [Photo H]. Press the seams open [Photo I]. Do not press the seams to the dark side. Pressing the seams open will reduce seam bulk and create an even surface around the quilt [Photo J].
07. With a pair of fabric scissors or a rotary cutter and ruler, carefully remove the dog ears from each joint [Photo J].
08. Repeat Steps 5–7 until all strips are combined and pressed.
09. Fold the binding in half lengthwise, with wrong sides of the fabric facing each other, and press. The width of the folded binding strip should measure half of what it started as [Photo K]. For example, a 2½ "-wide strip folded in half would measure 1 ¼ " wide.
PREPARING
BIAS BINDING
92 THE QUILTED HOME HANDBOOK



A B C
J K
D E F G H I

106
POSITIVE START BED QUILT
In this day and age, when we spend so much time on our devices, it’s not uncommon to wake up and go to bed with our phones next to us. Being able to switch off is hard. And that is something I really struggle with. It’s the worst when I toss and turn a lot, and wake up at least twice during my sleep. This leads to my bad habits of checking my phone, overthinking, and stressing about what I need to tackle the following day. Sometimes I lose hours of sleep because of this.
I am continuously learning the importance of restoration and what a good night’s rest can do. The lack of it can impact your mood, focus, and productivity throughout the day, as well as your mental and physical health.
So, let’s kick off the day with a positive start.
PROJECT SIZES
� BABY: 45" x 45" (115 cm x 115 cm)
� TWIN: 63" x 90" (160 cm x 229 cm)
� QUEEN: 81" x 99" (206 cm x 252 cm)
� KING: 99" x 108" (252 cm x 275 cm)
PIECING METHODS AND TECHNIQUES Strip piecing
OTHER MATERIALS Batting
TRANSFORMING THE QUILT INTO A WALL HANGING: This project can also be a wall hanging. Simply stop right before adding the binding on the quilt, and follow the instructions on how to make a quilt into a wall hanging ( page 60 ). I do not recommend turning bed quilts larger than twin size into wall hangings, due to their size and weight. However, with that said, it is possible.
SHARE YOUR WORK ON SOCIAL MEDIA: #postivestartquilt #theweekendquilter #quiltedhomehandbook
BEGINNER
107
QUILT TOP
FABRIC A
FABRIC REQUIREMENTS
BABY TWIN QUEEN KING
2 yards (183 cm) 4⅝ yards (423 cm) 6½ yards (595 cm) 8½ yards (778 cm)
FABRIC B ½ yard (46 cm) 1 yard (92 cm) 1½ yards (138 cm) 1¾ yards (160 cm)
FABRIC C ⅜ yard (35 cm) ¾ yard (69 cm) 1 yard (92 cm) 1¼ yards (115 cm)
QUILT BACK
FABRIC D 3 yards (275 cm) 5½ yards (506 cm) 7½ yards (686 cm) 9 yards (823 cm)
QUILT BINDING
FABRIC E ⅜ yard (35 cm) ⅝ yard (58 cm) ¾ yard (69 cm) ⅞ yard (80 cm)
CUTTING DIRECTIONS
BABY TWIN QUEEN KING
QUILT TOP
FABRIC A 8 strips, 4" x WOF (FOR STRIP PIECING)
4 strips, 2" x WOF (FOR STRIP PIECING)
13 strips, 2" x WOF, sub-cut: • 50 rectangle, 2" x 9½"
18 strips, 4" x WOF (FOR STRIP PIECING)
10 strips, 2" x WOF (FOR STRIP PIECING)
35 strips, 2"xWOF, sub-cut: • 140 rectangle, 2" x 9½"
FABRIC B 2 strips, 6½" x WOF (FOR STRIP PIECING) 5 strips, 6½" x WOF (FOR STRIP PIECING)
FABRIC C 4 strips, 2½" x WOF (FOR STRIP PIECING) 9 strips, 2½" x WOF (FOR STRIP PIECING)
QUILT BINDING
26 strips, 4" x WOF (FOR STRIP PIECING)
14 strips, 2" x WOF (FOR STRIP PIECING)
50 strips, 2" x WOF, sub-cut: • 198 rectangle, 2" x 9½"
7 strips, 6½" x WOF (FOR STRIP PIECING)
13 strips, 2½" x WOF (FOR STRIP PIECING)
34 strips, 4" x WOF (FOR STRIP PIECING)
18 strips, 2" x WOF (FOR STRIP PIECING)
66 strips, 2" x WOF, sub-cut: • 264 rectangle, 2" x 9½"
9 strips, 6½" x WOF (FOR STRIP PIECING)
17 strips, 2½" x WOF (FOR STRIP PIECING)
FABRIC E 5 strips, 2½" x WOF 8 strips, 2½" x WOF 10 strips, 2½" x WOF 11 strips, 2½" x WOF
108 THE QUILTED HOME HANDBOOK
For sections Strip Piecing Units and Block Assembly (page 110), sew pieces right side together with SCANT ¼" SEAM ALLOWANCES , unless specified otherwise.
STRIP PIECING UNITS
STEP 1: Lay 2 Fabric A 2" x WOF strips and 1 Fabric B 6½" x WOF strip in sewing order, as shown. With the right sides together, pin 2 strips together lengthwise and sew. Press the seams open and repeat with the third strip to make 1 STRIP SET A 1 unit.
REPEAT TO CREATE A T OTAL OF:
Baby: 4 Strip Set B1 units
Twin: 9 Strip Set B1 units
Queen: 13 Strip Set B1 units
King: 17 Strip Set B1 units
STEP 3: Trim the right-hand edge of all Strip Set units to ensure they are straight and perpendic ular against the length of the strip set. If you are left-handed, trim the left-hand edge of all Strip Set units. Strip Set A1 unit used in this example :
REPEAT TO CREATE A T OTAL OF:
Baby: 2 Strip Set A1 units
Twin: 5 Strip Set A1 units
Queen: 7 Strip Set A1 units
King: 9 Strip Set A1 units
Set aside for Strip Piecing Units, Step 3.
STEP 2: As shown, lay 2 Fabric A 4" x WOF strips and 1 Fabric C 2 ½ " x WOF strip in sewing order. With the right sides together, pin 2 strips together lengthwise and sew. Press the seams open and repeat with the third strip to make 1 STRIP SET B 1 unit.
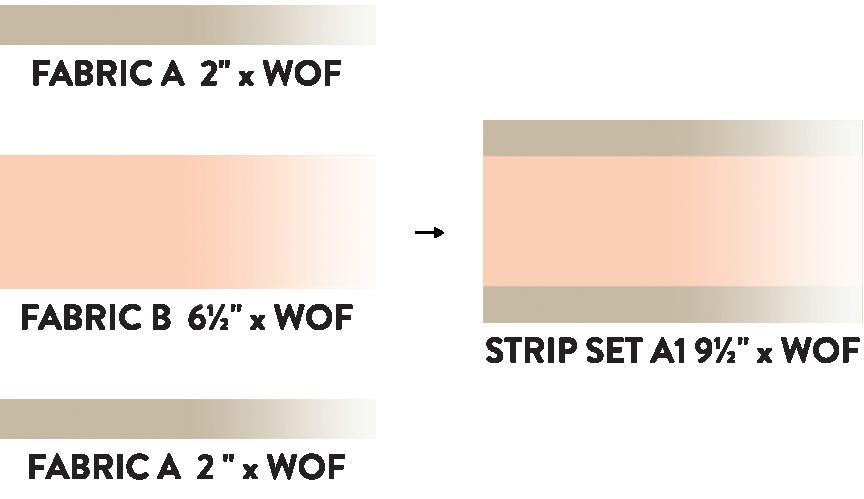
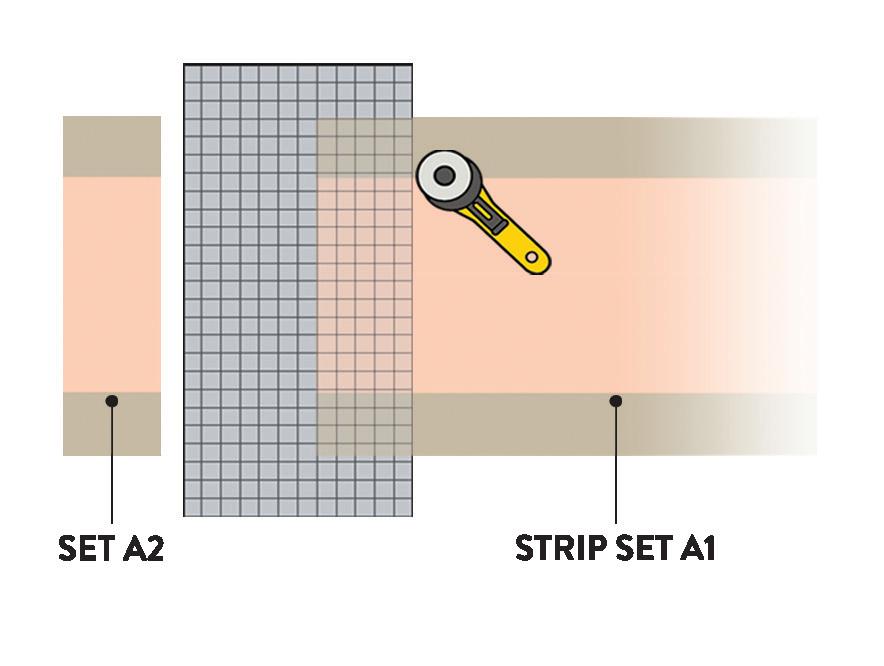
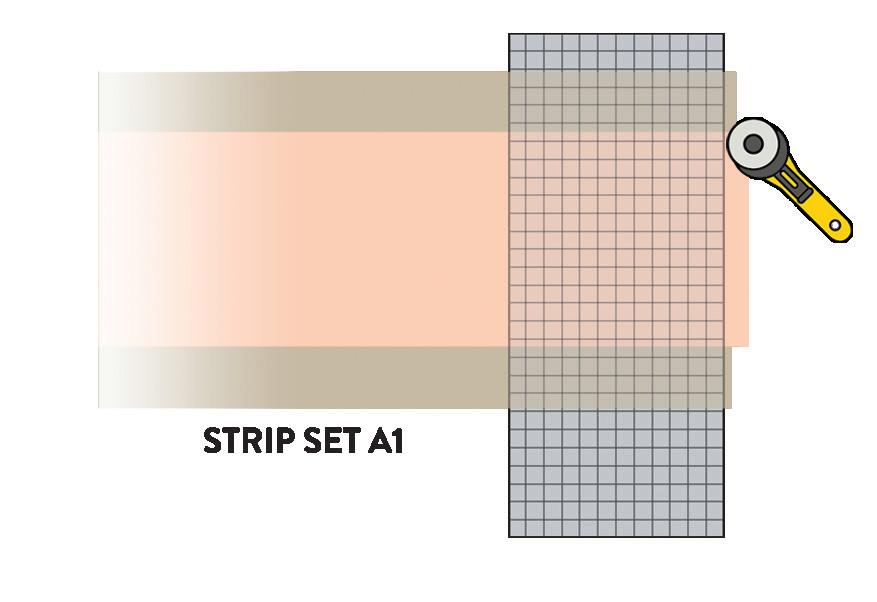

TIP: When trimming, use the top and bottom edges of the Strip Set units and the horizontal lines and marks on the ruler to align the strips for more accu rate cutting and piecing.
STEP 4: Rotate the Strip Set units 180 degrees. Using the straight edge of the left-hand side (right-hand side if you are left-handed) as a guide, cut a total of: ( Step 4 continued on next page )
109 P OSITI v E S T a RT B E d Qu I l T
( Continued from step 4 )
BABY TWIN QUEEN KING
Set A2 2½" x 9½" Rectangles (from Strip Set A1)

25 70 99 132
Set B2 2½" x 9½" Rectangles (from Strip Set B1)

50 140 198 264
REPEAT TO CREATE A T OTAL OF:
Baby: 25 Block A1 units
Twin: 70 Block A1 units
Queen: 99 Block A1 units King: 132 Block A1 units
QUILT ASSEMBLY
Take extra care when arranging and sewing the Block A1 units together. The rotation and placement of the blocks alternate—imagine a checkerboard.
BLOCK ASSEMBLY
STEP 1: Following the diagram, sew together 2 Fabric A 2" x 9 ½ " rectangles, 1 Set A2 2 ½ " x 9 ½ " rectangle, and 2 Set B2 2 ½ " x 9 ½ " rectangles to create 1 BLOCK A 1 unit. Press the seams open.
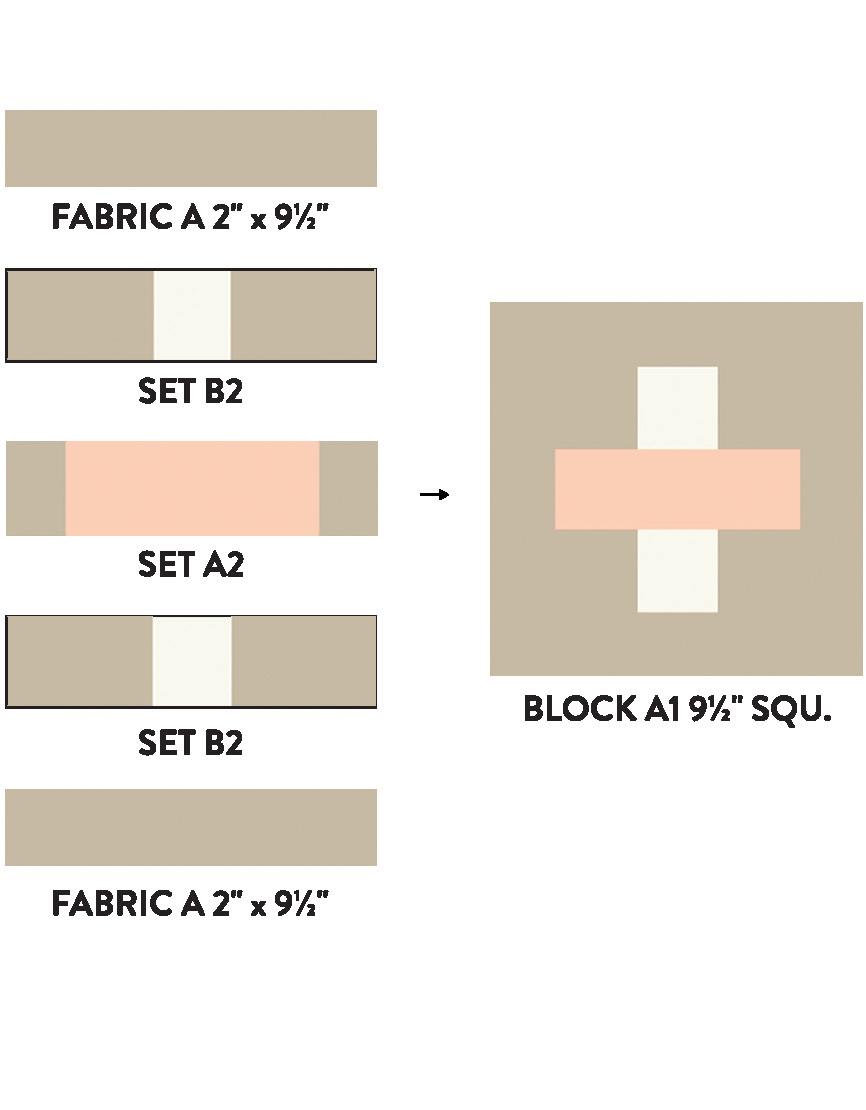
TIP: Use Fabric B in Block A1 as a guide in deter mining the rotation and placement. If it helps, divide the blocks into two piles based on the rotation of the block, and take from the piles as required.
STEP 1: (Shown in the diagram to the right) To construct the QUILT TOP , refer to the assembly diagram shown and combine:
Baby: 5 rows of 5 Block A1 units
Twin: 7 rows of 10 Block A1 units Queen: 9 rows of 11 Block A1 units King: 11 rows of 12 Block A1 units
Press the seams open as you go.
STEP 2: Press the quilt top and backing fabric. Layer the backing, batting, and quilt top. Baste, quilt, and bind, as desired.
FOR A WALL HANGING: Stop right before the binding on the quilt is added, and follow the instructions on how to put a quilt into a wall hang ing on page 60 .
110 THE QUILTED HOME HANDBOOK
Copyright © 2022 by Wendy Chow
Published by Paige Tate & Co. PO Box 8835, Bend, OR 97708 contact@bluestarpress.com | www.bluestarpress.com
All rights reserved. No part of this publication may be reproduced or transmitted in any form or by any means, electronic or mechanical, including photocopy, recording, or any information storage and retrieval system, without permission in writing from the publishers.
Art Direction by Megan Kesting
Production by David VanNess
Photography by Rachel Kuzma
ISBN 978-1950968626
Printed in Colombia
10 9 8 7 6
5 4 3 2 1
