
COOKBOOK Recipes Time

A m e l i a E m i l y
Table of Content 04 08 20 Introducing Iced Lavender Matcha Chunky Monkey Protein Smoothie Ginger Soy Glazed Cod recipestime com | 3 24 Smashed Avocado Bruschetta 28 Gordon Ramsay's Beef Wellington! 03 12 Oysters Rockefeller 16 Jamie Oliver’s Chicken Pie Recipe

The Culinary Chronicles of Amelia !
Hello, fellow food enthusiasts! I'm Amelia , the face and flavor behind this Recipe Time blog. Born with a spoon in one hand and a recipe book in the other, my passion for cooking and exploring diverse cuisines has taken me on a delectable journey through the world of food.
Growing up in a family where the kitchen was the heart of the home, I was always surrounded by the comforting aromas of home-cooked meals. My earliest memories are of watching my grandmother expertly knead dough for fresh bread and my mother's meticulous art of balancing spices for the perfect curry.
Over the years, I've traveled extensively, tasting my way through different cultures and traditions. From the bustling street markets of Bangkok to the quaint cafes of Paris, each place has added a unique flavor to my culinary repertoire.
This Cookbook is my canvas, where I paint with flavors, spices, and fresh ingredients. Here, I share not just recipes, but stories - of the people I've met, the places I've been, and the memories I've created. Each dish has a tale, a history, and a special place in my heart. Whether you're a seasoned chef or someone who's just starting out in the kitchen, I hope my recipes inspire you to experiment, enjoy, and embark on your own culinary adventures. After all, food is not just about eating; it's an experience, a journey, a love story between the heart, the palate, and the plate.
Emily
Amelia
recipestime com | 2

ICED LAVENDER MATCHA RECIPE Beverage
recipestime com | 7
r e c i p e s t i m e . c o m
Iced Lavender Matcha


Ingredients
To make iced lavender matcha, you will need the following ingredients:
For the Lavender Infusion:
Dried lavender flowers: 1 tablespoon
Hot water: 1/2 cup
For the Matcha Mixture:
Matcha powder: 1 teaspoon
Hot water: 1/4 cup
Honey or sweetener of choice: 1-2 teaspoons
Kitchen Tools and Equipment
1.
Teapot or Heatproof Bowl: For steeping the dried lavender flowers.
3.
2. Strainer: To strain the lavender infusion.
5.
Whisk: A bamboo whisk (chasen) for preparing the matcha, or a small regular whisk.
4. Glass: A clear glass to showcase the beautiful layers of the drink.
6.
Measuring Spoons: For measuring the matcha powder, lavender flowers, and sweetener.
Spoon: For stirring the sweetener into the matcha.
Prepare Time 25 Minutes Cook Time 30 Minutes
recipestime com | 8
Iced Lavender Matcha
Preparation Steps
Making iced lavender matcha is a straightforward process that involves creating a lavender infusion, preparing the matcha, and then assembling the drink. Here are the steps to prepare this delightful beverage:
Prepare the Lavender Infusion: 1.
In a teapot or heatproof bowl, add 1 tablespoon of dried lavender flowers.
Pour 1/2 cup of hot water over the lavender and let it steep for 5-7 minutes.
Strain the infusion through a fine-mesh strainer to remove the lavender flowers. Set aside to cool.
Prepare the Matcha Mixture: 2.
In a small bowl, add 1 teaspoon of matcha powder.
Pour 1/4 cup of hot water (not boiling) over the matcha.
Whisk vigorously in a zigzag motion until the matcha is fully dissolved and frothy.
Stir in 1-2 teaspoons of honey or your preferred sweetener until dissolved.
Assemble the Drink: 3.
Fill a clear glass with ice cubes. Pour the cooled lavender infusion over the ice. Slowly pour the matcha mixture over the lavender infusion to create a layered effect.
Top with 1 cup of milk or nondairy alternative.

Serving Suggestions
As a Morning Boost: 1.
Enjoy iced lavender matcha in the morning for a refreshing and energizing start to your day.
As an Afternoon Pick-Me-Up: 2
Savor this drink in the afternoon as a calming yet invigorating pick-me-up.
With Snacks: 3.
Pair iced lavender matcha with light snacks like biscotti, shortbread cookies, or a fruit platter for a delightful treat.
At a Gathering: 4
Serve iced lavender matcha at a brunch or tea party to impress your guests with its unique flavor and beautiful presentation
recipestime com | 9
“Your iced lavender matcha is now ready to be enjoyed.”


Next recipestime com | 10
Chunky Monkey Protein Smoothie
r e c i p e s t i m e . c o m
CHUNKY MONKEY PROTEIN SMOOTHIE

Prepare Time Serving Calories 5 Minutes 1 320 per serving
A D e l i c i o u s a n d N u t r i t i o u s P o s t - W o r k o u t D r i n k
recipestime com | 11

Ingredients
1 ripe banana, frozen
1 tablespoon cocoa powder
2 tablespoons peanut butter
1 scoop chocolate protein powder
1 cup milk of your choice
(dairy or plant-based)
1/2 cup plain Greek yogurt
1 tablespoon honey or maple syrup (optional, for added sweetness)
Ice cubes (optional, for a thicker consistency)

Instruction
1. Blend on high speed until smooth and creamy, adding more milk if necessary to reach your desired consistency.
Place all the ingredients in a blender in the order listed.
2. Taste the smoothie and adjust the sweetness if needed by adding honey or maple syrup.
3. If you prefer a thicker smoothie, add a handful of ice cubes and blend again until smooth.
5.
4. Once the smoothie reaches the desired consistency, pour it into glasses and serve immediately.
recipestime.com | 12
Chunky Monkey Protein Smoothie
Serving Size
The Chunky Monkey Protein Smoothie is a versatile drink that can be enjoyed as a snack or a meal replacement, depending on the serving size. For a quick and easy snack, a small serving of 8-10 ounces is recommended. For a more substantial meal replacement, a larger serving of 1216 ounces is recommended.
To customize the serving size, the recipe can be easily adjusted by increasing or decreasing the amount of ingredients used. It is important to note that the nutritional content of the smoothie will vary depending on the serving size and the specific ingredients used.


Storage and Shelf Life
In summary, the Chunky Monkey Protein Smoothie can be stored in the refrigerator for up to 24 hours and frozen for up to 3 months. Proper storage will help maintain the quality and freshness of the smoothie for longer periods.
recipestime com | 13

this smoothie after your next workout for a perfect blend of taste and health benefits. Stay energized and satisfied! recipestime com | 14 r e c i p e s t i m e . c o m
Enjoy

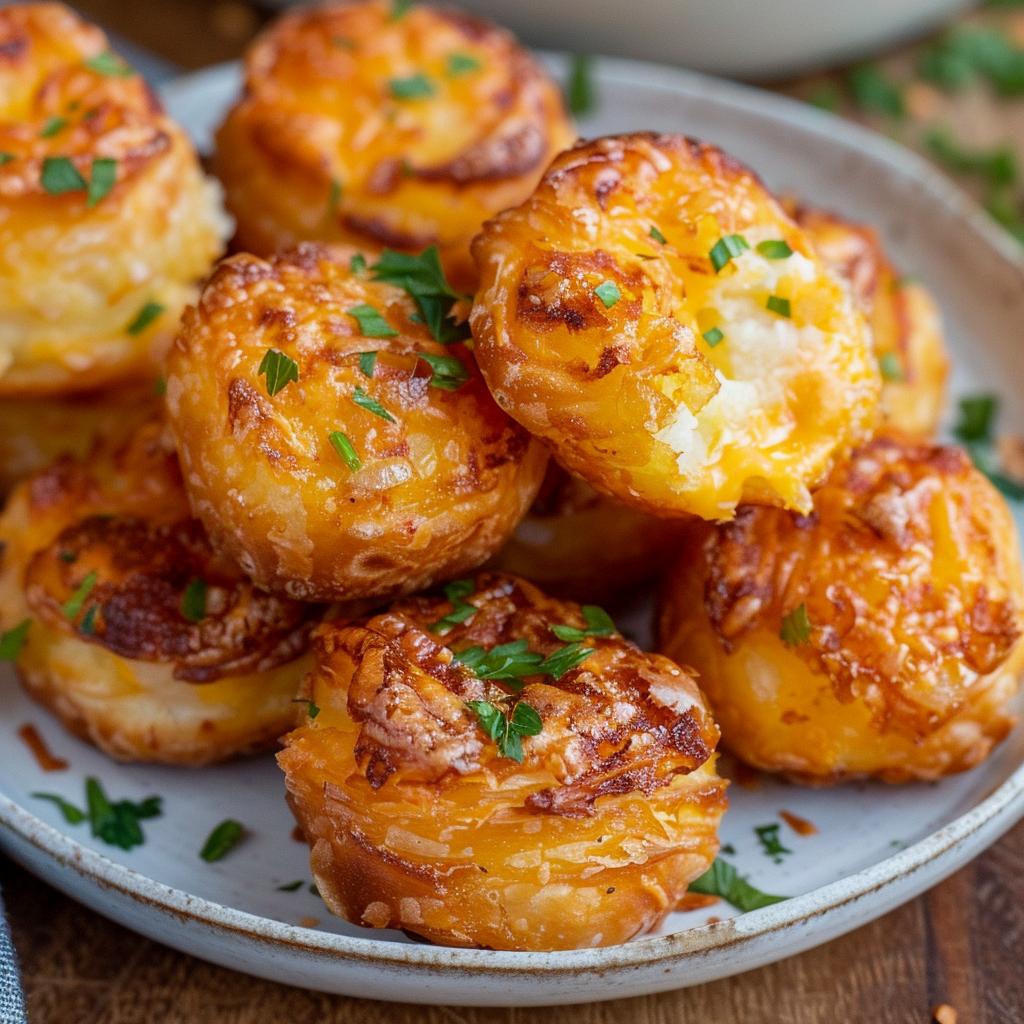
A Classic Dish for Seafood Lovers
OYSTERS ROCKEFELLER
recipestime.com | 15 r e c i p e s t i m e . c o m
Oysters Rockefeller


Ingredients Prepare Time 35 Minutes Calories 180 per serving
12 fresh oysters
1 cup fresh spinach
1/2 cup butter (115g)
1/4 cup breadcrumbs
2 shallots, finely chopped
2 garlic cloves, finely chopped
1/4 cup fresh parsley, chopped
1/4 cup fennel, finely chopped
1/4 cup heavy cream
1/4 cup grated Parmesan cheese
Salt and pepper to taste
Kitchen Tools and Equipment
Oyster Knife: An oyster knife is a musthave tool for shucking oysters. It has a short, sturdy blade that can easily pry open the oyster shell.
Baking Sheet: A baking sheet is necessary to hold the oysters while they are being cooked. It should be lined with parchment paper to prevent the oysters from sticking to the sheet.
Food Processor: A food processor is used to make the herb and spinach mixture for the topping. It should be able to chop the ingredients finely and uniformly.
recipestime com | 16
Serving 12
Oysters Rockefeller
Mixing Bowl: A mixing bowl is required to combine the herb and spinach mixture with the other ingredients for the topping.
Blender: A blender is used to make the hollandaise sauce. It should be powerful enough to blend the ingredients smoothly.
Saucepan: A saucepan is necessary to cook the hollandaise sauce. It should be the right size to hold the ingredients and allow for easy stirring.
Pastry Brush: A pastry brush is used to brush the hollandaise sauce onto the oysters. It should have soft bristles that can easily spread the sauce.
Preparation Steps
1. Prepare the Oysters: Preheat your oven to 220°C (425°F). Shuck the oysters and place them on a baking sheet lined with coarse salt to stabilize them.
2.Make the Topping: Melt the butter in a large skillet over medium heat. Add the shallots and garlic, and sauté until they are tender and fragrant.
3. Add the spinach and fennel, and cook until wilted. Stir in the

6. heavy cream, parsley, salt, and pepper.
7. If using absinthe or Pernod, add it at this stage and let it simmer for 2 minutes.
8. Assemble the Oysters:
9.Spoon the spinach mixture evenly over each oyster. Sprinkle with breadcrumbs and grated Parmesan cheese.
10. Bake: Bake the oysters for 10-12 minutes, or until the topping is golden brown and bubbly.
11. Serve: Serve immediately, garnished with lemon wedges and additional parsley if desired.
recipestime com | 17

Experience the elegance and exquisite taste of Oysters Rockefeller, perfect for impressing your guests at your next dinner party!

Jamie Oliver’s Chicken Pie Recipe
Next r e c i p e s t i m e . c o m recipestime com | 18
JAMIE OLIVER’S CHICKEN PIE RECIPE

A p e t i z e r a n d S n a c k s Prepare Time Serving Calories 45 Minutes 1 450 -500 per serving recipestime com | 19

Jamie Oliver’s Chicken Pie Recipe
Ingredients
For the Filling:
2 tablespoons olive oil
1 onion, finely chopped
2 carrots, diced
2 celery stalks, diced
2 cloves garlic, minced
1 teaspoon fresh thyme leaves
1 bay leaf
4 boneless, skinless chicken breasts, cut into bite-sized pieces
Salt and black pepper, to taste
2 tablespoons all-purpose flour
1 cup chicken stock
1/2 cup frozen peas
1/4 cup heavy cream
For the Pastry:
1 1/2 cups all-purpose flour
1/2 teaspoon salt
1/2 cup cold unsalted butter, cut into small cubes
3-4 tablespoons cold water
Directions:
Prepare the Filling: 1.
In a large skillet or frying pan, heat the olive oil over medium heat. Add the chopped onion, diced carrots, and diced celery. Cook, stirring occasionally, for about 5 minutes until the vegetables begin to soften.
recipestime com | 20
Jamie Oliver’s Chicken Pie Recipe
Add the minced garlic, fresh thyme leaves, and bay leaf to the pan. Cook for another 2 minutes until fragrant.
Season the chicken breast pieces with salt and black pepper, then add them to the pan. Cook, stirring occasionally, until the chicken is browned on all sides. Sprinkle the flour over the chicken and vegetables, stirring to coat evenly. Cook for 1-2 minutes to cook out the raw flour taste.
Gradually pour in the chicken stock, stirring constantly to prevent lumps from forming. Bring the mixture to a simmer, then reduce the heat and let it cook for 5-7 minutes until thickened.
Stir in the frozen peas and heavy cream. Cook for an additional 2-3 minutes until the peas are heated through and the sauce is creamy. Remove from heat and set aside
2. Prepare the Pastry:
In a large mixing bowl, combine the all-purpose flour and salt. Add the cold cubed butter to the bowl.
Use your fingertips to rub the butter into the flour until the mixture resembles coarse breadcrumbs.
Gradually add the cold water, one tablespoon at a time, mixing with a fork until the dough comes together into a ball.
Turn the dough out onto a lightly floured surface and knead it gently until smooth. Wrap the dough in plastic wrap and refrigerate for at least 30 minutes before using.
3.Assemble the Pie:
Preheat your oven to 400°F (200°C).

Roll out the chilled pastry dough on a lightly floured surface to about 1/4 inch thickness. Place the rolled-out pastry over the chicken filling in the skillet or transfer the filling to a baking dish. Trim any excess pastry and crimp the edges to seal.
Use a sharp knife to make a few small slits in the top of the pastry to allow steam to escape during baking.
recipestime com | 21

Dive into this comforting and delicious homemade chicken pie, perfect for any meal.
Seafood Dish
GINGER SOY GLAZED COD

r e c i p e s t i m e . c o m
recipestime com | 23
Ginger Soy Glazed Cod


Prepare Time 45 Minutes
Ingredients
4 cod fillets (6 oz each)
1/4 cup soy sauce
2 tablespoons honey
2 tablespoons rice vinegar
1 tablespoon fresh ginger, grated
2 garlic cloves, minced
1 tablespoon sesame oil
2 green onions, thinly sliced (for garnish)
1 tablespoon sesame seeds (for garnish)
Fresh cilantro, chopped (for garnish)
Lime wedges (for serving)
Calories
250 per serving
Directions:
Serving 4
Preheat the oven to 400°F (200°C). Line a baking sheet with parchment paper. In a small bowl, whisk together the soy sauce, honey, rice vinegar, grated ginger, minced garlic, and sesame oil until well combined.
Place the cod fillets on the prepared baking sheet. Brush the soy ginger glaze evenly over each fillet, making sure they are well coated.
Bake in the preheated oven for 12-15 minutes, or until the cod is cooked through and flakes easily with a fork.
Remove from the oven and transfer the cod fillets to serving plates.
recipestime com | 24
Oysters Rockefeller
Garnish with thinly sliced green onions, sesame seeds, and fresh cilantro.
Serve immediately with lime wedges on the side for an extra burst of flavor. Enjoy!
Marinating the Cod
To marinate the cod, simply place the fillets in a shallow dish and pour the marinade over them. Be sure to coat the fish evenly with the marinade and cover the dish with plastic wrap. Refrigerate for at least 30 minutes, or up to 1 hour, to allow the flavors to develop.
Glazing the Cod
After marinating, the cod is ready to be glazed and cooked. To make the glaze, simply heat the remaining marinade in a small saucepan over medium heat until it thickens and becomes syrupy.
Brush the glaze over the cod fillets and broil them in the oven until they are cooked through and the glaze is caramelized and bubbly. Be sure to keep a close eye on the fish while it is broiling to prevent it from burning.
Once the cod is cooked, it is ready to be served. Garnish the dish with sliced green onions and sesame seeds for a beautiful presentation.
Cooking Method
Baking the Cod
To bake ginger soy glazed cod, preheat the oven to 400°F. Place the marinated cod in a baking dish and bake it for 10-15 minutes, depending on the size of the fillets. Once done, remove the dish from the oven and let it rest for a few minutes before serving.
Pan-Searing the Cod
To pan-sear ginger soy glazed cod, heat a tablespoon of oil in a nonstick skillet over medium-high heat. Once the pan is hot, carefully add the cod fillets to the skillet and cook for 3-4 minutes on each side until golden brown. Once done, remove the cod from the skillet and let it rest for a few minutes before serving.
Grilling the Cod
To grill ginger soy glazed cod, preheat the grill to medium-high heat. Brush the grill grates with oil to prevent the fish from sticking. Place the marinated cod on the grill and cook for 3-4 minutes on each side until the fish is cooked through. Once done, remove the cod from the grill and let it rest for a few minutes before serving.
recipestime com | 25


Next
recipe
your loved
r e c i p e s t i m e . c o m recipestime com | 26 Smashed Avocado Bruschetta
Try the
now and surprise
ones!
SMASHED AVOCADO BRUSCHETTA

A p e t i z e r a n d S n a c k s Prepare
Serving
25
8 150 per serving recipestime com | 27
Time
Calories
Minutes

Smashed Avocado Bruschetta
Ingredients
1 baguette, sliced into 1/2-inch slices
2 ripe avocados
1 tablespoon lemon juice
1 teaspoon salt
1/2 teaspoon black pepper
1 cup cherry tomatoes, quartered
1/4 cup red onion, finely diced
1/4 cup fresh basil leaves, chopped
2 tablespoons olive oil
1 clove garlic, peeled and halved Balsamic glaze (for drizzling)
Directions:
1.
Prepare the Bread: Preheat your oven to 400°F (200°C). Arrange the baguette slices on a baking sheet. Brush each slice lightly with olive oil. Bake in the preheated oven for 8-10 minutes, or until the bread is golden and crispy. Remove from the oven and rub each slice with the cut side of the garlic clove. Set aside to cool.
Prepare the Avocado Mixture: In a medium bowl, mash the ripe avocados with lemon juice, salt, and black pepper until smooth and creamy. 2.
recipestime com | 28
Smashed Avocado Bruschetta


3. Prepare the Tomato Mixture: In another bowl, combine the quartered cherry tomatoes, finely diced red onion, chopped fresh basil leaves, and a pinch of salt and black pepper. Mix well.
4. Assemble the Bruschetta: Spread a generous amount of the mashed avocado mixture onto each toasted baguette slice. Top with the tomato mixture.
5. Serve: Drizzle the bruschetta with balsamic glaze before serving. Enjoy!
Additional Toppings
Bacon: Adding crispy bacon to the dish can add a smoky flavor and a crunch to the creamy avocado.
Eggs: Poached or fried eggs can be placed on top of the avocado for a more filling breakfast or brunch option.
Feta Cheese: Crumbled feta cheese can be sprinkled on top of the avocado and tomato mixture for a salty kick.
Red Onion: Thinly sliced red onion can be added to the tomato mixture for a sweet and tangy flavor.
These are just a few ideas for additional toppings, but the possibilities are endless. Smashed Avocado Bruschetta is a dish that can be easily customized to suit individual tastes and preferences.
recipestime com | 29

Enjoy this simple and tasty appetizer, perfect for any occasion.
r e c i p e s t i m e . c o m
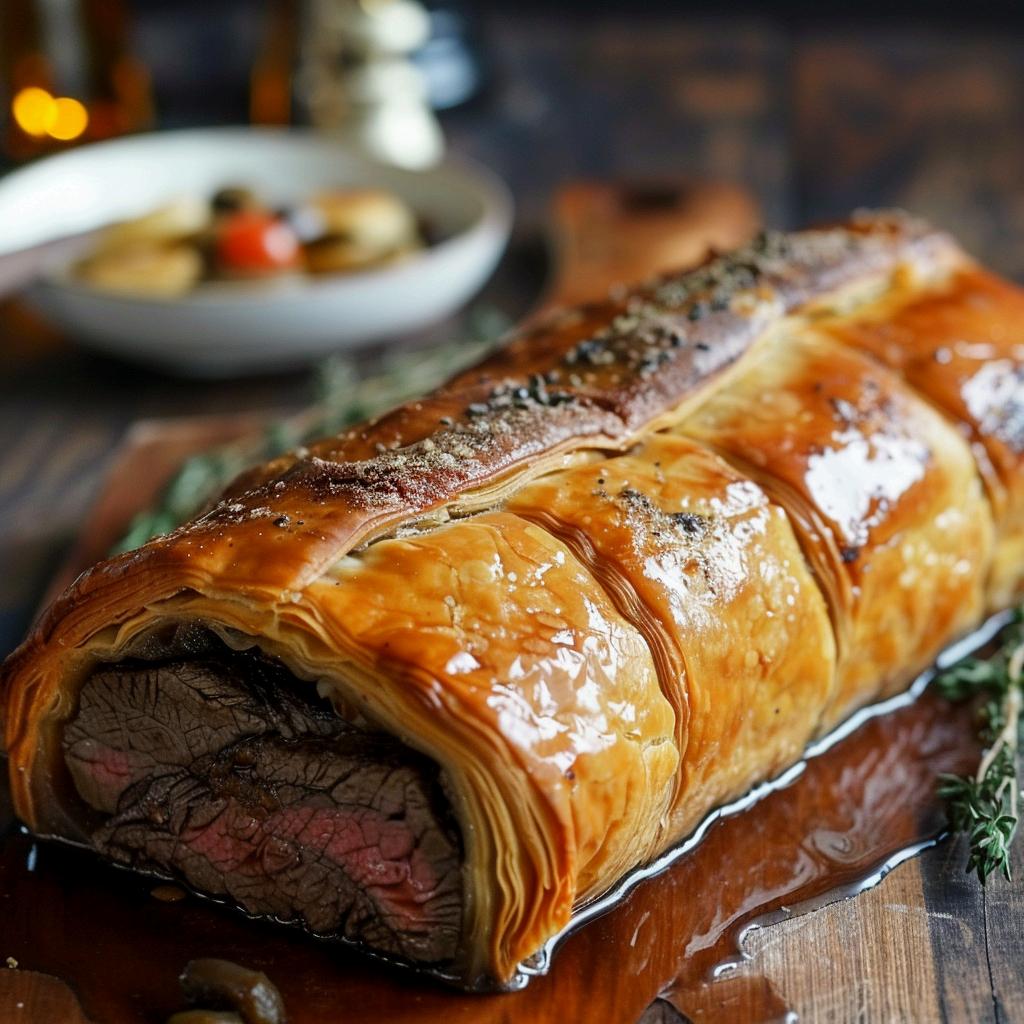
GORDON RAMSAY'S BEEF WELLINGTON! Protein Dish
r e c i p e s t i m e . c o m recipestime com | 31

Gordon Ramsay's Beef Wellington!
Ingredients
4 beef fillets, about 6 ounces each
• Salt and freshly ground black pepper
• Olive oil
• 1 pound mushrooms, finely chopped
• 4 cloves garlic, minced
• 2 tablespoons butter
• 1/2 cup dry white wine
• 1 package puff pastry, thawed if frozen
• Dijon mustard
• 2 egg yolks, beaten with 1 tablespoon water (for egg wash)
Directions:
1.Preheat Oven:
Preheat your oven to 425°F (220°C).
2. Season and Sear Beef:
Season the beef fillets generously with salt and pepper. Heat olive oil in a large skillet over high heat. Sear the beef fillets until browned on all sides, about 1 minute per side. Remove from skillet and let cool.
3. Make Mushroom Duxelles:
In the same skillet, add butter and sauté mushrooms and garlic until all the moisture has evaporated and the mushrooms are golden brown.
recipestime com | 32
Gordon Ramsay's Beef Wellington!


Prepare Time
1 Hours 30 Minutes Calories 800 per serving
Serving 6 - 8
Season with salt and pepper. Deglaze the pan with white wine and cook until evaporated. Remove from heat and let cool.
4.Assemble Beef Wellington:
Roll out puff pastry on a lightly floured surface. Spread a thin layer of Dijon mustard over each beef fillet. Place a portion of the mushroom duxelles in the center of each pastry sheet and top with a seared beef fillet. Wrap the pastry around the beef, sealing the edges tightly. Trim any excess pastry and crimp the edges with a fork to seal.
5. Bake:
Place the Beef Wellingtons seam-side down on a baking sheet lined with parchment paper. Brush the pastry with egg wash. Bake in the preheated oven for 25-30 minutes, or until the pastry is golden brown and the beef reaches your desired level of doneness.
6. Serve and Enjoy:
Allow the Beef Wellingtons to rest for a few minutes before slicing. Serve hot and enjoy the culinary masterpiece!
recipestime com | 33
“Enjoy our dishes made with love!

r e c i p e s t i m e . c o m
any occasion,
Perfect for
Try these culinary delights and savor the flavor . ”
Follow Our blog www.recipestime.com Amelia
Emily