5 minute read
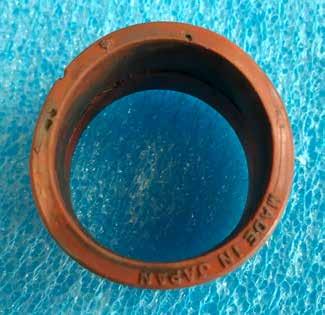
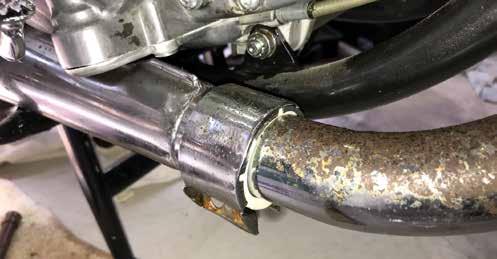
T20 Muffler Connector

from VJMC #158

Part No# 14771-11040 (Muffler Connector)
Article by Derek Milne
Advertisement

Experience level requirement
• Basic lathe operating skill to turn up the mould • Zero experience with silicon and making plastic/rubber/silicon parts is apparently ok.
The Mould
I used solid bar aluminium 50mm diameter turned up in a lathe for the inner part and aluminium pipe 60 x 5mm for the outer mould. The outside diameter of the part was thus set by the inside diameter of this pipe (close enough to give it a try I thought).
The outer mould would have been better made from pipe 60 x 10mm to allow the exact outside dimension of the gasket to be made, however this was more expensive to buy so I thought I would attempt the cheaper option first and see how the process workout out.


Sample Attempt 1 Attempt 2 Outside diameter 48mm (best estimate) 49.7mm 49.7 Length – total 28.5mm 30mm 30mm Length – inner smaller ID 14mm 16mm 16mm Length – inner larger ID 14mm 14mm 14mm Inside diameter – muffler end 42mm 42mm Inside diameter – exhaust end 39.5 39mm
Notes Ok, but ID of exhaust end marginally too large. 2 parts made from this mould. I chose aluminium over steel as it would not rust in storage when kept in my shed and it is cheaper than brass. Possibly the mould could be made from nylon or similar bar, however I do not have much expertise turning nylon as so went with the aluminium.
Measuring the internal/external diameters of a soft flexible part was somewhat problematic. My first attempt at an internal mould was discarded before use other than as a tool to help with sizing of my second attempt.
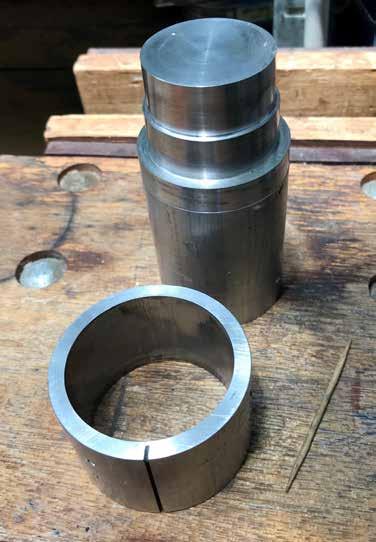
Make stepped inner mould long enough to hold in vice for mould separation purposes Mine was 100mm long.
Outer mould ring – make 5-10mm longer than total length of part Mine was 38mm long
The outside diameter of my part is larger than the sample due to cost of aluminium stock.
The total length of my part turned out 1.5mm longer than the sample. I initially thought it may be easier to pour if the inner mould part was a little longer. This was unnecessary as it turned out. I could have easily been reduced the length; however, it caused no issue with fitting, and as such I was happy to leave as is.
The Material
After much research and really finding nothing to help I chose: Firm Addition Cure RTV-2 Silicon M4670 Hardness Shore 55A

Approx. 25g of silicon is required to make the part. Mix slightly more than this as some silicon material will remain in the mixing container. I found 30g + 3g (Part A + Part B) was sufficient, with little waste when making a singular part.
The silicon is a beige colour but can be tinted orange if desired. This would have added to the cost and as the part is not really visible and I did not know if the part would even turn out I chose not to spend the extra.
I think it would be better to draw a vacuum on the silicon mix to remove air bubbles before use. I did not have anything to do this and as such I didn’t bother. A few bubbles came to the surface in the first ½ hour or so of setting. I popped these with a toothpick. The final resultant part did not show any signs of air bubbles and thus ruining the part so maybe drawing a vacuum is a bit over the top.
There was no evident shrinkage of this material upon setting.
Coat mould parts with graphite powder as a mould release.
A couple of dobs of hot melt glue secures the outer ring to the inner. This glue is easily removed when no longer needed.


I borrowed the kitchen scales to weigh out the silicon for mixing, but although they had a 1g resolution the accuracy was not good enough.
A few prods with a stick just during pouring to help release any trapped air pockets. Setting takes 24 hours.
Releasing the part from the mould can be problematic. In the end I chose to hold the inner mould piece in the vice and use a chain pipe wrench on the outer part. The twisting action that results released the parts without damage.


Note: the slit in the outer mould does not go all the way through and was part of an early attempt in trying to work out how to release the part from the mould pieces.


The part above is discoloured due to the graphite powder used for mould release. This can be cleaned somewhat, but I did not bother.
Conclusions
I am happy with the end result. The larger diameter part caused little problems in fitting, but being a bit retentive I would prefer to reduce the outer diameter to match the original.
Ideally, I would like to make at least two moulds to improve production speed and reduce waste. This would of course cost more in material so The colour. Although I could add pigment to colour it the cost and lack of visibility of the part discourages me.
I am yet to determine its lifespan/durability.
Update: March 2022 I have supplied a couple of gaskets with positive feedback from the user and another person has manufactured the gaskets based on the guide above also with positive results


